Loading ...
Loading ...

Setting Time
1. If necessary, press the MODE button repeatedly until the words
SET and CLOCK appear in the upper area of the display.
2. Press the + or – buttons to enter the current time.
NOTE: To go from AM to PM, keep pressing the + or – buttons
to cycle through the day. You can hold the + or – buttons down
for 3 seconds to make the time scroll quickly.
3. Press the MODE button to exit and advance to setting events.
1. If necessary, press the MODE button repeatedly until the
words SET ON/OFF EVENTS and EVENT 01 appear on the
display.
2. If necessary, press the ENTER button to display ON @ or OFF
@ (depending on what you want to set).
3. Press the + or – buttons to enter the time you want to set.
NOTE: To go from AM to PM, keep pressing the + or – buttons
to cycle through the day. You can hold the + or – buttons down
for 3 seconds to make the time scroll quickly.
4. ET1125C ONLY—For a multi-circuit device with loads set
independently, you can choose the load you want the event to
control. The default setting is for both loads, as you can see on
the display. Press the ON/OFF button under a load to remove
the load from the event.
5. When you have set the event correctly, you have two choices:
-Press the ENTER button to set the next ON/OFF event (up to
28 events).
-Press the MODE button to exit.
Setting ON/OFF Events
Press the MODE button repeatedly to select the desired operating
mode on the display. There are 2 options:
• AUTO—where the Time Switch follows the events you have
programmed, turning the circuits ON and OFF at the time(s) set.
NOTE: You can override programmed events and force the
Time Switch ON or OFF by pressing the ON/OFF button.
• MANUAL—where any events set are disabled and the Time
Switch controls all circuits through the ON/OFF button.
NOTE: You can review or edit any programmed events at any time
by pressing the MODE button repeatedly to return to the appropriate
menu, then following programming instruction provided on this sheet.
Operating the Time Switch
Use this procedure to clear the settings programmed for an event.
1. If necessary, press the MODE button repeatedly until the words
SET ON/OFF EVENTS are shown on the display.
2. Press the ENTER button as necessary to cycle through events
that have been set until you see the event you want to delete.
3. Press the + or – buttons AT THE SAME TIME to display --:-- --.
4. Press the MODE button to exit.
OPTIONAL – Deleting (Clearing) an Event
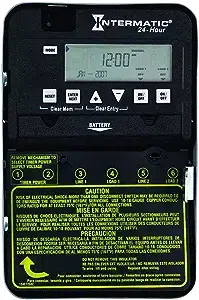
• Batteries can be easily replaced without removing the Time
Switch mechanism or eld wiring.
• Press in and downward (in the direction of the arrows) on the
battery cover.
• It is recommended to replace the batteries every 2-3 years
with 2 AAA industrial grade alkaline cells as part of normal
maintenance on the Time Switch.
• Be sure to observe battery polarity markings when installing
batteries.
• No other battery maintenance is required.
Battery Maintenance
158--01593
INTERMATIC INCORPORATED, SPRING GROVE, ILLINOIS 60081-9698
LIMITED ONE-YEAR WARRANTY
If within the warranty period specified, this product fails due to a defect in material or workmanship, Intermatic Incorporated will repair or replace it, at its sole option, free of charge.
This warranty is extended to the original household purchaser only and is not transferable. This warranty does not apply to: (a) damage to units caused by accident, dropping or abuse
in handling, acts of God or any negligent use; (b) units which have been subject to unauthorized repair, opened, taken apart or otherwise modified; (c) units not used in accordance
with instructions; (d) damages exceeding the cost of the product; (e) sealed lamps and/or lamp bulbs, LED’s and batteries; (f) the finish on any portion of the product, such as surface
and/or weathering, as this is considered normal wear and tear; (g) transit damage, initial installation costs, removal costs, or reinstallation costs.
INTERMATIC INCORPORATED WILL NOT BE LIABLE FOR INCIDENTAL OR CONSEQUENTIAL DAMAGES. SOME STATES DO NOT ALLOW THE EXCLUSION OR LIMITATION OF
INCIDENTAL OR CONSEQUENTIAL DAMAGES, SO THE ABOVE LIMITATION OR EXCLUSION MAY NOT APPLY TO YOU. THIS WARRANTY IS IN LIEU OF ALL OTHER EXPRESS OR
IMPLIED WARRANTIES. ALL IMPLIED WARRANTIES, INCLUDING THE WARRANTY OF MERCHANTABILITY AND THE WARRANTY OF FITNESS FOR A PARTICULAR PURPOSE, ARE
HEREBY MODIFIED TO EXIST ONLY AS CONTAINED IN THIS LIMITED WARRANTY, AND SHALL BE OF THE SAME DURATION AS THE WARRANTY PERIOD STATED ABOVE. SOME
STATES DO NOT ALLOW LIMITATIONS ON THE DURATION OF AN IMPLIED WARRANTY, SO THE ABOVE LIMITATION MAY NOT APPLY TO YOU.
This warranty service is available by either (a) returning the product to the dealer from whom the unit was purchased or (b) completing a warranty claim online at www.intermatic.com. This warranty is
made by: Intermatic Incorporated, Customer Service 7777 Winn Rd., Spring Grove, Illinois 60081-9698. For warranty service go to: http://www.Intermatic.com or call 815-675-7000.