Loading ...
Loading ...
Loading ...
Installation instructions en
19
¡ To optimally detect the cooking vapours, install the
appliance in the middle of the hob.
16.6 Instructions for the exhaust air pipe
The appliance manufacturer does not provide any war-
ranty for faults attributable to the pipeline.
¡ Use a short, straight exhaust air pipe with as large a
pipe diameter as possible.
¡ Long, rough exhaust air pipes, many pipe bends or
small pipe diameters reduce the suction power and
increase the fan noise.
¡ Use an exhaust pipe that is made of non-combust-
ible material.
¡ To prevent condensate from returning, fit the ex-
haust pipe with a 1° gradient from the appliance.
Flat ducts
Use flat ducts with an inner cross-section that corres-
ponds to the diameter of the round pipes:
¡ Diameter of 150mm corresponds to ap-
prox.177cm².
¡ Diameter of 120mm corresponds to ap-
prox.113cm².
¡ Use sealing strips for different pipe diameters.
¡ Do not use any flat ducts with sharp bends.
Round pipes
Use round pipes with an inner diameter of 150mm (re-
commended) or at least 120mm.
16.7 General information
Follow these general instructions during the installation.
¡ For the installation, observe the currently valid build-
ing regulations and the regulations of the local elec-
tricity and gas suppliers.
¡ When discharging the exhaust air, the official and
legal regulations, such as the regional building
code., must be observed.
¡ In order to freely access the appliance for servicing,
select an easy-to-reach installation site.
¡ The surfaces of the appliance are sensitive. Avoid
damaging them during installation.
16.8 Instructions for the electrical
connection
In order to safely connect the appliance to the elec-
trical system, follow these instructions.
WARNING‒Risk of electric shock!
It must always be possible to disconnect the appliance
from the electricity supply. The appliance must only be
connected to a protective contact socket that has been
correctly installed.
▶ The mains plug for the mains power cable must be
easily accessible after the appliance is installed.
▶ If this is not possible, an all-pole isolating switch
must be integrated into the permanent electrical in-
stallation according to the conditions of overvoltage
category III and according to the installation regula-
tions.
▶ The permanent electrical installation must only be
wired by a professional electrician. We recommend
installing a residual-current circuit breaker (RCCB)
in the appliance's power supply circuit.
Sharp-edged components inside the appliance may
damage the connecting cable.
▶ Do not kink or trap the connecting cable.
¡ The connection data can be found on the rating
plate. →Page14
¡ The connecting cable is approx.1.30m long.
¡ This appliance complies with the EC interference
suppression regulations.
¡ The appliance corresponds to protection class 1.
You should therefore only use the appliance with a
protective earth connection.
¡ Do not connect the appliance to the power supply
during installation.
¡ Only a licensed professional may connect appli-
ances without plugs. They are subject to the require-
ments of the local electricity provider.
16.9 Installation
Checking the ceiling
1.
Check whether the ceiling is horizontal and ad-
equately load-bearing.
The maximum weight of the appliance is 40kg.
Do not fit the appliance directly onto plasterboard
(or similar lightweight materials) in a suspended
ceiling.
2.
Drill the hole depth in accordance with the length of
the screws.
3.
Install the appliance with a fixing material which is
sufficiently stable and has been adjusted accord-
ingly for both the structural conditions and the
weight of the appliance.
4.
Check the cut-out area for existing cables of other
appliances.
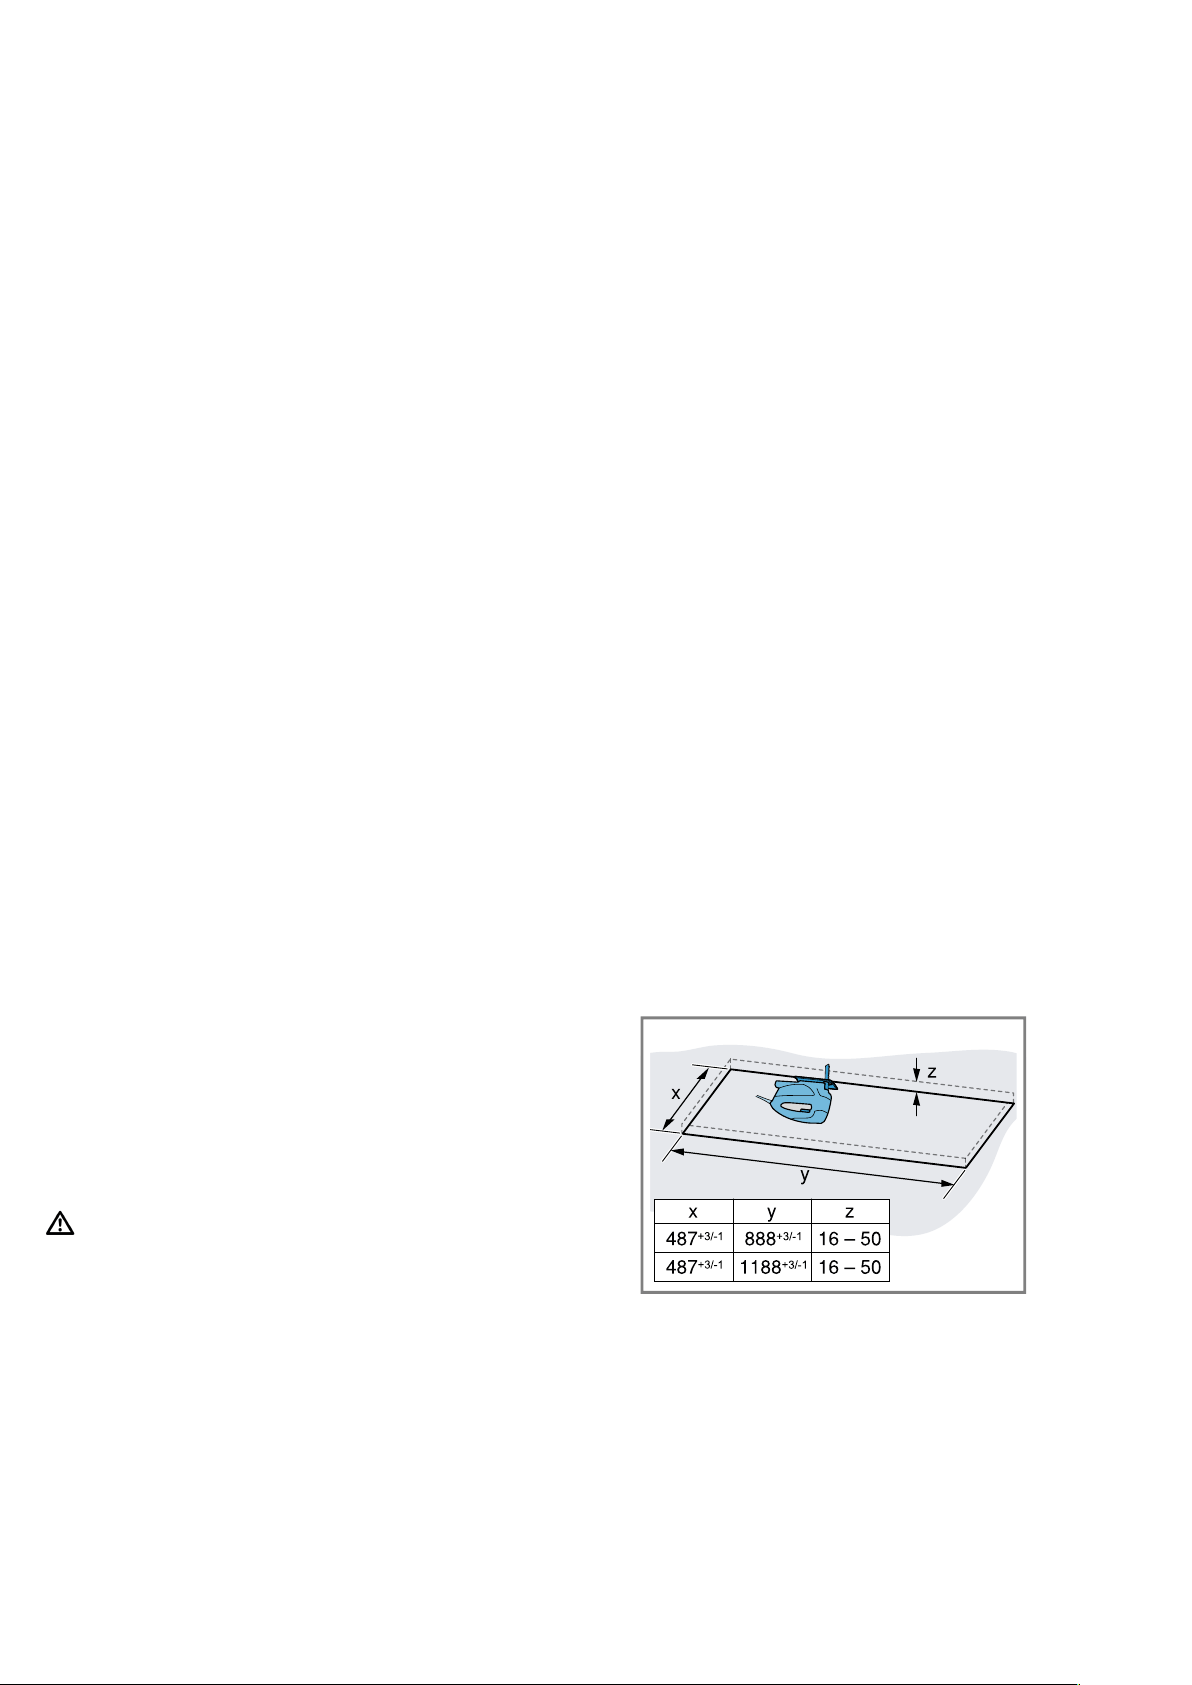
Preparing the ceiling
1.
Ensure that the stability of the ceiling is guaranteed
after the cut-outs have been made.
2.
Cover the hob to prevent damage.
3.
Saw a cut-out into the ceiling.
4.
Remove any shavings.
Preparing the appliance
1.
Remove the grease filters.
To avoid causing damage, do not bend the grease
filters.
Loading ...
Loading ...
Loading ...