
Please give us a chance to make it right and do better !
Contact our friendly customer service department for help first.
Replacements for missing or damaged parts will be shipped ASAP !
Contact Us!
Do NOT return this item.
US office: Fontana UK office: Ipswich AU office: Truganina
DE office: Hamburg
FR office: Saint Vigor d'Ymonville
PL office: Gdańsk
US:cs.us@costway.com
UK:cs.uk@costway.com
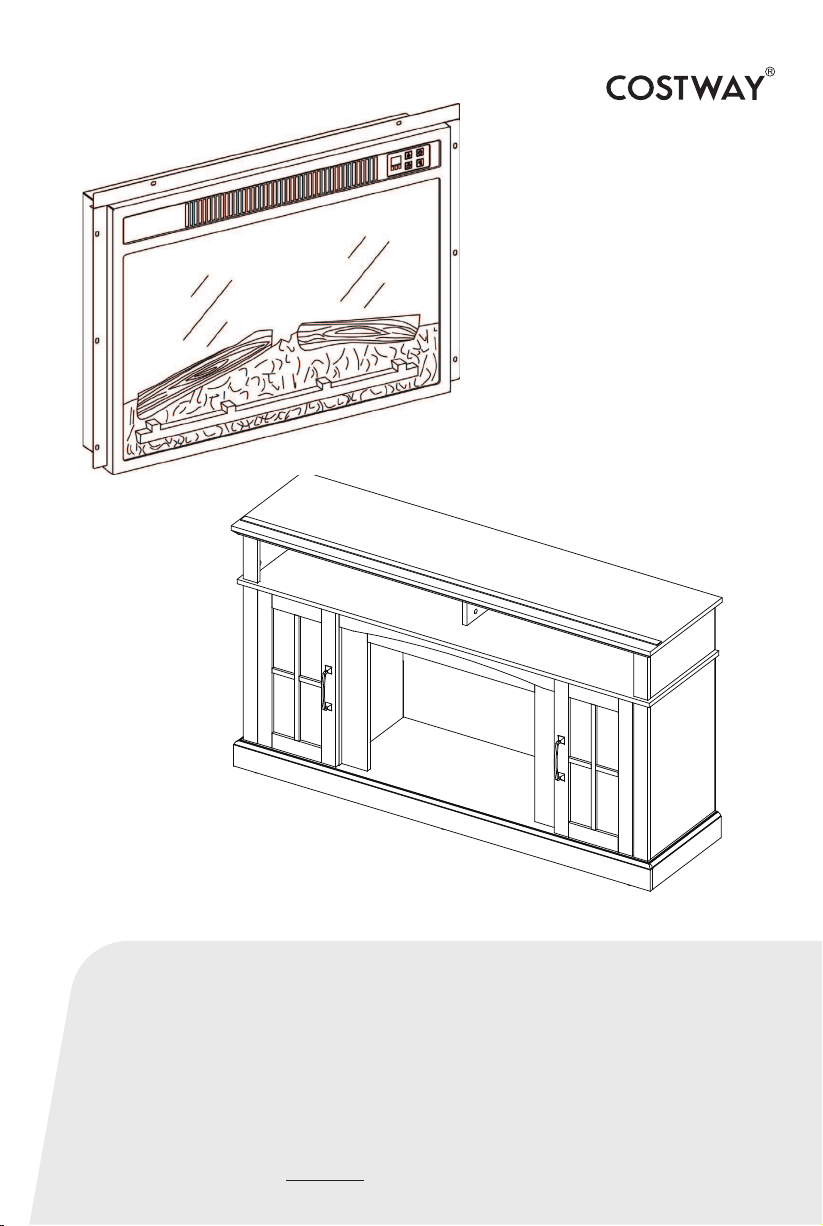
Fireplace TV Stand/Electric Fireplace
FP10106US
USER’S MANUAL
THIS INSTRUCTION BOOKLET CONTAINS IMPORTANT SAFETY INFORMATION. PLEASE READ AND KEEP FOR FUTURE REFERENCE.
Before You Start
Please read all instructions carefully.
Retain instructions for future reference.
Separate and count all parts and hardware.
Read through each step carefully and follow the proper order.
We recommend that, where possible, all items are assembled
near to the area in which they will be placed in use, to avoid
moving the product unnecessarily once assembled.
Always place the product on a flat, steady and stable surface.
Keep all small parts and packaging materials for this product
away from babies and children as they potentially pose a serious
choking hazard.
02
03
1
AZ
13
2
3
4
3
4
5
6
7
8
9
10
11
12
12
14 19
15
16
17
18
13
18
20
21
23
22
04
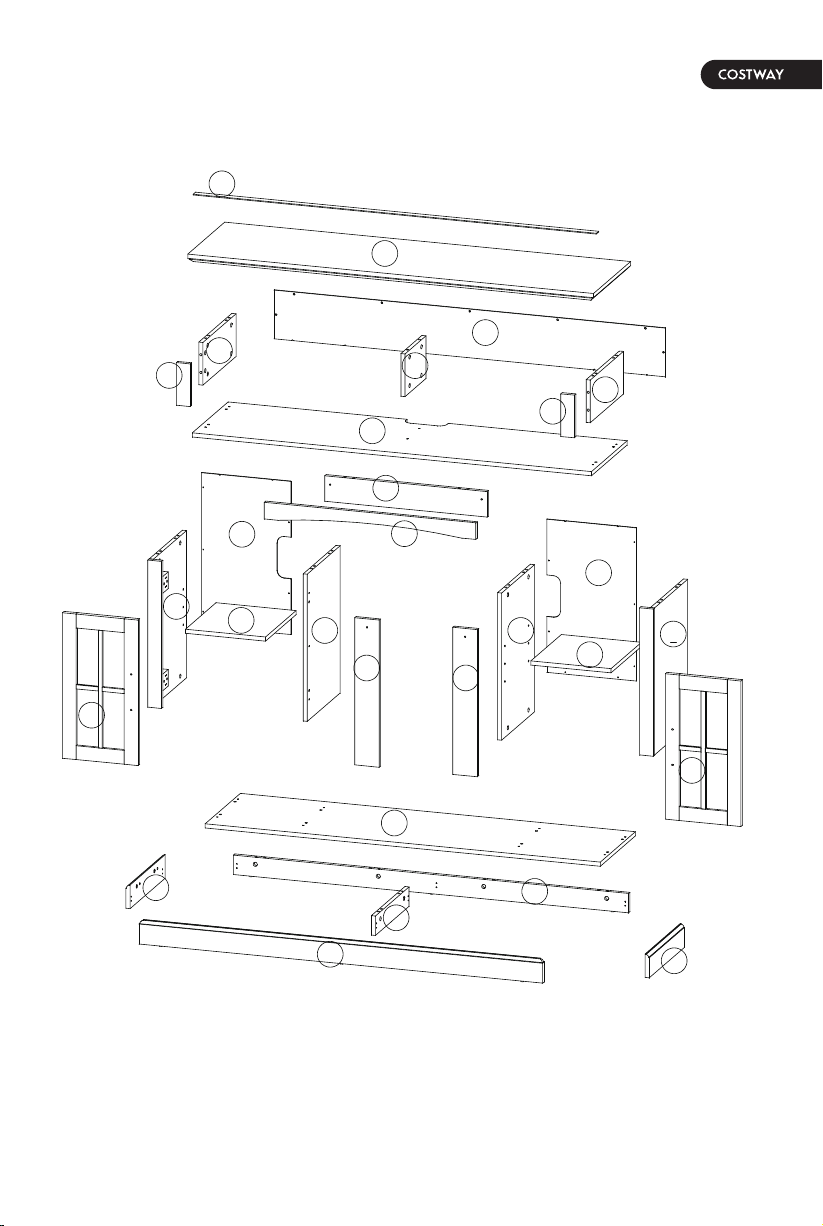
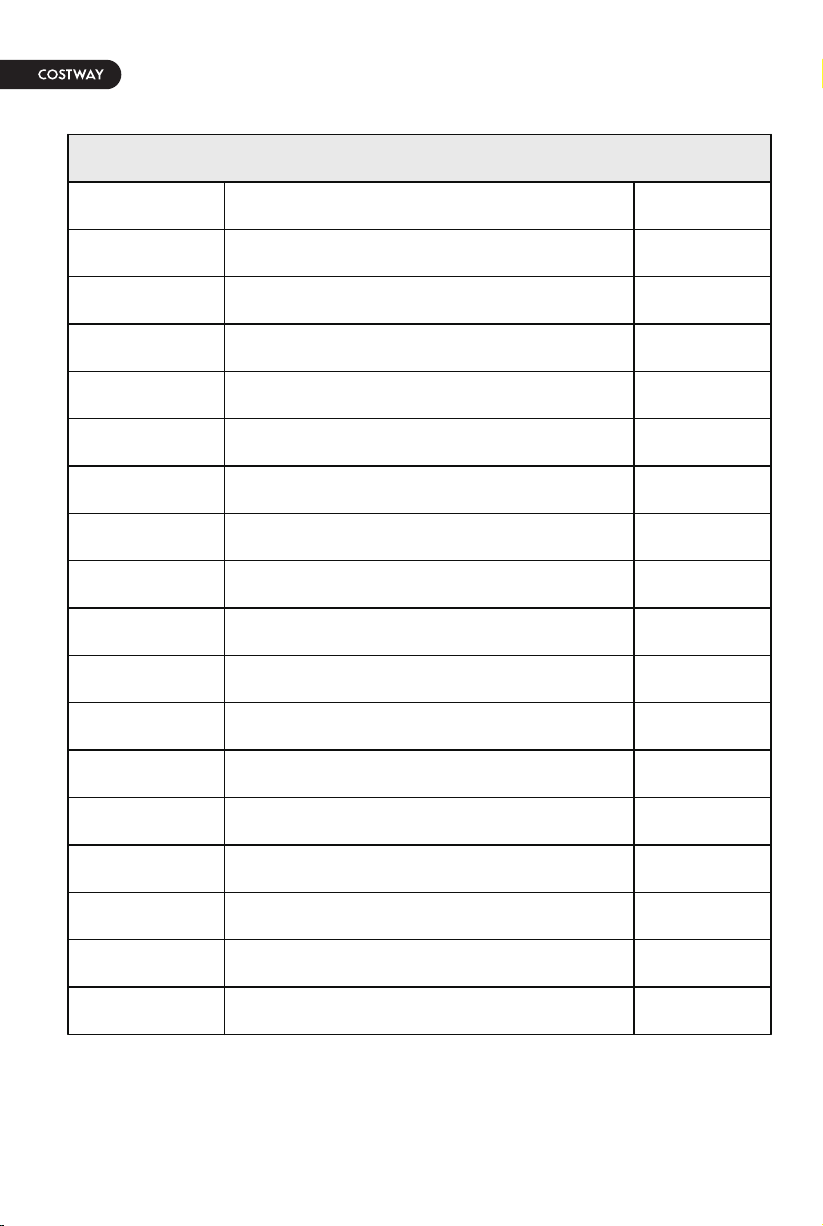
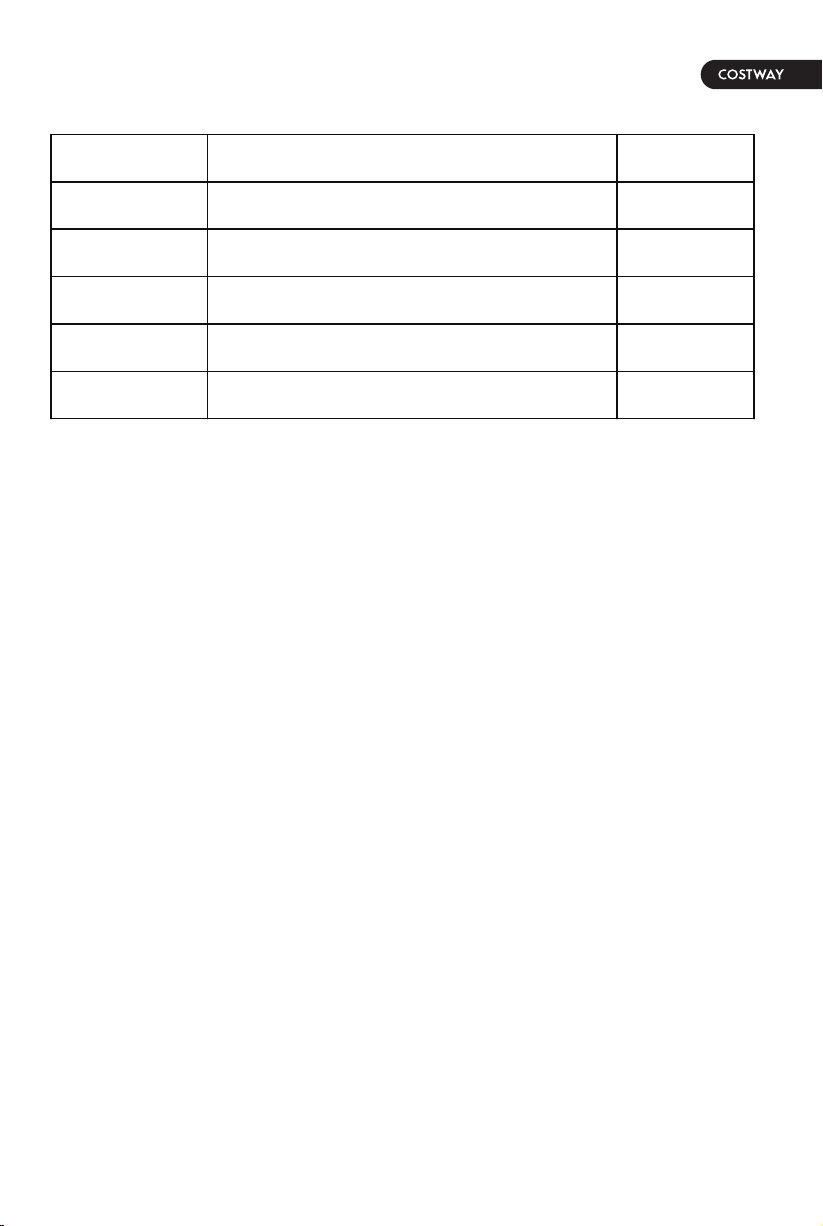
PACKAGE CONTENT
QTYCODR DESRIPTION
1
2
3
4
5
6
7
8
9
10
11
12
13
14
15
16
17
Countertop Board
Middle Partition
Upper Lateral Plate
Top Vertical
Laminates
Upper Back Panel
Middle Leg
Lower Left Side Plate
Lower Right Side Plate
Lintel Strip
Center Bar
Storage Shelf
Lower Back Panel
Left Middle Plate
Forefoot Strip
Left Frame Plate
Right Frame Plate
1
1
2
2
1
1
1
1
1
1
1
2
2
1
1
1
1
05
1
1
1
1
1
2
18
19
20
21
22
23
Cabinet Door
Right Middle Plate
Bottom Plate
Left Leg
Back Leg
Right Leg
A
x 46+1
B
x 36+1
C
D
E
F
H
x 46+1
Ø8x30mm
I
J
x 24+1
x 4 x 2 x 4
x 8 x 16
x 46x 6
K
L M
O
PN
x 8 x 2+4
Q
x 1
AZ
Ø15
3.9×15mm
Black
Ø5/32"×22mm
x 8
Ø2.9x16mm
x 27+1
Ø3.9×15mm
Silvery
x 24+1
58*29*29
Ø1/4"×15mm
32*19*19mm
Ø3.9×25mm
Y
R
32*19*19mm
Ø3.9×25mm
x 2+2 x 2
06
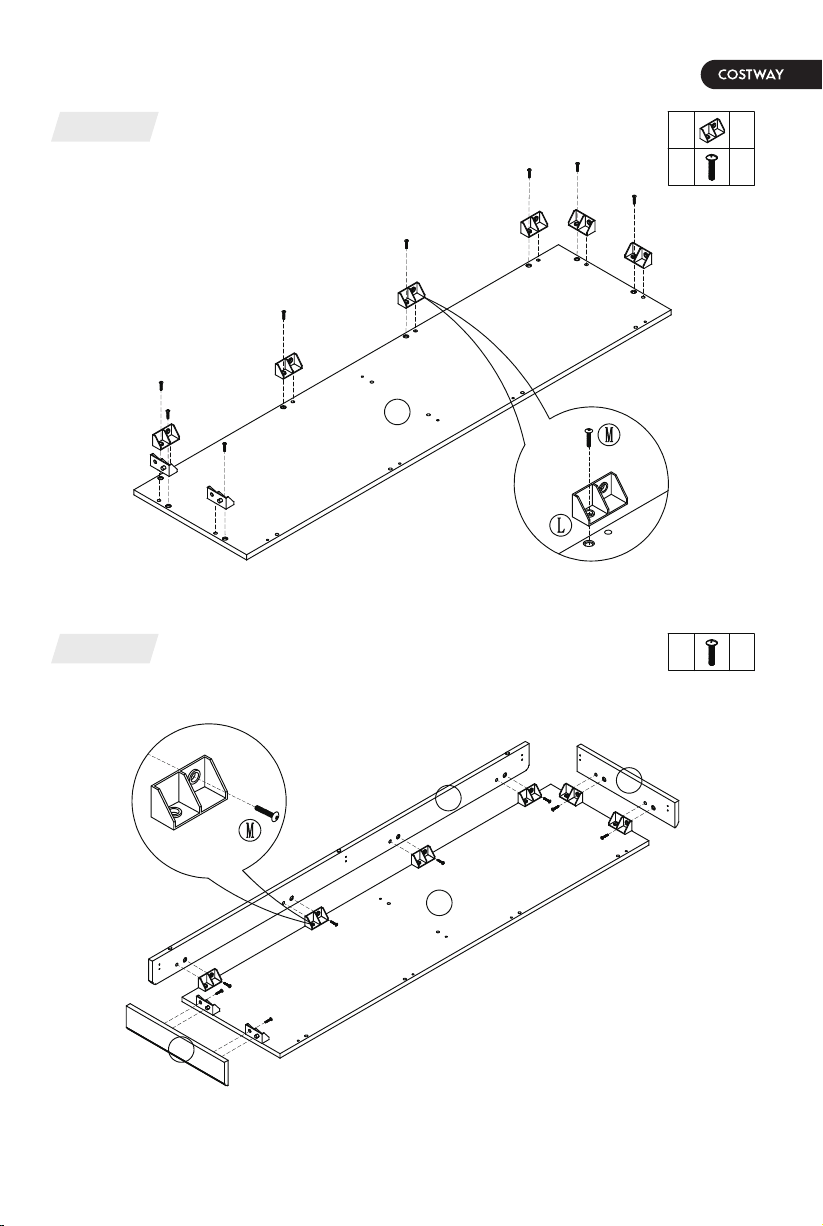
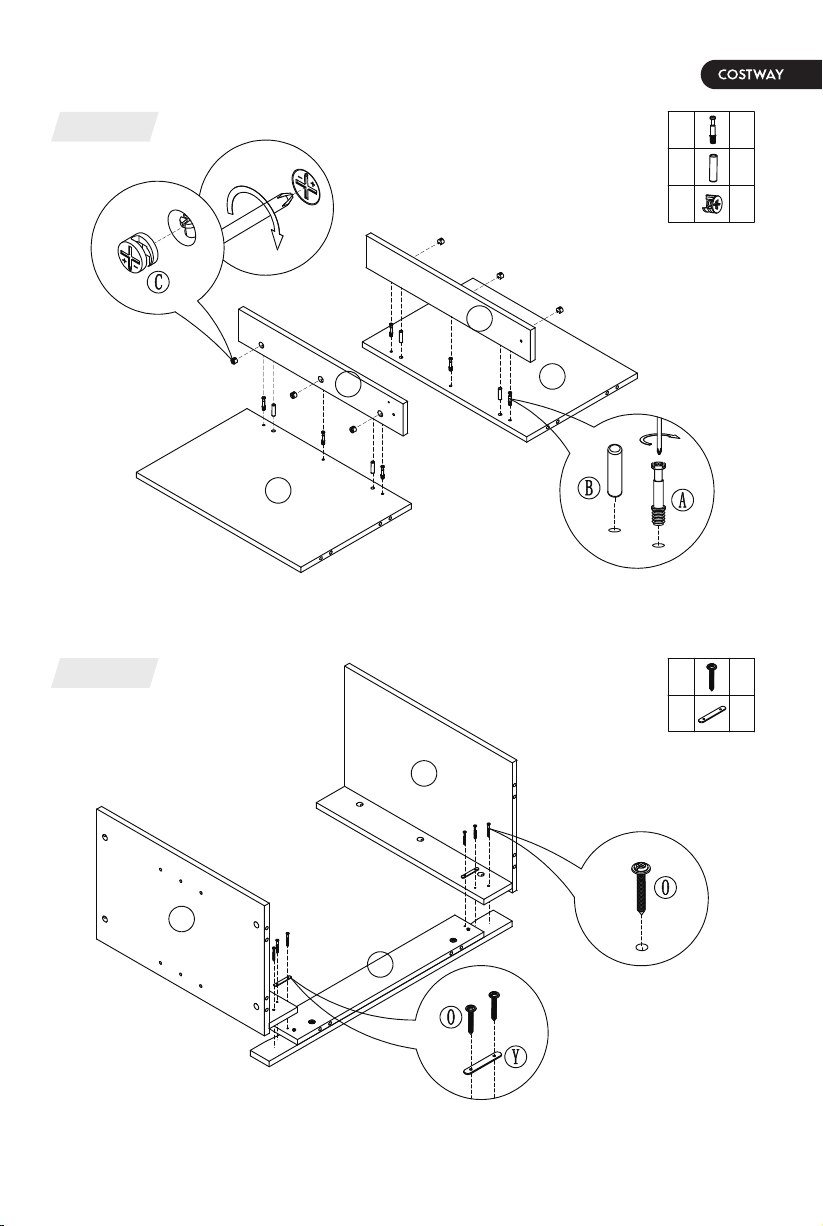
Step 1
Step 2
L 8
M 8
20
M 8
20
15
21
23
07
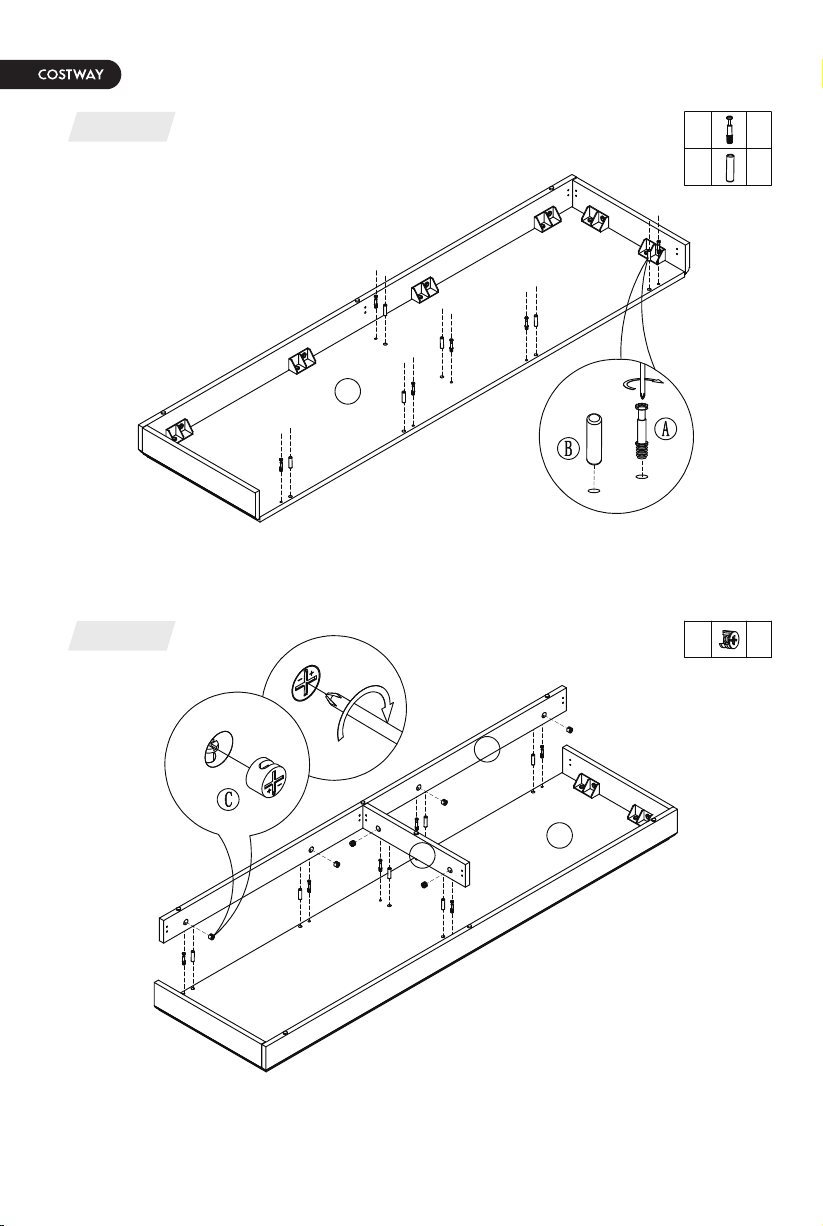
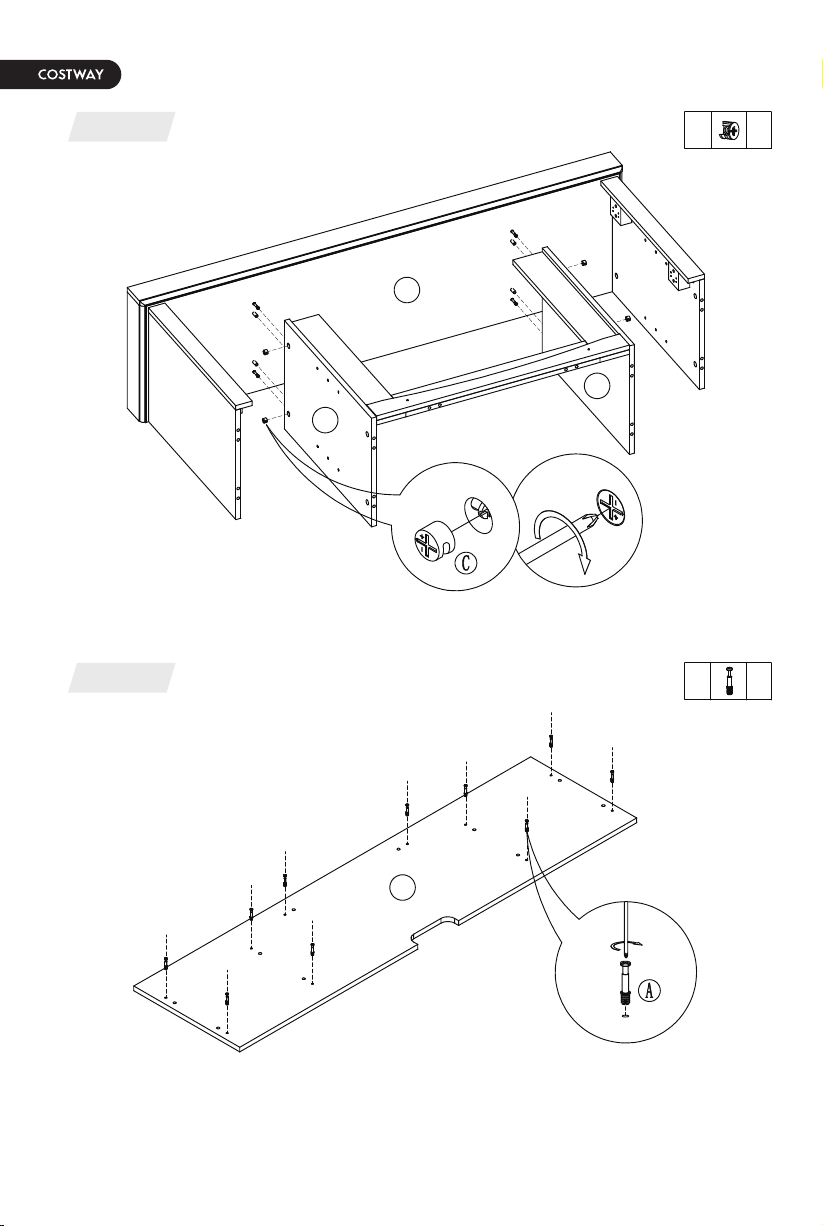
Step 3
Step 4
A 6
B 6
C
6
7
22
20
20
08
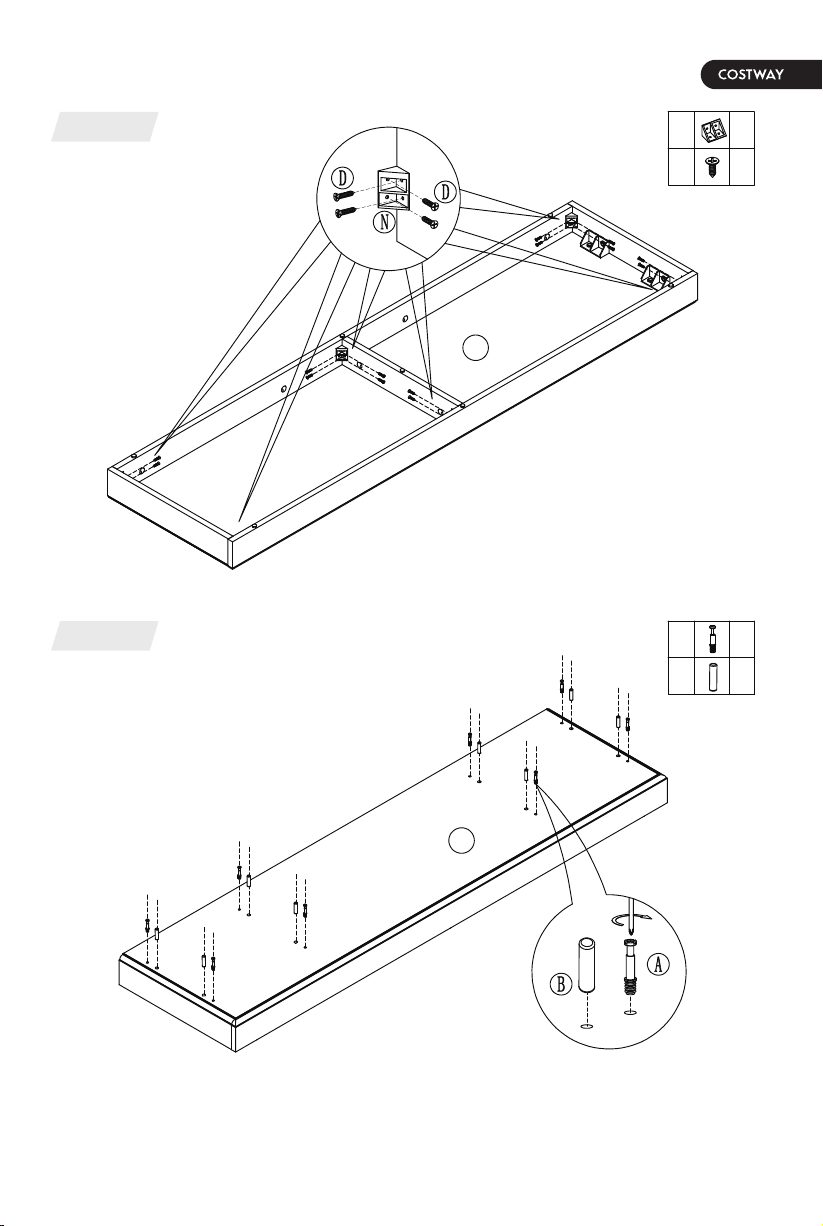
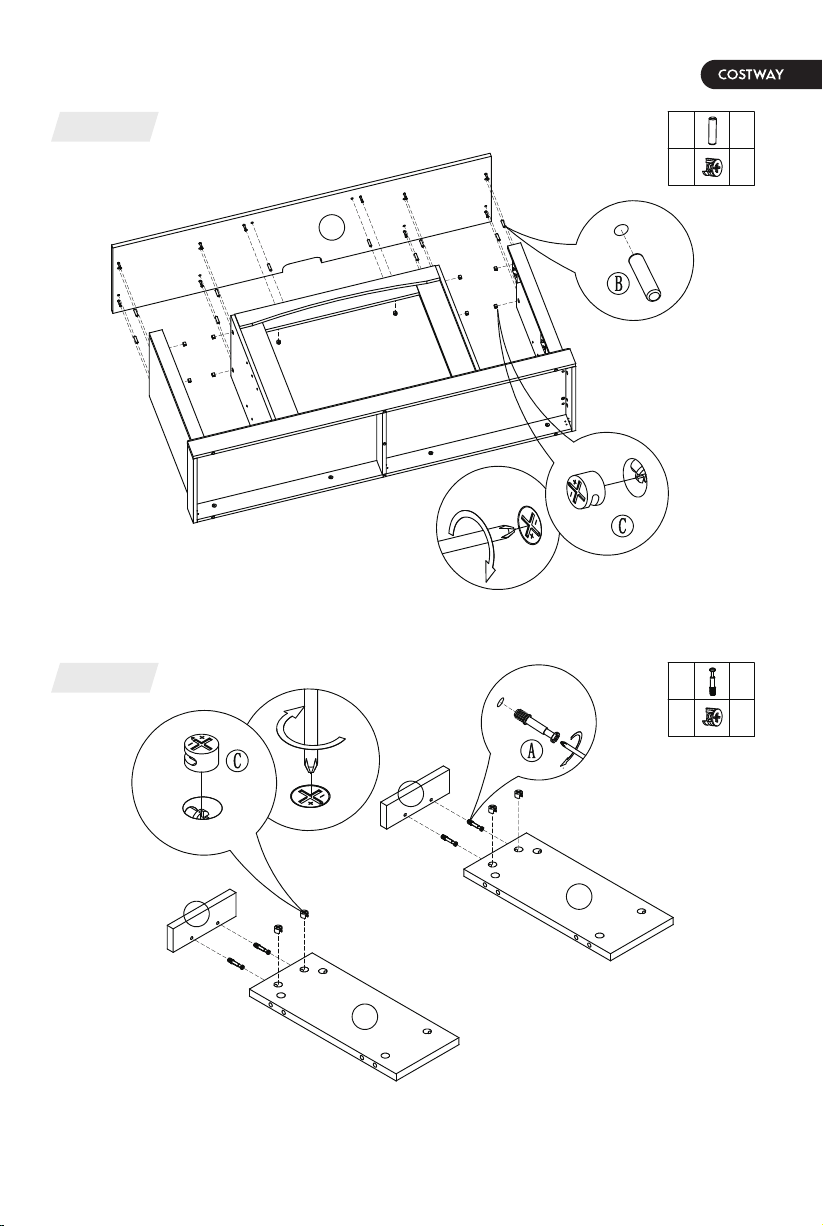
Step 5
Step 6
N 6
D
24
A 8
B 8
20
20
09

Step 7
Step 8
C 4
11
10
9
8
20
O 2
10
Step 9
Step 10
A 6
B 4
C 6
O 6
Y 2
19
14
11
16
17
14
19
11
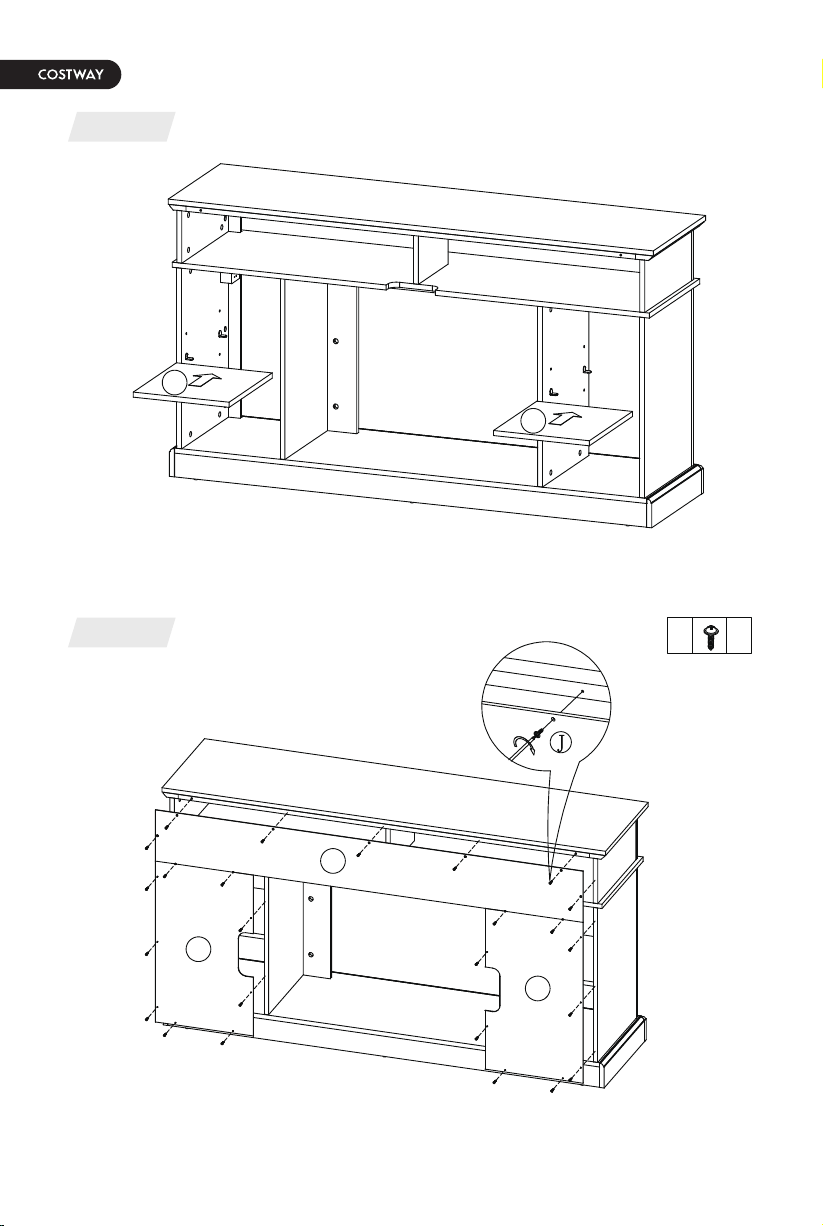
Step 11
Step 12
C 4
A 10
5
19
14
20
12
Step 13
Step 14
B 10
C 10
A 4
C 4
5
3
4
3
4
13
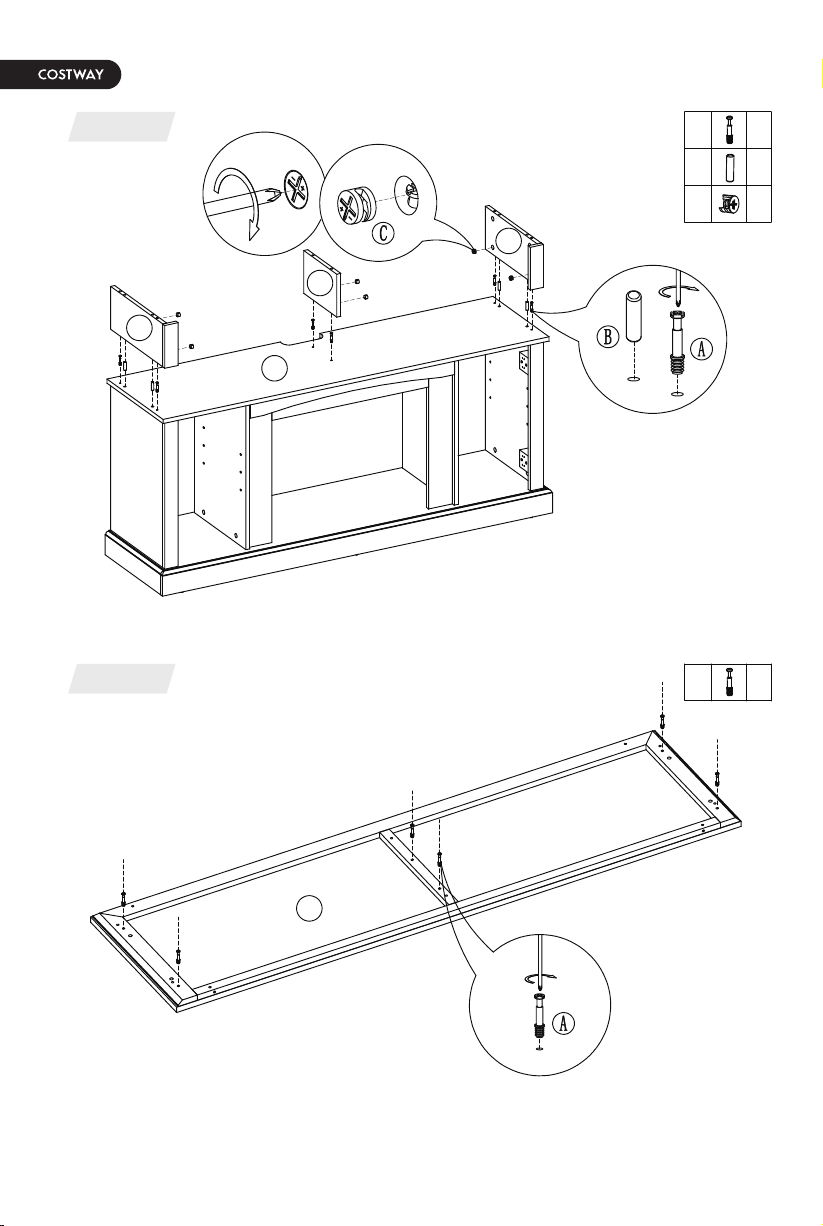
Step 15
Step 16
A 6
B 4
C 6
A 6
1
3
3
2
5
14
Step 17
Step 18
15
B 4
C 6
1
I
8
P 46
Each bolt cam (C) is equipped with a cover (P).
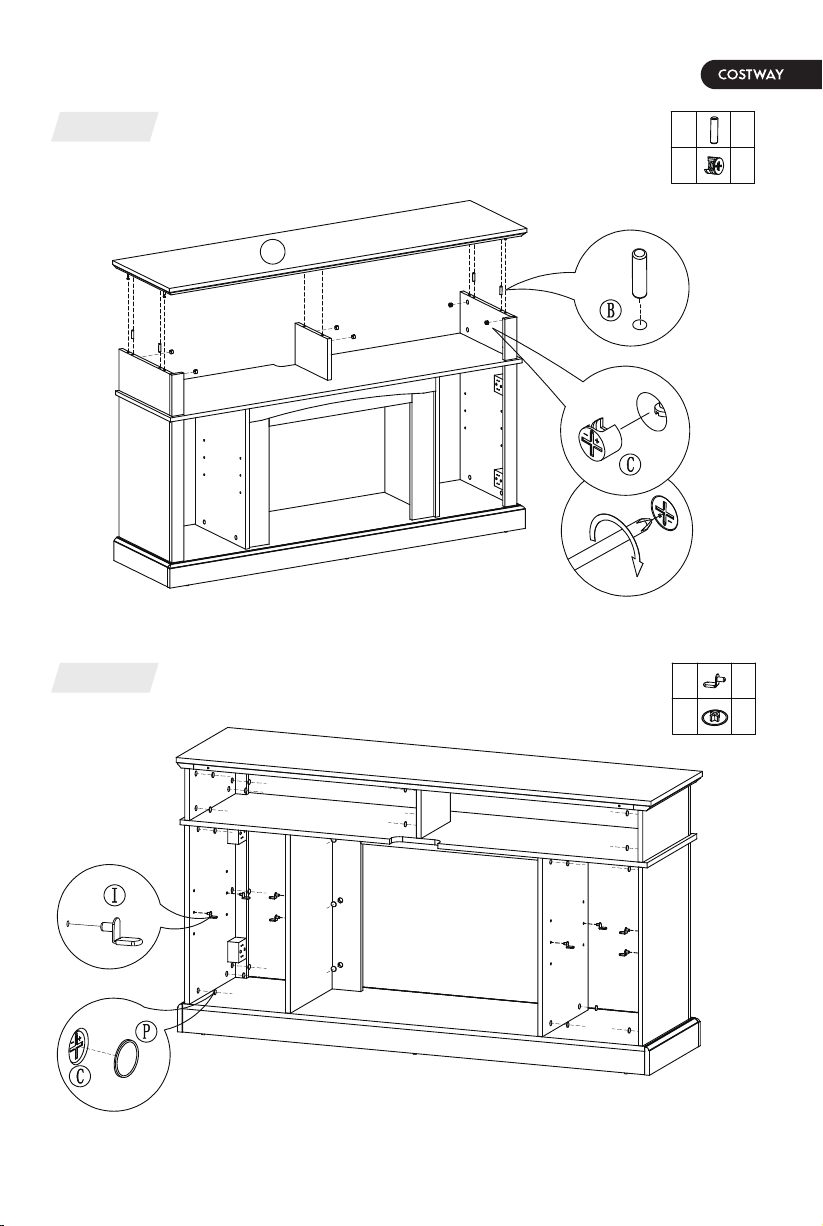
Step 19
Step 20
16
J
25
12
12
13
13
6
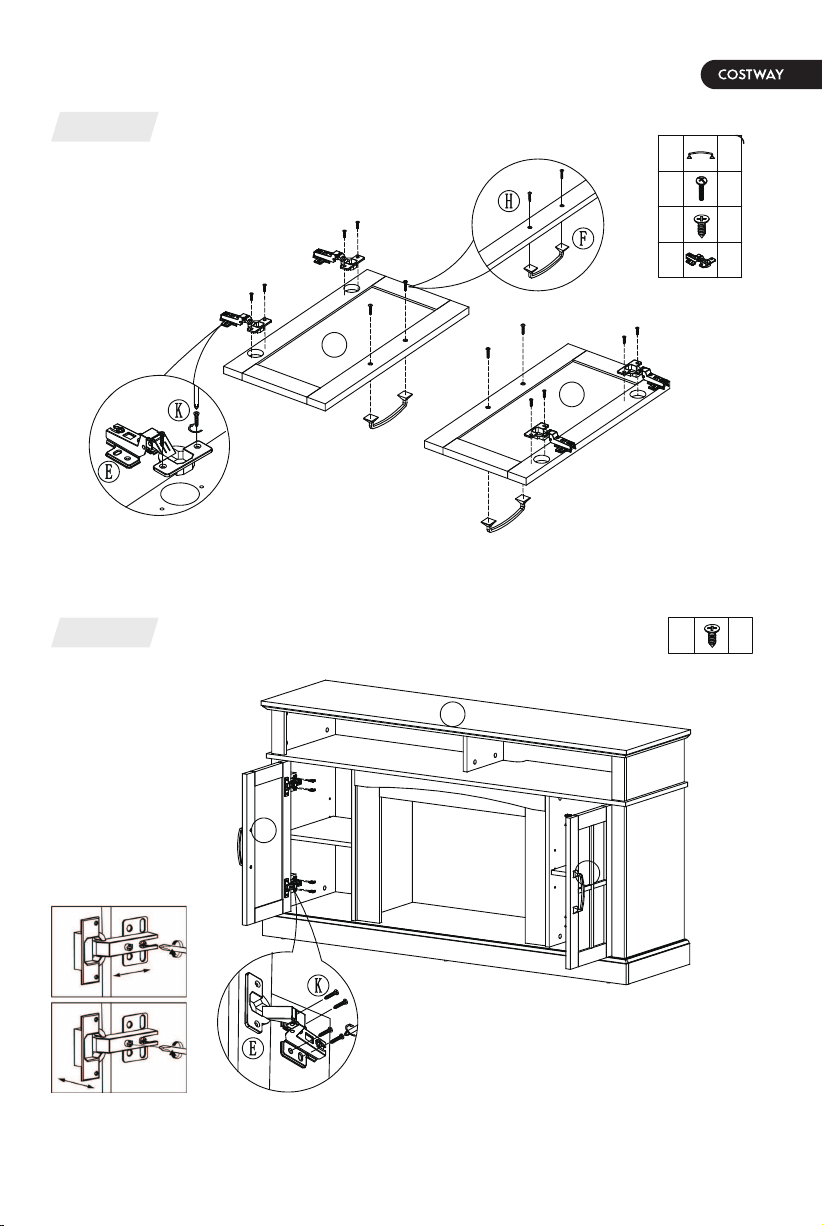
Step 21
Step 22
17
K 16
1
18
18
F 2
H
2
K
8
E 4
18
18
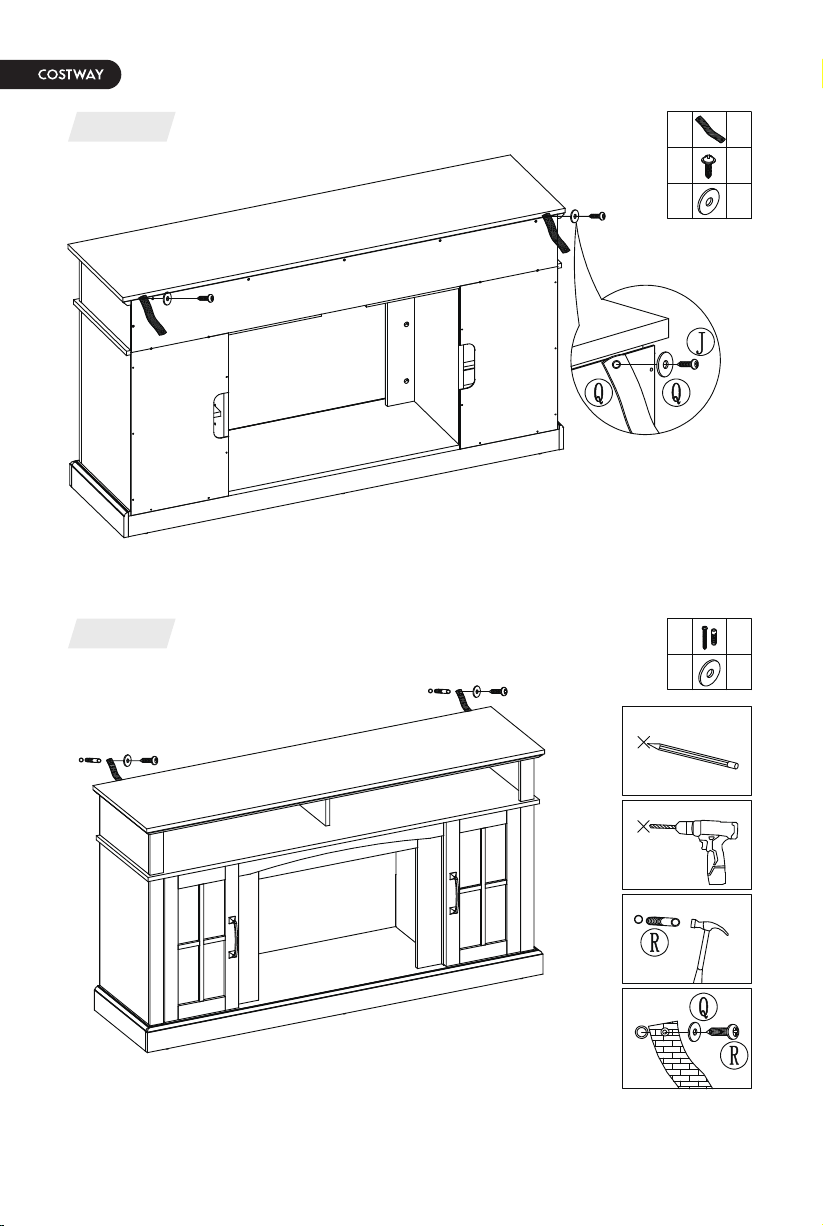
Step 23
Step 24
18
Q
2
J 2
Q
2
R 2
Q
2
Step 25
19
AZ 1
0.2"/5mm
2"/50mm
AZ
AZ
AZ
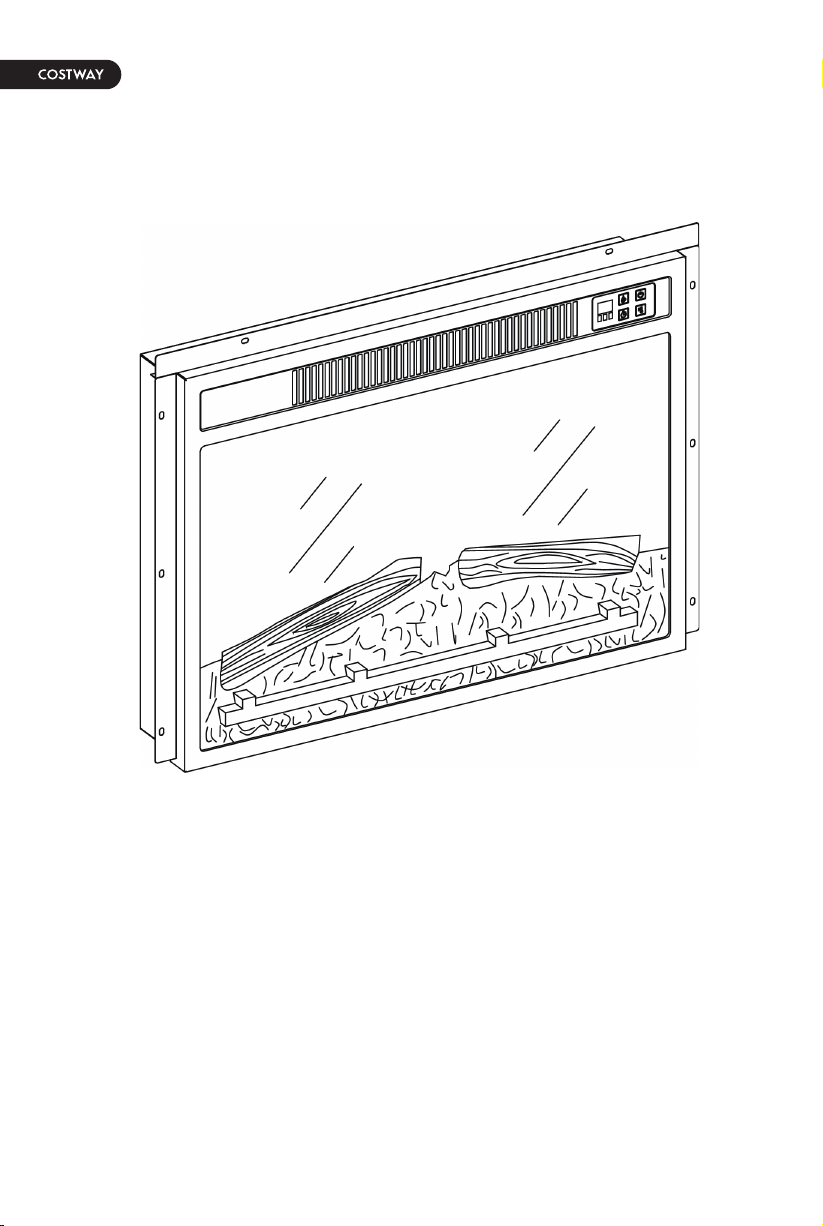
23" Insert Fireplace Heater
TABLE OF CONTENTS
• Safety Information
• Technical Specification
• Package Content
• Assembly Instruction
• Users Instruction
• Control Panel
• Remote Control
• Care and Maintenance
• Trouble Shooting
20

21
When using electrical appliances, basic safety precautions should always be
followed including the following:
READ ALL INSTRUCTIONS BEFORE USE
1. Read all instructions before using this heater.
2. Do not use this heater outdoors.
3. This heater is not intended for use in bathrooms, laundry areas and
similar indoor locations. Never locate the heater where it may fall into a
bathtub or other water container.
4. Do not run the power cord under carpeting.Do not cover the power cord
with throw rugs, runners, or the like. Arrange the power cord away from
traffic areas and where it will not be tripped over.
5. To disconnect the heater, turn controls to off,then remove the plug from
the outlet.
6. Connect to properly grounded outlet only. Always plug heaters directly
into a wall outlet/receptacle. Never use with an extension cord or reloadable
power tap(outlet/power strip).
7. To prevent possible fires, please do not use fireplace heaters on soft
surfaces, such as beds, carpets, which may block the opening.
8. There is a thermostat limiter inside the heater. When the inner
temperature overheat or abnormal heating occurs,the thermostat protective
device cuts off the power supply to avoid damage to the fireplace or risk of
fire.
9. Use the heater only as described in the manual. Any other use not
recommended by the manufacturer may cause fire, electric shock, or injury.
WARNING: There is no user serviceable parts inside
fireplace/heater. If the unit appears to malfunction, turn the unit off
and unplug from the wall immediately and contact Customer Service.
⚠

WARNING: A heater has hot and arching or sparking parts inside.
Do not use in areas where gasoline, paint, or flammable liquids are
used or stored.
⚠
WARNING: Extreme caution is necessary when any heater is used
by or near children or invalids and whenever the heater is left operating
and unattended.
⚠
WARNING: Do not insert or allow foreign objects to enter any
ventiliation or exhaust openings as this may cause an electric shock or
fire, or damage to the heater.
⚠
WARNING: Always unplug the heater when not in use.
⚠
WARNING: This heater is hot when in use.To avoid burns, do not
let bare skin touch hot surfaces. If provided, use handles when moving
the heater. Keep combustible material, such as furniture, pillows,
bedding, papers, clothes,and curtains at least 3ft (0.9m) from the front
of the heater and keep them away from the side or rear.
⚠
WARNING: Do not operate any heater with a damaged cord or
plug or after the heater malfunctions, has been dropped, or damaged
in any manner. Return the heater to an authorized service facility for
examination, electrical or mechanical adjustment, or repair.
⚠
22
CAUTION: While the heater is in use, the top center of the
fireplace can get hot to the touch, and may cause serious injury or
burns.Always supervise small children around the fireplace/heater. Do
not place any cloth or decorations over the heater outlet or fireplace,or
otherwise obstruct the heater outlet of the fireplace, as this may cause
a fire and serious injury.
⚠
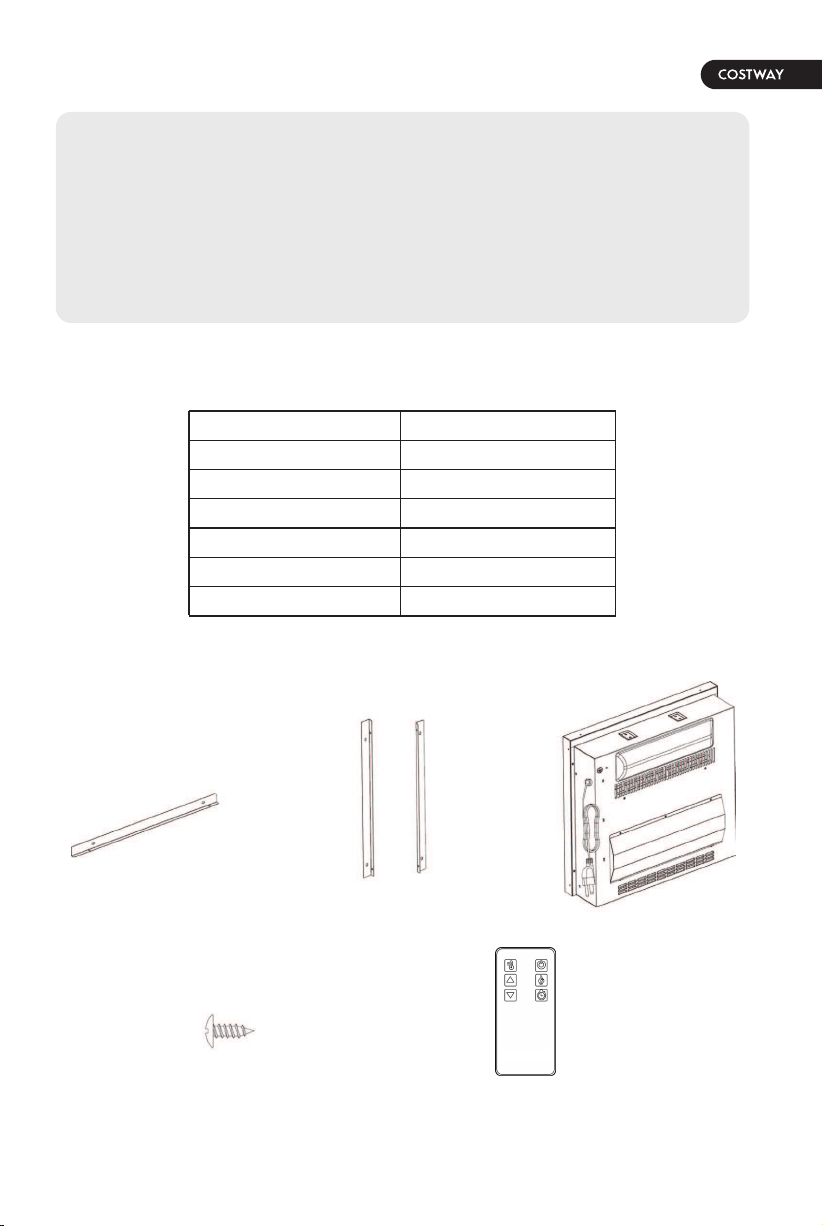
Screw x15 Remote Control
Fireplace UnitSide Trim (L/R)Top Trim
PACKAGE CONTENT
Model Number
23” x 5.04” x 17.1”
15.43 lb
17.11 lb
1400 W
120 V
60 Hz
Dimensions (W x D x H)
Net Weight
Gross Weight
Power Rating
Voltage
Frequency
23
TECHNICAL SPECIFICATION
STEP 1
Take out the unit from the box and layout all the spare parts for easy
assembly. Make sure all small items are not left in packaging materials.
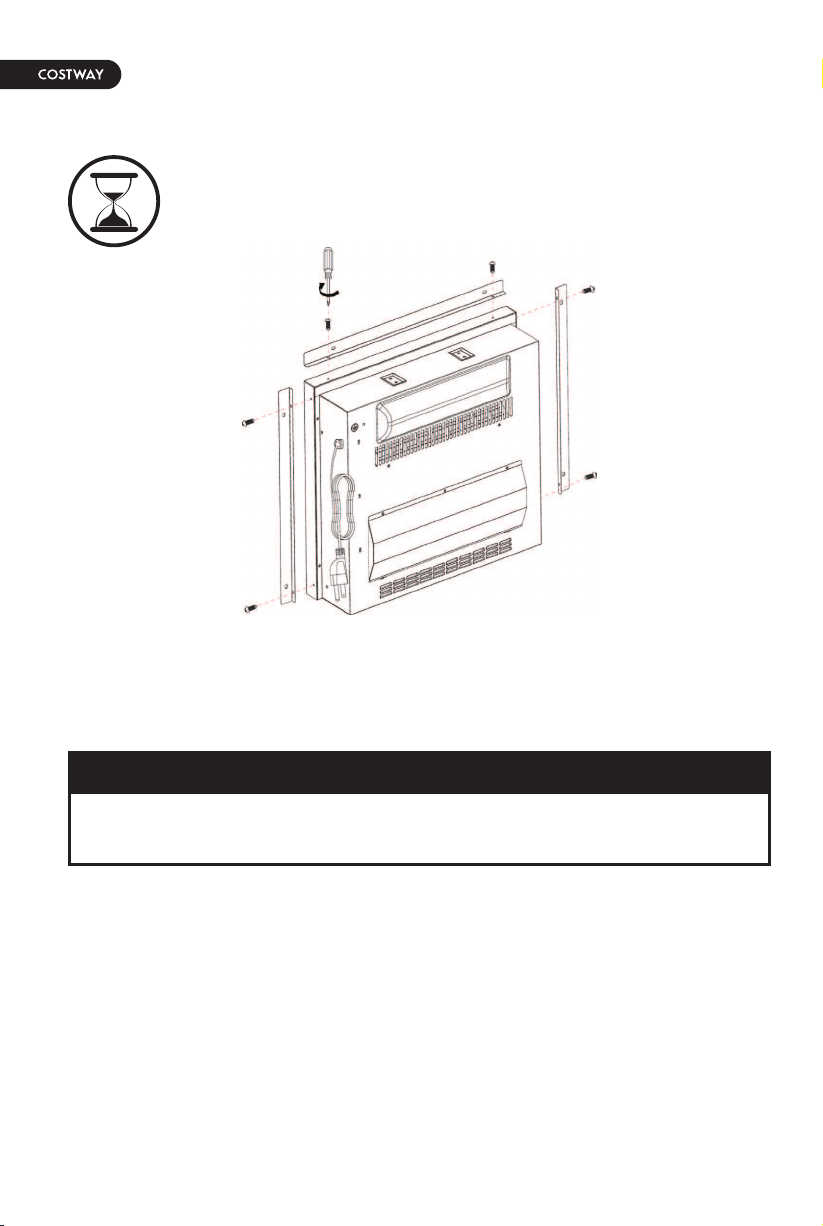
STEP 2
Attach the top trim to the top of the unit and secure it by tightening 2
screws. Make sure the right angle side faces the front of the unit.
Align and attach two side trims to the sides of the fireplace unit. Identify the
right and the left and make sure the right angle side is facing the front of the
unit.
ASSEMBLY INSTRUCTION
Estimated Time for Assembly
20:00
⚠CAUTION
• This unit has a glass front panel. Use extreme caution when handling
glass to prevent personal injury or damage.
24
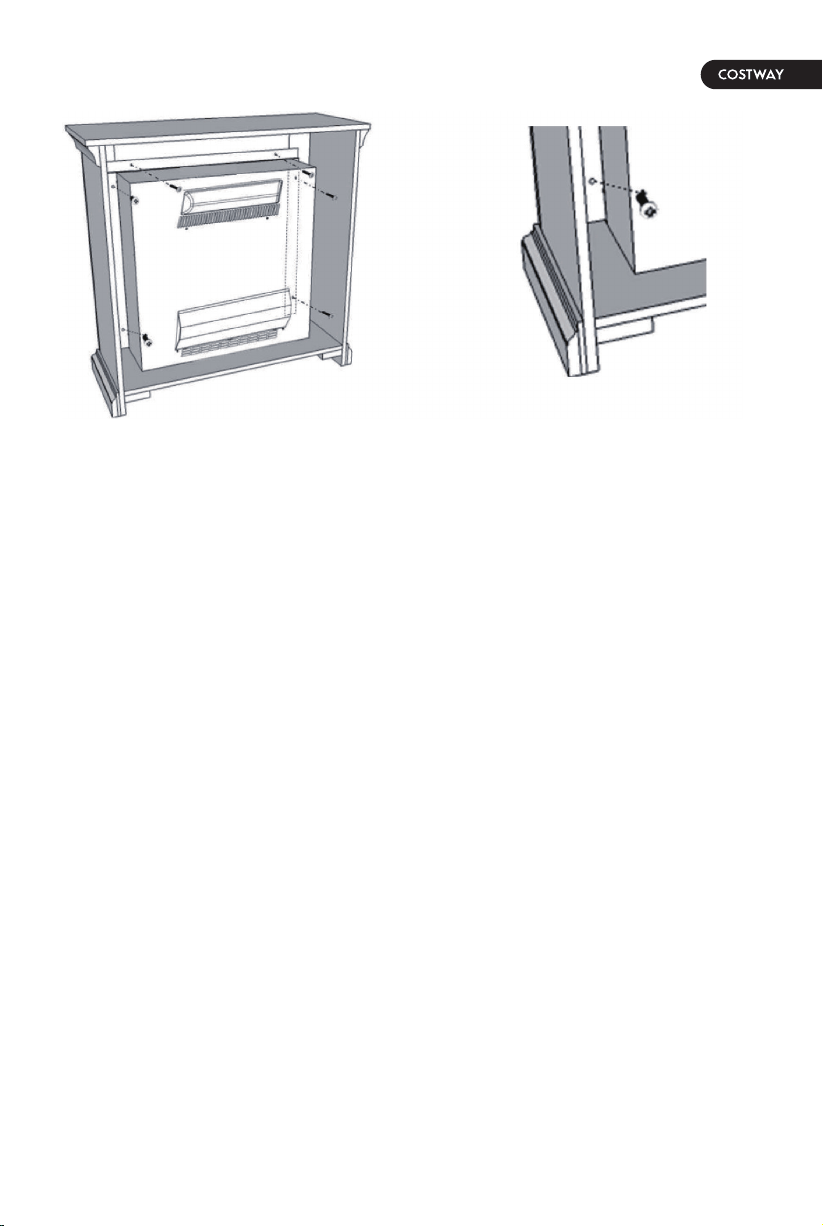
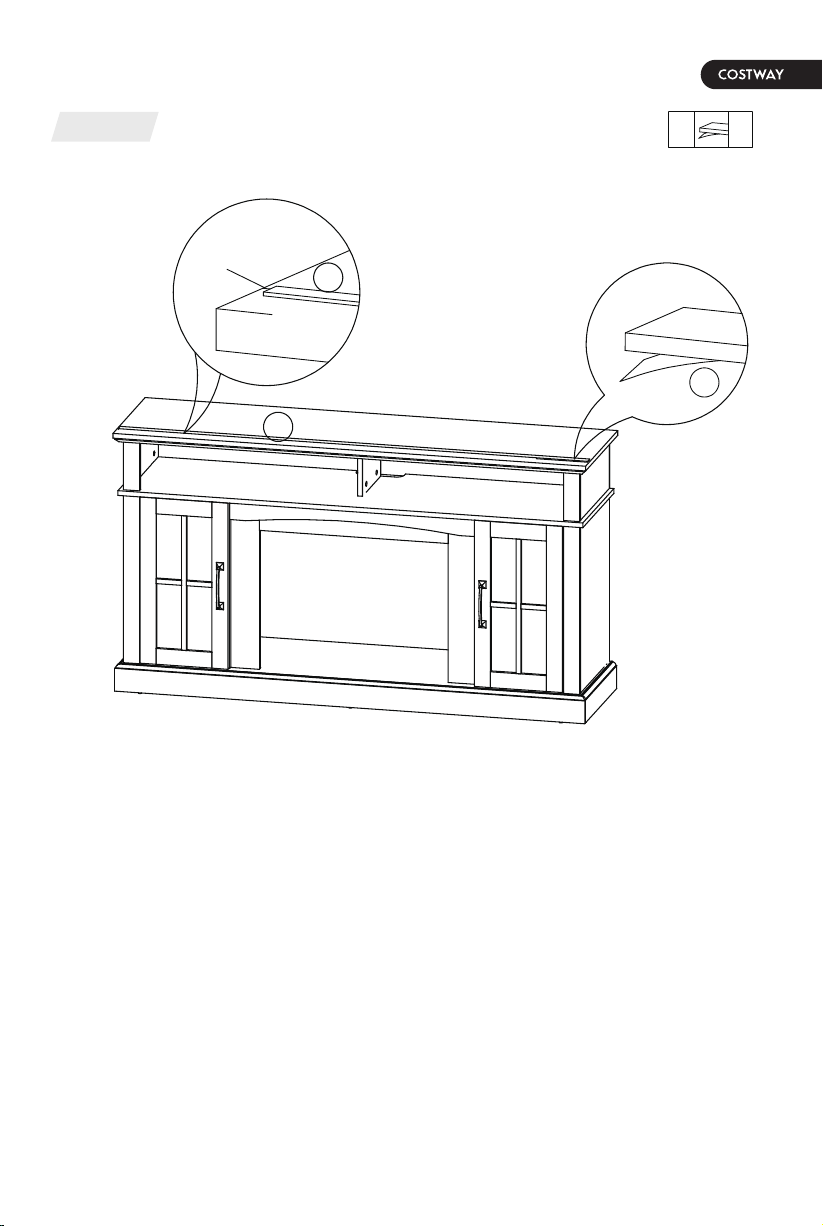
STEP 3
Carefully set the unit from the back of the mantel and center it in the
opening.
Check the alignment and attach the unit of the mantel by inserting screws
through the drilled holes on the trim of the mantel.
NOTE: Do not attempt to install the unit from the front of the mantel. It will
not fit.
25
USER INSTRUCTION
Before use
Check that the air intake and exhaust is not covered or obstructed in
anyway.
Keep combustible objects at least 3ft away from the unit.
Plug the unit to a grounded power socket.
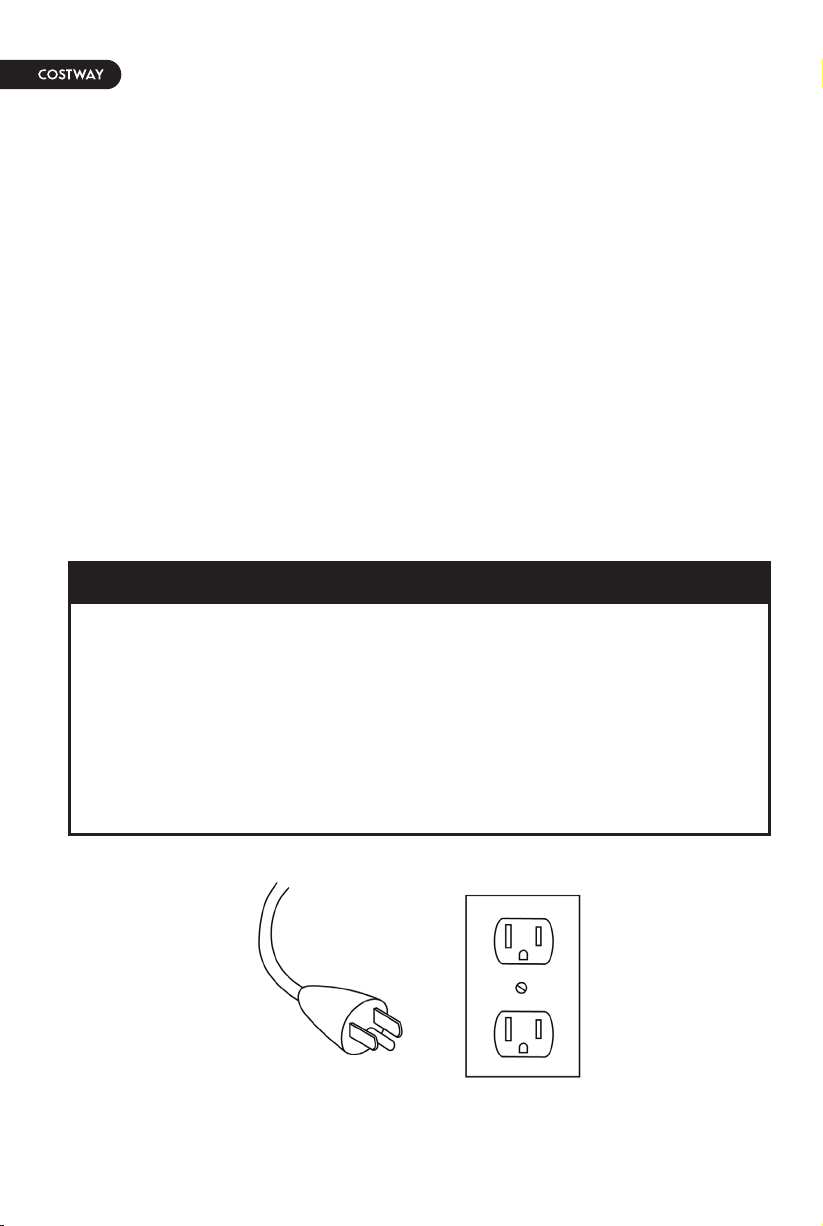
Grounding
This product must be grounded. If it should malfunction or breakdown,
grounding provides a path of least resistance for electric current to reduce
the risk of electric shock.
This unit comes standard with a 6ft (1.8m) long, three wired cord. Always
plug the unit into a wall outlet. An extension or relocate tab should never be
used.
⚠CAUTION / WARNING
• Improper connection of the equipment grounding conductor can result
in a risk of electric shock. Check with a qualified electrician or
serviceman if you are in doubt as to whether the product is properly
grounded.
•DO NOT modify the plug provided with the product nor using any
bypass device if the plug does not fit the outlet. Have a proper outlet
installed by a qualified electrician.
26
27
USER INSTRUCTION (CONTROL PANEL)
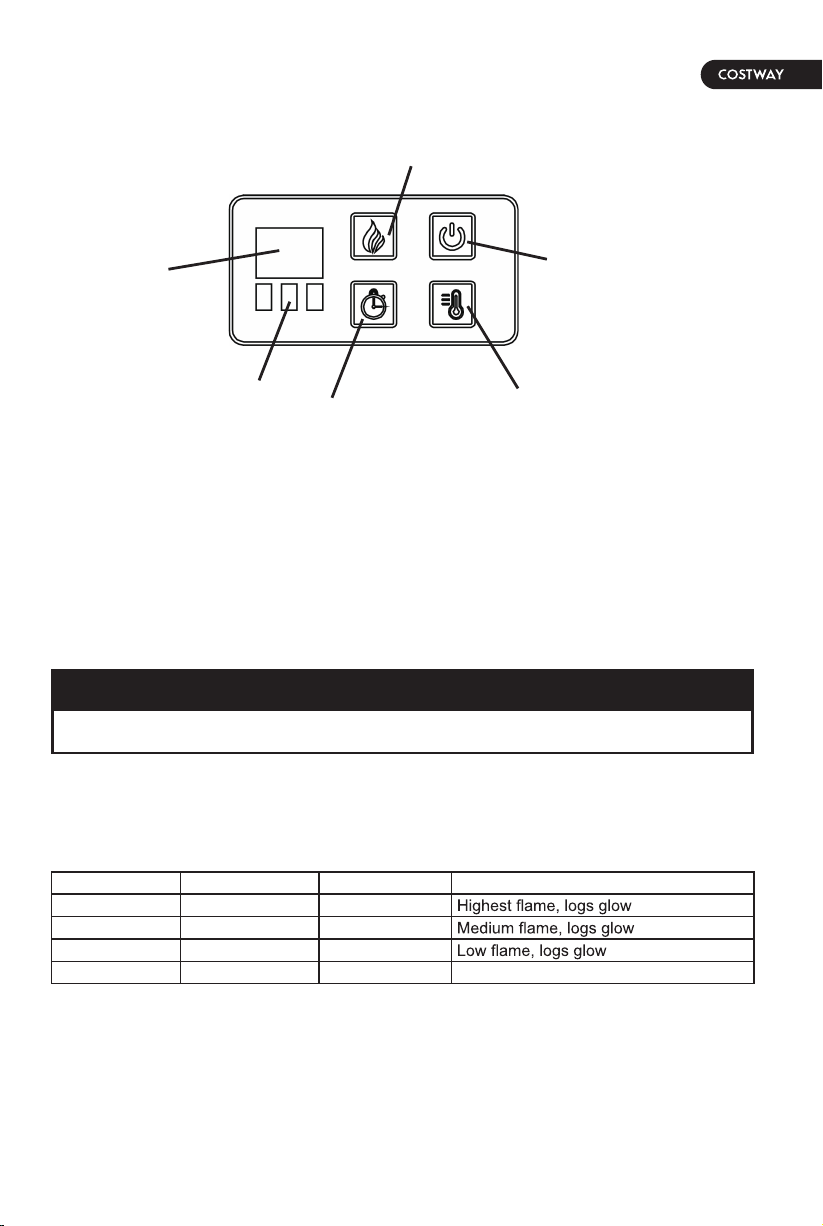
Control Panel
The control panel is located on the top right corner of the unit.
Power ON / OFF
Press the power button to turn on the unit. Press again to turn off the unit.
NOTE: There is a thermostat limiter inside the unit. When the inner
temperature is too hot, the unit will automatically turn off to avoid damage
to the product or risk of fire.
Flame Control
Press the flame control button to rotate and set flame effect levels. The
flame setting are as follows.
NOTE: When the heater is turned on, the flame effect level can only rotate
and set between High, Medium, and Low.
Power Button
Flame Control
Heater Control
Timer Control
Function Indicator
Display
⚠CAUTION / WARNING
• DO NOT unplug the unit when it is still “ON”
Button Press Flame Level Display Value Fireplace Appearance
1st Press High L3
2nd Press Medium L2
3rd Press Low L1
4th Press OFF None OFF
Heater Control
Press the heater control to turn on and off the heater.
When the heater is turned on, press and hold the heater control button for 5
seconds to enter temperature adjustment mode. The LED indicator is red. In
adjustment mode, the display will flashes. There are 22 levels to change
Fahrenheit temperature (ON, 62°F - 82°F). After this is set, the display will
flash 5 times and exit from setting status.
To switch from degree Fahrenheit to degree Celsius, press and hold the
power button for 5 seconds when the heater is turned on. The LED indicator
will turn to green. There are 12 levels to change Celsius temperature (ON,
17°C - 27°C). Repeat the same process to convert Celsius to Fahrenheit.
NOTE: Degree Fahrenheit will be displayed in RED and degree Celsius will be
displayed in Green.
Timer Control
Press the timer button to turn the timer on. The timer function can controls
both the flame effect and heater.
The timer can set as the table suggested below.
NOTE: Timer only controls heater if only the heater is on before timer is set.
NOTE: Timer only controls flame effect function if only the flame effect
function is on before timer is set.
NOTE: Timer can control both heater and flame effect function if both are on
before timer is set
28
Button Press Timer Interval Display
1st press 30 Minutes 30
2nd press 1 Hour 1h
3rd press 2 Hours 2h
4th press 3 Hours 3h
5th press 4 Hours 4h
6th press 5 Hours 5h
7th press 6 Hours 6h
8th press OFF None
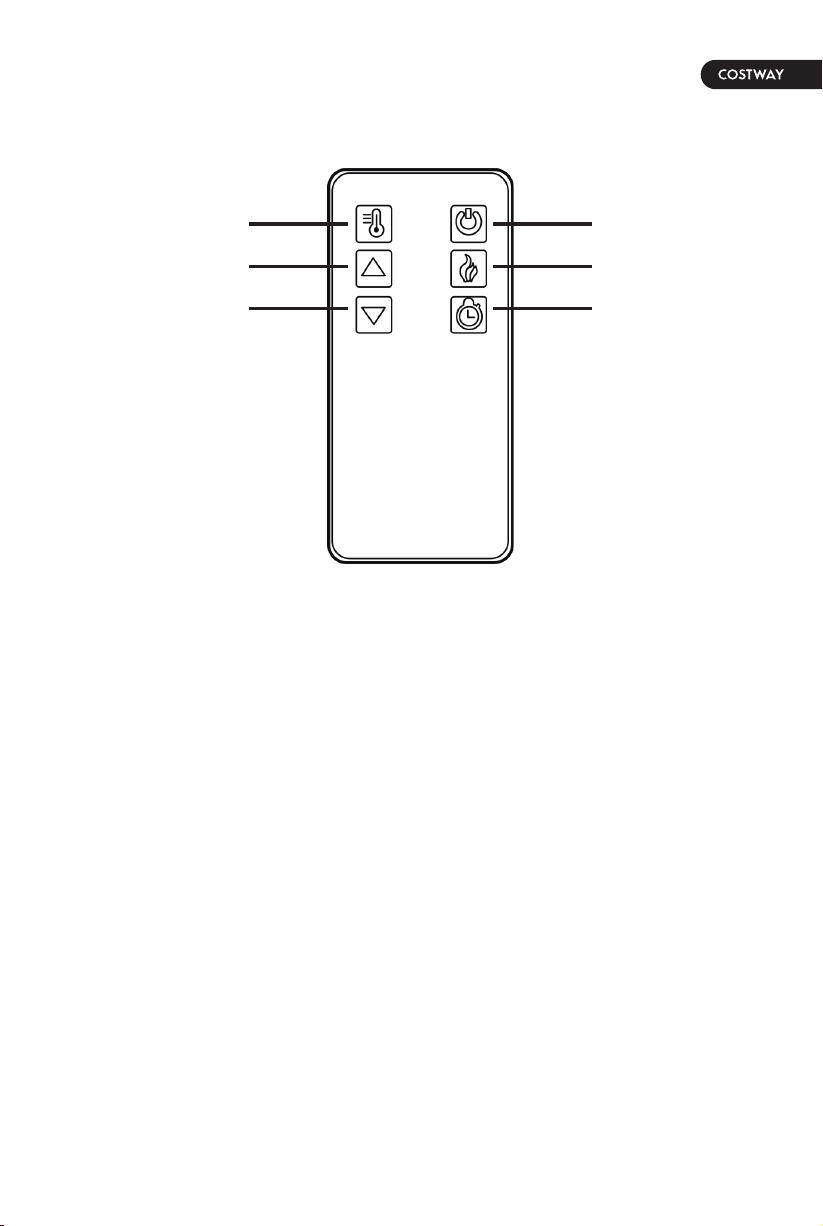
USER INSTRUCTION (REMOTE CONTROL)
Remote Control
The operation of the remote control buttons work the same as the button on
the control panel.
NOTE: The remote control cannot be used to switch between degree
Fahrenheit and degree Celsius.
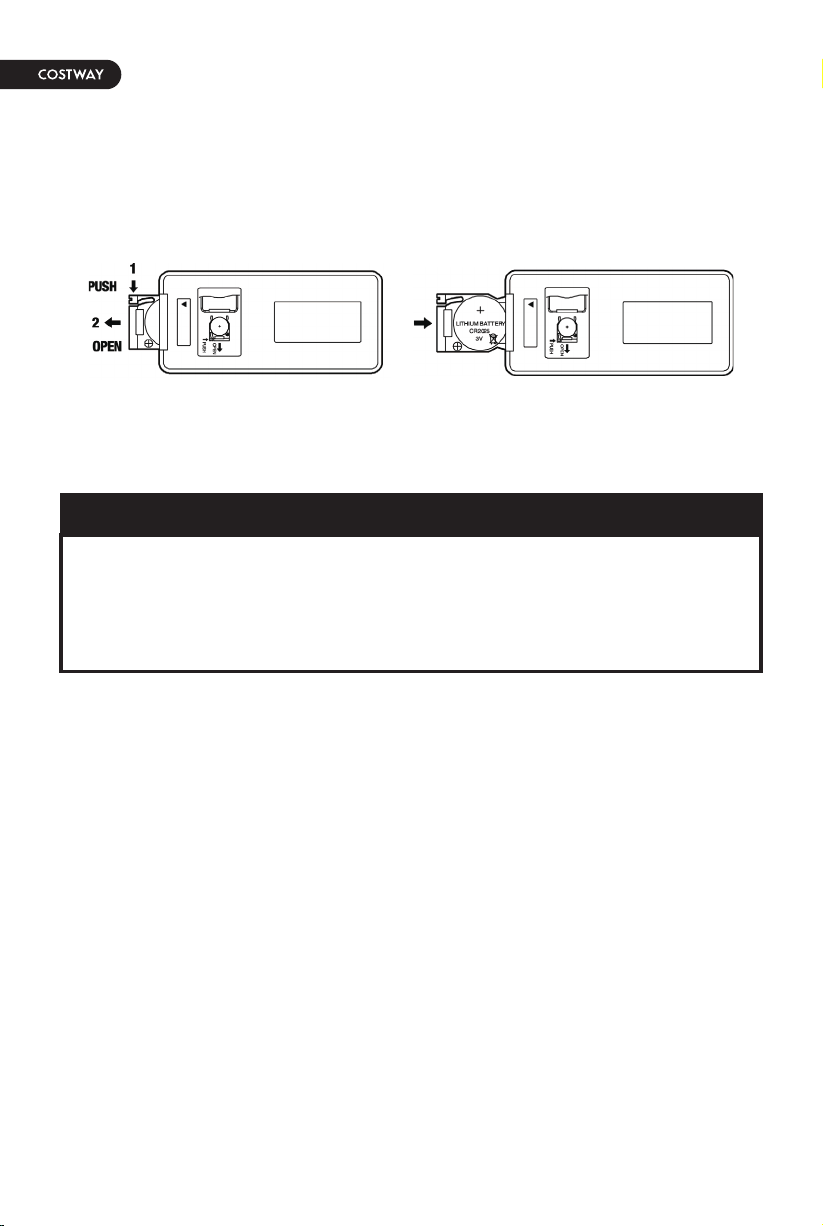
Install / Replace Battery
The remote control is provided with a CR2025 battery. Remove the plastic
insulating sheet before using.
To replace or remove old battery, push in the clip and pull the battery
bracket out simultaneously.
Insert a new battery with the button side into the battery bracket, make
sure the battery is firmly seated.
29
USER INSTRUCTION (REMOTE CONTROL)
Power ButtonHeater Control
Flame ControlHeater Up
Timer ControlHeater Down
CARE AND MAINTENANCE
Cleaning the unit:
Always turn off and unplug the unit from power outlet before cleaning.
Allow the unit to cool down completely before performing any maintenance
or cleaning.
Use a vacuum cleaner or duster to regularly remove any accumulated dust
on the unit
Use a damp soft cloth to clean the surface and buff with a dry cloth.
Do not use abrasive cleansers, liquid sprays or any cleaner that could scratch
the surface.
⚠CAUTION / WARNING
• Dispose old / used battery at a suitable recycling point or according to
local regulations.
• DO NOT ingest battery. If accidentally swallowed, seek for medical
help immediately.
30
To replace the bracket, simply push it into the remote control. Make sure the
bracket snaps into position.
NOTE: Remove battery from remote control if not use for an extended period
of time.
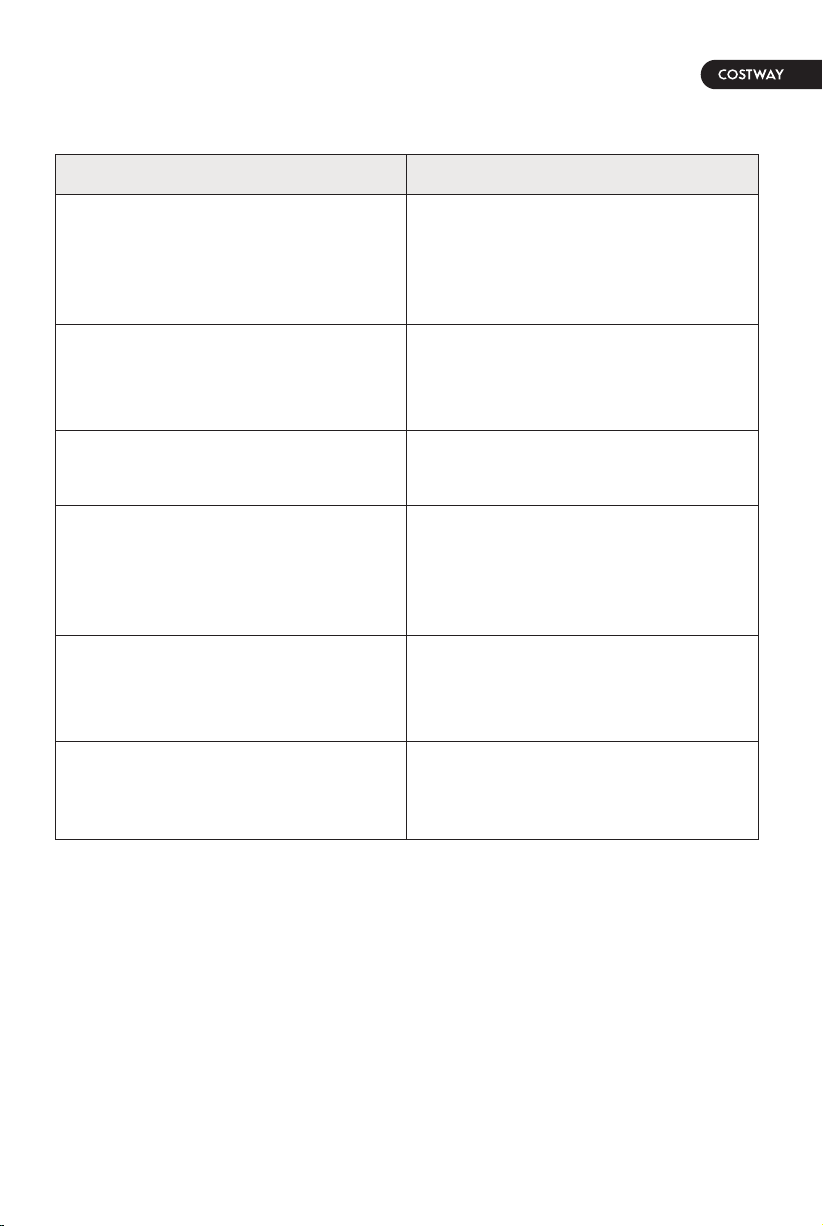
TROUBLE SHOOTING
Problem Solution
The unit does not turn on
Flame effect is on, but there is no
flame effect
Make sure the unit is plugged into
a standard 120V grounded power
source. Press the power button on
the control panel.
Open the top and back panel to
check if the flame spindle has
fallen off from the spindle motor.
Make sure the set temperature is
higher than the room temperature.
The heater does not blow warm air
Turn all switches to OFF and
unplug the unit for 5 minutes.
Plug the unit back to power and
operate as normal.
Reset the unit by unplugging the
unit from power source for 5
minutes and then plug it back.
Use it closer to the unit / change
battery / remove insulating plastic
sheet.
Error Code 88 shown on the
indicator
Remote control does not work
The heater does not work
31