USER MANUAL

Special Thanks
DIRECTION
Frédéric BRUN Kevin MOLCARD
DEVELOPMENT
Nicolo COMIN
Corentin COMTE
Simon CONAN
Matthieu COUROUBLE
Florian MARIN
François REME
Vincent TRAVAGLINI
DESIGN
Martin DUTASTA Shaun ELWOOD Morgan PERRIER
BETA TESTERS
Chuck CAPSIS
Marco CORREIA
"Koshdukai"
Dwight DAVIES
Neil HESTER
Jay JANSSEN
Luca LEFEVRE
Terry MARSDEN
Paolo NEGRI
William "Wheeliemix"
ROBERTSON
Fernando M RODRIGUES
Bernd WALDSTADT
Chuck ZWICKY
MANUAL
Fernando M RODRIGUES
(Author)
Leo DER STEPANIAN
Minoru KOIKE
Vincent LE HEN
Charlotte METAIS
Jose RENDON
Holger STEINBRINK
Jack VAN
© ARTURIA SA – 2019 – All rights reserved.
11 Chemin de la Dhuy
38240 Meylan
FRANCE
www.arturia.com
Information contained in this manual is subject to change without notice and does not
represent a commitment on the part of Arturia. The software described in this manual is
provided under the terms of a license agreement or non-disclosure agreement. The software
license agreement specifies the terms and conditions for its lawful use. No part of this
manual may be reproduced or transmitted in any form or by any purpose other than
purchaser’s personal use, without the express written permission of ARTURIA S.A.
All other products, logos or company names quoted in this manual are trademarks or
registered trademarks of their respective owners.
Product version: 1.0
Revision date: 17 May 2019

Thank you for purchasing Arturia's Comp FET-76!
This manual covers the features and operation of the Comp FET-76.
Be sure to register your software as soon as possible! When you purchased Comp FET-76
you were sent a serial number and an unlock code by e-mail. These are required during the
online registration process.
Special Messages
Specifications Subject to Change:
The information contained in this manual is believed to be correct at the time of printing.
However, Arturia reserves the right to change or modify any of the specifications or features
without notice or obligation.
IMPORTANT:
The software, when used in combination with an amplifier, headphones or speakers, may
be able to produce sound levels that could cause permanent hearing loss. DO NOT operate
for long periods of time at a high level or at a level that is uncomfortable.
If you encounter any hearing loss or ringing in the ears, you should consult an audiologist.

Introduction
Congratulations on your purchase of Arturia's Comp FET-76
Since the late 1990s, Arturia has received acclaim from players and reviewers alike for
designing state-of-the art software emulations of the venerable analog synthesizers from
the 1960s to the 1980s. From the Modular V, back in 2004, to Origin, a modular system
that was introduced in 2010, to the Matrix 12 V (2015), the Synclavier V (2016), and most
recently the Buchla Easel V, the DX7 V and, last but not the least, Pigments, our first
original software synthesizer, Arturia's passion for synthesizers and sonic purity has given
demanding musicians the best software instruments for professional audio production.
Arturia also has a growing expertise in the audio field, and in 2017 launched the
AudioFuse,
a pro studio quality audio interface that features two proprietary DiscretePRO® microphone
preamplifiers and a set of top-notch AD/DA converters. This line was recently expanded with
the launch of the AudioFuse Studio and the AudioFuse 8Pre. The audio software was another
field where Arturia already made its entrance, launching in 2018 the first Arturia effects
bundle: 3 PreAmps You'll Actually Use, which included the 1973-Pre, the TridA-Pre, and the
V76-Pre.
With the launching of a new effects bundle, Arturia consolidates its position as a leader in
the audio software, as well as the audio hardware market.
The ARTURIA Comp FET-76 is one of the three emulations included in the current bundle,
and benefits of over a decade of experience in recreating the most iconic tools of the past.
ARTURIA has a passion for excellence and accuracy. This led us to conduct an extensive
analysis of every aspect of the most famous FET compressor unit that ever existed, the Urei
1176, carefully reproducing the behavior of its electrical circuits. Not only have we faithfully
modeled the sound and behavior of this unique compressor, we have added many features
that were unimaginable in the days that unit first launched.
Comp FET-76 runs as a plug-in in all major formats inside your DAW.
DISCLAIMER: All manufacturer and product names mentioned in this manual are
trademarks of their respective owners, which are in no way associated or affiliated with
Arturia. The trademarks of other manufacturers eventually mentioned were used solely
to identify the products of those manufacturers whose features and sound were studied
during Comp FET-76 development. All names of equipment inventors and manufacturers
have been included for illustrative and educational purposes only and do not suggest any
affiliation or endorsement of Comp FET-76 by any equipment inventor or manufacturer.
The Arturia team

Table Of Contents
1.
WELCOME ......................................................................................................................................................................... 2
1.1. What is a compressor?...................................................................................................................................................... 2
1.2. What are the different types of compressors? ................................................................................................ 2
1.3. Where are compressors commonly used?......................................................................................................... 3
1.4. Arturia's secret ingredient: TAE® .................................................................................................................................. 4
1.5. Arturia's approach to Comp FET-76........................................................................................................................... 5
2. ACTIVATION AND FIRST START.......................................................................................................................... 6
2.1. Activate the Arturia Comp FET-76 license.............................................................................................................. 6
2.1.1. The Arturia Software Center (ASC).................................................................................................................................................................... 6
3. COMP FET-76 OVERVIEW....................................................................................................................................... 7
3.1. Working with plug-ins ........................................................................................................................................................ 7
3.2. When to use the Comp FET-76.................................................................................................................................... 7
3.3. Advanced Mode..................................................................................................................................................................... 8
3.4. Understanding the Comp FET-76 Signal Flow................................................................................................... 9
3.5. Getting hands on with Comp FET-76...................................................................................................................... 11
3.5.1. Compression Basics................................................................................................................................................................................................... 11
3.5.2. More advanced compression methods ..................................................................................................................................................... 12
4. COMP FET-76 CONTROL PANEL ........................................................................................................................ 13
4.1. Channel Configuration (Mono/Stereo) .................................................................................................................. 13
4.2. Main Control Panel ............................................................................................................................................................ 14
4.2.1. Input.................................................................................................................................................................................................................................... 14
4.2.2. Link ..................................................................................................................................................................................................................................... 15
4.2.3. Output ............................................................................................................................................................................................................................... 16
4.2.4. Attack ................................................................................................................................................................................................................................. 17
4.2.5. Release............................................................................................................................................................................................................................. 18
4.2.6. Ratio ................................................................................................................................................................................................................................... 19
4.2.7. Threshold ...................................................................................................................................................................................................................... 20
4.2.8. VU Meter.......................................................................................................................................................................................................................... 21
4.2.9. Power Switch.............................................................................................................................................................................................................. 22
4.2.10. Mix ................................................................................................................................................................................................................................... 22
4.3. Advanced Mode Control Panel ................................................................................................................................. 23
4.3.1. Advanced Side-Chain Control........................................................................................................................................................................... 23
4.3.2. Side-Chain Equalizer.............................................................................................................................................................................................. 26
4.3.3. Compression Range................................................................................................................................................................................................ 27
4.3.4. Listen ................................................................................................................................................................................................................................. 27
5. USER INTERFACE ....................................................................................................................................................... 28
5.1. The Upper Toolbar.............................................................................................................................................................. 28
5.1.1. Save..................................................................................................................................................................................................................................... 28
5.1.2. Save As….......................................................................................................................................................................................................................... 29
5.1.3. Import............................................................................................................................................................................................................................... 29
5.1.4. Export Menu .................................................................................................................................................................................................................. 29
5.1.5. Resize Window options......................................................................................................................................................................................... 29
5.1.6. Preset Selection......................................................................................................................................................................................................... 30
5.2. A/B Button ............................................................................................................................................................................... 31
5.3. Advanced Mode (Double Arrow) Button............................................................................................................. 32
5.4. Sound Design Tips ............................................................................................................................................................ 32
5.5. The Lower Toolbar ............................................................................................................................................................ 33
5.5.1. VU Calib........................................................................................................................................................................................................................... 33
5.5.2. Bypass............................................................................................................................................................................................................................. 33
5.5.3. CPU meter .................................................................................................................................................................................................................... 33
5.6. The Preset browser.......................................................................................................................................................... 34
5.7. Some Final Words............................................................................................................................................................. 35
6. SOFTWARE LICENSE AGREEMENT.................................................................................................................. 36
1. WELCOME
1.1. What is a compressor?
A compressor is an audio processing device that has been used by recording, mixing and
broadcast engineers for many decades to reduce the dynamic range of signals. This device
evens out ("compresses") the level differences between the loudest and quietest sections of
a recording to avoid excessive peaks. By bringing down the loudest parts of a recording,
compressors allow engineers to boost the entire processed signal without worrying about
the loudest parts overloading a recording. The net result is a higher average loudness level
in a recording.
There are many reasons to use a compressor. For example, a compressor can be used
to protect a recording (and our ears) from excessive peaks that can sound distorted and
can potentially damage our speakers (or our hearing). Also, reducing the loudest parts of a
recording can make for a far more pleasing listening experience. This is because listeners
can turn up the music and hear the softer parts without fear of earache when the louder
parts come. This is especially true in music with dynamic instruments that can produce
sudden loud peaks like a drum kit or the human voice. Compressors can even be used
creatively, to shape and contour sounds in pleasing ways. This flexibility is what makes
compressors one of the most popular tools in a recording engineer's toolkit.
1.2. What are the different types of compressors?
Historically, there have been several major categories of compressors, among them Tube,
FET and VCA. Each of these has a different sonic signature due to the electronics used to
create the compression effect. Arturia has chosen to emulate a top model from each of the
above categories to make sure that users have all the sonic options at their fingertips.
The Comp FET-76 is modeled after one of the most famous "FET" compressors ever
produced. FET stands for "Field Effect Transistor" and while its theory of operation is beyond
the scope of this guide, the key takeaway is that this technology is capable of handling
really
fast attack times. It can also induce some "color" and distortion to the sound that many
engineers find very pleasing. This makes it an ideal tool for sculpting instruments with fast
attack transients like drums, guitars and vocals.
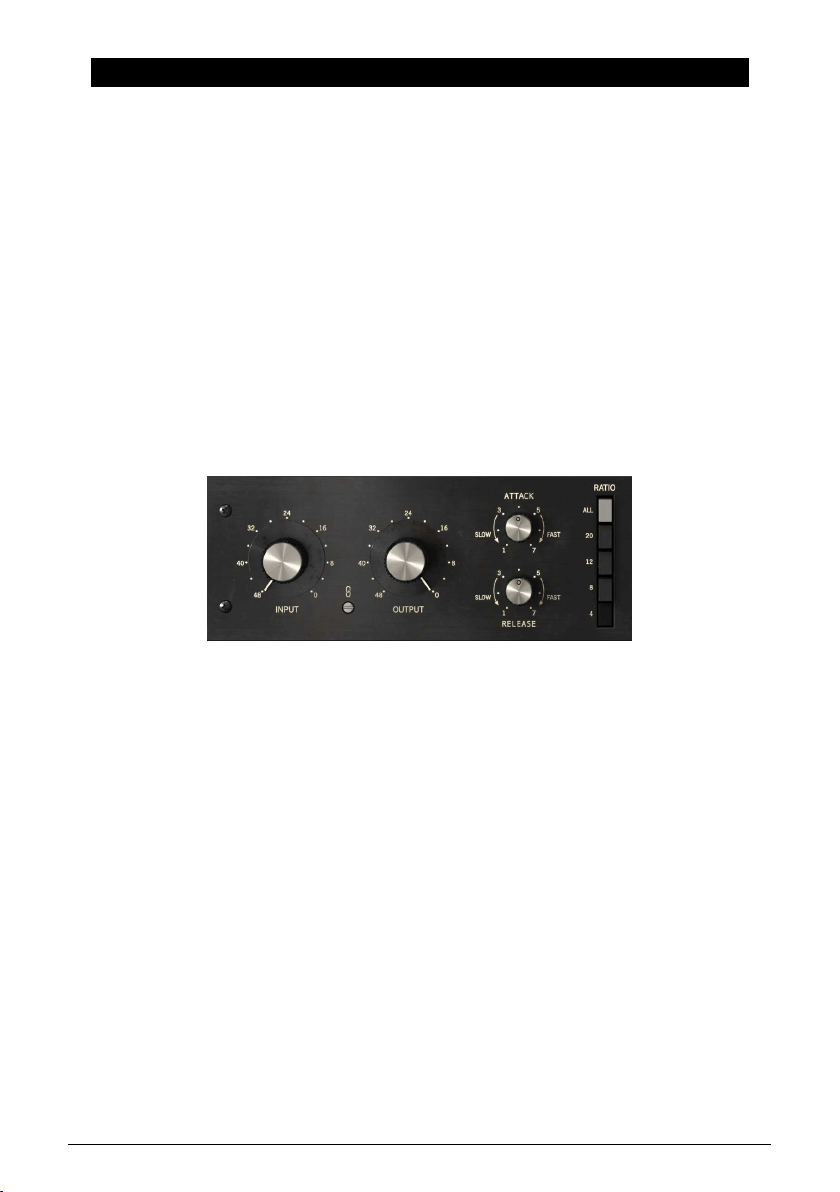
Main compressor controls of the FET-76
2 Arturia - User Manual Comp FET-76 - WELCOME
1.3. Where are compressors commonly used?
Compressors are flexible studio tools and are used everyday to…
• Reduce overly dynamic audio sources to help them "sit" better in a mix.
• To raise the average loudness level of a recording so that the quiet parts are
easier to hear.
• To "glue" a final stereo mix together and add cohesion to all the separate tracks.
• To sculpt the attack transients of percussive sounds to make them more (or less)
"present" and "punchy".
• To lengthen the release time of percussive acoustic instruments (like piano or
guitar) making them sound bigger.
• To even out the varying intensity of the individual drum hits or guitar chords.
When pushed to extreme settings on guitars, this creates the famous "wall-of-
sound" effect heard in rock music.
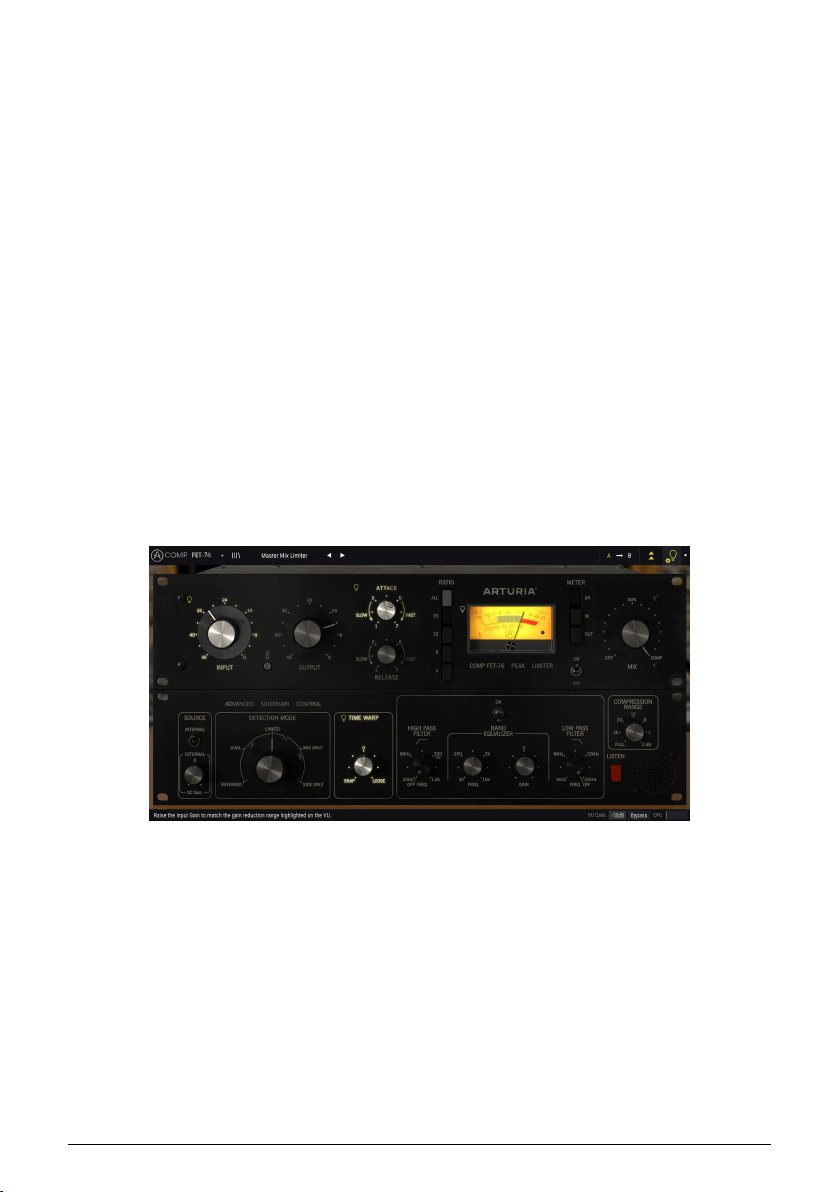
• To "limit" a signal and ensure that it never exceeds a set loudness limit.
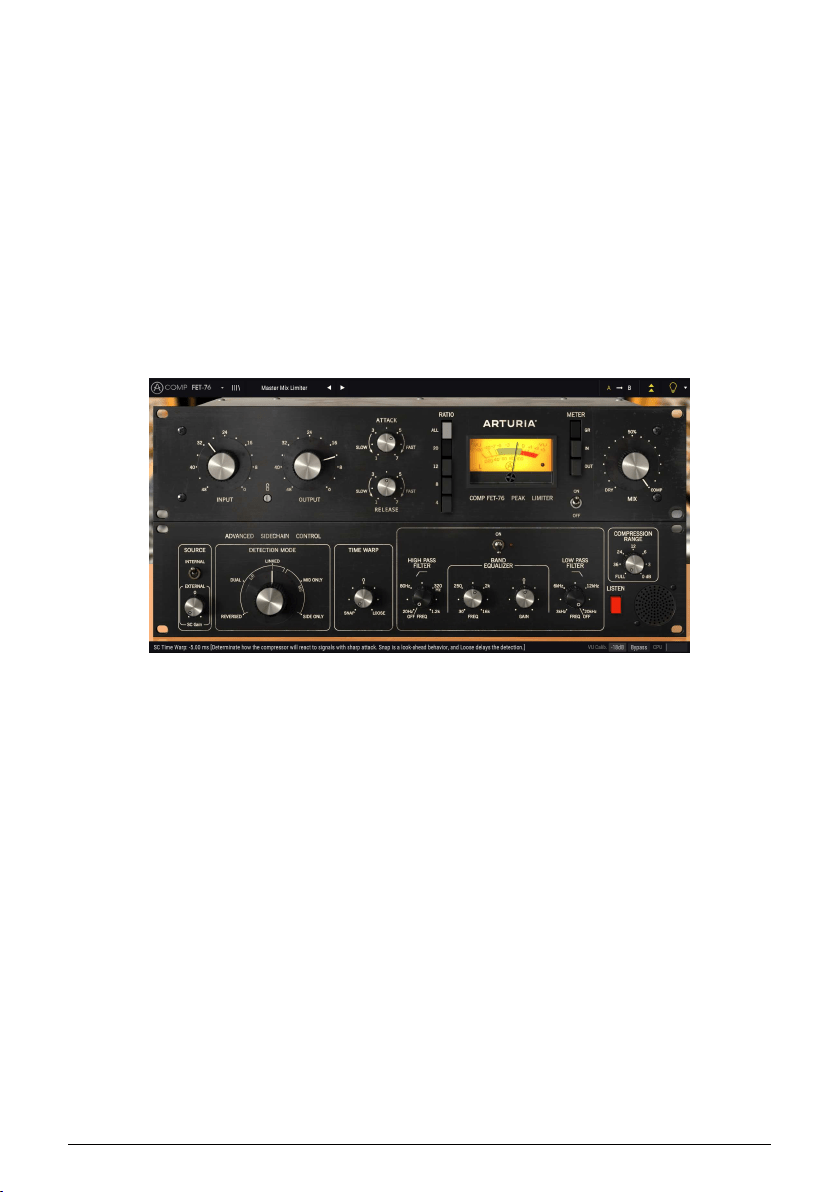
FET-76 set to act as a Limiter
Arturia - User Manual Comp FET-76 - WELCOME 3
1.4. Arturia's secret ingredient: TAE®
TAE® (True Analog Emulation) is Arturia's outstanding technology dedicated to the digital
reproduction of analogue circuits used in vintage synthesizers.
TAE®’s software algorithms result in spot-on emulation of analogue hardware. This is why
Comp FET-76 offers unparalleled sound quality, as do all of Arturia’s virtual synthesizers and
plug-ins.
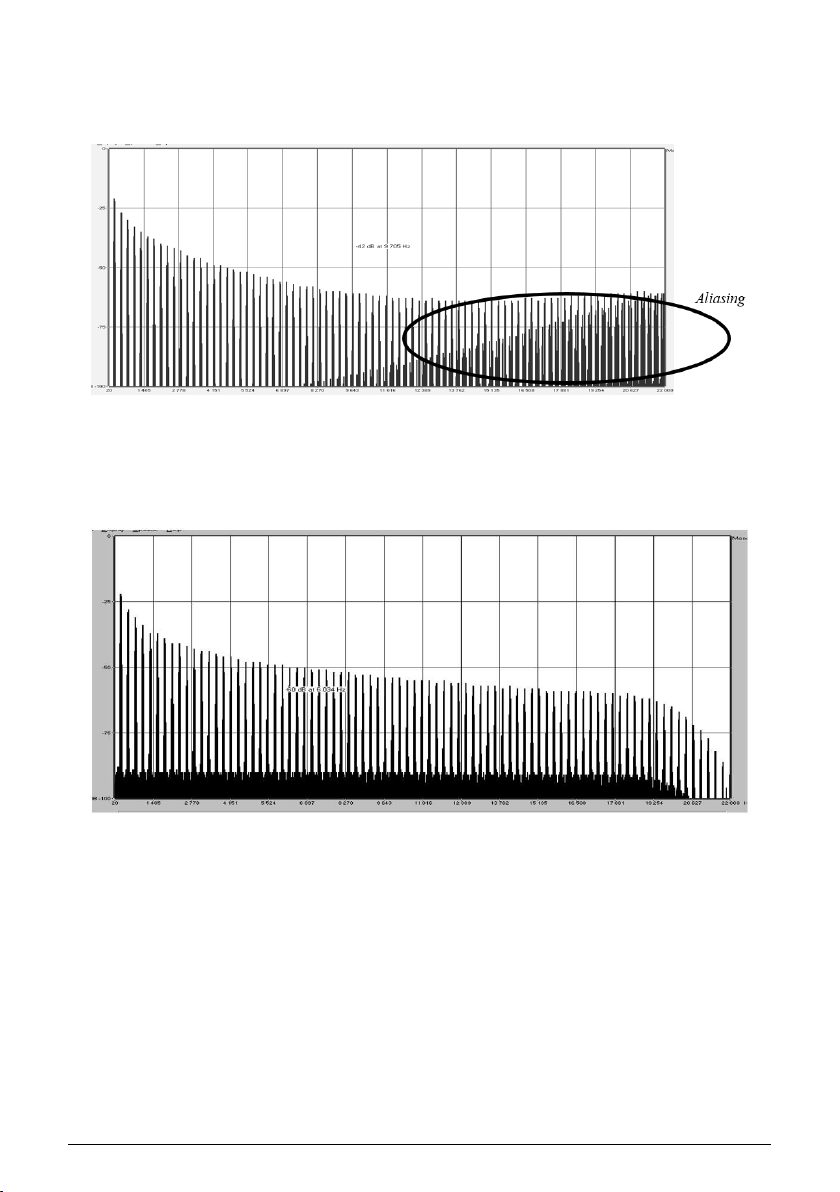
Linear Frequency spectrum of a well known software synthesizer
Linear frequency spectrum of an oscillator modeled with TAE®
4 Arturia - User Manual Comp FET-76 - WELCOME

1.5. Arturia's approach to Comp FET-76
Our goal was to accurately model the sound of the most famous FET compressor in the
world, commonly known as the "1176." Of course, being an Arturia product, it was not enough
to simply model the vintage hardware and call it done. We wanted to push the envelope, so
we also added some tasteful new features that honor the original hardware while making it
more useful in a modern context.
The 1176 was meant to be a "true peak limiter" with a very fast attack (up to 20
microseconds) and lots of makeup gain after the compression (up to 45 dB). We have
captured this in all of its detail and we hope you will hear the subtle nuances of the original
hardware coming through our plug-in.
The original hardware was famous for having a small number of controls and we have
maintained that simplicity and look in our plug-in. We have large knobs for setting Input and
Output level, small knobs for setting Attack and Release times and a column of buttons to
set the compression ratio (including a dedicated button for the famous "all buttons in" trick
that resulted in a hyper-compressed output). Like the original hardware, Comp FET-76 has
a large VU meter with various metering modes to help you see what is going on with your
signal.
Finally, there is a large "mix" knob that was not found on the original hardware. This is
an Arturia addition that allows to set a blend between the compressed and uncompressed
sound, and opens up a lot of creative sound-sweetening possibilities.
Besides the classic features and small improvements mentioned above, Arturia has also
included several more substantial features. These appear in a separate "Advanced" panel
that opens below the main panel. Here, you will find things like Advanced Side-Chain
Control, a single band EQ with High Pass and Low Pass filters, a Time Warp function, a
Compression Range knob and a button that enables listening the side chain signal. We will
cover all this in depth later in this guide.
Now, it's time to check how it sounds. Let's go!
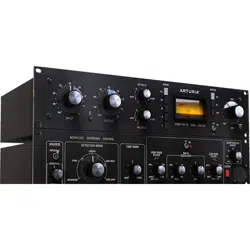
Arturia Comp FET-76
Arturia - User Manual Comp FET-76 - WELCOME 5
2. ACTIVATION AND FIRST START
The Arturia Comp FET-76 plug-in works on computers equipped with Windows 7 or later and
macOS 10.10 or later. You can use the Comp FET-76 as an Audio Unit, AAX, VST2 or VST3
plug-in (64-bit only).
2.1. Activate the Arturia Comp FET-76 license
Once the software has been installed, the next step should be to activate your license, so
that you can use it without limitations.
This is a simple process that involves a different software program: the Arturia Software
Center.
2.1.1. The Arturia Software Center (ASC)
If you have not already installed the ASC, go to this web page:
Arturia Updates & Manuals.
Look for the Arturia Software Center at the top of the page, and then download the version
of the installer that you need for your system (macOS or Windows).
Follow the installation instructions and then:
• Launch the Arturia Software Center (ASC)
• Log into your Arturia account
• Scroll down to the My Products section of the ASC
• Click the Activate button
That's all there is to it!
6 Arturia - User Manual Comp FET-76 - ACTIVATION AND FIRST START

3. COMP FET-76 OVERVIEW
3.1. Working with plug-ins
Comp FET-76 comes in VST2, VST3, AU and AAX plug-in formats for use in all major digital
audio workstations (DAW) including Ableton Live, Logic, Cubase, Pro Tools and others. Unlike
a hardware compressor, you can load as many instances of Comp FET-76 as you find
useful. Comp FET-76 has two other big advantages over hardware:
• You can automate many of Comp FET-76 parameters using your DAW’s
automation system.
• Your settings will be saved with your project so you can pick up exactly where
you left off the next time you open a session.
3.2. When to use the Comp FET-76
The key takeaway for Comp FET-76 is that it is big and bold. While it is possible to make
this compressor to sound very transparent and clear, this is usually not how it is used in
practice. For decades, engineers have pushed the original hardware aggressively to add life
and excitement to a track and we believe that this is where it really shines.
One of the most important characteristics of FET compressors is that they are capable of
handling really fast attack times while simultaneously adding pleasing "color" to the sound.
Just like the original hardware, Comp FET-76 sends incoming signals through an Input
amplifier that immediately adds a big—and usually very positive—impact on the "color" of
the sound. From there, the signal is routed to the FET that does the actual compression.
The blazing fast attack time (down to 20 microseconds, or 0.02 milliseconds) and powerful
Class A amplifier (capable of adding 45 dB of make-up gain to a signal) really give
engineers a wide latitude to push, pull and mold signals in extreme and exciting ways.
When pushed hard, distortion levels can increase adding even more excitement to grungy
electric guitars and bass. This combined with higher compression ratios can result in a
popular "squeezed" or "smashed" sound that is very popular when used on drum overhead
or drum room microphones. Hard compression on vocals adds a bright and "in-your-face"
presence that has been popular in rock music for decades.
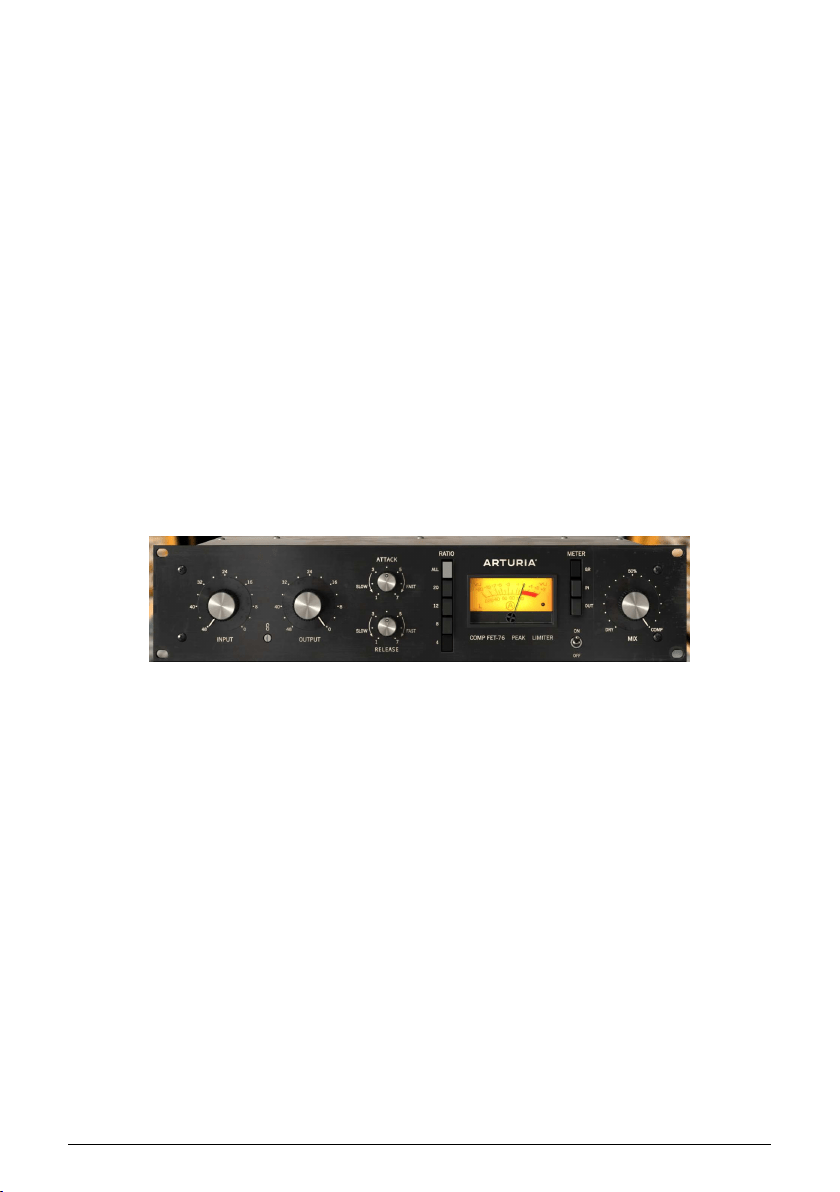
The Main FET-76 Compressor Controls
Arturia - User Manual Comp FET-76 - COMP FET-76 OVERVIEW 7

3.3. Advanced Mode
Comp FET-76 has some advanced features that can be revealed by clicking the Advanced
Mode button (the double arrow in the Upper Toolbar). This opens a second panel directly
below the main panel where you will find things like Advanced Side Chain Control, Time
Warp, a single band Equalizer (with additional high and low-pass Filters), a Compression
Range control, and a Listen button. None of these features were available on the original
hardware but we have included them here as we feel they are very useful for modern music
makers.
Please note that, when the Advanced Mode parameters have been changed (are set at
values different than the default ones) and that panel is closed, the double arrow button has
a point next to it, indicating that those parameters are "active".
We will take a detailed look at all of these things in the
Control Panel chapter [p.13].
8 Arturia - User Manual Comp FET-76 - COMP FET-76 OVERVIEW

3.4. Understanding the Comp FET-76 Signal Flow
The Comp FET-76 is what's called a "feedback compressor". This means that the detection
signal comes already from the Gain Reduction circuit. The signal flow is a little more
complex than what could be expected, due to the Advanced Mode features, especially those
related to the Advanced Side-Chain Control. This allows for several special detection modes,
some of them taking advantage of Mid/Side signal encoding.
As the signal enters the plug-in, it is immediately split in two paths:
1. The "main" signal path. The signal on this path is compressed and processed.
2. The "bypass" path. The signal on this path is sent without any processing to a
mixer just before the FET-76's output. The "Mix" knob on the front panel lets you
blend this unprocessed signal with the compressed signal.
If you are using Comp FET-76 on a stereo track, the first stop on the main signal path is the
optional M/S encoder. M/S stands for "Mid/Side" and is a way of processing audio where
only the "Mid" channel (the center of the stereo image) or "side" channel (the edges of the
stereo field) is processed. This is described in detail
later [p.25] in the manual. Note that the
Detection Mode control knob is only available on stereo signals and is bypassed when using
a mono version of the plug-in.
♪: M/S requires a stereo signal to work. If FET-76 is instantiated on a mono track, M/S encoding and
decoding stages are bypassed and the Detection Mode control knob is hidden in the advanced panel.
After this stage, the signal is routed on to the emulated FET gain reduction circuitry. This is
the heart of the circuit and where the actual compression takes place. This is controlled by
the Gain Reduction Control circuit.
If you are working with a stereo signal, the next stage is the M/S decoding block.
After passing through the Gain Reduction circuit, the signal is split into two more paths:
1. The main path goes on to the M/S decoding block. This is where your signal is
converted back into a regular stereo signal.
2. The second path (known as the "feedback" path) is sent back through a Source
Selector switch to the Gain Reduction Control circuitry. The Source Selector also
receives the external side-chain signal.
Comp FET-76 Signal Flow
Arturia - User Manual Comp FET-76 - COMP FET-76 OVERVIEW 9

The Gain Reduction Control module receives the detection signal (selected from the internal
feedback or the external side-chain signal) and also signals from the Advanced Side-Chain
Parameters, in order to determine how the Gain Reduction circuit will work on the main
signal path.
After the M/S decoding block, the main signal (processed audio) proceeds to the Output Gain
block. Make-up gain is applied to compensate for any reduction in volume that may have
happened at the Gain Reduction stage.
Finally, the main signal reaches the Mix stage, where it can be mixed with the original
(bypassed) audio, before sending everything to the plug-in output.
This is the complete signal flow of the Comp FET-76. It may seem a bit overwhelming,
but spend some time with it and we're sure you'll gain a deep understanding of how the
compressor works.
10 Arturia - User Manual Comp FET-76 - COMP FET-76 OVERVIEW
3.5. Getting hands on with Comp FET-76
3.5.1. Compression Basics
To get an idea of Comp FET-76's capabilities, we suggest you try the following:
• Load a stereo clip into an audio track in your DAW (drum or vocal tracks are
ideal for this);
• Load an instance of Comp FET-76 as an insert in that track and open the Comp
FET-76 window;
• Ensure the Default preset is loaded. This will mean that all settings are positioned
to provide a neutral sound;
• Begin playback. The clip should sound exactly as it was recorded. You can verify
this by clicking the Bypass button in the lower Toolbar and comparing what you
hear (they should sound the same);
• Now turn the Input clockwise. You will notice that the Output knob automatically
turns counter-clockwise to compensate. This is because the two knobs are linked
by default (there is a "Link" enable/disable switch between the Input and Output
knobs). You can switch the Link function off if you would like to adjust the Input
knob independently of the Output knob, but for the moment, let's keep both Input
and Output linked;
• Keep raising the Input until the VU Meter needle starts moving regularly to
the left. This means that compression is now being applied to the peaks of
your audio. You may check the amount of Gain Reduction quickly by turning
the System Bypass switch On and Off. When it is Off, compression circuit is
bypassed, and you'll hear the original unprocessed audio;
• Now let's try some different compression ratios to hear how they affect the
sound. The default option is 4, which means a 4:1 ratio. Change it to 12 for a more
dramatic 12:1 compression. Now try pressing the "All" button for the famous "all
buttons in" hyper-compression effect (you may need to reduce the Input level as
"All" mode can be loud). Choose which option you feel is the best to go;
• Now slowly adjust the Attack and Release knobs while listening to the attack and
decay of your transients. As you play with settings, hopefully you will hear the
loud transients of your sounds being softened, hardened or otherwise shaped.
You may notice that some settings will sound very natural and pleasing whereas
others may sound unnatural. Over time, engineers develop a feeling for this and
can dial in a great sound in seconds.
Comp FET-76 used in a drum track
Arturia - User Manual Comp FET-76 - COMP FET-76 OVERVIEW 11

♪: Note that Comp FET-76 has no direct control over the threshold. The threshold level is variable and
depends on the chosen compression ratio (the higher the compression ratio, the higher the threshold).
At 4:1, the threshold is around -18 dB, while at 20:1 it is around -12 dB.
3.5.2. More advanced compression methods
Now that you have a feeling for the Comp FET-76 basics, let's continue on and go a little
deeper.
• Click the double downward facing arrows to open the "Advanced" mode;
• Let's use the Advanced Side-Chain Control. We will not use an external signal, but
will simply try out the different Detection Mode settings. By default, the control
is positioned in the
Linked
position, but go ahead and try the other positions
while the track is playing. Notice how the sound changes, sometimes drastically,
especially when you choose the different Mid/Side positions. This effect can
produce some fantastic results when used on stereo tracks;
♪: Remember that the Detection Mode control knob is only visible when working in stereo. If you are
not seeing that option, it is because you are working on a mono signal.
• Now click the Listen button and apply some EQ to the analysis signal using the
controls in the Band Equalizer section. Don't be afraid of extreme settings here!
For example, if the original audio has a strong bass component, the bass energy
can have a major influence on the compressor as it works. By attenuating some
of the bass, you may end up with a better compressed sound;
• When you are done adjusting the Side-Chain EQ, switch off the Listen button and
try switching EQ on and off as the track plays. You should notice that the EQ may
have a big influence in the way compression works, even though it is only being
applied to the detection path of the signal.
12 Arturia - User Manual Comp FET-76 - COMP FET-76 OVERVIEW
4. COMP FET-76 CONTROL PANEL
The Comp FET-76 plug-in can be used in Mono or Stereo channels.
The Mono configuration is automatically loaded when we use the plug-in with mono tracks.
When inserted in stereo tracks, the Stereo configuration is automatically loaded as well.
4.1. Channel Configuration (Mono/Stereo)
The plug-in has different configurations for Mono and Stereo versions. The differences
between the two versions consist in the presence of certain additional features in the stereo
version, which are located in the Advanced Mode Control Panel. These are related with the
Advanced Side-Chain Control section. When inserted in mono channels, the plug-in only
shows the Source and Time Warp controls in that section (Mode Selection control knob is
removed).
The Advanced Side-Chain Control section is where we control how the plug-in performs
detection to trigger compression. In Mono mode we can simply select the Source, choosing
between Internal and External, while in Stereo mode we can also choose how detection is
performed (stereo, dual mono or M/S) and how it affects compression.
We will look deeper into this when we reach the Advanced Side-Chain Control [p.23] entry.
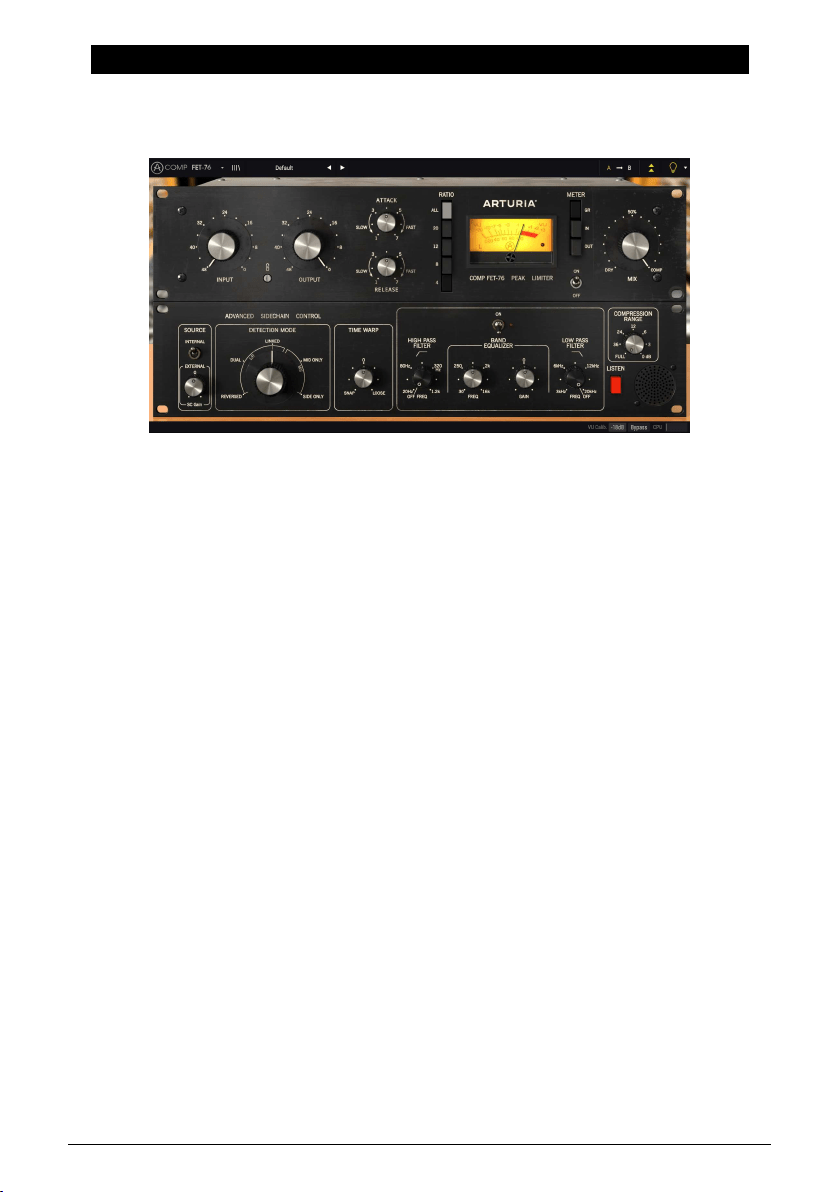
Comp FET-76 inserted in a mono track. Notice the absence of the Detection
Mode selection control knob
Arturia - User Manual Comp FET-76 - COMP FET-76 CONTROL PANEL 13
4.2. Main Control Panel
The Comp FET-76 Graphical User Interface reproduces all the controls present in the
emulated hardware unit, as well as a couple of extras added by Arturia to complement the
feature list. Those are located in the Main Control Panel , which is the one that opens by
default when we launch the plug-in.
Besides these, Arturia included several advanced features, not present in the original unit,
and some even unimaginable when it was launched. These new features are located in a
second panel, the Advanced Mode Control Panel, that opens when we click the double arrow
button (the Advanced Mode button) in the Upper Toolbar.
As was the case with the first effects bundle, this Arturia plug-in bundle also has an Upper
Toolbar and a Lower Toolbar. The Lower Toolbar is very important for the use of the
Compressors, as it displays the parameter name and current value when we point the
mouse to a parameter control, allows to calibrate the VU Meter, allows to put the plug-in in
Bypass (we also have a bypass control in the Main Control Panel but it works in a different
way), and measures CPU consumption.
Of course, the Upper Toolbar is very important as well, since it is where we access the main
menus, perform several important tasks, like load and save presets and banks of presets,
and where we can select a preset and see the name of the current preset in use.
The toolbars and their features are covered in detail in the the
User Interface chapter [p.28].
We will now have a look at all the controls available, explaining what they do, what are their
ranges, and how to interpret the numbers.
Beware that each time we click a control (knob or button), the Lower Toolbar displays the
parameter name and the current parameter value. This changes every time we move that
control, updating the parameter value in real time. These values aren't always of the same
type.
We may also have tips displayed (if the light bulb in the Upper Toolbar is lit). In this case,
the Lower Toolbar also displays a short description of each parameter next to its value, and
there is an area highlighted in the VU Meter that suggests the ideal range of gain reduction
the original preset should be used on to achieve the best results.
Now, let’s take a look at each control in Main Control Panel:
4.2.1. Input
The Input knob is of great importance, since it is going to influence the behavior of the unit
in terms of processing. The knob adjusts the audio input level.
Range goes from -48 dB up to 0 dB. By default, the knob is positioned at -48 dB, which
means the unit is not applying any gain and there will be only a minimal amount of
compression, depending on the detection signal.
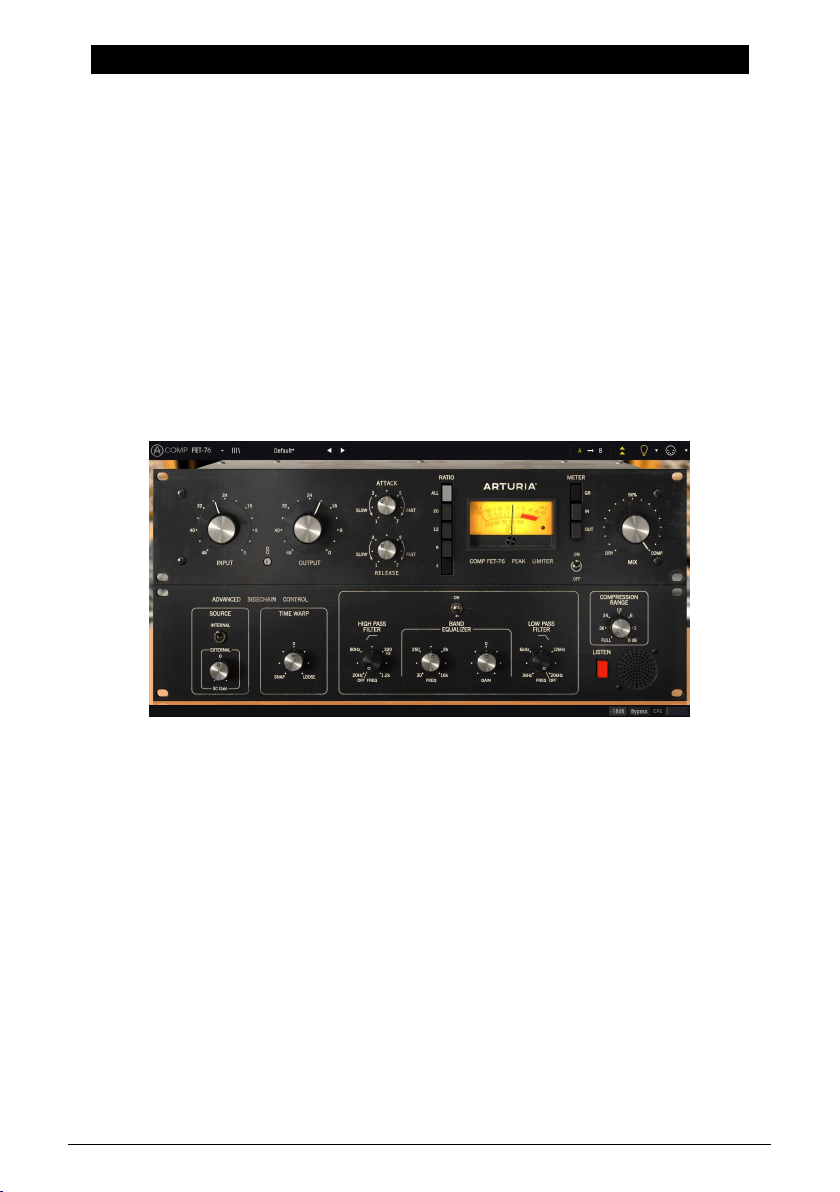
Comp FET-76 Main Control Panel
14 Arturia - User Manual Comp FET-76 - COMP FET-76 CONTROL PANEL
The Comp FET-76 doesn't have a Threshold control. Threshold changes according to the
chosen compression ratio. This is because, although we can define the compression ratio
(among the available choices) the compressor is still program dependent. This means that
it reacts differently according to the audio that feeds the circuit.
♪: To better find the right compression settings, first define the desired Ratio, and then slowly raise
the Input value. Since Input and Output are tied (linked), you may notice a decrease in the resulting
volume when compression starts to be applied. If you want, you may raise the Output volume to
compensate.
Since the unit has some coloring induced, it still has some impact in the sound, even if it's
not applying any compression.
4.2.2. Link
The Link switch connects the Output control to the Input control. It is a toggle switch, which
is On by default. The control is labeled with a picture of a chain.
When Link is On, each time we move the Input control, the Output control moves in the
opposite direction. Since the compressor is program dependent, we may be tempted to drive
the signal really hot. This way we can drive Input (and compression) like crazy without
risking overloading the audio chain.
We can always move the Output independently, since the link only works from the Input to
the Output, and not the other way. Therefore, after we find the ideal Input level to achieve
the desired compression, we can then check for the right Output gain without changing the
Input.
If we turn Off this control, both Input and Output can be changed independently of each
other.
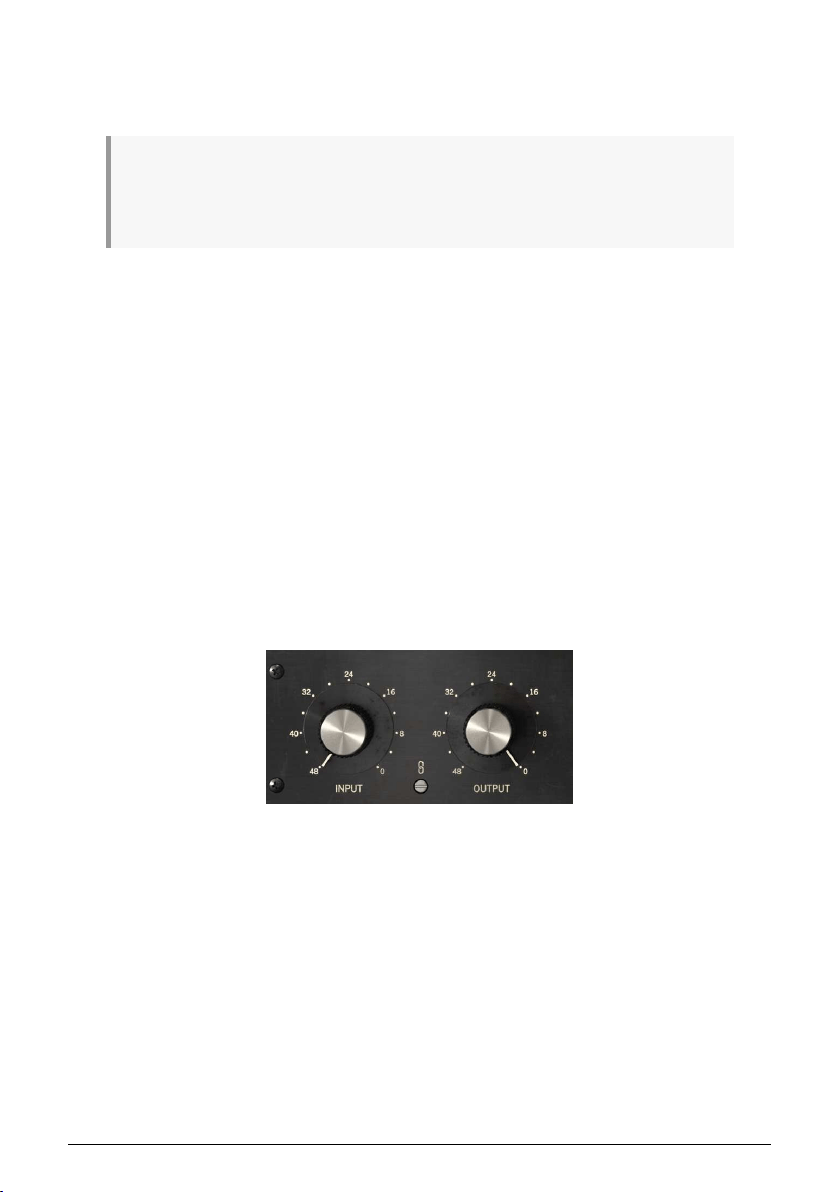
Comp FET-76 Input and Output controls at
the default position. We may see the Link
switch in the bottom, between the two
knobs
Arturia - User Manual Comp FET-76 - COMP FET-76 CONTROL PANEL 15

4.2.3. Output
This control is also often called Make-Up Gain, especially in modern units. Compressors
reduce the volume of the louder parts of the audio, which will lower the overall volume. This
is exactly what we use a compressor for. Since we don't have parts too loud anymore, we
can then raise the overall volume, which will make the lower volume parts more audible.
This is achieved with the Output control.
Range goes from -48 dB to 0 dB. By default, the Output knob is set to 0 dB, compensating
the default position of the Input knob (-48 dB).
The original hardware has a very distinctive sound even when it is not compressing. In
fact, sometimes it was used simply as a gain amplifier, taking advantage of the good
amplification circuit, and its coloring. We can also simulate this behavior through the use of
the
Compression Range control [p.27].
16 Arturia - User Manual Comp FET-76 - COMP FET-76 CONTROL PANEL
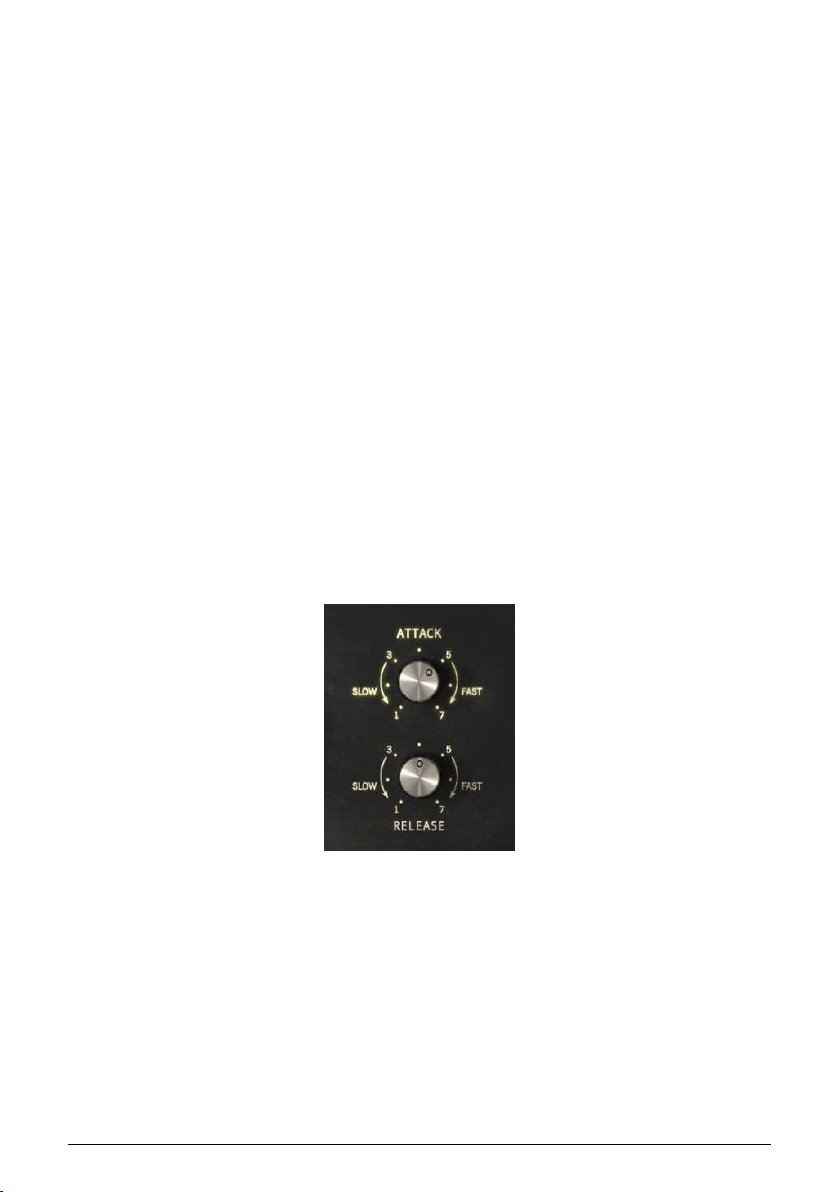
4.2.4. Attack
The Attack time is a very important control in a compressor. It is with this parameter that
we define how much time the compression takes to happen when the threshold value is
reached. Manipulating this parameter can completely change the character of a sound. Very
fast attack times cause the compressor to squash the signal. On the other hand, very long
attack times will let almost all transients to pass through, which, in the worst case scenario,
can deceive completely the goal we wanted to achieve by using compression in the first
place.
So, we have to define the Attack time according to the type of audio we are dealing with,
and our goals regarding compression. Vocals don't deal with attack transients we usually
want to preserve, therefore the attack time there may be shorter. On complete drum tracks,
where we want to achieve the "pumping" effect, the attack time may also be positioned at a
very short value (in this case with a higher compression ratio).
As a rule of thumb, observe this: fast attacks and high ratios can reduce the sound of
unwanted transients, like a guitar pick. Slow attacks and lower ratios let transients through
and retain sound character.
If we want to use the Comp FET-76 as a limiter, we would use a Ratio of 20, and use a fast
attack (no need to go to the fastest positions). When using the unit for limiting purposes,
we can also take advantage of the "
look-ahead [p.25]" feature made possible with the Time
Warp control in the Advanced Mode.
Comp FET-76, like its hardware counterpart, is capable of very, very fast Attack times. When
adjusting the Attack, you should keep that in mind. Since attack time values in the Comp
FET-76 may vary according with the audio being processed, they are expressed as figures,
where 1 is the slowest, and 7 is the fastest.
By default, the Attack time is positioned at 5.
Comp FET-76 Attack and
Release controls in their
default positions
Arturia - User Manual Comp FET-76 - COMP FET-76 CONTROL PANEL 17

4.2.5. Release
The Release parameter may be considered as the inseparable partner of the Attack. As the
first controls the time it takes for compression to start when threshold is reached, the second
tells the compressor how much it should take to bring the signal back to the original value
after the threshold level is no longer reached.
As we can see, all these parameters are linked to each other. Attack and Release act like
segments of an envelope, which is triggered when audio signal reaches the threshold level,
and which sustain level is defined by the Compression Ratio. In this case, the envelope is
inverted, which means the sustain level is lower than the original level.
Since Release is a time parameter, it can be faster or slower (just like Attack). The effect
the release may have varies, depending on the type of audio we are dealing with (again,
like what happens with the Attack parameter). Usually, release times are slower than attack
times, to avoid sudden changes in dynamics, since these would be more audible in this
segment.
It's important to mention that the Comp FET-76 features the special ability of vary its release
time based on program material. After a transient, it releases quickly to avoid level drops,
but if there is a continued state of heavy compression, the Comp FET-76 will exhibit a longer
release to reduce pumping.
Very much what we said for the Attack can be applied to the Release. Remember this is an
envelope. Think in terms of the original sound and what results you want to achieve, then
draw the envelope contour accordingly.
Release times in the Comp FET-76 can be also very fast, just as they were in the hardware
counterpart. Like Attack times, they are expressed as figures, where 1 is the slowest, and 7
is the fastest.
By default, the Release time is positioned at the middle (4).
18 Arturia - User Manual Comp FET-76 - COMP FET-76 CONTROL PANEL
4.2.6. Ratio
Together with Input, and complemented with Attack and Release, this is where we mainly
act to find the best settings for the effect.
Ratio is the relation between the incoming audio power and the resulting audio output
power, after compression. That's why it may also be called Compression Ratio. This is
perhaps the most important parameter in the compressor. The values of the compression
are displayed as numbers which express ratios. So, if we define a value of 4, that means a
compressor ratio of 4:1. Translating the ratio into real life values, what it says is that when the
audio exceeds the threshold by 4 dB the compressor will reduce the volume to just 1 dB. As
this is an emulation of an analog unit, and the emulated compression circuit adapts (reacts
differently) to the audio the feeds it, these values are meant to be mere reference values,
since they will vary according to the audio levels. Instead, we should wait the compression
ratio to start softly, and raise gradually as the volume raises above the threshold.
That's why we say that Comp FET-76 is "program dependent". It means the compression
curve is directly related to the audio input. The higher the audio level, the more it is
compressed. Although this isn't controllable, the results are usually very "musical", and that's
why the old program dependent compressors (like the tube compressors of which one
unit is also emulated in this bundle) are still highly regarded. So, the compression effect
will come up gradually, instead of suddenly, as the audio goes more and more over the
threshold.
Yes, we actually have a threshold. It isn't controllable, but it exists. It varies according to the
ratio chosen, as we will explain.
Back to the compression ratio: When we see a compression ratio of 4:1, it means that an
original value of +12 dB will become reduced to just +3 dB, after compression is applied.
Usually, a gentle value is desirable (no more than 4:1 and usually even less). But this also
depends on the type of music, the instrument and the results that we want to achieve, and
also the kind of compressor we are using. Some drum instruments commonly use higher
compression ratios, for example, and that, coupled with the way the Comp FET-76 works,
makes it a tool especially tailored for that kind of job.
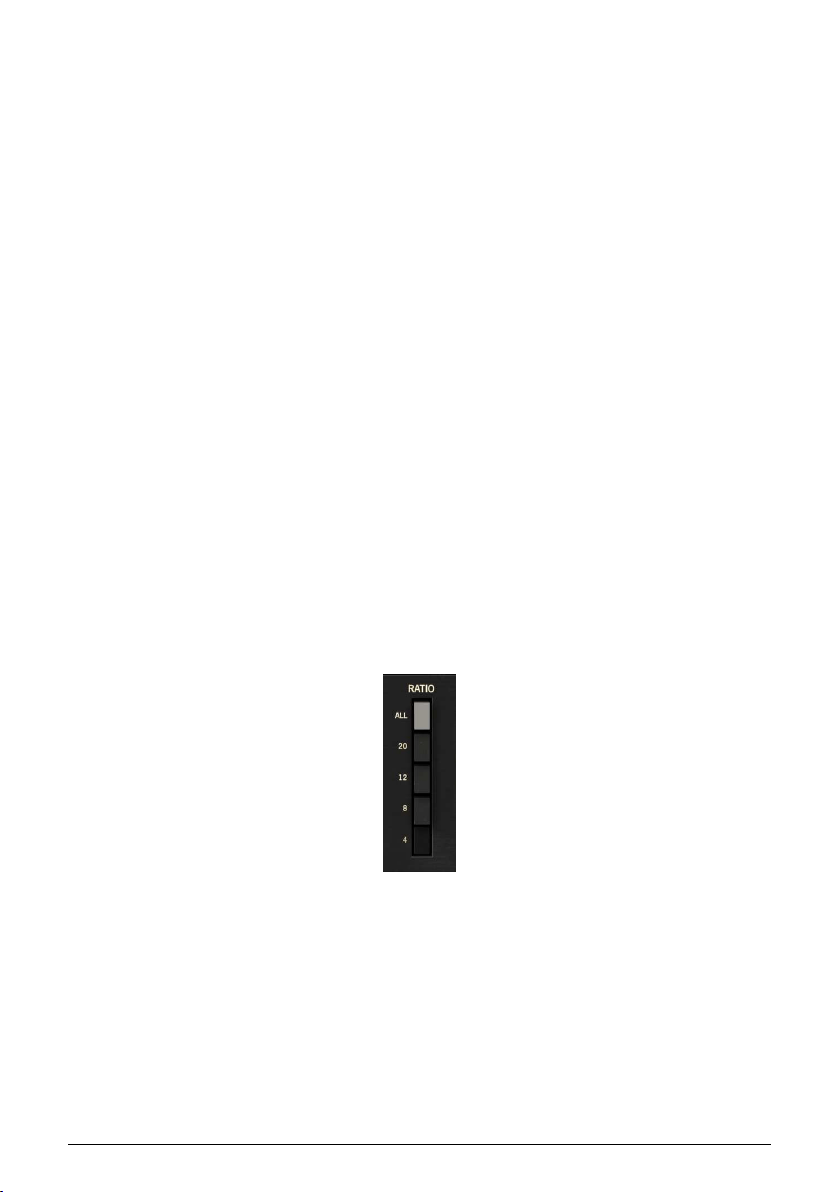
Compression range goes from 4 (4:1, meaning the original audio power will be reduced by
a factor of 4) up to 20 (where the compressor will act in practice as a limiter, since it has
also a fast attack). Usually, 4 and 8 are the most used for vocals and instruments, while 12
is more used for drums. 20 is mostly used for limiting, and All is a special case. By default,
Ratio button 4 is pressed, which means a 4:1 compression ratio.
Comp
FET-76
Ratio
control
set to a
ratio of
4:1
Arturia - User Manual Comp FET-76 - COMP FET-76 CONTROL PANEL 19

Threshold is defined by the Ratio. The higher the ratio, the higher the threshold (meaning
that compression starts at a higher level). Ratio also influences the compression curve,
which will be harder (closer to the behavior of a limiter) at higher ratios.
The All button is a special case, where all the ratios are activated at the same time. The
original units didn't have this button but they allowed to press more than one ratio button
(or all
ratio buttons) at the same time. It happens users found that and liked the effect. It
creates a very flat compressor response, together with some added distortion. Applied to
drums, the effect is a smashed dynamic range with added partials, creating a huge sound.
Applied to guitars and bass, it creates a distorted, grungy effect. Try it.
Another special case is the "No button", where the unit will not apply any compression, being
used just as an amplifier, taking advantage of its pleasant coloring and saturation. This may
also be achieved, using the
Compression Range control [p.27] in the Advanced Mode. By
setting that control to a value of 0 dB we null the compression, therefore leaving just the
gain circuit active.
4.2.7. Threshold
The threshold is one of the most important controls in a compressor unit. As it happens
with many similarly important controllers, what it does is deceptively simple: It just tells the
compressor when to start working (compressing).
The FET-76 has a threshold, but it hasn't a threshold control. The unit is program dependent,
which means compression varies according to the volume of the incoming audio. Threshold
is tied to the ratio. The higher the ratio, the higher the threshold. The difference between
them is around 6 dB. Compression curve is also influenced by the ratio, which means:
• Lower ratios - softer compression curve - lower threshold;
• Higher ratios - harder compression curve - higher threshold.
As the input level is turned up, a corresponding decrease in output level may be required.
This is where enters the Link parameter.
20 Arturia - User Manual Comp FET-76 - COMP FET-76 CONTROL PANEL
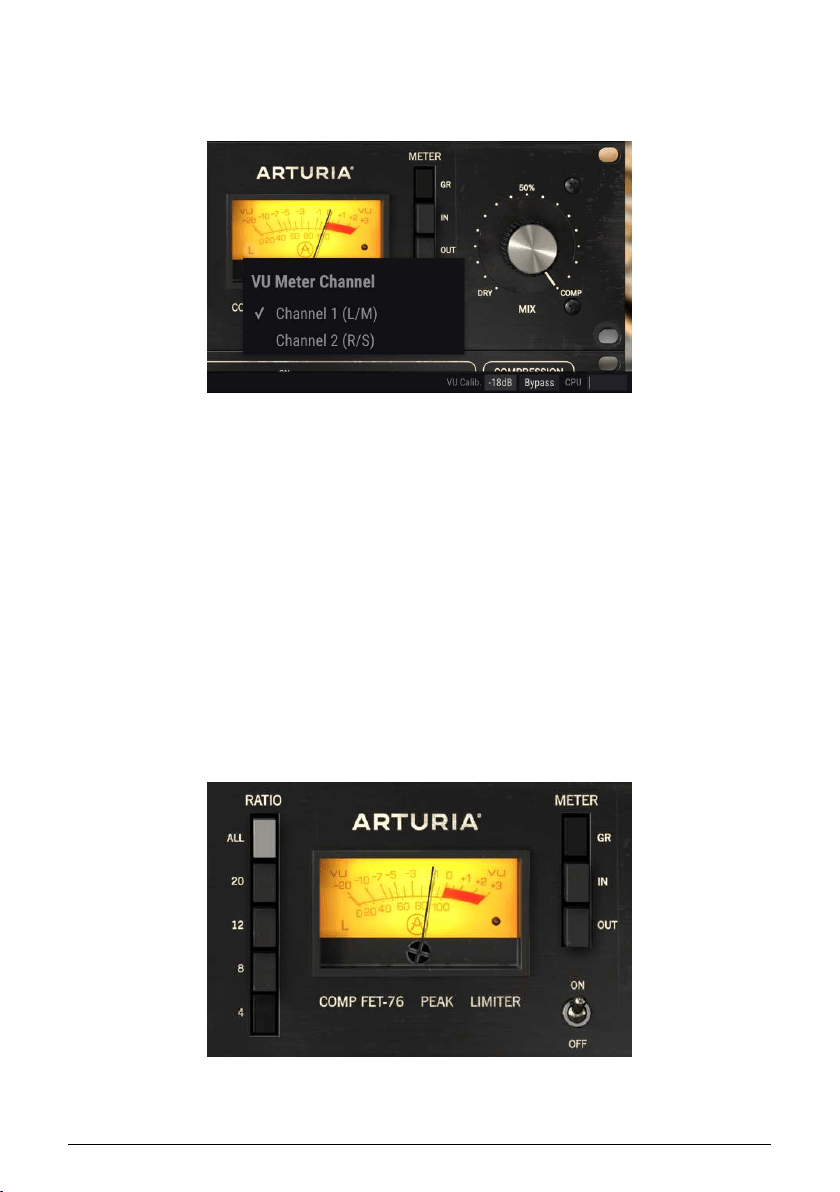
4.2.8. VU Meter
The VU Meter is very important to give us visual references. It doesn't replace our ears, but
certainly gives them some help.
In the Compressor collection, Arturia improved the Meters by allowing the user to choose to
monitor the Input Level, the Output Level or the Gain Change (Reduction) Level. By default,
they are set to Gain Reduction. Besides this, we also have the possibility to calibrate the VU
Meter sensitivity using the tool in the Lower Toolbar. We have three options: -18 dB, -14 dB,
and -8 dB. By default, the selected sensitivity is -18 dB. This means that the VU Meter will
display 0 VU when it is fed with a peak level of -18 dBFS.
When in Gain Reduction Mode (the default mode) the Meter is calibrated so it shows 0 dB
as rest position (no Gain Reduction). This reproduces the behavior of the hardware unit.
Since the VU Meter only measures one channel, Left channel is selected by default
(indicated by the L letter in the lower left corner of the Meter). If we change the Detection
Mode to one of the Mid/Side modes, the measured channel changes automatically to Middle
(the letter in the lower left corner changes to an M).
If we click over that letter, we can change the selected channel to the Right channel (if
Detection Mode is in one of the Left/Right modes), or to Side channel (if Detection Mode is in
one of the Mid/Side modes).
The VU Meter, showing channel selector
Comp FET-76 VU Meter, set to Gain Reduction. Notice the
letter L in the lower left corner and the clipping LED
indicator in the lower right corner.
Arturia - User Manual Comp FET-76 - COMP FET-76 CONTROL PANEL 21
Another handy functionality built in the VU Meter by Arturia is a clipping warning indicator.
This is a small red "LED" light positioned in the bottom right corner of the Meter. Every time
audio reaches clipping, the "LED" lights on with a bright red color.
4.2.9. Power Switch
This switch, when turned Off, makes the audio bypass the compression circuit. We can
still monitor it visually through the VU Meter, though. This is useful to quickly turn Off
compression while listening to audio, this way comparing audibly and visually both signals.
It differs from the button in the Lower Toolbar in the way that one turns Off the plug-
in completely (the GUI changes color, becoming darker). The power switch only turns Off
(bypasses) the compression circuit, but the plug-in remains active. By default, the switch is
On (unit is active).
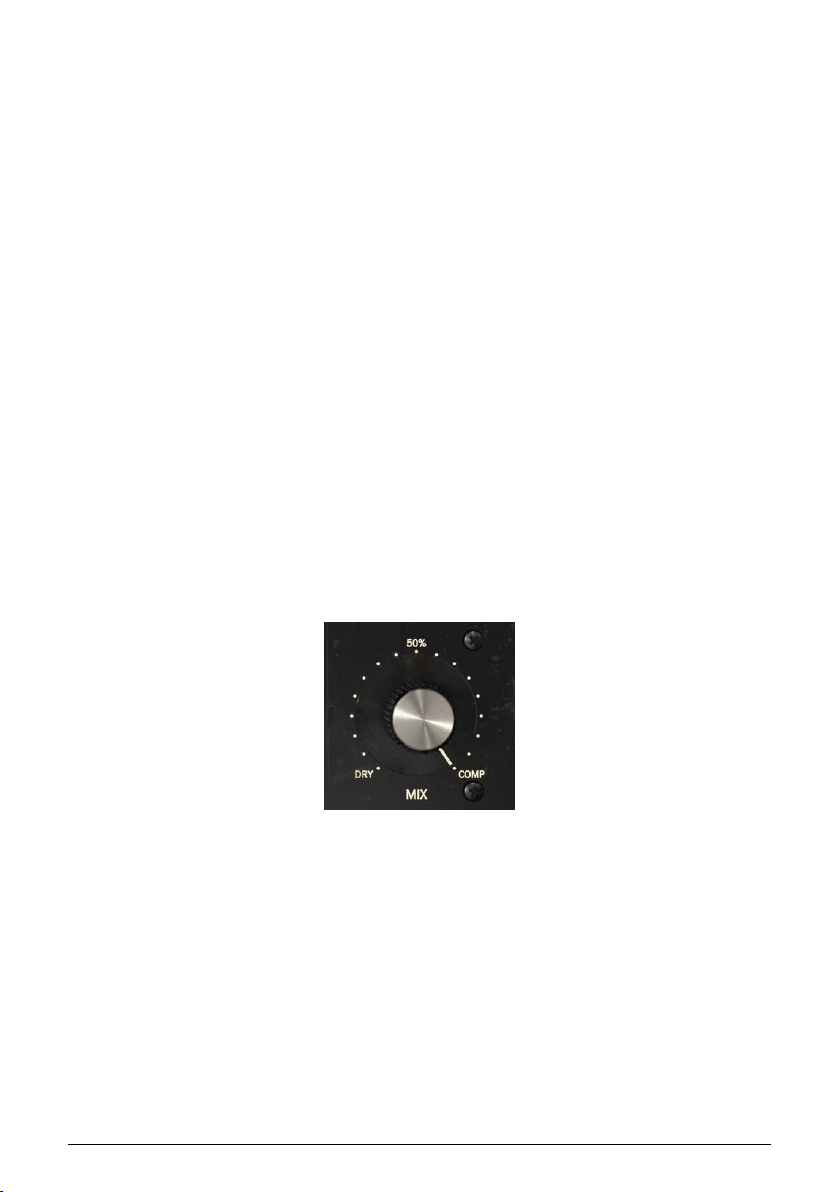
4.2.10. Mix
A technique often used in production is what's called Parallel Compression. This is useful
to allow compression of the audio signal while also preserving intact all the transient
characteristics of the audio. The basic concept is having a way to preserve the original
audio, while also processing it through compression. For this, we need to have a channel
that "passes the audio through". while on another channel we have the audio sent to the
compression path.
This is what can be achieved with the Mix parameter.
The Mix knob is set by default to Comp, which means the processed signal only. We can
turn it all the way down to Dry (fully uncompressed, original audio) or anything in between.
Values are displayed in percentage, where 100% is fully processed signal, and 0% is fully
unprocessed audio.
22 Arturia - User Manual Comp FET-76 - COMP FET-76 CONTROL PANEL

4.3. Advanced Mode Control Panel
The Advanced Mode Control Panel is accessed by clicking the Advanced Mode (double
arrow) button in the Upper Toolbar. This extra Control Panel is common to all three
Compressors, and with very similar features. These are very important add-ons, that bring
a lot of extra power and flexibility to the Compressors.
4.3.1. Advanced Side-Chain Control
Side-Chain is the signal used to control the compression applied to the audio. It can be that
very same audio (most of the time it's what happens), but it can also be an external signal,
coming from another track.
This external signal is what is usually meant when we commonly talk about side-chain. This
may be used to achieve control of separated instruments (for example balancing the mix
between the kick drum and the bass), or to achieve (another) special effect called "pumping".
For this, we need to be able to feed an external signal into the signal path (usually another
mix track), to be used as source by the detection path, and this way be able to trigger
compression.
The original hardware only allowed the internal signal to be used as side-chain (detection).
However, in Comp FET-76, we have both Internal and External sources. This is controlled in
a section of the Advanced Mode Control Panel called Advanced Side-Chain Control.
4.3.1.1. Source
This is the first part, where we select what source will be used to feed the Threshold and
trigger the Compression circuit. As default, Internal is selected. This is the usual way, where
it's the signal to be compressed that is going to be analyzed and will trigger Compression
when it goes over the threshold.
External is the second option. In this option, an external signal is fed into the detection circuit.
This is the usual external Side-Chain signal. When this button is pressed, the external signal
is the one used for detection.
The source selector is a toggle switch. Each time we click it changes position. As it is in
the Internal position by default, clicking it will change source to External. Clicking again will
change source back to Internal.
Since threshold is controlled by Input when source is Internal, we need another Input level
control when we are using an external signal. And we have it.
It is located below the Source switch, and is labeled SC Gain. By default, this is positioned at
0 dB, which means that the external signal will feed compression at its original power. We
can change it in a range that goes from -24 dB up to +24 dB, as it happens with the main
Input control.
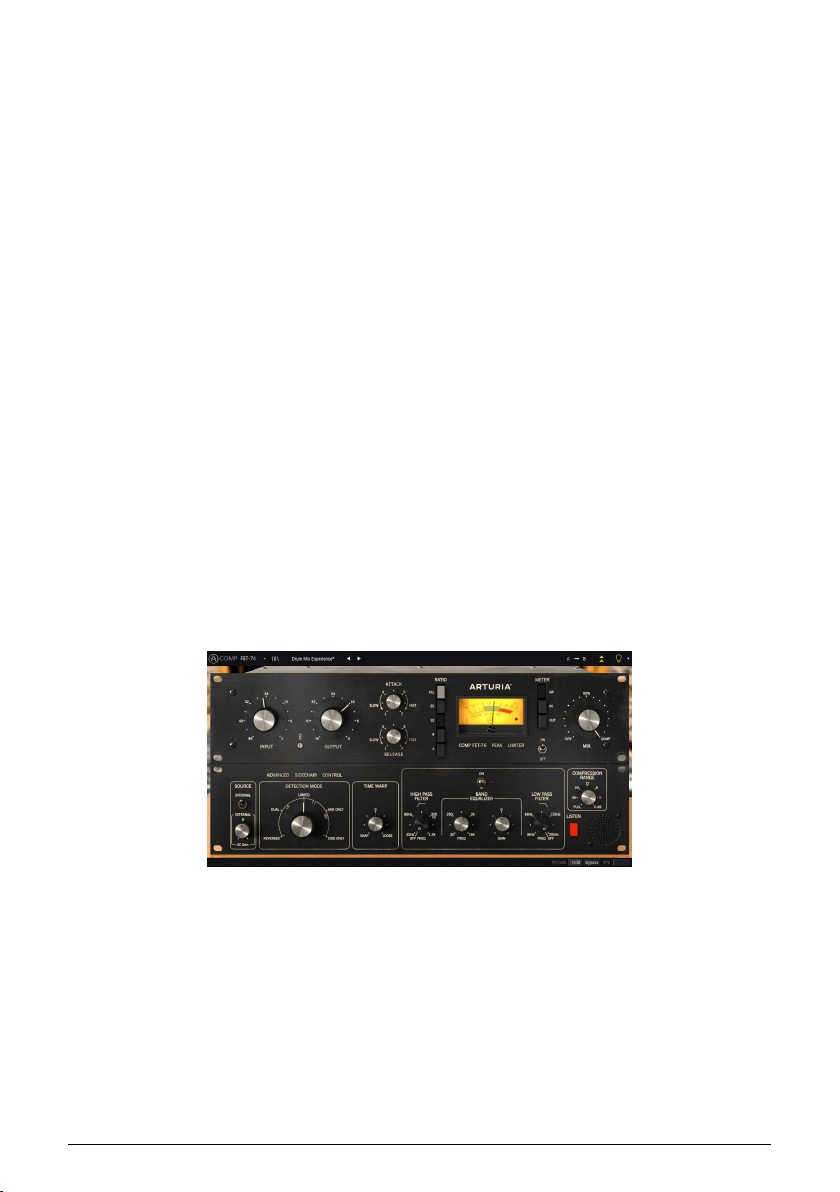
Comp FET-76 Advanced Mode Control Panel
Arturia - User Manual Comp FET-76 - COMP FET-76 CONTROL PANEL 23
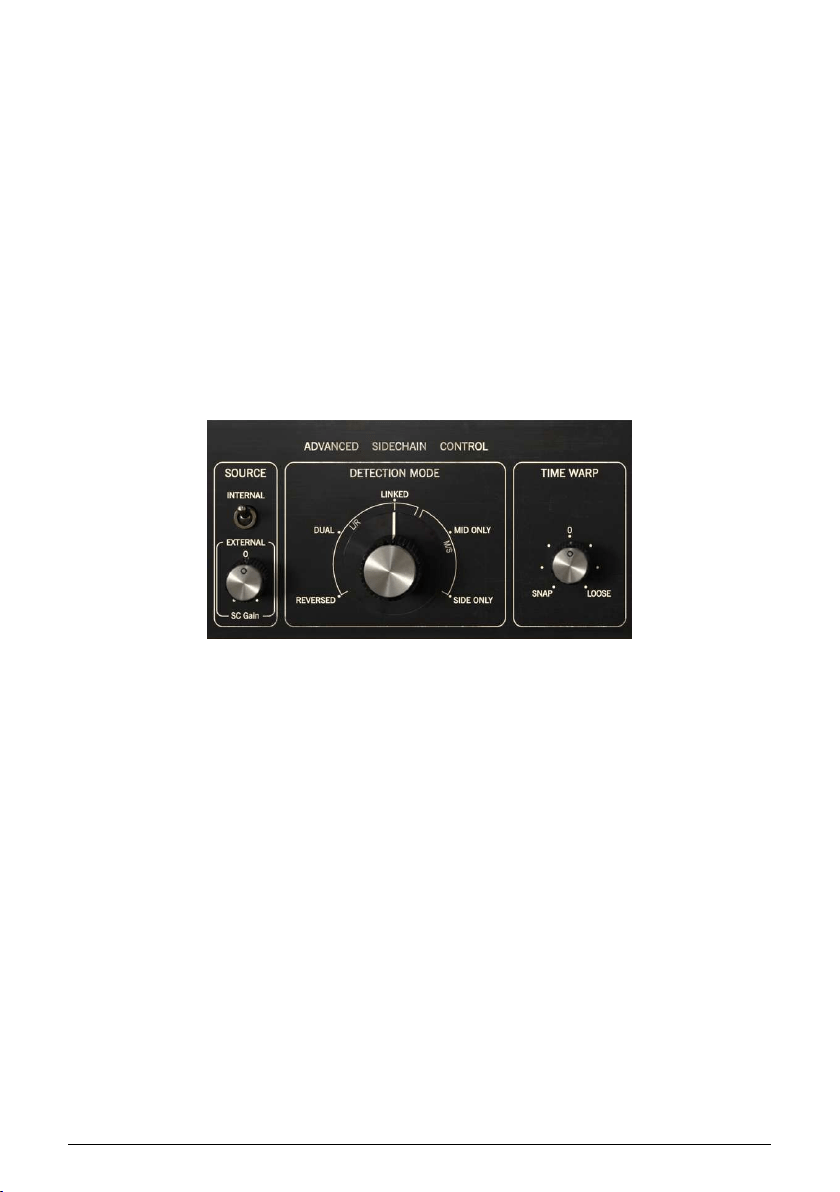
4.3.1.2. Detection Mode
The Detection Mode selection control appears only when the plug-in is inserted in a stereo
track/bus. When inserted in mono tracks, Comp FET-76 doesn't show these controls (since
they cannot operate with mono signals).
This is where things start to really become "advanced" in the Advanced Side-Chain section.
When we described the
Signal Flow [p.9] of the unit, we mentioned that the first operation
performed is optionally encoding the audio signal in Mid/Side mode. This would seem
strange, considering that none of the standard controls in the Comp FET-76 was ready to
use a M/S signal.
Well, here lies the reason for that Mid/Side encoding, and where we can take advantage
of it.
Mid/Side mode [p.25] is a special audio encoding mode where the Mid channel is the
center of a stereo image, while the Side channel is the edges of that same image.
In this advanced Detection Mode we have three options for Stereo (Left/Right) mode, and
two other options for Mid/Side mode - now you can see why this is really "advanced". For
Stereo (Left/Right) we have Linked, Dual, and Reversed options. For Mid/Side, we have Side
Only, and Mid Only options.
The default option is Linked (Left/Right mode). This works with the Stereo Left/Right signal,
and detection is performed using the max level between both channels, applying the same
compression to both channels. This is the standard way and how a compressor should be
used when dealing with stereo signals.
Next option is Dual. In this option, the Stereo signal is treated as dual mono channels.
Detection is performed independently in Left and Right channels and compression is applied
accordingly to each channel also. This may be good to balance the volume between the two
channels, when they are very different, but may affect perceived channel separation.
Reversed. Again, both channels are treated independently (dual mono) for detection and
compression. However, this time compression is applied to the channel opposite to the one
where detection is performed. Therefore, Left channel detection will trigger Right channel
compression and vice-versa. Again, this may be useful to balance the mix between two
channels which are very different, but this time allowing panned elements to “answer” to
each other.
Mid/Side mode has two options. Mid Only is the first one. Detection and compression will be
performed only on the Mid Channel. This may be useful to increase the width and presence
of sided elements, like the room ambiance of drum overhead tracks (because the side
elements will be left alone).
Comp FET-76 Advanced Side-Chain Control Section (as it
appears in stereo tracks)
24 Arturia - User Manual Comp FET-76 - COMP FET-76 CONTROL PANEL

Side Only is the second option. In this one, only the Side Channel is used for detection
and compression. This will have the opposite effect of the previous option, increasing the
presence of the centered elements of the mix (making it more mono compatible).
♪: Advanced Detection Mode needs two channels. Therefore, this control is absent (it doesn't exist)
when the plug-in is instantiated in Mono tracks.
4.3.1.3. Mid/Side Mode
Mid/Side mode is a highly effective way of making adjustments to the spacialization of a
mix or master. This is done by analyzing phase coherence between left and right channels
and letting the processor work only on the "middle" or "edges" of a stereo field, instead of the
entire f field.
In Mid/Side, the Mid channel is the center of the stereo image, while the Side channel is the
edges of that same image.
When we make adjustments in the Mid channel, this is perceived in the centered image
of the stereo spectrum (we can think of it as the mono compatible image). For example, a
boost in the Mid channel will make the sound more “mono” (both channels will sound more
equal).
On the other hand, when we make adjustments in the Side channel, this will have an impact
on the width of the stereo image, and a boost in this channel will be perceived as a more
spacious (wider) stereo sound.
4.3.1.4. Time Warp
This is where we can set the much talked “look-ahead” mode of detection, by applying
negative values (Snap).
We can also perform the exact opposite effect, and delay the detection by applying positive
values (Loose). This may allow some faster attack transients to "escape" detection, and
sound unaffected by compression.
By default, this control is positioned at 0, which means it will have no effect on detection.
Snap time (look-ahead) may go up to 5 milliseconds (-5.00) while Loose time may go up to
10 milliseconds (10.00).
Arturia - User Manual Comp FET-76 - COMP FET-76 CONTROL PANEL 25
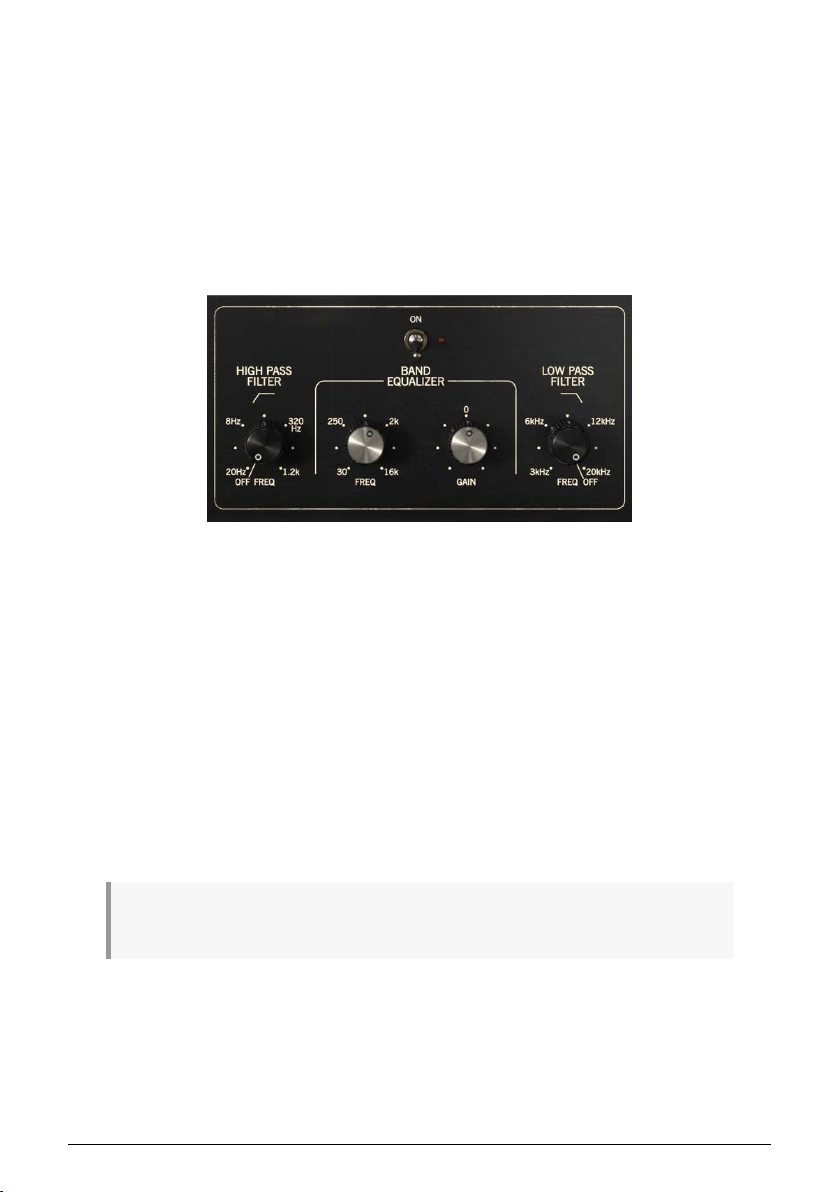
4.3.2. Side-Chain Equalizer
Modern compressors offer the possibility to sculpt the sound by manipulating some
frequencies (boost/cut high frequencies, for example) prior to detection, This way, we can
avoid some compression artifacts these frequencies could cause.
To do this, we need to route the sound through an EQ before it enters the detection circuit.
This is why the EQ is positioned first in the detection patch, right after the sound splits
between main signal and detection signal.
The EQ included in these compressors is a very simple EQ (semi-parametric), with a single
band featuring adjustable Gain and Frequency, complemented with a Low-Pass Filter and a
High-Pass Filter. This is exactly what's needed for the intended role.
The High Pass Filter has a fixed slope of -12dB/Octave, and a selectable continuous
frequency ranging from 20 Hz to 1.2 kHz. By default it is Off (the knob has an extra position
at the far left that turns the filter Off).
The Low Pass Filter has also a fixed slope of -12dB/Octave, and a selectable continuous
frequency ranging from 3 kHz to 20 kHz); By default it is also Off (the knob has an extra
position at the far right that turns the filter Off).
The EQ band has two controls: one for the Frequency and another for the Gain (frequency
range is fixed). Frequency control goes from 30 Hz to 16 kHz, and defaults to around 700 Hz.
Gain goes from -12 dB to +12 dB, and defaults to 0. The bandwidth is variable, and dependent
on the gain applied - the more gain is applied, the narrower will become the bandwidth.
The entire EQ section can be turned On or Off by clicking the switch above the main controls.
When turned On, the small red "LED" light next to the switch will be lighted. By default, it is
Off.
♪: If you set the EQ to frequencies in the region between 4 kHz and 8 kHz, you can make the unit act
like a de-esser.
The Comp FET-76 Equalizer
26 Arturia - User Manual Comp FET-76 - COMP FET-76 CONTROL PANEL
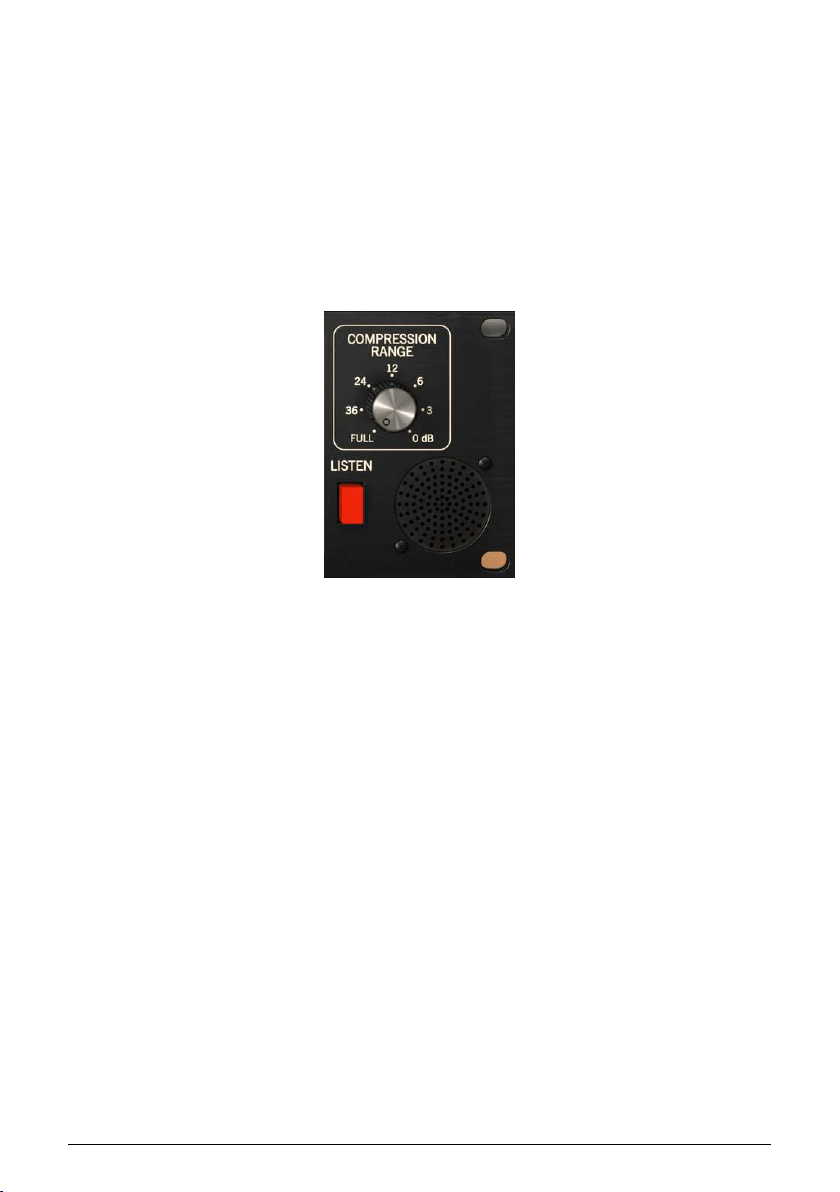
4.3.3. Compression Range
This control works in conjunction with the Compression Ratio.
What it does is limiting the amount of gain reduction applied, acting in practice as a Gain
Reduction Limiter. The higher the value, the less gain reduction is applied. At 0 dB the
Compression Ratio is 1:1 (no compression).
By default, it is positioned at -100 dB (full compression). The value can be increased by any
value up to 0 dB.
Placing the control at 0 dB (no compression) is equivalent to the "no button" option in the
original hardware, which allows to use the Comp FET-96 merely as an amplifier, taking
advantage of its pleasant coloring and saturation.
4.3.4. Listen
This button enables listening to the Side-Chain signal. It is a good way to listen to the
effect induced when we apply some EQ to the detection signal, and to determine how
Compression will be applied when some frequencies are boosted or cut due to equalization
of the detection signal.
Comp FET-76 Full
Compression Range and
Listen controls
Arturia - User Manual Comp FET-76 - COMP FET-76 CONTROL PANEL 27
5. USER INTERFACE
The Comp FET-76 User Interface has a Main Control Panel, an Advanced Mode Control Panel
and toolbars in the top and bottom of the window.
It is still a very simple User Interface. That will always be the main focus of every Arturia
product: to unleash your creativity while remaining easy to use.
We already look at the control panels. Now, it's time to look at the toolbars.
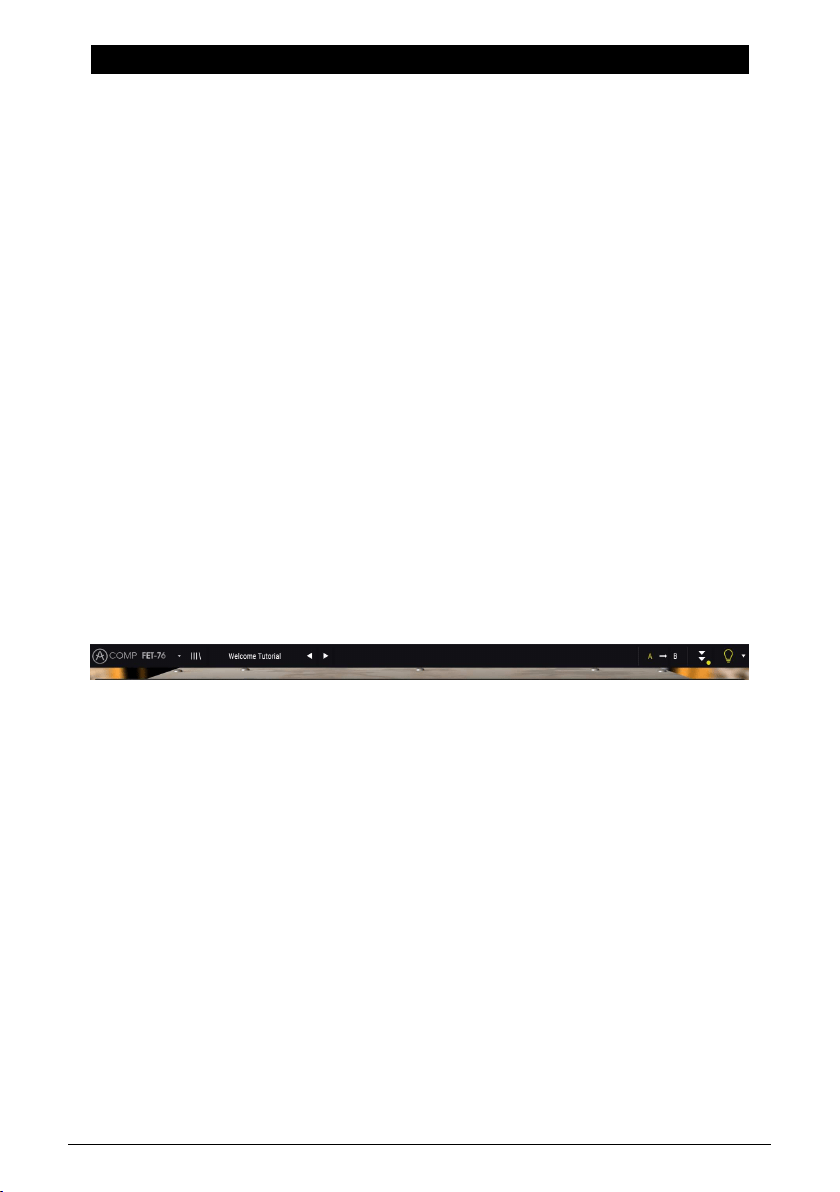
5.1. The Upper Toolbar
The plug-in GUI (Graphical User Interface) has the usual Arturia toolbar that runs across the
top edge, with the Arturia logo / plug-in name on the left (the colored part), followed by the
Library button and the Preset name, with arrows to navigate through the different presets
stored in the library.
Then, we have the right part of the toolbar, which presents a very important new feature -
an A/B button.
After this, we have the button that gives access to the Advanced Mode control panel (a
double arrow). This double arrow button is added with a point next to it every time the
Advanced Mode is in action (when there are parameters set to values different than the
default ones) and that panel is not visible.
The Advanced Mode panel is common to all three compressors, and features important add-
on features that greatly expand the functionality found on the original units.
Next, we have another very important button, one that was introduced in Pigments. It's the
Sound Design Tips button. It has the form of a light bulb, and when selected it displays tips
built in the presets by their creators to guide the user in the manipulation of the different
parameters.
As we saw, this upper toolbar, which is common to all current Arturia plug-ins, gives access
to many important functions.
These options can be found by clicking on the Arturia Comp FET-76 button at the top left-
hand corner of the plug-in window. Since these options are also common to all current
Arturia current plug-ins, they may be already familiar to you:
5.1.1. Save
This option will overwrite the active preset with any changes you have made, so if you
want to keep the source preset also, use the Save As option instead. See the next section for
information about this.
The Upper Toolbar
28 Arturia - User Manual Comp FET-76 - USER INTERFACE
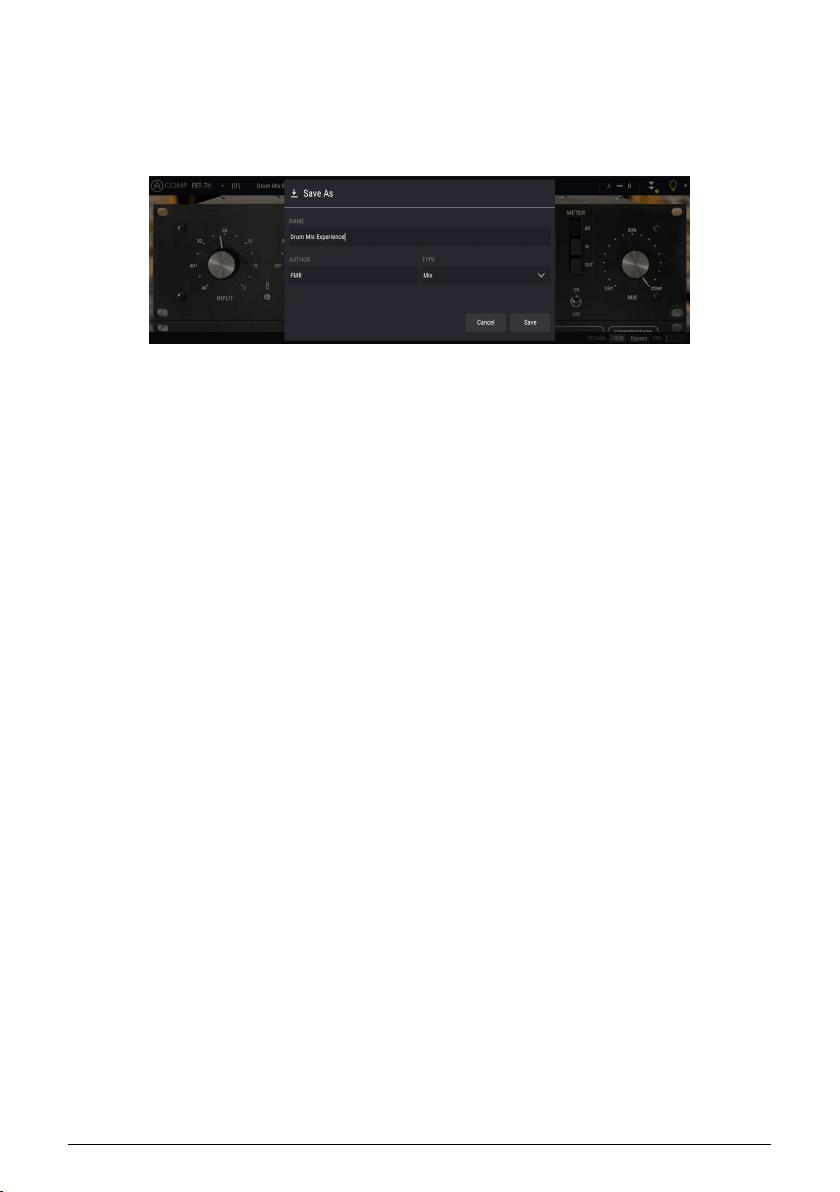
5.1.2. Save As…
If you select this option, you are presented with a window where you can enter information
about the preset. In addition to naming it, you can enter the Author name, and select a Type.
You can even create your own Type, by entering custom names in the respective place. This
information can be read by the preset browser and is useful for searching the preset later.
5.1.3. Import...
This command lets you import a preset file, which can be either a single preset or an entire
bank of presets. Both types are stored in .f76x format.
After selecting this option the default path to these files will appear in the window, but you
can navigate to whichever folder you are using to store presets.
5.1.4. Export Menu
You can export presets in two ways: as a single preset, and as a bank.
• Export Preset: Exporting a single preset is handy when you want to share a
preset with someone else. The default path to these files will appear in the "save"
window, but you can create a folder at another location if you like. The saved
preset can be reloaded with the import preset menu option.
• Export Bank: This option can be used to export an entire bank of sounds from the
instrument, which is useful for backing up or sharing presets.
5.1.5. Resize Window options
The Comp FET-76 window can be resized from 60% to 200% of its original size without
any visual artifacts. On a smaller screen such as a laptop, you might want to reduce the
interface size, so it doesn't dominate the display. On a larger screen or a second monitor,
you can increase the size to get a better view of the controls. The controls work the same at
any zoom level, but they can be harder to see at the smaller magnification values, or when
using high resolution monitors (like HD monitors or higher). The higher the resolution, the
bigger the size that should be used.
Arturia - User Manual Comp FET-76 - USER INTERFACE 29
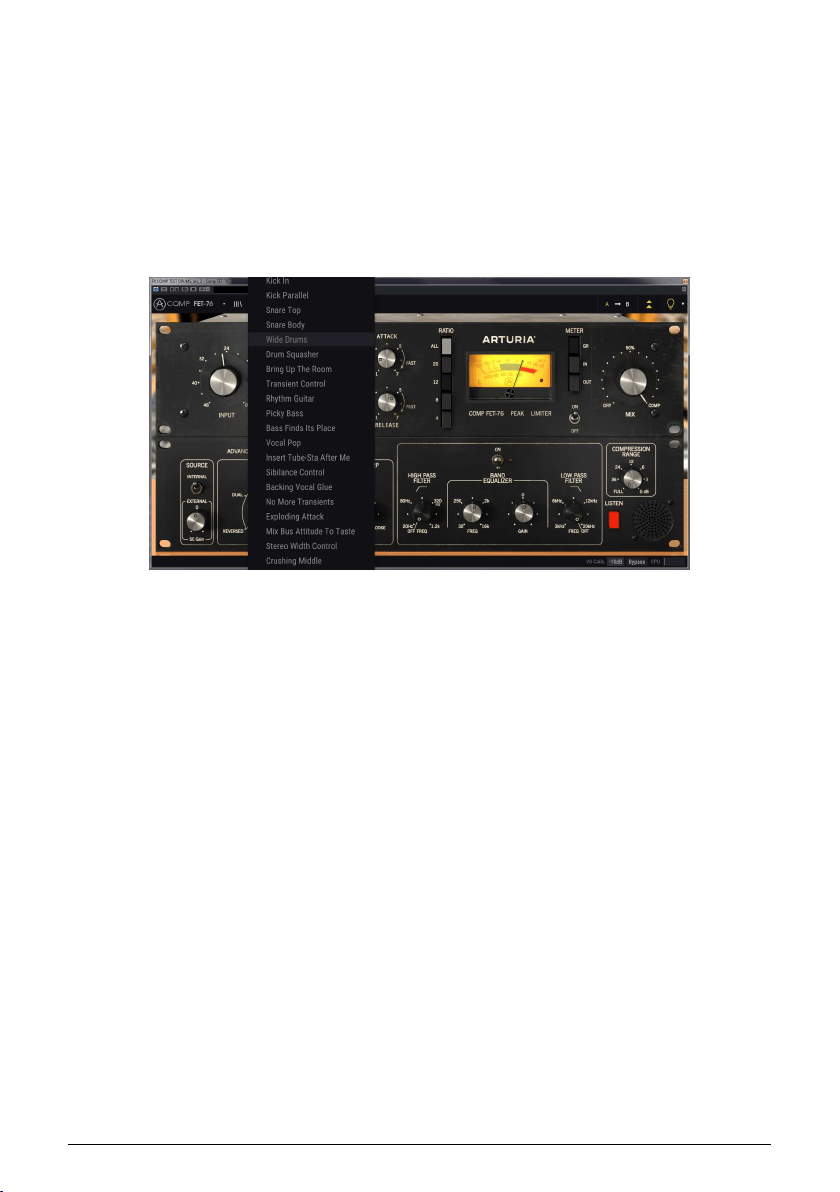
5.1.6. Preset Selection
The Preset browser [p.34] can be opened by clicking the library symbol on the toolbar. The
filter, name field and left / right arrows in the toolbar all assist with preset selection.
Selecting a preset is performed by clicking the preset name field in the Upper Toolbar. That
action will open a list with all the presets available. The currently selected preset is marked
with a
v
. Then, you just need to place the mouse over the name of the preset you want to
select (that preset name will be highlighted, and click it.
Alternatively, you may use the Preset Forward and Backward arrows (the arrows at the
right of the preset name field) to navigate through all the presets.
30 Arturia - User Manual Comp FET-76 - USER INTERFACE

5.2. A/B Button
The A/B button is a new feature introduced with the current version of Arturia plug-ins.
This button allows to compare between two distinct snapshots of the current preset, like
for example the currently edited version, with all the changes you made, and the stored
version. The snapshot in use is the highlighted one. This is great to perform some changes
in a preset, and check if those really match what you want and are an improvement when
compared to the original settings.
All presets may have a snapshot A and a snapshot B (these can be a completely different
settings configuration, a variation of the main preset, an edited preset or just the current
state of the plug-in). You can copy the settings of the A snapshot into B and vice-versa. When
a preset is loaded, the settings are the same for both A and B snapshot. Therefore, if you
start editing the preset when in snapshot A, snapshot B will preserve the original settings
until you save the changes. This way both the original preset and the edited version can
always be recalled for comparison.
♪: If you want to copy the settings on A to B or vice-versa, select the snapshot you want to copy
from (the source) and click over the arrow. This will make the settings of that snapshot to be copied
over the other snapshot. Notice that the arrow is always pointing from the currently selected snapshot
to the other one: Source -> Destination
Another interesting and very handy feature of the A/B button is the possibility to have two
presets loaded simultaneously, and compare between them. When you load a preset having
this button for example in position A, the preset loads in position A (position B assumes the
same settings). However, if you change to position B and load another preset, this will not
overwrite the settings in position A, which will keep the previous loaded settings. You can
then change between position A and position B and compare both presets.
When you save a preset only the settings for the currently selected snapshot are stored.
Therefore, if you save the preset with the B snapshot selected, the settings of the B snapshot
are the ones saved. If you save the preset with the A snapshot selected, the settings of that
snapshot are the ones stored in the preset.
The same way, when you edit settings for the currently loaded instance of the plug-in, and
you save the project in your DAW, next time you load that project, both A and B snapshots
will have the same settings, reflecting the saved state of the plug-in.
♪: If you want to save both snapshots of a preset, you will need to save two presets. To do this, select
snapshot A, and in the Arturia sub-menu choose "Save As..." and save the Preset, giving it a name. Then
select snapshot B and do the same thing, giving it a different name.
Arturia - User Manual Comp FET-76 - USER INTERFACE 31
5.3. Advanced Mode (Double Arrow) Button
This button opens the Advanced Mode control panel. This is where are located the controls
for the extra features added by Arturia to expand the possibilities found on the original units.
This extra control panel is common to all three compressors.
When the Advanced Mode panel is opened, the arrows point up. When the panel is closed,
the arrows point down.
When there are parameters active in the Advanced Mode panel (edited or set to values
different than the default ones), and that panel is not visible (is closed), the double arrow
button (pointing down) has a dot next to it, to call user's attention to those parameters. To
check them, click the button to open the Advanced Mode control panel.
You have a detailed explanation of all the features in this Advanced Mode in the
Control
Panel chapter [p.13].
5.4. Sound Design Tips
Pigments was Arturia's first plug-in to offer this feature, and we dare to say it will
revolutionize the way users look at presets.
The Sound Design Tips feature identifies parameters the preset creator defined as the most
relevant while developing the selected preset, and which are the best for the user to edit.
When On, a brief explanation of each parameter (tip) will also be displayed in the left-hand
side of the lower toolbar.
Select any Factory preset and position the cursor over the light bulb in the upper toolbar,
right after the Advanced Mode button. This is the Sound Design Tips button. It will darken the
User Interface, leaving lighted the selected parameters.
Each Factory preset has defined a preferred parameter, and the corresponding Meter range.
The preferred parameter is the one that should be set first when adjusting the selected
preset for optimum results. The Meter range is an indicator of the kind of gain reduction the
preset was programmed for.
If you click the little arrow at the right of the button, you will access a menu that has an
"(Advanced) Edit Tips"
option. Selecting that option will allow you to mark your own preferred
controllers. Each marked controller will show a small "light bulb" when that option is selected,
and a "cogwheel" appears next to the Sound Tips button.
32 Arturia - User Manual Comp FET-76 - USER INTERFACE

5.5. The Lower Toolbar
When you are changing a parameter, you will see a readout showing the value or state
of whatever control you are modifying at the left-hand side of the lower toolbar. It will
also display the current value of a parameter when you place the mouse pointer over that
parameter control in the control panel. This is handy, because you don’t need to touch the
parameter control to read the current value.
Finally, when the Sound Design Tips button is On, you will see an additional brief explanation
about the selected parameter.
At the right-hand side of the lower toolbar are several small windows and buttons. These
are very important features, so let’s take a closer look at them:
5.5.1. VU Calib.
The Comp FET-76 has one big VU meter in the middle-right of the control panel. By clicking
the value at the right of the "VU Calib." label, you can access a menu where you can calibrate
its response. By default, it is calibrated for -18dBu but you can change this to -14dBu or -8dBu.
5.5.2. Bypass
This one is obvious. Activating the bypass option will completely disable Comp FET-76 plug-
in.
5.5.3. CPU meter
The CPU meter is used to monitor how much of your computer’s CPU is being used by the
plug-in. If you stress your computer too much, the global performance of your system and
the audio may suffer.
The Lower Toolbar
Arturia - User Manual Comp FET-76 - USER INTERFACE 33
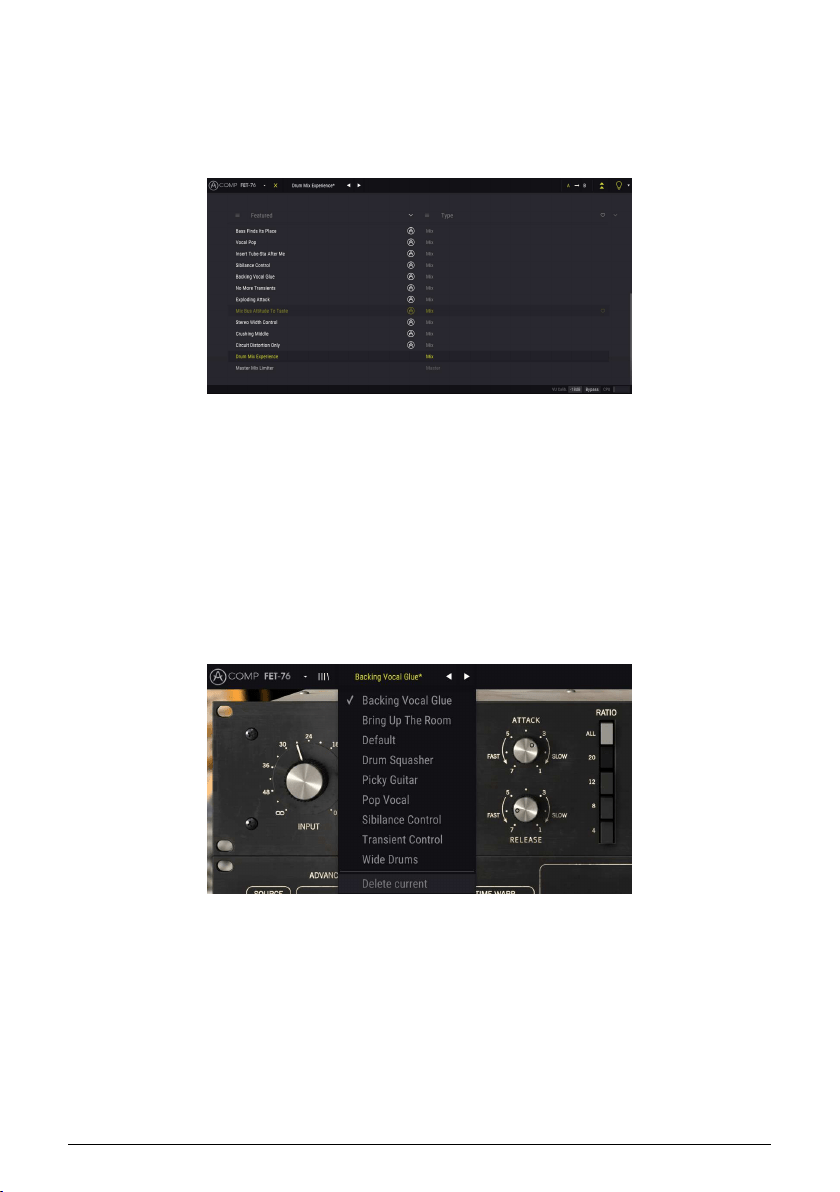
5.6. The Preset browser
The preset browser enables you to search, load and manage preset configurations in Comp
FET-76. Although this looks and is based on the usual Arturia Preset Browser, it is simpler,
and even easier to work with. You access the preset browser by clicking on the library
symbol next to the Arturia logo/plug-in name on the left.
When you click on the library symbol, you will see a screen with all the Presets you have
saved. You can sort the list by several different criteria, to make it easier to find the right
preset. There are two columns. The first one lists the Presets by Name or by "Featured".
Featured are presets that were classified as important by Arturia. The second one lists the
Presets by Type, Designer, or Bank.
There is only one attribute visible, which is the one you select by clicking the column title.
By default, Type is the attribute selected. When you select the Designer attribute, the list
changes, and that attribute appears in the second column, in the place where the Type field
was before.
If you want to delete a preset, you may do that by selecting it, and then, by clicking in the
name field, choose the option "Delete current" that's in the bottom of the list.
Preparing to delete a Preset from the Comp FET-76 library
34 Arturia - User Manual Comp FET-76 - USER INTERFACE

5.7. Some Final Words
Some final words to mention something very important. Usually, to change values in the
plug-in controls, we click on the corresponding control and drag the mouse up or down. If
the controls are switches, we simply click them to toggle On or Off. If we want finer editing
values, we can use Ctrl+Drag (Cmd+Drag on macOS). Alternatively, we can mouse Right-
Click and Drag. Using this key combination, the values change in a slower way, which allow
us to get more precise values easily.
Double-clicking a control changes it automatically to the default value. This also works with
Alt+Click (Opt+Click on macOS).
And that's it. We just finished describing all the controls and features you have at your
disposal to process sound in your DAW using the Comp FET-76 plug-in. We hope you'll enjoy
your new plug-in and the results you get when using it, as much as we enjoyed making it.
Arturia - User Manual Comp FET-76 - USER INTERFACE 35

6. SOFTWARE LICENSE AGREEMENT
In consideration of payment of the Licensee fee, which is a portion of the price you paid,
Arturia, as Licensor, grants to you (hereinafter termed “Licensee”) a nonexclusive right to
use this copy of the SOFTWARE.
All intellectual property rights in the software belong to Arturia SA (hereinafter: “Arturia”).
Arturia permits you only to copy, download, install and use the software in accordance with
the terms and conditions of this Agreement.
The product contains product activation for protection against unlawful copying. The OEM
software can be used only following registration.
Internet access is required for the activation process. The terms and conditions for use of the
software by you, the end-user, appear below. By installing the software on your computer
you agree to these terms and conditions. Please read the following text carefully in its
entirety. If you do not approve these terms and conditions, you must not install this software.
In this event give the product back to where you have purchased it (including all written
material, the complete undamaged packing as well as the enclosed hardware) immediately
but at the latest within 30 days in return for a refund of the purchase price.
1. Software Ownership Arturia shall retain full and complete title to the SOFTWARE recorded
on the enclosed disks and all subsequent copies of the SOFTWARE, regardless of the media
or form on or in which the original disks or copies may exist. The License is not a sale of the
original SOFTWARE.
2. Grant of License Arturia grants you a non-exclusive license for the use of the software
according to the terms and conditions of this Agreement. You may not lease, loan or sub-
license the software.
The use of the software within a network is illegal where there is the possibility of a
contemporaneous multiple use of the program.
You are entitled to prepare a backup copy of the software which will not be used for
purposes other than storage purposes.
You shall have no further right or interest to use the software other than the limited rights as
specified in this Agreement. Arturia reserves all rights not expressly granted.
3. Activation of the Software Arturia may use a compulsory activation of the software and
a compulsory registration of the OEM software for license control to protect the software
against unlawful copying. If you do not accept the terms and conditions of this Agreement,
the software will not work.
In such a case the product including the software may only be returned within 30 days
following acquisition of the product. Upon return a claim according to § 11 shall not apply.
4. Support, Upgrades and Updates after Product Registration You can only receive support,
upgrades and updates following the personal product registration. Support is provided only
for the current version and for the previous version during one year after publication of the
new version. Arturia can modify and partly or completely adjust the nature of the support
(hotline, forum on the website etc.), upgrades and updates at any time.
The product registration is possible during the activation process or at any time later through
the Internet. In such a process you are asked to agree to the storage and use of your
personal data (name, address, contact, email-address, and license data) for the purposes
specified above. Arturia may also forward these data to engaged third parties, in particular
distributors, for support purposes and for the verification of the upgrade or update right.
5. No Unbundling The software usually contains a variety of different files which in its
configuration ensure the complete functionality of the software. The software may be used
as one product only. It is not required that you use or install all components of the software.
You must not arrange components of the software in a new way and develop a modified
version of the software or a new product as a result. The configuration of the software may
not be modified for the purpose of distribution, assignment or resale.
36 Arturia - User Manual Comp FET-76 - SOFTWARE LICENSE AGREEMENT

6. Assignment of Rights You may assign all your rights to use the software to another
person subject to the conditions that (a) you assign to this other person (i) this Agreement
and (ii) the software or hardware provided with the software, packed or preinstalled
thereon, including all copies, upgrades, updates, backup copies and previous versions,
which granted a right to an update or upgrade on this software, (b) you do not retain
upgrades, updates, backup copies und previous versions of this software and (c) the
recipient accepts the terms and conditions of this Agreement as well as other regulations
pursuant to which you acquired a valid software license.
A return of the product due to a failure to accept the terms and conditions of this Agreement,
e.g. the product activation, shall not be possible following the assignment of rights.
7. Upgrades and Updates You must have a valid license for the previous or more inferior
version of the software in order to be allowed to use an upgrade or update for the software.
Upon transferring this previous or more inferior version of the software to third parties the
right to use the upgrade or update of the software shall expire.
The acquisition of an upgrade or update does not in itself confer any right to use the
software.
The right of support for the previous or inferior version of the software expires upon the
installation of an upgrade or update.
8. Limited Warranty Arturia warrants that the disks on which the software is furnished is
free from defects in materials and workmanship under normal use for a period of thirty (30)
days from the date of purchase. Your receipt shall be evidence of the date of purchase. Any
implied warranties on the software are limited to thirty (30) days from the date of purchase.
Some states do not allow limitations on duration of an implied warranty, so the above
limitation may not apply to you. All programs and accompanying materials are provided “as
is” without warranty of any kind. The complete risk as to the quality and performance of the
programs is with you. Should the program prove defective, you assume the entire cost of all
necessary servicing, repair or correction.
9. Remedies Arturia's entire liability and your exclusive remedy shall be at Arturia's option
either (a) return of the purchase price or (b) replacement of the disk that does not meet the
Limited Warranty and which is returned to Arturia with a copy of your receipt. This limited
Warranty is void if failure of the software has resulted from accident, abuse, modification,
or misapplication. Any replacement software will be warranted for the remainder of the
original warranty period or thirty (30) days, whichever is longer.
10. No other Warranties The above warranties are in lieu of all other warranties, expressed
or implied, including but not limited to, the implied warranties of merchantability and fitness
for a particular purpose. No oral or written information or advice given by Arturia, its dealers,
distributors, agents or employees shall create a warranty or in any way increase the scope
of this limited warranty.
11. No Liability for Consequential Damages Neither Arturia nor anyone else involved in
the creation, production, or delivery of this product shall be liable for any direct, indirect,
consequential, or incidental damages arising out of the use of, or inability to use this product
(including without limitation, damages for loss of business profits, business interruption, loss
of business information and the like) even if Arturia was previously advised of the possibility
of such damages. Some states do not allow limitations on the length of an implied warranty
or the exclusion or limitation of incidental or consequential damages, so the above limitation
or exclusions may not apply to you. This warranty gives you specific legal rights, and you
may also have other rights which vary from state to state.
Arturia - User Manual Comp FET-76 - SOFTWARE LICENSE AGREEMENT 37