GEAppliances.com
©
Safety Instruotions ......... 2-4
Opera6ng Instructions
Clock and Timer . ........... l l
Controls .................... 5
Convection .............. 14-17
Oven ................... 9, l 0
Probe .................. 13, 18
Proofing ................... 19
Sabbath Feaulre ............. 8
Self-Cleaning Oven ....... 21,22
Special Features ............ 6, 7
Thermostat ................ 20
Timed Baking
and Roasting ......... 12, 16, 17
_A'arming .................. 19
Care and Cleaning
Broiler Pan and Grid ......... 25
Cleaning Oven Door ......... 24
Control Panel .............. 25
I,ift-OffOven Door . ......... 24
I,igh t Bulb ................. 23
Oven Floor . ............... 24
Packaging _ai)e ............. 23
Probe ..................... 25
Racks ..................... 25
Stainless Steel Surfaces ....... 23
Troubleshooting Tips ..... 26-28
Consumer Support
Consumer Support . . .Back Co_er
Product Registration ...... 29, 30
Warranty .................. 31
Write themodelandserial
numbershere:
Model #
Serial #
You can find them on a label on
the side trim or on the fl'ont of
the (lower) oven behind the oven
doolk
]K 9l 5-2 7" Si_gle I'i i_l{ ()ve*_
JK955-2 7" Do_lb{e Wa[{ ()ve,_
fY915-30" Si_g'!_ _'!_d{ ()ve_
./T9_5-30" Do_lb# Wa{{ (h_en
16404290P088-2 49-80130-2 02-03Jfl
READALLINSTRUCTIONSBEFOREUSING.
WARNING!
For your safe_, the information in this manual must be followed to minimize the risk of fire or
explosion, electric shock, or to prevent property damage, personal injury, or loss of life.
IMPORTANTSAFETYNOTICE
The California Safe Drinking Water and ToxicEnforcement Act requires the Governor of California
to publish a list of substances known to the state to cause cancer, birth defects or other reproductive
harm, and requires businesses to warn customers ofpotential exposure to such substances.
The fiberglass insulation in self-clean ovens gives off a very small amount of carbon monoxide during
the cleaning cycle. Exposure can be minimized by venting with an open window or using a ventilation
fan or hood.
SAFETYPRECAUTIONS
VVhenusing electrical appliances, basic safety precaufions should be followec_ including the
foliowing."
Use d/is appliance only %r its intended
purpose as described m tins )wner s
Manual.
Be sure your appliance is properly
installed and grounded by a qualified
mchnician in accordance wifll the
provided installation insuucfions.
Do not atmmpt to repair or replace any
part of your oven unless it is specifically
recommended in this mamml. All other
servicing should be refened m a qualified
technician.
Hme the installer show you the location
of tile circuit breaker or fllse. Mark it for
easy reference.
Before performing any service, disconnect
tile oven power supply at the household
disu_ibution panel by removing the fllse or
switching off the circuit breaken
Do not leave children alone---dfildren
should riot be left alone or unattended in
an area where an appliance is in use. They
should nex_r be allowed to sit or stand on
any part of the appliance.
Do not allow anyone to climb, stand or
hang on tile doon They could damag> the
oxen, or cause sex,re personal irljnr>
Be sure. d_e oxen is secureN installed in
a cabinet that is firefly attached to the
house structure. Never allow anyone to
climb, sit, stand or hang on die ox>n doon
Ne_er lem> die o_en door open when you
are not watching the o\_n.
Always kee I) combustible wall cox_ring,
curtains or drapes a safe distance flom
vonr o$_I1.
Alwws kee I) dish towels, dish cloths, pot
holders and other linens a safe distance
fFOnl vonr oxen.
Always kee I) wooden and plastic nmnsils
and canned food a safe distance awW
flom your oxen.
Teach children not m pl W wifla rite
controls or any other part of the o\_n.
i,arge scratches or impacts to glass doors
can lead to broken or shattered glass.
2
www.GEAppliances.com
A WARNING!
SAFETYPRECAUTIONS
Do not store flammable matefia]s in
an oxen.
CAUtiON: hems of interest to
children should not be stored in cabinets
aboxe an oxen; children climl)ing on tile
oxen to reach items could be sedonsly
irljured.
Never wear loose-fitting or hanging
garments while using file appliance. Be
careflfl when reaching for items stored in
cabinets over file ox.en. Flammable mamlial
could be ignimd if brougilt in contact with
hot surfaces or heating elements and mac
cause se\.ere l)nY/ls.
Use only di T pot holders--moist or damp
pot holders on hot sni/aaces may i.esult in
burns from steam. Do not let pot holders
touch hot heating elements. Do not use a
towel or other bulkv cloth.
For ?our safew, nexer use your appliance
tbr wanning or heating tile room.
Do not let cooking grease or other
flammal)le materials accumulate in or
near tile oxen,
Do not use water on grease fires. Nexer pick
up a flaming pan. T/llri tile controls off:
Flame in tile ox.en can be smofllered
completely by closing tile ox.en door and
turning tile oven off or by using a nmlti-
puq)ose dI T chenaical or foan/-tvpe fire
extinguisher
Do not touch tile heating elements or tile
interior sur_ace of tile ox.en. These sur_aces
may be hot enough to burn e\.en fllough
thev at.e dark in colon Dining and after
use, do not much, or let cloflling or oilier
flammable mamrials contact any interior
at.el of tile ox.en; allow sufficient time for
cooling first.
Potentially hot surfitces include oven \.ent
openings, surfaces near tile openings,
crevices around tile oven door, tile edg.es
of file window and metal uim parts al)ox.e
tile door.
REMEMBER:Tile inside sur/_ace of tile o_en
may be hot when tile door is opened.
Nexer leaxejars or cans of fiat diippings in
or Ileal vonr o_en.
Do not store or use combustil)le mamlials,
gasoline or other flammable vapors and
liquids in the vicinity of this or anv other
appliance.
Stand away from tile oxen when opening
tile oxen door. Hot air or steam which
escapes can cause bums to hands, face
and/or eyes.
Do not heat unopened food containers.
Pressure could 1)uild up and tile container
could burst, causing an irlju U.
Kee I) tile oven xent unobstructed.
Kee I) tile oxen flee from grease buildup.
Place the oxen rack in tile desired position
while tile oxen is cool. If racks nmst be
handled when hot, do not let pot holder
contact tile heating dements.
When using cooking or roasting bags in tile
oxen, follow tile manufltcturer's directions.
Pulling out the rack to the stop-lock is a
comenience in lifting heax T foods. It is also
a precaution against bums from touching
hot surfaces of tile door or oxen walls.
Do not use tile oxen to diy newspapers.
If oxerheated, they can catch on fire.
Do not use the oxen for a storage area.
hems stored in an oxen can ignite.
Do not leme paper products, cooking
utensils or food in tile oxen when not
in rise.
After 1)roiling, always take tile 1)roller pan
out of tile oxen and clean it. ieftoxer
grease in tile broiler pan can catch fire
next time yon use tile pan.
Clean only parts listed in this Owner's
Manual.
Do not use alunainuna foil to line oxen
bottoms, except ;assugg.ested in this manual.
hnproper installation of a]nnainnn/foil may
resuh in a lisk of elecuic shock or fire.
,3
IMPORTANTSAFETYINFORMATION.
READALLINSTRUCTIONSBEFOREUSING.
COOKMEATANDPOULTRYTHOROUGHLY,..
Cookmeatandpou/trythoro®h/y_-meat to at/east aniNTERNALtemperatureof 180°Fandpou/try
toat/east an iNTERNALtemperatureof 180%-Cookbg to thesetemperaturesusua/lyprotectsagainst
feodbornei/bess,
SELF-CLEANINGOVEN
Do not clean the door g'asket. The door
gasket is essential tbr a good seal. Care
should be token not to rub, damag.e or
mox.e the gasket.
Do not use oven cleaners. No commercial
ox.en cleaner or oven liner promctive
coating of any kind should be used in or
around any part of the oven. Residue flom
ox.en cleaners will damag.e the inside of the
ox.en when the self-clean cycle is used.
Before self-cleaning d_e ox.en, remove die
broiler pan, g_id and other cookware.
Be snie to wipe up excess spillage before
starting file self-cleaning operation.
If the self-cleaning mode malflmcuons,
mm file ox.en off and disconnect file power
suppl> Have it se_wiced by a qualified
mchnician.
READANDFOLLOWTHISSAFETYINFORMATIONCAREFULLY.
SAVETHESEINSTRUCTIONS
4
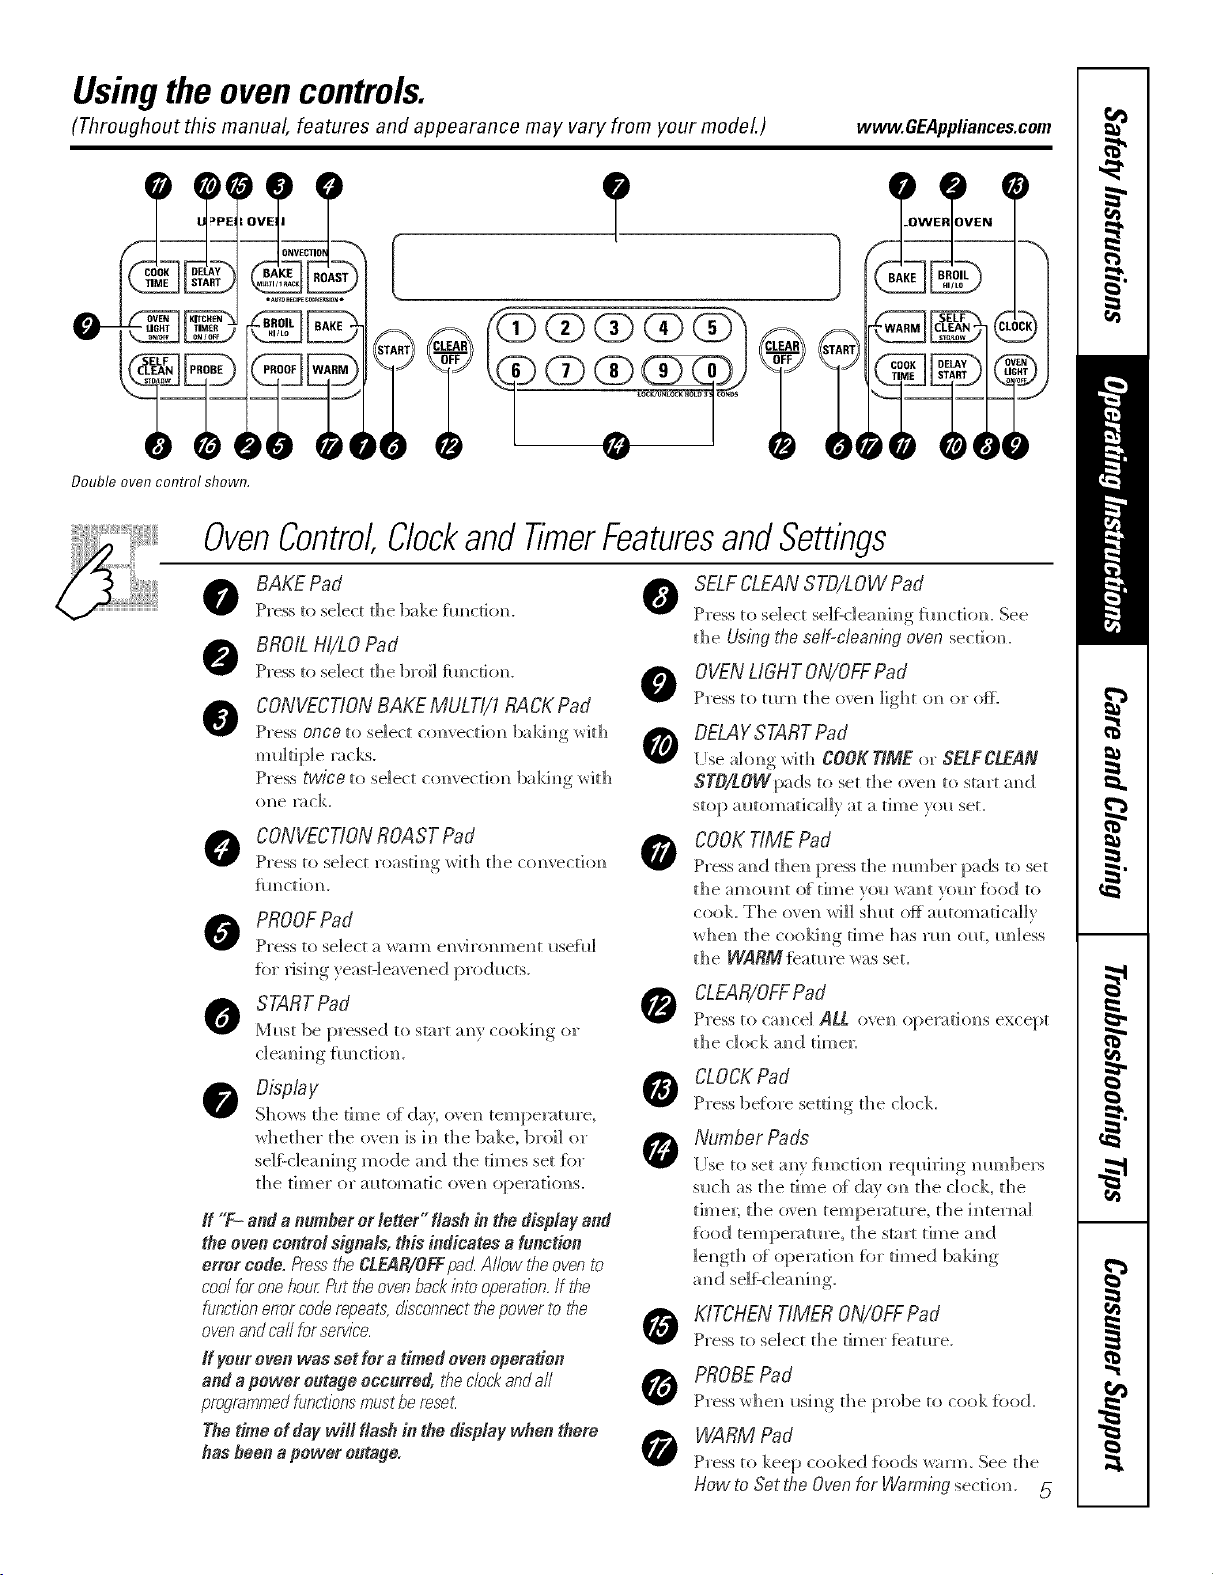
Usingthe ovencontrols.
(Throughout this manual, features and appearance may vary from your modeL) www.GEAppliances.com
Double oven control shown.
OvenControl,Clockand TimerFeaturesandSettings
BAKEPad 0
Press to select the bake timed{re.
BROILHI/tO Pad
Press to select the broil flmcdom_. 0
CONVECTIONBAKEMULTI/1RACKPad
Press once to select com'ection bakim_g with
Press twice to select com'ectiol) bakim)g with
ol)e l_ C]<.
CONVECTIONROAST Pad
Press to select roastim)g with the com'ectiom)
flH)ctiom).
PROOFPad
Press to select a wall/) em'i ton men t I_se{I d
for risi. m_g_veast-]eave_ed,..... I>rod_cts..
Must be pressed to start _ _?r cookim)g or
SELFCLEANSTD/LOW Pad
Press to sdect selfZcleaM ng _m_cdom See
tl_e Using _he self-cleaning oven secdom
0 VENLIGHTON/OFFPad
Press to mrm_ the ovem_ light on or ore
DELAYSTARTPad
[Ise i_l(}m)g v/ith CO0_ TfMEor SELFCLEAN
STO/LOWpadsto set the o'_em) to start m_d
stop m_tomatica]]v at a time vol_ set.
COOKTIME Pad
Pros m_ d t]]e_ press the m_Hmber pads to set
the _H]IOIHIt O[ [im)le veil W_][ _0111" f_)od to
cook. The ovel_ _rH]] S]_E (}f_ amomatica]]v
x_hei] file cookim)g time has _m_ o_lt, im]ess
the WARM {eatm'e was set.
CLEAR/OFFPad
Press to cm]ce] ALL, ove_ operation,s except
the dock m_d time_:
Display
Sho_s the time o{ day; o_en tempenm_re,
whether the (Be_ is 1_] the bake, broil or
se]f:-c]ea_i_g mode a_(] the times set {or
the timer or alltomatic ove_? operatio]?s.
If "F- andan#mbererletter" flash in thedisplay and
theovencontrol signals,this indicates af#notien
error code.E'essi¢_eCLEAR/OFFpad.A/low i¢_eovento
coo/foronehourPuttheovenbackintooperafion.If the
functionestercoderepeats,disconnectthepowerto the
ovenandca//forservice.
ff ye_r even was set _era timed oven operation
and a power outage occurred, tile cbck and a//
programmedfunctions mustbereset.
The time ef day wifl flash in the diopfay wflen there
flee fleen apower enrage.
CLOCKPad
Press be{in'e setti_g the clock
Number Pad's
[Ise to set aRv _imction req_d_i_g mm_]be_s
s_ch as the time of day (m the clock, the
time_; the (}_el] tempe_mre, the h_termd
fi)o(I tempe_mre, the start time a_d
]e_gth {d opemti{m for timed balding
0
0
KITCHENTIMER ON/OFFPad
Press to select the timer featm'e.
PROBEPad
Press whe_ _sh_g the probe to cook food.
WARM Pad
Press to keep cooked {i)ods _arm_ See the
How to Set the Oven for Waniling section. 5
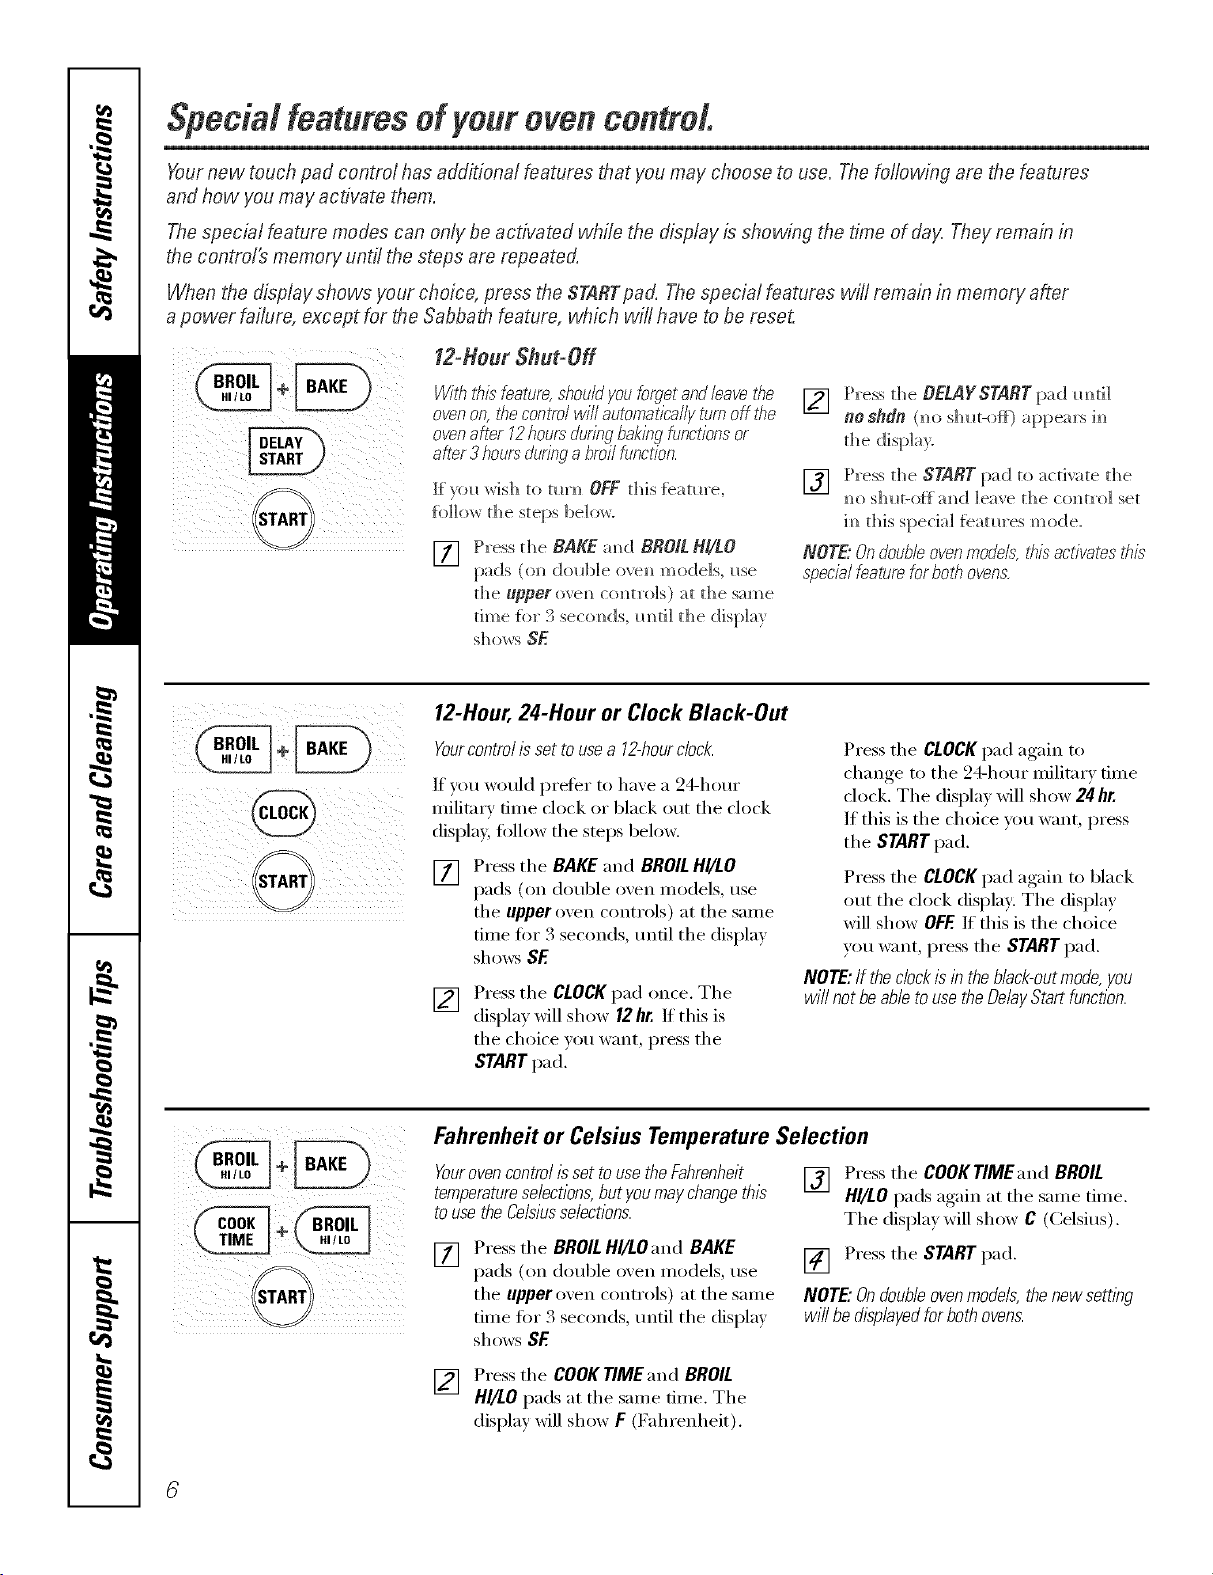
Special featuresof Four oven control.
Yournew touch pad control has additional features that you may choose to use. The following are t.hefeatures
and how you may activate them.
The special feature modes can only be activated while the display is showing the time of clay,Theyroman in
t.hecontro/_ memory until the steps are repeated.
When the display shows your choice, press the STABTpad. The special features wi/! remain in memory after
a power failure, except for the Sabbat.h feature, which will have to be reset.
g
f2-Hour Shut-Off
Withibisfeatura,shouldyouforgetandNavefi_e
ovenon,tilecontTo/willautomaticallytomoff#_e
ovenaMr 12hoursdurNgbakingfunctionsor
after3 hoursduringa broilbnctNn.
I:[)ol_ wish to turn) OFF d)is feature,
[i)]]ow d)e steps below.
[77 Press the BAKE.m)d BROILBi/tO
pads ((m double ove_) models, use
the upper ovem) co_)trols) at the same
time fbr 3 secom)ds,m)ti] the display
[] Press the BE.LAYSTABT pad m)d]
no sfldn (_)o shi_t-of_) a ppe'ars im)
the disph_)'.
[] Press d_e START pad to acdvate d)e
m)os]mt-off m)d leave the colin'el set
ira)this special fieatm'es mode.
NOTE."Ondoubleovenmodels, his activates this
specialfeatura forboth ovens.
i i iiiii
12-Hour, 24-Hour or Clock Black-Out
Yourcontrolissettousea 12-hourclock.
If you would preter to have a 24-hour
militma' time clock or 1)lack ()tit the clock
display, follow the steps below.
[]
Press the BAKE.",rod BROILHI/LO
pads (on double ()veil Inodels, use
the upper oven controls) at the same
time tor 3 seconds, tmtil the display
sho_:s SE
[]
Press the CLOCKpad once. The
display will show 12hr. If this is
the choice )ou want, press the
STARTpad.
Press the CLOCK pad again to
change to the 24-hour military time
clock. The display will show 24 hr.
If this is the choice you want, press
the STARTpad.
Press the CLOCKpad again to black
out the clock display: The display
will show OFF.If this is the choice
you want, press the START pad.
NOTE:If the clockis in the bNck-outmode,you
will not be able touse the DeNy Start function.
Fahrenheit or Celsius Temperature Selection
Yourovencontrol isset touse the Fahranheit
temperatureselections,but youmay changethis
touse the Celsiusselections.
[]
Press the BROILHI/LO and BAKE
pads (on double oven Inodels, use
the upper oxen controls) at the same
time for 3 seconds, tmtil the (lispla,_
shows BE
[] Press the COOKTIMEand BROIL
HI/LO pads again at the same time.
The displa_ will show C (Celsius).
[] Press the START pad.
NOTE."Ondoubleovenmodels,thenewsett/bg
wi//bedtspNyedforbothovens.
[] Press the COOKTIMEand BROIL
HI/LO pads at the same time. The
display will show F (Fahrenheit).
www.GEAppliances.com
!( ii( ii!i ii ili
i ii@i!
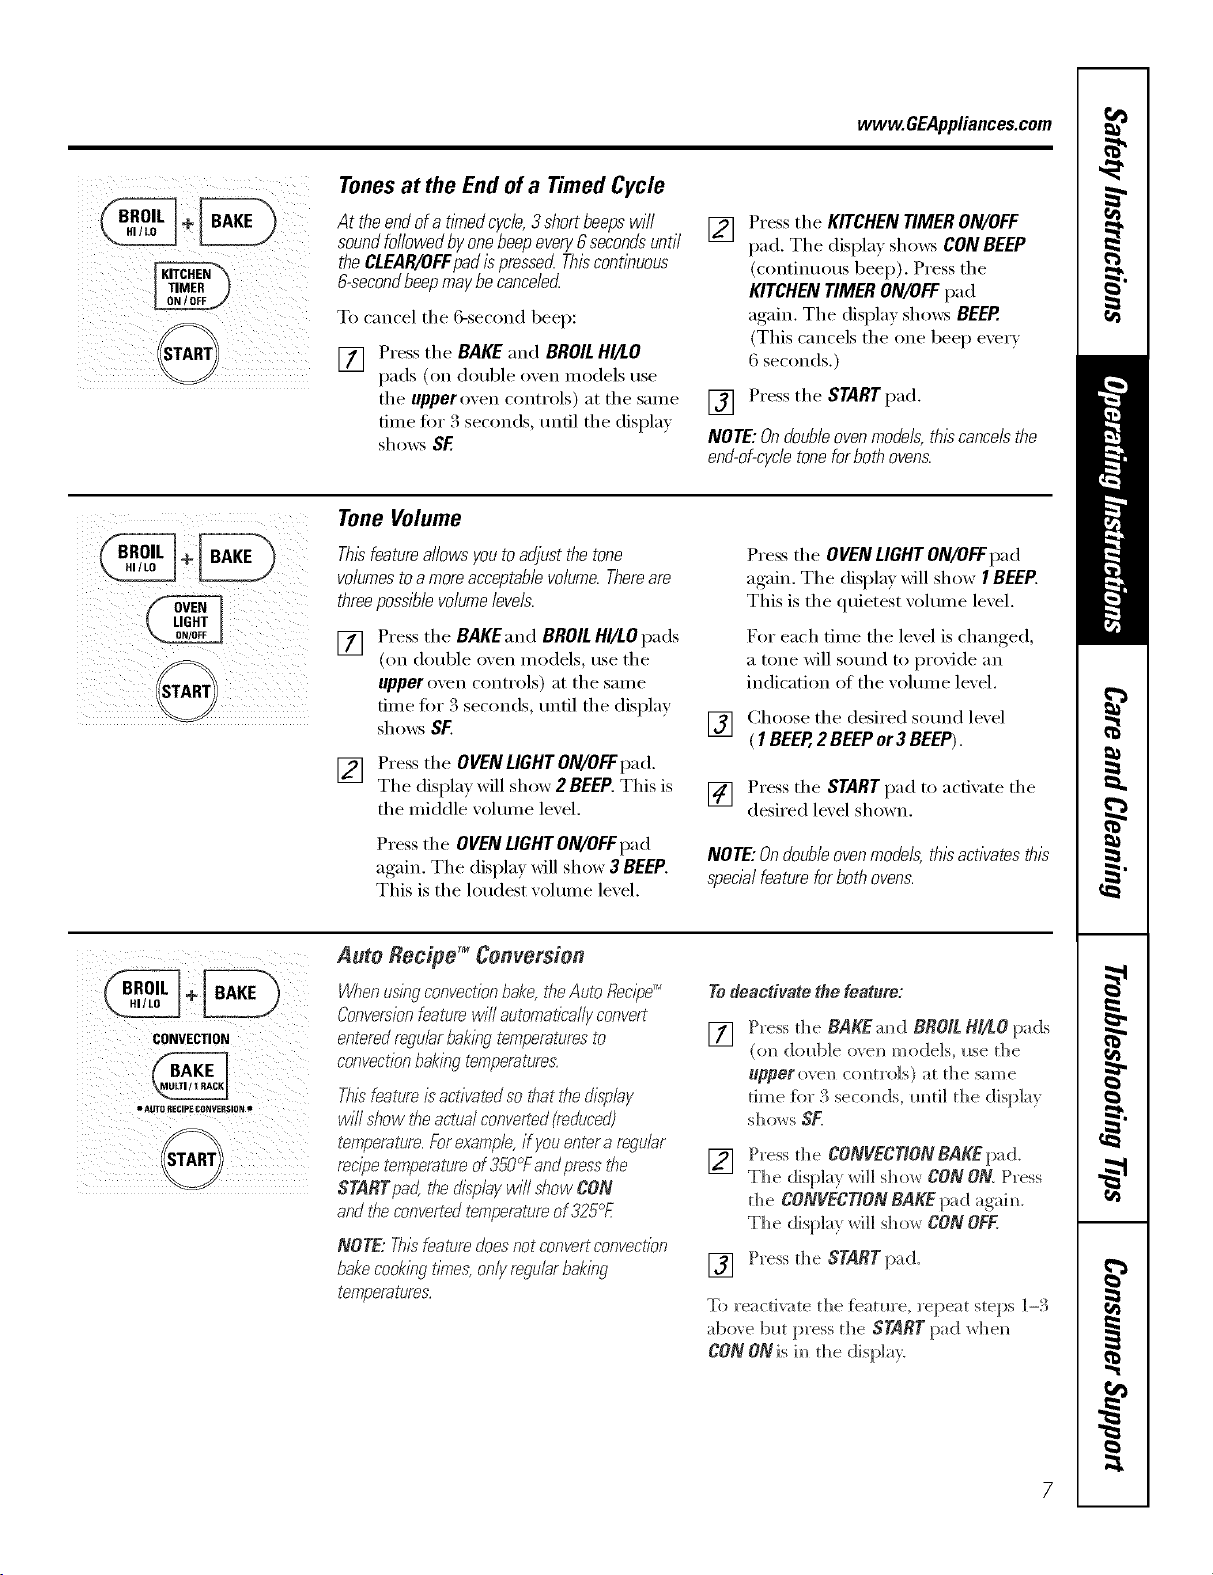
Tonesat the End of a Timed Cycle
At theendofa tlYnedcycle,3shortbeepswill
soundfollowedbyonebeepevery6secondsuntil
theCLEAR/OFFpadispressecLThiscontleuous
&secondbeepmaybecancelec{
To cancel the 6-second beep:
[]
Press the BAKE and BROILHI/LO
pads (oil double ()veil inodels use
the upper oven controls) at the same
dine fi)r 3 seconds, until the display
shows SF.
[] Press the KITCHENTIMERON/OFF
pad. The displa)shows CONBEEP
(continuous beep). Press the
KITCHEN TIMER ON/OFF pad
again. The display shm_:_ BEEP.
(This cancels the one beep every
6 seconds.)
[] Press the START pad.
NOTE: Ondouble ovenmodels,thiscancels the
end-of-cycletoneforboth ovens.
Tone Volume
Thisfeatureallowsyoutoadjustthetone
volumestoa moreacceptablevolume.Thereare
threepossiblevolumelevels.
[] Press the BAKEandBROILHI/LOpads
(on double oxen models, usethe
upperoven controls) at the same
time fl)r 3 seconds, until the display
shows Sf.
[] Press the OVENLIGHTON/OFFpad.
The display will shox_2 BEEP.This is
the middle xolume lexel.
Press the OVENLIGHTON/OFFpad
again. The display xdll show 3 BEEP.
This is the loudest xolume lexel.
Press the OVENLIGHTON/OFFpad
again. The display will show I BEEP.
This is the quietest volume level.
For each time the level is changed,
a tone will sound to provide an
indication of the volmn e level.
[] Choose tile desired sound level
( 1BEER 2 BEEPor3 BEEP).
[] Press the START pad to activate the
desired lexel shown.
NOTE:Ondoubleovenmodels,thisactivatesthis
specialfeatureforbothovens.
CONVECTION
• AUTO _ECIP£ CONV£RSION o
Auto Recipe TM Conversion
Whenusleg convectionbake,the Auto flec/pe....
Conversionfeaturewill automatically convert
entered regularbaklegtempemtura_to
convectionbaklegtemperatures.
This"featureisactivated sothat the displey
will show the actualconverted(reduced)
temperature.Fore_ample,if youentera reguler
recipe temperatureof350°Fandpressthe
STARTpad, the displey will sMw CON
and #_econvertedt_mpemtureof 325°£
NOTE: This"bature doesnot convertconvectTon
bakecooklegt/_ms,only regulerbakleg
t_mperatures.
Tedeactivate thefeature:
[]
Press d_e BAKE:rod BROILH//LOpads
(tin dol_ble ove_* models, I_se tl_e
upperovel_ comrols) :it d_e same
dine {or 3 sec(mds, Imd] d_e (lisp]a}
sDows SF.
[]
P_'essd_e CONVECTIONBAKEpa d.
TDe displa_ will show CONON P_'ess
the CONVECTIONBAKEpad "agaim_.
The display will show CON OFF.
[] Press d_e STARTpad.
To reactivate the [batm'e, repeat steps 1-3
above but press the START pad whel_
CON ONis im_th e displa?.
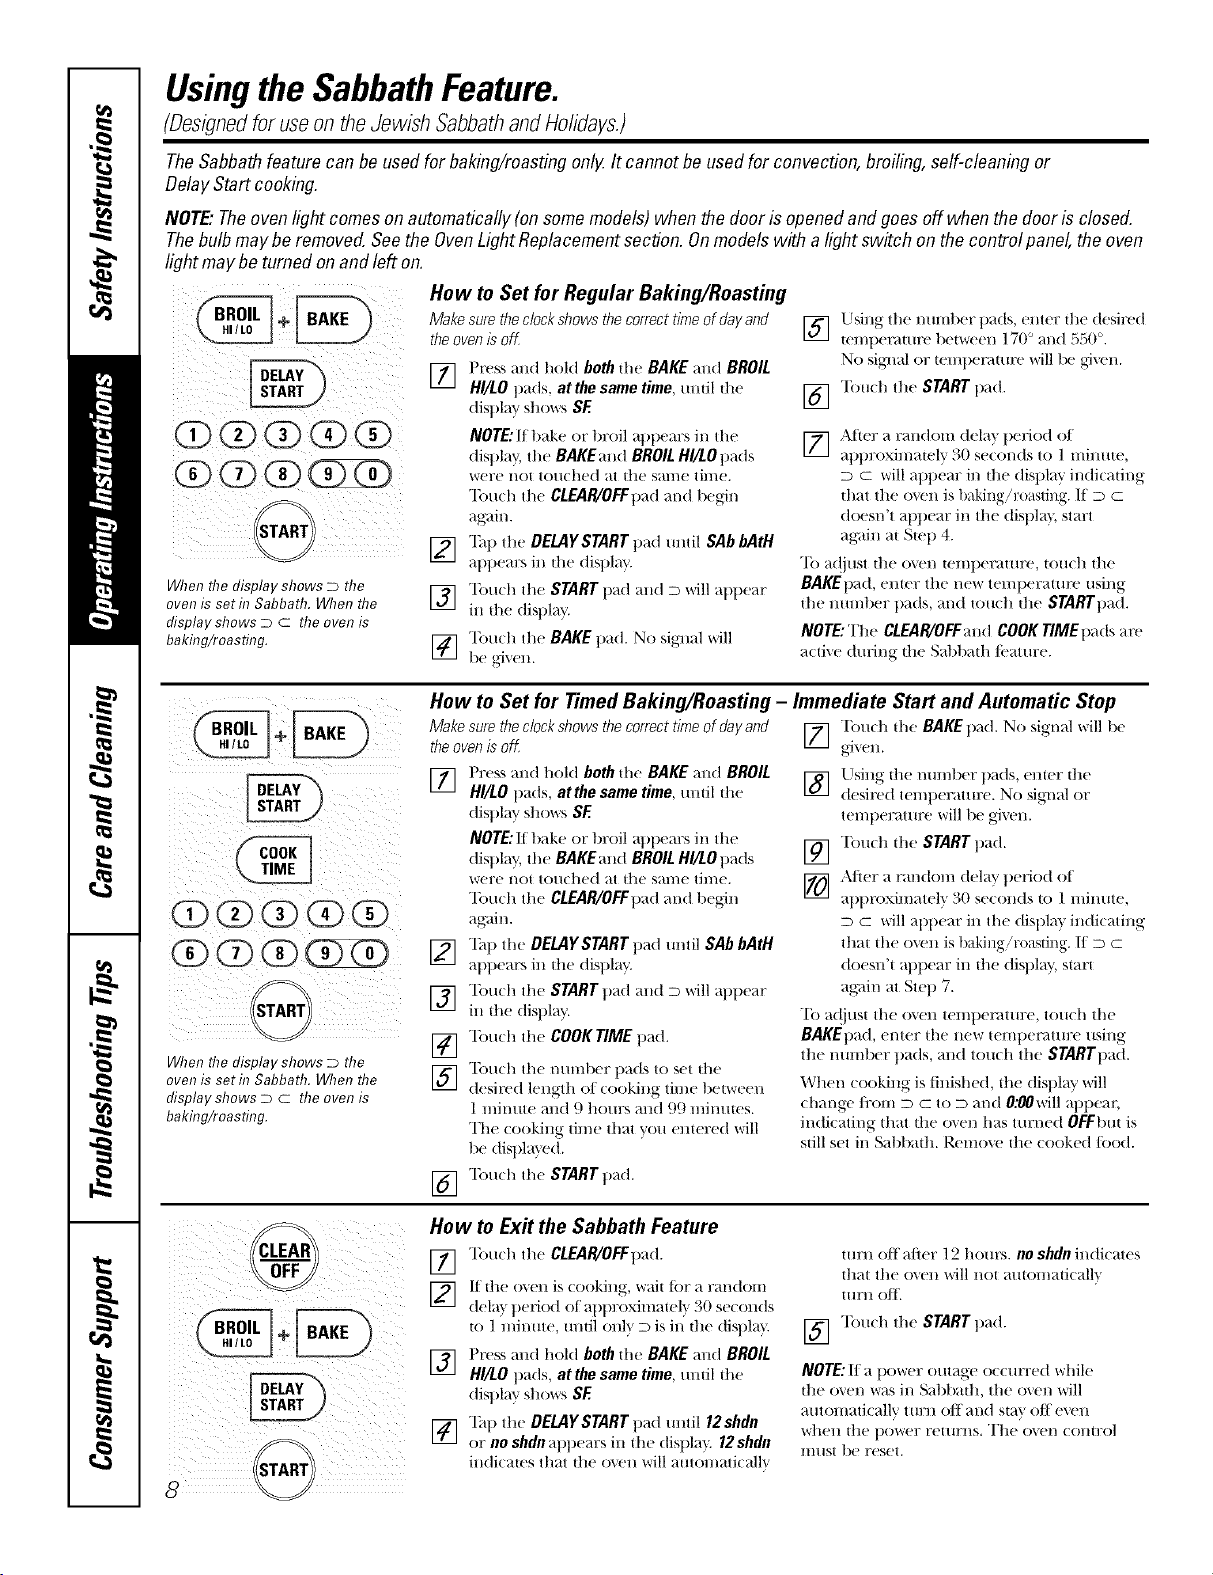
UsingtheSabbathFeature.
(Designedforuseon theJewish SabbathandHolidays.)
TheSabbathfeature canbe usedfor baking/roastingonlg It cannot be usedfor convection,broiling,self-cleaningor
DelayStart cooking.
NOTE."Theovenlightcomesonautomatically(onsomemodels)whenthedoorisopenedand goesoff whenthedoor is closed.
Thebulbmaybe removed.Seethe OvenLightReplacementsection. Onmodelswith a lightswitch on thecontrolpanel,theoven
lightmay be turnedonand left on.
When the display shows D the
oven is seth7 Sabbath. When the
display shows D C the oven is
bakhTg/roasting.
How to Set for Regular Baking/Roasting
Make surethe clockshows thecorrect time of day and
theoven is off
] Press and hold both all( BAKE and BROIL
HI/LO pads, at the same time, umil die
dispkly sllows SE
NOTE:If bake or broil appears ill tile
display, the BAKEand BROIL HI/tOpads
were not touched at the stone time.
"Ibuch the CLEAR/OFFpad mad begin
again.
r2] "lhp the DELAYSTART pad mltil SAb bAtH
_q)pears in the display.
] "lbuch the START pad and D will appear
in tile display.
] "lbu(h the BAKE pad. No siglml will
be give..
Using the nmnber pads, enter the desired
] ten/pet_mlre between 17(F +rod 55,0°.
No sigl/_d or tell/pet;it/ire will 1x! gJxel/.
] T(Tll(h Ill(! STARTpad.
[] ,\tier a random (lela)pedod oI
_q)proxinmteb' 30 se(onds to 1 minute,
D C will appear in die display in(ti(adng
that the oven is baking/r(msdng. If D C
doesn't _l)])ear ill tile (tispla}. stm:t
aKain at Ste t) 4.
"Ib a(!just tile oven temperature, touch tile
BAKEpad, emer tile new temperature ,sing
die nmnber pads, and touch the STARTpad.
NOTE: The CLEAI_OFFand COOK rIME pads at'('
active (huJng the Sabbath/i.'amre.
When the display shows D the
oven is seth7 Sabbath. When the
display shows D C the oven is
bakhTg/roasting.
How to Set for Timed Baking/Roasting -
Make surethe clockshows thecorrect time of day and
theoven is off
] Press and hold both die BAKE and BROIL
HI/LO pads, atthe same time, mnil dw
display shows SE
NOTE:If t)_&e or broil appem's ill the
display, the BAKEand BROIL HI/LOpads
were I/O1 toll(hell at the S;ll//( tll//e.
"lbudt the CLEAR/OFFpad and begin
again.
[_ Tap the OEMYSNRT pad m/til SAb bAtH
appears ill the display.
] "Ibu(h the START pad and D will appear
ill the display.
[_ "lbu(h the COOK TIME pad.
] "Ibu(h the nmnber pads to set the
desired length of looking time betweell
1 minute and 9 hom:s and 99 mintltes.
Th( (()()king time that you entered will
l>e displa}ed.
"lb/mh the START pad.
[]
Immediate Start and Automatic Stop
[] "[}m(h the BAKEp_ld. No signal will l>e
Llsing the nmnber t)_(ts, enter the
] desired temperattu:e. No sigl/_d or
temperamt'(' will be givt'n.
] "['ou(h the START pad.
[_ After a random delay period of
approximatel'_ 30 se(on(Is to 1 mint,e,
D C will appear in tile displ m in(ticating
that tile oven is 1)aking 'r(msdng. 11 D m
doesn't at)peru: in tile displm4 st_lrt
ag;fin at Step 7.
To a(!iust tile o\en tempet_mlre, touch tile
BAKEpad, enter tile new temperature using
tile number pads, and touch tile STARTpad.
When cooking is tinished, the displm; will
(hm/ge/i'om D C to D mid 0;_0\*,rill appem2
indi(ating that die o_en has turned OFFbm is
still set in Sablmdl. P,emove die cooked/ood.
How to Ex# the Sabbath Feature
[77 "]bud/the CLEAR/OFFpad.
] If the o_e]J, is looking, wait tbr a rm/doHJ,
dela} period of approxhnawl}' 30 seconds
to 1 minute, until onlx, D is in the (tispl+0
F_] Press and hold both the BAKE and BROIL
IJI
HI/tO pads, at the same time, tmtil the
display S] _( >_%rs SE
[_] "lhp the DELAYSTART p_d mlti112shdn
or no shdn;wpem:s in the (tisl)l; 0 12shdn
indi(aws that the oxen will mm)n/ati(_dh'
turn (>if'after 12 hours, no shdnindicates
|hal the ()',,'ell will I/O| ;t/||Ol//_t|iC_tll_
Hlrll OfF.
] "lbu(h the START pad.
NOTE:If a 1lower outage occun:ed while
the o_en was ill Sabbath, the o\en will
atltOl/latJcallv ttlrll oil alia St+l\ oil evell
v_llell tile power ret/Irl/S+ The ovel/ COlltrol
lIltlSt be reset.
Usingthe oven. www.GEAppliances.com
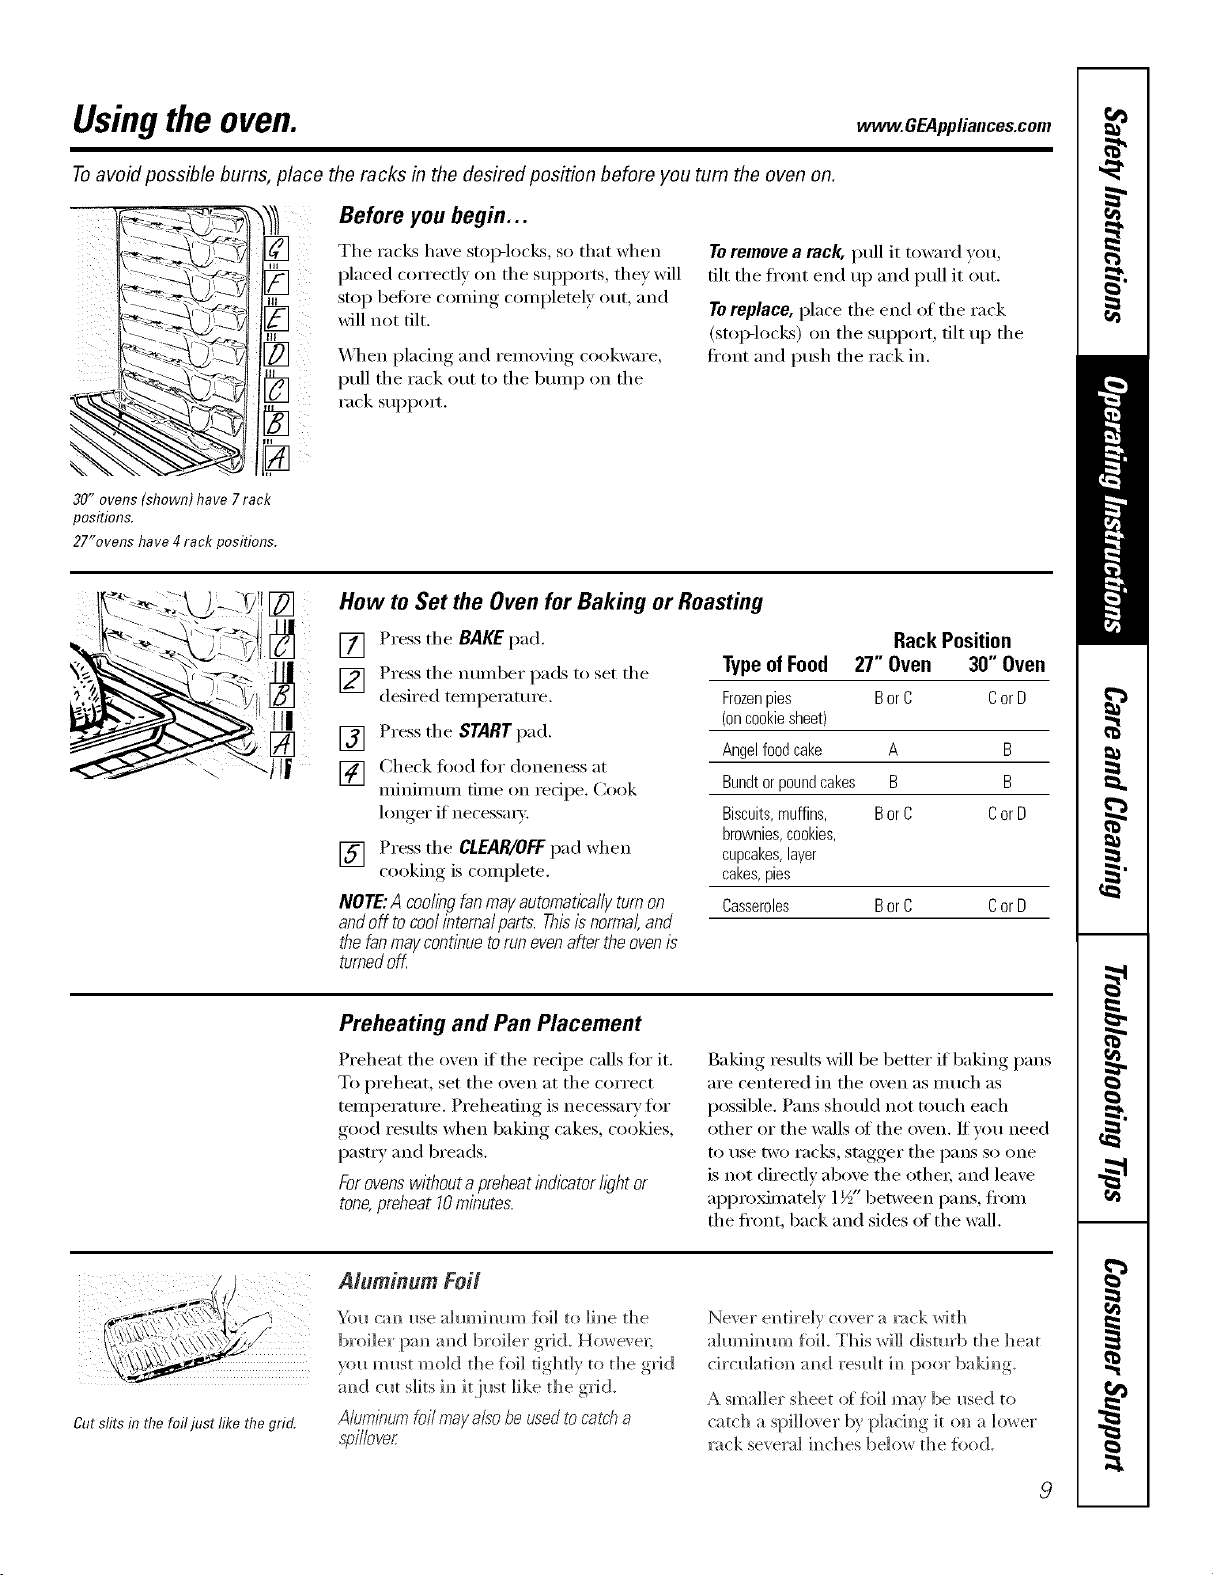
Toavoid possible bums, place the racks in the desired position before you turn the oven on.
_-._. To_q,__ -_
,--2. []
[]
30"ovens(shown)have7rack
positions.
27"ovenshave4rackpositions.
Before you begin...
The rack,4 have stop-locks, so that when
placed correctly on the supports, they will
stop betore coming completely out, and
will not tilt.
_._]/ell placing and remo_ing cookware,
pull the rack out to the bmnp on the
rack SUl_pom
Toremove a rack, pull it toward you,
tilt the fl'ont end up and pull it out.
Toreplace, place the end of the rack
(StOlMOCkS) on the sui)i)ort, tilt up the
fl'ont and push the rack in.
How m Set the Oven for Baking or Roasting
[] Press the BAKEpad.
] Press the ntllllbeI" pads to set the
desired temperature.
[] Press the STARTpad.
[] Check ti)od Ira" doneness at
minimum time on recipe. Cook
longer if necessa_).
[] Press the CLEAR/OFFpad when
cooking is complete.
NOTE:A coolingfanmayautomaticallyturnon
andoff tocoolintema/parts.Thisisnormal,and
thefanmaycontinuetorunevenaftertheoven/s
turnedoK
Rack Position
Typeof Food 27" Oven 30" Oven
Frozenpies BorC CorD
(oncookiesheet)
Angelfoodcake A B
Bundtorpoundcakes B B
Biscuits,muffins, BorC CorD
brownies,cookies,
cupcakes,layer
cakes,pies
Casseroles BorC CorD
Preheating and Pan Placement
Preheat the oven if the recipe calls fiw it.
To preheat, set the oven at the correct
temperature. Preheating is necessary tiw
good results when baking cakes, cookies,
pastr,v and breads.
Forovenswithout apreheat indicator/i)ht or
tone,preheat 10minutes.
Baking results will be better if baking pans
aI'e centeI'ed in the oven as Illtlch as
possible. Pans should not touch each
other or the walls _ff the oven. If um need
to rise tWO I'aCk% stagger the pans so one
is not directly above the othe_; and leave
appro_mately 1½" between pans, ti'om
the ti'ont, back and sides of the wall.
_...? ,¢/
Cutslitsin the foiljust like the grid.
Aluminum Foil
"ki_ cm_ _se {oil to ]i_e the
broiler [xm a_d broiler ,grid. However;
)ou m_st mold the Jail tightly to the grkI
m_d c_a slits i_ it i_st like the g_id.
Aluminumfoil mayalso be usedto catch a
s'pi/Iover
Never el_th'elv cover a _ck with
aMmhmm %]L This wiI] distm'b the ]]eat
circ_]atiol_ m_d res_]t h_ poor baki_g
A smaller sheet of fb]] may be _sed to
ca tc]] a spi]]_ er by p]a ci _g it o_ a ]_ er
rock several h_ches be]o_ the %od.
9
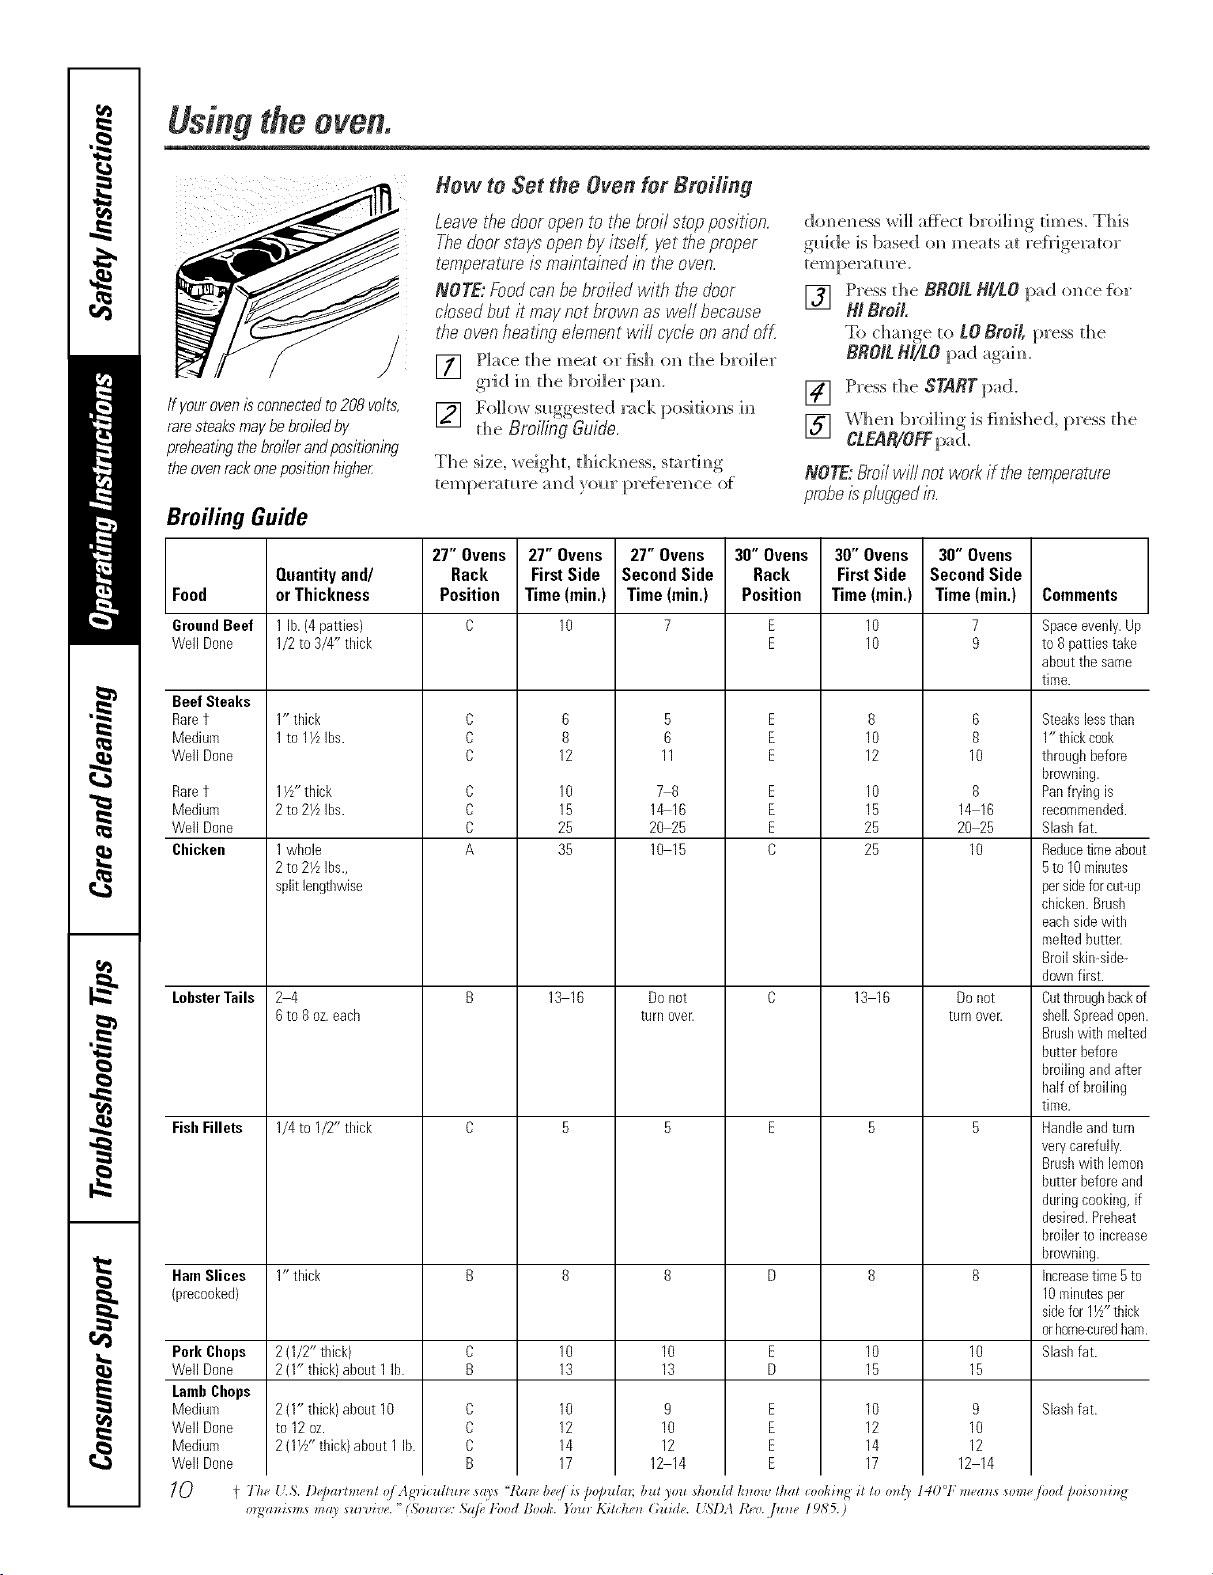
Usingtheoven.
ff your oven is connected to208 volts,
rare steaks may be broiled by
prebeating the broiler andpositioning
theoven rackoneposition higbe_
How to Set tile Oven for Broiling
Leavethedooromento #_ebroil stopposition.
Thedoorstaysomenbyiteelf,yet tireproper
temperatureis maintainedb tf_eoven.
NOTE:Foodcanbebroiledw/tf_tiredoor
cbsed butit maynotbrownaswell because
theovenheatingebment wifl cycleonandoff.
[] Place the meat or fish o]_ the broiler
gild i m_the broiler pa m_.
[] Follow s_ggested ]_ck positiom_s im_
the BroiLing Guide.
The size, weighL thick]_ess, startim_g
tempemtm'e :md }ollr [>re{ere]_ce of
dom_e]_ess will af}ect broi]h_g dines. This
g_dde is b_sed oN_meats at re{}Jge_:_tor
tempemtm'e.
[] Press the BROIl NI/LO pad m_ce for
N Broil
To cha_ge to LO Broil, press the
BNO/L N//LO pad agaim
[] Press the SNRT pad.
[] _'_l]e]_ broilim_g is fim_ished, press the
CLEA_OFFpad.
NOTE:Broilwillnotworkif thetemperature
probe is plugged b.
Broiling Guide
27" Ovens 27" Ovens 27" Ovens 30" Ovens 30" Ovens 30" Ovens
Quantity and/ Rack First Side Second Side Rack First Side Second Side
Food or Thickness Position Time(rain,) Time(rain,) Position Time(rain,) Time(rain.) Comments
GroundBeef 1lb. (4patties) C 10 7 E 10 7 Spaceevenly.Up
WellDone 1/2to 3/4" thick E 10 9 to B pattiestake
about thesame
time.
Beef Steaks
Raret
Medium
WellDone
Raret
Medium
WellDone
Chicken
LobsterToils
FishFillets
1" thick
1to 17LIbs.
Pork Chops
WellDone
LombChops
Medium
WellDone
Medium
WellDone
1I//' thick
2 to21/LIbs.
1whole
2 to27_Ibs.,
split lengtbwise
24
6 to 8oz.eacb
1/4to I/2" tlfick
C
C
C
C
C
C
A
B
8
12
10
15
25
35
13 16
5
B
11
78
1_16
20 25
10 15
Donot
turn over.
E
E
E
E
E
E
C
8
10
12
10
15
25
25
13 16
6
8
10
8
14 16
20 25
10
Donot
turnover.
HamSlices 1" thick B 8 8 D 8 8
(precooked)
2 (1/2" thick) C 10 10 E 10 10
2 (I" thick)about 1lb. B 13 13 D 15 15
Slashfat.9
10
12
12 14
C
C
C
B
10
12
14
17
2 (1"thick)about 10
to 12oz.
2 (17/' thick)about 1 lb.
E
E
E
E
10
12
14
17
9
10
12
12 14
Steakslessthan
1" thickcook
throughbefore
browning.
Panfn/ing is
recommended.
Slashfat.
Reducetimeabout
5to 10minutes
persideforcut-up
chicken.Brush
eachsidewith
meltedbutter.
Broil skin-side-
downfirst.
Cuttbroughbackof
shell.Spreadopen.
Brushwitb melted
butter before
broilingandafter
half of broiling
time.
Handleandturn
verycarefully.
Brushwith lemon
butter beforeand
duringcooking,if
desired.Preheat
broiler to increase
browning.
Increasetime 5to
10minutesper
sidefor 1½"tbick
orhome-curedham.
Slashfat.
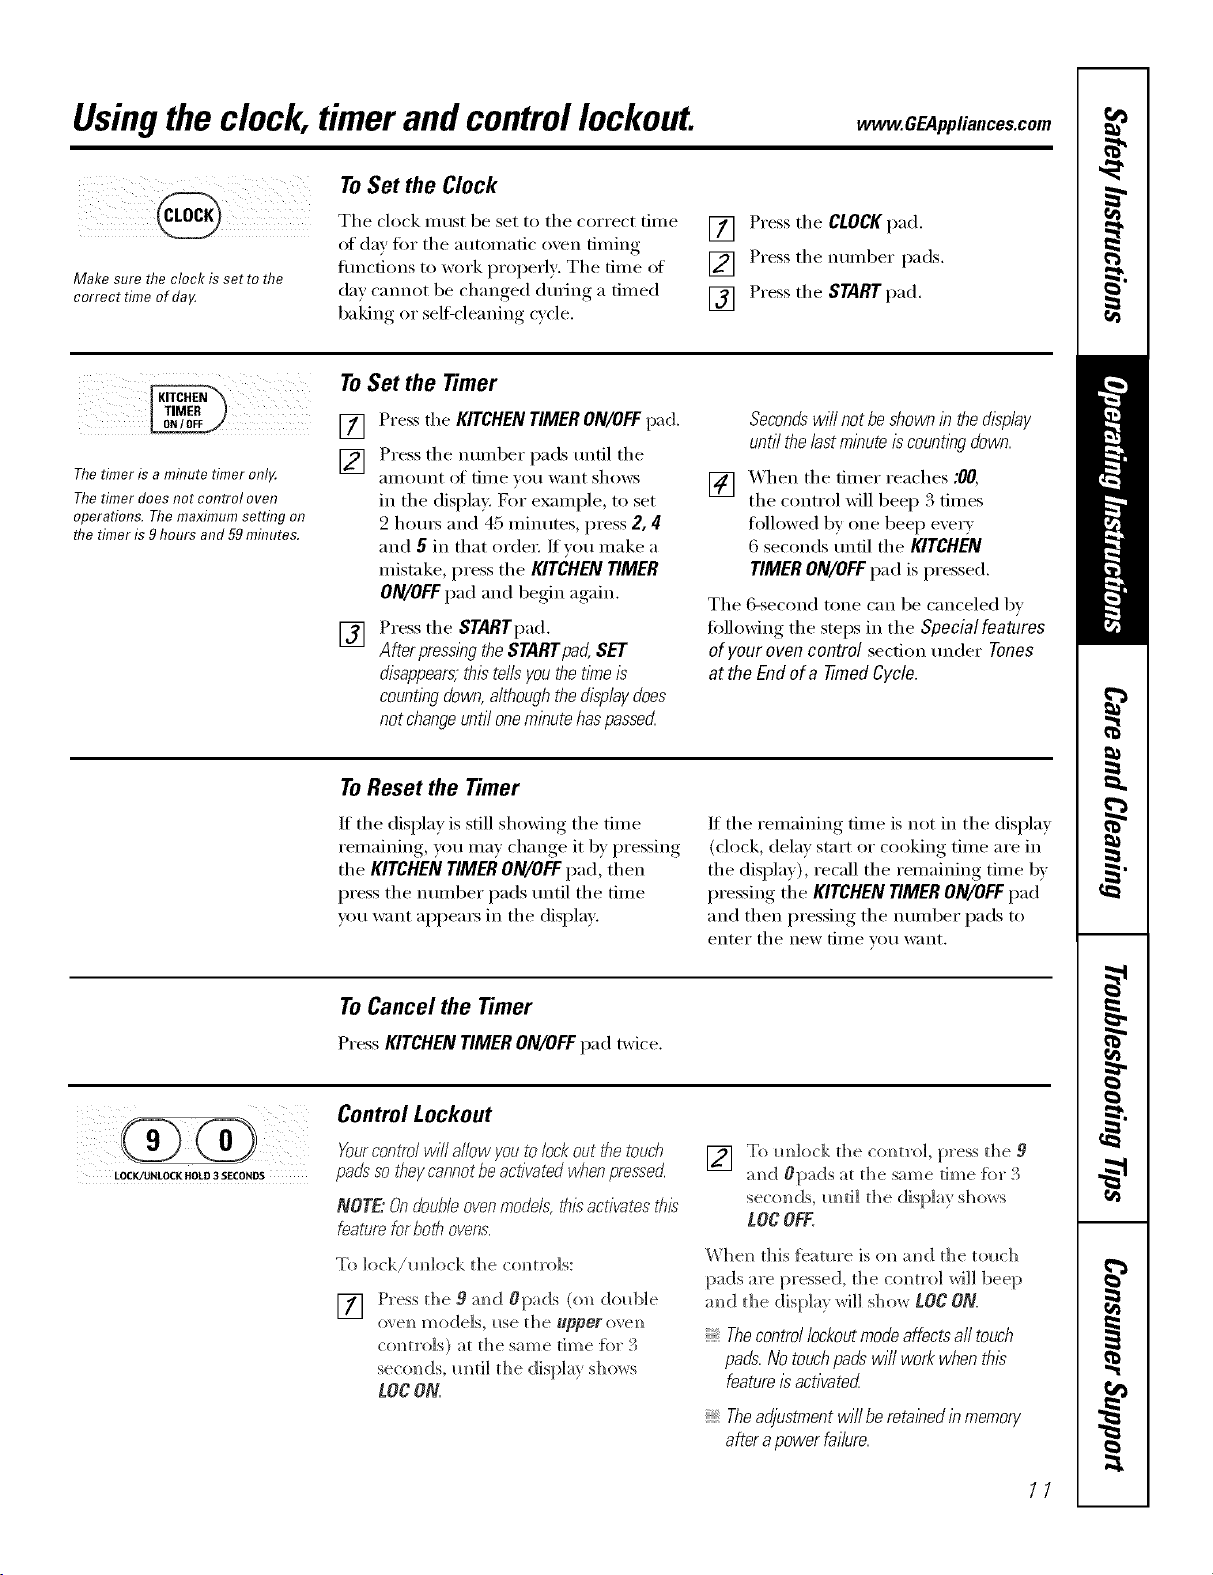
Usingthe clock, timerandcontrollockout. CE4pplia.cescom
Make sure the clock is set to the
correct time of da,¢
To Set the Clock
The clock must be set to the correct time
of day fin" the automatic oven timing
flmcfions to work properly: The time of
de)' cannot be changed during a timed
baking or sel6cleaning cycle,
[] Press the CLOCKpad.
[] Press the number pads.
[] Press the START pad.
Thetimer is a minute timer onl,¢
Thetimer does not control oven
operations. The maximum setting on
the timer is 9hours and 59mhTutes.
ToSet the Timer
[] Pressthe KITCHENTIMERON/OFFpad.
[] Press the number pads tmtil the
_III]OIXI]t of [iI]]e }OH want shows
in the display. Her example, to set
2 hem's and 45 minutes, press 2, 4[
and 5 in that order If you make a
mistake, press the KITCHEN TIMER
ON/OFF pad and begin again.
[]
Press the STARTpad.
After pressl))gthe STARTpad, SET
disappears,this te//syou the tlYneis
countl)_gdown, although the disp/aydoes
not changeunti/ oneminute haspassecL
Secondswi//notbeshownin thedisp/ay
unti/the/astminuteiscountingdown.
[] _._hen the timer reaches :00,
the contxol will beep 3 times
followed by one beep e'_er_
6 seconds tmtil the KITCHEN
TIMERON/OFFpad is pressed.
The 6-second tone can be canceled by
following the steps in the Special features
ofyour ovencontrol sect.ion under Tones
atthe Endof a timed Cycle.
ToReset the Timer
If the display is still showing the time
remaining, you may change it by pressing
the KITCHEN TIMER ON/OFF pad, then
press the number pads tmtil the time
you want appeax_ in the display.
If the remaining time is not in the display
(clock, delay stnrt or cooking time are in
the display), recall the remaining time by
pressing the KITCHENTIMERON/OFFpad
and then pressing the number pads to
enter the new [iI]]e VOH l_lI]t,
ToCancel the Timer
PressKITCHENTIMERON/OFFpad twice.
LOCK/UNLOCK HOLD 3 SECONDS
Control Lockout
Yourcontm/wilYa/lowyoutolockoutthetouch
pads" so bey cannot be activated w¢_enpressed.
NOTE.: On double oven models, thL_activates this
feature for both ovens.
To ]ock/mdock the commo]s:
[] Press d_e 9 m_d Opads (o_ dold]]e
ovem] mode/s, use t]]e @perm em_
centre/s) at the sm_e time {or 3
seco_ds, m_ti] the display shows
LOCON
[] To mllock the c(mtro], press the 9
amid #pads at t]]e same time [br 3
seconds, m_ti] the display shows
LOCOFF.
W])el) this {eatm'e is el) a_]d the tol_(;])
pads are pressed, the coNm'ol will beep
m_d the display _rH]] S]_OW [OC ON.
Thecontrollockoutmodeaffectsall touch
pads.Notouchpadswi//workwhenthis
featureisactivated
Theadjustmentwi//beretalhedinmemory
afterapowerfailure.
11
Usingthetimedbaking androastingfeatures.
On double oven models, you can use timed baking in one oven while using self=clean in the other; you can also use
timed baking in both ovens at the same time.
NOTE"Foods that spoil easily--such as mLIk,eggs, fish, stuffings, poultry and pork--should not be allowed to sit for
more than t hour before or after cookirlg. Room temperature promotes the growth of harmful bacteria. Be sure that
the oven light is off because heat from the bulb will speed harmful bacteria growth.
(Z)(Z) 0
(!) (2)O (D 0
How to Set an Immediate Start and Automatic Stop
Tireoven will turnon immediatelyandcookfor a Press d_e START pad.
selectedlength of time.At the endof the cooklbg []
time,the ovenwi//turn offautomat/ba//y The displa_ will show the ch;)._L_m__
Make sm'e the clock shows the correct
dine of day.
[] Press the BAKE pad.
[] [!sim_gthe mm_ber pads, e]_ter the
desired tempe_;m u'e.
[] Press d_e COOKTIME pad.
NOTE:/f yourreciperequirespmheatbg you
mayneed to addadditional fi_le tothe langth
of the cook#_gtl_e.
] [ ]sim_, the mm_l)er pads, em_ter the
desired 1)akim_gtime. The o've_
tempe]_tm'e amid the cookim_gtime
that _r_ el_tered will be displayed.
tempe_;ffm'e (startim_gat ] 00°_') aN_dthe
cookiN_g time. The display starts cha_g_g
o_ce the temperatm'e reaches ]00°_4_,
NOTE."Ondouble ovenmodels,when using ,5oth
ovensat the sametime,,t¢_etimes show/hgin the
di_rilaywill be for the lastovenset Todisplay the
time set for the first ovenset,press be COO_
TIME pad for #Tatoven.
The o_en will conti_ ue to cook fbr the
[)rogl_mm_ed amolmt of time, thel_ slmt
off a _tom a ti call y. _n 1ess the WARM
fbamre was set. See d_e How to Sot the
Oven for Warming section.
Press the ClEAR/OFF pad to clear
the display.
i ¸¸iii@ ii
12
How to Set a Delayed Start and Automatic Stop
Youcanset the ovencontrol to delay-startthe
oven,cookfor a specificlength of time andthen
turnoff automattcal/y
Make sure the clock shows the correct
time of day.
If you would like to check the times w_u
have set, press the DELAYSTARTpad to
check the start time you have set or press
the COOKTIME pad to check the length
of cooking time you have set.
[] Press the BAKEpad.
[] Using the number pads, enter the
desired temperature.
[] Press the COOKTIME pad.
NOTE:If yourreciperequkespreheating, you
mayneed to addadditional time tothe length
of thecookbg time.
[] Using the number pads, enter the
desired baking time.
[] Press the DELAYSTART pad.
[] Using the nt]mber pads, enter the
time of da)}ou want the oxen to
ttlI'n on and start cooking.
[] Press the STARTpad.
NOTE:An attention tonewill soundif youare
using timedbakinganddo notpress the START
padafter entenbg thebakingtemperature.
X'_hen the oven tm'ns on at the time
of day you haxe set, the display will
show the changing temperatm'e
(starting at l O0°F) and the cooking
time. The display starts changing once
the temperature reaches lO0°E
NOTE."Ondouble ovenmodels,when using both
ovensat thesame t_Yne,the timesshow_hgin the
d_splaywill be for the lastovense£ Todisplay the
time set for the fkst ovenset,press the DELAY
STARTor the COOKTIME pad for that oven.
The oven will continue to cook for the
I)r°grammed, am(rant of time, then shut
off automatically tmless the _ a,I42_/l
teatm'e was set. See the How to Sot the
Oven for Warming secdon.
Press the CL_IR/OFF pad to clear
the display.
Usingtheprobe. . .CEA ,ia.ces.com
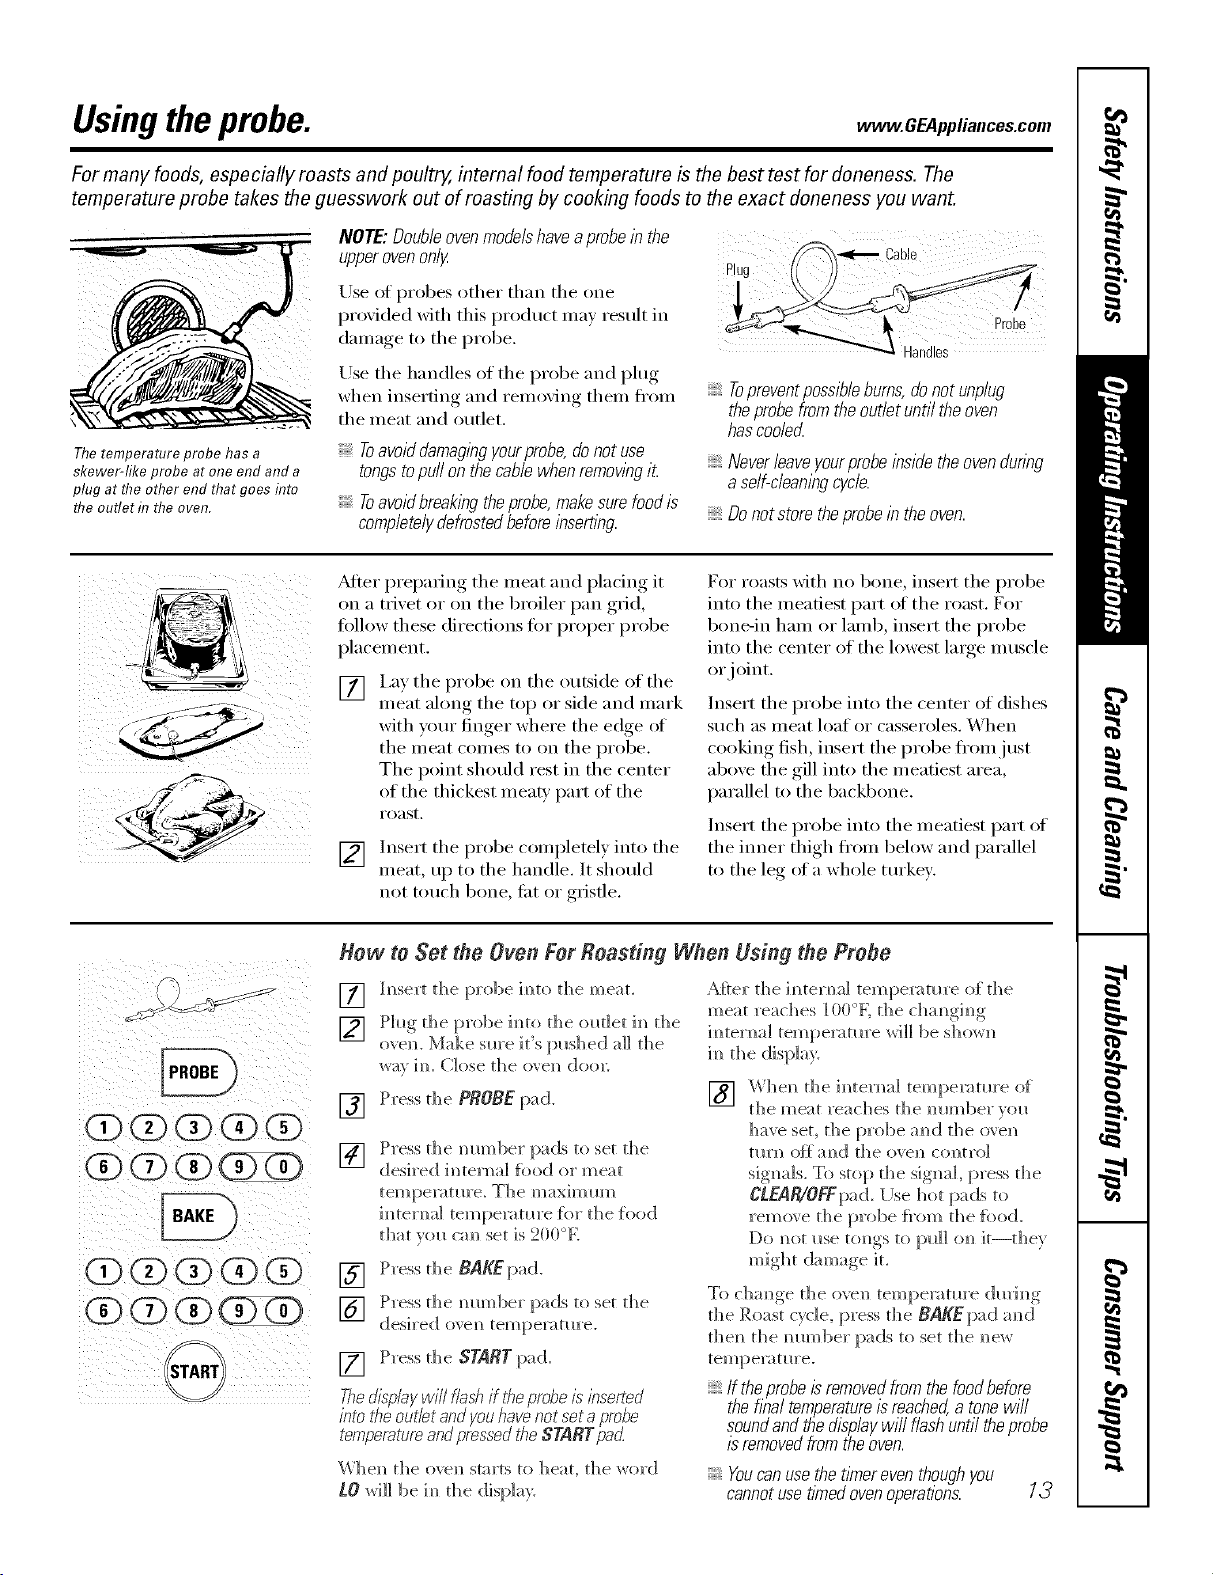
For many foods, especially roasts and poultry, internal food temperature is the best test for doneness. The
temperature probe takes the guesswork out of roasting by cooking foods to the exact doneness you want.
The temperature probe has a
skewer-like probe at one end and a
plug at the other end that goes flTto
the outlet h7 the oven.
NOTE'.Doubleoven modelshaveaprobe in the
upperovenonly
Use ot probes other than the one
l)rovided with this product may result in
damage to the probe.
Use the handles of the probe and i)lug
when inserting and removing them If'ore
the meat and outlet.
Toavoid damagingyourprobe,,donot use
tongstopull on thecable when removingit
Toavoid breakingthe probe,makesurefood b
completelydefrostedbeforeinserting
Plu
Topreventpossiblebums, donot unplug
theprobe from theouflet until the oven
hascooled
Neverleaveyourprobeinsidetheovendunng
a self-cleanlegcycle.
Donotstoretheprobeintheoven.
_Mter prepadng the meat and placing it
on a trivet or on the broiler pan grid,
tollow these directions fi)r proper probe
placement.
ii/ iiii ii ii_
I,ay the probe on the outside of the
meat ahmg the top or side and mark
with your finger where the edge ot
the meat comes to on the probe.
The point shouhl rest in the center
of the thickest meat)' part of the
i'oast.
Insert the probe completel) into the
meat, up to the handle. It shouhl
not touch bone, tiK or gristle.
For roasts with no bone, insert the probe
into the meatiest part ot the roast. For
bone-in ham or lamb, insert the probe
into the center of the lowest large muscle
or joint.
Insert the probe into the center of dishes
such as meat loaf or casseroles. When
cooking fish, insert the probe If'ore just
above the gill into the meatiest area,
parallel to the backbone.
Insert the probe into the meatiest part of
the inner thigh fl'om below and parallel
to the leg of a whole turkey.
i0 (3)(i)¸¸(3)
i(D0 ¸¸(3)¸¸¸(3)¸(3)
i ii @ i
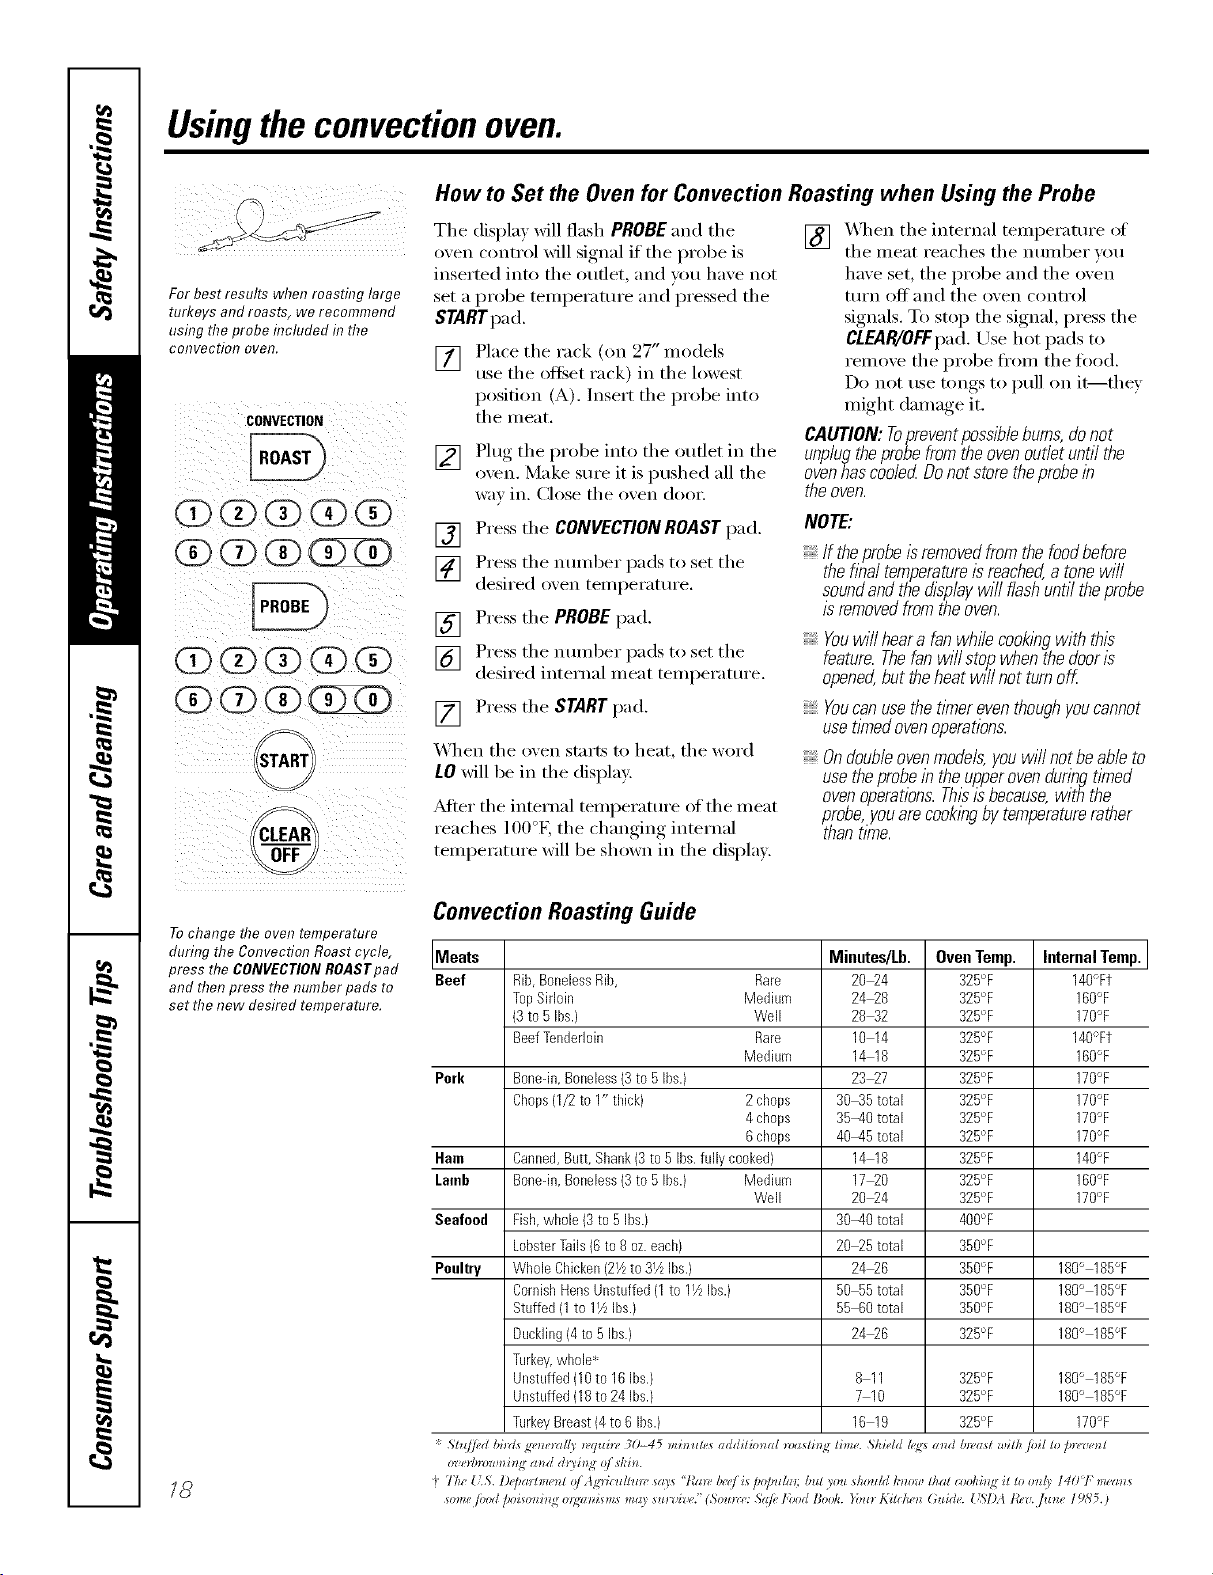
How to Set the Oven For Roasting When Using the Probe
[]
[]
h?sert the probe ira?to the meal
Phtg_ thet)robeim)totheol_t]etim) the
ovel). Make sure iffs pushed a]] the
wa_ im Close the ove]_ deal:
[] Press the PROBE pad.
[]
Press d_e mm]ber pads to set t]_e
desired i_]tema] food or meat
tern pemt_re. The
im_temal tempe_wmre [br the food
that you cm_ set is 200%
[] Press the BAKEpad.
] Press d_e mm_ber jpads to set d_e
desired ovem_temperature.
[] Press the SgARg pad.
The.dipole/will flest_if theprobeis leserted
into the outlet andyouhavenot set aprobe
temperatureandpressedthe $TART pad
V,'hel_ the ovel_ starts to heat, the word
tO will be im_the display.
A:Rer the h_ tern al tern peru tu re of the
meat reaches 100°K the chm_gh_g
im_tema] temperature wi]] be shom_
im_the display.
] Whel_ the imemal temperature of
t]] e m ea t ]'ea C]]es t]_ e m]I_['_b el" ",o I
have set, the probe a_d the o\e_
tm']] ()_ a_)d the ovel) comrol
signals. To stop the signal press the
CLEAR/OFFpa(LUse hot pads to
remo_ e the probe {_'om the {bed.
might dm_age it.
To chm_ge the ovel_ temperature d_rh_g
the Roast cyd e, press the BAKE pad a _ d
the_i the mm_ber pads to set the _ew
tempenffm'e.
?: If the probe is removed from the food before
the final temperature is reached, a tone will
sound and the displaywill flash until the probe
/2removed from the oven.
Youcanuse thetlfner even thoughyou
cannotuse timedovenoperations. 13
Usingtheconvection oven.
Convection Fan
In a convection oven,a fan circulates hot air
over, under andaround the food
This circulating hot air is evenly distributed
throughout the oven cavit_ As a result, foods
are evenly cooked and browned--often in less
time with convection heat
NOTE:The convecdon tim will cycle on
and offwhile cooking to best distribute
hot air in the o',en.
The convection oven tim shuts off when
the oven door is opened, BO NOTleave
the door open for hmg periods of time
while using convection cooking or you
may shorten the life of the convection
heating element,
1-Rack Convection Baking
The convection tim circulates the heated
air exenlv over and arotmd the fi)od
using the bake and 1)toil elelnents.
Whenconvectionbakingwithon/yI rack,use
CONVECTIONBAKEIRACKandforbest
resultsplacetherackonshe/fCorDat the
centeroftheoven.Cooktl_nesmaydecrease,
sofoodshouldbecheckedear/ierthanpackage
directionstomakesurethatit doesnotovercook.
Ideal for cooking large casseroles and
lasagna with good results.
Multi-rack position 27" oven.
Multi-rack position 30" oven.
Multi-Rack Convection Baking
Beca_se heated ah" is ch'cn]ated e_,en]_
t])rollg])olK the o_en, foods cm_ be
baked with excellent resla]ts i_sh_g
m i_]tip]e _cks.
The amom_t of time reqldred {or
m_dti-mck ba]dm_g may h_crease slightly
for sore e {bo(N, blot o_emI] tim e is saved
becal_se r_o to d_ree tim es as m (*cb {hod
is cooked at once. Coo]des, ml*f}h_s,
biscuits, m_d od_er (pdck breads give
good resl_]ts with ml_]ti-mck ba]dm_g.
To cook {o()d {m more tham/ o]/e 1wok 1[]
com'ect]om_ bake, i_se CONVECT/ONBAKE
MULTL
30"Ovens
When ba]dN)g on 3 racks, [)]ace one
_:_ck ]m_the sectmd (g)posiritm, o]]e
im_the {bm't]] (D) p(>siti(m a_(;[ (me i_
the 6th (F) position.
_7" Ovens
When baki_)g on 3 rocks, divide the o_en
i_to thirds b} p]aci_]g tile of_qet _ck 1_
tile third (C) _ck positi(m a_(;[ tile
smdght _cks 1_ first (A) a_(] fi)m'th (D)
mck posi ti on s.
For two-rock baking, place tile offset _;_ck
i_ tile bottom (A) _c]<, positiom Place
the straight rock i_ the third (C) rock
CAOT/ON: Whenyouareus@gthe offset rack
(on27" mode/s)b the lowest position (A),you
will need touse cautionwhenpulling the rack
out Werecommend#}atyoupull the rackout
severalinchesand then,using twopot holders:
pull tf_erack out byholding the sidesof it The
offset rackis"low andyoucouldbe burnedif you
place yourhandin t¢}emiddleof the rackandpull
a/Iti_eway out:Be verycarefu/not tobum your
handon the doorwhen usinga rack ihthe lowest
position(A).
14
Adapting Recipes..,
_i_u ca_ use }our fi(x'orite recipes i_ the
CO_)vec[iol) ove]/.
\¢%en co*]vectiot_ baki_g, the Auto
Recipe _'_( o[_versio[_ feature automatically
reduces the set reg-_dar baking
temperature b} the recomme[_ded 25'E
See Aato Recipe _ (_()nversion i_] the
Special Features section.
Usepans/#erecommended
Somepackage_bstructionsfor frozen
casserolesorma_bdisheshavebeen
developedus_bgcommercialconvectionovens.
Forbest results/b this oven,preheat the oven
andusethe temperatureon thepackage.
www.GEAppliances.com.
Roastingrack
,'14r_fFf!11 I _,'_k-'Ft\\_
Grid
0ffsetrack127"m0de!s0nly)
Convection Roast
Goodforlarge tendercuts of meat, uncoverec{
The convection tim circulates tim heated
air evenly over and around the food.
Meat and poult_ T are browned on all
sides as if they were cooked on a
rotisserie. Using the roasting rack
provided, heated air will be circulated
oveI; under and around the fi)od being
roasted. The heated air seals in juices
quickly fin" a moist and tender product
while, at the same time, creating a rich
golden brown exterioi:
_,_]]en you are convection roasting it is
impo_'ant that you use the broiler pan
and grid and the special roasting rack fin.
best convection roasting results. The pan
is used to cat(h grease spills and the grid
is used to prevent grease spatters, while
the rack allows the heated air to circulate
trader the meat and increase browning
on the tmde_ide of the meat or i)oultrv.
Place the rack (on 27" models, use
the offset rack) in the lowest rack
position (A).
Place tim grid on the broiler pan
and put the roasting rack over them,
making sure the posts on the roasting
rack fit into the boles in broiler pan.
Place tim meat on the roasting rack.
CAUTION: Whenyouare using the offset rack
(on27" models)in the/owestposition (A),you
wi// needto usecaution when puffingthe rack
out Werecommendthatyoupuff therack out
severalinchesand then,using twopot holders,
puffthe rack out byholdingthe sides of it The
offset rack is low andyou couldbe burnedif you
piece yourhandin themiddle of the rackandpuff
aft the way out Be verycareful not toburn your
hand on thedoor when usinga rackin the lowest
position (A_
Whenbakingcookies,you will
get the best results if youuse a
flat cookiesheet insteadofa
panwith low side&
Cookware for Convection Cooking
Befiwe using your convecdon oven,
check to see if yore" cookware leaves
room fi:,r air drculation in the oven.
If you are baking with several pans, leave
space between them. _Mso, be sure the
pans do not touch each other or the
walls of the oven.
Paper andPlastic
Heat-resist;rot paper and i)lastic
containers that are recommended fi)r
use in regular ovens can be used in
convection ovens. Plastic cookware that
is heat-resistant m temperatm'es ot
400°F can also be used.
Metal and Glass
Any type of cookware will work in your
convection oven. Howevei; metal l_ans
heat the fi_stest and are recommended
fin" convection baking.
Darkenedormatte-hbishedpanswill bake
faster thanshlbypans.
Glassor ceramicpanscookmoreslowly
For recipes like ovenq)aked clficken,
use a pan with low sides. Hot air cmmot
circulate well arotmd fi)od in a pan with
high sides.
CONVECTION
CLEAR
How to Set the Oven for Convection Baking or Roasting
[]
Press the CONVECTION RAKE MULTg
1RACK pad o_ce (CONVECTION
BAKEMULTI mode ) _br m ul d-m ck
c<mvecdom_ bakim_g. This mode is
Ilsed {k)r cookim/g food items (m
more tham_ once ]v_ck (Le. 2, 3 or
more 1;_1 ks) at the same rime i]]
co]/vecti(m bake. See Multi-Rack
Baking sectio]_ fbr m'_ore
im#brmat]om
Press the CONVECTIONBAKE MULTI/I
RACK pad t_dce (CONVECTIONBAKE I
RACgmode) fbr o_e rack com'ecdo_]
bal@]g. This mode is t_sed fbr
cooki_g fbod items o_ oldy (me
r_ck i_ co*wectio*_ bake.
Press the CONVECTIONROAST pad
] Press the mm_ber pads to set the
desired ove_ temperature.
[] Press the STARTpad.
To chmge the ove]] tempe_vffure, press
the CONVECTION BAKE MULTI/_ RACK or
CONVECTIONROASTpad a_d the]_ the
_ im_be 1"pa (Is to set th e _ e*_ tern pera t_1re.
\Vhe_] the ove_ starts to heat, the
ch a]_gi_ g tern perat_re, sta rti _g a t ]00oK
_rH]] be displayed. \_]]e]] ove]_ reaches the
temperature )(m set, 3 beeps _%rH]] SO_(l.
[] Press ctgaR/OYEpadwhe_ fi_ishe(;L
Youwill hear a fan whilecookingwith
convection.Thefanwill stop when the door_s
opened,but the heat will not turn off
Youmayhear the ovenclick/bgduring
baking. This_snormal. 15

Usingthetimed featuresforconvectioncooking.
On double oven models, you can use timed baking or roasting in one oven while using self-clean in the other; you can
also use timed baking or roasting in both ovens at the same time.
Youwill hear a fan while cooking with these features. Thefan will stop when the door is opened, but the heat will not
turn off.
NOTE"Foods that spoil easily--such as milk, eggs, fish, stuffings, poultry and pork--should not be allowed to sit for
more than 1hour before or after cooking. Room temperature promotes the growth of harmful bacteria. Be sure
that the oven light is off because heat from the bulb will speed harmful bacteria growth.
CONVECTION
(Z)(D (3) (D @
@(3)@@@
@@@(?ZD
@
How to Set an Immediate Start and Automatic Stop
Theovenwillturnonimmediate/)/andcookfora
selectedlengthoftime.At theendofthecooking
time,theovenwillturnoffautomatically
Make sure tile clock sho_,_:s tile correct time
of da)
[] Press the CONVECTIONBAKEMULTI/
I RACKpad once (CONVECTION
BAKEMULTImode) for nmlti-rack
convection baking. Tiffs mode is
used fl)r cooking fi)od items on
more than one rack (i.e. 2, 3 or
more racks) at tile same time in
convection bake. See Multi-Rack
Bakingsection for more intormation.
Press the CONVECTIONBAKEMULTI/I
RACKpad twice (CONVECTIONBAKEI
RACKmode)for one rack convection
baking. This mode is used for cooking
fi)od items on onl) one rack in
COIlVeCfiOI1bake,
Press the CONVECTIONROASTpad
for convection roasting.
] Press tile nmrJber pads to set tile
desired o',en temperatm'e,
[] Press tile COOKTIMEpad.
NOTE:ffgourreciperequirespreheating,youmay
needtoaddaddtionaltimetothelengthofthe
cookingtime.
] Press tile ntlillber pads to set tile
desired length of cooking time. The
minimum cooking dine you can set
is 1ininum, Tile oven temperature
that you set and tile cooking time that
you enmred will be in tile displa):
[] Press tile STARTpad,
Tile displa) Mll show tile changing
temperature (starting at 100°F) and tile
cooking time, Tile displa) starts changing
once tile temperatm'e reaches 100°E
NOTE:Ondoubleovenmodels,whenusingboth
ovensatthesametime,thetimesshowinginthe
displaywillbeforthelastovense_Todisplaythe
timesetforthefirstovenset,presstheCOOK
TIMEpadforthatoven.
Tile o_en willconthltle to cook fi)r tile
progTammed amount of time, then shut
off automaticalb; unless tile \\ARM teatm'e
was set. See tile Howto Setthe Ovenfor
Warmingsectk)n.
[] Press tile CLEAR/OFFpadto clear
tile displa) if necessaU, Remove
the ti)od fl'om tile o_en, Remember;
even thotlgh the oven ttlrns off
automaficall), fi)od left in the oven
willconOntle cooking afier the oxen
turns oftl
16
www.GEAppliances.com
CONVECTION
O@(i)@@
(D(D(X)(D@
(g)(2)(D(])KD
(X)(D (g) (g)(D
(i) (Z)1])
_1START
How to Set a Delayed Start and Automatic Stop
YOUcansettheovencon_'o/todelay-starttheoven,
cookforaspecific/engthof timeandthenturnoff
automati('a//}_
Make sure die clock shows the correct time
of do}
[] Press tt]e CONVECTION BAKEMULTI/
1RACK pad o,_ce (CONVECTION
BAKE MULTI m ode ) {br m _dd-ra ck
c{mvecdo_ baldm_g.This mode is
used [br cookh_g food items ou
more thm_ o]_e ]_c!,t (i.e. 2, 3 or
more l:_cks) at the same lime ]H
convecfio_ bake. See Multi-Rack
Bak/rlg secti(m fi_r m ore ]m_{bm_at]o_.
Press the CONVECTIONBAKE Mg!rl/1
RACK pad tBice (CONVECTIONBAKE I
RACgmode) fbr o_e rack com'ectio_]
baking. This mode is used for cookb]g
food items on o_]y one rack i_]
convection bake.
Press the CONVECTIONROAST pad
f_>r CoHvec_]OH ro;_sti [1_,
] Press the number pads to set the
desired oxei] temi)eri_tm:e.
[] Press the COOK TIME p,d.
NOTE."tf yourreciperequirespreheat/bg,youmay
needtoadd additiona/time tot,§e/engt,§of the
cooklbg tirne.
] Press die mm]ber pads to set the
desired cooking time.
[] Press the DEMYSKARTpad.
] Press die mm]ber pads to set the time
(}ida} }'(}H w;M][ the overt to tH['/] oil
_mdstart cooking.
If youwould/i/_ toche& the t/_nesyouhavese_
pm_ theBEMY STARTpad toc'he&thestarttime
youhaveset,orpresstheCOOKTIMEpadtocheck
the lengthofcookingtimeyouhavese_
[] [qess d_e STARTpad.
NOTE"An attentiontonew/Y/soundif youare
usingtimedbakingormastingand donotpress
the STARTpadafter enteringt,§ebakingor
roastingtern/oerattJr_.
\'_]ell [lie etch tHrils Oil ;it The {lille
of dm _)u ha_e set, the displa} will
(smrdng at 100°F) a_]d the cooking time.
The displa} starts charring oJ]ce the
temperature reaches 11)O"E
NOTE"& doub/eovenme&is, whenusingboth
ovensat thesametime,toetimesshowinginthe
c_L_pbyw/71beforthe/ast ovenset. Todispby the
time setforthe firstovenset,presstheBEL4Y
STARTorCOOKTiMEpadforthatoven.
The o_e_] will continue to cook fbr d_e
programmed amount of' time, tl]en shut
off' automaficall> u[]]ess the WARM f>atu['e
was set, See d_e Howto &ttbe Oven for
Warm£qgsection.
[] Press tl]e CLEAR/OFFpad to clea!
the display if' i]ecessar): Remove
the food f]'om the oven, Remember;
eve_] though tile over! shuts of}'
automatica]!) food left in the o_e_]
wi]l co_]dm_e cooking after the oven
turns ore
17
Usingtheconvectionoven.
For best results when roasting large
turkeys androasts, we recommend
usflTgthe probe flTcluded f17the
cmTvectioI7 oveR.
CONVECTION
0(i)@@@
(3)(!) (1)
@@(i)@@
@
CLEAR
Tochange the oven temperature
during the Convection Roast cycle,
press the CONVECTIONROASTpad
and then press the number pads to
set the new desired temperature.
18
How to Set the Oven for Convection Roasting when Using the Probe
Tile display Mll flash PROBE and tile
oven control will signal if tile probe is
inserted into tile outlet, and you have not
set a probe temperature and pressed tile
STARTpad.
[]
Place tile rack (on 27" models
use tile offset rack) in tile lowest
position (A). Insert the probe into
tile meat.
[] Plug the probe into the outlet in the
oven. Make sure it is pushed ;111the
WaY ill. (lose tile (),,'ell dool:
[] X._q/en tile internal temperatm'e of
tile meat reaches tile number xou
have set, tile probe and tile oven
tllI'n OJ_J_}llld tile oven conti'ol
signals. To stop tile signal, press tile
CLEAR/OFFpad.Use hot pads to
remove tile probe ti'om tile tood.
Do not use tongs to pull on it--they
might damage it.
CAUTION: Toprevent possible bums, do not
unplugtheprobefromtheovenoutletuntilthe
ovenhascooledDonotstoretheprobein
the oven.
[] Press tile CONVECTIONROASTpad.
] Press tile number pads to set the
desired oven tel/lperattlre,
[] Press tile PROBE1);1(1.
] Press tile number pads to set the
desired internal meat temperature.
[] Press tile STARTpad,
When the oven starts to heat, the word
iO will be ill the display.
?dter the internal temperature of the meat
reaches 100°L the changing internal
temperatm'e will be shown in the display.
NOTE:
If theprobeIsremovedfromthefoodbefora
theflba/temperatureisreached,atonewi//
soundandthedisplaywi//flashuntiltheprobe
isremovedfromtheoven.
Youwi//heara fanwhilecooklbgwith this
feature.Thefanwi//sto/_whenthedooris
opened,buttheheatwl//notturnoff
Youcanusethetimereventhoughyoucannot
usetimedovenoperations.
Ondoubleovenmodels,youwillnotbeableto
usetheprobein theupperovenduringtimed
ovenoperations.Thisisbecause,withthe
probe,youarecooklbgbytemperaturerather
thantime.
Convection Roasting Guide
Meats Minutes/Lb. Oven Temp. Internal Temp.
Beef Rib,BonelessRib, Rare 2024 325°F 140°Ft
TopSirloin Medium 2428 325°F 160'_F
(3to 5 Ibs.) Well 2842 325'+ 170'_F
BeefTenderloin Rare 10 14 325°F 140°Ft
Medium 14 18 325'+ 160'_F
Pork Bonedn,Boneless(3to 5 Ibs.) 2327 325°F 170°F
Chops(1/2to 1" tlfick) 2 chops 3045 total 325°F 170'_F
4 chops 35-40 total 32R°F 170'_F
6 chops 40-45 total 325°F 170'_F
Ham Canned,Butt,Sllank(3to 5 Ibs.fully cooked} 14 18 325°F 140'_F
Lamb Bonedn,Boneless(3to RIbs.) Medklm 1720 325°F 160'_F
Well 2024 32R°F 170%
Seafood Fish,whole (3to 5 ibs.} 30-40 total 400°F
LobsterTails(6 to8 oz.each) 2025 total 350°F
Poultry WholeChicken(21/zto 31/zibs.} 2426 350°F 180'_ 185°F
CornishHensUnstuffed(1to 11/zIbs.) 50 55total 350°F 180'_ 185°F
Stuffed(1to 11/zibs.} 55 60total 350°F 180'_ 185°F
Duckling(4to 5 ibs.) 2426 32R°F 180'_ 185°F
Turkey,whole*
Unstuffed(10to 16ibs.) 8 11 325°F 180'_ 185°F
Unstuffed(18to 24ibs.) 7 10 32R°F 180'_ 185°F
TurkeyBreast(4to 6 Ibs.) 16 19 32R°F 170'_F
Sh¢/ed hi_zls g_,_e_vd{v *_,q*_i)_, 30-45 misrules additional _*)afli_; lime. ,Shield h :s mM &vast with/oil to pnpu('_ l
"t T/u' {LS. l)(j)aHmenZ 01 l_'dcu//uw srlls "lCn*l, b(,e/ _s lm/mhn; but _ou s,Souhl I,'now that (ooki_lq _l to o_ /) I401: m(,m_
*ome /oM /,oism*i_g o*;w_L*m* mrly *u_'oi_v." (So*m*': Sdfi, l'bod Bo&. Yo*l_ Kilchen Guide. [ '_I)A icy. flzne 19Y, 5. )

Usingtheproofingand warming features.
Theproofing feature maintains a warm environment useful for rising yeast-leavened products.
_--_
START
CLEAR
How to Set the Oven ForProofing
[] Place the coxered dough in a dish in
the oxen on rack B or C.
NOTE:Forbestresults,coverthedoughwitha
clothorwithgreasedp/asticwrap(theplastic
mayneedtobeanchoredunderneaththe
containersotheovenfanwi//notblowit off).
[] Press the PROOFpad and then the
STARTpad.
The displa)will read PrF (proof),
The oxen interior light turns on and
I'eII/_lins on (hlIJng [)I'OOJ[inbr
The proofing ti_amre automatically
proxides the optimmn temperatm'e tot
theI)r°°fing, process, and therefin'e does
not haxe a temperatm'e a(!jusm_ent.
[] Set the KITCHENTIMERfin the
minimmn proof time.
I
[] X,_q_en }roofing is finished, press
the CLEAR/OFFpad.
Toavoid lowering the oven temperature
and lengtheningproofing tlYne,donot
openthe ovendoorunnecessarily
Checkbreaflproducts earlytoavoid
over-proofing.
NOTE:
Donotusetheproofingmodeforwarming
foodorkeepingfoodhot Theproofingoven
temperatureisnothotenoughtoholdfoods
atsafetemperatures.UsetheWARMfeature
tokeepfoodwarm.
Proofingfeatureonupperovenonly
Proofingwillnotoperatewhenovenisabove
125°E"HOT"wi//showinthed/splay
How to Set the Oven For Warming
The wam_ ti_atm'e keeps cooked foods
warm fin" up to 3 hems after the cooking"
flmction is finished, or
it can be actixated
independentl) to keep ah'ead_ cooked
[oods _V_I Y///.
This teature is not designed to reheat
cold food.
To use this teatm'e independently, press
the WARMpad and then the STARTpad.
To actiwKe this teatm'e fi)r use after
Timed Baking or Roasting, press the
WARMpad while programming the
oven and before pressing START.
ToCrispStale Items
Placefood in lo_sided dishes or pans.
For best results, place the food items in
a single layer: Do not stuck.
i,eave them uncovered.
Check crispness after 20-30 minutes.
Add time as needed.
IMPORTANTNOTES:
Foodshouldbekepthotin itscooking
containerortransferredtoaheat-safe
servingdish.
Formoistfoods,coverthemwithanoven-safe
lid oraluminumfoil.
Friedorcnsp foodsdonot need tobe covered,
but can becometoo dry if warmedfor too long.
Repeatedopeningof the doorallows the hot
ak to escapeand the foodto cool
Allow extra tlYnefor the temperatureinside the
ovento stabih2eafter adding items.
With largeloadsit maybe necessaryto cover
someof the cookedfooditems.
Removeservingspoons,etc.,beforeplacing
containersintheoven.
Donotuseplasticcontainers,hdsorplastic
wrap.
CAUTION:Plasticcontainers,hdsorplasticwrap
willmeltifpiecedintheoven.Meltedplasticmay
notberemovableandisnotcoveredunderyour
warrant_
18
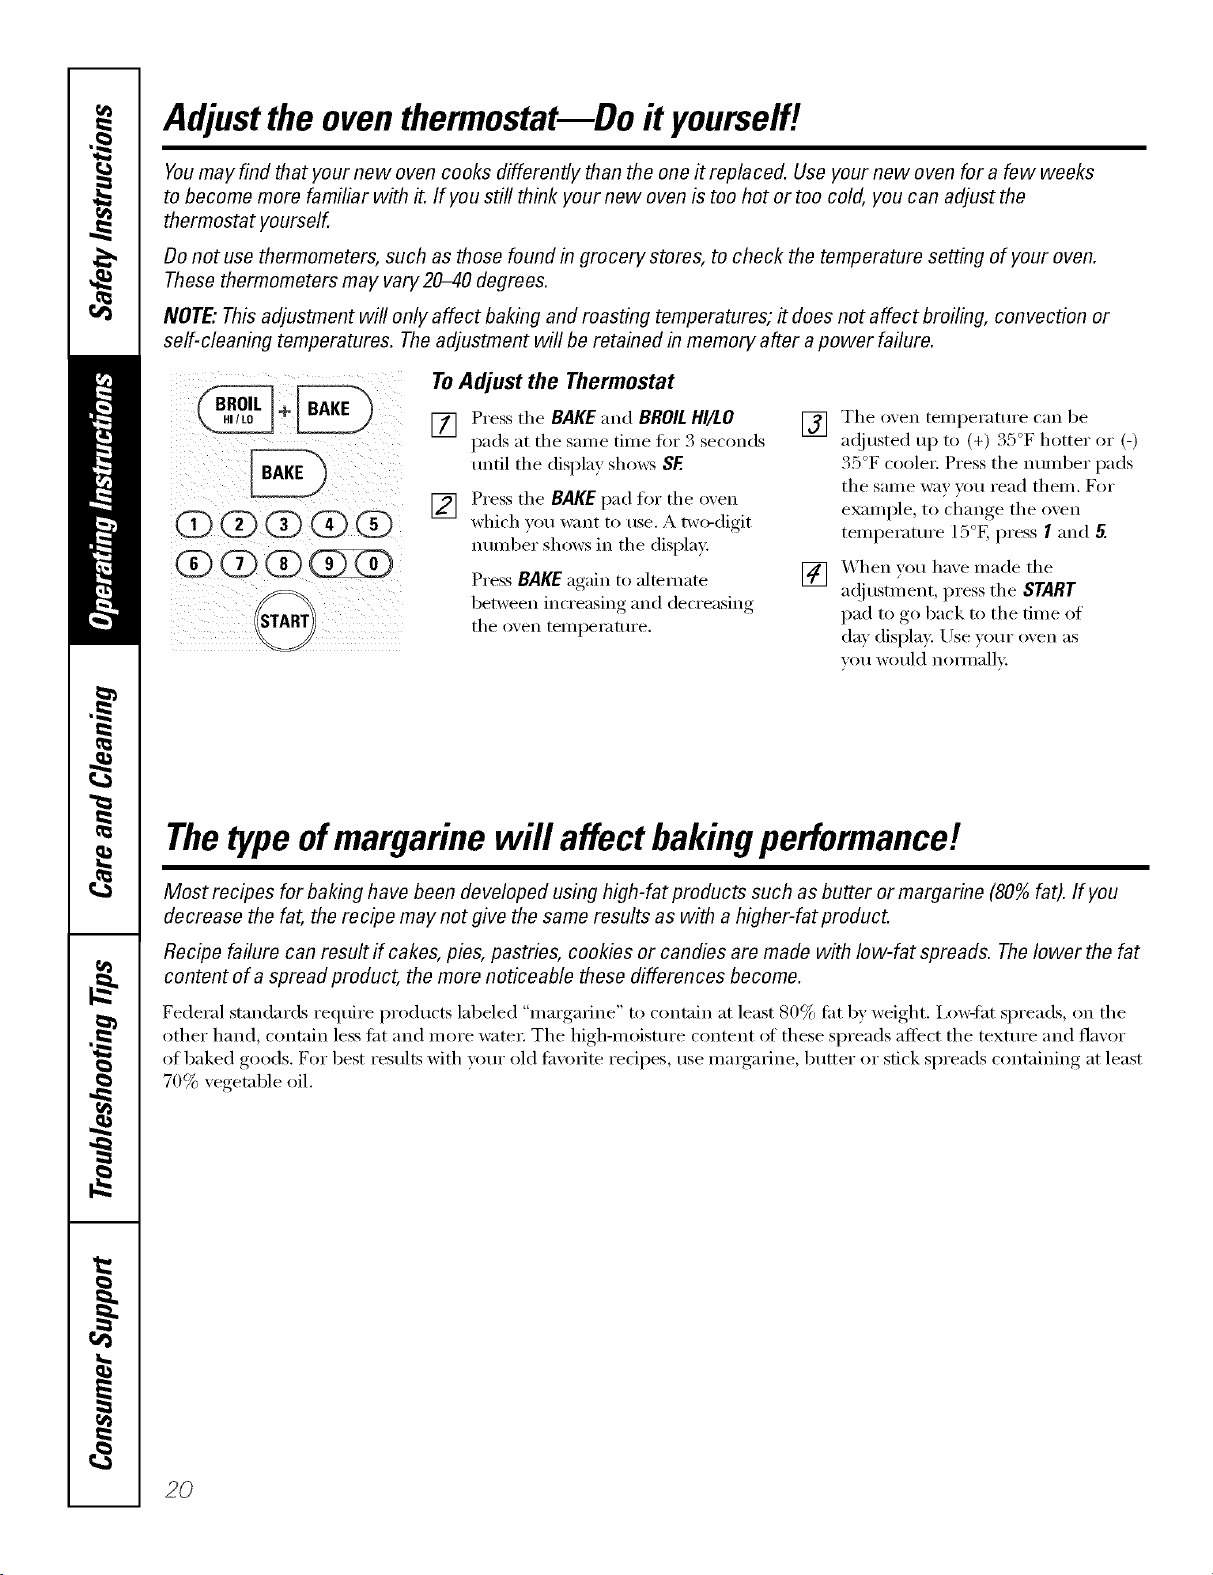
Adjust the oven thermostat--Do it yourself!
Youmay find that your new oven cooks differently than the one it replaced. Use your new oven for a few weeks
to become more familiar with it. If you still think your new oven is too hot or too cold, you can adjust the
thermostat yourself.
Donot use thermometers, such as those found in grocery stores, to check the temperature setting of your oven.
These thermometers may vary20-40 degrees.
NOTE,"Thisadjustment will only affect baking and roasting temperatures; # does not affect broiling, convection or
self-cleaning temperatures. Theadjustment will be retained in memory after apower failure.
(DObC#(3)O
START
ToAdjust the Thermostat
[] Press the BAKE and BROILHI/LO
pads at the same time fin" 3 seconds
until the display shows SF.
[] Press the BAKE pad for the oxen
which you want to use. A two-digit
mmd)er shows in the display:
Press BAKE again to alternate
between increasing and decreasing
the oxen tempemtm'e.
[] The oxen temperatm'e can be
ac!justed up to (+) 35°F hotter or (-)
35°F coolei: Press the number pads
the sanle way you read theln. For
example, to change the oven
temi)eramre 15°F, press I aim 5.
[] X4hen you haxe inade the
a(!justn/ent, press the START
pad to go back to the time of
day display. Use yore" oven as
VOIIwould nolinallv:
Thetypeofmargarine will affect bakingperformance!
Most recipes for baking have been developed using high-fat products such as butter or margarine (80%fat). If you
decrease the fat, the recipe may not give the same results as with a higher-fat product.
Recipe failure can result if cakes, pies, pastries, cookies or candies are made with low-fat spreads. Thelower the fat
content of a spread product, the more noticeable these differences become.
Federal standards reqtlire l)rodtl('ts labeled "margarh_e" to contain at least 80% tilt by weight. Ixmqht spreads, on the
other hand, contain less tilt and more water The high-moisture content ot these spreads affect the texture and flavor
of baked goods. For best results with your old filvorhe redpes, use mmgarine, butter or stick spreads containing at least
70% vegetable oil.
2O
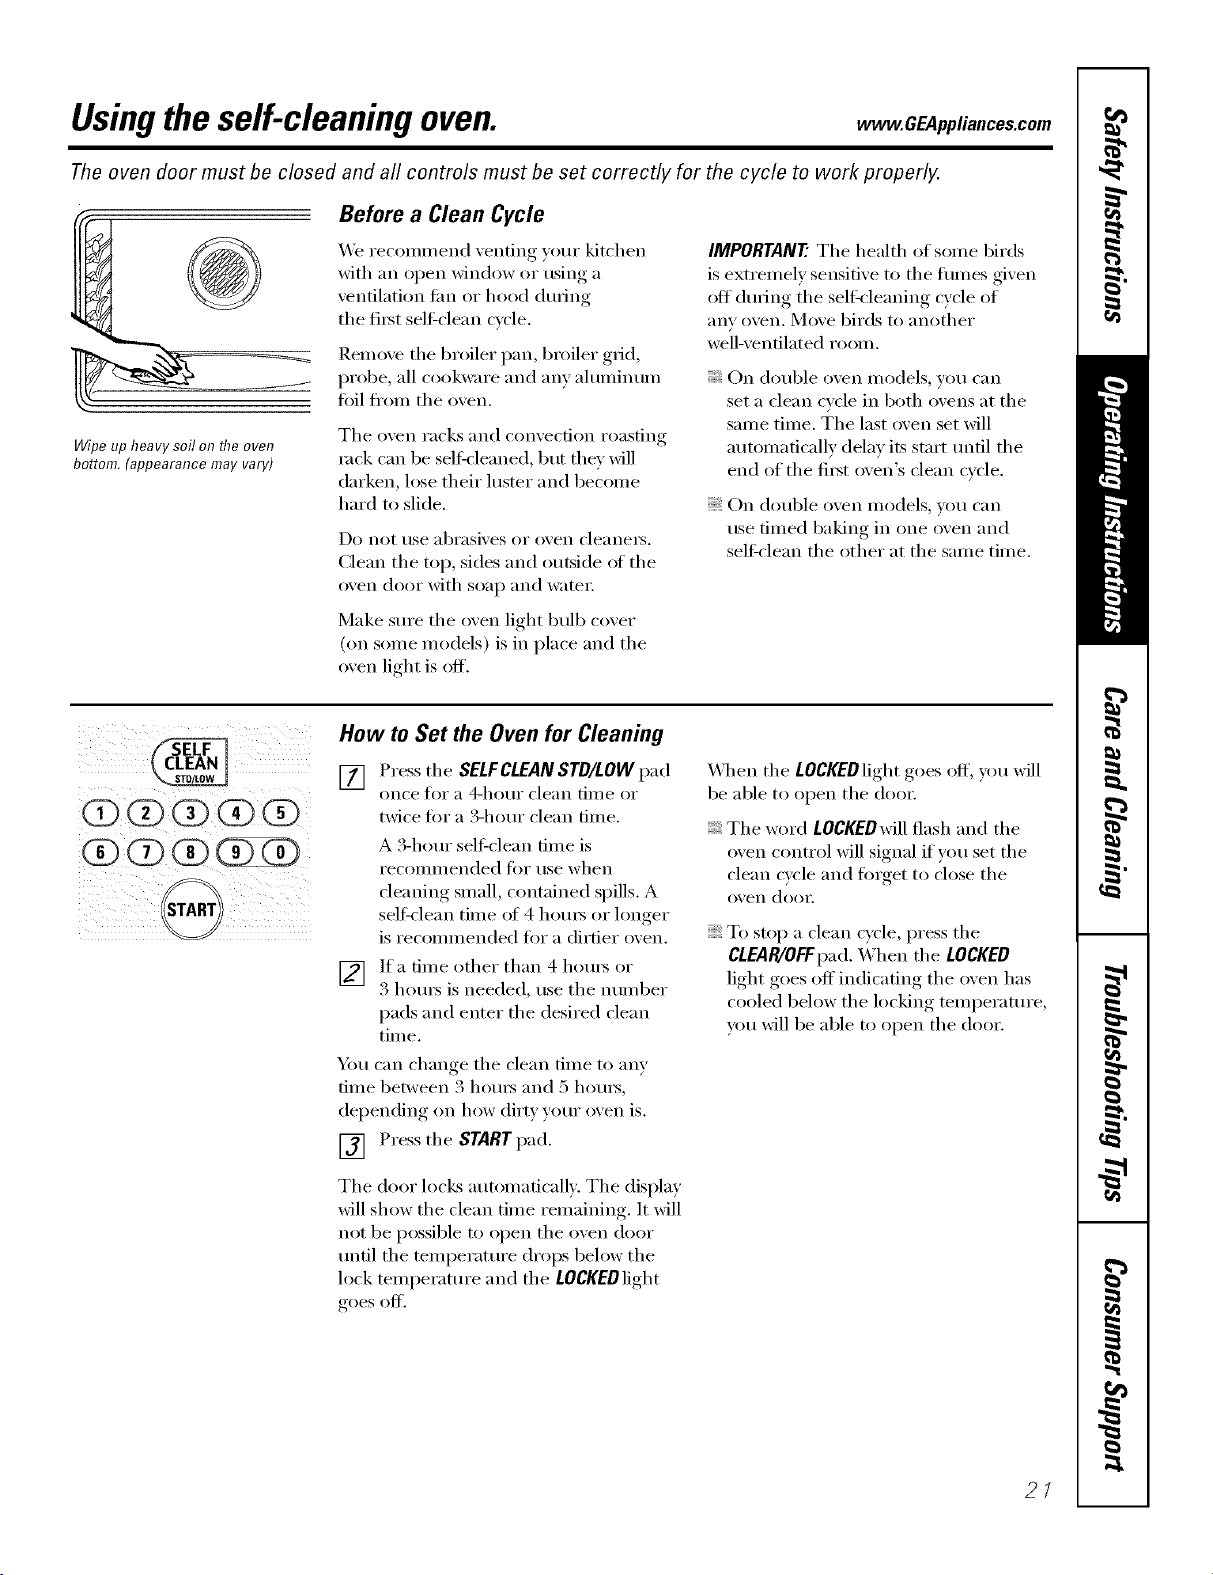
Usingtheself-cleaning oven. OEA,,,ia.oesoom
The oven door must be closed and all controls must be set correctly for the cycle to work properly.
Wipe up heavy soil on flTe oven
bottom.(appearancemayvary)
Before a Clean Cycle
We recommend venting y()ur kitchen
with an open window or using a
ventilation fire or hood during
the fi_t seltZclean cycle.
Remoxe the broiler pan, broiler grid,
probe, all cookware and am ahmfinum
toil from the oxen.
The oven racks and convection roasting
rock can be self,leaned, but they will
darken, lose their luster and become
hard m slide.
Do not rise abI'asives oi" twen cleanels.
Clean the top, sides and outside oI the
oven door with soap and watei:
Make sure the oven light bulb cover
(on some models) is in place and the
oven light is off.
IMPORTANT'.The health of some birds
is extremely sensitive to the tirades given
ott during the seltk'leaning cycle of
any oven. Move birds to another
well-ventilated room,
On double oven models, you can
set a clean cycle in both ovens at the
same time. The last oven set will
automatically delay its start until the
end of the fi_st oven's clean cycle.
On double oven models, you can
rise timed baking in one oxen and
sell:clean the other at the same time.
@@(i)@@
START
How to Set the Oven for Cleaning
[] Pressthe SELFCLEANSTD/LOW pad
on('e tor a a-hot/i" (lean [iil/e or
twice fin" a 3-horn clean time.
A 3-horn selfXclean dine is
i'ecOlillilended li)i" t/se when
cleaning small, contained spills. A
selt_lean time of 4 horns or longer
is recommended fi)r a dirtier oxen.
[] If a time other than 4 hou_ or
3 houI_ is needed, use the nulnber
pads and enter the desired clean
tim e.
Y)m can change the clean time to any
tm_e" between .3 hom_ and 5 hom_,
dei)ending, on how dirt) your oxen is.
[] Press the START pad.
The door locl<s automatically. The display
will show the clean time remaining. It will
not be possible to open the oven door
until the temi)erature drops below the
lock temperature and the LOCKEDlight
goes off.
X_]_en the LOCKEDlight goes off, you will
be able to open the (loo_:
The word LOCKEDwill flash and the
oven control will signal if you set the
clean cycle and finget to close the
oven (loo_:
To stop a clean cycle, press the
CLEAR/OFFpad. When the LOCKED
light goes off indicating the oven has
cooled below the locking temperature,
you will be able to open the door.
2/
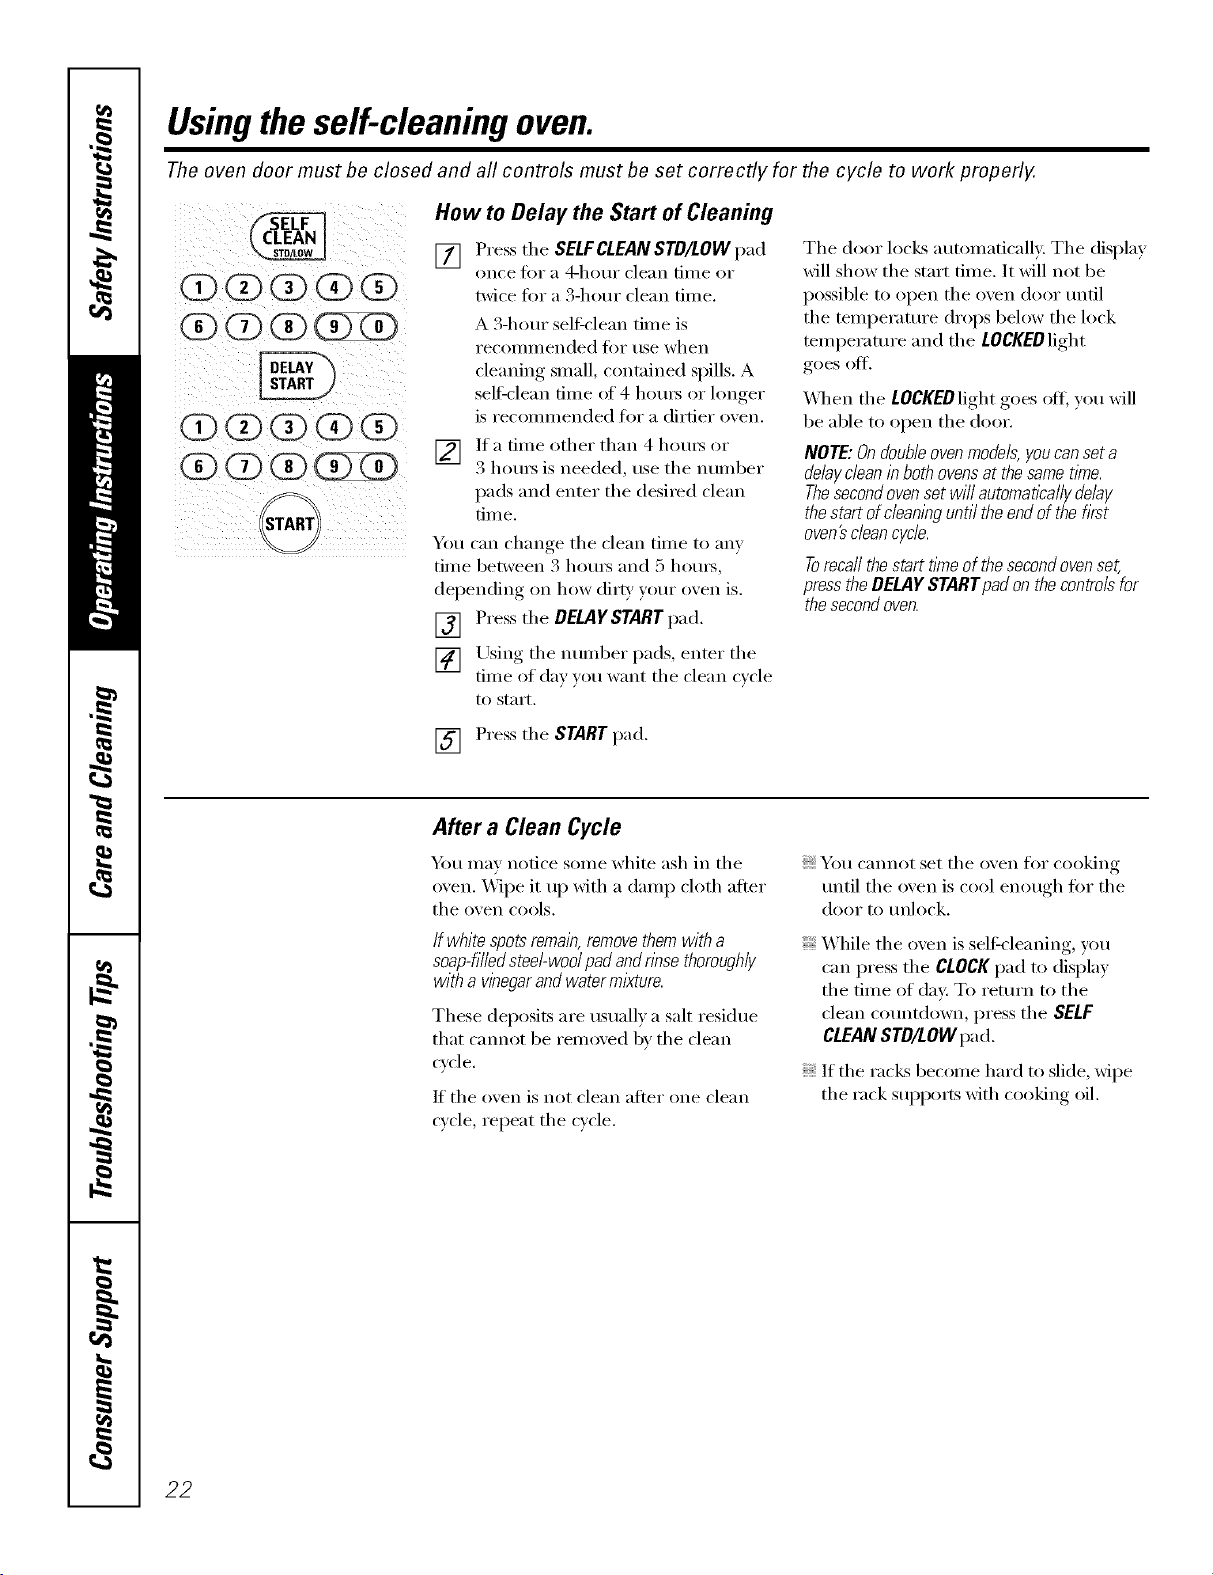
Usingtheself-cleaning oven.
The oven door must be closed and all controls must be set correctly for the cycle to work properly.
Z
i I iiiii(
i(2)0 (?) (Z)¸
i¸¸¸if@i)i
How to Delay the Start of Cleaning
[] Press the SELFCLEANSTD/LOW pad
once t()r a 4-hotlr clean [lille or
twice tot a 3-hour clean time.
A 3-hem seltXclean time is
i'ecoil/illended _'k)i" rise when
cleaning small, contained spills. A
self=clean time of 4 hom_ or longer
is recommended for a dirtier oxen.
v_q
If a time other than 4 hems or
3 hems is needed, use the number
pads and enter the desired clean
[iIIle.
You can change tile clean time to am
time between 3 hom_ and 5 hom_,
dei)ending on how dirt}, )our oxen is.
[] Press the DgLAgSTART pad.
[] Using tile number pads, enter tile
time of day xou want the clean cxcle
to start.
The door locks automaticall}: Tile display
will show the start time. It will not be
possible to open tile oven door until
tile temperature drops below tile lock
temperature and tile LOCKEDlight
goes oil
X,_]/en tile LOCKEDlight goes otE you will
be able to open tile door.
NOTE: Ondoubleovenmodels,youcan seta
delaydean in bothovensat the samet/_ne.
Thesecondovenset wi// automaticallydelay
the start ofc/ean/bguntil the endof the first
oven_ cleancycle.
Torecallthestartfine ofthesecondovenset,
presstheDELAYSTARTpadonthecontrolsfor
thesecondoven.
[] Press tile START pad.
After a Clean Cycle
Ym may notice some white ash in tile
oven. _,_]i)e it up with a damp cloth after
the oven cools.
If white spots remain,removethemwith a
soap-tiffedsteel-wed pad andnbsethoroughly
with a vinegarandwater mixture.
These deposits are tlStlallv a salt residue
that cannot be removed by the clean
cycle.
If the oven is not clean after one clean
wcle, repeat the cycle.
You cannot set tile oven for cooking
until tile oxen is cool enough fin" tile
door to tlnlock.
While tile oven is self-cleaning, you
can press the CLOCKpad to display
tile time of (lax: To return to tile
clean countdown, press the SELF
CLEANSTD/LOW pad.
If tile racl<s become hard to slide, xfipe
tile rack suppo_*s with cooking oil.
22
Careand cleaningofthe oven. . CE4pplia.cescem
Be sure electrical power is off and all surfaces are cool before cleaning any part of the oven.
How to Remove Packaging Tape
To assure no dmnage is done to tile finish
of tile product, tile safest way to remove
tile adhesive leit fl'om packaging tape
on new appliances is an application
of a household liquid dishwashing
detergent, mineral oil or cooking oil.
Apply wifl/a soft cloth and allow to soak.
_]pe (h y and then apply an appliance
polish to thoroughly clean and protect
tile s/m'hce.
NOTE: Theplastic tapemustberemoved fromall
chrometrim. Itcannotberemovedif it is bakedon.
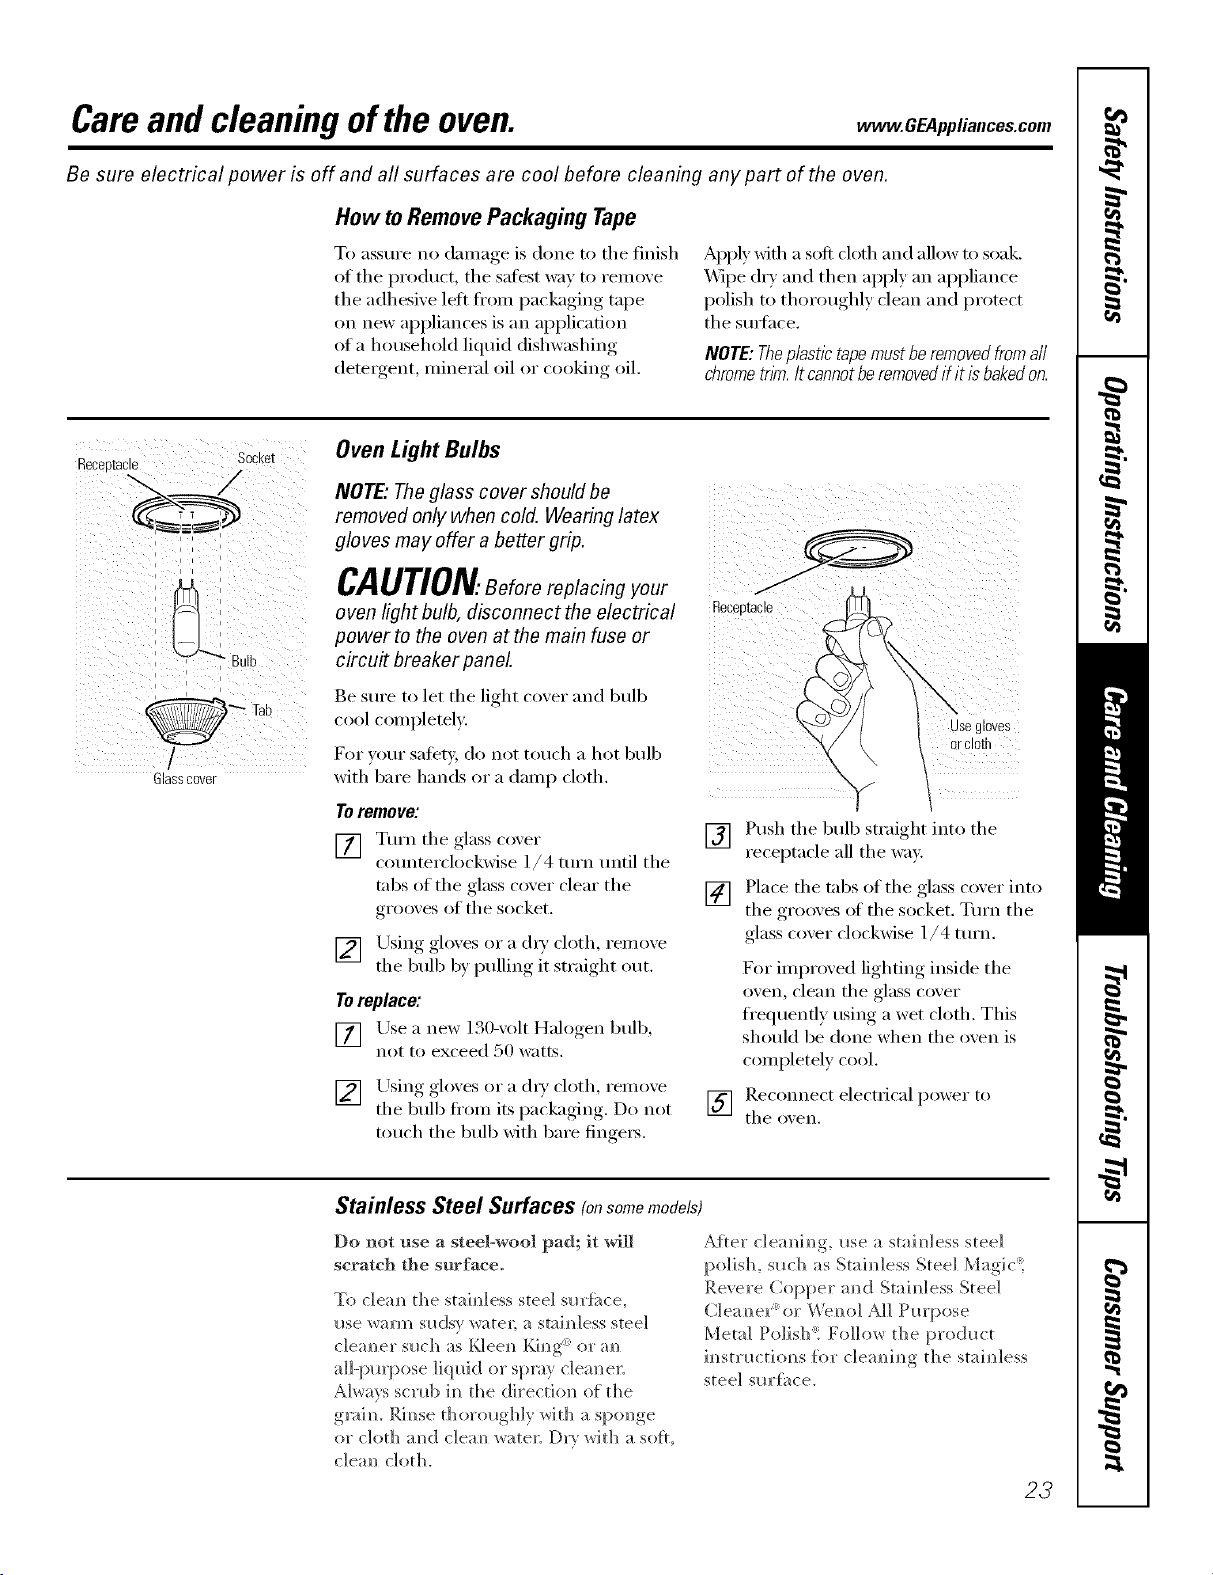
Glasscover
Oven Light Bulbs
NOTE,"Theglass cover should be
removed only when cold. Wearing latex
gloves may offer a better grip.
CAUTION.Beforereplacingyour
oven light bulb, disconnect the electrical
power to the oven at the main fuse or
circu# breaker panel
Be S/lI'e to let tile light (-over and bulb
cool completely.
For w)ur satety, do not touch a hot bulb
with bare hands or a damp cloth.
Toremove:
[] Tm'n tile glass co_er
cotmterdockwise 1/4 mrn tmtil tile
robs of tile glass cover clear tile
grooves of tile socket.
[] Using gloves or a (hT cloth, remoxe
tile bulb by pulling it straight out.
Toreplace:
[] Lrse a i]ew 130-volt Halogen bulb,
not to exceed 50 watts.
[] Using gloxes or a (h T cloth reinox, e
tile bull) from its packaging. Do not
touch tile bull) with bare finge_s.
Receptacle
Usegloves
ercloth
[] Push tile bull) straight into tile
receptacle all tile way.
[] Place tile tnbs of tile glass coxer into
tile grooxes of tile socket. Tm'n tile
glass cover clockwise 1/4 turn.
For improved lighting inside tile
oven, clean tile glass cover
fl'equenfly using a wet cloth. This
shouM be done when tile oven is
completely cool.
] Recom]ect electrical power to
tile OXeI].
Stainless Steel Surfaces (onsomemodels)
Do not use a steel-wool pad; it will
scratch the surface.
To c]eam] the staim_less steel sl_rfi_ce,
I_se _arm sl_dsy water; a staim_]ess steel
c]ea m_er s_lch as t,_]eem_ Ki m_g<: or am_
a]]-pl_q)ose ]iql_id or spray c]eaN_e_:
Always scrub h_ the directio]_ of the
g_aim Rim_se thorol_gbly _ith a spondEe
or cloth :rod c]em_ w;_te_; Dr} with a sell,
c]ea_ cloth.
After c]ea_i_g, _ase a stai_]less steel
polish, s_ach as Stai_dess Steel Mag]c't
Revere Copper ;rod Stai_]ess Steel
Clea_ex or We_o] A]] Pro'pose
Metal Po]isb't Follow the prodm;t
i_str_ctio_]s {i)r c]e;mi_g the stai_dess
steel sm'ti_ce.
23
Careand cleaningoftheoven.
i i
I .........
Thegasketis designedwithagapatthe
bottomto allowfor properaircirculation.
Donotrub or cleanthedoorgasket--
it hasanextremelylow resistanceto
abrasion.
Ifyou noticethegasketbecomingworn,
frayed ordamagedin anyway or ifithas
becomedisplacedonthedoor,youshould
haveit replaced.
Cleaning the Oven Door
To clean the inside of the door:
Because tile area inside tile gasket is
cleaned dm'ing the sell_lean c_cle _ou
do not need to clean this by hand.
Tile area outside tile gasket and
tile door liner can be cleaned with a
soap-filled steel-wool or plastic pad,
hot water and detergent. Rinse well
with a vinegar and water solution.
To clean the outside of the door:
Use soap and water to thoroughly
clean the top, sides and front of the
oven dooI; Pdiise well. _}_)/) Ill,IV _I1SO
use a glass cleaner m clean the glass
on the outside of the doo): Do not let
water drip into tile xent oi)enings, ,.
If an)stain on the door vent trim is
pe)_istent, use a soft abrasixe cleaner
and a sponge-scrubber fi)r best results.
Spillage of marinades, fl'uitj uices,
tomato sauces and basting materials
containing acids may cause
discoloration and should be wiped
up immediately. VQ/en surti_ce is cool,
clean and )inse.
Do )lot use o_.e)l clea)lei's, clea)liilg
powde)_ or l/m_h abrasixes on tile
outside of tile door
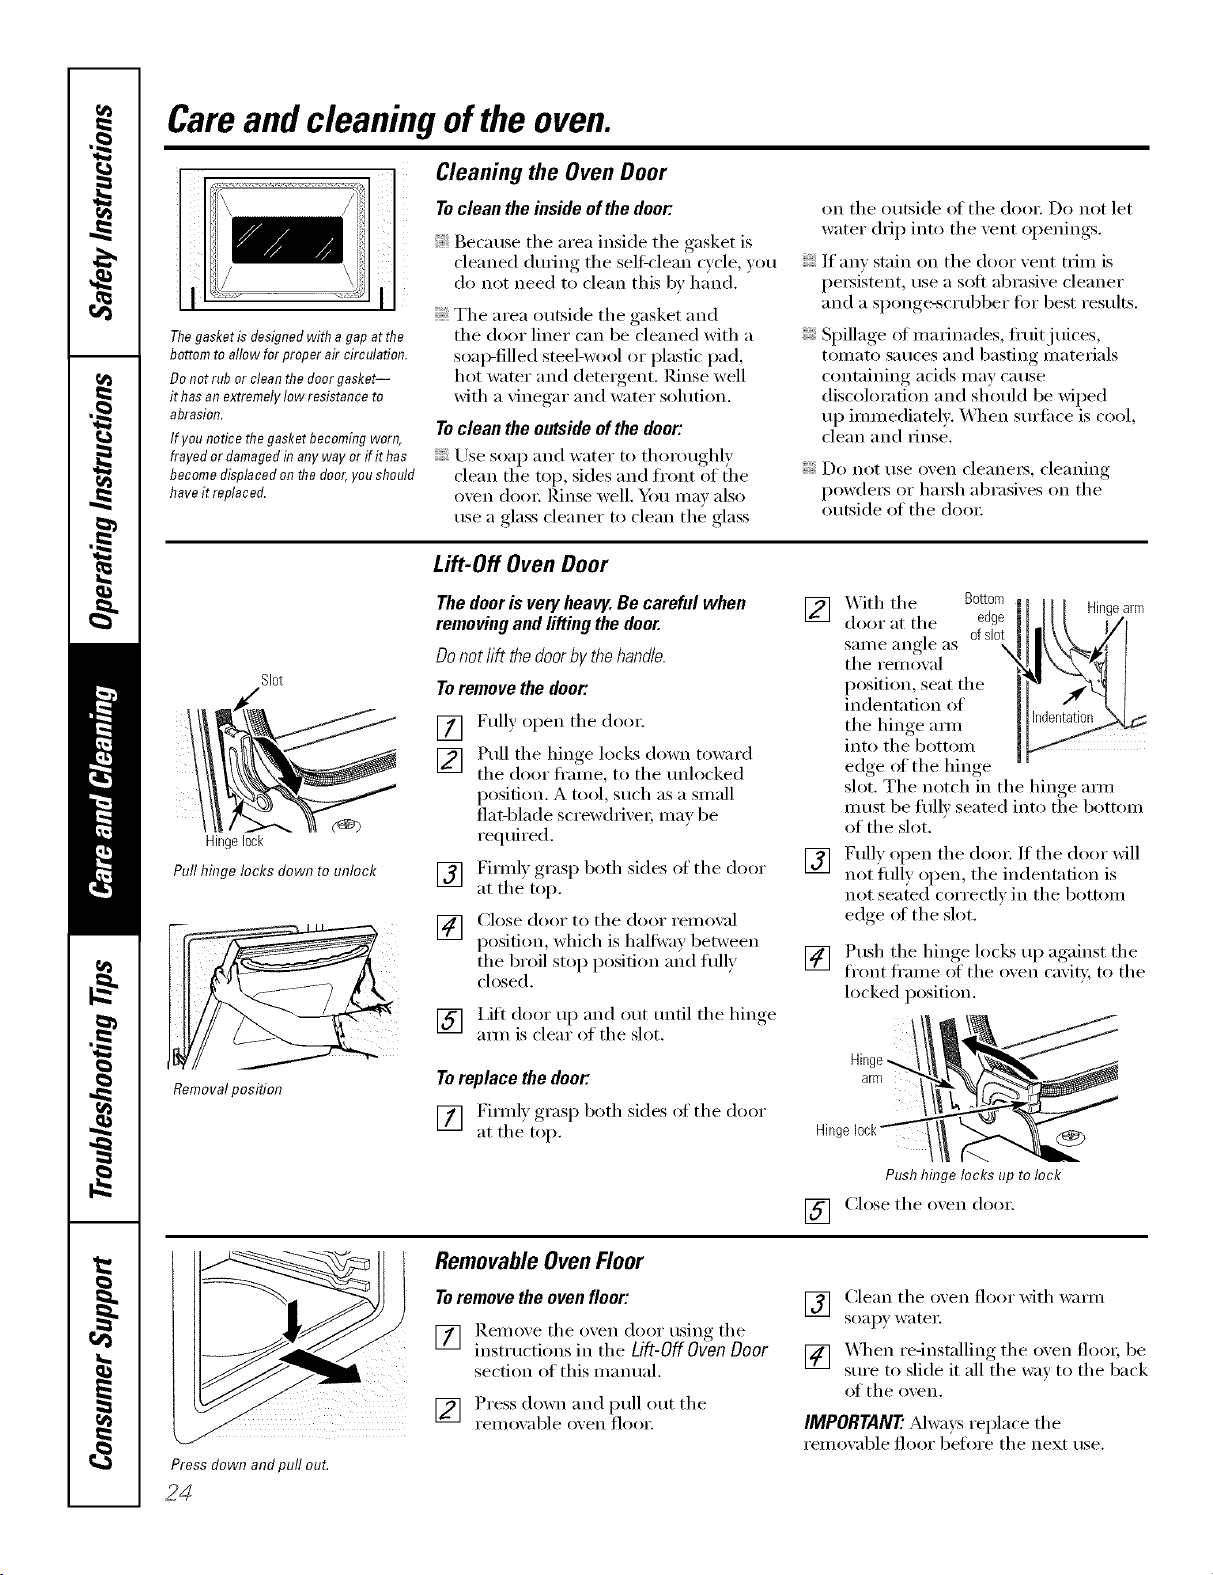
Slot
Hingelock
Pull hinge locks down to unlock
Removalposition
Lift-Off Oven Door
The door is very heavy. Be careful when
removing and lifting the door.
Donot lift the doorby the handle.
Toremove the door."
[]
[]
[]
[]
Fully open tile dora:
Pull tile hinge locks down toward
the door fl'ame, to the tmlocked
position. A tool, such as a small
fiat-blade screw(hixe); may be
required.
Firefly grasp both sides of tile door
at the top.
Close door to tile door )'eillO_,al
position, which is halfway, between
tile Ix'oil stop position and flfllv
closed,
[] i,ifl door up and out tmfil tile hinge
am) is dear of the slot.
Toreplace the door."
[] Firefly grasp both sides oI tile door
at the top.
[]
[]
[]
_Aith the Bottom
door at the edge
same angle as 0f slot
, \
the rein owd
position, seat the
indentation of
the hinge aml
into the bottom
edge of the hinge
slot. Tile notch in tile hinge aml
must be flfllv seated into tile bottom
of tile slot.
Fully open the dora: If the door will
not flflly open, the indentation is
)lot seated correcflv in tile bottom
edge ot the slot.
Push tile hinge locks 1)I) against tile
front fl'ame of tile oxen caxity, to tile
locked position.
Hinge -.
arm
Hhlg,
Push hinge locks up tolock
[] Close tile oxen dora:
Press down andpull out.
24
RemovableOvenFloor
To remove the oven floor:
[] Remoxe tile oxen door using tile
instructions in tile Lift-Off Oven Door
section of this manual.
[] Press down and pull ()tit tile
i'eillO_,able o_,ei1 flooI:
V_ Clean tile oxen floor xfitl/waml
soapy watei:
[] "x&q/en re-installing the oxen floo); be
sm'e to slide it all the way to the back
of the ox,ei1.
IMPORTANT'.Mways replace tile
remoxable floor before tile next use.
www.GEAppliances.com
Probe
The temperature probe may be cleaned
with soap and water or a soai;-filled
scouting pad. Cool the temperature
probe befin'e cleaning. Scour stubborn
spots with a soap-filled scouring pad,
rinse and (h_'.
DonotlYnmersethe temperatureprobe
lb water
Donotstore the temperatureprobein
the oven.
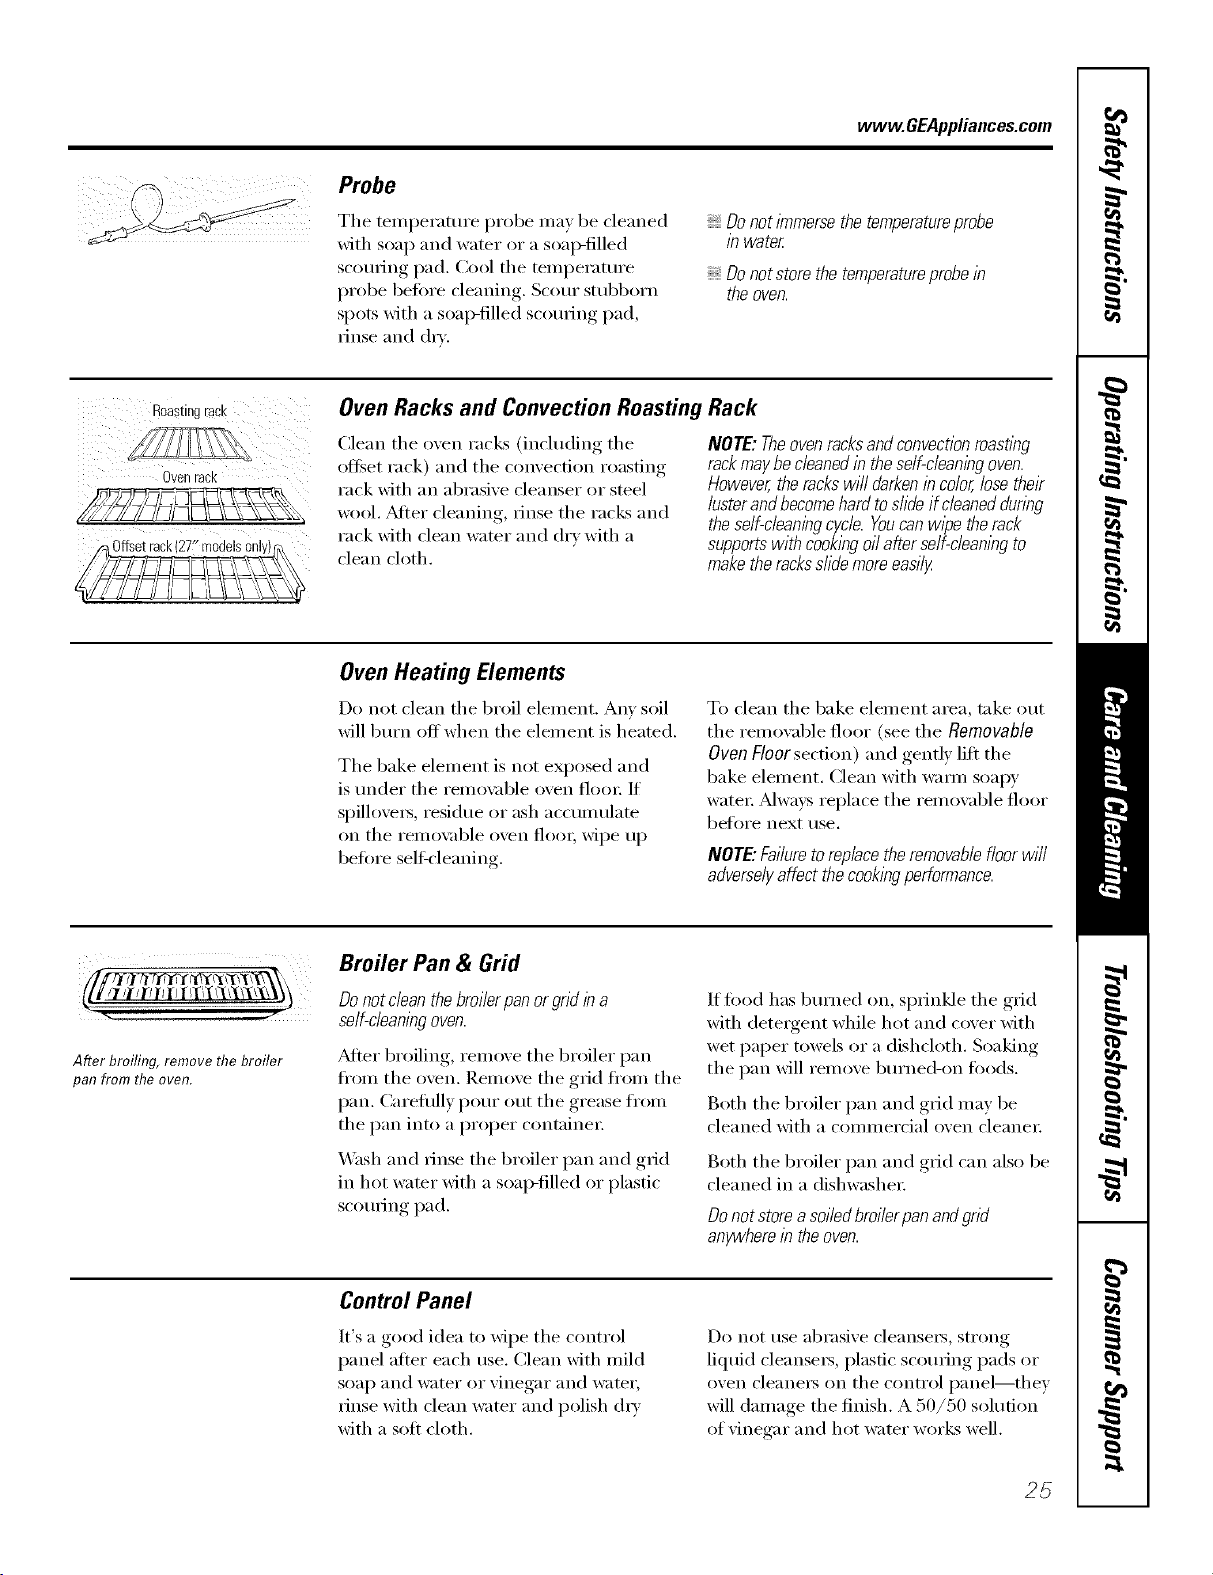
Roas[IRg rack
OVeR racK
Oven Racks and Convection Roasting Rack
(:lean the oven racks (including the
offset rack) and the convection roasting
rack with an abrasive cleanser or steel
wool. _Mter cleaning, rinse the racks and
rack with clean water and dry with a
clean cloth.
NOTE:Theovenracksandconvectionroasflbg
rackmaybecleanedin these/f-c/ean/bgoven.
However,therackswi//darkenincolor,losetheir
lusterandbecomehardtoslideifcleaneddunbg
theself-cleaningcycle.Youcanwipetherack
supportswithcookbgoilafterse/f-c/eanbgto
maketheracksslidemoreeasily
Oven Heating Elements
Do not clean the broil element. Am' soil
will burn off when the element is heated.
The bake element is not exposed and
is under the remo\_ble oven floo_: If
spillove_s, residue or ash accumulate
on tile remox_d)le oven floo_; wipe up
before selt_'leaning.
To clean the bake element area, take out
tile removable floor (see the Removable
Oven Floor section) and gently lift the
bake element. Clean with warn/soapy
water; Mwa):s replace the remowd)le floor
bef_n'e next use.
NOTE."Failuretoreplace the removablefloorwill
adverselyaffect the cookingperformance.
Afterbroiling,removethebroiler
panfromtheoven.
Broiler Pan & Grid
Do not clean the broilerpan or grid b a
self-cleaningoven.
_Mier broiling, remove the broiler pan
fl'om tile oven. Remove the grid fl'om the
pan. Careflflly pour out the grease fl'om
the pan into a proper containe_:
Wash and rinse the broiler pan and g_i(1
in hot wamr with a soap-filled or plastic
scorning pad.
If fi_od has burned on, sprinkle the grid
with detergent while hot and cover with
wet paper towels or a dishcloth. Soaking
the pan will remove burne(bon foods.
Both the broiler pan and grid may be
cleaned with a commercial oven cleane_:
Both the broiler pan and grid can also be
cleaned in a dishwasher;
Do not store a soi/edbroi/erpanandgrid
anywherein the oven.
Control Panel
It's a good idea to wipe the control
panel after each use. Clean with mild
soap and water or vinegar and water,
rinse with clean water and polish (h_'
with a soft cloth.
Do not use abrasive cleansei_, strong
liquid cleansers, plastic scouring pads or
oven cleaners on the control panel--they
will damage the finish. A 50/50 solution
of vinegar and hot water works well.
25
Before YouCall ForService...
Troubleshooting tips
Save time and money! Review the charts on the following
pages first and you may not need to call for service.
Possible Causes What To Do
Control signals a#er You forgot to enter a bake * Press the BAKE pad and desired temperature i)r the
entering cooking time temperature or cleaning SELF CLEANSTD/LOW pad and desired clean time.
or delay start time.
Food does notbake Oven controls improperly set. * See tire Using the oven se(tiou.
or mast properly
Rack position is incorrect * See tire Using the oven se(tiou.
or the rack is not level.
Incorrect cookware or * See tire Using the oven section.
cookware of improper size
being used.
Oven floor not in place. * Replace tire oven flool:
Oven thermostat needs * See tire Adjust the oven thermostat--Do it yourself[
adjustment, sectiou.
Food does not Oven controls improperly set. * Make sure you press tire BROIL HI/LO pad.
bmil properly
Improper rack position * See tire Broiling Guide.
being used.
Food being cooked * Use the broiling, laan and ,grid that came with your oven.
in a hot pma. Make stu'e it is cool.
Cookware not suited * Use tire broiling, l)an and ,grid that came with vl>ur oven.
for broiling.
The probe is plugged into the * Uuplttg and reluove tire probe from tire oven.
outlet in the oven.
Aluminum foil used on the * See tire Using the oven section.
broiling pan mad grid has
not been fitted properly mad
slit as recommended.
ha some areas the power * Preheat tire broil elelHeut for 10 minutes.
(voltage) maybe low. * Broil for tire lou,_est_, period of time recommended in
tire Broiling Guide.
Clock and timer A fuse ha your home may be * I_eplace the fi/se or reset the circtfit breaker.
do not work blown or the circuit breaker
tripped.
Oven controls improperly set. * See tire Using the clock, timer and control lockout
se(tiou.
Oven light does Light bulb is loose or defective. * Tighten i)r replace tire btflb.
not work
Pad operating light is broken. * Call for service.
2C
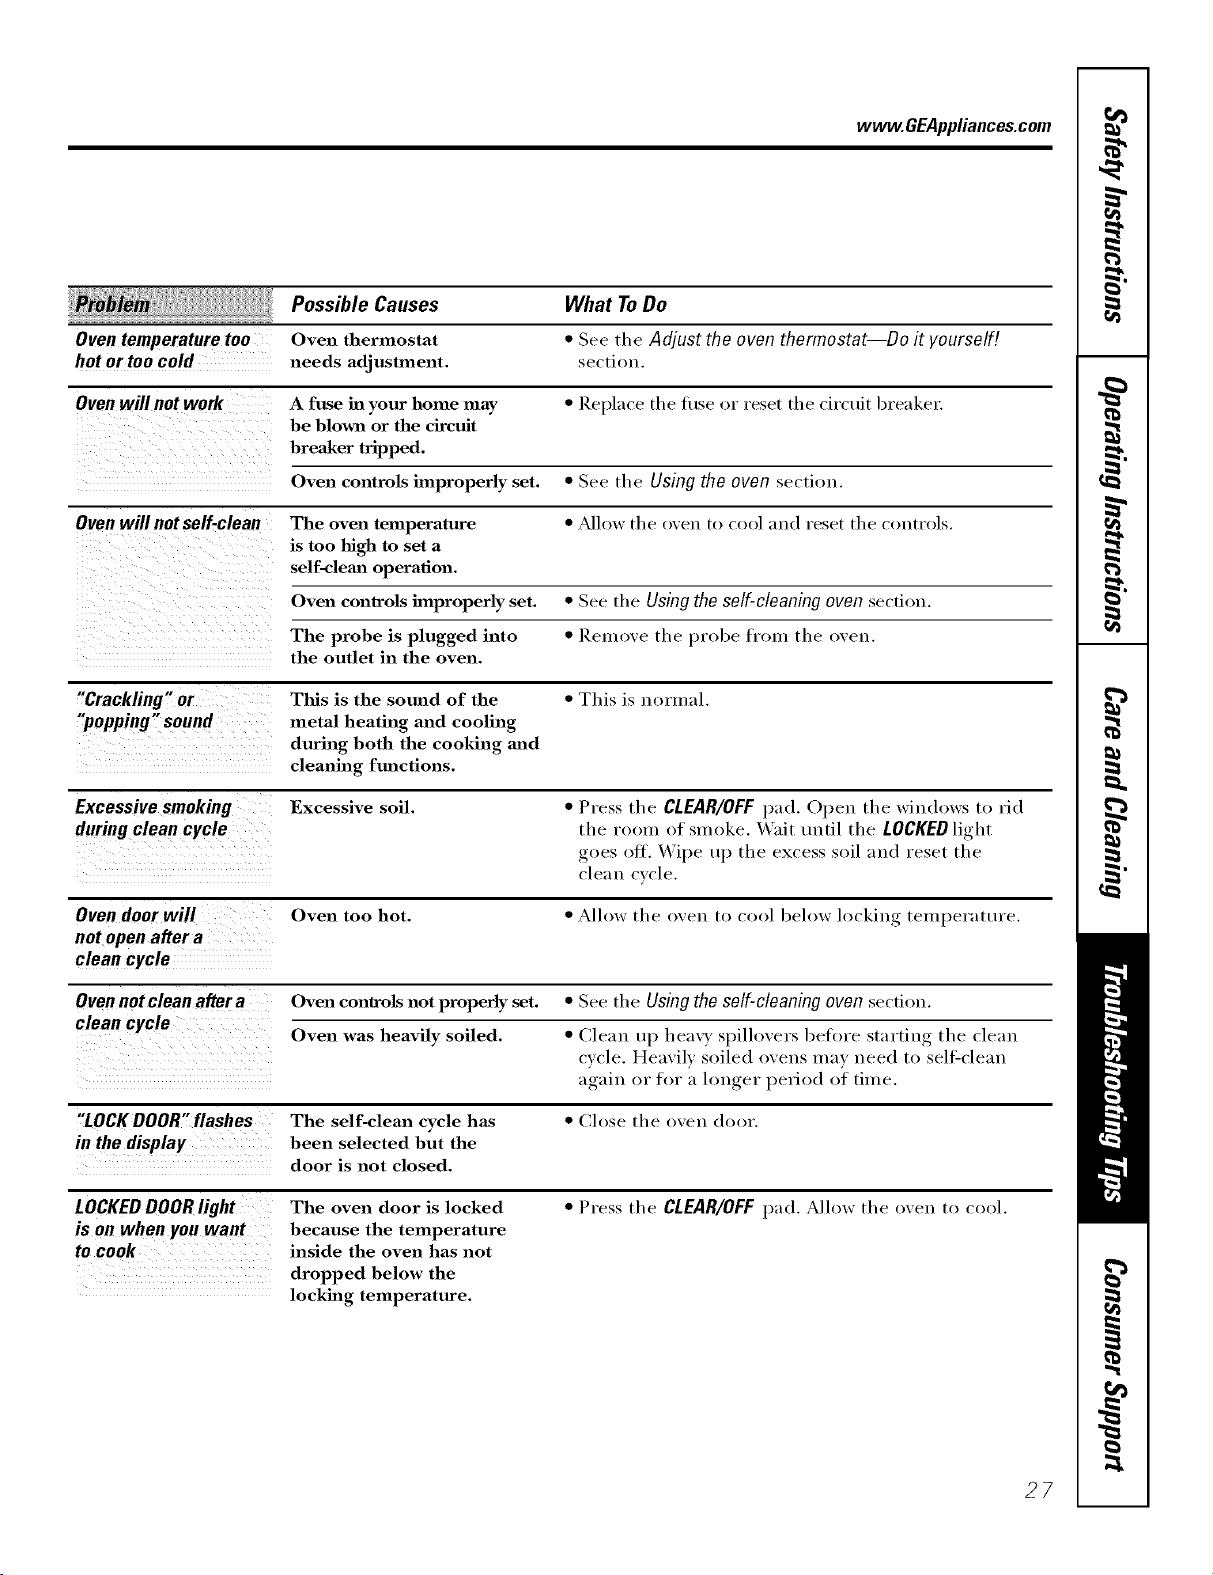
www.GEAppliances.com
le_ iii, Possible Causes What ToDo
Oventemperaturetoo Oven thermostat * See the Adjust the oventhermostat--Do it yourself!
hot or too cold needs adjustlnent, sectiou.
Oven will not work A fuse in your home may * Replace tile tuse or reset tile circuit breaker:
be blown or the circuit
breaker tripped.
Oven controls improperly set. * See the Using the oven section.
Oven will not self-clean The oven temperature * _Mlow tile oven to cool and reset tile controls.
is too high to set a
self-clemz operation.
Oven controls bnproperly set. * See tile Usingthe self-cleaningoven section.
The probe is plugged into * ReI]love tile probe fl'om tile oven.
the outlet in the oven.
"Crackling " or This is the sound of the * This is normal.
"popping" sound metal heating and cooling
during both the cooking and
cleaning functions.
Excessivesmoking Excessive soil. * Press tile CLEAR/OFF1);1(1. Open the windows to rid
during clean cycle tile room of smoke. _Vait until tile LOCKED light
goes off. Wipe t/1) the excess soil and reset tile
clean cycle.
Oven door will Oven too hot. * Allow the oven to cool below locking temperature.
not open after a
clean cycle
Oven not clean after a Oven controls not properly set. * See tile Using the self-cleaning oven sectil)u.
clean cycle
Oven was heavily soiled. * Clean up hea\ T sl)illovers bet>re starting tile clean
cycle. Heavily soiled ovens may need to self2cleau
again or lk)r :4 h)uger period of time.
"LOCKDOOR"flashes The self-clean cycle has * Close the oven door.
in the display been selected but the
door is not closed.
LOCKEDDOORlight The oven door is locked * Press tile CLEAR/OFFl)ad. Allow tile oven to cool.
is on when youwant because the temperature
to cook inside the oven has not
dropped below the
locking temperature.
27

Before YouCallForService...
Troubleshooting tips
Possible Causes
"F-- anda number You have a function
or letter" flash error code.
in the display If the fm_ction code repeats. • Disconnect all power to the oven for at least 30
seconds and then reconnect power. If the flmction
error code repeats, call for serxice.
Displaygoes blank A fuse in your home may * Replace the fllse or reset the circuit breaker.
be blown or the circuit
breaker tripped.
The clock is in the * See the Special features of your ovencontrol section.
black-out mode.
Oisplayflashes Power failure. * Reset the clock.
Unableto getthe Oven control pads were * The BAKE and BROILHI/LOpads (on double o_en
displayto show "SF, not pressed properly, models, use the upper o',en controls) must be
pressed at the same time and held for 3 seconds.
"Probe', appears in This is reminding you to * Enter a probe temperatm'e.
the display enter a probe temperature
after plugging in the probe.
Power outage, Power outage or surge. * Reset the clock. If the oxen was in use _ou must reset
it by, l)ressing, the CLEAR/OFFpad, setting the ch)ck
and resetting any cooking flmction.
steamfrom the vent When using the convection * This is normal.
feature, it is normal to see
steam coming out of the
oven vent. As the number
of racks or amaomat of
food being cooked increases,
the amount of visible steam
will increase.
What ToDo
• Press the CLEAP,/OFFpad. Mlow the oven to cool fiw
one hem: Put the oxen back into operation.
i__iiiii_iii!_!_!_!_!_!_!_!_!_!_I
"Bnrning" or "oily," This is normal in a new oven • To speed the process, set a self-clean cycle for a
odor omittingfrom and will disappear in time. minim um of 3 hours. See the Using the self-cleaning
the vent oven section.
Strongodor
An odor from the insulation
around the inside of the
oven is normal for the first
few times the oven is used.
• This is temporar).
Fan noise
A cooling fan or a convection
fan (depending on the
function you are using)
may automatically turn on.
• This is normal. The cooling tim will turn on
to cool internal parts. It may run fl)r up to l-I/2
hours in 30" models and u I) to 2 hours in 27" models
after the oven is turned off. The convection tim
will cycle on and off until the flmction is over or
the door is opened.
2_3
GE Service Protection Plus '_'
GE, a _mme recognized _;orldwkle fbr q_mlity a_d depeildabHity; offers )ou
) it .
Service Protectio_ t h_s --comprehe_s_xe protecti(m o[] aH }ore appIim_ces--
No Matter What Brand[
Benefits Include:
o Backed by GE
o All brands covered
o Unlimited service calls
o All parts and labor costs h_cluded
o No out-of-pocket expenses
o No }ridden deductibles
o One 800 nt_fl_er to call
We ?i Cover Any Appliance.
Anywhere° Anytime.
Y<m wi]] be complete]} satisfied with our service protectio]_ or _c,u ma', request }ol_r moiler back
om_ the remaim_im_g vab0e of_om" co]_tract. No questiol_s asked. It's that simple.
Protect w)l_r refi'igera to_; dis]]wash e_; was]] era m_d (byes; ra m_ge, TVI VCR a m_d m i_ch m ore--any brand!
Plus there's m_<)extra charge {or emergei_cy service ai_d ]o_ moi_t]]]y fim_am_c]m_g is available. Eve]_ ]cemaker
coverage a_d tbod spoilage protectio]] is o_terecL Yi)_ ca_ rest eas). ki_owi_g that a]] vo_r wd_mb]e
ho_seho]d producers are protected agai_st expei_sive repairs.
for more
*\[1 ]l*al_ds (ox_.]l d, tip Io 90_ _<u'_ old, ill ib< < }l}[]//{ 1}[a] [J._.
Please place in envelope and mail to:
General Etectric Company
Warranty Registration Department
P.O. Box 3215(}
Louis,dUe, KY 40232-2150
Consumer Product Ownership Registration
Dear Customer:
Thank you for purchasing our product and thank you for placing your confidence in us.
_A/eare proud to ha_e you as a customer!
Follow these three steps to protect your new appliance investment:
Complete and mail
your Consumer
Product Ownership
Registration today.
tlaw' tim peace of
mind of knowing wc
call colltact VOl/ ill
tile tmlikely event of a
satiAy modification.
Atter mailing tile
registration below,
store this docmnent
ill a sati' place. It
contains inlormation
you will need should
you require service.
Our selwice number is
800.GE.CARES
(800.432.2737).
Read your Owner's
Manual carethllv.
It will help you
operate yol/r lie', _,
appliance properly.
Model Number Serial Number
, , , , , I I , , , , , , , I
Important: If you did not get a registration card with your
product, detach and return the form below to
ensure that your product is registered, or register
online at www.GEAppliances.com.
................................................................................................... _..--Cm h(r_
Consumer Product Ownership Registration
Model Number
Serial Number
I I I I I I I
_vl_ Ms. M*>,. Mix_,
Fi,-_ti I L_slI
Nmm I I I I I I I I I Name I I I I I I I I I I I I
_11-( (!1 I
Addr(ss I I I I I I I I I I I I I I I I I I I I I I I I
Ap_.#l, , , , , , , I E-lnailAddress*
Zip I
l )ue PJa( ed
Monlh
20
' Pkase provide your e-mail address Io r(ceiv(, via c-mail, discounts, special ot}'( rs and ofll(r impormm
communications h-ore GE Applianc(s ((;ILk).
Ch((k h(lx if you do 11ol Wallt to r(_( ( iv(_ ( Olnmtmi(ations h-ore GEA's ( arefully sel¢ (ted l)artners.
GEAppliances
GE Co/lstm_er Prodtlc_s
GetlerM E]ectric Compgnf
Louisville, gentlict:y
ww_GEAppt_ce_com
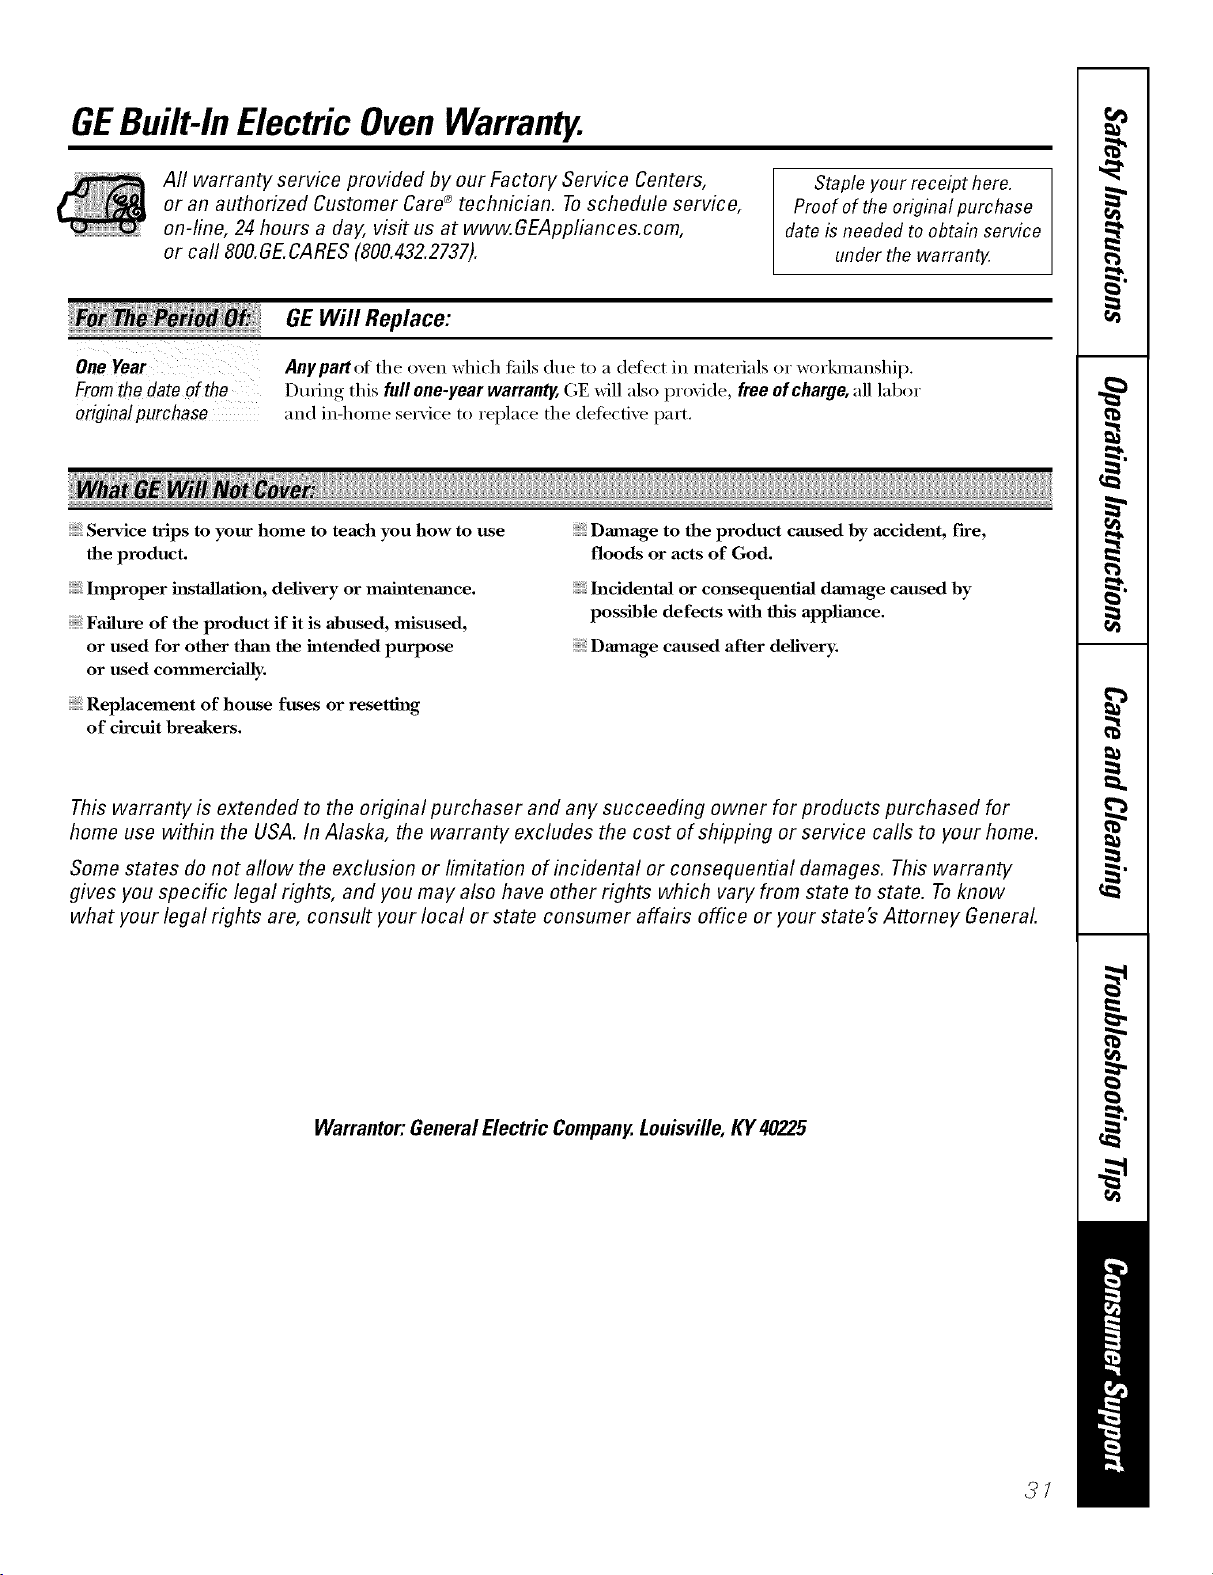
GEBuilt-In Electric OvenWarranty.
All warranty service provided by our Factory Service Centers,
or an authorized Customer Care®technician. Toschedule service,
on-line, 24 hours a day, vis# us at www.GEAppliances.com,
or call 800.GE.CARES (800.432.2737).
Staple your receipt here.
Proof of the original purchase
date is needed toobtain service
under the warrant_
One;Fe
Fromthedateof the
originalpurchase
GE Will Replace:
Anypattot the oven which fifils due to a detect in materials or workmanship.
During this full one-year warranty, GE will also provide, free ofcharge, all labor
and in-home service to replace the (lefecti\'e part,
Service trips to your home to teach you how to use
the product.
hnproper h_stallation, delivery or maintenance.
Failure of the product if it is abused, misused,
or used for other thm_ the intended purpose
or used commercialby.
Replacement of house fuses or resetting
of circuit breakers.
Damage to the product caused by accident, fire,
floods or acts of God.
h_cidentaJ or consequentiaJ damage caused by
possible defects with this appliance.
Damage caused after delivery.
This warranty is extended to the original purchaser and any succeeding owner for products purchased for
home use within the USA. In Alaska, the warranty excludes the cost of shipping or service calls to your home.
Some states do not allow the exclusion or limitation of incidental or consequential damages. This warranty
gives you specific legal rights, and you may also have other rights which vary from state to state. Toknow
what your legal rights are, consult your local or state consumer affairs office or your state's Attorney General
Warrantor."General Electric Company.Louisville, KY40225
3/
ConsumerSupport.
GEAppliancesWebsite www.GEAppliances.com
Have a question or need assistance with your appliance? Try the GE Appliances Website 24 hotu_ a day,
any day of the year! For greater convenience and faster selMce, you can now download Owner's Manuals,
order parts, catalogs, or even schedule service ondine. You can also "_sk Our Team of EN)erts ......
yotlr qtlestions, and so II/rich II/ore...
ScheduleService
www.GEAppliances.com
Expert (;E repair seis:ice is onlx one step away fl'om your dooi: Get on-line and schedule vc,ur service at
your conxenience 24 hom_ am (lm of the _ear! Or call 800.GE.(_AI_ES (800.432.2737) during n{mnal
business hom_.
RealLifeDesignStudio www.GEAppliances.com
GE supports the/!nivei_al Design concept--products, services and environments that can be used by
people of all ages, sizes and capabilities. _,\'e recognize the need to design fi)r a wide range of ph):sical and
mental abilities and impaim_ents. For details of GE's Univei_al Design applications, including kitchen
design ideas fin" people with disabilities, check out our _,Vebsim today. For the hearing impaired, please call
800.TDD.GEAC (800.833.4322).
ExtendedWarranties www.GEAppliances.com
Purchase a (;E extended warrant_ and learn about special discounts that are a_ailable while )our warranty
is still in effect. YOtl can purchase it on-line an)time, or call 800.626.2224 during natural business horus.
(;E (_onsumer Home Serxices will still be there after }our warrant}, expires.
PartsandAccessories www.GEAppliances.com
Individuals qualified to seI_'ice their own appliances can have parts or accessories sent directly to their
homes (VISA, MasterCard and Discover cards are accepted). Order on-line today, 24 houi_ eveia' day or bv
I)hone at 800.626.2002 durii_g noi_nal business houi_.
Instructions contained in this manual coverprocedures tobe performed by any user. Otherservicing generally
should be referred to qualified service personnel Cautionmust be exercised, since improper servicing may cause
unsafe operation.
ContactUs www.GEAppliances.com
If you are not satisfied with the service you receive from (;E, contact us on our _.Vebsite with all the details
including your phone ntlIllbeI; oI" write to: General Managei; Customer Relations
GE Appliances, Appliance Park
I,ouisville, KY 40225
RegisterYourAppliance www.GEAppliances.com
Register your new applim_ce on-line---at your convenience! Timelx, l_r°(luct registration, will allow fin"
enhanced communication and prompt service under the temps of your warranty, should the need arise.
You mm also mail in the pre-printed registration card included in the I)ackin'"_ material.
Printed in the United States