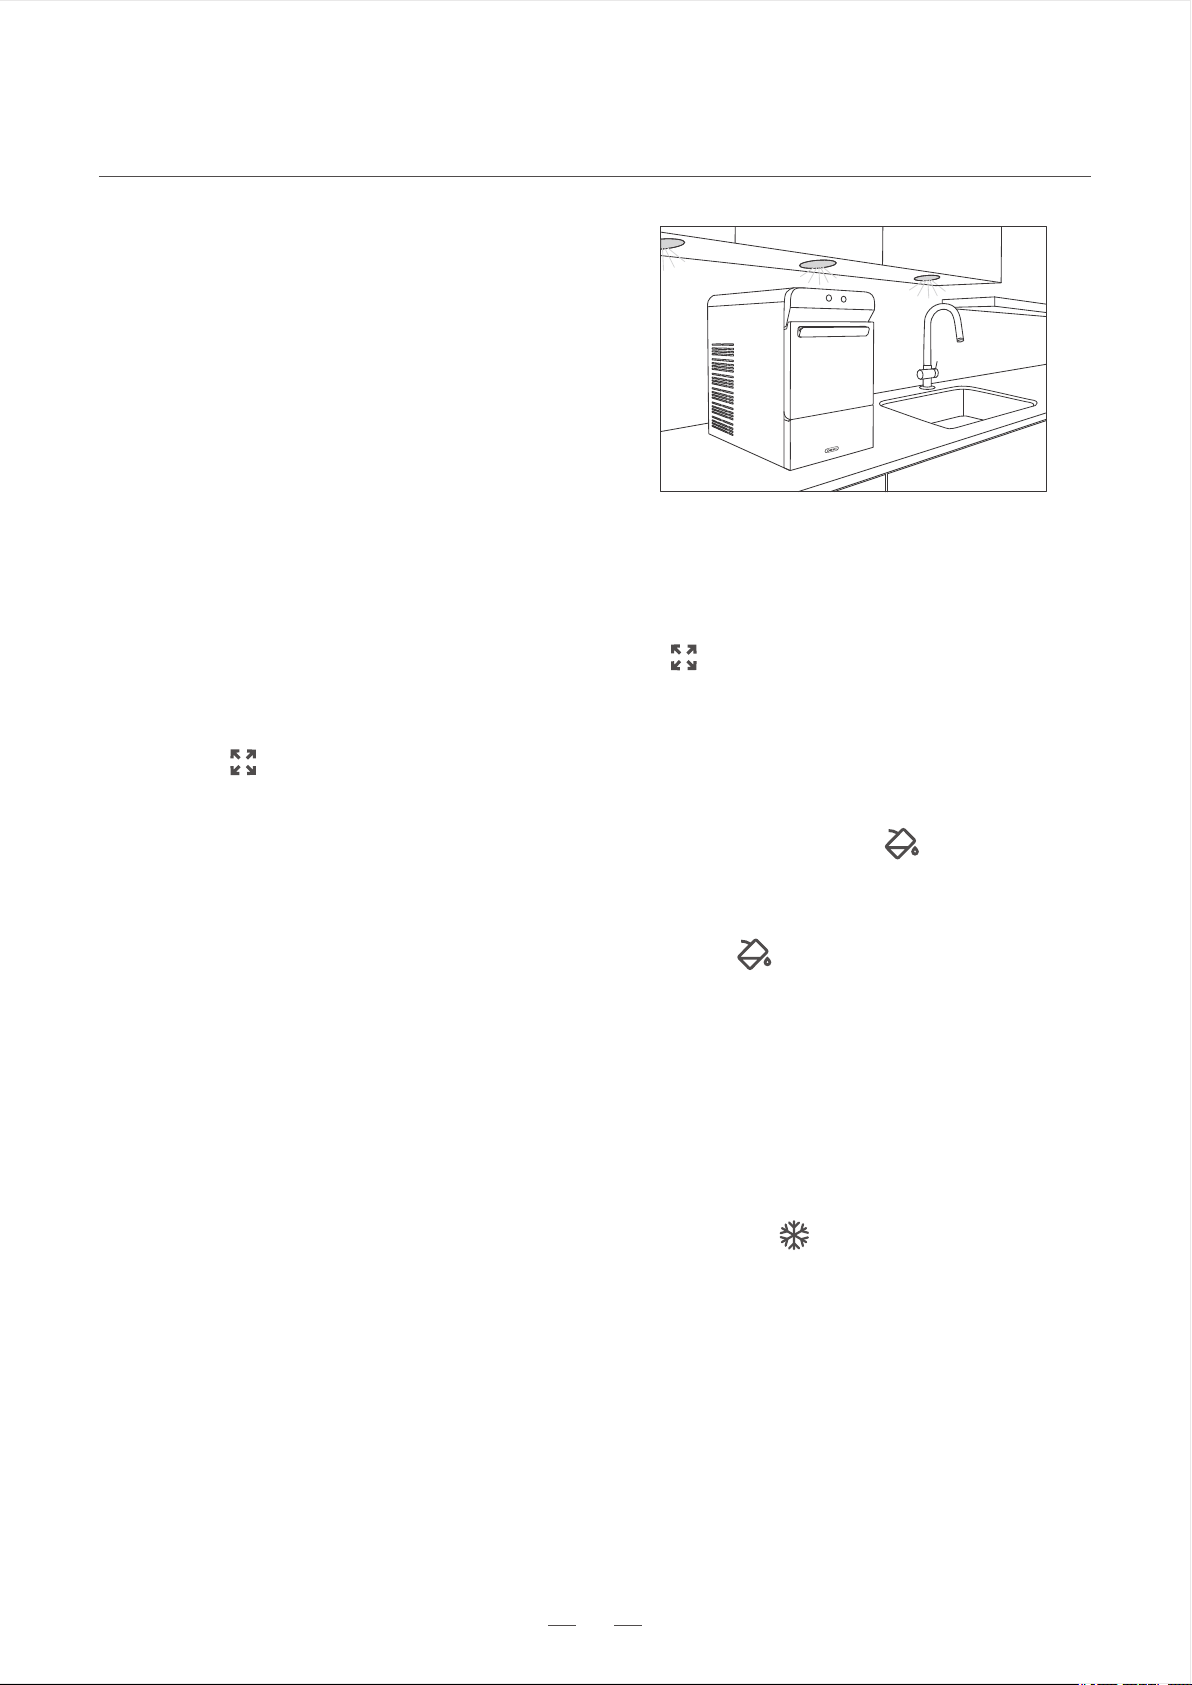
Household Use Only
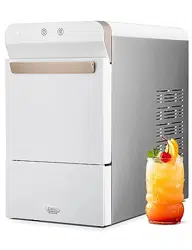
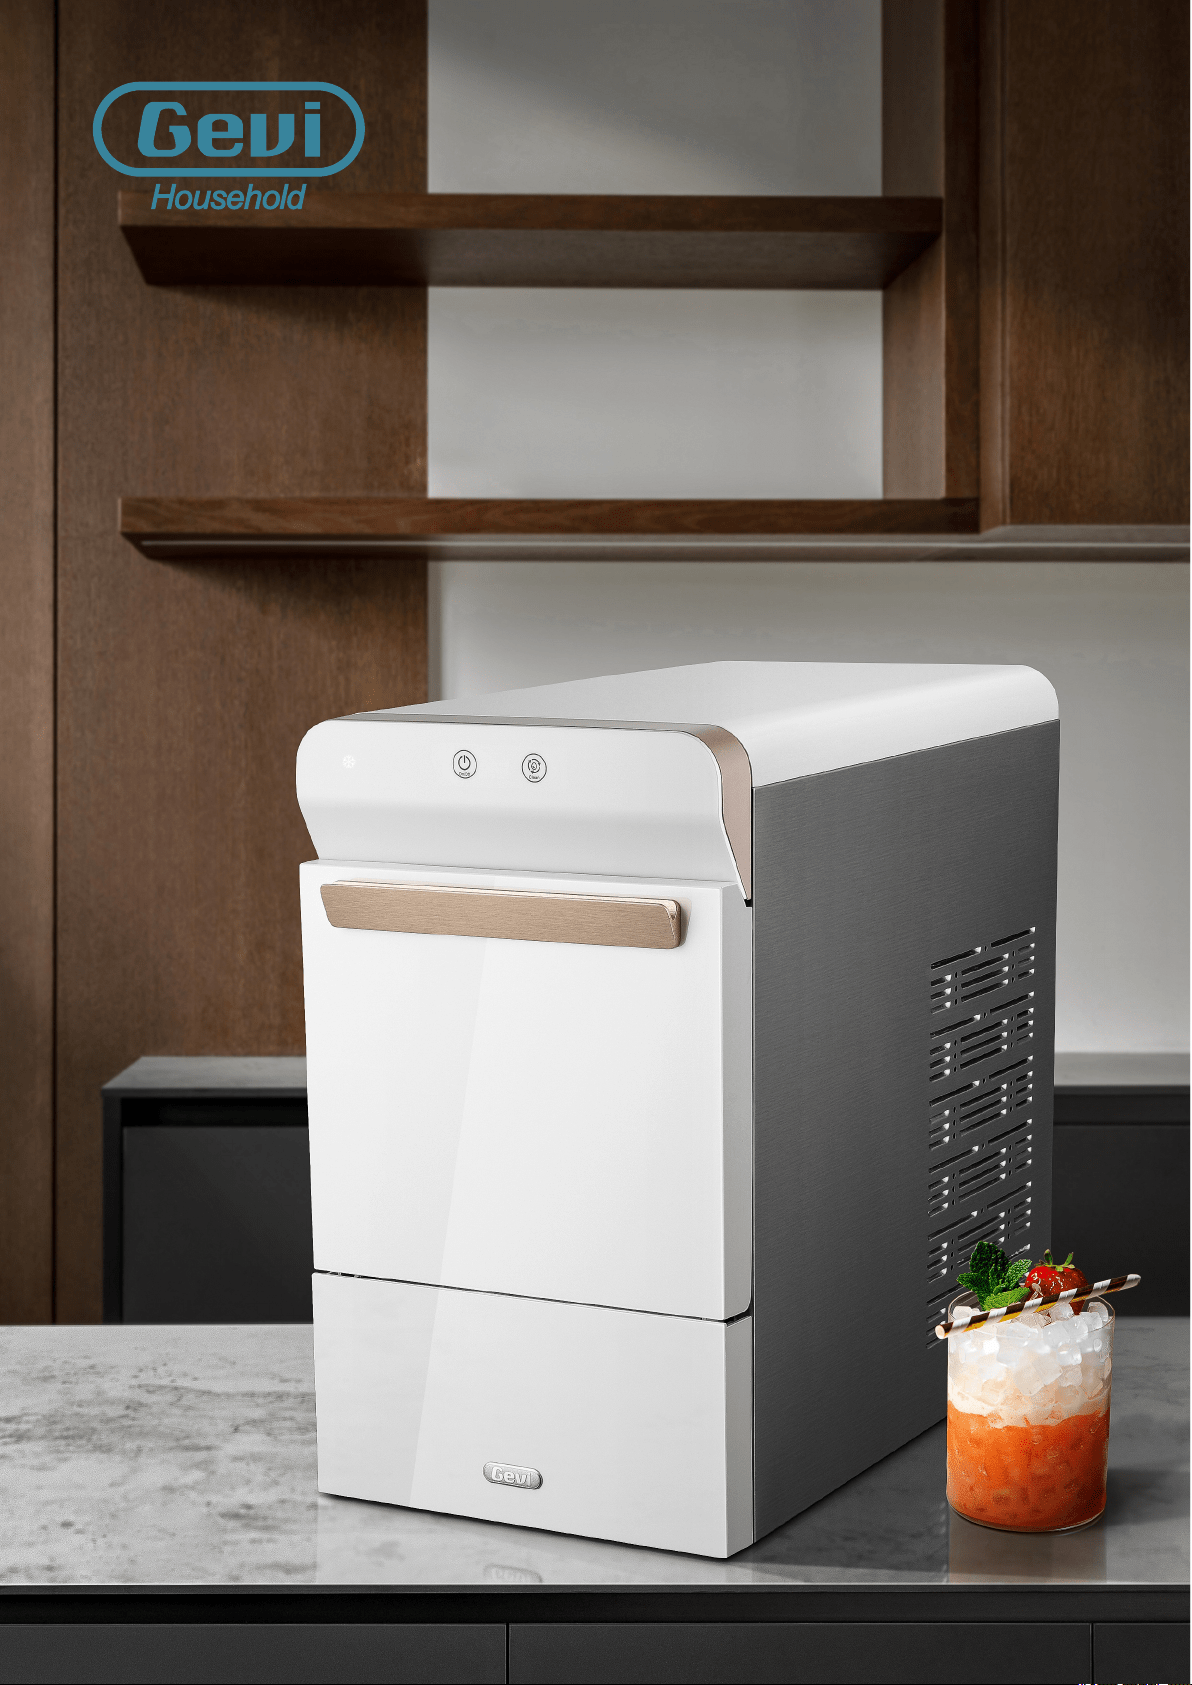
NUGGET ICE MAKER
USER
MANUAL
GIMN-1000B

THANK YOU FOR HAVING GEVI A PART OF YOUR HOME
Gevi Team
Gevi is a newly built brand specializing in small home appliances. Our goal is to bring convenience
and joy to families around the world. We are proud of the innovation and quality that put into every
Gevi product and we hope you will too. To ensure proper use of this appliance and make it last longer,
please read this manual thoroughly before using and save it for future reference.
One more important notice: Keep the ice maker upright for at least 2 hours before first use and
every time it’s heavily skewed or inverted.
To let us better provide service, register your Gevi appliances online now to receive important
product information and warranty details. You may also find our contact ways in the Customer
Support section of this User Manual.

IMPORTANT SAFETY INSTRUCTIONS......................................................
GET YOUR ICE MAKER READY.................................................................
HOW TO USE.............................................................................................
Unpacking......................................................................................................
Know Your Ice Maker....................................................................................
Before First Use.............................................................................................
Ice Making......................................................................................................
Cleaning........................................................................................................
Descaling......................................................................................................
3
3
3
6
7
7
9
10
11
12
14
14
15
1
Table Of Contents
Operation Guide............................................................................................
WARRANTY..............................................................................................
TROUBLE SHOOTING..............................................................................
TECHNICAL PARAMETERS......................................................................
CUSTOMER SUPPORT.............................................................................

1
Do not store or use gasoline or other flammable material and vapors around this appliance.
Repare service shall be performed by qualified electric service personnel and component
parts shall be replaced with manufacturer authorized replacement components.
It should be positioned such that it does not drape over the counter or tabletop where it
Plug the ice maker into an exclusive grounded outlet, do not use an adapter. No other appliance
should be plugged into the same outlet. Be sure that the plug is fully inserted into the receptacle.
Do not remove any safety, warning, or product information labels from your ice maker.
Before using, check if the power source corresponds to 120V, 60Hz.
Use only extension cords with grounding plug.
The marked rating of an extension cord must be equal to or greater than the rating of
can be pulled on by children intentionally.
this appliance.
Do not try to open the housing of the ice maker for repair, study or otherwise purpose. This action
may result in frostbite, electrical shock, fire, property loss or death.
Avoid the use of an extension cord because it may overheat and cause a risk of fire.
However, if it is necessary to use an extension cord:
The action of cleaning ice maker requires scale remover which contains acids. Acids can
cause burns. If skin contact with concentrated cleaner may happen, flush with water. If
swallowed, drink large amount of water or milk and call physician immediately. Keep scale
remover out of reach of children.
When handling, installing, and operating the appliance, care should be taken to avoid damage
to the refrigerant tubing.
Do not operate any appliance with a damage cord or plug or after the appliance malfunction
or has been damaged in any manner. Return the appliance to the nearest authorized service
facility for examination, repair or adjustment.
·
·
·
·
·
·
·
·
·
·
IMPORTANT SAFETY INSTRUCTIONS
READ ALL INSTRUCTIONS BEFORE USING
Nugget Ice Maker
To reduce the risk of fire, explosion, electric shock, or injury when using your
ice maker, follow these important safety instructions:

2
READ ALL INSTRUCTIONS BEFORE USING
IMPORTANT SAFETY INSTRUCTIONS
Nugget Ice Maker
·
·
·
Keep Cool: Operation in ambient temperature beyond the limits listed in this manual (Refer
to page 6) may result in severe damage which is not covered by warranty.
Provide Shade: Heat from the sun will reduce the unit’s ability to make and store ice. UV
radiation can potentially damage the plastic components.
Keep Upright: Place on level surface only, skewed placement may damage the refrigeration system.
Outdoor Use Notice
Do not, under any circumstances, remove the ground prong from the power cord or use an
adaptor that prevents it from functioning. For personal safety, this unit must be properly
grounded.
The unit should always be plugged into its rated source, 120 volt, 60 Hz, 15 amp circuit. This
helps the machine to provide the best performance and also prevents overloading wiring
circuits which could potentially cause a fire hazard from overheated wires.
Do not plug or unplug the unit with wet hand.
Grounding is to minimize the possibility of electric shock hazard. The power cord of this appliance
is equipped with a 3-prong plug which mates with a standard 3-prong wall outlet. Have your wall
outlet and circuit checked by a qualified electrician to make sure it’s properly grounded.
The appliance should not be plugged into a 2-prong outlet, it is user’s responsibility and obligation to
replace it with a properly grounded 3-prong wall outlet.
Repair or replace immediately all power cords that are frayed or otherwise damaged. Do not use a cord
that has cracks or abrasion damage along its length or at either end.
·
·
·
·
·
Electricity
All refrigeration products contain flammable refrigerants, which under federal law must be removed
prior to disposal. Please check with the company handling the disposal for what to do if you are
getting rid of refrigeration product.
Disposal of Your Appliance
Nugget Ice Maker
GET YOUR ICE MAKER READY
·
·
·
Remove tape and any labels from your ice maker before using (except for the labels listed above).
Do not use sharp tools, alcohol, flammable fluids or rough cleaners to remove tape or glue.
These items can cause damage to the surface of your ice maker.
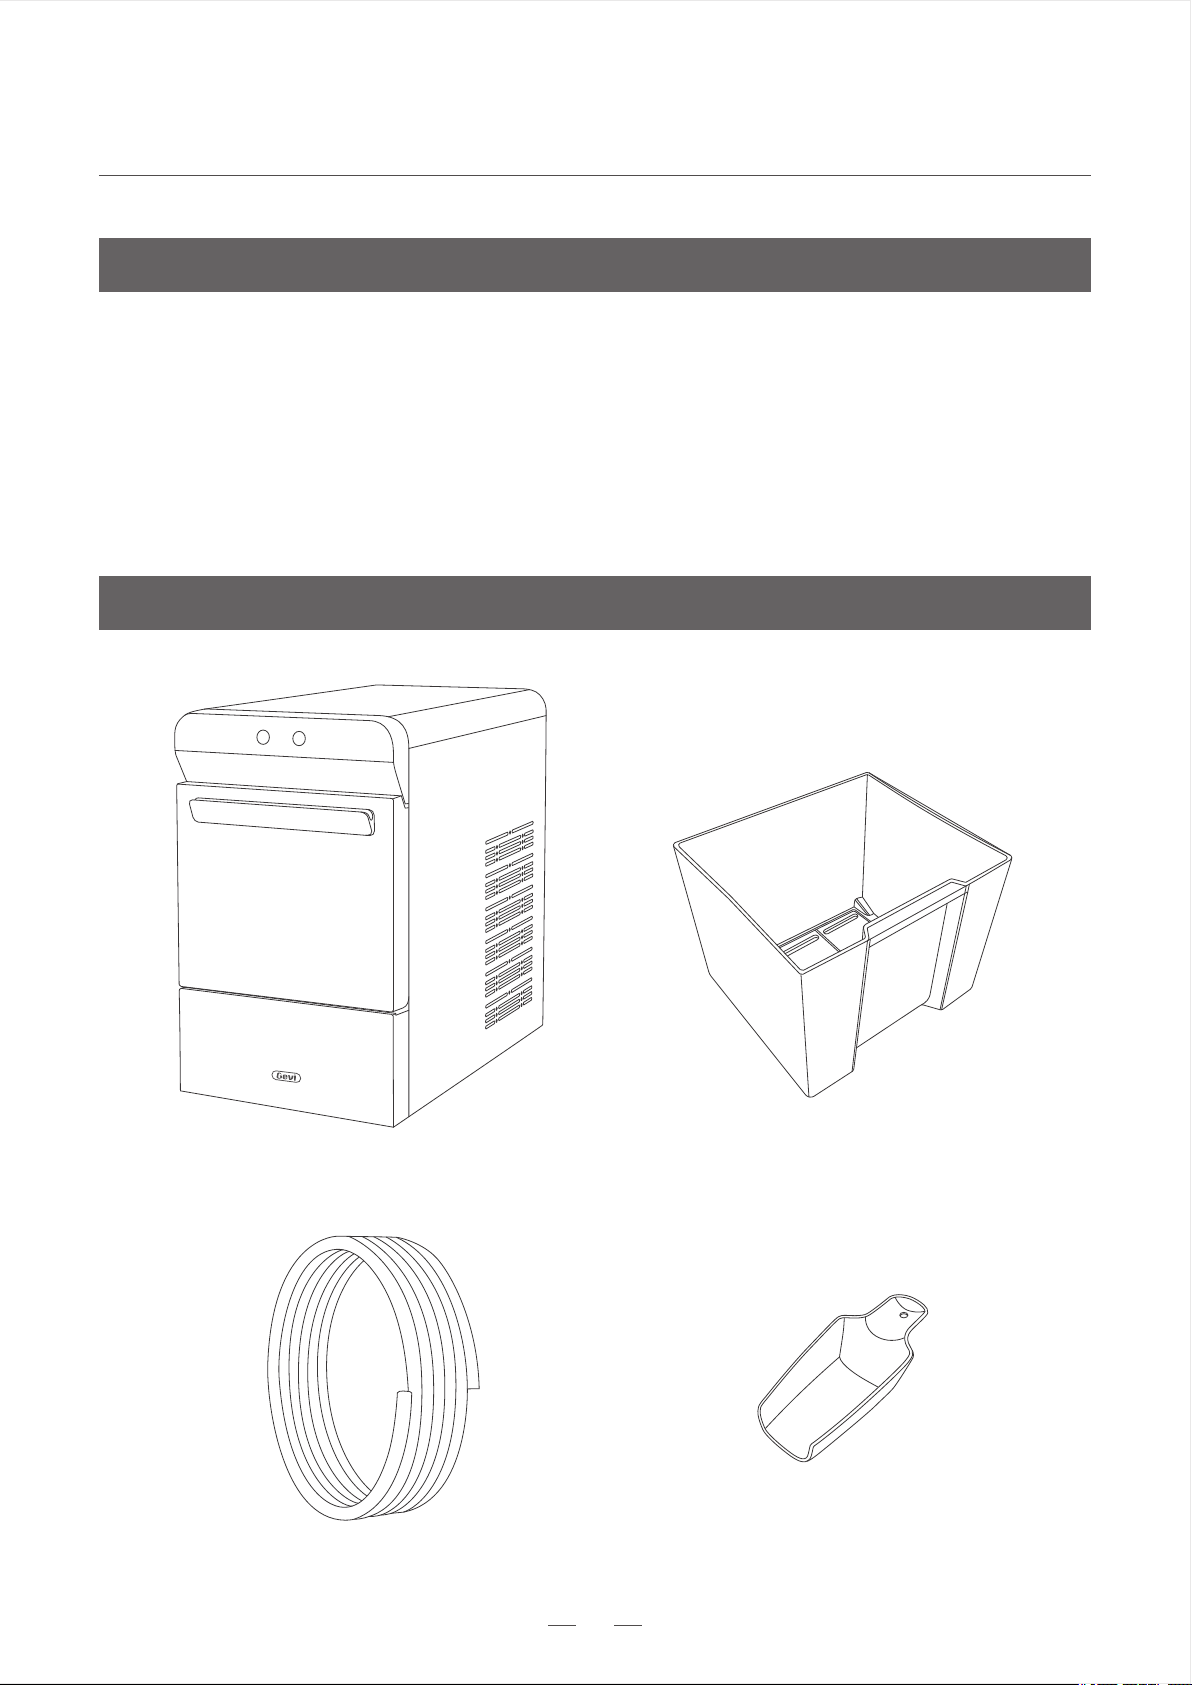
Package includes: 1 ice maker, 1 ice basket, 1 ice scoop, 1 10ft 1/4” hose and 1 user manual.
IMPORTANT : Do not remove any safety, warning, or product information labels from your ice
maker.
Ice Basket
Gevi Ice Maker
Ice Scoop
10ft 1/4” hose
3
Unpacking
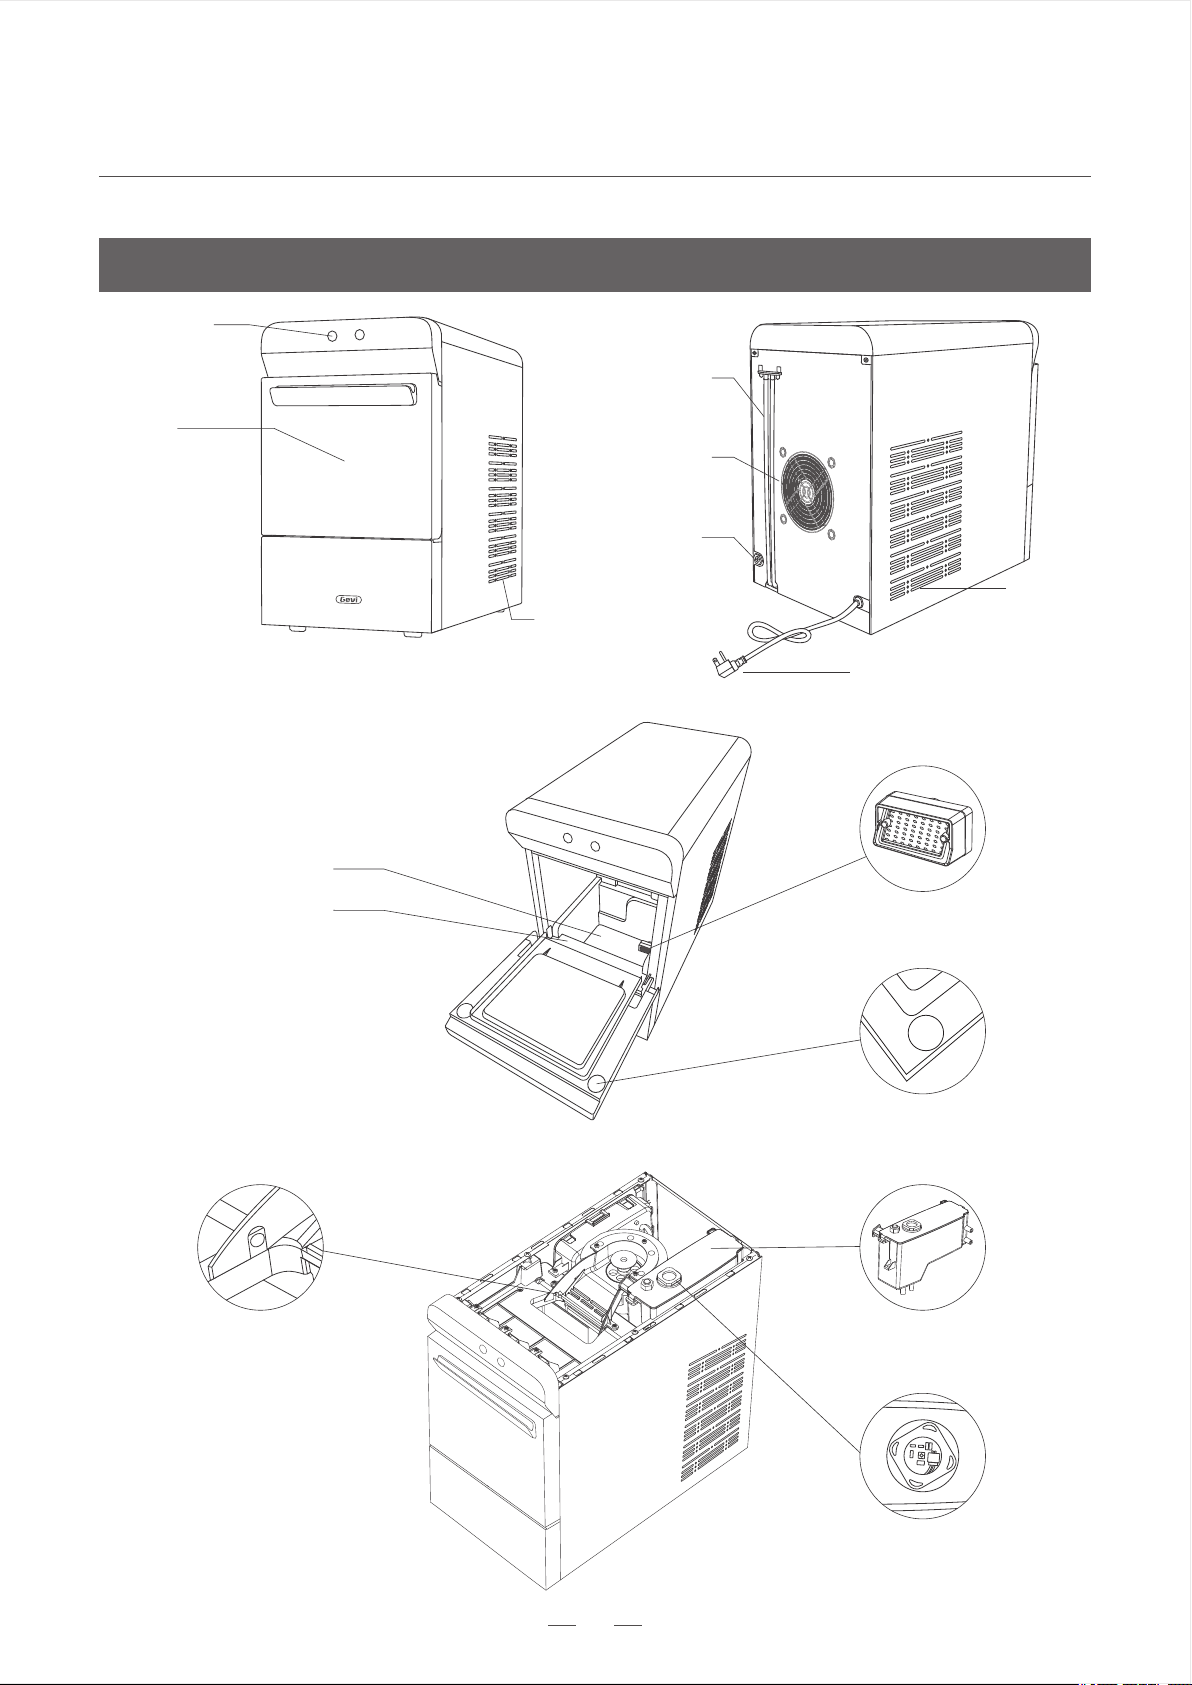
Know Your Ice Maker
Nugget Ice Maker
GET YOUR ICE MAKER READY
4
Front Lid
Top Water Reservoir
UV Light
Magnetic Switch
Drain Hoses
Exhaust Fan
Power Cord
Water Inlet
Know Your Ice Maker
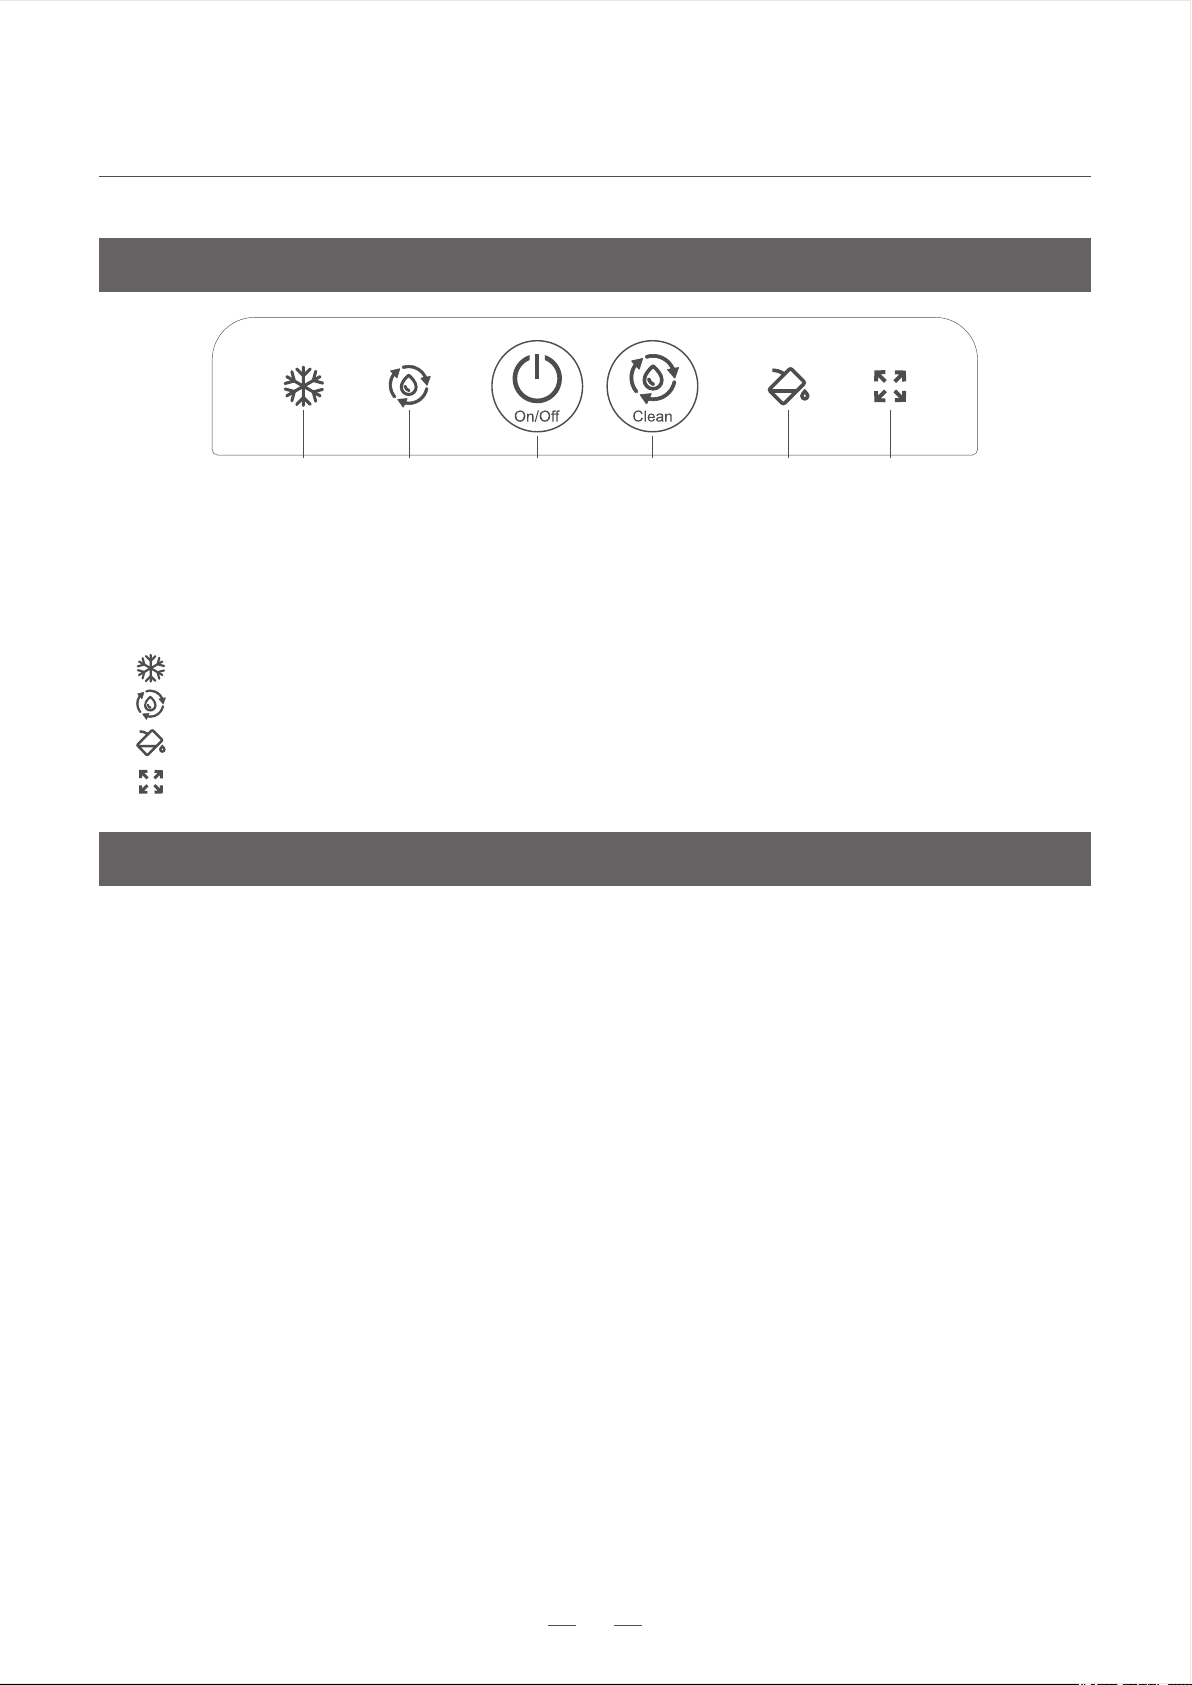
Control Panel
Air Vent II
Ice Full Infrared Sensor
Water Reservoir
Water Screen
Air Vent
Max Water Line
Nugget Ice Maker
GET YOUR ICE MAKER READY
5
Know Your Ice Maker
FAQs
②④⑥①③⑤
- Keep flashing when the ice maker is plugged in, glow solidly during ice making.
- Glow white when the ice maker is running self-cleaning program.
- Glow white when the water supply is not enough to continue making ice.
- Glow white when the ice basket is full.
Clean
On/Off
Control Buttons
Indicators
②
④
⑥
①
③
⑤
- Press to turn the ice maker on or off.
- Press and hold for 3 seconds to enter self-cleaning program.
It’s normal for the ice maker to generate some heat during working, especially when it has kept
working for a long time.
5.Heat Generation
4.Sounds Made by Ice Maker
The ice maker is designed to work quietly but will make some sounds during operation.
Every time the ice maker starts making ice or water is refilled.Water flows through the ice
chute into water reservoir, this is to cool the water. Water will stop flowing when its
temperature is low enough to form ice.
3.Water Flowing During Ice Making
2.Time of Ice Making
Time of ice making is affected by the ambient and water temperature. (Refer to page 6 for
temperature range.) The first ice comes out between 15 and 30 minutes. Usually, it takes 3-4
hours to fill the ice basket.
1.Water Residue Found
Every Gevi Ice Maker goes through a running test before leaving the plant, so it’s normal to
find water residue in water reservoir or drain hoses. Run self-cleaning program twice with
fresh water before first use.

Nugget Ice Maker
GET YOUR ICE MAKER READY
6
Before First Use
6.Clean your ice maker and accessories. Add water to the reservoir, run self-cleaning program
twice with fresh water, and then drain it out through the drain hoses.
1.Unpack and check if all the items (Refer to page 3) are available. Please contact Gevi Customer
Service if anything is missing.
3.The incline angle should not exceed 45° when moving. Turning upside down is strictly
forbidden. Doing so can cause damage to the compressor or refrigerating system.
4.Keep the environment dry and stay away from heat sources such as ovens, heaters and
corrosive gases. Maintain at least 6 inches clearance on all sides of the ice maker for
ventilation.
2.Ensure the ice maker stands upright on the level surface. After the jolt of transport, keep the
ice maker still for 2 hours before plugging in.
5.The ice maker should operate between 50°F (10°C) and 90°F (32°C). Use water with a
temperature between 46°F (8°C) and 82°F (28°C) for ice making or cleaning. Exceeding the
limit may result in severe damage which is not covered by the warranty.
still for
2 hours
keep it
Nugget Ice Maker
HOW TO USE
7
Operation Guide
Drain the ice maker should be through the drain hoses at the back of the machine. Do not tip the ice maker over.
Notes
Figure 1
Figure 2
Figure 3Figure 4Figure 5
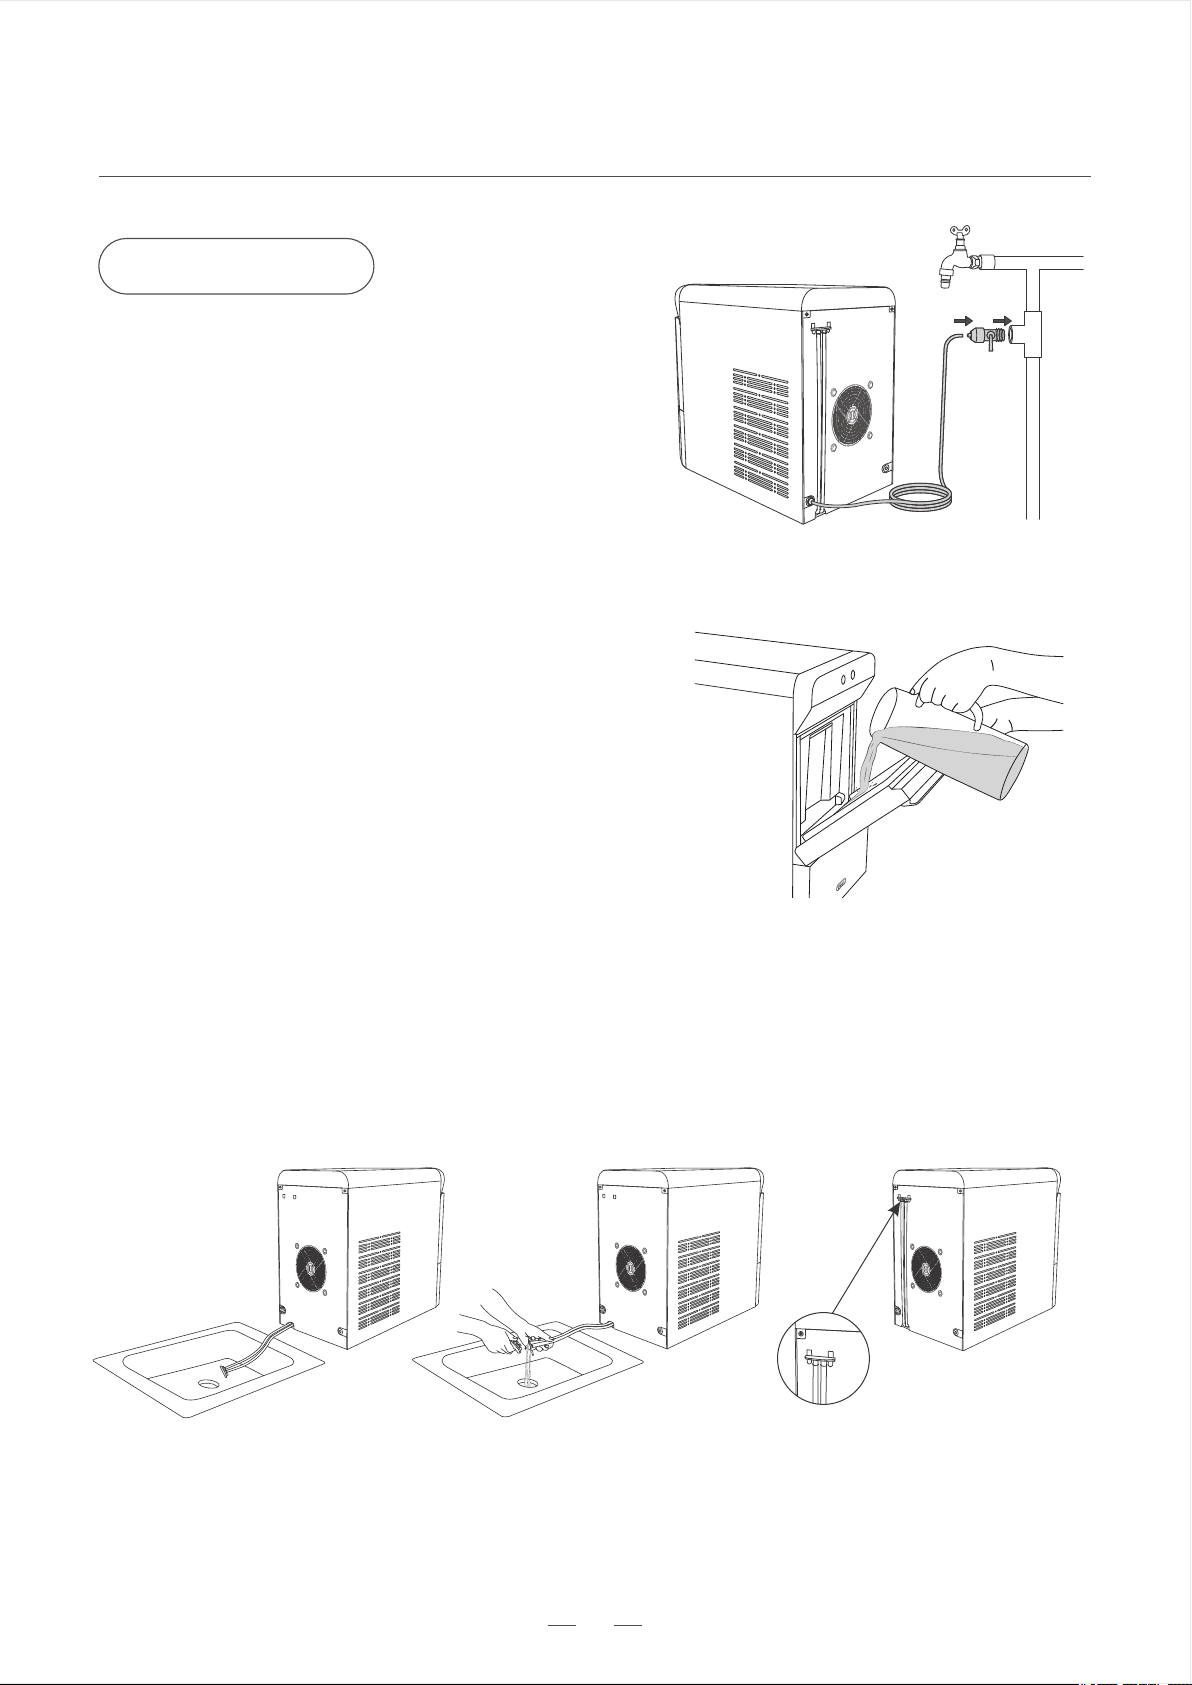
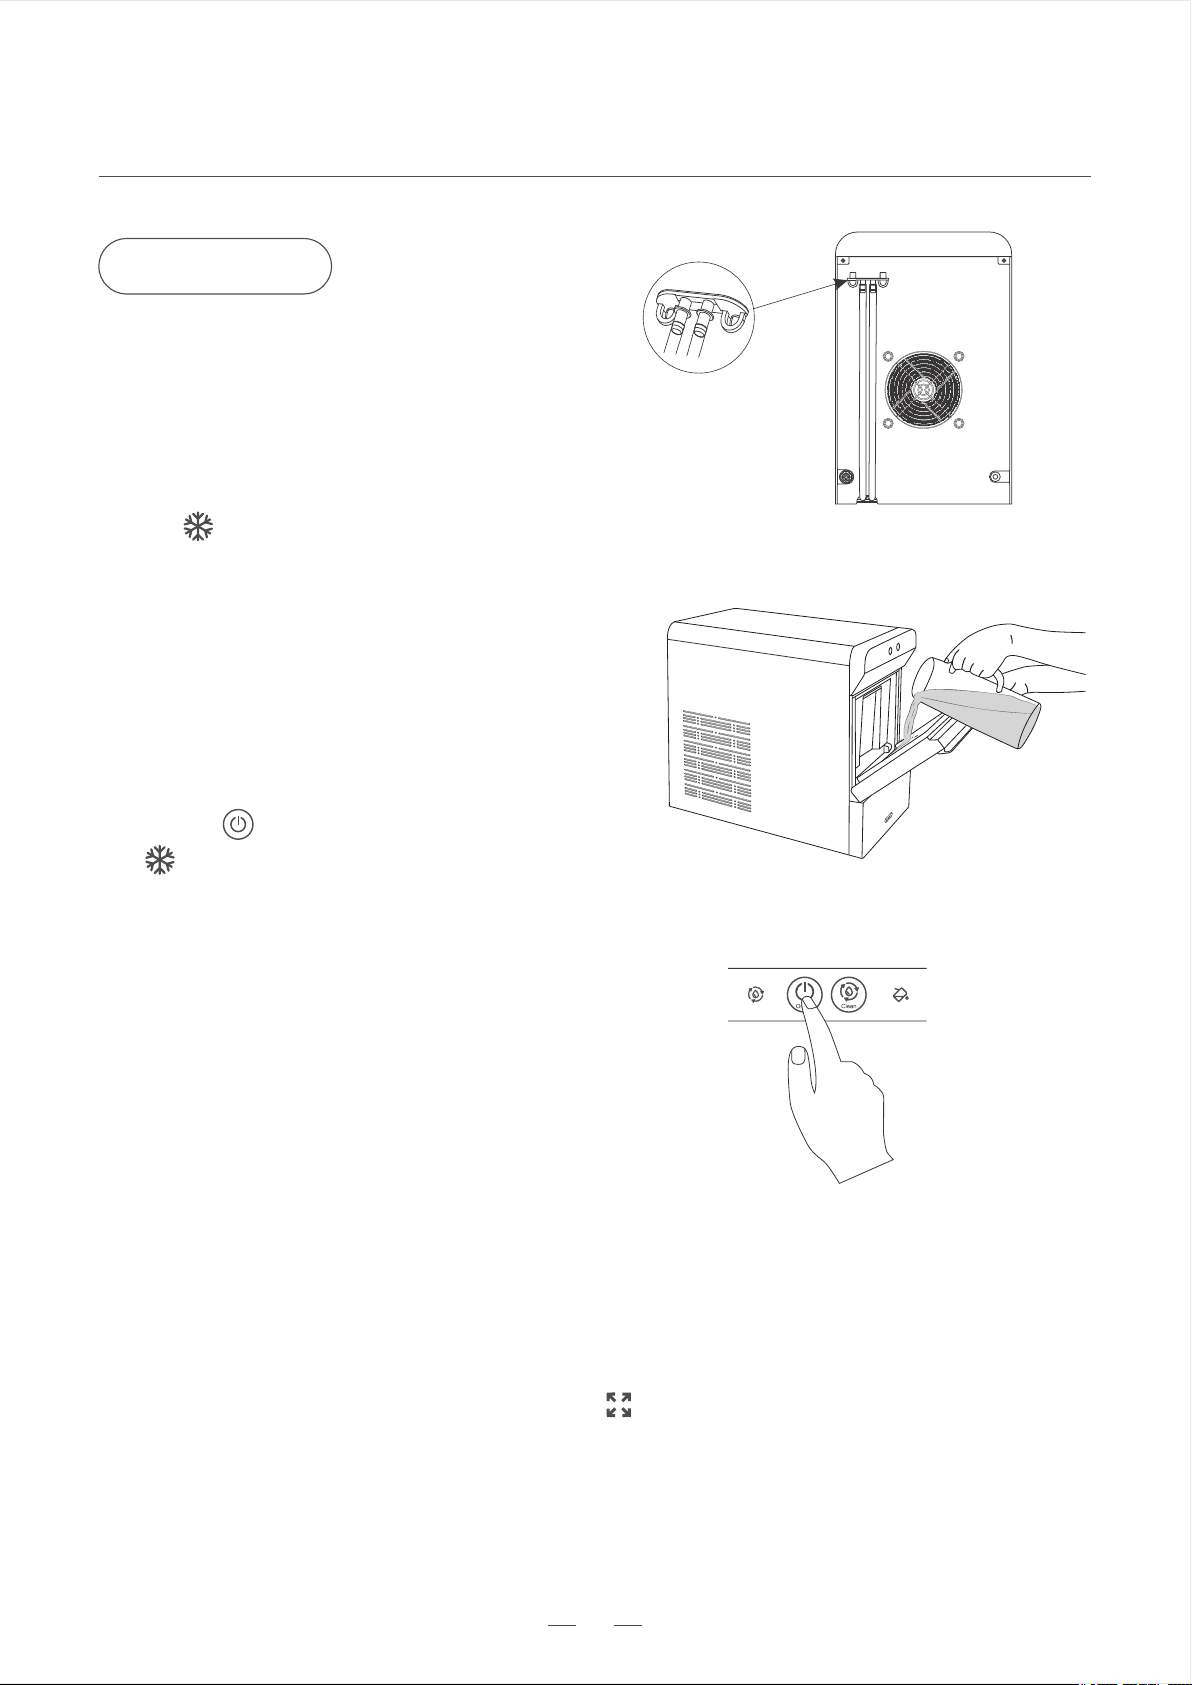
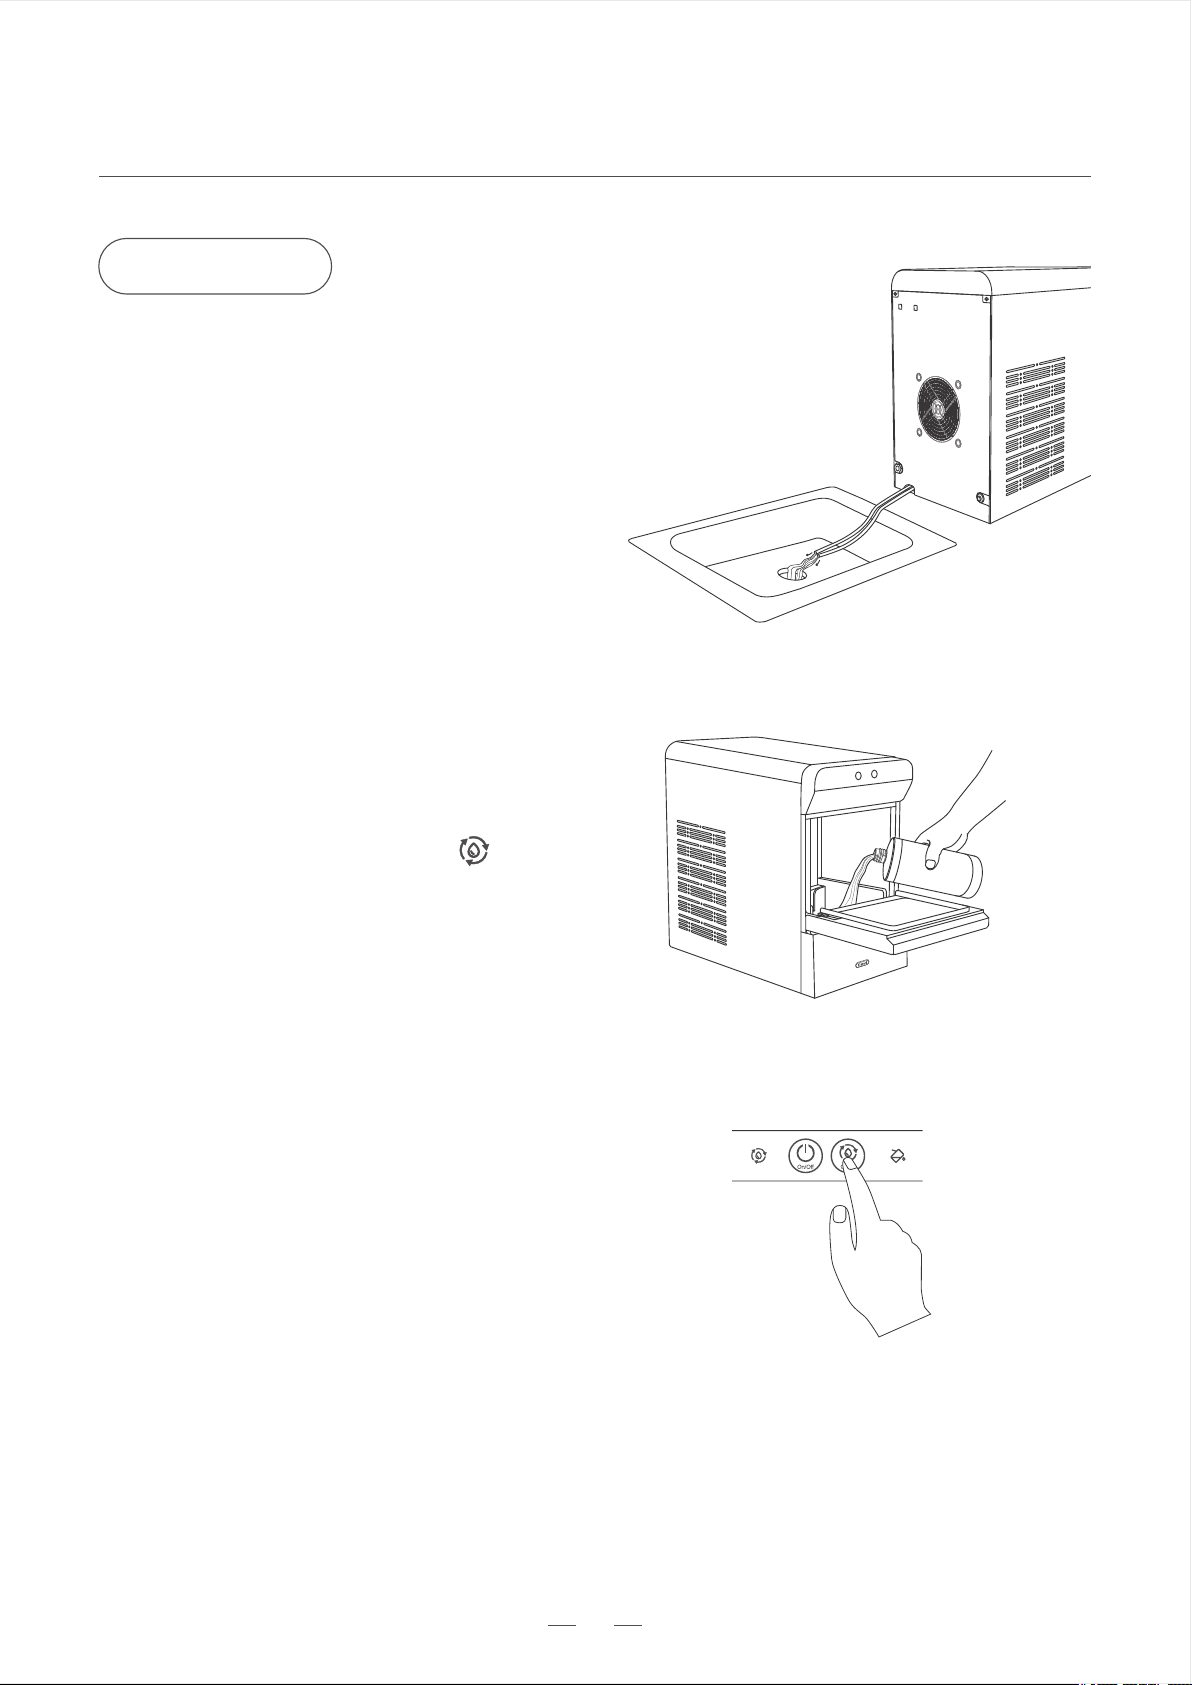
Remove the drain cap. The drain hoses will drain the water by themselves.
Take the drain hoses off and put them in a sink or a bucket. Make sure that the end of the
hoses are lower than the bottom of the ice maker.
After fully drained, seal back the drain hoses and hang them up at the back of your ice maker.
2.Drain Water
·
·
·
Automatically add water by connecting tap
water with the 10ft 1/4” hose (included in the
package). Insert one end of it into the water
inlet and connect the other end to water tap
through a faucet adapter (excluded from the
package). Water refill will stop if you turn off
the machine, or open and close the lid.
Manually add water by pouring potable water
into the water reservoir. Do not exceed the
“Max” water line.
1.Two Ways of Adding Water
·
·
The water used for ice making needs to be between
46°F(8°C) and 82°F (28°C).
Notes
Nugget Ice Maker
HOW TO USE
8
should be kept for proper ventilation.
Remember to keep the environment dry and
stay away from heat sources such as ovens,
heaters and corrosive gases.
The ice maker generates some heat while it
is working, so a 6-inch clearance on all sides
3.Heat Dissipation
Magnetic switch in the lid works for the below two scenarios.
Scenario 2. The ice maker stops ice making when the water is not enough , it will not
continue to make ice until there’s enough water. When you open and close the lid, the
magnetic switch triggers water level detection. If there’s enough water for ice making, the
machine will resume ice making. Otherwise, the indicator of lights up again. Be aware
that if you connect the ice maker to a water supply, the action of opening and closing the lid
will trigger the magnetic switch to stop auto water refill and restart ice making.
4.Magnetic Switch
Short press “On/Off” button to turn off the ice maker. The machine will continue to work for
an extra 30-60s to remove the remaining ice from internal components, and it will
automatically stop working when the process is completed. The indicator keeps flashing
unless the ice maker is unplugged.
Note: When unplugging the ice maker, empty the ice basket to avoid overflow of water from
melted ice.
5.Turn Off the Ice Maker
Figure 6
Scenario 1. The ice maker stops ice making when the indicator is on.When you open and
close the lid, the magnetic switch triggers ice making. If the ice full infrared sensor (refer to
page 4) detects that the ice is not full, the machine continues ice making. Otherwise, the
indicator of lights up again. This is designed to save energy in case the ice melts and the
machine restarts making ice constantly but no one is around.
Nugget Ice Maker
HOW TO USE
9
Ice Making
Figure 9
Heat insulation layer used for housing only helps slow down the melting of ice. The rate of melting
depends on ambient temperature. It's recommended to transfer ice to freezer for longer storage.
Remember to take out the ice scoop before making ice to avoid it being covered by the ice.
If the ice maker is not to be used for some time, empty the water reservoir and dry it for storage.
The ice maker is designed to work quietly but will make some noise during operation.
When the machine stops ice making triggered by , it will not continue to make ice until the ice is
fully/partially removed, or the lid is opened and closed. This is designed to save energy in case ice
melts and machine restarts making ice but no one is around.
·
·
·
·
Notes
·
Figure 8
Figure 7
6.The ice maker keeps making ice until the
ice basket is full, or the water runs low.
1.Ensure the drain hoses at the back of the
ice maker have been sealed and hung up
on the machine.
3.Open the lid, add potable water into water
reservoir, then close the lid. Be careful not to
exceed the “Max” water line.If it’s the first
time using this ice maker, read instructions
of “Before First Use” on page 6.
5.Wait for 15-30 minutes to enjoy fresh
nugget ice. Note that time of first ice is
affected by the ambient temperature and
water temperature.(Refer to page 6 for
temperature range.)
2.Plug into a 120V/60Hz wall outlet. Check
if the indicator flashes.
The indicator glows white solidly.
4.Press the “On/Off” button.

Nugget Ice Maker
HOW TO USE
10
·
·
Do not use organic solvent, boiled water, detergent, strong acid or strong alkali, etc. for cleaning.
It’s recommended to clean the ice maker once a week to keep ice fresh and help the machine
last longer.
Notes
Cleaning
Figure 10
Figure 11
Figure 12
6.Refill water into the water reservoir. Repeat
step 4 and step 5 more than twice to rinse
out the residues. Remember to use fresh
water each time.
1.Remove all the ice.
3.Pour cleaning solution into water reservoir
and add water to the max water line.
5.The self-cleaning program ends in 5
minutes. Then empty the ice maker through
the drain hoses and seal them back.
Remember to place the hoses into a sink or
a bucket before removing the drain cap.
2.Drain the ice maker through the drain hoses.
7.Clean ice basket and ice scoop.
8.Clean the exterior of the machine with a
damp sponge.
4.Close the lid, press and hold the button
for 3 seconds to enter self-cleaning program.
Nugget Ice Maker
HOW TO USE
11
·
·
It’s recommended to descale the ice maker once a week to keep ice fresh and help the machine
last longer.
Do not use organic solvent, boiled water, detergent, strong acid or strong alkali, etc. for descaling.
Notes
Descaling
Figure 13
Figure 14
Figure 15
6.Refill water into the water reservoir. Repeat
step 4 and step 5 more than twice to rinse
out the residues. Remember to use fresh
water each time.
3.Pour descaling solution into water reservoir
and add water to the max water line.
5.The self-cleaning program ends in 5
minutes. Then empty the ice maker through
the drain hoses and seal them back.
1.Remove all the ice.
4.Close the lid, press and hold the button
for 3 seconds to enter self-cleaning program.
2.Drain the ice maker through the drain hoses.
Remember to place the hoses into a sink or
a bucket before removing the drain cap.

Nugget Ice Maker
TROUBLE SHOOTING
12
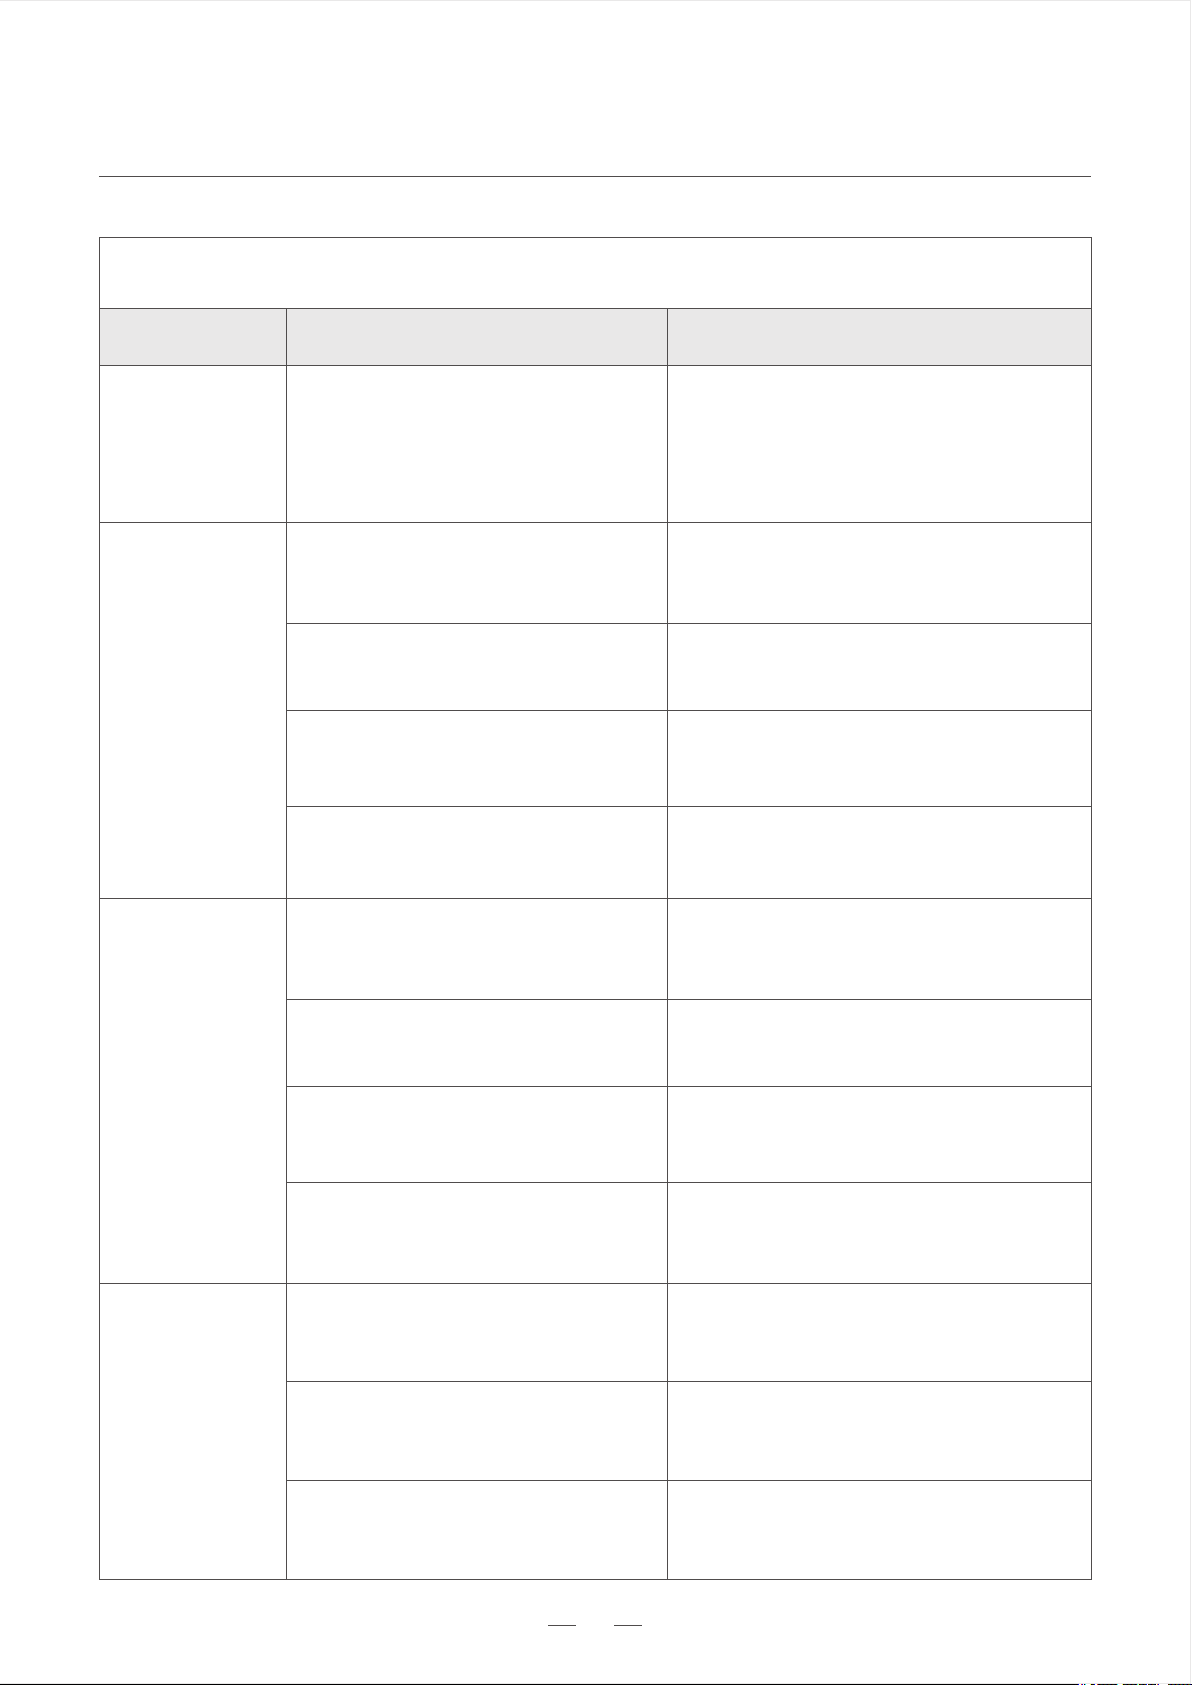
ProblemPossible CausesSolutions
Water is not enough
- Connected to water supply
Water is not enough
- Not connected to water supply
Water screen in the water
reservoir is blocked
Pump malfunction
Ice basket is full
Ambient temperature exceeds
limited working temperature
Infrared sensor blocked
NTC malfunction
Trouble Shooting
Add water to reservoir manually
Clean water screen
Contact Gevi Customer Service for help
Change the environment to meet the
requirements on page 6.
Empty the ice basket
Contact Gevi Customer Service for help
Check if the supply is still functioning.
If affirmative, wait for the auto refill. Do
not add water manually to avoid overflow.
"Add Water"
On
"Full" On
Defrosting mode
1.No action is needed. The ice maker is
in defrosting process and it will end in
approx 30 minutes.
2.Alternatively, you can hold and press
the "Clean" button for 3 seconds, and
then press the "ON /OFF" button again
to restart the appliance.
"Making"On and
"Cleaning" Flash
Check if any ice has blocked or got
stuck in the infrared sensor and Clean it.
Ice making components are
frozen
1.Unplug the ice maker for 45-60
minutes for ice to melt. Then run
cleaning program 2-3 times with
fresh water.
"Making" and
"Cleaning" Flash
Nugget Ice Maker
TROUBLE SHOOTING
13
Problem
Possible Causes
Solutions
Trouble Shooting
No Ice
Poor heat dissipation
The water temperature is
too high
The ambient temperature is
too high
The ice-making system is
Malfunctioning
Keep a 15cm/6inch clearance on all
sides of the ice maker for proper
ventilation.
Contact Gevi customer service for help
Use water with a temperature between
46°F(8°C) and 82°F(28°C)
Operate in an environment between
50°F (10°C) and 90°F (32°C)
Noise
Ice-making components are frozen
Resonance
Compressor malfunction
Exhaust fan makes a loud noise
Turn off the machine for 45 to 60
minutes for ice to melt. Then follow
the steps of “Descaling” on page 11.
Making a sound during working is
normal. If the sound is too loud, contact
Gevi customer service for help.
Remove any other object that is in
contact with the ice maker.
Contact Gevi customer service for help
Water Leak
The water pipe is leaking
- Connected to water supply
Water pipe isn’t connected properly
to the water inlet
- Connected to water supply
Other causes
Contact Gevi customer service for help
Change a water pipe.
Reconnect the water pipe to the water
inlet.
Ice making components are
frozen
2.Contact Gevi customer service for
help if it happens frequently.
"Making" and
"Cleaning" Flash
Nugget Ice Maker
TECHNICAL PARAMETERS
CUSTOMER SUPPORT
14
Gevi Official Website
Have a question or need assistance with your appliances? Visit Gevi Official
Website any time any where. You can also get more information about Gevi via
www.gevi.com
Gevi Official Hotline
Wish to speak with someone? Call 855-9922-888 during normal business hours.
Gevi Official Email
To describe your issue in detail, write to us at service@gevi.com
Model:
Applicable Climate:
Class:
Power Source:
Rated Power:
Refrigerant/Refrigerant Amount:
Foaming Agent:
Net Weight:
Housing:
Unit Size (DxWxH):
GIMN-1000B
ST/SN/N/T
I
120V/60Hz/3.0A
170W
R600a / 24g
C5H10
16.5kg/36.4Lbs
SUS430
17.2 x 9.6 x 16.7 inch

Nugget Ice Maker
WARRANTY
15
www.gevi.com
Warranty service is provided by Gevi Customer Service Center. To contact customer service team,
visit our website at www.gevi.com, email at service@gevi.com or call Gevi at 855-9922-888.
30 Days
From the date of original purchase
Whole unit if the ice maker fails
due to a defect in materials or
workmanship.
Any part of the ice machine which
fails due to a defect in materials or
workmanship.
1 Year
From the date of original purchase
Period
Gevi Will Replace
Warranty Register
Warranty Extension
Register your warranty at www.gevi.com/warranty
to receive 3 months warranty extension for FREE.
·
Tel:
855-9922-888
Email:
service@gevi.com
Website:
www.gevi.com