Loading ...
Loading ...
3
3
www.comfortzoneproducts.com
USAGE
Operating Instructions: Plug power cord into any properly
grounded, 3-prong, 120 volt wall outlet. The fan speed is controlled
by a 3-speed rotary switch. Turn the rotary switch to change the
speed or turn the fan off. Height of fan can be adjusted by loosening
cap screw (19). Make sure collar is tight before operating fan.
The angle can be adjusted by loosening the knob screw (16) which
holds the motor to the column. Once you have the desired angle,
be sure to tighten the knob screw. Do not attempt to relocate fan by
dragging the base. The fan can be moved to its next location by tilting
it on the edge of the base and rolling it, or by carrying it.
Note: This fan is equipped with a thermal protection switch.
If the fan overheats for any reason, the switch will turn off the fan.
The switch will automatically reset after the fan cools.
Assembly Instructions:
Tools Required: Phillips Screwdriver and Adjustable Wrench.
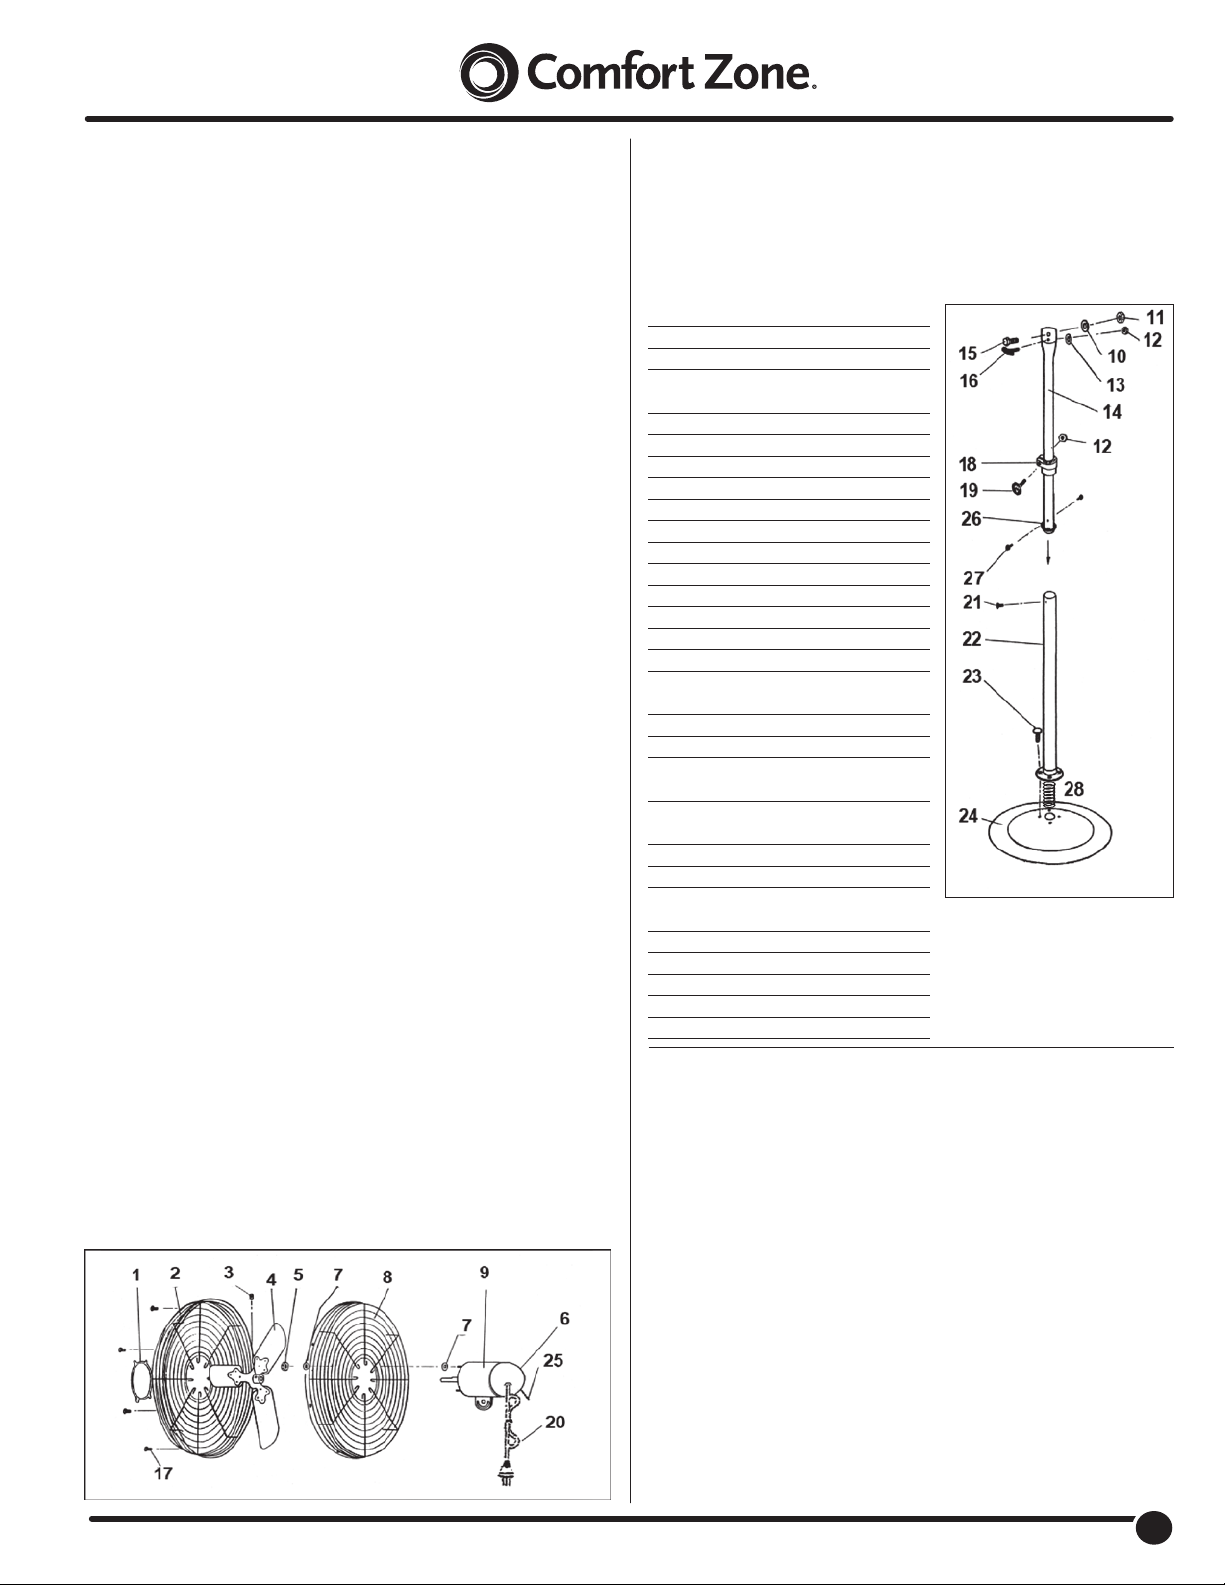
Head Assembly: ( Fig 1 )
Mount motor assembly (9) to extension column (14) with
1/2" x 1" hex bolt (15), one lock washer (10) and hex nut (11), and
with 1/4" x 1" knob screw (16), one lock washer (13) and hex nut (12).
Ensure that the knob on the 1/4" knob screw and the head of the
1/2" bolt are on the same side (See gure 1).
Tilt motor slightly up and tighten motor mounting nut. Place the rear
guard (8) on motor studs. Place four additional at washers (7), over
grille onto motor studs. Secure using four hex nuts (5).
Slide fan blade (4) on motor shaft with hub pointing towards the
motor. Tighten set screw (3) against at on shaft with 5/32 hex key
wrench provided.
Mount the front guard to the rear guard using grille clips (17).
DO NOT operate any fan with a damaged cord or plug or after
fan malfunctions, has been dropped or damaged in any manner.
Do not operate fan with a broken blade, safety cage or any visual
imperfections. Disconnect power before servicing. For repairs
covered under warranty, see warranty statement. For all other repairs
contact Comfort Zone
®
Customer Service by telephone or mail for
information and assistance.
DO NOT run power cord under carpeting. DO NOT cover cord with
throw rugs, runners or the like. Arrange cord away from trafc area
where it will not be tripped over. Avoid the use of extension cords
due to risk of re. If an extension cord must be used, the cord must
be minimum 14 AWG and rated not less then 1875 watts. Do not use
an extension cord unless the plug can be completely inserted into its
receptacle. Unplug the fan when not in use. Do not operate fan with
its ventilation obstructed.
Fig 1
# Description Qty
1 Nameplate 1
2 Front Guard 1
3
Set Screw
5/16"- 24 x .250 1
4 Fan Blade 1
5 Nut #8-32 4
6 Dome Cover 1
7 Flat Washer #10 4
8 Rear Guard 1
9 Motor 1
10 Lock Washer 1/2" 2
11 Nut 1/2"-13 2
12 Nut 1/4"-20 2
13 Lock Washer 1/4" 1
14 Extension Column 1
15 Bolt 1/2" – 13 x 1 1
16
Knob Screw
1/4" – 20 x 1" 1
17 Grille Clip 6
18 Collar 1
19
Cap Screw
1/4 - 20 x 1-1/4" 1
20
Power Cord
9ft/274cm 1
21 Screw #8 – 32 x 1/4" 1
22 Painted Column 1
23
Carriage Bolt
5/16" – 18 x .750 5
24 Base Plate 1
25 Rotary Switch 1
26 Plastic Spacer 1
27 Screw #8 – 18 x 5/16" 2
28 Spring 1
Fig 2
CARE AND MAINTENANCE
WARNING: ALWAYS UNPLUG THE UNIT BEFORE
ATTEMPTING TO PERFORM ANY SERVICE.
Cleaning: Unscrew and remove front grille only. Clean the grille
and fan blade surface with a clean damp cloth. Do not use harsh
chemical or abrasive cleaners. DO NOT IMMERSE THE FAN OR
ANY WIRES IN WATER. Replace front grille before fan use. Allow
fan to dry completely before use. Periodic grille cleaning with a
vacuum will prevent dust build up. The motor does not require
any interior maintenance, cleaning or lubrication.
Maintenance: The Internal motor bearings are permanently
lubricated at the factory and do not require any additional
lubrication.
Repair: DO NOT OPERATE THE FAN WITHOUT THE GRILLE IN
PLACE. DO NOT USE THE FAN IF IT HAS MALFUNCTIONED OR
BECOME DAMAGED IN ANY WAY.
STORAGE: Keep original package for storage of the fan. Coil
and tie the power cord to avoid damage during storage.
Pedestal Assembly: ( Fig 2 )
1. Place the spring (28) inside painted column (22).
2. Mount the painted column (22) to the base using four carriage bolts
5/16" x 3/4" (23) and lock with the thread on the base.
3. Adjust the extension column (14) to the proper height, then tighten
the plastic collar (18) using a 1/4"-20 x 1/4" cap screw (19) and a
1/4"-20 nut (12).
Loading ...