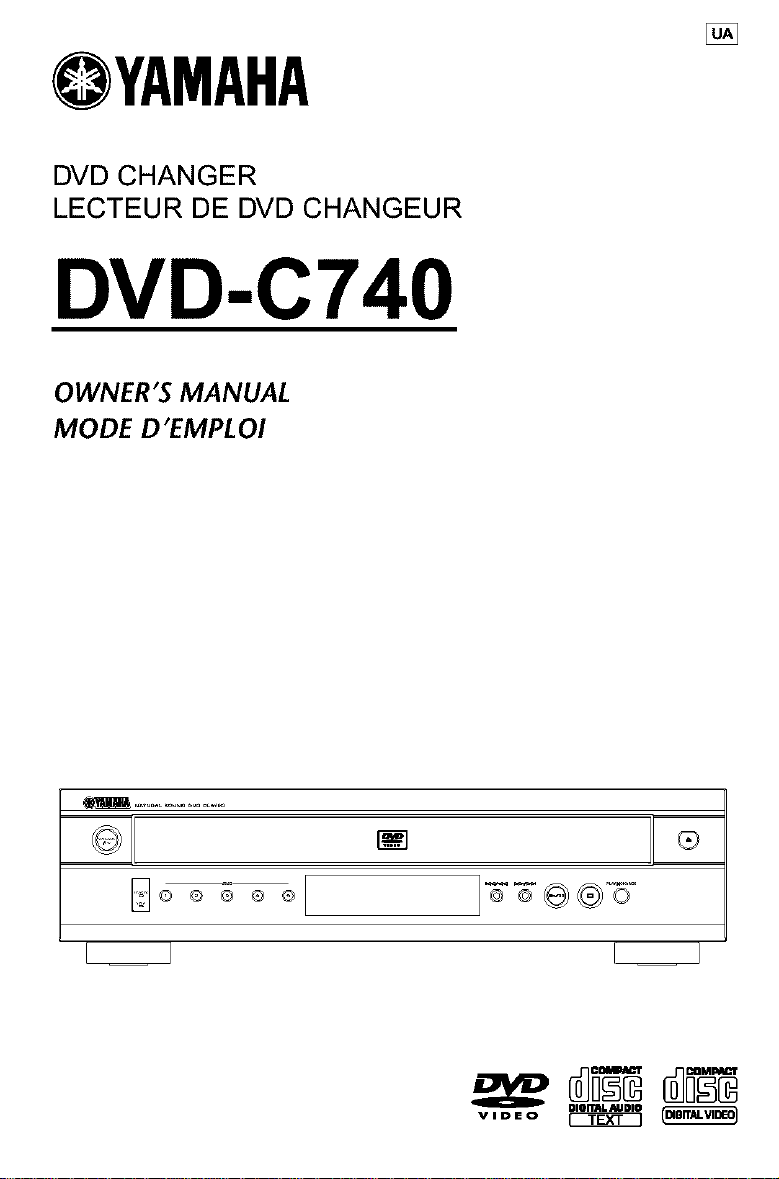
OYAMAHA
DVD CHANGER
LECTEUR DE DVD CHANGEUR
DVD-C740
OWNER'S MANUAL
MODE D'EMPLOI
_©Q®®®
JTY_ ®5-
RISK OF ELECTRtC SHOCK
DO NOT OPEN
CAUTiON_ TO REDUCE THE RiSK OF ELECTRIC SHOCK,
DO NOT REMOVE COVER {OR BACK).
NO USER=SERViCEABLE PARTS iNSiDE.
REFER SERVICING TO QUALIFIED SERVICE PERSONNEL.
L_ hls symbol wams the _ser lJlat unilIsu_ate_ voltage
w_thin tl_e unit may have s_ffl¢_ent m_gnitu_e to cause
e_ectr_¢ sho¢l< Tl_erofo_e, it _sdal_gerous to make
any killd of co_tact with an,/insitJe part of this un_
_ This symt_oI _ert_ the user that iml3orlant klteratur e
concernillg _l_e operation antt m_intellance of th_s
unit has beell illclu_ett TIlerofole, it Shou_t be read
¢atefukl,/in order to avoi_t ally Ilroblems
WARNING
TO reduce the risk of fire or e_ectri¢ shock, do no_
expose this appliance _o _*alnor reoist ul'e.
CAUTION
Use of controls o__adjustments or per formance of
procedures other than herein m;_yresult in h_zardous
radiation exposure.
The set complies with the FCC-P, ules, Par_ 15 and
with 21 CFR 1040.10.
IMPORTANT SAFETY INSTRUCTIONS
1. Read these instructions.
2. Keep these instructions.
3. Heed all warnings.
4, Follow atl instructions.
S, Do not use this apparatus near water.
6. Clean only with a d_y cloth.
7. Do not block any of the ventilation openings.
Insl_a_I in accordance with the manufacturers
instructions.
8. DO not install near any heat sources _uch as
radiators. Ileal i_'gistel s. s_oves_or oth_.l _pparatus
(in ludin_ _plif_,rs) L_ produce I_e_
9, DO not defeat the safety
llaS two 5lades wilJl one wider than Pl_g
the olhe_ A grouilding type plug has two blades and a third
glx)unding plx)ng [he wide blade orthe third prollg _
provided for your safety Whe_ the provided plu_ does n_
fr_ into your ¸ out I(._t.consult an electr_ciaJ i for replacement of
the ob_lete outlet
10. P_tect the power cord f_om being walk_,d on or
pin¢_d_ par_t_¢ular_yat plu_.s_¢ol_e_lence l_ceptacles, and
the poi_ where they exit from the apparatus¸
11 • Only use art achm enl:s/accessoHes spe ifled by Ule
m_u_acture_
12. _ Use only with a cart, s_and,tripod, bracket,
or table spedf_ed by the manufacturer or sold
with the _paratus W_en a cart is used, use
caution when moving the carl/apparatus
combi_ation _ avoid i_ury from tip ove_:
13. Unplug this apparatus durin_ li_ _ni_ sto_ ms or whe_
u_used _ long period_ of time
14. Refer all servicing 1o qualified _rvice personnel¸
_ervidng _srequil_'d whe_ the app_ atu_ ha_sbeen
damaged in any way, such as _ the powe_ supply Cord ol ¸
plu_ is d_m_ed liquid l_asbeen spilled o_¸objects have
[alle_ into the app_ atus, Or whe_ the appar atu_ has been
exposed to raill Or mois_ul_, does not operate nor_l_l_ Or
h_ been dropped¸
15. Battery usage CAUTION _ preve_ b_ery leakage
whid_ may _u_t in bodi_/i_ury or damag_ _ the un_
Ill,tail all batteries colr_ tl_ + aid - as m_k_'d on the ullit
Do not mix _attelies (old _.'ld new or carbon and
_lkaline, _,t¢)
Remove batteries when the unit is no_ us{.d fol a long time
EL 6475-E002:01/3
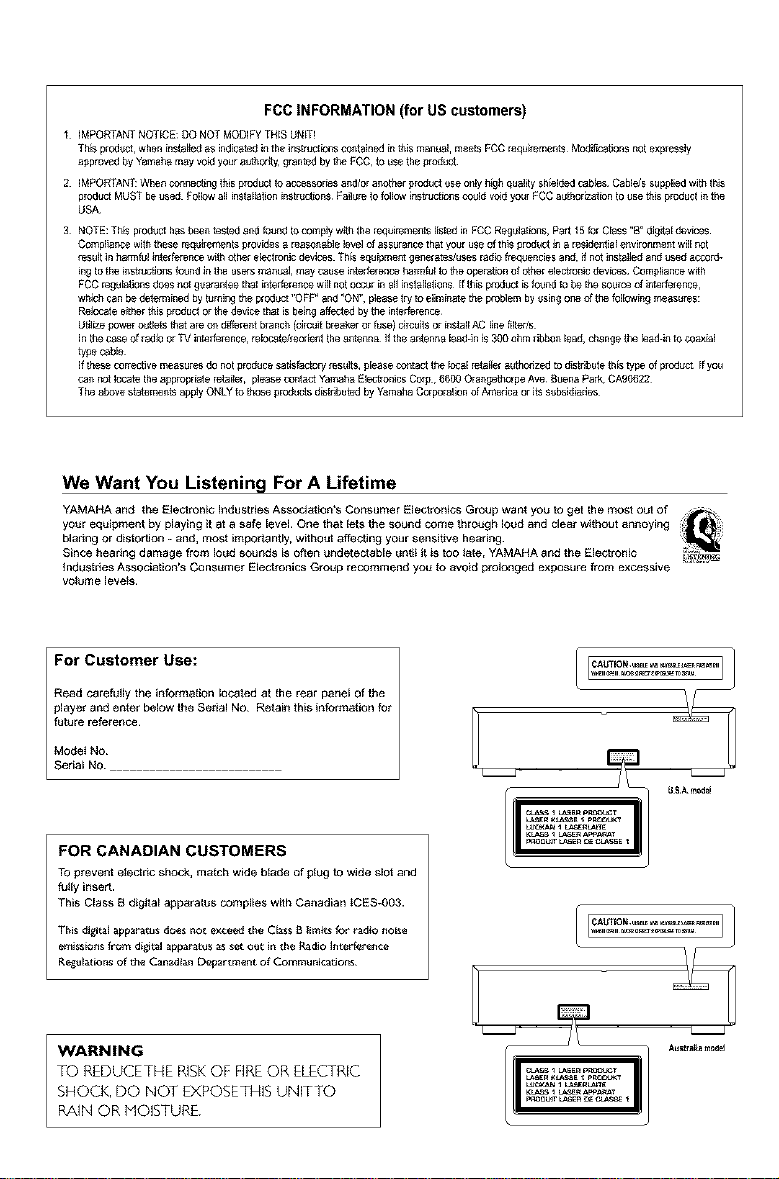
FCCINFORMATION(forUScustomers)
I iMPORTANTNOTICE:DO NOT MODIFY THIS UNIT!
ThEsproduct,wheninsta_ as indicated inthe instruct_onscontained iRthis manu,_l,meets FCCrequirements Modi_cations Rotexpressly
approved by Yamaham_y voidyour autherlty, gtant_ by theFCC, to usethe product¸
2 iMPORTANTWhen correcting this product toacc_sor_s ,_r_l/oranelher I_roductuse o_ h_h qualitysh_l_ cab_s CablJs suppJ_ withthis
product MUSTbe L_ed FoJlowall installation instruct_ns Failureto follow _nstrJct_nscould voidyour FCCau[horEz,_tEonto usethis product inthe
USA
3 N_TE_Th_pr_dUcthas_eentestedandf_undtoc_mp]ywjththereqUiremen_s[EstedinFCCReguiatmns_Pa_ti5f_rCIass"B_'djgitaIdevEces
Compli,_ncewiththese requirements provEdesa re,_so_edleleve_of ,_ssurancethat yc;Jr useofthis product Jn,_residential enviro_me£t wiJJPOt
result in harmful interfereRcewithother e_gtrotlic devices Th_sequipment generates]usesradio frequencies and, _fnotinstalJedand used accord-
ing tothe instecotJonsfound Jnthe uses manL_al,may Causei_terfelence harrnfuJtotheopePat_oROfotherelectnonicdev_es CornpJiancew_th
FCCregulations does notguarantee that interference willnot occur in a_JinstalJations If this pmdt=ctis found to bethe source of interference,
whichcanbe determined byturning theproduct "OFF* and "ON", please try toeJiminatetheproblem byusing or_ of the foJJowingmeasures:
ReJocateei[herthis produc_orthe device that is beingaffected by the interference¸
Utilize poweroutJetsthat are o_ dffre_t branch (drcuit bre,_keror fuse) drcults or instaJJAC I_nef_lter/s
JRthecase of radio or_/interference, rebc4_te/reede£tthe ,_ntenRaIf theantenna Jead4RJ$300 ohm ribbon_ead,ch,_ngethe [eed-into coaxial
type cable
Jfthesecorrective measures do not producesatisfactory results, please co_tact the bcaJ retailer authoazedto distabutethis type Ofproduct¸ If you
can POtlocatethe ,_ppropriateretailer, pleasecontact YamahaElectronics Ccrp, 6600Orangethorpe Ave BuenaPark CA90622
The above statementsapply ONLY to thoseproductsdistabutedby YamahaCorporation ofAmedca or _tssubsidiedes
We Want You Listening For A Lifetime
YAMAHA and the Electronic Industries Association*s Consumer Electronics Group want you to get the most out of
your eqt_ipment by playing it at a safe level One that lets the sound come throt_gh loud and clear without annoying
blaring or distorfJon - and, most importantly, withot_t affecting your sensitive hearing¸
Since hearing damage from loud sounds is often undetectable unti_ it is too late, YAMAHA and the Electronic
industries Association's Consumer E_ectronics Group recommend you to avoid prolonged exposure from excessive ........
volume Jevets.
I For Customer Use:
Read carefofly the information located at the rear paneE of the
pJaye_ and enter beJow Lhe Seria_ No Retain this information for
future reference
Serial NO.
Model No
FOR CANADIAN CUSTOMERS
TO prevent elect tic shock, match wide blade of plug fe wide sect and
rally insert.
This CEass B digital apparatus complies with Canadian tCES_003.
Thi_ digita_apparatus does not excee_ the aas$ B {irnits for radio noise
_'nission_ from distal apparatus as_et o_t in the Radio _nterference
Re_ofations of die Cana/_ia_ Department of Commu nic2,dons
WARMING
TO REDUCETHE RISKOF FIREOR ELECTRIC
SHOCK, DO NOT EXPOSETHIS UNITTO
PAIN QR MOISTURE.
KL_S _ _,_ AP'_AnAI
L
LUC=XAN_ _,_n_
A_r_m0dd
1 To assure the finest performance, please read
this manual caref,allX Keep it in a safe place for
futurereference.
2 InstaEI this unt n a well ventilated, cool, dry, dean
place away from direct sunlight, heat sources,
vibration, dust, mo sture, or cold, In a cabinet,
allow about 2,5cm (I inch) of free space all
around this unt for adequate venflation.
3 Locate this unit away from other electrical
appliances, motors, or transformers to avoid
humming sounds.
4 Do not expose this untt to sudden temperature
changes from cold to hot, nor locate ths untt in
an environment with high humidity (.e. a room
wth a humid fier) to prevent condensation inside
this unit, which may cause an electr cal shock, fire,
damage to this unit, and/or personal _jur)4
5 Avoid installing this unit in a location where
foreign obJeCts may fall onto this unit or where
this unt may be exposed to liqud dripping or
splashing, On the top of this unit, do not place:
Other components, as they may cause
damage and/or discolorat on on the surface
of this un¢
Burning objects (i.e,, candles), as they may
cause fire, damage to this unit, and/or
personal qury.
Conta ners wtth Iquid n them, as they may
fall, spilling the liquid and causing an electrical
shock to the user and/or damage to this unit.
6 Do not cover this untt with a newspaper,
tablecloth, curtain, etc, n order not to obstruct
heat rad ation, lfthe temperature nside this untt
rises, it may cause fire, damage to this unit_and/or
personal iniul 7
7 Do not plug in this unit to a wall outlet untl all
connect ons are complete.
8 Do not operate this unit upsidedown, lt may
overheat, possibly causing damage.
9 Do not use excessive force on switches, knobs
and/or cords,
10 When disconnect}ng the power cord from the
wall outlet, grasp the plug; do not pull the cord.
11 Do not clean th}s un}t wtth chemical solvents;this
might damage the fin sh, Use a clean, dry cloth,
1 2 Use only the voltage specified on this unit. Using
this un}t w@ a higher voltage than specified is
dangerous and may cause fire, damage to this
unit, and/or personal inplyYAMAHA will not be
held responsible for any damage resulting from
use of this un}t wtth a voltage other than as
specified.
13 To preve_t damage by lightning, disconnect the
power cord from the wall outlet durng an
electrical storm.
14 Do not attempt to modify or fix this unit.
Contact qualifiedYAMAHA service personnel
when any serv ce is needed.The cabinet should
never be opened for- any reason.
15 When not planning to use this unit for long
periods of t}me (i.e., vacation), disconnect the AC
power plug from the wall outlet.
16 Be sure to read the "Troub[eshoot}ng" section on
common operating errors before concluding
that this unit }s fauff>_
| 7 Before moving this unit, press STANDBY/ON to
set the unit n standby mode,then disconnect
the AC power plug from the wall outlet.
The unit is not disconnected fl-om the AC power
source as long as t is connected to the wall
outlet,even if this unit tselfi s turned ofETh}s state is
called the standby modeJn this state,this unit is
designed to consume a very small quantity of power
NOTE:
Pictures shown maybe different between countries,
Never make or change connections w}th the power
switched on,
LASER SAFETY
This unit employs a laser: Due to possible eye injury,
only a qualified serv ce person should remove the
cover or attempt to service this device,
CAUTION
VISIBLEAND INVISIBLELASER RADIATION
WHEN OPEN,AVOID EXPOSURETO BEAN
Use dcontrols or adjustments or performance d
procedures other than those specified herein may
result in hazardous radiation exposure.
This unit is designed forhome use onl XDo not use
this unit forbusiness purposes.
Be sure to place this unit on a level surface,
Ifinot so,this unit wll fail to work non_lly at the
PLAYXCHANGE operation and causedam_e to
the disc(s) andthis unit itselfi
LASER
Type
Wave lenSh
Output Power
Beam d}vergence
Semiconductor laser GaAIAs
650 nm (DVD)
780 nm (VCD/CD)
7 mW (DVD)
10 mW (VCD/CD)
60 degree
Contents
Introduction
Suppliedaccessories..................................................2
Notes about discs......................................................2
Cleaning discs..........................................................................2
Symbols Used in this Manual...................................2
Functional Overview
Front Panel..................................................................3
Rear Panel....................................................................4
Remote Contro[ .........................................................5
Preparation
General Notes on connections .............................. 6
Digital Connections ................................................... 6
Analog Connections ................................................. 6
Video Connections .................................................... 6
S Video jack_ ...........................................................................7
Component Video iacks ...................................................7
Composite Video jacks .....................................................7
Inserting batteries into the Remote Control .,,,,,8
Using the Remote Control .............................................8
NTSC/PAL Conversion ............................................ 8
Switching On ............................................................... 8
Menu Bars on TV Screen ......................................... 9
Temporal 7 Feedback Field Icons .................................9
User Preference Settings .......................................... 9
General operation ................................................................9
Picture ......................................................................................10
Sound .......................................................................................11
language .................................................................................13
Features ...................................................................................13
OCher Feature ......................................................................13
General Features ..................................................... 17
Moving to another bale/chapter ................................17
Search .......................................................................................17
Slow Noton .........................................................................17
Still Picture and Frame byfiame pbyback,....,..17
Scan ...........................................................................................17
Repeat ......................................................................................
Repeat A-B ............................................................................
Shuffle Across All Discs ..................................................
Time search ..........................................................................
Zoom .......................................................................................
Favorite Track SeleCtion Across Disc ....................19
FTS for- a Single disc .........................................................19
MP3 Disc Features .................................................. 20
Album/Title Playback .......................................................21
Repeat tracldalbum/Disc ...............................................21
Access Control
Child Lock.................................................................22
Act vat ng/deactivatngthe CtHd Lock..................22
Author_singdscs ................................................................22
Deauthodsing discs...........................................................22
Parental Control ......................................................22
Activat rig/Deactivating Parental Control .............2:
Countr7...................................................................................
Changingthe 4digd code ............................................
Ifyou forget your 4 digit code ...................................
ParentalControl Disdaimer ........................................
Troubleshooting ........................ 24
Specifications ............................. 25
Operation
Basic Playback .......................................................... 14
Playing a DVD-Video .............................................. 14
Playing a title .........................................................................14
Resume ....................................................................................14
Video CD and Super Video CD .......................... 15
Playing a disc .........................................................................15
Playing an Audio CD .............................................. 15
Playing a disc .........................................................................15
Special DVD Features ............................................ 16
Title/Disc menu ..................................................................16
Camera Angle ......................................................................16
Changing the audio language ......................................16
Subtitle Language ...............................................................16
Special VCD & SVCD Features ............................ 16
Playback Control (PBC) .................................................16
Special CD & MP3 Features .................................. 16
CD text and hiP3 text ...................................................16

Introduction
Thank you for purchasing this YAMAHA DVD
playen This Owner's Manual expla ns the basic
operation of this DVD playen
Supplied accessories
Remote control
Batteries (two AA size) for remote control
Audio/Video cabEe
Owner*s ManuaE
Notes about discs
- This unit is designed for use with DVD video,
Video CD, Super video CD, Audio CD (CD text
supported), CD-R and CD-RW (MP3 Supported),
DVD+RW and DVD+R.
- CD-R and CD-RW cannot be played unless
finalized.
- Some discs cannot be played depending on the
disc characteristics or recording conditions.
- Be sure to use only CD-R and CD-RW discs made
by reliable manufacturers.
- Do not use any non standard shaped discs(hear_,
etc.)
- Do not use disc with tape, scals, or paste on it,
damage to the unit may result.
- Do not use a disc printed on its surface by a
commercially available label printer.
Symbols Used in this Manual
The beEow symbols appear in some headings and
notes with the foflowing mean ngs:
- Description refers to playback of
DVD*video discs
- Description refers to playback of
Video CDs
_D _ - Description refers to playback of
Audio CDs
Helpful Hints_
• Some DVD video discs require specific
functions or allow only limited functions
during playback.
• " _ " may appears on the TV screen
which means that the function is not
available on that specific DVD video disc.
Cleaning discs
• When a disc becomes dirty, clean it wdh a
cleaning clot h, Wipe the disc from the centre out,
Do not wipe in a circular motion,
• Do not use solvents such as benzine, thinner,
commerciatly available cleaners, or antistatic spray
}ntended for analogue records.
Manutbcturedunderlicensefrom DolbyLabo_atunes
"Dolb/" and the doubleD symbolam trad_mar_ of
DolbyLabo_atunes
"DTS"and "DTSD_g_talOut" are trademarksof
Dsg_talTheaterSystems,Inc
2
Ttnsptoduct_nco_pe_dtescopyrightp_ot_ction
technolugythat _splotected by method claimsof
ce_ainUS patents and otherintellectualptoperty
nghtsowned byMacrowsionCu_pe_atsonand other
nghtsowners.Use of thiscopyrightprotection
technolugymust be authorizedby Mac_owslon
Corporation,and isintended{br home andother
I_mitedv;ew;ngusesonlyunlessotherwiseauthonzed
by Mdcrows_onCotporat_onReverseeng_neenngor
d_sassemblyis prohibited
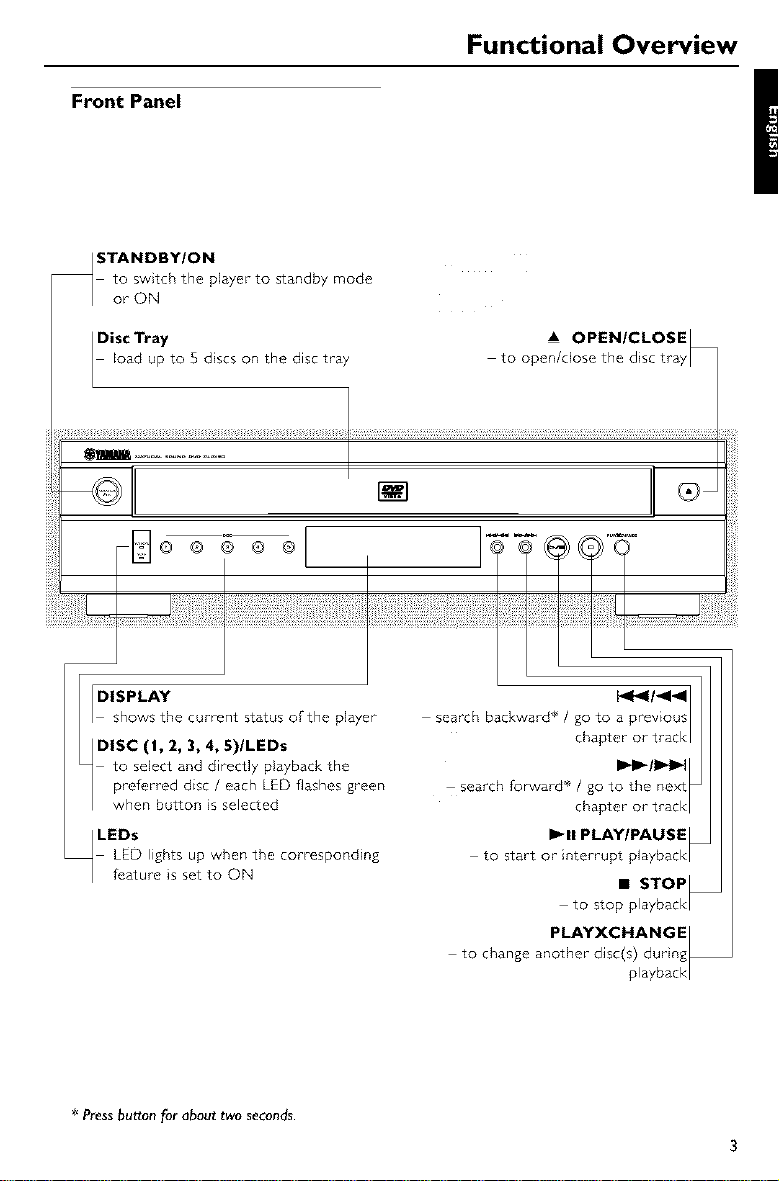
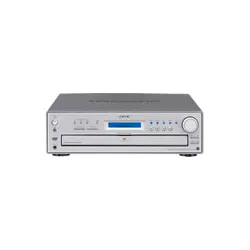
Front Panel
Functional Overview
/ STANDBY/ON
to switch the player to standby mode
or ON
Disc Tray
Eoad up to 5 dscs on the disc tray
A OPEN/CLOSE R
to open/dose the disc tray /
_m ..............
@ @ @ ®
r_l
iji_S_ii{iiii£_ii ¸
LEDs
LED lights up when the corresponding
feature is set to ON
_11 PLAY/PAUSE
to start or interrupt playback/
• STOP_
to stop playback/
PLAYXCHANGE|
to change another disc(s) during_
playback/
* Pressbutton for about two seconds.
3
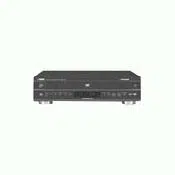
Functional Overview
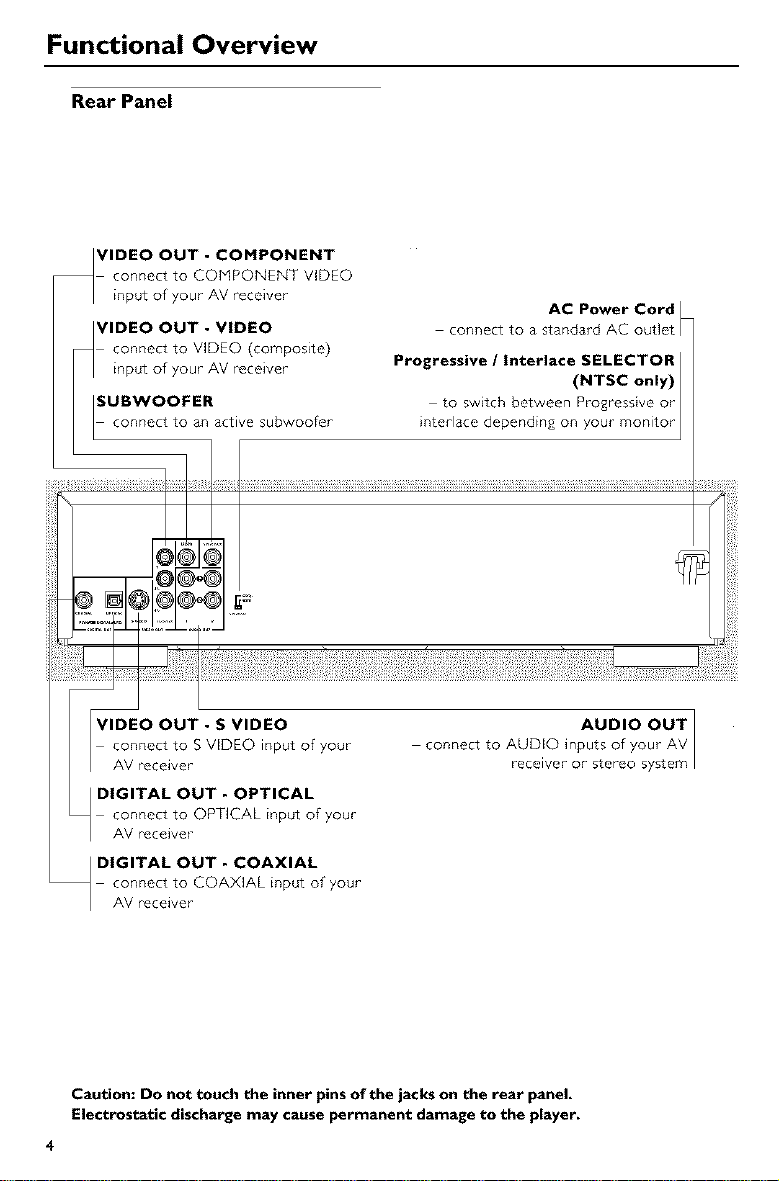
Rear Panel
VIDEO OUT - COMPONENT
connect to COMPONENT VIDEO
input of your AV receiver
VIDEO OUT - VIDEO
connect to VIDEO (composite)
connect to an active subwoofer
AC Power Cord
connect to a standard AC outlet
Progressive / Interlace SELECTOR
(NTSC only)
to switch between Progressive or
}nterlace depending on your monitor
VIDEO OUT - S VIDEO
connect to S VIDEO input of your
AV receiver
_ DIGITAL OUT - OPTICAL
connect to OPT]CAL input of your
AV receiver
_ DIGITAL OUT - COAXIAL
connect to COAXIAL input of your
AV receiver
AUDIO OUT ]
connect to AUDIO inputs of your AV
receiver or stereo system
Caution: Do not touch the inner pins of the jacks on the rear panel,
Electrostatic discharge may cause permanent damage to the player,
4
Functional Overview
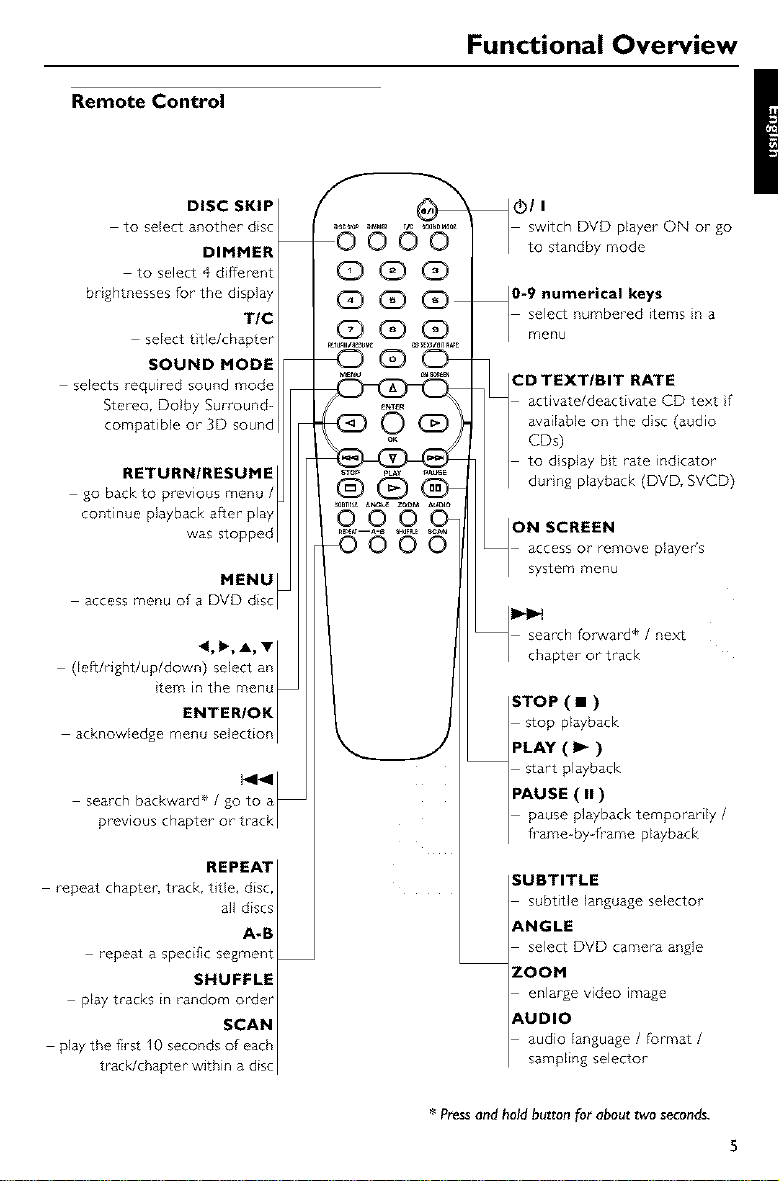
Remote Control
DISC SKIP
to select another disc
DIMMER
to select 4 different
brightnesses for the display
TIC
select t tie/chapter
SOUND MODE
selects required sound mode
Stereo, Dolby Surround-
compatible or 3D sound
RETURN/RESUME
go back to previous menu /
continue playback after play
was stopped
MENU
access menu of a DVD disc
(left/right/up/down) select an
tern in the menu
ENTER/OK
acknowledge menu selection
search backward ÷ / go to a
prewous chapteror track
REPEAT
repeat chapter, track, title, disc,
all discs
A-B
repeat a specific segment
SNUFFLE
play tracks in random o_er
SCAN
play the first I0 seconds of each
t_cWchapter within a disc
_ (!)1 I
switch DVD player ON or go
to standby mode
_0-9 numerical keys
select numbered items in a
menu
CD TEXT/BIT RATE
activate/deactivate GD text if
available on the disc (audio
CDs)
to d splay bit rate indicator
durng playback (DVD, SVCE
ON SCREEN
access or remove player's
system menu
search fot_vard* / next
chapter or track
STOP ( • )
stop playback
PLAY ( I_ )
start playback
PAUSE ( II )
pause playback temporarily /
frame-by frame playback
SUBTITLE
subtitle language selector
ANGLE
select DVD camera angle
ZOOM
enlarge video image
AUDIO
audio language / format /
sampling selector
* Pressandhold button for about two seconds.
5
Preparation
General Notes on connections
Never make or change connecLiOnS with the
power switched on,
• Depending on the equipment you wish to
connect, there a_-evarious ways you could
connect this platen Possible connections are
shown in the follow ng d_wings.
• Please _fer to the manuals of other equipment as
necessa_7 to make the besS connections.
• Do not connect this player via your VCR. The
video qualty could be distorted by the copy
protection system.
• Do not connect this player's audio out jack to the
phono in jack of your audio syssem,
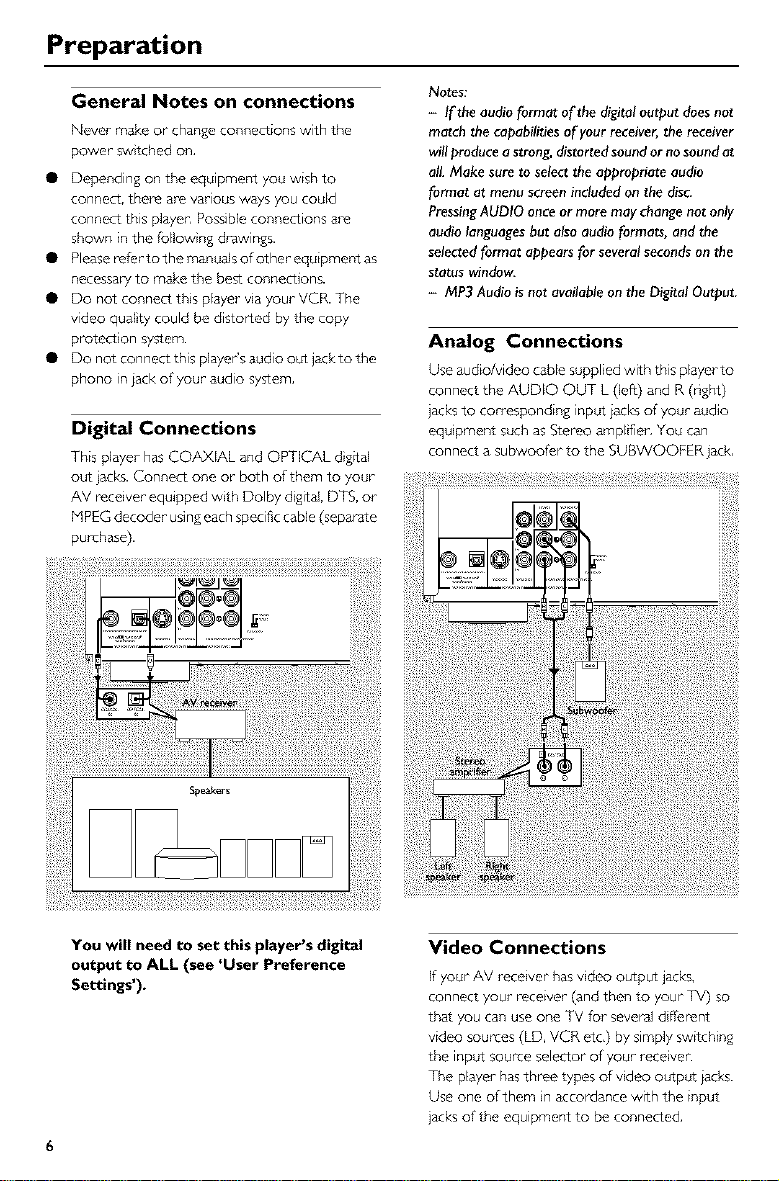
Digital Connections
This player hasCOAXIAL and OPT[_L dig_al
out jack_.Connect one or both of them to 7our
AV receiver equipped wth Dolby dgital,DTS,or
HPEGdecoder usingeachspecificcable(separate
purchase).
N0tes:
- If the audio format of the digital output does not
match the capabilities of your receiver, the receiver
will produce a strong, distorted sound or no sound at
al!. Make sure to select the appropriate audio
format at menu screen included on the disc.
Pressing AUDIO once or more may change not only
audio languages but also audio formats, and the
selected format appears for several seconds on tile
status window.
- MP3 Audio is not available on tile Digital Output.
Analog Connections
Use audio/video cablesuppliedwith this playerto
connect the AUDIO OUT L (left) and R (ng_)
jack_to corresponding input jacksof your audio
equpment suchasStereo ampl f'en You can
connect asubwoofer to the SUBWOOFER jack,
6
You will need to set this player's digital
output to ALL (see 'User Preference
Settings').
Video Connections
If _ur AV receiver has video output jacks,
connect your receiver (and then to your TV) so
that you can use one TV for several different
video sources (LD, VCR etc,) by simply switching
the input source selector of your receiver.
The player has three types of vdeo output jacks.
Use one of them in accordance with the input
jacks of the equipment to be connected,
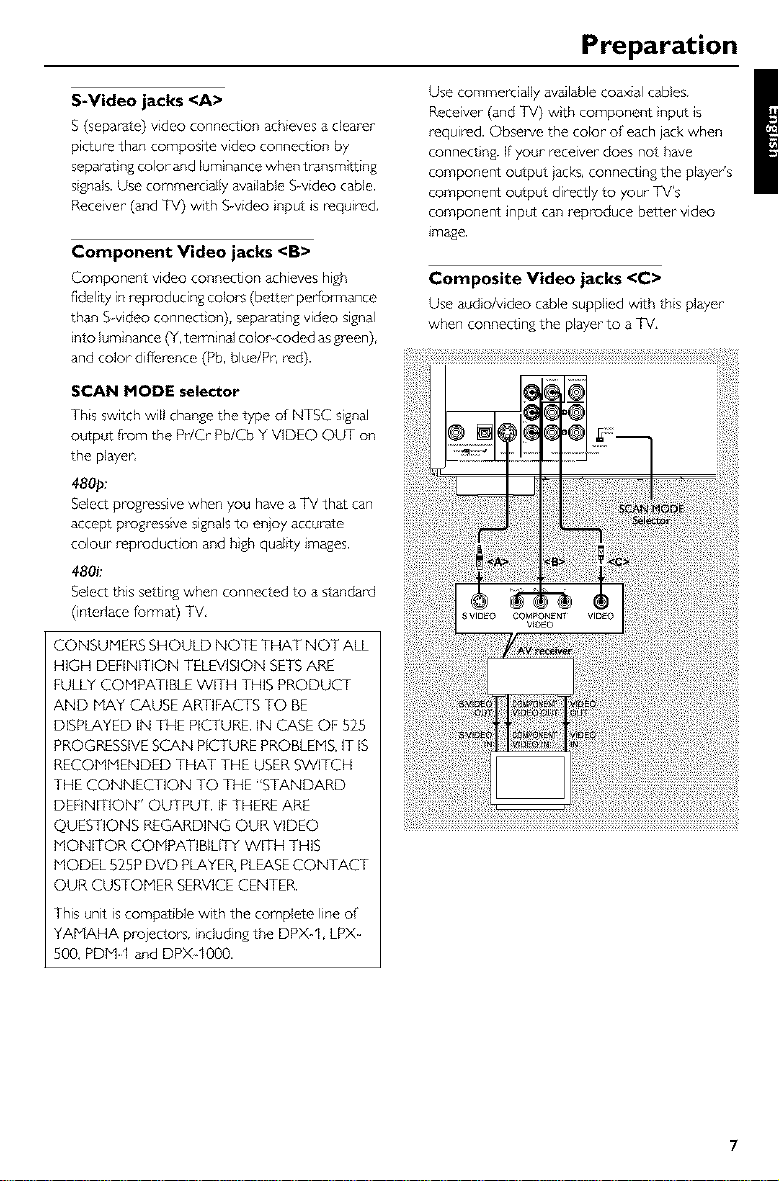
S-Video jacks <A>
S (separate) video connection achieves a clearer
picture than composite video connection by
separat ng color and luminance when transmitting
signals. Use commercially available %video cable.
Receiver (and TV) with S-video nput is required,
Component Video jacks <B>
Component video connection achieves high
f'del_ty in reD_ducing color's (better performance
than Svdeo connect on), separating video signal
nto luminance (Y, terminal color-coded as green),
and color difference (Pb, blue/Pr, red).
SCAN MODE selector
This switch will change the type of NTSC signal
output from the Pr/Cr Pb/Cb Y VIDEO OUT on
the player
480p:
Select progressive when you have a TV that can
accept progressive signals to enjoy accurate
colour reproduction and high quality images.
480k
Select this setting when connected to a standard
(intedace format) TV,
CONSUMERS SHOULD NOTE THAT NOT ALL
HIGH DEFINITION TELEVISION SETS ARE
FULLYCOMPATIBLE WITH THIS PRODUCT
AND MAY CAUSE ARTIFACTS TO BE
DISPLAYED IN THE PICTURE. IN CASE OF 525
PROGRESSIVESCAN PICTURE PROBLEMS,IT IS
RECOMMENDED THAT THE USERSWITCH
THE CONNECTION TO THE "STANDARD
DEFINITION" OUTPUT. IFTHEREARE
QUESTIONS REGARDING OUR VIDEO
MONITOR COMPATIBILITY WITH THIS
MODEL 525P DVD PLAYER,PLEASECONTACT
OUR CUSTOMER SERVICECENTER.
This unit iscompatible wth the complete line of
YAMAHA projector's, includingthe DPX-1, LPX
5OO,PDM-1 and DPX-IO00.
Preparation
Use commercially available coaxial cables.
Receiver (and TV) with component nput is
required. Obse_/e the color of each jack when
connect ng. Ifyour receiver does not have
component output jacks, connecting the player's
component output directly to your TV's
component input can reD_duce better video
_mage.
Composite Video jacks <C>
Use audo/v deo cablesuppled with this player
when connecting the playerto aTV,
Preparation
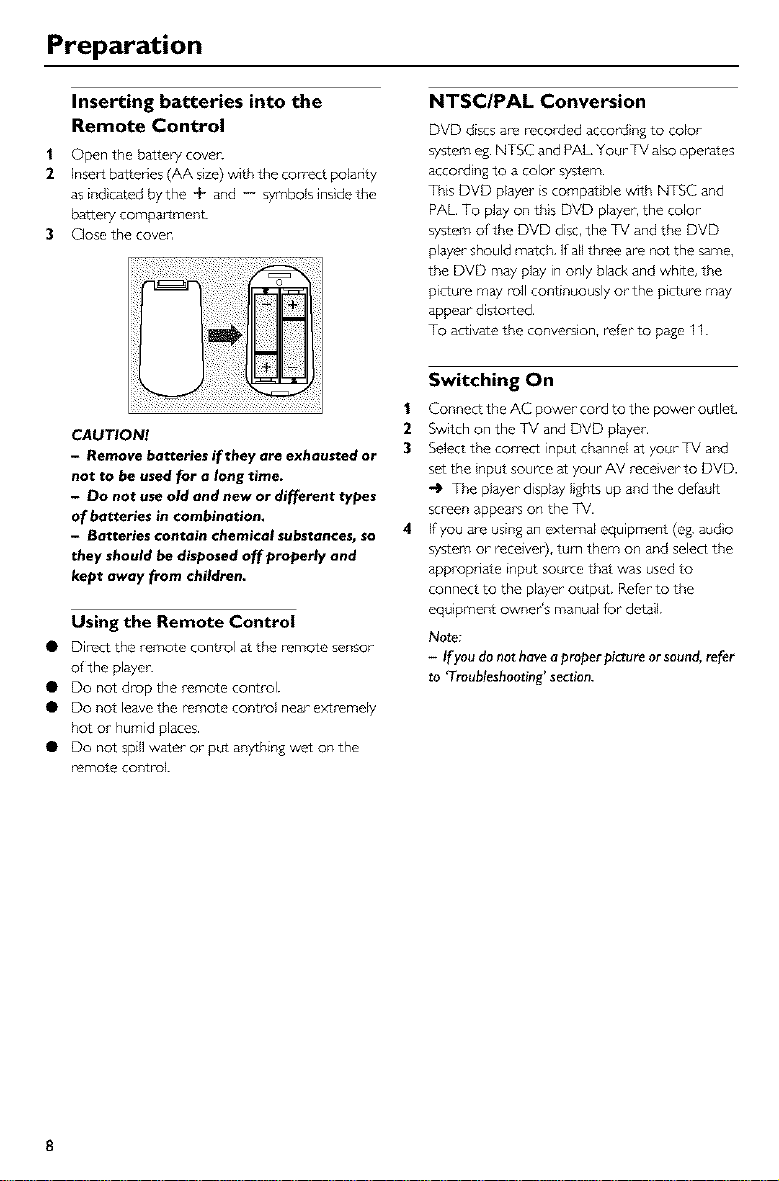
Inserting batteries into the
Remote Control
| Open the batterycove_
2 Insertba_edes (AA size)with the co_ect polanty
as ind cared bythe + and -- symbols inside the
battery compartmenL
3 Close the cover,
CAUTION!
- Remove batteries if they are exhausted or
not to be used for a long time.
- Do not use old and new or different types
of batteries in combination.
- Batteries contain chemical substances, so
they should be disposed off properly and
kept away from children.
Using the Remote Control
• Direct the remote control at the remote sensor
of the player.
• Do not drop the remote control.
• Do riot leave the remote control near- extremely
hot or humid places.
• Do not spill water or put anything wet on the
remote control.
NTSC/PAL Conversion
DVD discs am recorded according to color
system eg. NTSC and PAL. Your TV also operates
accord ng to a color system.
This DVD player is compat ble with NTSC and
PAL. To play on this DVD player, the color
system of the DVD disc, the TV and the DVD
player should match. If all three are not the same,
the DVD may play in only black and white, the
Dcture may roll continuously or the picture may
appear distorted,
To activate the conversion, refer to page 1I.
1
2
3
4
Switching On
Connect the AC power cord to the power outlet.
Switch on the TV and DVD player,
Select the correct input channel at your TV and
set the nput source at your AV recover to DVD.
-l_ The player display Ights up and the default
screen appears on the TV.
If you are using an external equipment (eg. audo
system or receiver), turn them on and select the
appropnate input source that was used to
connect to the player output. Refer to the
equ pment owner's manual for detail.
Note:
- If you do not have a proper picture or sound, refer
to Troubleshooting' section.
8
Preparation
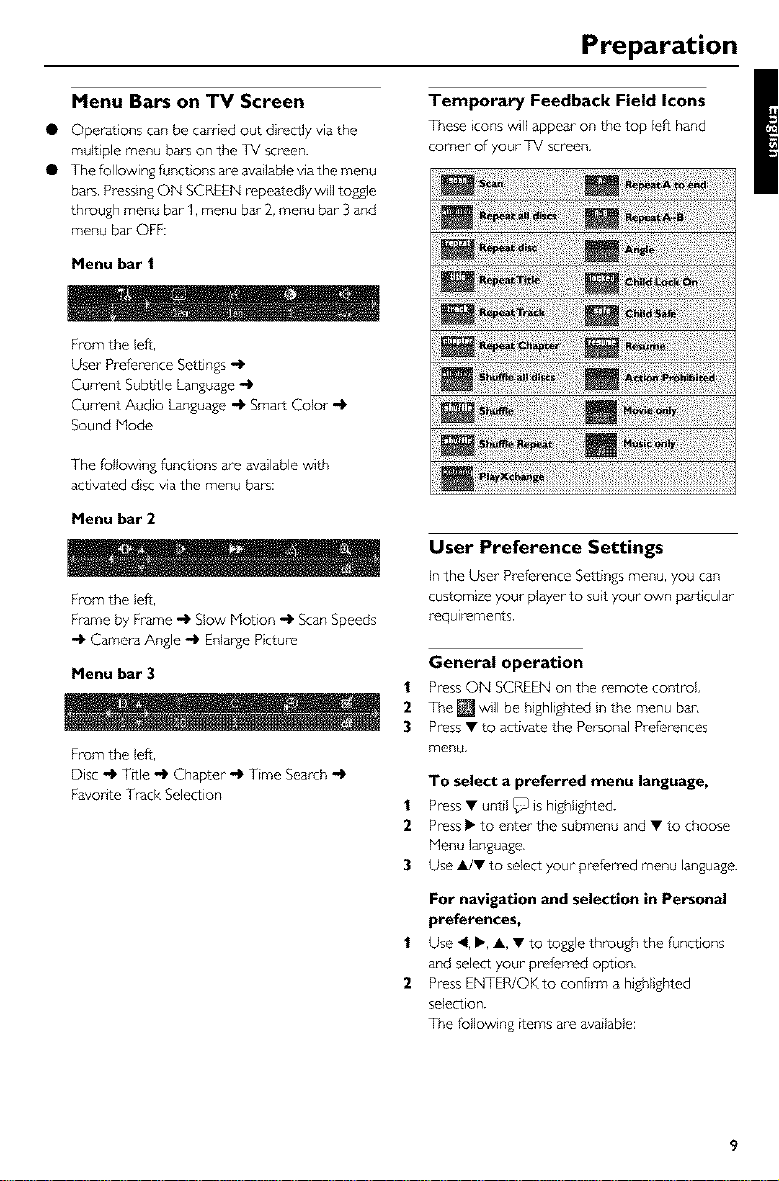
Menu Bars on TV Screen
• Operatons can be carried out directly via the
mult pie menu bals on the TV screen.
• The following fianct ons are available via the menu
bars. Pressing ON SCREEN repeatedly wll toggle
through menu bar" I, menu bat" 2, menu bar"3 and
menu bar" OFF:
Menu bar |
From the Jeff,
User Preference Settings -_
Current Subbtle Language "_
Current Audio Language "_ Smart Color "_
Sound Mode
The follow ng funct ors are available with
activated dsc va the menu bars:
Menu bar 2
From the Jeff,
Frame by Frame _ Slow Motion _ Scan Speeds
-_ Camera Angle -ip Enlapge Picture
Menu bar 3
From the Jeff,
Disc "_ TRle "_ Chapter "_ Time Search "_
Favorite Track Selection
Temporary Feedback Field Icons
These icons will appear on the top leff hand
comer of your TV screen,
User Preference Settings
In the User Preference Settings menu, you can
customize your pl_er to suit your own par titular
requlr"ements.
General operation
1 Press ON SCREEN on the remote control
2 The [] will be highlighted n the menu bar,
3 Press • to activate the Personal Preferences
menu.
To select a preferred menu language,
Press • until _ is highlighted.
2 Press I_ to enter the submenu and • to choose
Henu language,
3 Use _/• to select your preferred menu language.
1
2
For navigation and selection in Personal
pl'efel'ences,
Use 4, I_, A, • to toggle through the functions
and select your" preferred option,
Press ENTER/OK to confirm a higN girted
selection.
The following items are available:
Preparation
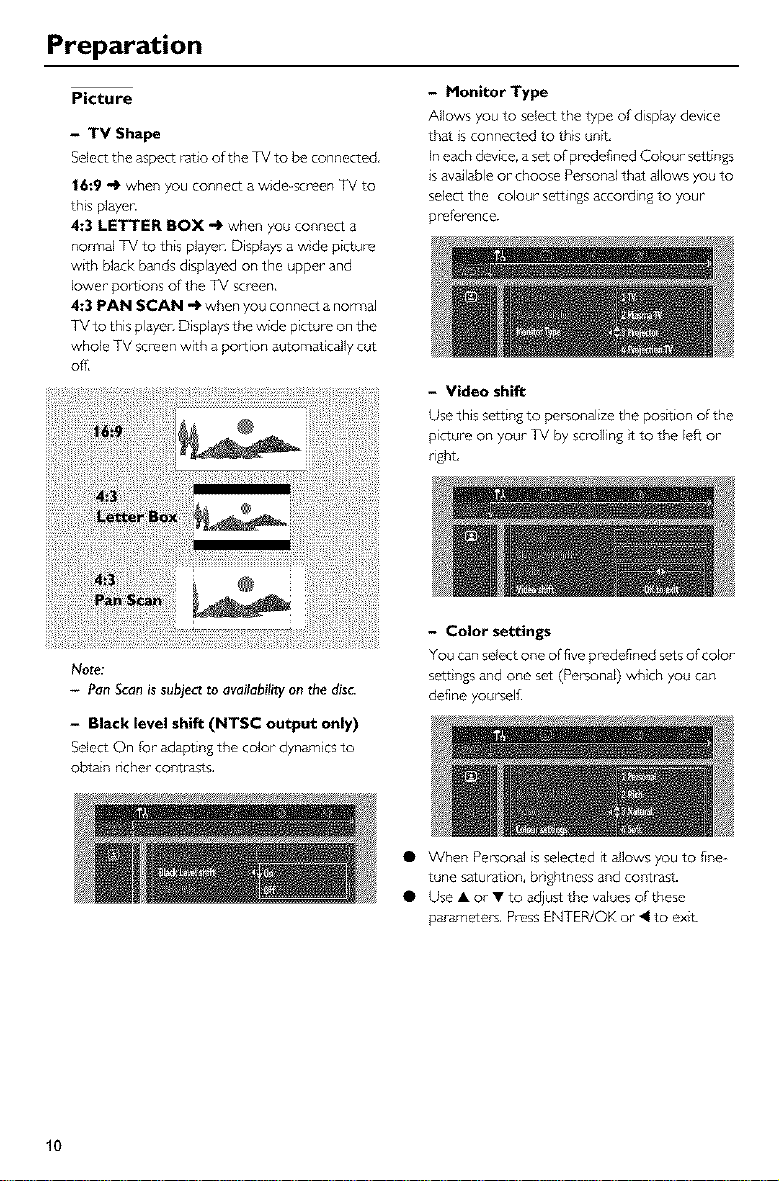
Picture
- TV Shape
Select the aspect ratio of the TV to be connected,
16:9 -_ when you connect a wde screen TV to
this playen
4:3 LETTER BOX -_ when you connect a
normal TV to this platen Displays a wde picture
w_th black bands displayed on the upper and
lower portions of the TV screen,
4:3 PAN SCAN -l_ when you connect a non_al
TV to this playec Displays the wide picture on the
whole TV screen with a portion automat tally cut
ofl_
Note:
- Pan Scan is subject to availability on the disc.
- Black level shift (NTSC output only)
Select On for adapting the color dynamics to
obtain ncher conb_sts,
- Monitor Type
Allows you to select the type of display device
that is connected to this unit,
In each device, a set ofpr_defined Colour settings
is available or choose Personal that allows you to
select the colour settings according to your
preference.
- Video shift
Use this setting to personalize the position of the
picture on your TV by scrolling it to the left ol-
right,
- Color settings
You can select one of five predefined sets of color
sett}ngs and one set (Personal) which you can
define yourselfi
• When Personal is selected it allows you to fine-
tune saturat}on, bnghtness and contrast.
• Use A or T to adjust the values of these
parameters, Press ENTER/OK or 4 to exit.
10
Preparation
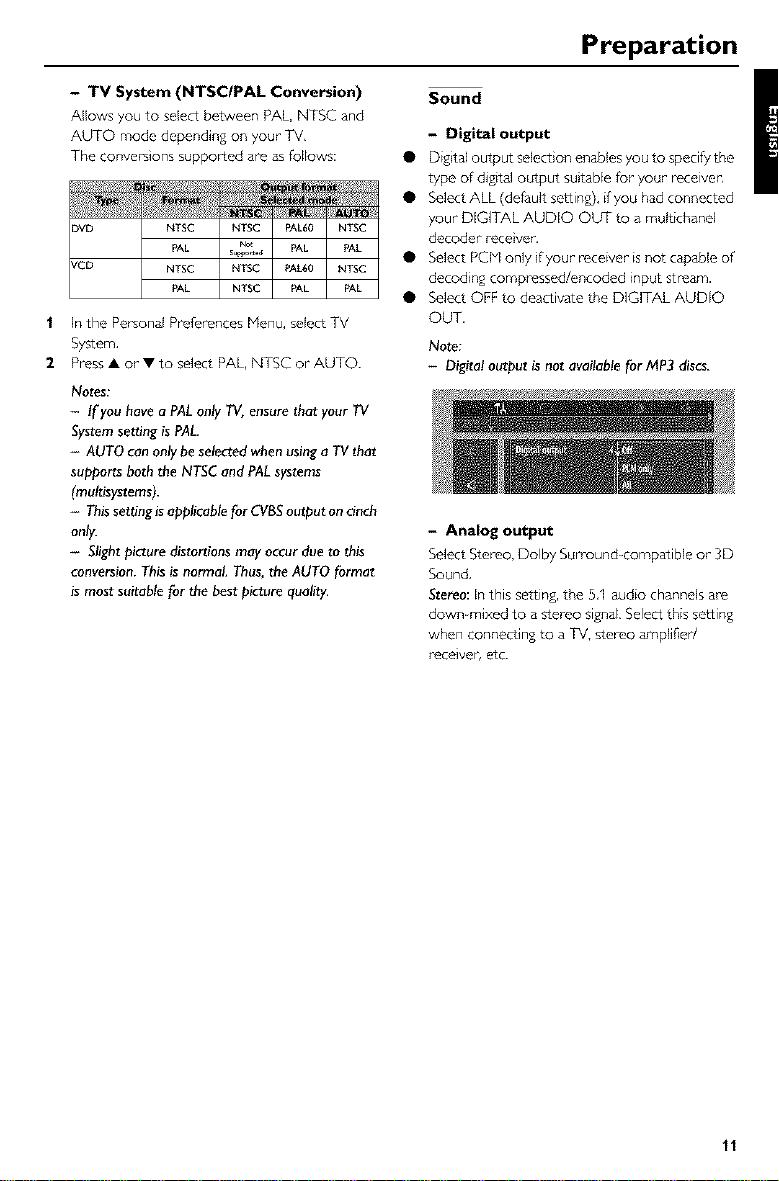
- TV System (NTSCIPAL Conversion)
Allows you to select between PAL, NTSC and
AUTO mode depending on your TV,
The conversions supported are as follows
)VD NTSC NTSC PAL60 NTSC
PAL su_N_ PAL PAL
KCD NTSC NTSC PAL60 NTSC
PAL NTSC PAL PAL
| In the Personal Preferences Menu, select TV
System,
2 Press • or • to select PAL,NTSC or AUTO.
Notes:
- If youhave aPALonlyTV, ensurethat your TV
Systemsettingis PAL.
- AUTO can onlybeselectedwhenusinga TVthat
supportsboththe NTSCandPALsystems
(multisystems).
- Thissettingisapplicablefor CVBSoutput oncinch
only.
- Slight picturedistortionsmay occurdueto this
conversion.Thisis normal. Thus,theAUTO format
is mostsuitablefor the bestpicture quality.
Sound
- Digital output
• Digital output select on enables you to specify the
type of digital output su table for your recewen
• Select ALL (default setting), if you had connected
your D[QTAL AUDIO OL_ to a multichanel
decoder rece ver,
• SelectPCblonlyfyourreceiverisnotcapableof
decoding compressed/encoded input stream.
• Select OFF to deactivate the DIGITAL AUDIO
OUT,
No_:
- Digital ou_ut _ n_ a_ble _r MP3 _scs.
- Analog o_put
Select Stereo, Dolby Surround compatible or 3D
Sound,
Stereo: In this setting, the 5,1 audio channels are
down-mixed to a stereo signal, Select this setting
when connecting to a TV, stereo amplifier/
receiver, etc.
11
Preparation
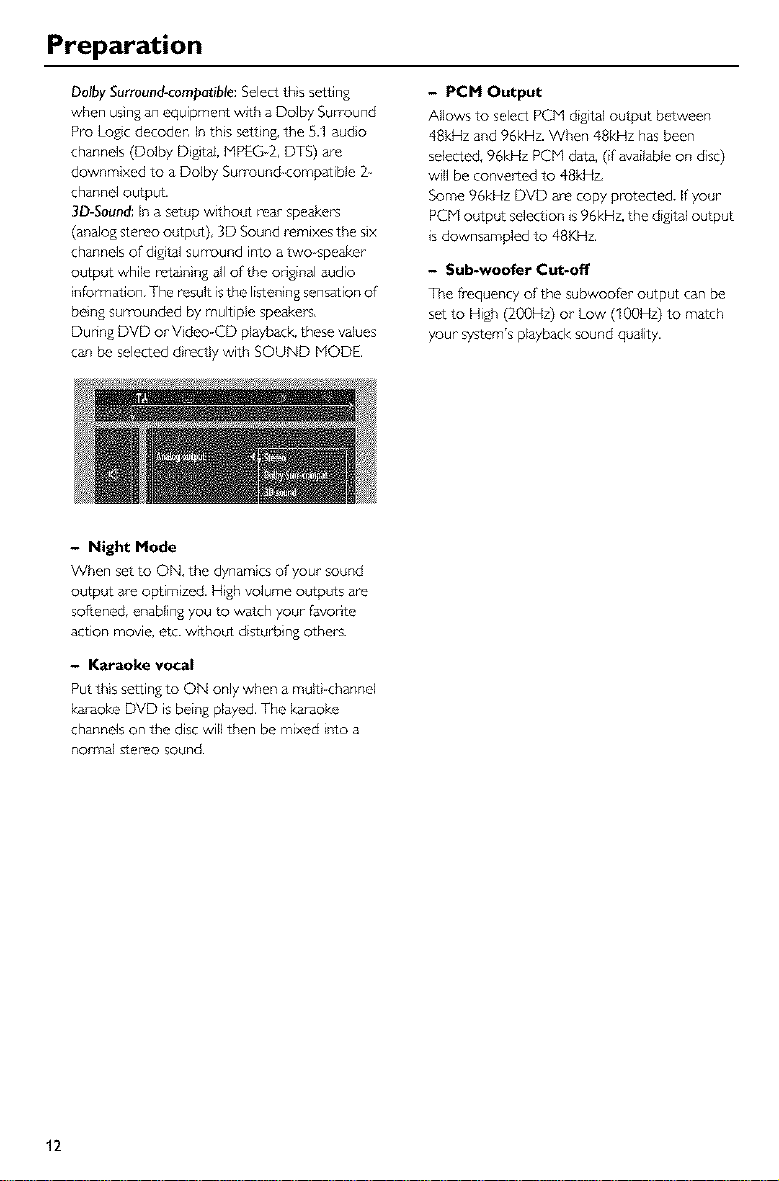
Dolby Surround-compatible: Select ths setting
when using an equipment with a Dolby Surround
Pro Logic decoden In this setting, the 5.1 audo
channels (Doiby Digital, HPEG 2, DTS) are
downmixed to a Doiby Surround compatible 2-
channel output.
3D-Sound: In a setup without rear speakers
(analog stereo output), 3D Sound remixes the six
channels ofdig}tal surround into a two speaker
output while retain ng all of the odginal audio
information. The result is the listening sensation of
be}ng surrounded by multiple speakers,
Dunng DVD or V deo-CD playback, these values
can be selected directly with SOUND MODE,
- PCM Output
Allows to select RCH digital output between
48kHz and 96kHz.When 48kHz hasbeen
selected,96kHz PCM data,(if availableon disc)
wll be converted to 48kHz,
Some 96kHz DVD are copy protected. Ifyour
PCMoutput selection is96kHz,the digital output
isdownsampled to 48KHz,
- Sub-woofer C_-off
The frequency of the subwoofler output can be
set to High (200Hz) or Low (100Hz) to match
your system'splayback sound quality,
- Night Mode
When set to ON, the dynamics of your sound
output are optimized. H}gh volume outputs are
softened, enabling you to watch your- favonte
action movie, etc. w}thout disturbing others.
- Karaoke vocal
Put this setting to ON only when a muir -channel
karaoke DVD is being played, The karaoke
channels on the disc will then be mixed into a
normal stereo sound.
12
Preparation
Language
Selecting disc languages:
Menu/Audio/Subtitle language
• This is to select the audio language, subtitle
language and the langu_e used in TV screen
menus or DVD menus which will always be used
for evel 7 disc to be played back.
• Ifthe language selected is not available on the disc,
the default language designated by each disc will
be selected.
- Smart Power OFF
Puts the set to standby after a predefined tme.
This can be set to Enabled or Disabled,
- Wake-up Timer
The wake-up truer allows your player to turn on
after a preset time. Whenever the player wakes
up, the value of wake up timer is set to zero
automatically. The Wake-up Timer will activate
when the set is switched to standby-mode.
Features
- Access Control
Access Conb_l contains the follow ng features:
Child Lock - When Child Lock is set to ON, a 4-
digit code needs to be entered in order to
playback discs,
Parental control - Allows the condit onal
presentation of DVDs containing Parental
Control information (see _ccess Contlol' section),
- Status Window
Displays the curreut status of the player and
appears with the menu bar, When disc playback
}s stopped, it is displayed with the 'Tempo_ a_,
Feedback Fe[d' in the default screen. See 'On
Screen D splay' infol_mation;
Factol3/setting }s ON. Select OFF to suppress
display of the Status Window,
- IntelliPlay
Intelliplay s a convenieut feature for automated
playback of disc content,
When switched to "ON", the playback will
automatically play only disc with similar content
(either audio or video) to previous disc while
skipping the rest content.
For example, when a CD was played previously,
the player will sea_h Forthe next audio disc in the
tray sequence (CD or HP3 disc), ( _ Husic only)
Pressing the Disc Direct Access to a disc other
than a music disc when IntelliPlay is set to ON, will
change to video mode. ( * Hovie only)
- PBC (Playback Control - for VCD)
The PlaybackControl can be set to ON or OFF
(seesecdon"%ecial VCD& SVCDFeatures"_or
details).
- Beeper
The beeper can be set to ON or OFF.
- Help text
When set to ON, help text descnbes the icons
selected. Select OFF ff you no longer- require the
help text.
Other Feature
- Bit Rate Indicator
Press CD TEXT/BIT RATE to act vate the b_t rate
indicator, When activated, the bit rate for video
and audio, as well asthe total b_t rate s displayed,
This is only applicable during playback of
DVD and SVCD discs.
13
Operation
Basic Playback
| PressSTANDBY/ON on the front panel,
2 PressOPEN/CLOSE • on the front panelto
open disc loadingtray.
3 Placethe chosendiscs}nthe tray, with the label
facingup,
4 PressPLAYI_.
-1_ The disc tray closesand playbackstarts
automatically with allthe loaded discson the tray
n sequence.
5 To stop playback press STOP.
Playing a DVD-Video
• DVD video discsmay haveone or more TITLES,
andeach TITLE may have one or more
CHAPTERS,
• Playbackstopsat the endof each TITLE.
• To playback a specific disc directly, press DISC
SKIP repeatedly on the remote coutrol or one of
the DISC (% 2, 3, 4, 5) on the front panel,
• Press PLAYXCHANGE on the front panel to
open the disc tray and reload or unload any discs
without interrupting curreut dsc playback.
• Playback will stop after- all d scs have been played,
• When the disc tray s open, pressing PLAY,
OPEN/CLOSE, PLAYXCHANGE, DISC (1, 2, 3,
4, 5) will dose the disc tray automatically.
Notes:
- DVDs may have a region code. Your player will
not play discs that have a region code different from
the region code of your player. The region code of
this player is stated on the rear panel
- If'Child Lock' is set to ON and the disc inserted
is not authorized, the 4-digit code must be entered
and/or the disc must be authorized (see 'Access
Contror_.
Playing a title
1 Press DISC (1,2, 3, 4, 5) on the front panel or
DISC SKIP repeatedly on the remote control to
playback a specific disc directly.
-IP Playback starts automatically.
2 When the MENU appears on the TV screen, use
Y, A, ,, I_ or- numencal keys on the remote
control to select anopton and continue playback.
3 If the titles are numbered, press the numerical
keys or- use A/V to select desired title in the
menuban
4 To stop playback_ press STOP,
1
2
Resume
The playback of a disc can be interrupted at any
point and then resumed from the pont where the
playback was last stopped,
Press STOP to interrupt playback.
-1_ The help line text appears "P_ess Stop again to
staa f/ore beginning" for- 5 seconds.
Pressing PLAY wll automat cally resume playback
from the pont where playback was iuterrupted.
OR
Press STOP agan and then press PLAY,
.O Playback wll starts from the beginning of the
discs,
If you press PLAY when resume icon appears on
the screen, resume playback starts fi-om the po}nt
where playback was interrupted.
Note:
- Resume feature is also applicable to VCDs and
SVCDs.
14
Operation
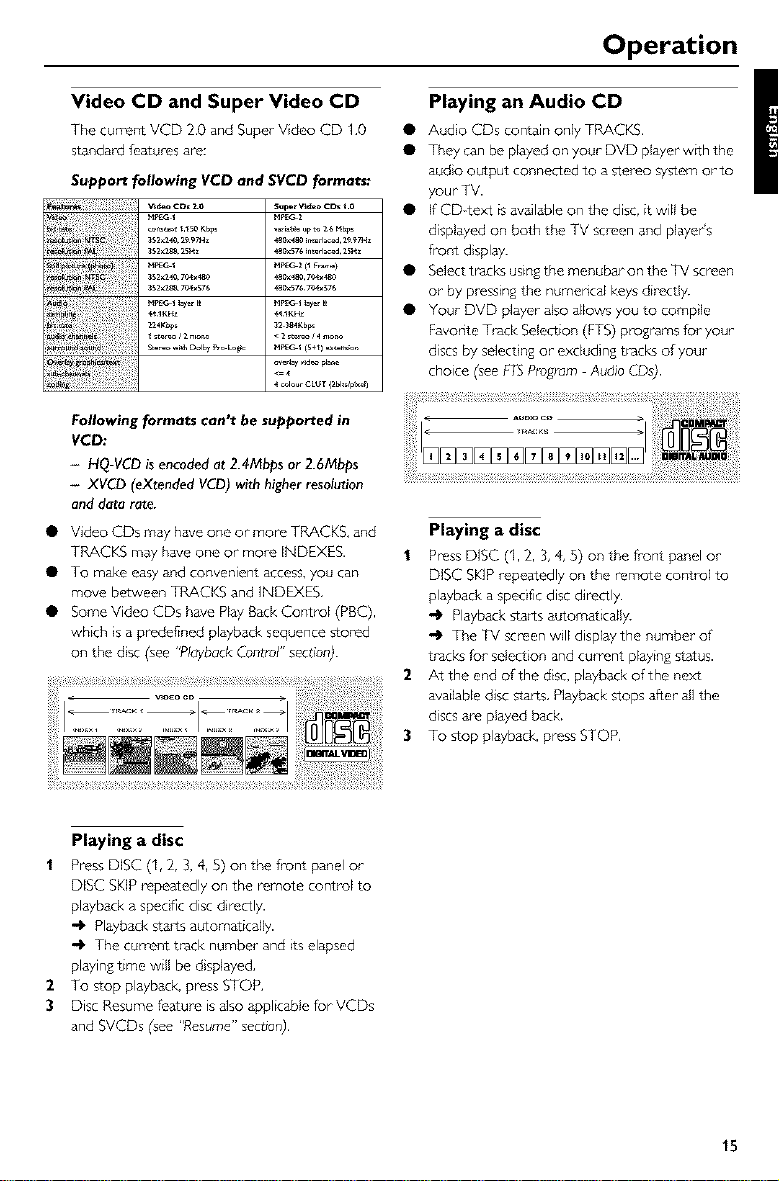
Video CD and Super Video CD
The current VCD 2.0 and Super Vdeo CD 1,0
standard f_atures are:
Support following VCD and SVCD forrnat_
N_G I N_Z
_r_t1150Kbp_ _l_ _pto 26 Mbp_
3S2_Z40,yv4_4B0 480_4S0,7V4_4_0
3sz_s_,yv_s76 480_s767v_sy_
<=
Playing an Audio CD
Audio CDs contain only TP_C_S.
They can be played on your DVD player w_th the
audio output connected to a stereo system or-to
Your TV.
If CDrtext is available on the disc, it will be
displayed on both the TV screen and playeds
ftout d}splay.
Select t_acks using the menubar on the TV screen
or by pressing the numencal keys directly.
Your DVD player also allows you to comp}le
Favonte Track Selection (FTS) programs for your
discs by select ng or excluding tracks of Your
choice (see FTSProgram Audio COs).
Following formats can't be supported in
VCD:
- HQ-VCD is encoded at 2.4Mbps or 2.6Mbps
- XVCD (eXtended VCD) with higher resolution
and data rate.
Video CDs may h_ve one or more TRACKS, and
TRACKS may have one or more INDEXES.
To make easy and convenient access, yo_ can
move between TRACKS and INDEXES,
Some Video CDs have Play Back Control (PBC),
which is a predefined playback sequence stored
on the dsc (see "Playback Control" section).
Playing a disc
1 Press DISC (1,2, 3, 4, 5) on the front panel or
DISC SKIP repeatedly on the remote control to
playback a specific disc directly.
-1_ Playback starts automatically.
-1_ The TV screen will display the number of
tracks for selection and current playing status.
2 At the end of the disc, playback of the nex_
available disc starts, Playback stops after all the
discs are played back.
3 To stop playback, press STOP,
Playing a disc
PressDiSC (1,2, 3,4, 5) on the front panel or
DISC SKIPrepeatedly on the remote control to
playbackaspecific disc directly.
Playbackstarts automatically.
-1_ The curreut track number and itselapsed
playingtime will be d}splayed,
2 To stop playback press STOP,
3 Disc Resumefeature isalsoapplicable for VCDs
and SVCDs (see"Resume"secd0r_),
15

Operation
Special DVD Features
DVDs may contain menus to navigate the disc
and access special _eatures. Press the appropnate
numerical key or use Y, A, I,, _ to highlight your
selection n the DVD menu and press ENTER/OK
to confimq,
Title/Disc menu
1 Press MENU, 1
If the current trtle has a menu, the menu will 2
appear on the screen, Otherwise, the menu will
be displayed.
2 If menu }s available on the disc, audio language,
subttle opt ons, chaptel_s for the tttle and other 3
options wll appear for select on. 4
3 To remove the title/menu, press MENU again,
Camera Angle
Some discs contain scenes which have been shot
simultaneously from various angles,
This DVD player allows you to select the desired
camera angle.
• When the DVD player encounters a scene shot
n mult pie angles, t will give an indication on the
"Tempolaly Feedback Field,"
,4_ The angle icon remains displayed until mult pie
angles are no longer available.
• Use A/Y to select the required angle,
"_ Playback changes to the selected angle.
• You can also select :} in the menu bar or press
ANGLE on the remote control directly.
Changing the audio language
| Select/l_" in the menu bar or press AUDIO on the
remote control d}rectly.
2 Press AUDIO or A/V repeatedly to select the
different languages,
Special VCD & SVCD Features
Playback Control (PBC)
Playback control is a feature on some Video CDs
/ Super Video CDs that enables interact ve use.
Video CD discs wtth Playback Control features
enables user to access a selected track directly
from the menu,
Load a Video GD with PBC and press PLAY,
Go through the menu with the keys indicated on
the TV screen u_til your chosen passage starts to
playback. Ira PBC menu consists of a list of tracks,
you can select a track directly.
Enter your choice wtth the numencal keys,
Press RETURN/RESUME to go back to the
previous menu, if applcable on the menu,
You may also select PBC OFF under Personal
Preferences,
.O When set to OFF, PBC menus are not
activated for fiarther playback.
Special CD & MP3 Features
4
CD text and MP3 text
Some CD or MP3CD discs may contain text
information (eg. track name, album name, artist
name etc.) which will appear on the player and TV
screen during pbybaclc
By default, GD text display is set to ON.
To switch offthe CD text display, press CD
TEXT/BIT RATE on the remote control during
playback.
Press CD TEXT/BIT RATE on the remote control
again to switch on the text display mode.
Subtitle Language
| Select _ in the menu bar or press SUBTITLE on
the remote control directly.
2 Press SUBTITLE or A/V repeatedly to select the
different subtitles,
16
Operation
General Features
Note:
- Unless stated, al! operations described are based
on remote contro_use. Some opera_ns cQn be
carried out using the menu bar on the TV screen.
Moving to another title/chapter
vcc.
When a disc has more than one title/track or
chapter, you can move to another t_tle/chapter as
follows:
| Press ON SCREEN, then select • or G in the
menu ban
2 Press A/Y or the numencal keys to select a title/
chapter
| Press I_l_l or 141_1 briefly dunng playback to go
to the next tFack or to return to the beginning of
the currect track respectively.
2 Press [41_ltwice bnefly to step back to the
prey ous track.
3 To go d rectly to any track, enter the track
number using the numerical keys.
Search
1
2 Use O to select the required speed: 32, 8 or
4 (backward), or +4, k8, +32 (fol_vard).
3 Select 1 to play the disc at nom_al speed again,
4 To exit the Search mode, press A,
• Tosearchforwardorbackwardthroughdifferent
speeds, you can also hold down _ or _ for
more than two seconds,
1
2
3
4
Slow Motion _ VCC_
Playbackwll pause,
Use O to select the required speed: 1, 1/2,
1/4or 1/8 (backward), or 4q/8, +l/4, -__/2 or
4-1 (forward),
Select I to playthe disc at nom_alspeed again,
Ifll ispressed,the speed will be set to zero
(PAUSE).
To exit slow motion mode, pressA,
(Playbackcontinues at the selected speed,)
Still Picture and Frame-by-frame
playback V_
1
-) Playback wll pause,
2 Use _ to select the pr_wous or next picture
frame.
• Press PLAY to play the disc at normal speed again.
Note:
- You can also activate frame-by-frame playback by
pressing PAUSE repeatedly on the remote control.
Sca.
Scanni% plays the fl_st 10 seconds of each
chapter/track on a disc.
Press SCAN.
To cont rue pbyback at your chosen chapter/
track, press SCAN again or press PLAY,
17
Operation
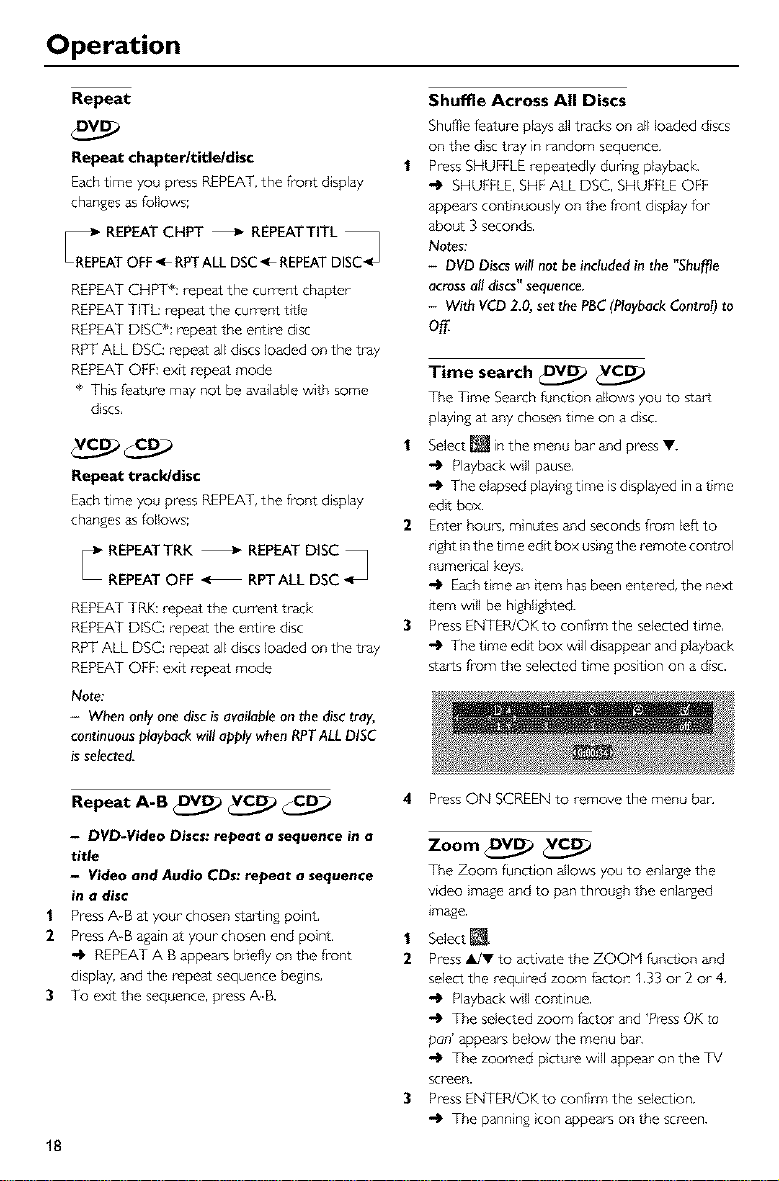
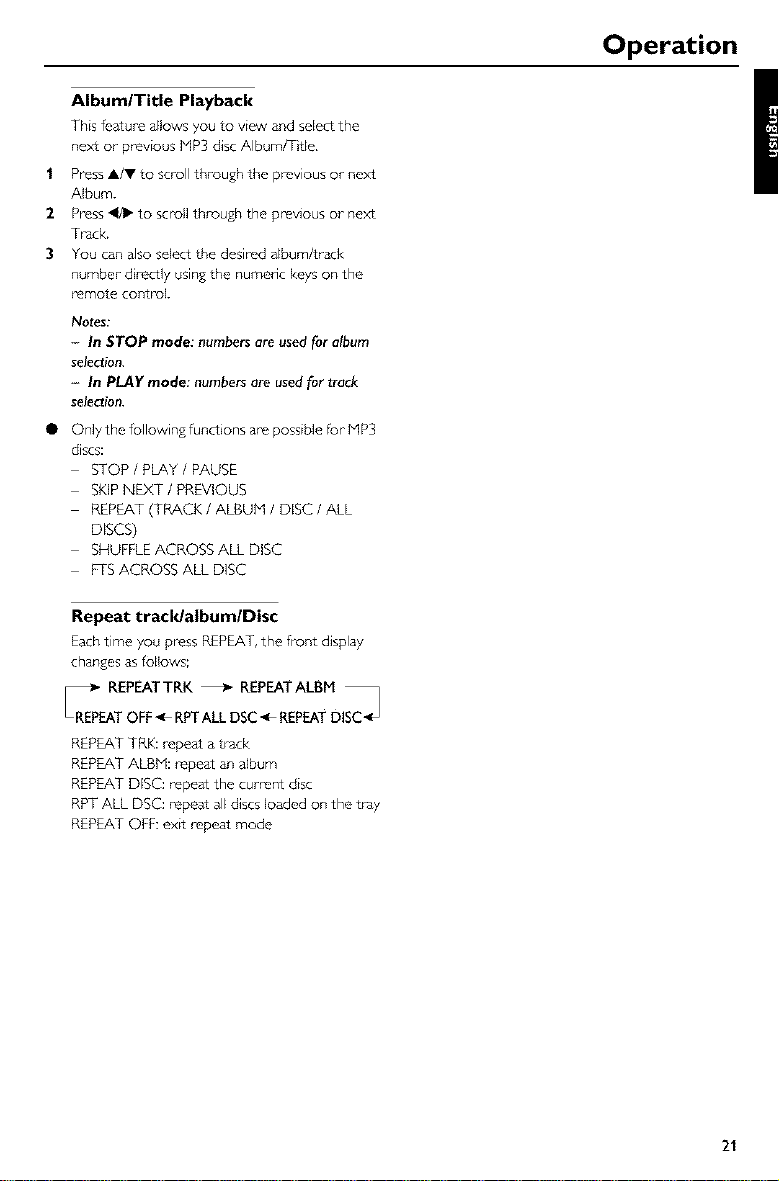
Repeat
Repeat chapter/title/disc
Each time you press REPEAT, the front display
changes as follows;
R_EP REPEAT CHPT _ REPEATTITL
EAT OFF 4, RPTALL DSC 4, REPEAT DISC
REPEAT CHPT*: repeat the current chapter
REPEAT T[TL: repeat the current title
REPEAT DISC÷: repeat the eutire disc
RPT ALL DSC: repeat all discs loaded on the tray
REPEAT OFF: extt repeat mode
* This Feature may not be available with some
dscs,
Repeat track/disc
Each time you press REPEAT, the front display
changes as follows;
RPT ALL DSC
REPEAT TRK: repeat the current track
REPEAT DISC: repeat the entire disc
RPT ALL DSC: repeat all discs loaded on the tray
REPEAT OFF: exit repeat mode
Note:
- When only one disc is available on the disc tray,
continuous playback will apply when RPT ALL DISC
is selected.
Shuffle Across All Discs
Shume feature plays all t_cks on all loaded discs
on the dsc tray in random sequence.
1 Press SHUFFLE repeatedly dunng playback
SHUFFLE, SHF ALL DSC, SHUFFLE OFF
appears co_tinuously on the front display for
about 3 seconds.
Notes:
- DVD Discs wil! not be included in the "Shuffle
across al! discs" sequence,
- With VCD 2.0, set the PBC (Playback Control) to
off
Time search _ VCc__
The Time Search function allows you to start
playing at any chosen time on a dso
Playback wll pause,
The elapsed playing time is d splayed in a time
edit box.
2 Enter hours, minutes and seconds from left to
nght n the time edit box using the remote control
numerical keys,
"_ Each tme an tern has been entered, the next
item will be highlighted.
3 Press ENTER/OKto confirm the selected time,
The time edit box will disappear and playback
starts from the selected time position on a disc.
Repeat A-B V_ _
- DVD-Video Discs: repeat a sequence in a
title
- Video and Audio CDs: repeat a sequence
in a disc
| Press A-B at your chosen starting point,
2 Press A-B again at your chosen end point.
"_ REPEAT A B appears bnefly on the front
display, and the repeat sequence begins,
3 To exit the sequence, press A-B.
18
4 Press ON SCREEN to remove the menu ban
Zoom _
The Zoom function allows you to enlarge the
video image and to pan through the enlarged
image.
| Select _,
2 Press A/Y to activate the ZOOM funct on and
select the required zoom l_cto_: 1,33 or 2 or 4,
Playback w II continue.
The selected zoom factor and 'P_ess OK to
pan' appears below the menu bar.
The zoomed picture w}ll appear on the TV
screen.
3 Press ENTER/OKto confirm the selection.
The panning }con appears on the screen.
Operation
4 Use _1, •, A, • to pan across the screen.
5 When ENTER/OK is pressed only the panned
picture will be shown on the screen,
6 To exit ZOQH mode, select zoom factor to
"Off' (zoom factor 1) in the menu ban
Note:
- ZOOM mode gets deactivatedwhenstarting
playbackof next elementin FTSacrossdiscand
ShuffleacrossDiscmodes.
Favorite Track Selection Across Disc
• This FTS funct on allows you to create a list
favorite tracksby selectingtracksfrom different
discsavailableinthe disc tray,
• The supported discsare CDDA, HP3, VCD,
SVCD.
• Favorite Track Selection (ITS) list contains upto
I00 elements acrossall the discson the tray,
Storing a Program
| Press OPEN/CLOSE and load preferred discs
onto the disc tray.
2 In STOP mode, select ITS in the menu bar-,
3 Press • in the menu bar.
-_ The ITS window menu appears.
4 Select All Discs option.
Storing entire disc as the FTS
1 Press• to select DISC,
2 Use • and _ to select the require disc listfor all
the loaded discsin the disc tray,
3 PressENTER/OK to store the entire disc
selection.
1
2
3
Storing album/title
Press• to selectALBU PI/TRACK.Albums arefor
HP3 discsand Tracksfor (S)VCD.
Use • and _1to selectthe require Album/Track,
PressENTER/OK to store the entire selected
Album/Track_
-_ The Album/Track, number will be added to
the program list.
Storing track/chapter
| Press • on the selected TR/kCK/INDEX. Tracks
are for MP3/CDDA discs and Index for S(VCD).
.O Thetrack/chapter number will be highlighted.
2 Use • and _1 to select the required TracWlndex.
3 Press ENTER/OK to conf_lTn the selection.
.O The selected Track/Index wll be added to the
program list.
4 Press ON SCREEN to exit the ITS menu,
Switching a Program OFF
| Use_ to move to ITS.
2 Press • or _ to select OFF,
3 Press ON SCREEN to exit.
Erasing a selection in a Program
| While playback isstopped, select ITS in the menu
ban
2 Use • to select PROGRAM.
3 Use • and _1to select the required number.
4 Press ENTER/OKto erase the selection,
g Press ON SCREEN to exit.
Erasing all selections
| While playback isstopped, select ITS in the menu
ban
2 Use • to select CLEAR ALL and press ENTER/
OK
"_ All selections will be erased.
3 Press ON SCREEN to exit.
Note;
- Pressing PLAYXCHANGE or OPEN/CLOSE during
playback wil! erase the selected Program if any.
- With VCD 2.0, set the PBC (Playback Control) to
off
FTS for a Single disc
| Select ITSin the menu ban
2 Press • in the menu bar.
,O The ITS window menu appears.
3 Select CURRENT DISC option.
19
Operation
Storing album/title
1 PressY to selectALBUM/TRACK, Albums arefor
HP3 and T_3cksfor (S)VCD.
2 Use • and_1to select the require Album/Track,
3 PressENTER/OK to store the entire selected
Album/Track.
"_ The AIbum/T_ck number will be added to
the program list.
Storing track/chapter
1 Press • on the selected TPT_CK/INDEX. Tracks
are for MP3/CDDA and index for (S)VCD,
-I_ The tracldchapter number will be hghlighted.
2 Use • and _1 to select the required TracWIndex.
3 Press ENTER/OK to confim7 the selection.
-1_ The selected Tracldlndex w}ll be added to the
program list.
4 Press ON SCREEN to exit the ITS Menu,
Switching a Program OFF
1 Use A/• to move to ITS.
2 Press • or < to select OFF,
Erasing a selection in a Program
1 While playback is stopped, select ITS in the menu
bar,
2 Use • to select PROGRAM,
3 Use • and _1 to select the required number.
4 Press ENTER/OK to elase the selection,
5 Press ON SCREEN to exit.
Erasing all selections
1 While playback is stopped, select ITS in the menu
bar.
2 Use • to select CLEAR ALL and press ENTER/
OK
-I_ All selections will be erased.
3 Press ON SCREEN to exit.
MP3 Disc Features
Support following MP3-CD formats (Joliet
format):
Q Max, 64 cha_acte_ (file names or directoo,)
II Max, nested director), is 8 levels
II The max. album (d rectoo') number }s 100
II Supported VBR btt-rate
II Supported sampling fi-equencies for MP3 disc are:
32 kHz, 44.1 kHz, 48 kHz
II Supported Bit-rates of MP3 disc are: 32, 64, 96,
128, 192, 256 (kbps)
Following formats can't be supported
Q The files like ÷.WMA, *,AAC, ÷.DLF, *,H 3U, *,PLS
II Chnese filenames
II The non session closed discs
II The discs recorded under UDfi folTnat
Downloading MP3 files from the Intemet or
copy ng songs from your own legal discs is a
delicate process,
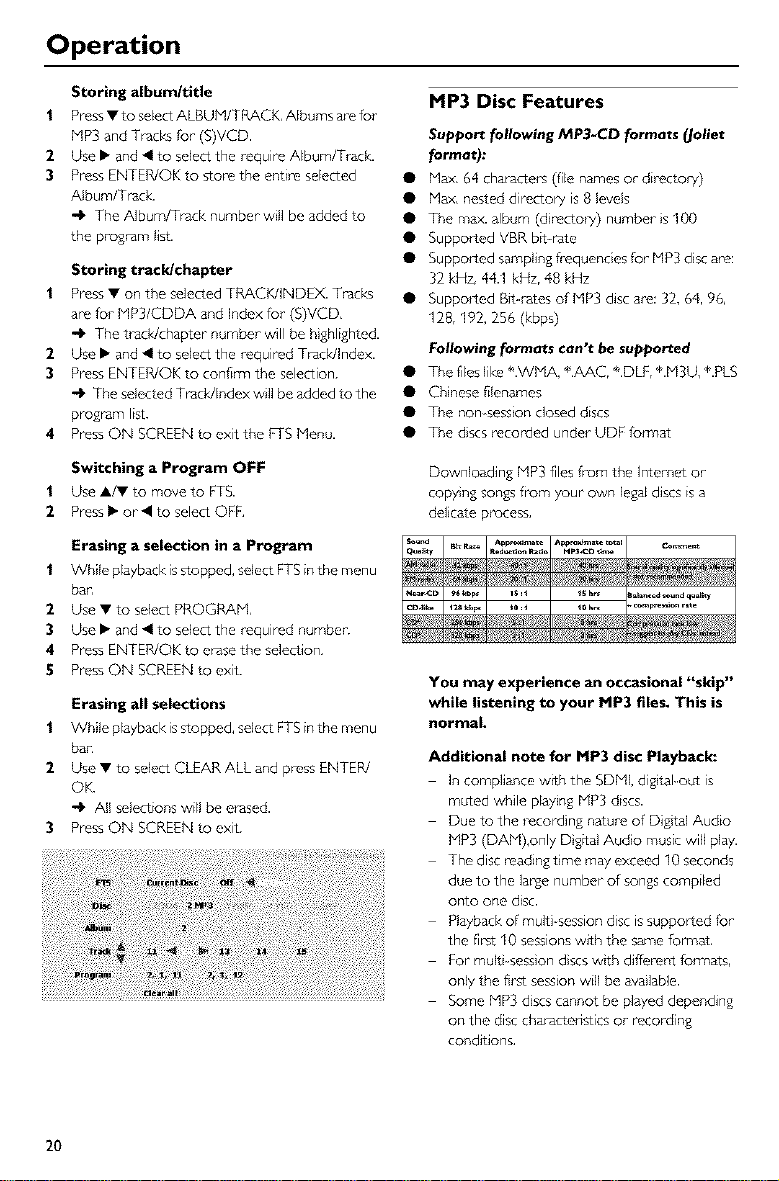
You may experience an occasional "skip"
while listening to your MP3 files. This is
normal.
Additional note for MP3 disc Playback:
In compliance wtth the SDML digtal-out is
muted while playing HP3 discs.
Due to the recording nature of Digital Audio
MP3 (DAM),only Dig_al Audio music will play.
The disc reading time may exceed 10 seconds
due to the lapse number of songs compiled
onto one disc.
Playback of multi-session disc is supported for
the first 10 sessions with the same fon_at,
For multi_session discs with different fo_Tnat_,
only the first session will be available.
Some HP3 discs cannot be played depending
on the disc characteristics or recording
conditions,
2O
Operation
AlbumlTitle Playback
This feature allows you to view and select the
next or previous MP3 disc AlbumfTtle,
| Press A/V to scroll through the previous or next
Album.
2 Press O to scroll through the previous or next
Track.
3 You can also select the desired album/track
number d rectly using the numeric keys on the
remote control.
Notes:
- In STOP mode: numbers are used for album
selection.
- In PLAY mode: numbers are used for track
selection.
• Only the following functions a_ possible for MP3
discs:
STOP / PLAY / PAUSE
SKIP NEXT/PREVIOUS
REPEAT (TRACK / ALBUM / DISC / ALL
DISCS)
SHUFFLE ACROSS ALL DISC
ITS ACROSS ALL DISC
Repeat track/albumlDisc
Each time you press REPEAT, the front display
changes as follows;
REPEAT TRK: repeat a track
REPEAT ALBbl: repe_t an album
REPEAT DISC: repeat the cument disc
RPT ALL DSC: repeat all discs loaded on the tray
REPEAT OFF: exit repeat mode
21
Access Control
Child Lock _
Activating/deactivating the Child
Lock
| When disc pbyback isstopped, selectACCESS
CONTROL n the Personal Preferencesmenu
usingA/T,
2 Enter a 4dgit code of your-own choice twice.
3 Hove to "CHILD LOCK" usingA/V,
4 Hove to _ / r_ using!_,
5 Select _ usingA.
6 PressENTER/OK or • to confirm,then pressON
SCREENto exLtthe Pel_onal Preferencesmenu.
.4_ Now unauthorized discswll not be played
unlessthe 4-digit code isentered.
7 Select @to deactivatethe CHILD LOCK.
Notes:
Confirmationof the 4_digitcodeisnecessarywhen:
- Thecodeis enteredfor the veryfirst time (see
above),
- Thecode ischangedor cancelled(see'Changing
the 4-dig_code'),
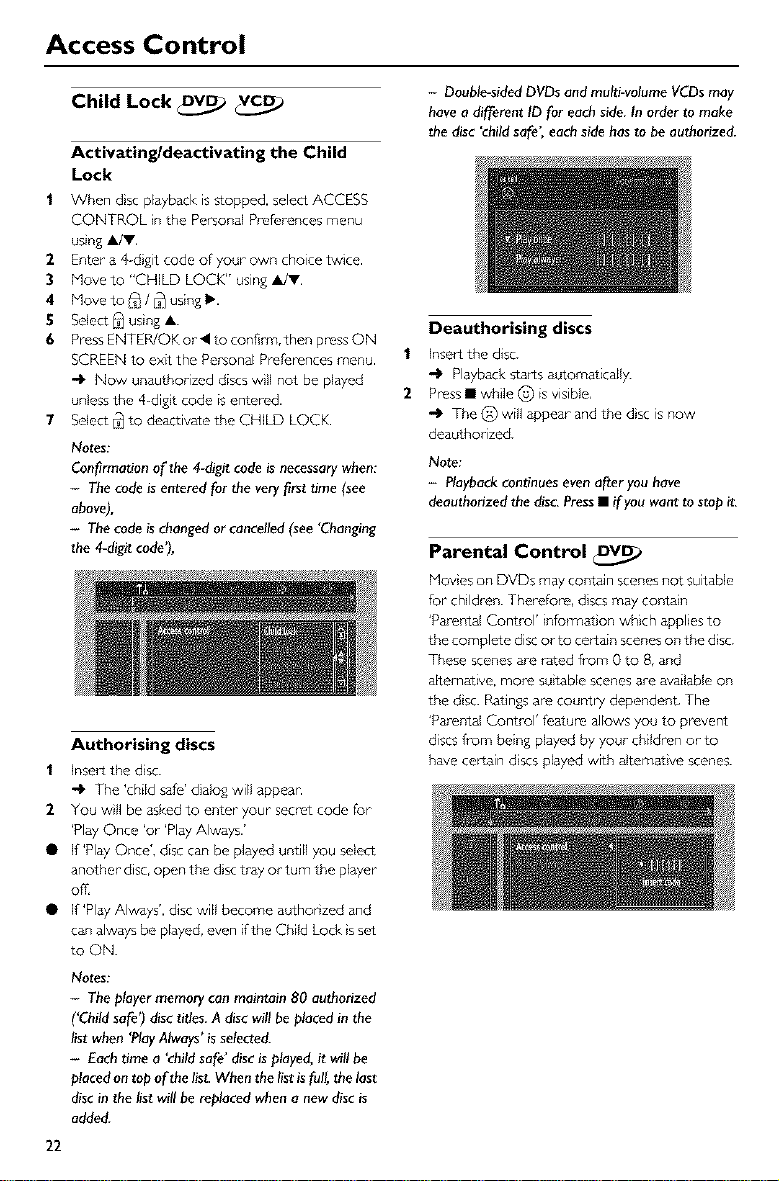
Authorising discs
| Insert the disc.
The 'child safe' dialog will appear.
2 You wll be asked to enter your secret code for
'Play Once 'or 'Play Always.'
• If 'Play Once', disc can be played untill you sdect
another disc, open the disc tray or turn the player
of£
• If 'Play Always', disc will become authonzed and
can always be played, even if the Child Lock }sset
to ON.
Notes:
- The player memory can maintain 80 authorized
('Child safe') disc titles. A disc will be placed in the
list when 'Play Always' is selected.
- Each time a "child safe' disc is played, it will be
placed on top of the list. When the list is full, the last
disc in the list will be replaced when a new disc is
added.
22
- Double-sidedDVDsand multi-volumeVCDsmay
havea different ID for eachside.Inorder to make
thedisc 'childsafe" eachsidehasto beauthorized.
1
2
Deauthorising discs
Insert the disc.
-l_ Playback starts automatically.
Press • while _'_ is visible,
-Ip The (_) will appear and the dsc is now
deauthorized.
Note:
- Playbackcontinuesevenafteryou have
deauthorizedthedisc.Press• if you wantto stop it.
Parental Control q_
Moves ors DVDs may contain scenes not suitable
for children. Therefore, discs may contain
'Parei_tal Control' information which applies to
the complete disc or to certain scenes on the disc.
These scenes are rated from 0 to 8, and
alternative, more su}table scenes are available on
the dsc. Ratings are country dependent, The
'Parental Control' feature allows you to prevent
discs from being played by your children or to
have certain discs played with altemat}ve scenes.
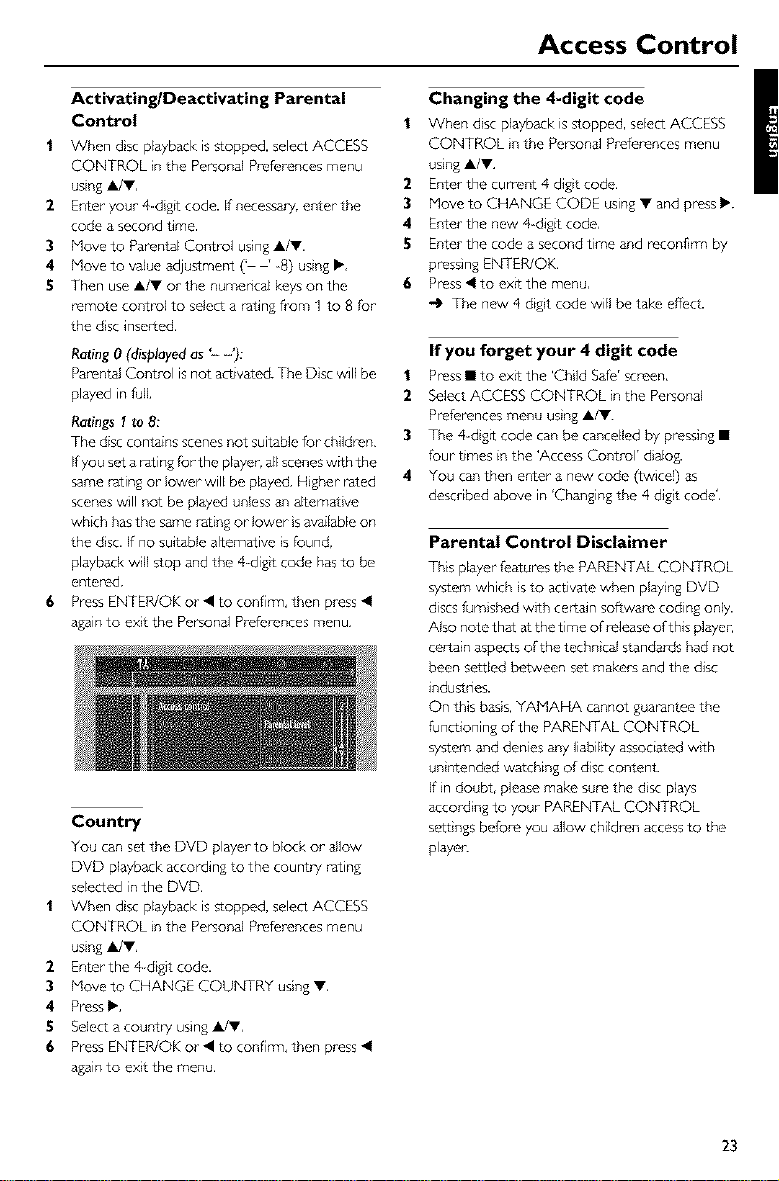
Access Control
Activating/Deactivating Parental
Control
I When disc playback is stopped, select ACCESS
CONTROL n the Personal Preferences menu
using A/Y,
2 Enter your 4dg_t code. If necessary, enter the
code a second time.
3 Hove to Parental Control using A/Y.
4 Hove to value adjustment (' ' -8) using I_,
5 Then use A/V or the numerical keys on the
remote co_trol to select a rating from I to 8 for
the dsc inserted,
Rating 0 (displayed as '- -'):
Parental Control is not activated. The Disc will be
played in full
Ratings I to 8:
The disc contains scenes not suitable for children,
Ifyou set a rating for the player, all scenes w_th the
same rating or lower will be played. Higher rated
scenes will not be played unless an altemat ve
which has the same rating or lower s available on
the dsc. If no suitable alternative s found,
playback wll stop and the 4-digit code has to be
entered.
6 Press ENTER/OK or • to confbTn, then press •
again to exit the Personal Preferences menu,
Country
You can set the DVD player to block or allow
DVD playback according to the count_T rating
selected in the DVD,
| When disc playback is stopped, select ACCESS
CONTROL n the Personal Preferences menu
using _IJY,
2 Enter the 4 digit code,
3 Hove to CHANGE COUNTRY using T,
4 Press _,
5 Select a count_7 using A/Y,
6 Press ENTER/OK or • to confimy, then press •
again to exit the menu.
Changing the 4-digit code
| When dsc pbyback is stopped, select ACCESS
CONTROL n the Personal Preferences menu
using A/V,
2 Enter'the cumeut 4 digt code.
3 Hove to CHANGE CODE using • and press I_.
4 Enter the new 4-digtt code,
5 Enter the code a second time and reconfirm by
pressing ENTER/OK,
6 Press • to exLt the menu,
-IP The new 4 digit code will be take effect.
If you forget your 4 digit code
| Press • to extt the 'Child Safe' screen,
2 Select ACCESS CONTROL in the Personal
Preferences menu using A/V.
3 The 4-dg_t code can be cancelled by pressing •
four times in the 'Access Control' dMog.
4 You can then enter a new code (twice]) as
described above in 'Changing the 4 digit code',
Parental Control Disclaimer
This player features the PARENTAL CONTROL
system which s to activate when play ng DVD
discs furnished with certain software coding only.
Also note that at the time of release of this player,
certain aspects of the techn}cal standards had not
been settled between set makers and the disc
industries.
On this basis, YAMAHA cannot guarantee the
functioning of the PARENTAL CONTROL
system and denies any liabihty associated w}th
un ntended watching of disc content
If in doubt, please make sure the disc plays
accord}ng to your- PARENTAL CONTROL
settings before you allow children access to the
player.
23
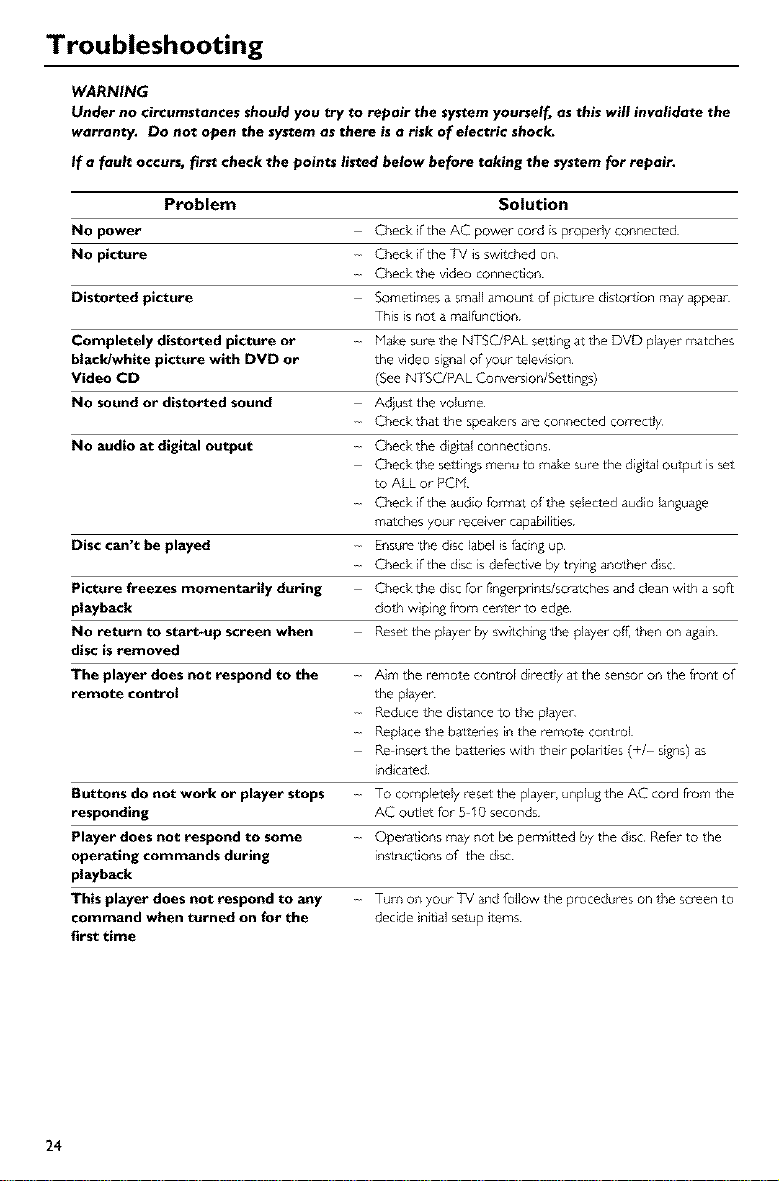
Troubleshooting
WARNING
Under no circumstances should you try to repair the system yourself, as this will invalidate the
warranty. Do not open the system as there is a risk of electric shock.
If a fault occurs, first check the points listed below before taking the system for repair.
Problem Solution
No power CheckiftheACpowercordispropedyconnected
No plcture Check if the TV is switched on
C2_eckthe video connection
Distorted picture Sometimes a small amount of picture distortion may appear
This is not a rnalfiJnction
Completely distorted picture or Hake sure the NTSCJPAL setting at l±_eDVD player matches
bla_ldwhite picture with DVD or the video signal of your lelevision
Video CD (See NTSCJPAL Conve_sion/Settings)
No sound or distorted sound Adiust the volume
Check that the speakers ace connected cor_Pctly
No audio at digital output Check the d gital connect ons
Check the settings menu to make sum the digital ouq_ut is sol
to ALL or PCM
Check if the audio fo_t of l±_eselected audio language
matches your tecewer capabilities
Disc can't be played Ensure the dsc label s facing up
C2_eckif the disc is defective by t®ing another disc
Picture freezes momentarily during C2_eckthe disc for f}ngerprints/scratches and clean with a sofL
playback c[o1±_wiping ft'om center to edge
NO return to start-up screen when Reset the player by switching the player of[, then on again
disc is removed
The player does not respond to the Aim the temole control dimclly at the sensor on the front of
remote control the player
Reduce the distance to the player
Replace the b_tteries in the remme control
Re insert the battedes with their polarities (+/ signs) as
indicated
Buttons do not work or player stops TO completely _eset the player, unplug the AC cord from the
responding AC ou,t[et for 5 10 seconds
Player does not respond to some Operations may not be pemnitted by the disc Refer to the
operating commands during in_t_actions of the disc
playback
This player does not respond to any Turn on your TV and follow the procedures on the so_en to
command when turned on for the decide nitial setup items
first time
24
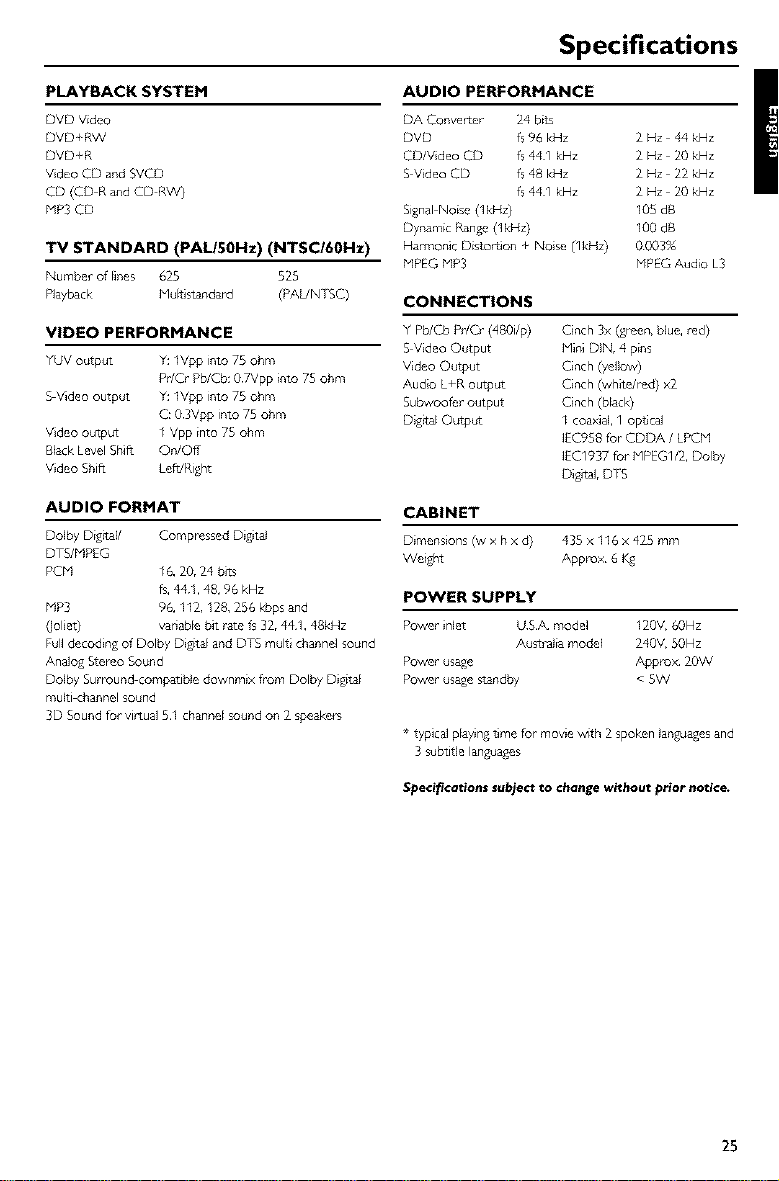
Specifications
PLAYBACK SYSTEM
DVD Video
DVD _RW
DVD_R
Video CD and SVCD
CD (CD R aridCD RW)
MP3 CD
TV STANDARD (PAI-/50Hz) (NTSC/60Hz)
Numberoflines 625 525
Playback Mukis_nda_ (_UN_C)
VIDEO PERFORMANCE
YUV output Y: 1Vpp into 75 ohm
Pr/Cr Pb/Cb: 07Vpp into 75 ohm
S Video output Y: lVpp into 75 ohm
C: 03Vpp into 75 ohm
Vdeo output 1 Vpp into 75 ohm
Black Level Shift On/Oft
Video Shift LeffJRight
AUDIO FORMAT
Dolby Digttag Compressed Digital
DTS/MPEG
PCM 16, 20, 24 bits
fs,441, 48, 96 kHz
hIP3 96, 112, 128, 256 kbps and
(Joliet) variable bit rate fs 32, 441, 48kHz
Fulldecoding of Dolby Digital and DTS multi channel sound
Analog Stereo Sound
Dolby Surround compatible downmix from Dolby Digital
multi channel sound
3D Sound for virtual 51 channel sound on 2 speakers
AUDIO PERFORMANCE
DA Converter 24 bits
DVD fs96 kHz 2 Hz 44 kHz
CD/Video CD fs441 kHz 2 Hz 20 kHz
SVideo CD fs 48 kHz 2 Hz 22 kHz
fs441 kHz 2Hz 20kHz
Signal Noise (IkHz) 105 dB
Dynamic Range (IkHz) 100 dB
Harmonic Distortion + Noise (1kHz) 0¸003%
bIPEG hIP3 HPEG Audio L3
CONNECTIONS
Y Pb/Cb Pr/Cr (480i/p) Cinch 3x (green, blue, red)
S Video Output Mini DIN, 4 pins
Video Output Cinch (yellow)
Audio L_R output Cinch (white/red) x2
Subwoofer output Cinch (black)
Digttal Output I coaxial, I opbcal
IEC958 for CDDA / LPCM
IEC1937 for MPEGI/2, Dolby
DiDtal, Drg
CABINET
Dimensions_ x hx d) 435x 116x 425mm
Weight Approx 6
POWER SUPPLY
Power inlet USA model 120V, 60Hz
Australia model 240V, 50Hz
Power usage Appro_ 20W
Power usagestandby < gW
* typical playingbme for movie w_th 2 spoken languagesand
3 subtitle languages
Specifications subject to change without prior notice.
25

OYAMAHA