Loading ...
Loading ...
Loading ...
5
Lithium-ion batteries with a star marking are equipped
with a protection system. This system automatically cuts
off power to the tool to extend battery life.
The tool will automatically stop during operation if the tool
and/or battery are placed under one of the following
conditions:
• Overloaded:
The tool is operated in a manner that causes
it to draw an abnormally high current.
In this situation, release the trigger switch on
the tool and stop the application that caused
the tool to become overloaded. Then pull the
trigger switch again to restart.
If the tool does not start, the battery is
overheated. In this situation, let the battery
cool before pulling the trigger switch again.
• Low battery voltage:
The remaining battery capacity is too low and
the tool will not operate. In this situation,
remove and recharge the battery.
Setting for desired screw length
1
2
3
4
008123
There are 7 positive-lock screw length settings. To obtain
the desired setting, pull out the stopper base while
depressing the lever until you see the number of the
desired screw length (indicated on the label on feeder
box) appear to rest in the fenestella of stopper base. See
the table below for the relation between the number
indicated on the label on feeder box and the respective
screw length.
For Model XRF01
45
50
55
45 mm (1-3/4")
50 mm (2")
55 mm (2-3/16")
60
65
70
75
60 mm (2-3/8")
65 mm (2-9/16")
70 mm (2-3/4")
75 mm (2-15/16")
Number indicated on the label Screw length
008240
For Model XRF02
25
30
35
40
45
50
55
25 mm (1")
30 mm (13/16")
35 mm (1-3/8")
40 mm (1-9/16")
45 mm (1-3/4")
50 mm (2")
55 mm (2-3/16")
Number indicated on the label Screw length
008239
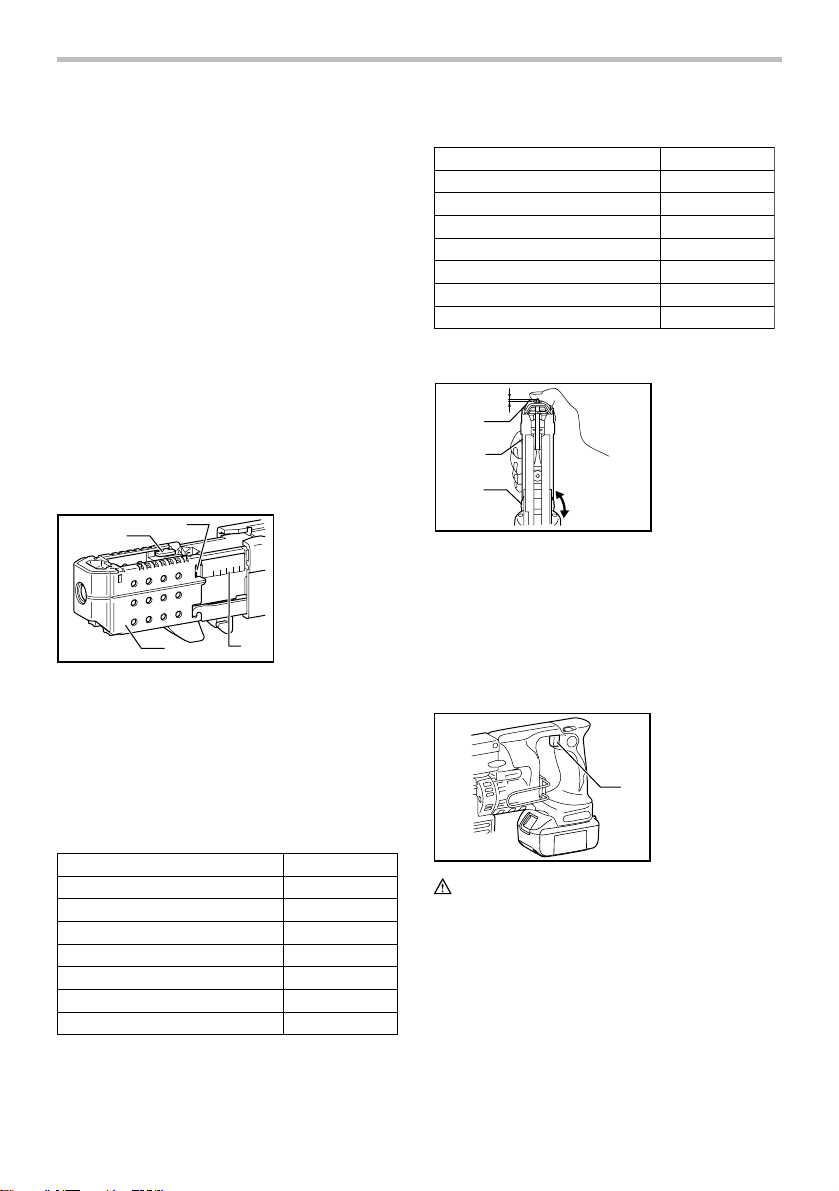
Adjusting the driving depth
5 mm
(3/16")
1
2
3
A
B
008280
Depress the stopper base as far as it will go. While
keeping it in this position, turn the adjusting knob until the
bit tip projects approx. 5 mm (3/16") from the stopper
base. Drive a trial screw. If the screw head projects
above the surface of the workpiece, turn the adjusting
knob in the A direction; if the screw head is counter-sunk,
turn the adjusting knob in the B direction.
Switch action
1
014062
CAUTION:
• Before inserting the battery cartridge into the tool,
always check to see that the switch trigger actuates
properly and returns to the "OFF" position when
released.
To start the tool, simply pull the switch trigger. Release
the switch trigger to stop.
1. Switch trigger
1. Stopper base
2. Casing
3. Adjusting knob
1. Lever
2. Stopper base
3. Label on feeder
box
4. Fenestella
Loading ...
Loading ...
Loading ...