Loading ...
Loading ...
Loading ...
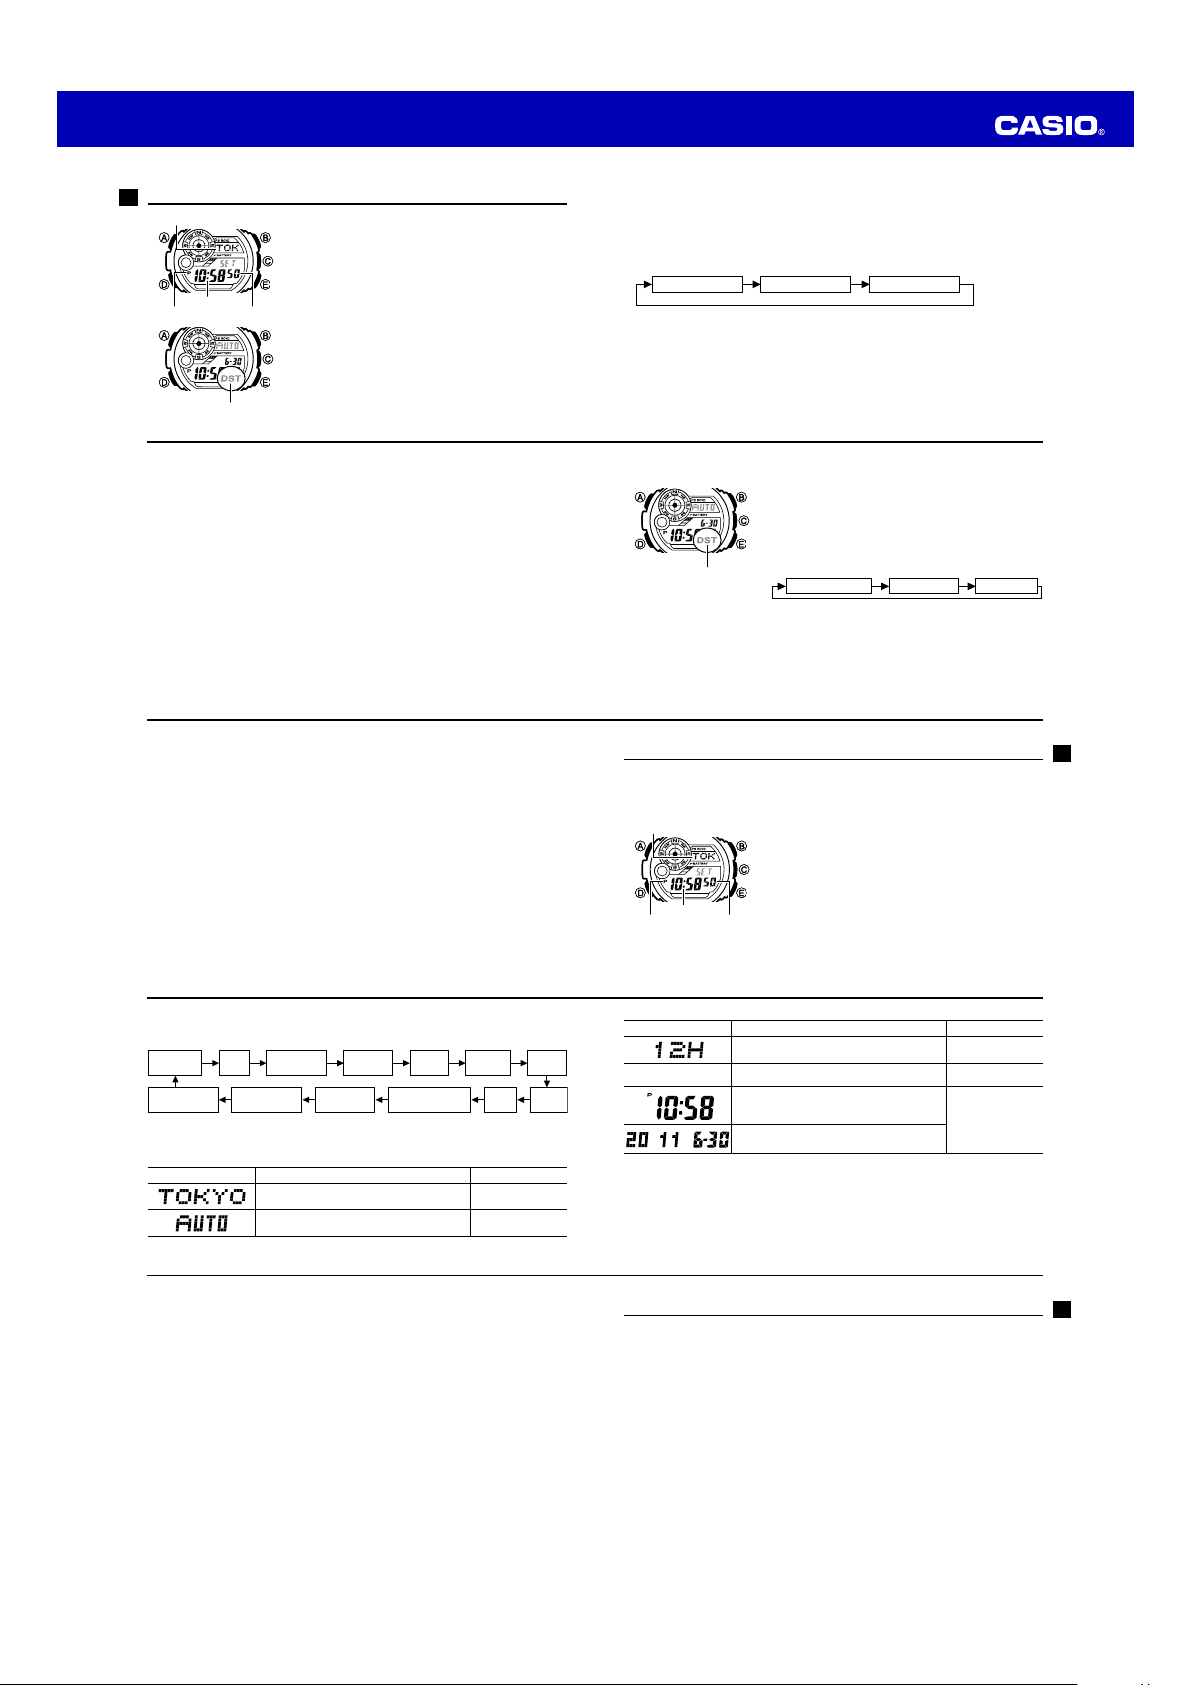
Operation Guide 3260 3280
E-40
Configuring Home City Settings
There are two Home City settings: actually selecting the
Home City and selecting either standard time or daylight
saving time (DST).
To configure Home City settings
1. In the Timekeeping Mode, hold down
A
until
SET
starts to flash and the city name starts to scroll on the
display.
• This is the setting screen.
• The watch will exit the setting mode automatically if
you do not perform any operation for about two or
three minutes.
• For details about city names, see the “City Code
Table” at the back of this manual.
l
l
l
l
l
l
l
l
l
l
l
l
l
l
l
l
l
l
l
l
l
l
l
l
l
l
l
l
l
l
l
l
l
PM indicator
City name
Seconds
Hour : Minutes
DST indicator
l
l
l
l
l
l
l
l
l
l
l
l
l
l
l
l
l
l
l
l
l
l
l
l
l
l
l
l
l
l
l
l
l
PM indicator
City name
Seconds
Hour : Minutes
DST indicator
E-41
2. Press
E
(East) and
B
(West) to select the city name you want to use as your
Home City.
• Keep pressing
E
or
B
until the city name you want to select as your Home
City appears on the display.
3. Press
D
to display the DST setting screen.
4. Use
E
to cycle through the DST settings in the sequence shown below.
Auto DST (AUTO) DST off (OFF)
DST on (
On
)
• The Auto DST (AUTO) setting will be available only when a city name that
supports time calibration signal reception (page E-21) is selected as the Home
City. While Auto DST is selected the DST setting will be changed automatically
in accordance with time calibration signal data.
• Note that you cannot switch between standard time and daylight saving time
(DST) while UTC is selected as your Home City.
E-42
5. After all the settings are the way you want, press
A
to return to the Timekeeping
Mode.
• The DST indicator appears to indicate that Daylight Saving Time is turned on.
Note
• After you specify a city name, the watch will use UTC* offsets in the World Time
Mode to calculate the current time for other time zones based on the current
time in your Home City.
* Coordinated Universal Time, the world-wide scientific standard of timekeeping.
The reference point for UTC is Greenwich, England.
• Selecting some city names automatically makes it possible for the watch to
receive the time calibration signal for the corresponding area. See page E-21
for details.
E-43
To change the Daylight Saving Time (summer time) setting
1. In the Timekeeping Mode, hold down
A
until
SET
starts to flash and the city name starts to scroll on the
display.
• This is the setting screen.
2. Press
D
to display the DST setting screen.
3. Use
E
to cycle through the DST settings in the
sequence shown below.
Auto DST (
AUTO
) DST off (
OFF
) DST on (
On
)
• The Auto DST (AUTO) setting will be available only
when a city name that supports time calibration
signal reception (page E-21) is selected as the
Home City. While Auto DST is selected the DST
setting will be changed automatically in accordance
with time calibration signal data.
l
l
l
l
l
l
l
l
l
l
l
l
l
l
l
l
l
l
l
l
l
l
DST indicator
l
l
l
l
l
l
l
l
l
l
l
l
l
l
l
l
l
l
l
l
l
l
DST indicator
E-44
4. After all the settings are the way you want, press
A
to return to the Timekeeping
Mode.
• The DST indicator appears to indicate that Daylight Saving Time is turned on.
E-45
Configuring Current Time and Date Settings Manually
You can configure current time and date settings manually when the watch is unable
to receive a time calibration signal.
To change the current time and date settings manually
1. In the Timekeeping Mode, hold down
A
until
SET
starts to flash and the city name starts to scroll on the
display.
• This is the setting screen.
2. Use
E
and
B
to select the city name you want.
• Select your Home City name before changing any
other setting.
• For full information on city names, see the “City
Code Table” at the back of this manual.
l
l
l
l
l
l
l
l
l
l
l
PM indicator
City name
Seconds
Hour : Minutes
l
l
l
l
l
l
l
l
l
l
l
PM indicator
City name
Seconds
Hour : Minutes
E-46
3. Press
D
to move the flashing in the sequence shown below to select the other
settings.
City Name
DST
12/24-Hour
Format
Seconds Minutes
Year
Hour
Thermometer
unit
Power Saving
Illumination
Duration
Button Operation
Tone On/Off
Day Month
• The following steps explain how to configure timekeeping settings only.
4. When the timekeeping setting you want to change is flashing, use
E
and/or
B
to
change it as described below.
Screen To do this: Do this:
Change the city name
Use
E
(East) and
B
(West).
Cycle between Auto DST (
AUTO
), Daylight
Saving Time (
On
) and Standard Time (
OFF
).
Press
E
.
E-47
Screen To do this: Do this:
Toggle between 12-hour (
12H
) and 24-hour
(
24H
) timekeeping.
Press
E
.
50
Reset the seconds to
00
Press
E
.
Change the hour or minutes
Use
E
(+) and
B
(–).
Change the year, month, or day
5. Press
A
to exit the setting screen.
Note
• For information about selecting a Home City and configuring the DST setting,
see “Configuring Home City Settings” (page E-40).
E-48
• While 12-hour format is selected for timekeeping, a P (PM) indicator will appear
for times from noon to 11:59 p.m. No indicator appears for times from midnight
to 11:59 a.m. With 24-hour format, time is displayed from 0:00 to 23:59, without
any P (PM) indicator.
• The watch’s built-in full automatic calendar makes allowances for different
month lengths and leap years. Once you set the date, there should be no
reason to change it except after you have the watch’s rechargeable battery
replaced or after power drops to Level 5 (page E-14).
E-49
Digital Compass
A built-in bearing sensor detects magnetic north at regular intervals and indicates one
of 16 directions on the display.
• The watch also takes temperature readings in the Digital Compass/Thermometer
Mode. For more information, see “Thermometer” (page E-73).
Loading ...
Loading ...
Loading ...