
EN
KL-P350W
User’s Guide
Supported Tape Widths
6
mm
9
mm
12
mm
18
mm
24
mm
MO2003-C
© 2018 CASIO COMPUTER CO., LTD.

1
Important!
Before using this printer, be sure to read and follow the information in
the “Safety Precautions” section of this manual.
Be sure to keep all user documentation handy for future reference.

2
3
Contents
Safety Precautions .................................................................................................. 4
Precautions During Use .......................................................................................... 9
Check to make sure that everything has been included with the printer.........11
Read this before using the printer! ......................................................................11
Printer User Documentation ...................................................................................11
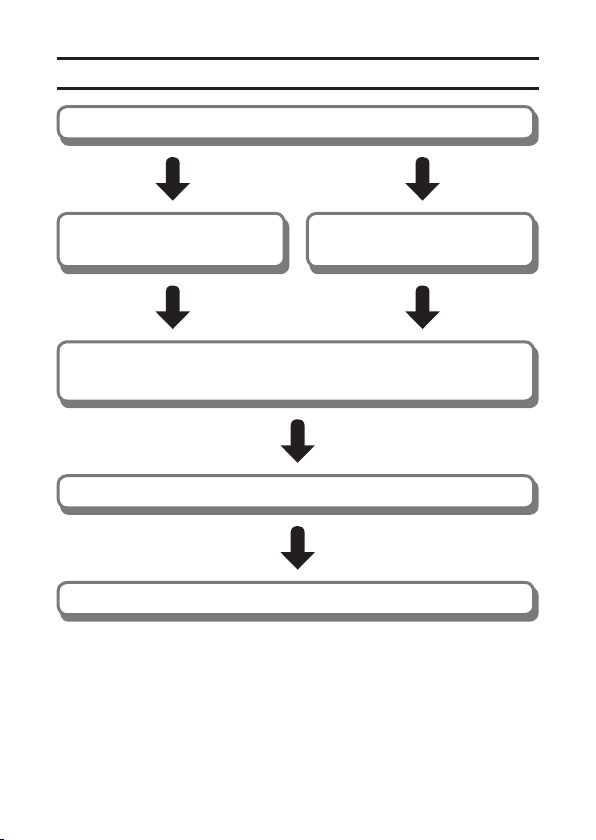
Printer Operation Flow ..........................................................................................12
Installing the Software ..........................................................................................13
Names of Parts and Their Functions ...................................................................14
Turning Power On and Off ....................................................................................15
Sleep State (Network Standby) .............................................................................. 15
Auto Power Off ....................................................................................................... 15
Loading and Removing a Tape Cartridge ............................................................16
To load a tape cartridge .......................................................................................... 16
To remove a tape cartridge ..................................................................................... 20
Connecting with the USB Cable (Computer Only) ..............................................21
To connect .............................................................................................................. 21
To disconnect .........................................................................................................22
Connecting Over a Wireless LAN ......................................................................... 23
Wireless LAN Mode ................................................................................................23
Getting Ready to Connect ...................................................................................... 24
Connecting to a Computer .....................................................................................24
Connecting to a Phone ........................................................................................... 25
Initializing Printer Settings ...................................................................................26
Printing a Label ......................................................................................................26
Stopping a Print Operation ..................................................................................... 27
Feeding the Tape .................................................................................................... 27
Cutting the Tape .....................................................................................................27
Affixing a Label to a Surface ..................................................................................28
Print Modes (Computer Printing Only) ................................................................ 29
Printing Consecutive Labels.................................................................................29
Printing Label Data From Printer Memory ..........................................................30
Re-printing the Last Label Printed (Reprint) ...........................................................30
Printing Data Stored in Printer Memory (Memory Print) .........................................30
User Maintenance ................................................................................................. 32
Using a Cotton Swab for Cleaning .........................................................................32
Troubleshooting .....................................................................................................33
Lamp and Printer Status .......................................................................................35
Specifications ........................................................................................................37

2
3
• The contents of this manual are subject to change without notice.
• The contents of this manual have been checked at each step along the production
process. Feel free to contact us if you notice anything that is questionable, erroneous,
etc.
• Any copying of the contents of this manual, either in part or its entirety, is forbidden.
Except for your own personal use, any other use of the contents of this manual
without the permission of CASIO COMPUTER CO., LTD. is prohibited under copyright
laws.
• CASIO COMPUTER CO., LTD. shall not be held liable for any damages or losses
suffered by you or any third party due to the use or malfunction of this product.
• CASIO COMPUTER CO., LTD. shall not be held liable for any damages or losses
caused by loss of memory contents due to malfunction or repair.
•
Microsoft and Windows are registered trademarks or trademarks of Microsoft Corporation
of the United States in the United States and other countries.
• Wi-Fi, the Wi-Fi logo, the Wi-Fi CERTIFIED logo, and Wi-Fi Protected Setup are
trademarks or registered trademarks of the Wi-Fi Alliance.
Other company names and product names used in this manual may be trademarks or
registered trademarks of their respective companies.
4
5
Safety Precautions
Thank you for purchasing this printer. Before using it, be sure to read and follow these
“Safety Precautions”. Also, keep this manual in a safe place where it is always available
for future reference.
Warning
Indicates something that creates a risk of death or serious
personal injury.
Caution
Indicates something that creates a risk of minor personal injury or
physical damage.
Symbol Examples
The white symbol indicates something you should not do. The symbol shown
here indicates that you should not attempt to disassemble the printer.
The triangle symbol indicates a caution item. The symbol shown here indicates
high-temperature caution.
The
●
black symbol indicates something you must do.
Warning
Power Cord, AC Adaptor
Do not touch the plug with wet hands.
Doing so creates the risk of electric shock.
If the AC adaptor or power cord becomes damaged, contact your original
retailer or a CASIO Service Center.
Continued use creates the risk of fire and electric shock.
Before leaving the product unattended, unplug the AC adaptor from the power
outlet, and move the product to a location away from animals and pets.
Pet chewing or urine can cause shorting, which creates the risk of fire.
B

4
5
Warning
AC Adaptor, USB Cable
Observe the precautions below in order to avoid the risk of fire and electrical
shock from the AC adaptor and USB cable.
• Use only the specified type of AC adaptor and USB cable.
• Use only the included power cord.
• Use the AC adaptor only with the device specified for it.
• Do not plug the power cord into an outlet with the wrong voltage rating.
• Do not plug into an overloaded extension cord or power outlet.
• Do not cover the power cord with a blanket or other material during use, and keep
it away from heating devices.
• Do not place heavy objects on the power cord or USB cable, and do not have
them bundled during use.
• Do not subject a power cord to heat or attempt to modify it, and avoid damaging
it.
• Do not subject the power cord to excessive bending, twisting, or pulling.
Storage and Operation Locations
Do not store or use the product in any of the locations described below.
Doing so creates the risk of fire and electric shock.
• Areas subjected to large amounts of moisture and dust
• Food preparation areas, near a humidifier, or in areas where the product is
exposed to oil smoke or water vapor
• Near a heating device, on an electric carpet, in a location exposed to direct
sunlight, in a car parked outside, or any other area where the product is subjected
to high temperatures.
Do not place the product on an unsteady platform, on a high shelf, or in any
other unstable location.
Dropping and tipping over create the risk of personal injury.
Do not place heavy objects on the product.
Dropping and tipping over create the risk of personal injury.
6
7
Warning
Abnormalities (Smoke, Odor, Heat Generation, etc.)
Do not use the product if it is emitting smoke, odor, heat, or exhibiting any
other abnormality. Do not use the product after it has been dropped or
otherwise damaged.
Doing so creates the risk of fire and electric shock. Immediately perform the steps
below.
1. Turn off power.
2. Disconnect the USB cable.
3. Unplug the AC adaptor power plug from the power outlet.
4. Contact your original retailer or a CASIO Service Center.
Disassembly and Modification
Do not attempt any disassembly or modification. For any internal inspection,
adjustment, or repair, contact your original retailer or a CASIO Service Center.
Doing so creates the risk of electric shock, burn injury, and personal injury.
Suffocation and Choking Risks
Do not allow anyone to play with the plastic bags used for product packaging.
Plastic bags create the risk of suffocation when placed over the head, when
swallowed, etc.
Particular care is required in areas where young children are present.
Avoiding Water and Foreign Matter
Do not allow water, other liquids (sports drinks, seawater, animal or pet urine,
etc.), or foreign objects (metal fragments, etc.) to get into the product or the
AC adaptor. Should any such matter get into the product, immediately perform
the steps below.
Continued use creates the risk of fire and electric shock.
1. Turn off power.
2. Disconnect the USB cable.
3. Unplug the AC adaptor power plug from the power outlet.
4. Contact your original retailer or a CASIO Service Center.
Do not locate a flower vase or other liquid container on top of or next to the
product or AC adaptor.
Liquid spilling from a container creates the risk of fire and electric shock.
6
7
Warning
In the case of a lightning storm, do not touch the device plugged into the
power outlet.
Lightning creates the risk of electric shock.
Effect on Other Electronic Devices
When using the product in a medical facility or aircraft, follow the instructions
of local personnel and crew concerning use of such devices.
Do not use the product in an area where use of such devices is prohibited.
Electromagnetic waves and other signals emitted by this product may affect
measuring instruments and create the risk of accident.
Do not use the product in the vicinity of high-precision electronic equipment or
any electronic equipment that handles weak signals.
Doing so can cause misoperation and other problems in the electronic equipment,
and creates the risk of accident.
Keep this product away from the chest area of any individual fitted with a
cardiac pacemaker.
Cardiac pacemakers and similar devices can be affected by electromagnetism.
Should anyone fitted with a cardiac pacemaker or other medical device ever
experience any abnormality, move the product away and contact a physician.
Microwave Ovens
Do not affix labels to any container that will be used for heating in a
microwave oven.
The label material includes metal fragments. Heating in a microwave oven creates
the risk of fire and burn injury. It can also cause deformation of the container to
which the label is affixed.
8
9
Caution
Connections
Connect only specified devices and items to connectors.
Connecting to other devices and items creates the risk of fire and electric shock.
AC Adaptor
Observe the precautions below in order to avoid AC adaptor fire and electric
shock.
• Insert the power plug into the outlet as far as it will go.
• After use, unplug the power plug from the power outlet.
• When unplugging the power plug, do not pull on the power cord. Grasp the plug.
• If you do not plan to use the product for a long time, unplug from the power
outlet.
• At least once a year, unplug the power plug from the power outlet and use a dry
cloth to wipe away any dust buildup from the area between the prongs of the
plug.
• Do not use detergent when cleaning the power cord, especially the power plug
and jack parts.
Auto Tape Cutter
Do not touch the areas around the print head and the travel path of the tape
during printing or when you turn on power.
The auto tape cutter operates during these operations, creating the risk of cut injury.
High Temperature Warning
Avoid touching the print head and the metal parts around it, all of which can
become very hot.
Doing so creates the risk of burn injury.
B

8
9
Precautions During Use
To ensure that your printer provides you with the many years of operation for which it is
designed, be sure to note the important precautions described below.
• Avoid using the printer in any location where any of the following is present: exposure
to direct sunlight, high humidity, static electric charge, extreme temperature
fluctuations, extreme temperatures. The operating temperature range of the printer is:
10°C to 35°C (50°F to 95°F).
• Do not subject the printer to strong impact.
• Do not allow paper clips or pins to get into the printer.
• Do not forcibly pull tape out of or push it back into the printer.
• Avoid allowing tape cuttings to accumulate around the printer tape outlet. Printing a
continuous series of multiple labels can cause printed tape to pile up at the tape outlet,
and/or tape cuttings to accumulate around the tape outlet or get inside the printer. Such
conditions can cause errors, interfere with proper tape cutting, or other malfunctions.
Use tweezers or a cotton swab to remove tape cuttings as required.
• Dirt or other foreign matter adhering to the printer head can cause horizontal stripes of
missing dots on printed tapes. If this happens, clean the print head and the rubber roller
as described under “User Maintenance” (page 32).
• Using the printer in a location exposed to strong direct sunlight can cause malfunction
of the printer’s internal light sensor, resulting in display of error messages.
• In order to ensure best printer function and stability, always use only genuine CASIO
tape cartridges. Use of a non-CASIO tape cartridge can harm your printer, result in poor
printing quality, and cause other problems that can permanently affect the printer’s
ability to perform at the level for which it was designed. Also note that problems caused
by use of a non-CASIO tape cartridge are not covered by the printer’s warranty, so any
charges required for servicing and repair must be borne by you.
Precautions when Using Wireless LAN
• Check to make sure that there are no other wireless network devices in use nearby
before using this printer’s wireless LAN function.
• Maintain a distance of at least two meters between the printer and other devices
(electrical appliances, audio/visual equipment, office equipment, digital cordless
telephones, fax machines, etc.) whenever performing wireless LAN data
communication. In the case of a microwave oven, maintain a distance of at least three
meters. Locating the printer too close to such a device while the device is turned on
can cause data communication problems, TV or radio static or interference, or other
problems. It can also cause distortion of UHF and broadcast satellite television images
on certain channels.
• If data communication is not possible when located close to a broadcasting station,
wireless device, or other similar equipment, move the printer to another location and try
again. Proper data communication may not be possible in a location where strong radio
waves are present.

10
11
• If you experience problems or have any concerns about radio interference, contact your
original retailer or a CASIO service center.
• This device is subject to the Export Administration Regulations (EAR) of the United
States, and so it cannot be exported to or brought into countries that fall under U.S.
Embargoes and Other Special Controls.
Note that CASIO COMPUTER CO., LTD. shall not be held liable for any damages
or losses due to data or information theft that may occur during wireless LAN
data communication.
Personal Information
• Personal information is name, address, phone number, and date of birth information
that can be used to identify a particular individual.
10
11
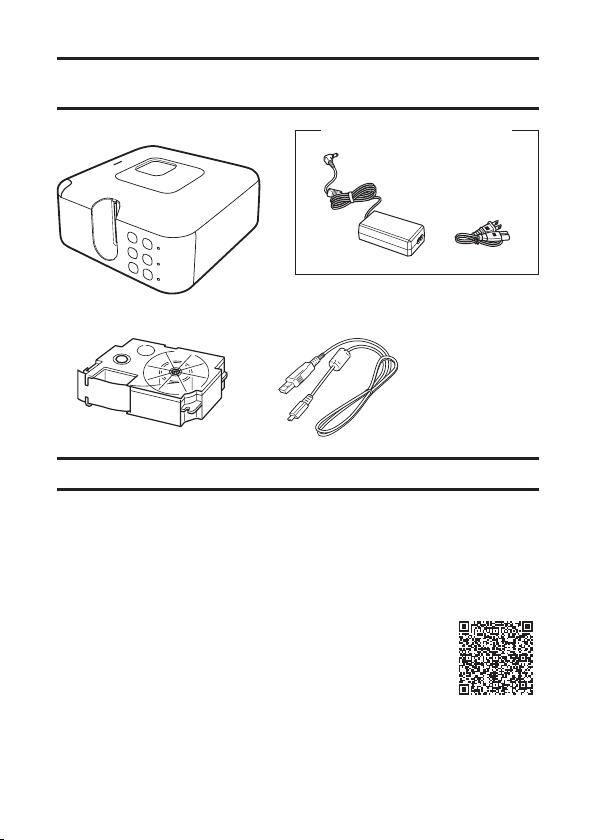
Check to make sure that everything has been
included with the printer.
Label printer AD-1824L AC adaptor (with power cord)
Tape cartridge (18 mm wide)
USB cable KL-P350W
Quick Start Guide
The shape of the
power cord plug varies
according to country or
geographic area.
Read this before using the printer!
Printer User Documentation
This section explains the user documentation required for using this printer.
Printed Documentation
KL-P350W Quick Start Guide
Download Documentation
KL-P350W User’s Guide (This manual)
Go to the site at the URL below and download the user
documentation to your computer or phone.
https://support.casio.com/global/en/d-stationery/model/KL-P350W/

12
13
Installing the Software
Use the LABEL DESIGN MAKER label printing software to create labels for this printer.
At the website below, you can select either “For a computer” or “For a phone”. On the
page that appears, download and install LABEL DESIGN MAKER.
Download LABEL DESIGN MAKER here:
https://labeldesignmaker.casio.jp
• For information about supported operating systems, versions, and other running
environment details, refer to the above download page.
14
15
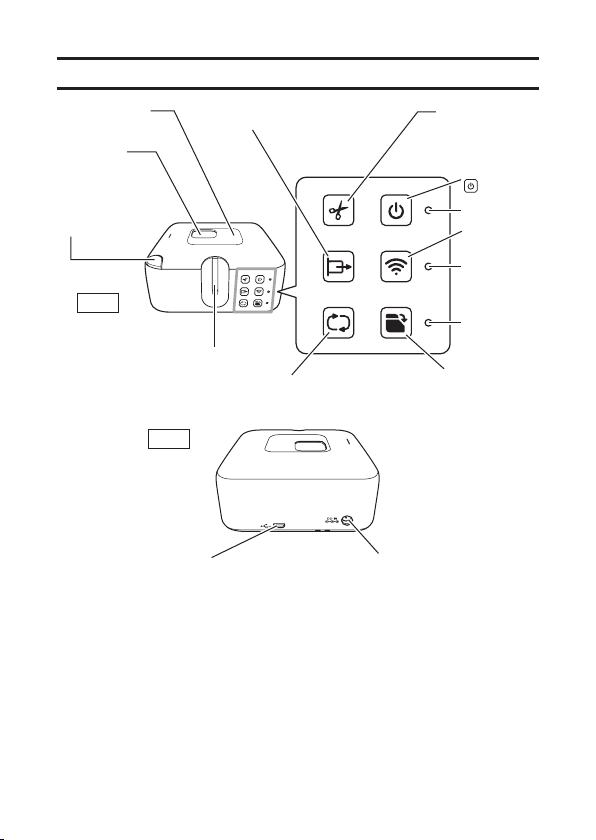
Names of Parts and Their Functions
USB port
Plug in a USB cable when
connecting to a computer.
AC adaptor connection
terminal
Connect the specified AC
adaptor.
Remaining tape window
(tape window)
Tape outlet
Power lamp
Wireless LAN
key
Wireless LAN
lamp
Status lamp
Memory print key
Press to register or
print created data.
Tape compartment
Tape cartridge
cover open
button
Cut key
Press to cut the tape.
Feed key
Press to feed the tape.
ON/Stand-by
key
Re-print key
Press to re-print.
Front
Back

14
15
Turning Power On and Off
Use the procedures below to turn power on or off.
To turn on power
Press . This will turn on power and cause the power lamp to light green.
• Before turning on power, connect the supplied AC adaptor and power cord to the
printer. For information about connections, refer to steps 2 through 4 under
“Connecting with a USB Cable (Computer Only)” (page 21)
To turn off power
Press . This will turn off power and cause the power lamp to go out.
Sleep State (Network Standby)
If the printer is connected to a computer over a USB or wireless LAN connection, it will
automatically enter a sleep state after about six minutes of non-operation. This will cause
the power lamp color to change from green to orange. This indicates that the printer is in
network standby.
When a print operation is executed on the computer, the printer will automatically recover
and start printing.
• Auto Power off does not work while the printer is in network standby.
Auto Power Off
If the printer is not connected to a computer over a USB or wireless LAN connection,
Auto Power Off will turn off printer power after about six minutes of non operation.
When you need to use the printer again, press
.
16
17
Loading and Removing a Tape Cartridge
A tape cartridge must be loaded in the printer in order to print a label.
A tape cartridge comes with the printer, and there are various types of tape cartridges that
are also available separately.
• This printer supports the following tape widths: 6 mm, 9 mm, 12 mm, 18 mm, 24 mm.
Important!
• When replacing the tape cartridge, position the printer with the tape window facing
upwards.
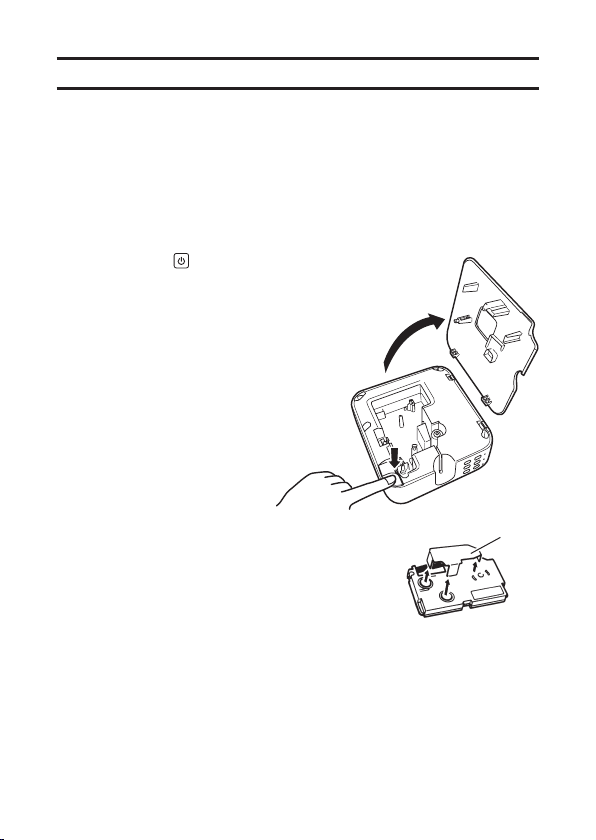
To load a tape cartridge
1. Press the printer’s to turn off power.
2. Positioning the printer with the tape window
facing upwards, press the tape cartridge
cover open button and open the cover.
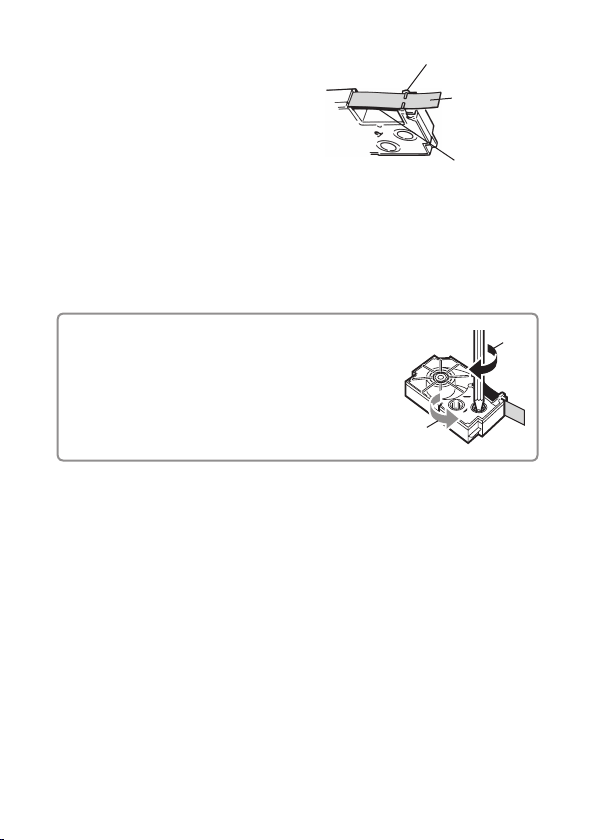
3. Remove the stopper attached to the tape
cartridge.
Important!
• When removing the stopper, carefully and slowly raise it straight upwards. Pulling on
the stopper with strong force can cause the stopper to break and leave part it inside
one of the tape wheels, which can cause tape rotation problems and faulty printing.
Stopper
16
17
4. Check the condition of the tape and the ink
ribbon.
• Make sure the leading end of the tape is
not bent. If it is, use scissors to trim off the
bent part.
• Make sure the leading end of the tape is
passing through the tape guide.
• Make sure there is no slack in the ink
ribbon.
Important!
• Tape once pulled out of the cartridge cannot be pushed back in.
• Do not apply excessive force when pulling on the tape. Doing so can break or
otherwise damage the ink ribbon.
• Loading a tape cartridge whose ink ribbon is slack can cause cutting of the ink
ribbon and other malfunction.
Take up any slack in the ink ribbon.
If there is slack in the ink ribbon, insert a pencil or
similar object into the upper right wheel (“a” in the
nearby illustration) and rotate in the direction indicated
by the arrow. Rotate until the lower left wheel (“b” in
the illustration) starts to rotate.
Note that the tape does not move along with the ink
ribbon at this time.
a
b
Tape
(
Pull out about 3cm.
)
Ink ribbon
(under the tape)
Tape guide
18
19
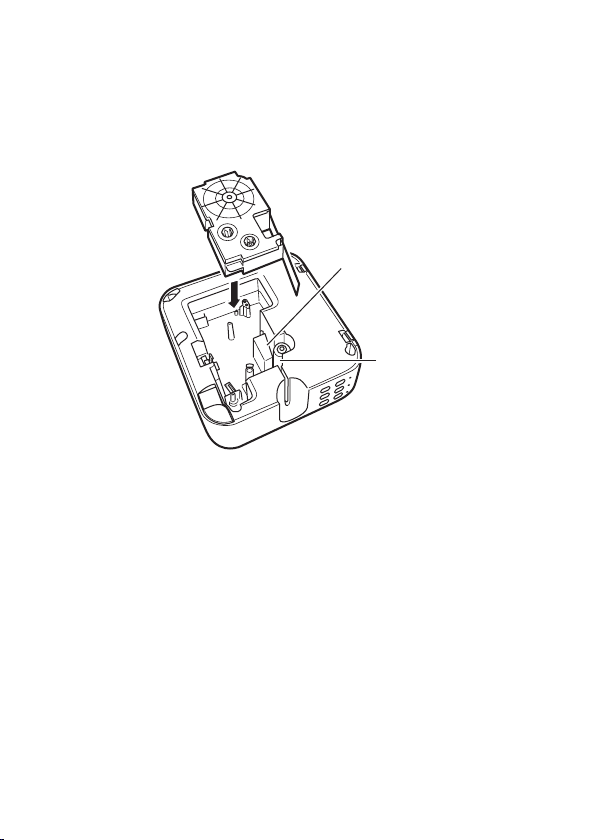
5. Set the tape cartridge in place.
Taking care not to pull on the ink ribbon, pass the tape and ink ribbon between the
print head and the rubber roller (illustration below). Press down on the tape cartridge
until it clicks securely into place.
Important!
• An improperly loaded tape cartridge can cause the ribbon to break.
Print head
Rubber roller
18
19
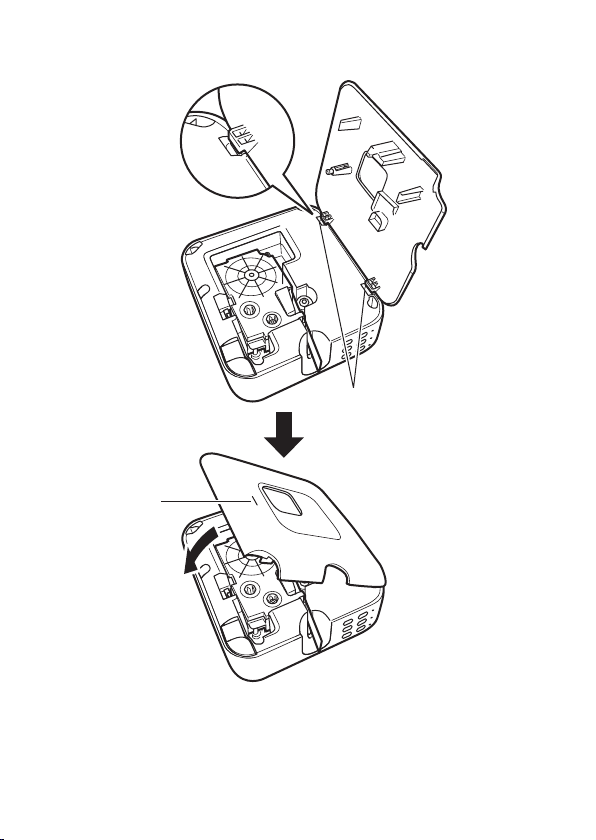
6. Attach and close the tape compartment cover.
a
b
• Hook the hinges of the cover onto the printer at the two points marked “a” in the
illustration and then close the cover. Press down at point “b” in the illustration until
the cover clicks securely into place.
• Do not pull the tape with excessive force or try to force tape back in while the tape
cartridge is loaded in the printer.
20
21
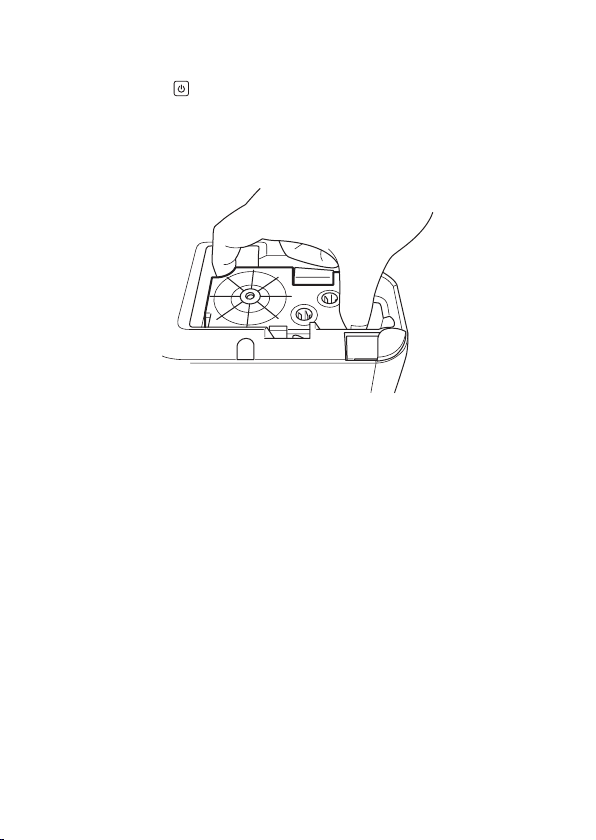
To remove a tape cartridge
1. Press the printer’s to turn off power.
2. Press the tape cartridge cover open button and remove the tape compartment cover.
3. Remove the tape cartridge from the printer.
• The print head is hot immediately after printing, so wait until it is cooled down before
removing the tape cartridge.
20
21
Connecting with the USB Cable (Computer Only)
Important!
• Do not connect the printer to a computer that does not have LABEL DESIGN MAKER
installed. Install LABEL DESIGN MAKER first and then connect.
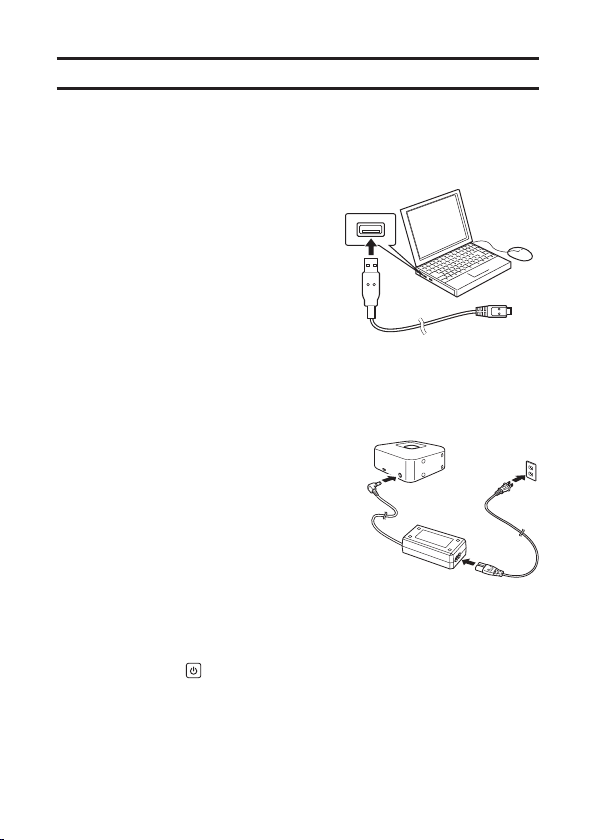
To connect
1. Start up the computer and then connect the
supplied USB cable to a USB port on the
computer.
Important!
• Be sure to plug the cable directly into the computer’s USB port. Proper operation is
not guaranteed when the cable is connected to a USB port of another device.
Compatibility issues may result in the printer not being recognized by your computer
when you connect to one of its USB ports. If this happens, try changing to a
different computer USB port.
2. Plug the AC adaptor plug into the AC adaptor
connection terminal of the printer.
3. Connect the power cord to the AC adaptor.
4. Plug the power cord into a household power
outlet.
Important!
• Be sure to plug the power cord into a
normal household power outlet.
• Use only the AC adaptor specified for this
printer.
• Do not use the power cord that comes with
the printer with any other device.
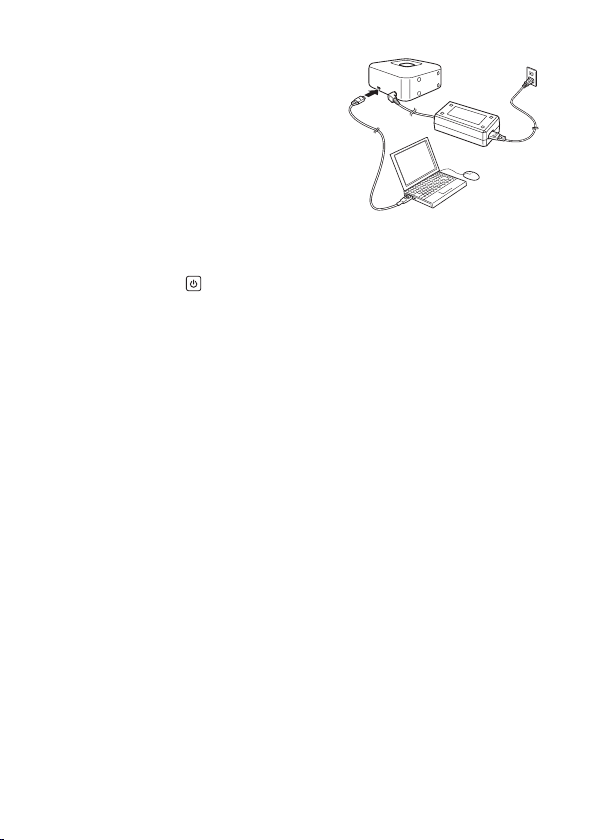
5. On the printer, press to turn on power.
1
2
3
4
22
23
6. Connect the USB cable to the printer’s USB
port.
Important!
• Wireless LAN and USB operation cannot be
performed at the same time.
To disconnect
1. On the printer, press to turn off power.
2. Disconnect the USB cable from the computer.
3. Unplug the power cord from the power outlet and then disconnect it from the printer.
Important!
• Do not disconnect the AC adaptor or USB cable from the printer while printing is in
progress. Doing so can lead to malfunction.
• Do not touch the AC adaptor plugs and USB cable plugs while a data
communication operation is in progress. Static electricity and other problems can
interrupt data communication.
6
22
23
Connecting Over a Wireless LAN
In addition to connection with a computer using a USB cable, your printer can also
connect with a computer or phone over a wireless LAN.
Wireless LAN Mode
The wireless LAN function of the printer has a Client mode and an Access Point mode.
• Network communication (mail send/receive, etc.) is not possible during Access Point
mode connection, so Client mode connection is recommended.
• If the printer already has a wired LAN connection, terminate the wired LAN connection
before attempting to establish a wireless LAN connection. You will not be able to
connect over a wireless LAN if there is an existing wired LAN connection.
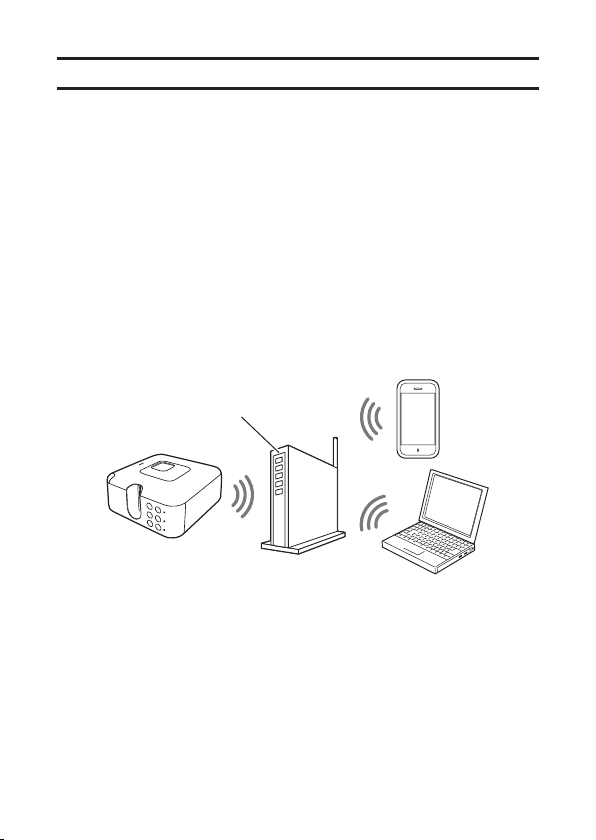
Client Mode
In this mode, the printer functions as a network printer connected to a wireless LAN.
Since the printer operates as a client in this mode, a wireless LAN router or wireless LAN
access point is required for wireless connection.
This mode can be used for wireless connection with a computer, a phone, or other
device.
Wireless LAN router
24
25
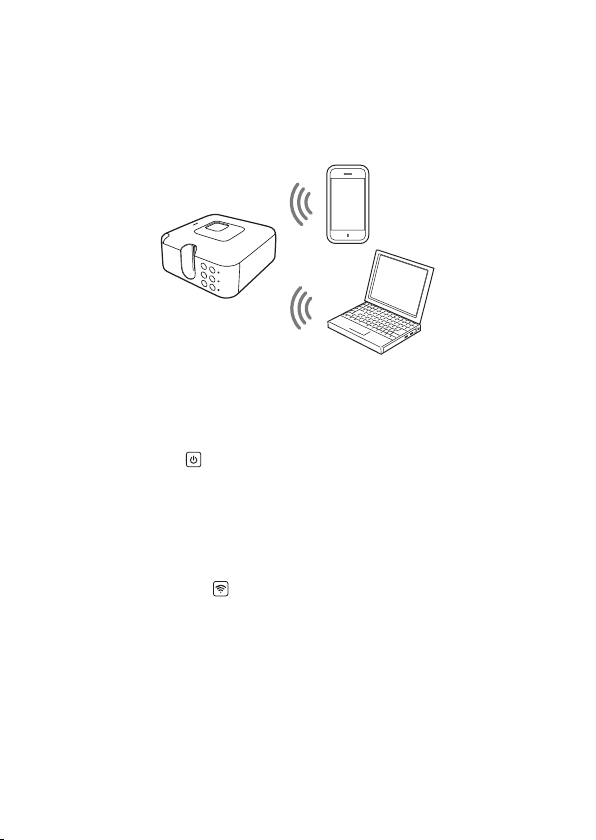
Access Point Mode
In this mode, you can establish a direct wireless LAN connection between the printer and
a computer or phone.
Since the printer functions as an access point, it can connect to another device even
when a wireless LAN router or another wireless LAN access point environment is not
available.
Getting Ready to Connect
1. Connect the AC adaptor and power cord to the printer.
• See steps 2 through 4 under “Connecting with the USB Cable (Computer Only)”
(page 21).
2. On the printer, press to turn on power.
Connecting to a Computer
Connecting with the Client Mode
In this mode, you can connect the printer as a client in the wireless LAN environment you
are using. You can connect the printer to a computer via a wireless LAN router or wireless
LAN access point.
1. On the printer, hold down for at least three seconds.
• This puts the printer into simple connection standby, which is indicated by the
wireless LAN lamp flashing green, in two quick flash bursts (page 35).
2. Within about the next two minutes, press the WPS (Wi-Fi Protected Setup) button of
the wireless LAN router/access point you are using.
• This puts the wireless LAN router/access point into WPS standby.
• For details about WPS button operation and other information, refer to the user
documentation for the wireless LAN router/access point you are using.
• When a connection is established, the printer’s wireless LAN lamp lights green.
• To configure settings manually, perform the following operation on your computer
with LABEL DESIGN MAKER: Settings - Wireless LAN settings - Select connect
device. Next, configure the settings that appear.

24
25
Connecting with the Access Point Mode
In this mode, you can establish a direct wireless LAN connection with a computer.
Since the printer functions as an access point, it can connect to another device even
when a wireless LAN environment is not available.
You should be able to connect with the Access Point Mode under initial default settings.
1. On the printer, press to turn on wireless LAN.
• This causes the wireless LAN lamp to flash green (page 35).
2. On your computer, configure the settings required to make the printer the wireless LAN
access point.
• KL-P350W SSID (initial default): CASIO KLPC18 AP
• If your phone does not display the SSID, initialize printer settings (page 26).
• When a connection is established, the printer’s wireless LAN lamp lights green.
• You can change the passphrase and other wireless LAN settings as required. On
your computer, use LABEL DESIGN MAKER to configure the following setting:
Settings - Wireless LAN settings - Access point connect.
Connecting to a Phone
Connecting with the Client Mode
In this mode, you can connect the printer as a client in the wireless LAN environment you
are using. You can connect the printer to a phone via a wireless LAN router or wireless
LAN access point.
1. Connect the printer to the wireless LAN router you are using.
• For details about how to connect, see steps 1 to 2 under “Connecting to a
Computer” (page 24).
2. Use phone settings to specify the router you are using as the wireless LAN access
point.
3. With the LABEL DESIGN MAKER phone app Print Settings, specify the printer to be
connected.
• KL-P350W Printer Name (initial default): My CASIO PC LABEL PRINTER 18
Connecting with the Access Point Mode
In this mode, you can establish a direct wireless LAN connection with a phone.
Since the printer functions as an access point, it can connect to another device even
when a wireless LAN environment is not available.
You should be able to connect with the Access Point Mode under initial default settings.
1. On the printer, press to turn on wireless LAN.
• This causes the wireless LAN lamp to flash green.
2. Use phone settings to specify the printer as the wireless LAN access point.
• KL-P350W SSID (initial default): CASIO KLPC18 AP
• If your phone does not display the SSID, initialize printer settings (page 26).
• When a connection is established, the printer’s wireless LAN lamp lights green.

26
27
3. With the LABEL DESIGN MAKER phone app Print Settings, specify the printer to be
connected.
• KL-P350W Printer Name (initial default): My CASIO PC LABEL PRINTER 18
Initializing Printer Settings
Use the procedure below to return the printer to its initial factory default setup.
Important!
• Note that initializing settings will delete all setting information currently registered on the
printer.
- Wireless LAN setting information
- Reprint data stored in printer memory (page 30)
- Memory Print data stored in printer memory (page 30)
• Initialization cannot be performed while printing is in progress.
1. With printer power turned on, hold down for at least seven seconds until the power
lamp and wireless LAN lamp start to flash alternately between green and orange.
When initialization is complete, the power lamp will light green and the wireless LAN lamp
will go out.
Printing a Label
Use LABEL DESIGN MAKER to create and print labels.
• The LABEL DESIGN MAKER phone app does not support magnetic tape printing.
•
If magnetic tape is loaded in the printer, use the LABEL DESIGN MAKER computer
software for printing and put the printer in the Magnetic Tape mode for printing. (page 29)
• If reflective tape, iron on tape, or heat-shrinkable tubing is loaded in the printer, make
sure that No Cut is specified for Cut Style. (page 27)
• Your printer includes a Reprint feature that lets you re-print the last label you printed,
and a Memory Print feature that prints label data you stored in printer memory. For
details about these features, see “Printing Label Data From Printer Memory” (page 30).
Important!
• Do not touch the tape coming out of the printer until it is automatically cut or until
printing is complete.
• To avoid running out of tape during long label printing, continuous label printing or other
similar printing operations, check beforehand to ensure that the tape cartridge being
used has sufficient tape remaining. If a cartridge runs out of tape, do not leave it in the
printer. Replace it with a new one.
• Avoid allowing tape cuttings to accumulate around the tape outlet. Printing a continuous
series of multiple labels can result in printed tape to pile up at the tape outlet, and/or in
tape cuttings to accumulate around the tape outlet or get pushed back into the printer.
Such conditions can cause errors, interfere with proper tape cutting, or cause other
malfunctions. Use tweezers or a cotton swab to remove tape cuttings as required.
• Be sure to take necessary data security measures whenever using LABEL DESIGN
MAKER to create labels that include names, addresses, and other personal information.

26
27
Stopping a Print Operation
To interrupt an ongoing print operation, press .
• After printing stops, cut the tape manually. For information about how to cut tape, see
“Cutting the Tape”.
Feeding the Tape
You can perform a tape feed operation either before or after printing.
1. Press .
• This will feed the tape by a fixed amount.
Cutting the Tape
Normally, the printer will cut the tape automatically after printing is complete. You can
also cut the tape manually as required.
1. Press .
• This feeds the tape a fixed amount and then cuts it.
Important!
• Depending on the type of tape you are printing, use of the cutter can cause cutter
wear and malfunction. When printing on the tape types listed below, make sure that
No Cut is specified for Cut Style.
- Reflective tape
- Iron on tape
- Heat-shrinkable tubing
After printing is complete, press
to feed the tape and then use scissors to cut it.
28
29
Affixing a Label to a Surface
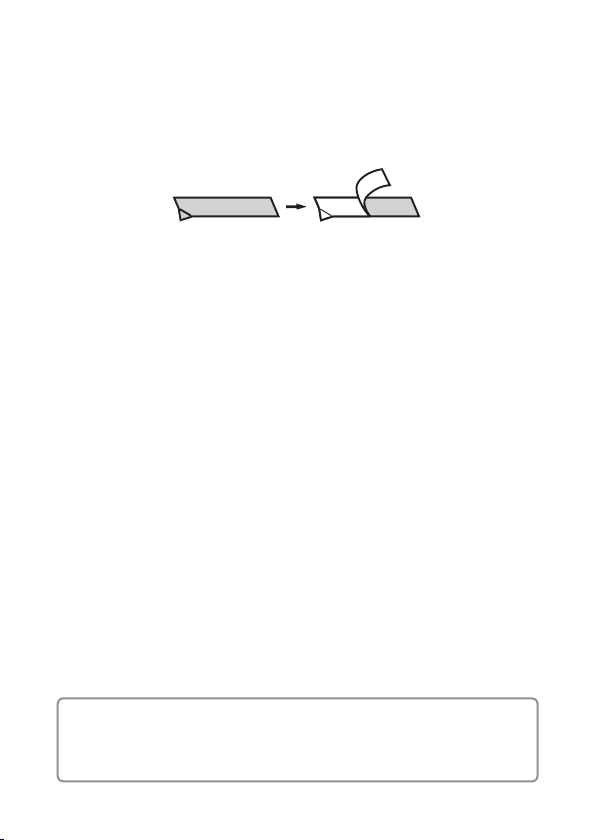
1. If required, use scissors or some other implement to trim the label to the desired size
or shape.
2. Peel off the backing of the label and affix the label to the desired surface.
• Bending a corner of the label makes the backing easier to peel off.
HAPPY!
PPY!
• Removing a label from a surface where it was affixed may cause adhesive residue to
remain on the surface.
Important!
Do not try to affix a label to the objects or at the locations described below.
• On a surface exposed to direct sunlight or rain
• On the body of a person or animal
• On a utility pole, on a fence or structure not owned by you, etc.
• On a container used for heating in a microwave oven
Incompatible Surfaces
• Rough or grainy surfaces
• Wet, oily, dusty, or otherwise soiled surfaces
• Special plastic (silicon, polypropylene, etc.) surfaces
28
29
Print Modes (Computer Printing Only)
You can select either of the following print modes: Normal Print, Magnetic Tape. Select
the print mode on the LABEL DESIGN MAKER setting screen.
• Normally, you should use the Normal Print mode.
Printing on Magnetic Tape
• Use the LABEL DESIGN MAKER label printing software. The LABEL DESIGN MAKER
phone app does not support magnetic tape printing.
• Configure the following settings: Tape Size: 24 mm (16 mm), Print Mode: Magnetic
Tape.
• Normally use a print density setting of 3 when printing with the Magnetic Tape mode. If
printing is not clear at this setting, adjust print density as required.
• Note that selecting Magnetic Tape automatically disables auto cutting. After printing on
magnetic tape, feed the tape and then use scissors to cut it.
• Magnetic tape is made using special materials. Because of this, you may not be able to
achieve clear printing under low temperatures. Printing on magnetic tape in a location
where the temperature is 20°C or higher is recommended. Also make sure that the tape
has been in the location long enough to become acclimated.
Printing Consecutive Labels
Normally, the printer will cut the tape automatically after printing is complete. When you
start a new printing operation, the printer will first feed the tape a fixed amount, which
means that some tape is wasted. To eliminate this wasted tape, you can disable the tape
cut operation at the end of each label and have consecutive labels printed on a continual
piece of tape (Continual Printing). After printing of all the labels is complete, you press
to cut off the tape, and then separate the labels by cutting with scissors.
To enable continual printing, select the check box next to the Continual Print option on
the LABEL DESIGN MAKER setting screen.

30
31
Printing Label Data From Printer Memory
Your printer’s Reprint function and Memory Print function let you print label data from
printer memory.
Re-printing the Last Label Printed (Reprint)
Reprint lets you re-print the last label you printed.
You can re-print even when the printer is not connected to a computer or phone.
This comes in handy when you need one more copy of a label you just printed.
1. Press .
• This prints one copy of the last label that was printed.
• During printing, the status lamp flashes green.
• The print setup used is the same as the one in effect for the last label you printed.
Important!
• Even if you printed multiple copies of the last label, Reprint will print only one copy.
• Note that turning off printer power or initializing printer settings (page 26) will clear the
Reprint memory data, so re-printing of that data will not be possible.
• You can interrupt an on-going printing operation by pressing
. After printing stops,
cut the tape manually. (page 27)
Printing Data Stored in Printer Memory (Memory Print)
With Memory Print, you can store label data in printer memory and print it when needed.
You can perform Memory Printing even when the printer is not connected to a computer
or phone.
This feature comes in handy when you need to print certain data multiple times during the
day.
To store Memory Print data
1. Print the label whose data you want to store.

30
31
2. After printing is complete, hold down for at least three seconds. Release the key
when the status lamp lights green.
• The status lamp will remain lit for about one second, indicating that the Memory
Print data was saved.
• Memory Print data is not cleared if you turn off printer power or print a different
label. For information about how to delete Memory Print data, see “To delete
Memory Print Data” below.
Important!
• Data for only one label can be stored in printer memory. Storing data for a different
label will overwrite any Memory Print data currently in memory.
• You can interrupt an on-going printing operation by pressing
. After printing stops,
cut the tape manually. (page 27)
• Memory Print data will be viewable by third parties if your printer is ever stolen, if
you dispose of the printer, or if the printer is transferred to a third party by any other
means. Because of this, you should not leave personal information stored in printer
memory.
To print Memory Print data
1. Press .
• During printing, the status lamp flashes green.
• The print setup is the same as the one in effect for the print data you save. For
example, if you save data with Full Cut Only, printing the saved data will be
performed with Full Cut Only.
To delete Memory Print data
1. Turn printer power off and then back on again.
2. Hold down for at least three seconds.
• The status lamp will remain lit for about one second, indicating that the Memory
Print data was deleted.
• You can also clear Memory Print data by initializing the printer (page 26).

32
33
User Maintenance
A dirty print head or rubber roller will make proper label printing impossible. Perform the
procedure below to clean the print head and the rubber roller as required.
Using a Cotton Swab for Cleaning
Important!
Use a cotton swab or some other soft object to clean the print head and the rubber roller.
Use of a thin cotton swab is recommended.
1. Positioning the printer with the tape window facing upwards, press the tape cartridge
cover open button and open the cover.
• If a tape cartridge is loaded in the printer, remove it.
Important!
• The print head is hot during and immediately after printing, so wait until it is cooled
down before removing the tape cartridge.
2. Use a cotton swab moistened with alcohol to wipe the surfaces of the print head and
rubber roller.
Focus your wiping in the brown area (bounded by the dotted lines in the illustration)
where the print head contacts the rubber roller.
Print head Rubber roller
• You can rotate the rubber roller by pressing .
Cleaning the Exterior of the Printer
Use a soft cloth moistened with water to clean the exterior of the printer. Be sure to
completely wring out all excess liquid from the cloth before wiping. Never use
benzene, alcohol, thinner, or other volatile agents, which can damage the printer.
32
33
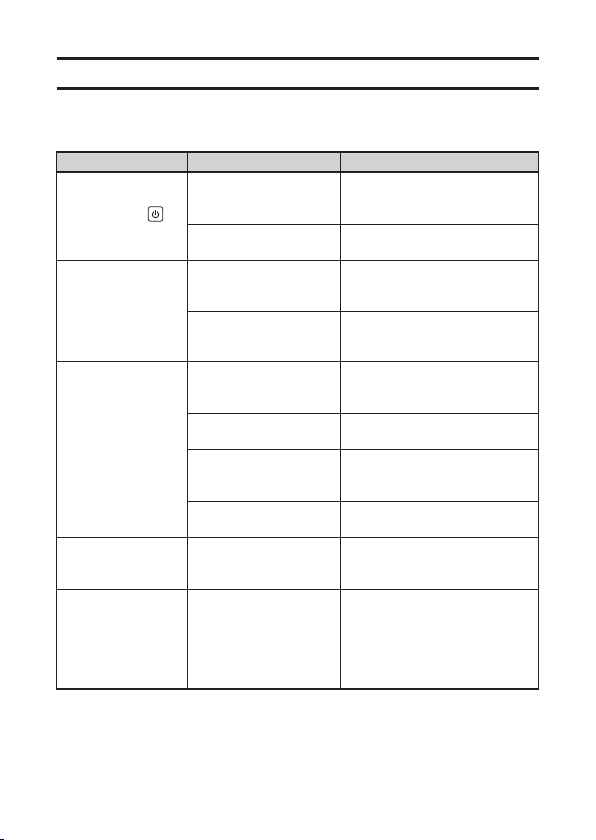
Troubleshooting
This section explains reference information that comes in handy when you experience
problems with printer operation. If, for any reason, you cannot find the solution to your
problem here, contact your original retailer or a CASIO service center.
Symptom Possible Cause Required Action
The power lamp
does not light
when I press
.
The AC adaptor and
power cord are not
connected securely.
Correctly connect the AC adaptor
and power cord. (page 21)
You are using the wrong
type of AC adaptor.
Use the specified AC adaptor.
A print operation
seems normal,
but nothing was
printed.
The cartridge is out of
tape.
Replace the tape cartridge with a
new one.
Only spaces are input. Input the text you want to print.
Printing is unclear.
Printout is dirty.
Printing is light.
Dirt, dust, or other foreign
matter is on the print head
and/or the rubber roller.
Clean the printer. (page 32)
The tape is not loaded
correctly.
Remove the tape cartridge and
correctly reload it.
There is slack in the ink
ribbon.
Take up ink ribbon slack and
correctly re-load the tape
cartridge. (page 16)
The print density setting is
not correct.
Adjust print density.
Nothing prints.
Power turned off
during printing.
You are using the wrong
type of AC adaptor.
Use the specified AC adaptor.
Ink ribbon is
coming out of the
tape outlet along
with the tape.
The tape cartridge was
loaded while there was
slack in the ink ribbon.
Remove the tape cartridge from
the printer. After checking to make
sure the ink ribbon is not broken,
take up any slack in it. Next,
reload the cassette back into the
printer. (page 16)
34
35
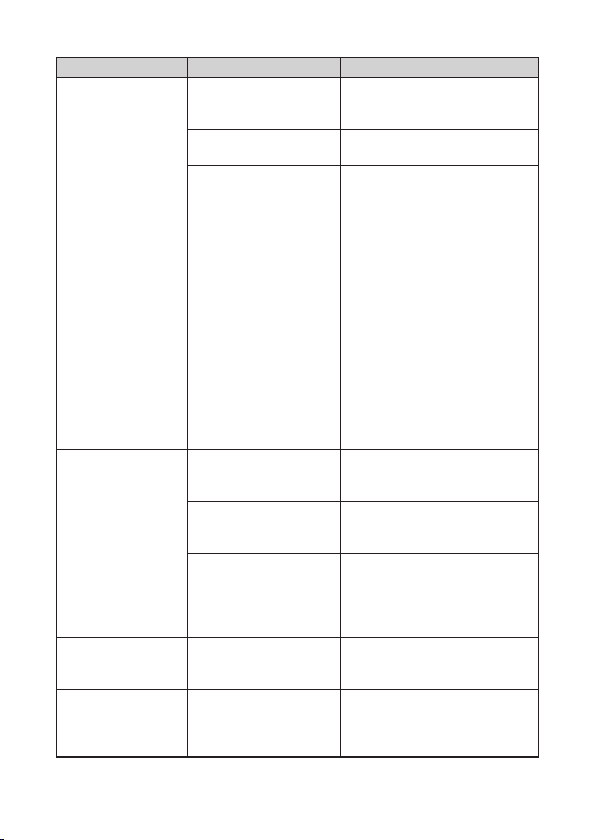
Symptom Possible Cause Required Action
No tape comes out
when I try to print.
The tape compartment
cover is not closed
securely.
Close the cover securely.
The cartridge is out of
tape.
Replace the tape cartridge with a
new one (sold separately).
Tape is jammed. Remove the tape cartridge from
the printer and pull out the
jammed tape with your fingers.
Use scissors to trim off the tape
you pulled out. Next, correctly
load the cartridge back into the
printer.
Important!
Note the following while printing is in
progress.
• Do not allow the tape outlet to
become blocked.
• Do not touch the tape coming
out of the printer.
• Do not open the printer cover.
• Do not disconnect the AC
adaptor.
The printer does
not cut the tape.
Tape is jammed in the
tape outlet.
Turn off power, remove the tape
cartridge, and clear the jammed
tape.
The tape cutter is dull. Contact your original retailer or a
CASIO Service Center for
replacement.
Magnetic Tape is
selected for the print
mode.
Note that selecting Magnetic
Tape automatically disables auto
cutting. After printing on magnetic
tape, feed the tape and then use
scissors to cut it. (page 29)
The label does
not stick to the
intended surface.
The surface or object is
inappropriate.
A label cannot be affixed to a
surface that is rough, wet, oily,
dirty, etc. (page 28)
Tape margins are
too big.
The print format margin
setting is Large or
Medium.
Change the setting to Small. Note
that the printer is designed to print
labels with a leading margin at the
beginning.
34
35
Symptom Possible Cause Required Action
I cannot connect
using wireless LAN.
• There is a problem with
the wireless LAN
settings.
• You forgot the
password.
Initialize printer settings,
reconfigure wireless LAN settings,
and then try connecting again.
(page 26)
The Printer not
found. error
message is
displayed.
Noise or some other
problem caused wireless
LAN communication to
time out.
Use the printer’s to turn power
off and then back on again. Next,
try establishing a wireless LAN
connection again.
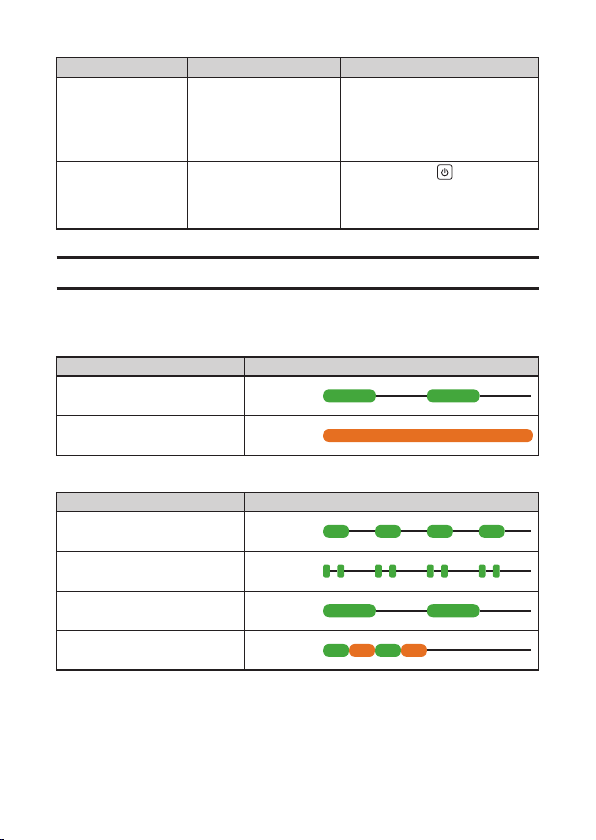
Lamp and Printer Status
The current status of the printer is indicated by the lamp light and flash patterns shown
below.
Power Lamp
Unit Status Lamp Light/Flash Pattern
USB communication, printing
(feeding, cutting) in progress
Green
Sleep state
Orange
Wireless LAN Lamp
Unit Status Lamp Light/Flash Pattern
Connecting to a wireless LAN
Green
Simple connection standby
Green
Wireless LAN communication/
printing in progress
Green
Initializing
Green/orange
36
37
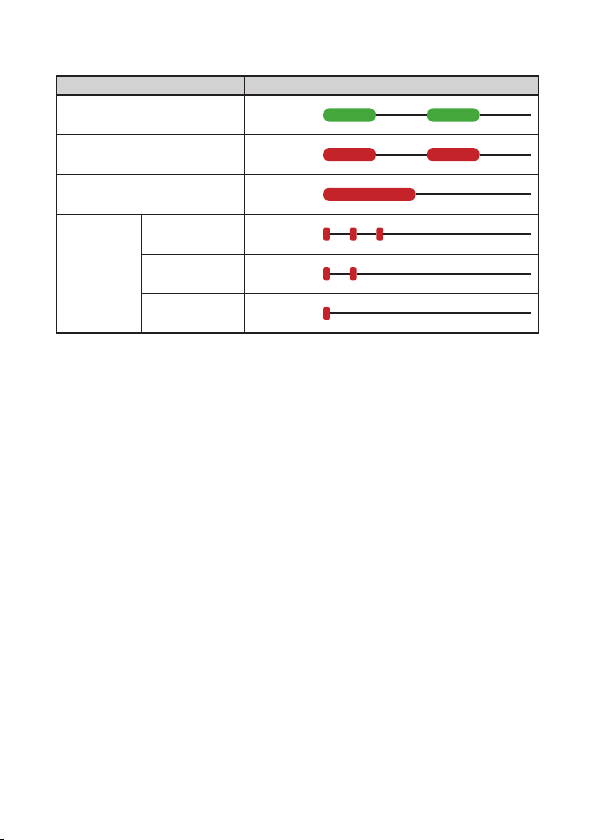
Status Lamp
Unit Status Lamp Light/Flash Pattern
Reprint or Memory Print
operation in progress
Green
Tape jam
Red
Printing stopped, no Reprint
data, data save failed
Red
Wrong tape
cartridge
loaded
Load 18 mm or
24 mm tape.
Red
Load 9 mm or
12 mm tape.
Red
Load 6 mm
tape.
Red

36
37
Specifications
Model Name: KL-P350W
Printing
Printing resolution: 200 dpi
Printing method: Thermal transfer
Printing speed: 20 mm per second maximum (6 to 18 mm wide tape
printing)
10 mm per second maximum (24 mm wide tape printing)
5 mm per second maximum (magnetic tape printing)*
• Printing speed depends on the printing environment, printing conditions, etc.
Maximum print width: Approximately 18 mm
4 mm (Tape width: 6 mm)
7 mm (Tape width: 9 mm)
10 mm (Tape width: 12 mm)
16 mm (Tape width: 18 mm)
16 mm (Tape width: 24 mm, magnetic tape printing)*
18 mm (Tape width: 24 mm)
* The LABEL DESIGN MAKER phone app does not support magnetic tape printing.
Power Supply, Other
Power requirements: Specified AC adaptor (AD-1824L, included)
Rated voltage: 18.8 V DC
Rated consumption current:
800 mA (15 W)
Auto Power Off: Approximately 6 minutes
Dimensions: 61 (H) × 131.7 (W) × 136 (D) mm (2
3
/
8
"H × 5
3
/
16
"W ×
5
3
/
8
"D) (including feet)
Weight: Approximately 495 g (17.5 oz)
Operating temperature: 10°C to 35°C
Wireless LAN Specifications
Wireless standard: IEEE 802.11b/g/n (2.4 GHz)
Transmission method: OFDM modulation, DSSS modulation
AC adaptor (AD-1824L)
INPUT: AC 100 to 240V, 50/60Hz, 1.1A
OUTPUT: DC 18.8V, 2.4A, 45.12W
Average active efficiency: 87.73 (%)
Efficiency at low load (10 %): 83.5 (%)
No-load power consumption: 0.10 (W)
C

CASIO COMPUTER CO., LTD.
6-2, Hon-machi 1-chome
Shibuya-ku, Tokyo 151-8543, Japan

