
Loading ...
Loading ...
Loading ...
Cleaning
WARNING: Blow dirt and dust out of all air vents with clean, dry air
at least once a week. To minimize the risk of eye injury, always wear
ANSI Z87.1 approved eye protection when performing this.
WARNING: Never use solvents or other harsh chemicals for
cleaning the non-metallic parts of the tool. These chemicals may
weaken the plastic materials used in these parts. Use a cloth
dampened only with water and mild soap. Never let any liquid get
inside the tool; never immerse any part of the tool into a liquid.
BATTERY CLEANING INSTRUCTIONS
Dirt and grease may be removed from the exterior of the battery using
a cloth or soft non-metallic brush. Do not use water or any cleaning
solutions.
WARNING: Never use solvents or other harsh chemicals for
cleaning the battery. These chemicals may weaken the plastic parts.
CHARGER CLEANING INSTRUCTIONS
WARNING: Shock hazard. Disconnect the charger from the AC
outlet before cleaning. Dirt and grease may be removed from the
exterior of the charger using a cloth or soft non-metallic brush. Do not
use water or any cleaning solutions.
WARNING: Never use solvents or other harsh chemicals for
cleaning the charger. These chemicals may weaken the plastic parts.
CLEANING CONTAMINANTS FROM THE GREASE GUN
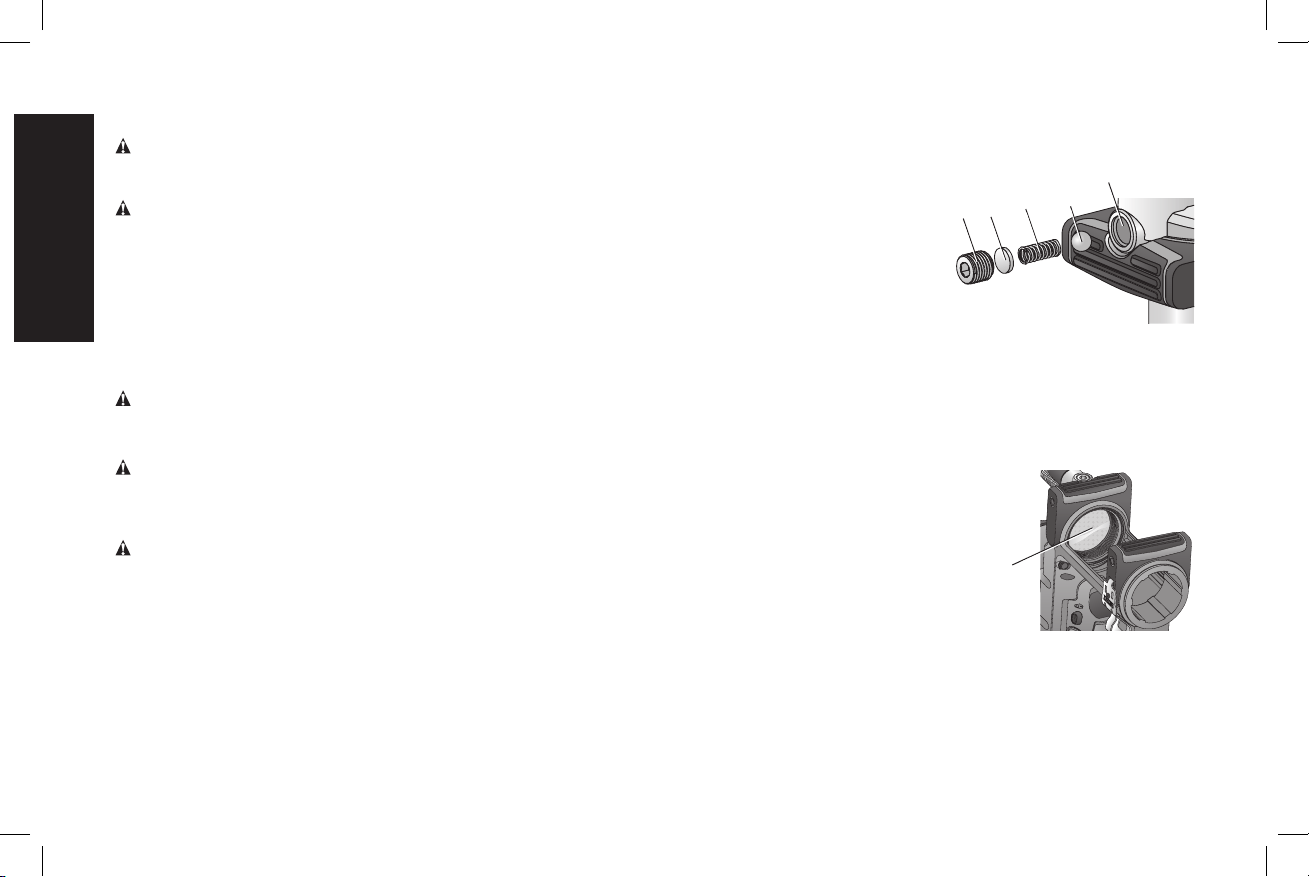
Cleaning Contamination from the Check Valve (Fig.12)
Should the grease gun fail to
FIG. 12
CC
DD
EE
BB
Y
dispense grease, the check valve
(Y) should be cleaned.
1. Remove the check valve
plug (BB), then the disc (EE),
spring (DD) and check valve
ball (CC).
2. Clean the ball (CC) and the
check valve area in the main
casting.
3. Reinstall the ball (CC), the spring (DD), and then the disc (EE).
4. After all grease is cleaned from the area, reinstall the check valve
plug (BB).
Cleaning Contamination from the Filter (Fig. 2, 13)
Should the grease gun fail to dispense
FIG. 13
V
grease, clean the filter (V).
NOTE: If there is still grease in the tube,
open the purge valve prior to pulling the
tube handle.
1. Pull the grease tube handle (L) out
as far as it will go, then secure
the grease tube rod (M) into the
retaining slot (O) by moving the rod
to the side. Ensure the rod is placed
securely in the slot to prevent it from
disengaging.
2. Unscrew the grease tube assembly (N) from the grease gun and
remove.
3. Using a small flat-blade screwdriver or pick, carefully pop out the
filter.
English
16
Loading ...
Loading ...
Loading ...