
0
GEAppliances.com
C
I
Q_
0
-0
c-
E3
C
I
(1)
-0
OE
m
Lf3
C
OE
-0
C
E3
Or)
I
(D
LL
For a Spanish version of this
manual, visit our Website at
GEAppliances.com.
Para consultar una version
en espafiol de este manual de
instrucciones, visite nuestro sitio
de internet GEAppliances.com.
In Canada contact us at:
www.G EAppliances.ca
Safety Instructions ......... 2-6
Operating Instructions
Clock and Timer ................... 18
EnerggSaver Mode ...............20
Oven .......................... 11-24
Adjust the Oven Thermostat ..... 20
Broiling, Broiling Guide ........... 14
Controls ...................... 11, 12
Convection Oven ................. 15
Lower Oven Drawer .............. 17
Power Outage ................... 12
Sabbath Feature ................. 21
Self-Cleaning ................. 22, 23
Special Features ................. 20
Steam Cleaning .................. 24
Timed Baking .................... 19
Warming Drawer ................ 16
Surface Units ................... 7-10
Care and Cleaning
Coil Surface Units ................. 32
Control Knobs .................... 25
Drip Pans ......................... 32
Glass Cooktop ................ 30, 31
Lift-Off Oven Door ................ 27
Lift-Up Cooktop ................... 32
Light .............................. 29
Oven Heating Elements ........... 28
Rocks ............................. 28
Removable Lower Oven
Drawer Pan ....................... 26
Removable Worming
Drawer Pan ....................... 26
Standard-Cleon Oven Interior .... 26
Storage Drawer ................... 28
Vent .............................. 26
Troubleshooting Tips .... 33-36
Accessories .................... 37
Consumer Support
Consumer Support ...... Back Cover
Warrantg ......................... 39
Write the model and serial
numbers here:
Model #
Serial #
You can find them on a label
behind the drawer or behind the
lower oven door on the front of
the range frame.
Ouickset III and
Quickset IV Models
Printed on
Recgcled Paper
49-80591-105-09JR
IMPORTANT SAFETY INFORMATION.
READ ALL INSTRUCTIONS BEFORE USING.
i-4,WARNING i
Read all safety instructions before using the product. Failure to follow these instructions may result in fire, electric
shock, serious injury or death.
ANTI-TIP DEVICE
• All ronges con tip.
• BURNS or other SERIOUS
INJURIES can result.
• INSTALL and CHECK the
ANTI-TIP bracket following
the instructions supplied
with the bracket.
To reduce the risk of tipping the range, the range must
be secured by a properl_l installed anti-tip bracket. See
installation instructions shipped with the bracket for complete
details before attempting to install
For Freestanding Ranges:
To check ff the bracket is installed and engaged properly,
remove the storage drawer or kick panel and look underneath
the range to see that the leveling leg is engaged in the
bracket. On models without a storage drawer or kick panel,
carefully tip the range forward. The bracket should stop the
range within 4 inches. If it does not, the bracket must be
reinstalled. If the range is pulled from the wall for any reason,
always repeat this procedure to verify the range is properly
secured by the anti-tip bracket.
Never completely remove the leveling legs or the range will
not be secured to the anti-tip device properly.
For Slide-In Ranges:
To check if the bracket is installed and engaged properly,
remove the storage drawer or kick panel and look
underneath the range to see that the leveling leg is engaged
in the bracket.
For Drop-In Ranges:
To check if the bracket is installed and engaged properly,
lower the oven door and gently apply medium force at
the handle end until movement of the range is detected.
Continue pressing until the anti-tip bracket is engaged
and movement stops. A small amount of movement is
acceptable at the back of the range top, but it should be
stable and not tip once the anti-tip bracket is engaged.
If it does not, the bracket must be reinstalled.
If you did not receive an anti-tip bracket with your purchase,
call 1.800.626.8774 to receive one at no cost (in Canada, call
1.800.561.3Bq4). For installation instructions of the bracket,
visit GEAppliances.com (in Canada, GEAppliances.ca).
i-& WARNING ] IMPORTANTSAFETYNOTICE
The California Safe Drinking Water and Toxic Enforcement Act requires the Governor of California to publish a list
of substances known to the state to cause cancer, birth defects or other reproductive harm, and requires
businesses to warn customers of potential exposure to such substances.
The fiberglass insulation in self-clean ovens gives off a very small amount of carbon monoxide during the cleaning
cycle. Exposure can be minimized by venting with an open window or using a ventilation fan or hood.
2
GEAppliances.com
[-&WARNING ] GENERALSAFETYINSTRUCTIONS
Use this appliance for its intended purpose as
described in this Owner's Manual.
Be sure your appliance is properly installed and
grounded by a qualified installer in accordance with
the provided installation instructions.
_::Do not attempt to repair or replace any part of your
range unless it is specifically recommended in this
manual. All other servicing should be referred to
a qualified technician.
Before performing any service, unplug the range
or disconnect the power supply at the household
distribution panel by removing the fuse or switching
off the circuit breaker.
Do not leave children alone-children should not
be left alone or unattended in an area where an
appliance is in use. They should never be allowed
to climb, sit or stand on any part of the appliance.
CAUTION : Do not store items of interest to
children above a range or on the backguard of a
range-children climbing on the range to reach
items could be seriously injured.
_::Use only dry pot holders-moist or damp pot
holders on hot surfaces may result in burns from
steam. Do not let pot holders touch hot surface
units or heating elements. Do not use a towel or
other bulky cloth in place of pot holders.
Never use your appliance for warming or heating
the room.
iiiiiil
iiiiiiili_
iiiiiiili_
iiiiiiili_
iiiiiiili_
Do not touch the surface units, the heating
elements or the interior surface of the oven.
These surfaces may be hot enough to burn even
though they are dark in color. During and after use,
do not touch, or let clothing or other flammable
materials contact the surface units, areas nearby
the surface units or any interior area of the oven;
allow sufficient time for cooling first. Other surfaces
of the appliance may become hot enough to cause
burns. Potentially hot surfaces include the cooktop,
areas facing the cooktop, oven vent opening,
surfaces near the opening and crevices around the
oven door.
Do not heat unopened food containers. Pressure
could build up and the container could burst,
causing an injury.
Do not use aluminum foil to line the drip pans or
anywhere in the oven, except as described in this
manual. Misuse could result in damage to the range
and shock or fire hazard.
Avoid scratching or impacting glass doors, cook
tops or control panels. Doing so may lead to glass
breakage. Do not cook on a product with broken
glass. Shock, fire or cuts may occur.
Cook meat and poultry thoroughly-meat to at
least an internal temperature of 160°F and poultry
to at least an internal temperature of 180°F. Cooking
to these temperatures usually protects against
foodborne illness.
[_/i,WARNING i KEEPFLAMMABLE MATERIALSAWAYFROtvl
THE RANGE.
Do not store or use flammable materials in an oven
or near the cooktop, including paper, plastic, pot
holders, linens, wall coverings, curtains, drapes and
gasoline or other flammable vapors and liquids.
Never wear loose-fitting or hanging garments while
using the appliance. These garments may ignite if
they contact hot surfaces causing severe burns.
Do not let cooking grease or other flammable
materials accumulate in or near the range. Grease
in the oven or on the cooktop may ignite.
Clean ventilating hoods frequently. Grease should
not be allowed to accumulate on the hood or filter.
3
IMPORTANT SAFETY INFORMATION.
READ ALL INSTRUCTIONS BEFORE USING.
l-& WARNING ] IN THE EVENT OF A FIRE,TAKETHE FOLLOWING
STEPSTO PREVENT THE FIREFROM SPREADING:
_:,Do not use water on grease fires. Never pick up
a flaming pan. Turn the controls off. Smother a
flaming pan on a surface unit by covering the
pun completely with a well-fitting lid, cookie sheet
or flat tray. Use a multi-purpose dry chemical or
foam4ype fire extinguisher.
::, If there is a fire in the oven during baking, smother
the fire by closing the oven door and turning the
oven off or by using a multi-purpose dry chemical
or foam4ype fire extinguisher.
If there is a fire in the oven during self-clean,
turn the oven off and wait for the fire to go out.
Do not force the door open. Introduction of fresh
air at self-clean temperatures may lead to a burst
of flame from the oven. Failure to follow this
instruction may result in severe burns.
i-4,WARNING i COOKTOPSAFETYINSTRUCTIONS
Never leave the surface units unattended at
medium or high heat settings. Boilovers cause
smoking and greasy spillovers that may catch
on fire.
_:,Never leave oil unattended while frying. If allowed
to heat beyond its smoking point, oil may ignite
resulting in fire that may spread to surrounding
cabinets. Use a deep fat thermometer whenever
possible to monitor oil temperature.
To avoid oil spillover and fire, use a minimum
amount of oil when shallow pan-frying and avoid
cooking frozen foods with excessive amounts of ice.
_:,Use proper pan size-select cookware having flat
bottoms large enough to cover the surface heating
element. The use of undersized cookware will
expose a portion of the surface unit to direct
contact and may result in ignition of clothing.
Proper relationship of cookware to surface unit
will also improve efficiency.
iii::,Only certain types of glass, glass/ceramic,
earthenware or other glazed containers are suitable
for cooktop service; others may break because of
the sudden change in temperature.
To minimize the possibility of burns, ignition of
flammable materials and spillage, the handle of a
container should be turned toward the center of the
range without extending over nearby surface units.
When preparing flaming foods under a hood, turn
the fan on.
GEAppliances.com
WARNING J
(Some models)
RADIANT COOKTOP SAFETY INSTRUCTIONS
Use care when touching the cooktop. The glass
surface of the cooktop will retain heat after the
controls have been turned off.
*:, Do not cook on a broken cooktop. If glass cooktop
should break, cleaning solutions and spillovers may
penetrate the broken cooktop and create o risk of
electric shock. Contact a qualified technician
immediately.
*:, Avoid scratching the glass cooktop. The cooktop
con be scratched with items such as knives, sharp
instruments, rings or otherjewelrg, and rivets on
clothing.
Do not place or store items that can melt or catch
fire on the glass cooktop, even when it is not being
used. If the cooktop is inadvertentlg turned on, theg
iiiiiil
iiiiiiili_
mog ignite. Heat from the cooktop or oven vent
offer it is turned off mag cause them to ignite also.
Use CERAMABRYTE®ceramic Cooktop Cleanerand
CERAMABRYTE®Cleaning Padto clean the cooktop.
Wait until the cooktop cools and the indicator light
goes out before cleaning.A wet sponge or cloth
on a hot surface can cause steam burns.Some
cleaners can produce noxious fumes if applied to
a hot surface. Note: Sugarspills are an exception.
Theg should be scraped off while still hot using an
oven mitt and a scraper.Seethe Cleaningthe glass
cooktop section for detailed instructions.
Read and follow all instructions and warnings on
the cleaning cream label.
WARNING i
(Some models)
COIL COOKTOP SAFETY INSTRUCTIONS
Do not immerse or soak the removable surface
units. Do not put them in a dishwasher. Do not self-
clean the surface units in an oven. Doing so mag
cause them to fail presenting a burn or fire hazard.
To avoid the possibilitg of a burn or electric shock,
alwags be certain that the controls for all surface
units are at the OFF position and all coils are cool
before attempting to lift or remove a coil surface unit.
Be sure the drip pans are not covered and are in
place. Their absence during cooking could damage
range parts and wiring.
WARNING i OVENSAFETYINSTRUCTIONS
Stand awag from the range when opening the oven
door. Hot air or steam which escapes can cause
burns to hands, face and/or eges.
Keep the oven vent unobstructed.
Keep the oven free from grease buildup. Grease
in the oven mag ignite.
Place oven racks in desired location while oven
is cool. If rack must be moved while oven is hot,
do not let pot holder contact hot heating element
in oven.
When using cooking or roasting bags in the oven,
follow the manufacturer's directions.
Pull the oven rack to the stop-lock position when
loading and unloading food from the oven. This
helps prevent burns from touching hot surfaces
of the door and oven walls.
Do not leave items such as paper, cooking utensils
or food in the oven when not in use. Items stored in
an oven can ignite.
Do not use aluminum foil to line the oven bottom.
Foil mag trap or reflect heat leading to a shock or
fire hazard.
5
IMPORTANT SAFETY INFORMATION.
READ ALL INSTRUCTIONS BEFORE USING.
[_ WARNING j
(Some models)
SELF-CLEANINGOVENSAFETYINSTRUCTIONS
The self-cleaning feature operates the oven at temperatures high enough to burn away food soils in the
oven. Follow these instructions for safe operation.
_:,Before operating the self-clean cycle, remove pans, _:,
shiny metal oven rocks and other utensils from the
oven. Only grog porcelain-coated oven rocks may
be left in the oven. Do not use self-clean to clean
other ports, such as drip pans or bowls. }
*:, Before operating the self-clean cycle, wipe grease
and food soils from the oven. Excessive amount of
grease may ignite leading to smoke damage to
your home.
If the self-cleaning mode malfunctions, turn the
oven off and disconnect the power supply. Have it
serviced by a qualified technician.
Do not clean the door gasket. The door gasket is
essential for a good seal. Care should be taken not
to rub, damage or move the gasket.
Do not use oven cleaners. No commercial oven
cleaner or oven liner protective coating of any kind
should be used in or around any part of the oven.
[-& WARNING 1WARMING DRAWER/LOWER OVEN DRAWER
SAFETY INSTRUCTIONS Isomemode_s)
*:, The purpose of the warming drawer is to hold hot
cooked foods at serving temperature. Bacteria will
grow in food while it is below 140%. Do not put cold
food in warming drawer. Do not heat food for more
than 2 hours. Failure to follow these instructions
may result in foodborne illness.
*:, Do not leave paper products, plastics, canned food
or combustible materials in the drawer. They may
ignite.
*:, Do not touch the heating element or the interior
surface of the drawer. These surfaces may be hot
enough to cause burns.
Use care when opening the drawer. Open the
drawer a crack and let hot air or steam escape
before removing or replacing food. Hot air or
steam that escapes can cause burns to hands,
face and/or eyes.
Do not use aluminum foil to line the warming
drawer. Foil is an excellent heat insulator and
will trap heat beneath it. This will upset the
performance of the drawer and potentially
cause a fire hazard.
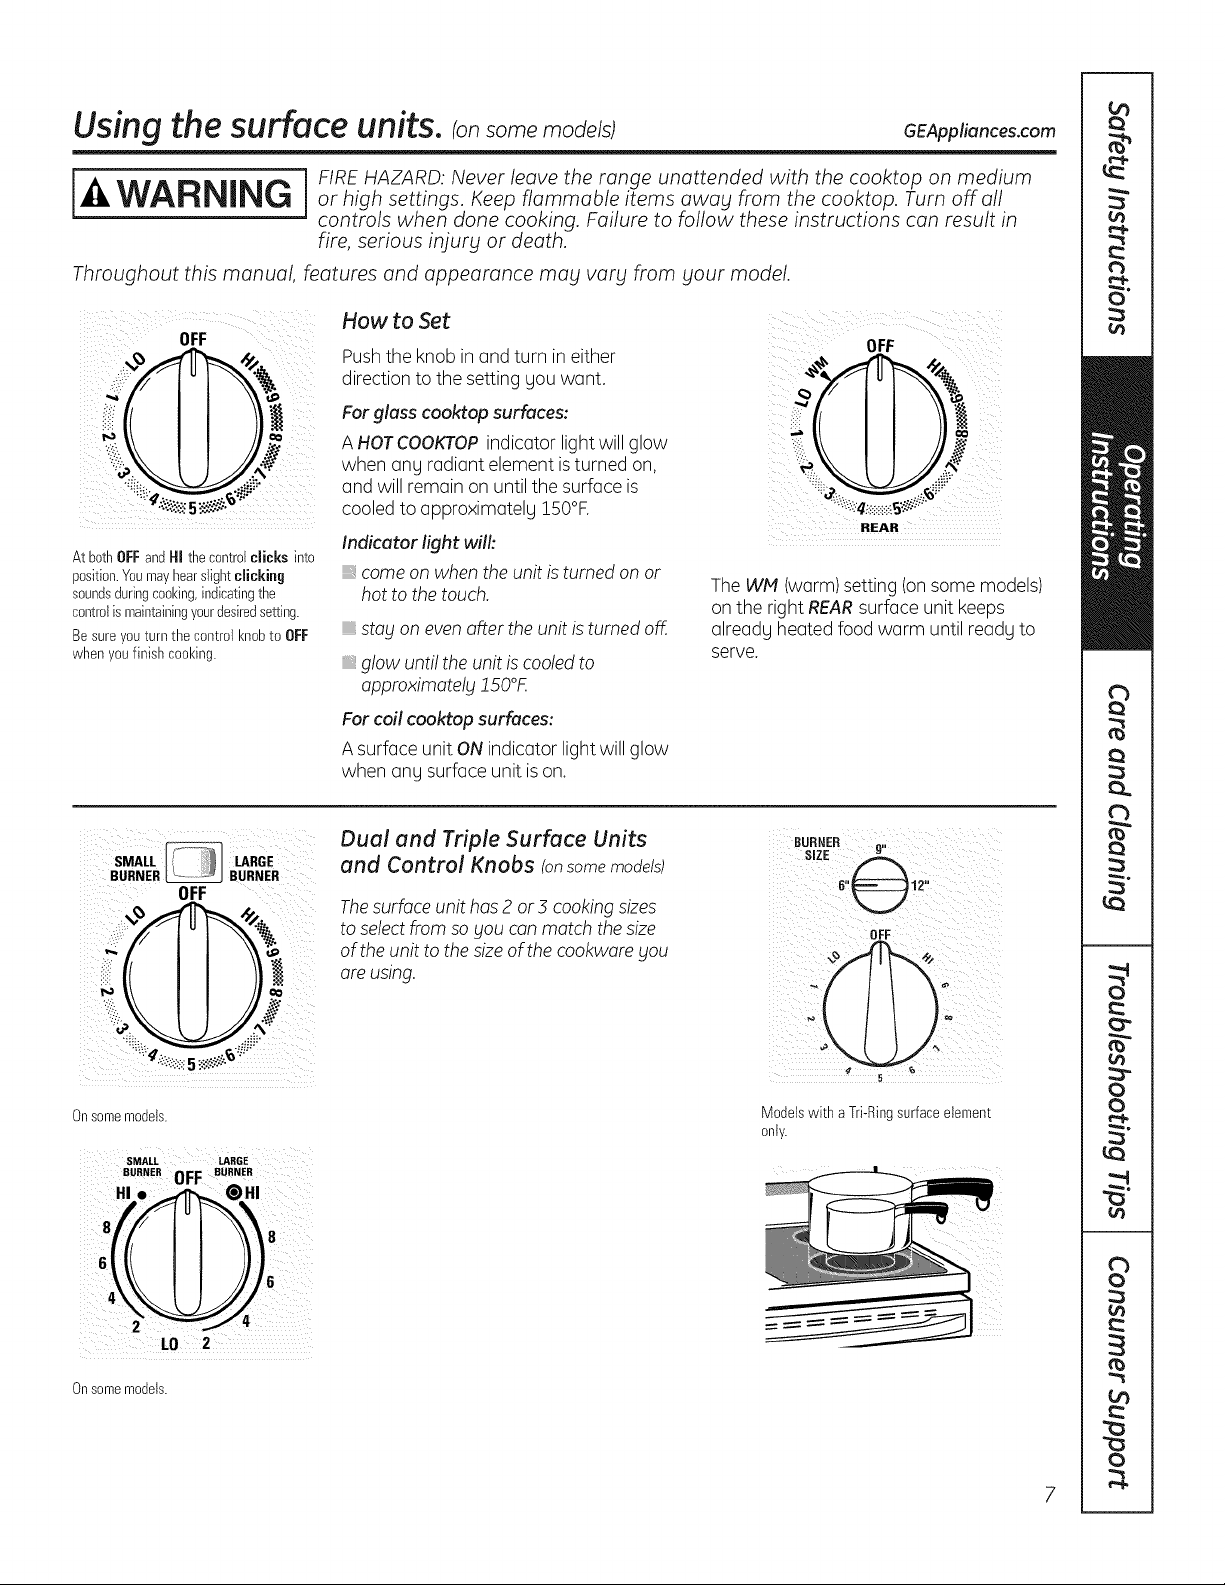
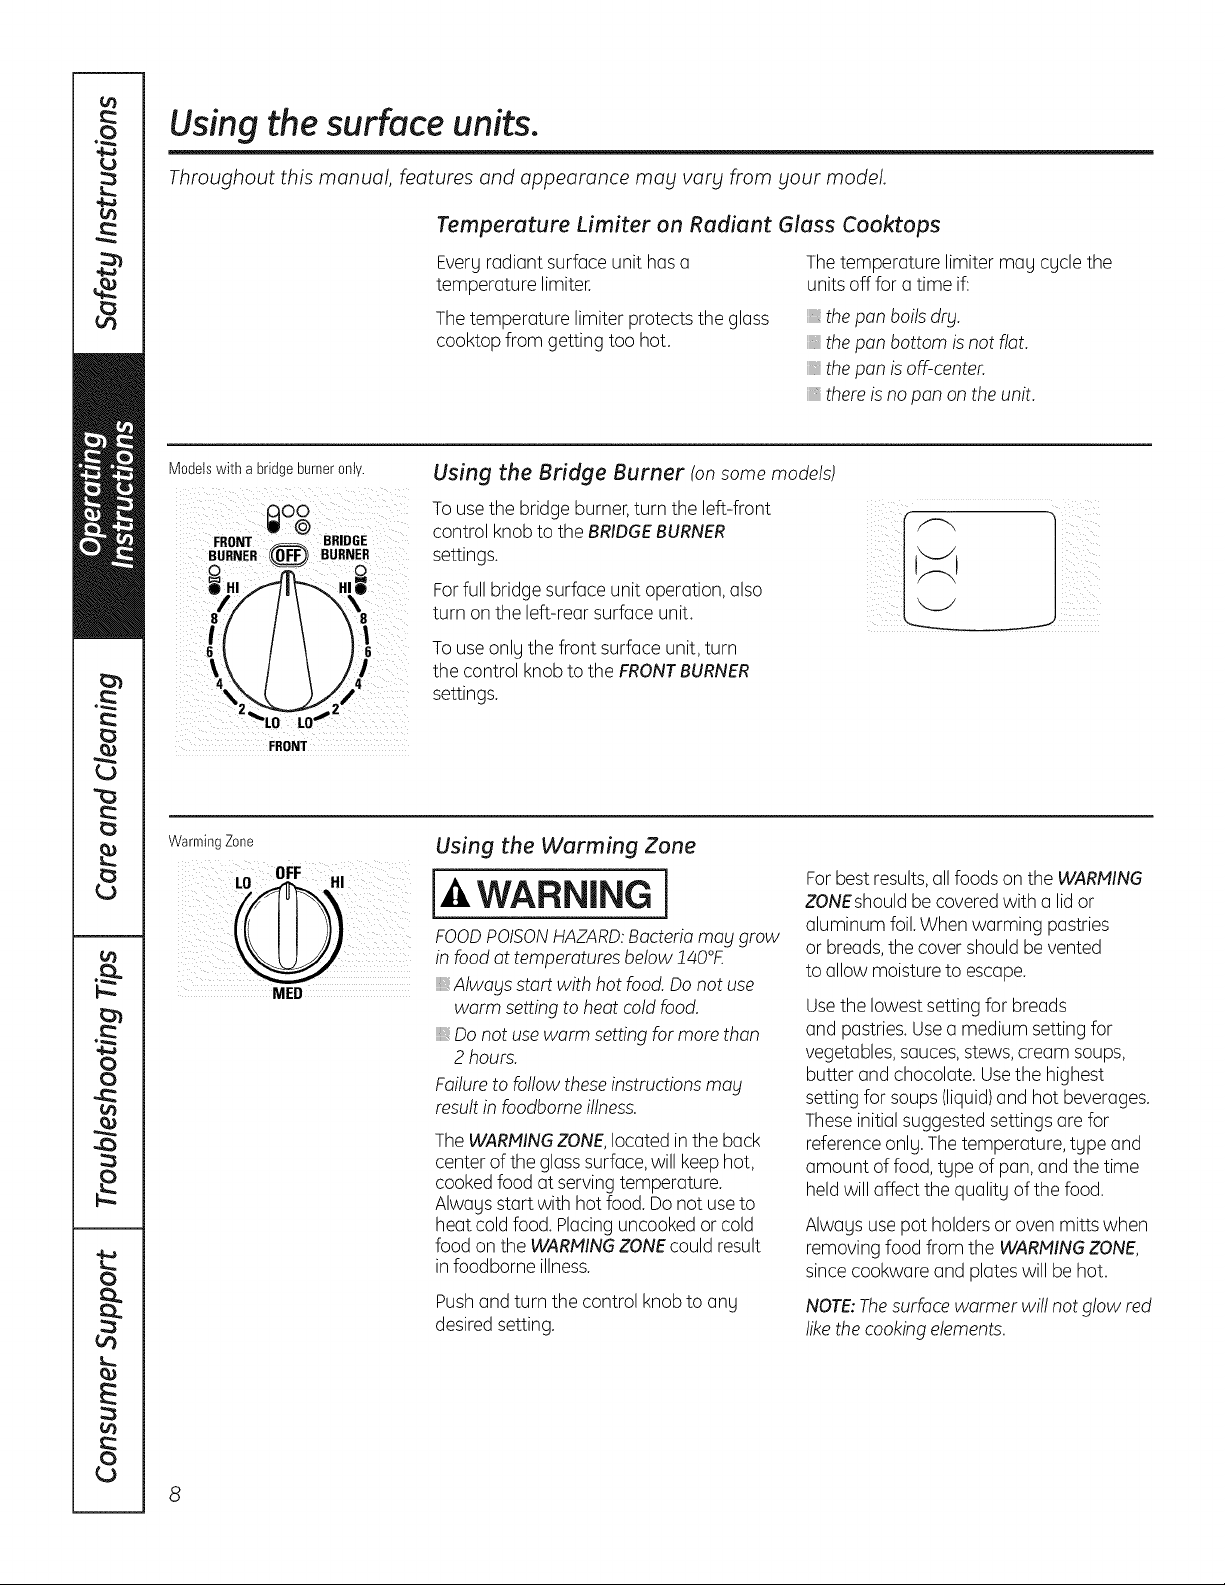
"'-usingthe surface units. (on some models) GEAppliances.com
WARNINGI °nor high settings. Keep flammable items awabl from the cooktop. Turn off all
controls when done cooking. Failure to follow these instructions can result in
fire, serious injur_l or death.
Throughout this manual, features and appearance mabt varbt from btour model.
How to Set
OFF OFF
Pushthe knob in and turn in either
,::i_ direction to the setting gou want.
_il _ For glass cooktop surfaces:
_ A HOTCOOKTOPindicator light will glow
when any radiant element is turned on,
: and will remain on until the surface is .:
cooled to approximatelu 150°F.
REAR
Indicator fight will:
At bothOFFandHI thecontrolclicks into
position.Youmayhearslightclicking come on when the unit is turned on or
soundsduringcooking,indicatingthe hot to the touch. The WM (warm) setting (on some models)
controlis maintainingyour@siredsetting, on the right REARsurface unit keeps
Besure you turn the control knobto OFF already heated food warm until ready to
when youfinish cooking, serve.
stag on even after the unit is turned off.
glow unti! the unit is cooled to
approximotelg JSO°K
For coil cooktop surfaces:
A surface unit ON indicator light will glow
when any surface unit is on.
SMALL LARGE
BURNER _ BURNER
OFF
i,i_iO
Onsomemodels.
SMALL LARGE
BURNER 0FF BURNER
HI.
L0 2
Onsomemodels.
Dual and Triple Surface Units
and Control Knobs !on some models)
The surface unit has 2 or3 cooking sizes
to select from so gou can match the size
of the unit to the size of the cookware gou
are using.
OFF¸¸¸ )
Modelswith a Tri-Ringsurfaceelement
only.
Using the surface units.
Throughout this manual, features and appearance mag varg from gout model.
Temperoture Limiter on Redient Gloss Cooktops
Every radiant surface unit has a
temperature limiter.
The temperature limiter protects the glass
cooktop from getting too hot.
The temperature limiter may cycle the
units off for a time if:
. ; the pan boils dry.
the pan bottom is not flat.
the pan is off-center.
_,there is no pan on the unit.
Models with a bridgeburneronly.
Using the Bridge Burner (on some models)
To use the bridge burner,turn the left-front
control knob to the BRIDGEBURNER
settings.
For full bridge surface unit operation, also
turn on the left-rear surface unit.
To use only the front surface unit, turn
the control knob to the FRONTBURNER
settings.
FRONT
WarmingZone
NED
Using the Warming Zone
WARNING I
FOODPOISONHAZARD:Bacteriamabl grow
in food at temperatures below !40°£
,, Alwablsstart with hot food. Do not use
warm setting to heat cold food.
,, Do not use warm setting for more than
2 hours.
Failure to follow these instructions mag
result in foodbome illness.
The WARMINGZONE,located inthe back
center of the glasssurface,will keep hot,
cooked food at serving temperature.
Always start with hot food. Do not use to
heat cold food. Placing uncooked or cold
food on the WARMINGZONEcould result
in foodborne illness.
Pushand turn the control knob to any
desired setting.
Forbest results, all foods on the WARMING
ZONEshould be covered with a lid or
aluminum foil. When warming pastries
or breads,the cover should be vented
to allow moisture to escape.
Usethe lowest setting for breads
and pastries. Use a medium setting for
vegetables, sauces,stews, cream soups,
butter and chocolate. Use the highest
setting for soups (liquid)and hot beverages.
Theseinitial suggested settings are for
reference only. The temperature, type and
amount of food, type of pan, and the time
held will affect the quality of the food.
Always use pot holders or oven mitts when
removing food from the WARMINGZONE,
since cookware and plates will be hot.
NOTE:Thesurface warmer wi!! not glow red
like the cooking elements.
GEAppliances.com
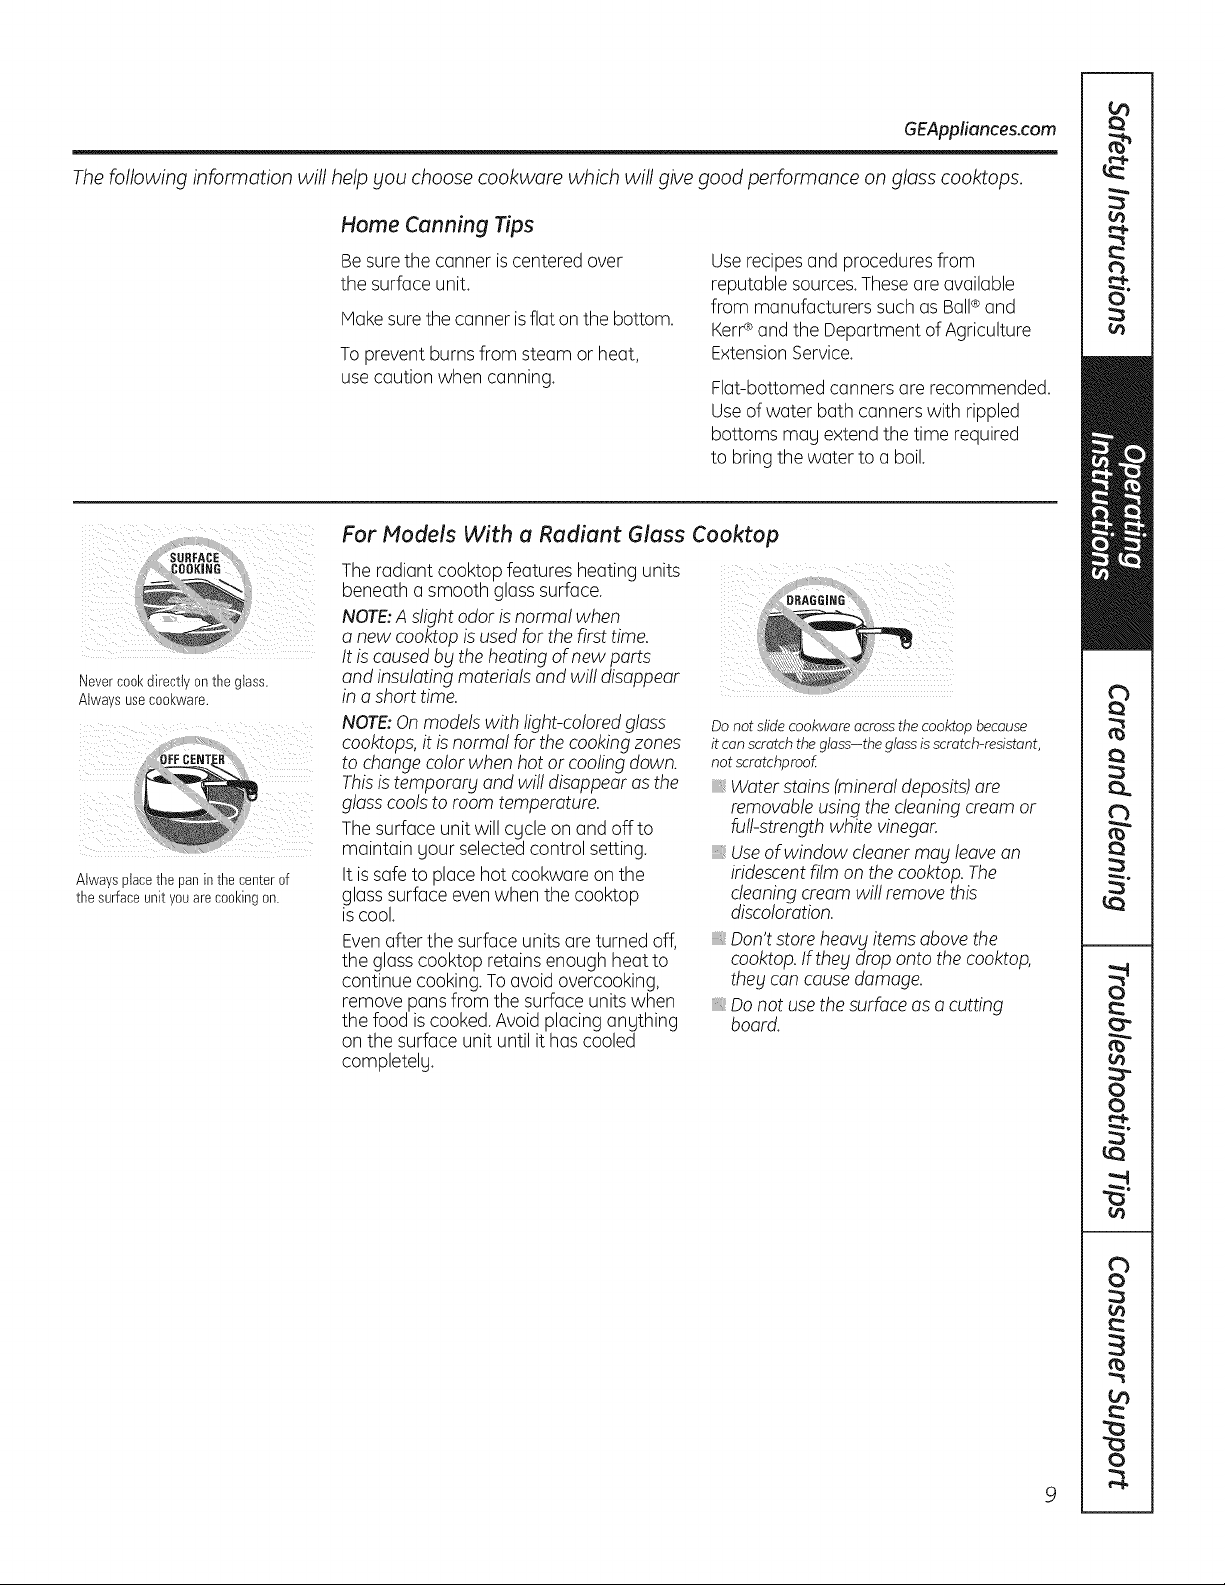
The following information will help you choose cookware which will give good performance on glass cooktops.
Home Canning Tips
Be sure the canner is centered over
the surface unit.
Makesure the canner isflat on the bottom.
To prevent burns from steam or heat,
use caution when canning.
Use recipesand procedures from
reputable sources.Theseare available
from manufacturers such as Ball®and
KerP and the Department of Agriculture
Extension Service.
Flat-bottomed canners are recommended.
Useof water bath canners with rippled
bottoms mag extend the time required
to bring the water to a boil.
Nevercool(directtv on tne glass.
Alwa s useCOOl(ware,
Alwaysplacethe panin the centerof
the surfaceunityouare cookingon.
For Models With a Radiant Glass Cooktop
The radiant cooktop features heating units
beneath a smooth glass surface.
NOTE:A s!ight odor is normal when
a new cooktop is used for the first time.
It is caused by the heating of new parts :_
and insu!ating materials and wil! disappear
in a short time.
NOTE:Onmodels with light-colored glass
cooktops, it is norma! for the cooking zones
to change color when hot or cooling down.
Thisis temporarg and wi!! disappear as the
glass cools to room temperature.
The surface unit will cgcle on and offto
maintain your selected control setting.
It is safe to place hot cookware on the
glasssurface even when the cooktop
is cool.
Evenafter the surface units are turned off,
the glass cooktop retains enough heat to
continue cooking. To avoid overcooking,
remove pans from the surface units when
the food is cooked.Avoid placing anything
on the surface unit until it has cooled
completelg.
Do not slide cookware across the cooktop because
it can scratch the glass-the glassis scratch-resistant,
not scratchproof
_,Water stains (mineraldeposits)are
removableusing the cleaning cream or
furl-strengthwhite vinegar.
_,Useof window cleanermay leave an
iridescentfilm on the cooktop. The
cleaning cream wi!! remove this
discoloration.
Don't store heavy items above the
cooktop.If thebtdrop onto the cooktop,
they can causedamage.
Do not use the surface as a cutting
board.
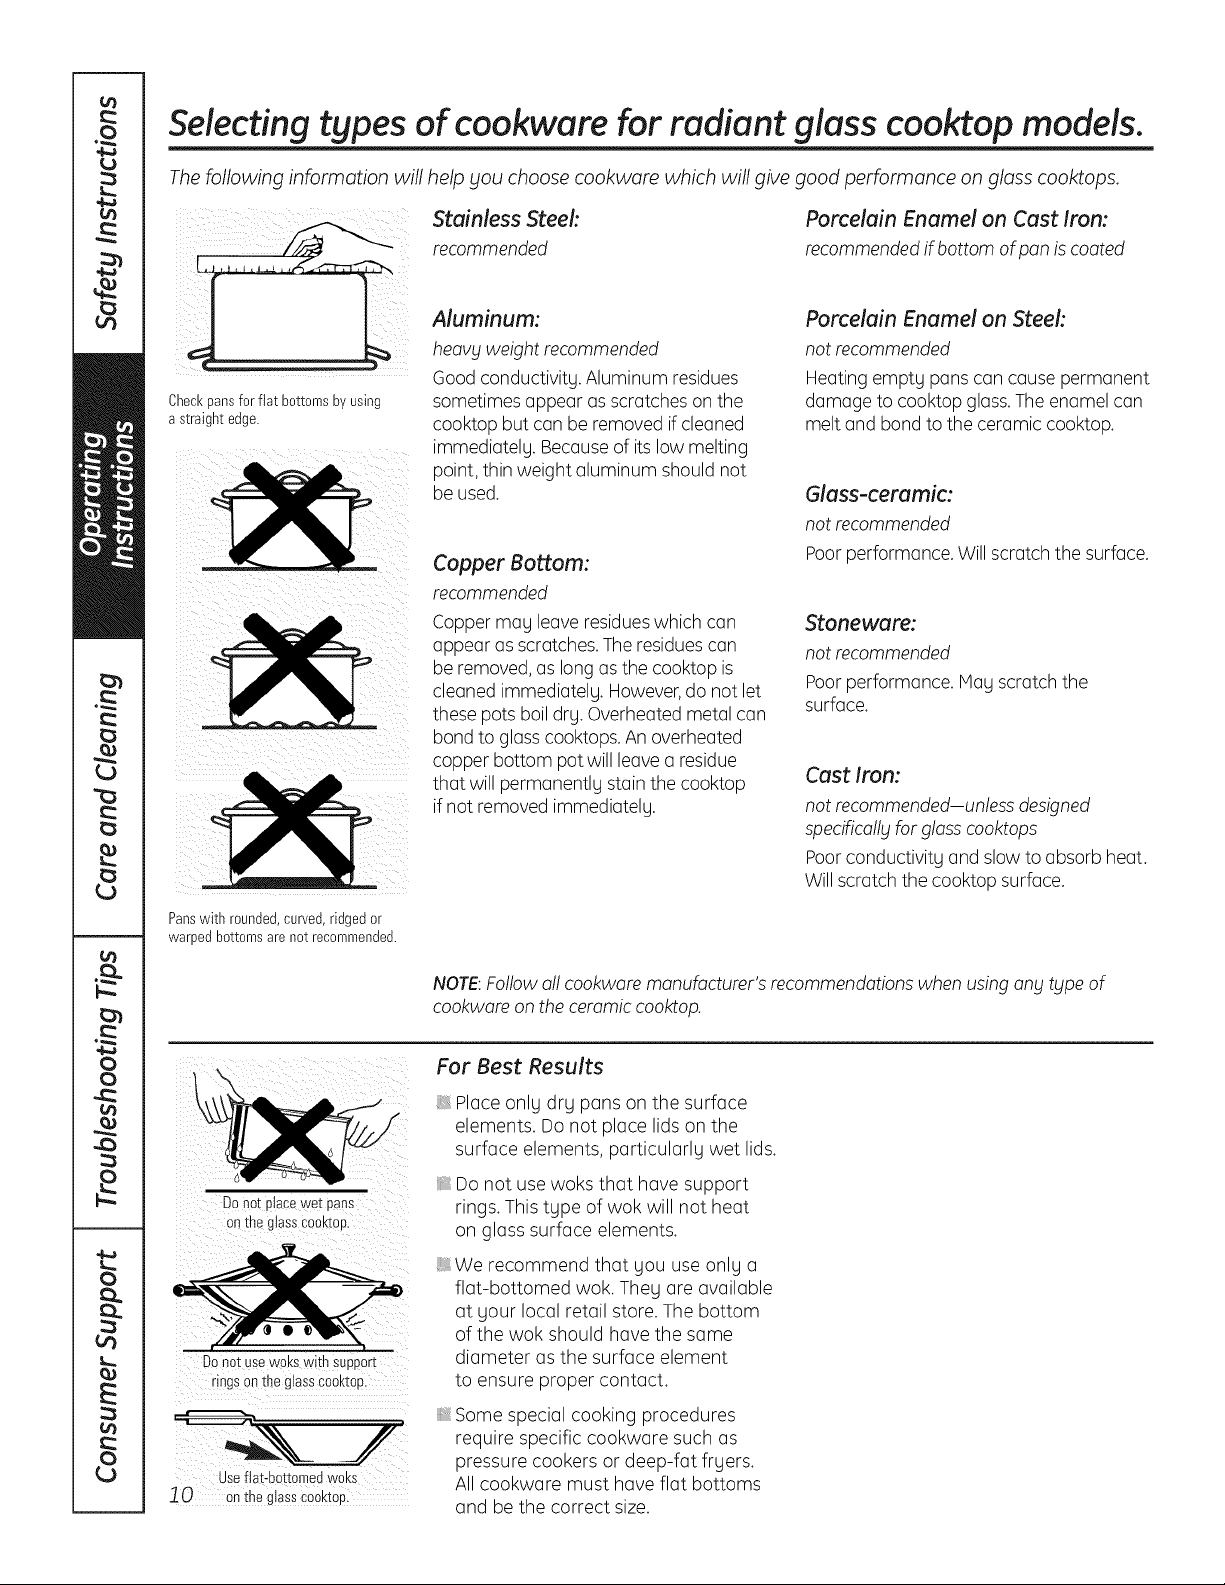
Selecting types of cookware for radiant glass cooktop models.
The following information will help you choose cookware which will give good performance on glass cooktops.
stainlessrecommendedSteel:
.....
Aluminum:
heavy weight recommended
Good conductivity. Aluminum residues
Checkpans for flat bottomsby using
a straight edge.
sometimes appear as scratches on the
cooktop but can be removed if cleaned
immediately. Becauseof its low melting
point, thin weight aluminum should not
be used.
Copper Bottom:
recommended
Copper may leave residueswhich can
appear as scratches. The residuescan
be removed, as long as the cooktop is
cleaned immediately. However,do not let
these pots boil dry. Overheated metal can
bond to glass cooktops. An overheated
copper bottom pot will leave a residue
that will permanently stain the cooktop
if not removed immediately.
Panswith rounded,curved,ridgedor
warped bottomsare not recommended.
Porcelain Enamel on Cast Iron:
recommended if bottom of pan is coated
Porcelain Enamel on Steek
not recommended
Heating empty pans can cause permanent
damage to cooktop glass.The enamel can
melt and bond to the ceramic cooktop.
Glass-ceramic:
not recommended
Poor performance. Will scratch the surface.
Stoneware:
not recommended
Poor performance. May scratch the
surface.
Cast Iron:
not recommended-unless designed
specifica!!_jfor glasscooktops
Poorconductivity and slow to absorb heat.
Will scratch the cooktop surface.
NOTE:Followa!! cookware manufacturer's recommendations when using any type of
cookware on the ceramic cooktop.
DOnot ptace wet pans
on the glassCoaktop.
Do not usew0ks with SUpport
rings on the glass€00ktop
useflat-bottomed woks
10 o"thsgiaiSc_Okto_
For Best Results
Place only dry pans on the surface
elements. Do not place lids on the
surface elements, particularly wet lids.
Do not use woks that have support
rings. This type of wok will not heat
on glass surface elements.
We recommend that gou use onlg a
flat-bottomed wok. Theg are available
at gour local retail store. The bottom
of the wok should have the same
diameter as the surface element
to ensure proper contact.
Some special cooking procedures
require specific cookware such as
pressure cookers or deep-fat frgers.
All cookware must have flat bottoms
and be the correct size.
Usingthe oven control, clock
and timer features and settings.
Throughout this manual, features and appearance may vary from your model.
GEAppliances.com
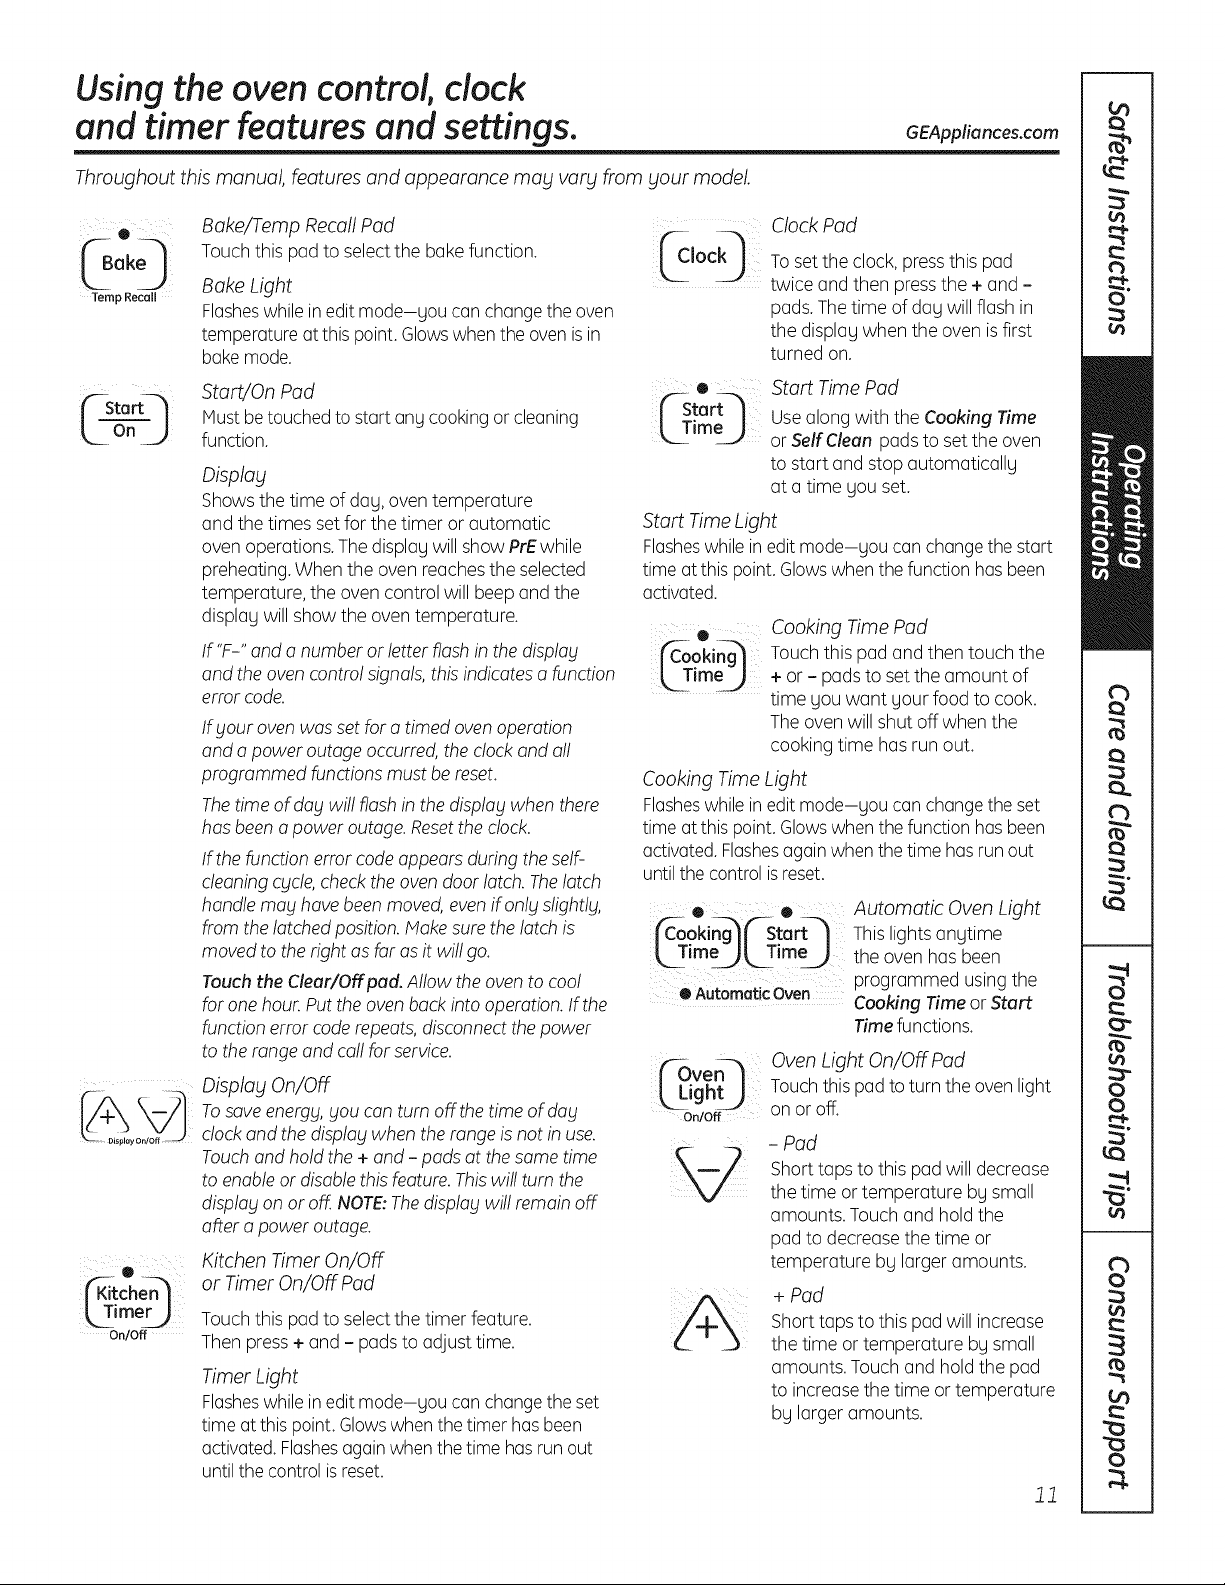
® Bake/Temp Recall Pad
(B 0 Touch this pad to select the bake function. _Jock_
ok
Temp Recall Bake Light
Flasheswhile in edit mode-gou can change the oven
temperature at this point. Glows when the oven is in
bake mode.
| rL|f--Sta -- _ StartJOn Pad ('--Start_t
Must be touched to start any cooking or cleaning m Tim,, I_--" U
L
On
J
function.
_imer_
On/Off
Display
Showsthe time of dag, oven temperature
and the times set for the timer or automatic
oven operations. The displag will show PrEwhile
preheating.When the oven reachesthe selected
temperature, the oven control will beep and the
displag will show the oven temperature.
If'F-" and a number or letter flash in the display
and the oven contro! signals, this indicates a function
error code.
Ifblouroven was set for a timed oven operation
and a power outage occurred, the clock and al!
programmed functions must be reset.
Thetime of dablwi!! flash in the display when there
has been a power outage. Resetthe clock.
If the function error code appears during the self-
cleaning cycle, check the oven door latch. Thelatch
handle may have been moved, even if onlblslightlg,
from the latched position. Make sure the latch is
moved to the right as far as it wi!! go.
Touch the Cleur/Off pod. Allow the oven to coo!
for one hour. Put the oven back into operation. If the
function error code repeats, disconnect the power
to the range and ca!! for service.
Display On/Off
Tosave energy, you can turn off the time of dabl
clock and the display when the range is not in use.
Touchand hold the + and - pads at the same time
to enableor disable this feature. Thiswi!! turn the
display on or off. NOTE:Thedisplay wil! remain off
after a power outage.
Kitchen Timer On/Off
or Timer On/Off Pad
Touch this pad to select the timer feature.
Then press+ and - pads to adjust time.
Timer Light
Flasheswhile in edit mode-gou can change the set
time at this point. Glows when the timer has been
activated.Flashesagainwhen the time has run out
until the control is reset.
Clock Pad
To set the clock, press this pad
twice and then press the + and -
pads.The time of dag will flash in
the displag when the oven is first
turned on.
Start Time Pad
Use along with the Cooking Time
or Self Cleon pads to set the oven
to start and stop automaticallg
at a time gou set.
Start Time Light
Flasheswhile in edit mode-gou can change the start
time at this point. Glowswhen the function has been
activated.
® Cooking Time Pad
j_-ooking_ Touch this pad and then touch the
[_TmeJ + or - pads to set the amount of
time you want your food to cook.
The oven will shut off when the
cooking time has run out.
Cooking Time Light
Flasheswhile in edit mode-gou can change the set
time at this point. Glowswhen the function has been
activated. Flashesagain when the time has run out
until the control is reset.
• • Automatic Oven Light
jfC-ooki@('-Start-] This lights angtime
[ T meal, Time_ the oven has been
programmed using the
OAutomaticOven Cooking Time or Start
Time functions.
_ven_
_Light_
On/Off
OvenLight On/Off Pad
Touch this pad to turn the oven light
on or off.
- Pad
Short taps to this pad will decrease
the time or temperature bg small
amounts. Touch and hold the
pad to decreasethe time or
temperature bg larger amounts.
+ Pad
Short taps to this pad will increase
the time or temperature bg small
amounts. Touch and hold the pad
to increasethe time or temperature
bg larger amounts.
11
Usingthe oven control, clock
and timer features and settings.
Throughout this manual, features and appearance may vary from
¸¸¸01
('-Self--_
Lc eo
sour model.
SelfClean Pad
Touchthis pad to select the self-cleaning function.
Seethe Usingthe self-cleaning oven section.
SelfClean Light
Flasheswhile in edit mode-sou can change the
length of time for the self-clean cycle at this point.
Glowswhen the oven is in the self-clean cycle. After
the self-clean cycle,the light will turn off. Unlatch
the door.
Indicator Lights
EPITmode lasts severalseconds after the last pad
press.Start Time On/OFFand Cooking Time On/OFF
will be the only pads lit if either of these options
is selected. (Example:Start Time is selected with
Bake-the Start Time pad will remain lit until the
clock reaches the programmed time, at which point
it will turn off and the Bake/Tamp Recall pad light
will light up.)
e
J Bake I
_mp Recal_
e
(Steam_
_lean j
C-€,oor l
o.j
(Br° 0
Hi/Lo
ConvectionBake/TampRecall
Touchthis pad to select baking with the convection
function.
Steam Clean
Touchthis pad for easier cleaning, light soiling
of the oven cavity or door.
Clear/OffPad
Touchthis pad to cancel ALL oven operations
except the clock and timer.
Broil Hi/Lo Pad
Touchthis pad to select the broil function.
BroilLight
Flasheswhile in edit mode-you can switch from
Hi to Lo Broil at this point. Glows when the oven
is in broil mode.
Power Outage
If a flashing time is in the disp!ag,SOUhave
experienceda power failure. Resetthe clock.
To resetthe clock,touch the Clock pad. Enterthe
correct time of day by touching the + or - pads.
Touch the Start/On pad.
Using the oven.
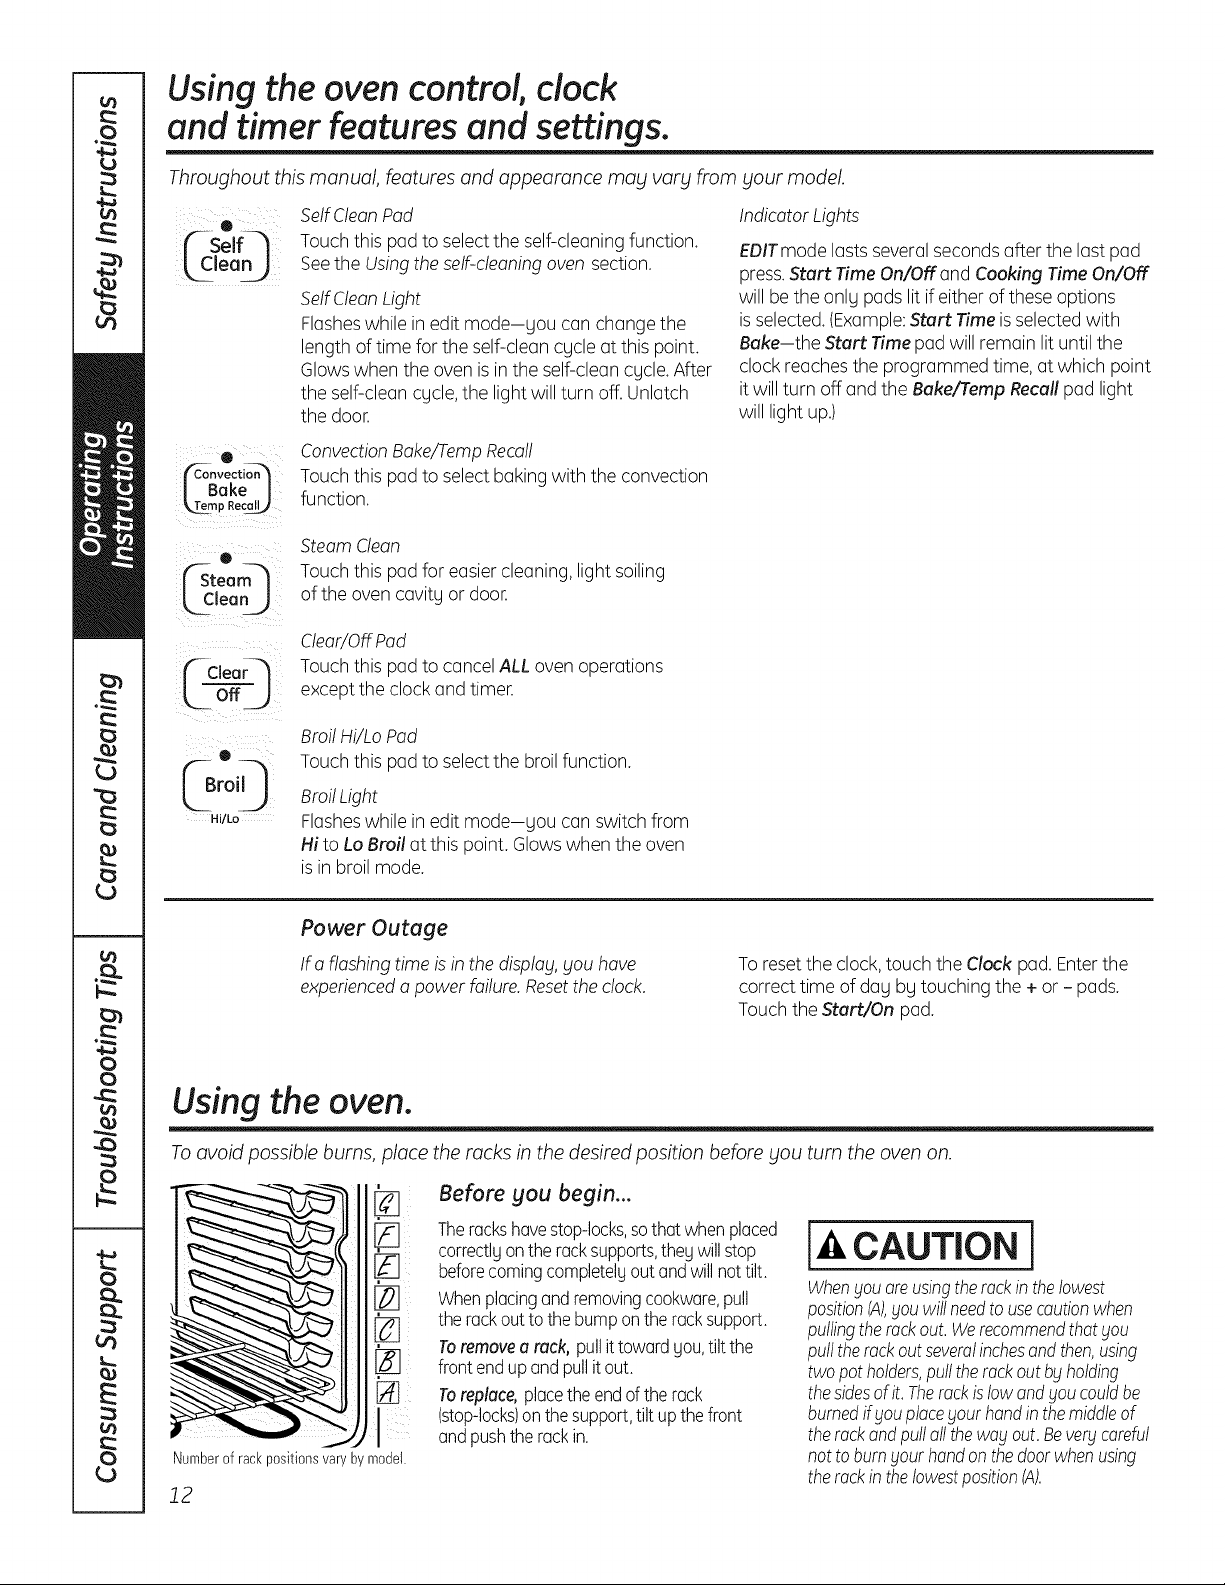
To avoid possible burns, place the rocks in the desired position before you turn the oven on.
[]
Numberof rackpositionsvary by model.
12
Before you begin...
Thereckshavestop-locks,sothat whenplaced
correctlgon the racksupports,thegwill stop
beforecomingcompletelyout and willnot tilt.
Whenplacingand removingcookware,pull
the rackout to the bumponthe rack support.
Toremovea rack, pullit toward gou,tilt the
front endup and pull it out.
Toreplace,placethe endof the rack
(stop-locks)on thesupport,tilt upthe front
andpushthe rack in.
CAUTION l
WhenSouore usingtherockin thelowest
positionIA),Souwillneedto usecautionwhen
pullingthereckout. WerecommendthatSou
pulltherack outseveralinchesandthen,using
two pot holders,pull the rackout bg holding
thesidesof it. Therockislow andSoucouldbe
burnedif Souplacegout handin themiddleof
the rackand pulloil the wagout. Bevergcareful
not to burnsour handonthedoorwhenusing
the rockin the lowestposition(A).
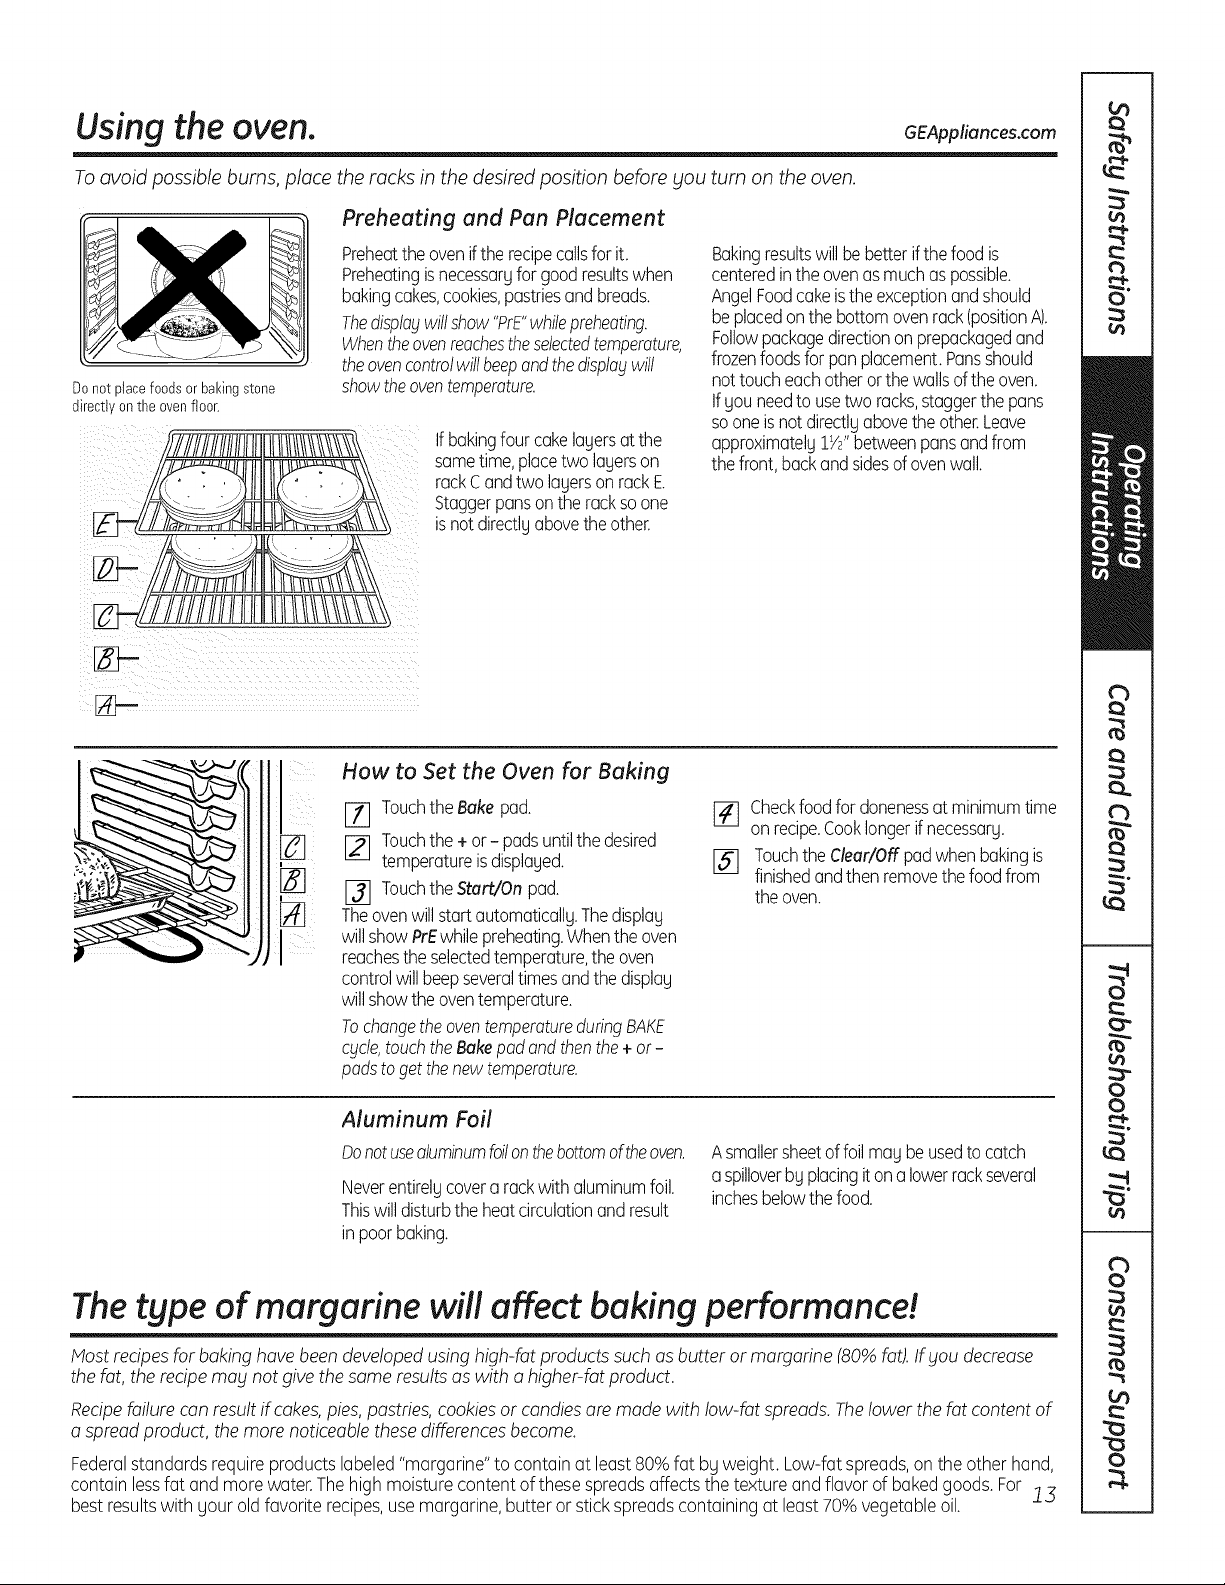
Using the oven. GEAppliances.com
To avoid possible burns, place the racks in the desired position before you turn on the oven.
Do not placefoods or bakingstone
directlyon the oven floor.
Preheating and Pan Placement
Preheatthe ovenif the recipecallsfor it.
Preheatingisnecessaryfor goodresultswhen
bakingcakes,cookies,pastriesand breads.
Thedisplaywillshow"PrE"whilepreheating.
Whentheovenreachestheselectedtemperature,
theovencontrolwillbeepandthedisplaywill
showtheoventemperature.
If bakingfour cakelayersat the
sametime,placetwo layerson
rackC andtwo layerson rackE
Staggerpansonthe rackso one
is notdirectlyabovethe other.
Bakingresultswill bebetterif thefood is
centeredinthe ovenasmuchaspossible.
AngelFoodcake isthe exceptionand should
beplacedonthe bottomovenreck(positionA).
Followpackagedirectionon prepackagedand
frozenfoodsfor panplacement.Pansshould
not touch eachotherorthe wallsof theoven.
Ifyou needto usetwo racks,staggerthe pans
so oneis notdirectlyabovethe other.Leave
approximately1W'betweenpansand from
the front,backand sidesof ovenwall.
How to Set the Oven for Baking
[71 Touchthe Bake pad.
[_ Touchthe + or - padsuntilthedesired
temperatureisdisplayed.
_l Touchthe Start/On pad.
Theovenwill startautomatically.Thedisplay
will showPrEwhilepreheating.Whenthe oven
reachesthe selectedtemperature,the oven
controlwillbeepseveraltimesand the display
will showthe oventemperature.
Tochangethe oventemperatureduringBAKE
cycle,touch the Bake pad and then the + or-
padsto get thenewtemperature.
[_l Checkfoodfor donenessat minimumtime
onrecipe.Cooklongerif necessary.
15] Touchthe Clear/Off pad whenbakingis
finishedandthen removethe foodfrom
theoven.
Aluminum Foil
Donotusealuminumfoilon thebottomoftheoven.
Neverentirelycovera rack with aluminumfoil.
Thiswill disturbthe heatcirculationand result
inpoorbaking.
Asmallersheetof foil maybeusedto catch
a spilloverby placingiton a lowerrackseveral
inchesbelowthefood.
The type of margarine will affect baking performance!
Most recipes for baking have been developedusing high-fat products such as butter or margarine (80% fat).If you decrease
the fat, the recipemabl not give the same resultsas with a higher-fat product.
Recipefailure can result if cakes,pies, pastries, cookies or candies are made with low-fat spreads. Thelower the fat content of
a spread product, the more noticeable these differences become.
Federalstandards requireproducts labeled"margarine"to containat least80%fat bg weight. Low-fatspreads,on the other hand,
contain lessfat and more water.Thehigh moisturecontent of thesespreadsaffects the texture and flavor of baked goods.For !3
best resultswith gearold favorite recipes,usemargarine,butter or stick spreads containing at least 70% vegetable oil.
Using the oven.
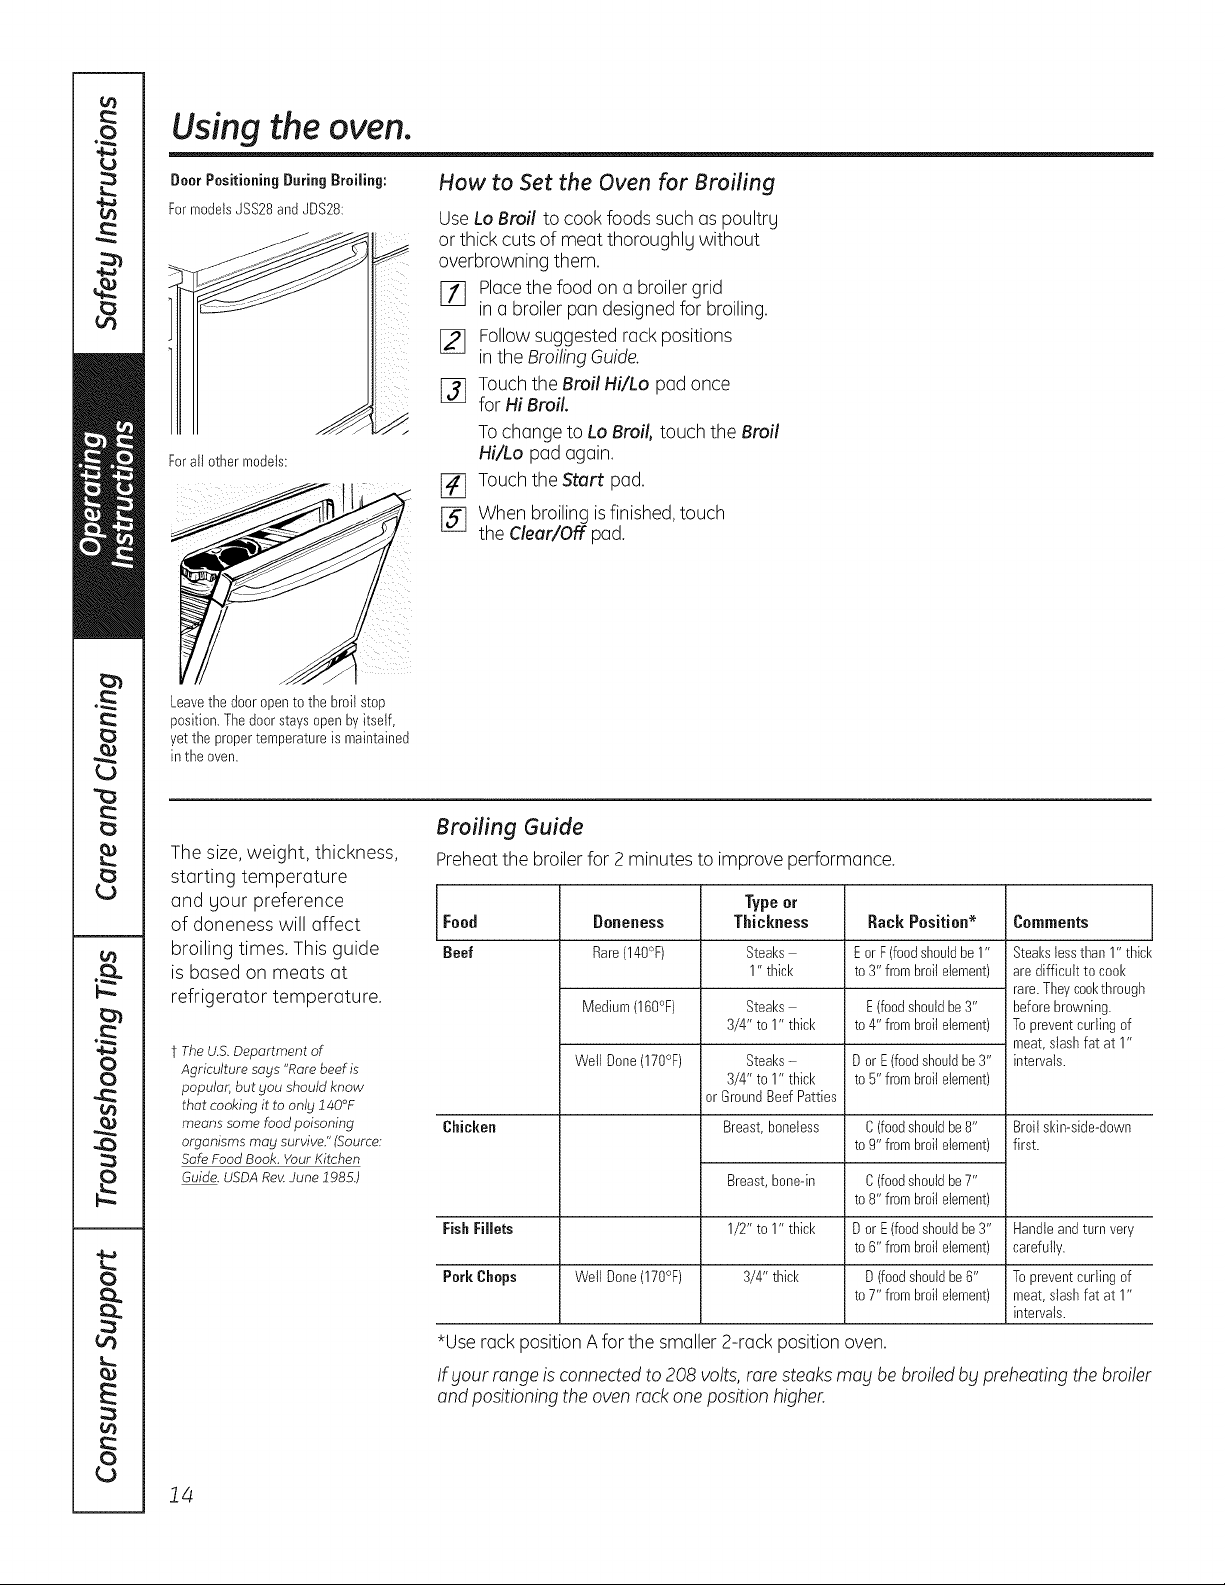
DoorPositioning During Broiling:
FormodelsJSS28and JDS28:
Forall other models:
How to Set the Oven for Broiling
UseLo Broil to cook foods such as poultry
or thick cuts of meat thoroughlg without
overbrowning them.
Placethe food on a broiler grid
]71 in a broiler pan designed for broiling.
Followsuggested rack positions
[_ in the BroilingGuide.
j_j Touch the Broil Hi/Lo pad once
for Hi Broil.
To change to Lo Broil, touch the Broil
Hi/Lo pad again.
[_ Touch the Start pad.
[] When broiling isfinished, touch
the Clear/Off pad.
Leavethe door opento the broil stop
position.The door staysopen byitself,
yetthe propertemperatureis maintained
in the oven.
The size, weight, thickness,
starting temperature
and gour preference
of doneness will affect
broiling times. This guide
is based on meats at
refrigerator temperature.
t The U.S. Department of
Agriculture says "Rare beef is
popular, but you should know
that cooking it to only 140°F
means some food poisoning
organisms may survive." (Source:
Safe Food Book. Your Kitchen
Guide. USDA Rat4June 1985.)
Broiling Guide
Preheat the broiler for 2 minutes to improve performance.
Type or
Food Doneness Thickness Rack Position* Comments
Beef Rare(140°F) Steaks E orF (foodshouldbe1" Steakslessthan 1" thick
1" thick to 3" frombroil element) are difficult to cool<
rare.Theycool<through
Medium(160°F) Steaks E (foodshouldbe 3" beforebrowning.
3/4" to 1" thick to 4" frombroil element) Toprevent curlingof
meat,stashfat at 1"
Well Done(170°F) Steaks- D or E(foodshouldbe 3" intervals.
3/4" to 1" thick to 5" frombroil element)
or GroundBeefPatties
Chicken Breast,boneless C (foodshouldbe8" Broil skin-side-down
to 9" frombroilelement) first.
Breast,bone-in
1/2" to 1" thick
3/4" thick
C (foodshouldbe7"
to 8" frombroilelement)
Fish Fillets D or E(foodshouldbe 3" Handleandturn very
to 6" frombroilelement) carefully.
Pork Chops Well Done(170°F) D (foodshouldbe6" To prevent curlingof
to 7" frombroilelement) meat,stashfat at 1"
intervals.
*Use rack position A for the smaller 2-rack position oven.
If _/ourrange is connected to 208 volts,rare steaks ma£ be broiled b£ preheating the broiler
and positioning the oven rack one position higher.
14
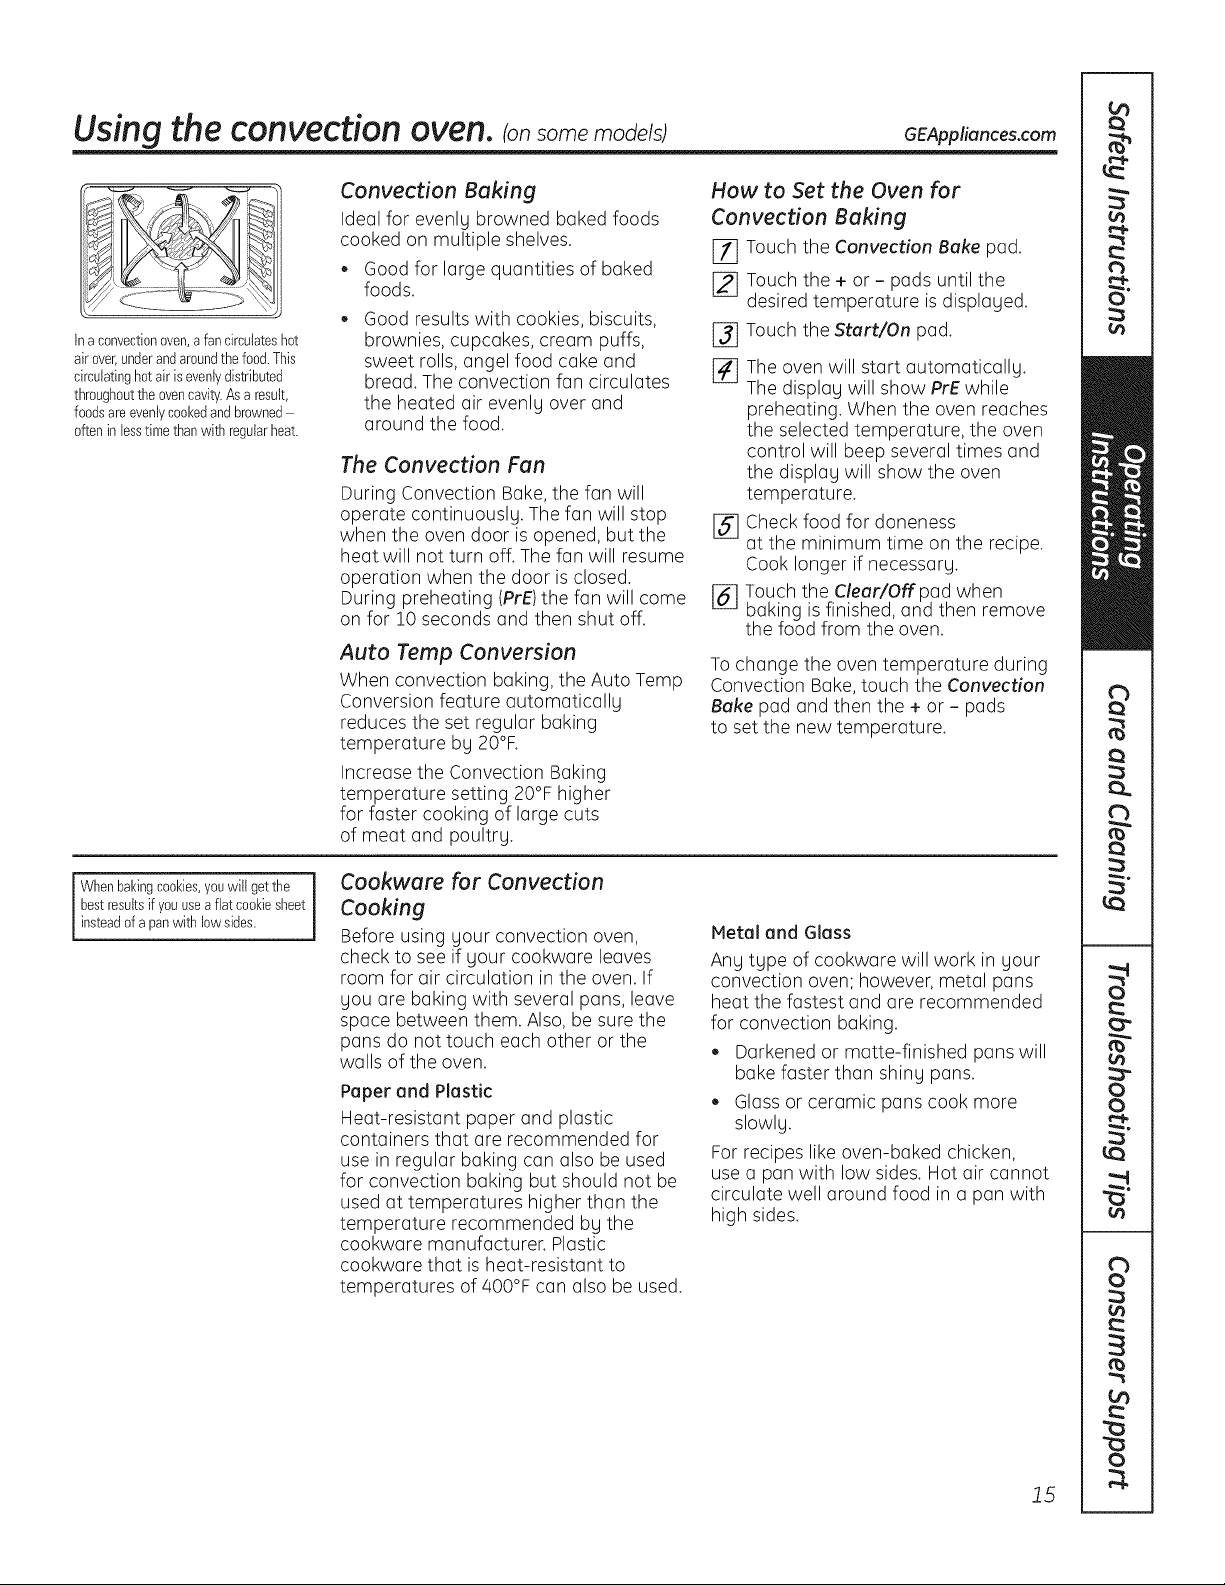
Using the convection oven. Ionsome models) GEAppliances.com
Ina convectionoven,a fan circulateshot
air over,underandaroundthefood.This
circulatinghotair is evenlydistributed
throughoutthe ovencavity.Asa result,
foodsareevenlycookedandbrowned
oftenin lesstimethanwith regularheat.
Convection Baking
Ideal for evenly browned baked foods
cooked on multiple shelves.
• Good for large quantities of baked
foods.
Good results with cookies, biscuits,
brownies, cupcakes, cream puffs, [_
sweet rolls, angel food cake and
bread. The convection fan circulates [_
the heated air evenly over and
around the food.
The Convection Fan
During Convection Bake, the fan will
operate continuously. The fan will stop
when the oven door is opened, but the [_
heat will not turn off. The fan will resume
operation when the door is closed.
During preheating (PrE)the fan will come [_
on for 10 seconds and then shut off.
Auto Temp Conversion
When convection baking, the Auto Temp
Conversion feature automatically
reduces the set regular baking
temperature by 20°F.
Increase the Convection Baking
temperature setting 20°F higher
for faster cooking of large cuts
of meat and poultry.
How to Set the Oven for
Convection Baking
E_ Touch the Convection Bake pad.
[_ Touch the + or- pads until the
desired temperature is displayed.
Touch the Start/On pad.
The oven will start automatically.
The display will show PrE while
preheating. When the oven reaches
the selected temperature, the oven
control will beep several times and
the display will show the oven
temperature.
Check food for doneness
at the minimum time on the recipe.
Cook longer if necessary.
Touch the Clear/Off pad when
baking is finished, and then remove
the food from the oven.
To change the oven temperature during
Convection Bake, touch the Convection
Bake pad and then the + or - pads
to set the new temperature.
i Whenbakingcookies,youwill getthe
bestresultsif youuse a fiat cookiesheet
insteadof a panwith low sides.
Cookware for Convection
Cooking
Before using your convection oven,
check to see if your cookware leaves
room for air circulation in the oven. If
you are baking with several pans, leave
space between them. Also, be sure the
pans do not touch each other or the
walls of the oven.
Paper and Plastic
Heat-resistant paper and plastic
containers that are recommended for
use in regular baking can also be used
for convection baking but should not be
used at temperatures higher than the
temperature recommended by the
cookware manufacturer. Plastic
cookware that is heat-resistant to
temperatures of 400°F can also be used.
Metal and Glass
Any type of cookware will work in your
convection oven; however, metal pans
heat the fastest and are recommended
for convection baking.
Darkened or matte-finished pans will
bake faster than shiny pans.
Glass or ceramic pans cook more
slowly.
For recipes like oven-baked chicken,
use a pan with low sides. Hot air cannot
circulate well around food in a pan with
high sides.
15
Using the wurming druwer, ionsome models)
WARNING JFoo_ POISONnAZAn_: Bacteria ma_lgrow in food at temperatures below 140°F
l
. Always start with hot food. Do not use warm settings to heat cold food.
. Do not warm food for more than 2 hours.
Failure to follow these instructions may result in foodborne illness.
The warming drawer will keep hot, cooked foods at serving temperature. Alwags start with hot food.
Do not use to heat cold food other than crisping crackers, chips or drg cereal.
WARMINGDRAWER
When Using the Werming Drewer
Push and turn the control knob to ang
desired setting.
Thewarming drawer will keephot, cooked
foodswarm.
Do not line the warming drawer or pan
with aluminum foil Foil is an excellent heat
insulator and will trap heat beneath it. This
will upset the performance of the drawer
and could damage the interior finish.
Allow approximately 25 minutes for the
warming drawer to preheat.
Do not put liquid or water in the warming
drawer.
, Allfoodsplaced in the warming drawer
should be coveredwith a lid or aluminum
foil.Whenwarming pastriesor breads,the
covershould be vented to allow moisture
to escape.
, Foodshould be kept hot in its cooking
containeror transferredto a heat-safe
servingdish.
NOTE:Plasticcontainersor plastic wrap will
melt if in direct contact with the drawer, pan
or a hot utensil. Helted plastic may not be
removable and is not covered under your
warranty.
, Remove serving spoons, etc., before
placing containersinwarming drawer.
Temperuture Selection Chert
Tokeepseveraldifferentfoodshot, setthe
controlto the foodneedingthe highestsetting.
Thetemperature,tgpe and amount of food,
and the time held will affectthe qualitg of
the food.
Repeatedopeningof the drawerallows
the hot air to escape and the food to cool.
With largeloadsit mag be necessargto
use a higherwarming drawer settingand
coversomeof the cookedfood items.
Donot useplasticcontainersorplasticwrap.
FoodType Control Setting
Casserole MED
Chili HI
Pizza MED
Potatoes,baked HI
TortillaChips LO
Waffles LO
To Crisp Stale Items
Placefood in low-sideddishesor pans.
Preheaton LOsetting.
Checkcrispnessafter45 minutes.Addtime
as needed.
To Werm Serving Bowls end Pletes
cAuTIo,i
Disheswill behot. Usepot holdersor mitts
when removinghot dishes.
Towarm serving bowls and plates,setthe
control onLO.
Useonlg heat-safe dishes.
Ifgouwant to heat fine china, pleasecheck
with the manufacturerof the dishesfor
their maximum heat tolerance.
Youmay warm emptg servingdishes
while preheatingthe drawer.
16

Using the lower oven drawer, ionsome models) GEAppliances.com
The lower oven drawer may be used to bake foods using the same times and temperatures as a standard oven.
Foods ideal for baking in the lower oven drawer include pizza, frozen foods, casseroles, biscuits, rolls and many
desserts.
LOWER
OVEN
e
WARN t
0
3011 • 3511 • 41111
o
Pushinand turn the lower oven drawer
knobto anydesiredsetting.
To Use the Lower Oven Drawer
[_ Push in and turn the lower oven
drawer knob to ang desired setting.
[] Allow the lower oven drawer to
preheat.
The ON signal light is located above the
knob and glows when the knob is in the
ON position. It remains ON until the knob
is moved to the OFFposition.
The "Heating" signal light is located below
the knob and glows when the heating
elements are active. Preheat is complete
after the "Heating" signal has turned
off for the first time after the knob is
turned on.
NOTES:
_,Always use the included drawer rack
when using the lower oven drawer.
_,Thelower oven drawer cannot be used
during a self-clean cycle of the upper
oven.
iiiilDiiii_,
Do not put food, foi! or cookware directly
on the bottom of the lower oven drawer.
Always use the included drawer rack.
If foods require a cover,use only
foi! or lids able to withstand baking
temperatures. Do not use plastic.
Maximum height of foods that can be
baked in the lower oven drawer is31/2".
Do not put liquid or water in the lower
oven drawer.
_,Neverplace plastics,paper, canned foods
or combustible material in the lower oven
drawer.
The lower oven drawer uses less energg than the upper oven.
Allow the following approximate times for preheating:
Desired Lower Preheat
Oven Temperature Time
WARM 2 0 minutes
350°F J5 minutes
425°F 25 minutes
When Using the Lower Oven Drawer Warm Setting
TheWARMSETTINGof the !ower oven
drawer can beused to keephot cooked
foodsat servingtemperatures.Always start
with hot food. Do not use the WARM
SETTINGto heat cold food other than
crisping crackers,chips or dry cerea!.
Push in and turn the control knob to
the warm setting.
NOTE:The beginning temperature of the
food, the amount of food, the type of food,
the container and the amount of time the
food is in the drawer wi!! affect the quality
and ending temperature of the food.
J7
Using the clock and timer.
Not all featuresare on all models.
_ On )
Make sure the clock is setto the correct
time of day.
To Set the Clock
The clock must be set to the correct time
of day for the automatic oven timing
functions to work properly. The time of day
cannot be changed during a delayed
cooking or a delayed self-cleaning cycle.
[11 Touch the Clock pad twice.
I_ Touch the + or - pads.
Ifthe + or - pads are not touched within
one minute after you touch the Clock pad,
the display reverts to the original setting.
Ifthis happens, touch the Clock pad twice
and reenter the time of day.
I_ Touchthe Start/On pad until the time
of day shows in the display. This
enters the time and starts the clock.
To checkthe time of day when the display
is showing other information, simply touch
the Clock pad. Thetime of dog shows unti!
another pad is touched.
To Turn OFFthe Clock Display
If you have severalclocks in your kitchen,
you may wish to turn off the time of day
clock display on your range.
%
Touchthe Clock pad once to turn
off the time of day display. Although
you will not be able to see it, the clock
maintains the correct time of day.
[_ Touch the Clock pad twice to recall
the clock display.
NOTE:If the clock cannot be recalled or it
will not stay permanently displayed, the
Energy Saver Mode feature is on.To turn
the feature off, see the Energy SaverMode
section.
0
itcho
kTimerJ
On/Off
FSta rtq
_LOn j j
Thetimerisa minutetimeronly.
TheClear/Offpaddoesnotaffect
thetimer.
To Set the Timer
The timer does not contro! oven operations.
The maximum setting on the timer is
9 hours and 59 minutes.
[]
Touchthe Kitchen Timer On/Off pad.
Touchthe + or - pads until the
amount of time you want shows in
the display. The maximum time that
can be entered in minutes is 59.
Times more than 59 minutes should
be changed to hours and minutes.
If bloumake a mistake,touch the Kitchen
Timer On/Off pad and begin again.
%
Touch the Start/On pad. The time will
start counting down, although the
display does not change until one
minute has passed.
When the timer reaches :00, the
control will beep 3 times followed by
one beep every 6 seconds until the
Kitchen Timer On/Off pad is touched.
To Reset the Timer
Ifthe display is still showing the time
remaining, you may change it by touching
the Kitchen Timer On/OFFpad, then
touching the + or - pads until the time you
want appears in the display.
If the remaining time is not in the display
(clock,start time or cooking time are in
the display),recall the remaining time by
touching the Kitchen Timer On/OFFpad
and then touching the + or - pads to
enter the new time you want.
18
To Cancel the Timer
Touch the Kitchen Timer On/OFF
pad twice.
Using the timed baking feature, ionsome models) GEAppliances.com
Do not lock the oven door with the latch during timed cooking. The latch is used for self-cleaning only.
NOTE: Foods that spoil easily-such as milk, eggs, fish, stuffings, poultry and pork-should not be allowed to sit
for more than 1 hour before or after cooking. Room temperature promotes the growth of harmful bacteria. Be sure
that the oven light is off because heat from the bulb will speed harmful bacteria growth.
Temp Reca! I
f---cloor--/
off_)
How to Set an Immediate Start and Automatic Stop
The oven wi!! turn on immediately and cook
for a selectedlength of time. At the end of
the cooking time, the oven wi!! turn off
automatica!!g.
[_ Touch the Bake pad.
[_ Touch the + or - pads to set the
oven temperature.
j_j Touch the Cooking Time pad.
NOTE:If your recipe requires preheating,
you may need to add additiona! time
to the length of the cooking time.
[_ Touch the + or - pads to set the
baking time.
The cooking time that you entered will be
displayed. (If you select Cooking Time first
and then adjust the Bake Temperature,
the oven temperature will be displayed
instead.)
[] Touch the Start/On pad.
The display shows either the oven
temperature that you set or the cooking
time countdown. (Thedisplay starts with
PrE if showing the oven temperature.)
The oven will continue to cook for the
programmed amount of time, then turn
off automatically.
[_ Touch the Clear/Offpad to cancel
if necessary.
Remove the food from the oven.
Remember,even though the oven shuts off
automatically, foods continue cooking after
controls are off.
(40
Temp Recall
AW
o
L TimeJ
o
k_TimoJ
"--Stor
Or1 J
¢C,eorQ
How to Set a Delaged Start and Automatic Stop
Theoven wi!! turn on at the time of day you
set, cook for a specificlength of time and
then turn off.automatically.
Hake sure the clock shows the correct
time of day.
[_ Touch the Bake pad.
12] Touch the + or - pads to set the
oven temperature.
[_ Touch the Cooking Time pad.
[_ Touch the + or - pads to set the
desired length of cooking time.
[_ Touch the Start Time pad.
j_j Touch the + or - pads to set the time of
day you want the oven to turn on and
start cooking.
[Z] Touch the Start/On pad.
NOTE:If you would liketo check the times
you have set, touch the Start Time pad to
check the start time you have set or touch
the Cooking Time pad to check the length
of cooking time you have set.
When the oven turns on at the time of day
you have set, the display will show PrE until
it reachesthe selected temperature, then it
will display the oven temperature.
At the end of cooking time, the oven
will turn off and the end-of-cycle tone
will sound.
j_ Touch the Clear/Offpad to cancel
if necessary.
Removethe food from the oven.
Remember,even though the oven shuts off
automatically, foodscontinue cooking after
controls are off.
NOTE:An attention tone wi!! sound if you
are using timed baking and do not touch
the Start/On pad.
19
Special features of your oven control.
Energy Saver Mode
To save energy, you can turn off the time
of day clock and the display when the
range is not in use.
Pressand hold the + and- pads
at the same time to enable or disable
this feature. This will turn the display
on or off.
NOTE: The disp!og wil! remain off offer
o power outage.
Your new touch pad control has additional features that you may choose to use. The following are the features
and how you may activate them.
The special feature modes can only be activated while the display is showing the time of day. They remain in the
control's memory until the steps are repeated.
When the display shows your choice, touch the Start/On pad. The special features will remain in memory after
a power failure.
NOTE: The Sabbath feature and the Thermostat Adjustment feature are also Special Features, but they are
addressed separately in the following sections.
Temp Recall Hi/Lo
(_stort--'-!
Looj
12 Hour Shutoff
With this feature, should you forget
and leave the oven on, the contro! wi!!
outomotico!lg turn off the oven offer
!2 hours during baking functions or after
3 hours during a broi! function.
If you wish to turn OFF this feature, follow
the steps below.
[_ Touch the Bake and Broil Hi/Lo pads
at the same time until the display
shows SR
Touch the Clock pad. The display will
show ON (12hour shutoff).Touch the
Clock pad repeatedly until the display
shows OFF (no shutoff).
Touch the Start/On pad to activate
the no shut-off and leave the control
set in this special features mode.
Adjust the oven thermostat--Do it yourself!
You may find that your new oven cooks differently than the one it replaced. Use your new oven for a few
weeks to become more familiar with it. If you still think your new oven is too hot or too cold, you can adjust
the thermostat yourself.
Do not use thermometers, such as those found in grocery stores, to check the temperature setting of your oven.
These thermometers may vary 20-40 degrees.
NOTE: This adjustment will not affect the broiling or the self-cleaning temperatures. The adjustment will be
retained in memory after a power failure.
0 . 0
Temp Recall Hi/ko
Temp Recoil
20
To Adjust the Thermostat
[_ Touch the Bake and Broil Hi/Lo pads
at the some time until the display
shows SR
Touch the Bake pad. Atwo-digit
number shows in the display.
The oven temperature can be
adjusted up to (+)35°F hotter or
(-)35°F cooler.Touch the + pad to
increasethe temperature in 1-degree
increments.
Touch the - pad to decreasethe
temperature in 1-degree increments.
[]
When you have made the
adjustment, touch the Start/On pad
to go back to the time of day display.
Useyour oven as you would normally.
NOTE:Thisadjustment wi!! not affect the
broiling or self-cleaning temperatures. It wi!!
be retained in memory offer o power failure.
"'-usingthe Sabbath feature. (onsomemode/sJ
(Designed for use on the Jewish Sabbath and Holidabts) GEAppliances.com
TheSabbathfeaturecanbeusedforbakingonly.It cannotbeusedforbroiling,self-cleaning,convectionbaking,steamcleaningordelaystart
cooking.
NOTE:TheovenlightcomesonautomaticallyIonsomemodels)whenthedoorisopenedandgoesoffwhenthedoorisclosed.Thebulbmaybe
removed.SeetheOvenLightReplacementsection.Onmodelswitholightswitchonthecontrolpanel,theovenlightmaybeturnedonandlefton.
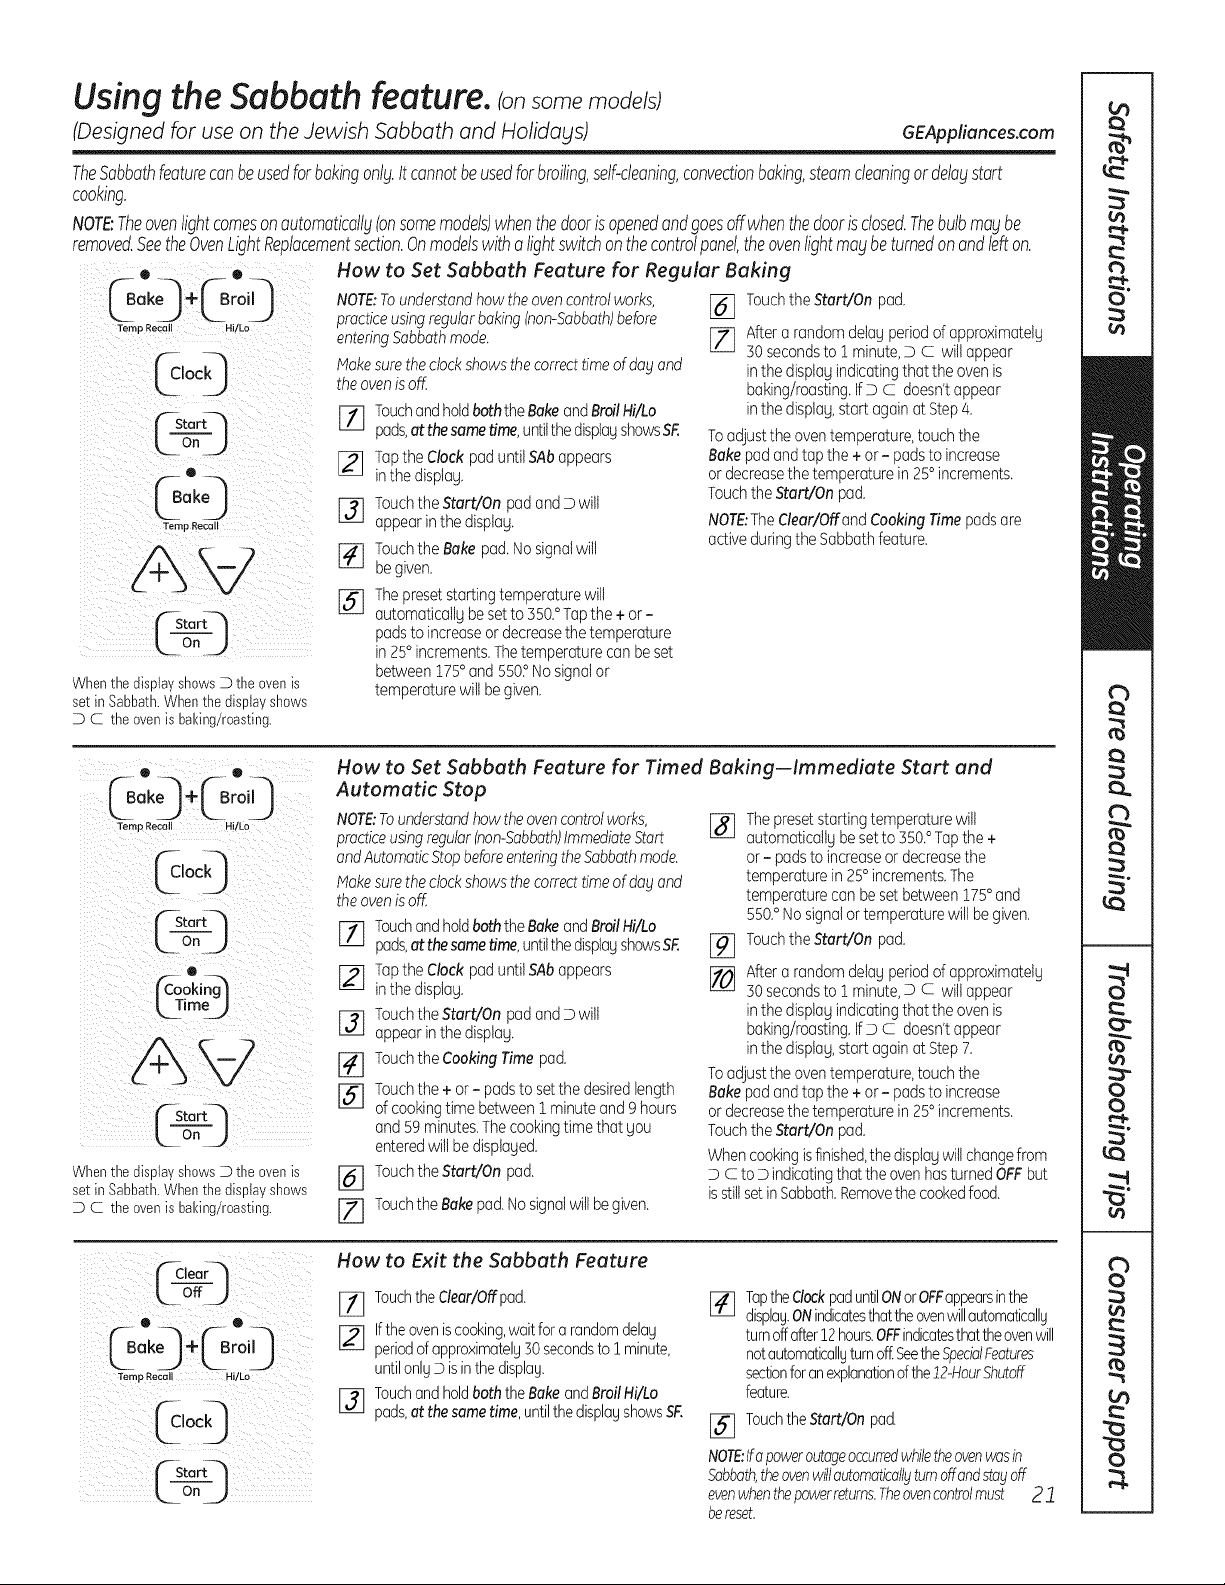
How to Set Sabbath Feature for Regular Baking
Whenthe display shewsD the even is
set in Sabbath.When the dispia7shews
D C the even is baking/roasting.
NOTE;Tounderstandhowtheovencontrolworks,
practiceusingregularbaking(non-Sabbath)before
enteringSabbathmode.
Makesuretheclockshowsthe correcttime of dogand
theovenis off.
rl] TouchandholdboththeBakeandBroilHi/Lo
pads,at thesametime,untilthedisplayshowsSF.
[] Tapthe Clockpaduntil SAbappears
inthe displag.
[] Touchthe Start/On padandD wilt
appearinthe displag.
[_ Touchthe Bakepad.Nosignalwill
be given.
[_The presetstartingtemperaturewill
automaticallgbesetto 550.° Tapthe + or-
padsto increaseor decreasethetemperature
in 25°increments.Thetemperaturecan beset
between175° and 550?Nosignalor
temperaturewilt be given.
[_] TouchtheStart/On pad.
[_ After a randomdelagperiodof approximatelg
30 secondsto 1 minute,D C will appear
inthe displagindicatingthat the ovenis
baking/roasting.IfD C doesn'tappear
inthe displag,start againat Step4.
Toadjustthe oventemperature,touchthe
Bakepadandtap the + or- padsto increase
ordecreasethetemperaturein 25° increments.
TouchtheStart/On pad.
NOTE:The dear/Off and CookingTimepadsare
activeduringtheSabbathfeature.
0. 0.
_Bake_ ÷_Br°i 9
Ternp Recall H!!Lo
iii I i
("-Start4
ton )
Whenthe displa7 shewsD the evenis
set in Sabbath.When the dispia7shews
D C the even is baking/roasting.
How to Set Sabbath Feature for Timed Baking--Immediate Start and
Automatic Stop
NOTE:Tounderstandhowtheovencontrolworks,
practiceusingregular(non-Sabbath)ImmediateStart
and Automatic Stop before enteringthe Sabbath mode.
I_ake sure the clock shows the correct time of dog and
theovenis off.
TouchandholdboththeBakeandBroilHi/Lo
pads,at thesametime,untilthedispiagshowsSF.
[_] Tapthe Clock paduntil SAbappears
inthe displag.
F3] Touchthe Start/On padandD wilt
appearinthe displag.
[_] Touchthe CookingTime pad.
[_] Touchthe + or - padsto setthe desiredlength
of cookingtime between1 minuteand ghours
and 59 minutes.Thecookingtimethat Sou
enteredwiltbe displaged.
[_] Touchthe Start/On pad.
[Z] TouchtheBakepad.Nosignalwillbe given.
%
%
[]
Thepresetstartingtemperaturewill
automaticallgbe setto 350.° Tapthe +
or- padsto increaseor decreasethe
temperaturein 25°increments.The
temperaturecan be setbetween175° and
550.° Nosignalortemperaturewill begiven.
TouchtheStart/On pad.
After a randomdelagperiodof approximatelg
30 secondsto 1 minute,D c willappear
inthe displagindicatingthat the ovenis
baking/roasting.IfD c doesn'tappear
inthe displag,start againat Step7.
Toadjustthe oventemperature,touchthe
Bakepadandtap the + or- padsto increase
ordecreasethetemperaturein 25° increments.
TouchtheStart/On pad.
Whencookingisfinished,thedisplagwill changefrom
D c to D indicatingthat theovenhasturnedOFFbut
isstillsetinSabbath.Removethe cookedfood.
(_aear_I
LoffJ
e
@°,9
How to Exit the Sabbath Feature
Touchthe dear/Offpad.
I-_ Ifthe oven iscooking,waitfor a random delos
periodof approximatelg30seconds to ! minute,
untilonlgD isinthe displag.
I-_ Touchand holdboth the Bake and BroilHi/Lo
pods,at the same time, untilthe displagshows SF.
J_q TaptheClockpaduntilONor OFFappearsinthe
displag.ONindicatesthattheovenwillautomaticallg
turnoffafter12hours.OFFindicatesthattheovenwill
notautomaticallgturnoff:SeetheSpecialFeatures
sectionforanexplanationofthe12-HourShutoff
feature.
[_] TouchtheStart/On pad.
NOTE:Ifapoweroutageoccurredwhilethe ovenwasin
Sabbath,theovenwillautomaticallgturnoffandstayoff
evenwhenthepowerreturns.Theovencontrolmust 2 "1
bereset.
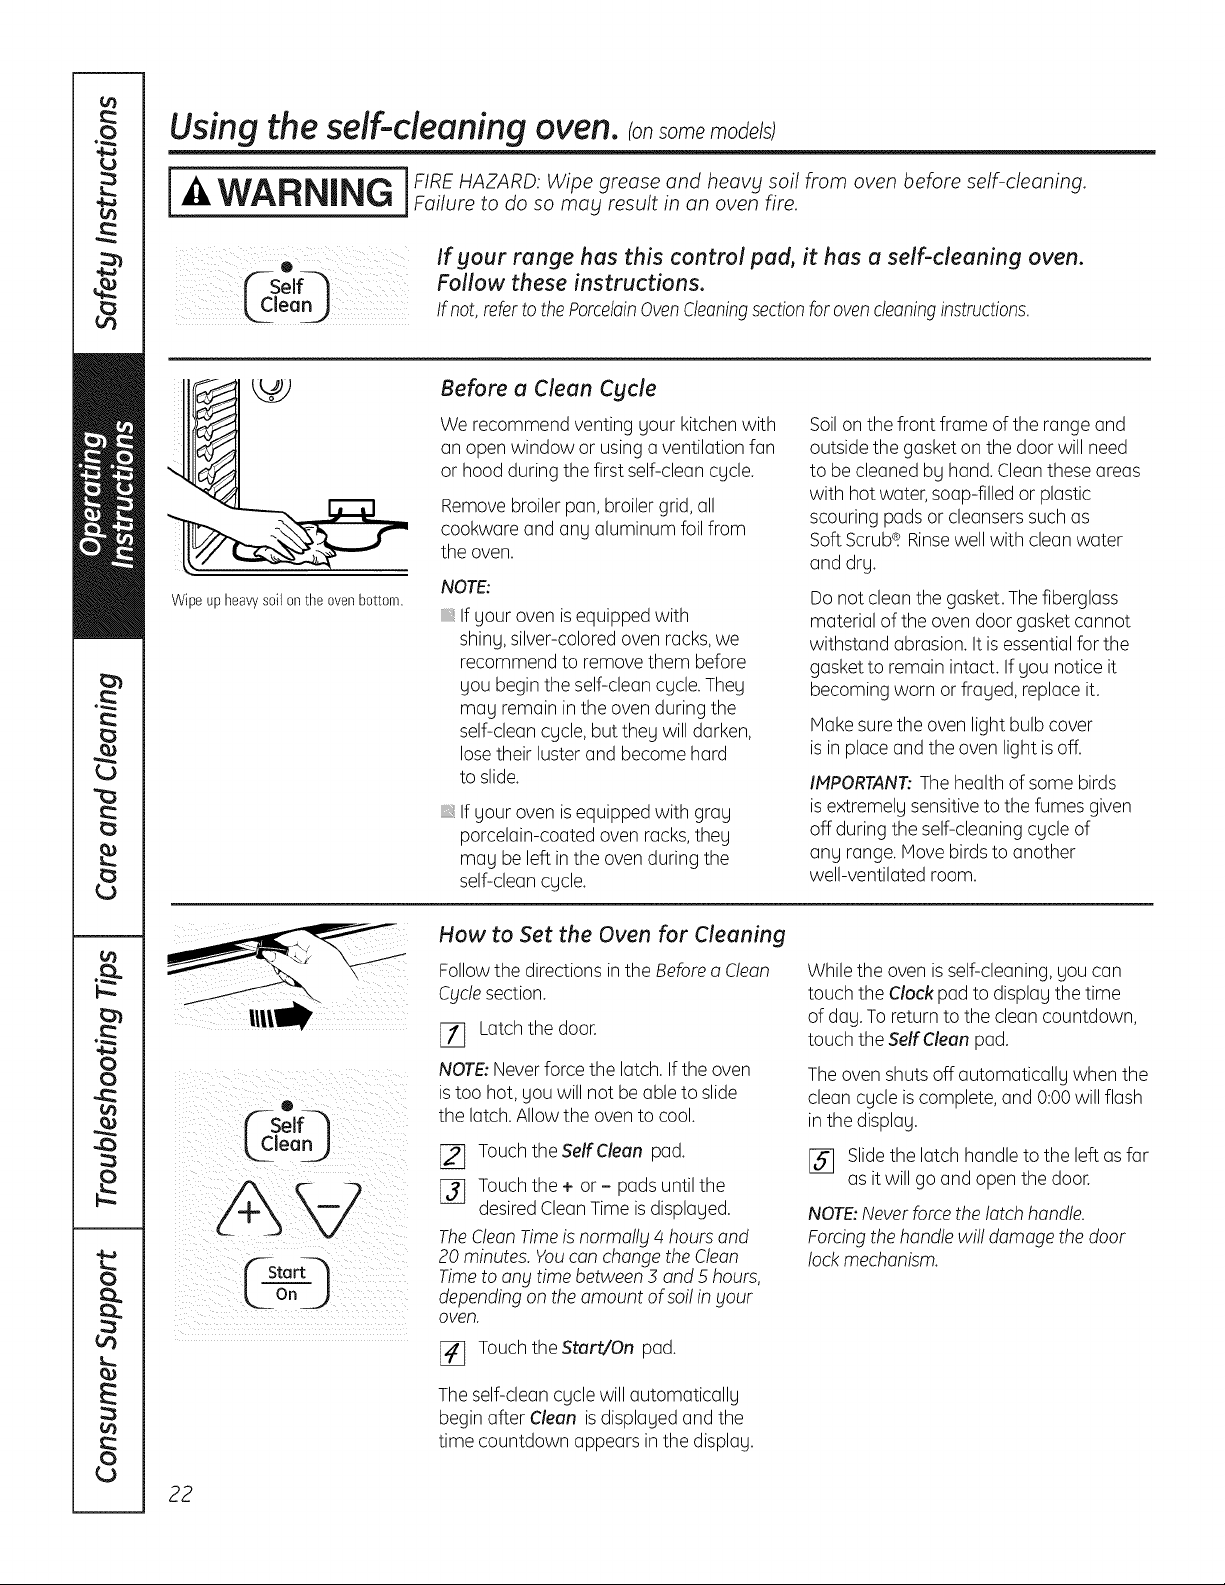
Usingthe self-cleaning oven.Consomemode/s
] FIRE HAZARD: Wipe grease and heav_l soil from oven before self-cleaning.
WARNING jFaiUretodosomauresultinanovenfire
C-self-]
ean_
If gour range has this control pad, it has a self-cleaning oven.
Follow these instructions.
If not, refer to the PorcelainOven Cleaningsection for oven cleaning instructions.
Wipe up heavy soil on the oven bottom.
Before a Clean Cycle
We recommend venting gour kitchen with
an open window or using a ventilation fan
or hood during the first self-clean cgcle.
Removebroiler pan, broiler grid, all
cookware and ang aluminum foil from
the oven.
NOTE:
If gour oven is equipped with
shing, silver-colored oven racks, we
recommend to remove them before
gou begin the self-clean cgcle. Theg
mag remain in the oven during the
self-clean cgcle, but theg will darken,
losetheir luster and become hard
to slide.
If gour oven is equipped with grag
porcelain-coated oven racks,theg
mag be left in the oven during the
self-clean cgcle.
Soilon the front frame of the range and
outside the gasket on the door will need
to be cleaned bg hand. Clean these areas
with hot water, soap-filled or plastic
scouring pads or cleansers such as
Soft Scrub_. Rinsewell with clean water
and drg.
Do not clean the gasket. The fiberglass
material of the oven door gasket cannot
withstand abrasion. It is essential for the
gasket to remain intact. If gou notice it
becoming worn or fraged, replace it.
Makesure the oven light bulb cover
is in place and the oven light is off.
IMPORTANT:The health of some birds
is extremelg sensitive to the fumes given
off during the self-cleaning cgcle of
ang range. Move birds to another
well-ventilated room.
0
L!,eo
How to Set the Oven for Cleaning
Followthe directions in the Before a Clean
Cyclesection.
_7] Latchthe door.
NOTE:Neverforce the latch. Ifthe oven
is too hot, gou will not be able to slide
the latch. Allow the oven to cool.
[_ Touch theSelfClean pad.
[]_] Touchthe + or - pads until the
desired CleanTime is displaged.
TheClean Timeis normally 4 hours and
20 minutes. Youcan change the Clean
Timeto any time between 3 and 5 hours,
depending on the amount of so!!in your
oven.
_-] Touchthe Start/On pad.
The self-clean cgcle will automaticallg
begin after Clean is displaged and the
time countdown appears in the displag.
While the oven is self-cleaning, gou can
touch the Clock pad to displag the time
of dag.To return to the clean countdown,
touch the Self Clean pad.
The oven shuts off automaticallg when the
clean cgcle is complete, and 0:00 will flash
in the displag.
[]_] Slide the latch handle to the left as far
as it will go and open the door.
NOTE:Never forcethe latch handle.
Forcing the handle wi!! damage the door
lock mechanism.
22
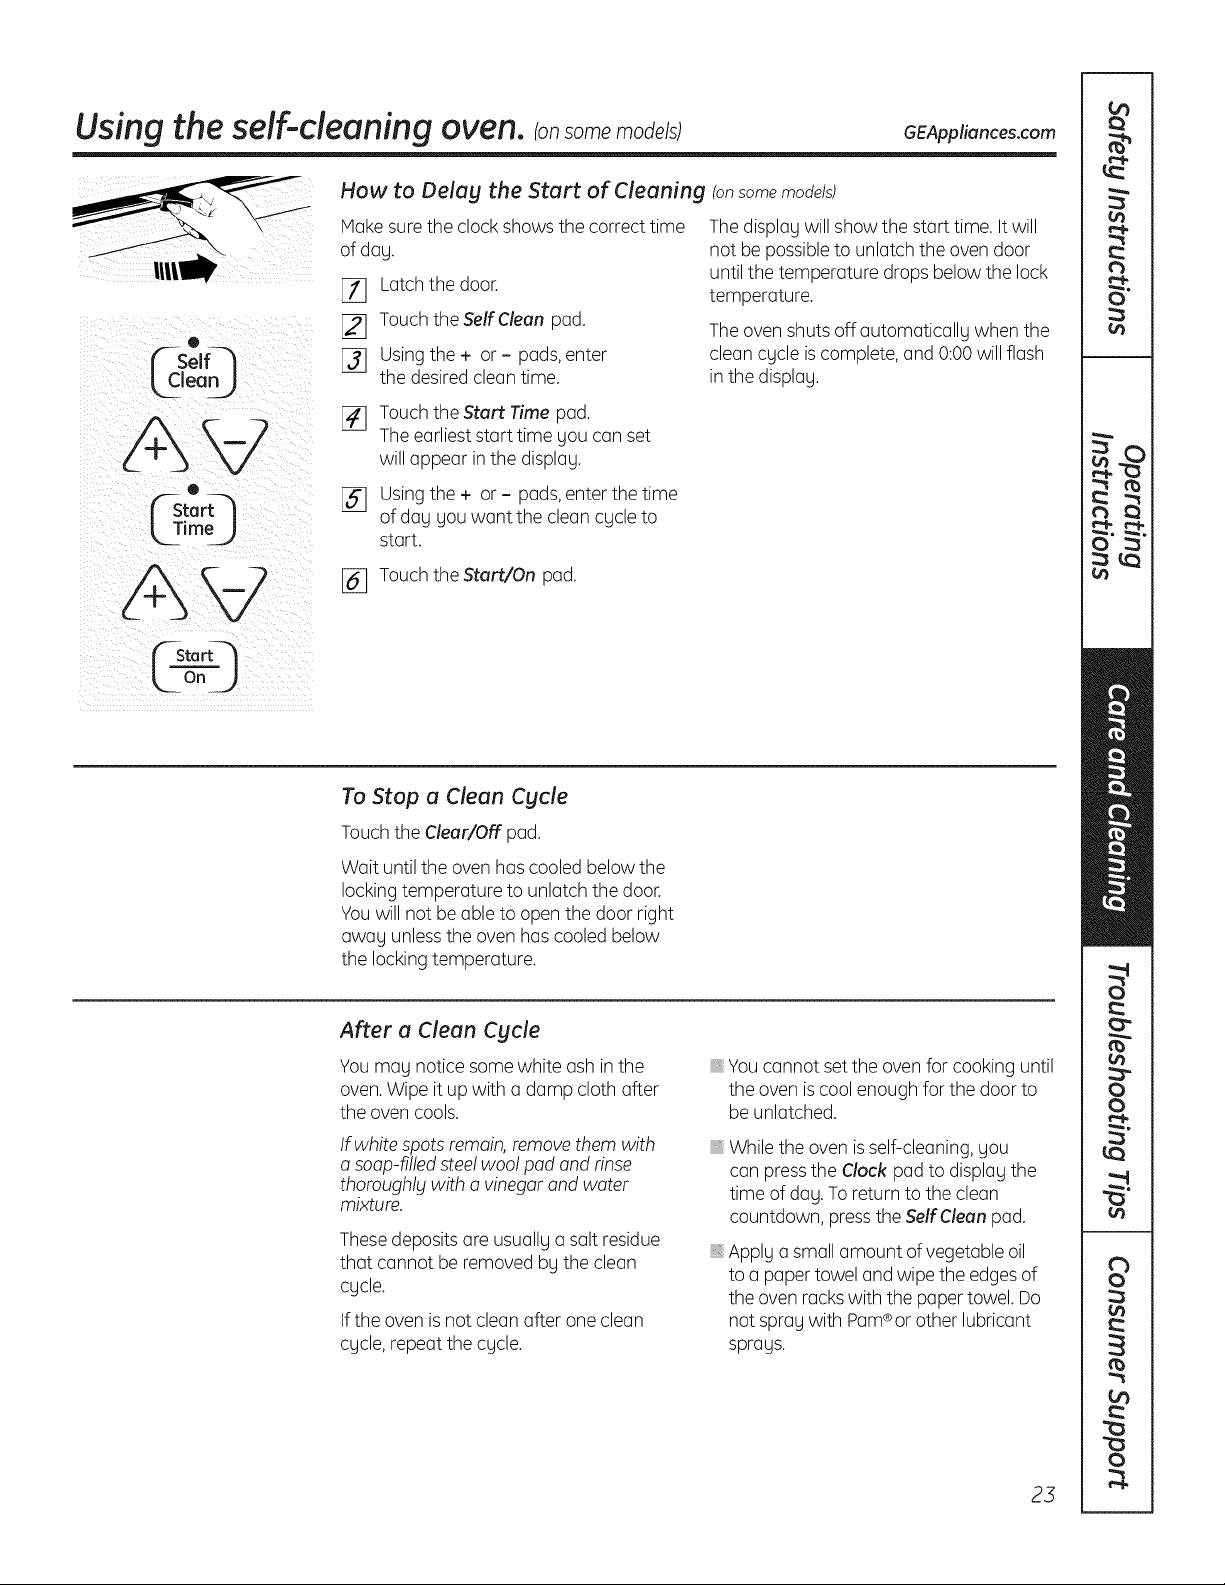
Usingthe self-cleaning oven.consomemodels; GEAppliances.com
o
_--Self-_
®
L3imeJ
How to Delag the Start of Cleaning (onsome models)
Hake sure the clock shows the correct time
ofdag.
[_ Latch the door.
[_] Touch the Self Clean pad.
[]_] Usingthe + or - pads,enter
the desired clean time.
The display will show the start time. It will
not be possible to unlatch the oven door
until the temperature drops below the lock
temperature.
The oven shuts off automaticallg when the
clean cgcle is complete, and 0:00 will flash
in the displag.
[_ Touch the Start Time pad.
The earliest start time gou can set
will appear in the displag.
[] Usingthe + or - pads,enter the time
ofdag gou want the clean cgcle to
start.
[_ Touch the Start/On pad.
n
To Stop a Clean Cgcle
Touch the Clear/Off pad.
Wait until the oven has cooled below the
lockingtemperature to unlatch the door.
Youwill not be able to open the door right
awag unlessthe oven has cooled below
the locking temperature.
After a Clean Cgcle
You mag notice some white ash inthe
oven.Wipe it up with a damp cloth after
the oven cools.
If white spots remain, removethem with
a soap-filled steelwoo! pad and rinse
thoroughlg with o vinegar and water
mixture.
Thesedeposits are usuallg a salt residue
that cannot be removed bg the clean
cgcle.
If the oven is not clean after one clean
cgcle, repeat the cgcle.
Youcannot set the oven for cooking until
the oven is cool enough for the door to
be unlatched.
While the oven is self-cleaning, gou
can pressthe Clock pad to displag the
time of dog. To return to the clean
countdown, pressthe Self Clean pad.
Applg a small amount of vegetable oil
to a paper towel and wipe the edges of
the oven rackswith the paper towel. Do
not sprag with Pam®or other lubricant
sprags.
23
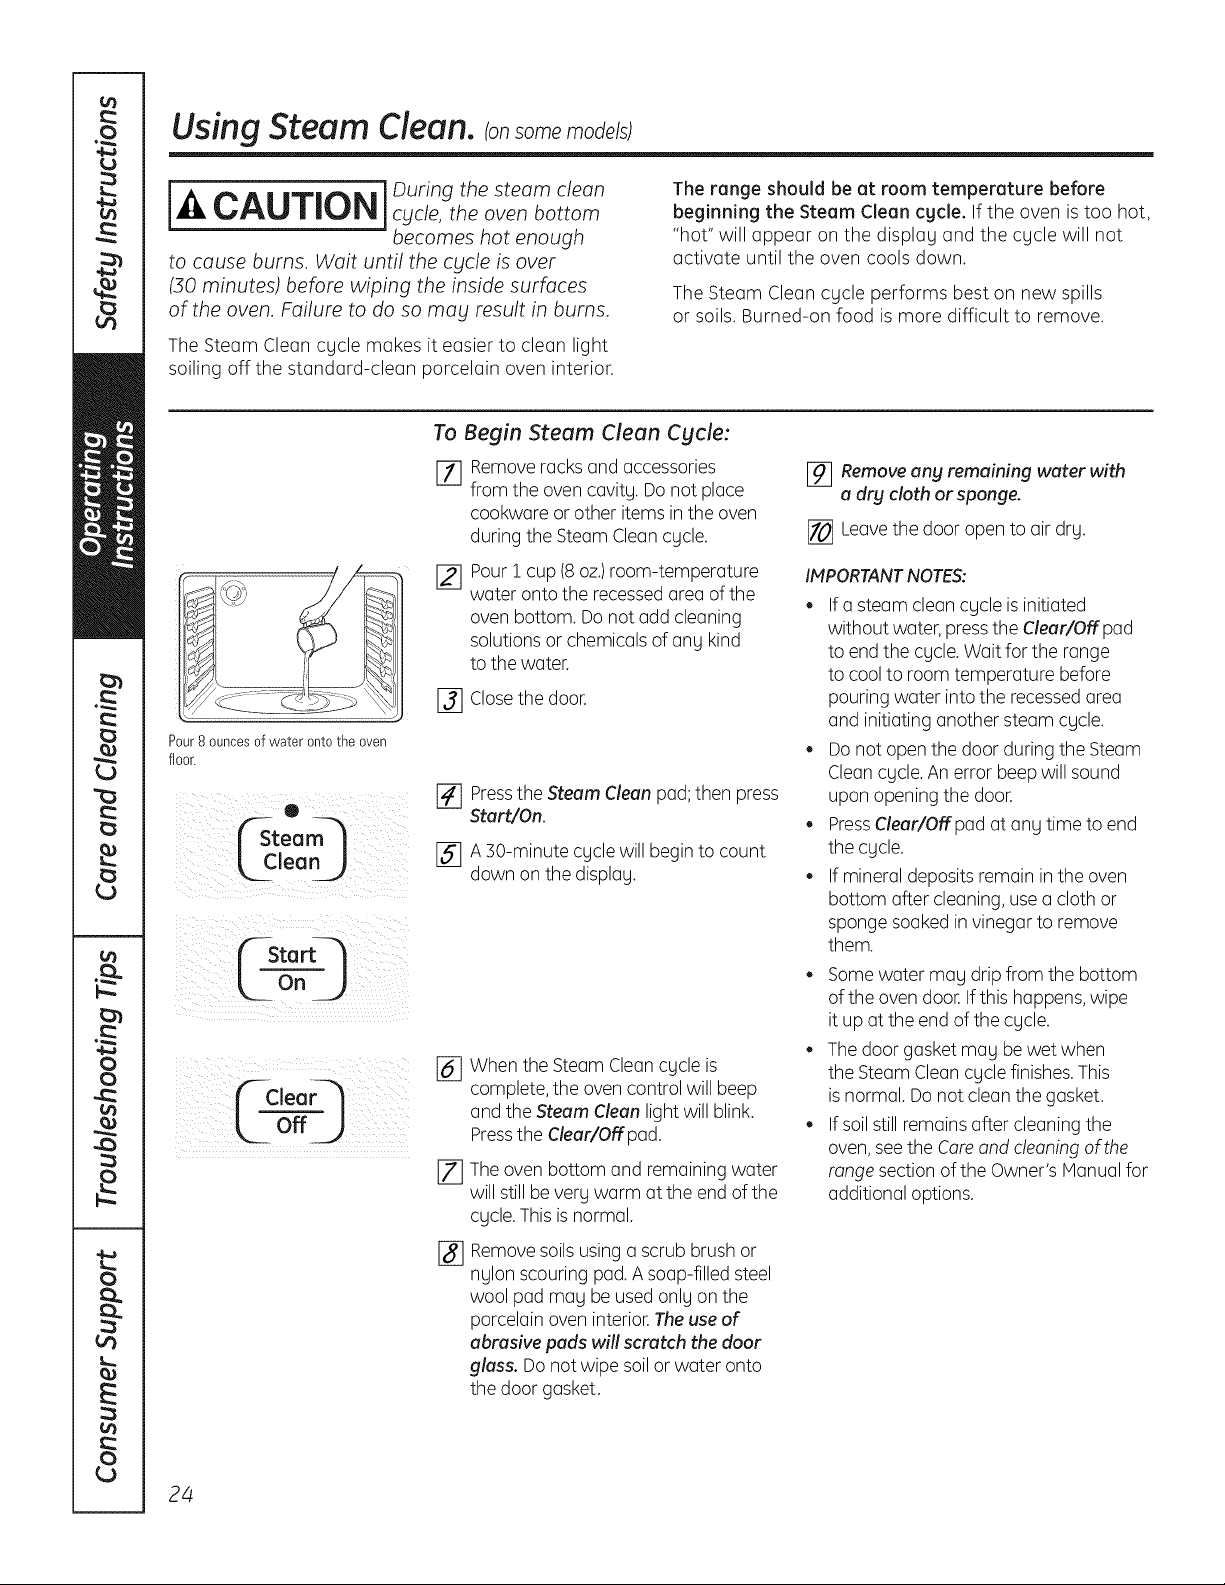
UsingSteam Clean.
[_1_ ] During the steam cleanCAUTION cycle,theovenbottom
becomes hot enough
to cause burns. Wait until the cycle is over
(30 minutes) before wiping the inside surfaces
of the oven. Failure to do so mag result in burns.
The Steam Clean cgcle makes it easier to clean light
soiling off the standard-clean porcelain oven interior.
The range should be at room temperature before
beginning the Steam Clean cgcle. If the oven is too hot,
"hot" will appear on the displog and the cgcle will not
activate until the oven cools down.
The Steam Clean cgcle performs best on new spills
or soils. Burned-on food is more difficult to remove.
Pour8 ouncesof water onto the oven
floor.
O
_team
[,Clean )
Startq
L ooJ
¢_Clear---_
off_.)
To Begin Steam Clean Cgcle:
[] Remove rocksond occessories
fromtheovencovitg.Do notploce
cookworeorotheritemsintheoven
during the Steam Clean cgcle.
Pour i cup (8oz.)room-temperature
water onto the recessed area of the
oven bottom. Do not odd cleaning
solutions or chemicals of any kind
to the water.
[_] Closethe door.
[] Pressthe Steam Clean pod; then press
Start/On.
[_ A ]0-minute cgcle will begin to count
down on the displog.
%
[]
%
When the Steam Clean cgcle is
complete, the oven control will beep
and the Steam Clean light will blink.
Pressthe Clear/Off pod.
The oven bottom and remaining water
will still beverg warm otthe end of the
cgcle.This is normal.
Remove soils using o scrub brush or
nglon scouring pod. A soap-filled steel
wool pad mog be used onlg on the
porcelain oven interior.The use of
abrasive pads will scratch the door
glass. Do not wipe soil or woter onto
the door gasket.
[_ Remove ang remaining water with
a dry cloth or sponge.
[] Leavethe door open to air drg.
IMPORTANTNOTES:
• If o steam cleon cgcle is initiated
without water, pressthe Clear/Off pod
to end the cgcle. Wait for the range
to cool to room temperature before
pouring water into the recessedarea
and initiating another steam cgcle.
Do not open the door during the Steam
Cleancgcle. An error beep will sound
upon opening the door.
PressClear/Off pod at ong time to end
the cgcle.
If mineral deposits remain in the oven
bottom offer cleaning, use o cloth or
sponge soaked in vinegar to remove
them.
Somewater mog drip from the bottom
of the oven door. Ifthis happens, wipe
it up at the end of the cgcle.
The door gasket mog be wet when
the Steam Cleancgcle finishes. This
is normal. Do not clean the gasket.
If soil still remains offer cleaning the
oven,see the Care and cleaning of the
range section of the Owner's Manual for
additional options.
24
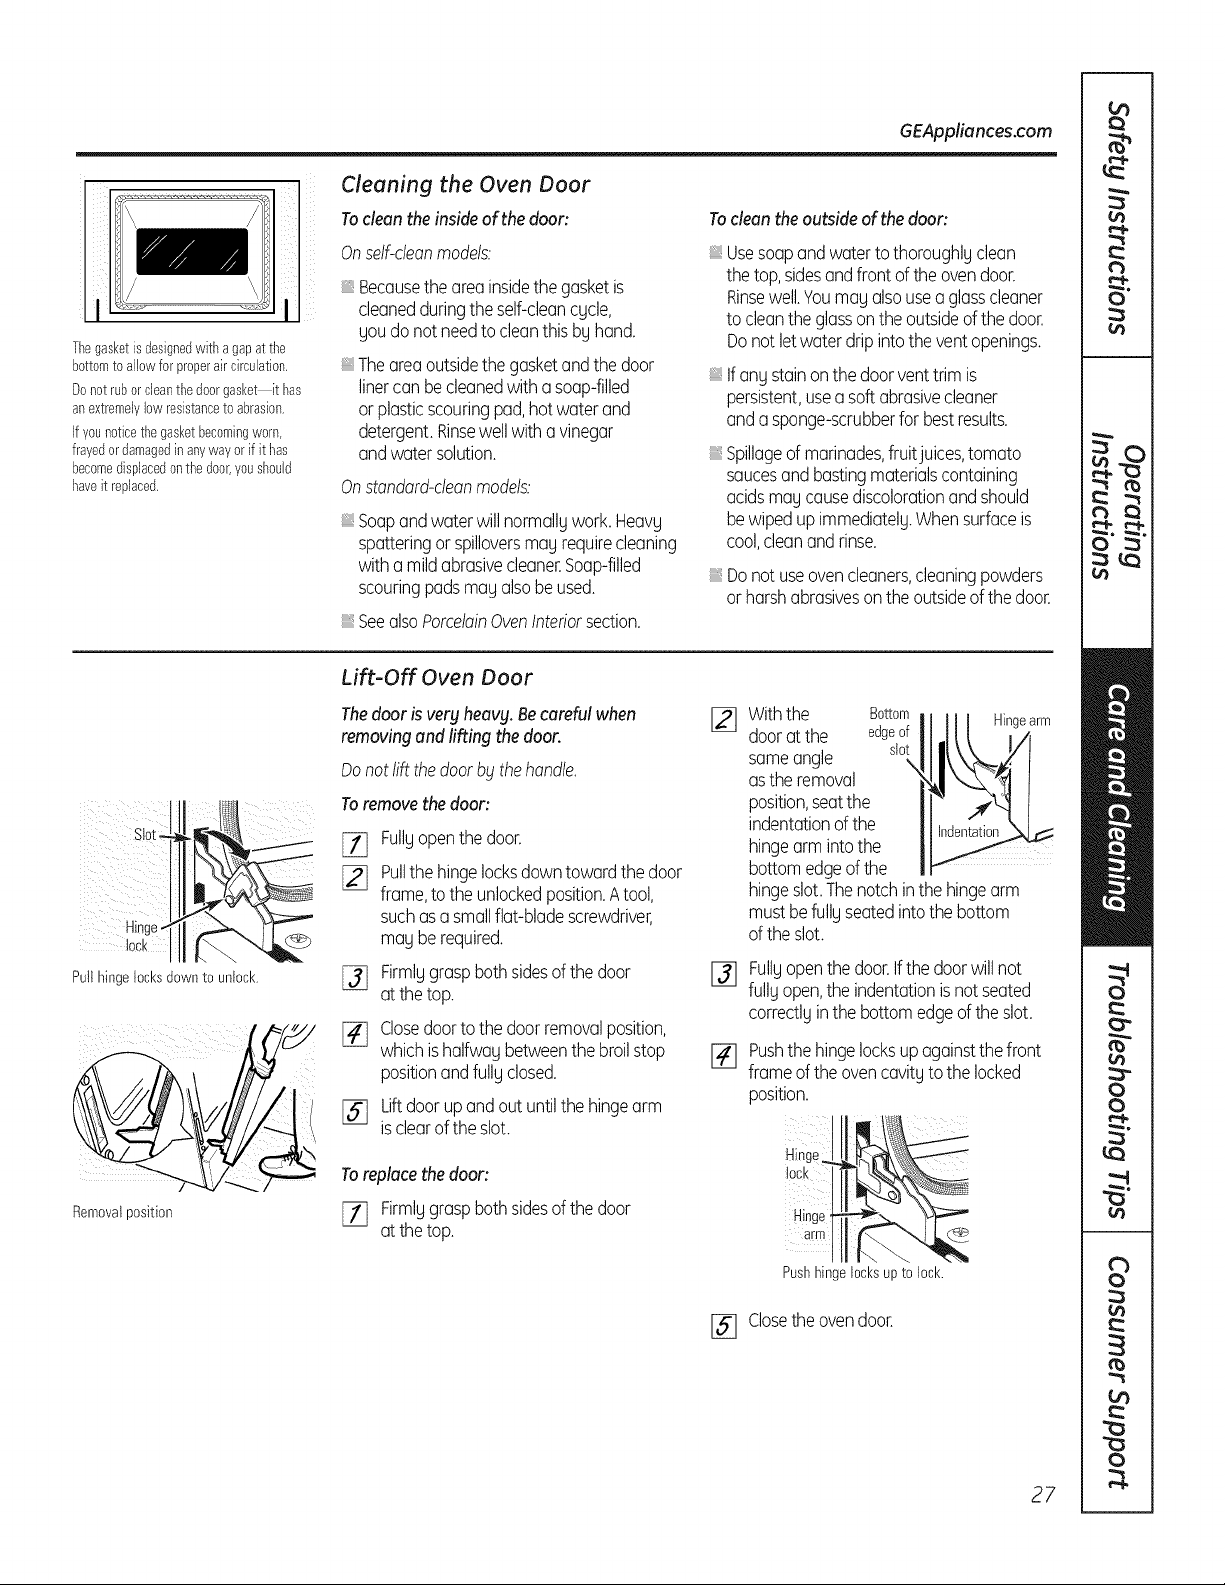
Care and cleaning of the range. GEAppliances.com
Be sure all controls are off and
all surfaces are cool before cleaning any part of the range.
j I If your range is removed for cleaning, servicing or
-4,WARNING , any reason, be sure the anti-tip device is reengaged
properly when the range is replaced. Failure to take this precaution could result in
tipping of the range and cause injury.
How to Remove Protective Shipping Film and Packaging Tape
Carefullggrasp a corner of the protective Toensure no damage is done to the finish
shipping filmwithgour fingers and slowlg peel of the product, the safest wag to remove
itfrom the appliancesurface.Donot useang the adhesivefrom packagingtape on new
sharpitemsto removethe film.Removeallof appliancesisan applicationof a household
the film beforeusingtheappliancefor the first liquiddishwashingdetergent.Applgwith
time. a softcloth and allowto soak.
NOTE:Theadhesivemustberemovedfrom
allparts.It cannotbe removedif it isbakedon.
Control Knobs
Thecontrolknobsma_jbe removedfor easier
cleaning.
Makesurethe knobsare in the OFFpositions
and pullthemstraightoff the stemsfor
cleaning.
Theknobscanbecleanedina dishwasheror
theg maUalsobewashedwith soapand water.
Makesurethe insideofthe knobsaredrU
beforereplacing.
Replacethe knobs,in the OFFpositionto
ensureproperplacement.
Control Panel
It'sa goodideato wipethe controlpanelafter
each useof the oven.Usea damp clothto
cleanor rinse.Forcleaning,usemildsoapand
wateror a 50/50solutionof vinegarandwater.
Forrinsing,usecleanwater.Polishdrgwitha
soft cloth.
Donot useabrasivecleansers,strongliquid
cleaners,plasticscouringpadsor ovencleaners
onthe controlpanel-the Uwill damagethe
finish.
Painted Surfaces
Paintedsurfacesincludethe sidesofthe range
andthe door,top of controlpanelandthe
drawerfront.Cleanthese with soapandwater
or a vinegarandwatersolution.
Do not use commercial oven cleaners, cleaning
powders, steel wool or harsh abrasives on ang
painted surface.
Stainless Steel Surfaces ton some models)
Do not use a steel wool pad; it will
scratch the surface.
To clean the stainless steel surface, use
warm, sudsg water or a stainlesssteel
cleaner or polish.Alwags wipe the surface
in the direction of the grain. Follow the
cleaner instructions for cleaning the
stainlesssteel surface.
To inquire about purchasing stainless steel
appliance cleaner or polish, or to find the
location of a dealer nearest gou, please call
our toll-free number:
National Parts Center 1.800.626.2002
GEAppliances.com
Porcelain Enamel Cooktop (onsome models)
The porcelain enamel finish is sturdg but
breakable if misused.Thisfinish is acid-
resistant. However,ang acidic foods spilled
(suchas fruit juices, tomato or vinegar)
should not be permitted to remain
on the finish.
If acids spill on the cooktop while it is hot,
use a drg paper towel or cloth to wipe it up
right awag. When the surface has cooled,
wash with soap and water. Rinsewell.
Forother spills such as fat spatterings,
wash with soap and water or cleansing
powders after the surface has cooled.
Rinsewell. Polishwith a drg cloth.
25
Care and cleaning of the range.
Porcelain Oven Interior (on standard-clean models)
Withpropercare,the porcelainenamelfinishon
the insideof the oven-top, bottom,sides,back
andinsideof the door-will stay new-lookingfor
years.
Letthe oven cool before cleaning.
We recommend that you wear rubber gloves
when cleaning the oven.
Soapandwaterwillnormallydo thejob. Heavy
spatteringor spilloversmay requirecleaning
witha mildabrasivecleaner.Soap-filled
scouringpadsmay alsobe used.
Donot allowfoodspillswitha highsugaror
acidcontent(suchastomatoes,sauerkraut,
fruitjuicesorpiefilling)to remainonthesurface.
Thebtmo_jcausea dull spotevenafter cleaning.
Householdammoniamaymakethe cleaning
job easier.Place1/2cup in a shallowglassor
potterycontainerin a coldovenovernight.
Theammoniafumeswill helploosen
the burned-ongreaseand food.
Ifnecessary,you may usean ovencleaner.
Followthe packagedirections.
Do notsprabtovencleaneronthe electrical
controlsandswitchesbecauseit couldcause
a shortcircuitandresultinsparkingorfire.
Do notallowa film from thecleanerto build
up onthetemperaturesensor-it couldcause
the ovento heatimproperlbt.(Thesensoris
locatedat thetop of theoven.)Carefullbtwipe
the sensorcleonafter eachovencleaning,
beingcarefulnot to movethe sensoras
a changein itspositioncouldaffecthow
the ovenbakes.
Do notsprabtan_tovencleaneron the oven
door,handlesor anbtexteriorsurfaceof the
oven,cabinetsorpaintedsurfaces.Thecleaner
can damagethesesurfaces.
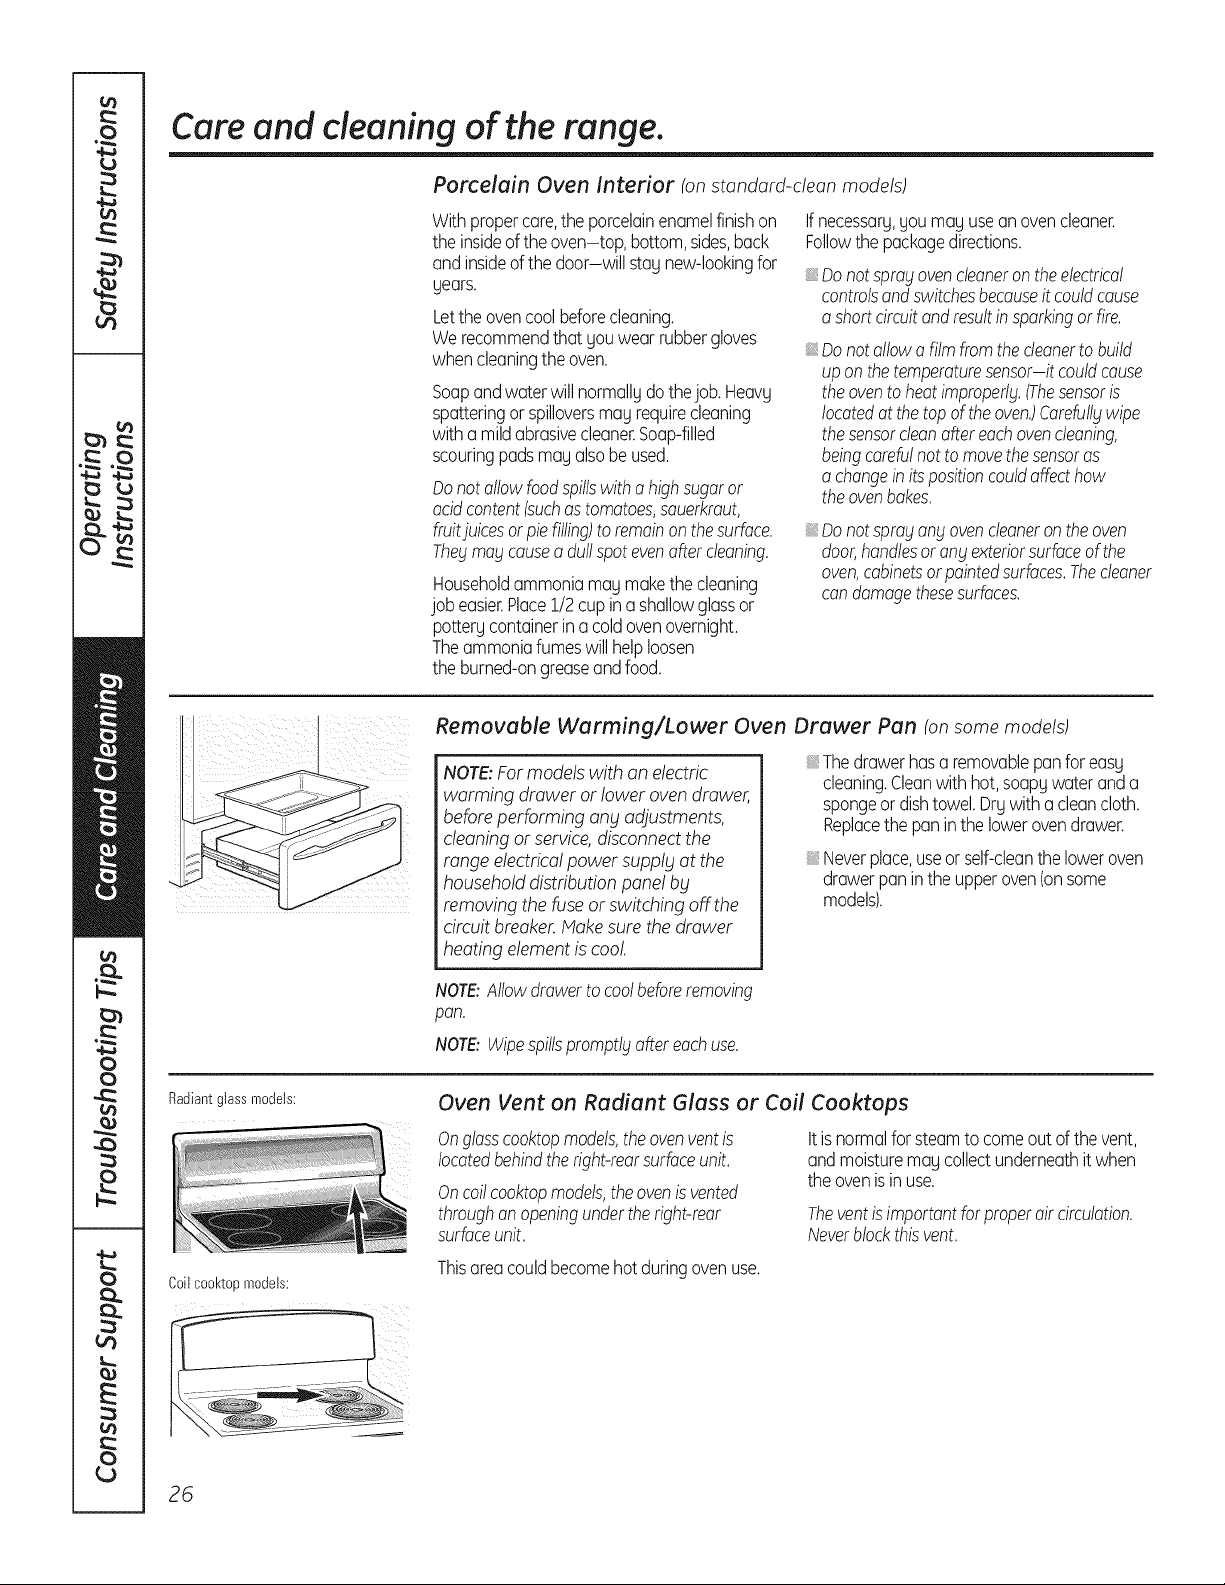
Removable Warming/Lower Oven Drawer Pan (onsome models)
NOTE:For models with an electric
warming drawer or lower oven drawer,
before performing any adjustments,
cleaning or service,disconnect the
range electrical power supply at the
household distribution pane! by
removing the fuse or switching off the
circuit breaker.Makesure the drawer
heating element is cool
Thedrawerhasa removablepan for easy
cleaning.Cleanwith hot, soapywateranda
spongeor dishtowel.Drywitha cleancloth.
Replacethe pan in the lowerovendrawer.
Neverplace,useor self-cleanthe loweroven
drawerpan in the upperoven(onsome
models).
NOTE:Allowdrawerto coolbeforeremoving
pan.
NOTE:Wipespillspromptlbtafter eachuse.
Radiantglassmodels:
Coil cool<topmodels:
Oven Vent on Radiant Glass or Coil Cooktops
Onglasscooktopmodels,theovenventis
locatedbehindtheright-rearsurfaceunit.
Oncoilcooktopmodels,theovenis vented
throughanopeningunderthe right-rear
surfaceunit.
Itisnormalfor steamto comeout of the vent,
andmoisturemaycollectunderneathit when
the ovenisinuse.
Theventis importantforproperair circulation.
Neverblockthisvent.
Thisareacouldbecomehot duringovenuse.
26
GEAppliances.com
Thegasketis designedwith a gapat the
bottomto allowfor properair circulation.
Donotruborcleanthedoorgasket it has
anextremelylowresistanceto abrasion.
If younoticethegasketbecomingworn,
frayedor damagedinanywayor if it has
becomedisplacedonthe door,youshould
haveit replaced.
Cleaning the Oven Door
To clean the inside of the door:
Onselficleanmodels:
iiiiiii
Becausethe area insidethe gasketis
cleanedduringthe self-cleancycle,
you do not needto cleanthis by hand.
Theareaoutsidethe gasketandthe door
linercan becleanedwith a soap-filled
orplasticscouringpad,hot waterand
detergent.Rinsewellwitha vinegar
andwatersolution.
Onstandard-deanmodels:
Soapandwaterwill normallgwork.Heavg
spatteringor spilloversmagrequirecleaning
witha mildabrasivecleaner.Soap-filled
scouringpadsmagalsobeused.
SeealsoPorcelainOvenInteriorsection.
To clean the outside of the door:
iiiiiii
iiiiiii
iiiiiii
iiiiiii
Usesoapand water to thoroughlyclean
the top, sidesandfront of the ovendoor.
Rinsewell.Youmayalsousea glasscleaner
to cleanthe glasson the outsideof the door.
Donot letwater drip intothe vent openings.
Ifany stainon the doorventtrimis
persistent,usea soft abrasivecleaner
andasponge-scrubberfor bestresults.
Spillageof marinades,fruitjuices,tomato
saucesand bastingmaterialscontaining
acidsmaycausediscolorationand should
bewipedup immediately.Whensurfaceis
cool,cleanand rinse.
Donot useovencleaners,cleaningpowders
orharshabrasiveson the outsideof the door.
Lift-Off Oven Door
The door is very heavy. Be careful when
removing and lifting the door.
Donot liftthe doorbbtthehandle.
To remove the door:
E_ Fullyopenthe door.
[_j Pullthe hingelocksdowntoward the door
frame,to the unlockedposition.A tool,
suchasa smallflat-bladescrewdriver,
may berequired.
[_ Firmlygraspbothsidesof the door
at the top.
[_ Closedoorto the doorremovalposition,
whichishalfwaybetweenthe broilstop
positionandfullyclosed.
Liftdoorupandout untilthe hingearm
[SJ isclearof the slot.
To replace the door:
[7] Firmlggrasp both sides of the door
at the top.
%
Withthe Bottom
doorat the edgeof
sameangle slot
\
asthe removal
position,seatthe
indentationof the
hingearm intothe
bottomedgeof the
Hingearm
hingeslot.Thenotchinthe hingearm
mustbe fully seatedintothe bottom
of theslot.
Fullyopenthedoor.Ifthe door willnot
fully open,the indentationis notseated
correctlyinthe bottomedgeof the slot.
Pushthe hingelocksupagainstthefront
frameof the ovencavityto the locked
position.
Hinge
lock
Hinge
arm _
Pushhinge locksup to lock.
[] Closethe ovendoor.
27
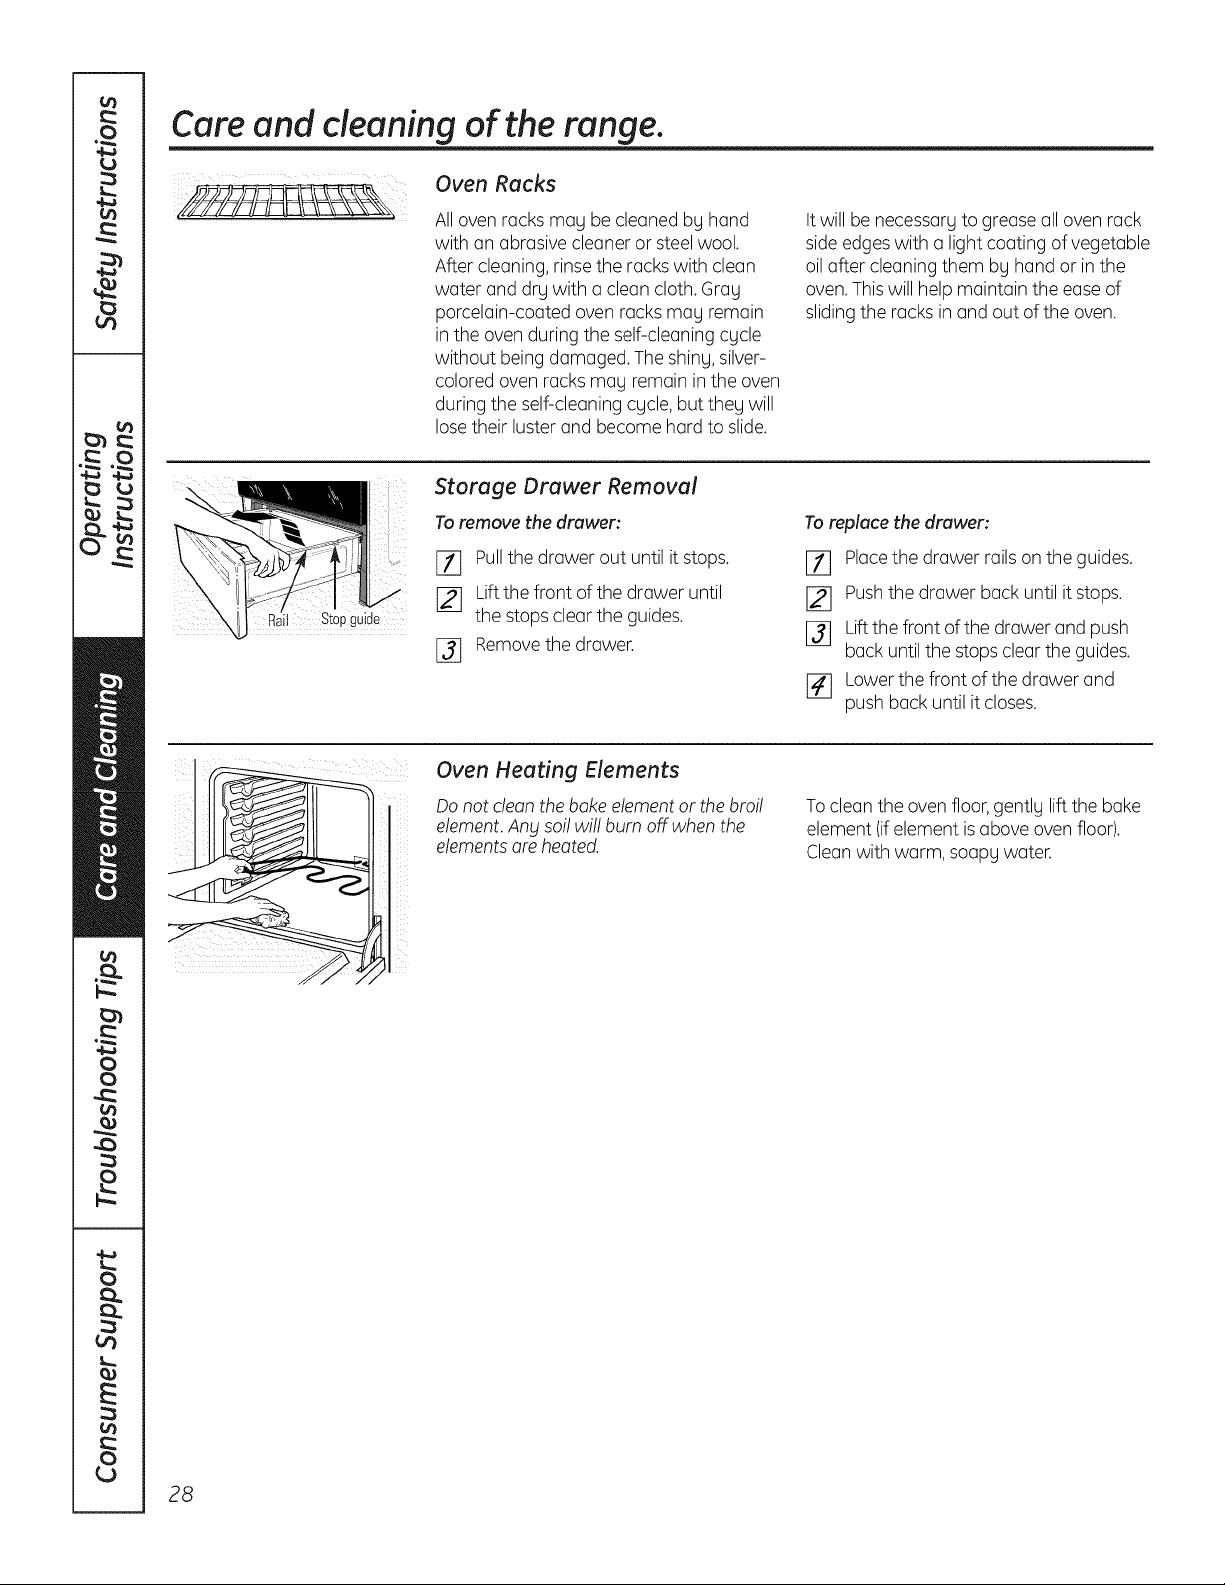
Care and cleaning of the range.
Oven Racks
All oven racks may be cleaned by hand
with an abrasive cleaner or steel wool.
After cleaning, rinse the racks with clean
water and dry with a clean cloth. Gray
porcelain-coated oven racks may remain
in the oven during the self-cleaning cycle
without being damaged. The shiny, silver-
colored oven racks may remain in the oven
during the self-cleaning cycle, but they will
lose their luster and become hard to slide.
Itwill be necessary to grease all oven rack
side edges with a light coating of vegetable
oil after cleaning them by hand or in the
oven.Thiswill help maintain the ease of
sliding the racks in and out of the oven.
Stopguide
Storage Drawer Removal
To remove the drawer:
_] Pullthe drawer out until it stops.
[_j Lift the front of the drawer until
the stops clear the guides.
[_ Removethe drawer.
To replace the drawer:
Ell Placethe drawer rails on the guides.
[_ Pushthe drawer back until it stops.
[_ Liftthe front of the drawer and push
back until the stops clear the guides.
r4] Lower the front of the drawer and
push back until it closes.
Oven Heating Elements
Do not clean the bake element or the broil
element.Any sol! wi!! burn off when the
elementsare heated.
To clean the oven floor, gently lift the bake
element (ifelement is above oven floor).
Cleanwith warm, soapy water.
28
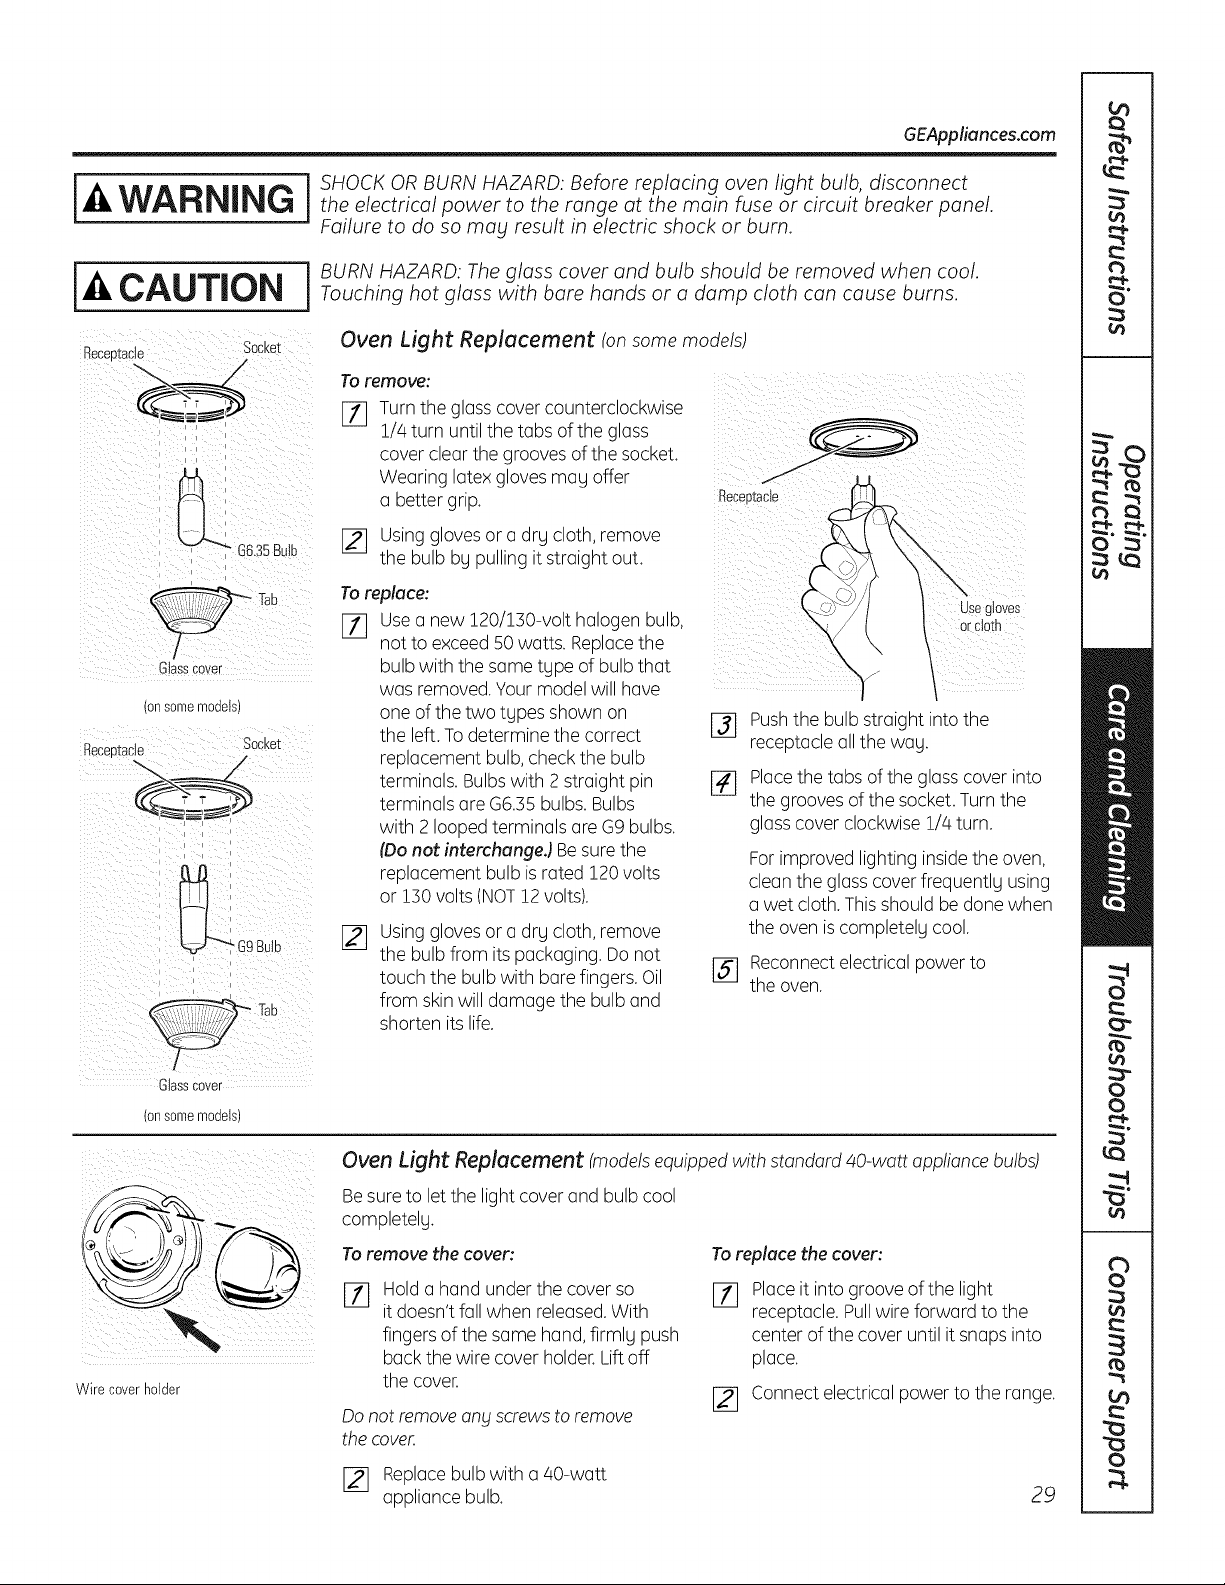
GEAppliances.com
j j SHOCK OR BURN HAZARD: Before replacing oven light bulb, disconnect
WARNING j theelectricalpowertotherangeatthemainfuseorcircuitbreakerpanel
Failure to do so mag result in electric shock or burn.
i J BURN HAZARD: The glass cover and bulb should be removed when cool.
-&CAUTION Touchinghotglasswithbarehandsoradampclothcancauseburns
Becee_acle Socket
/
C ass Cover
(onsomemodels)
Receptacle Socket
i i k
Oven Light Replacement ton some models)
To remove:
F11 Turn the glass cover counterclockwise
1//4turn until the tabs of the glass
cover clear the grooves of the socket.
Wearing latex gloves may offer
a better grip.
[_ Using glovesor a drg cloth, remove
the bulb by pulling it straight out.
To replace:
[77 Usea new 120/150-volt halogen bulb,
not to exceed50 watts. Replacethe
bulb with the same type of bulb that
was removed.Your model will have
one of the two types shown on
the left. To determine the correct
replacement bulb, check the bulb
terminals. Bulbs with 2 straight pin
terminals are G6.55 bulbs. Bulbs
with 2 looped terminals are G9 bulbs.
(Donot interchungeJ Be sure the
replacement bulb is rated 120 volts
or 150 volts (NOT12 volts).
_q
Using glovesor a drg cloth, remove
the bulb from its packaging. Do not
touch the bulb with bare fingers. Oil
from skinwill damage the bulb and
shorten its life.
Pushthe bulb straight into the
receptacle all the wag.
[_ Placethe tabs of the glass cover into
the grooves of the socket. Turn the
glass cover clockwise 1/4 turn.
For improved lighting insidethe oven,
clean the glass cover frequently using
a wet cloth. This should be done when
the oven is completely cool.
[_ Reconnectelectrical power to
the oven.
Glasscover
(onsomemodels)
Wire coverholder
Oven Light Replacement (models equipped with standard 40-watt appliance bulbs)
Besure to let the light cover and bulb cool
completelg.
To remove the cover:
rT]
Hold a hand under the cover so
it doesn't fall when released.With
fingers of the same hand, firmlg push
back the wire cover holder. Lift off
the cover.
Do not remove ang Screws to remove
the cover.
To replace the cover:
F_
Placeit into groove of the light
receptacle. Pullwire forward to the
center of the cover until it snaps into
place.
[_ Connect electrical power to the range.
[_ Replacebulb with a 40-watt
appliance bulb.
29
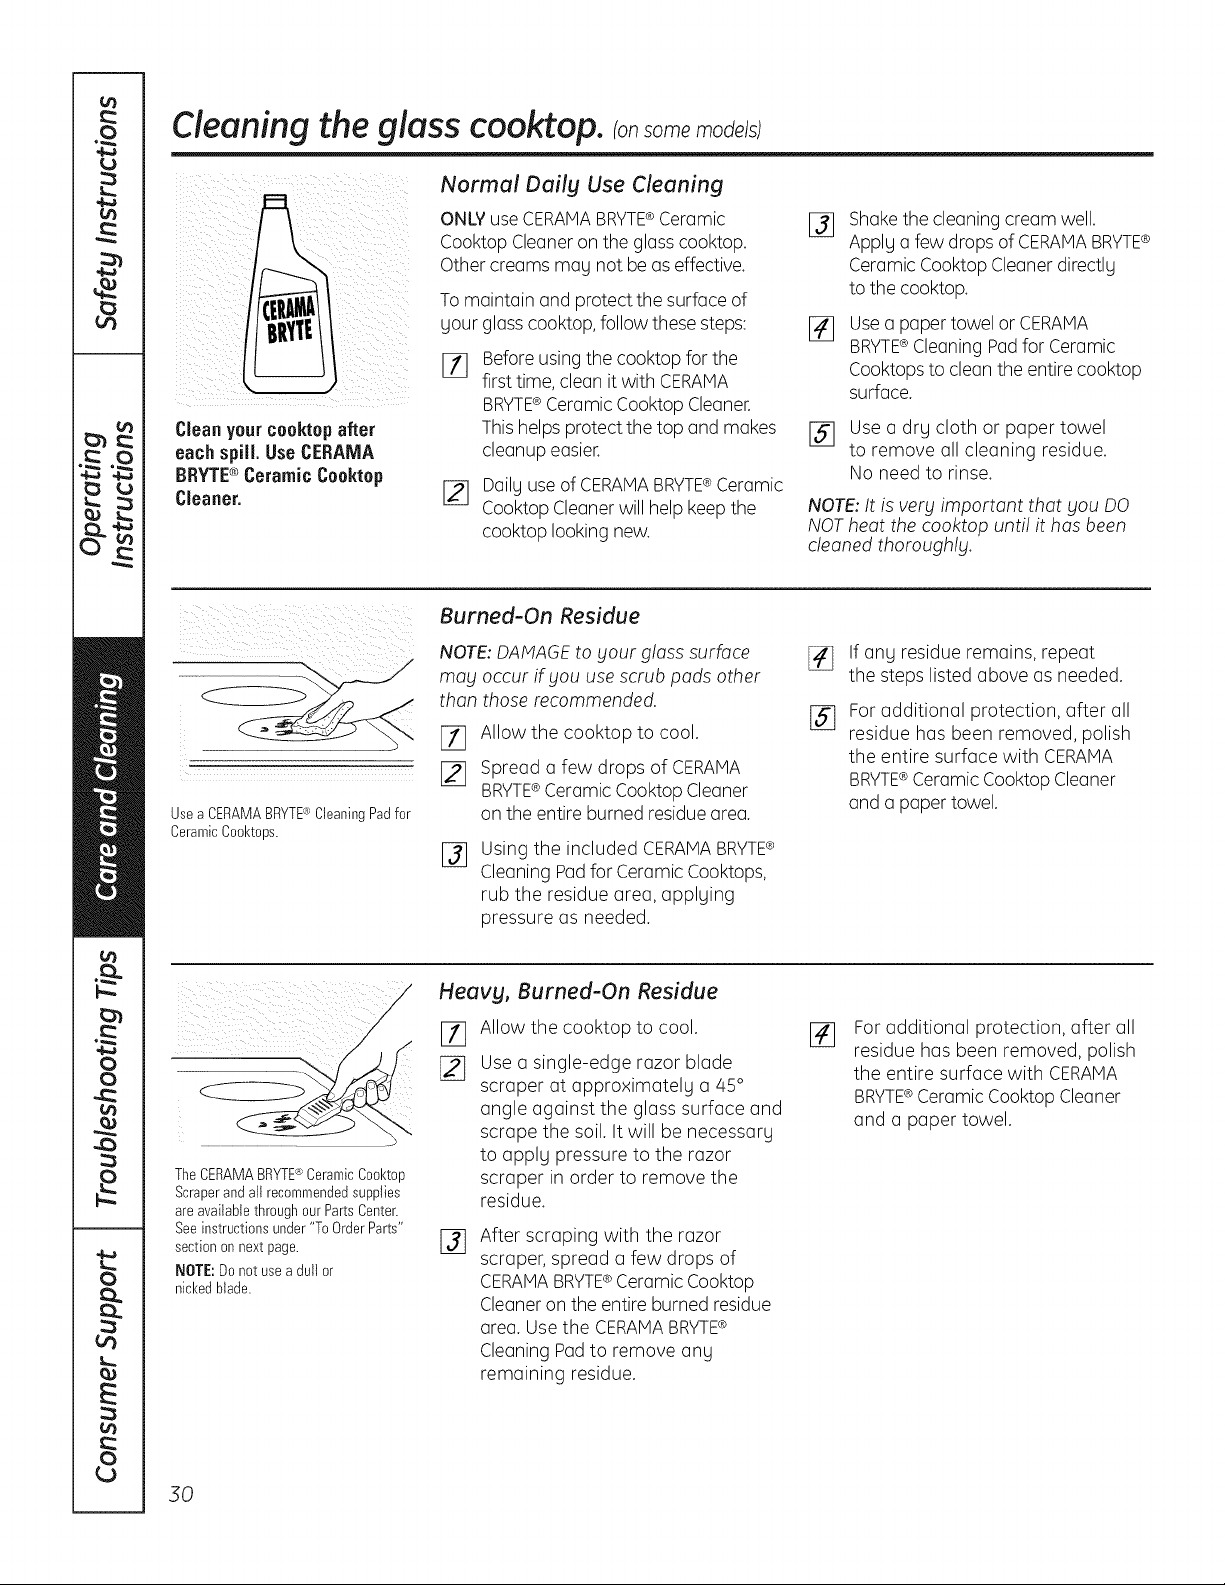
Cleaningthe glass cooktop, ransomemode/s
Clean yourcooktopafter
each spill. Use CERAMA
BRYTE® Ceramic Cooktop
Cleaner.
Normal Dailg Use Cleaning
ONLY useCERAMABRYTE®Ceramic
Cooktop Cleaneron the glass cooktop.
Other creams nag not be as effective.
To maintain and protect the surface of
gour glass cooktop, follow these steps:
Before using the cooktop for the
first time, clean it with CERAMA
BRYTE® Ceramic Cooktop Cleaner.
This helps protect the top and makes
cleanup easier.
[_ Dailg use of CERAMABRYTE®Ceramic
Cooktop Cleaner will help keep the
cooktop looking new.
%
Shakethecleaningcream well.
Applga few dropsofCERAMA BRYTE®
CeramicCooktopCleanerdirectlg
tothecooktop.
Usea paper towel or CERAMA
BRYTE®Cleaning Pad for Ceramic
Cooktopsto clean the entire cooktop
surface.
[] Use a drg cloth or paper towel
to remove all cleaning residue.
No need to rinse.
NOTE: It is very important that you DO
NOT heat the cooktop unti! it has been
cleaned thoroughly.
Usea CERAMABRYTE®CleaningPadfor
CeramicCool<tops.
Burned-On Residue
NOTE: DAMAGEto Four glass surface
may occur if you use scrub pads other
than those recommended.
I-f] Allow the cooktop to cool.
[] Spread a few drops of CERAMA
BRYTE®Ceramic Cooktop Cleaner
on the entire burned residue area.
%
Using the included CERAMABRYTE¢
Cleaning Padfor Ceramic Cooktops,
rub the residue area, applging
pressure as needed.
[]
%
If ang residue remains, repeat
the steps listed above as needed.
For additional protection, after all
residue has been removed, polish
the entire surface with CERAMA
BRYTE®Ceramic Cooktop Cleaner
and a paper towel.
TheCERAMABRYTE®CeramicCool<top
Scraperand all recommendedsupplies
are availablethrough our PartsCenter.
Seeinstructionsunder"To OrderParts"
sectionon next page.
NOTE:Do not usea dull or
nickedblade.
Heavg, Burned-On Residue
[]
Allow the cooktop to cool.
Use a single-edge razor blade
scraper at approximatelg a 45 °
angle against the glass surface and
scrape the soil. It will be necessarg
to applg pressure to the razor
scraper in order to remove the
residue.
%
After scraping with the razor
scraper, spread a few drops of
CERAMABRYTE®Ceramic Cooktop
Cleaneron the entire burned residue
area. Use the CERAMABRYTE®
Cleaning Pad to remove any
remaining residue.
[]
For additional protection, offer all
residue has been removed, polish
the entire surface with CERAMA
BRYTE®Ceramic Cooktop Cleaner
and a paper towel.
30
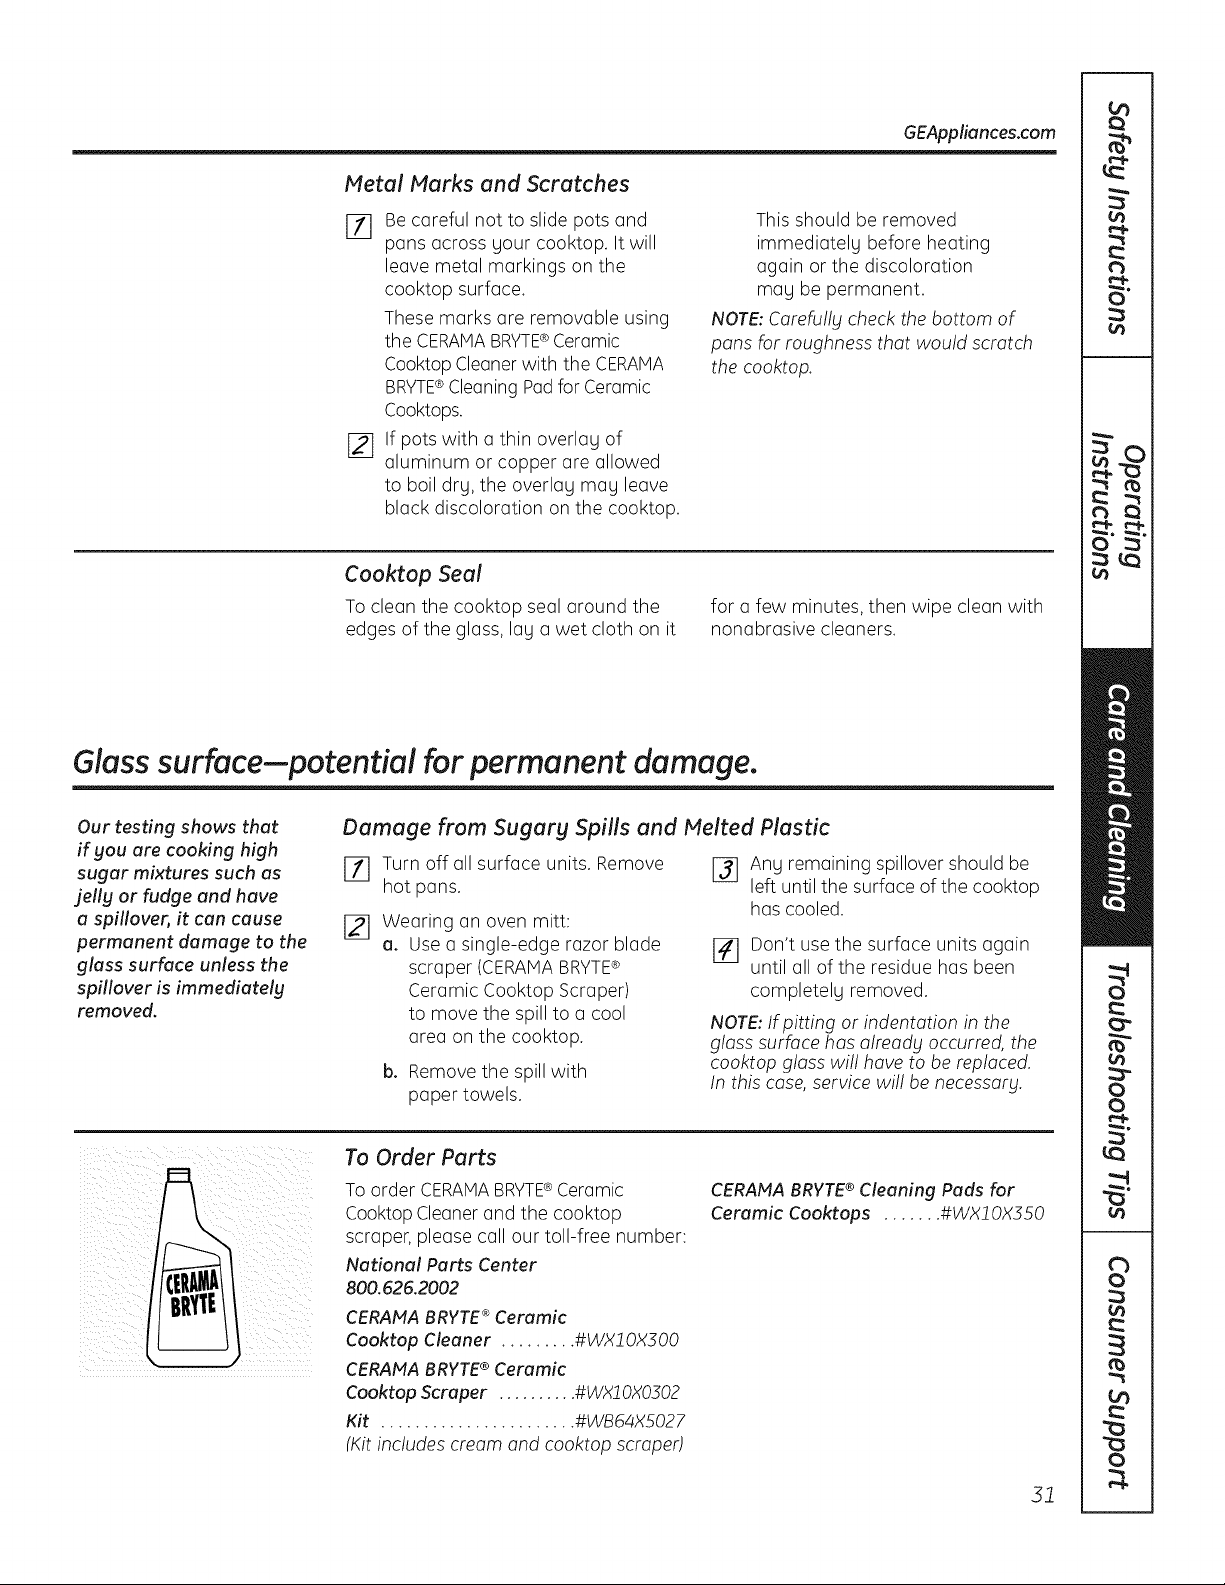
GEAppliances.com
Metal Marks and Scratches
Eli Be careful not to slide pots and
pans across your cooktop. It will
leave metal markings on the
cooktop surface.
These marks are removable using
the CERAMABRYTE®Ceramic
Cooktop Cleanerwith the CERAMA
BRYTE®Cleaning Pad for Ceramic
Cooktops.
j_] If pots with a thin overlay of
aluminum or copper are allowed
to boil dry, the overlay may leave
black discoloration on the cooktop.
This should be removed
immediately before heating
again or the discoloration
may be permanent.
NOTE: Carefu!lg check the bottom of
pans for roughness that would scratch
the cooktop.
Cooktop Seal
To clean the cooktop seal around the
edges of the glass, lay a wet cloth on it
for a few minutes, then wipe clean with
nonabrasive cleaners.
Glass surface--potential for permanent damage.
Our testing shows that
if gou are cooking high
sugar mixtures such as
jelly or fudge and have
a spillover, it can cause
permanent damage to the
glass surface unless the
spillover is immediately
removed.
Damage from Sugarg Spills and Melted Plastic
Ell Turn off all surface units. Remove
hot pans.
[21 Wearing an oven mitt:
a. Use a single-edge razor blade
scraper (CERAMABRYTE®
Ceramic Cooktop Scraper)
to move the spill to a cool
area on the cooktop.
b. Remove the spill with
paper towels.
J_ Any remaining spillover should be
left until the surface of the cooktop
has cooled.
]41 Don't use the surface units again
until all of the residue has been
completely removed.
NOTE: If pitting or indentation in the
glass surface has already occurred, the
cooktop gloss wi!! hove to be replaced.
In this case, service wi!! be necessary.
To Order Parts
To order CERAMABRYTE®Ceramic
Cooktop Cleaner and the cooktop
scraper, please call our toll-free number:
National Parts Center
800.626.2002
CERAFfA BRYTE ®Ceramic
Cool<top Cleaner ......... #WX2 0X300
CERAMA BRYTE® Ceramic
Cool<top Scraper .......... #WXJ 0X0302
Kit ....................... #WB64XS027
(Kitincludes cream and cooktop scraped
CERANA BRYTE® Cleaning Pads for
Ceramic Cool<tops ....... #WXl OX350
31
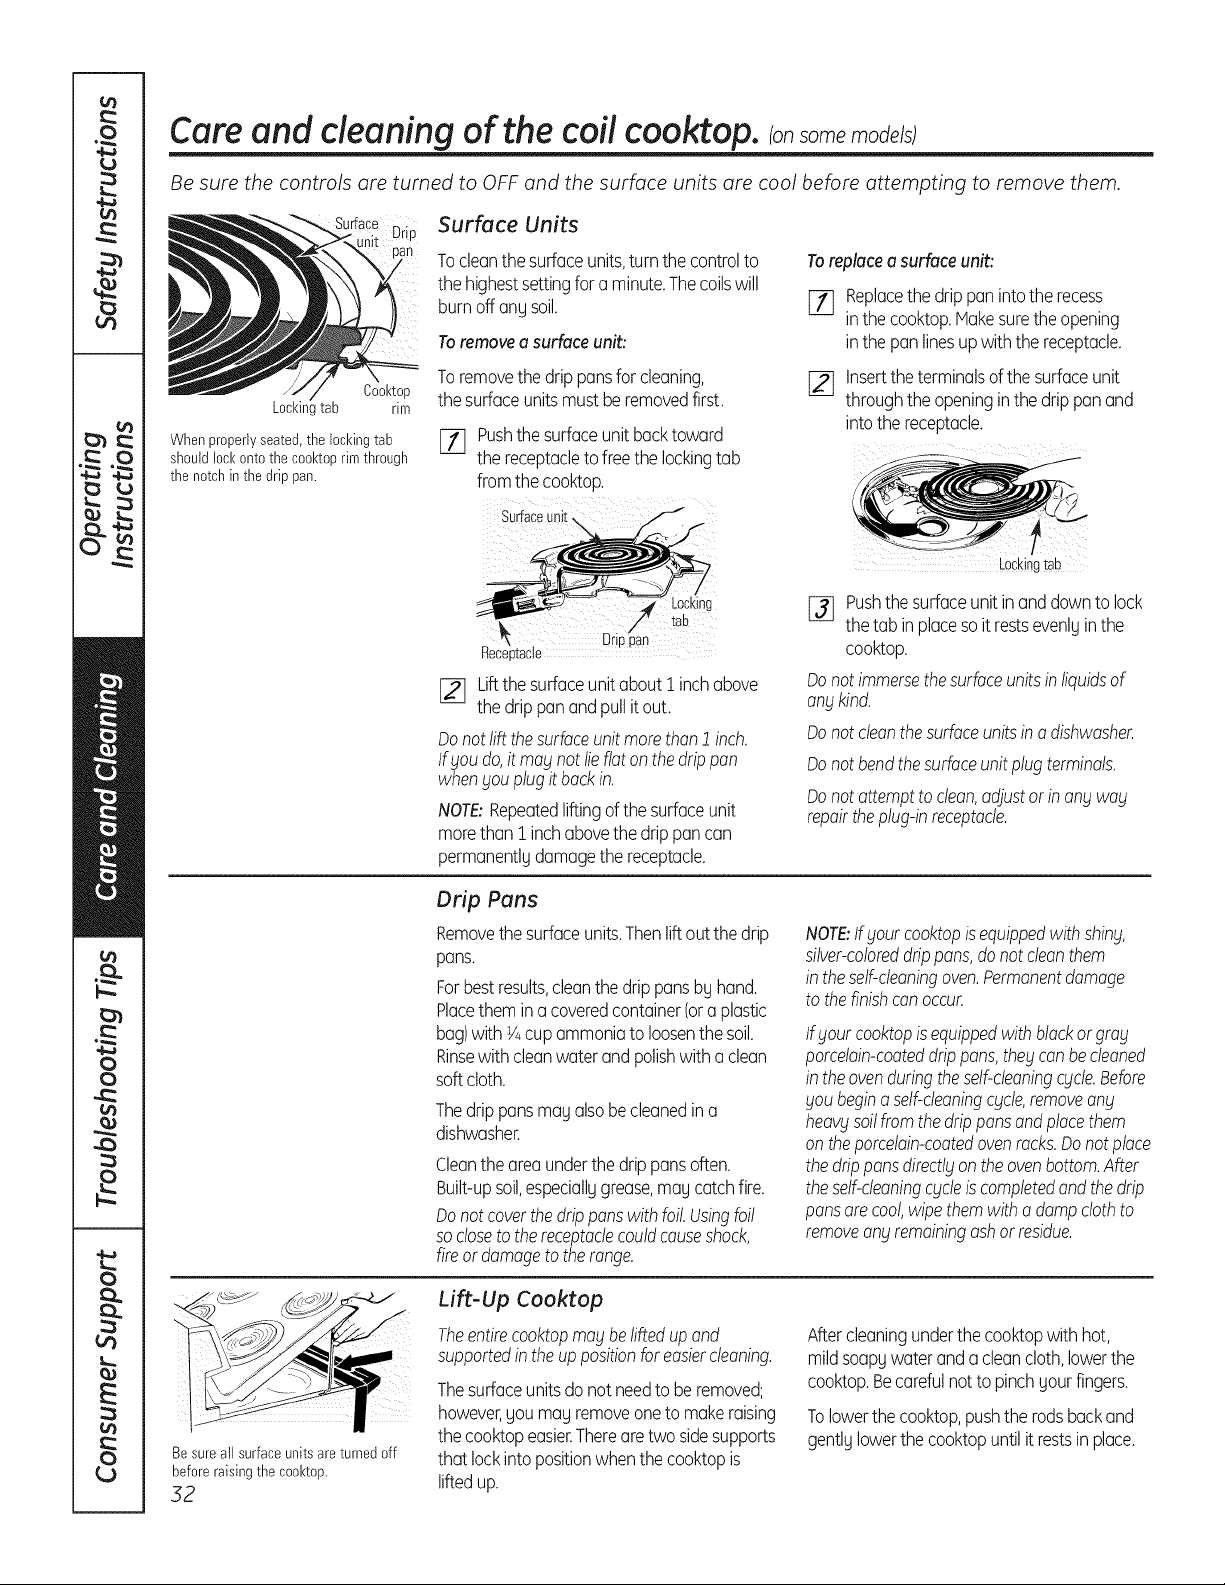
Care and cleaning of the coil cooktop, consomemode/s
Be sure the controls are turned to OFF and the surface units are cool before attempting to remove them.
Cool<top
Locl<inltab rim
Whenproperlyseated,the lockingtab
shouldlock ontothe cool<toprim through
the notchin the drip pan.
Surface Units
Tocleanthe surfaceunits,turnthe controlto
the highestsettingfor a minute.Thecoilswill
burnoff anUsoil.
Toremovea surfaceunit:
Toremovethe drippansfor cleaning,
the surfaceunits mustbe removedfirst.
[] Pushthesurfaceunit backtoward
the receptacleto freethe lockingtab
fromthe cooktop.
Toreplacea surfaceunit:
[_ Replacethe drip paninto the recess
inthe cooktop.Hakesuretheopening
inthe pan linesup with the receptacle.
[] Insertthe terminalsof thesurfaceunit
throughthe openinginthe drip pan and
into the receptacle.
Surface unii
Drioaan
Receotacle
[_ Liftthesurfaceunitabout i inchabove
the drip pan and pull it out.
Donotlift thesurfaceunit morethan1 inch.
lf gou do,it mag not lieflatonthe drippan
when£ouplugit backin.
NOTE:Repeatedliftingof the surfaceunit
morethan i inchabovethe drip pan can
permanentlUdamagethe receptacle.
[_ Pushthe surfaceunitin and downto lock
the tab inplacesoit restsevenlUin the
cooktop.
Donot immersethesurfaceunitsin liquidsof
angkind.
Donot cleanthesurfaceunitsino dishwasher.
Donot bendthesurfaceunitplugterminals.
Donot attemptto clean,adjustor in ongwag
repairtheplug-inreceptacle.
Drip Pans
Removethe surfaceunits.Thenlift out the drip
pans.
Forbestresults,cleanthe drippansbUhand.
Placethem in a coveredcontainer(ora plastic
bag)with Y4cupammoniato loosenthe soil.
Rinsewithcleanwaterand polishwith a clean
soft cloth.
Thedrip pansmau alsobecleanedin a
dishwasher.
Cleantheareaunderthe drip pansoften.
Built-upsoil,especiallugrease,mau catchfire.
Donotcoverthedrippanswith foil. Usingfoil
so closeto thereceptaclecouldcauseshock,
fireor damageto therange.
NOTE:If goutcooktopisequippedwith shing,
silver-coloreddrippans,donot cleanthem
in theself-cleaningoven.Permanentdamage
to thefinishcon occur.
Ifgout cooktopis equippedwith blackor grog
porcelain-coateddrippans,the£canbecleaned
in theovenduringtheself-cleaningcgcle.Before
goubeginaself-cleaningcgcte,removeang
heaW soilfromthe drippansandplacethem
on theporcelain-coatedovenrocks.Donotplace
the drippansdirectlgontheovenbottom.After
theself-cleaningcgcleis completedand thedrip
pansarecool,wipethemwitha dampclothto
removeangremainingashor residue.
Besure all surfaceunits are turned off
before raising the cool<top.
32
Lift-Up Cooktop
Theentirecooktopmagbeliftedupand
supportedinthe up positionforeasiercleaning.
Thesurfaceunitsdonot needto be removed;
however,you mayremoveoneto makeraising
the cooktopeasier.Therearetwo sidesupports
that lockintopositionwhenthe cooktopis
liftedup.
Aftercleaningunderthe cooktopwithhot,
mildsoapy water and a cleancloth,lowerthe
cooktop.Becarefulnotto pinchyourfingers.
Tolowerthe cooktop,pushthe rodsbackand
gentlUlowerthe cooktopuntilit restsin place.
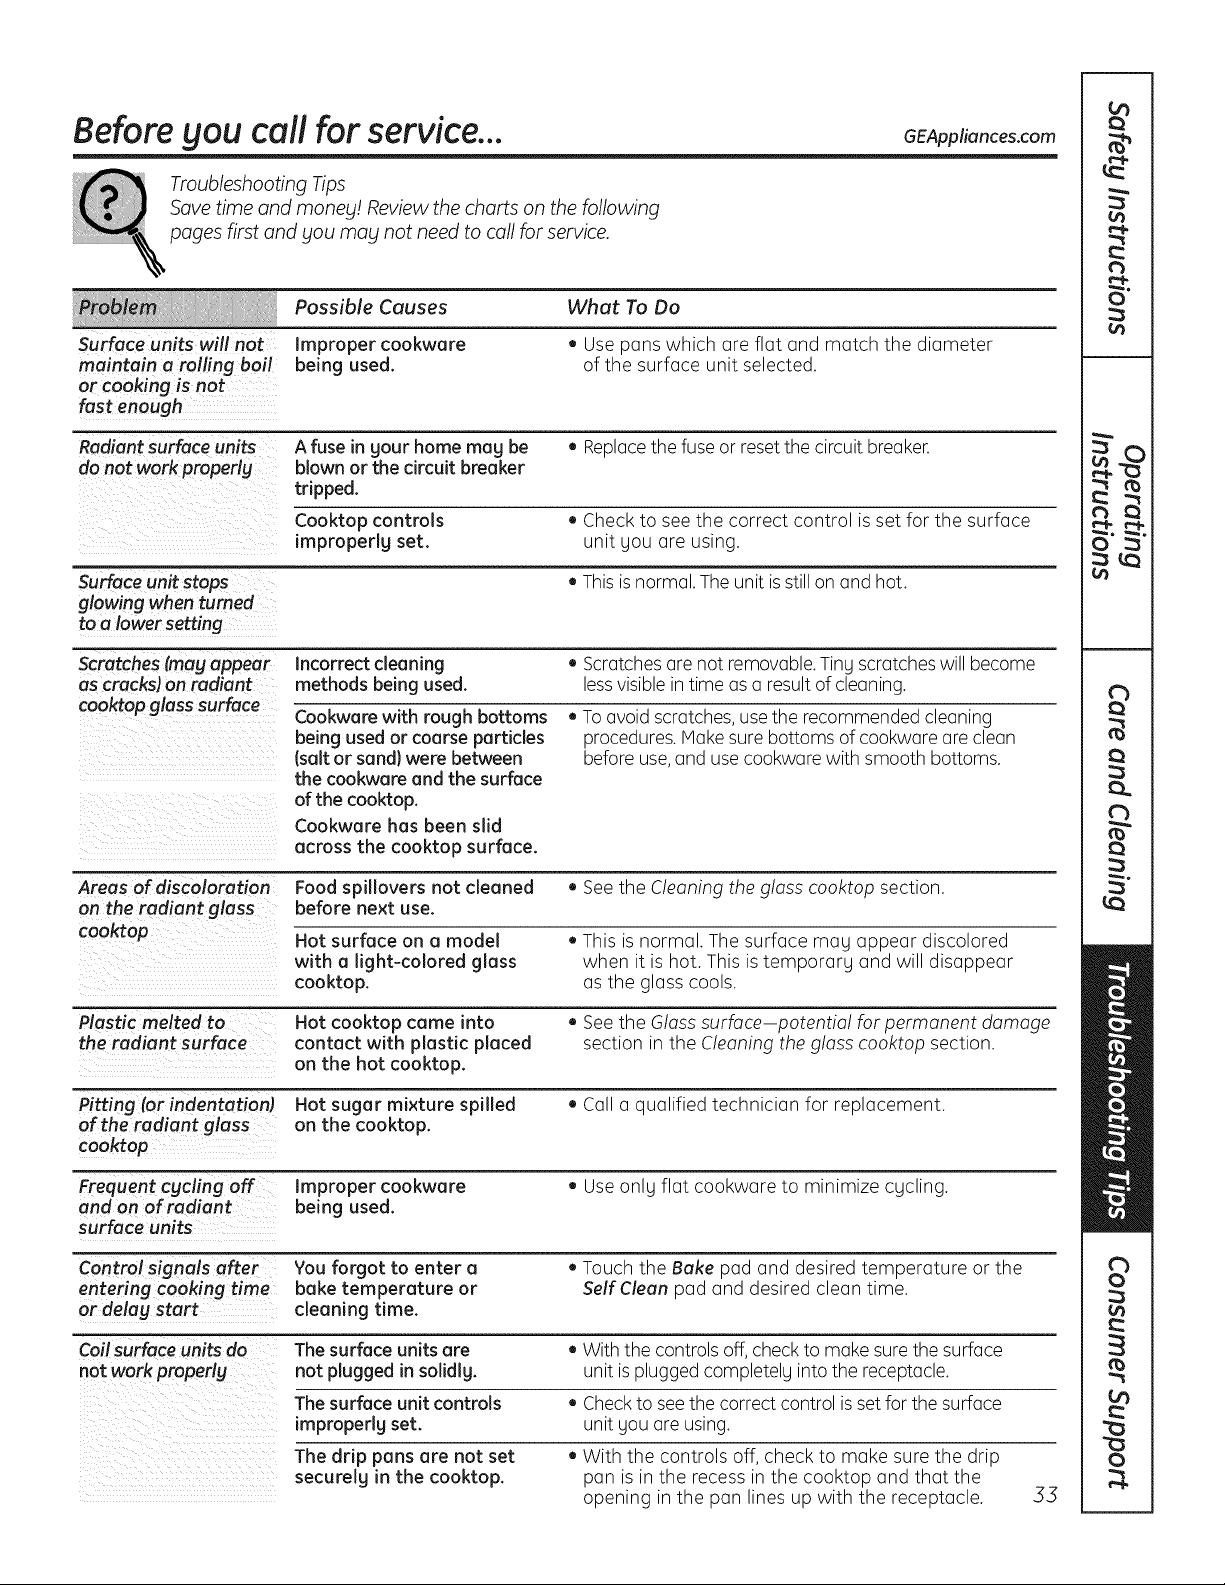
Before Sou call for service... 6EAppliances.com
Troubleshooting Tips
Save time and manes! Review the charts on the following
pages first and Sou mag not need to call for service.
Possible Causes What To Do
Surface units will not Improper cookware • Use pans which are flat and match the diameter
maintain a rolling boil being used. of the surface unit selected.
or cooking is not
fast enough
Radiant surface units A fuse in sour home mag be • Replacethe fuse or resetthe circuit breaker.
do not work properlg blown or the circuit breaker
tripped.
Cooktop controls , Check to see the correct control is set for the surface
improperlg set. unit you are using.
Surface unitstops , Thisis normal. The unit is still on and hot.
glowing when turned
to a lower setting
Scratches (mag a_ear Incorrect cleaning • Scratches are not removable.Tiny scratches will become
as cracks) on radiant methods being used. less visible in time as a result of cleaning.
coo_op glass surface Cookware with rough bottoms , To avoid scratches,use the recommended cleaning
being used or coarse particles procedures. Make sure bottoms of cookware are clean
(salt or sand} were between before use, and use cookware with smooth bottoms.
the cookware and the surface
of the cooktop.
Cookware has been slid
across the cooktop surface.
Areas of discoloration Food spillovers not cleaned • See the Cleaning the g!oss cooktop section.
on the radiant glass before next use.
cooktop Hot surface on a model . This is normal. The surface may appear discolored
with a light-colored glass when it is hot. This is temporary and will disappear
cooktop, as the glass cools.
Plastic melted to Hot cooktop came into • See the Gloss surface potentia! for permanent damage
the radiant surface contact with plastic placed section in the Cleaning the glass cooktop section.
on the hot cooktop.
Pitting (or indentation Hot sugar mixture spilled • Call a qualified technician for replacement.
of the radiant glass on the cooktop.
cooktop
Frequent cgcling off Improper cookware • Useonly flat cookware to minimize cycling.
and on of radiant being used.
surface units
Control signals after You forgot to enter a • Touch the Bake pad and desired temperature or the
entering cooking time bake temperature or Self Clean pad and desired clean time.
or delag start cleaning time.
Coil surface units do The surface units are . With the controls off, check to make sure the surface
not work properlg not plugged in solidlg, unit is plugged completely into the receptacle.
The surface unit controls • Check to see the correct control is set for the surface
improperlg set. unit you are using.
The drip pans are not set , With the controls off, check to make sure the drip
securelg in the cooktop, pan is in the recess in the cooktop and that the
opening in the pan lines up with the receptacle. .53
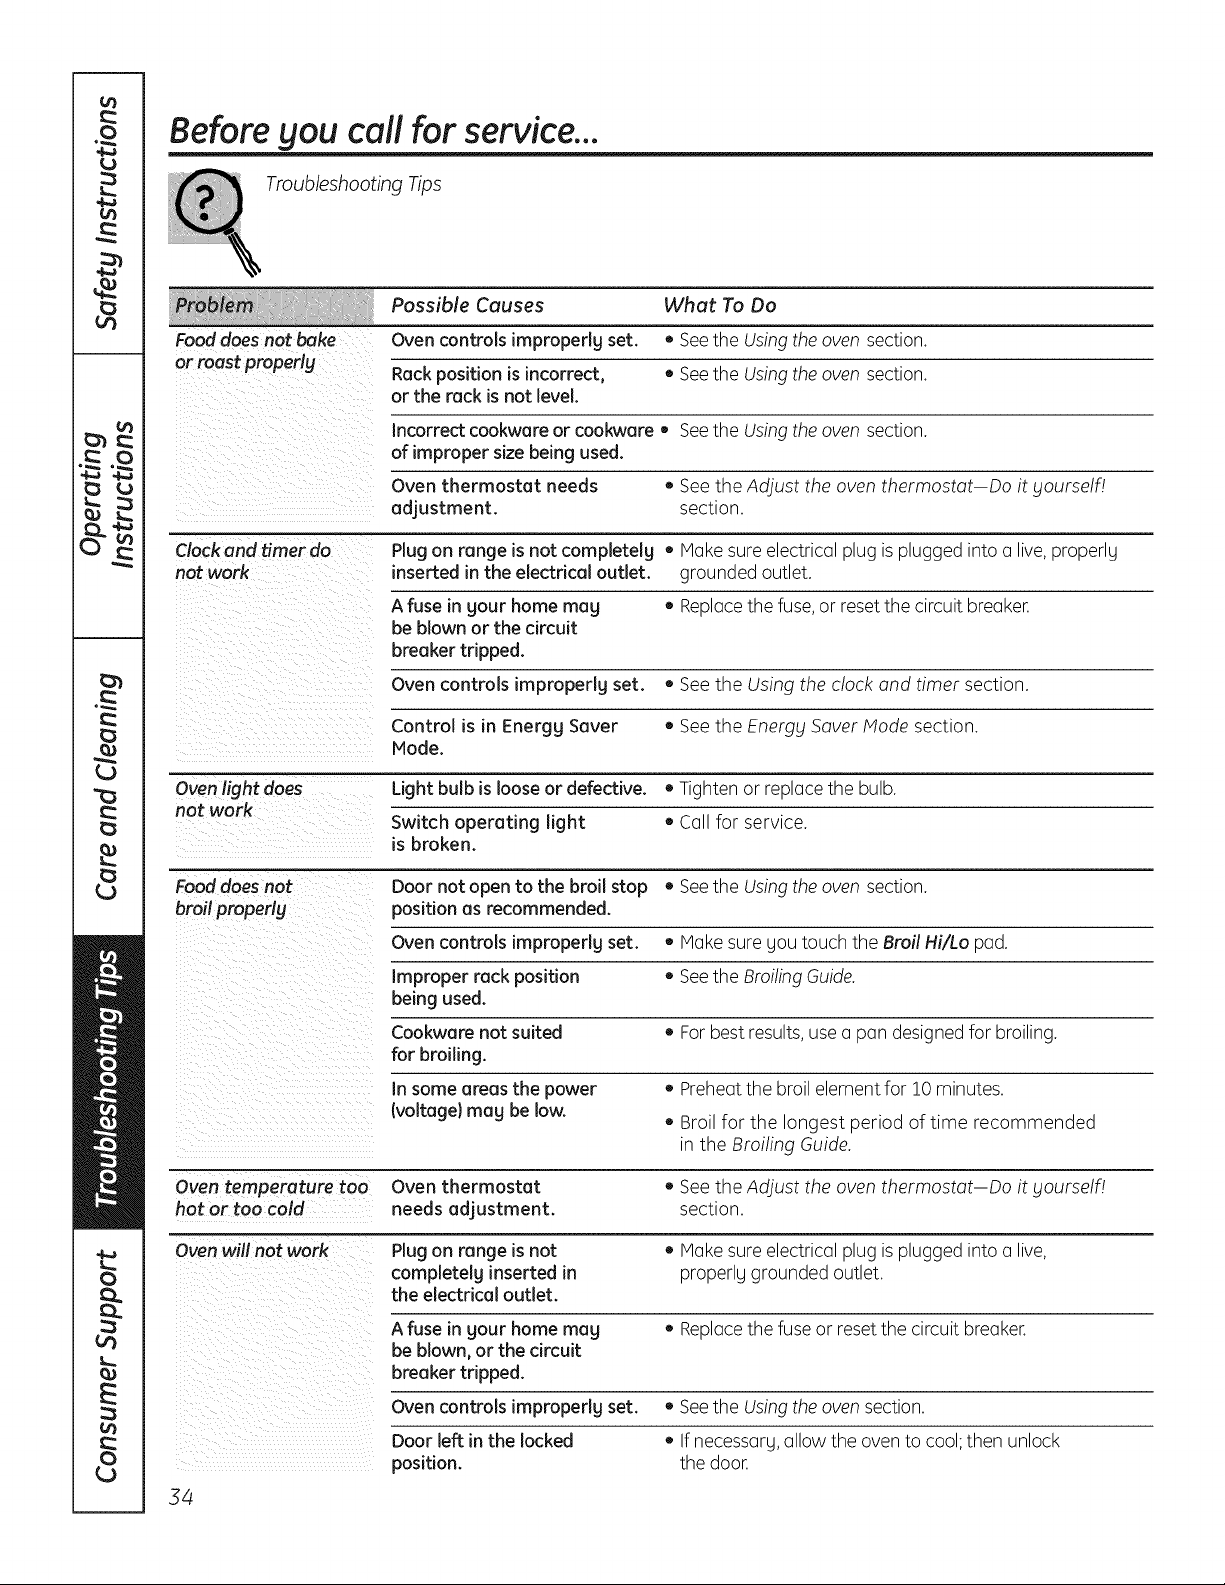
Before gou call for service...
Troubleshooting Tips
Possible Causes What To Do
Food does not bake Oven controls improperly set. • Seethe Usingthe oven section.
or roast properlg Rack position is incorrect, ,, See the Using the oven section.
or the rack is not level.
Incorrect cookware or cookware, See the Using the oven section.
of improper size being used.
Oven thermostat needs , See the Adjust the oven thermostat Do it gourself/
adjustment, section.
Clock and timer do Plugon range is not completelg • Makesure electrical plug is plugged into a live, properly
not work inserted in the electrical outlet, grounded outlet.
A fuse in gout home meg • Replacethe fuse, or reset the circuit breaker.
be blown or the circuit
breaker tripped.
Oven controls improperly set. • See the Using the clock and timer section.
Control is in Energy Sever • See the Energy Saver Mode section.
Mode.
Oven light does Light bulb is loose or defective. • Tighten or replace the bulb.
not work
Switch operating light • Call for service.
is broken.
Food does not Door not open to the broil stop • Seethe Usingthe oven section.
broil properly position as recommended.
Oven controls improperlg set. • Make sure gou touch the Broil Hi/Lo pad.
Improper rack position • See the Broiling Guide.
being used.
Cookware not suited ,, For best results,use a pan designed for broiling.
for broiling.
In some areas the power • Preheatthe broil element for 10 minutes.
(voltage} mag be low.
• Broil for the longest period of time recommended
in the Broiling Guide.
Oven temperature too Oven thermostat ,, See the Adjust the oven thermostat Do it yourself!
hot or too cold needs adjustment, section.
Oven will not work Plugon range is not • Make sure electrical plug is plugged into a live,
completelg inserted in properly grounded outlet.
the electrical outlet.
A fuse in gout home mag • Replacethe fuse or reset the circuit breaker.
be blown, or the circuit
breaker tripped.
Oven controls impropedg set.
Door left in the locked
position.
34
• Seethe Usingthe oven section.
• If necessarg,allow the oven to cool;then unlock
the door.
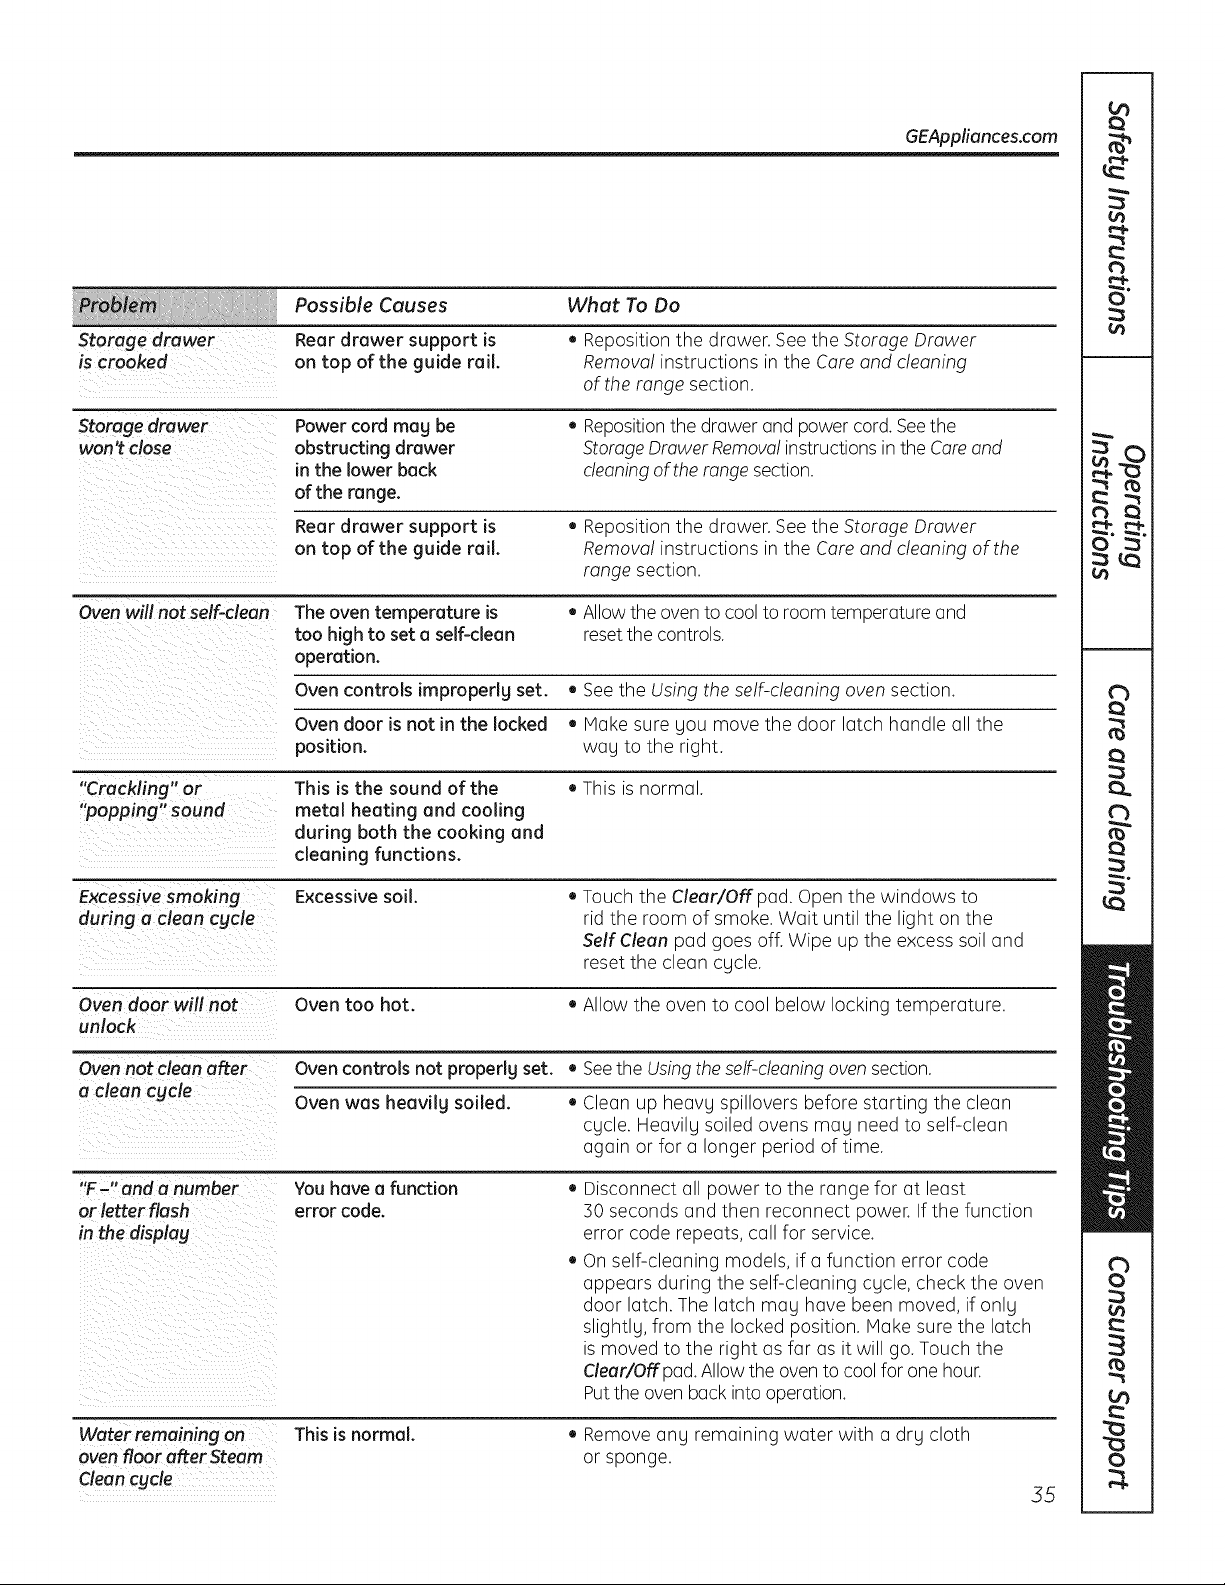
Storage drawer
is crooked
GEAppliances.com
Possible Causes
Rear drawer support is
on top of the guide rail.
What To Do
• Reposition the drawer. See the Storage Drawer
Remova! instructions in the Care and cleaning
of the range section.
Storage drawer
won't close
Power cord mag be
obstructing drawer
in the lower back
of the range.
• Repositionthe drawer and power cord. Seethe
Storage Drawer Removal instructions in the Careand
cleaning of the range section.
Rear drawer support is
on top of the guide rail.
• Reposition the drawer. See the Storage Drawer
Removal instructions in the Care and cleaning of the
range section.
=
Oven will not self-clean The oven temperature is • Allowthe oven to cool to room temperature and
too high to set a self-clean reset the controls.
operation.
Oven controls impropedg set. • See the Using the self-cleaning oven section.
Oven door is not in the locked • Hake sure Sou move the door latch handle all the
position, wag to the right.
"Crackling" or This is the sound of the • This is normal.
"popping" sound metal heating and cooling
during both the cooking and
cleaning functions.
Excessive smoking Excessive soil. • Touch the Clear/Off pad. Open the windows to
during a clean cgcle rid the room of smoke. Wait until the light on the
Self Clean pad goes off. Wipe up the excess soil and
reset the clean cycle.
Oven door will not Oven too hot. • Allow the oven to cool below locking temperature.
unlock
Oven not clean after Oven controlsnot properlg set. • Seethe Usingthe self-cleaning oven section.
a clean cgcle Oven was heavilg soiled. • Clean up heavg spillovers before starting the clean
cgcle. Heavilg soiled ovens mag need to self-clean
again or for a longer period of time.
"F-" and a number You have a function • Disconnect all power to the range for at least
or letter flash error code. 50 seconds and then reconnect power. If the function
in the display error code repeats, call for service.
• On self-cleaning models, if a function error code
appears during the self-cleaning cgcle, check the oven
door latch. The latch mag have been moved, if onlg
slightlg, from the locked position. Hake sure the latch
is moved to the right as far as it will go. Touch the
Clear!Off pad. Allow the oven to cool for one hour.
Putthe oven back into operation.
Water remaining on This is normal.
oven floor after Steam
Clean cycle
• Remove ang remaining water with a drg cloth
or sponge.
55
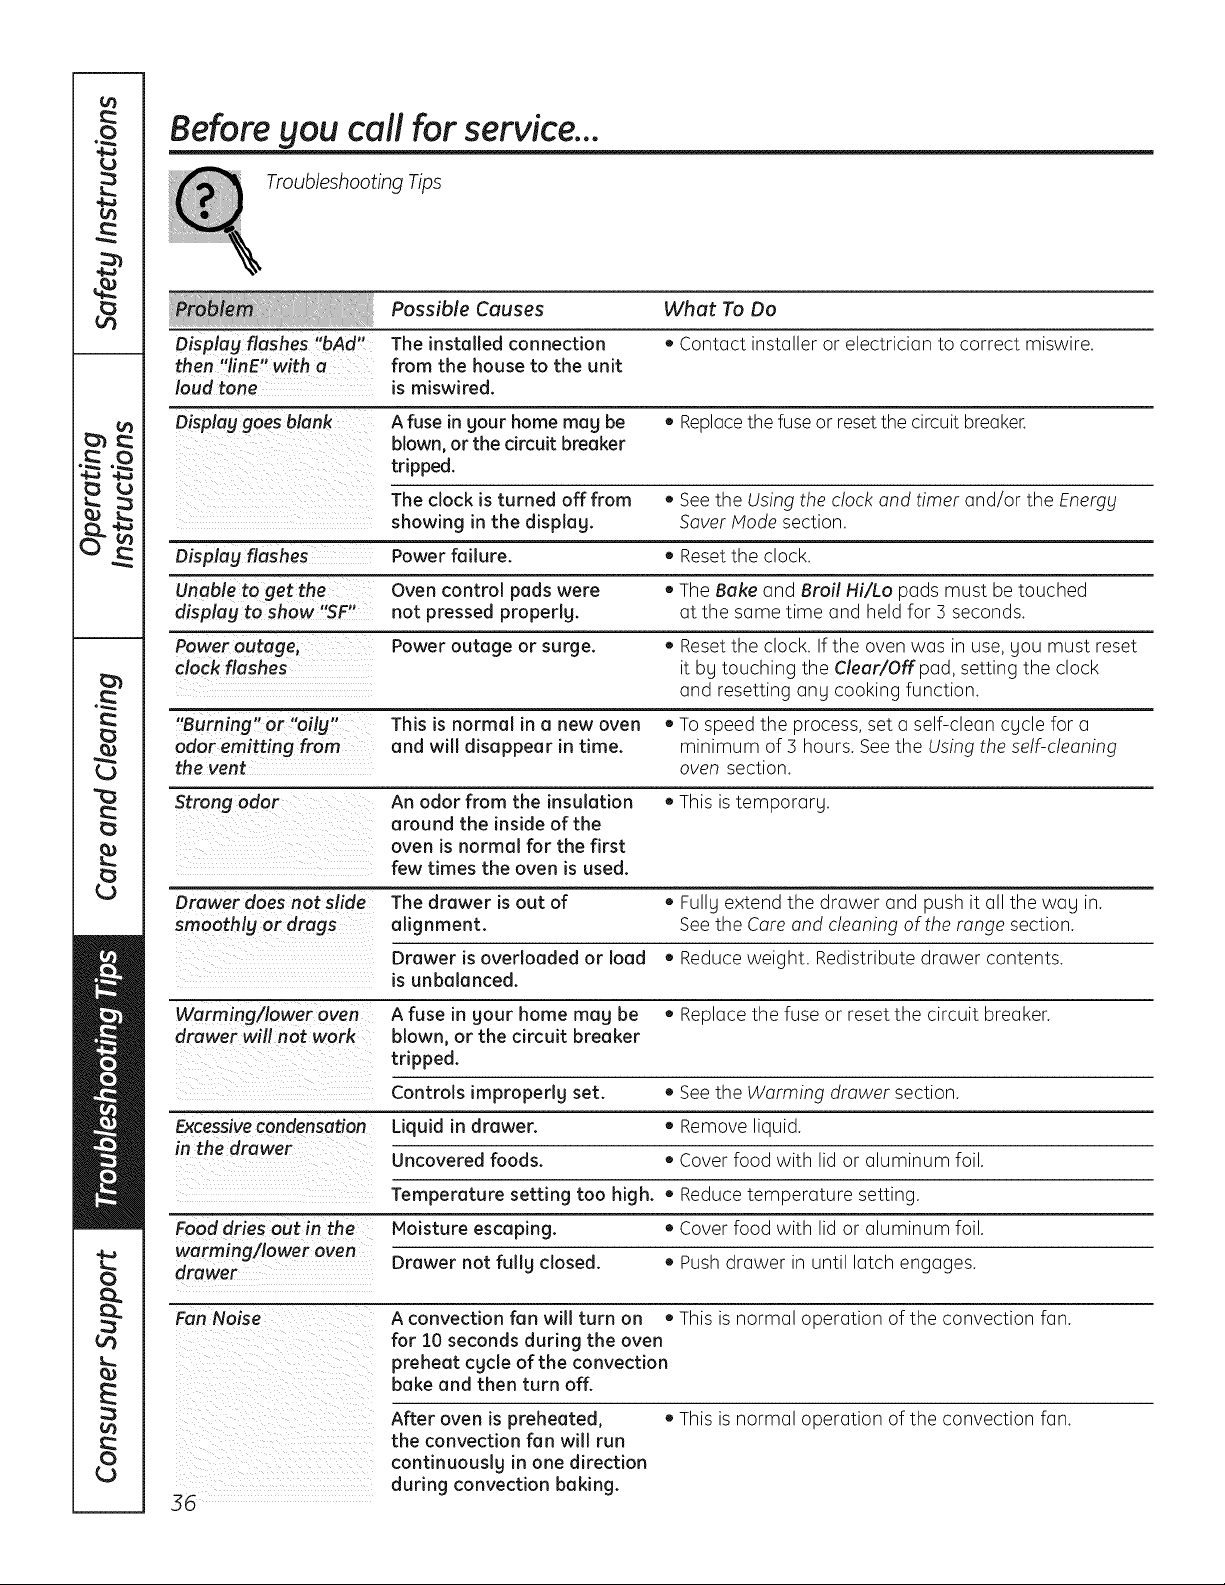
Before gou call for service...
Troubleshooting Tips
Possible Causes What To Do
Displag flashes "bAd" The installed connection • Contact installer or electrician to correct miswire.
then "linE" with a from the house to the unit
loud tone is miswired.
Displag goes blank A fuse in gour home mug be • Replacethe fuse or reset the circuit breaker.
blown, or the circuit breaker
tripped.
The clock is turned off from , See the Using the clock and timer and/or the Energy
showing in the displag. Saver Hode section.
Displag flashes Power failure. • Reset the clock.
Unable to get the- control pads were
displag to show "SF" Oven • The Bake and Broil Hi/Lo pads must be touched
not pressed properlg, at the same time and held for 5 seconds.
Power outage, Power outage or surge. • Reset the clock. If the oven was in use, you must reset
clock flashes it by touching the Clear/Off pad, setting the clock
and resetting any cooking function.
"Burning" or "oilg" This is normal in a new oven , To speed the process, set a self-clean cycle for a
odor emitting from and will disappear in time. minimum of 3 hours. See the Using the self-cleaning
the vent oven section.
Strong odor An odor from the insulation • This is temporary.
around the inside of the
oven is normal for the first
few times the oven is used.
Drawer does not slide The drawer is out of ,, Fullg extend the drawer and push it all the wag in.
smoothlg or drags alignment. See the Care and cleaning of the range section.
Drawer is overloaded or load , Reduce weight. Redistribute drawer contents.
is unbalanced.
Warming/lower oven A fuse in gour home mug be • Replace the fuse or reset the circuit breaker.
drawer will not work blown, or the circuit breaker
tripped.
Controls improperly set. • See the Warming drawer section.
Excessivecondensation Liquid in drawer. • Remove liquid.
in the drawer
Uncovered foods. • Cover food with lid or aluminum foil.
Temperature setting too high. • Reduce temperature setting.
Food dries out in the Moisture escaping. • Cover food with lid or aluminum foil.
worming/lower oven
drawer Drawer not fullg closed. • Push drawer in until latch engages.
Fan Noise A convection fan will turn on • This is normal operation of the convection fan.
for 10 seconds during the oven
preheat cgcle of the convection
bake and then turn off.
After oven is preheated, • This is normal operation of the convection fan.
the convection fan will run
continuouslg in one direction
during convection baking.
36
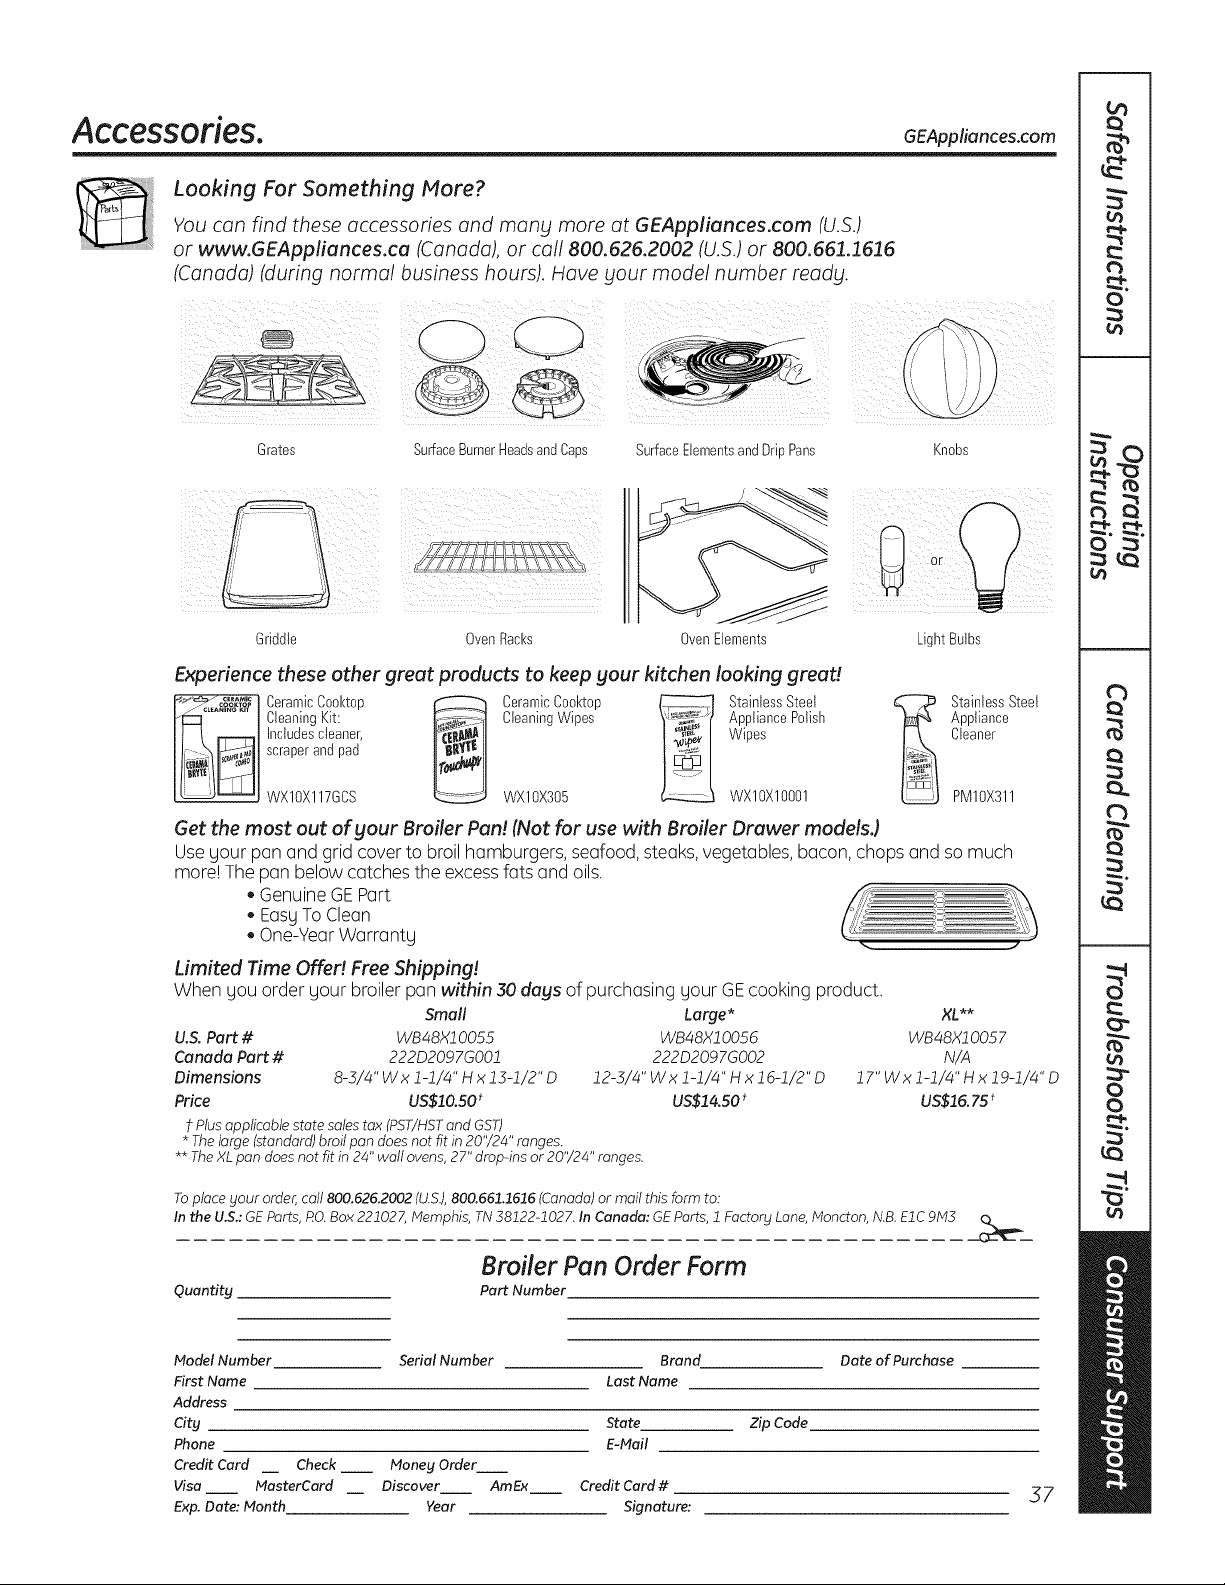
Accessories. GEAppliances.com
Looking For Something More?
You can find these accessories and many more at GEAppliances.com (U.S.)
or www.GEAppliances.ca (Canada), or call 800.626.2002 (U.S.) or 800.661.1616
(Canada) (during normal business hours). Have your model number ready.
Grates
SurfaceBurnerHeadsandCaps SurfaceElementsandDrip Pans
Knobs
Griddle OvenRacks Oven Elements
i ¸¸
Light Bulbs
Experience these other great products to keep your kitchen looking great!
_"_ ....... Ceramic Cool<top _ Ceramic Cool<top _ Stainless Steel
/_°_'A_'I'_°_"°t Cleaning Kit: _ Cleaning Wipes _ Appliance Polish
___ Inctudes cteaner, Wipes
scraper and pad
WXIOX117GCS WXlOX305 WXlOXlO001
StainlessSteel
Appliance
Cleaner
PM10X311
Get the most out of your Broiler Pan! (Not for use with Broiler Drawer models.)
Usegour pan and grid cover to broil hamburgers, seafood, steaks, vegetables,bacon, chops and so much
more! The pan below catches the excess fats and oils.
GenuineGEPart
EasyTo Clean
One-YearWarranty .. ..
Limited Time Offe!! Free Shipping!
When gou order gour broiler pan within 30 days of purchasing gour GE cooking product.
Small
U.S. Part # WB48X10055
Canada Part # 222D2097GO01
Dimensions 8-3/4" Wx 1-1/4" H x 13-1/2"D
Price US$10.50t
t Plus applicable state sales tax (PST/HST and GST)
* The large (standard) broil pan does not fit in 20'/24" ranges.
Large* XL **
WB48X10056 WB48X1005 7
222D2097GO02 N/A
12-5/4"Wxl-1/4"Hxlg-1/2"D 17"Wxl-1/4"Hxlg-1/4"D
US$14.50 * US$15. 75 t
** The XL pan does not fit in 24" wall ovens, 27" drop-ins or 20'/24" ranges.
Toplace your order,call 800.626.2002 (U.S.),800.661.1616 (Canada)or mail this form to:
In the U.S.:GEParts, RO.Box 221027, Memphis, TN 38122-1027. In Canada: GEParts, 1 Factory Lane,Moncton, N.B.EIC 9M3
Quantity
Broiler Pan Order Form
Part Number
Model Number
First Name
Address
City
Phone
Credit Card
Visa
Exp. Dote: Month
Serial Number Brand Date of Purchase
Last Name
State Zip Code
E-Mail
Check __ Money Order
MasterCard Discover AmEx Credit Card #
Year Signature:
37
L_
o
c)
c)
E
C)
L_
Notes.
58
GE Electric Range Warranty. GEAppliances.com
All warrant_l service provided bg our Factors Service Centers,
or an authorized Customer Care ® technician. To schedule
service, visit us on-line at GEAppliances.com, or call
800.GE.CARES (800.432.2737). Please have serial number
and model number available when calling for service.
Staple your receipt here.
Proof of the original purchase
date is needed to obtain service
under the warranty.
GE Will Provide:
One Year
From the date of the
origina! purchase
Any pert of the range which fails due to a defect in materials or workmanship.
During this limited one-year warranty, GEwill also provide,free of charge, all labor
and in-home service to replace the defective part.
Service trips to gout home to teach SOUhow to use
the product.
Improper installation, delivers or maintenance.
Failure of the product if it is abused, misused, or used
for other than the intended purpose or used
commerdallg.
Replacement of house fuses or resetting of circuit
breakers.
Damage to the product caused bg accident, fire, floods
or acts of God.
Incidental or consequential damage caused bg possible
defects with th is a pplia nce.
Damage caused after delivers.
Product not accessible to provide required service.
EXCLUSION OF IMPLIED WARRANTIES--Your sole and exclusive remedy is product repair as provided in this Limited
Warranty. Any implied warranties, including the implied warranties of merchantabilitg or fitness for a particular
purpose, are limited to one year or the shortest period allowed by law.
This warranty is extended to the original purchaser and any succeeding owner for products purchased for
home use within the USA. If the product is located in an area where service by a GE Authorized Servicer is not
available, you may be responsible for a trip charge or you may be required to bring the product to an Authorized
GE Service location for service. In Alaska, the warranty excludes the cost of shipping or service calls to your home.
Some states do not allow the exclusion or limitation of incidental or consequential damages. This warranty
gives you specific legal rights, and _lOU ma_l also have other rights which var_l from state to state. To know
what Four legal rights are, consult _tour local or state consumer affairs office or _tour state's Attorne_t
General.
Warrantor: General Electric Company. Louisville, KY 40225
39

Consumer Support.
GE Appliances Website GEAppliances.com
Have a question or need assistance with your appliance? Try the GEAppliances Website 24 hours a day,
any day of the gear! For greater convenience and faster service,you can now download Owner's Manuals,
order parts or even schedule service on-line.
Schedule Service GEAppliances.com
Expert GErepair service is only one step away from your door. Get on-line and schedule your service at
your convenience any day of the gear! Or call 800.GE.CARES(800./432.2737)duringnormal business hours.
Real Life Design Studio GEAppliances.com
GEsupports the Universal Design concept-products, services and environments that can be used by
people of all ages, sizesand capabilities. We recognize the need to design for a wide range of physical and
mental abilities and impairments. For details of GE'sUniversal Design applications, including kitchen design ideas
for people with disabilities,check out our Website today. Forthe hearing impaired, please call 800.TDD.GEAC
(800.855.4522).
Extended Warranties
GEAppliances.cam
Purchasea GEextended warranty and learn about special discounts that are available while your warranty
is still in effect. You can purchase it on-line anytime, or call 800.626.2224during normal business hours.
GEConsumer Home Serviceswill still be there after your warranty expires.
Parts and Accessories
GEAppliances.cam
Individuals qualified to service their own appliances can have parts or accessoriessent directly to their homes
(VISA,MasterCardand Discover cards are accepted). Order on-line today, 24 hours every day or by phone at
800.626.2002during normal business hours.
Instructions contained in this manual cover procedures to be performed by any user. Other servicing
generally should be referred to qualified service personnel. Caution must be exercised, since improper
servicing may cause unsafe operation.
Contact Us
GEAppliances.com
If you are not satisfiedwith the service you receivefrom GE,contact us on our Website with all the details
including your phone number, or write to: General Manager, Customer Relations
GEAppliances,Appliance Park
Louisville,KY40225
] Register Your Appliance GEAppliances.com
Register your new appliance on-line-at your convenience! Timely product registration will allow for
enhanced communication and prompt service under the terms of your warranty, should the need arise.
Youmay also mail in the pre-printed registration card included in the packing material, or detach and use
the form in the Owner's Hanual.
Printed in the United States