Loading ...
Loading ...
2080-3
3.While the hour, minutes, or seconds digits are flashing, press
DD
DD
D to increase the
value or
BB
BB
B to decrease it. Holding down either button changes the value at high
speed.
4.While the auto repeat indicator is flashing, press
DD
DD
D toggle auto repeat on and off.
The auto repeat indicator is on the display only while you are setting the count-
down start time.
Press
BB
BB
B
Auto repeat OFF Auto repeat ON
• To set the starting value of the countdown time to 24 hours, set 0:00' 00".
5.After you set the countdown start time and auto repeat timing on and off, press
AA
AA
A
to return to the Countdown Alarm Mode.
To use the countdown alarm
1.Press
DD
DD
D while in the Countdown Alarm Mode to start the countdown alarm.
2.Press
DD
DD
D again to stop the countdown alarm.
• You can resume countdown alarm operation by pressing
DD
DD
D.
3.Press
DD
DD
D to stop the countdown alarm, and then press
BB
BB
B to reset the countdown
time to its starting value.
• When the end of the countdown is reached and auto repeat timing is off, the alarm
sounds for 10 seconds or until you stop the alarm by pressing any button. Count-
down timing stops and the countdown time is automatically reset to its starting
value after the alarm stops.
To turn the progress beeper on and off
1.While the Countdown Alarm Mode screen shows its starting value or while a count-
down operation is in progress, press
BB
BB
B to toggle the progress beeper on and off.
OFF ON
• When the end of the countdown is reached while auto repeat is on, the alarm sounds,
but the countdown restarts from the beginning without stopping. You can stop the
countdown by pressing
DD
DD
D and manually reset to the start time by pressing
BB
BB
B.
• If you set a starting time of 10 seconds or less and have Auto Repeat turned on, the
countdown alarm tone (which normally sounds for 10 seconds) sounds for only one
second.
• When the progress beeper is turned on, the watch beeps as the countdown time
passes the 10, 5, 4, 3, 2, and 1-minute marks, and the 50, 40, 30, 20, 10, 5, 4, 3, 2,
and 1-second marks.
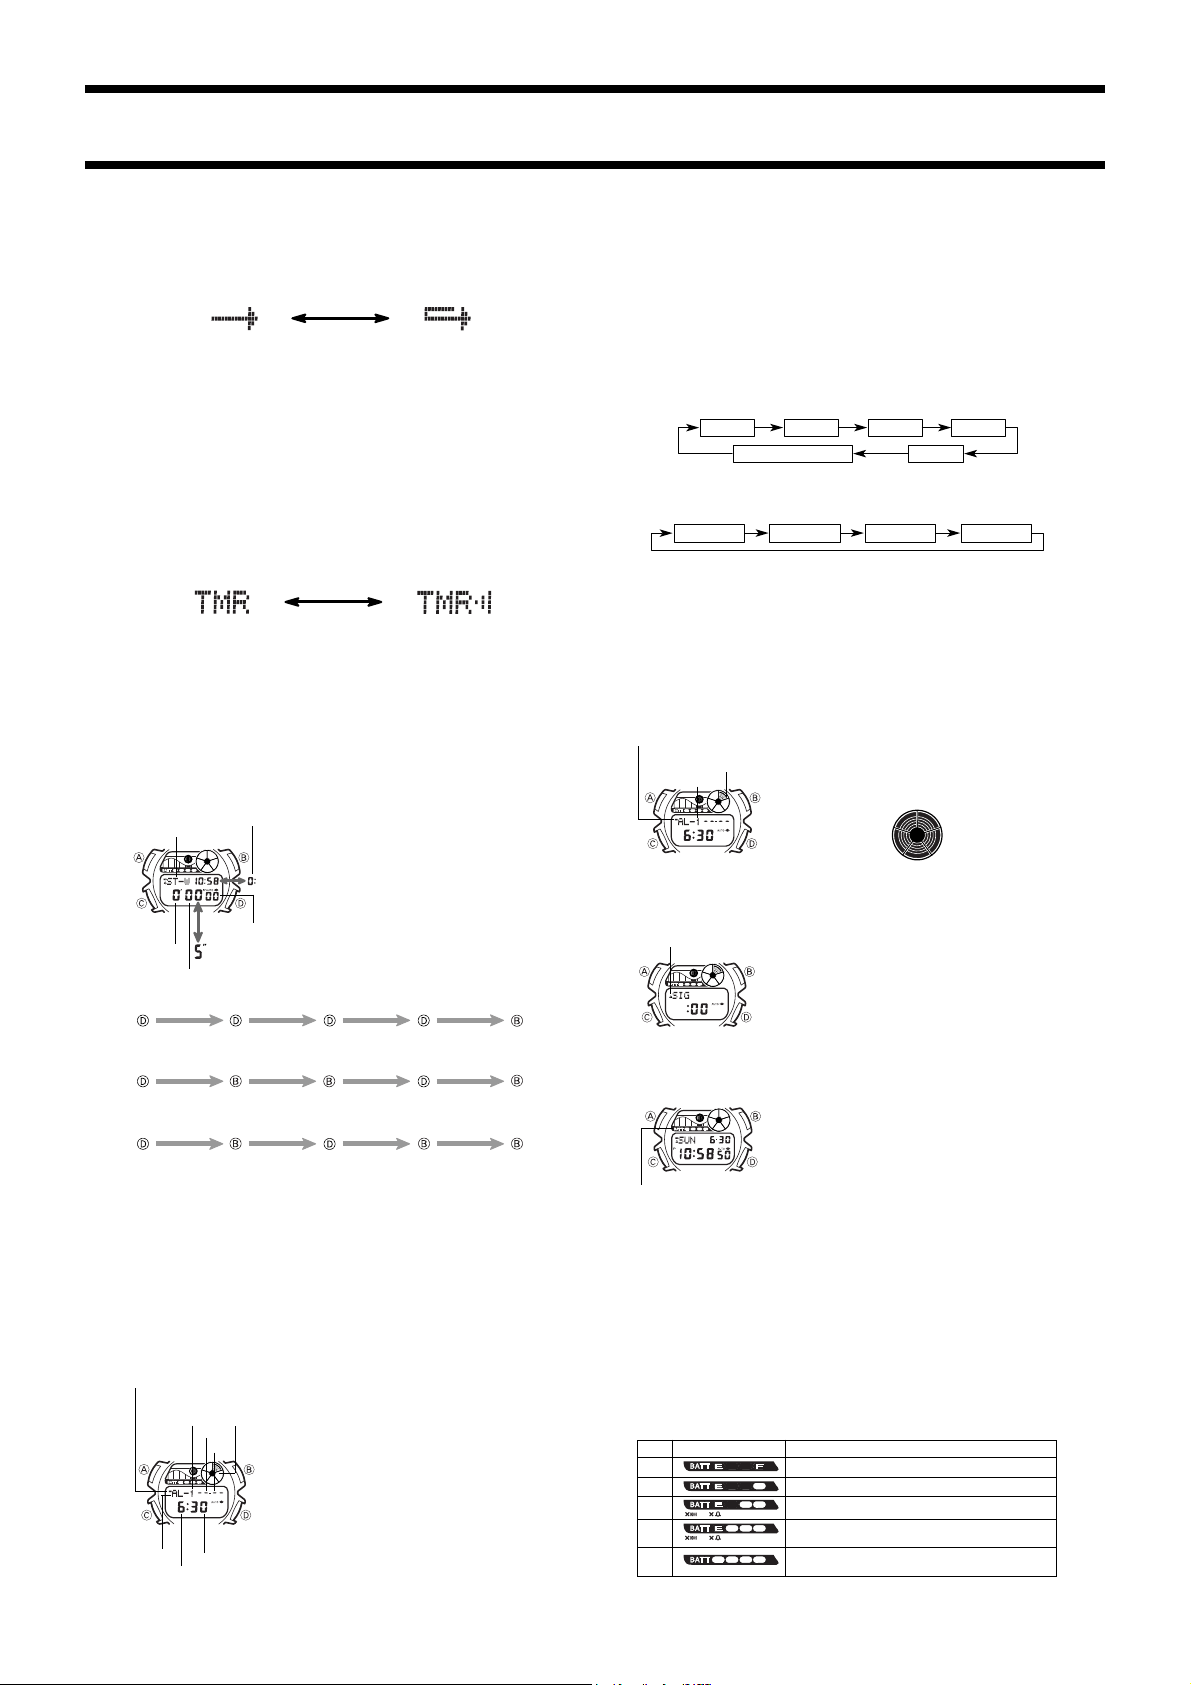
STOPWATCH MODE
The Stopwatch Mode lets you measure elapsed time, split
times, and two finishes. The range of the stopwatch is 23
hours, 59 minutes 59.99 seconds.
• Pressing
AA
AA
A in the Stopwatch Mode while an elapsed
time operation is in progress or while an elapsed time
(other than all zeros) is stopped on the display causes
the upper right display to alternate between the current
time and stopwatch time.
Elapsed time measurement
Start
Stop Re-start Stop Clear
Start
Split Split release Stop Clear
Start
Split Stop Split release Clear
Split time measurement
Split time and 1st-2nd place times
First runner
finishes.
Second runner
finishes.
Record time of
first runner.
Record time of
second runner.
Countdown Start
In addition to the normal instant start at the press of a button, the stopwatch can also
be set up to start timing automatically after five seconds have elapsed.
• While the stopwatch is stopped and cleared to all zeros, press
AA
AA
A to toggle count-
down start on and off. Turning on countdown start displays 5" in the lower part of
the display. 00' 00" 00 is displayed when countdown start is turned off. The upper
part of the display always shows the current time.
ALARM MODE
You can set five independent alarms with the hour,
minutes, month and day. Use the Alarm Mode to turn the
alarm and the Hourly Time Signal on and off.
• When an alarm is turned on, an alarm tone sounds for
20 seconds when the preset time reached.
• When the Hourly Time Signal is turned on, the watch
beeps every hour on the hour.
Alarm types
The types of alarm you get depends on the information
you set.
• To set a daily alarm
Set the hour and minutes for the alarm time. Set “x” for
the month and “xx” for the day. This type of setting
causes the alarm to sound everyday at the time you set.
• To set a date alarm
Set the month, day, hour and minutes for the alarm time. This type of setting causes
the alarm to sound at the specific time, on the specific date you set.
• To set a 1-month alarm
Set the month, hour and minutes for the alarm time. Set “xx” for the day. This type
setting causes the alarm to sound every day at the time you set, only during the
month you set.
• To set a month alarm
Set the day, hour and minutes for the alarm time. Set “
x
” for the month. This type of
the setting causes the alarm to sound every month at the time you set, on the day you
set.
To set the alarm time
1.Press
DD
DD
D while in the Alarm Mode to select Alarm 1 through Alarm 5 and Hourly
Time Signal.
2.After you select an alarm, hold down
AA
AA
A until the hour digits start to flash on the
display. The hour digits flash because they are
selected
. At this time the alarm is
automatically switched on.
3.Press
CC
CC
C to change the selection in the following sequence.
Hour Minutes Month Day
4.Press
DD
DD
D to increase the number or
BB
BB
B to decrease it. Holding down either button
changes the current number at high speed.
• The format (12-hour and 24-hour) of the alarm time matches the format you select
for normal timekeeping.
• When setting the alarm time using the 12-hour format, take care to set the time
correctly as morning or afternoon.
5.After you set the alarm time, press
AA
AA
A to return to the Alarm Mode.
• If you do not operate any button for a few minutes while a selection is flashing, the
flashing stops and the watch goes back to the Alarm Mode automatically.
To stop the alarm
• Press any button to stop the alarm after it starts to sound.
To switch an alarm on and off
1.In the Alarm Mode, press
DD
DD
D to select an alarm.
2.When an alarm you want to is selected, press
BB
BB
B to
switch it on and off.
• The individual alarm indicators let you see at a glance
the on/off status of each alarm. The meaning of these
indicators depends on the mode you are in.
• The general alarm indicator is displayed in all modes.
To switch the Hourly Time Signal on and off
1.In the Alarm Mode, press
DD
DD
D to select the Hourly Time
Signal.
2.When Hourly Time Signal is selected, press
BB
BB
B to switch
it on and off.
• If Hourly Time Signal is on, the Hourly Time Signal On
indicator is shown on the display when you change to
another mode.
To test the alarm
Hold down
DD
DD
D while in the Alarm Mode to sound the alarm.
BATTERY
This watch is equipped with a solar cell and a storage
battery (secondary battery) that is charged by the electri-
cal power produced by the solar cell.
• The area outside of the LCD digital areas is a solar cell
panel that picks up available light to charge the storage
battery.
• A sleep Mode is provided to conserve battery power.
Important!
• Storing the watch for long periods in an area where there is no light or wearing it in
such a way that it is blocked from exposure to light can cause storage battery power
to run down. Be sure that the watch is normally exposed to light whenever possible.
• This watch employs a solar cell that converts light into electricity that charges a
built-in storage battery. Normally, the storage battery should not need replacement,
but after very long use over a number of years, the storage battery may lose its
ability to achieve a full charge. Should you notice problems with getting the storage
battery to a full charge, contact your dealer or CASIO distributor about having the
storage battery replaced.
• The storage battery should be replaced with a CASIO-specified, ML-2016 battery
only. Other storage batteries can cause damage to the watch.
• Be sure to put the watch into its Sleep Mode and keep in an area normally exposed
to light when storing it for long periods. This helps to keep the storage battery from
going dead.
Battery Power Indicator
The battery power indicator on the display shows you the current status of the stor-
age battery's power.
Alarm 1
Alarm 3
Alarm 2
Hourly Time Signal
Alarm 4
Alarm 5
• At Level 4, the display is disabled but timekeeping and other functions continue to
operate internally. Pressing any button causes the Timekeeping Mode screen to
appear for two or three minutes.
Level Indicator Functional Status
1 All functions enabled.
2 All functions enabled.
3 Alarms, Hourly Time Signal, backlight disabled.
4
5
Alarms, Hourly Time Signal, backlight, display
disabled; timekeeping enabled.
Alarms, Hourly Time Signal, backlight, display,
timekeeping disabled.
Mode indicator
Hours
1/100
second
Minutes
Seconds
Countdown start on
General alarm on indicator
Hour
Minutes
Day
Month
Alarm number
Individual
alarm on
indicator
Alarm number
Individual alarm
on indicator
General alarm on indicator
AL-1
AL-2
AL-3
Individual alarm
on indicator
AL-4
AL-5
Hourly time signal on
indicator
Battery power indicator
Mode
indicator
Loading ...
Loading ...
Loading ...