
Loading ...
Loading ...
Loading ...
8 9
IMPORTANT SAFETY INSTRUCTIONS
plug. The plug must be plugged into an appropriate outlet that is properly installed and grounded in accordance with
all local codes. The power cord of this appliance is equipped with a three-prong plug which mates with standard
three prong wall outlets to minimize the possibility of electrical shock.
• This appliance requires a standard 115Volts/60Hz electrical outlet with three-prong.
• WARNING - Improper connection of the equipment/grounding conductor can result in a risk of electric shock. Check
with a qualified electrician or service representative or personnel if you are in doubt as to whether the appliance
is properly grounded. Do not modify the plug provided with the appliance: if it will not fit the outlet, have a proper
outlet installed by a qualified electrician.
SURGE PROTECTOR
• Most electrical appliances use a series of electric control boards to operate. These boards are very susceptible to
power surges and could be damaged or destroyed.
• If the appliance is going to be used in an area or if your city / country is prone to power surges / outages; it is
suggested that you use a power surge protector for all electrical devices / appliances you use. The surge protector
that you select must have a surge block high enough to protect the appliance it is connected to. If you have any
questions regarding the type and size of surge protector needed contact a licensed electrician in your area.
• Damages due to power surges are not considered a manufacturer covered defect and will void your product
warranty.
WARNING: To reduce the risk of fire, electrical shock, or injury when using your appliance, follow these basic precautions:
• DANGER: Risk of child entrapment.
• Child entrapment and suffocation are not problems of the past. Junked or abandoned appliances are still dangerous
even if they “just sit in the garage for a few days.”
• Before you throw away your old appliance, take off the door so that children may not easily climb inside.
• Never allow children to operate, play with, or crawl inside the appliance.
• Never clean the parts with flammable fluids. The fumes can create a fire hazard or explosion.
• Do not place the dryer in steamy rooms or where the dryer is directly exposed to rain. Moisture may destroy the
electrical insulation causing an electrical shock hazard.
• During spinning, do not put your hand in the spin basket. The spin basket is rotating at high speed and may injure
your hand.
• Do not store or use gasoline or any other flammable vapors and liquids in the vicinity of this appliance. The fumes
can create a fire hazard or explosion.
INSTALLATION INSTRUCTIONS
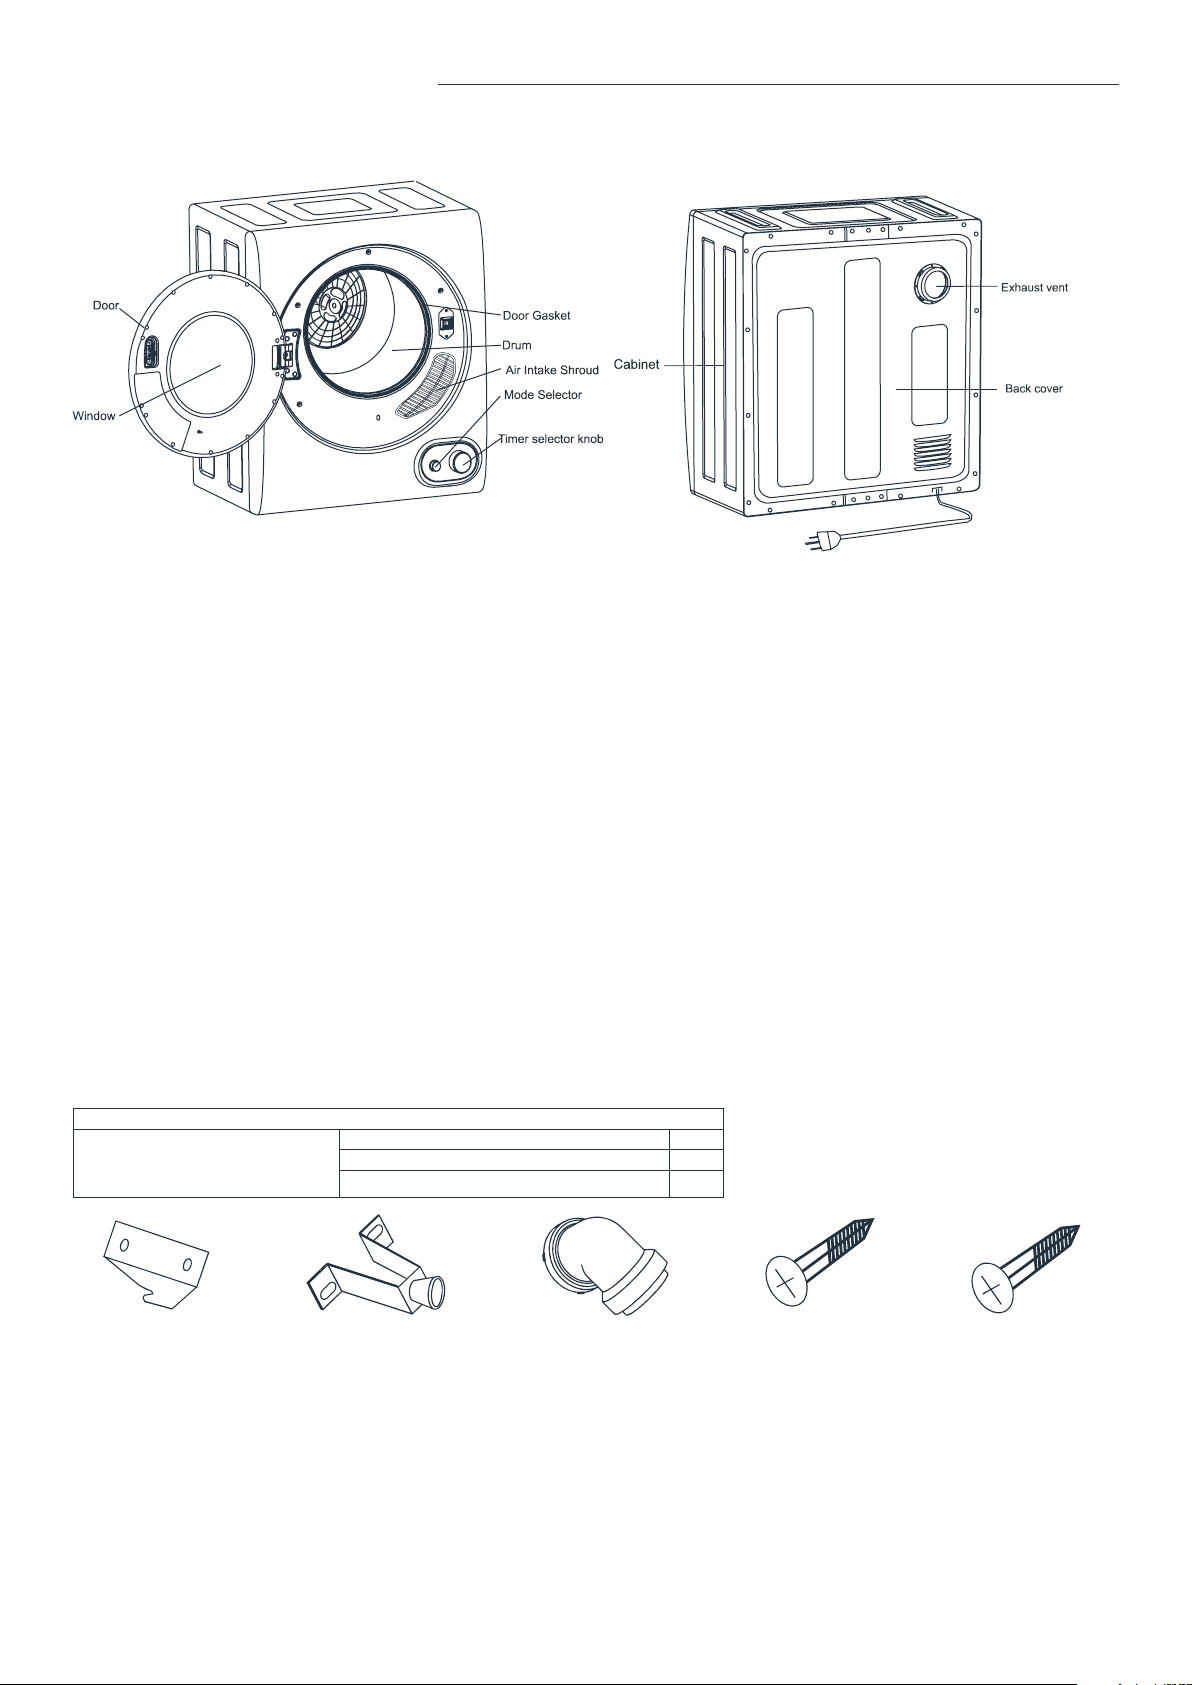
Parts Description
Unpacking and Removing Shipping Material
Remove the box and lift the dryer up and away from the foam base cushion. Open the lid of dryer to take out all
accessories including protection foam.
Put your laundry into the dryer evenly. Uneven laundry may cause noise or vibration.
Before drying, check all pockets of your clothes. If nails or pins remain in pockets, they may damage the dryer or clothes.
Never splash water on the control panel.
Plug the dryer into an exclusive properly installed-grounded wall outlet. Do not cut or remove the third (ground) prong from
the power cord. Any questions concerning power and or grounding should be directed toward a certified electrician or an
authorized service center.
CHOOSE THE PROPER LOCATION
IMPORTANT: Make sure to follow the electric and grounding requirements and warning in Important Safety Instructions.
INSTALL YOUR DRYER
For best performance, you must install your dryer on a solidly constructed floor. Wood floors may need to be reinforced to
minimize vibration and/or unbalanced load situations.
Avoid install your dryer on carpet and soft tile surfaces. This can cause vibration and your dryer will move slightly during
the spin cycle.
Do not expose the dryer to direct sun light or freezing temperatures (under 32°F).
WALL MOUNTING INSTRUCTIONS
Tools required (Not included)
Tools and parts Drill & Drill Bit
required for Plaster or Wood
Installation
Drill & Drill Bit 1
Phillips Head Screw Driver 1
Wood screws 50mm(2 inch) long 4
It is recommended to complete the following procedure with at least 2 people.
1. Determine dryer position on wall and mark required bracket position. This dryer is not suitable to be directly placed on
top of a washing machine.
* A minimum 2 inch is needed between the top of the dryer and the ceiling for ease of installation.
* If mounting above a washing machine, allow sufficient room to open the lid of the washer.
2. Fix the wall hanging brackets to the wall securely (e.g. into the stud). Fit a timber slat between the studs to mount the
Wall Hanging Bracket
X2
Wall Hanging Hook
X2
Exhaust connector
X1
0.5 inch long Screws
X4
1 inch long Screws
X4
Loading ...
Loading ...
Loading ...