
True Wireless Earbuds
User Guide
EN

Contents
Introduction 4
About this User Guide................................................................................4
Cautions regarding product handling...........................................................5
Advantages of this product.........................................................................6
Accessory and part names..........................................................................8
Charging and Powering 10
Charging the earbuds...............................................................................10
Charging the charging case.......................................................................12
Turning on the power...............................................................................14
Turning off the power..............................................................................15
Remaining Battery Power.........................................................................16
Bluetooth® Connectivity 17
Pairing for the First Time..........................................................................17
Pairing with a Different Device..................................................................20
Connecting to a Device Already Paired........................................................22
Wearing This Product 23
Putting on the earbuds.............................................................................23
Replacing the eartips...............................................................................24
Operation (Audio Playback and Phone Calls) 25
Playing back audio on this product.. .......................................................... 25
Playing back sound according to your surroundings.....................................27
Talking on the phone.. ............................................................................. 29
Starting the voice assistant.. .................................................................... 30
2
Contents

Dedicated Application 31
About the “Headphone Control” app..........................................................31
App settings.. ......................................................................................... 32
Troubleshooting 35
Read this first......................................................................................... 35
Cannot connect.......................................................................................36
Power will not turn on.. ........................................................................... 37
The product cannot be charged................................................................. 38
The product does not operate or play back..................................................39
No sound can be heard............................................................................. 40
Sound can only be heard from one earbud.. ................................................ 41
Sound is not good or sounds strange.......................................................... 42
The sound is distorted, noisy or choppy......................................................43
Using only one of the earbuds.. ................................................................. 44
Initializing (performing a factory reset)......................................................45
Updating the firmware.............................................................................47
List of support centers.............................................................................48
Appendix 49
List of operations....................................................................................49
List of indicator displays and audio messages..............................................51
Specifications.........................................................................................53
Trademarks............................................................................................55
3
Contents

Introduction
About this User Guide
The User Guide is intended for users of this product, and explains how to connect and operate the product.
(
The precautions and other matters in this Guide are classified as follows.
(
WARNING
This content indicates “risk of serious injury or death.”
(
CAUTION
This content indicates “risk of injury.”
(
NOTICE
Indicates points that you must observe in order to prevent product failure, damage or malfunction and
data loss, as well as to protect the environment.
(
NOTE
Indicates notes on instructions, restrictions on functions, and additional information that may be
helpful.
(
All illustrations and screens shown in this Guide are for explanatory purposes.
(
All company names, product names and other such listings in this Guide are the registered trademarks or
trademarks of their respective companies.
(
Text labeled as [search tag] is for the purpose of searching. These tags are used as links from the “Quick
Start Guide” to the “User Guide.”
4
Introduction > About this User Guide

Cautions regarding product handling
Please read the “Safety Brochure” included with this product and use caution regarding the following points.
Waterproof performance
The waterproof performance of this product are as shown below. Product failures caused by water ingress
due to incorrect handling are not covered by the warranty.
(
Earbuds
(
The waterproof performance of the body of these earbuds is compliant with IPX5 standards. The
earbuds are protected by direct jets of water from all directions. (Earbud nozzle: excluding the sound
conduit)
(
The waterproof performance of this product will not continue to last, and may degrade through regular
use.
(
Charging case
The charging case and the included USB power cable are not waterproof. Use caution regarding the
following to avoid electric shock or product failure.
(
Do not expose this product to liquids such as sweat, rainwater or seawater.
(
Thoroughly wipe off any sweat, rainwater, seawater or other liquids that get on the earbuds before
placing them back in the charging case.
About IPX
(
IPX refers to a product's “liquid ingress protection” as cited in JIS C 0920 (the harmonized standard of IEC 60529), “Degrees of
protection provided by enclosures (IP Code)”.
(
These are provisions that guarantee the performance of a product in fresh water or tap water at room temperature. This does
not guarantee equivalent performance in warm water, seawater or the like.
About the charging performance
This product uses lithium-ion batteries in both the earbuds and in the charging case. Lithium-ion batteries
are consumable items. To extend the life of the batteries as long as possible, use caution regarding the
following.
(
If the product is not used for a long period of time, it may take longer to recharge the batteries.
(
When storing the product for a long time, charge the product around once every six months to avoid
excessive discharge.
(
If the duration of the battery’s charge is too short, it may have reached the end of its lifespan. Contact
Yamaha dealer or service center.
5
Introduction > Cautions regarding product handling

Advantages of this product
This product is a set of wireless earbuds that connect to Bluetooth devices such as a portable music player or
smartphone.
High-definition playback of sound from Bluetooth devices
This product supports Qualcomm® aptX™ Adaptive as well as the SBC and AAC codecs.
Qualcomm® aptX™ Adaptive Audio is an audio codec that offers both high quality and high connectivity
performance in response to audio signal interruptions.
Supports Qualcomm TrueWireless™ Mirroring
This product features technology that lets you connect both left and right earbuds at the same time to a
smartphone, music player or other device for high-definition sound. The earbuds switch between primary
and secondary devices automatically for a stable connection.
AMBIENT SOUND
This function makes it easier to hear the sounds around you, such as announcements made on public
transportation, the sounds of passing cars and so on.
(
“Playing back sound according to your surroundings”(p.27)
ADVANCED ANC
This feature analyzes the playback sound and outside noise, and reduces only the noise while maintaining
the playback sound quality. By reducing noises from outside such as trains, buses and so on, you can absorb
yourself in the music without the need to raise the volume too much.
(
“Playing back sound according to your surroundings”(p.27)
LISTENING CARE -Advanced
This product features LISTENING CARE -Advanced, which lets you enjoy rich sound quality even at a low
volume. Focusing on the characteristics of the human ear where the low- and high-end sounds become
harder to hear at lower volumes, as well as how things sound differently in different listening environments,
this feature corrects the sound balance for the optimal sound to match the volume. By rendering a natural
sound that's easy to listen to, this feature reduces the load on your ears caused by excessive levels.
LISTENING OPTIMIZER
This analyzes the audio in real time and adjusts the sound quality to best match how this product fits on your
ears and your ear shape.
GAMING MODE
Enabling this function helps improve latency when you are watching a video or playing a game that is
affected by lag or delay.
6
Introduction > Advantages of this product

In-Ear Detection
When you remove one of the earbuds, its built-in sensor activates, pausing the playback of your audio
automatically. The audio automatically starts again when you put the earbuds back on. This is useful for
automatically operating the playback or pause controls on a Bluetooth device, such as a portable music
player or smartphone.
(
“Playing back audio on this product”(p.25)
Google Fast Pair
You can easily pair this product with your Android™ smartphone. Pairing is supported with Android devices
than run Android OS 6.0 or later, or Google Play 11.7 or later.
(
“Pairing for the First Time”(p.17)
Smartphone support
You can use this product to talk on the phone and start up the voice assistant while connected to this
product.
Dedicated smartphone app: Headphone Control
Install the Headphone Control app on your smartphone to configure more detailed settings.
You can switch ON/OFF for AMBIENT SOUND, ADVANCED ANC, LISTENING CARE -Advanced, LISTENING
OPTIMIZER, GAMING MODE, In-Ear Detection and so on.
NOTE
(
While the AMBIENT SOUND feature makes it easier to hear sounds around you, it does not guarantee that you will be able to hear
everything. You may be unable to hear ambient sounds if you’ve turned up the volume of the audio, or in certain situations.
(
When using GAMING MODE, the video/audio latency may change or the sound quality and connection stability may degrade,
depending on the usage environment and how you wear the product.
Related links
(
“Pairing for the First Time”(p.17)
(
“Playing back audio on this product”(p.25)
(
“Playing back sound according to your surroundings”(p.27)
(
“Starting the voice assistant”(p.30)
(
“About the “Headphone Control” app”(p.31)
(
“App settings”(p.32)
7
Introduction > Advantages of this product
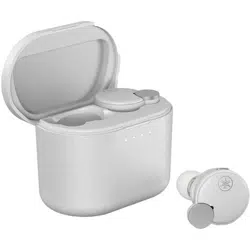
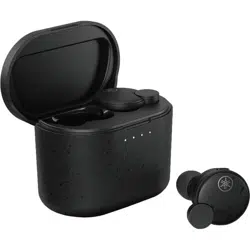
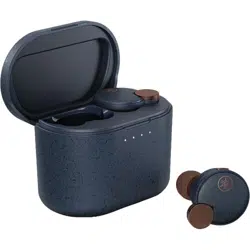
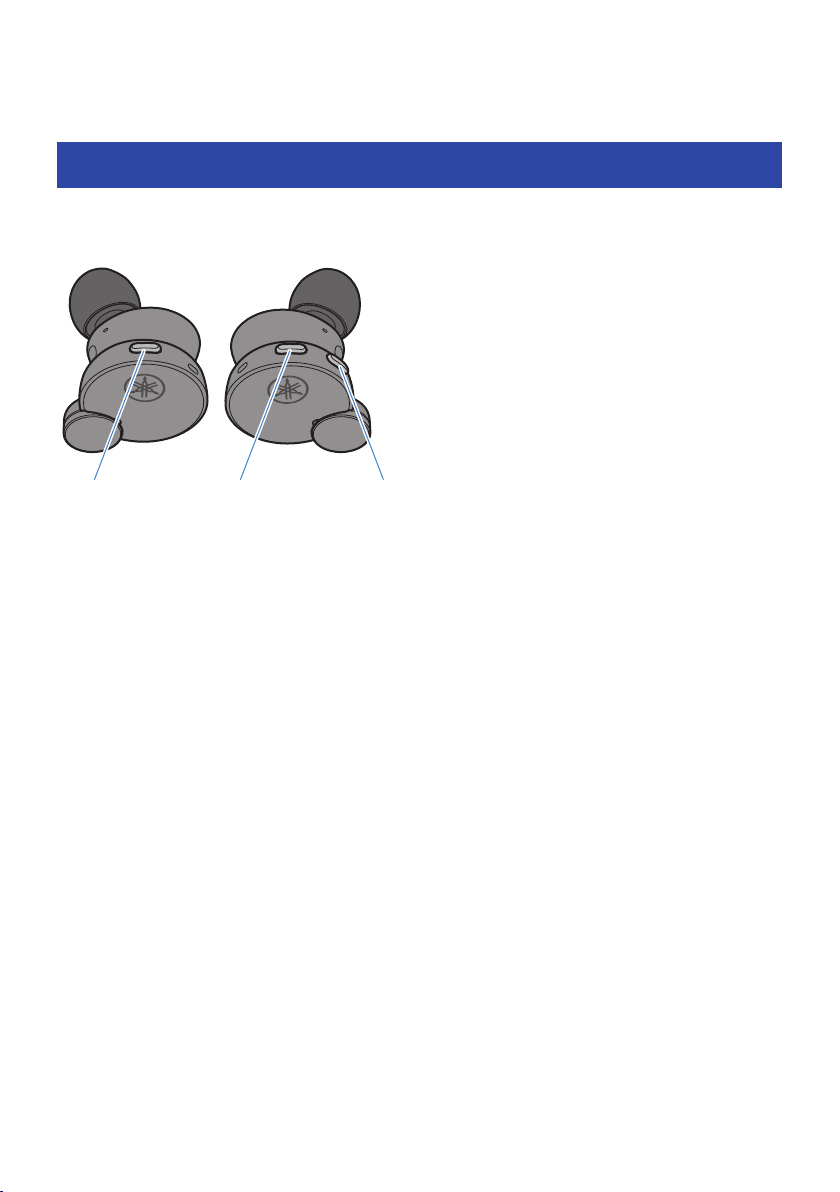
Accessory and part names
Make sure that all of the accessories are included with this product.
Earbuds
b c
d
a
Earbud (R)Earbud (L)
a
Function key
b
+ (plus) key
c
− (minus) key
d
Indicator
Charging case
e
f
Front Back
e
Charging indicators
f
Charging connector
8
Introduction > Accessory and part names

USB power cable (20 cm (7-7/8 in); type A to C)
Eartips (XS, S, M, L, XL; one set each)
Note: The M-size eartips are pre-attached.
XLLMSXS
Quick Start Guide
Safety Brochure
NOTE
(
The earbuds are stored in the charging case.
(
The earbuds feature a built-in microphone.
(
The charging case contains a battery for charging the earbuds.
9
Introduction > Accessory and part names
Charging and Powering
Charging the earbuds
Charge the earbuds before use by placing them in the charging case.
CAUTION
(
The charging case is not waterproof. Thoroughly wipe off any sweat, rainwater, seawater or other liquids that get on the
earbuds before placing them back in the charging case.
When using this product for the first time
(
Remove the earbuds from the charging case the first time you use this product, and peel off the isolation sheets found on each.
Isolation sheet
Indicator
Charging indicators
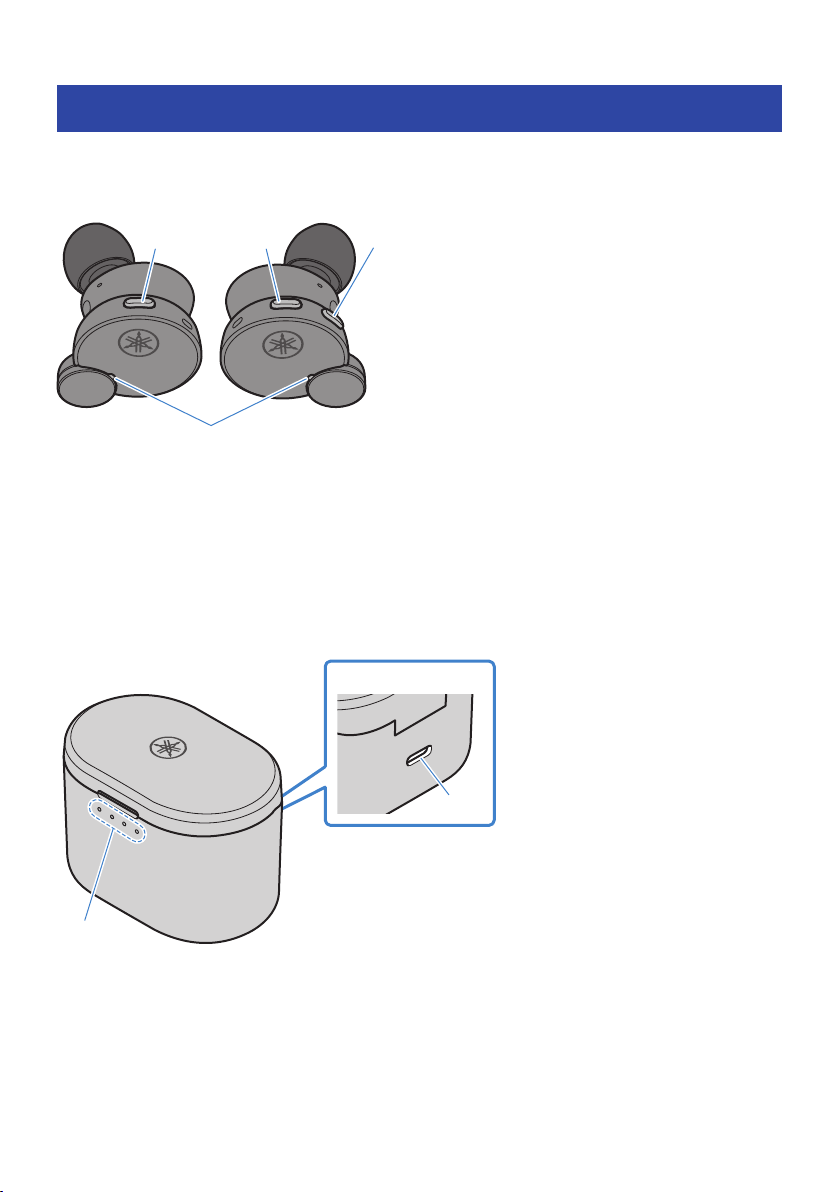
1 Open the charging case lid.
10
Charging and Powering > Charging the earbuds

2 Place the earbuds in the charging case.
The earbud indicators light up red while charging, and turn off when charging is completed.
Charging takes about 2 hours.
CAUTION
(
When charging the earbuds, use caution regarding the ambient temperature.
(
Recommended charging temperatures: 10–35ºC
(
If the ambient temperature exceeds the recommended charging temperature, the earbuds may stop recharging. When the
ambient temperature returns to the recommended charging temperatures, the earbuds will automatically start recharging
again.
NOTE
(
Once you place the earbuds in the charging case, the indicators on the charging case will show the remaining battery power for five
seconds (except when the charging case itself is still charging).
(
You cannot connect the earbuds via Bluetooth or use them for playback while they are recharging.
Related links
“Appendix”(p.49)
11
Charging and Powering > Charging the earbuds
Charging the charging case
To charge the charging case, connect the included USB power adaptor.
CAUTION
(
The charging case is not waterproof. Do not expose this product to liquids such as sweat, rainwater or seawater.
(
Be sure to use the USB power cable that was included with this product.
(
When using a USB power adaptor, be sure that the commercially-available adaptor is compatible with 5 V DC (at least 0.5 A)
power output.
(
When charging this product inside of China, be sure to use a USB power adaptor that is approved by CCC.
(
Recommended charging temperatures: 10–35ºC
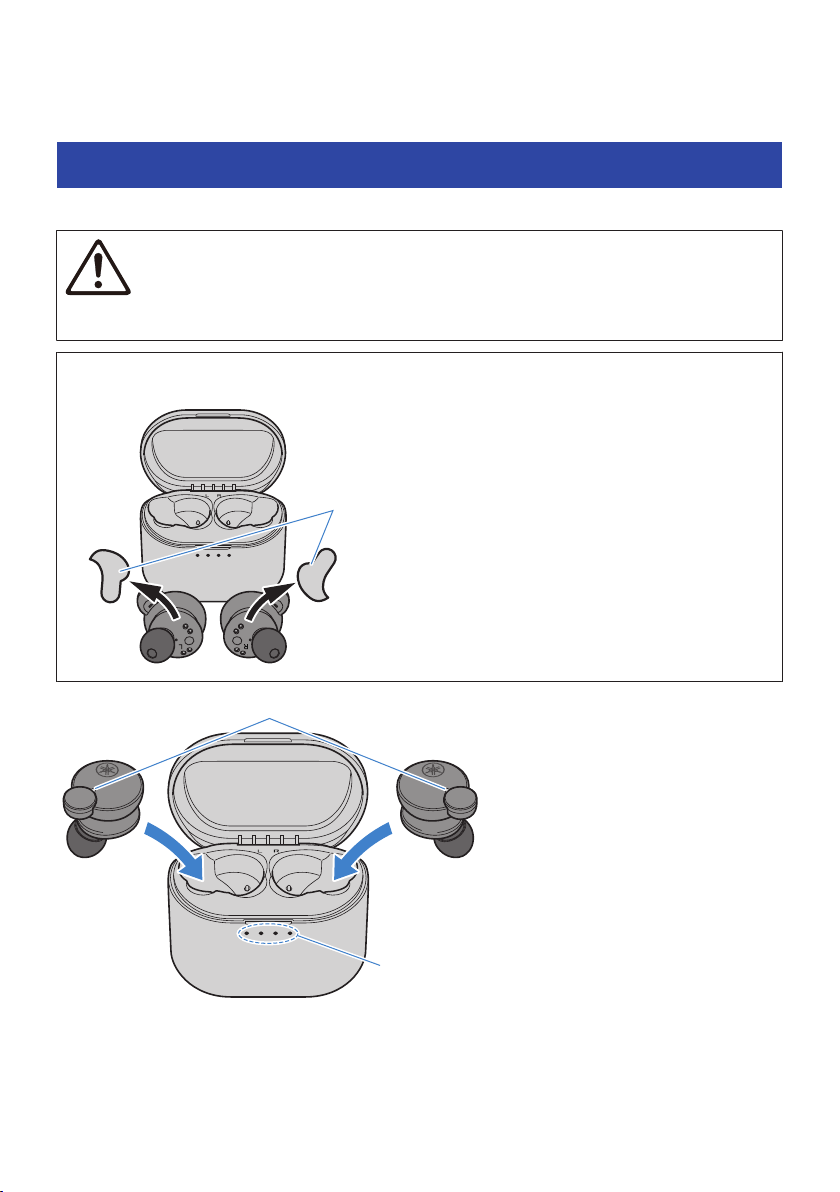
1
2
3
Front
Charging indicators
Type C
Type A
USB power adaptor
(commercially available)
1 Plug the USB power cable (type C side) into the charging case.
2 Plug the USB power cable (type A side) into the USB power adaptor.
3 Plug the USB power adaptor into the power outlet.
Charging will begin. Charging takes about 3 hours.
While the case is charging, the indicators light up as shown below.
Remaining battery power Indicator
100%
75–100%
50–75%
25–50%
12
Charging and Powering > Charging the charging case

0–25%
: Lights up
: Flashes : Not lit
NOTE
(
You can also charge the earbuds while the charging case is charging.
(
You can charge from the USB port on your computer instead of using a USB power adaptor.
(
Once you place the earbuds in the charging case, the indicators on the charging case will show the remaining battery power for five
seconds (except when the charging case itself is still charging).
13
Charging and Powering > Charging the charging case
Turning on the power
Once you remove the earbuds from the charging case, the earbuds will turn on.
1 Remove the earbuds from the charging case.
The indicators light up as shown below, and the power turns on.
Blue
Lights up for 1 sec
NOTE
When an earbud is low on battery power, its indicator will flash red three times when the power is turned on. If this happens, charge
the earbud.
Related links
“Remaining Battery Power”(p.16)
14
Charging and Powering > Turning on the power
Turning off the power
When you put the earbuds back into the charging case, the earbuds turn off.
1 Place the earbuds in the charging case.
The earbud power will turn off, and the product will enter charging mode.
NOTE
When you want to turn off the earbuds without putting them back in the charging case, hold down the function key on earbud (L) and
the + (plus) key on earbud (R) until the indicators light up red. You will hear the “Power Off” audio message in the earbuds.
7 sec
Red
Lights up for 1 sec
Earbud (L) Earbud (R)
15
Charging and Powering > Turning off the power

Remaining Battery Power
When this product is turned on, the audio message in the earbuds tells you how much battery power is left.
(
Audio messages:
(
Battery High: plenty of charge remaining
(
Battery Medium: moderate charge remaining
(
Battery Low: small amount of charge remaining
NOTE
You can check the remaining battery power of the charging case in the following situations.
(
While charging the charging case
(
Right after placing the earbuds into the charging case (except when the charging case itself is charging)
(
Right after opening/closing the charging case
Related links
“Charging the charging case”(p.12)
16
Charging and Powering > Remaining Battery Power
Bluetooth® Connectivity
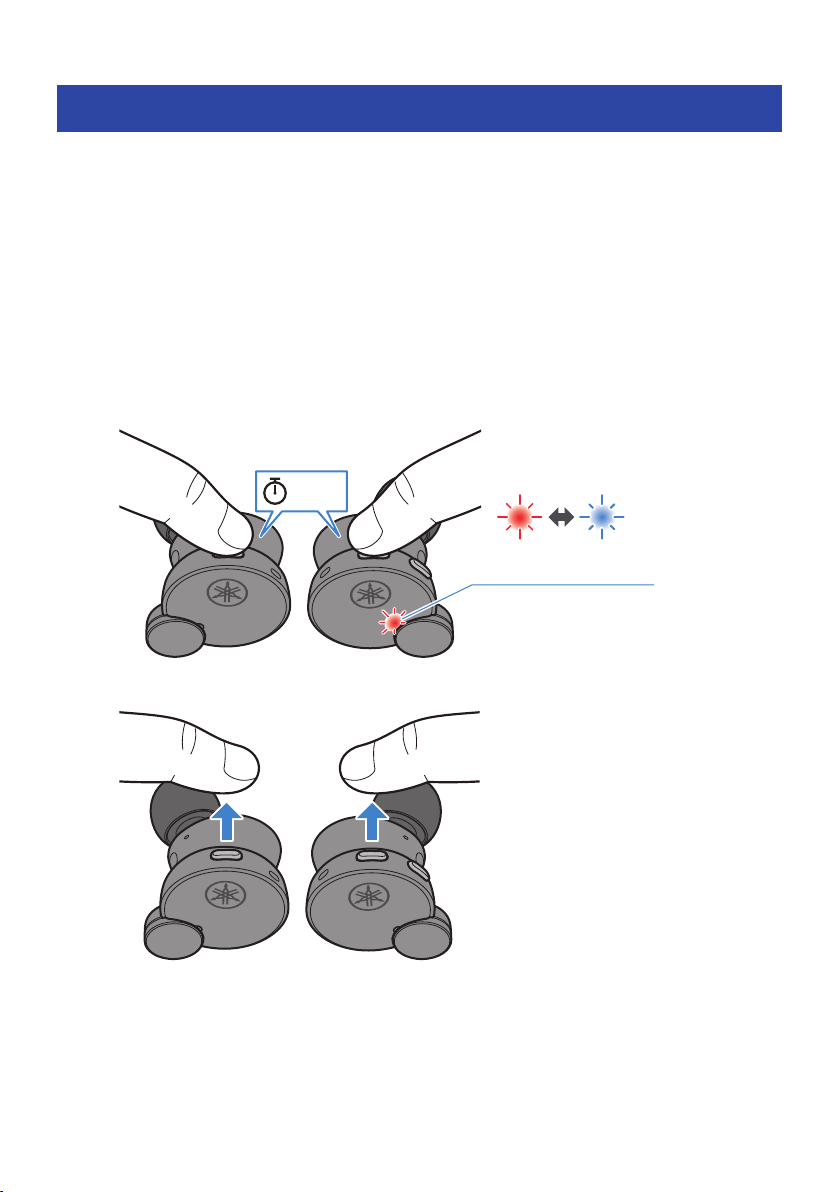
Pairing for the First Time
When first connecting this product to a Bluetooth device (such as a smartphone), follow the steps below to
pair (register) this product with that device.
[Search tag] #Q02 Pairing
NOTE
You can use Google Fast Pair (described afterwards) to easily pair this product with your Android smartphone.
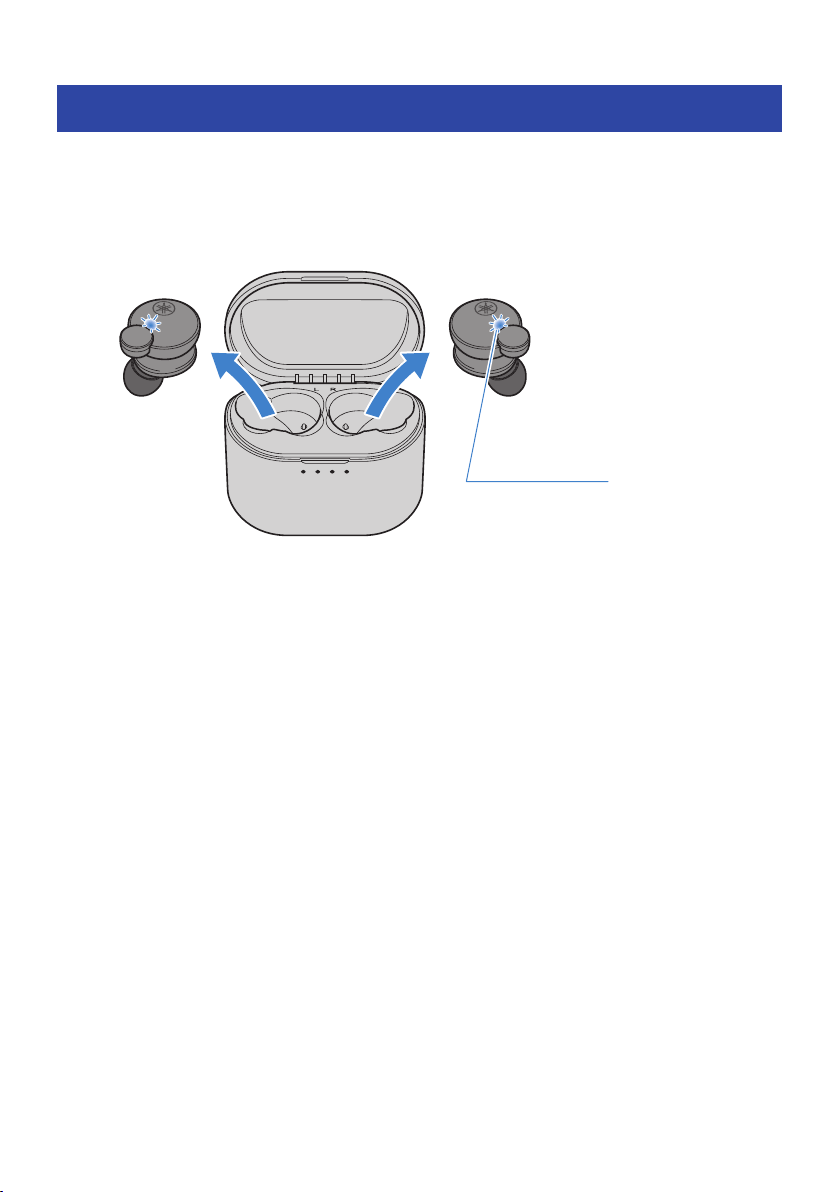
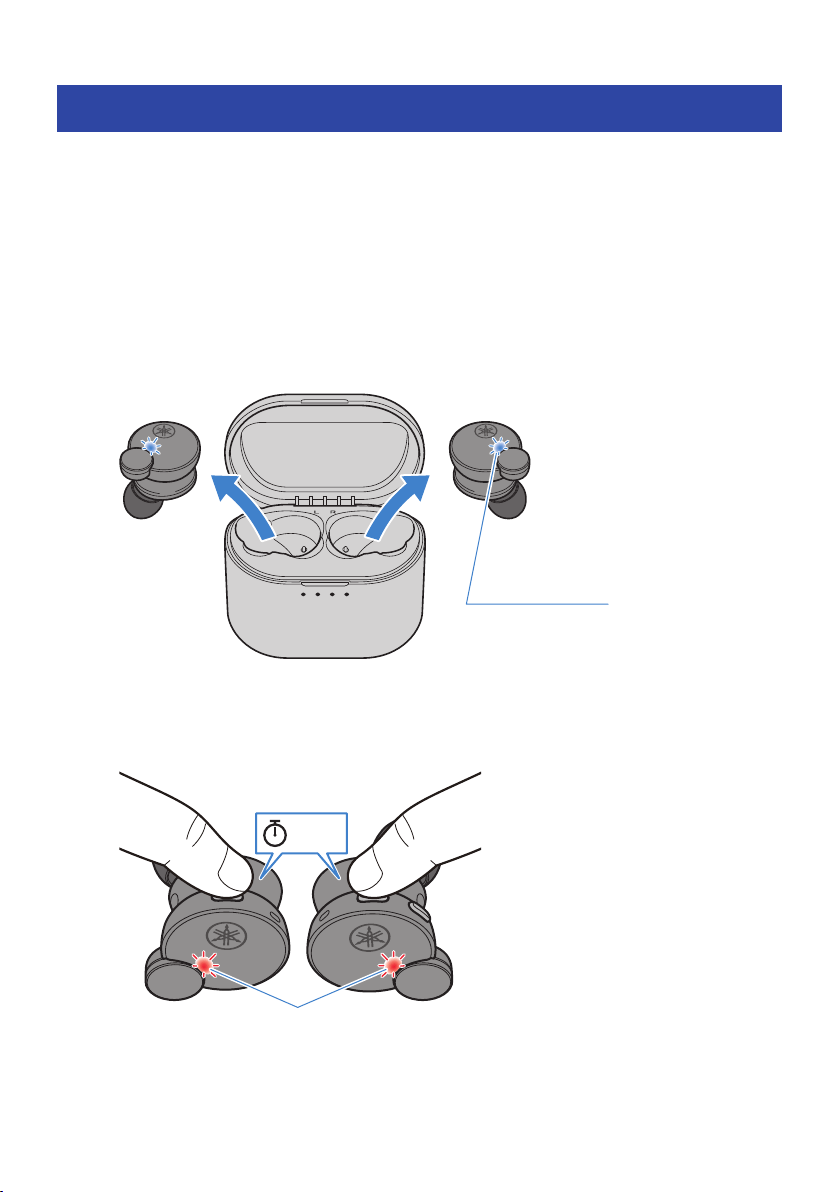
1 Remove the earbuds from the charging case.
The earbuds will turn on and both earbuds automatically connect. Either earbud (L) or (R) will
be the primary earbud, and its indicator lights up as shown in the illustration below as the unit
enters pairing standby mode. You will hear the “Pairing” audio message in the earbud. Either
earbud (L) or earbud (R) can become the primary earbud.
Blue
Lights up
for 1 sec
Purple
Lights up
for 5 sec
Red and blue
Flashes
alternately
Blue
Lights up
for 1 sec
Purple
Lights up
for 5 sec
Earbud that is now primary
NOTE
The indicators may flash blue for a while after you remove the earbuds from the charging case.
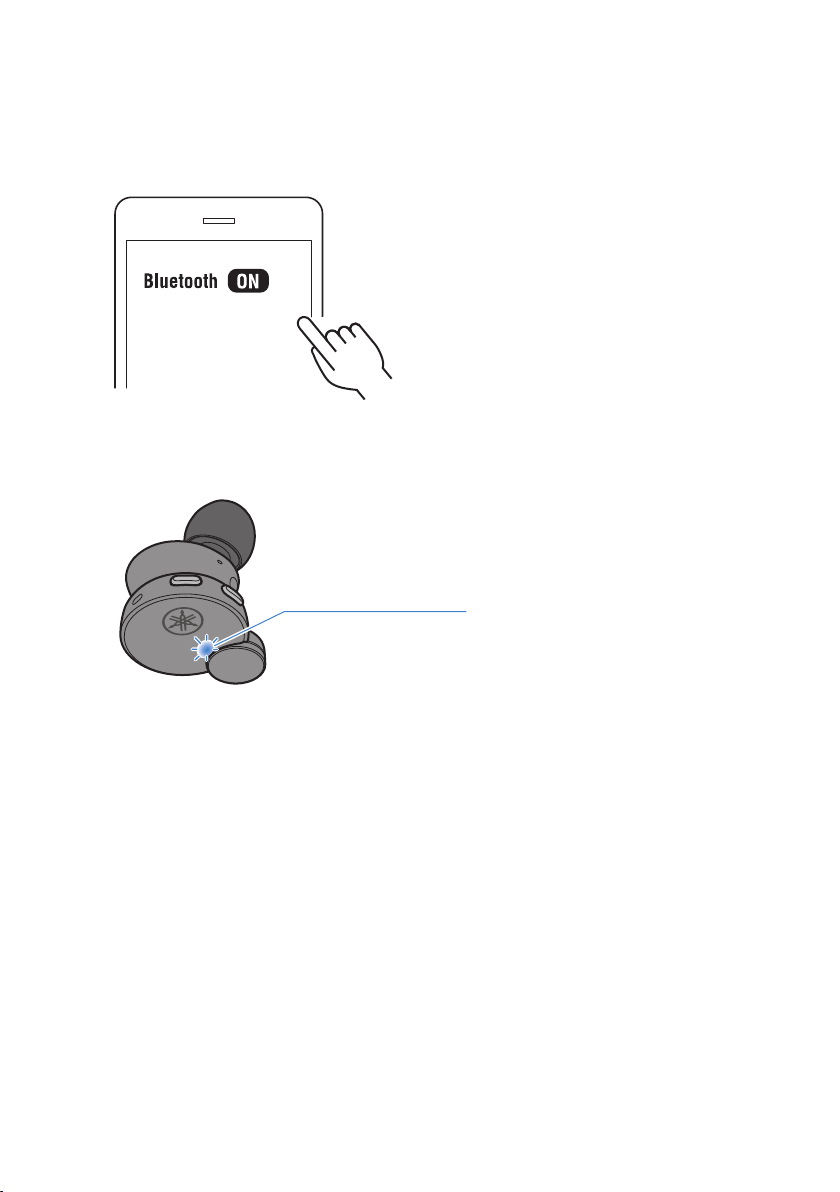
2 Activate Bluetooth on your Bluetooth device.
A list of Bluetooth devices that can be connected will be shown.
17
Bluetooth® Connectivity > Pairing for the First Time
3 Select this product from the list on your Bluetooth device.
Select the listing that reads “Yamaha...” and not the listing that reads “LE-Yamaha...”.
If a passkey is required when connecting, input “0000”.
Yamaha TW-E7B
Once connected, the indicator on the primary earbud lights up as shown below. You will hear
the “Pairing Successful” and “Connected” audio messages in the earbud.
Blue
Lights up for 10 sec
Earbud that is now primary
NOTE
(
Pairing standby mode will automatically end on this product after about two minutes. To pair again or if the connection was
unsuccessful, place the earbuds back into the charging case and start again at step 1.
(
If the earbuds (L) and (R) do not automatically connect, put them back into the charging case and take them out again.
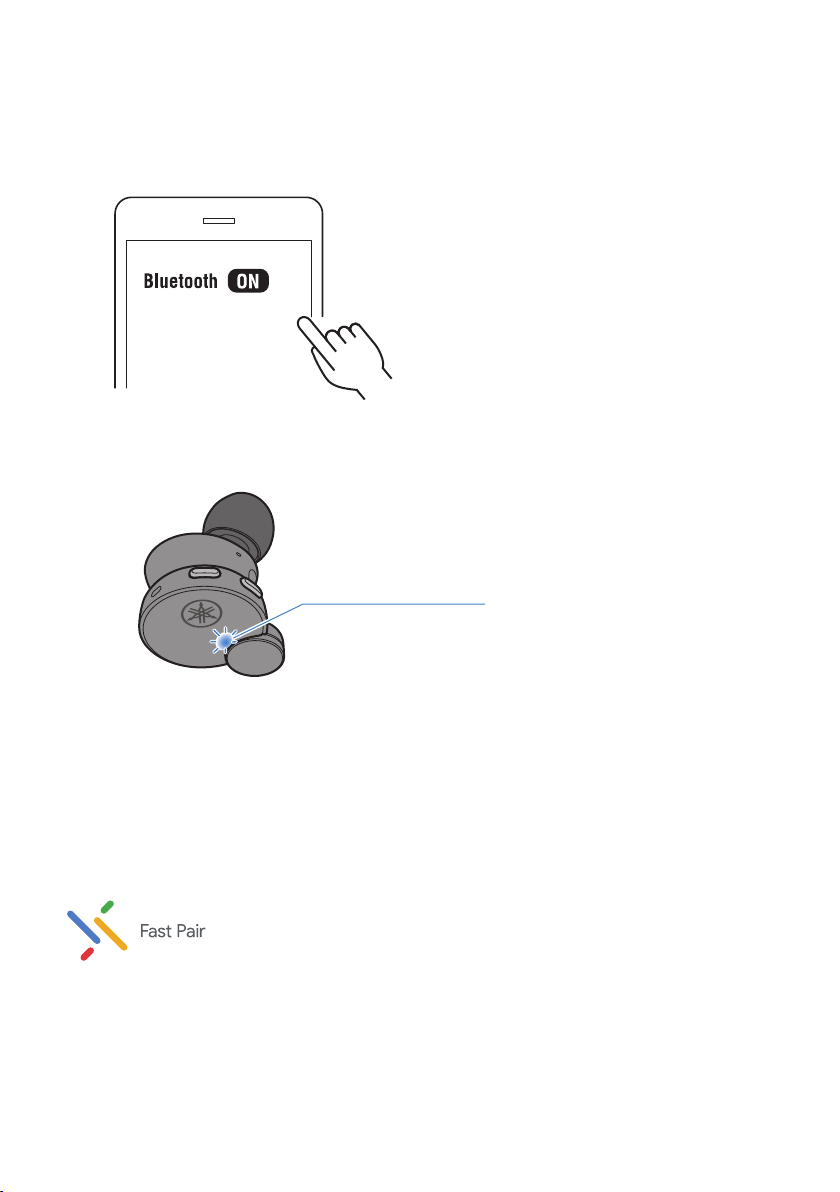
Connect using Google Fast Pair.
You can easily pair this product with your Android smartphone.
Pairing is supported with Android devices running Android OS 6.0/Google Play 11.7 or later.
18
Bluetooth® Connectivity > Pairing for the First Time

1 Activate Bluetooth on your Android device.
2 Remove earbud (L) and (R) from the charging case and bring them near your
Android device.
A notification will be shown on your Android device.
3 Tap the notification on your Android device.
The device will then finish pairing with this product.
The indicator on the primary earbud will light up blue for 10 seconds, and you will hear the
“Pairing Successful” and “Connected” audio messages in the earbud.
NOTE
To use Google Fast Pair, you’ll need to configure your Google account and connect to a network.
Related links
(
“Pairing with a Different Device”(p.20)
(
“Connecting to a Device Already Paired”(p.22)
(
“About the “Headphone Control” app”(p.31)
(
“Using only one of the earbuds”(p.44)
19
Bluetooth® Connectivity > Pairing for the First Time
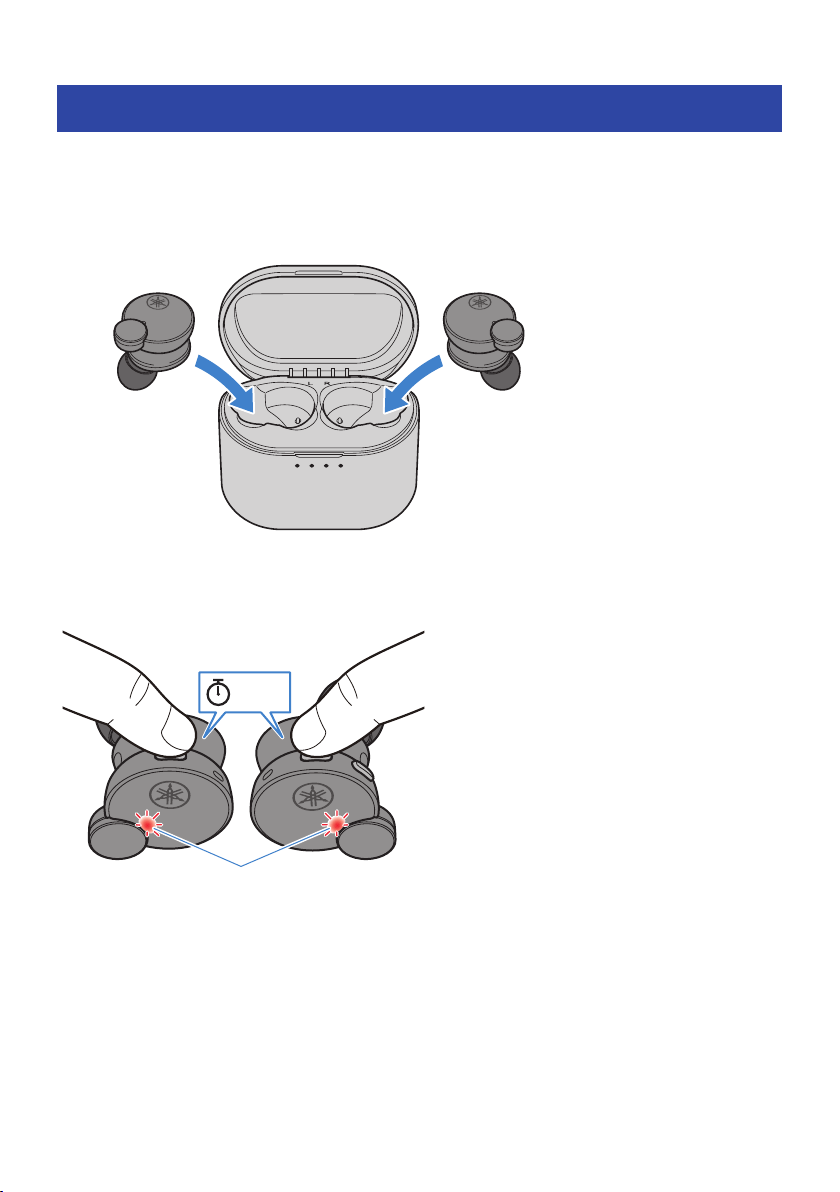
Pairing with a Different Device
Follow the steps below to pair with another Bluetooth device, or to try pairing with the same device again.
Note that this product cannot connect to more than one Bluetooth device at the same time. If this product is
already connected to another Bluetooth device, disconnect it and then follow these steps.
[Search tag] #Q02 Pairing
1 With earbuds (L) and (R) turned on, hold down the function key on earbud (L) and
the + (plus) key on earbud (R) for about three seconds, and then release your
fingers.
Either earbud (L) or (R) will be the primary earbud, and its indicator alternately flashes red and
blue while you hear the message “Pairing.” This means that the earbud is in pairing standby
mode.
Flashes
Red
Blue
Earbud that is now primary
3 sec
2 Activate Bluetooth on the Bluetooth device.
A list of Bluetooth devices that can be connected will be shown.
20
Bluetooth® Connectivity > Pairing with a Different Device
3 Select this product from the list on your Bluetooth device.
Select the listing that reads “Yamaha...” and not the listing that reads “LE-Yamaha...”.
If a passkey is required when connecting, input “0000”.
Yamaha TW-E7B
If successfully connected, you will hear the “Pairing Successful” and “Connected” audio
messages in the earbud that is flashing red and blue. The indicator displays as shown below.
Blue
Lights up for 10 sec
Earbud that is now primary
Earbud (L) and (R) connect automatically and are ready for use.
NOTE
(
Pairing standby mode will automatically end on this product after about two minutes. To pair again, start from step 1.
(
If the earbuds (L) and (R) do not automatically connect, put them back into the charging case and take them out again.
(
Up to six Bluetooth devices can be registered with this product. If you pair a device beyond the maximum number, the information
for device you first paired (the oldest pairing) will be deleted.
(
This product does not support multi-point connectivity (connection to multiple devices at the same time).
Related links
(
“Pairing for the First Time”(p.17)
(
“Connecting to a Device Already Paired”(p.22)
(
“About the “Headphone Control” app”(p.31)
(
“Using only one of the earbuds”(p.44)
21
Bluetooth® Connectivity > Pairing with a Different Device
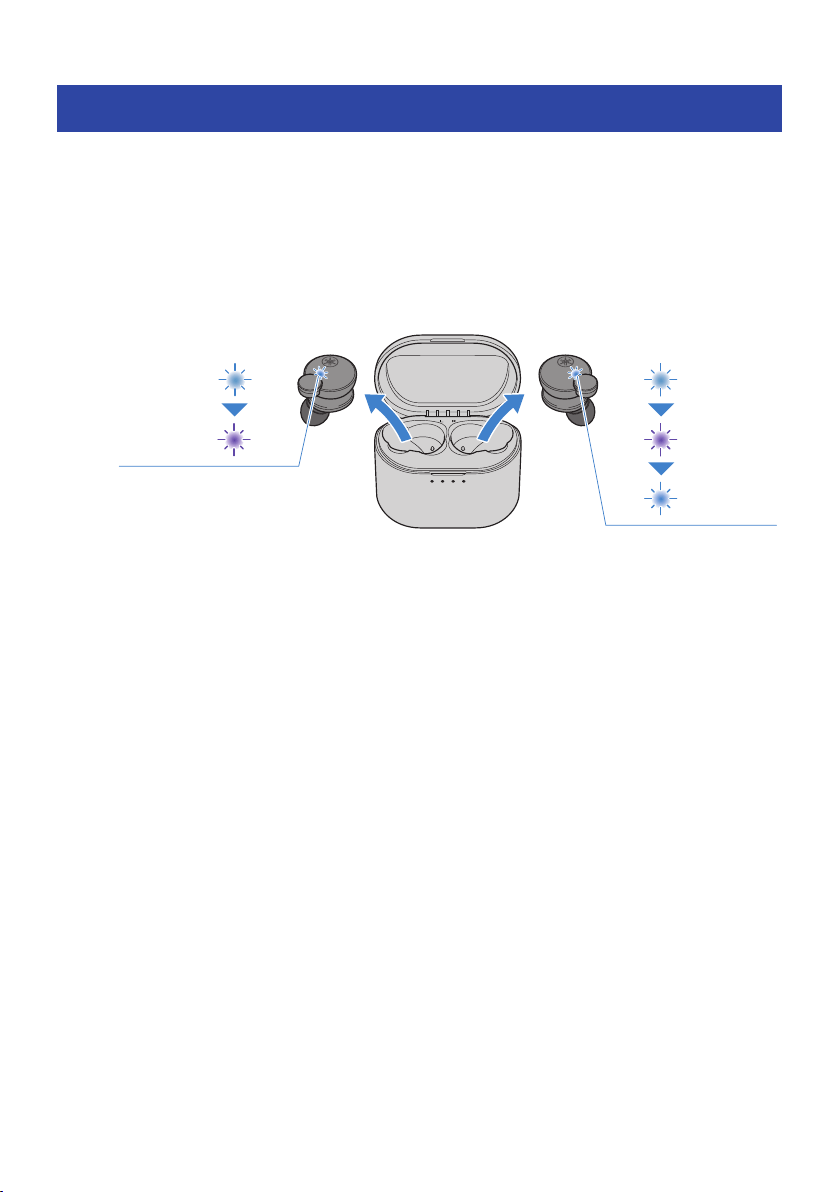
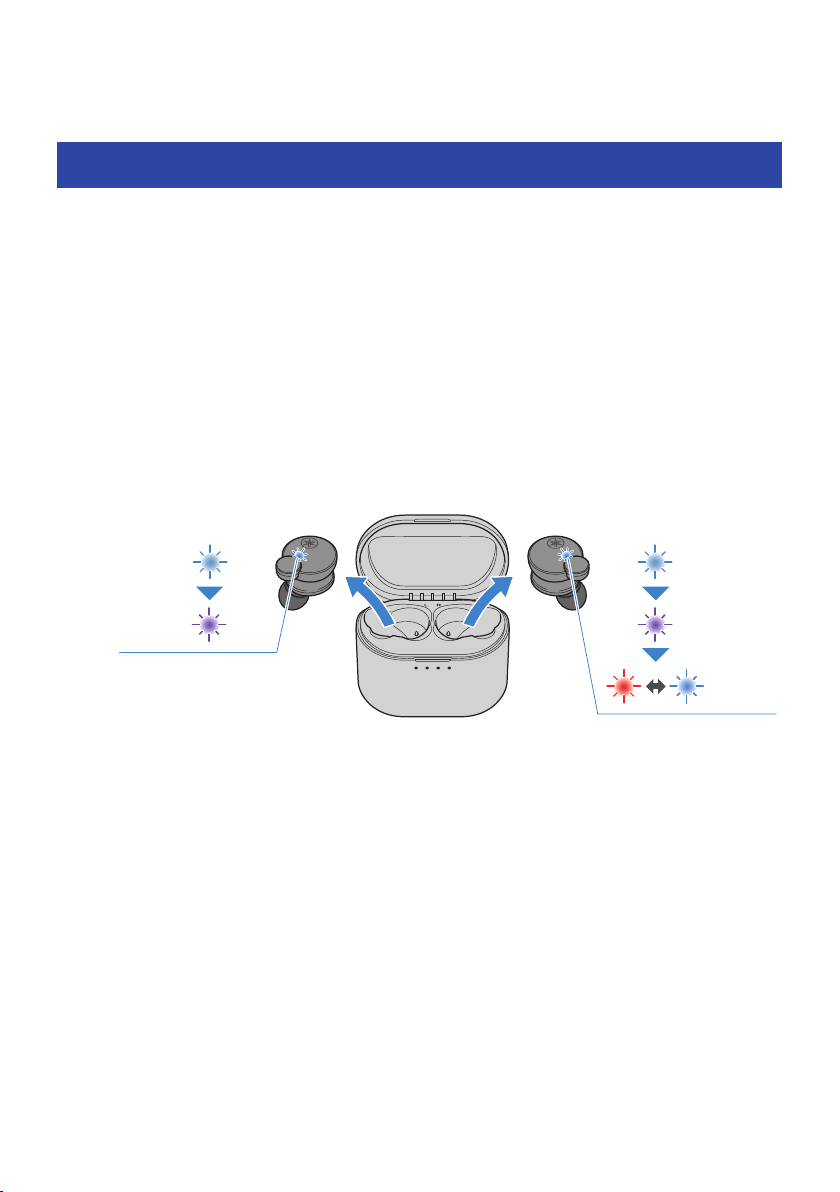
Connecting to a Device Already Paired
Here’s how to connect to a Bluetooth device to which this product has already been paired.
1 Activate Bluetooth on the Bluetooth device.
2 Remove the earbuds from the charging case.
The earbuds will turn on and both earbuds automatically connect to the last Bluetooth device
to which they were connected. Once connected, the indicators light up as shown below.
Purple
Lights up for 5 sec
Blue
Lights up for 10 sec
Blue
Lights up for 1 sec
Purple
Lights up for 5 sec
Blue
Lights up for 1 sec
Earbud that is now primary
If successfully connected, you will hear the “Connected” audio message in the earbud.
If the earbuds do not automatically connect to a Bluetooth device, they are waiting for a connection or are
in pairing standby mode. Make the connection to the earbuds from your Bluetooth device.
NOTE
(
One of the earbuds (L or R) will be the primary earbud when connecting, according to their remaining battery power.
(
If the earbuds (L) and (R) do not automatically connect, put them back into the charging case and take them out again.
(
This product does not support multi-point connectivity (connection to multiple devices at the same time).
Related links
(
“Pairing for the First Time”(p.17)
(
“Pairing with a Different Device”(p.20)
(
“Using only one of the earbuds”(p.44)
22
Bluetooth® Connectivity > Connecting to a Device Already Paired
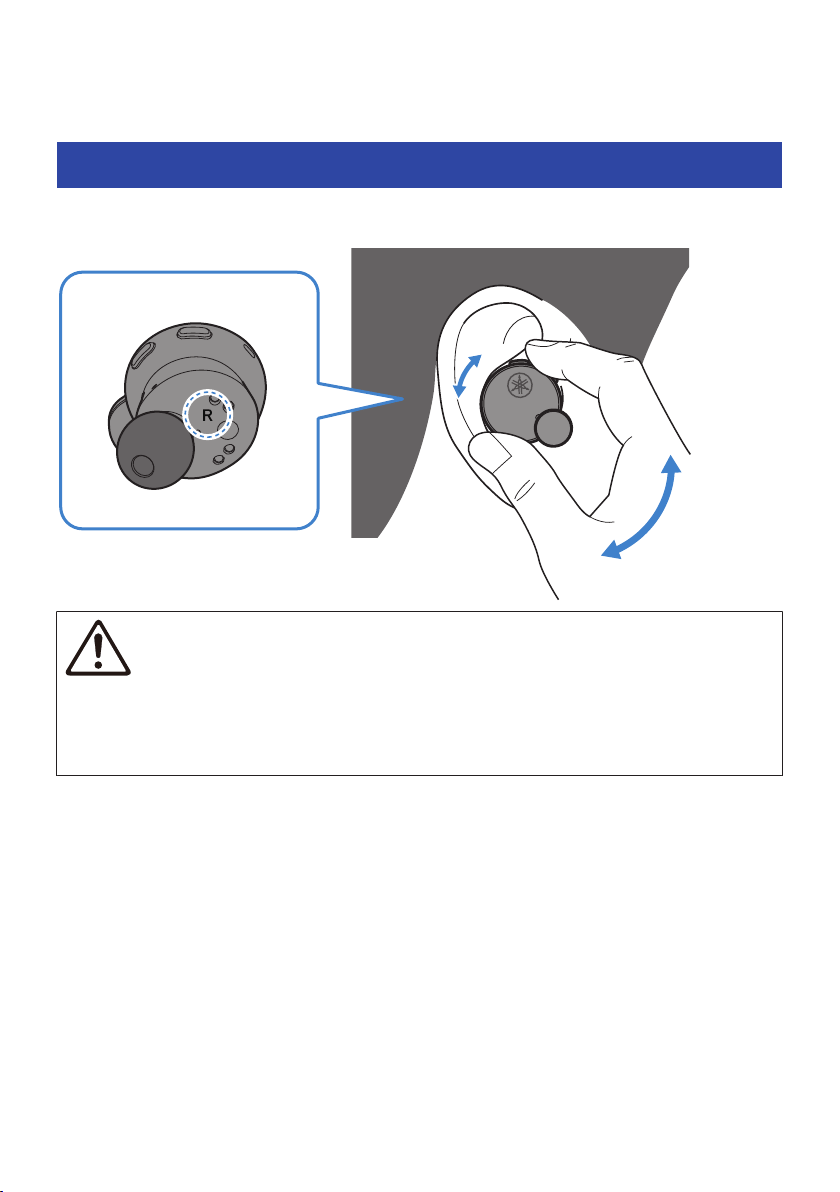
Wearing This Product
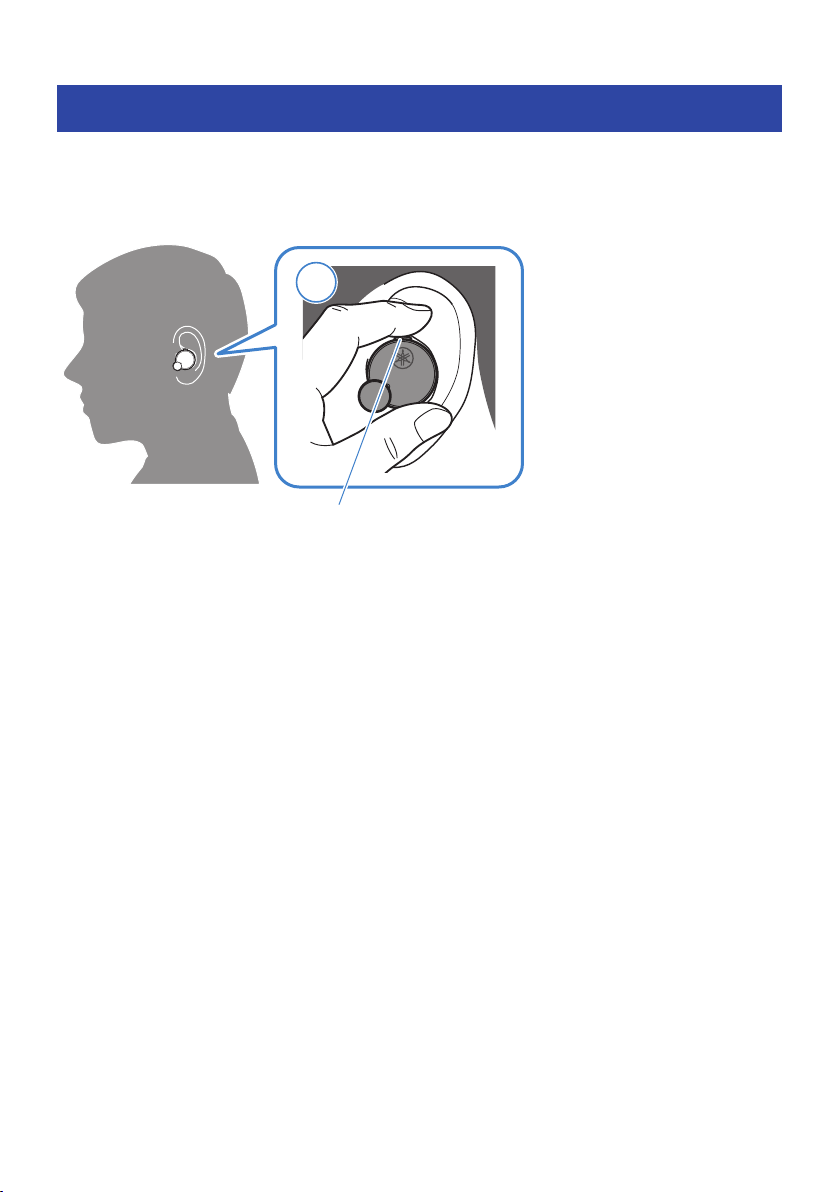
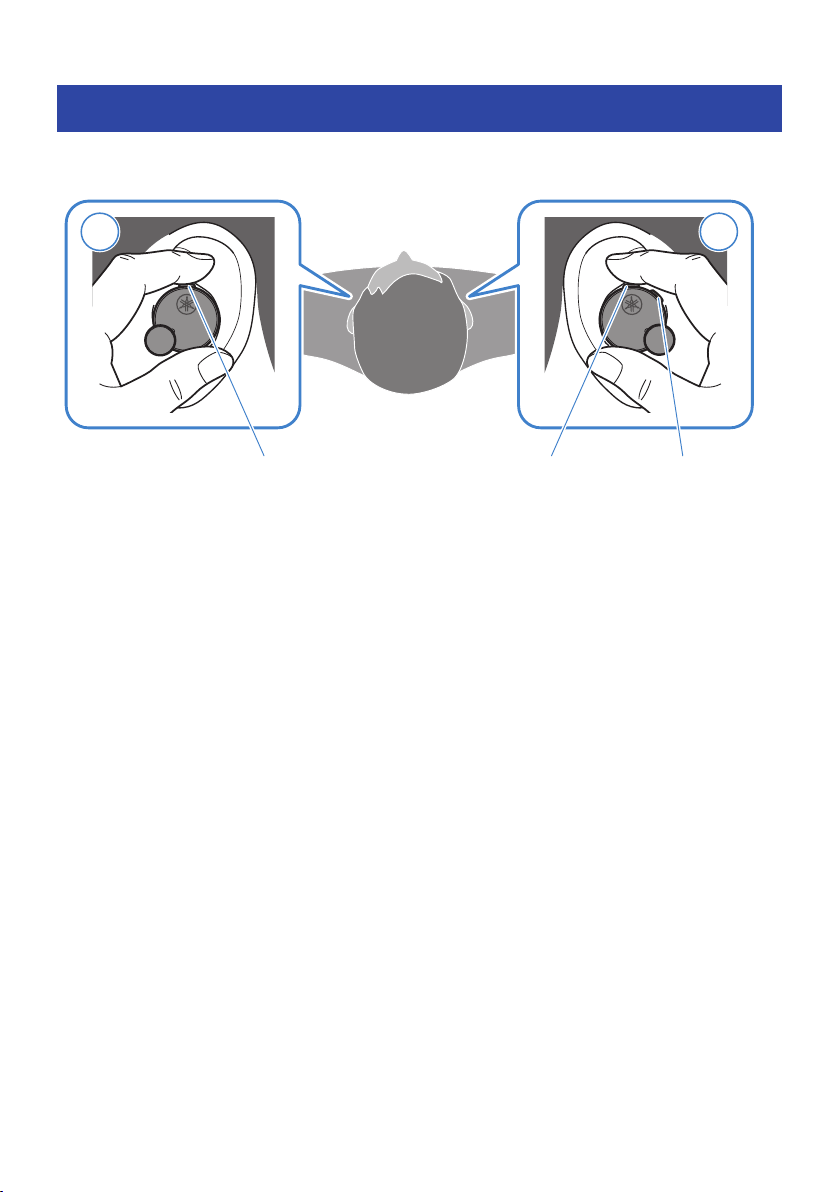
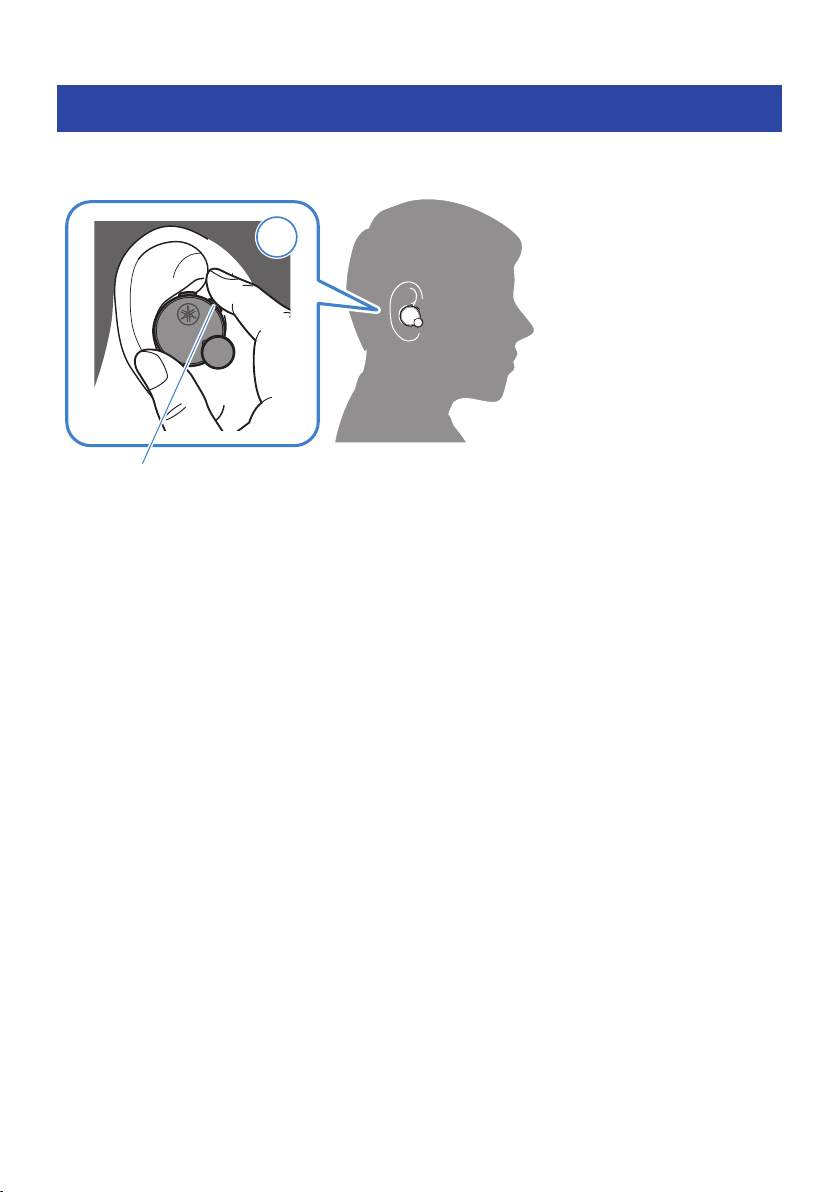
Putting on the earbuds
Check the markings on the L (left) and R (right) earbuds to make sure they are worn in the correct ear. Rotate
the earbuds slowly to adjust them so that they fit well in your ears after you put them on.
CAUTION
(
Do not forcibly press on or move the earbuds once you’ve put them on. Doing this may damage your ears.
(
If the earbuds still aren’t fitting snugly in your ears, try replacing the eartips.
(
As this product is designed to fit in your ears, your ears may feel tired depending on how the earbuds fit. If you notice any skin
problems after coming into direct contact with this product, stop using this product immediately. If the problem does not
improve, consult with a physician.
Related links
“Replacing the eartips”(p.24)
23
Wearing This Product > Putting on the earbuds
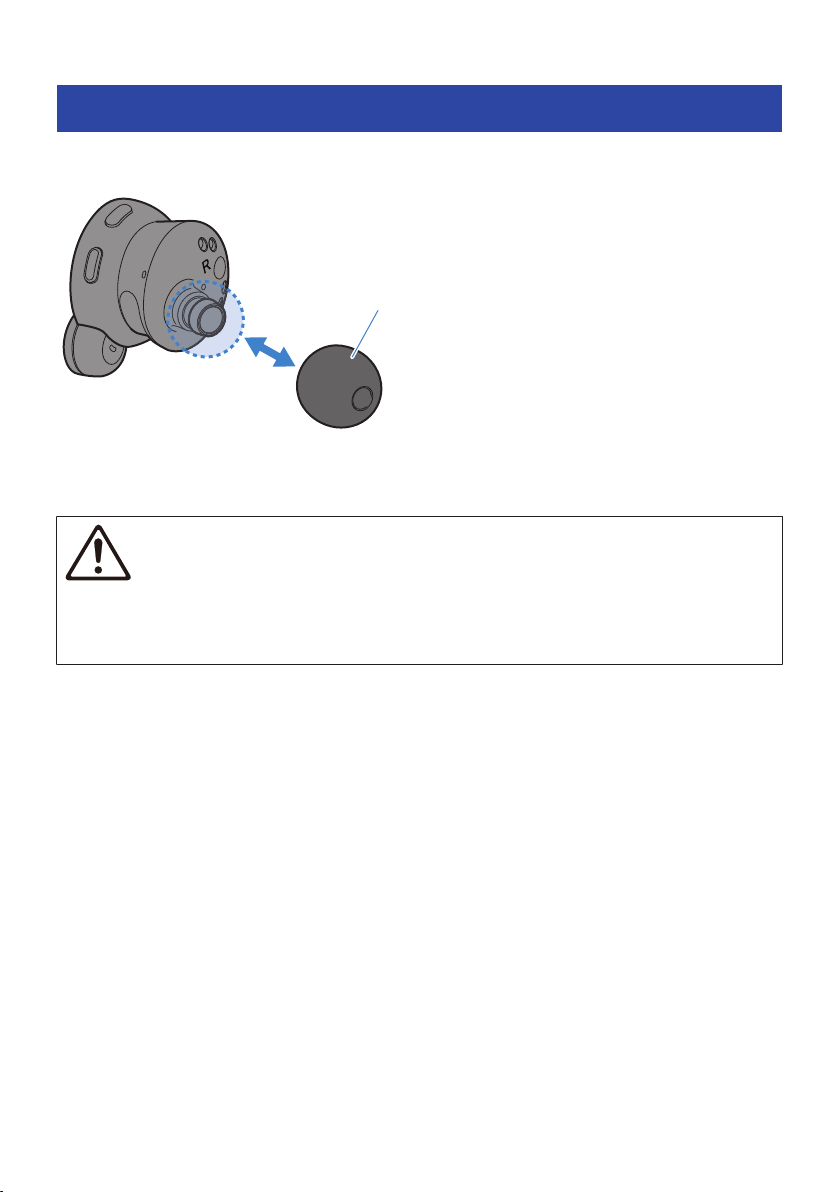
Replacing the eartips
When using different eartips, select the size that matches your ears. When putting the earbuds on, use the
eartips that keep out ambient sounds as much as possible while the audio is stopped.
Eartip
NOTE
Five sizes of eartips are included with this product. The earbuds come pre-attached with M-size eartips.
CAUTION
(
Do not use broken eartips or wear the earbuds without eartips. Doing so may damage your ears.
(
Firmly attach the eartips. Failure to do so may cause them to come loose inside your ears, which may damage your ears. If an
eartip comes loose inside your ear, consult a physician.
(
Once removed, keep the eartips out of reach of children, to avoid them being accidentally swallowed.
24
Wearing This Product > Replacing the eartips

Operation (Audio Playback and Phone Calls)
Playing back audio on this product
You can operate this product using the respective keys during playback as follows.
R
L
Function key + (plus) key − (minus) key
Volume controls
(
Turn the volume up
Press the + (plus) key.
(
Turn the volume down
Press the − (minus) key.
Playing back audio
(
Pause/play
Press the function key.
(
Skip to the next track
Press the + (plus) key twice.
(
Go back to the beginning of the track (while in the middle of the track), or back to the previous track (when
at the beginning of a track)
Press the − (minus) key twice.
The operation may differ, depending on the Bluetooth device or app you use.
In-Ear Detection
(
Pause or restart playback
When you remove either earbud (L) or (R), its built-in sensor activates, pausing the audio playback
automatically. The audio automatically starts again when you put the earbuds back on.
25
Operation (Audio Playback and Phone Calls) > Playing back audio on this product

GAMING MODE
By using this function, the audio and video will sound more in sync when you are watching a video or playing
a game.
1 Press the − (minus) key three times.
Press the key three times to toggle between enable and disable.
GAMING MODE → OFF → back to GAMING MODE
NOTE
(
In regard to In-Ear Detection, please observe the following.
(
The default setting is “ON.”
(
Before putting the earbuds on, turn down the volume on the connecting device.
(
In-Ear Detection only supports playback. This feature does not work when making phone calls.
(
Playback will stop when either or both earbuds are removed.
(
In-Ear Detection may not work correctly if the earbud is not placed correctly in your ear.
(
If the detection feature is on, auto power off will not operate.
(
When you turn the earbuds off, the GAMING MODE setting changes to OFF. To turn the setting on again, either turn on the earbuds
manually or use the Headphone Control app to change the setting to ON.
(
You can also set the GAMING MODE features using the Headphone Control app. The settings are as follows.
(
ON: enables GAMING MODE
(
OFF (default setting): disables GAMING MODE
(
When connecting to a device (such as a smartphone) on which the volume can be adjusted, you can also adjust the volume using
that device.
(
To select a song for playback, operate the connected device.
Related links
(
“App settings”(p.32)
(
“Using only one of the earbuds”(p.44)
26
Operation (Audio Playback and Phone Calls) > Playing back audio on this product
Playing back sound according to your surroundings
Enabling AMBIENT SOUND makes it easier to hear the sounds around you, such as announcements made on
public transportation, the sounds of passing cars and so on.
Also, when you enable ADVANCED ANC, the earbuds reduce only the external noise while maintaining
playback sound quality, eliminating the need to turn the volume up too high.
L
Function key
Switching between AMBIENT SOUND/ADVANCED ANC/OFF
1 Press the function key twice.
The function will switch each time you press the key twice in a row.
OFF → AMBIENT SOUND → ADVANCED ANC → back to OFF
(
OFF → AMBIENT SOUND: an ascending piano chord is heard.
(
AMBIENT SOUND → ADVANCED ANC: an ascending piano chord is heard.
(
ADVANCED ANC → OFF: the “Off” audio message will be heard from this product.
NOTE
(
The default setting is OFF.
(
While the AMBIENT SOUND feature makes it easier to hear sounds around you, it does not guarantee that you will be able to hear
everything. You may be unable to hear ambient sounds if you’ve turned up the volume of the audio, or in certain situations.
(
You can also set the AMBIENT SOUND and ADVANCED ANC features with the Headphone Control app. The settings are as follows.
(
AMBIENT SOUND: the sounds around you will be mixed together with the playback sound.
(
ADVANCED ANC: This feature reduces only the external noise while maintaining playback sound quality, so that you don’t need
to turn the volume up too high.
(
OFF (default setting): this is normal playback mode.
(
Depending on the type of sound you are playing back and what is going on around you, the ambient sound may not be so easy to
hear. In this case, pause the playback.
(
Do not cover the earbuds with your hand. If your hand is covering the earbuds, AMBIENT SOUND and ADVANCED ANC will not work
properly, and you may hear noise.
27
Operation (Audio Playback and Phone Calls) > Playing back sound according to your surroundings

Talking on the phone
You can use this product to talk on the phone when connecting to a Bluetooth device such as a smartphone.
Operate this product as follows.
R
L
Function key − (minus) key
+ (plus) key
(
Receive a phone call
When a phone call comes in, press the function key.
(
End a phone call
During the phone call, hold down the function key for at least one second.
Take your finger off the key once you hear the beeping sound.
(
Ignore a call
When a phone call comes in, hold down the function key for at least one second.
Take your finger off the key once you hear the beeping sound.
(
Turn the volume up
During the phone call, press the + (plus) key.
(
Turn the volume down
During the phone call, press the − (minus) key.
NOTE
When a call is coming in, any audio being played will be paused. Audio playback will automatically resume when the call ends or you
ignore the call.
29
Operation (Audio Playback and Phone Calls) > Talking on the phone
Starting the voice assistant
You can use this product to control a voice assistance feature such as Siri or Google Assistant. This feature is
available when you connect this product to a Bluetooth device that supports voice assistance.
R
− (minus) key
(
Start voice assistant
Hold down the − (minus) key (about one second).
(
Stop voice assistant
(
When using Siri
Hold down the − (minus) key (about one second).
(
When using Google Assistant
Operate using your Bluetooth device.
NOTE
The operations for the voice assistant feature will vary depending on your Bluetooth device. See the user’s manual of your Bluetooth
device for details.
30
Operation (Audio Playback and Phone Calls) > Starting the voice assistant

Dedicated Application
About the “Headphone Control” app
The Headphone Control smartphone app is a dedicated app for getting the best sound quality from your
Yamaha earbuds or headphones.
[Search tag] #Q03 App
This app will let you do the following.
(
Show the status of your earbuds/headphones (such as remaining battery power)
(
Make detailed settings on your earbuds/headphones
Install the app from the App Store (iOS devices) or Google Play (Android devices). See the information about
the app on each store for details.
31
Dedicated Application > About the “Headphone Control” app
App settings
This explains the settings and items you can check using the Headphone Control app.
[Search tag] #Q03 App
NOTE
The app screen and items may differ, depending on your product.
Main screen
(
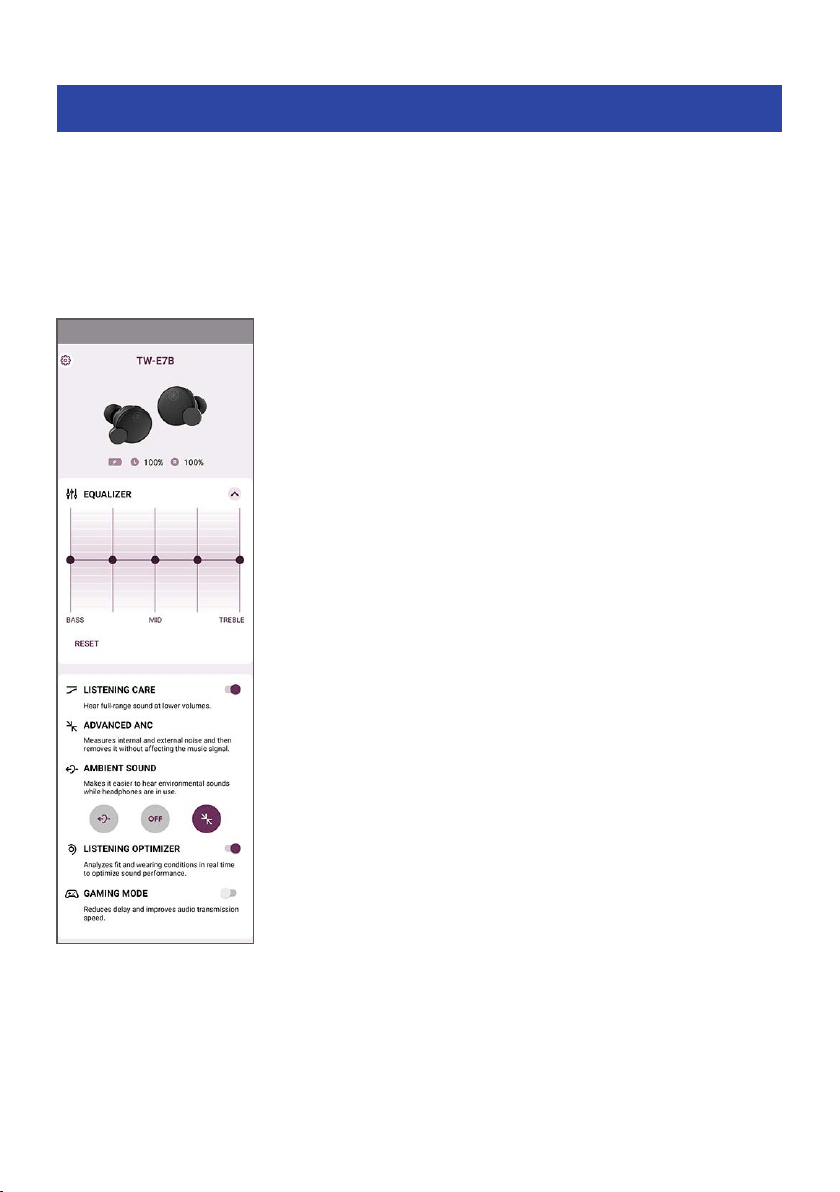
AMBIENT SOUND
This function makes it easier to hear the sounds around you, such as announcements made on public
transportation, the sounds of passing cars and so on.
32
Dedicated Application > App settings

(
ADVANCED ANC
This feature reduces only the external noise while maintaining playback sound quality, eliminating the
need to turn the volume up too high.
Settings
(
AMBIENT SOUND: enables AMBIENT SOUND
(
ADVANCED ANC: enables ADVANCED ANC
(
OFF (default setting): AMBIENT SOUND and ADVANCED ANC are both disabled (normal playback mode)
(
LISTENING CARE -Advanced
When LISTENING CARE -Advanced is enabled, this product automatically adjusts the sound quality
according to the playback volume. This feature adjusts the frequency balance, offering rich sound quality
playback even at a low volume.
Settings
(
ON (default setting): enables LISTENING CARE -Advanced
(
OFF: disables LISTENING CARE -Advanced
(
LISTENING OPTIMIZER
When you enable the LISTENING OPTIMIZER, the audio is analyzed in real time and the sound quality is
adjusted to best match how this product fits on your ears and your ear shape.
Settings
(
ON (default setting): enables LISTENING OPTIMIZER
(
OFF: disables LISTENING OPTIMIZER
(
In-Ear Detection
When you remove either earbud (L) or (R), this feature pauses the audio playback automatically. The audio
automatically starts again when you put the earbuds back on.
Settings
(
ON (default setting): enables In-Ear Detection
(
OFF: disables In-Ear Detection
(
GAMING MODE
This makes the audio and video sound more in sync when you are watching a video or playing a game.
Settings
(
ON: enabled GAMING MODE
(
OFF (default setting): disabled GAMING MODE
(
EQUALIZER
This is a five-band graphic equalizer that lets you create your own custom sound settings.
EQUALIZER default settings
(
RESET: the gain of all equalizers is reset to 0 dB.
Gain settings for each equalizer
(
0 dB (default setting)
33
Dedicated Application > App settings
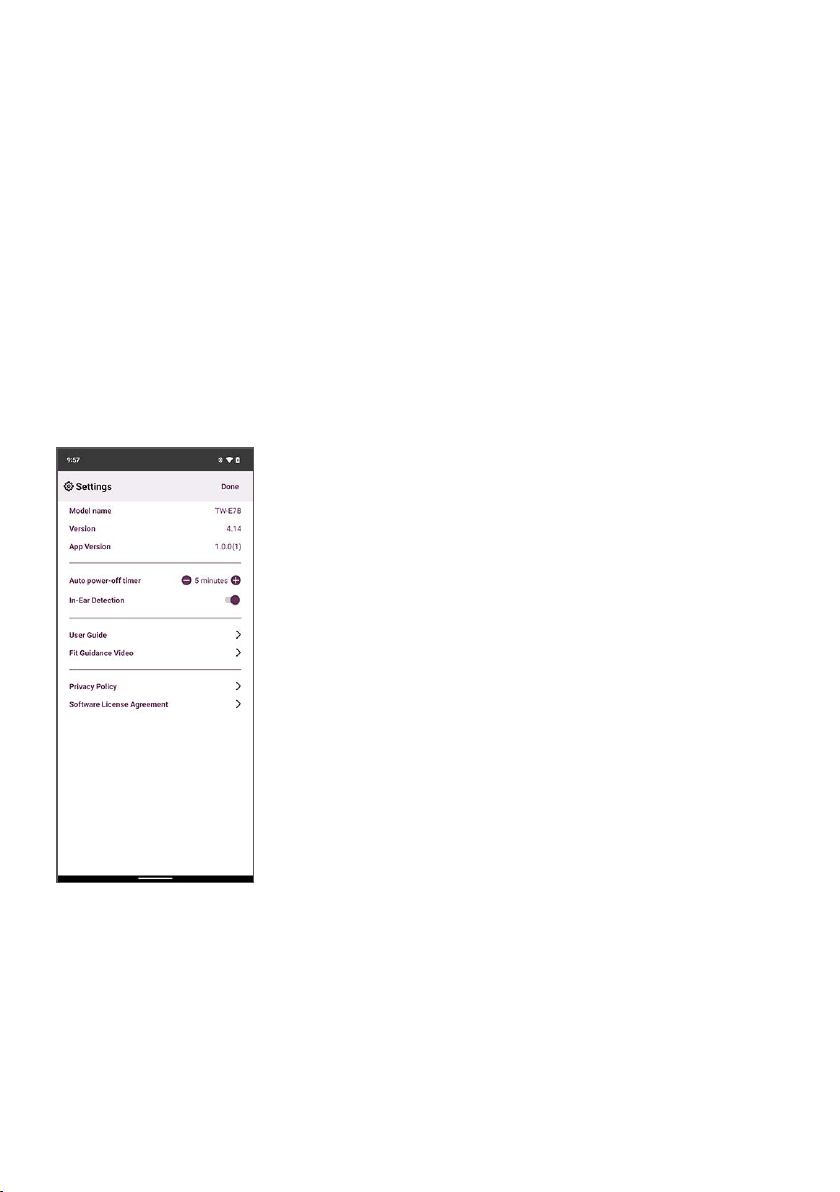
(
Auto power-off timer
Sets the time it takes for the power to turn off after Bluetooth has been disconnected.
Settings
(
OFF (default setting)
(
5 minutes
(
30 minutes
(
1 hour
(
3 hours
NOTE
(
The AMBIENT SOUND does not guarantee that you will be able to hear everything. You may be unable to hear ambient sounds if
you’ve turned up the volume of the audio, or in certain situations.
(
When using GAMING MODE, the video/audio latency may change or the sound quality and connection stability may degrade,
depending on the usage environment and how you wear the product.
Menu screen
(
Check for firmware update
Checks whether new firmware has been released, and performs updates.
(
User Guide
Accesses the User Guide
(
Google Analytics
Displays information regarding Google Analytics.
34
Dedicated Application > App settings

Troubleshooting
Read this first
If this product does not operate normally while you are using it, first check the following.
[Search tag] #Q01 Troubleshooting
(
After putting the earbuds back into the charging case, wait for at least 10 seconds and then take
them out again.
If this does not solve the problem, initialize (factory reset) the earbuds.
(
“Initializing (performing a factory reset)”(p.45)
(
Make sure that this product has been sufficiently charged.
(
“Charging the earbuds”(p.10)
(
“Charging the charging case”(p.12)
(
Update the firmware of this product to the latest version.
(
“Updating the firmware”(p.47)
(
Check the following items according to the trouble you are experiencing.
(
“Cannot connect”(p.36)
(
“Power will not turn on”(p.37)
(
“The product cannot be charged”(p.38)
(
“The product does not operate or play back”(p.39)
(
“No sound can be heard”(p.40)
(
“Sound can only be heard from one earbud”(p.41)
(
“Sound is not good or sounds strange”(p.42)
(
“The sound is distorted, noisy or choppy”(p.43)
(
“Using only one of the earbuds”(p.44)
(
“Initializing (performing a factory reset)”(p.45)
35
Troubleshooting > Read this first

Cannot connect
(
Earbuds (L) and (R) are not connecting properly.
Put the earbuds back into the charging case and then take them out again.
The earbuds will turn on and both earbuds automatically connect. The indicators display as shown
below.
(
Power on: Blue Lights up for 1 sec
(
Earbuds (L) and (R) are now connected: Purple Lights up for 5 sec
The indicators may flash blue for a while after you remove the earbuds from the charging case.
(
The product is not pairing correctly.
If the information for this product still remains in the list of connected devices on your Bluetooth device,
delete that information and try pairing again.
(
“Pairing with a Different Device”(p.20)
(
The information for a Bluetooth device that was registered on this product was deleted.
If you pair a device beyond the maximum number of pairable Bluetooth devices, the information for
device you first paired (the oldest pairing) is deleted. Pair this product once more.
(
“Pairing with a Different Device”(p.20)
(
This product may already be connected to another Bluetooth device.
On your Bluetooth device, remove the connection with this product and then connect this product
again.
(
This product and your Bluetooth device may be too far apart.
Move this product closer to the Bluetooth device.
(
A device that emits electromagnetic waves (such as a microwave oven, access point and so on)
might be nearby.
Do not use this product near other devices that emit electromagnetic waves.
36
Troubleshooting > Cannot connect

Power will not turn on
(
There may not be enough battery power left.
Charge this product.
(
“Charging the earbuds”(p.10)
(
The battery power of the charging case may have been depleted while charging the earbuds.
Charge the charging case.
(
“Charging the charging case”(p.12)
(
“Turning on the power”(p.14)
(
The product is temporarily not functioning in a stable way.
After putting the earbuds back into the charging case, wait for at least 10 seconds and then take them
out again.
If this does not solve the problem, initialize (factory reset) the earbuds.
(
“Initializing (performing a factory reset)”(p.45)
37
Troubleshooting > Power will not turn on

The product cannot be charged
(
Your computer is not turned on (when charging from your computer).
Turn the power of your computer on, and then charge this product.
(
You may have been using a USB power cable other than the one included with this product.
Use the included USB power cable to make sure the product correctly charges.
(
The earbuds and the charging connectors in the charging case may not be coming into contact.
The earbuds will not charge if they are not properly seated in the charging case. Use your fingertips to
lightly slide the earbuds from side to side and store them in the proper position within their storage
compartments, and make sure that the earbud indicators are lit. Also note that the earbuds may not
charge correctly if there is any dust or dirt on the surfaces where the earbuds and the charging
connectors on the charging case come into contact. Use a dry and soft cloth, a cotton swab or similar
material to wipe these surfaces off before charging.
38
Troubleshooting > The product cannot be charged

The product does not operate or play back
(
The earbuds are still charging.
You cannot use this product while they are charging. Use the earbuds after charging is finished.
(
There is not enough battery power.
Charge the earbuds.
(
“Charging the earbuds”(p.10)
(
“Charging the charging case”(p.12)
(
The product is temporarily not functioning in a stable way.
After putting the earbuds back into the charging case, wait for at least 10 seconds and then take them
out again.
If this does not solve the problem, initialize (factory reset) the earbuds.
(
“Initializing (performing a factory reset)”(p.45)
39
Troubleshooting > The product does not operate or play back

No sound can be heard
(
The earbuds are not connected to a Bluetooth device.
Pair this product.
(
“Pairing for the First Time”(p.17)
(
“Pairing with a Different Device”(p.20)
(
The volume is too low.
Raise the volume.
(
“Playing back audio on this product”(p.25)
(
The audio stopped playing back.
Start playback.
(
“Playing back audio on this product”(p.25)
(
You may have taken off one of the earbuds while In-Ear Detection is ON.
Make sure that you are wearing both earbuds.
(
“Playing back audio on this product”(p.25)
40
Troubleshooting > No sound can be heard

Sound can only be heard from one earbud
(
Earbuds (L) and (R) are not connecting properly.
Put the earbuds back into the charging case and then take them out again.
The earbuds will turn on and both earbuds automatically connect. The indicators display as shown
below.
(
Power on: Blue Lights up for 1 sec
(
Earbuds (L) and (R) are now connected: Purple Lights up for 5 sec
The indicators may flash blue for a while after you remove the earbuds from the charging case.
(
The signal may not be coming in clearly, making the connection unstable.
Move away from wireless devices such as access points, or appliances that produce electromagnetic
waves such as microwave ovens. After placing both earbuds into the charging case, take them out again.
(
You may be using a smartphone app that generates sound from only one channel.
Check whether you can hear sound coming from both left and right channels by playing back sound from
a different app.
(
One of the earbuds might be turned off.
Turn the power on.
(
“Turning on the power”(p.14)
(
The connection information for the registered Bluetooth device may not be working properly.
Delete the connection information of this product from the Bluetooth device, and then pair the earbuds
with the Bluetooth device.
(
“Pairing with a Different Device”(p.20)
41
Troubleshooting > Sound can only be heard from one earbud

Sound is not good or sounds strange
(
You might be wearing the earbuds on the wrong sides (L/R).
Check that the left (L) and right (R) earbuds are worn on the correct sides.
(
“Putting on the earbuds”(p.23)
(
The eartips don’t fit my ears.
Replace the eartips with the size that match your ear shape.
(
“Replacing the eartips”(p.24)
42
Troubleshooting > Sound is not good or sounds strange

The sound is distorted, noisy or choppy
(
The signal may not be coming in clearly, making the connection unstable.
Move away from wireless devices such as access points, or appliances that produce electromagnetic
waves such as microwave ovens.
Try placing the connected Bluetooth device as close to this product as you can.
Devices with wireless network connectivity may transmit signals that obstruct Bluetooth
communications. In this case, turn off the wireless network connectivity feature on your Bluetooth
device.
(
The product is temporarily not functioning in a stable way.
After putting the earbuds back into the charging case, wait for at least 10 seconds and then take them
out again.
If this does not solve the problem, initialize (factory reset) the earbuds.
(
“Initializing (performing a factory reset)”(p.45)
(
GAMING MODE is ON.
Set GAMING MODE to OFF.
When using GAMING MODE, the video/audio latency may change or the sound quality and connection
stability may degrade, depending on the usage environment and how you wear the product.
(
“Playing back audio on this product”(p.25)
(
“App settings”(p.32)
43
Troubleshooting > The sound is distorted, noisy or choppy

Using only one of the earbuds
Pair the earbud you want to use with the Bluetooth device.
When doing this, note the following.
(
This product does not offer a function to convert stereo sound to monaural sound.
(
Check whether such a function is available on the Bluetooth device to be connected.
(
The L and R side keys on the earbuds work differently. When using only one earbud, use your Bluetooth
device to operate controls like playback or talking on the phone.
(
Set In-Ear Detection to OFF.
Related links
“App settings”(p.32)
44
Troubleshooting > Using only one of the earbuds
Initializing (performing a factory reset)
Follow the steps below to initialize (perform a factory reset on) this product.
[Search tag] #Q04 Reset
Initializing (performing a factory reset)
This will restore all of the earbud settings to their factory defaults. The information for devices registered
(paired) will be deleted.
1 Remove earbuds (L) and (R) from the charging case.
The indicators light up blue for one second.
Blue
Lights up for 1 sec
2 Hold down the function key and the + (plus) key for about seven seconds to turn
the power off.
Make sure that the indicator lights up as shown below.
7 sec
Red
Lights up for 1 sec
Earbud (L) Earbud (R)
45
Troubleshooting > Initializing (performing a factory reset)
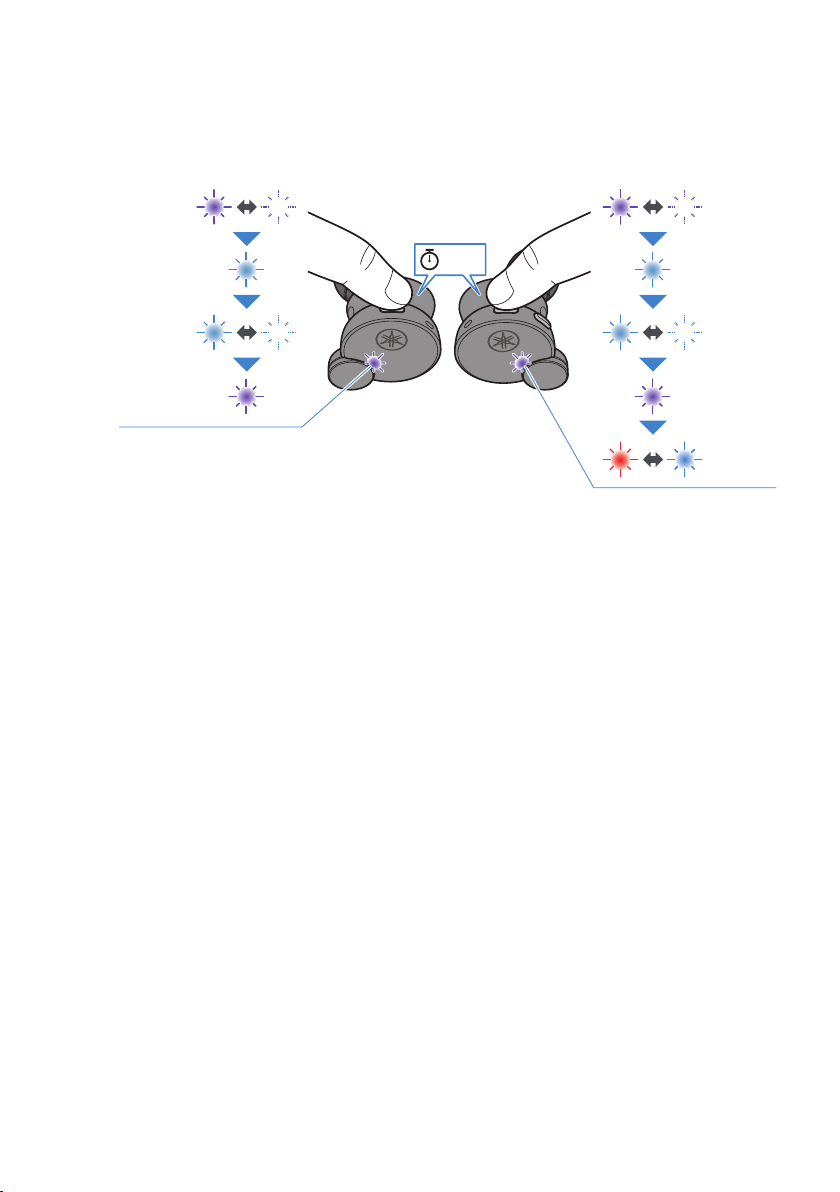
3 After the power turns off, hold down the function key and the + (plus) key for 10
seconds.
Make sure that the indicator lights up as shown below.
10 sec
Earbud (L) Earbud (R)
Flashes
purple twice
Blue
Lights up for 1 sec
Blue
Flashing
Purple
Lights up for 5 sec
Red and blue
Flashing
Earbud that is now primary
Flashes
purple twice
Blue
Lights up for 1 sec
Blue
Flashing
Purple
Lights up for 5 sec
4 Place earbuds (L) and (R) in the charging case.
The earbuds are now initialized (factory reset).
Related links
“Pairing for the First Time”(p.17)
46
Troubleshooting > Initializing (performing a factory reset)

Updating the firmware
Update the firmware on this product with the Headphone Control app.
The firmware on this product can be updated to add new functionality, rectify product issues and so on. For
more details on the contents of updates, see the product information page on the Yamaha website.
NOTICE
(
For stable data communication between this product and your Bluetooth device, update the firmware in a place where the
signal is good. Do not do the following while the firmware is being updated.
(
Placing the earbuds in the charging case
(
Turning the power of this product off
(
Closing the Headphone Control app, or using another app
(
Turning your smartphone off
(
Canceling the connection between your smartphone and this product
1 On the main screen of the Headphone Control app, open the menu.
2 Tap “Check for firmware update”.
If new firmware has been released, you will see instructions on how to perform the update.
Install the firmware by following the instructions on the screen.
Related links
(
“About the “Headphone Control” app”(p.31)
(
“App settings”(p.32)
47
Troubleshooting > Updating the firmware

List of support centers
If the trouble still cannot be solved, please contact us for product support as shown below.
For customers within Japan
(
Please contact the store where you purchased this product, or the Product Support Center as listed in the
“Quick Start Guide” included with this product.
For customers outside of Japan
(
Please contact your nearest authorized Yamaha dealer or service center.
https://manual.yamaha.com/av/support/
48
Troubleshooting > List of support centers
Appendix
List of operations
The main operations of this product are as shown below.
Function key + (plus) key − (minus) key
Earbud (L) Earbud (R)
Power
(
Power on
Remove from the charging case
(
Power off
Function key, + (plus) key (hold down for seven seconds)
Volume
(
Volume up
+ (plus) key
(
Volume down
− (minus) key
Audio playback
(
Pause/play
Function key
(
Skip to the next song
+ (plus) key (press quickly twice)
(
Go back to the beginning of the song, or skip to the previous song
− (minus) key (press quickly twice)
The operation may differ, depending on the Bluetooth device or app you use.
Selecting the modes
(
Switch between AMBIENT SOUND/ADVANCED ANC/OFF
Function key (press quickly, two times in a row)
(
Switch GAMING MODE/ON/OFF
− (minus) key (press quickly three times)
49
Appendix > List of operations

Phone calls
(
Receive a phone call
Function key
(
End a phone call
Function key (hold down during a call for at least one second)
(
Ignore a call
Function key (hold down when a call is coming in for at least one second)
Other functions
(
Start pairing
Hold down the function key and + (plus) key with the power turned on (hold both down for about three seconds and then
release)
(
Start voice assistant
− (minus) key (hold down for about one second)
(
End voice assistant (Siri only)
− (minus) key (hold down for about one second)
50
Appendix > List of operations

List of indicator displays and audio messages
The indicator displays and audio messages on this product are shown below.
Earbud indicator display
(
Power on
Lights up for one second (blue) and turns off
(
Standby mode for pairing with Bluetooth device
Flashes (between red and blue alternately; only the primary earbud)
(
Searching for paired Bluetooth device
Not lit
(
Finished connecting to Bluetooth device
Lights up (blue, for approx. 10 sec) and turns off
(
Power off
Lights up for one second (red) and then turns off (when using the button on the earbuds to turn the power off)
(
Earbuds (L) and (R) are connecting
Flashes (blue)
(
Connection with earbud (L) and earbud (R) complete
Lights up for five seconds (purple) and then turns off
Indicator display when charging
(
Charging
Lights up (red)
(
Charging completed
Not lit
Charging case indicator display
When the charging case is not connected to a power source
(
For five seconds right after placing the earbuds in the charging case
Shows the remaining battery power of the charging case and turns off
When the charging case is connected to a power source
(
Shows the remaining battery power of the charging case
51
Appendix > List of indicator displays and audio messages

Audio messages
(
Battery High
Plenty of battery charge remaining
(
Battery Medium
Moderate battery charge remaining
(
Battery Low
Small amount of battery charge remaining
(
Power Off
Power off
(
Pairing
Start pairing (device registration)
(
Pairing Successful
Pairing successful/finished connecting
(
Pairing Failed
Pairing unsuccessful
(
Connected
Finished connecting to Bluetooth device
(
Disconnected
Disconnected from Bluetooth device
(
Link Lost
The link to the Bluetooth device has been severed
(
Off
Either AMBIENT SOUND or ADVANCED ANC is disabled (normal playback mode)
Related links
(
“Charging the earbuds”(p.10)
(
“Charging the charging case”(p.12)
(
“Turning on the power”(p.14)
(
“Turning off the power”(p.15)
(
“Remaining Battery Power”(p.16)
(
“Pairing for the First Time”(p.17)
(
“Pairing with a Different Device”(p.20)
(
“Connecting to a Device Already Paired”(p.22)
(
“Playing back sound according to your surroundings”(p.27)
52
Appendix > List of indicator displays and audio messages

Specifications
The specifications of this product are as shown below.
(
Driver type
Dynamic
(
Driver unit
10 mm
(
Frequency range
20–20,000 Hz
(
Bluetooth version
5.2
(
Supported profiles
A2DP, AVRCP, HFP, HSP
(
Supported codecs
SBC, AAC, Qualcomm® aptX™ Adaptive
(
Supported content protection (Japan only)
SCMS-T
(
RF output power
Class 1
(
Maximum communication range
10 m (without obstructions)
(
Maximum number of pairable devices
6
Microphone for phone calls
(
Driver type
MEMS
(
Directivity characteristics
Overall directivity
(
Frequency range
20–10,000 Hz
Rechargeable battery
(
Internal rechargeable battery
Lithium-ion battery
(
Charging time (to full capacity)
Earbuds: approx. 2 hours
Charging case: approx. 3 hours
(
Continuous playback time
Approximately 6 hours
Number of earbud charging cycles available with charging case (when charging case is fully charged)
Approx. 3 times
(
Recommended charging temperatures
10–35ºC
Charge this product within the listed temperature range.
53
Appendix > Specifications

General
(
Waterproof rating
IPX 5 (earbuds)
(
Weight
7.3 g (per earbud)
*The explanations in this User Guide are written according to the latest specifications as of the date of
publication. For the latest version of the User Guide, refer to the Yamaha website.
54
Appendix > Specifications

Trademarks
The trademarks used in this guide are as follows.
The Bluetooth® word mark and logos are registered trademarks owned by Bluetooth SIG, Inc. and any use of such marks by
Yamaha Corporation is under license. Other trademarks and trade names are those of their respective owners.
Qualcomm aptX and Qualcomm TrueWireless are products of Qualcomm Technologies, Inc. and/or its subsidiaries.
Qualcomm and Qualcomm TrueWireless are trademarks of Qualcomm Incorporated, registered in the United States and
other countries.
Android and Google Play
Google, Android and Google Play are trademarks of Google LLC.
App Store
App Store is a service mark of Apple Inc., registered in the U.S. and other countries.
Siri
Siri is a trademark of Apple Inc., registered in the U.S. and other countries and regions.
55
Appendix > Trademarks

Yamaha Global Site
https://www.yamaha.com/
Yamaha Downloads
https://download.yamaha.com/
© 2022 Yamaha Corporation
Published 06/2022 AM-A0
AV20-0166
Layout Folder: YMH_PDF_Manual_A5_AV
Stylesheet Name: 01_YMH_PDF_Manual_A5_AV_En-Multi
Stylesheet Version: 2022.04.13