Loading ...
Loading ...
Loading ...
ninjakitchen.co.uk
ninjakitchen.co.uk
ninjakitchen.co.uk
ninjakitchen.co.uk
4 To remove the power base from the hand
blender attachment, first unplug the unit. Press
and hold the release buttons on either side of
the power base to remove the hand blender
attachment.
5 Refer to the Care & Maintenance section for
cleaning and storage instructions.
3 Submerge the holes of the blender head in the
ingredients. Press and hold the power button while
using an up-and-down motion to blend, making sure
to stop blending anytime the blender head is no
longer submerged. While continuously holding
to
blend, press and hold the TURBO button to ramp up
to high speed.
1 Install the hand blender attachment to the
power base by aligning the arrow
on the power base with the arrow on the
hand blender attachment. Then, push the
power base onto the attachment to lock
into place. Plug the unit in.
IMPORTANT: Review all warnings before proceeding
HAND BLENDER ATTACHMENT ASSEMBLY
(accessories vary by model)
2 Prior to blending, make sure to use a container large
enough to fully submerge the blender head in ingredients.
Once submerged, there should be ample room in the
container to avoid overflowing and splashing. A cooking
pot*, large measuring container, or the blending jug (not
available with all models) is recommended.
*NOTE: DO NOT blend in non-stick cookware.
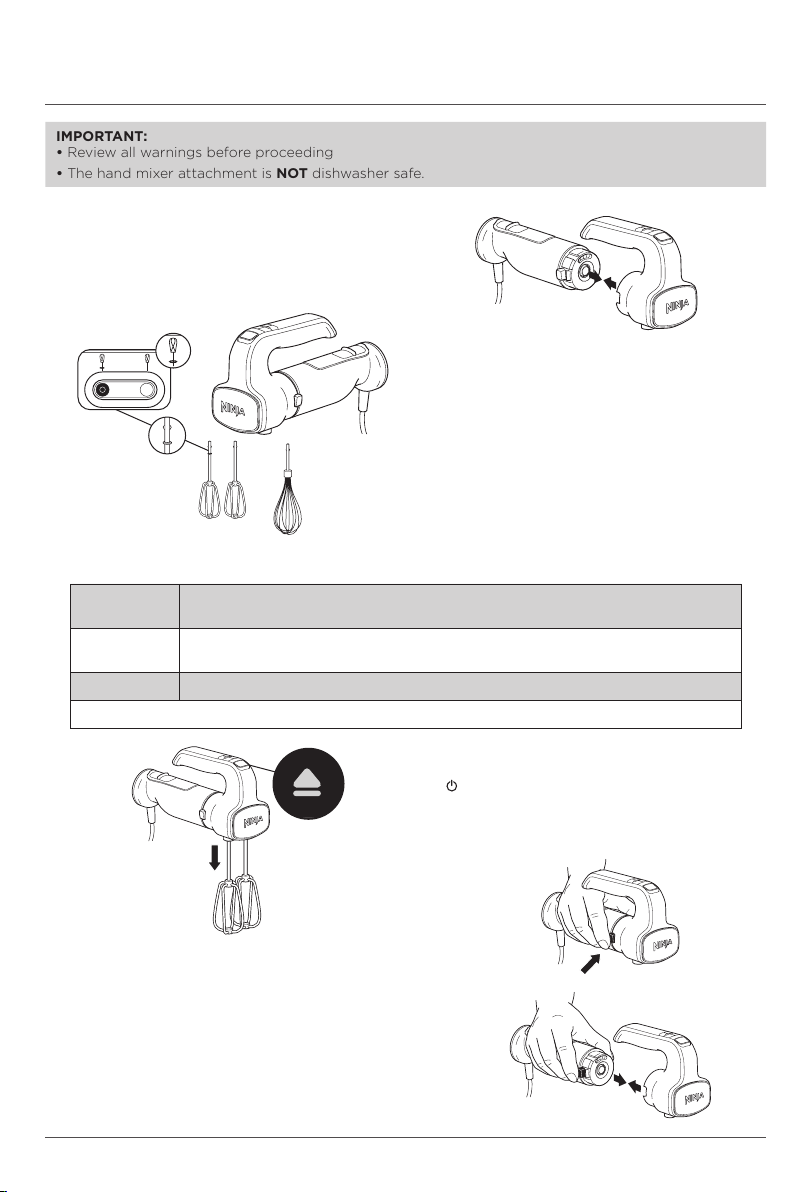
1 Install the hand mixer attachment to the power base by
aligning the arrow on the power base with the arrow on
the mixer attachment. Then, push the power base onto
the attachment to lock into place.
2 Attach both beaters or the whisk using the
accessory slots on the mixer head. Insert the
beater with the collar into the slot with the
diagram showing a collar. The whisk can be
inserted into either slot. You will hear a slight
click when locked in place.
IMPORTANT:
• Review all warnings before proceeding
• The hand mixer attachment is NOT dishwasher safe.
HAND MIXER ATTACHMENT ASSEMBLY
(accessories vary by model)
Speeds 1 & 2
Use speeds 1–2 when combining dry ingredients, such as flour, into liquid
ingredients.
Speeds 3 & 4
Use speeds 3–4 when making cookie doughs, batters, quick breads, icing and
most other recipes.
Speed 5 Use speed 5 for whipping cream, mousse, or egg whites.
NOTE: Start on speed 1, then slowly ramp up to prevent ingredients from splattering.
LOW
Use to blend liquids, such as mayo or
dressing, or soups and sauces with soft
ingredients, such as tomato sauce.
TURBO
Use for tougher ingredients, such
as butternut squash, or for smooth
purees, such as houmous.
3 Plug the unit in and power on. The unit will begin mixing on speed 1. Use the speed selector to
increase or decrease speed.
4 Press to turn the unit o. To remove the
beaters or other accessories, press the eject
button. Ensure the beaters or other accessories
come to a complete stop before pressing the
eject button.
5 To remove the power base from the hand mixer
attachment, first unplug the unit. Press and hold the
release buttons on either side of the power base to
remove the mixer attachment.
6 Refer to the Care & Maintenance section for cleaning and
storage instructions.
COLLAR
Loading ...
Loading ...
Loading ...