USER GUIDE
US CA
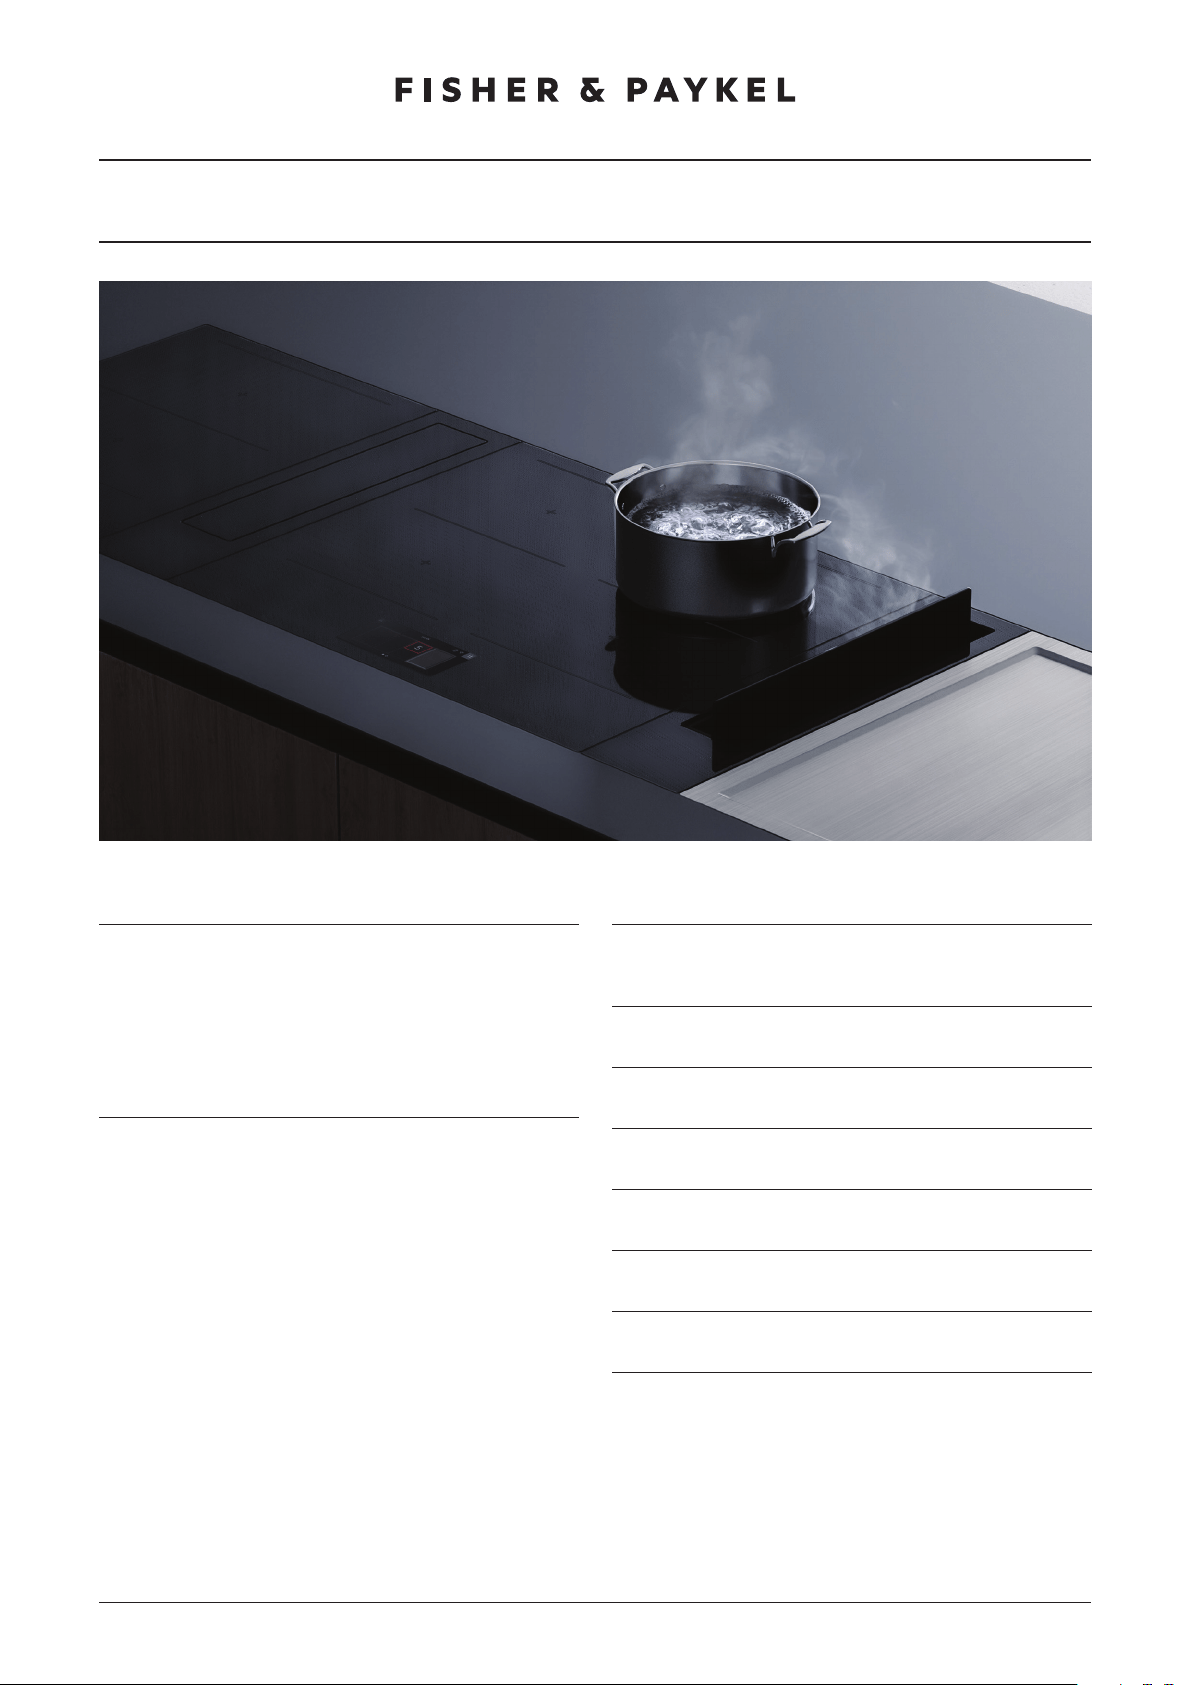
MODULAR COOKTOP
PRIMARY COOKTOP MODELS
CI365DTTB1, CI304DTTB1, CI244DTTB1, CI152DTTB1
2
CONTENTS
Registration
To register your product visit our website: fisherpaykel.com/register
Safety and warnings 3
Product overview 8
Control panel 10
Menu 11
Using the induction 12
Cookware 13
Cooking options 14
Using the temperature sensor 16
Wi-Fi connection 18
Cleaning 19
Troubleshooting 20
Fault codes 23
Manufacturer’s warranty and service guide 24
3
SAFETY AND WARNINGS
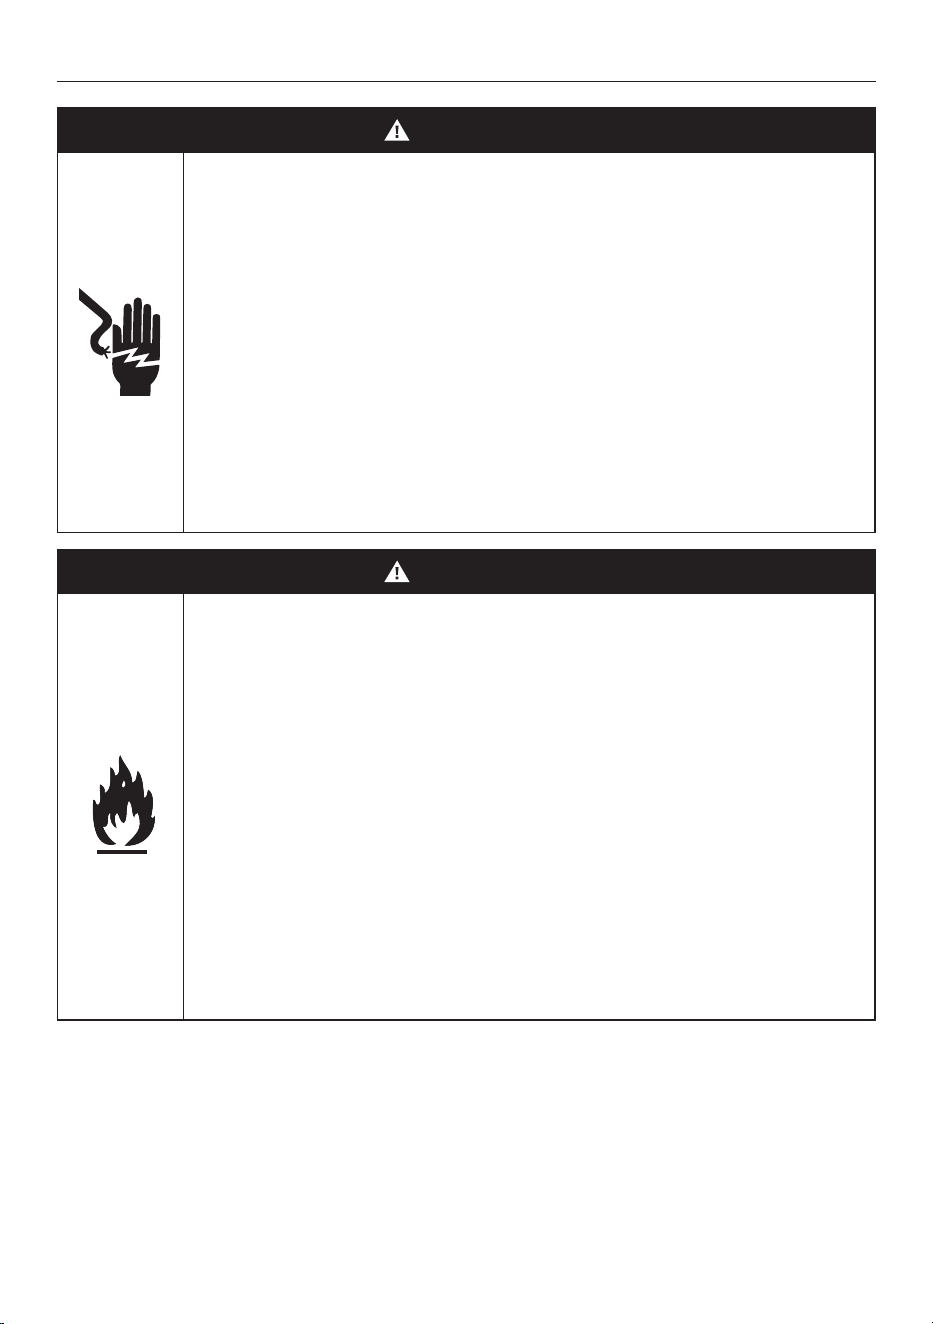
WARNING!
Electric Shock Hazard
Failure to follow this advice may result in
electrical shock or death.
• Do not cook on a broken or cracked
cooktop. If the cooktop surface should
break or crack, switch the appliance off
immediately at the mains supply (wall
switch) and contact a qualified technician.
• Switch off the appliance before cleaning
or maintenance.
WARNING!
Fire Hazard
Failure to follow this advice may result in
serious burns or death.
• Unattended cooking on a hob with fat or
oil can be dangerous and may result in
fire.
• Never try to extinguish fire with water.
Switch off the appliance. Cover the flame,
eg with a lid or fire blanket, or use dry
chemical or foam-type extinguisher.
• Do not store items on cooking surfaces.
4
SAFETY AND WARNINGS
WARNING!
Hot Surface Hazard
Failure to follow this advice could result in
burns and scalds.
• During use, accessible parts of this
appliance will become hot enough to
cause burns.
• Do not let body, clothing or item other
than suitable cookware contact the cook
surface until the surface is cool.
• Never leave metal objects (such as kitchen
utensils) or empty pans on the cooktop as
they can become hot very quickly.
• Beware: magnetizable metal objects
worn on the body may become hot in
the vicinity of the cooktop. Gold or silver
jewelry will not be affected.
• Keep children away.
• Handles of saucepans may be hot to
touch. Check saucepan handles do not
overhang other cook zones that are on.
Keep handles out of reach of children.
5
SAFETY AND WARNINGS
WARNING!
Cut Hazard
Failure to use caution could result in injury.
• The razor-sharp blade of a cooktop
scraper is exposed when the safety cover
is retracted. Use with extreme care and
always store safely and out of reach of
children.
WARNING!
Health Hazard
Failure to follow this advice may result
in death.
• This appliance complies with
electromagnetic safety standards.
However, persons with cardiac pacemakers
or other electrical implants (such as
insulin pumps) must consult with their
doctor or implant manufacturer before
using this appliance to make sure that
their implants will not be affected by the
electromagnetic field.

6
SAFETY AND WARNINGS
READ AND SAVE THIS GUIDE
WARNING!
To reduce the risk of fire, injury to persons or damage when using the appliance, follow
the important safety instructions listed below. Read all the guidance before using
the appliance.
Installation
z
Unpack the packaging materials from the cooktop.
z
Ensure your appliance is properly installed and earthed by a qualified technician.
z
If a drawer is situated under an embedded appliance, ensure the space between the
content of drawer and appliance is large enough (13/16in) to provide correct ventilation.
General Use
z
This domestic appliance is exclusively for the cooking of food to the exclusion of any
other domestic, commercial or industrial use.
z
Remove all labels and self-adhesives from the ceramic glass.
z
Do not change or alter the appliance.
z
Never leave the appliance unattended when in use. Boilover causes smoking and greasy
spillovers that may ignite.
z
Never use your appliance as a work or storage surface.
z
Wear proper apparel — Loose-fitting or hanging garments should never be worn while
using the appliance.
z
Never leave any objects or utensils on the appliance.
z
Do not place or leave any magnetizable objects (eg credit cards, memory cards) or
electronic devices (eg computers, Smartphones) near the appliance, as they may be
affected by its electromagnetic field.
z
Storage on appliance — Flammable materials should not be stored on the cooktop or
near surface units.
z
Do not place or leave aluminum foil on the cooktop.
z
Never use your appliance for warming or heating the room.
z
Do not use water on grease fires – Smother fire or flame or use dry chemical or
foam-type extinguisher.
z
Use only dry potholders — Moist or damp potholders on any hot surfaces may result in
burns from steam. Do not let potholder touch hot heating elements. Do not use a towel
or other bulky cloth.
z
After use, always turn off the cooktop as described in this guide (ie by using
the power button).
z
Do not rely on the pan detection feature to turn off the cook zones when you
remove the pans.
z
Do not use a steam cleaner to clean your cooktop.
z
Do not place or drop heavy objects on your cooktop.
z
Do not use pans with jagged edges as this can scratch the glass.
z
Do not stand on your cooktop.
z
Do not use scourers or any other harsh/abrasive cleaning agents to clean your cooktop,
as these can scratch the cooktop surface.
z
Do not operate your cooktop by means of an external timer or separate
remote-control system.

7
SAFETY AND WARNINGS
z
Do not cook on a broken cooktop. If cooktop is broken, cleaning solutions and
spillovers may penetrate inside the cooktop and create a risk of electric shock. Contact
a qualified technician immediately.
z
CAUTION: The cooking process has to be supervised. A short term cooking process has
to be supervised continuously.
Child Safety
z
Do not allow children to play with the appliance or sit, stand, or climb on it.
z
Do not store items of interest to children in cabinets above the appliance. Children
climbing on the cooktop could be seriously injured.
z
Do not leave children alone or unattended in the area where the appliance is in
use. Children of less than 8 years old must be kept away from the appliance unless
continuously supervised. This appliance can be used by children aged from 8 years
and above, and persons with reduced physical, sensory or mental capabilities
or lack of experience and knowledge, if they have been given supervision or
instruction concerning the use of the appliance in a safe way and they understand
the hazards involved. Cleaning and user maintenance shall not be done by children
without supervision.
Cleaning
z
Clean cooktop with caution — If a wet sponge or cloth is used to wipe spills on a hot
cooking area, be careful to avoid steam burn. Some cleaners can produce noxious
fumes if applied to a hot surface.
Servicing
z
Do not repair or replace any part of the appliance unless specifically recommended in
the user guide. All other servicing should be undertaken be a Fisher & Paykel trained
and supported service technician or qualified person.
z
If the power supply cable is damaged, it must only be replaced by a
qualified technician.
z
If the appliance is malfunctioning, it will display an alert code: first note down the alert
code (see section ‘Alert codes’ in this manual), then contact your Authorized Service
Center or Customer Care to arrange for service. Do not use your appliance until it has
been repaired by a Fisher & Paykel authorized technician.
Standard Requirements
z
This induction cooktop generates and uses ISM frequency energy that heats cookware
by using an electromagnetic field. It has been tested and complies with Part 18 of the
FCC Rules for ISM equipment. This induction cooktop meets the FCC requirements to
minimize interference with other devices in residential installation. Induction cooktops
may cause interference with television or radio reception. If interference occurs, the
user should try to correct the interference by:
z
Relocating the receiving antenna of the radio or television.
z
Increasing the distance between the cooktop and the receiver.
z
Connecting the receiver into an outlet different from the induction cooktop.
8
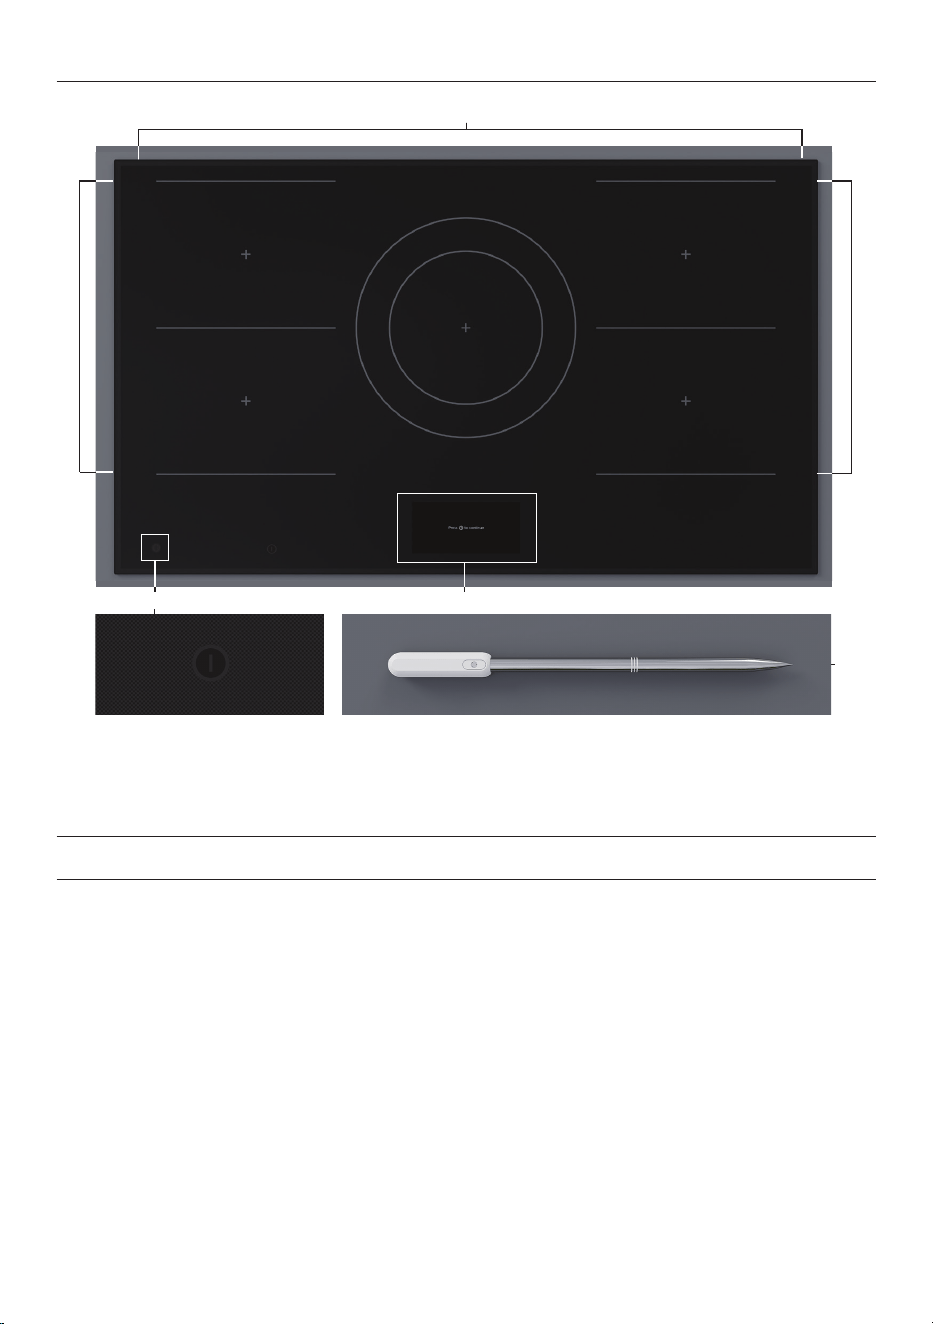
PRODUCT OVERVIEW
5
8
2
3
4
4
5
36" Primary induction cooktop illustrated.
1
Features and accessories
1 Power button
2 Cooktop controls
3 Cook zones
4 SmartZones
5 Temperature sensor
9
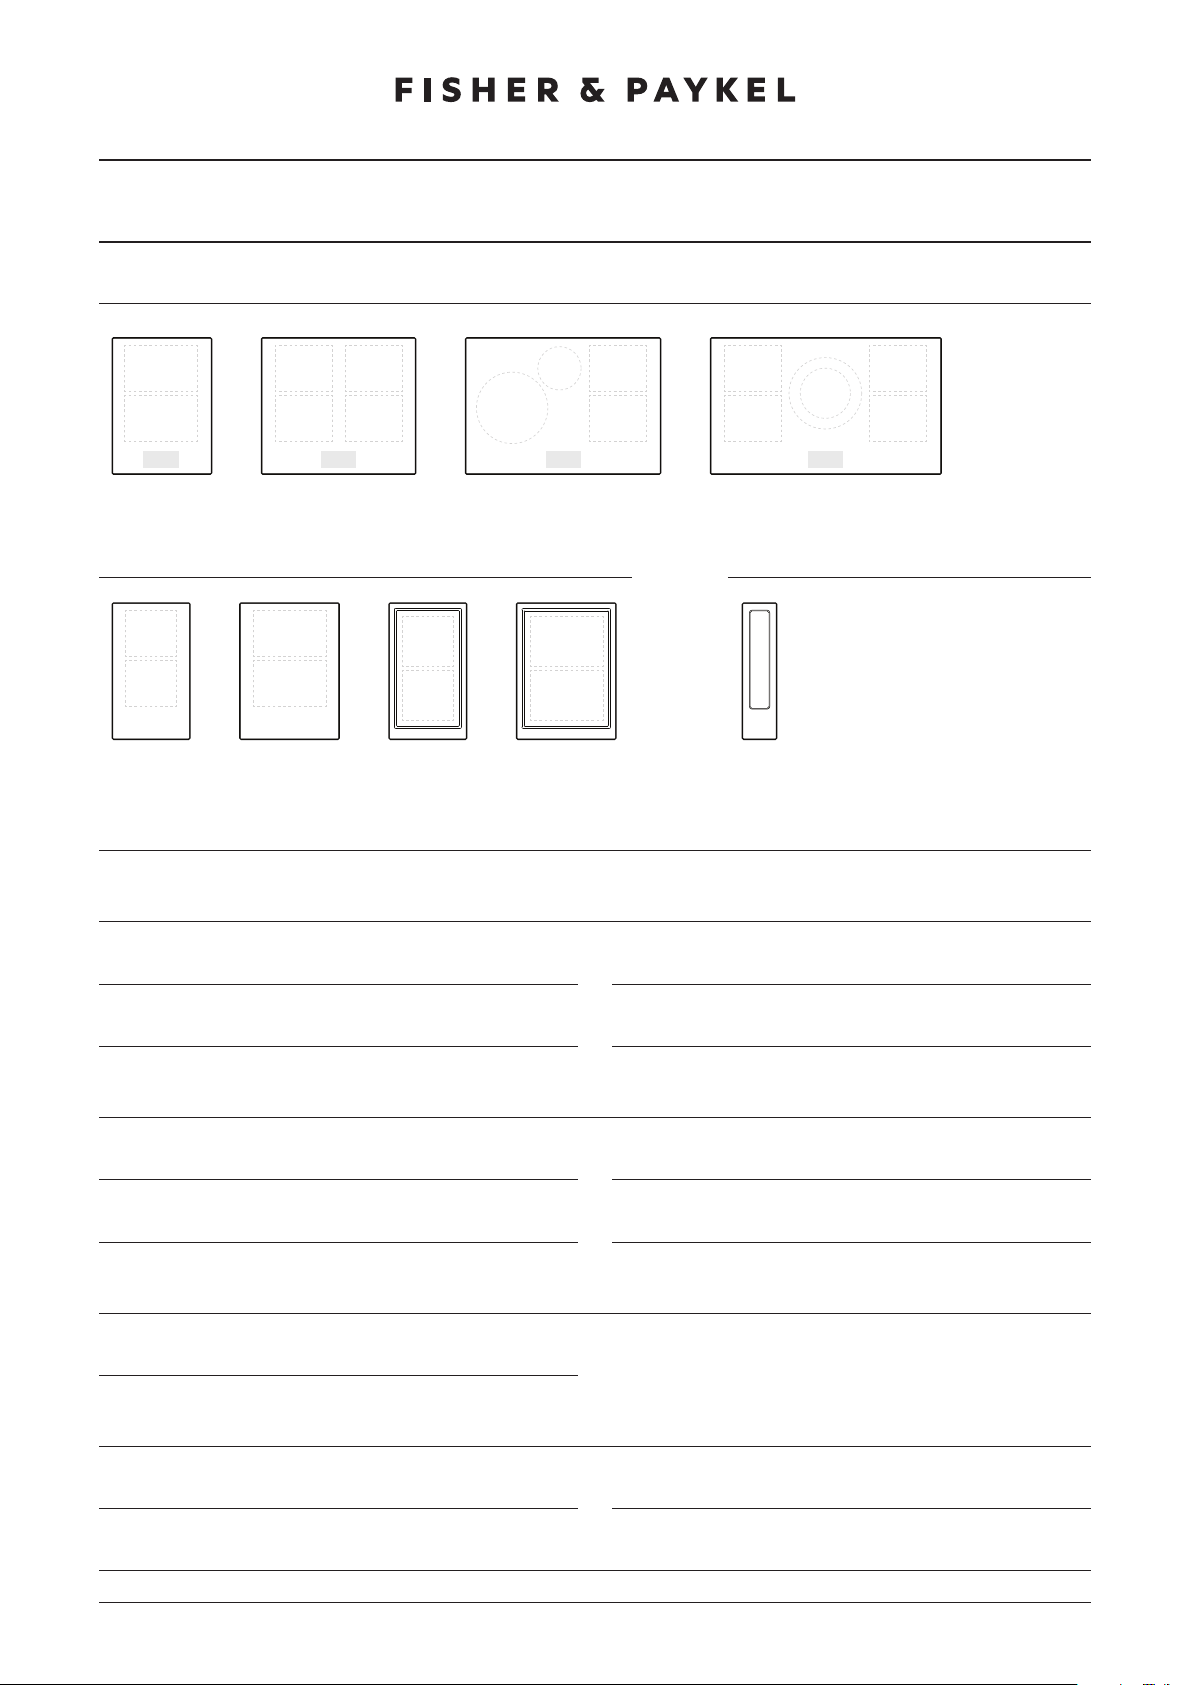
PRODUCT OVERVIEW
CI392DTTB1
CI764DTTB1 CI604DTTB1
CI905DTTB1
10
CONTROL PANEL
1
3
2
4 5
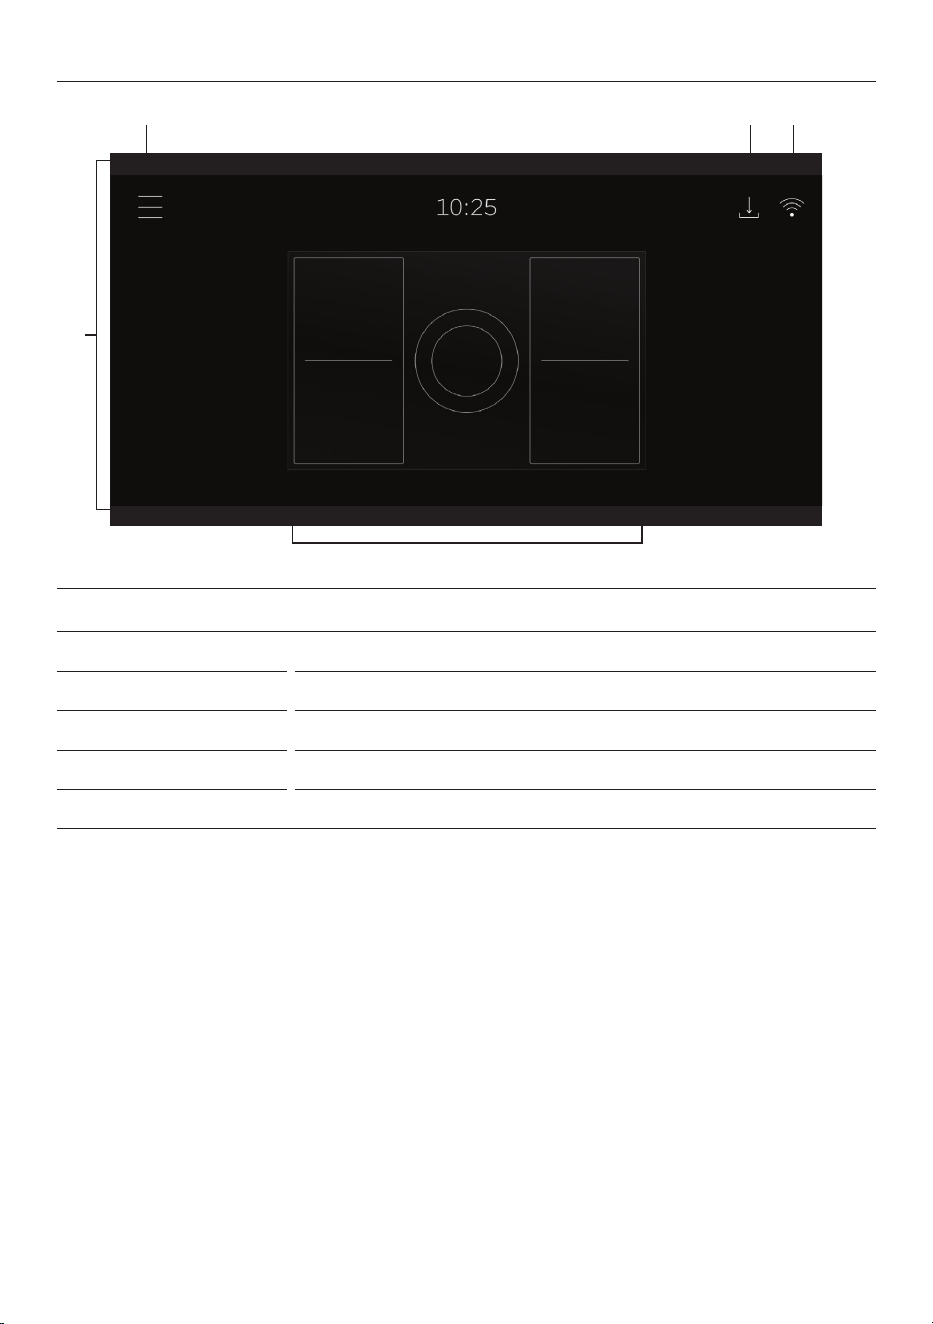
Control panel
1 Touchscreen display Use to operate cook zones, ventilation and settings.
2 Menu Press to access additional features and settings.
3 Cook zone selectors Press to select cook zones and adjust zone settings.
4 Updates indicator Illuminates when an update is available.
5 Wi-Fi indicator Illuminates when Wi-Fi is connected.
11
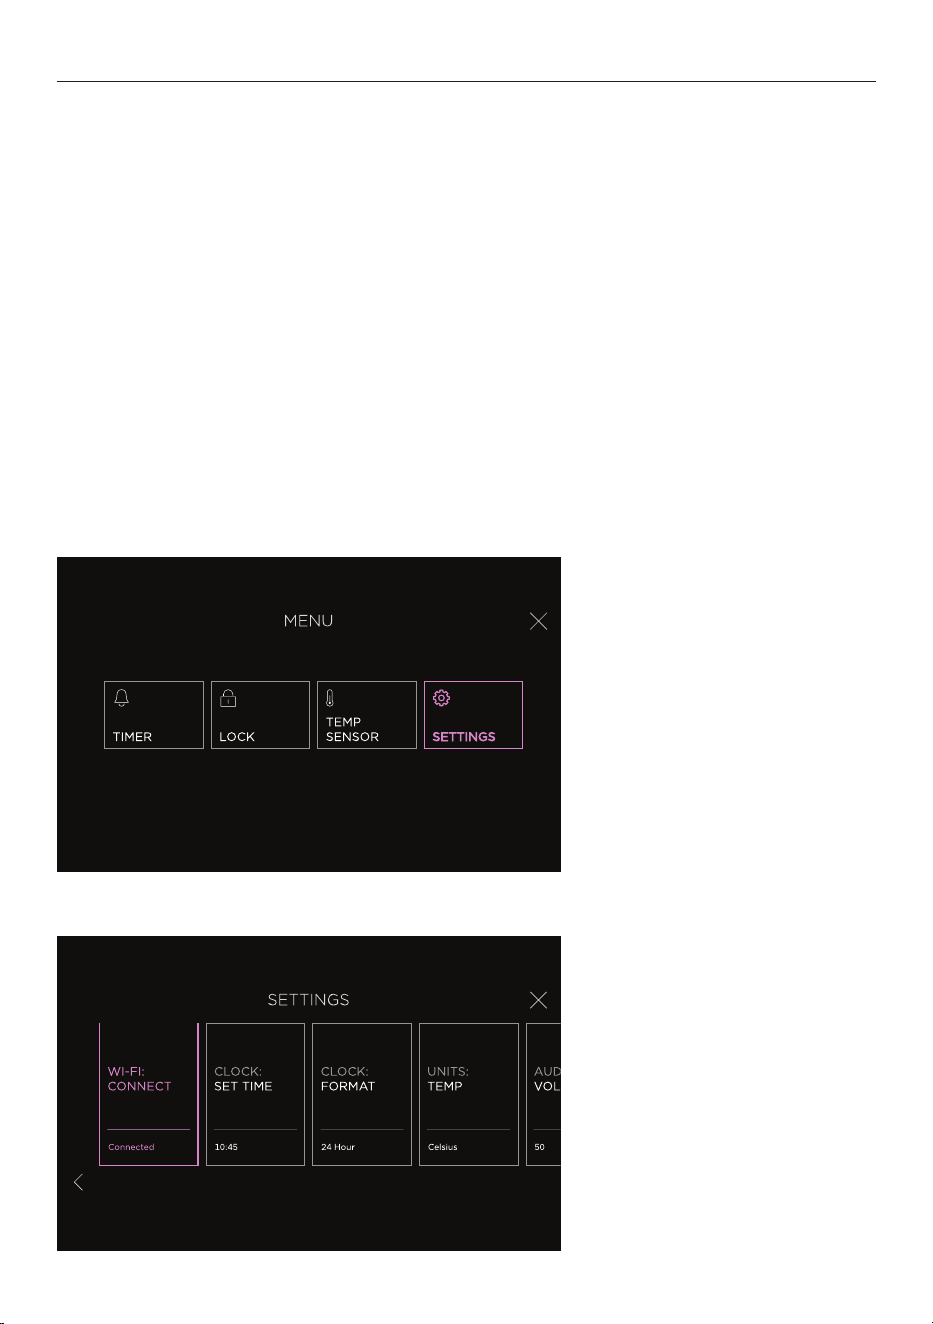
MENU
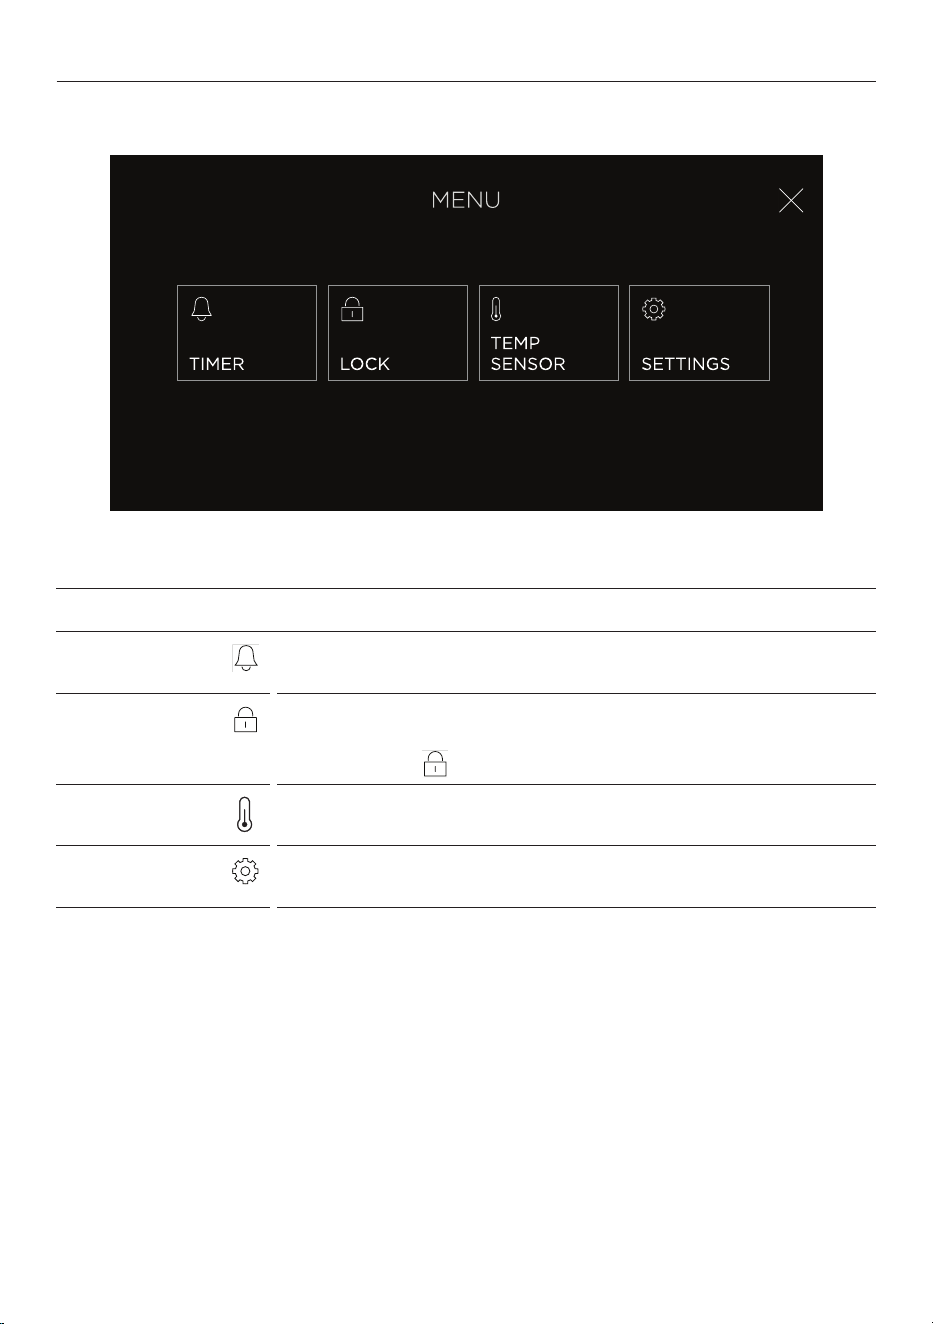
Menu
TIMER
Use the timer to keep track of cooking times. You can use it at
any time, even if you are not using any cook zones.
LOCK
Lock the controls to prevent accidental use. When locked, the
controls will be unresponsive and the cooktop will not turn on.
Press and hold
to unlock.
TEMP SENSOR
Use the temperature sensor to monitor cooking or notify you
when a certain temperature is reached.
SETTINGS
Adjust the settings to suit your preferences or set up a Wi-Fi
connection. Refer to ‘Wi-Fi connection’.
12
Always lift cookware to move it around the cooktop, as sliding may scratch the glass
surface or cookware.
Ensure cookware is inside the cook zone markings. Hot cookware placed along the front of
the cooktop may cause the controls to overheat.
For larger cookware, we recommend using rear zones or paired zones. See ‘Cooking
options’ for information about pairing.
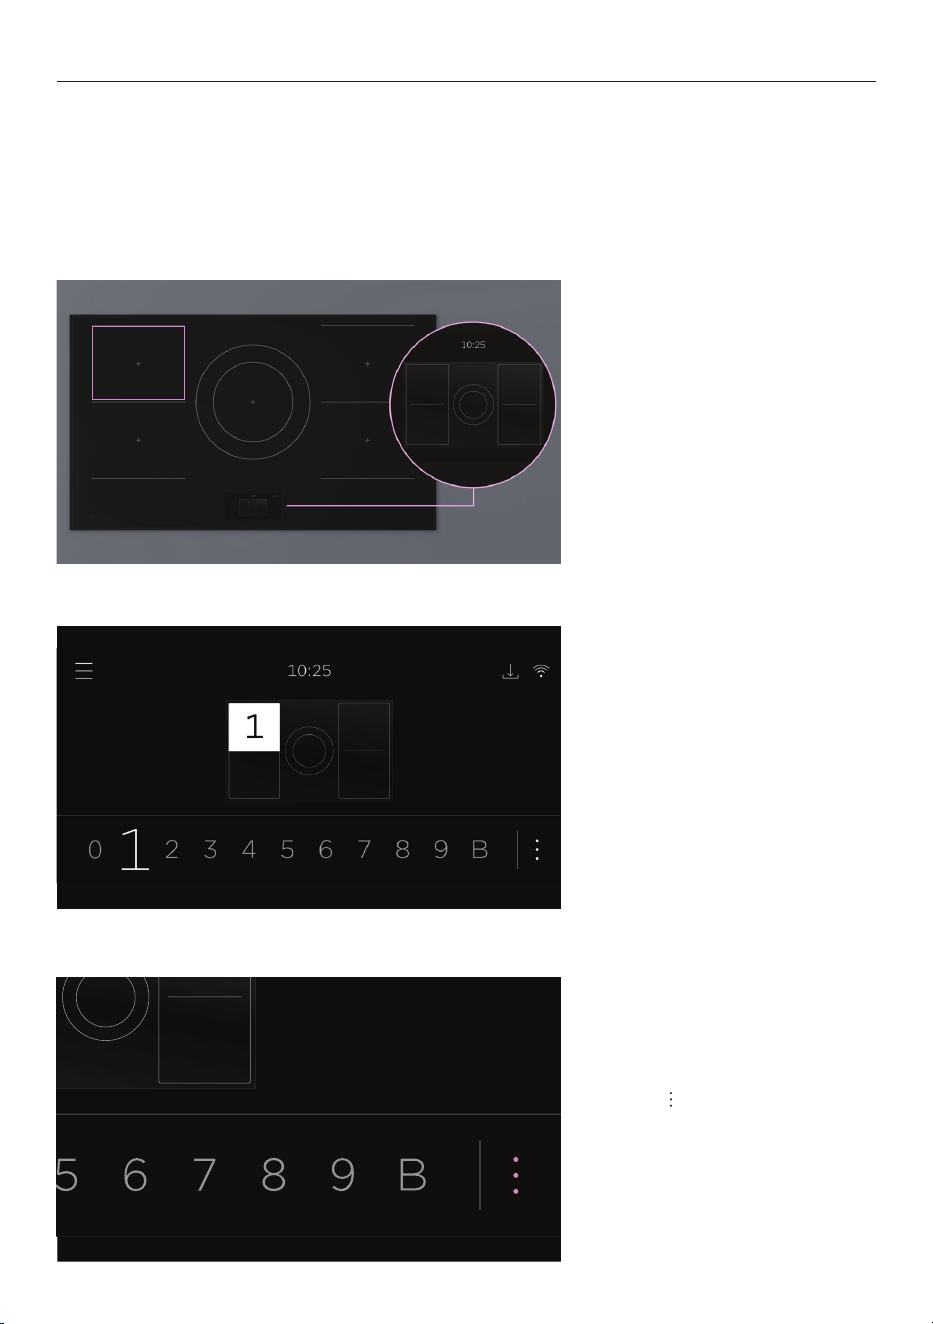
USING THE INDUCTION
2. Use the selector to set a
power level. Select 0 to turn
cook zone off.
3. Press to access cooking
options. For more information,
refer to ‘Cooking options.’
0
0
1. Place cookware on cook zone
and select corresponding zone
on the display.
13
Compatible cookware
Use induction-compatible cookware with a smooth, flat base and similar size to the cook
zone to ensure optimal performance.
Induction-compatible cookware that has a magnetic base or core:
z
Stainless steel
z
Carbon steel
z
Cast iron
z
Enamelled steel
z
Enamelled cast iron
z
Aluminum and copper with
magnetizable base.
If cookware is not compatible or is not detected,
will flash on the display.
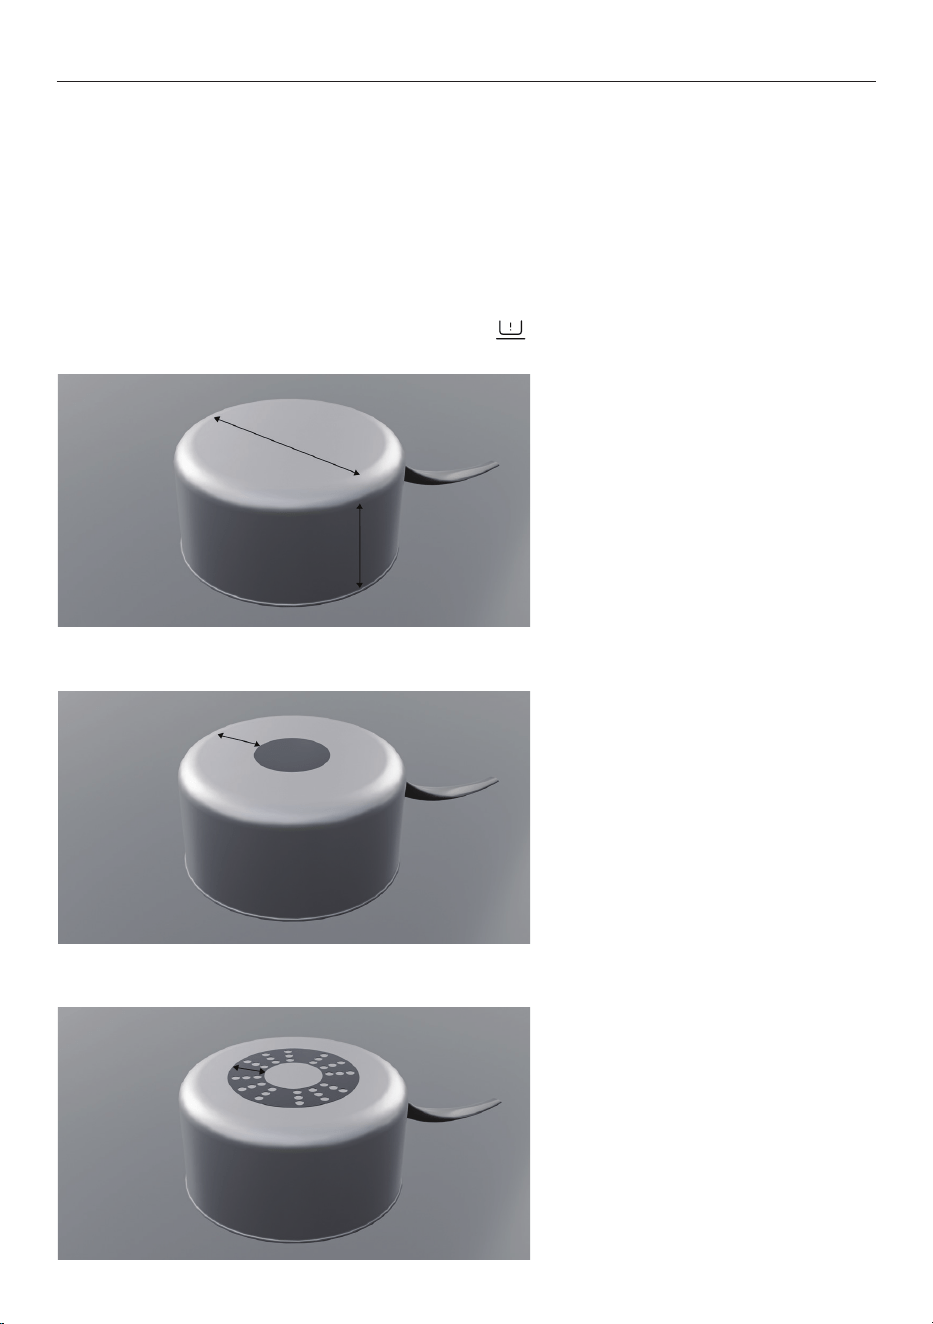
COOKWARE
Quickest heating performance
High magnetic content provides a
consistent heating area across the
base and up the sides of pan.
Average heating performance
Medium magnetic content reduces
the heating zone and results in
slower heating.
Slow heating performance
Limited magnetic content results in
very slow heating performance.
14
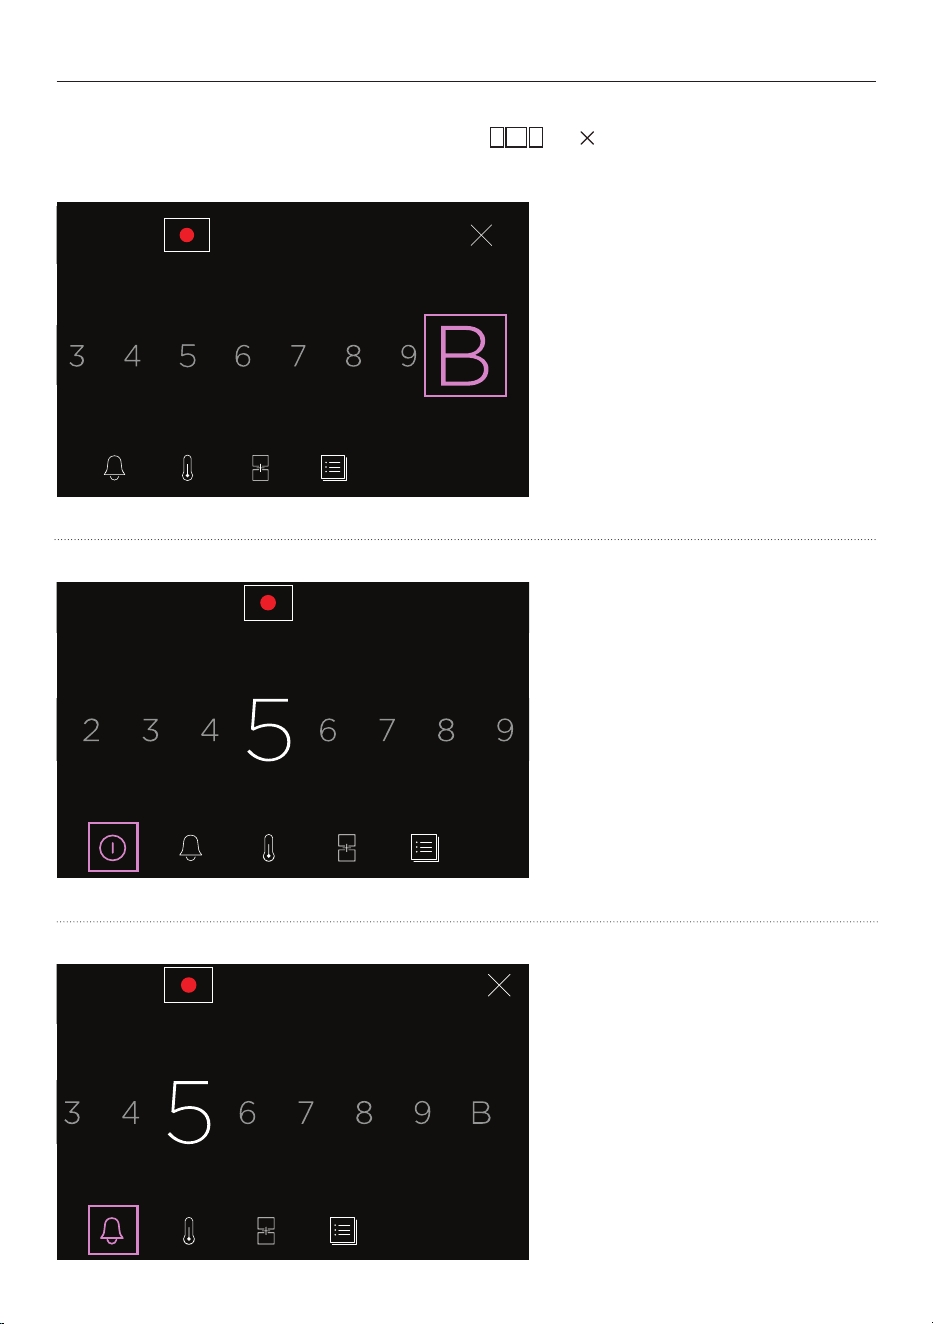
COOKING OPTIONS
Cooking options offer features and controls for specific cook zones. The zone map indicator
shows which cook zone is being adjusted. Press or to return to control panel
home screen.
POWER BUTTON
Turn off selected zone and
cancel zone settings.
ZONE TIMER
Set individual timer for selected
cook zone. This will not turn
the cook zone off.
BOOST
Cook above maximum power
for up to 10 minutes. Ideal
for boiling water quickly. Not
available on paired zones.
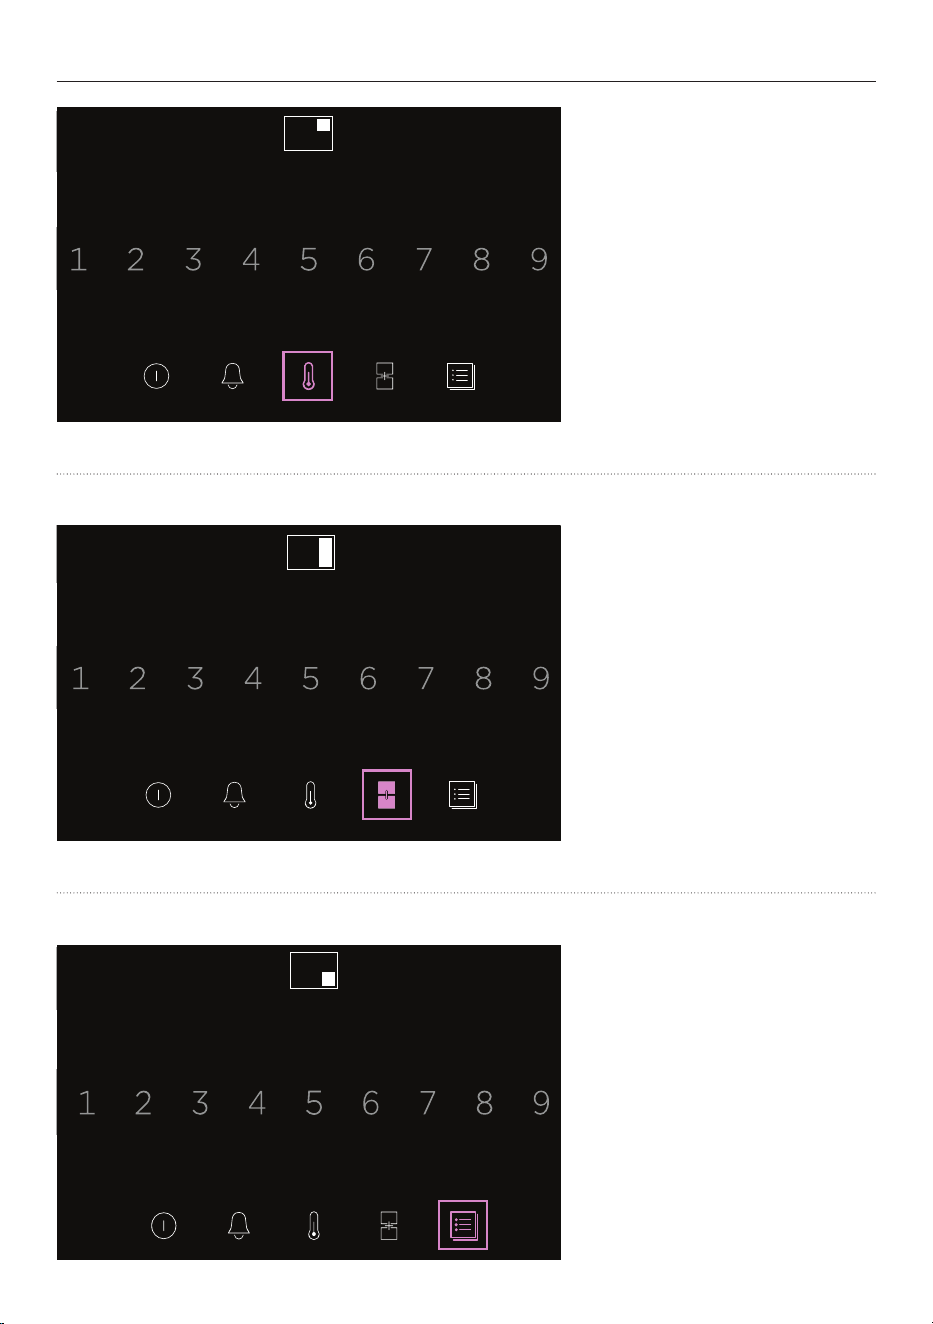
15
COOKING OPTIONS
TEMPERATURE SENSOR
Use to monitor the temperature
of a specific cook zone, notify
you when it reaches a certain
temperature or adjust the zone
settings to hold liquids at a set
temperature.
0
SMARTZONE PAIRING
Join front and rear cook zones
to create a large cook zone
with single temperature control.
Unavailable when a zone is
already in use.
COOK BY METHOD
Access guided cooking features
and specialised functions
such as
SOUS VIDE, POACH,
MELT and WARM.
0
16
The sensor allows you to MONITOR, REACH or HOLD a temperature, ensuring precise
temperature control. Ensure you charge it before use.
MONITOR
Insert the sensor into your food or cooking liquids to monitor their internal temperature.
REACH
Insert the sensor into your food or cooking liquids to reach a set internal temperature.
Notifies you when the food or cooking liquids reach target temperature, so you can turn off
cook zone. Sensor will not turn off the cook zone.
HOLD
Insert the sensor in cooking liquid to hold it at a set temperature.
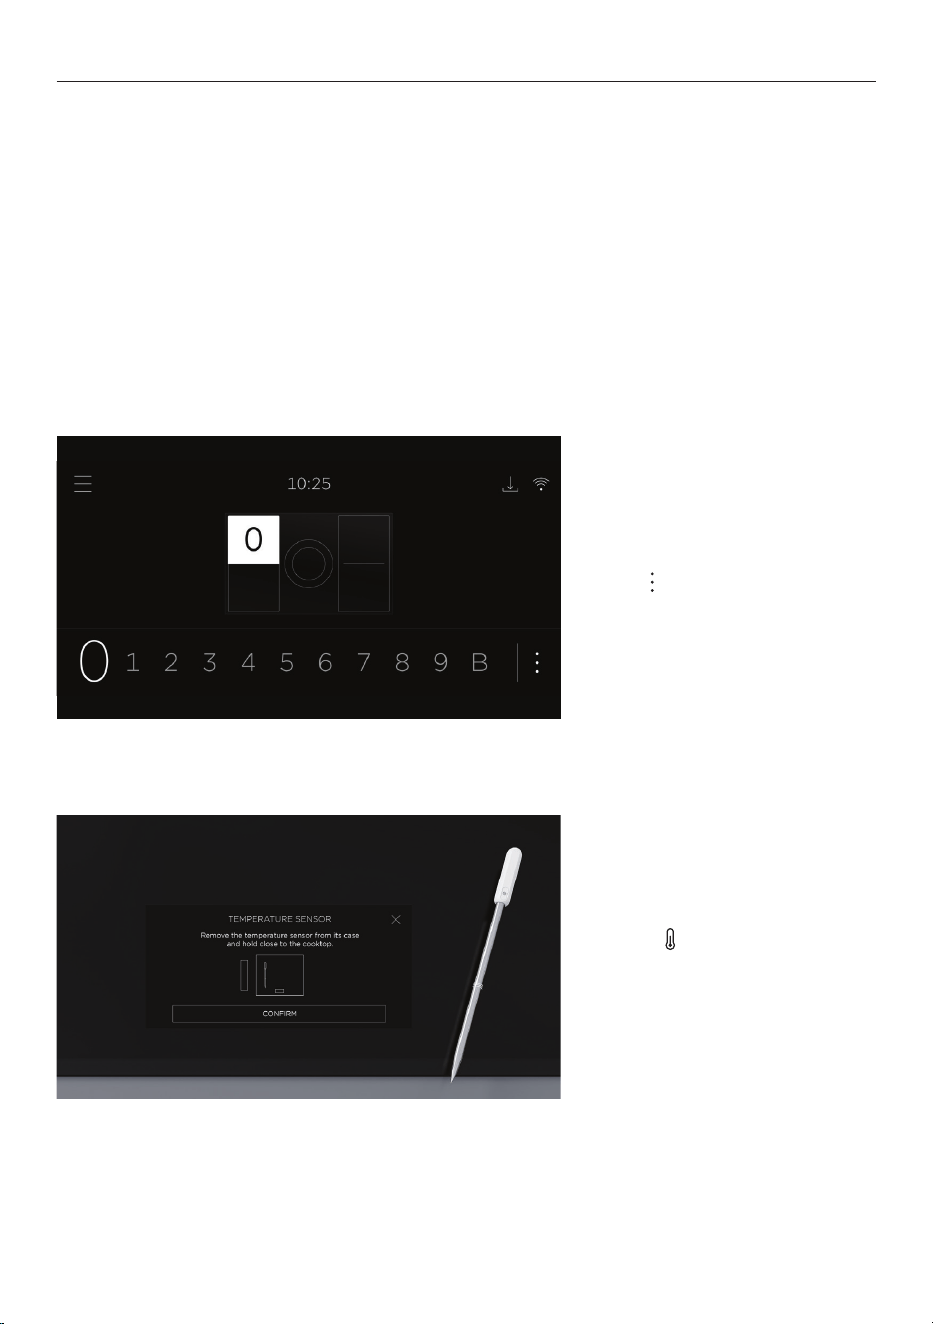
USING THE TEMPERATURE SENSOR
1. Select a cook zone.
Press
to access
cooking options.
2. Press . Hold sensor near
cooktop, and press CONFIRM
to connect.

17
USING THE TEMPERATURE SENSOR
3. Select a goal and follow the
onscreen instructions.
18
Your cooktop can be connected to your home wireless network and monitored remotely
using the app.
Connect your cooktop to ensure it stays up to date with the latest software and features.
Getting started
z
Ensure your home Wi-Fi network is turned on.
z
You will be given step by step guidance on both your appliance and mobile device.
z
It may take up to 10 minutes to connect your cooktop.
z
For further guidance and troubleshooting, please refer to the app.
On your mobile device:
1 Download the app. Scan the QR code or go to www.fisherpaykel.com/connect
2 Register and create an account.
3 Add your appliance and set up the Wi-Fi connection.
Connecting to your home Wi-Fi
WI-FI CONNECTION
1. Select SETTINGS from
the menu.
2. Select WI-FI CONNECT
and follow the instructions
onscreen.

19
CLEANING
Wipe with a damp cloth and mild detergent. Dry with a clean, lint-free cloth.
If further cleaning is required, apply cooktop cleaner following the manufacturer’s
instructions. We recommend locking the controls if you’re cleaning near them.
We do not recommend using the following cleaning products as they may cause damage:
z
Plastic or stainless steel scouring pads
z
Abrasive, solvent, household cleaners
z
Acid or alkaline cleaners
z
Hand washing liquids or soap
z
Stainless steel cleaners or polishes
z
Laundry detergents or disinfectants
Fingerprints, marks, metal sheen and non-sugary spills
Apply cooktop cleaner, then wipe with a damp cloth. Dry with a clean, lint-free cloth or
paper towel.
Boilovers, melts and hot sugary spills
Remove these immediately with a glass scraper, but beware of hot cook zone surfaces.
1 Lock the controls or turn off the cooktop.
2 Hold the scraper at a 30° angle, and move the spill to a cool area of the cooktop.
3 Wipe clean with a damp cloth or paper towel.
Temperature sensor
Wash in hot water with mild detergent, then dry thoroughly with a clean cloth before
storing in its case in a cool, dry place.
z
Wait for sensor to cool down before cleaning. Do not submerge it in cold water
immediately after cooking.
z
Do not place in dishwasher.

20
TROUBLESHOOTING
General use
Why won’t my cooktop turn on?
z
No power. Make sure the cooktop is connected to the power supply and switched
on at the wall.
z
Check the circuit breaker, or check if there is a power cut in your home or area. If your
cooktop still won’t turn on, call Customer Care or your Authorized Service Center.
Why aren’t the controls working when the display is on?
z
The controls are locked when is displayed. Press and hold the screen to unlock.
z
Zones are still hot or DELAYED OFF is still running. Press to turn controls on.
z
The cooktop is in Demo Mode. Call Customer Care or your Authorized Service Center.
Why are the controls difficult to use?
z
Moisture or oil on the controls. Dry them with a cloth and try again.
z
Using the tip of your finger to press the controls. Use the ball of your finger instead.
Why does my cooktop make a humming sound on high heat and
BOOST?
This is normal for induction. It should quieten or stop when you decrease the
heat setting.
Why is the display going black?
Overheated due to cookware placed along the front of the cooktop. Remove cookware
or shift to rear cook zones. Allow controls to cool.
Why can’t I select the heat setting I want?
z
Cooktop is at maximum power. Reduce heat settings on other zones.
z
Cooktop or teppanyaki has reduced power to prevent overheating. Allow to cool.
z
BOOST is unavailable with paired cook zones.
Why is condensation forming on walls and cabinetry?
This is normal for induction. Its energy-efficient technology means minimal heat is lost to
surrounding surfaces. Surfaces stay cool, and steam from cooking condenses on them.

21
TROUBLESHOOTING
Why is the cooktop turning off unexpectedly?
z
Safety timeout. The cooktop will turn a cook zone off automatically if it is left working
for an extended period of time without the power level being altered. The lower the
setting, the longer the cooking zone will remain on.
z
Display protection. The cooktop will turn off to protect the display if it overheats. See
'Using the induction.'
Why can't I pair cook zones?
z
One of the zones is already in use. Turn off the zone, then pair it.
z
Zones you're selecting are not pairable because they are circular or side-by-side
zones. You can pair adjacent front and rear Smartzones. See 'Cooking options'.
Cookware
Why isn’t the cookware getting hot?
z
Cookware is too small or not centered on zone.
z
Cookware is not induction compatible. See ‘Cookware.’
z
The cooktop is in Demo Mode. Call Customer Care or your Authorized Service Center.
Why is my cookware making crackling and clicking noises?
Some induction cookware has metal layers that vibrate. This is normal.
Alerts
Why is showing on the display?
z
No cookware detected. Check it is correct size and centered on selected cook zone.
z
Check cookware is induction compatible.

22
Wear and tear
Why are there scratches on the cooktop?
z
Sliding cookware across it. Scratches will not affect performance, but you should
always lift cookware to avoid scratching. See 'Using the induction.'
z
Cookware may have rough edges. Use cookware with flat and smooth base.
See ‘Cookware’.
z
Cleaning products may be unsuitable. See ‘Cleaning.’
What should I do if the glass gets cracked or chipped?
Stop using the cooktop. Turn off the power supply at the wall, and call Customer Care or
your Authorized Service Center.
TROUBLESHOOTING

23
FAULT CODES
How do I know if there is a problem?
Your cooktop will beep and a fault code will show in the display. You can mute the alert.
What to do
Try to fix the issue and clear the alert according to the onscreen instructions.
‘E’ fault codes
You may be able to clear the fault by resetting the cooktop. Follow the steps below:
1 Press and hold the power button to turn the cooktop off.
2 Wait a few seconds, then press and hold the power button again to turn the cooktop
back on.
If the fault code has disappeared, you can continue to use your cooktop. If not, turn the
power supply off and on at the wall.
If the problem persists
1 Note down the fault code.
2 Contact Customer Care or a Fisher & Paykel trained and supported service technician.
Refer to the Service and Warranty booklet for contact details.

24
MANUFACTURER’S WARRANTY AND SERVICE GUIDE
Complete and keep for safe reference:
Model
Serial No.
Purchase Date
Purchaser
Dealer
City
State
Zip
Country
To access your Warranty and Service Guide
Scan the QR code with your smartphone to access your warranty
and book a service, refer to your separate warranty and service
book or view online at https://www.fisherpaykel.com/us/help-and-
support/warranty-information
This product has been designed for use in a domestic (residential) environment. This
product is not designed for any commercial use. Any commercial use by the customer will
affect this product’s Manufacturer’s Warranty.
To access your Warranty and Service Guide
Scan the QR code with your smartphone to access your warranty
and book a service, refer to your separate warranty and service
book or view online at https://www.fisherpaykel.com/ca/help-and-
support/warranty-information
US
CA
431510A 12.23
FISHERPAYKEL.COM

431510A 12.23
FISHERPAYKEL.COM
© Fisher & Paykel Appliances 2023. All rights reserved.
The models shown in this guide may not be available in all markets
and are subject to change at any time.
The product specifications in this guide apply to the specific products and
models described at the date of issue. Under our policy of continuous product
improvement, these specifications may change at any time.
For current details about model and specification availability in your country,
please go to our website or contact your local Fisher&Paykel dealer.