Home
Bookmarks
Home
Tripp Lite
Tripp Lite DMVWSC4570XUL User Manual
Page 73
Tripp Lite DMVWSC4570XUL Pop-Out Video Wall Mount w/Security for 45" to 70" TVs and Monitors
Owner's Manual - Page 73
For DMVWSC4570XUL.
PDF File Manual
,
75 pages
,
Read Online
|
Download pdf file
English
WARNING
Warranty And Product Registration
Component Checklist
Product Dimensions
Assembly
1.Attach Connecting Plates To Wall Plates
2a.Mount On Wood Stud Wall
2b.Mount On Solid Brick Or Concrete Block Wall
3.Install The Pop–Out Adapter Brackets
3a.For Flat Back Screens
3b.For Bump–Out Screen, Recessed Back Screen Or To Access A/V Inputs
4.Attach The Display Onto The Wall Plate
5.Adjustment
5a.Micro Adjustment
5b.Tilt Adjustment
5c.Height Adjustment
5d.Depth Adjustment
6.Secure And Lock The Display
Spanish
French
German
Page 73/75
Page 1
Page 2
Page 3
Page 4
Page 5
Page 6
Page 7
Page 8
Page 9
Page 10
Page 11
Page 12
Page 13
Page 14
Page 15
Page 16
Page 17
Page 18
Page 19
Page 20
Page 21
Page 22
Page 23
Page 24
Page 25
Page 26
Page 27
Page 28
Page 29
Page 30
Page 31
Page 32
Page 33
Page 34
Page 35
Page 36
Page 37
Page 38
Page 39
Page 40
Page 41
Page 42
Page 43
Page 44
Page 45
Page 46
Page 47
Page 48
Page 49
Page 50
Page 51
Page 52
Page 53
Page 54
Page 55
Page 56
Page 57
Page 58
Page 59
Page 60
Page 61
Page 62
Page 63
Page 64
Page 65
Page 66
Page 67
Page 68
Page 69
Page 70
Page 71
Page 72
Page 73
Page 74
Page 75
Contents
Table of Contents
Search
Previous
Next
Bookmarks
Loading ...
Loading ...
Loading ...
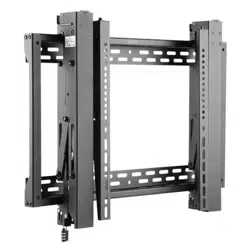
73
Montage
5c
Höheneinstellung
1
2
3
4
Loading ...
Loading ...
File type: PDF
File name: 31006540_dmvwsc4570xul.pdf
File size: 27.58 MB
File Language: English, French, Spanish, German
Pages: 75
Author: Tripp Lite
File created: 2019-04-25
Published:
2023-11-21
Updated: 2024-02-20
Verified by
Kathryn Cummings
on 2024-02-20
Download File
Table of Contents
×
English
1
WARNING
2
Warranty And Product Registration
2
Component Checklist
3
Product Dimensions
4
Assembly
5
1.Attach Connecting Plates To Wall Plates
5
2a.Mount On Wood Stud Wall
6
2b.Mount On Solid Brick Or Concrete Block Wall
7
3.Install The Pop–Out Adapter Brackets
8
3a.For Flat Back Screens
9
3b.For Bump–Out Screen, Recessed Back Screen Or To Access A/V Inputs
10
4.Attach The Display Onto The Wall Plate
11
5.Adjustment
11
5a.Micro Adjustment
11
5b.Tilt Adjustment
12
5c.Height Adjustment
13
5d.Depth Adjustment
14
6.Secure And Lock The Display
15
Spanish
16
French
31
German
61
Search:
×
Search