USER MANUAL
domestic ovens
NORTH AMERICA ONLY
1
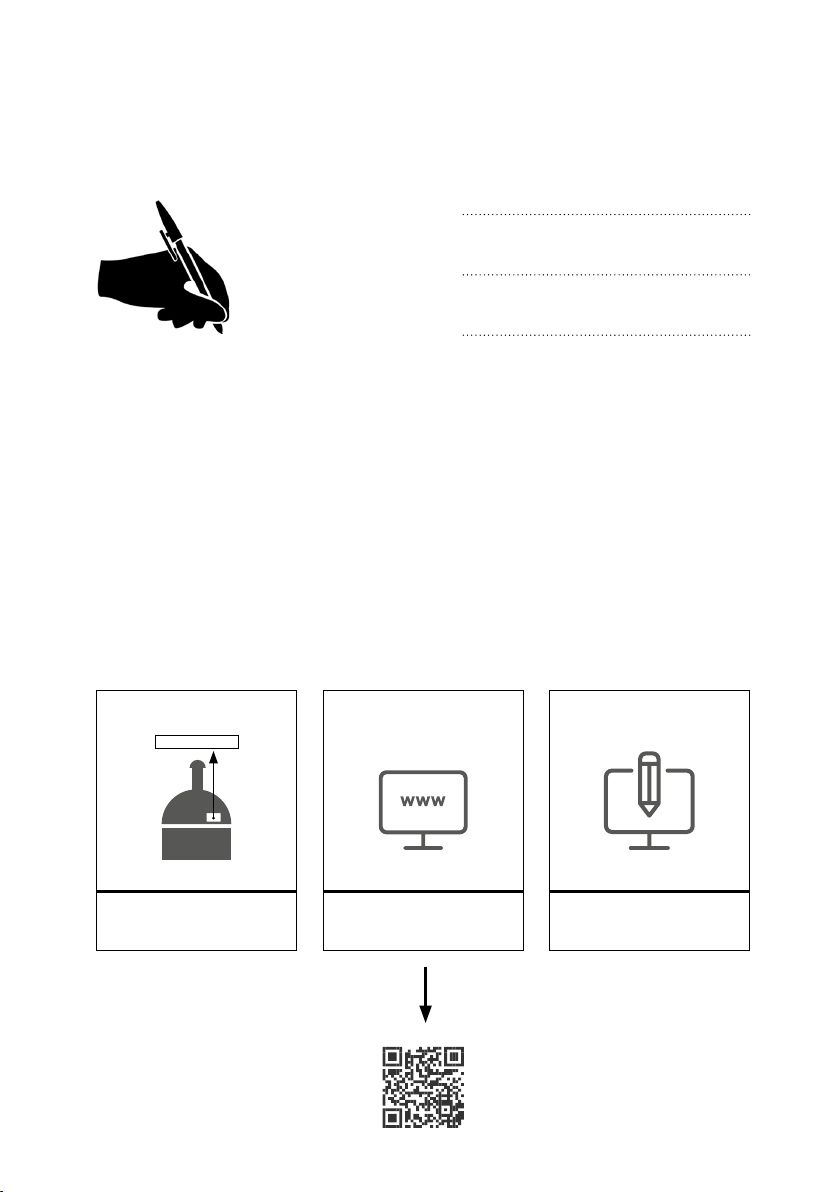
Write in this section the data of your product.
Oven Model:
Serial number:
Purchase date:
NB: The identication label is located on the back of the product.
Identies the serial number,
the identication label is located
on the back of the product.
Enter your information
and register
Visit our web site and click on
“register your product” or type
“alfaforni.com/registration.php”
1 2 3
Visit www.alfaovens.com and register your oven today.
12345678901234
02 GENERAL WARNINGS
04 SAFETY WARNINGS
06 POSITIONING THE OVEN
08 LPG / NG CONNECTION WARNINGS
09 LPG / NG CONNECTION AND INSTALLATION
13 LPG / NG CONVERSION INSTRUCTIONS
16 LIGHTING THE OVEN - WOOD
20 LIGHTING THE OVEN - GAS
22 USING THE OVEN
26 COOKING & DOUGH RECIPES
32 MAINTENANCE AND CARE
38 BASIC VENTING GUIDE
42 TROUBLESHOOTING
44 WARRANTY

1
Write in this section the data of your product.
Oven Model:
Serial number:
Purchase date:
NB: The identication label is located on the back of the product.
Identies the serial number,
the identication label is located
on the back of the product.
Enter your information
and register
Visit our web site and click on
“register your product” or type
“alfaforni.com/registration.php”
1 2 3
Visit www.alfaovens.com and register your oven today.
12345678901234
02 GENERAL WARNINGS
04 SAFETY WARNINGS
06 POSITIONING THE OVEN
08 LPG / NG CONNECTION WARNINGS
09 LPG / NG CONNECTION AND INSTALLATION
13 LPG / NG CONVERSION INSTRUCTIONS
16 LIGHTING THE OVEN - WOOD
20 LIGHTING THE OVEN - GAS
22 USING THE OVEN
26 COOKING & DOUGH RECIPES
32 MAINTENANCE AND CARE
38 BASIC VENTING GUIDE
42 TROUBLESHOOTING
44 WARRANTY

2 3
GENERAL WARNINGS
RETAIN THIS MANUAL FOR FUTURE REFERENCE
Additional copies of this manual at www.alfaovens.com
WARNING: improper installation, adjustment, alteration, service or
maintenance can cause property damage, injury or death. Read the
installation, operating and maintenance instructions thoroughly
before installing or servicing this equipment.
Never touch the metal door or ue
during use as they are not insulated
and become very hot when in use.
- The identication plate, with technical data, lot number and brand name is
visibly applied on the device. Do not remove this label
- Remove all protective lm before putting the unit into operation. To help
facilitate the separation, use warm air (for example, a hair dryer)
- Never use steel sponges or sharp scrapers, it can damage the stainless surfaces.
Use ordinary non-abrasive products. If necessary, use wood or plastic tools. Rinse
thoroughly and dry with a soft cloth or microber cloth.
- Do not use dishes or containers made of plastic material. The high temperatures
inside the oven could melt the plastic, damaging the appliance.
- Use tools and utensils that are resistant to high temperatures.
- Position the oven on a at and level surface.
- Due to the temperature, the color of the surfaces may vary in time.
- Installation of the product must allow for easy
- access for cleaning and access to and remove burner on gas models.
- Never store, use or put ammable liquids or objects in or near the oven.
- ALFA stainless steel ready-to-use ovens can become hot on the outside even
with two layers of high quality insulation.
- Always remove the oven door by gripping the handles and using gloves when
hot.
- Closing the door when the oven is lit with ame can cause the ame to go out
from lack of oxygen
- Do not touch the surfaces of the chimney ue during use.
- Keep any electrical wiring and fuel lines away from hot surfaces.
- Do not use the oven if it’s not working properly or you suspect a fault in
operation.
- Do not move the oven during use or when it is hot.
- Do not lean on or rest objects on the oven, this may compromise its stability.
- Never extinguish the ame with water.
- In the event that a grease re occurs, turn off the gas and leave the door closed
until the re is extinguished.
- When using the oven wear heat resistant oven gloves.
- The parts that are sealed by the manufacturer should not be modied by the
user.
- Do not block the openings and slots provided for ventilation and heat dissipation.
- When using charcoal, only use high quality natural lump wood charcoal. Do not
- use briquettes, lava rock, liquid fuels, accelerants or anything other than that
expressly indicated.
- Do not lift the oven from the sill or shelf
PLEASE READ THE FOLLOWING INFORMATION FOR PROPER
INSTALLATION AND OPTIMUM PERFORMANCE OF THE OVEN.
THIS USER MANUAL IS VALID IN
NORTH AMERICA ONLY.
4 5
GAS LEAKS MAY RESULT IN FIRE OR EXPLOSION AND CAUSE SERIOUS
PERSONAL INJURY OR DEATH, OR PROPERTY DAMAGE.
IF YOU SMELL GAS:
1. Turn the gas off.
2. Put out any live re or ames.
3. Open the door to the oven.
4. Consult a licensed gas professional
WARNING: Do not store unused gas cylinders near the oven.
ATTENTION! The gas oven may be converted from LPG to natural gas and
viceversa using the Alfa Ovens supplied conversion kit. Follow the supplied
instructions or contact a qualied and licensed gas professional.
WARNING: If the gas oven is not used
close the gas supply valve.
READ ALL INSTRUCTIONS BEFORE INSTALLING AND USING THIS APPLIANCE
Do not install where prohibited.
FOR YOUR SAFETY: Do not store or use gasoline or other ammable vapors or
liquids in the vicinity of this or any other appliance. Also, always keep the area
under and around this appliance free and clear of any and all combustible
materials
SAFETY WARNINGS
FOR WOOD-BURNING OVENS ONLY
WARNING: Improper installation, adjustment, alteration, service or
maintenance can cause property damage, injury or death.
SAFETY WARNINGS
FOR GAS-BURNING OVENS ONLY
WARNING: Do not use wood red ovens in any enclosed room unless
properly vented and meeting all local building codes and approvals.
6 7
POSITIONING THE OVEN
COUNTER TOP OVENS SHOULD BE PLACED ON FIXED TABLES OR
TABLES WITH LOCKING WHEELS OR OTHER FIREPROOF SURFACES WITH
ADEQUATE LOAD-BEARING CAPACITY. IF NEEDED, ADJUST THE LEGS TO
LEVEL THE SUPPORTING SURFACE.
ATTENTION
THE OUTER WALLS OF OVEN MAY REACH HIGH TEMPERATURES
GREATER THAN 50°C / 120°F. ANY FLAMMABLE MATERIAL SHOULD BE
KEPT AT LEAST 3 FEET (1 METRE) AWAY FROM THE OVEN.
CAUTION: When being used, place the oven at a safe distance from ammable
materials or substances that may be damaged by heat
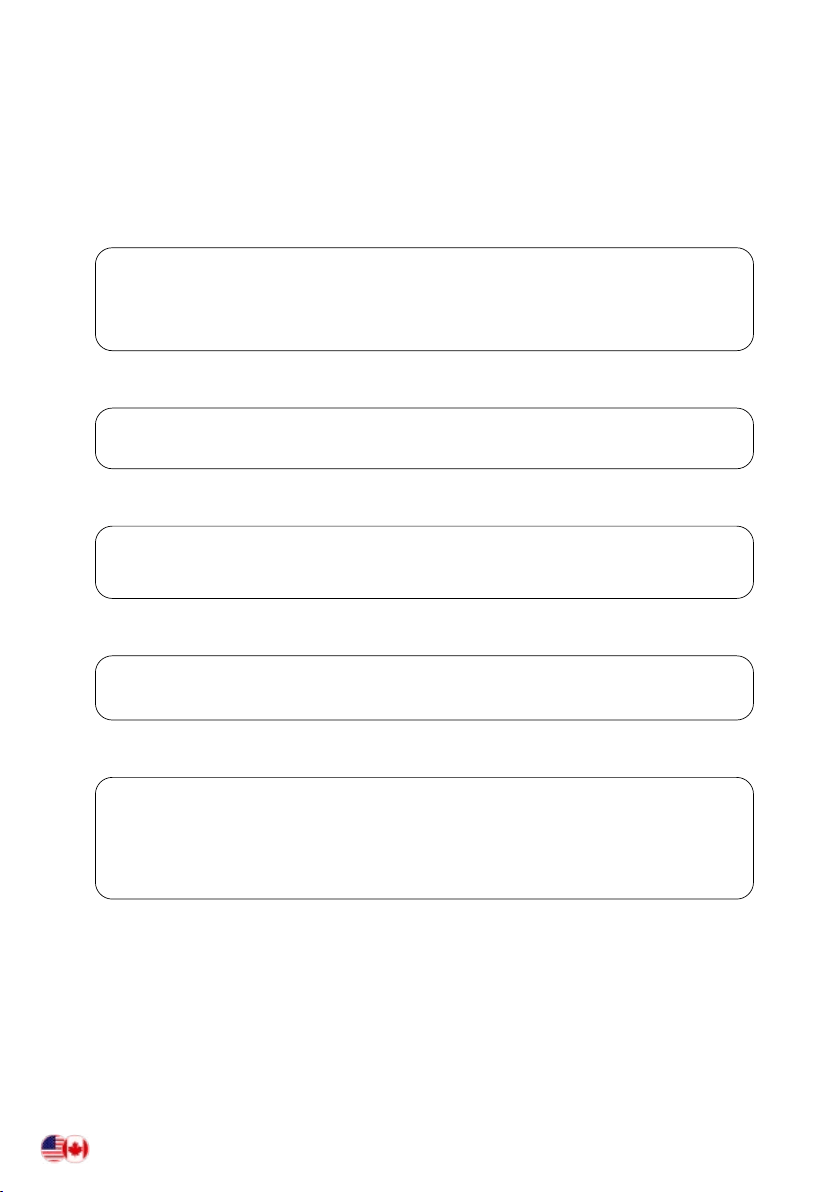
CAUTION! Position the oven at a minimum distance of 8 in (20 cm)
from the walls and from any other equipment.
CAUTION
Place the oven on a at, stable surface to
prevent it from moving during use.
continue next page >>
Front view
View from above
8 in 8 in
8 in8 in
8 in
50 cm
50 cm
100 cm
20 cm
20 cm20 cm
20 cm 20 cm
20 in
20 in
40 in
6 7
POSITIONING THE OVEN
COUNTER TOP OVENS SHOULD BE PLACED ON FIXED TABLES OR
TABLES WITH LOCKING WHEELS OR OTHER FIREPROOF SURFACES WITH
ADEQUATE LOAD-BEARING CAPACITY. IF NEEDED, ADJUST THE LEGS TO
LEVEL THE SUPPORTING SURFACE.
ATTENTION
THE OUTER WALLS OF OVEN MAY REACH HIGH TEMPERATURES
GREATER THAN 50°C / 120°F. ANY FLAMMABLE MATERIAL SHOULD BE
KEPT AT LEAST 3 FEET (1 METRE) AWAY FROM THE OVEN.
CAUTION: When being used, place the oven at a safe distance from ammable
materials or substances that may be damaged by heat
CAUTION! Position the oven at a minimum distance of 8 in (20 cm)
from the walls and from any other equipment.
CAUTION
Place the oven on a at, stable surface to
prevent it from moving during use.
continue next page >>
Front view
View from above
8 in 8 in
8 in8 in
8 in
50 cm
50 cm
100 cm
20 cm
20 cm20 cm
20 cm 20 cm
20 in
20 in
40 in

8 9
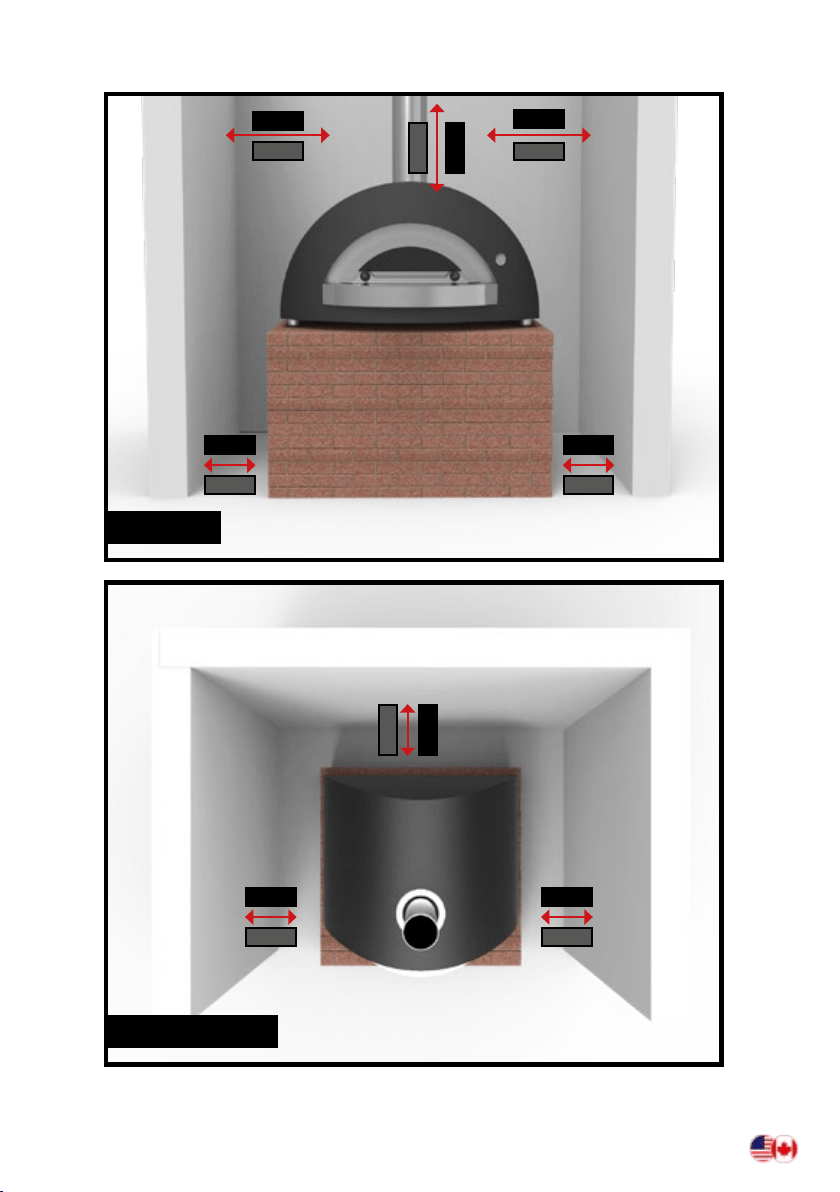
CONNECT THE LPG CYLINDER
(only for LPG oven)
Connect the exible hose to the back of the oven.
PRESSURE REGULATOR :
Liquid Propane Gas (LPG):
11.0” Max water column pressure (W.L.P.)
Natural Gas (NG):
4.0” Max water column pressure (W.L.P)
FLEXIBLE HOSE:
Diameter 1/2ʺ”
CYLINDER
Recommended Type 1 20lb, 30lb, or larger
Pressure regulator, exible hose and cylinder are
not supplied with the oven.
LPG/NG CONNECTIONSLPG/NG CONNECTION WARNINGS
ONLY FOR LPG OVENS
- LPG is heavier than air. Any losses of LPG may collect in a lower part of the
environment.
- The LPG cylinder must always be installed, transported and stored in a vertical
position. Handle with care and do not drop the LPG cylinders.
- Make sure the gas tank is placed in a ventilated place that it is away from other
objects.
- Never store a spare gas cylinder near the gas oven.
- Do not leave or transport the LPG cylinders in places where temperatures can
reach 120°F/50°C (too hot to handle. For example: Do not leave the cylinder in the
car on hot days).
- Treat “empty” LPG cylinders with the same attention as full ones. Even if there is
no more liquid in the cylinder there may always be gas fumes.
- Always close cylinder valve before disconnect in gas there could still be pressure
- Always check all gas connections before using the oven.
- Make sure to use the proper PTFE gas piping tape for all threaded connections.
- It is recommended that all gas connections are checked before using the oven.
- Make sure that the valve on the LPG cylinder or the regulator is closed.
Replacement of the cylinder must be performed away from sources of heat and
ignition.
- Only use cylinders rated for LPG.
- Do not twist the hose.
- Before each use check that the hose does not have any marks, cracks, abrasions
or cuts. If the hose is damaged in some way, do not use the oven.
Use the supplied conversion kits if changing from factory settings
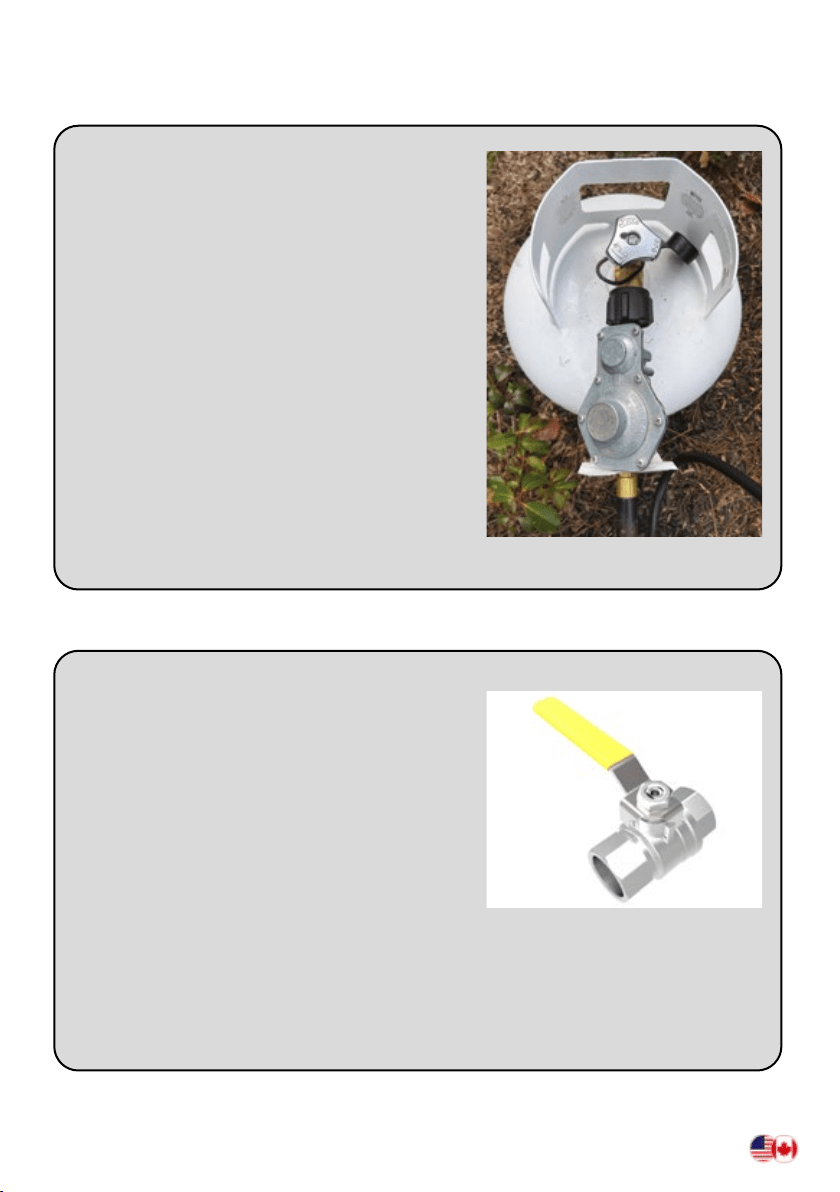
NATURAL GAS SUPPLY
– Connect the exible hose to the back of the
oven.
– The natural gas supply must be delivered
through a galvanized pipe Ø 1/2” or equivalent
copper pipe, located at the burner inlet hole.
– Install the gas shut-off valve in a suitable
position up-line.
ATTENTION!
Follow our advice to correctly use your oven.
– We recommend checking gas connection before using the oven.
– Make sure the gas tap is turned off when the oven is not being used and during
maintenance or cleaning operations.
– Before using the oven, check out the hose searching for cracks, cuts or any
wearing sign. If the hose is damaged, do not use the oven.
continue next page >>
8 9
CONNECT THE LPG CYLINDER
(only for LPG oven)
Connect the exible hose to the back of the oven.
PRESSURE REGULATOR :
Liquid Propane Gas (LPG):
11.0” Max water column pressure (W.L.P.)
Natural Gas (NG):
4.0” Max water column pressure (W.L.P)
FLEXIBLE HOSE:
Diameter 1/2ʺ”
CYLINDER
Recommended Type 1 20lb, 30lb, or larger
Pressure regulator, exible hose and cylinder are
not supplied with the oven.
LPG/NG CONNECTIONSLPG/NG CONNECTION WARNINGS
ONLY FOR LPG OVENS
- LPG is heavier than air. Any losses of LPG may collect in a lower part of the
environment.
- The LPG cylinder must always be installed, transported and stored in a vertical
position. Handle with care and do not drop the LPG cylinders.
- Make sure the gas tank is placed in a ventilated place that it is away from other
objects.
- Never store a spare gas cylinder near the gas oven.
- Do not leave or transport the LPG cylinders in places where temperatures can
reach 120°F/50°C (too hot to handle. For example: Do not leave the cylinder in the
car on hot days).
- Treat “empty” LPG cylinders with the same attention as full ones. Even if there is
no more liquid in the cylinder there may always be gas fumes.
- Always close cylinder valve before disconnect in gas there could still be pressure
- Always check all gas connections before using the oven.
- Make sure to use the proper PTFE gas piping tape for all threaded connections.
- It is recommended that all gas connections are checked before using the oven.
- Make sure that the valve on the LPG cylinder or the regulator is closed.
Replacement of the cylinder must be performed away from sources of heat and
ignition.
- Only use cylinders rated for LPG.
- Do not twist the hose.
- Before each use check that the hose does not have any marks, cracks, abrasions
or cuts. If the hose is damaged in some way, do not use the oven.
Use the supplied conversion kits if changing from factory settings
NATURAL GAS SUPPLY
– Connect the exible hose to the back of the
oven.
– The natural gas supply must be delivered
through a galvanized pipe Ø 1/2” or equivalent
copper pipe, located at the burner inlet hole.
– Install the gas shut-off valve in a suitable
position up-line.
ATTENTION!
Follow our advice to correctly use your oven.
– We recommend checking gas connection before using the oven.
– Make sure the gas tap is turned off when the oven is not being used and during
maintenance or cleaning operations.
– Before using the oven, check out the hose searching for cracks, cuts or any
wearing sign. If the hose is damaged, do not use the oven.
continue next page >>
10 11
OVEN
A
B
C1
C2
D
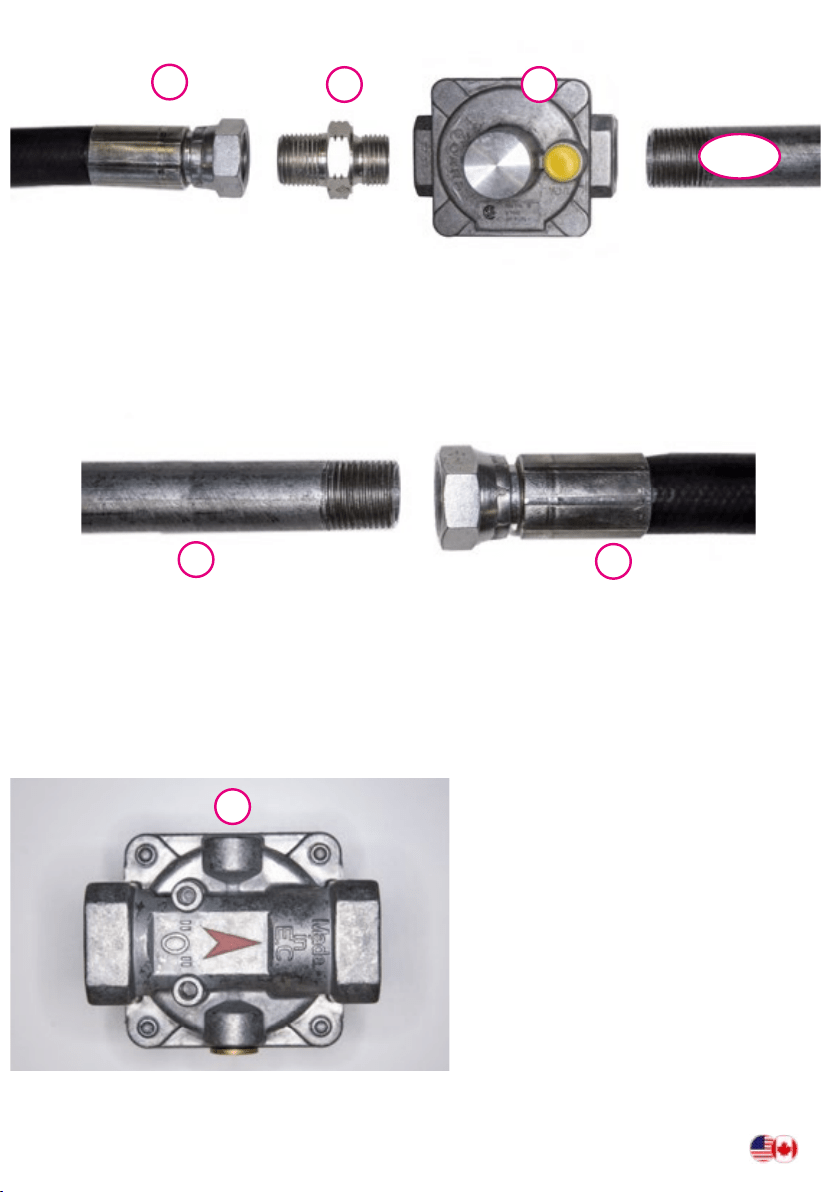
LPG/NG CONNECTION AND INSTALLATION
SEE BELOW TO FIND YOUR OVEN AND
HOW IT IS CONFIGURED FROM THE FACTORY
ALFA ONE and BRIO GAS OVENS COME FROM FACTORY PRE-SET FOR LPG
(NG CONVERSION KITS INCLUDED WITH OVEN)
ALFA STONE M and STONE L COME FROM FACTORY PRE-SET FOR NG
(LPG CONVERSION KITS INCLUDED WITH OVEN)
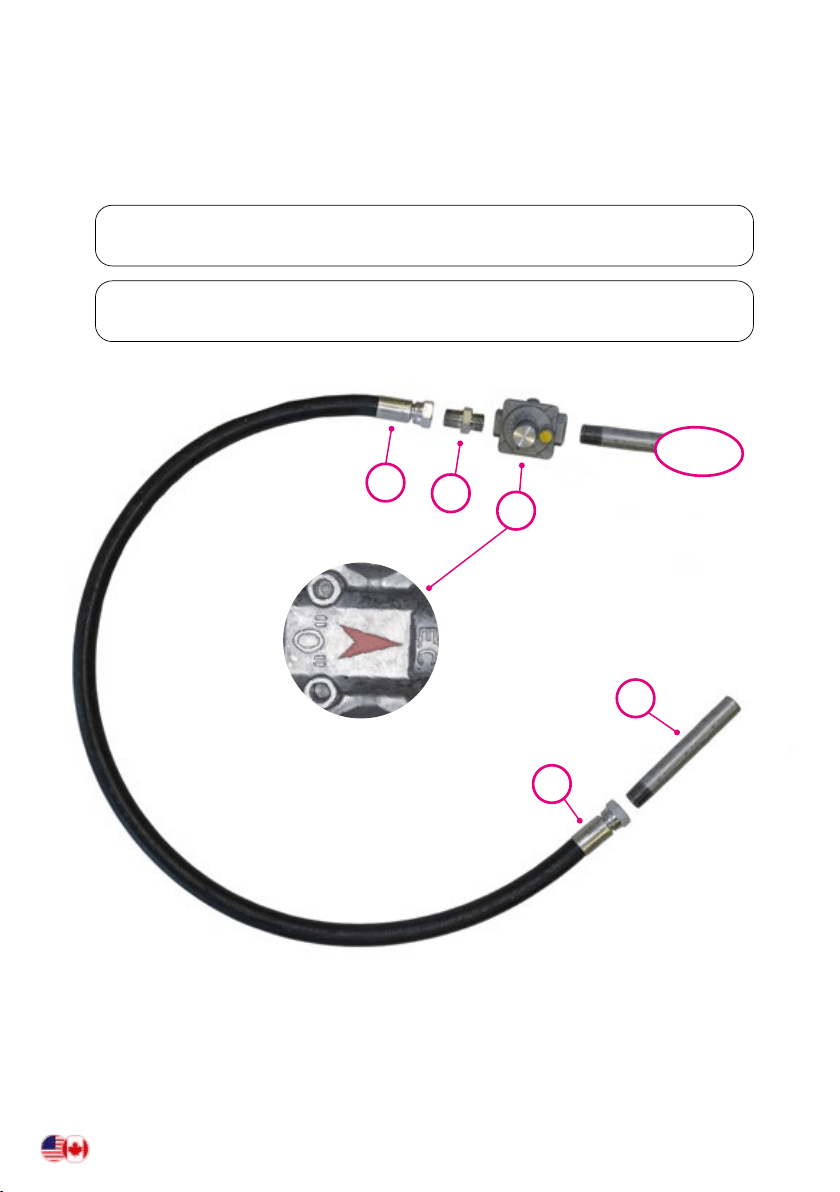
NG CONNECTION
A REGULATOR CONNECT TO OVEN (supplied)
B BSPP - NPT ADAPTER (supplied)
C1 GAS HOSE TO OVEN
C2 GAS HOSE TO GAS SUPPLY
D GAS SUPPLY PIPING
D
C2
C1
B A
E
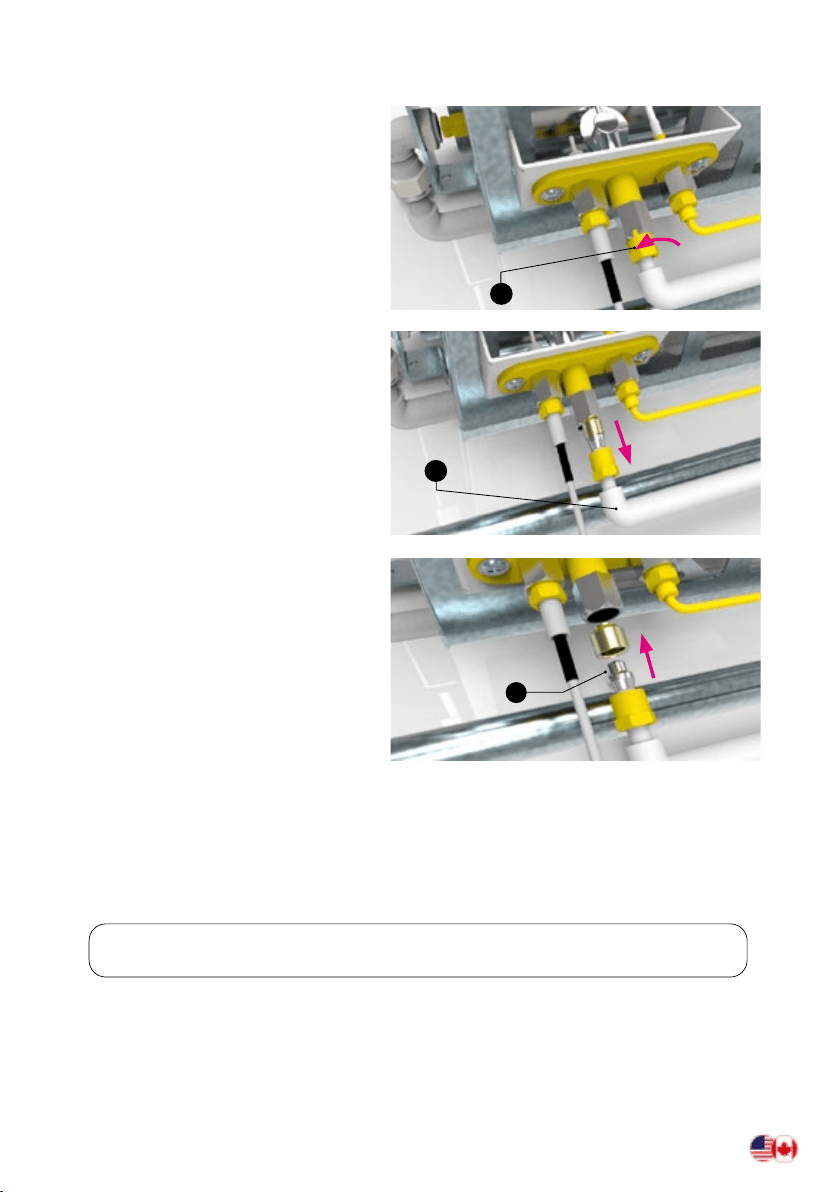
IN OUT
OVEN
Mount the adapter (B) on the gas inlet (C1), followed by the regulator (A).
Connect the gas supply (D) to the gas hose (C2)
CAUTION
Respect the direction indicated by
the arrow to connect the regulator.
continue next page >> continue next page >>
10 11
OVEN
A
B
C1
C2
D
LPG/NG CONNECTION AND INSTALLATION
SEE BELOW TO FIND YOUR OVEN AND
HOW IT IS CONFIGURED FROM THE FACTORY
ALFA ONE and BRIO GAS OVENS COME FROM FACTORY PRE-SET FOR LPG
(NG CONVERSION KITS INCLUDED WITH OVEN)
ALFA STONE M and STONE L COME FROM FACTORY PRE-SET FOR NG
(LPG CONVERSION KITS INCLUDED WITH OVEN)
NG CONNECTION
A REGULATOR CONNECT TO OVEN (supplied)
B BSPP - NPT ADAPTER (supplied)
C1 GAS HOSE TO OVEN
C2 GAS HOSE TO GAS SUPPLY
D GAS SUPPLY PIPING
D
C2
C1
B A
E
IN OUT
OVEN
Mount the adapter (B) on the gas inlet (C1), followed by the regulator (A).
Connect the gas supply (D) to the gas hose (C2)
CAUTION
Respect the direction indicated by
the arrow to connect the regulator.
continue next page >> continue next page >>
12 13
F1
F2
OVEN
A
E
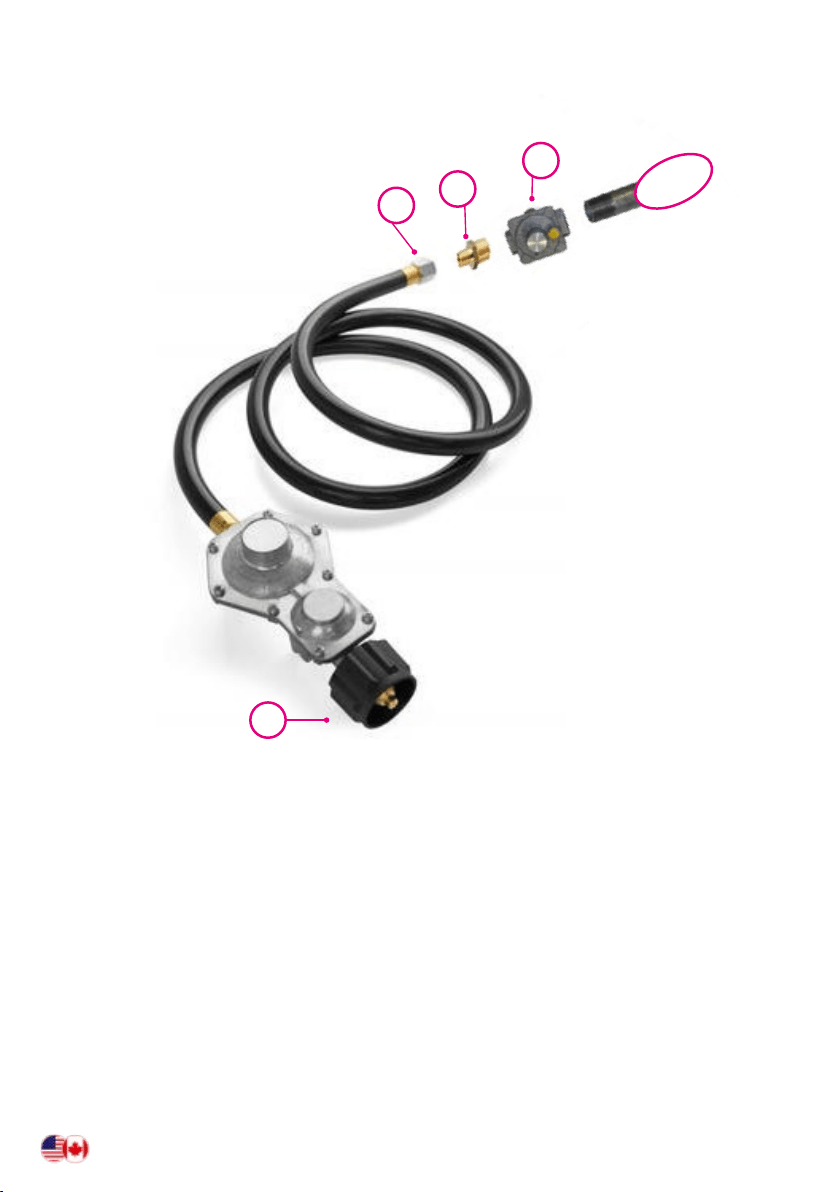
CONNECTION TO THE GAS CYLINDER
LPG CONNECTION
A(supplied)
E(supplied)
F1(supplied)
F2(supplied)
•
•
•
•
1
2
3
4
5
LPG
NATURAL
GAS
H G
A
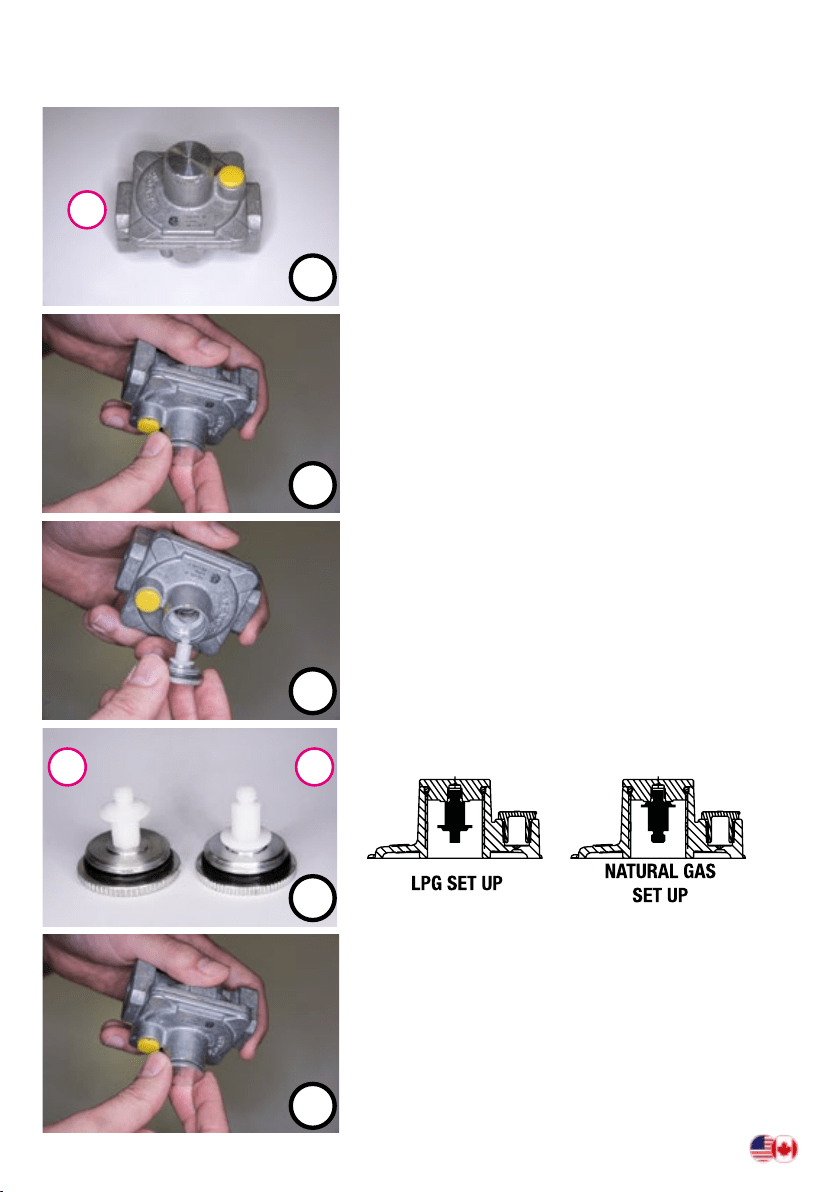
LPG / NG REGULATOR CONVERSION INSTRUCTIONS
1 - Begin by Converting the
Regulator to LPG
(H)
2 -
3 -
5 -
4 -
continue next page >>
12 13
F1
F2
OVEN
A
E
CONNECTION TO THE GAS CYLINDER
LPG CONNECTION
A(supplied)
E(supplied)
F1(supplied)
F2(supplied)
•
•
•
•
1
2
3
4
5
LPG
NATURAL
GAS
H G
A
LPG / NG REGULATOR CONVERSION INSTRUCTIONS
1 - Begin by Converting the
Regulator to LPG
(H)
2 -
3 -
5 -
4 -
continue next page >>
14 15
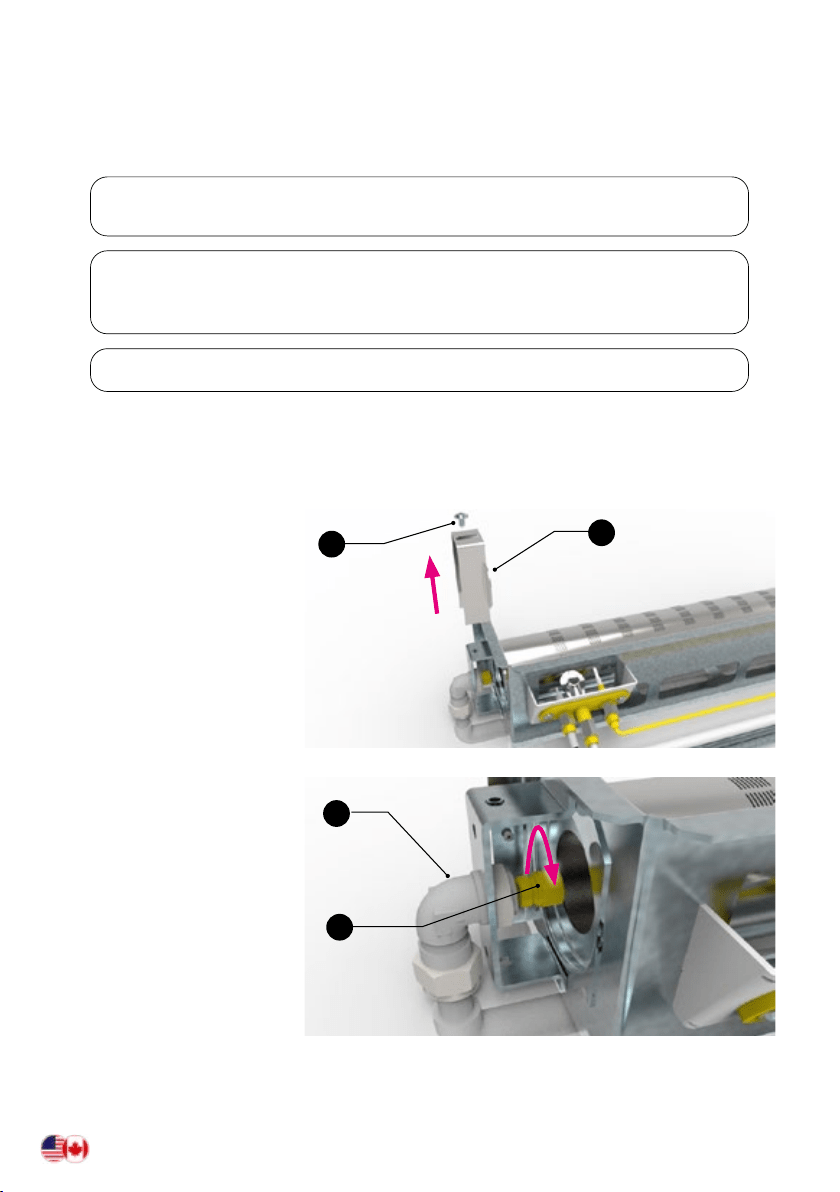
GAS ORIFICE AND PILOT SPUD CONVERSION
NATURAL GAS (NG) – LIQUID PROPANE GAS (LPG)
ONLY USE THE COMPONENTS AND
PARTS SUPPLIED WITH THE CONVERSION KIT
WARNING: The following conversion should be performed by authorized
professionals when the oven is completely cold. Improper installation,
adjustment, alteration can cause property damage or injury.
See next page for proper spud and orce component numbers
1 - GAS KIT DISASSEMBLY
Remove the gas kit
according to the
instructions in the
appropriate section of
the manual.
2 REPLACEMENT OF THE
MAIN GAS NOZZLE
Unscrew the xing screw
(a) and remove the plate (b)
covering the nozzle. Unfasten
the main nozzle (e) to the
holder screw (d) by using an
11 mm spanner. Replace the
nozzle with orice supplied
in the
kit and screw it back to the
holder (d). During these
operations, secure lock the
nozzle holder (d) to keep it
from rotating.
d
e
a
b
continue next page >>
3.1 REPLACEMENT OF THE PILOT
SPUD
Unscrew the xing screw (h) of the
pilot light tube..
3.2
Remove the tube (i) from the seat.
3.3
Remove the pilot nozzle ( j) from the
cone-like support (o) and replace
it with the spare component
supplied in the kit.
Reassemble everything following the
same steps in reverse order.
h
i
o
Following the conversion, apply the new label on the product and
check that the size of the nozzle corresponds to that shown on the label.
14 15
GAS ORIFICE AND PILOT SPUD CONVERSION
NATURAL GAS (NG) – LIQUID PROPANE GAS (LPG)
ONLY USE THE COMPONENTS AND
PARTS SUPPLIED WITH THE CONVERSION KIT
WARNING: The following conversion should be performed by authorized
professionals when the oven is completely cold. Improper installation,
adjustment, alteration can cause property damage or injury.
See next page for proper spud and orce component numbers
1 - GAS KIT DISASSEMBLY
Remove the gas kit
according to the
instructions in the
appropriate section of
the manual.
2 REPLACEMENT OF THE
MAIN GAS NOZZLE
Unscrew the xing screw
(a) and remove the plate (b)
covering the nozzle. Unfasten
the main nozzle (e) to the
holder screw (d) by using an
11 mm spanner. Replace the
nozzle with orice supplied
in the
kit and screw it back to the
holder (d). During these
operations, secure lock the
nozzle holder (d) to keep it
from rotating.
d
e
a
b
continue next page >>
3.1 REPLACEMENT OF THE PILOT
SPUD
Unscrew the xing screw (h) of the
pilot light tube..
3.2
Remove the tube (i) from the seat.
3.3
Remove the pilot nozzle ( j) from the
cone-like support (o) and replace
it with the spare component
supplied in the kit.
Reassemble everything following the
same steps in reverse order.
h
i
o
Following the conversion, apply the new label on the product and
check that the size of the nozzle corresponds to that shown on the label.

16 17
WARNING: Follow the instructions before turning on the oven.
- Do not use ammable liquids or other fuels to light the oven.
- Make sure that there are no ammable materials near the oven and that the
minimum safety distance is respected.
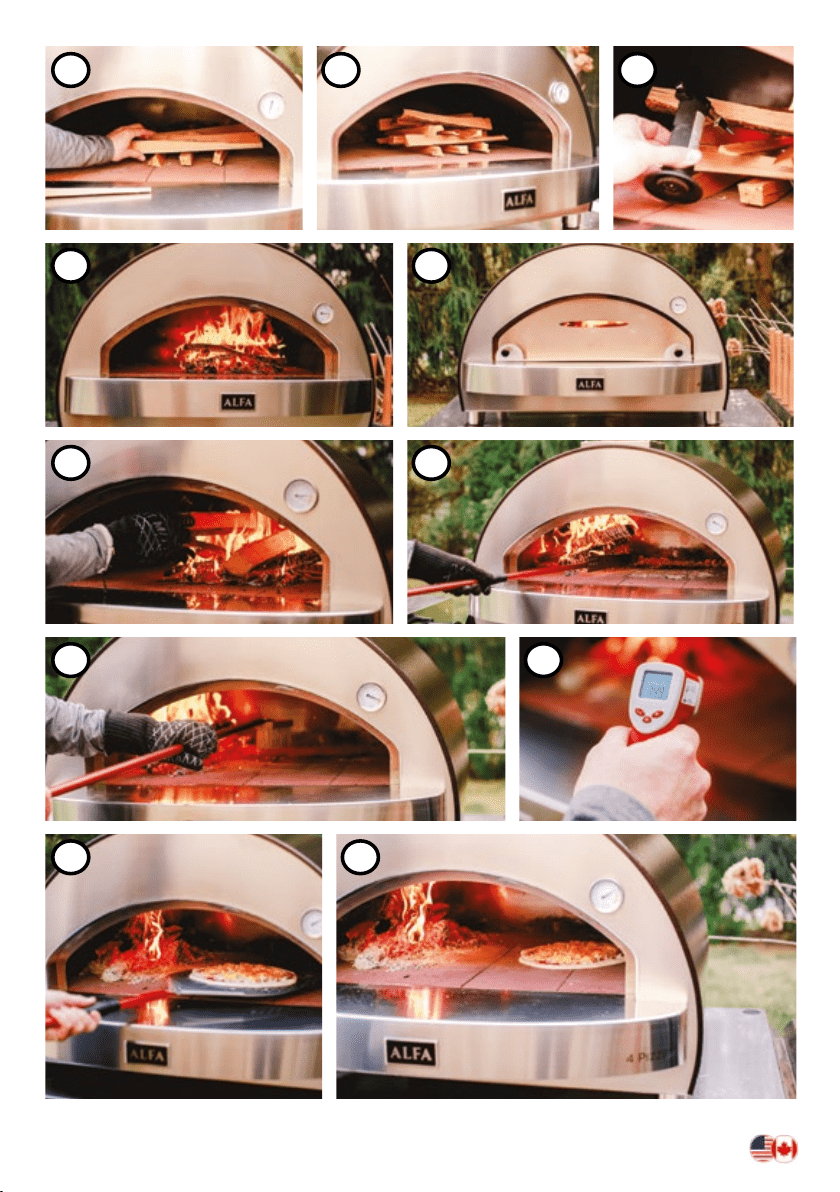
LIGHTING THE OVEN
ONLY FOR WOOD VERSION
1 - In the center of the oven or slightly right of center create a cross
stacked pile of ALFA Wood using smaller pieces. Include 2-3 QwikWik
brand or your favorite re-starters to help start the re quickly.
2 - Light the QwikWik restarters to ignite your initial cross stacked
wood pile in the oven
3 - After the wood is on re, replace the oven door on the oven
warming shelf leaving a small gap of 1-2 inches so air can enter the
oven and to help keep the re roaring. This helps keep the re in the
oven and heat the oven to your desired temperature faster.
4 - Slowly add larger wood logs to create a larger re. Do this for
about 15-20 minutes depending on the size of your oven. Larger ovens
can take longer to heat up. Do not put too much wood in at one time
and replace the door as noted in section 3 to help keep the ame inside
the oven.
5 - After you’ve built a nice re and hot bed of coals move them
to the left side of the oven with the help of the ember mover. The
re should be on the opposite side of the thermometer for the most
accurate oven chamber temp.
6 - Clean the refractory oor with the brush tool.
7 - Using a laser thermometer check the temperature of the
oven oor. You want it to be about 650°-750°F.
8 - When the oven oor is the right temperature you’re ready to
begin cooking your pizzas! Cook pizzas with the oven door off and feel
free to replace the oven door with the same gap for air as mentioned in
section 3 to keep heat and ame in the oven.
continue next page >>
1.1 1.2 2
3.1
3.2
4 5
6 7
8.1
8.2
continue next page >>
16 17
WARNING: Follow the instructions before turning on the oven.
- Do not use ammable liquids or other fuels to light the oven.
- Make sure that there are no ammable materials near the oven and that the
minimum safety distance is respected.
LIGHTING THE OVEN
ONLY FOR WOOD VERSION
1 - In the center of the oven or slightly right of center create a cross
stacked pile of ALFA Wood using smaller pieces. Include 2-3 QwikWik
brand or your favorite re-starters to help start the re quickly.
2 - Light the QwikWik restarters to ignite your initial cross stacked
wood pile in the oven
3 - After the wood is on re, replace the oven door on the oven
warming shelf leaving a small gap of 1-2 inches so air can enter the
oven and to help keep the re roaring. This helps keep the re in the
oven and heat the oven to your desired temperature faster.
4 - Slowly add larger wood logs to create a larger re. Do this for
about 15-20 minutes depending on the size of your oven. Larger ovens
can take longer to heat up. Do not put too much wood in at one time
and replace the door as noted in section 3 to help keep the ame inside
the oven.
5 - After you’ve built a nice re and hot bed of coals move them
to the left side of the oven with the help of the ember mover. The
re should be on the opposite side of the thermometer for the most
accurate oven chamber temp.
6 - Clean the refractory oor with the brush tool.
7 - Using a laser thermometer check the temperature of the
oven oor. You want it to be about 650°-750°F.
8 - When the oven oor is the right temperature you’re ready to
begin cooking your pizzas! Cook pizzas with the oven door off and feel
free to replace the oven door with the same gap for air as mentioned in
section 3 to keep heat and ame in the oven.
continue next page >>
1.1 1.2 2
3.1
3.2
4 5
6 7
8.1
8.2
continue next page >>

18 19
TURNING OFF
• To turn the oven off, close the oven door and wait for ash to form.
• When the re is out and the oven has been completely shut down
for 60 minutes or longer and you conrm the coals have cooled
down, you can remove the ashes into a re safe metal ash can.
• Never put hot coals or ashes on the ground, patio, deck or near
plants or trees.
DIFFERENT TYPES OF WOOD
• Use small sized wood pieces that are very dry for lighting.
• Treated wood, pine, resin or scrap woods are strictly prohibited.
• Wet or damp wood can be difcult to start and can pop due to the
increased volume of water. This will produce a lot of smoke and ash
and less than optimal heat and performance.
FOR YOUR SAFETY:
- Do not exceed the temperature limit of 1000°F / 500°C.
- Do not leave the oven unattended when the re is going.
- To keep constant temp, throw in small quantities of rewood at regular
intervals; do not keep adding more logs to avoid a dangerous rise in
temperature or ames spilling out of the oven that might damage people or
property.

20 21
WARNING: Follow the instructions before turning on the oven.
- Check all gas connections for gas leak before starting your oven.
- Use the proper PTFE gas piping tape for all threaded connections
- Do not lean over the oven when lighting. Keep your face and body at a safe
distance from the oven door.
- When lighting the oven, the oven door must be open.
- The burner control knob must be in the off position before turning on the
LGP cylinder valve.
- Do not move the oven while it is in use.
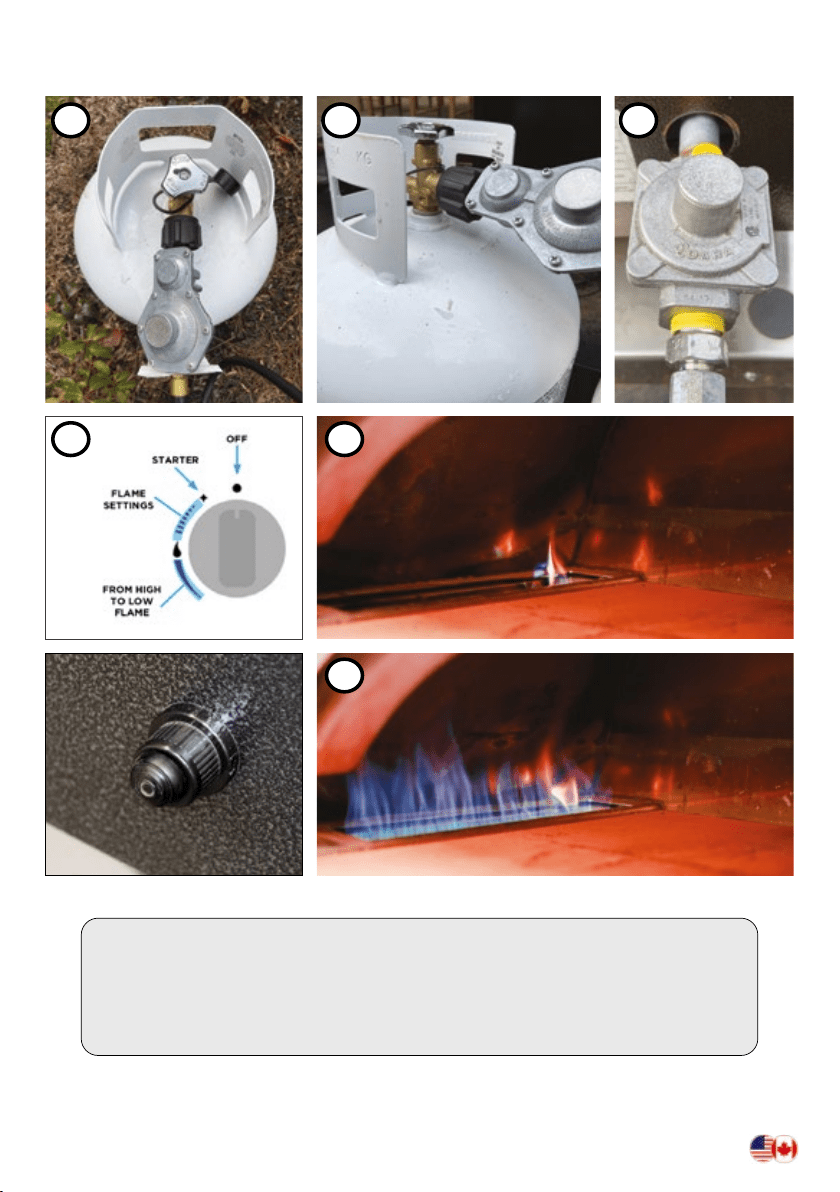
LIGHTING THE OVEN
ONLY FOR GAS VERSION
1 - Connect to 20lb. tank using supplied dual regulator hose or direct
connect to natural gas source. Make sure the burner stabilizer is connected
in the correct direction to the burner at the oven.
2 - Push IN the burner knob and turn it counter-clockwise to the star
symbol on the control panel.
3 - While KEEPING the burner knob pushed in, push the ignitor button
at the same time to light the burner pilot ame.
NOTE: Lighting the pilot ame for the rst time or after it has cooled
could take some time and possibly a few attempts due to air in the
supply line. Be patient as the gas makes its way to the pilot light.
4 - Once the pilot ame is lit properly you will see a small ame inside
(rear left corner) of the oven. You can now release the ignition button
BUT will need to KEEP the burner knob pushed in for 15 seconds. This will
ensure that the thermocouple is hot enough to allow the pilot ame to
stay on.
5 - Slowly release the burner knob and turn it counter- clockwise to the
larger dual ame symbol on the control panel.
The oven burner is now on high and you can start preheating the oven.
6 - Return oven door to warming shelf leaving 1-2” gap all the way
around the oven opening so air can enter the oven. Do repace oven door
tightly or the lack of air will force the ame to extinguish. Preheat oven for
45 minutes to allow the re bricks to get to pizza making temp. Using a
laser thermometer, check the oven oor temperature. You want the oor
to be 600°-700°F to make pizza.
FOR YOUR SAFETY:
- Do not close the door when the oven is lit with the ame at the maximum
position.
- Do not exceed the temperature limit of 1000°F / 500°C.
- Never disconnect the gas pipe or other ttings when using the oven.
continue next page >>
1.1 1.2
2 4
1.3
5
PUSH
20 21
WARNING: Follow the instructions before turning on the oven.
- Check all gas connections for gas leak before starting your oven.
- Use the proper PTFE gas piping tape for all threaded connections
- Do not lean over the oven when lighting. Keep your face and body at a safe
distance from the oven door.
- When lighting the oven, the oven door must be open.
- The burner control knob must be in the off position before turning on the
LGP cylinder valve.
- Do not move the oven while it is in use.
LIGHTING THE OVEN
ONLY FOR GAS VERSION
1 - Connect to 20lb. tank using supplied dual regulator hose or direct
connect to natural gas source. Make sure the burner stabilizer is connected
in the correct direction to the burner at the oven.
2 - Push IN the burner knob and turn it counter-clockwise to the star
symbol on the control panel.
3 - While KEEPING the burner knob pushed in, push the ignitor button
at the same time to light the burner pilot ame.
NOTE: Lighting the pilot ame for the rst time or after it has cooled
could take some time and possibly a few attempts due to air in the
supply line. Be patient as the gas makes its way to the pilot light.
4 - Once the pilot ame is lit properly you will see a small ame inside
(rear left corner) of the oven. You can now release the ignition button
BUT will need to KEEP the burner knob pushed in for 15 seconds. This will
ensure that the thermocouple is hot enough to allow the pilot ame to
stay on.
5 - Slowly release the burner knob and turn it counter- clockwise to the
larger dual ame symbol on the control panel.
The oven burner is now on high and you can start preheating the oven.
6 - Return oven door to warming shelf leaving 1-2” gap all the way
around the oven opening so air can enter the oven. Do repace oven door
tightly or the lack of air will force the ame to extinguish. Preheat oven for
45 minutes to allow the re bricks to get to pizza making temp. Using a
laser thermometer, check the oven oor temperature. You want the oor
to be 600°-700°F to make pizza.
FOR YOUR SAFETY:
- Do not close the door when the oven is lit with the ame at the maximum
position.
- Do not exceed the temperature limit of 1000°F / 500°C.
- Never disconnect the gas pipe or other ttings when using the oven.
continue next page >>
1.1 1.2
2 4
1.3
5
PUSH
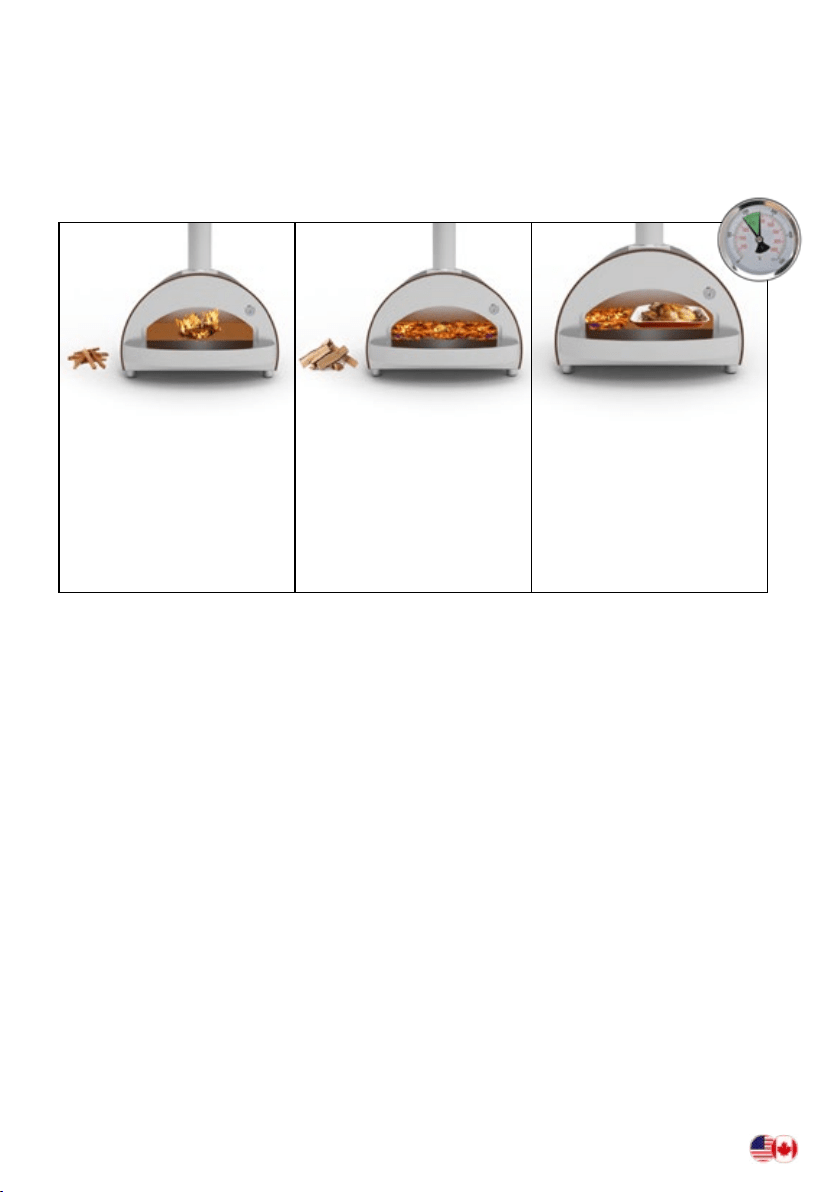
22 23
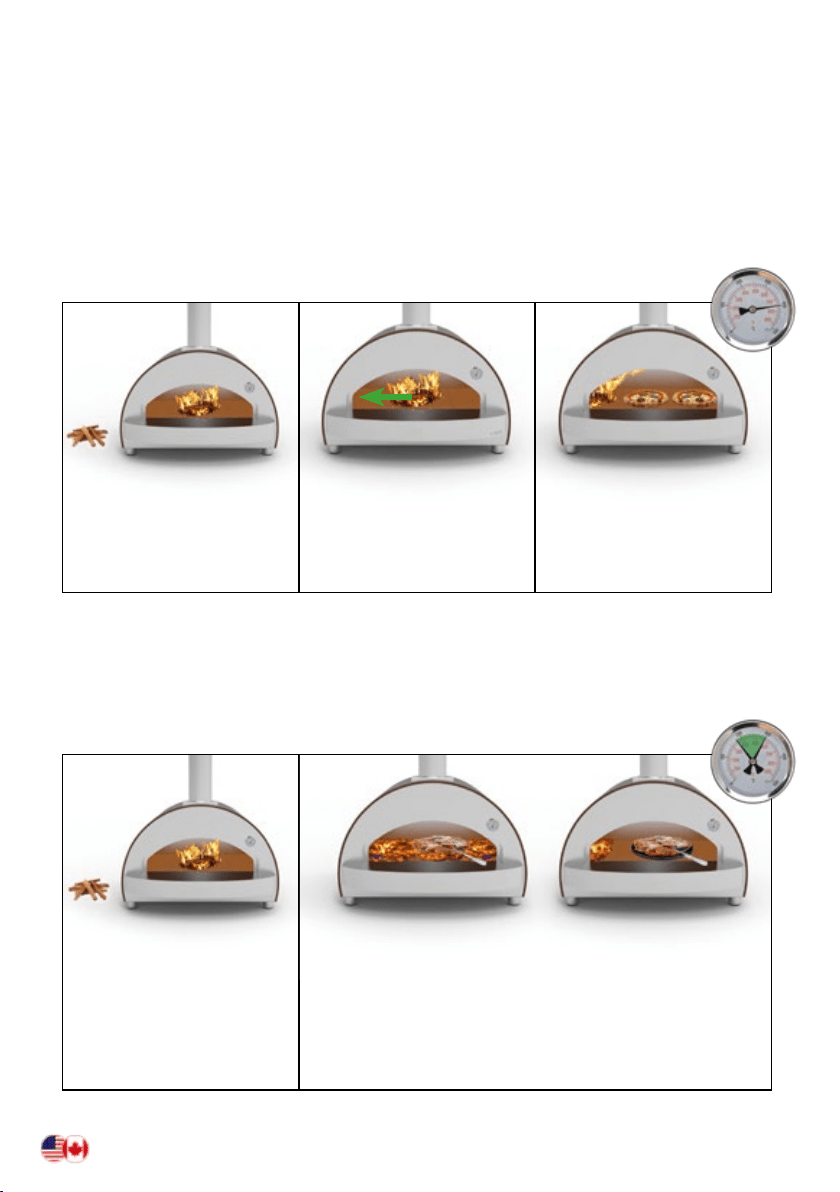
LIGHTING THE OVEN
- 1.1 For Neapolitan pizza
Pizza needs both ame and very hot sustained temperature (oor and dome).
Use small dry pieces of wood to start your re and control your ame and
temperature:
Start the re with small
pieces of wood in the center
of the oven oor.
After re has fully started
and burning thoroughly
move to the left side using
the wood or pizza turner
tools.
Continue to add wood as
needed (one or two pieces)
to keep temperature around
400°C (750°F).
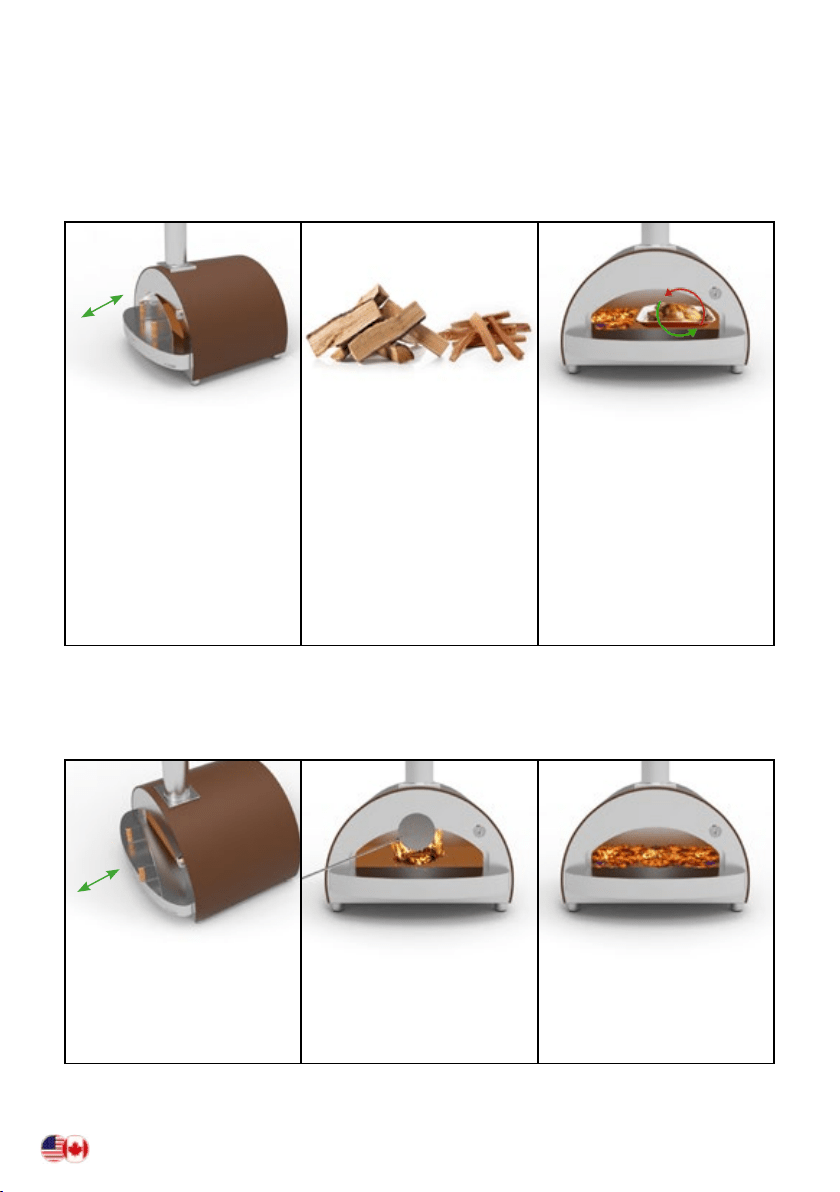
- 1.2 For grilling
Grilling uses more embers to get the smoke avor in the oven and less ame to
prevent burning. Larger pieces of wood or lump charcoal (not briquettes) can help
control temps.
Start the re with small
pieces of wood in the center
of the oven oor. Add larger
pieces of wood or lump
charcoal making sure to
keep the ame low unless
searing.
Wait for the oven temps to stabilize around 180°C (350°F),
a good temperature for grilling. Higher temps can be
achieved with more ame for searing.
1.3 For baking / tray
The stainless steel ovens are made to light up and increase temperature in a short
time and hold temps for extended periods of time.
Start the re with small
pieces of wood in the center
of the oven oor.
Add larger pieces of wood or
lump charcoal making sure
to have glowing embers and
no ame. Stabilizing your
oven around 180°C (350°F)
or your desired baking
temperature.
When 180°C (350°F) is
reached and at least 1/3 of
the cooking oor is full of
embers insert the tray or
the bread and close the
door. If temp lowers, insert
a small piece of wood or
lump charcoal, if temp rises
slightly open door (par.2)
SMOKE
- 2.1 Manage the smoke
Smoke can be desired for traditional barbecue but also can be to much for certain
foods and for the people that you are entertaining both taste wise and vision/smell
wise
1. Use dry wood (wet wood doesn’t burn well and makes smoke)
2. Try to keep the ame always on
3. If you have embers (no ame) insert a small piece of paper or starters and then
put a small piece of wood, paying attention to let the air enter among embers
and wood
4. To avoid the smoke do not use the door - more air enters, less smoke you’ll have
5. Place the oven strategically so smoke is manipulated to ow away from your
entertaining area the wind can affect smoke as wellespecially on an abnormally
breezy day
- 2.2 Looking for the smoke
For the people who want to cook with smoke we suggest to:
1. Try to close the door when the ame is on
2. Use big pieces of wood or lump charcoal
3. If the ame is high break the ame to produce embers (and then use the door
or big pieces of wood)
4. Incorporate a smoker box lled with soaked wood chips of desired avor
22 23
LIGHTING THE OVEN
- 1.1 For Neapolitan pizza
Pizza needs both ame and very hot sustained temperature (oor and dome).
Use small dry pieces of wood to start your re and control your ame and
temperature:
Start the re with small
pieces of wood in the center
of the oven oor.
After re has fully started
and burning thoroughly
move to the left side using
the wood or pizza turner
tools.
Continue to add wood as
needed (one or two pieces)
to keep temperature around
400°C (750°F).
- 1.2 For grilling
Grilling uses more embers to get the smoke avor in the oven and less ame to
prevent burning. Larger pieces of wood or lump charcoal (not briquettes) can help
control temps.
Start the re with small
pieces of wood in the center
of the oven oor. Add larger
pieces of wood or lump
charcoal making sure to
keep the ame low unless
searing.
Wait for the oven temps to stabilize around 180°C (350°F),
a good temperature for grilling. Higher temps can be
achieved with more ame for searing.
1.3 For baking / tray
The stainless steel ovens are made to light up and increase temperature in a short
time and hold temps for extended periods of time.
Start the re with small
pieces of wood in the center
of the oven oor.
Add larger pieces of wood or
lump charcoal making sure
to have glowing embers and
no ame. Stabilizing your
oven around 180°C (350°F)
or your desired baking
temperature.
When 180°C (350°F) is
reached and at least 1/3 of
the cooking oor is full of
embers insert the tray or
the bread and close the
door. If temp lowers, insert
a small piece of wood or
lump charcoal, if temp rises
slightly open door (par.2)
SMOKE
- 2.1 Manage the smoke
Smoke can be desired for traditional barbecue but also can be to much for certain
foods and for the people that you are entertaining both taste wise and vision/smell
wise
1. Use dry wood (wet wood doesn’t burn well and makes smoke)
2. Try to keep the ame always on
3. If you have embers (no ame) insert a small piece of paper or starters and then
put a small piece of wood, paying attention to let the air enter among embers
and wood
4. To avoid the smoke do not use the door - more air enters, less smoke you’ll have
5. Place the oven strategically so smoke is manipulated to ow away from your
entertaining area the wind can affect smoke as wellespecially on an abnormally
breezy day
- 2.2 Looking for the smoke
For the people who want to cook with smoke we suggest to:
1. Try to close the door when the ame is on
2. Use big pieces of wood or lump charcoal
3. If the ame is high break the ame to produce embers (and then use the door
or big pieces of wood)
4. Incorporate a smoker box lled with soaked wood chips of desired avor
24 25
USE THE DOOR AND SMALL PIECES OF WOOD TO STABILIZE
- 3.1 Stabilize the temperature
The wood red oven is designed to let the user choose the right temperature
depending on what they are cooking. Stabilizing the temperature is the biggest
challenge for the user but with experience it becomes much easier.
There are 3 elements designed to assist in Temperature stabilization:
- 3.2 Cool down the oven
The wood red oven is a machine that can easily reach temps over 500°C (1000°F)
but with no possibility to switch off (never use the water as it can cause the oven
oor re bricks to be damaged). We suggest doing these 3 actions:
Open the oven door
gradually keeping the
ame exiting through the
chimney ue, the more you
can open the more the oven
can cool down.
Use the pizza turner or
wood rake to break the re
and wood.
Spread the embers over the
cooking oor.
DOOR
DOOR
The Door (use the door
to control the internal
temperature, open more to
cool down and close more
to raise it up). Completely
Close to smother the re
The Fuel: Small pieces of
wood or lump charcoal
(once temperature is
consistent and stable ,
add small pieces of lump
coal or wood chunks to
maintain the desired
temperature and to avoid
either temperatures that are
too low or creating sudden
jolts of high temperatures or
ames)
Rotation -Control and
check distance of food from
the ame and embers to
prevent burning your meal
(closest to ame/embers is
the highest temperature)
Rotation is a key technique
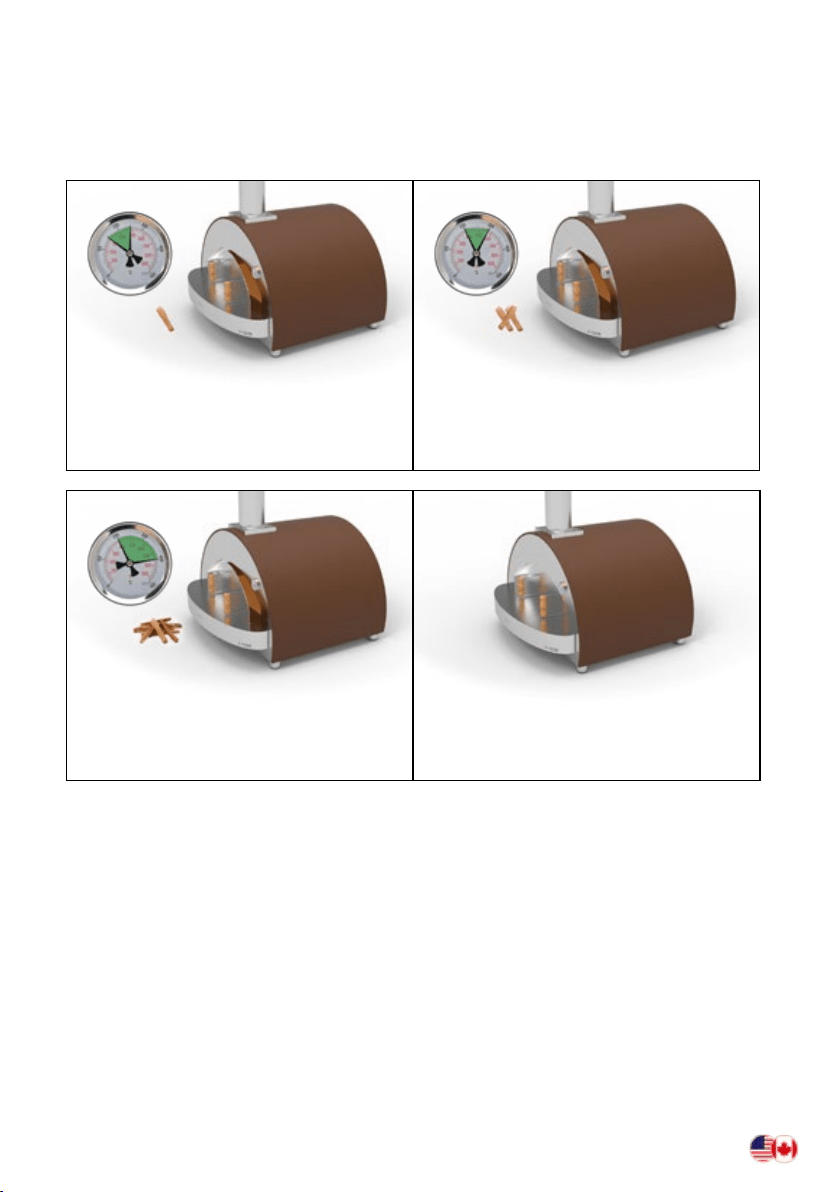
- 3.3 Raise the temperature up
The wood red oven is a machine that can also raise the temperature quickly, with
stainless steel dome oven, it’s simply and easy to do.
FROM 150°C (300°F) TO 250°C (480°F)
Insert 1 small piece of wood and close the
door partially on the opposite side of the
ame
FROM 200°C (400°F) TO 300°C (570°F)
Insert 2-3 small pieces of wood and leave
the door open to let the air enter
FROM 200°C (400°F) TO 400°C (750°F)
Insert 3-5 small pieces of wood and leave
the door open to let the air enter
RAISE 50°C (100°F)
Close the door and check the
temperature
24 25
USE THE DOOR AND SMALL PIECES OF WOOD TO STABILIZE
- 3.1 Stabilize the temperature
The wood red oven is designed to let the user choose the right temperature
depending on what they are cooking. Stabilizing the temperature is the biggest
challenge for the user but with experience it becomes much easier.
There are 3 elements designed to assist in Temperature stabilization:
- 3.2 Cool down the oven
The wood red oven is a machine that can easily reach temps over 500°C (1000°F)
but with no possibility to switch off (never use the water as it can cause the oven
oor re bricks to be damaged). We suggest doing these 3 actions:
Open the oven door
gradually keeping the
ame exiting through the
chimney ue, the more you
can open the more the oven
can cool down.
Use the pizza turner or
wood rake to break the re
and wood.
Spread the embers over the
cooking oor.
DOOR
DOOR
The Door (use the door
to control the internal
temperature, open more to
cool down and close more
to raise it up). Completely
Close to smother the re
The Fuel: Small pieces of
wood or lump charcoal
(once temperature is
consistent and stable ,
add small pieces of lump
coal or wood chunks to
maintain the desired
temperature and to avoid
either temperatures that are
too low or creating sudden
jolts of high temperatures or
ames)
Rotation -Control and
check distance of food from
the ame and embers to
prevent burning your meal
(closest to ame/embers is
the highest temperature)
Rotation is a key technique
- 3.3 Raise the temperature up
The wood red oven is a machine that can also raise the temperature quickly, with
stainless steel dome oven, it’s simply and easy to do.
FROM 150°C (300°F) TO 250°C (480°F)
Insert 1 small piece of wood and close the
door partially on the opposite side of the
ame
FROM 200°C (400°F) TO 300°C (570°F)
Insert 2-3 small pieces of wood and leave
the door open to let the air enter
FROM 200°C (400°F) TO 400°C (750°F)
Insert 3-5 small pieces of wood and leave
the door open to let the air enter
RAISE 50°C (100°F)
Close the door and check the
temperature
26 27
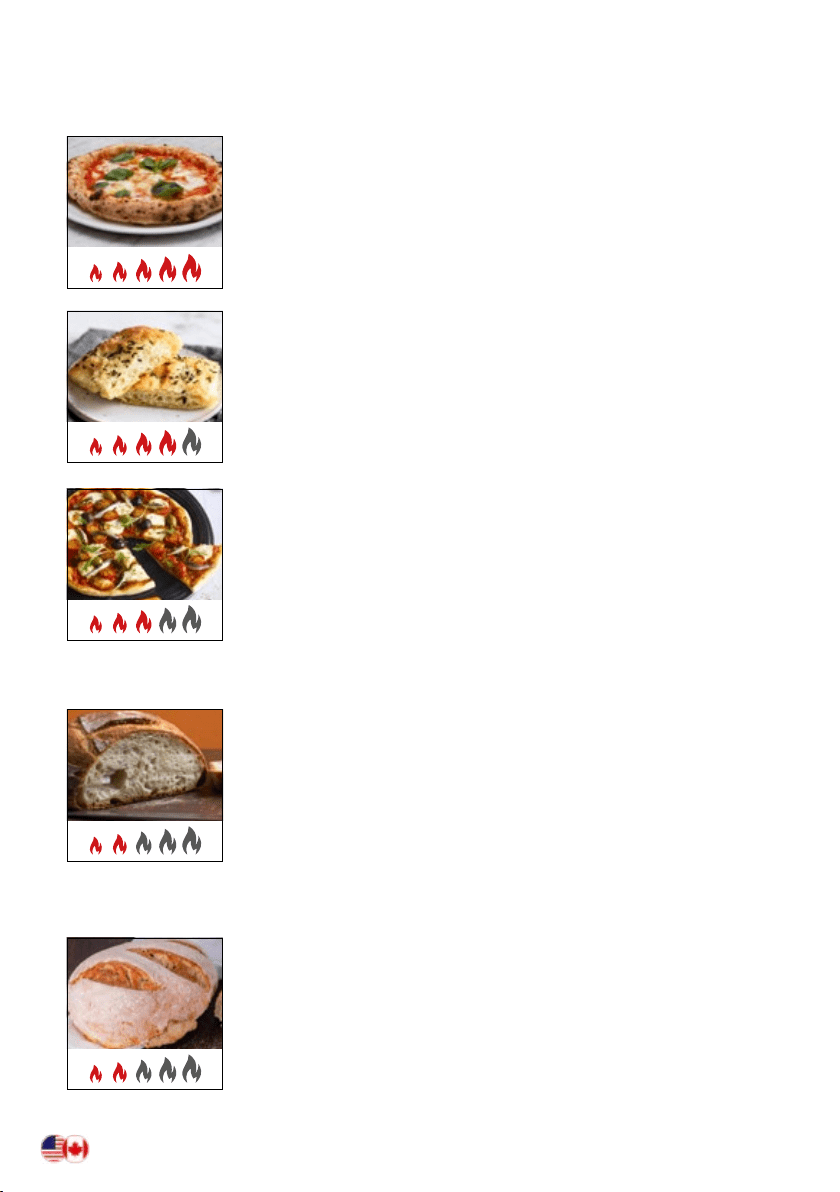
- 4.1 Flame and cooking oor for Neapolitan pizza
The ame for the Neapolitan Pizza has to be strong. Use laser
thermometer to measure the temperature of the oven oor. The
ambient and oven oor temps should both be about 700°F. The
ame should go across the top of the dome ceiling in the oven.
- 4.2 Flame for roman and focaccia pizza
The focaccia (also called roman pizza) needs lower temperature
than Neapolitan pizza. Reaching lower temperatures of around
500°F is easy: you need a small ame that reaches the highest point
of the dome.
- 4.3 Deep Dish Pizza/Detroit Style Pizza
Pizza in a tray/pan is made for more toppings and a thicker pan
crust. Cast Iron, stainless steel or mixed-use heavy trays are
recommended. The cooking process for this method of pizza
making is slower and lower temperature around 350°F, giving the
crust and bottom of the pizza time to fully bake. It is recommended
to use aluminum foil on top during the cook so the top of the pizza
does not burn. It can be removed at the very end when pizza is
nished to brown the top.
- 4.4 Small bread (rest of the pizza dough)
It is common to have some leftovers when you make many dough
balls. We suggest freezing them. Otherwise, you can give them as
a present to your party guests and cook for them before they go.
Put a small piece of wood, close the door partially and reach 450°F.
Stretch to lengthen the dough, put the oil on top and place it on the
cooking oor; after 15 minutes your bread should be ready. Do not
cut it till it gets cold (we know the smell will attract you so much).
- 4.5 Big bread (rest of the pizza dough)
If you want to cook a larger loaf of bread (at least 4 pizza
dough, 1 Kg) you want to have lot of embers. With temperature
approximately 400°F and the cooking oor is around 400°F you can
insert the bread dough. We suggest closing the door and checking
the temperature every 5-10 minutes. The oven should cool down to
325°F in one hour and the bread should be ready (do not cut it till it’s
cold).
FLAME INTENSITY, COOKING FLOOR AND TEMPERATURE
TIPS TO ORGANIZE A PIZZA PARTY
- 5.1 How many people there are at the party?
You can organize parties from 3 to 100 people, just don’t panic and remember some
small tips:
1. If less than 10 people you can make a more sophisticated menu (many different
kinds of pizza); if more people we suggest being really focused on basic Neapolitan
pizza and minimal toppings
2. We usually count 1-2 10” pizzas for each guest (then 250-300 grams of our each)
3. Always keep in mind your guests: if they have any special requirements or food
allergies you need to plan in your menu
4. You can include appetizers to let people eating while waiting and give to the oven
maestro enough time to get everything ready
- 5.2 Am I alone or do I have any assistant at the party?
When you organize a pizza party with more than 10 guests, we suggest you to have an
assistant to help with your preparations or cooking.
1. Fire up and take care of the oven
2. Cut all the pizza ingredients
3. Set up the table
- 5.3 Weeknights after work?
If you are hosting the party during weekdays with a better need to organize your time.
The ALFA oven is ready to cook 30 minutes! We suggest making the pizza dough 1-2
days ahead of the party. You can also make the pizza dough weeks before and freeze
the dough balls. Remember to take it out from the freezer 24-48 hours before your
event and slow thaw in the fridge. Remove dough immediately when home as its
necessary for the pizza dough to acclimate to room temperature, usually 1-2 hours.
- 5.4 Make your party unforgettable! Include your guests in the
party — let them make pizza!
During the pizza party people love to be involved, so keep in mind they can be your
assistants. Teach your friends, family and guests to enjoy the ALFA Oven just like you
do. Cutting nished pizzas, adding fresh toppings and taking care of the oven… but
most of all they love to stretch pizzas and make their own special pizza like the oven
maestro does. Stretching the pizza will be the funniest game for adults and children,
let’s try! Cooking pizzas for friends, family and guests is all about the lifestyle and
entertaining. Talk, cook, have a drink and most of all HAVE FUN!

26 27
- 4.1 Flame and cooking oor for Neapolitan pizza
The ame for the Neapolitan Pizza has to be strong. Use laser
thermometer to measure the temperature of the oven oor. The
ambient and oven oor temps should both be about 700°F. The
ame should go across the top of the dome ceiling in the oven.
- 4.2 Flame for roman and focaccia pizza
The focaccia (also called roman pizza) needs lower temperature
than Neapolitan pizza. Reaching lower temperatures of around
500°F is easy: you need a small ame that reaches the highest point
of the dome.
- 4.3 Deep Dish Pizza/Detroit Style Pizza
Pizza in a tray/pan is made for more toppings and a thicker pan
crust. Cast Iron, stainless steel or mixed-use heavy trays are
recommended. The cooking process for this method of pizza
making is slower and lower temperature around 350°F, giving the
crust and bottom of the pizza time to fully bake. It is recommended
to use aluminum foil on top during the cook so the top of the pizza
does not burn. It can be removed at the very end when pizza is
nished to brown the top.
- 4.4 Small bread (rest of the pizza dough)
It is common to have some leftovers when you make many dough
balls. We suggest freezing them. Otherwise, you can give them as
a present to your party guests and cook for them before they go.
Put a small piece of wood, close the door partially and reach 450°F.
Stretch to lengthen the dough, put the oil on top and place it on the
cooking oor; after 15 minutes your bread should be ready. Do not
cut it till it gets cold (we know the smell will attract you so much).
- 4.5 Big bread (rest of the pizza dough)
If you want to cook a larger loaf of bread (at least 4 pizza
dough, 1 Kg) you want to have lot of embers. With temperature
approximately 400°F and the cooking oor is around 400°F you can
insert the bread dough. We suggest closing the door and checking
the temperature every 5-10 minutes. The oven should cool down to
325°F in one hour and the bread should be ready (do not cut it till it’s
cold).
FLAME INTENSITY, COOKING FLOOR AND TEMPERATURE
TIPS TO ORGANIZE A PIZZA PARTY
- 5.1 How many people there are at the party?
You can organize parties from 3 to 100 people, just don’t panic and remember some
small tips:
1. If less than 10 people you can make a more sophisticated menu (many different
kinds of pizza); if more people we suggest being really focused on basic Neapolitan
pizza and minimal toppings
2. We usually count 1-2 10” pizzas for each guest (then 250-300 grams of our each)
3. Always keep in mind your guests: if they have any special requirements or food
allergies you need to plan in your menu
4. You can include appetizers to let people eating while waiting and give to the oven
maestro enough time to get everything ready
- 5.2 Am I alone or do I have any assistant at the party?
When you organize a pizza party with more than 10 guests, we suggest you to have an
assistant to help with your preparations or cooking.
1. Fire up and take care of the oven
2. Cut all the pizza ingredients
3. Set up the table
- 5.3 Weeknights after work?
If you are hosting the party during weekdays with a better need to organize your time.
The ALFA oven is ready to cook 30 minutes! We suggest making the pizza dough 1-2
days ahead of the party. You can also make the pizza dough weeks before and freeze
the dough balls. Remember to take it out from the freezer 24-48 hours before your
event and slow thaw in the fridge. Remove dough immediately when home as its
necessary for the pizza dough to acclimate to room temperature, usually 1-2 hours.
- 5.4 Make your party unforgettable! Include your guests in the
party — let them make pizza!
During the pizza party people love to be involved, so keep in mind they can be your
assistants. Teach your friends, family and guests to enjoy the ALFA Oven just like you
do. Cutting nished pizzas, adding fresh toppings and taking care of the oven… but
most of all they love to stretch pizzas and make their own special pizza like the oven
maestro does. Stretching the pizza will be the funniest game for adults and children,
let’s try! Cooking pizzas for friends, family and guests is all about the lifestyle and
entertaining. Talk, cook, have a drink and most of all HAVE FUN!
28 29
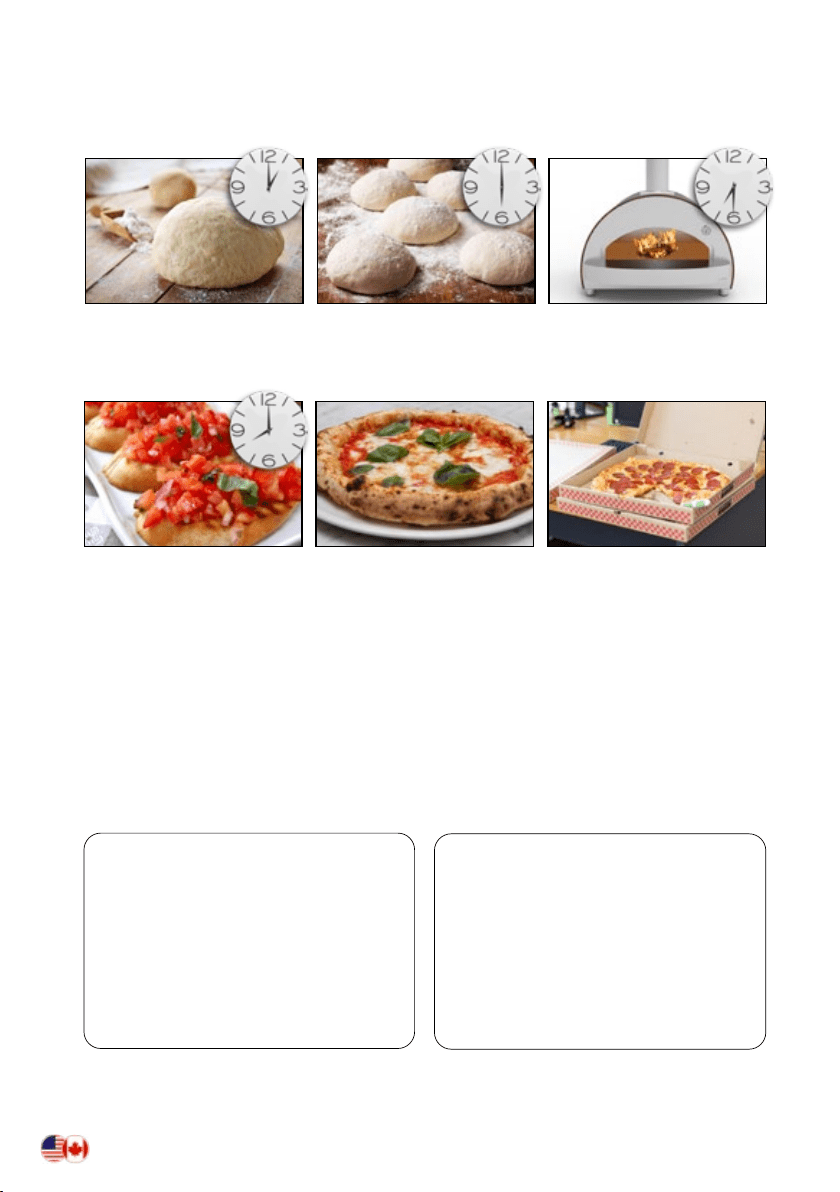
YOUR TO-DO LIST FOR A PERFECT PIZZA PARTY
(WITH BRUSCHETTA)
“Everytime friends organize a pizza
party I try to stay away from the
cooking stage: but the oven at-
tracts me too much. All the parties
nish in the same way: me, enjoy-
ing that time using the Alfa oven.”
— Marcello Ortuso, founder
Make the pizza dough well
in advance before the party*
Prepare the dough balls in
room temperature 1 to 2
hours before the party*
Light up the oven 30
minutes before and in
the meantime cut the
ingredients
Cook some bruschettas
(with tomatoes and basil
on top) while waiting for
the oven to reach the
temperature
Start the pizza party, using
your imagination to invent
original pizzas
Finish the party giving
people the leftover dough
or cooked pizzas!
*These timings depend on the season and the outside temperature: in Summer can be
lower; in Winter you will need to nd the hottest room of your house to wait for the pizza
dough to raise.
“Cooking with a wood red oven
is to celebrate our roots, where we
come from, what we love more,
spending time with our families
and friends, smelling a wonderful
perfume of our, meat and wood. I
think there is no any better emotion
we can enjoy in life.”
— Rocco Lauro founder
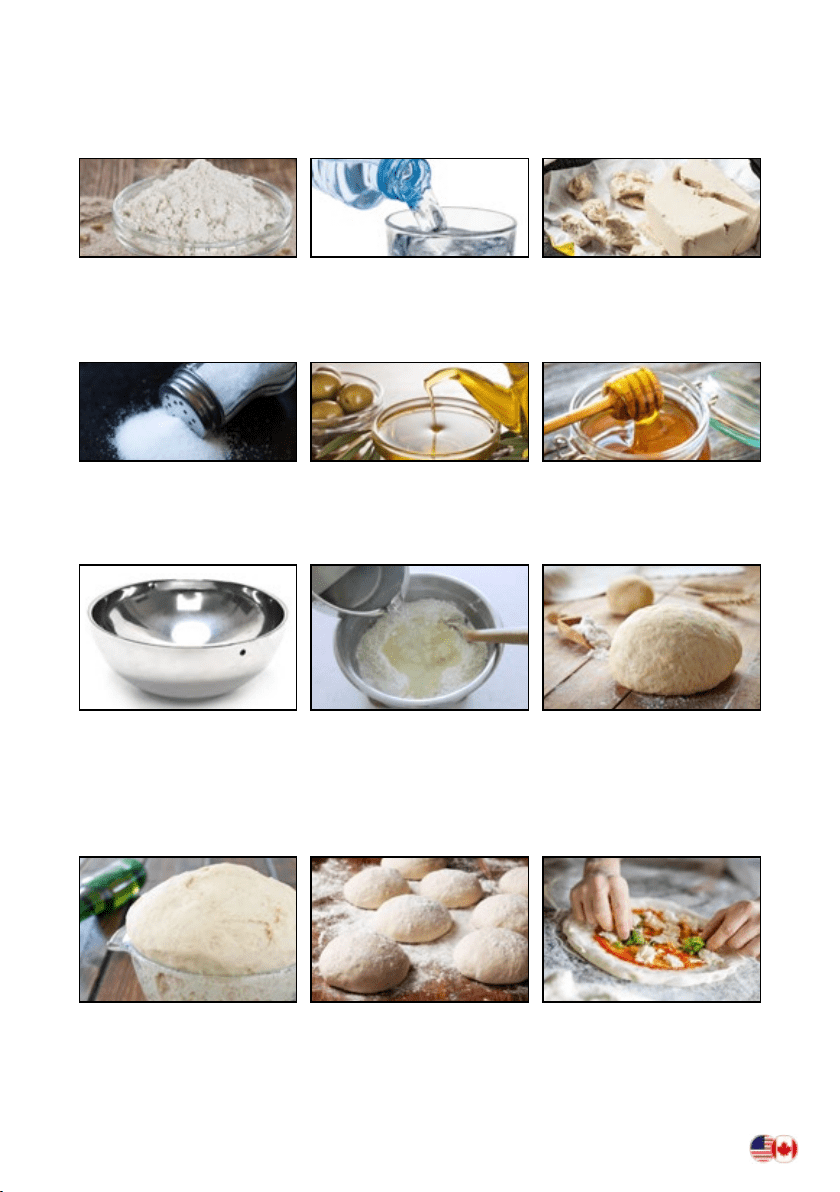
ALFA SPECIAL RECIPE FOR THE PERFECT PIZZA DOUGH
Recipe for 5 medium or 4 big pizzas
Flour: 1 Kg (look for an
Italian brand: “5 Stagioni”
or “Caputo” are the most
famous in the States)
Water: 630 grams or ml
(we suggest to use a good
mineral water)
Brewer Yeast (not dried):
quantity depends on the
weather - 1gr and 6h if in
Summer, 3gr and 24 hour if
in Winter
Salt: 30 gr Oil: a spoon or more if you like
a softer dough; we suggest
Italian cold pressed oil.
Honey or malt: a spoon
INGREDIENTS
PREPARATION
You start from putting all
the warm water in a bowl.
Then you take the oil, the
yeast and the honey and
you melt them together.
Then you take half our
and you mix it till it gets a
cream.
Then you put salt and other
50% of our and mix till you
can see a smooth dough
(the secret to make it really
smooth is to leave it resting
for 5 minutes while you’re
pulling the dough).
You wait till the dough has
raised 2-3 times its original
volume (we always choose
the coldest place in the
house during the Summer;
if it’s really hot you can put
it in the fridge).
Then you cut it with a knife
and you make dough balls
(around 250-300 grams
each).
You wait till they have raised
again and then you just
have to enjoy! We suggest
semolina our to stretch
the dough.
28 29
YOUR TO-DO LIST FOR A PERFECT PIZZA PARTY
(WITH BRUSCHETTA)
“Everytime friends organize a pizza
party I try to stay away from the
cooking stage: but the oven at-
tracts me too much. All the parties
nish in the same way: me, enjoy-
ing that time using the Alfa oven.”
— Marcello Ortuso, founder
Make the pizza dough well
in advance before the party*
Prepare the dough balls in
room temperature 1 to 2
hours before the party*
Light up the oven 30
minutes before and in
the meantime cut the
ingredients
Cook some bruschettas
(with tomatoes and basil
on top) while waiting for
the oven to reach the
temperature
Start the pizza party, using
your imagination to invent
original pizzas
Finish the party giving
people the leftover dough
or cooked pizzas!
*These timings depend on the season and the outside temperature: in Summer can be
lower; in Winter you will need to nd the hottest room of your house to wait for the pizza
dough to raise.
“Cooking with a wood red oven
is to celebrate our roots, where we
come from, what we love more,
spending time with our families
and friends, smelling a wonderful
perfume of our, meat and wood. I
think there is no any better emotion
we can enjoy in life.”
— Rocco Lauro founder
ALFA SPECIAL RECIPE FOR THE PERFECT PIZZA DOUGH
Recipe for 5 medium or 4 big pizzas
Flour: 1 Kg (look for an
Italian brand: “5 Stagioni”
or “Caputo” are the most
famous in the States)
Water: 630 grams or ml
(we suggest to use a good
mineral water)
Brewer Yeast (not dried):
quantity depends on the
weather - 1gr and 6h if in
Summer, 3gr and 24 hour if
in Winter
Salt: 30 gr Oil: a spoon or more if you like
a softer dough; we suggest
Italian cold pressed oil.
Honey or malt: a spoon
INGREDIENTS
PREPARATION
You start from putting all
the warm water in a bowl.
Then you take the oil, the
yeast and the honey and
you melt them together.
Then you take half our
and you mix it till it gets a
cream.
Then you put salt and other
50% of our and mix till you
can see a smooth dough
(the secret to make it really
smooth is to leave it resting
for 5 minutes while you’re
pulling the dough).
You wait till the dough has
raised 2-3 times its original
volume (we always choose
the coldest place in the
house during the Summer;
if it’s really hot you can put
it in the fridge).
Then you cut it with a knife
and you make dough balls
(around 250-300 grams
each).
You wait till they have raised
again and then you just
have to enjoy! We suggest
semolina our to stretch
the dough.
30 31
BASIC 24 HOUR PIZZA DOUGH
- Initial fermentation 20 minutes covered room temperature
- Bulk fermentation 2 hours covered room temperature
- Divide, shape and cover dough 10 minutes
- Second fermentation 24 to 48 hours refrigerated
- Sample Schedule: Mix the dough at 5PM, shape into dough balls at 7PM, cover
and refrigerate. Make pizza the next evening (optimal) or the day after that (still
very good)
1. Measure and Combine the Ingredients: Using your digital scale, measure 300
grams of 90° to 95°F (32° to 35°C) water into a 6-quart dough bowl. Measure
12 grams of ne Mediterranean Sea Salt, add it to the water, and stir or swish
around in the tub until it’s dissolved. Measure 1.5 grams of instant dried yeast.
Add the yeast to the water, let it rest there for a minute to hydrate, then swish it
around until dissolved. Add 500 grams of our (preferably 50/50 mix of Caputo
00 Pizza and Chefs our) to the water-salt- yeast mixture.
2. Mixing the Dough: Mix by hand, rst by stirring your hand around inside the
dough tub to integrate the our, water, salt and yeast into a single mass of
dough. Continue for just about a minute or two. The target dough temperature
at the end of the mix is 80°F (27°C); use your probe thermometer to check it.
3. Knead and First Rise: Let the dough rest for 20 minutes, then knead it on a work
it on a hard surface with a very light dusting of our for about 2 to 3 minutes.
The skin of the dough should be very smooth. Place the large dough ball, seam
side down, in a lightly oiled proong box or bowl. Cover with a tight tting lid or
plastic wrap. Let the dough rest for 2 hours at room temperature (assuming 70°
to 74°F/21° to 23°C) for the initial rise.
4. Shape and Divide into Dough Balls: Moderately our your work surface about
2 feet wide. With oured hands, gently ease the dough onto the oured work
surface. With your hands still oured, pick up the dough and ease it back down
onto the work surface in a somewhat even shape. Dust the entire top of the
dough with our, then cut it into 3, 4 or 5 equal-sized pieces, depending on the
size of pizzas you want to make, using your scale to get evenly sized dough balls.
Shape each piece of dough into a medium-tight round balls.
5. Final Fermentation: Put the dough balls, seam side down back into your lightly
oiled proong box, leaving space between them to allow for expansion. Lightly
our the tops and tightly cover with lid plastic wrap if using separate bowls and
put them into the refrigerator. Refrigerate until ready to make pizza, either the
next evening (24 hours ideal) or the day after (still good).
6. Time to make the Pizza!: Remove the dough balls from the fridge 2–3– 4 hours
before making pizza. This timing all depends on your room temperature. The
dough should be at room temperature (about 72°F) when you are ready to cook
the pizzas.
SOURDOUGH RECIPE
Use high-protein, unbleached our (bread our) — if you want to change to 00 our
then also drop hydration down to 60-62%
• 65%hydration • 25% sourdough starter • 2%salt
1. Mix/dissolve the starter into the (room temp) water
2. Add salt
3. Mix in our until it forms a shaggy ball, cover with plastic- wrap and allow to rest
for 20 minutes.
4. On oured surface, stretch and fold for 2-3 minutes (to develop gluten structure)
form a ball and place in a lightly-oiled container and cover with plastic wrap.
Allow to rest at room temp for 2 hours and then place in refrigerator for 24-48
hours.
5. On baking day, remove from refrigerator, form into balls, cover and allow to
come up to room temp (4-5 hours) and bake your pizzas.

32 33
1 - PYROLYSIS CLEANING OF THE OVEN CHAMBER AND
COOKING FLOOR.
The ALFA oven can be cleaned by the re itself through a
process called “pyrolysis” (pyro “re” + lysis “separating”).
The processes involved in charring wood and it has a
function of thermal cleaning, which removes organic
substances from products or production components.
During the thermal cleaning process, organic material is
converted by pyrolysis and oxidation into volatile organic
compounds, hydrocarbons and carbonized gas. Inorganic
elements remain. To clean the oven with pyrolysis we suggest to keep the temperature
above 425°C / 800°F for 5 minutes. You can also spread the hot coals from your cook across
the re brick oven oor. They will burn off any particles or residue that may have been
leftover from your cook.
REGULAR MAINTENANCE
CALENDAR MAINTENANCE
CLEANING TIME SCHEDULE
1 Combustion chamber Daily - Every use
2 Cooking oor Daily - Every use
3 Oven outside Weekly
4 Stainless-steel parts Weekly
5 Steel protection Monthly
6 Burner Monthly
7 Rust spots Yearly
8 Nozzles Biennually
2 - CLEAN THE COOKING FLOOR BEFORE COOKING.
After the oven has completely cooled down (usually next
day) you can remove the cold ashes away from the oven.
(ALWAYS to use a re resistant bin to hold the used ashes).
When you are 100% certain the ashes are cold you can
put them in an ash pan or you can also use the ashes as
a fertilizer for your plants/garden. Periodically you can
remove the rebricks and vacuum the ashes from the
holes of the cooking oor with an outdoor shop vac.
3 - CLEANING THE OUTSIDE OF THE OVEN.
Never use abrasive products on powder coated surfaces.
Like all 304 stainless & powder coated products, these
are built to withstand and resists many environments
including coastal salt marine, however will need regular
care and maintenance. Wash with a soft cloth and a
solution of soap and water or use a cleaning solution
mixture you can easily clean the powder coated parts of
the oven.
In addition, you can us a mix of 50/50 Baking Soda and
Dish Washing liquid detergent on the stainless steel. With scouring side of sponge, scrub
WITH THE GRAIN of the stainless steel and rinse with clean water.
PROTECTIVE MAINTENANCE
We also recommend both Barry’s Restore It All or Bar Keepers Friend
products for cleaning ALFA Stainless Steel Surfaces
www.barrysrestoreitall.com
www.barkeepersfriend.com
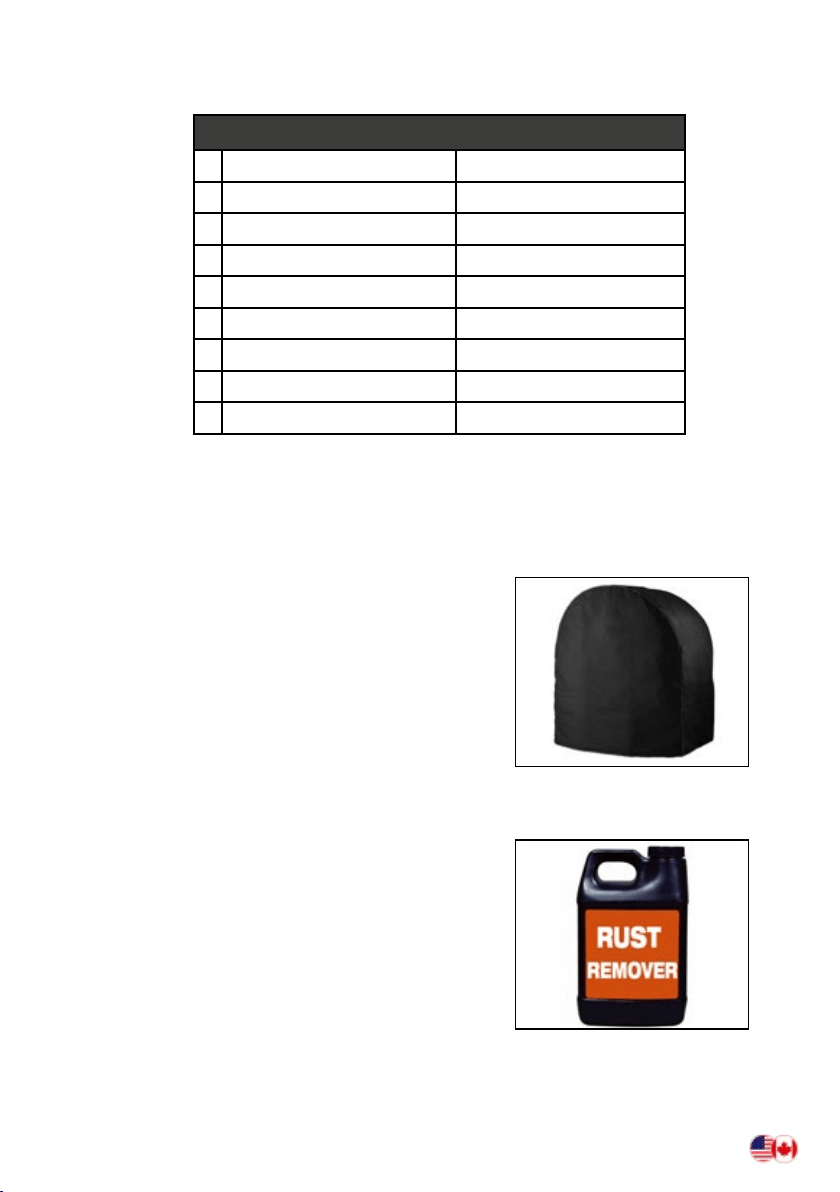
1 - COVER YOUR OVEN.
ALFA makes covers for all ovens.
Make sure you protect your investment by covering
your oven with an ALFA Ovens branded cover!
2 - EVERY 1-2 YEARS - CLEAN MINOR RUST
SPOTS
304 Stainless steel is rust-proof but in some case
(humidity, sea salt, etc.) some rust spots may
appear. You can use a rust remover to get your
stainless steel perfect again. your oven with an
ALFA Ovens branded cover!
32 33
1 - PYROLYSIS CLEANING OF THE OVEN CHAMBER AND
COOKING FLOOR.
The ALFA oven can be cleaned by the re itself through a
process called “pyrolysis” (pyro “re” + lysis “separating”).
The processes involved in charring wood and it has a
function of thermal cleaning, which removes organic
substances from products or production components.
During the thermal cleaning process, organic material is
converted by pyrolysis and oxidation into volatile organic
compounds, hydrocarbons and carbonized gas. Inorganic
elements remain. To clean the oven with pyrolysis we suggest to keep the temperature
above 425°C / 800°F for 5 minutes. You can also spread the hot coals from your cook across
the re brick oven oor. They will burn off any particles or residue that may have been
leftover from your cook.
REGULAR MAINTENANCE
CALENDAR MAINTENANCE
CLEANING TIME SCHEDULE
1 Combustion chamber Daily - Every use
2 Cooking oor Daily - Every use
3 Oven outside Weekly
4 Stainless-steel parts Weekly
5 Steel protection Monthly
6 Burner Monthly
7 Rust spots Yearly
8 Nozzles Biennually
2 - CLEAN THE COOKING FLOOR BEFORE COOKING.
After the oven has completely cooled down (usually next
day) you can remove the cold ashes away from the oven.
(ALWAYS to use a re resistant bin to hold the used ashes).
When you are 100% certain the ashes are cold you can
put them in an ash pan or you can also use the ashes as
a fertilizer for your plants/garden. Periodically you can
remove the rebricks and vacuum the ashes from the
holes of the cooking oor with an outdoor shop vac.
3 - CLEANING THE OUTSIDE OF THE OVEN.
Never use abrasive products on powder coated surfaces.
Like all 304 stainless & powder coated products, these
are built to withstand and resists many environments
including coastal salt marine, however will need regular
care and maintenance. Wash with a soft cloth and a
solution of soap and water or use a cleaning solution
mixture you can easily clean the powder coated parts of
the oven.
In addition, you can us a mix of 50/50 Baking Soda and
Dish Washing liquid detergent on the stainless steel. With scouring side of sponge, scrub
WITH THE GRAIN of the stainless steel and rinse with clean water.
PROTECTIVE MAINTENANCE
We also recommend both Barry’s Restore It All or Bar Keepers Friend
products for cleaning ALFA Stainless Steel Surfaces
www.barrysrestoreitall.com
www.barkeepersfriend.com
1 - COVER YOUR OVEN.
ALFA makes covers for all ovens.
Make sure you protect your investment by covering
your oven with an ALFA Ovens branded cover!
2 - EVERY 1-2 YEARS - CLEAN MINOR RUST
SPOTS
304 Stainless steel is rust-proof but in some case
(humidity, sea salt, etc.) some rust spots may
appear. You can use a rust remover to get your
stainless steel perfect again. your oven with an
ALFA Ovens branded cover!

34 35
MAINTENANCE AND CARE
SPECIFICATIONS FOR WOOD-FIRED OVENS
- Before lighting the oven make sure that the chimney ue is unobstructed and that
any previous ash has been removed.
- When the re is out and the oven not too hot, collect the ash from previous cooking
with a wire brush and a shovel.
- The oven can be used all year round; in the winter months, heat the oven with a small
re to avoid thermal shock due to humidity.
- Creosote - Formation and need for removal. When the wood is burned slowly, it
produces organic vapors which combine with moisture to form creosote. Creosote
vapors condense in the ue and accumulate on the inner surface of the ue.
- The chimney should be inspected at least twice a year for creosote build-up. When
you observe excessive creosote, it should be removed to reduce the risk of re.
- Remove and sweep the chimney ue once a year: birds nesting in it or other
obstructions can lead to hazardous blockages.
MAINTENANCE AND CARE
SPECIFICATIONS FOR GAS-FIRED OVENS
1. MAINTENANCE.
The gas burner should be cleaned periodically by
carefully sucking up any food residue.
When cleaning valves and burners, be careful not to
damage the burner. Do not enlarge the burner holes
(The openings where the gas escapes).
2. GAS BURNER DISASSEMBLY
Before cleaning the gas burner, remove it from the
oven by proceeding as follows:
- Remove the front knob (A).
- Unscrew the xing screw (B).
- Unscrew the xing screws and remove the protection
casing (C).
- Remove the gas box (D) to expose the connection of
the piezoelectric ignition cables (E).
- Disconnect the two piezoelectric ignition cables. If
need be, remove the protection casing by unscrewing
the screw (F) and pull the burner out.
- Clean the burner.
- To assemble the burner, repeat the procedure in
reverse order.
3. OVEN STORAGE
- If the gas-red oven is not used, shut off the supply
valve of the gas bottle.
- If the gas-red oven is stored in a closed space,
disconnect the gas supply. The bottle must be left
outside in a well-ventilated area.
- In the event that the gas bottle is not taken out of the
oven, place the whole lot in a well-ventilated area.
- The gas bottles must be stored outdoors in a well-
ventilated area and out of reach of any children.
Unused bottles shouldn’t be stored in a building,
garage or other enclosed space.
A
B
C
D
E
F
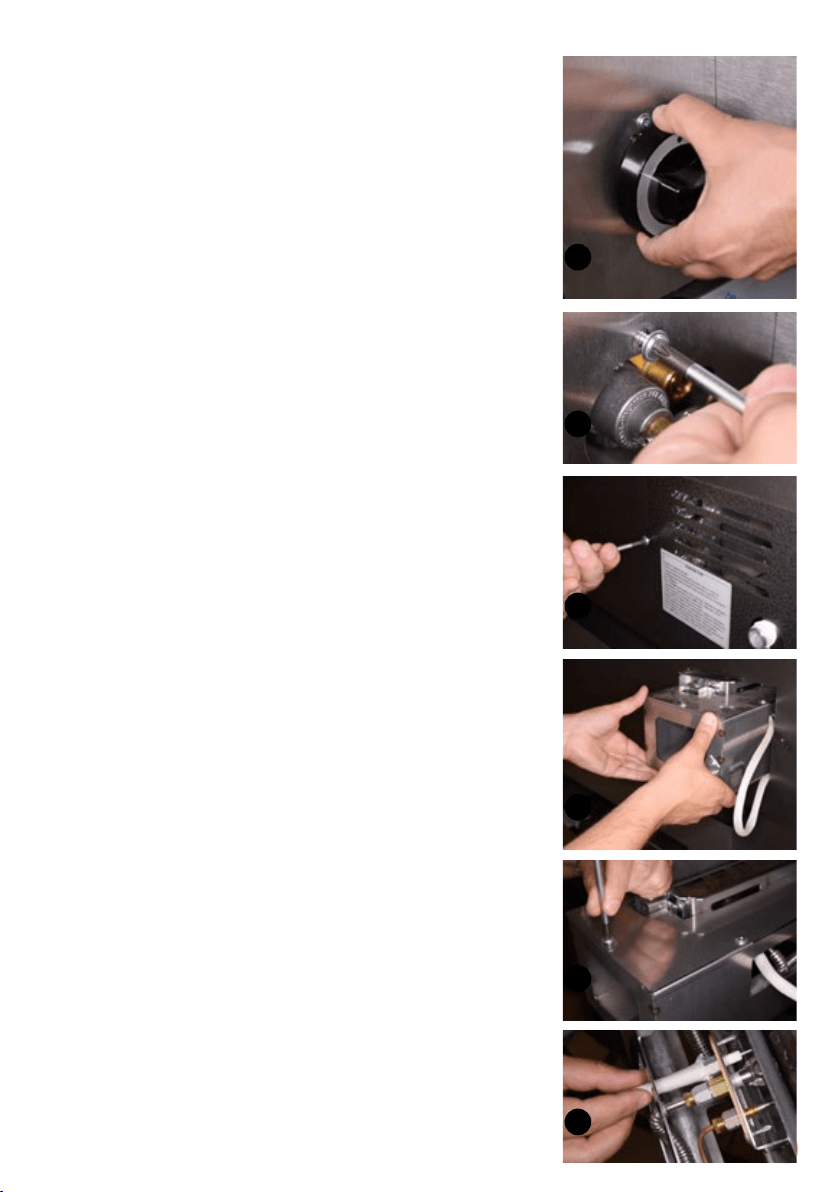

36 37
MAINTENANCE AND CARE
ONLY FOR WOOD VERSION
CLEANING
When the re has gone out and the oven is not hot enough, collect the ashes
left over from previous cooking with a metallic brush and a pan.
MAINTENANCE AND CARE
ONLY FOR GAS VERSION
MAINTENANCE
- The gas burner should be cleaned periodically by carefully sucking up any
cooking residues.
- When cleaning valves and burners, be careful not to damage the burner.
- Remove any residues from the burners with a brush.
- Do not enlarge burner holes (openings).
GAS KIT DISASSEMBLY
- The gas burner should be cleaned periodically by carefully sucking up any
cooking residues.
- When cleaning valves and burners, be careful not to damage the burner.
- Before cleaning is necessary to remove the burner from the oven by
following the procedure in the assembly instructions.
STORING THE OVEN
- If the gas oven is not used close the supply valve of the gas cylinder.
- If the gas oven is placed in a closed space, disconnect the gas supply. The
gas cylinder must be left outside in a well-ventilated area.
- In the event that the cylinder is not removed from gas oven, place the
entire device and the cylinder in a well-ventilated outdoor area.
- The gas cylinders must be stored outdoors in a well-ventilated area and
out of the reach of children. Cylinders not in use must not be stored in a
building, garage or other enclosed space.
Alfa Forni is not responsible for veins, cracks, hairline cracks of the oor
as they are an intrinsic characteristic of the material.
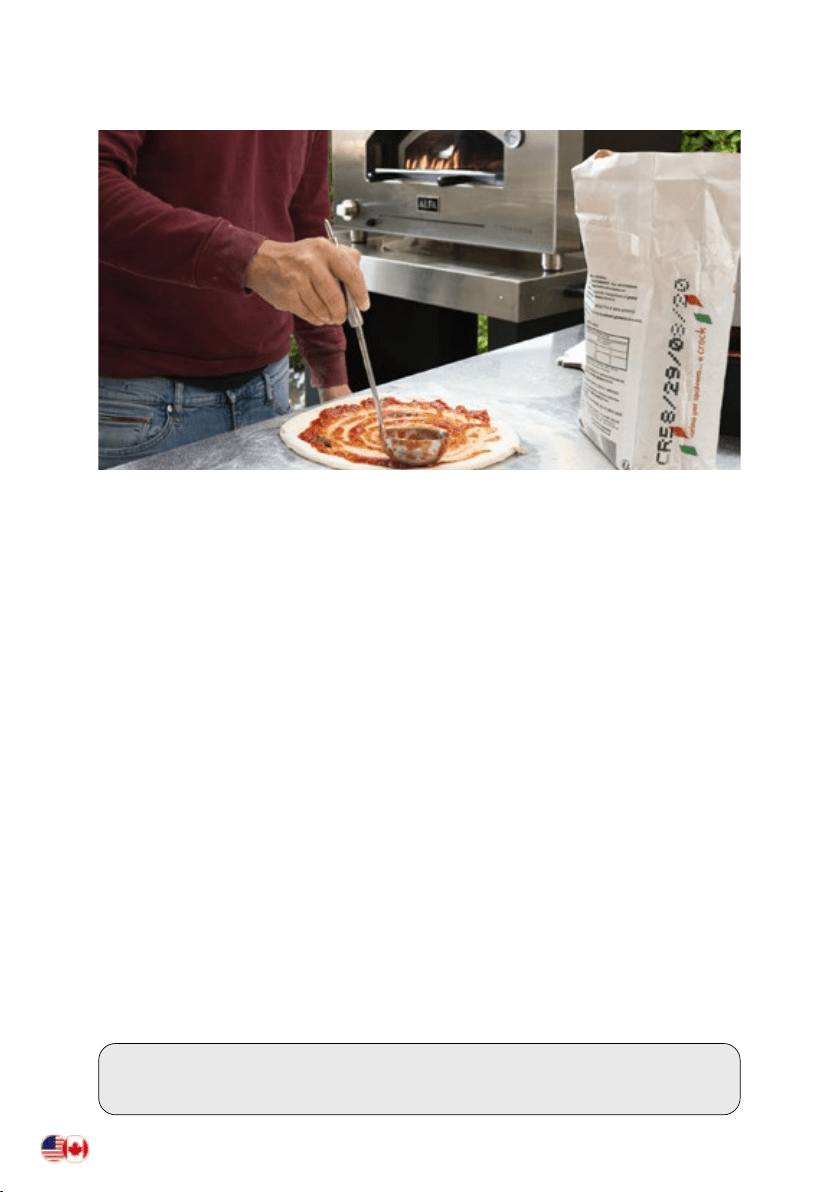
38 39
VENTING GUIDE
FOR WOOD FIRED AND GAS OVENS
One of the most common questions for ALFA Oven owners revolves around
venting. Many owners nd the need to customize the basic vent pipe and cap
that comes supplied with your oven. We hope the following information will
help whether you’re looking to extend your supplied pipe, add a bend to your
supplied pipe or more complex projects that need converted to double wall
chimney as well as penetrating overhead objects and roong.).
PROJECTS REVIEWED
- Outdoor installation with no overhead obstructions
- Outdoor installation with overhead obstructions
- Indoor installation–Vertical direct vent approved–MUST use UL103HT double
wall chimney
- Any customized installation beyond the supplied single wall pipe and cap,
ALFA highly recommends that you contact your planning, building and
zoning ofcials to ensure all local building codes are followed along with
necessary permits, where needed.
- DO NOT CONNECT THIS TO A CHIMNEY FLUE SERVING ANOTHER
APPLIANCE
Our dedicated Venting Specialist will work with you or your architects and
contactors to identify the best solution for your chimney layout. You’ll have
peace of mind knowing that your venting system has all the UL listings, so you
won’t have to worry about running to problems with the inspections process.
ALFA Venting | 570 350 7939
alfaventing@olympiachimney.com
DIRECT VENT, SINGLE WALL
FLUE EXHAUST
When installing the ALFA Oven in
your outdoor cooking area with the
venting away from any structures
or low ceilings, the ALFA supplied
high quality stainless steel pipe and
cap are sufcient and no additional
piping is necessary.
You can customize these systems
vertically to assist draw or to help
with your install design. ALFA and
LakeView do not offer custom pipe
or chimney, but we can help with sourcing by starting with Olympia Chimney Supply/
Coppereld Chimney, LLC manufactured pipe and chimney products.
Supplied single wall wood stove ue pipe can always be upgraded to double wall
chimney.
WARNING: Major causes of vent related res is failure to maintain required clearances
(air spaces) to combustible materials.
Note: The outer walls of oven may reach high temperatures, more than 125°F.
Position the oven so it is not in contact with the wall or other furniture and make
sure there is a gap of at least 3 inches (7.5cm) alongside and behind the oven if
you are using reproof materials, at least 8 inches (20cm) if you not using re-
resistant materials.
DIRECT VENT, DOUBLE WALL
CHIMNEY
For indoor ALFA Oven venting
installations, or outdoor settings
where your wood red oven will be
under a roof structures, pergolas, or
any type of ceiling/roof.
ALFA Stone Ovens LPG/NG have
all been UL tested and certied for
indoor installation using approved
UL103HT double walled chimney
exhaust systems.
UL103HT Double wall chimney can
be installed up to 60 feet vertically and must be a minimum of 3 feet above the roof
or structure it is penetrating.
If you are penetrating through an overhead object you must remove supplied
single wall pipe and start with Olympia Chimney Supply/Coppereld Chimney LLC
manufactured pipe and chimney products
If a bend is needed to change the pipe or chimney direction to avoid an obstruction,
you can use up to (2) 30-degree or less angles but NEVER together to form a
60-degree bend..
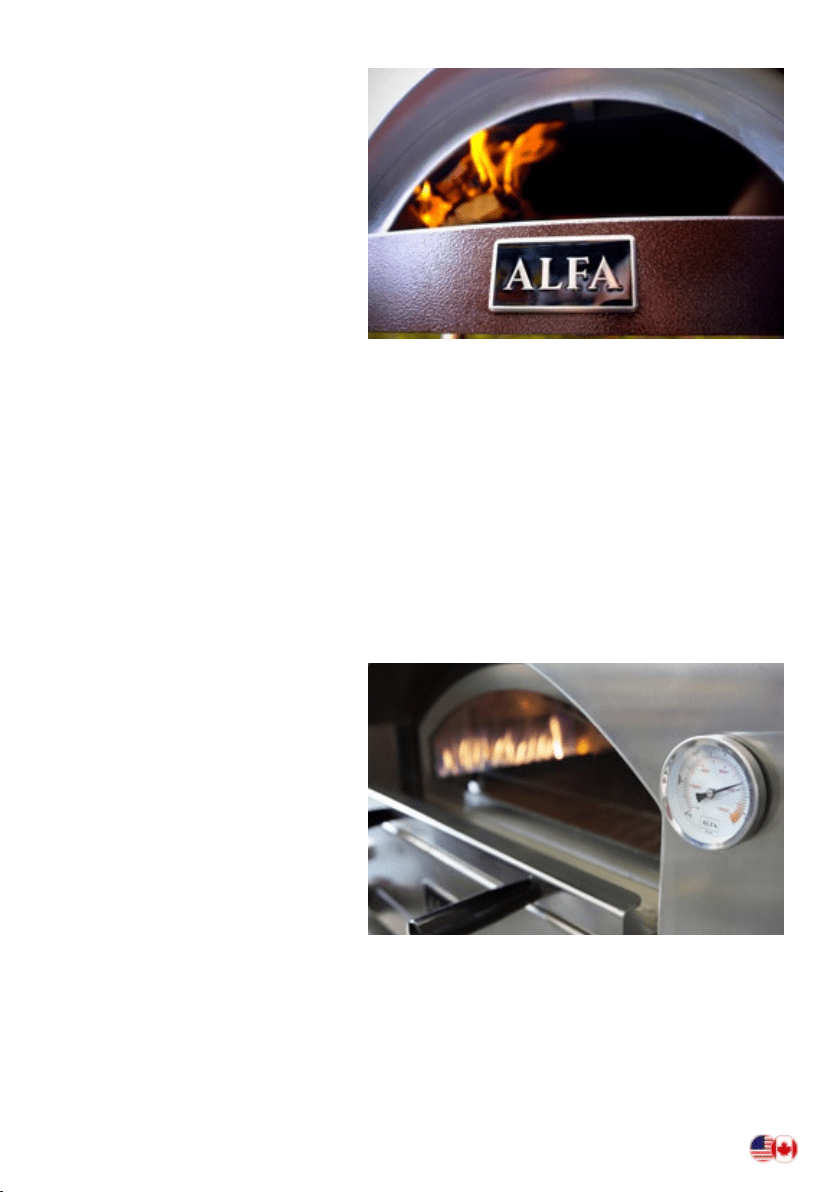
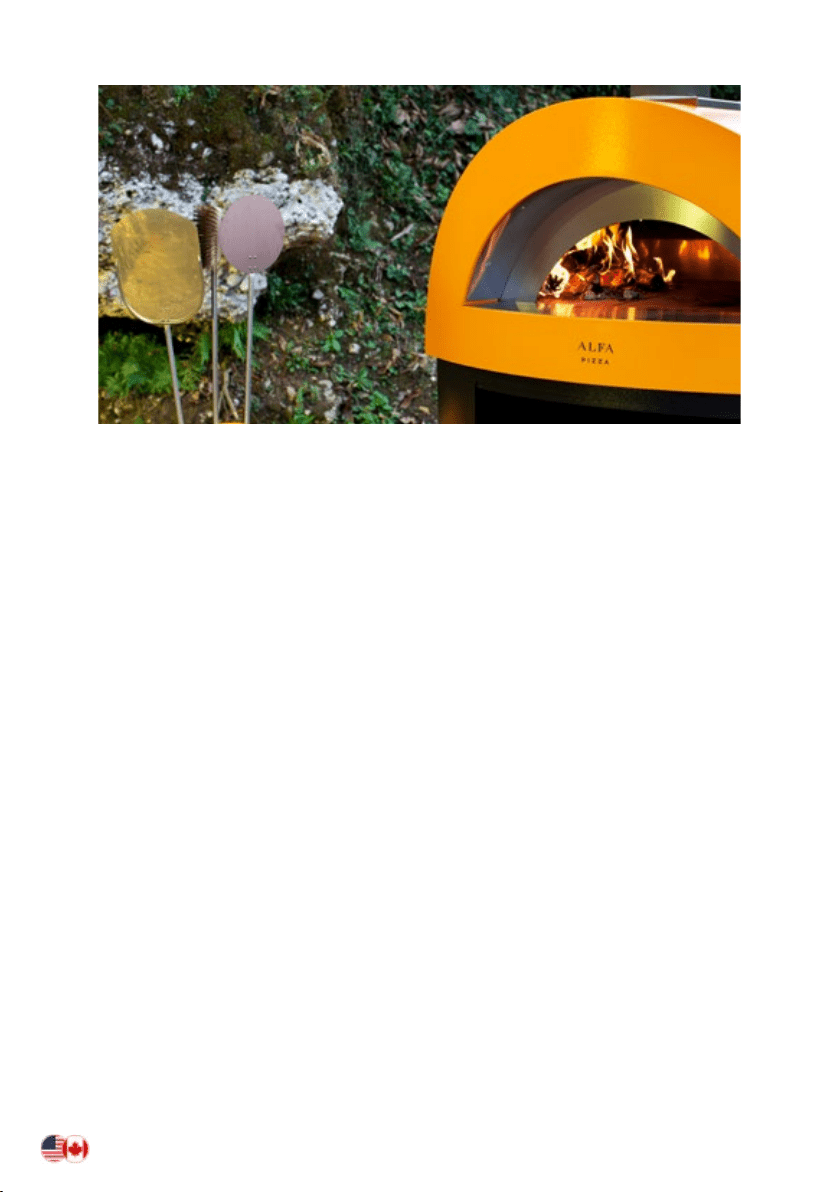
40 41
ALFA OVENS VENTING GUIDE FOR WOOD FIRED OVENS
Basic Guideline for ALFA Ovens Flue and Obstruction Clearances:
- Single Wall Flue Piping: Allow 18” of clearance around pipe
- Double Wall Flue Chimney: Allow 3” of clearance around chimney
- Combustible Clearance: Minimum of 3 feet below the ceiling is required
- Chimneys must extend at least 3 feet above the highest point where it passes
through a roof, and at least 2 feet higher than any portion of a building within
10 feet
- Never ll any required clearance with any insulation or other materials
OFFSET ELBOW INSTALLATION:
- Avoid elbows if at all possible, as a vertical pipe or chimney is the most efcient
- Pipe or chimney systems may have a maximum of 2 offsets (two elbows total)
of 30-degrees from vertical
- Elbows are manufactured in 15-degree and 30-degree angles, measured from
the vertical
- Do not combine elbows to create steeper angles and never exceed 2 elbows in
one pipe or chimney system
- A single elbow is dened as a 30-degree bend and then a 30-degree correction
(one set)
- ForExample:Youcouldhavea30-degreebendwitha0-48” horizontal pipe or
chimney and then another 30-degree bend back to the vertical position
- Do not use with forced-draft, positive-pressure appliances.
ALFA Venting | 570 350 7939
alfaventing@olympiachimney.com
WARNING: DO NOT USE (2) 30-DEGREE ELBOWS
TO CREATE A 60-DEGREE ANGLE!
THIS VOIDS ALL WARRANTIES AND PRESENTS A FIRE HAZZARD
WITHIN THE PIPE OR CHIMNEY SYSTEM.
If your installation requirement cannot meet the basic standards be sure to
consult a professional and obtain necessary permits in advance.
lvdistributes.com
1065 W North Thorndale Ave | Bensenville, IL 60106 | 630 238 1280
Appliance Distribution Service, Parts, Installation & Delivery
NORTH AMERICA ONLY
42 43
CRACKED
GASBETON OR
FIREBRICK
- Firebricks can crack and pose no problems or performance issues
when cooking on your ALFA Oven.
- Gasbeton insulation brick is inherently brittle and many times is
cracked from large pieces just to get into the oven mouth for place-
ment under the rebrick in assembly. This is completely normal.
- If you ever have a cavity in either of your bricks you can turn it and
use the other side or replace it.
- All ovens come with an extra re brick if you would need to replace
one.
- If you feel any of the bricks are too damaged for use please contact
Lakeview Customer Service
THE OVEN
PRODUCES SMOKE
- Check that the wood is not too moist and the embers are not un-
burned.
- Make sure that you have started a re with vivid ames, gradual but
steady, in order to avoid incomplete combustion.
- If the oven is installed indoors, check the chimney ue and any air
inlets in the room.
- It is recommended to close the oven door.
THE OVEN DOES
NOT HEAT
- Check that the re is on one side of the oven and not near the
mouth
- Fire with vivid ames for 20minutes.
- Do not amass the wood over the embers.
- Gradually add the wood to the re.
THE OVEN COOLS
DOWN QUICKLY
- Check that no moisture or water has inltrated the oven.
- It may be lit for the rst time or after a long idle period.
- Avoid sudden short res that do not warm the bottom of the oven.
THE FLAMES COME
OUT OF THE MOUTH
OR CHIMNEY CAP
- Avoid excessive res and immediately dampen the ames that reach
out of the oven by resting the door over the mouth of the oven,
leaving a gap of 1-2 inches.
CAN YOU PUT THE
OVENS RIGHT ON
THE COUNTERTOP
WITHOUT USING
THE SUPPLIED
FEET?
- No, the feet must be used to allow for air to ow beneath the bottom
of the oven oor
TROUBLESHOOTING
WOOD-FIRED OVENS
CANT GET THE
PILOT TO LIGHT
- Check that the knob is not going in too far and hitting the oven
preventing the pilot to allow gas for ignition.
IGNITION DOESN’T
WORK
- Make sure the battery is new and has power
CAN YOU PUT THE
OVENS RIGHT ON
THE COUNTERTOP
WITHOUT USING
THE SUPPLIED
FEET?
- No, the feet must be used to allow for air to ow beneath the bottom
of the oven oor
TROUBLESHOOTING
GAS-FIRED OVENS
Contact us directly for expert advice on the web site
www.alfaovens.com
Contact us directly for expert advice on the web site
www.alfaovens.com
ELECTRONIC BUTTON
ONLY FOR GAS OVENS
The ignition button comes with AA
battery included. To install it, follow
this procedure.
1. Unscrew the button head.
2. Put in the battery.
3. Screw the button head.
Carry out these operations when the
oven is off.
Remove the battery during long
periods of inactivity.
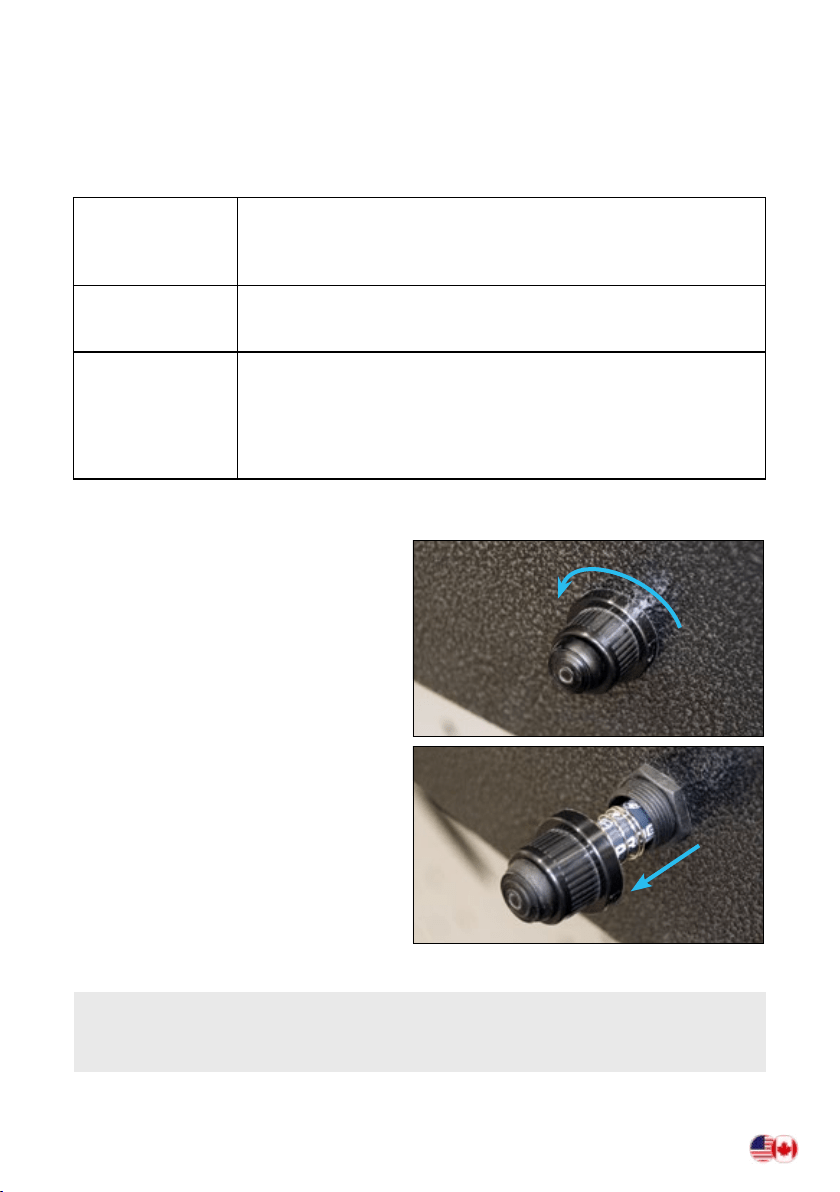
NOTE
WARRANTY
warranty addendum — for the North America market
The oven is guaranteed for 2 (two) years against
defects and craftsmanship; good maintenance and
proper use can make sure that the oven lasts much
longer.
Warranty covers parts and components for 2 years
and gas burner for 3 years. Shipping and assembly
costs are charged to the customer.
PLEASE RETAIN YOUR SALES RECEIPT OR INVOICE WRITE HERE
UNDER THE SERIAL NUMBER ON THE PRODUCT IDENTIFICATION TAG
• If the oven is not properly used and installed
as described in this manual.
• If the oven has been damaged either
voluntarily or involuntarily in any way.
• In the event the equipment is improperly or
inadequately maintained. Burner problems
resulting from debris and ash from live re
in the burner will not be covered by the
warranty.
• If the oven, for any reason, has been altered
and is no longer in the condition detected at
delivery of the product.
• If products have been used other than
suggested. Do not use liquid re starters for
barbecues, other chemicals or products that
contain liquid fuels.
• If the damage is the result of the use of
chemicals inside or outside the oven.
• Damage caused by exceeding the
temperature limit of 1000°F /500°C.
• Void if replacement components not
produced or approved by Alfa are installed.
• In the event that the rating plate has been
removed,altered or destroyed.
The warranty does not apply in the following circumstances:
We recommend the exclusive use of ALFA branded spare parts

V.20210308
alfaovens.com