, .ARS
operator's
manual
MODEL NO. 143.989005
SOLID STATE IGNITION
CAUTION:
Read RULES for
Safe OPERATION
and INSTRUCTIONS
Carefully
A
ENGIN
• Operating
• Maintenance
• Repair Parts
California Proposition 65 WARNING: The=,gi,,o_,_a,,,, from this product contains chemicals [
known to theState of California to cause cancer, birthdefects or other reproductive harm.
I
Sold by SEARS, ROEBUCK AND CO., CHICAGO/IL 60684 U.S.A.
and SEARS CANADA, INC., TORONTO, ONTARIO, CANADA
PrintedinU.S.A. 9-1-97 181-11.,51-11
OIL FILLPLUGANDDIPSTICK \ SPANKPLUG. _1WIRE
FUELRLL CAP
TANK
LEVERSAND LINKAGE
MODEL AND
D.O.M. DECAL
I lllllllllllllllJ I
NR CLEANEI
STARTER HANDLE
Figure1
A 11"11SSYMBOL POINTSOUT IMPORTANTSAFETYINSTRUCTIONSWHICH IF NOT FOLLOWEDCOULDF.NOANGER11tE h
PERSONAL SAFETYAND/OR PROPERTY OFYOURSELFAND OTHERS. READANDFOLLOW ALLINSTRUCTIONS IN
MANUAL AND ANY PROVIDEDwrrH THE EQUIPMENTON WHICHTHIS ENGINE ISUSED BEFORE ATI--/=MPTINGTO
OPERATING.
APPEAR ON THE ENGINE: SLOW CHOKE
ENGINESWHICH ARECERTIFIEDTO COMPLYwrnt CALIFORNIA AND
US EPA EMISSION REGULATIONS FORULGE ENGINES: Are certifiedto
operateonregularunleadedgasoline.Includethe followingemissioncontrol
system(s): EM, "nNC(ifso equipped); Donotincludeanyuseradjustable
features- thereforenootheradjustmentsare needed.
OIL & FUEL RECOMMENDATIONS
TO OPERATE ENGINE, YOU WILL NEED THE FOLLOWING:
(_) A CLEAN, HIGH QUALITY, DETERGENT OIL, BIA,
NMMA TC-WII, OR TC-W3.
Besure originalcontainerismarked:
A.P.I. service"SF*,"SG', "SH"or "SWCD'.
FOR SUMMER (ABOVE 32q=)USE SAE 30 OIL.
Usingmultigradeoilwillincreaseoilconsumption.
FOR WINTER (BELOW32_') USESAE 5W30 OIL.
(SAE 10W isanacceptablesubstitute.)
DO NOT USE SAE 10W40 OIL
OIL SUMP CAPACITY: 24 ounces(1-1/2 pints)
.71 liter
(_) A FRESH, CLEAN, UNLEADED REGULAR, UN-
LEADED PREMIUM, OR REFORMULATED AUTO-
MOTIVE GASOLINE ONLY. DO NOT USE LEADED
GASOLINE.
NOTE: DO NOT USE GASOLINE CONTAINING METHANOL
(WOOD ALCOHOL). Gasoline containing upto 10% ethanol or
grain alcohol (=Gasohol'), or up to 15% MTBE (Methyl Tertiary
Butyl Ether), may be used but requires special care when engine
is unused for extended pedods.
See "STORAGE" instruction on Page 4.
NOTE: Use clean oil and fuel and store in approved, clean
covered containers. Use clean fill funnels.
Never use "stale"gasoline left overfrom last season or stored for
long pedods. Page -1
IMPORTANT
KEEP THIS MANUAL HANDY AT ALL TIMES FOR FUTURE
REFERENCE. READITCAREFULLY AND FAMIMARIZEYOUR-
SELF WITH THE OPERATING, MAINTENANCE AND SAFETY
INSTRUCTIONS. THIS MANUAL ALSO CONTAINS A COM-
PLETE PARTS LISTING.
BEFORE STARTING
(_ READ ALL INSTRUCTIONS PROVIDED WITH THE EQUIP-
MENT ON WHICH THIS ENGINE IS USED.
(_) CHECK OIL LEVEL:
CAUTION: NEVER RUN ENGINE UNLESS OIL LEVEL IS
BETWEEN =FULL" AND =ADD" MARKS ON DIPSlllCK.
CHECK OIL LEVEL OFTEN DURING ENGINE BREAK-IN.
NEVER RUN ENGINE UNLESS OIL RLL PLUG IS TIGHT-
ENED SECURELY INTO OIL FILL HOLE.
A. POSITION EQUIPMENT SO ENGINE IS LEVEL
B. Cleanarea aroundoilfillplug(see Figure1).
C. Removeoilfillplugand dipstick.
D. Wipe dipstickclean,insertitintooilfill holeandtighten
securely.
E. Removeoil fillplugandcheckoillevel. If levelis not upto
=FULL"mark on dipstick,add recommendedoil, untilit is.
POUR SLOWLY.
Wipedipstickclean eachtimeoil level ischecked.
DONOT FILL ABOVE "FULL"MARK ON DIPSTICK.
F. Replaceoilfillplug andtightensecurely.
See "MAINTENANCE" sectienforanyfutureoillevelandoil
changeinstructions(see Page3).
181-1151-11
BEF ORE STARTING (Con ued)
(_ RLL FUEL TANK withgasoline as specifiedinthe preced-
ing "OIL & FUELRECOMMENDATIONS" item2.
NEVER MIX OIL WITH GASOUNE
Neveruse"stale"gasolineleftoverIromlastseasonorstored for
longperiods.
NEVER FILL FUEL TANK INDOORS. NEVER FILL FUEL
TANK WHENENGINEISRUNNINGORHOT.DONOTSMOKE
WHEN FILUNG FUEL TANK.
NEVER FILL FUELTANK COMPLETELY, FILL TANKTO1/2"
BELOW BOTTOM OF FILLER NECK TO PROVIDE SPACE
FOR FUEL EXPANSION.WIPE ANY FUEL SPILLAGE FROM
I ENGINE AND EQUIPMENT BEFORE STARTING ENGINE.
_P PETROLEUM (LPG) OR NATURAL GAS
_ST BE LEAKPROOF AND MEET ALLI
I APPUCABLE CODES AND REGULATIONS. I
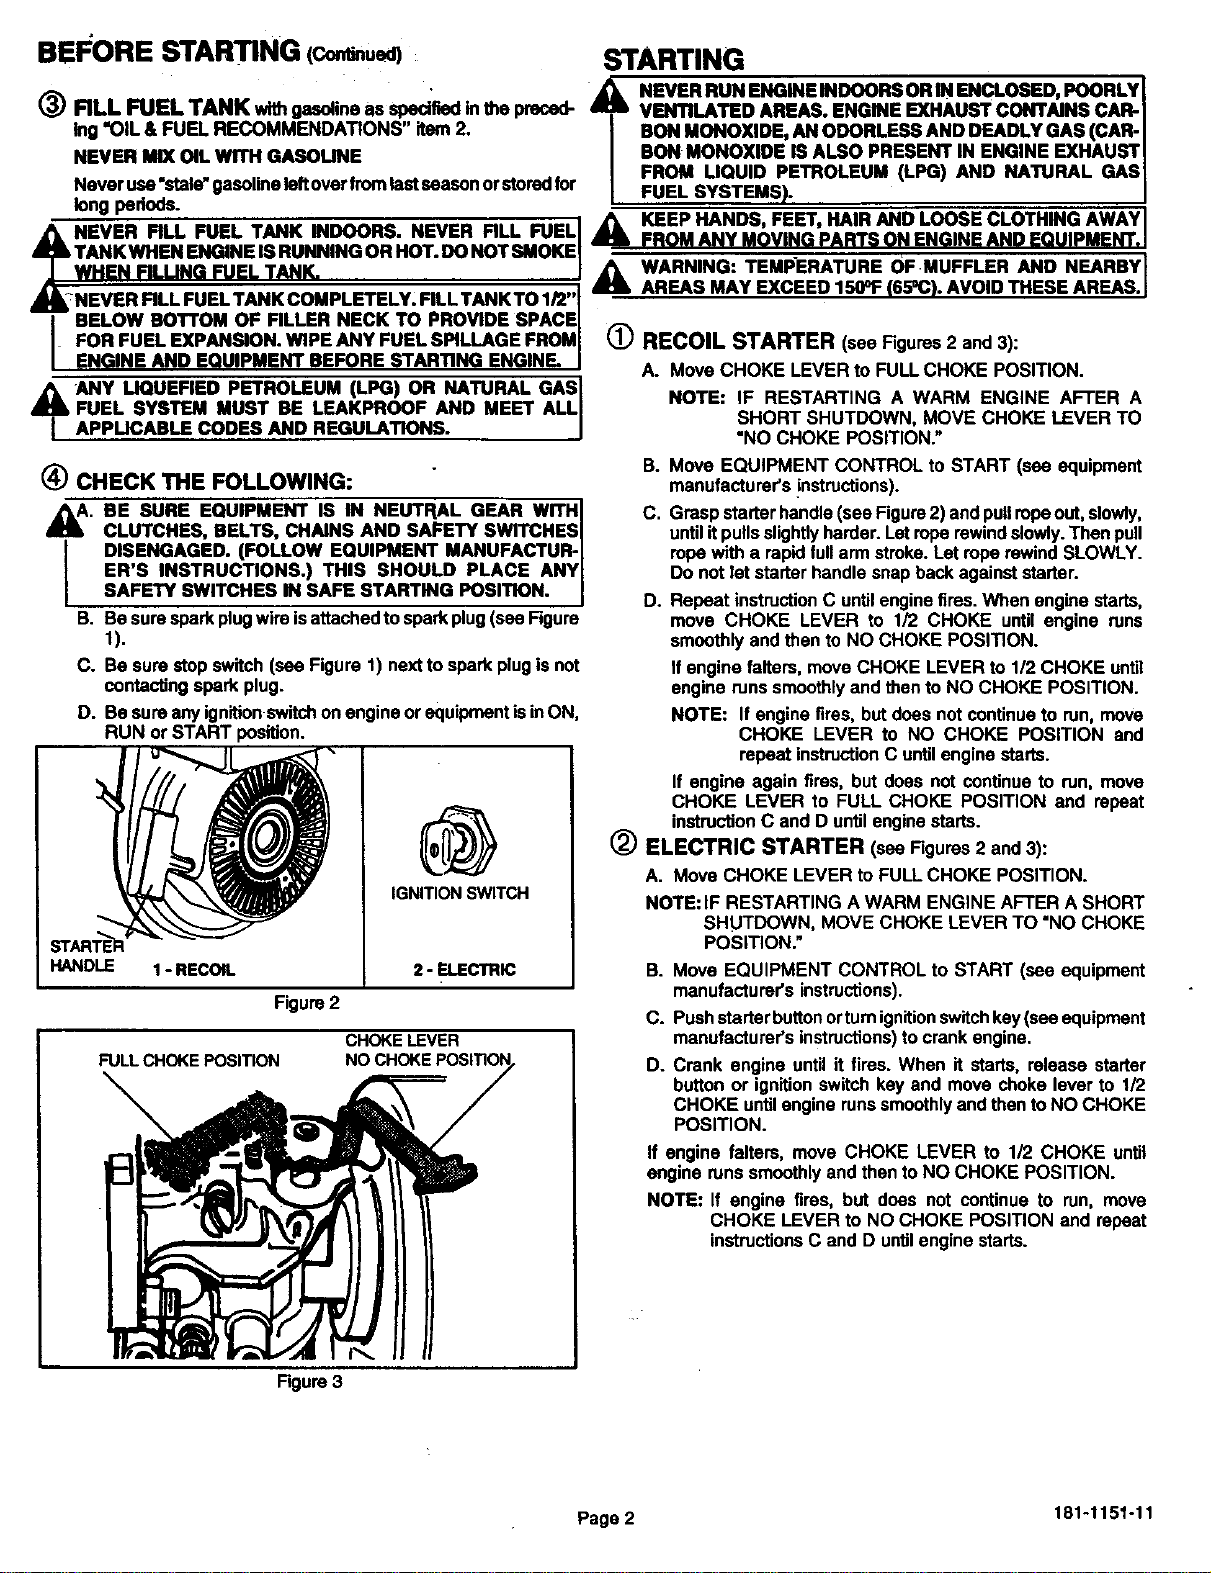
(_) CHECK THE FOLLOWING:
_. BE SURE EQUIPMENT IS IN NEUTRAL GEAR WITH I
CLUTCHES, BELTS, CHAINS AND SAFETY SWITCHES I
DISENGAGED. (FOLLOW EQUIPMENT MANUFACTUR.I
ER'S INSTRUCTIONS.) THIS SHOULD PLACE ANY
SAFETY SWITCHES IN SAFE STARTING POS TION.
B. Besuresparkplugwireisattachedtosparkplug(see Figure
1).
C. Be surestopswitch(see Figure1) nexttosparkplugis not
contactingspark plug.
D. Besureanyignitionswitchonengineor equipmentisinON,
RUN or START position.
@
IGNITION SWITCH
STAR_R_
HANDLE 1- RECOIL
Figure 2
FULLCHOKEPOSITION
\
2 - ELECTRIC
CHOKE LEVER
STARTING
_. NEVER RUN ENGINEINDOORSORIN ENCLOSED,POORLY
VENTILATED AREAS. ENGINEEXHAUST CONTAINS CAR-
BON MONOXIDE, ANODORLESSAND DEADLYGAS (CAR-
BON MONOXIDE IS ALSO PRESENT IN ENGINE EXHAUST
FROM UQUID PETROLEUM (LPG) AND NATURAL GAS
I FUEL SYSTEMS).
_KEEP HANDS, FEET, HAIR AND LOOSE CLOTHING AWAY
FROM ANY MOVING PARTS ON ENGINE AND EQUIPMENT.
_k WARNING: TEMPERATURE OFMUFFLER AND NEARBY
a AREAS MAY EXCEED 150°F (65_C). AVOID THESE AREAS.
(_ RECOIL STARTER (see Figures2 and 3):
A. MoveCHOKE LEVERto FULLCHOKE POSITION.
NOTE: IF RESTARTING A WARM ENGINE AFTER A
SHORT SHUTDOWN, MOVE CHOKE LEVER TO
"NO CHOKE POSITION."
B. Move EQUIPMENT CONTROL to START (see equipment
manufacturer's !nstructions).
C. Grasp starter handle (see Figure 2) and pull ropeout, slowly,
until it pulls slightly harder. Let rope rewind slowly.Then pull
rope with a rapid full arm stroke. Let rope rewind SLOWLY.
Do not let starter handle snap back against starter.
D. Repeat instruction C until engine rims. When engine starts,
move CHOKE LEVER to 1/2 CHOKE until engine runs
smoothly and then to NO CHOKE POSITION.
If engine falters, move CHOKE LEVER to 1/2 CHOKE until
engine runs smoothly and then to NO CHOKE POSITION.
NOTE: If engine rims, but does not continue to run, move
CHOKE LEVER to NO CHOKE POSITION and
repeat instruction C until engine starts.
If engine again rims, but does not continue to run, move
CHOKE LEVER to FULL CHOKE POSITION and repeat
instruction C and D until engine starts.
ELECTRIC STARTER (see Figures 2 and 3):
A. Move CHOKE LEVER to FULL CHOKE POSITION.
®
NOTE: IF RESTARTING A WARM ENGINE AFTER A SHORT
SHUTDOWN, MOVE CHOKE LEVER TO "NO CHOKE
POSITION."
B. Move EQUIPMENT CONTROLto START (see equipment
manufacturer'sinstructions).
C. Pushstarterbuttonorturnignitionswitchkey(seeequipment
manufacturer'sinstructions)tocrank engine.
D. Crank engine untilit fires. When it starts,release starter
buttonor ignitionswitchkey and movechoke lever to 1/2
CHOKE untilenginerunssmoothlyandthentoNOCHOKE
POSITION.
If engine falters, move CHOKE LEVER to 1/2 CHOKE until
enginerunssmoothlyand then to NO CHOKEPOSITION.
NOTE: If engine rims, but does not continueto run, move
CHOKE LEVER to NO CHOKE POSITION and repeat
instructionsC and D untilenginestarts.
Figure 3
Page 2 181-1151-11
S[TOPPING
Moveequipmentcontrolorany ignitionstopswitchonengineto
STOP orOFF (see equipmentmenufactumr'sinstructions).
_) Pushstopswitch(see Figure1) locatednextto spark plugon
engineagainstsparkplugandholditinthispositionuntilengine
iscompletelystopped.
AFTER ENGINE IS STOPPED:
_A. DISGONNEGTSPARK PLUG WIRE FROM SPARKPLUG
AND KEEP IT AWAY FROM SPARK PLUG.
_kB. TURN IGNmON SWITCH KEY (IF SO EQUIPPED) TO
"OFF" POSITION AND REMOVE KEY FROM SWITCH.
THIS WILL REDUCE THE POSSIBILITY OF UNAUTHO-
RIZED STARTING OF ENGINE WHILE EQUIPMENT IS
NOT IN USE.
NEVER STORE ENGINEWITH FUEL IN TANK INDOORS I
OR IN ENCLOSEO, POORLY VENTILATED AREAS I
WHERE FUEL FUMES MAY REACH AN OPEN FLAME,[
SPARK OR PILOT LIGHT AS ON A FURNACE, WATER I
HEATER, CLOTHES DRYER OR OTHER GAS APPLI-I
ANcE. : I
MAINTENANCE
_WARNING: TEMPERATURE OF MUFFLER AND NEARBY
AREAS MAY EXCEED 150=F (65°C). AVOID THESE AREAS.
1(!) CHECK OIL LEVEL:
Checkoilleveleveryfive(5) opamtinghoursoreachtimeengine
isused.See "2 CHECK OIL LEVEL"in "BEFORE STARTING"
on Page 1.
(_) CHANGE OIL:
Change oil after first two (2) operating hours and every 25
operating hours thereafter, more often if operated in extremely
dusty or dirty condltlens. Change oil while engine is still warm
from recent running.
A. Positionequipment so engine oil drain plug is lowest pointon
engine (see Rgure 1).
B. Remove oil drain plug and oil fill plug to drain oil.
C. Replace oil drain plug and tighten securely.
D. Fill oil sump with recommended oil. See "OIL & FUEL
RECOMMENDATIONS" and "CHECK OIL LEVEL" on Page
1.
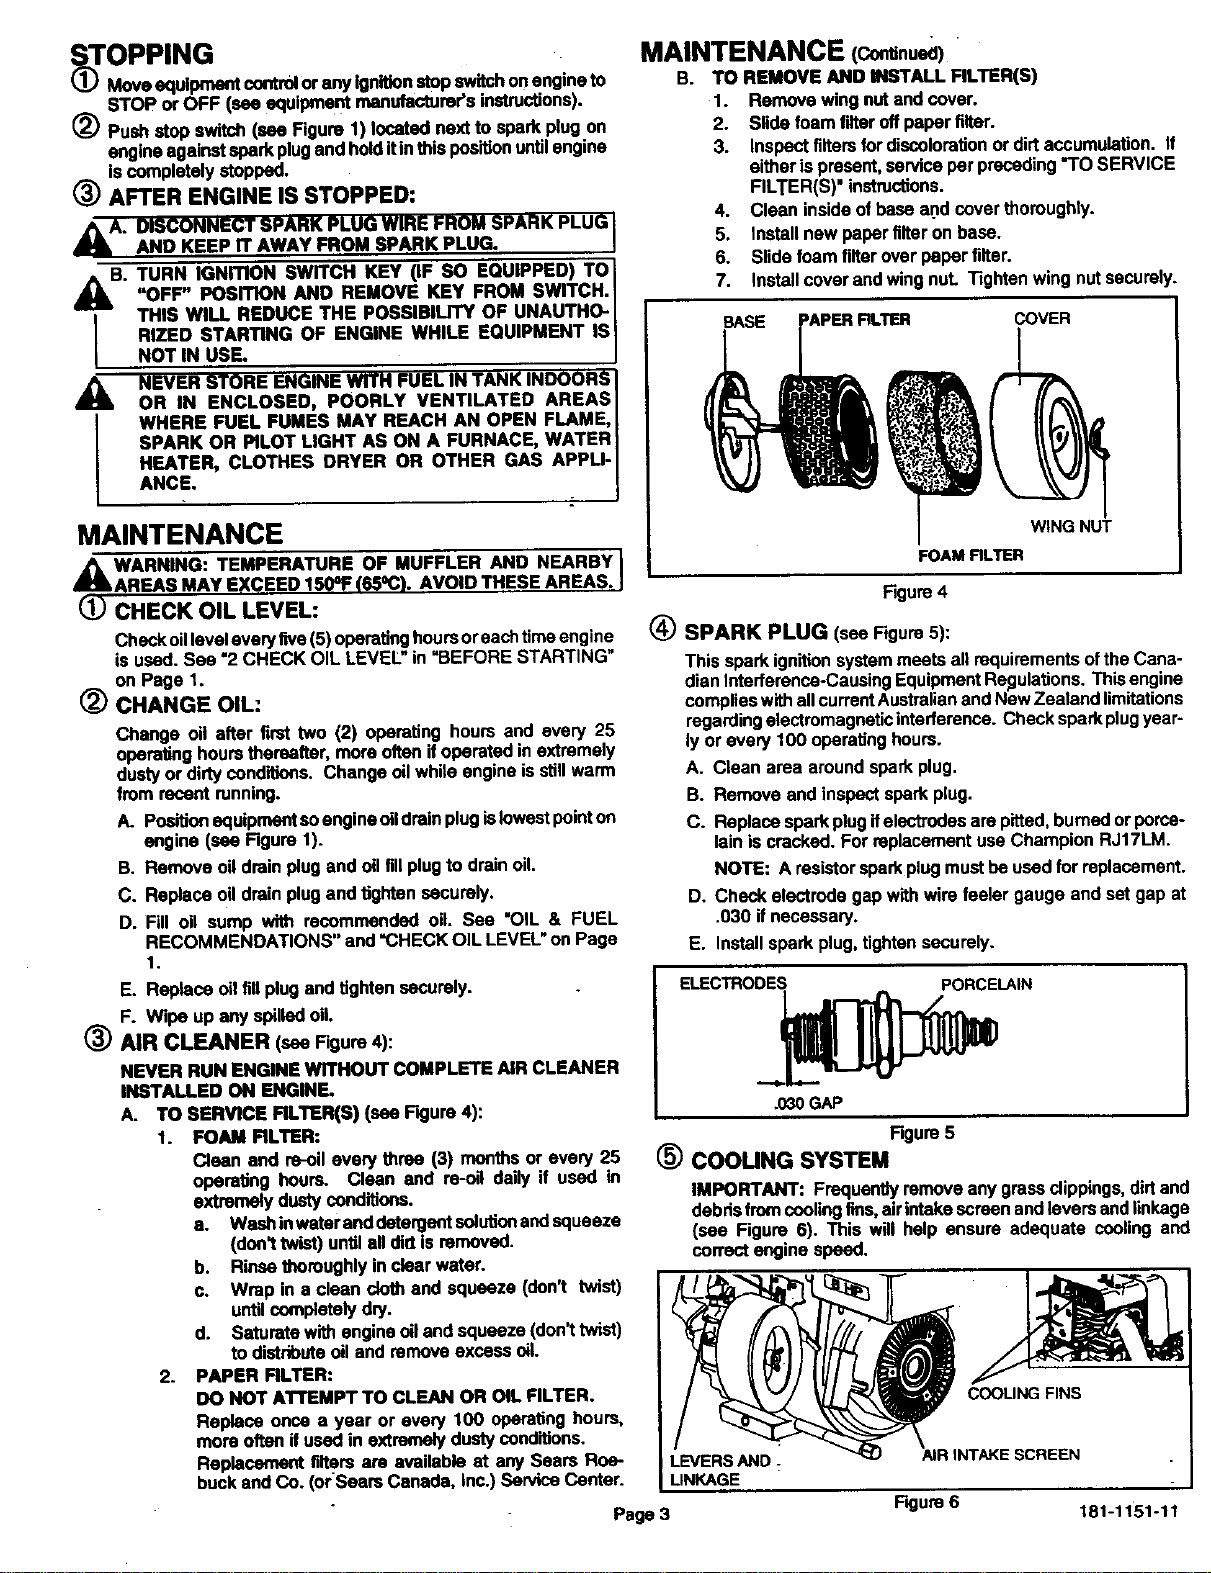
MAINTENANCE (continued)
B. TO REMOVE AND INSTALL FILTER(S)
1. Removewingnutand cover.
2. Slidefoamfilteroffpapertilter.
3. Inspectfiltersfordiscolorationordirtaccumulation.If
eitherispresent,serviceperpreceding"TOSERVICE
FILTER(S)"instructions.
4. Cleaninsideofbaseand coverthoroughly.
5. Installnewpaperfilteron base.
6. Slidefoam filter over paper tilter.
7. Installcoverandwingnut. Tightenwingnutsecurely.
BASE APERRL1 (__t
FOAMNL'I_R
Figure4
(_) SPARK PLUG (see Figure5):
Thissparkign_onsystemmeetsallrequirementsoftheCana-
dianInterference-CausingEquipmentRegulations.Thisengine
complies withallcurrentAustralianandNewZealandlimitations
regardingelectromagneticinterference.Checksparkplugyear-
ly or every100 operatinghours.
A. Clean area aroundsparkplug.
B. Remove andinspectsparkplug.
C. Replacesparkplugifelectrodesarepitted,burnedorporce-
lainiscracked.For replacementuseChampionRJ17LM.
NOTE: A resistorsparkplugmustbeusedfor replacement.
D. Checkelectrodegapwithwire feelergauge and setgapat
.030 ifnecessary.
E. Installsparkplug,tightensecurely.
E. Replaceoilfigplugandtighten securely.
F. Wipeup anyspilledoil.
(_) AIR CLEANER (see Figure4):
NEVER RUN ENGINEWITHOUT COMPLETE AIRCLEANER
INSTALLED ON ENGINE.
A. TO SERVICE RLTER(S) (see Figura 4):
1. FOAM RLTER:
Clean and re-oilevery three (3) monthsor every 25
operatfilg hours. Clean and re-oil dally if used in
extremelydustyconditions.
a. Washinwateranddstergentsolutionandsqueeze
(don'ttwist)untilall didisremoved.
b. Rinsethoroughly in dear water.
c. Wrap ina clean clothand squeeze(don't twist)
untilcompletelydry.
d. Saturatewithengineoil andsqueeze(don_twist)
to distributeoil and removeexcessoil.
2. PAPER RLTER:
DO NOT ATTEMPT TO CLEAN OR OIL FILTER.
Replace once a year or every 100 operatinghours,
more oftenifusedin extremely dustyconditions.
Replacementfiltersare availableat any Sears Roe-
buckandCo.(orSears Canada, inc.)ServiceCenter.
ELECTRODES PORCELAIN
Page 3
.O3OGAP
Figure5
(_ COOUNG SYSTEM
IMPORTANT: Frequentlyremoveanygrassclippings,dirtand
debrisfrom coolingfins,air intakescreenandleversandlinkage
(see Figure 6). This will help ensure adequate coolingan_
correctenginespeed.
COOLING FINS
INTAKE SCREEN
LINKAGE
Figure 6 181-1151-11
MAINTENANCE (costin.ad) STORAGE
A NEVER STORE ENGINE WITH FUEL IN TANK INDOORS OR I
(_ CHECK ENGINE AND EQUIPMENT OFTEN FOR LOOSE I AML IN ENCLOSED, POORLYVENTILATED AREASWHERE FUEL I
_k NUTS, BOLTS AND ATTACHMENTS AND KEEP THESE FUMES MAY REACH AN OPEN FLAME, SPARK OR PILOT|
ITEMS TIGHTENED. LIGHT AS ON A FURNACE, WATER HEATER, CLOTHES|
DRYER OR OTHER GAS APPLIANCE. |
ADJUSTMENTS
DO NOT MAKE UNNECESSARY ADJtJSTMENTS. FACTORY
SETTINGS ARE SATISFACTORY FOR MOST APPLICATIONS
AND CONDITIONS. IF ADJUSTMENTS ARE NEEDED, PRO-
CEED AS FOLLOWS:
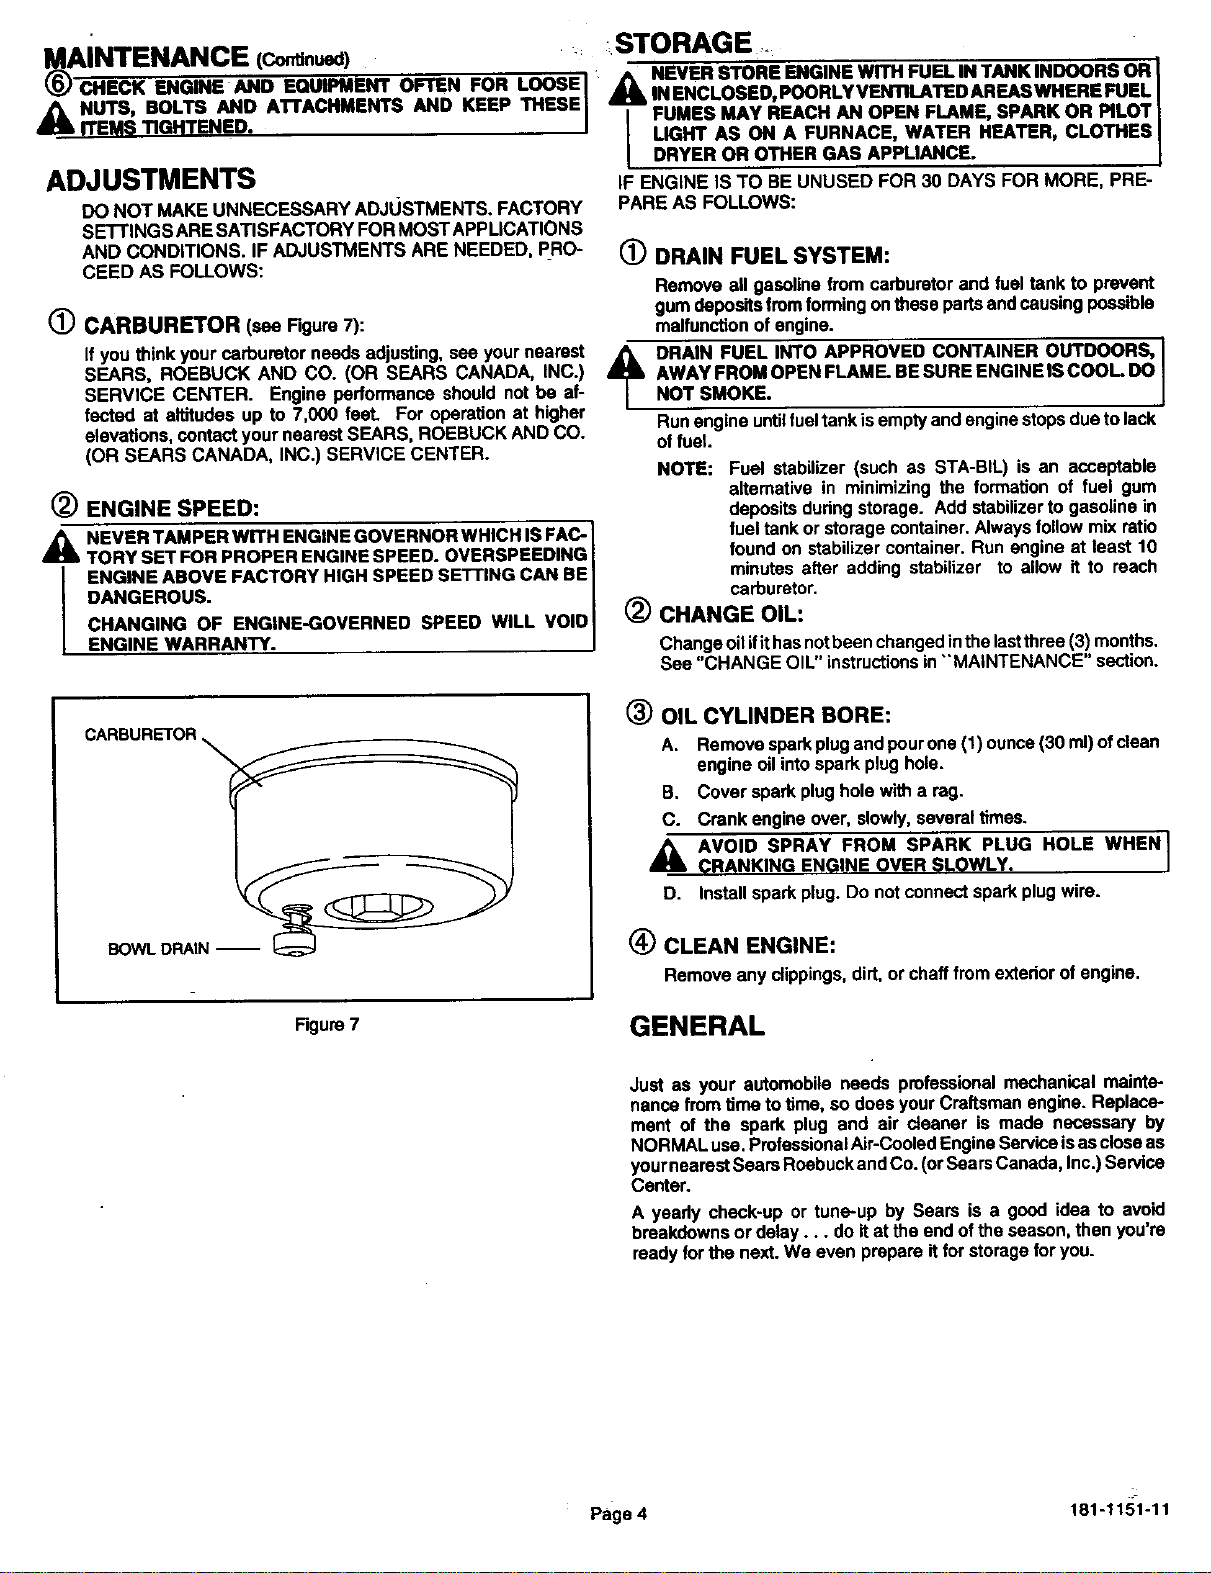
(_ CARBURETOR (seeFigure7):
If you think your carburetor needs adjusting, see your nearest
SEARS, ROEBUCK AND CO. (OR SEARS CANADA, INC.)
SERVICE CENTER. Engine performance should not be af-
fected at altitudes up to 7,000 feeL For operation at higher
elevations, contact your nearest SEARS, ROEBUCK AND CO.
(OR SEARS CANADA, INC.) SERVICE CENTER.
(_) ENGINE SPEED:
_ NEVER TAMPER WITH ENGINE GOVERNOR WHICH IS FAC- I
TORY SET FOR PROPER ENGINE SPEED. OVERSPEEDING I
ENGINE ABOVE FACTORY HIGH SPEED SETTING CAN BE
DANGEROUS.
CHANGING OF ENGINE-GOVERNED SPEED WILL VOlO I
ENGINE WARRANTY. I
IF ENGINE ISTO BEUNUSED FOR 30 DAYS FOR MORE, PRE-
PAREAS FOLLOWS:
(_) DRAIN FUEL SYSTEM:
Remove all gasolinefromcarburetorand fueltankto prevent
gumdepositsfromformingonthesepartsandcausingpossible
malfunction of engine.
_plk DRAIN FUEL INTO APPROVED CONTAINER OUTDOORS,
AWAY FROM OPEN FLAME. BE SURE ENGINE IS COOL DO
NOT SMOKE.
Run engine untilfuel tank isempty and engine stops due to lack
ot fuel.
NOTE: Fuel stabilizer (such as STA-BIL) is an acceptable
aitemative in minimizing the formation of fuel gum
deposits during storage. Add stabilizer to gasoline in
fuel tank or storage container. Always follow mix ratio
found on stabilizer container. Run engine at least 10
minutes after adding stabilizer to allow it to reach
carburetor.
(_ CHANGE OIL:
Change oil ifit has notbeen changed in the lastthree (3) months.
See "CHANGE OIL" instructions in "'MAINTENANCE" section.
CARBURETOR.
BOWLDRAIN 1
(_ OIL CYLINDER BORE:
A, Remove spark plug and pour one (1) ounce (30 ml) of clean
engine oil into spark plug hole.
B. Cover spark plug hole with a rag,
C. Crank engine over, slowly, several times.
_ AVOID SPRAY FROM SPARK PLUG HOLE WHEN I
(_RANKING ENGINE OVER SLOWLY.
D. Install spark plug. Do not connect spark plug wire.
(_ CLEAN ENGINE:
Removeanyclippings,dirt,or chafffromextedorof engine,
Figure 7
GENERAL
Just as your automobileneeds professionalmechanicalmainte-
nancefromtime totime,so doesyourCraftsman engine.Replace-
ment of the spark plug and air cleaner is made necessary by
NORMALuse.ProfessionalAir-CooledEngineServiceisascloseas
yournearestSearsRoebuckandCo.(orSearsCanada,Inc.)Service
Center.
A yeedy check-upor tune-up by Sears is a good idea to avoid
breakdownsor delay.., do itat the endoftheseason,then you're
readyforthe next.We even prepareitfor storageforyou.
P_,,e 4 181-1151-11
TROUBLESHOOTING
THE FOLLOWING MAY HELP AVOID A DELAY IN YOUR WORK OR
SAVE THE EXPENSE OF A SERVICE CALL.
ENGINE FALLS TO START OR STARTS WITH DIFFICULTY
CAUSE
Controls not in start position.
Spark plug wire disconnected from spark plug.
Spark plug fouled.
Spark plug porcelain cracked.
Insufficientfuel.
Water or dirt in fuel.
Improper carburetor adjustment
REMEDY
MoveENGINE CONTROL orequipmentcontrolto "HI" or
STARTpostJon.See "STARTING" instructionsinthis
manual.
Connect SPARK PLUG WIRE to SPARK PLUG.
Remove SPARK PLUG and dean it. See
"SPARK
PLUG" instructions in "MAINTENANCE" section inthis
manual.
Install new spark plug.
FillFUEL TANK per "BEFORE STARTING" instructions.
Drain FUEL TANK and re-fill with clean, fresh gasoline.
See "BEFORE STARTING" instructionsin this manual.
Adjust carburetor (if applicable). See "ADJUSTMENTS"
sec_on in this manual.
ENGINE LACKS POWER
CAUSE
jDirty air cleaner.
Impropercarburetoradjustment.
Lack of lubdcaiton.
REMEDY
Replace or clean air cleaner per "AIR CLEANER"
instructions in "MAINTENANCE" section in this manual.
Adjust carburetor (if applicable). See "ADJUSTMENTS"
section in this manual.
Filloilsumpto properlevel. See "BEFORE STARTING"
instructionssectioninthismanual.
ENGINE MISSES UNDER LOAD
CAUSE
Spark plug fouled.
Sparkplugporcelain cracked.
Impropersparkpluggap.
Improper carburetor adjustment
REMEDY
iRemove SPARK PLUG and clean it. See "SPARK
PLUG" instructions in "MAINTENANCE" section in this
manual.
In=allnew SPARK PLUG.
Regal)SPARK PLUG electrodes.See "SPARK PLUG"
instructionsin"MAINTENANCE"sectioninthismanual.
Adjustcarburetor (ifapplicable).See "ADJUSTMENTS"
sec'doninthis manual.
Page 5 181-1151-11

SEARS, ROEBUCK AND CO.
Federal and California Emission Control Systems Limited Warranty
Utility and Lawn and Garden Engines
CALIFORNIA & US EPA EMISSION CONTROL
WARRANTY 8TA'rEMENT
The U. S. Envk.ormwofld Proteclfon Agency ('I_A'), the California Air Resources
Board ('CARB') and Sears, Roebuck and Co. are pleased to explain the Federal and
Califomis EmkmJon Control Systems Warranty onyour new uffl_ or lawn and
garden equipment engine. In Callfomla, new 1995and ister utility and lawn and
garden equipment engines must be designed, built and equipp_:l to meet the State's
stringent anti-smog standards. In other states, new 1997 and later model year
engibon must be designed, built and equipped, at the time of Sail, to rn_t the U.S.
EPA repu aflons tot" small t_on-road chaises. Sears. Roebuck and Co. _ll warrant
the emission con_ system on your uffltiy or lawn and garden equipment engine for
the periods of time listed below, provided there has been no abuse, neglect,
unapprovnd modification, or Imp_oper maintenance of your utility or lawn and garden
equipment engine.
Your emission control system may include parts such as the carburetor, _gnitldn
system and exheust aystem. Also included may be the compression release system
and other emlselon-related assemblils.
Where a warrantable condition exists, Sears, Roebuck and CO. will repair your utility
or lawn and garden equipment engine at no cost to you for diagnosis, parts and
tabor,
MANUFACTURER'S EMISSION CON;'IrROL SYSTEM
WARRANTY COVERAGE
Emission control systems on 1995 and later model year California utirity and lawn
and garden equipment engines are warranted for two years as hereinafter noted. In
other states. 1997 and later model year engineearealsowarrante_;!for two ears. If,
during such warranty period any emlssion-relsted pert on your engine =sdef/_tive in
mafedsts or workmanship, the part will be repaired or rep aced by Sears, Roebuck
and CO,
OWNER'S WARRANTY BESPONSIBlUTIES
As the utility or iswn and garden equipment engine owner, you are responsible for
the performance of the required maintenance listed In your Owner's Manual, .but
Sears, Roebuck and Co, will not deny warmntyssoilly due to the lack of receibta or
for your failure to provide written evidence of the performance of all SCheduled
maintenance.
As the utillty_orlawn and garden equipment engine owner, you should, however be
aware thst _ears, Roebuck and Co. may deny you warranty coverage d your uti ity or
lawn and garden equfpment or a part thereof has failed due to abuse, neglect,
Im_pper maintenance or oneqproved modificaitons.
You are responsible for I_esentth_ your utility or lawn and garden equipment eng!ne
to a Sears, Roebuck and Co. Aumodzed Sendce Outlet as soon as a problem ex=sts.
The warran repairs should be completed in a reasonable amount of time, not to
exceed 3O _/ays.
Warranty seri, ce can be arranged by contacting either a Sears, Roebuck and Co.
Authorized Service Outlet, or by contacting Sears, Roebuck and Co. at 1-800-473-
7247.
IMPORTANT NOTE
This warranty statement explains your rights and obll_ctlons under the Emission
Control System Warranty _'ECS Warranty" ) which is provided to you by Sears,
Roebuck and Co, pursuant to California law. See also the Sears, Roebuck and CO.
Limited Warranties for Seam, Roebuck and Co, which is enclosed therewith on a
separate sheet and also is provided to you by Sears, Roebuck and Co. The ECS
Warranty al_lils only to the emission contrnt system of your new engice. To the
extent that there is any conflict in terms between the ECS Warrantj and the Sears,
Roebuck and Co. Warranty, the ECS Warranty shall apply excedt?n an_/circum-
stances in which the Sears, Roebuck and Co. Warranty may provide a Fonger
warranty period. Both the ECS Warranty and the Sears, Roebuck anti Co. Warranty
describe important rights and obligations with resbect to your new engtne.
Warranty service can only be performed by a Sears, Roebuck and CO. Authorized
Service Outlet. At the time of requesting warranty service, evidence must be
presented of the date of sail to the odglnal purchaser. The purchaser shall pay any
charges for making service calls end/or for transporting the woducil to and rrom the
pilce where the inspection and/or warranty work is performed, The purchaser shall
be respons!bil for any dame • or loss incurred in connection with the transportation
of any engine or any bert(s) tgh_reo f submitted for inspection and/or warranty work.
ff you have any qusetio_s regarding your warranty dghfs and responsibilities, you
should contact Sears, Roebuck and Co. at 1-800-473-7247.
EMISSION CONTROL SYSTEM WARRANTY
Emission Control System Warranty (=ECS Warranty') for 1995 and later model year
California utility and lawn and garden equipment engines (for other states, 1997 and
later model year engines):
A. APPLICABILITY: This warranty shall apply to 1995 and later model year
California utility and Ilvm and garden equipment engines (for other states, f997 and
later model year engines. The ECS Warranty Period shall begin on the date the
new engine or equipment is delivered to its original, end-use purchaser, and shall
continue for 24 consecutive months thereafter.
B. GENERAL EMISSIONSWARRANTY COVERAGE: Sears. RoebuckandCo,
warrantstothe odgthal end-use purchaser of .thenewengineor equipment and to
each subsequentpumheser that each o ItsuUityand lawn andgardenequipment
engines Is:
1. Designed.builtand equippedso as to conformwithallapplkiel:4eregulations
adoptedby the AirResourcesBoardpurSuant to itsau_ority InChapters I
and 2. Part5, Divielou26ofthe Health and SafetyCode. and
2. FreefromdefectsInmaterialsand workmanshipwhich, at any time dudnlgthe
ECSWarranty Pedod,willcausea warrantedemissions-related partto fail to
be IdenticalIn allmaildst resbect_tothe partas describedin the engine
manufacturer'sappticationfor certification.
C. The ECS Warrantyonlypertainstoemissldns-relatadpartsonyourengine,as
fuilows:
1. Any warranted, emlssilns-ralafed parts which are not scheduled _or
mp_acemouf as required maintenance in the Owner's Manual shall be
warranted for the ECS Warranty Period. If any such pert fails dedng the ECS
Warranty Peded, It shal! be repaired or replaced by Sears, Roebuck and Co.
according to Subsection 4 below. Any such part repaired or replaced under
the ECS Warranty shall be warranted for any remainder of the ECS Warranty
Period.
2. Any warranted, emlssisns-relaled part which is scheduled only for regular -
inspection as specified in the Owner's Manual shall be warranted for the ECS
Warranty Period. A statement In such written instructions to the effect of
"repair or replace as nacessaPi', shall not reduce the ECS Warranty Period.
Any such part repaired or replaced under the ECS Warranty shall be
warranted for the remainder of the ECS Warranty Period.
3. Any warranted, emissions-related part which is scheduled for repilcement as
required maintenance in the Owner's Manual, she, be warranted for the
bedod of time pdor to the first scheduled replacement point for that part. If
e part toils prior to the first scheduled req=acemant, the bert shall be
repaired or replaced by Sears, Roebuck and Co. according to Subsection 4
below. Any such emissions-related part repaired or replaced under the ECS
Warranty shall be warranted tot the remainder of the ECS Warranty Pedod
prior to the first scheduled replacement point for such emissldns-re ated part.
4. Repair or replacement of any warranted, emissions-related bert under this
ECS Warranty shall be performed at no charge to the owner at a Sears,
Roebuck and Co. Authorized Service Outlet.
5. The owner shall not be charged for d]ngnostic labor which leads to the
determination that a part covered by the ECS Warranty is in fact defective,
provided that such diagnostic work is performed at a Sears, Roebuck and Co,
Authorized Sen/ice Outlet.
6. Sears, Roebuckand Co, shall be liablefor damakgeesto otherodginstengine
componentsor approved modifications proximatelycausedby afailure under
'warrantyof an emission-relatedpartcoveredby the ECSWarranty.
7. Throughout the ECS Warranty Padod, Sears, Roebuck and Co. shall
maintain a supply of warranted emission-related parts sufficient to meet the
expected demand for such emissfon-related parts,
8. Any Seam, Roebuck and Co. authorized and approved emission-related
replacement part may be used in the performance of any ECS Warranty .
maintenance or repair and will be _rovlded without charEc_eto the owner,
Such use shall not reduce Sears, Roebuck and Co. Warranty obliga-
tions,
9. Unapproved add-on or modified parts may not be used to modify or repair a
Sears Roebuck and CO. engine. Such use voids this ECS Warrentyaand
shall be sufficient grounds for disallowing an ECS Warranty claim. Seam,
Roebuck and Co. shall not be liable hereunder for failures of alnywarranted
parts of a Seam, Roebuck and Co. engine caused by the use of such an
unapproved add-on or modified part.
EMISSION-RELATED PARTS INCLUDE THE FOLLOWING:
1. Carburetor Assembly and its Internal Components
!lFseti"
Carburetor gaskets
Intake pipe
2. AirCleanerAssembly
a) Airtilter element
3. IgnitionSystem,including:
a) Sparkplug
b I on module
c_ IF_sel assembly
4. Catalytic Muffler (if so equipped)
a Muffler gasket (if so equipped)
b Exhaust manifold f so equipped)
5. CrankcaseBreatherAssemblyand itsComponents
a) Breather connacdentube
Sears, Roebuck and Co., Hoffman Estates, IL 60179 U.S.A.
: ; Page 6 1B1"1151"11
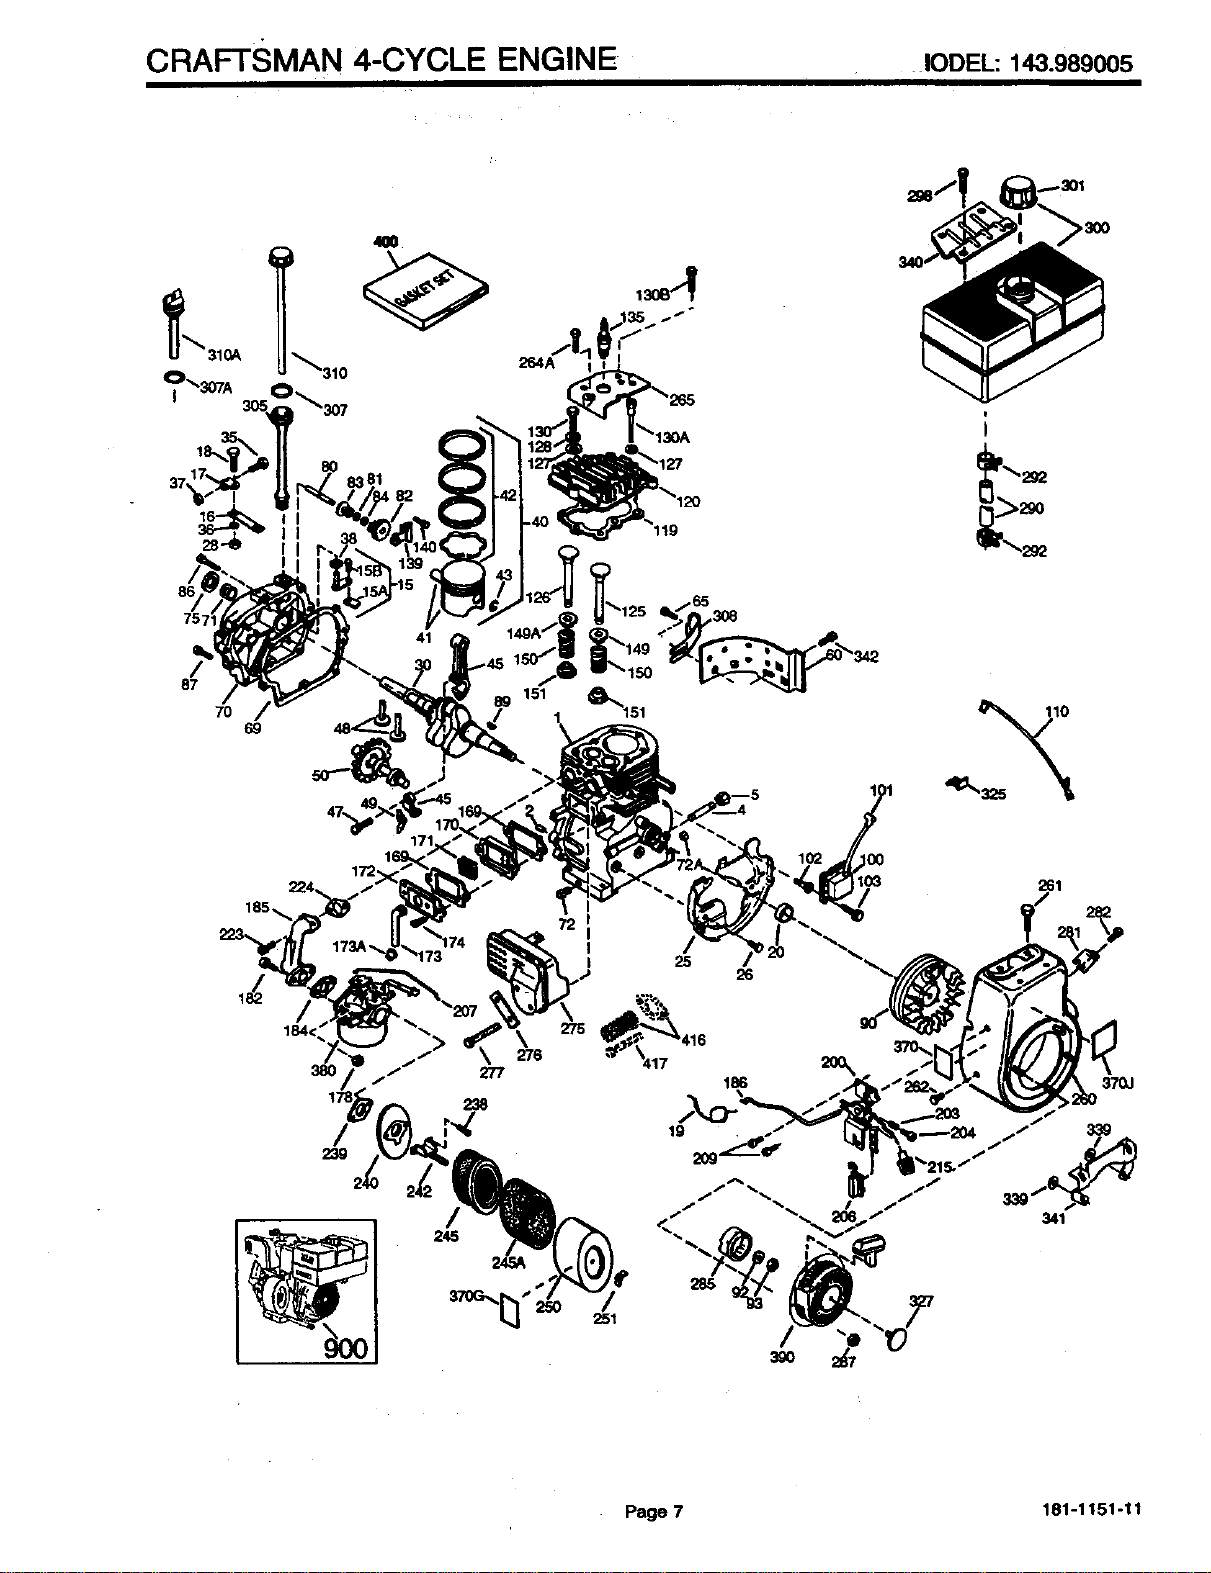
CRAFTSMAN 4-CYCLE ENGINE IODEL:143.989005
264A
757
87
70
69
41
38O
172
245
10
Page 7 181-1151-11
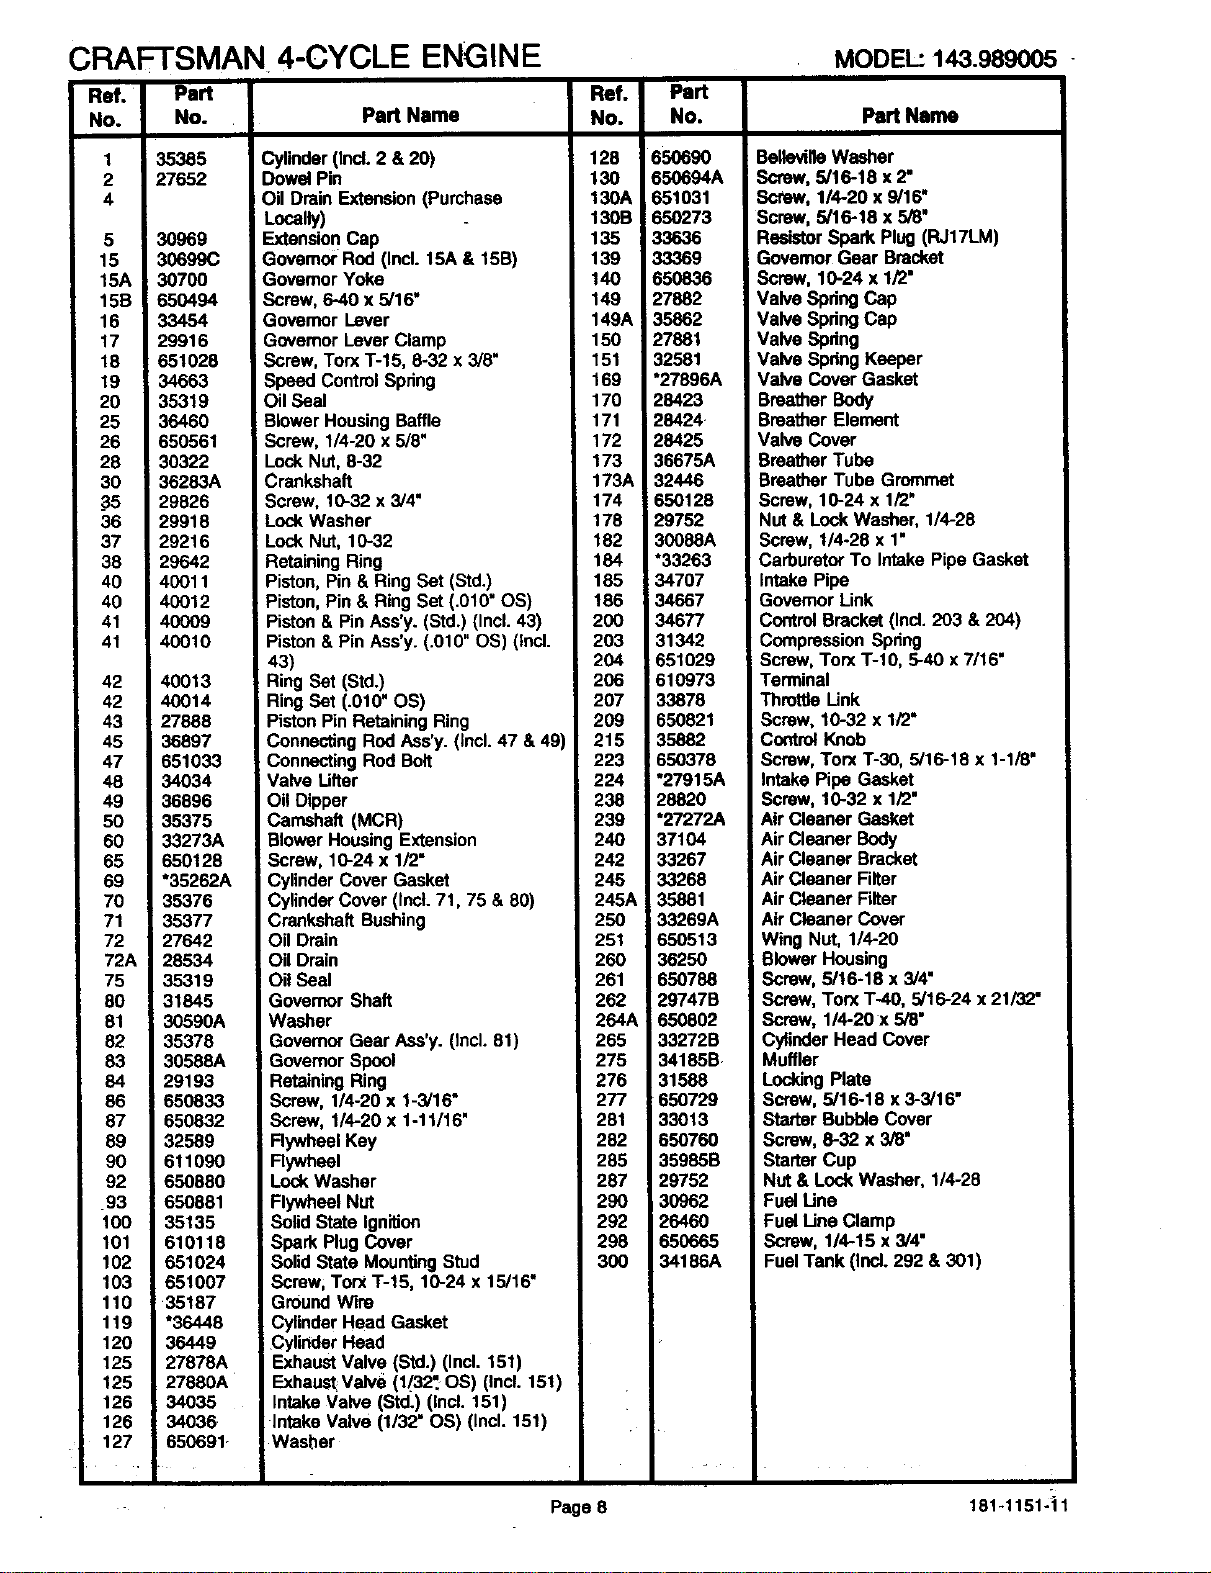
CRAFTSMAN 4-CYCLE ENGINE . MODEL:143.989005-
Part Fief, Part
No. Part Name No. No. Part Name
Ref.
NO.
1
2
4
5
15
15A
15B
16
17
18
19
20
25
26
28
30
_35
36
37
38
40
40
41
41
42
42
43
45
47
48
49
50
60
65
69
70
71
72
72A
75
80
81
82
83
84
86
87
89
90
92
93
100
101
102
103
110
119
120
125
125
126
126
127
35385
27652
3O969
30699C
30700
650494
33454
29916
651028
34663
35319
36460
650561
30322
36283A
29826
29918
29216
29642
40011
40012
40009
40010
40013
40014
27888
36897
651033
34034
36896
35375
33273A
650128
"35262A
35376
35377
27642
28534
35319
31845
30590A
35378
30588A
29193
650833
650832
32589
611090
650880
650881
35135
610118
651024
651007
35187
*36449
36449
27878A
27880A
34035
34O36
650691-
I-
Cylinder (Ind. 2 & 20)
Dowel Pin
i Oil Drain Extension (Purchase
'Locally)
Extension Cap
Govemor Rod (Ind. 15A & 15B)
Govemor Yoke
Screw, 6-40 x 5/16"
Govemor Lever
Governor Lever Clamp
Screw, Ton( T-15, 8-32 x 3/8"
Speed Control Spring
Oil Seal
Blower Housing Baffle
Screw, 1/4`20 x 5/8"
Lock Nut, 8-32
Crankshaft
Screw, 10-32 x 3/4"
Lock Washer
Lock NUt, 10-32
Retaining Ring
Piston, Pin & Ring Set (Std.)
Piston, Pin & Ring Set (.010" OS)
Piston & Pin Ass'y. (Std.) (Incl. 43)
Piston & Pin Ass'y. (.0t0" OS) (Incl.
43)
Ring Set (Std.)
Ring Set (.010" OS)
Piston Pin Retaining Ring
Connecting Rod Ass'y. (Incl. 47 & 49
Connecting Rod Bolt
Valve Lifter
Oil Dipper
Camshaft (MCR)
Blower Housing Extension
Screw, 10-24 x 1/2"
Cylinder Cover Gasket
Cylinder Cover (Incl. 71, 75 & 80)
Crankshaft Bushing
Oil Drain
Oil Drain
Oil Seal
Governor Shaft
Washer
Governor Gear Ass'y. (Incl. 81)
Govemor Spool
Retaining Ring
Screw, 1/4-20 x 1-3/16"
Screw, 1/4-20 x 1-11/16"
Rywheel Key
Rywheal
Lock Washer
Flywheel Nut
Solid State Ignition
Spark Plug Cover
Solid State Mounting Stud
Screw, Ton( T-15, 10-24 x 15/16"
Ground Wire
Cylinder Head Gasket
Cylinder Head
Exhaust Valve (Std.) (IncL 151)
Exhaust Valve (1/32" OS) (Incl. 151)
Intake Valve (Std.) (incl. 151)
Intake Valve (1/32" OS) (Incl. 151)
Washer
128
130
130A
130B
135
139
140
149
149A
150
151
169
170
171
173
173A
174
178
184
185
186
200
2O3
204
2O6
207
209
215
223
224
238
239
240
242
245
245A
250
251
260
261
262
264A
265
275
276
277
281
2_
285
287
290
2_
298
300
65O690
650694A
651031
150273
13636
33369
650836
27882
35862
27881
32581
"27896A
28423
28424
28425
36675A
32446
650128
29752
30088A
*33263
34707
34667
34677
31342
651029
610973
33878
650821
35882
650378
"27915A
28820
"27272A
37104
33267
33268
35881
33269A
650513
36250
150788
29747B
650802
33272B
34185B
31588
650729
33013
650760
35985B
29752
3O962
26460
650665
34186A
Belloville Washer
Screw, 5/16-18 x 2"
Screw, 1/4-20 x 9/16"
Screw, 5/16-18 x 5/8"
Resistor Spark Plug (RJ17LM)
GovemoF Gear Bracket
Screw, 10-24 x 1/2"
Valve Spring Cap
Valve Spdng Cap
Valve Spring
Valve Spring Keeper
Valve Cover Gasket
Breather Body
Breather Element
Valve Cover
Breather Tube
Breather Tube Grommet
Screw, 10-24 x 1/2"
Nut & Lock Washer, 1/4-28
Screw, 1/4-28 x 1"
Carburetor To Intake Pipe Gasket
Intake Pipe
Governor Link
Control Bracket (Ind. 203 & 204)
Compression Spring
Screw, Ton( T-t0, 5-40 x 7/16"
Terminal
Threffie Unk
Screw, 10-32 x 1/2"
Control Knob
Screw, Ton( T-30, 5/16-18 x 1-1/8"
Intake Pipe Gasket
Screw, 10-32 x 1/2"
Air Cleaner Gasket
Air Cleaner Body
Air Cleaner Bracket
Air Cleaner Filter
Air Cleaner Filter
Air Cleaner Cover
Wing Nut, 1/4-20
Blower Housing
Screw, 5/16-18 x 3/4"
Screw, Torx T-40, 5/16-24 x 21/32"
Screw, 1/4-20 x 5/8"
Cylinder Head Cover
Muffler
Locking Plate
Screw, 5/16-18 x 3-3/16"
Starter Bubble Cover
Screw, 6-32 x 3/8"
Starter Cup
NUt & Lock Washer, 1/4-28
Fuel Une
Fuel Line Clamp
Screw, 114-15 x 3/4"
Fuel Tank (Ind. 292 & 301)
Page 8 181-1151'11
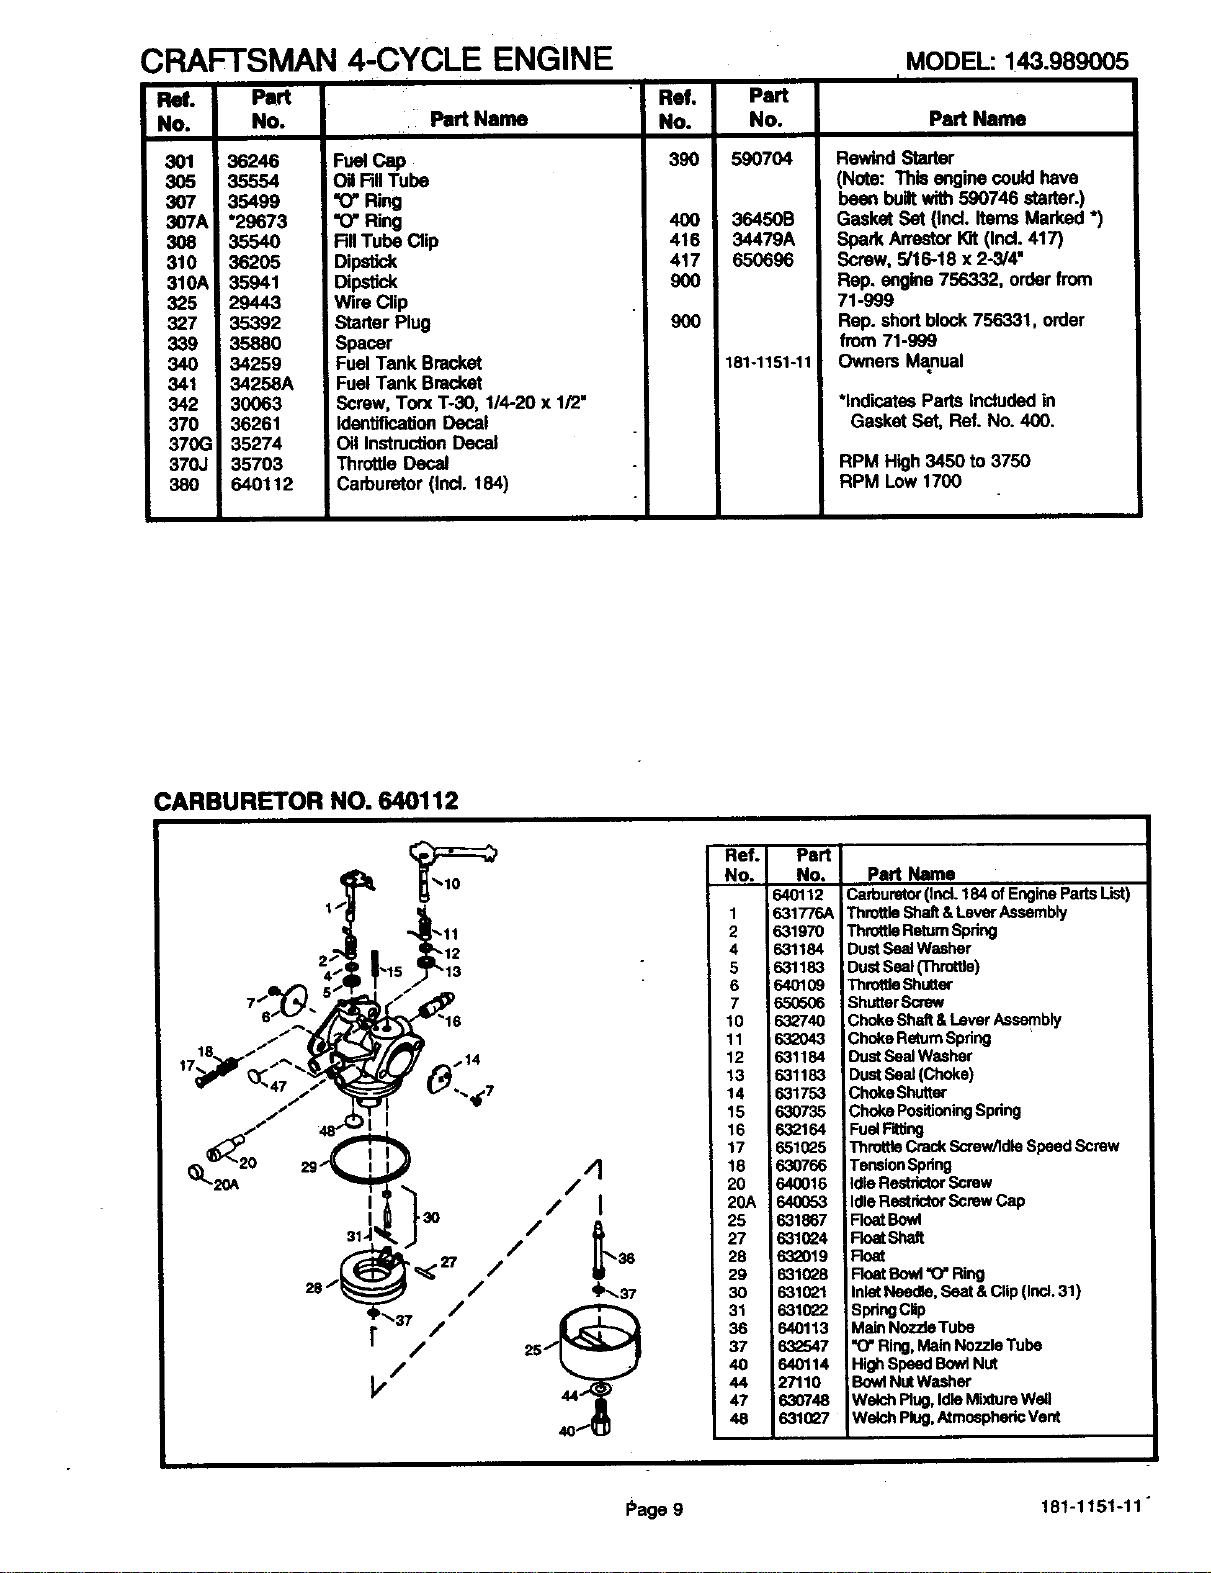
CRAFTSMAN 4-CYCLE ENGINE MODEL:143.989005
I
Ref. Part Ref. Part
No. No. Part Name No. No. Part Name
I
390 590704
301
305
307
307A
308
310
310A
325
327
339
340
341
342
370
370G
370J
380
36246
35554
35499
*29673
3554O
36205
35941
I 29443
35392
35880
34259
34258A
3OO63
36261
35274
35703
640112
F._ Cap
Oil RIITube
"O" Ring
"O" Ring
RII Tube Clip
Dipstick
D_p._ck
WireClip
StarterPlug
Spacer
FuelTank Bracket
FuelTank Bracket
Screw,TocxI"-30, 114-20x 1/2"
Identif'w,etion Decal
i Oil Instruction Decal
ThrottleDecal
Carburetor(Ind. 184)
400 36450B
416 34479A
417 650696
900
9OO
181o1151-11
RewindStarter
(Note: Thisenginecouldhave
beenbuiltwith590746 starter.)
GasketSet (Ind. ItemsMarked*)
SparkArrestorWit(Ind. 417)
Screw,5/16-18x 2-3/4"
Rep. engine756332, orderfrom
71-999
Rep.shortblock756331, order
from 71-999
OwnersManual
*Indicates Parts Included in
Gasket Set, Ref. No. 400.
RPM High 3450 to 3750
RPM Low 1700
CARBURETOR NO. 640112
Ref. Part
No. No. Pert Name
640112 Carburntor{InsL 184 of Engine Parts List)
1 631776A Thrnttle Shaft & Lever Assembly
2 631970 Throttle Retum Spring
4 631184 Dust Seal Washer
5 631183 Dust Seal (Thrnttle)
6 640109 Throttle,Shutter
7 65_606 Shutter Screw
10 632740 Choke Shaft &Lever Assembly
11 632043 Choke Return Spring
12 631184 Dust Seal Washer
13 631183 Dust Seal (Choke)
14 631753 Choke Shutter
15 630735 Choke PositioningSpring
16 632164 Fuel FdlJng
17 651025 Throttle Crack Screw/idle Speed Screw
18 630766 TensionSpring
20 640016 Idle Restdctor Screw
20A 640053 Idle Restdctor Screw Cap
25 631867 Fleat Bowl
27 631024 FloatShalt
28 63_019 Float
29 631028 Float Bowl"O"Ring
30 631021 Inlet Needle, Seat & Clip (Inct.31)
31 631022 Spdng Clip
36 640113 Main Nozz_ Tube
37 632547 !"O"Ring, Main Nozzle Tube
40 640114 High Speed Bowl Nut
44 27110 Bo_ Nut Washer
47 530748 Welch Plug, Idle Mixture Well
48 6311027 Welch Plug, Atmospheric Vent
Page 9 181-1151-11"
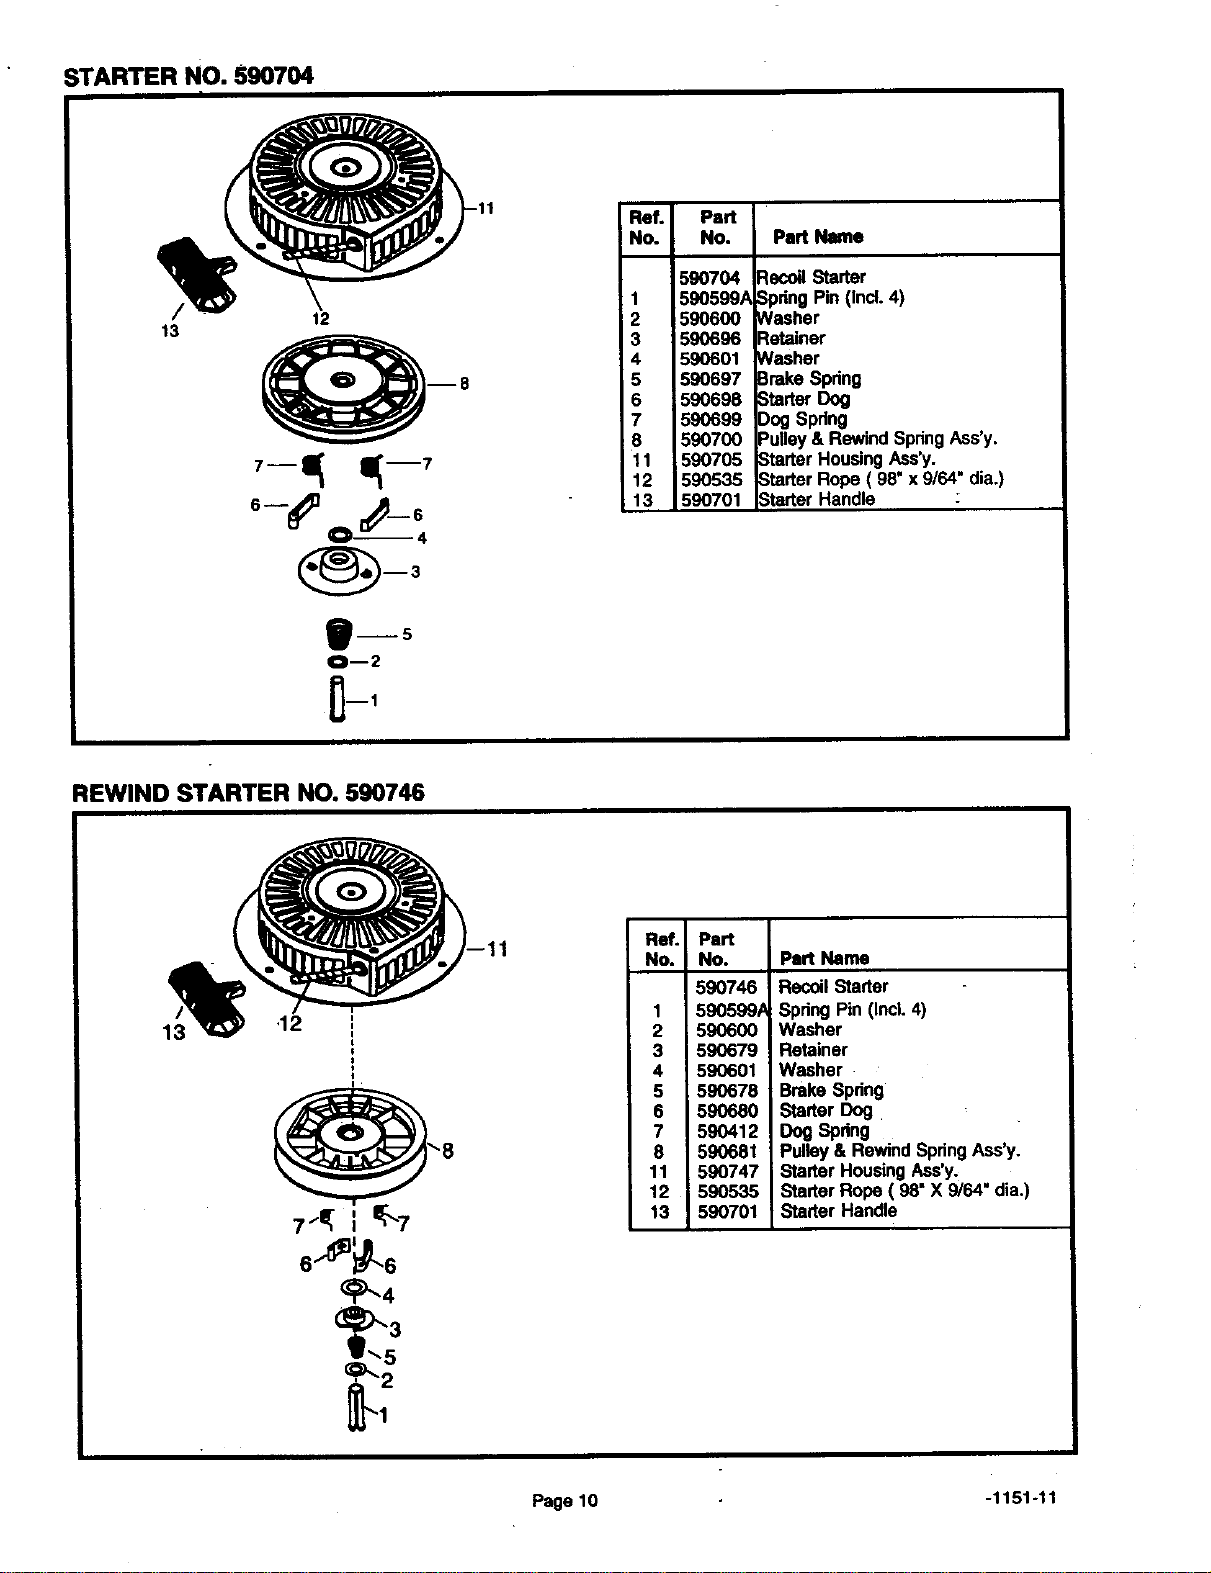
STARTER NO. 590704
/
13
12
B--5
OD2
Ref. Part
No. No. Part Name
590704
1 590599,4
2 590600
3 590696
4 590601
5 590697
6 590698
7 590699
8 590700
11 590705
12 590535
13 590701
_ecoil Starter
3pdngPin (Incl.4)
Nasher
:_etainer
Nasher
3rakeSpdng
3tarter Dog
:)ogSpring
_ulley& RewindSpringAss'y.
_tarter HousingAss'y.
StarterRope( 98"x 9/64"dia.)
Starter Handle
REWIND STARTER NO. 590746
13
P-4
2
Ref. Part
No. No. =art Name
590746
1 590599,4
2 590600
3 59O679
4 590601
5 590678
6 590680
7 590412
8 590681
11 590747
12 590535
13 590701
RecoilStarter
SpringPin (Incl.4)
Washer
Retainer
Washer
Brake Spdng
Starter Dog
DogSpdng
Pulley& RewindSpringAss'y.
i Starter HousingAss'y.
StarterRope( 98"X 9/64" dia.)
StarterHandle
Page 10 -1151-11
SF. LRS
operator's
manual
MODEL NO. 143.989005
SOLID STATE IGNITION
CAUTION:
Read RULES for
Safe OPERATION
and INSTRUCTIONS
Carefully
How to ORDER Repair Parts
The Model Number will be found on a decal on the blower
housing (See Figure 1). Always mention the Model Number
when requesting service or repair parts for your Craftsman
Engine.
All parts listed herein may be ordered from any SEARS, ROE-
BUCK AND CO. or SEARS CANADA, INC. retailor catalog store.
If the parts you need are not stocked locally,your order will be
electronically transmitted to a Sears Repair Parts Distribution
Center for expedited handling.
WHEN ORDERING REPAIR PARTS, ALWAYS GIVE THE
FOLLOWING INFORMATION AS SHOWN IN THIS LIST.
1. The PART NUMBER
2. The PART DESCRIPTION
3. The MODEL NUMBER
4. The NAME OF ITEM - ENGINE
"Your Sears merchandise has added value when you consider that Sears has
service units nationwide staffed with Sears trained technidans.., professional
technicians specifically trained on Sears products, having the parts, tools and
equipment toinsure that we meet our pledge toyou ... we service what we sell."
Sold by SEARS, ROEBUCK AND CO., CHICAGO, IL 60684 U.S.A.
and SEARS CANADA, _INC, TORONTO, ONTARIO, CANADA
181-1151-11