
DX100 Field Maintenance Guide
is guide has been created to help you maintain your DX100 printer’s peak performance and
quality. It is important to utilize these maintenance procedure based on your environmental
usage of the printer. e frequency of some of these maintenance items may need to be
performed more oen based on these conditions.
1

DX100 Field Maintenance Guide
Glossary of Tasks
• Dusting off the paper roll
o When a new roll of paper is opened. It is important to utilize a lint free cloth to wipe the
edges of the paper off prior to inserting the paper spindle flanges.
Doing so will help to minimize the amount of paper dust being ingested into
vital printer sections.
• Emptying waste paper box
o It is important to empty the waste paper box when the paper is changed. If the paper
slugs build up in the box they can be ingested by the printer and cause damage to the
cutter, fans, and also cause paper jams.
• Clean the outside of the printer
o Every start of the day the printer’s exterior should be wiped down with a damp cloth.
Being certain the area where the prints exit the printer kept clean of debris.
• Clean the roll unit
o Daily, it is important to clean the roll unit. Utilizing a lint free cloth. First, by wiping out
the roll units. Then lift the rear plate and wipe out from behind this plate to remove any
dust or lint. Next, lift the front plate to clean behind this unit. It is also important to wipe
across the felt pads to help lift some of the paper dust that may have accumulated in
these pads
It is important not to vacuum this section. The suction from the vacuum can
dislodge the small white rollers
• Cleaning ink/paper dust from upper platen
o Daily, the upper platen should be checked for excessive ink and paper dust. To clean this
section it is recommended to use a bemcot moistened with water and lightly dab the
absorbent material where the paper dust has accumulated. Next, uses a new bemcot
moistened with water and wipe the plastic sections of the upper platen.
By keeping this section clean of debris and ink build up will prevent ink from
being transferred to the prints.
2

• Clean ink from upper paper guide rollers
o Daily inspection: If the upper platen is not properly maintained, ink may be transferred
to the rollers of the paper guides. Utilize a bemcot moistened with water to clean these
rollers.
It is extremely important not to push down on these rollers, pushing too hard
can dislodge them from the guides.
• Vacuum Anti-condensing fans
o Bi-Weekly: These fans should be inspected weekly for any dust or debris build up
vacuuming them bi-weekly to keep the dust and debris from collecting in and around
these fans
• Vacuum air filters
o Monthly vacuum the air filter for the power supply and cooling fans. Keeping these
filters clear of dust and debris will improve the efficiency of keeping the vital boards
cool and operating.
• Cleaning the feed rollers (roll unit)
o Monthly, at the end of a work day, it is recommended that the rubber feed rollers be
cleaned with a damp bemcot. By doing this at the end of the day will allow the rollers to
dry properly.
• Clean the feed rollers (rear cover)
o Monthly, at the end of a work day, it is recommended that the rubber feed rollers be
cleaned with a damp bemcot. By doing this at the end of the day will allow the rollers to
dry properly.
Troubleshooting:
• Ink lines on prints
o When lines appear on the front and back of prints it is important to check and clean the
upper platen and upper paper guides
• White edge on prints
3

o When a small white edge appears on the prints, this may be a result of the paper
meandering while bee fed through the printer
Check that the paper is tight on the spindle by pressing the black and grey
flanges together so that they tight against the edges of paper
Check the paper guides in the roll unit to be sure the front and rear paper
guides are set and locked into position for the paper size loaded.
• W-1108: Paper Size Error
o If you encounter with a W-1108 error this may be caused by the paper flange not being
tight against the edge of the paper. Remove the paper from the roll unit and press the
grey and black flanges tightly against the paper and reload the paper verify both the
front and rear paper guides are set correctly. If the error persists please contact the help
desk.
• W-1102: Paper Jam (Rear Cover/ Top Cover)
o W-1102 indicates that a paper jam has occurred. After removing the roll paper verify
both the front and rear paper guides are set to the correct paper width.
o Inspect the roll unit for any debris such as paper slugs, torn pieces of paper, excessive
dirty rollers.
o Inspect the inlet roller by following these steps
• E-2101: Tube Maintenance Error
o The E-2101 message will be displayed when the ink tubes are close to being to their
service life. It is recommended to contact the help desk for further instruction. It is also
important to understand your printer’s warranty.
• E-9901: Fatal Error
o A fatal error occurs when there is a mechanical malfunction. It is important to contact
the help desk for further assistance on a potential remedy for the specific error code.
• Service call error 1102
o This error will be associated with an E=9901 indicating the ink tubes will need to be
serviced, at this point the printer will need to be serviced. You must contact the help
desk for further instructions.
4
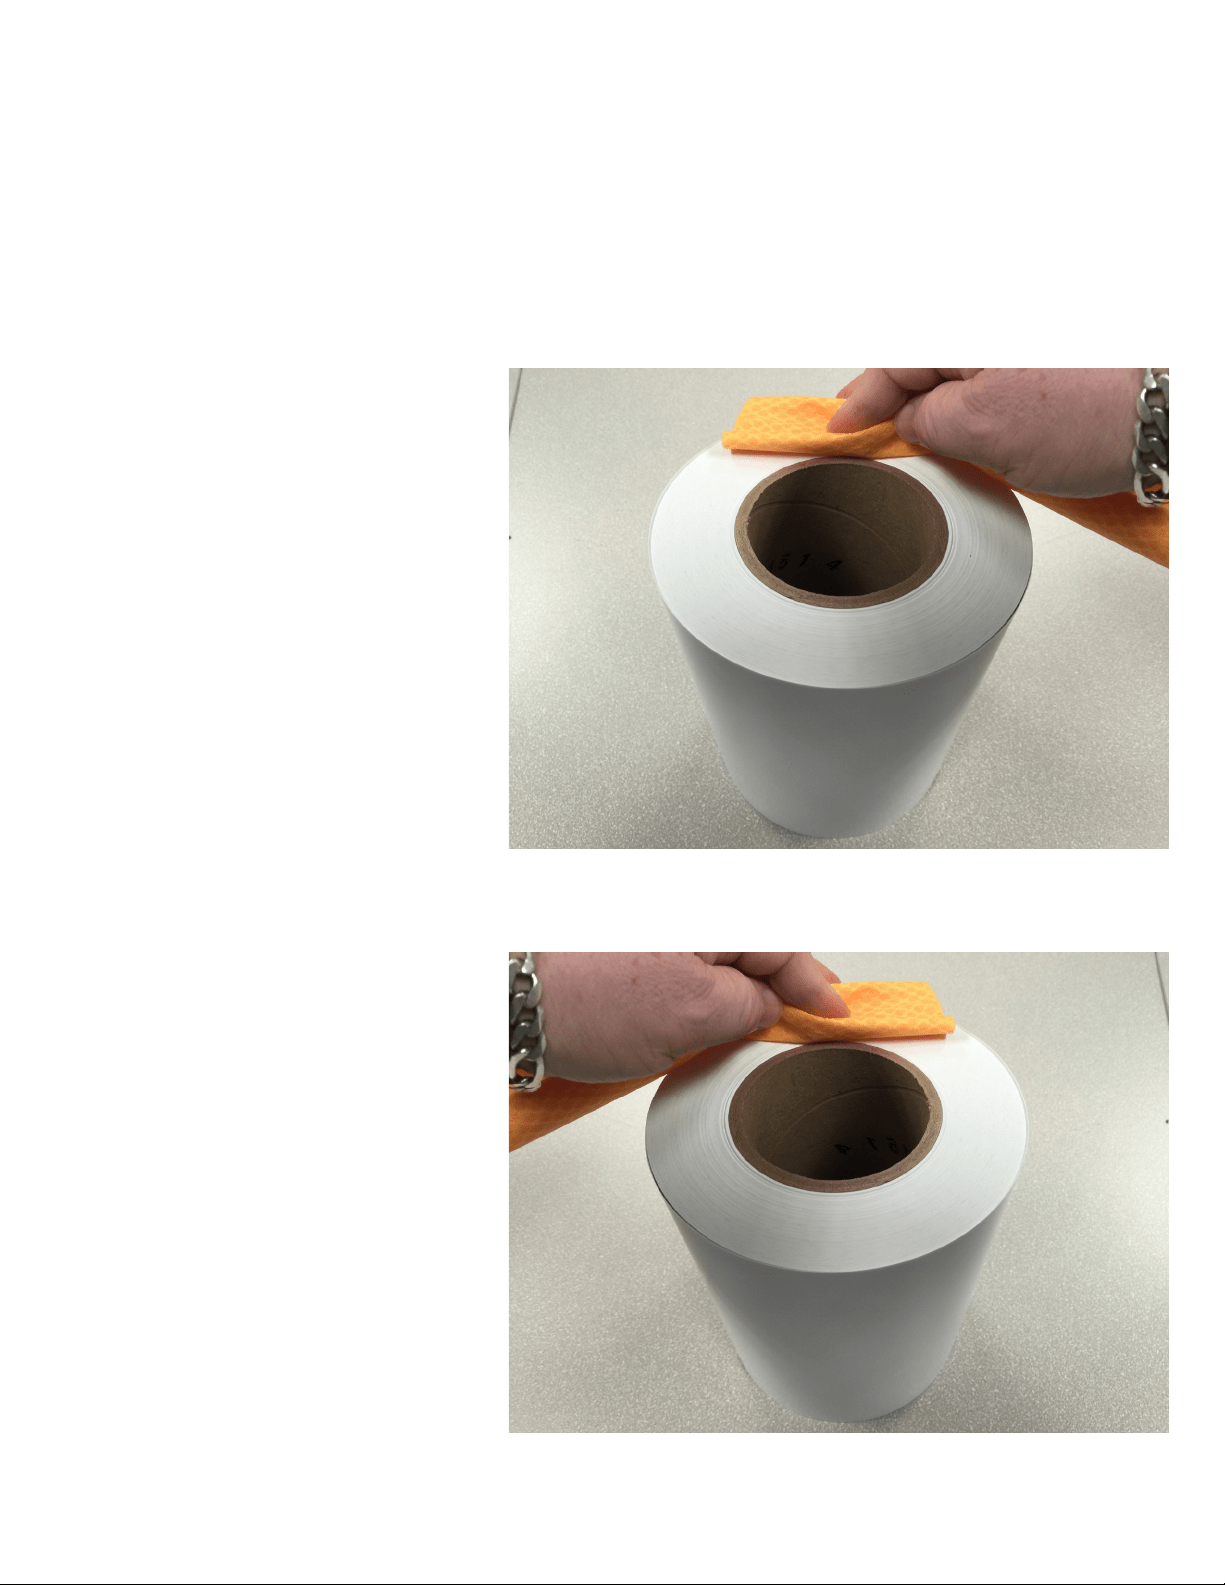
Dusting o the Paper Roll
Paper dust can accumulate on the ends of the roll paper during manufacturing. When the
paper is removed from the packaging. It is important to wipe o both ends of the roll prior
to placing it on the paper spindle.
1. With a lint free cloth set the paper on
end as shown and wipe around the top of
the roll to remove any dust.
2. Carefully turn the roll over and dust o
the other end.
Important: ese step should be followed
for every paper change.
5

Empty the Wastepaper Box
It is extremely important to empty the wastepaper box aer every roll of paper. By having the paper slugs
collect in the box can result in the slugs being introduced back into the printer causing mechanical failures
and paper jamming .
2. Re-install the wastepaper box
1. Remove the wastepaper box then discard
the paper slug in the trash.
6
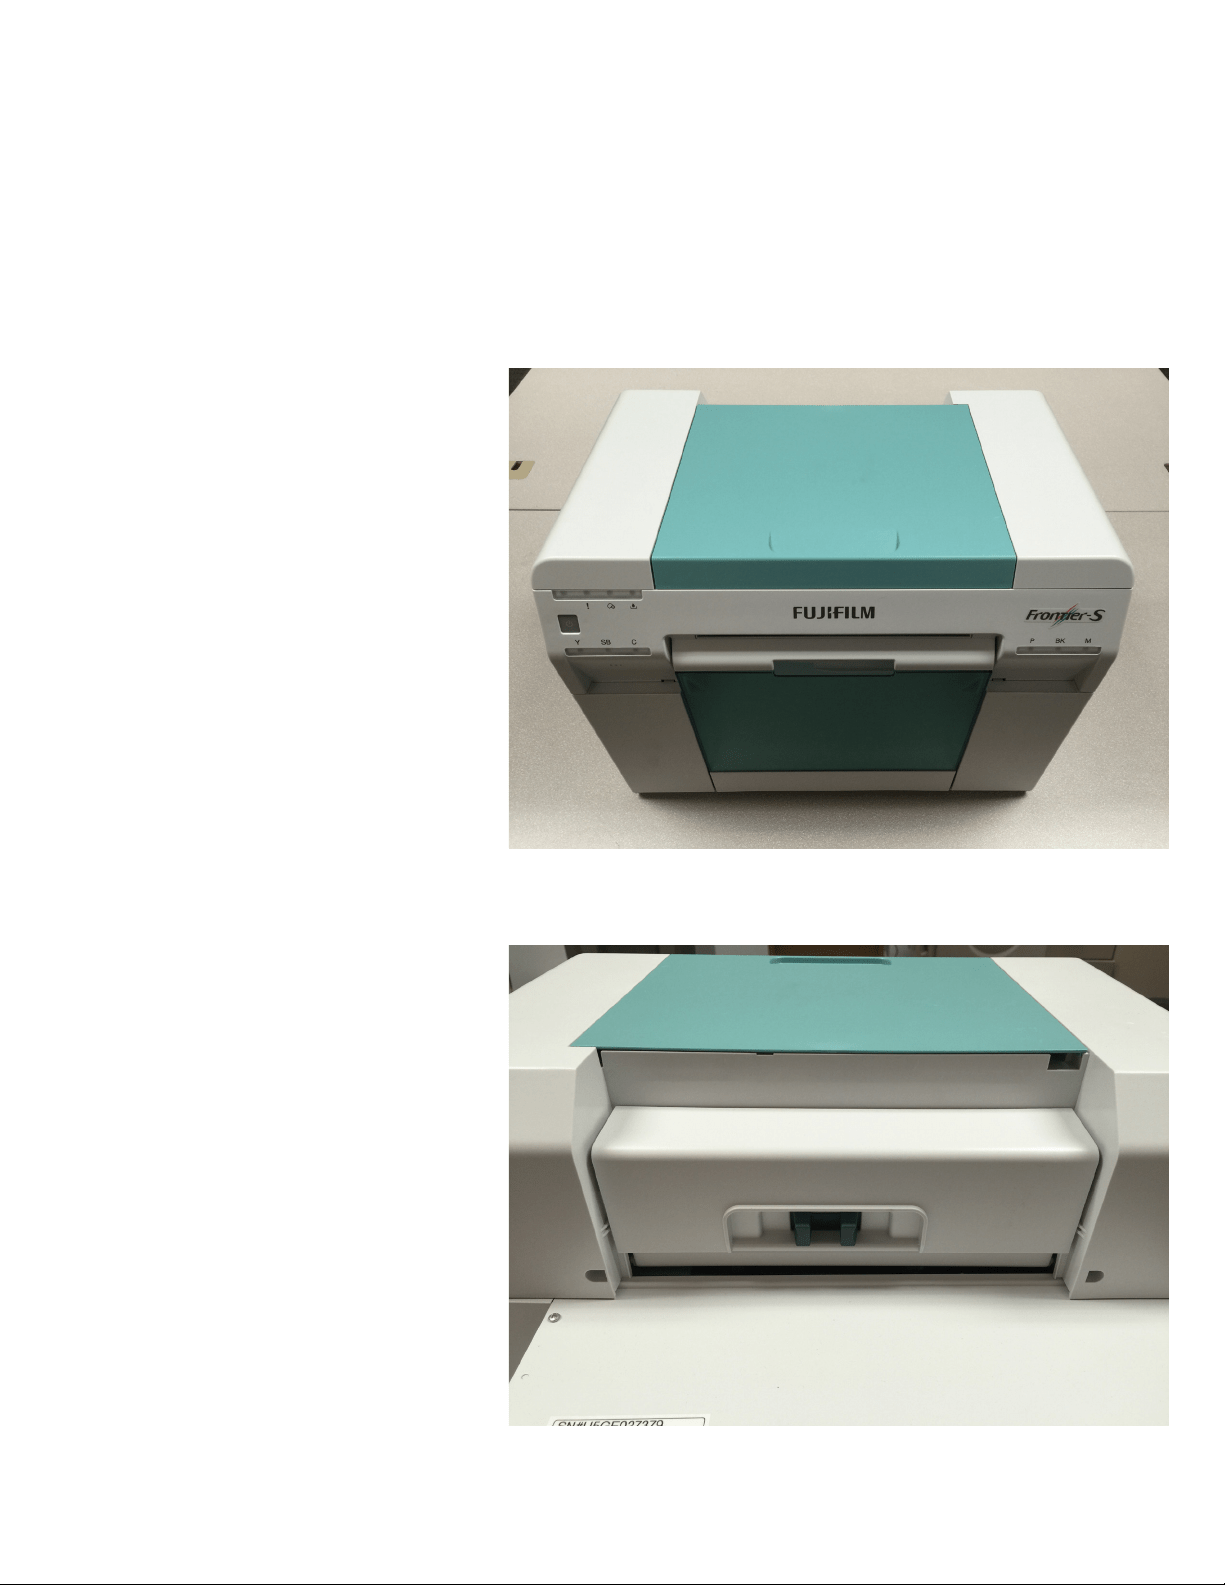
Cleaning outside surfaces of the
DX100
To keep your printer looking its best. It recommended to clean the outside of the printer to control the
amount of dust and debris that can collect on its surface.
2. Wipe the rear and sides of the printer.
1. With a cloth moistened with water wipe
the front and sides of the printer. Be sure to
wipe slightly inside the print exit section.
7
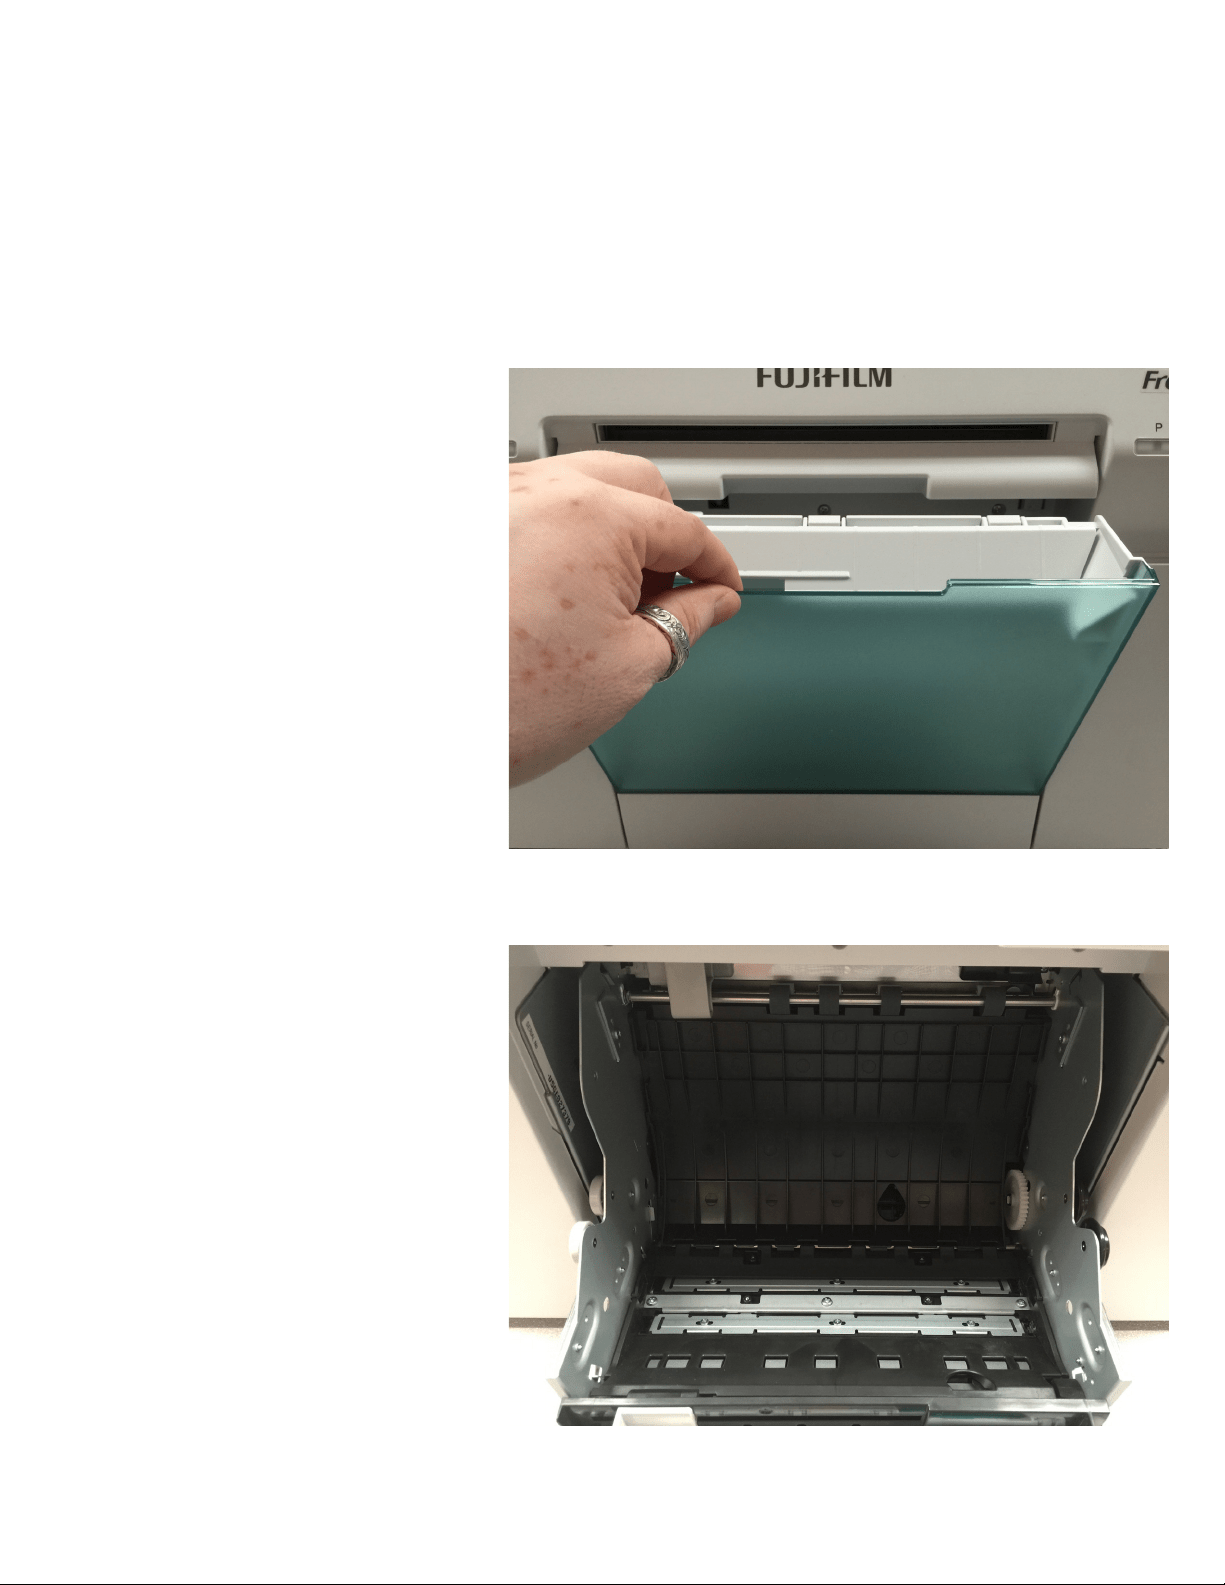
Cleaning the Roll Unit
e roll unit is a vital part of the DX100’s paper transport section. It is important to maintain this sections
cleanliness by follow the steps below.
2. Release the blue lock lever to open the
roll unit.
1. Remove the wastepaper box
Important: Do not vacuum near the
white rollers of the roll unit doing so may
dislodge the small white rollers.
8
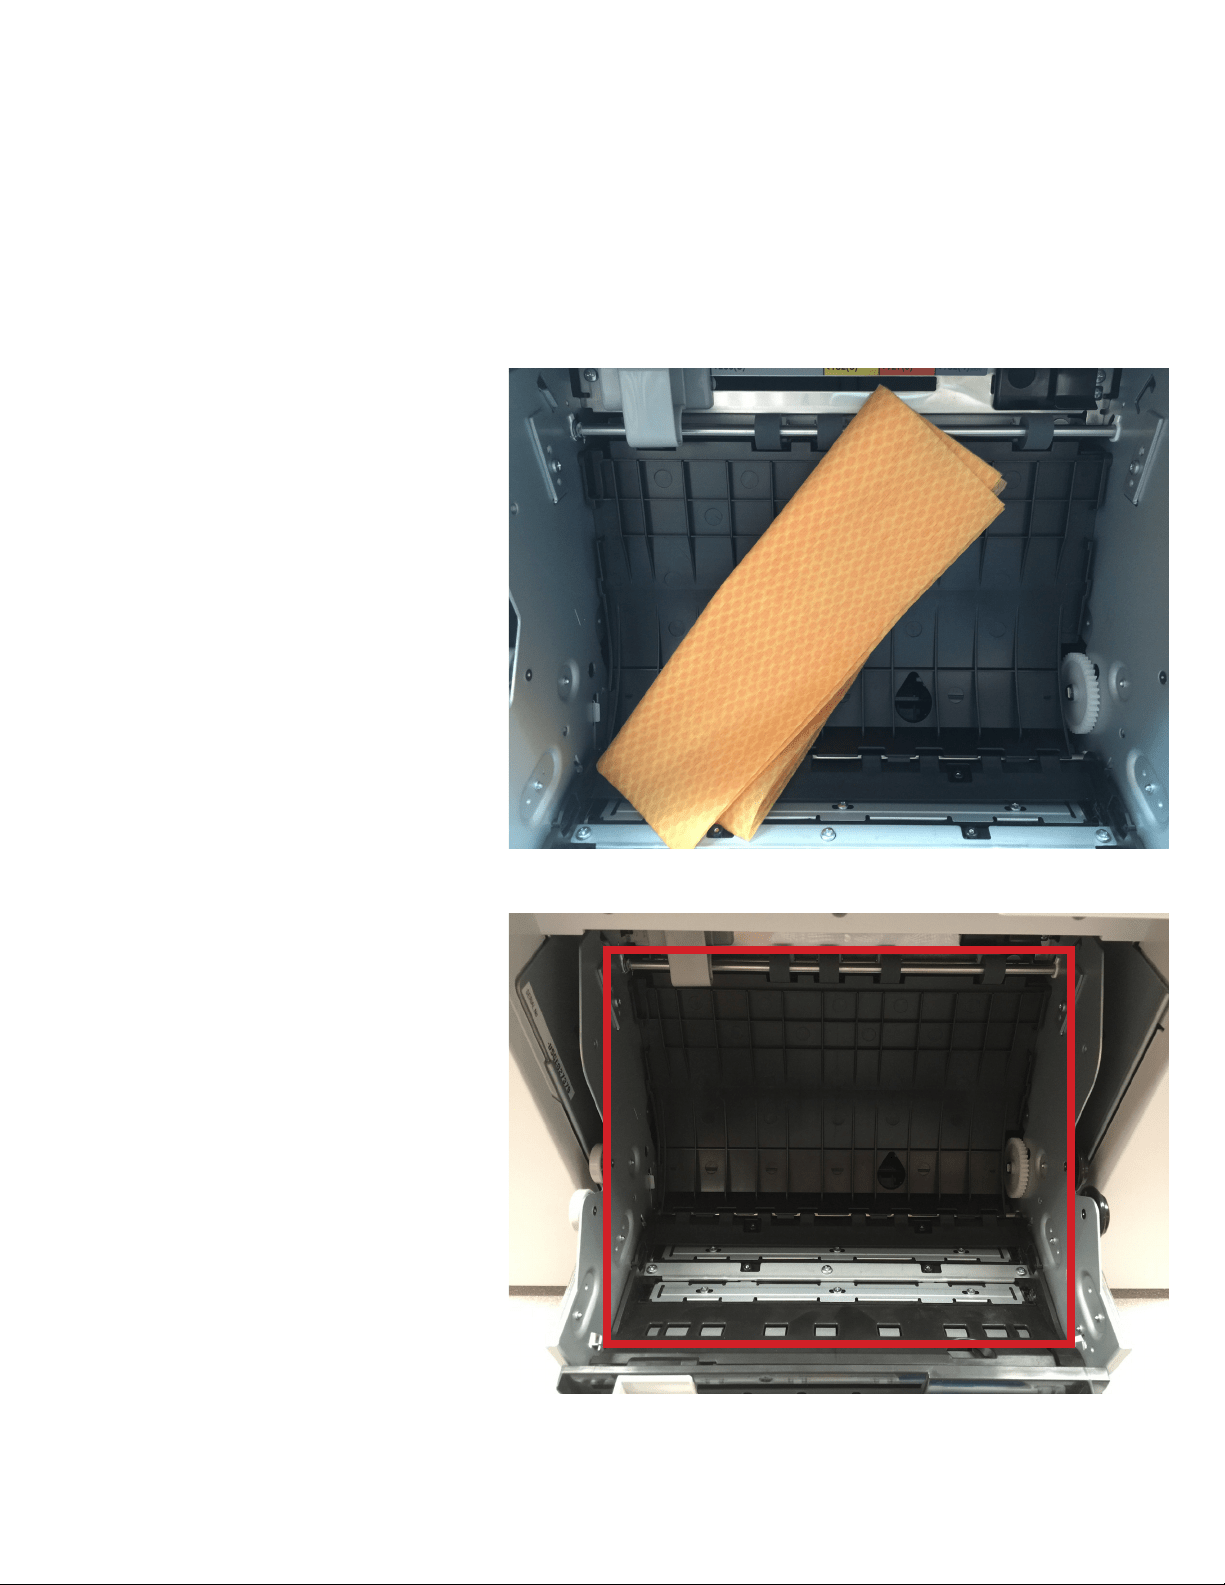
Cleaning the Roll Unit
3. Utilizing a list free cloth or a bemcot.
Gently wipe the inside of the roll unit to
remove any dirt or debris.
9
Cleaning the Roll Unit
5. Gently wipe this area in an up and down
manner to dust and clear the area of any
debris.
Note: Be careful not to dislodge any white
rollers
4. Li up the rear plate by placing your
nger in the teardrop hole and liing
upwards.
10

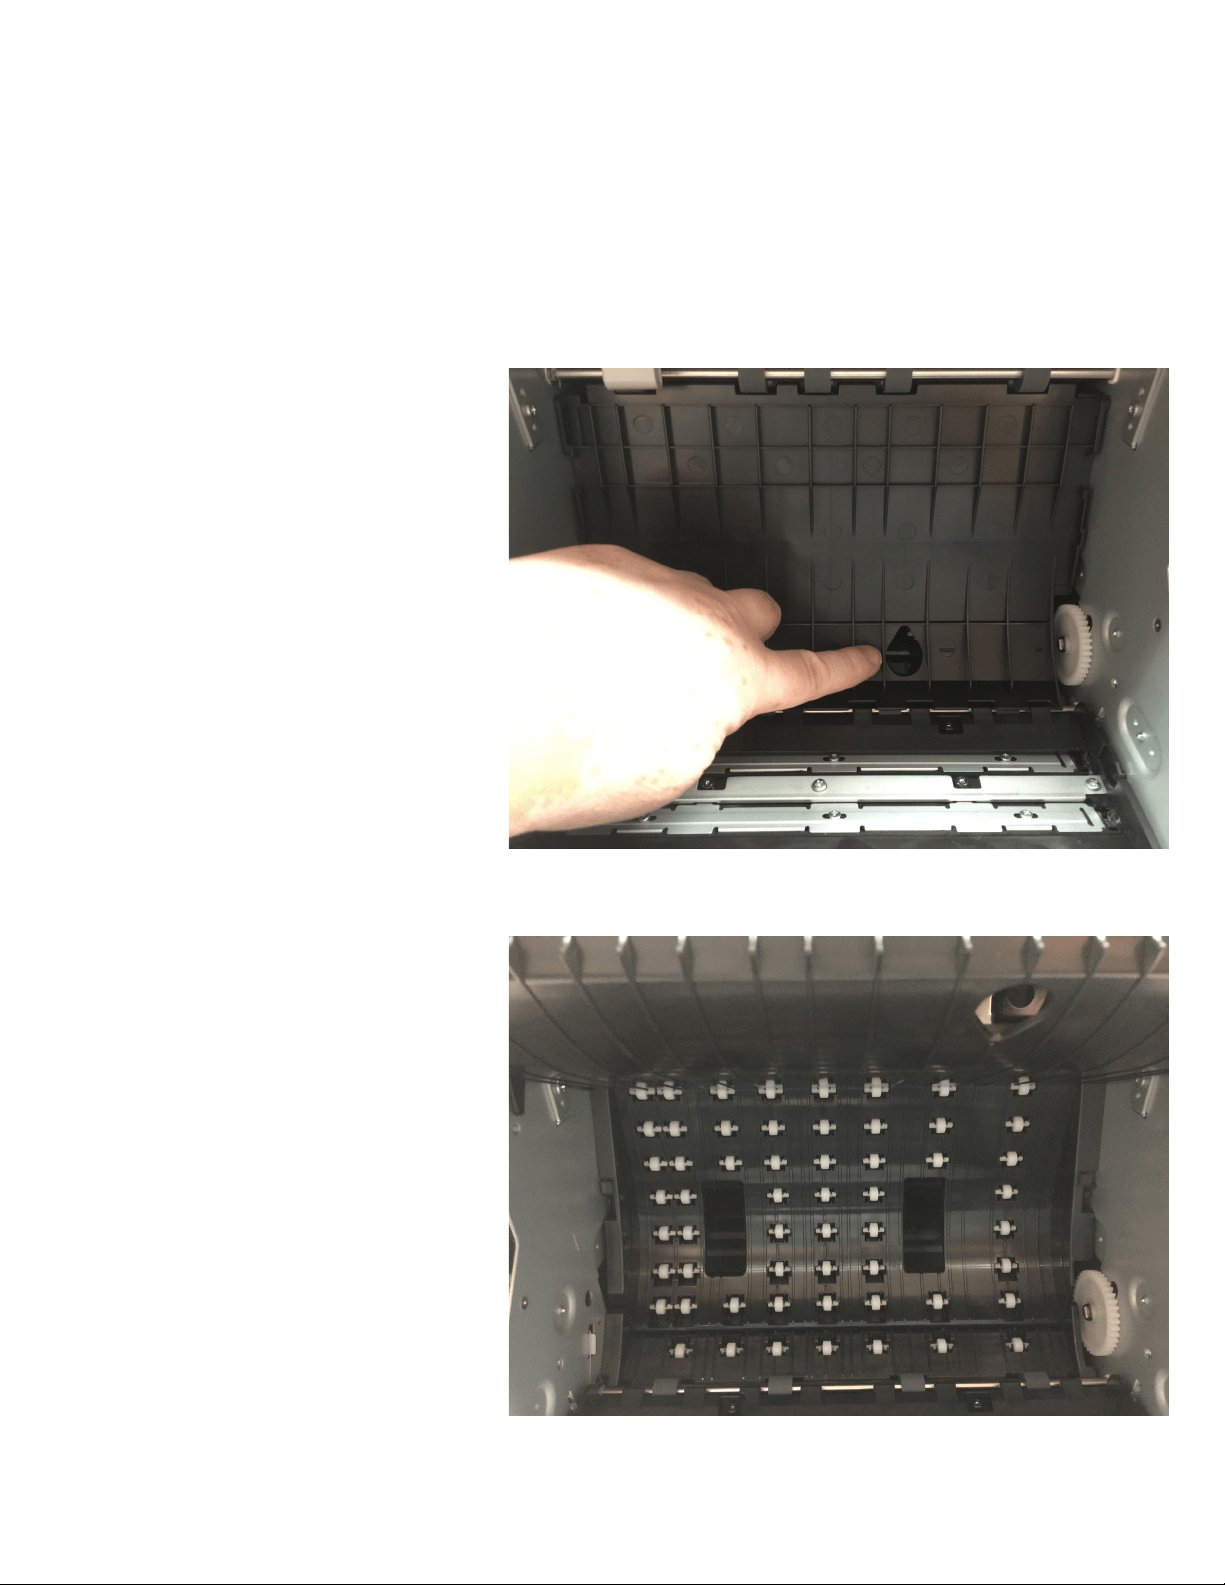
Cleaning the Roll Unit
6. Li up on the front plate, by placing
your nger in the hole and liing upwards
7. Gently wipe this area of any dust or
debris. Brush lightly across the felt pads to
remove excess paper dust.
Note: When you have completed the
cleaning of the roll unit. It is recommended
to inspect the unit thoroughly for any
missed debris, such as paper slugs, torn
paper, or any loose or dislodged rollers.
11
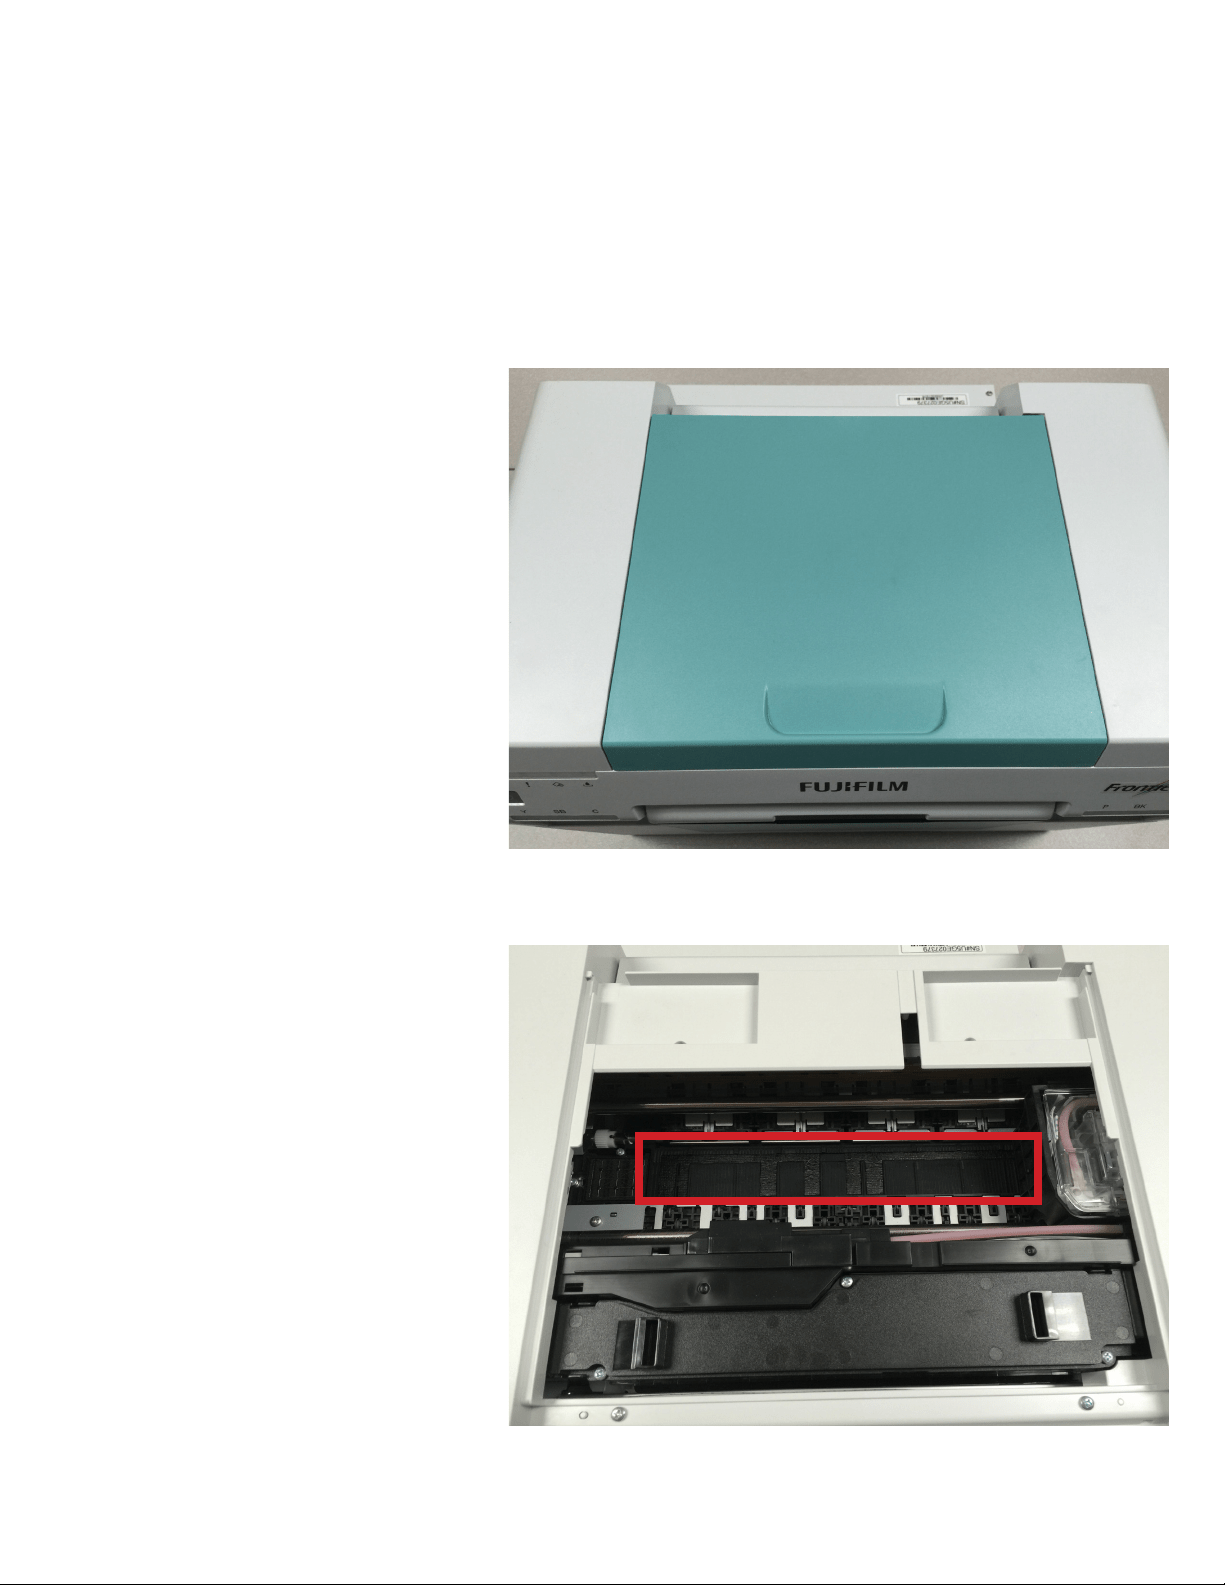
Cleaning ink/paper dust from
Upper Platen
Ink may build up on some area of the printer. It is best to inspect these areas and clean them as necessary. A
daily inspection of this area will ensure superior image quality.
2. With the cover removed. Inspect the
upper platen are for excessive ink.
1. Remove the top cover to expose the
upper platen.
12
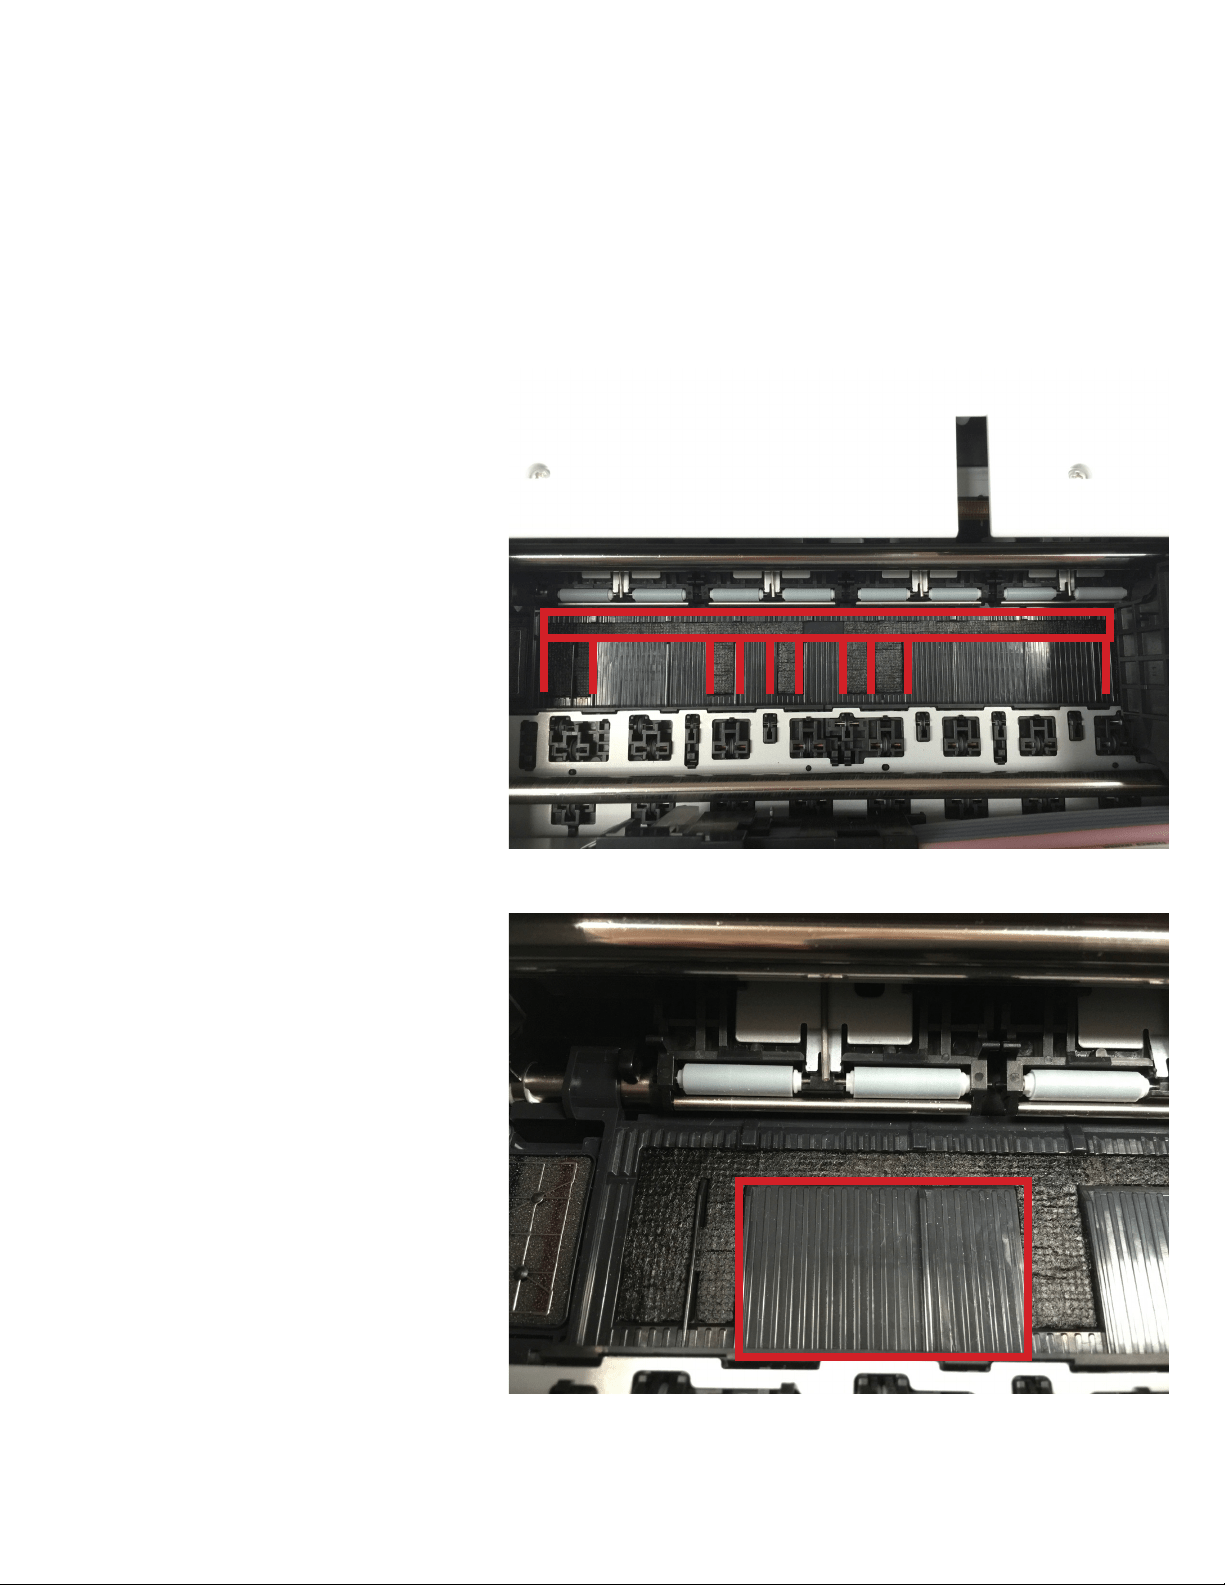
3. Utilizing a lightly moistened bemcot,
if there is any debris on the absorbent
material wipe/dab it gently towards the
front of the printer to remove it.
Cleaning ink/paper dust from
Upper Platen
4. Utilizing a lightly moistened bemcot,
Wipe any residual ink from the hard plastic
platen.
Important: Do not smear ink around this
area, be very careful not to use downward
force when dabbing the absorbent material.
e absorbent is the cloth like material.
Note: the image to the right is a zoomed
portion of the plastic platen to be cleaned.
Be sure to clean the entire area of the
platen.
13
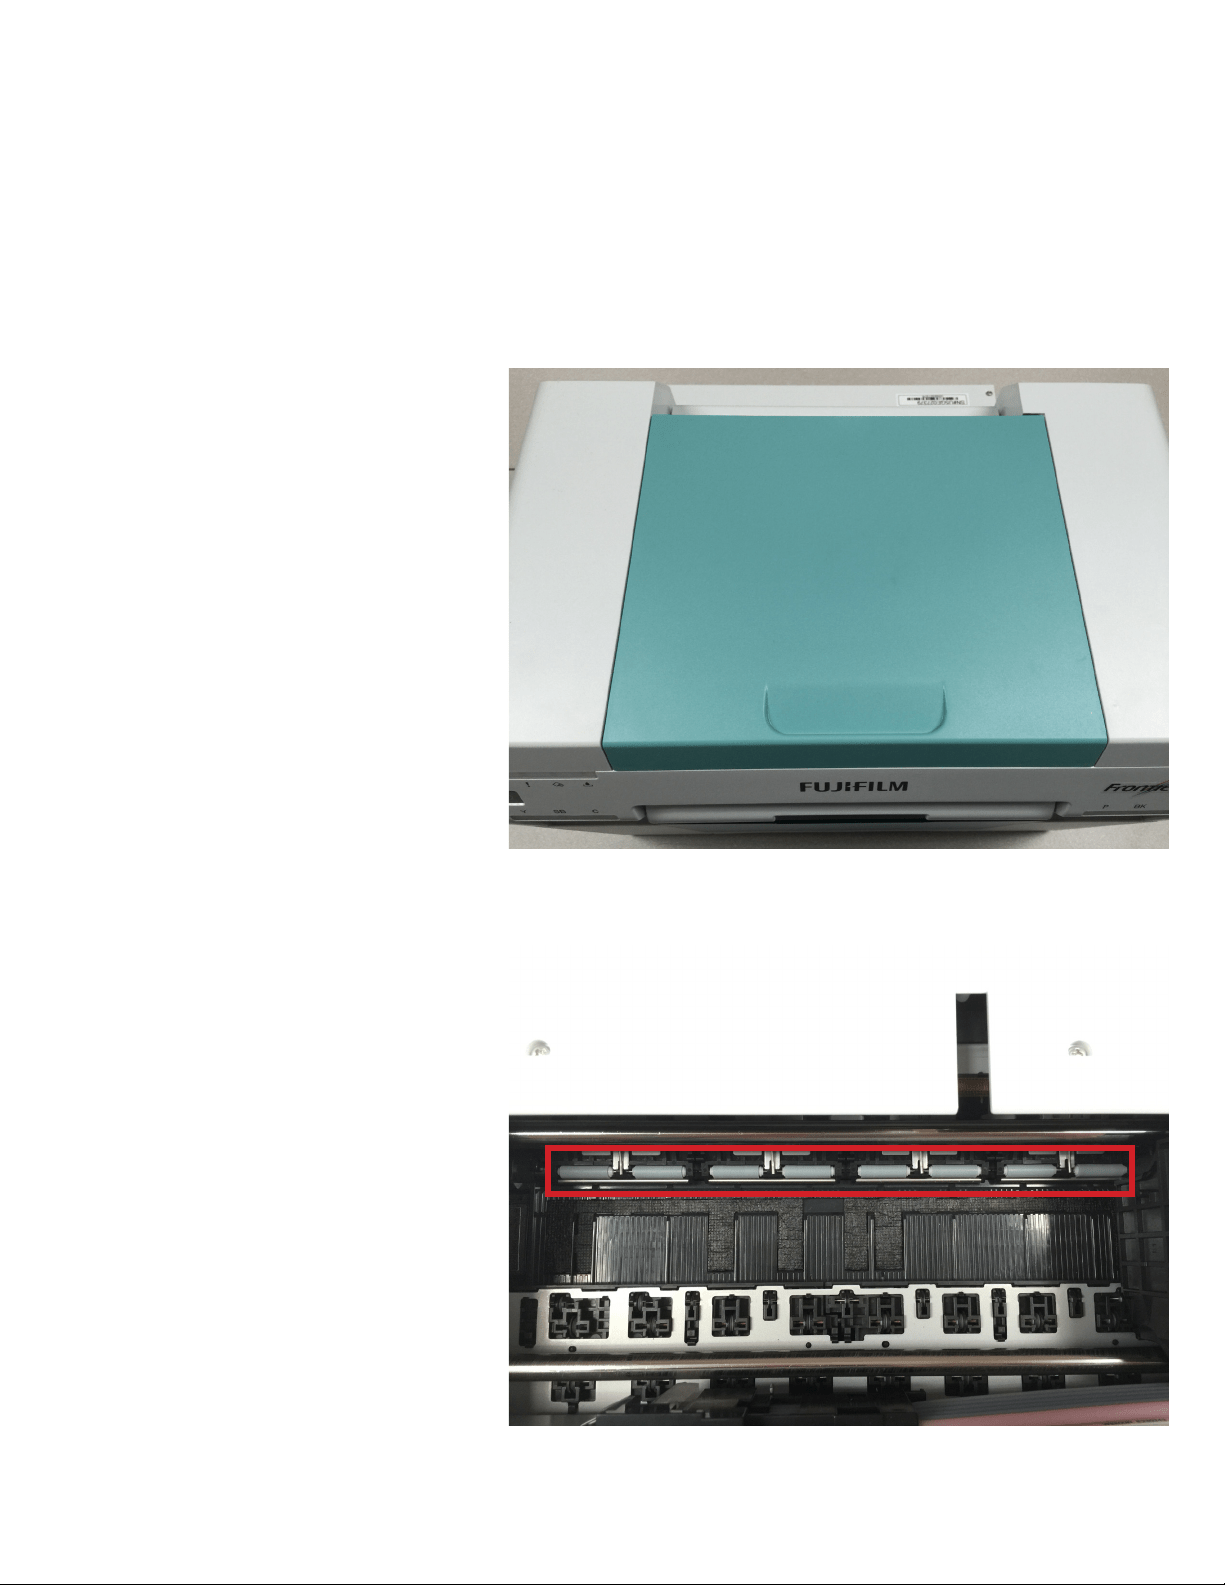
Cleaning ink from upper paper
guide rollers
ese rollers can accumulate ink transfered from the upper platen and cause lines on the prints. It is
recommended to inspect these rollers daily to ensure high image quality.
2. Inspect the gray rollers for any ink and
clean them as needed.
1. Remove the top cover to expose the
printing section.
14
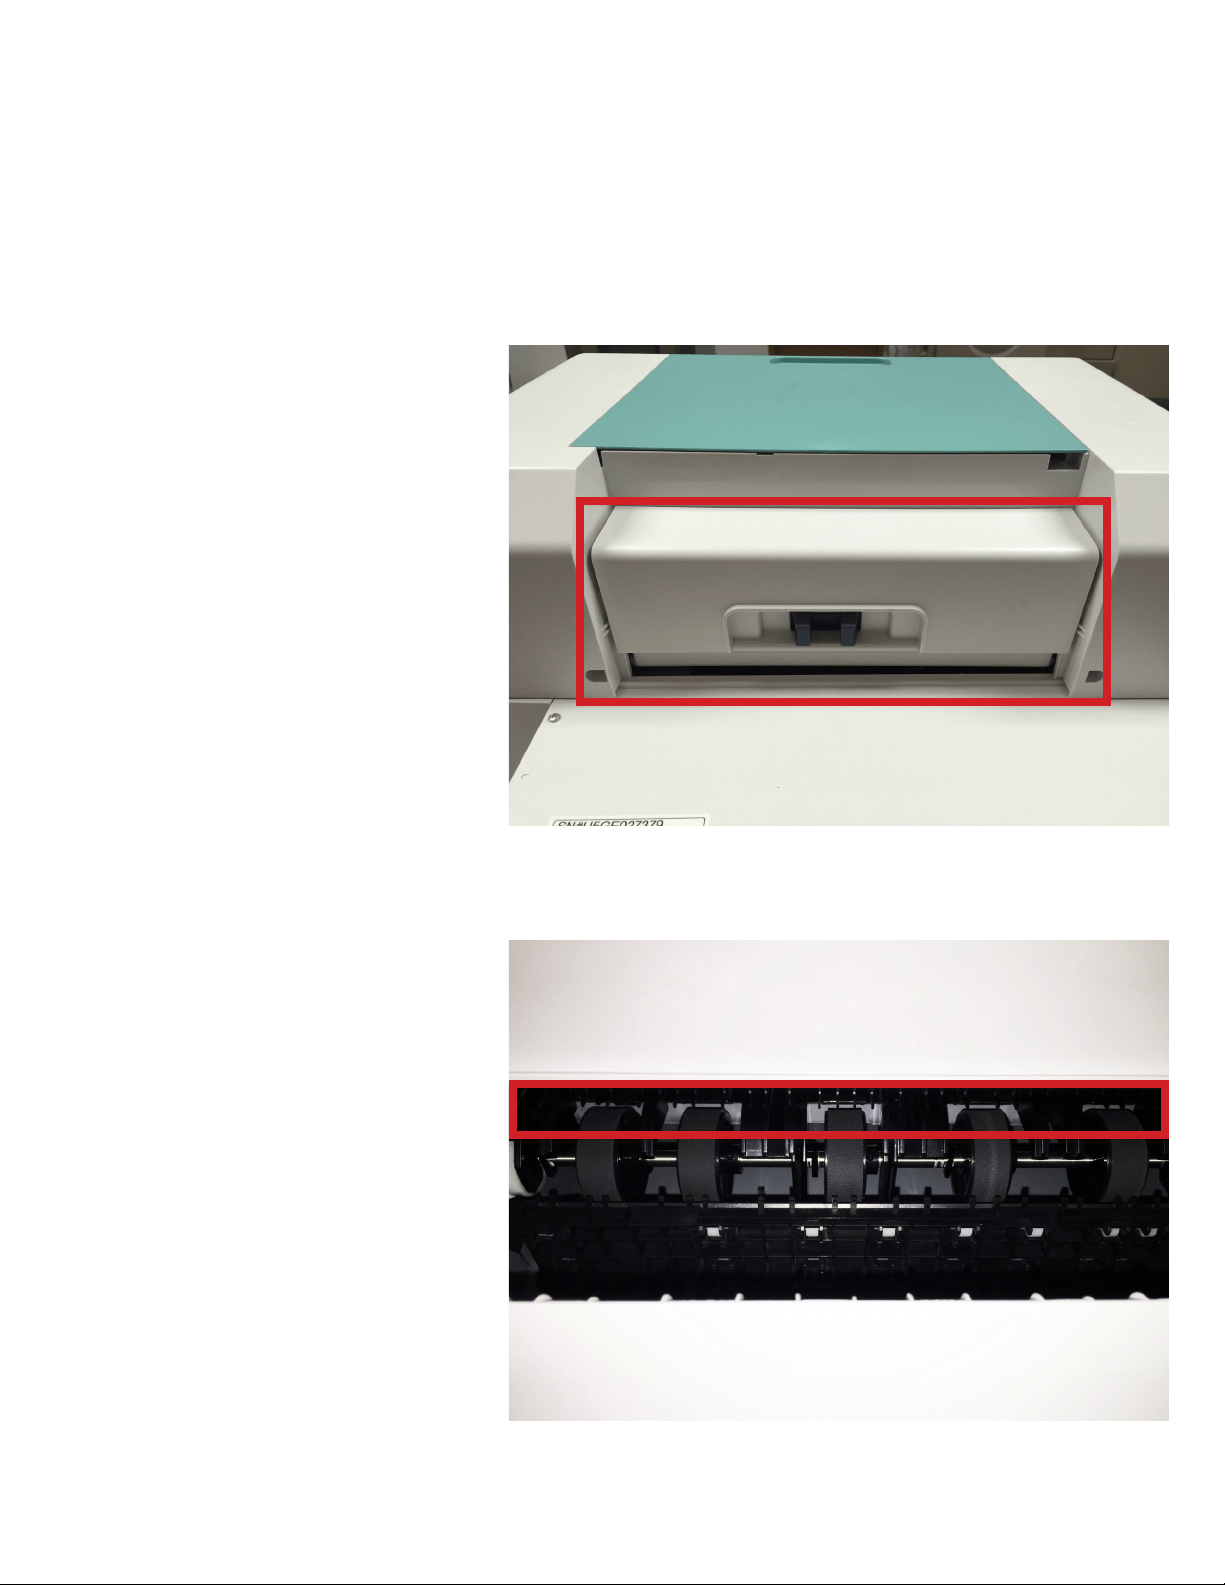
3. Open the rear cover
Cleaning ink from upper paper
guide rollers
Note: To better clean these rollers it is best
to push down on the paper guides to raise
the rollers from the main feed roller.
4. Behind the rear cover and above the
rubber feed rollers. Gently place your hand
to feel for a comb or segmented ns.
15

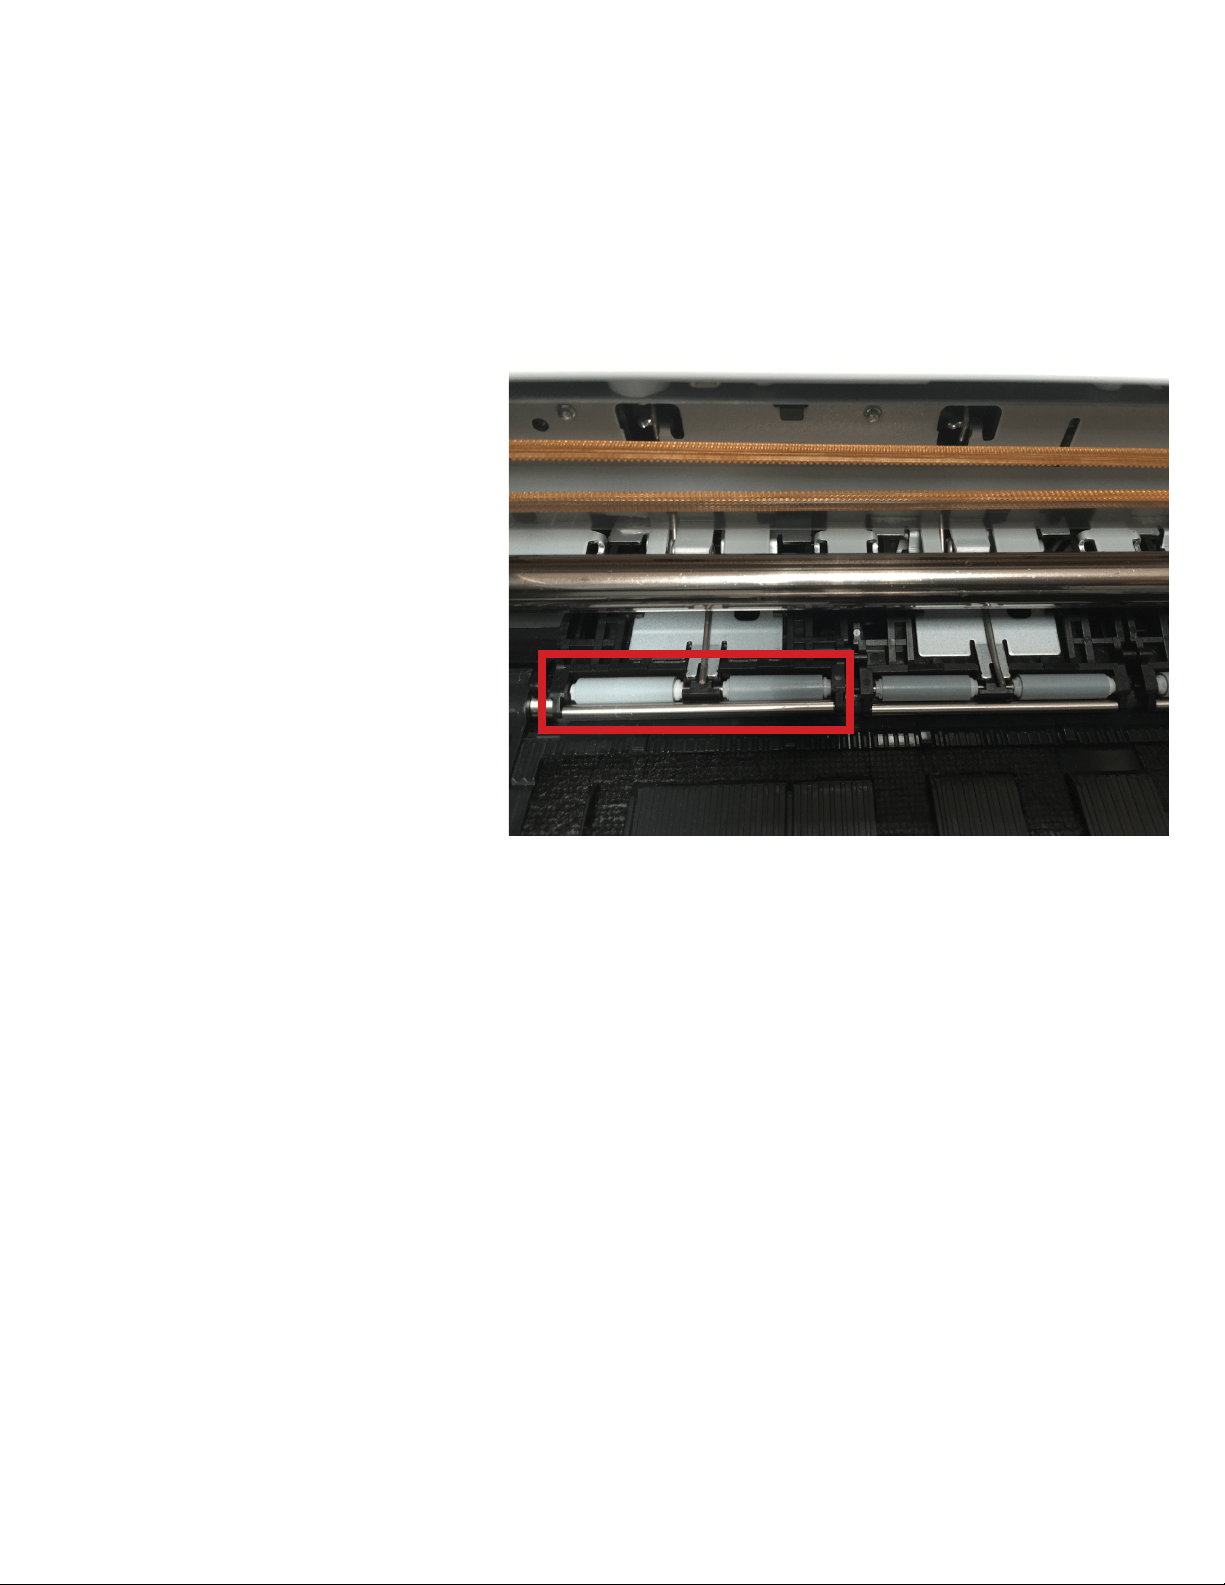
5. While holding the guide down the
rollers will raise up.
Cleaning ink from upper paper
guide rollers
Here is a guide removed to show the ns or
combs.
16
6. Using a bemcot moistened with water
gently, very gently wipe across the rollers
at an angle to rotate them while you are
cleaning them.
Cleaning ink from upper paper
guide rollers
Important: when cleaning these rollers do
not push down. e rollers can become
dislodged.
7. Repeat prior steps for each of the four
guides roller sets.
17
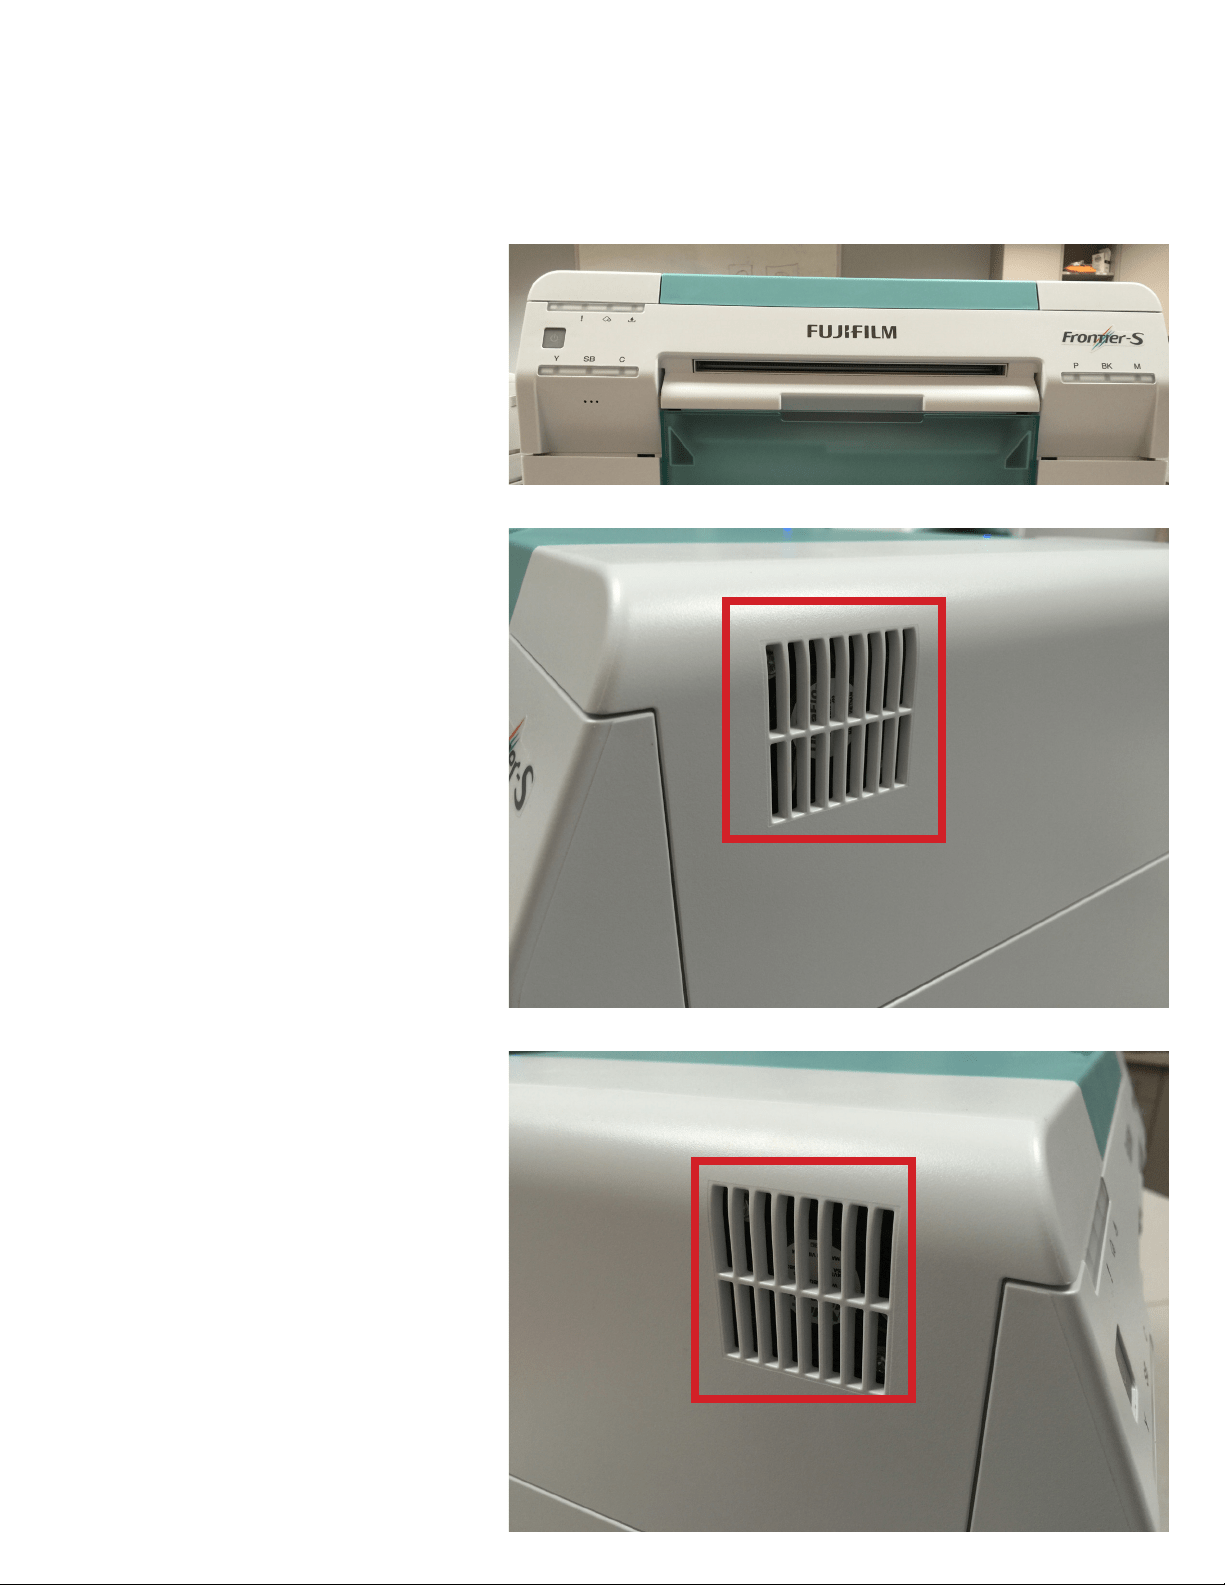
Cleaning Anti-Condensing fans
e anti-condensing fans are important to keep clear of debris. is will keep the heater section of printer
running at normal temperatures and prevent some fan failures.
2. Vacuum these louvers, if there is any
residual debris wipe it away with a damp
bemcot to keep the area clean.
1. Turn o the power to the printer. e
anti-condensing fans are locate on the le
and right side of the printer.
18
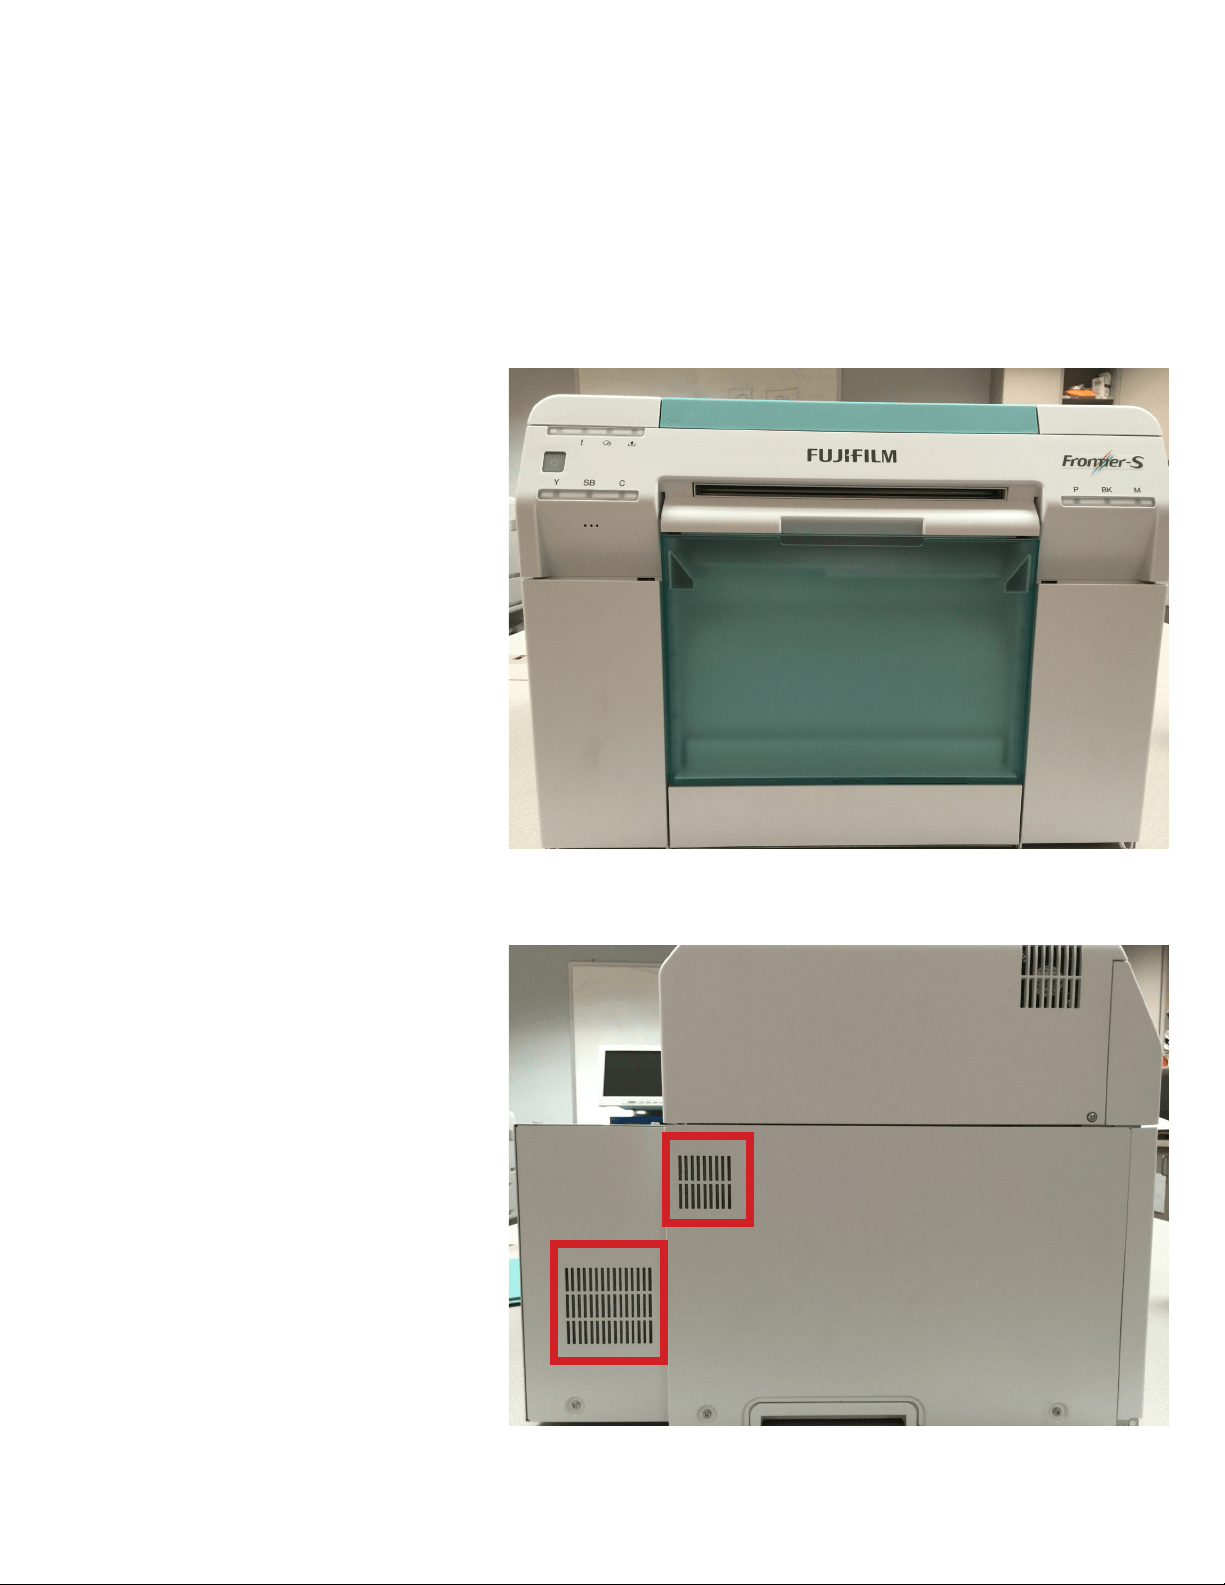
Cleaning Air Filters
It is important to keep the two air lter of the DX100 clean and clear. is will ensure proper cooling of the
internal circuit boards.
2. Vacuum these two louvers to ensure the
dust and debris has been cleared.
1. Turn the power o then while facing the
front of the printer on the le side of the
metal frame cover you will see the two air
lter louvers.
19

Cleaning the feed rollers
(Roll Unit)
e roll unit is a vital part of the DX100’s paper transport section. It is important to maintain this section
cleanliness by follow the steps below.
2. Release the blue lock lever to open the
roll unit.
1. Remove the wastepaper box
20
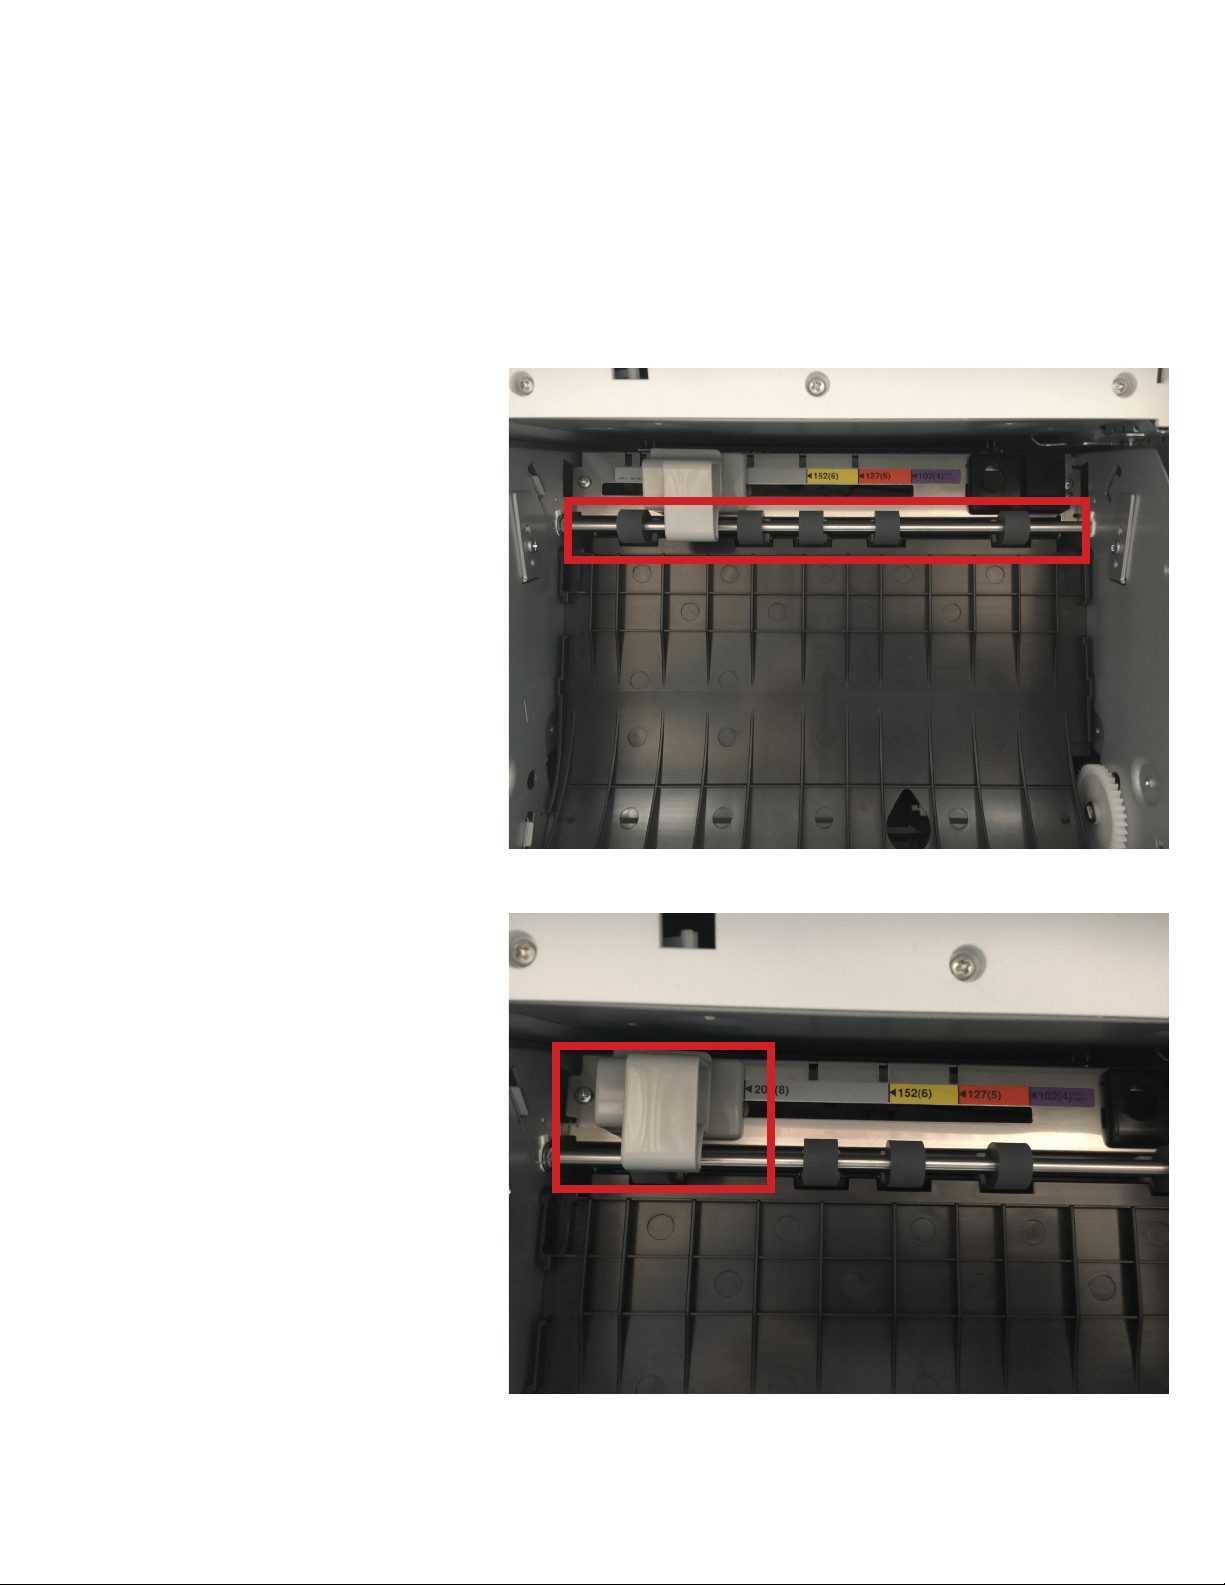
3. Move the rear paper guide to expose
the gray so roller behind it. en with a
bemcot moistened with water hold it on
each roller while rotating the sha by hand.
Cleaning the feed rollers
(Roll Unit)
4. Place the rear paper guide back to the
correct position.
21
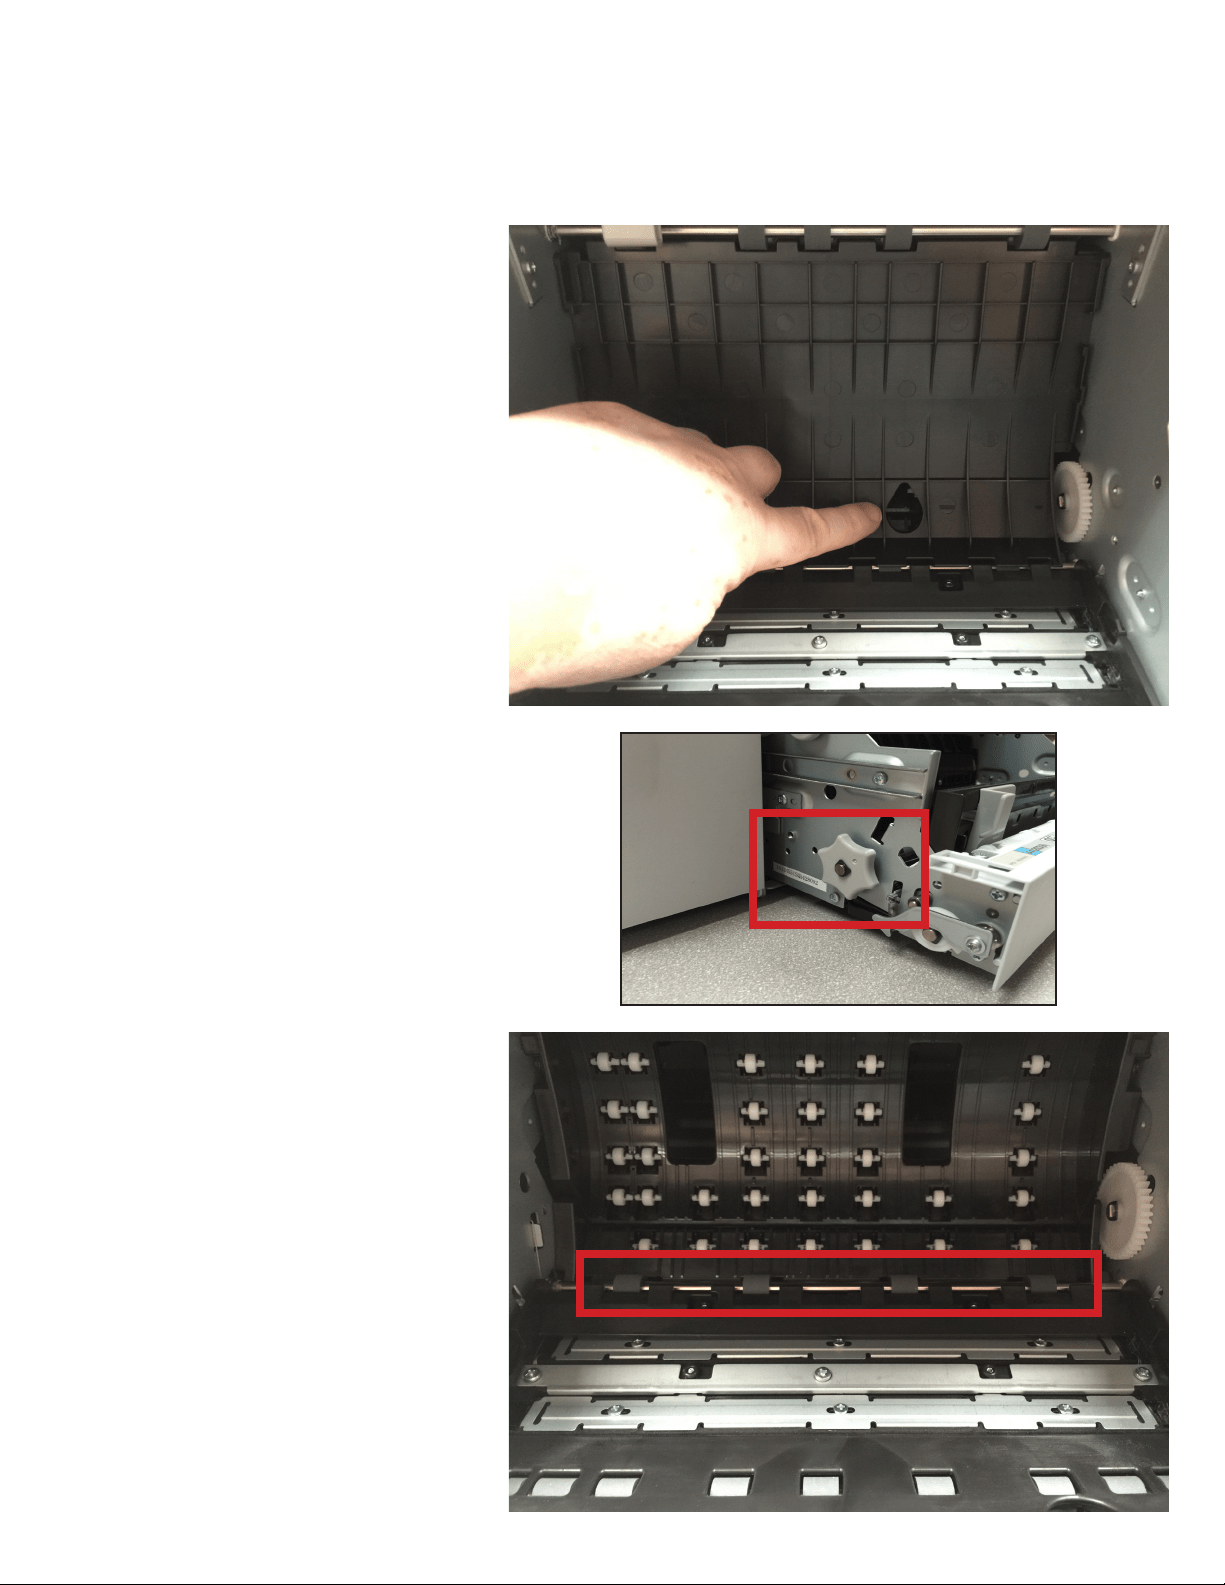
6. Utilizing the gray knob on the le side of
the roll unit
5. Li up the rear plate by placing your
nger in the teardrop hole and liing
upwards.
Cleaning the feed rollers
(Roll Unit)
7. Using a bemcot moistened with water.
Place the bemcot on each gray roller
outlined while turning the gray knob
backwards and forwards to ensure
22

8. Li up on the front plate, by placing
your nger in the hole and liing upwards
9. Using a bemcot moistened with water.
Place the bemcot on each gray roller while
turning the gray knob backwards and
forwards to ensure
Note: When you have completed
the cleaning of the feed rollers. It is
recommended to inspect the unit
thoroughly for any missed debris, such
as paper slugs, torn paper, or any loose
or dislodged rollers. Be sure to reset
the guides and plates to their original
positions.
Cleaning the feed rollers
(Roll Unit)
23
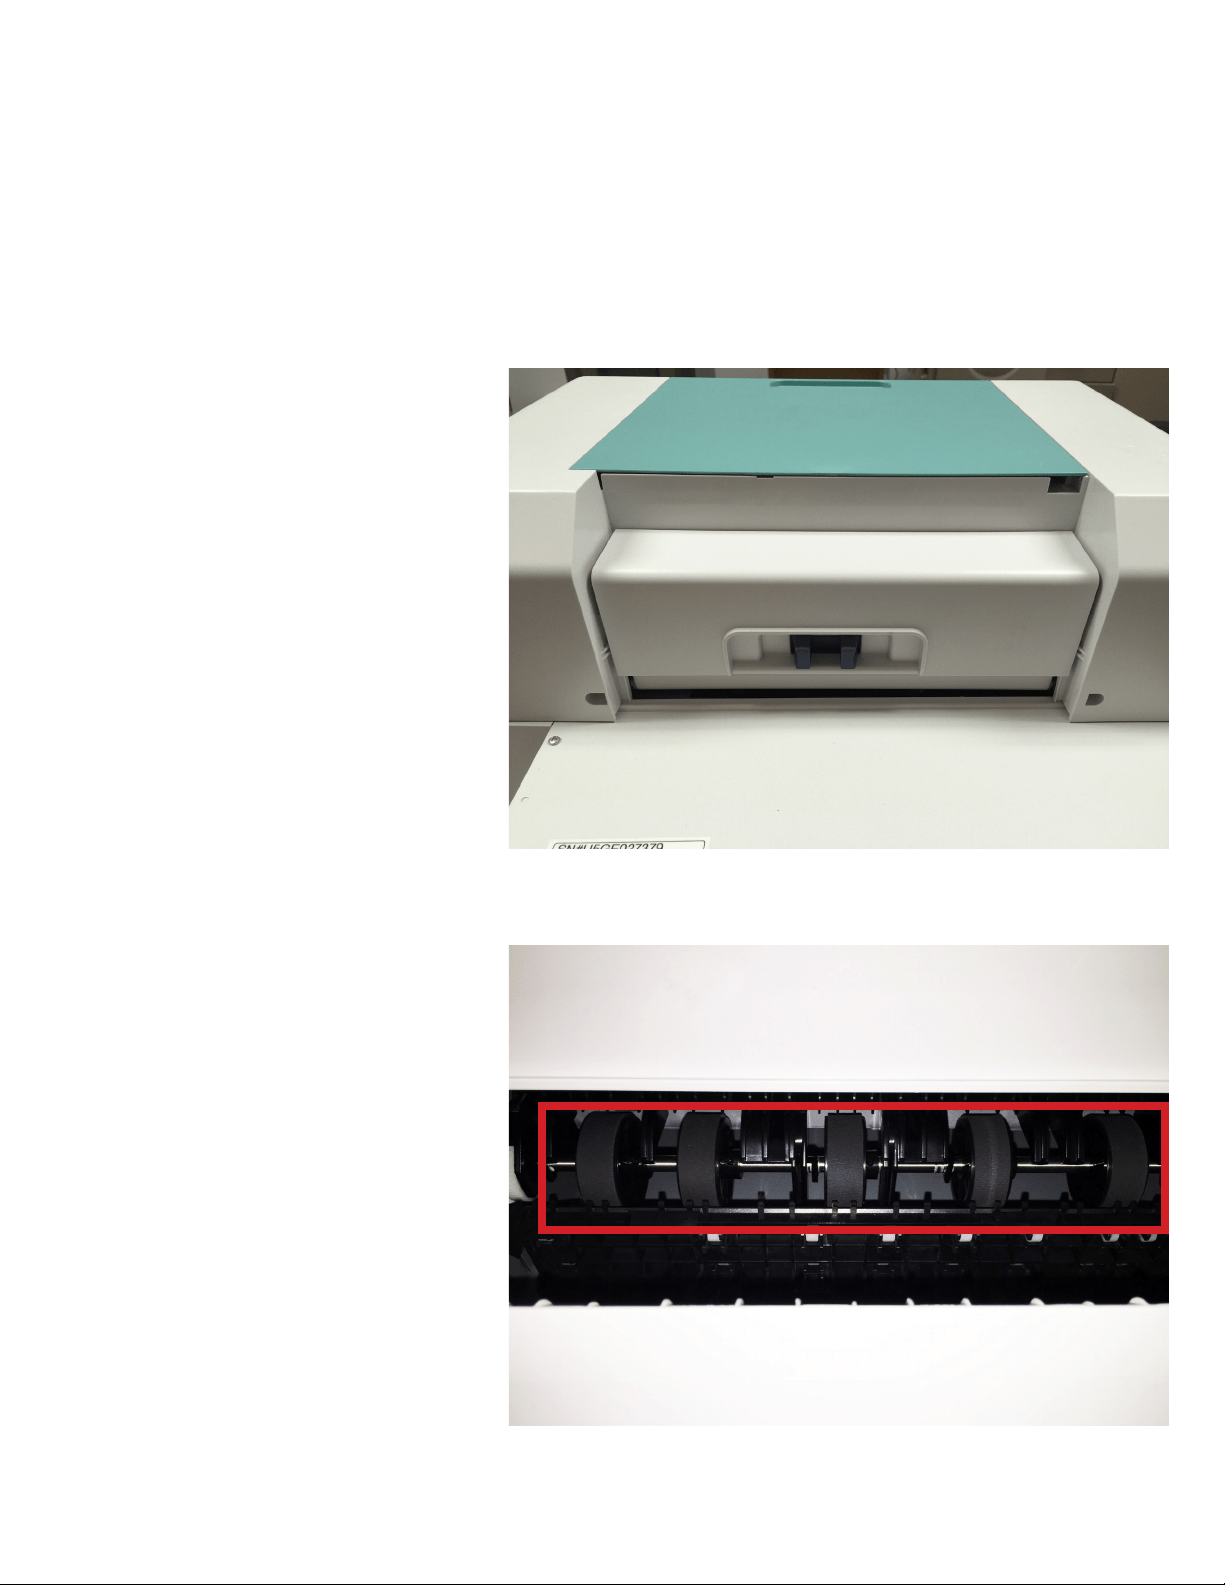
Cleaning the feed rollers
(Rear Cover)
Paper dust can accumulate along with other debris to soil these rollers. To ensure proper paper transport it is
important to clean these rollers.
2. Using a bemcot moistened with water
place the bemcot on the so rubber rollers
and rotate the sha by hand. en close the
rear cover.
1. From the rear of the printer open the
rear cover by squeezing the blue release
levers.
24