
WARNING
It is the owner and/or operators’ responsibility to study all WARNINGS, operating, and maintenance
instructions contained on the product label and instruction manual prior to operation of this product. The
owner/operator shall retain product instructions for future reference.
The owner and/or operator are responsible for maintenance, maintaining all decals or warning labels and
while in use, maintaining the unit in good working order. If the owner and/or operator are not fluent in
English, the product warnings and instructions shall be read and discussed with the operators’ native
language by the purchaser/owner or his designee. Make sure that the operator comprehends its contents.
Safety information shall be emphasized and understood prior to usage. The product shall be inspected per
the operating instructions.
Users of this product must fully understand these instructions. Each person operating this product must also
be of sound mind and body and must not be under the influence of any substance that might impair their
vision, dexterity, or judgment.
Protect yourself and others by observing all safety information.
Failure to comply with instructions could result in personal injury and/or property damage!
If you encounter any problems or difficulties, please contact our customer service department at:
1-800-426-1262 between 6:30 a.m. and 4:30 p.m. Pacific time.
2 1/4 TON HYDRAULIC
FLOOR JACK
OWNER’S MANUAL
Item Number W1611

2
DANGER Indicates an imminently hazardous situation that, if
not avoided, WILL result in death or serious injury.
WARNING Indicates a potentially hazardous situation that, if
not avoided, COULD result in death or serious injury.
CAUTION
Indicates a potentially hazardous situation that, if
not avoided, MAY result in minor or moderate injury.
NOTICE Indicates important information, which if not
followed, MAY cause damage to equipment.
SAFETY GUIDELINES / DEFINITIONS
SPECIFICATIONS
IMPORTANT SAFETY INFORMATION
Specifications are subject to change without notice.
WARNING
READ, UNDERSTAND AND FOLLOW ALL INSTRUCTIONS AND WARNINGS BEFORE OPERATING THIS TOOL. FAILURE TO DO SO MAY
RESULT IN PERSONAL INJURY AND/OR PROPERTY DAMAGE AND WILL VOID WARRANTY.
1. Study, understand and follow all instructions before operat-
ing this device.
2. DO NOT exceed rated capacity. Overloading can cause
damage to or failure of this product.
3. Use only on hard, level surface capable of sustaining the
load. Use of jack on other than hard level surfaces can
result in jack instability and possible loss of load.
4. Lifting device only. Immediately after lifting, support the
vehicle with appropriate means. Ensure that no personnel
pass underneath load until load is securely supported by
jack stands.
5. DO NOT adjust safety valve.
6. Wear ANSI approved safety goggles and heavy duty work
gloves during use.
7. Keep clear of load while lifting and lowering.
8. Lower load slowly.
9. DO NOT use for aircraft purposes.
10. Apply parking brake and chock tires before lifting vehicle.
11. Lift vehicle only at vehicle manufacturer recommended lift
locations.
12. Inspect before every use; do not use if parts are loose or
damaged.
13. Do not alter this product in any way.
14. Keep your work area clean and well lit. Cluttered work
areas invite accidents.
15. Keep bystanders, children, and visitors away while operat-
ing this product. Distractions can cause you to lose control.
16. Stay alert. Watch what you are doing, and use common
sense when operating this product. Do not use this product
Warning: This is a lifting device only. Load must be supported immediately by Jack Stands.
WARNING: Read and understand this entire
instruction manual before attempting to assemble,
install, operate or maintain this product. Failure to
comply with the instructions may result in serious
personal injury and/or property damage!
The following signal words are used to emphasize
safety warnings that must be followed when using
this product:
This instruction manual is intended for your benefit. Please read and follow the safety, installation, maintenance and troubleshooting steps
described within to ensure your safety and satisfaction. The contents of this instruction manual are based upon the latest product information
available at the time of publication. The manufacturer reserves the right to make product changes at any time without notice.
After opening the carton, unpack your new product and related parts & accessories. Please inspect it carefully
for any damage that may have occurred during transit. Please check it against the photograph on carton. If any
parts are missing, please call customer service at 1-800-426-1262 between 6 a.m. and 5 p.m. Pacific time.
WARNING DO NOT operate this product if damaged during shipment, handling or misuse. Do not operate the product until the
parts have been replaced or the fault rectified. Failure to do so may result in serious personal injury or property damage. All
damaged parts must be repaired or replaced as needed prior to operating this product. Check to see that all nuts, bolts and
fittings are secure before putting this product into service. If you have any questions, or require assistance with damaged or
missing parts, please contact our factory customer service department at: 1-800-426-1262.
Please have the serial number, model number, and date of purchase available for reference when calling.
Capacity: .......................................................................................................................... 4,500 lbs.
Minimum Lift Height: ......................................................................................................... 5 1/4 in.
Maximum Lift Height: ...................................................................................................... 15 1/2 in.
Base Length: .......................................................................................................................... 17 in.
Base Width: .............................................................................................................................. 8 in.
3
NOTICE During shipment or handling, air in the jack can become trapped in the hydraulic system
causing the jack to malfunction.
IMPORTANT SAFETY INFORMATION
OPERATION
BEFORE USE
while tired or under the influence of drugs, alcohol or
medication. A moment of inattention while operating this
product may result in serious personal injury.
17. Store idle jacks out of reach of children and other untrained
persons. Jacks are dangerous in the hands of untrained
users.
18. Tool/equipment service must be performed only by quali-
fied repair personnel. Service or maintenance performed by
unqualified personnel could result in a risk of injury.
19. When servicing this product, use only identical replacement
parts - refer to attached, product-specific parts list and
diagram. Follow instructions in the Care & Maintenance
section of this manual. Use of unauthorized parts or failure
to follow maintenance instructions may create a risk of
injury and may void any applicable warranty.
20. Maintain labels and nameplates on this product. These
carry important information. If unreadable or missing,
contact Performance Tool for a replacement.
21. Before use, read manufacturer’s instruction manual for the
vehicle (or object) you will lift.
22. When lifting only one wheel, support the load immediately
with one jack stand (not included) placed under the side of
the vehicle being lifted. Align the saddle of the jack stand
directly under the vehicle’s frame or recommended lifting
point.
23. When lifting the entire front end or rear end of a vehicle,
support the load immediately with two jack stands. Align
the saddles of the jack stands directly under the vehicle’s
frame or recommended lifting points. Also, adjust the jack
stands to the same height.
24. Do not work under the vehicle without properly supporting
the vehicle with jack stands.
25. Avoid dangerous oncoming traffic. Use the Jack as far
away from the roadside as possible.
26. Industrial applications must follow OSHA requirements.
27. Do not allow anyone inside the vehicle while using the
Jack. Keep all bystanders a safe distance away from the
vehicle.
28. Do not support both ends of the vehicle at the same time.
29. Before lowering the jack, remove all tools and equipment
from under the vehicle.
30. The warnings, precautions, and instructions discussed
in this manual cannot cover all possible conditions and
situations that may occur. The operator must understand
that common sense and caution are factors, which cannot
be built into this product, but must be supplied by the
operator.
WARNING: This product and its packaging contain a chemical
known to the State of California to cause cancer, birth defects,
or other reproductive harm.
To raise:
1. Park vehicle on a hard level surface safely
away from oncoming traffic.
2. Turn off the vehicle’s engine.
3. Place the vehicle’s transmission in PARK,
if equipped with an automatic, or in its
lowest gear, if equipped with a manual
transmission.
4. Set the vehicle’s emergency brake and
block the wheels that are not being lifted.
5. Refer to vehicle owner’s manual for proper
jacking procedures. Lift only on areas of
vehicle as specified by manufacturer.
6. Make certain that load is centered on
saddle.
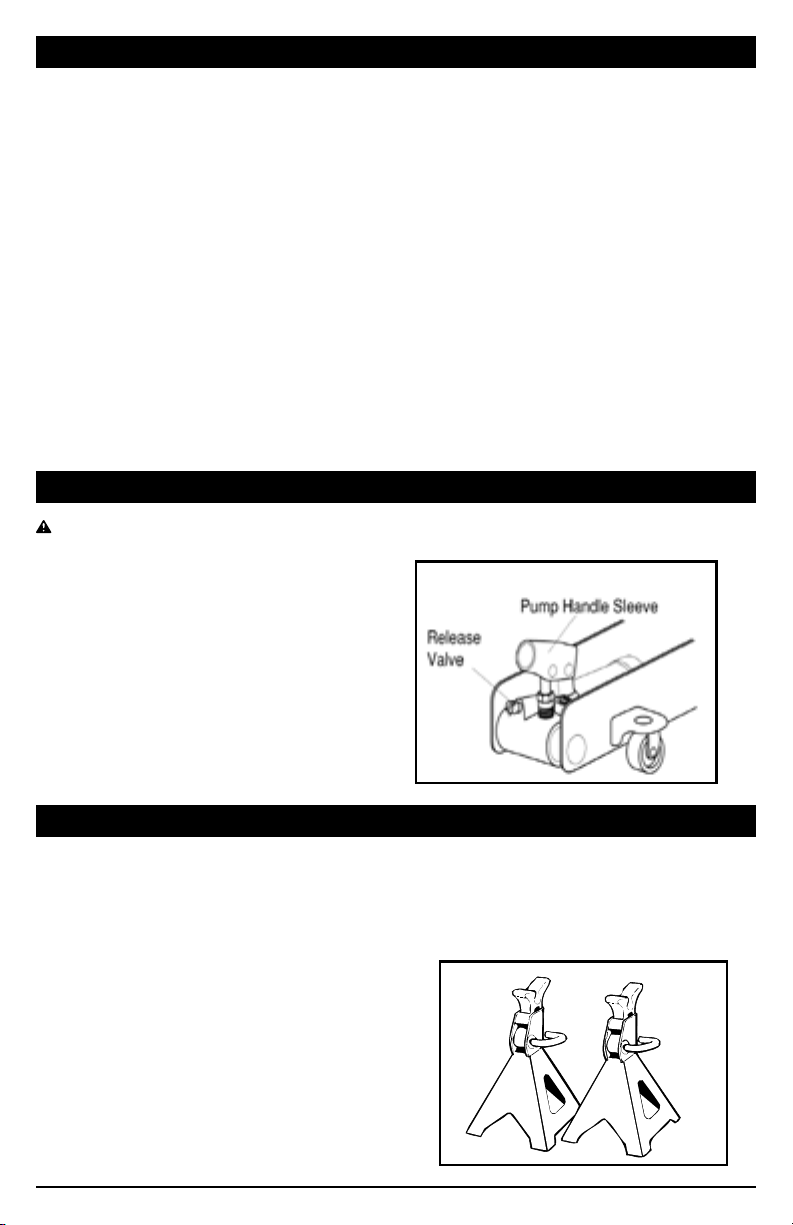
7. Place pump handle over release valve and
turn clockwise to close.
8. Insert handle into handle socket and pump
to raise load to desired height.
Figure 1
Figure 2
Before using your jack:
1. Place pump handle over release valve and
turn counter-clockwise no more than two
turns to open.
2. Pump jack about 6 full strokes to ensure
complete distribution of hydraulic fluid.
(See Figure 1)
3. Repeat above steps as needed.
4
1. Before each use, inspect the general condi-
tion of the jack. Check for broken, cracked,
or bent parts, loose or missing parts, and
any condition that may affect the proper
operation of the product. Any jack that ap-
pears damaged in anyway must be removed
from service. Have the problem corrected
before further use. DO NOT use damaged
equipment.
2. Replace worn or damaged parts with Perfor-
mance Tool replacement parts. Be sure that
only qualified personnel perform repairs.
3. Before each use, thoroughly test the jack
for proper operation prior to its actual use. If
the jack appears not to be working properly,
follow bleeding instructions on page 3.
4. When jack is not in use, ram and pump piston
should be in fully down position to keep their
machined surfaces free from corrosion.
5. Keep jack clean and well lubricated at points
illustrated in figure 3.
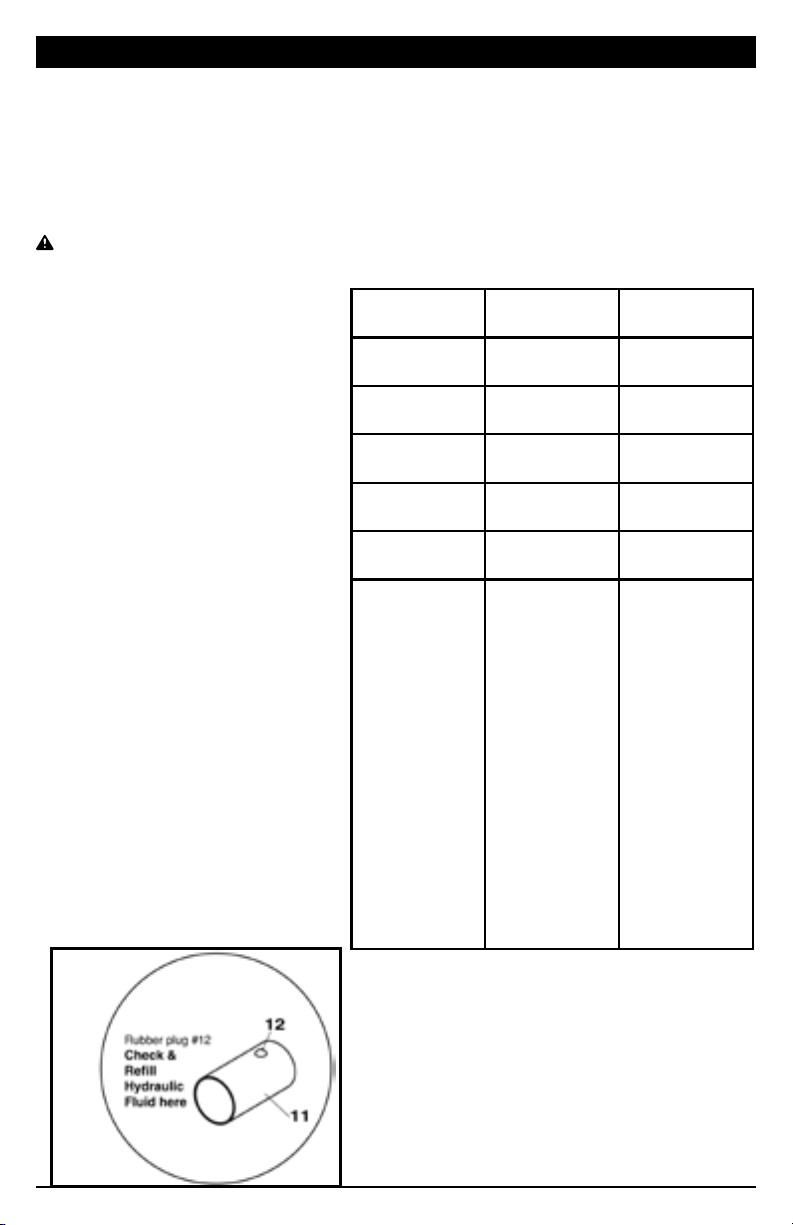
6. For best results, use only hydraulic fluid with
a rating of SAE 20 for refills. Check fluid level
with jack in fully down position. Fluid level
should be up to bottom of oil fill port. (See
figure 4)
7. Change the hydraulic oil at least once every
three years:
a. With the jack fully lowered, remove the oil
filler plug on the side of the Housing.
b. Tip the jack to allow the old hydraulic oil
to drain out of the Housing completely, and
dispose of the old hydraulic oil in accordance
with local regulations.
c. With the jack upright, completely fill the
housing with a high quality hydraulic oil (not
included) until the oil just begins to run out
of the oil fill hole. Be VERY CAREFUL not to
allow dirt or foreign matter into the system.
d. Then, reinstall the oil filler plug.
e. Clean with a clean cloth using a detergent
or mild solvent. Then, store the jack in a safe,
dry location with the ram and pump piston
in fully down position. Keep out of reach of
children and other non-authorized people.
Figure 3
OPERATION
CARE & MAINTENANCE
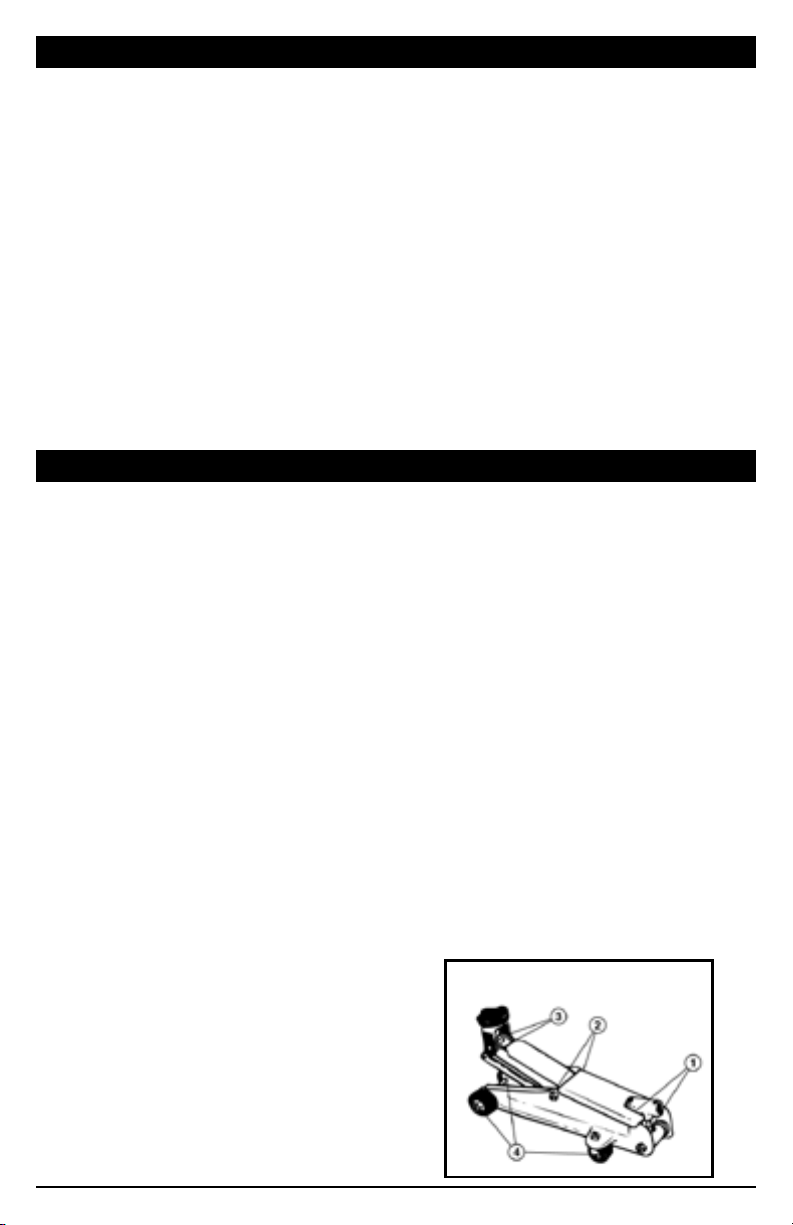
9. ALWAYS support load with jack stands. (See
figure 2) Place jack stands of appropriate
capacity (not included) beneath the vehicle
at locations recommended by the vehicle
manufacturer. DO NOT Get under the vehicle
without jack stands. Jacks are not designed
to maintain heavy loads for long periods of
time. DO NOT attempt to put jack stands
simultaneously under both ends of vehicle
or under one side of vehicle. NOTE: When
using two jack stands, they must be at the
same height.
10. SLOWLY turn the release valve counter-
clockwise to lower vehicle onto jack stands
and remove jack.
IMPORTANT:
NEVER MOVE JACK WHEN THE HANDLE
IS IN OPERATING LEVER OR THE VALVE SLEEVE.
DAMAGE TO THE PUMPING UNIT MAY OCCUR.
To lower:
1.
Remove all tools, parts, etc. from under the
vehicle.
2. Position the saddle under the lifting point.
Place pump handle over release valve and
turn clockwise to close the valve release
screw, and pump the upper/lower handle to
raise the vehicle slightly above the saddle(s)
of the jack stands. Then, collapse and
remove jack stand(s).
3. SLOWLY turn the release valve counter-
clockwise with the handle just enough to
allow controlled descent of the vehicle onto
the ground. (Never more than two full turns).
4. Lower the jack completely. Then, store in a
safe, dry location out of reach of children.
Monthly maintenance is recommended. Lubrication is critical to jacks as they support
heavy loads. Any restriction due to dirt, rust, etc. can cause either slow movement or
cause extremely rapid jerks, damaging the internal components. The following steps
are designed to keep the jack maintained and operational.
5
WARNING: Remove jack from service before making adjustments
NOTE:
Problems listed above with more than
one solution may have a combination of
causes. Please be sure that all solutions
listed for each problem have been
checked to eliminate possibility of further
trouble. Sometimes solutions may need
to be repeated for best results.
● ● ●
●
● ●
● ●
●
●
Power unit may
be low in fluid.
With jack on level
surface and in
down position,
remove filler plug
and add clean
hydraulic jack
fluid to level of
filler.
Power unit may
be air bound.
Open the release
valve a minimum
of 2 full turns.
Pump the handle
a minimum of 20
full strokes to
purge air from
the system.
Valve may not be
closing
completely.
To seat valves:
a.) Close release
valve.
b.) With jack in
fully lowered
position,
manually raise
lifting arm as
high as
possible.
c.) Open release
valve and
allow jack to
descend to
lowered
position
Will not lift load
Will not hold load
Will not lift to full height
Pump feels "spongy" under load
Handle raises under load
Handle lowers under load
TROUBLESHOOTING
Your Performance Tool® product was constructed with quality materials and work-
manship and will give you many years of trouble free use when cared for as described
in the "Care & Maintenance" section on page 4. However, as with any mechanical
device, periodic adjustments are necessary to maintain a peak level of performance.
Should your jack be displaying any of the following symptoms, the simple procedures
shown below will correct the problem.
Figure 4
6
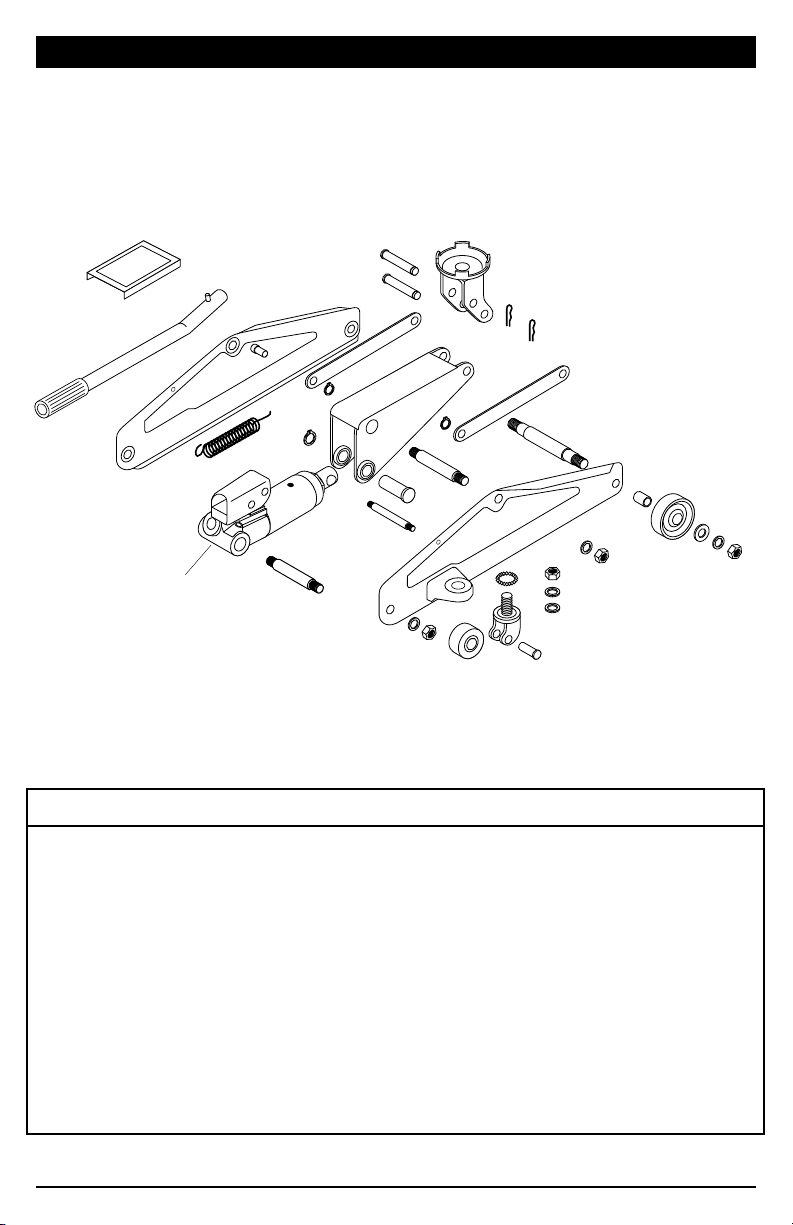
REPLACEMENT PARTS LIST
# Description Qty.
39 Return Spring 1
40 Spring Washer 6
41 Nut 6
42 Caster Wheel 2
43
Caster Wheel Spindle
2
44 Caster Wheel Fork 2
45 Steel Ball Bearings 28
47 Right Side Member 1
48 Flat Washer 2
49 Lock Washer 2
50 Nut 2
Figure 5
67
66
69
60
61
62
64
58
63
65
61
60
54
52
51
53
40
41
41
40
50
49
48
47
45
44
43
42
41
40
55
70
39
73
68
Ram Assembly
(See figure 6)
72
# Description Qty.
51 Front Wheel Spacer 2
52 Front Wheel 2
53 Flat Washer 2
54 Front Wheel Spindle 1
55 Body Spindle 1
58 Left Side Member 1
60 Radius Link 2
61 Retaining Ring 2
62 Lifting Arm 1
63 Cross Head Pin 1
64 C 19 Retaining Ring 1
# Description Qty.
65 Lifting Arm Spindle 1
66 Saddle Mount Pin 1
67 Saddle Assembly 1
68 Radius Link Pin 1
69 Retaining Pin 2
70 Pump Handle 1
72 Cover Plate 1
73 Support Bar 1
7
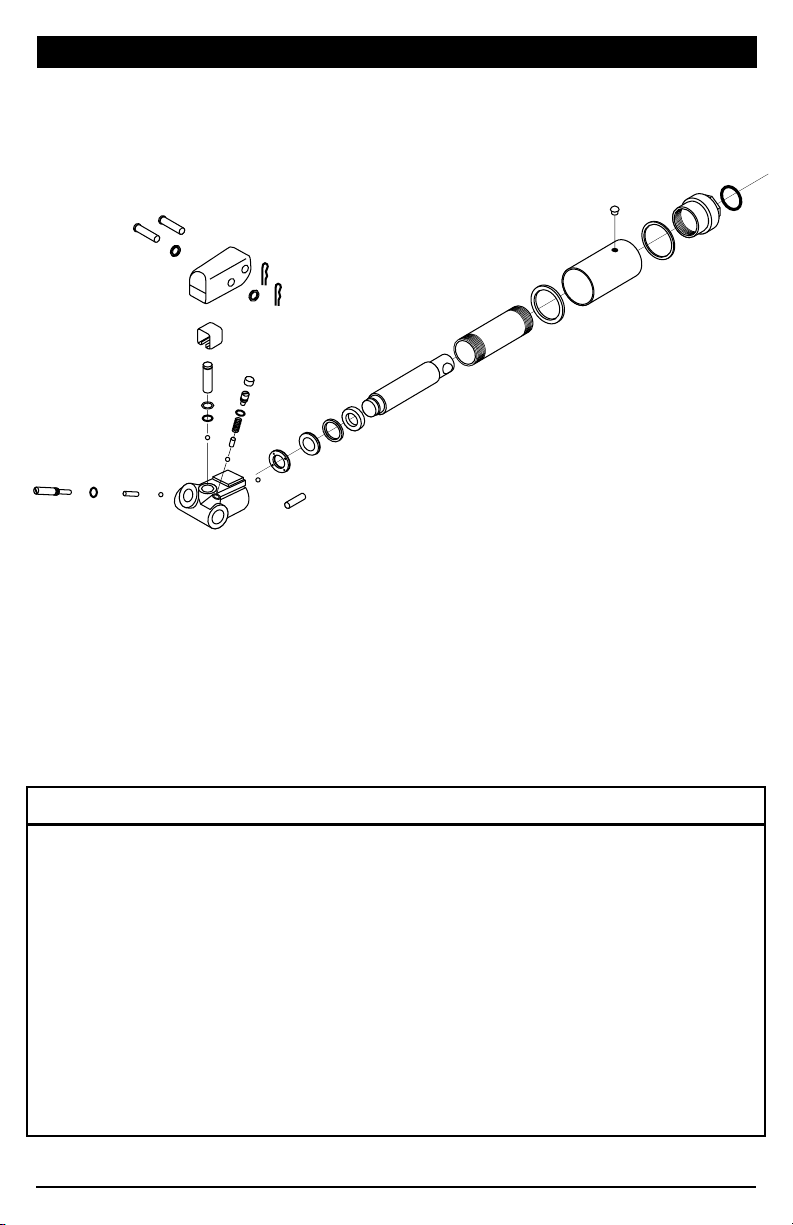
REPLACEMENT PARTS LIST - RAM ASSEMBLY
# Description Qty. # Description Qty. # Description Qty.
1 Hydraulic Unit Body 1 12 Oil Fill Plug 1 26 Piston Pin 1
2 3/16” Steel Ball 2 13 Fiber Washer (A) 1 27 Connecting Pin 1
3 Filter Body Screen 1 14 Top Nut 1 28 Retaining Pin 2
4 Copper Washer 1 15 Top Nut O-Ring 1 31
Release Valve Spacer
1
5 Pump Cylinder O-Ring 1 16 1/4” Steel Ball 1 32
Release Valve O-Ring
1
6 Back Up Ring 1 19
Pump Cylinder O-Ring
1 33 Release Valve 1
7 Ram Collar 1 20 Back Up Ring 1 34 Spring Guide 1
8 Ram 1 21 Pump Piston 1 35
Overload Valve Spring
1
9 Cylinder 1 22 Piston Clamp 1 36 O-Ring 1
10 Fiber Washer (B) 1 24 Handle Sleeve 1 37 Adjusting Screw 1
11 Oil Chamber 1 25 Piston Washer 2 38 Cap 1
Figure 6
15
14
13
12
11
10
9
8
7
6
5
2
34
35
36
37
38
2
16
19
20
21
22
4
3
33
32
31 16
1
24
25
28
25
26
27

1 YEAR LIMITED WARRANTY
PERFORMANCE TOOL® extends only the following warranties, and only to original retail purchasers. These warranties give specific
legal rights. Except where prohibited by local law, the law of the State of Washington governs all warranties and all exclusions and
limitations of warranties and remedies. There may be other rights which vary from state to state.
PERFORMANCE TOOL® warrants the product to be free from defects in materials and workmanship under normal use and service. A
defective product may be returned for a free replacement within 90 days from the date of purchase, provided that product is returned
to place of purchase immediately after discovery of defect. After 90 days and up to one year from date of purchase, PERFORMANCE
TOOL® will replace at no charge any parts which our examination shall disclose to be defective and under warranty. These warranties
shall be valid only when a sales receipt showing the date of purchase accompanies the defective product or defective part(s) being
returned. For part(s) after 90 days, please remit your request, postage prepaid to:
PERFORMANCE TOOL, P.O. Box 88259 Tukwila, WA 98138
These warranties exclude blades, bits, punches, dies, bulbs, fuses, hoses, and other consumables which must be replaced under
normal use and service. These warranties shall not apply to any product or part which is used for a purpose for which it is not
designed, or which has been repaired or altered in any way so as to affect adversely its performance or reliability, nor shall these
warranties apply to any product or part which has been subject to misuse, neglect, accident or wear and tear incident to normal use
and service.
PERFORMANCE TOOL® does not authorize any other person to make any warranty or to assume any liability in connection with its
products.
Except for warranties of title and the limited express warranties set forth above, PERFORMANCE TOOL® makes no express or
implied warranties of any kind with respect to its products. In particular, PERFORMANCE TOOL® makes no implied warranty of
merchantability and no implied warranty of fitness for any particular purpose, except that for goods purchased primarily for personal,
family or household use and not for commercial or business use, PERFORMANCE TOOL® makes an implied warranty of
merchantability (and, if otherwise applicable, an implied warranty of fitness for a particular purpose), but only for the particular
qualities or characteristics, and for the duration, expressly warranted above. The laws on limitation of implied warranties may differ
from state to state, so the above limitations may not apply in all cases.
PERFORMANCE TOOL® shall not be liable for consequential, incidental or special damages resulting from or in any manner related
to any product, or to the design, use, or any inability to use the product. The sole and exclusive remedy for a defective product or
part shall be the repair, or replacement thereof as provided above. The laws on limitation of remedies or on consequential, incidental
or special damages may vary from state to state, so the above limitations may not apply in all cases.
© Copyright 2011 WILMAR CORPORATION, P.O. Box 88259 Tukwila, WA 98138