
1
KEY INFORMATION YOU SHOULD KNOW:
• The guard must be installed before trimming or
edging - if not, the motor will overheat.
• When replacing the line, use only .065 inch diameter
ROUND line (B+D Model #AF-100 is recommended) -
otherwise the tool will not function properly.
• Do not bump the feed head against the ground - it
will disrupt the feed mechanism.
For use only with LB series 36v or 40v MAX* batteries.
INSTRUCTION MANUAL
40V MAX* LITHIUM
TRIMMER / EDGER
Thank you for choosing BLACK+DECKER!
PLEASE READ BEFORE RETURNING THIS PRODUCT FOR ANY REASON.
If you have a question or experience a problem with your BLACK+DECKER purchase, go to http://www.blackanddecker.com/instantanswers . If
you can’t find the answer or do not have access to the Internet, call 1-800-544-6986 from 8 a.m. to 5 p.m. EST Mon. - Fri. to speak with an agent.
Please have the catalog number available when you call.
SAVE THIS MANUAL FOR FUTURE REFERENCE.
VEA EL ESPANOL EN LA CONTRAPORTADA.
INSTRUCTIVO DE OPERACIÓN, CENTROS DE SERVICIO Y PÓLIZA DE GARANTÍA. ADVERTENCIA: LÉASE
ESTE INSTRUCTIVO ANTES DE USAR EL PRODUCTO.
*Maximum initial battery pack voltage (measured without a workload) is 40 volts. Measured under a workload, nominal voltage is 36.
CATALOG NUMBER
LST136
To register your new product, visit www.BlackandDecker.com/NewOwner

SAFETY GUIDELINES - DEFINITIONS
It is important for you to read and understand this manual. The
information it contains relates to protecting YOUR SAFETY and
PREVENTING PROBLEMS. The symbols below are used to help
you recognize this information.
DANGER: Indicates an imminently hazardous situation which,
if not avoided, will result in death or serious injury.
WARNING: Indicates a potentially hazardous situation which, if
not avoided, could result in death or serious injury.
CAUTION: Indicates a potentially hazardous situation which, if
not avoided, may result in minor or moderate injury.
NOTICE: Used without the safety alert symbol indicates a
potentially hazardous situation which, if not avoided, may result in
property damage.
IMPORTANT SAFETY WARNINGS
2
•KEEP ALL BYSTANDERS AWAY – at a safe distance from
work area, especially children.
•IMPORTANT WARNING – When being used as an Edger,
stones, pieces of metal and other objects can be thrown out
at high speed by the line. The tool and guard are designed to
reduce the danger. However, the following special precautions
should be taken: MAKE SURE that other persons and pets are at least
100 feet (30m) away.
•TO REDUCE THE RISK of rebound (ricochet) injury, work
going away from any nearby solid object such as wall, steps,
large stone, tree, etc. Use great care when working close to solid
objects and where necessary, do edging or trimming by hand.
•AVOID ACCIDENTALLY STARTING – Don’t carry plugged-in
tool with finger on trigger.
•DO NOT FORCE THE TOOL – at a rate faster than the rate at
which it is able to cut effectively.
•USE THE RIGHT TOOL – Do not use this tool for any job except
that for which it is intended.
•DON’T OVERREACH – Keep proper footing and balance at all times.
•DAMAGE TO UNIT – If you strike or become entangled with a
foreign object, stop tool immediately, unplug, check for damage
and have any damage repaired before further operation is
attempted. Do not operate with a broken hub or spool.
•DISCONNECT TOOL – when not in use, when replacing line, or
prior to cleaning.
•AVOID DANGEROUS ENVIRONMENTAL CONDITIONS – Do
not use electric tools in damp or wet locations. Follow all
instructions in this Instruction Manual for proper operation of your
tool. Don’t use the tool in the rain.
•DO NOT OPERATE portable electric tools in gaseous or
explosive atmospheres. Motors in these tools normally spark, and
the sparks might ignite fumes.
•STORE IDLE TOOLS INDOORS – When not in use, tools should be
stored indoors in a dry, locked-up place out of reach of children.
•STAY ALERT – Do not operate this unit when you are tired, ill,
or under the influence of alcohol, drugs, or medication.
•MAINTAIN APPLIANCES WITH CARE – Follow instructions in
maintenance section. Keep handles dry, clean and free from oil
and grease.
•CHECK DAMAGED PARTS – Before further use of the
IMPORTANT SAFETY WARNINGS & INSTRUCTIONS
WARNING: When using electric gardening appliances, basic
safety precautions should always be followed to reduce risk of fire,
electric shock, and personal injury, including the following.
Read All Instructions
•ALWAYS WEAR EYE PROTECTION – Wear safety spectacles
or goggles at all times when this tool is plugged in.
•GUARD – Do not use this tool without guard attached.
•DRESS PROPERLY – Do not wear loose clothing or jewelry.
They can be caught in moving parts. Rubber gloves and
substantial rubber soled footwear are recommended when
working outdoors. Don’t operate the tool when barefoot or
wearing open sandals. Wear heavy long pants to protect your
legs. Wear protective hair covering to contain long hair.
•NYLON LINE – Keep face, hands and feet clear of rotating nylon
line at all times.
•THE ROTATING LINE PERFORMS A CUTTING FUNCTION –
Use care when trimming around screens and desirable plantings.

3
appliance, a guard or other part that is damaged should be
carefully checked to determine that it will operate properly and
perform its intended function. Check for alignment of moving
parts, binding of moving parts, breakage of parts, mounting, and
any other condition that may affect its operation. A guard or other
part that is damaged should be properly repaired or replaced
by an authorized service center unless otherwise indicated
elsewhere in this manual.
•DONOTimmersetoolinwaterorsquirtitwithahose.DONOT
allowanyliquidtogetinsideit.
•DONOTstorethetoolonoradjacenttofertilizersorchemicals.
•DONOTcleanwithapressurewasher.
•Keepguardsinplaceandinworkingorder.
•Keephandsandfeetawayfromcuttingarea.
WARNING: Do not use tool if the switch trigger does not turn
the tool on or off. Any tool that can not be controlled with the switch
trigger is dangerous and must be repaired.
SAVE THESE INSTRUCTIONS
SYMBOLS
The label on your tool may include the following symbols.
The symbols and their definitions are as follows:
V ......................volts A ...................... amperes
Hz .................... hertz W ..................... watts
min ................... minutes or AC ........alternating current
or DC ...... direct current
n
o ....................no load speed
.................... Class I Construction .................... earthing terminal
(grounded) .................. safety alert symbol
.................... Class II Construction .../min or rpm...revolutions or
(double insulated) reciprocation per minute
............... Read instruction manual before use
.................... Use proper respiratory protection
.................... Use proper eye protection
.................... Use proper hearing protection
WARNING: Some dust created by this product contains
chemicals known to the State of California to cause cancer,
birth defects or other reproductive harm. Some examples of
these chemicals are:
•compoundsinfertilizers
•compoundsininsecticides,herbicidesandpesticides
•arsenicandchromiumfromchemicallytreatedlumber
To reduce your exposure to these chemicals, wear approved safety
equipmentsuchasdustmasksthatarespeciallydesignedtofilterout
microscopic particles.
IMPORTANT SAFETY INSTRUCTIONS FOR BATTERY CHARGERS
SAVE THESE INSTRUCTIONS: This manual contains important
safety instructions for battery chargers.
•Beforeusingcharger,readallinstructionsandcautionarymarkings
on charger, battery pack, and product using battery pack.
WARNING: Shock hazard.Donotallowanyliquidtoget
inside charger.
CAUTION: Burn hazard. To reduce the risk of injury, charge
only designated BLACK+DECKER batteries. Other types of
batteries may burst causing personal injury and damage.
CAUTION: Under certain conditions, with the charger plugged
in to the power supply, the charger can be shorted by foreign
material. Foreign materials of a conductive nature such as, but not
limited to, steel wool, aluminum foil, or any buildup of metallic
particles should be kept away from charger cavities. Always unplug
the charger from the power supply when there is no battery pack in
the cavity. Unplug charger before attempting to clean.
WARNING:
•DO NOT attempt to charge the battery pack with any chargers
other than the ones in this manual. The charger and battery
pack are specifically designed to work together.
•These chargers are not intended for any uses other than

to any surface. The charger is intended to use on a flat, stable
surface (i.e., table top, bench top).
•Do not operate charger with damaged cord or plug — have
them replaced immediately.
•Do not operate charger if it has received a sharp blow, been
dropped, or otherwise damaged in any way. Take it to an
authorized service center.
•Do not disassemble charger; take it to an authorized service
center when service or repair is required. Incorrect reassembly
may result in a risk of electric shock, electrocution or fire.
•Disconnect the charger from the outlet before attempting any
cleaning. This will reduce the risk of electric shock. Removing the
battery pack will not reduce this risk.
•NEVER attempt to connect 2 chargers together.
•The charger is designed to operate on standard household
electrical power (120 Volts). Do not attempt to use it on any
other voltage.
SAVE THESE INSTRUCTIONS
IMPORTANT SAFETY INSTRUCTIONS FOR BATTERY PACKS
WARNING: For safe operation, read this manual and manuals
originally supplied with tool before using the charger.
The battery pack is not fully charged out of the carton. Before using
the battery pack and charger, read the safety instructions below.
Then follow charging procedures outlined.
READ ALL INSTRUCTIONS
•Do not incinerate the battery pack even if it is severely
damaged or is completely worn out. The battery pack can
explode in a fire. Toxic fumes and materials are created when
battery packs are burned.
•Do not charge or use battery in explosive atmospheres, such as
in the presence of flammable liquids, gases or dust. Inserting or
removing the battery from the charger may ignite the dust or fumes.
4
charging designated BLACK+DECKERrechargeable batteries.
Any other uses may result in risk of fire, electric shock or
electrocution.
•Do not expose charger to rain or snow.
•Pull by plug rather than cord when disconnecting charger.
This will reduce risk of damage to electric plug and cord.
•Make sure that cord is located so that it will not be stepped
on, tripped over, or otherwise subjected to damage or stress.
•Do not use an extension cord unless it is absolutely
necessary. Use of improper extension cord could result in risk of
fire, electric shock, or electrocution.
•An extension cord must have adequate wire size (AWG
or American Wire Gauge) for safety. The smaller the gauge
number of the wire, the greater the capacity of the cable, that is 16
gauge has more capacity than 18 gauge. When using more than
one extension to make up the total length, be sure each individual
extension contains at least the minimum wire size.
Recommended Minimum Wire Size for Extension Cords
•Do not place any object on top of charger or place the charger
on a soft surface that might block the ventilation slots and
result in excessive internal heat. Place the charger in a
position away from any heat source. The charger is ventilated
through slots in the top and the bottom of the housing.
•Do not mount charger on wall or permanently affix charger
Minimum Gauge for Cord Sets
Volts Total Length of Cord in Feet
120V 0-25 26-50 51-100 101-150
240V 0-50 51-100 101-200 201-300
Ampere Rating
More Not more American Wire Gauge
Than Than
0 - 6 18 16 16 14
6 - 10 18 16 14 12
10 - 12 16 16 14 12
12 - 16 14 12 Not Recommended
5
•If battery contents come into contact with the skin,
immediately wash area with mild soap and water. If battery
liquid gets into the eye, rinse water over the open eye for 15
minutes or until irritation ceases. If medical attention is needed, the
battery electrolyte for Li-ion batteries is composed of a mixture of
liquid organic carbonates and lithium salts.
• Contents of opened battery cells may cause respiratory irritation.
Provide fresh air. If symptoms persist, seek medical attention.
WARNING: Burn hazard. Battery liquid may be flammable if
exposed to spark or flame.
•Charge the battery packs only in BLACK+DECKER chargers.
•DO NOT splash or immerse in water or other liquids. This may
cause premature cell failure.
•Do not store or use the tool and battery pack in locations
as outside sheds or metal buildings in summer).
WARNING: Never attempt to open the battery pack for any
reason. If battery pack case is cracked or damaged, do not insert into
charger. Do not crush, drop or damage battery pack. Do not use a
battery pack or charger that has received a sharp blow, been
dropped, run over or damaged in any way (i.e., pierced with a nail,
hit with a hammer, stepped on). Damaged battery packs should be
returned to service center for recycling.
WARNING: Fire hazard. Do not store or carry battery so that
metal objects can contact exposed battery terminals. For example, do
not place battery in aprons, pockets, tool boxes, product kit boxes, drawers,
etc., with loose nails, screws, keys, etc. Transporting batteries can
possibly cause fires if the battery terminals inadvertently come in
contact with conductive materials such as keys, coins, hand tools and
the like. The US Department of Transportation Hazardous Material
Regulations (HMR) actually prohibit transporting batteries in commerce or
on airplanes (i.e., packed in suitcases and carry-on luggage) UNLESS they
are properly protected from short circuits. So when transporting individual
batteries, make sure that the battery terminals are protected and well
insulated from materials that could contact them and cause a short circuit.
NOTE: Batteries should not be put in checked baggage.
1. On/Off Switch
2. Handle
3. Lock Off Button
4. Battery
5. Charge Indicator
6. Power Command
7. Auxillary Handle
8. Height Adjust
Locking Clamp
9. Trimmer Head
10. Edge Guide
11. Guard
12. Spool Housing
8
3
4
7
COMPONENTS
2
10
1
11
12
9
5
6
A
6
STORAGE RECOMMENDATIONS
1. The best storage place is one that is cool and dry away from
direct sunlight and excess heat or cold.
2. Long storage will not harm the battery pack or charger.
CHARGING PROCEDURE
BLACK+DECKER chargers are designed to charge
BLACK+DECKER battery packs: LCS36 (2 hrs), LCS436 (6 hrs).
1. Plug the charger into an appropriate outlet before inserting
the battery pack.
2. Insert the battery pack into the charger.
3. The green LED will flash indicating that the battery is being
charged.
4. The completion of charge is indicated by the green LED
remaining on continuously. The pack is fully charged and may be
used at this time or left on the charger.
Recharge discharged batteries as soon as possible after use or
battery life may be greatly diminished.
CHARGER DIAGNOSTICS
This charger is designed to detect certain problems that can
arise with the battery packs or the power source. Problems
are indicated by one LED flashing in different patterns.
BAD BATTERY
The charger can detect a weak or damaged battery. The red LED
flashes in the pattern indicated on the label. If you see this bad
battery blink pattern, do not continue to charge the battery.
Return it to a service center or a collection site for recycling.
HOT/COLD PACK DELAY
When the charger detects a battery that is excessively hot
or excessively cold, it automatically starts a Hot/Cold Pack
Delay, suspending charging until the battery has normalized.
After this happens, the charger automatically switches to the Pack
Charging mode. This feature ensures maximum battery life. The red
LED flashes in the pattern indicated on the label when the hot / cold
pack delay is detected.
LEAVING THE BATTERY IN THE CHARGER
The charger and battery pack can be left connected with the green
LED glowing indefinitely. The charger will keep the battery pack
fresh and fully charged.
IMPORTANT CHARGING NOTES
1. Longest life and best performance can be obtained if the battery
pack is charged when the air temperature is between 60°F and 80°F
(16°- 27°C). DO NOT charge the battery pack in an air temperature
below +40°F (+4.5°C), or above +105°F (+40.5°C). This is important
and will prevent serious damage to the battery pack.
2. The charger and battery pack may become warm to touch
while charging. This is a normal condition, and does not indicate a
problem. To facilitate the cooling of the battery pack after use, avoid
placing the charger or battery pack in a warm environment such as
in a metal shed, or an uninsulated trailer.
3. If the battery pack does not charge properly:
a. Check current at receptacle by plugging in a lamp or other
appliance
b. Check to see if receptacle is connected to a light switch
BLACK+DECKER Battery and Charger Systems
Chargers/Charge Time** (Hours) (0% - 100% charge)
40V MAX*
Batteries
Watt Hours
40V MAX* Chargers
LCS36 LCS40 LCS436
LBX36 47 1 1 3.25
LBXR36 60 1.25 1.25 3.75
LBX1540 60 1.25 1.25 3.75
LBXR2036 80 1.5 1.5 5
LBX2040 80 1.5 1.5 5
LBXR2540 100 1.75 1.75 6.25
LBX2540 100 1.75 1.75 6.25
**All charge times are approximate. Actual charge time may vary.
7
which turns power off when you turn out the lights.
c. Move charger and battery pack to a location where the
surrounding air temperature is approximately 60°F - 80°F
(16° - 27°C).
d. If charging problems persist, take the tool, battery pack and
charger to your local service center.
4. The battery pack should be recharged when it fails to produce
sufficient power on jobs which were easily done previously. DO
NOT CONTINUE to use under these conditions. Follow the charging
procedure. You may also charge a partially used pack whenever
you desire with no adverse affect on the battery pack.
5. Foreign materials of a conductive nature such as, but not limited
to, steel wool, aluminum foil, or any buildup of metallic particles
should be kept away from charger cavities. Always unplug the
charger from the power supply when there is no battery pack in the
cavity. Unplug charger before attempting to clean.
6.Donotfreezeorimmersechargerinwateroranyotherliquid.
WARNING: Shock hazard. Donotallowanyliquidtoget
inside charger. Never attempt to open the battery pack for any
reason. If the plastic housing of the battery pack breaks or cracks,
return to a service center for recycling.
STATE OF CHARGE INDICATOR (FIGURE B)
Thebatteryisequippedwithastateofchargeindicator.Thiscan
be used to display the current level of
charge in the battery during use and
during charging. It does not indicate
tool functionality and is subject to
variation based on product components,
temperature and end-user application.
Checking state of charge during use:
•Press the state of charge indicator
button (B1).
•ThethreeLEDs(B2) will illuminate,
indicating the percent of charge in the
battery. See chart in figure B.
•IfLEDlightdoesnotilluminate,
charge battery.
INSTALLING AND REMOVING THE BATTERY PACK
WARNING: Make certain the lock-off button is engaged to
prevent switch actuation before removing or installing battery.
TO INSTALL BATTERY PACK:
Insert battery pack into tool until fully
seated and an audible click is heard
(figure C). Make sure battery pack is fully
seated and fully latched into position.
TO REMOVE BATTERY
PACK: Depress the battery release
button in the back of the battery pack
and pull battery pack out of tool.
WARNING: Before assembly, make sure that the tool is
switched off and the battery has been removed.
ASSEMBLY & ADJUSTMENT
ASSEMBLY TOOLS REQUIRED (NOT SUPPLIED):
- Phillips Screwdriver
WARNING: Remove the battery before attempting to attach any
of the following components.
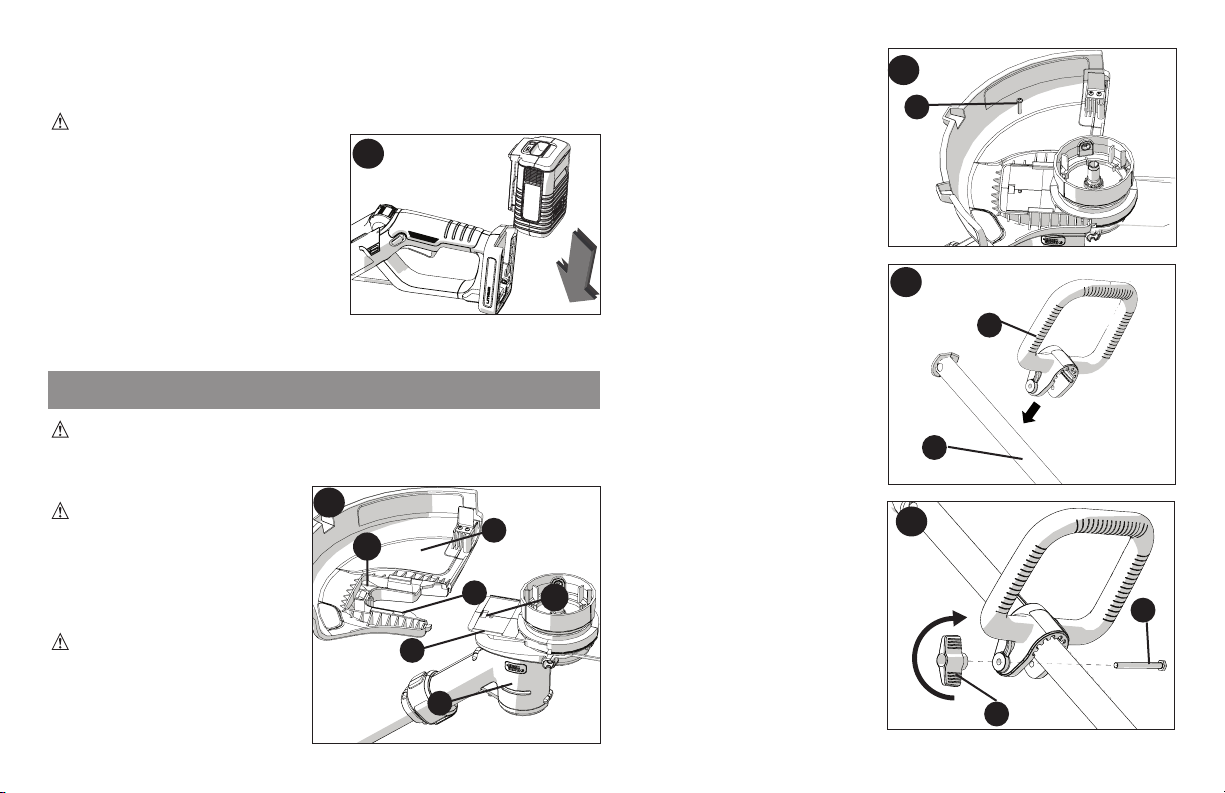
ATTACHING THE GUARD (FIGURES D AND E)
WARNING: NEVER
OPERATE TOOL WITHOUT
GUARD FIRMLY IN PLACE.
The guard must always be
properly attached on the tool to
protect the user.
•Removethescrewfromthe
guard.
•Keepingtheguardsquareto
the trimmer head slide it fully
into place until the retaining
tab clicks into place (Ensure
that the guide rails (D1) on
C
<18%
18% - 45%
45% - 72%
72% - 100%
B
B2
B1
D
D2
D1
D3
D4
D6
D5
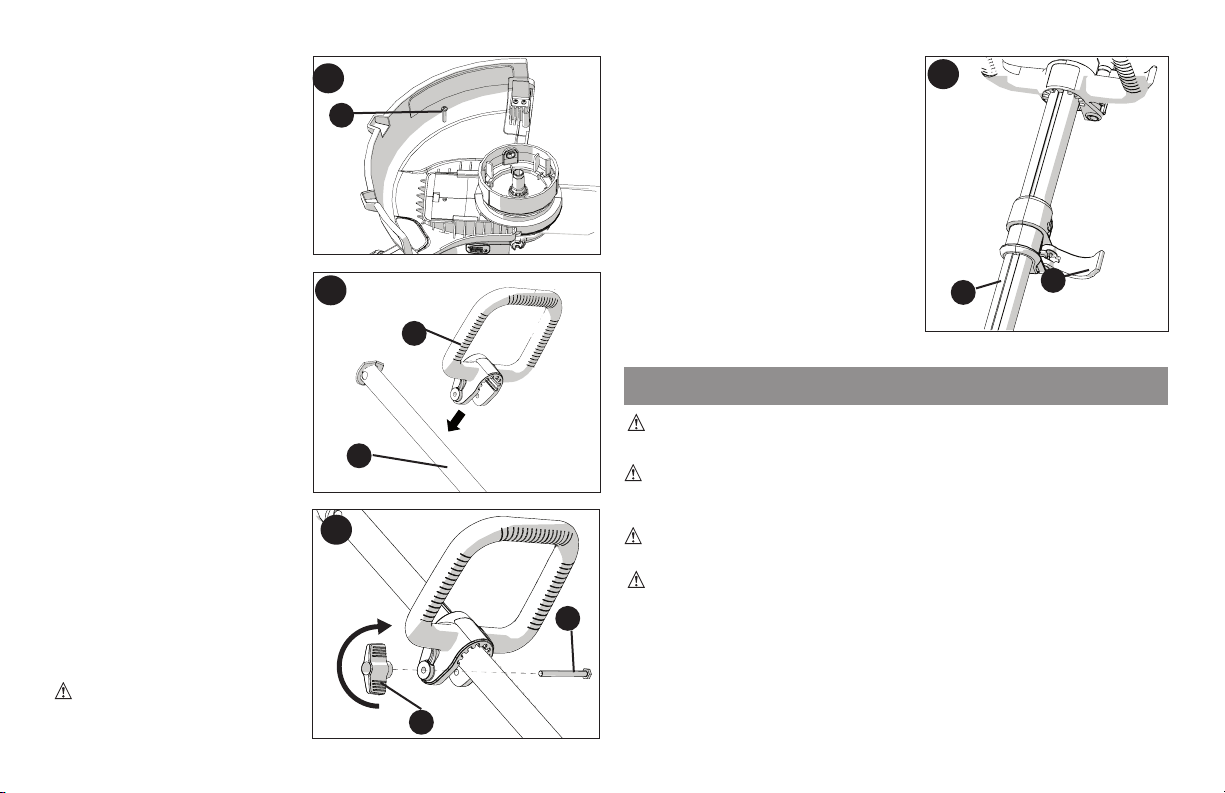
shown in figure N.
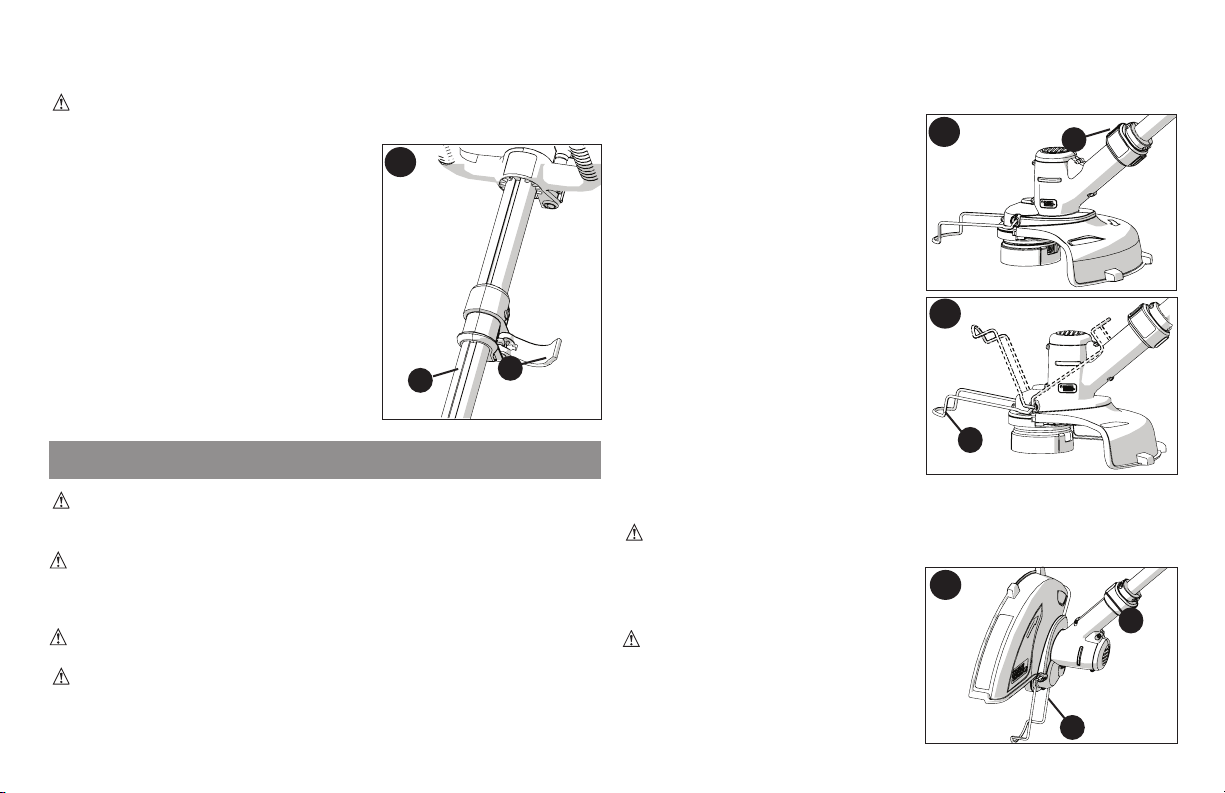
•Thistoolhasatelescopic
mechanism, allowing you to set it
to a comfortable height.
To adjust the height setting:
•Releasetheheightadjust
locking clamp (H1).
•Gentlypullthetube(H2) up or
down to the desired height.
•Closetheheightadjustlocking
clamp (H1).
RELEASING THE CUTTING LINE
In transit, the cutting line is taped
to the spool housing.
•Remove the tape holding the
cutting line to the spool housing.
OPERATING INSTRUCTIONS
WARNING: Always use proper eye protection that conforms
to ANSI Z87.1 (CAN/CSA Z94.3) while operating this power tool.
WARNING: Remove the battery before making any assembly,
adjustments, or changing accessories. Such preventive safety measures
reduce the risk of starting the
trimmer
accidentally.
CAUTION: Before you begin trimming, only use the
appropriate type of cutting line.
CAUTION: Inspect area to be trimmed and remove any wire,
cord, or string-like objects which could become entangled in the
rotating line or spool. Be particularly careful to avoid any wire which
might be bent outwardly into the path of the tool, such as barbs at the
base of a chain link fence.
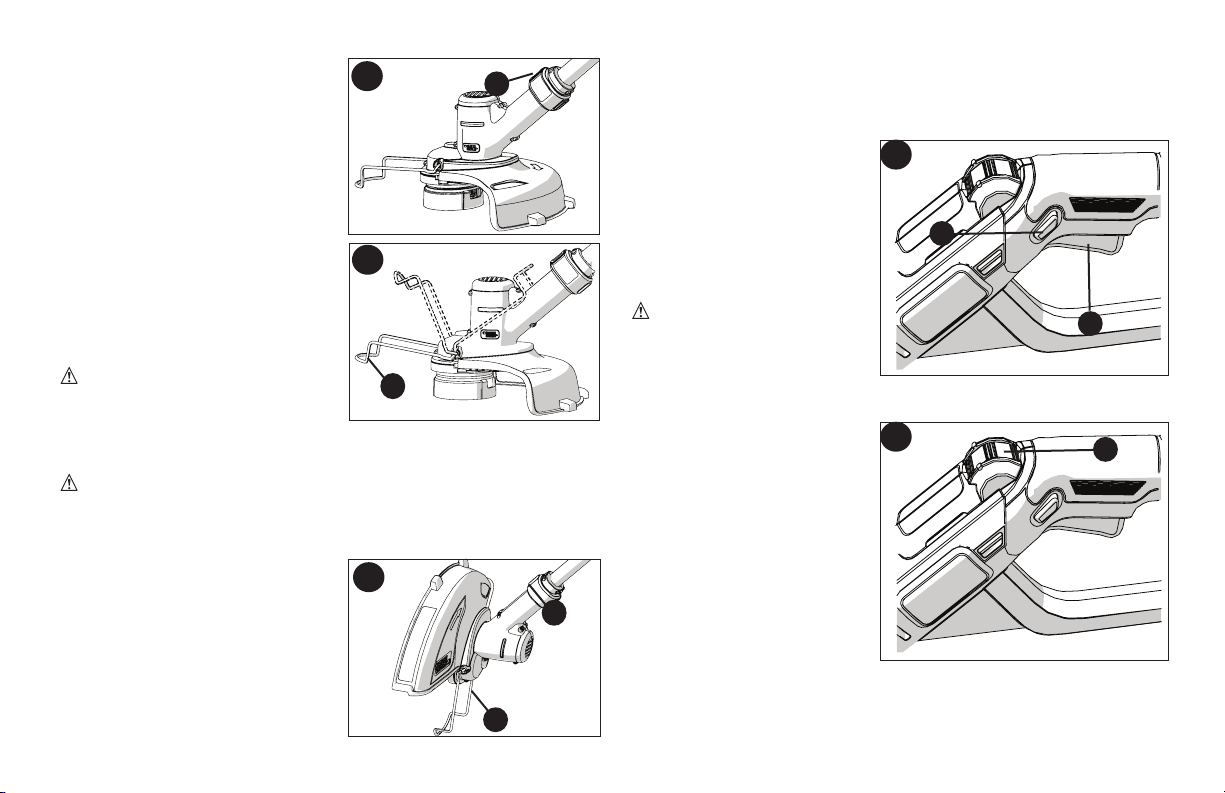
SETTING THE TOOL TO TRIMMING OR EDGING MODE
(FIGURE I, J AND K)
•Thetoolcanbeusedintrimmingmodeasshowninfigure I or in
8
the guard (D2) are correctly
aligned with the guide rails
(D3) on the trimmer head
(D4) (figure D).
The locking
tab (D5) should snapped into
the housing slot (D6).
•Securetheguardwiththe
screw (E1) (figure E).
ATTACHING THE AUXILIARY
HANDLE (FIGURES F AND G)
•Push the auxiliary handle
(F1) onto the tube (F2).
•Slide the bolt (G1) through
the holes in the auxiliary
handle.
•Tightentheknob(G2)
onto the bolt by turning it
clockwise.
ADJUSTING THE POSITION
OF THE AUXILIARY HANDLE
(FIG. G)
The auxiliary handle can be
adjusted to provide optimum
balance and comfort.
•Loosentheknobonthe
bolt by turning it counter
clockwise.
•Gentlyslidetheauxiliary
handle up or down the tube
to the desired height.
•Tightentheknobontothe
bolt by turning it clockwise.
ADJUSTING THE HEIGHT OF
THE TOOL (FIGURE H)
CAUTION: Adjust the
length of the trimmer to obtain
proper working positions as
H
H1
H2
E
E1
F
F1
F2
G
G2
G1
9
edging mode to trim overhanging
grass along lawn edges and flower
beds as shown in figure K.
TRIMMING MODE
For trimming, the trimmer head
should be in the position shown in
figure I. If it is not:
•Removethebatteryfromthetool.
•Pressandholdtheheadrelease
button (I1).
•Whileholdingtheauxillaryhandle,
rotate the head clockwise.
•Releasetheheadreleasebutton.
•Lifttheedgeguide(J1) into the
closed position.
Note: The head will only rotate in one
direction.
CAUTION: Wire edge guide
should only be used when in the
edging mode. Keep wire edge guide
in the retracted position when in the trimming mode.
EDGING MODE (FIGURE K)
WARNING: When being used as an Edger, stones, pieces of
metal and other objects can be thrown out at high speed by the line. The
trimmer and guard are designed to reduce the danger. However, MAKE
SURE that other persons and pets are at least 100 feet (30m) away.
For edging, the trimmer head should be in
the position shown in figure K. If it is not:
•Removethebatteryfromthetool.
•Pressandholdtheheadrelease
button (K1).
•Whileholdingtheauxillary
handle, rotate the head
counterclockwise.
•Releasetheheadreleasebutton.
•Droptheedgeguide(K2) in to
the open position. Ensure that the edging guide is all the way down,
an audible click will be heard.
Note: The head will only rotate in one direction.
Note: The Auto Feed System may not operate correctly if edge guide is not used.
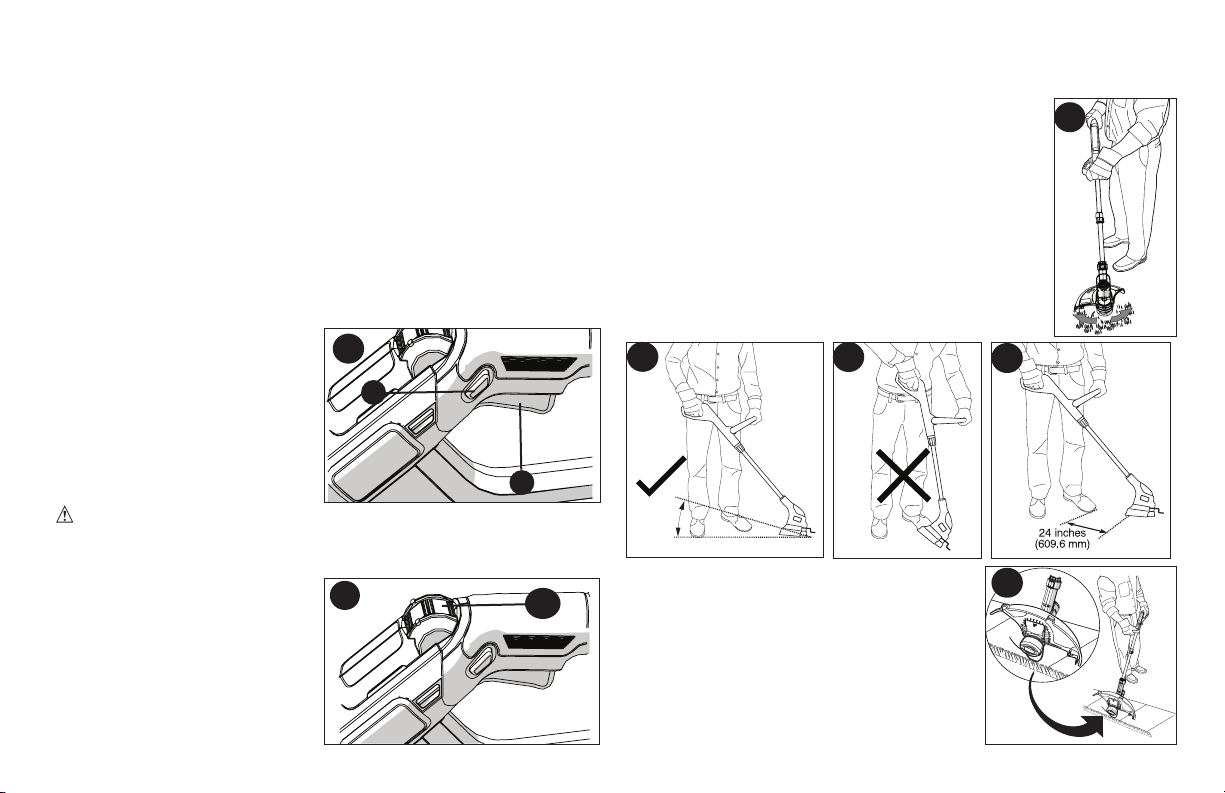
SWITCHING ON AND OFF
•Toswitchthetoolon,press
in and hold the lock off button
(L1)thensqueezethetrigger
lever (L2). Once the tool is
running you may release the
lock off button (L1).
•Toswitchthetooloff,release
the trigger lever.
WARNING: Never attempt
to lock the trigger lever in the
on position.
POWER COMMAND - MAX POWER / MAX RUNTIME
The max power / max runtime
feature (M1) is located on the
tool handle. It allows you to
optimize the tools performance
and boost the power as needed.
•Tochoosemaxpowerto
tackle thick weeds, rotate dial
to setting 6.
•Tochoosemaxruntimeto
increase battery life rotate dial
to setting 1.
•Foracombinationofboth,
rotate dial to setting from 2 to 5.
I
K
I1
K2
J
J1
K1
L
L1
L2
M
M1
10
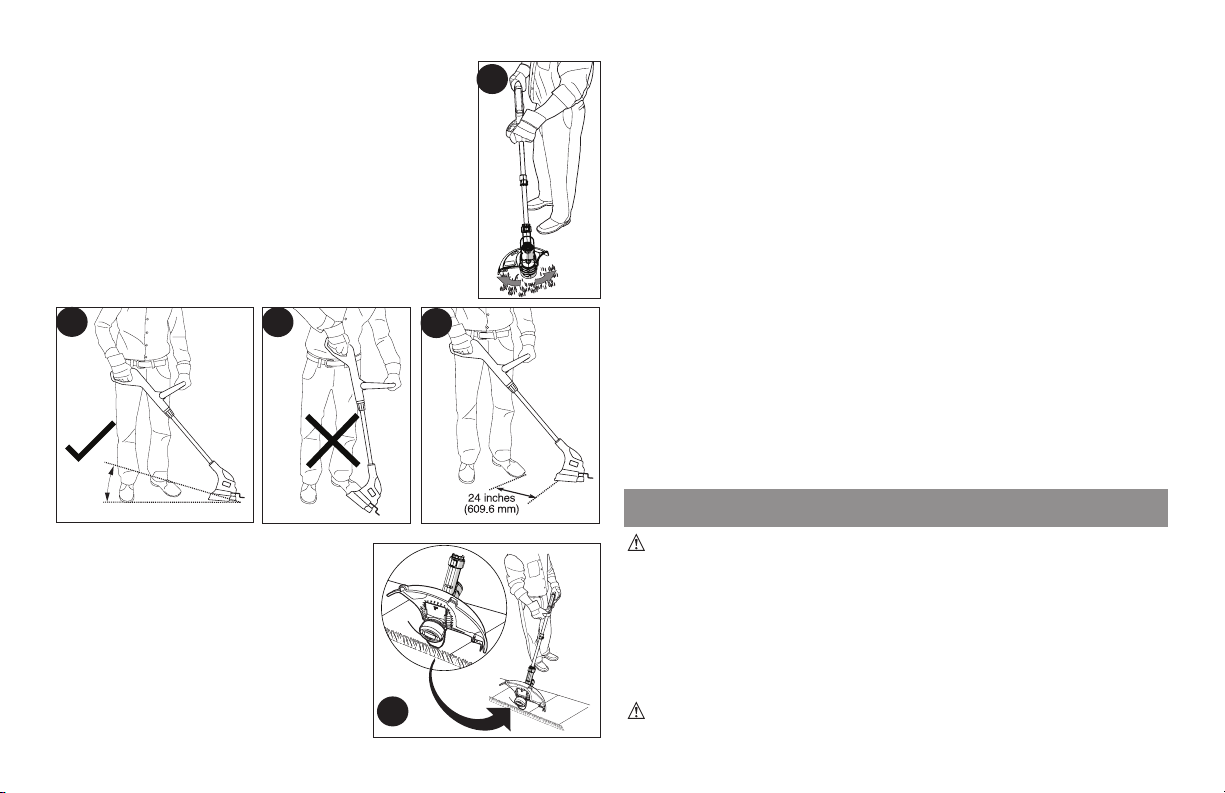
OPERATING THE TRIMMER
•With the unit on, angle unit and slowly swing the
trimmer side to side as shown in figure N.
•Maintainacuttingangleof5° to 10° as shown
in figure N1. Do not exceed 10°(figure N2). Cut
with the tip of the line. To keep distance from hard
surfaces use edge guide (10). Pull the guide out
until it snaps securely into place
•Maintainaminimumdistanceof24 inches
(609.6 mm) between the guard and your feet
as shown in figure N3. To acheive this distance
adjust the overall height of the trimmer as shown
in figure H.
EDGING
Optimum cutting results are achieved on
edges deeper than 2 inches (50 mm).
•Do not use the tool to create edges
or trenches.
•Guide the tool as shown in figure O.
•To make a closer cut, slightly tilt the
tool.
HELPFUL CUTTING TIPS
•Use the tip of the string to do the cutting; do not force string
head into uncut grass. Use edge guide along such things as
fences, houses and flower beds for best practices.
•Wireandpicketfencescauseextrastringwear,evenbreakage.
Stone and brick walls, curbs, and wood may wear string rapidly.
•Donotallowspoolcaptodragongroundorothersurfaces.
•Inlonggrowthcutfromthetopdownanddonotexceed12
inches (304.8 mm) high.
•Keeptrimmertiltedtowardtheareabeingcut;thisisthebest
cutting area.
•Thetrimmercutswhenpassingtheunitfromtherighttoleft.
This will avoid throwing debris at the operator.
•Avoidtreesandshrubs.Treebark,woodmoldings,siding,and
fence posts can easily be damaged by the string.
CUTTING LINE / LINE FEEDING
Your trimmer uses .065 inch
(1.65 mm) diameter, ROUND nylon
line. During use, the tips of the nylon lines will become frayed and
worn and the special self feeding spool will automatically feed and
trim a fresh length of line. DO NOT BUMP unit on ground in attempt
to feed line or for any other purposes. Cutting line will wear faster and
requiremorefeedingifthecuttingoredgingisdonealongsidewalks
or other abrasive surfaces or heavier weeds are being cut.
REPLACEMENT ACCESSORIES
CAUTION: Before you begin trimming, only use the appropriate
type of cutting line.
Use BLACK+DECKER replacement spool Model No. AF-100.
USE ONLY .065 inch (1.65 mm) DIAMETER ROUND NYLON
MONOFILAMENT LINE. Do not use serrated or heavier gauge
line, as they will overload the motor and cause overheating. Other
replacement parts (guards, spool caps, etc.) are available through
BLACK+DECKER service centers. To find your local service location
call: 1-800-544-6986 or visit www.blackanddecker.com.
WARNING: The use of any accessory not recommended by
BLACK+DECKER for use with this tool could be hazardous.
N
O
N3
5
O
-10
O
N1
N2
11
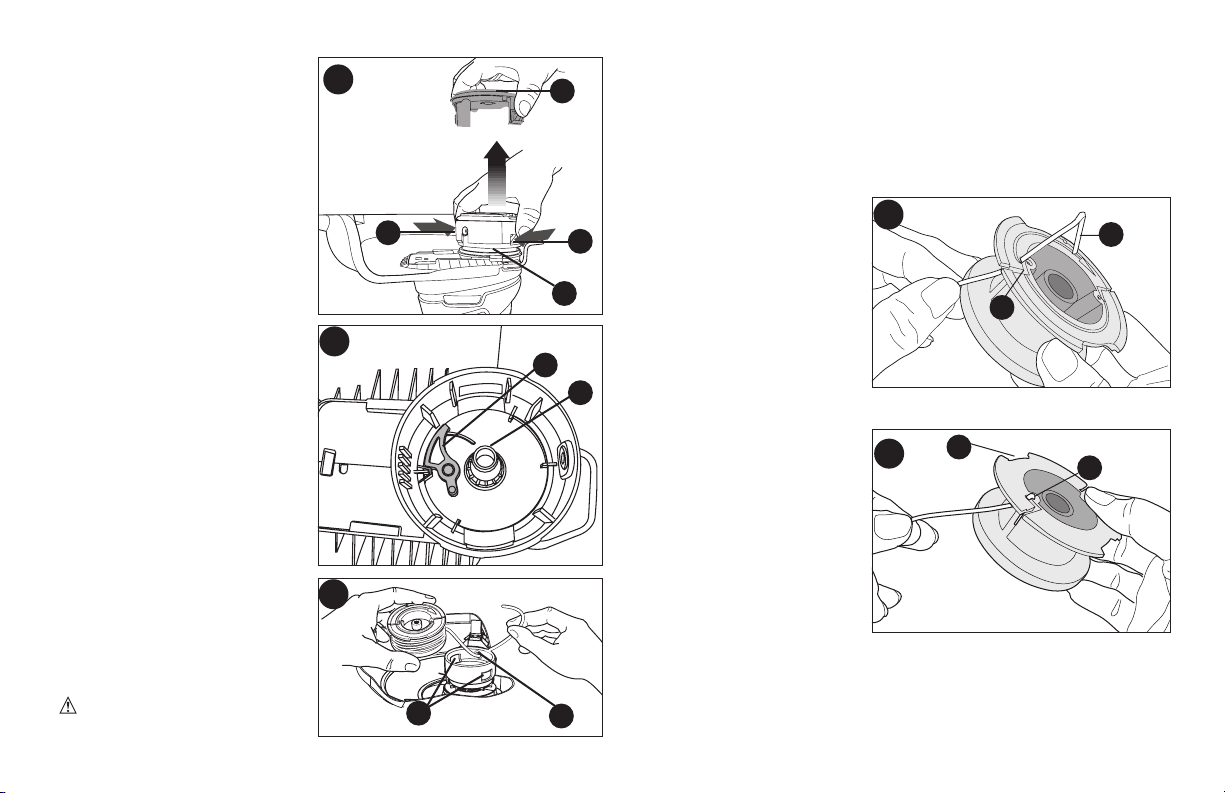
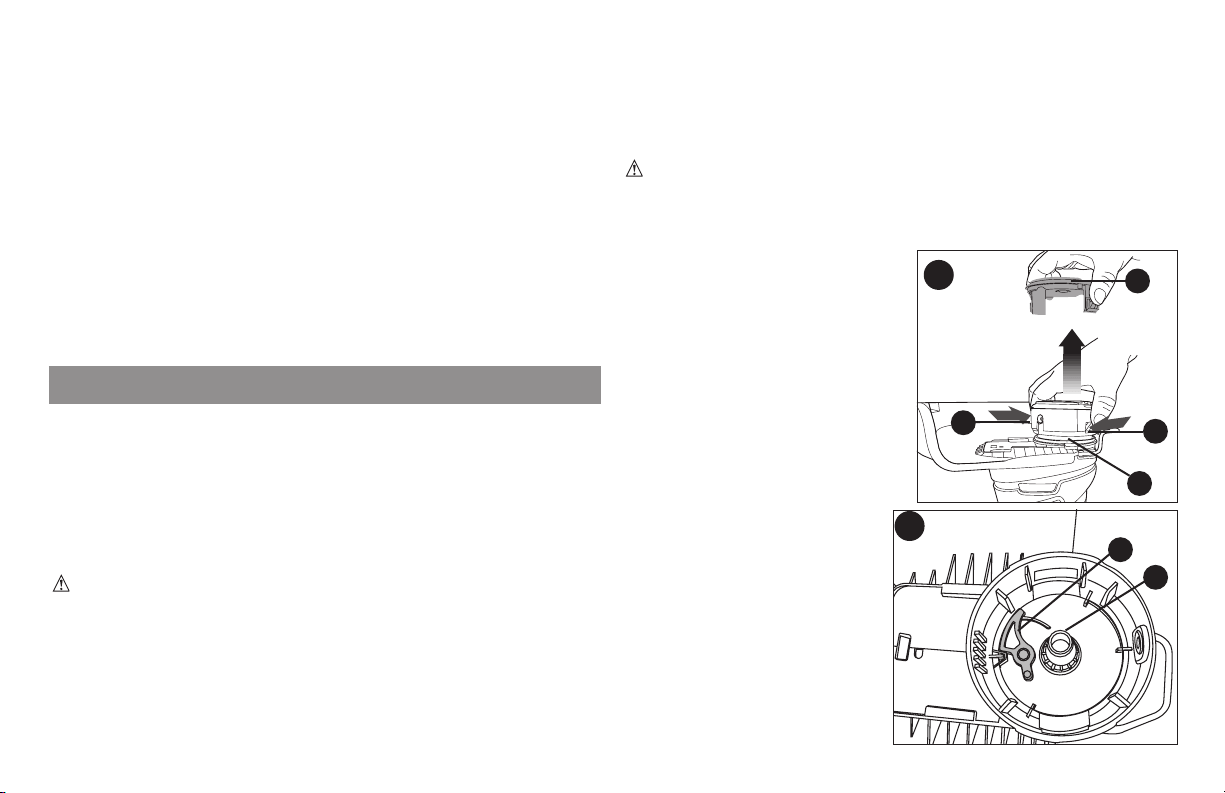
REPLACING THE SPOOL
(FIGURES P, Q AND R)
•Removebatteryfromtool.
•Depressthetabs(P1) and
remove the spool cap (P2)
from the spool housing (P3) in
the trimmer head (figure P).
•Replacespoolwith
BLACK+DECKER model
# AF-100.
•Graspemptyspoolwithone
hand and spool housing with
other hand and pull spool out.
•Iflever(Q1) in base of
housing becomes dislodged,
replace in correct position
before inserting new spool
into housing.
•Removeanydirtandgrass
from the spool and housing.
•Unfasten the end of the
cutting line and guide the line
into the eyelet (R2) figure R.
•Takethenewspooland
push it onto the boss (Q2) in
the housing. Rotate the spool
slightly until it is seated.
The line should protrude
approximately 4-13/16 inches
(122mm) from the housing.
•Alignthetabsonthespool
cap with the slots (R1) in the
housing (figure R).
•Pushthecapontothe
housing until it snaps securely
into place.
CAUTION: To avoid tool
damage, if the cutting line
protrudes beyond the trimming blade, cut it off so that it just reaches
the blade.
REWINDING SPOOL
(USE ONLY .065 IN. ROUND DIAMETER LINE) (FIGURES S, T & U)
NOTE: Hand wound spools from bulk line are likely to become
tangledmorefrequentlythanBLACK+DECKERfactorywound
spools. For best results, factory wound spools are recommended.
To rewind spool, follow the
steps below:
•Removebatteryfromtool.
•Removetheemptyspool
from the tool as described in
REPLACING THE SPOOL”.
•Makeafoldattheendof
the cutting line at about 3/4
inch (19mm)(S1). Feed the
cutting line into one of the
line holding slots (S2) as
shown in figure S.
•Insertthe3/4inch(19mm)
end of the bulk line into
the hole (T1) in the spool
adjacent to the slot as
shown in figure T. Make
sure the line is pulled tight
against the spool as shown
in figure T.
P
Replacement
spool
Model #
AF-100
P1
P2
P1
P3
Q
Q1
Q2
R
R1
R2
S
S1
S2
T
T1
T2

12
•Windthecuttinglineontothespoolin
the direction of the arrow on the spool.
Make sure to wind the line on neatly and
in layers. Do not crisscross (figure U).
•Whenthewoundcuttinglinereaches
the recesses (T2), cut the line. (figure T).
•Fitthespoolontothetoolasdescribed
in “REPLACING THE SPOOL”.
Maintenance
WARNING: To avoid serious injury, remove the battery from
the tool before performing any maintenance.
1. Keep the air intake slots clean to avoid overheating.
2. Your trimmer line can dry out over time. To keep your line in top
condition, store spare pre-wound spools or bulk line in a plastic,
sealable bag with a tablespoon of water.
3. Plastic parts may be cleaned by using a mild soap and a damp rag.
4. The line cutter on the edge of the guard can dull over time. It is
recommended you periodically touch-up the sharpness of the
blade with a file.
IMPORTANT: To assure product SAFETY and RELIABILITY,
repairs, maintenance and adjustment should be performed by
authorizedservicecentersorotherqualifiedserviceorganizations,
always using identical replacement parts.
THE RBRC™ SEAL
The RBRC™ (Rechargeable Battery Recycling
Corporation) Seal on the Li-Ion battery (or battery pack)
indicates that the costs to recycle the battery (or battery pack) at
the end of its useful life have already been paid by Black & Decker.
RBRC™ in cooperation with BLACK+DECKERand other battery
users, has established programs in the United States to facilitate the
collection of spent Li-Ion batteries. Help protect our environment and
conserve natural resources by returning the spent Li-Ion battery to
an authorized BLACK+DECKERservice center or to your local retailer for
recycling. You may also contact your local recycling center for information on
where to drop off the spent battery.
RBRC™ is a registered trademark of the
Rechargeable Battery Recycling Corporation.
This device complies with part 15 of the FCC rules. Operation
is subject to the following two conditions: (1) This device may
not cause harmful interference, and (2) this device must accept
any interference received, including interference that may cause
undesired operation.
NOTE: Thisequipmenthasbeentestedandfoundtocomplywith
the limits for a Class B digital device, pursuant to Part 15 of the FCC
Rules. These limits are designed to provide reasonable protection
against harmful interference in a residential installation. This
equipmentgenerates,usesandcanradiateradiofrequencyenergy
and, if not installed and used in accordance with the instructions,
may cause harmful interference to radio communications. However,
there is no guarantee that interference will not occur in a particular
installation.
Ifthisequipmentdoescauseharmfulinterferencetoradioor
television reception, which can be determined by turning the
equipmentoffandon,theuserisencouragedtotrytocorrectthe
interference by one or more of the following measures:
•Reorientorrelocatethereceivingantenna.
•Increasetheseparationbetweentheequipmentandreceiver.
•Connecttheequipmentintoanoutletonacircuitdifferentfromthat
to which the receiver is connected.
•Consultthedealeroranexperiencedradio/TVtechnicianforhelp.
Changes or modifications to this unit not expressly approved by the
party responsible for compliance could void the user’s authority to
operatetheequipment.ThisClassBdigitalapparatuscomplieswith
Canadian ICES-003.
U

13
Service inforMation
All BLACK+DECKER Service Centers are staffed with trained
personnel to provide customers with efficient and reliable power tool
service. Whether you need technical advice, repair, or genuine factory
replacement parts, contact the BLACK+DECKER location nearest
you. To find your local service location, call: 1-800-544-6986 or visit
www.blackanddecker.com
ProBLeM
Tool runs slowly.
Automatic line feed does not
feed more line.
SoLution
•Removebatteryfromtool.
•Checkthatthespoolhousing
can rotate freely. Carefully clean
it if necessary.
•Checkthatthecuttingline
does not protrude more than
approximately 4-13/16 inches
(122mm) from the spool.
If it does, cut it off so that it just
reaches the line trimmingblade.
•Morelineisfedwhentheline
shortens to approximately 3
inches (76.2mm). To determine
if the line is not feeding, let line
wear past this point.
ProBLeM
Automatic line feed does not
feed more line.
SoLution
•Keepthetabsdepressedand
remove the spool from the spool
housing in the trimmer head.
•Ensurethatthelineisnot
crisscrossed on the spool as
detailed in figure U. If it is,
unwind the cutting line, then
wind it back on the spool neatly
so that the lines do not cross.
•Inspecttracksatthebottomof
spool for damage. If damaged,
replace spool.
•Readthecodeonthebackof
spool. If it reads “PA66” call
customer service for a replacement.
If it reads “ABS” this is not the issue.
•Pullthecuttinglineuntilit
protrudes approximately 4-13/16
inches (122mm) from the spool. If
insufficient cutting line is left on the
spool, install a new spool of cutting
line.
•Alignthetabsonthespoolcap
with the cut outs in the housing.
•Pushthespoolcapontothehousing
until it snaps securely into place.
•Ifthecuttinglineprotrudes
beyond the trimming blade, cut
it off so that it just reaches the blade.
If the automatic line feed still does
not work or the spool is jammed, try
the following suggestions:
•Carefullycleanthespooland
housing.
•Removethespoolandcheckifthe
lever in the spool housing can
move freely.
trouBLe Shooting guiDe

trouBLe Shooting continueD
14
THREE-YEAR LIMITED WARRANTY
Black & Decker (U.S.) Inc. warranties this product to be free from
defects in material or workmanship for a period of three (3) years
following the date of purchase, provided that the product is used in
a home environment. This limited warranty does not cover failures
due to abuse, accidental damage or when repairs have been
made or attempted by anyone other than BLACK+DECKER and
its Authorized Service Centers. A defective product meeting the
warranty conditions set forth herein will be replaced or repaired at no
charge in either of two ways:
The first, which will result in exchanges only, is to return the product
to the retailer from whom it was purchased (provided that the store
is a participating retailer).Returns should be made within the time
period of the retailer’s policy for exchanges. Proof of purchase may
berequired.Pleasecheckwiththeretailerforitsspecificreturn
policy regarding time limits for returns or exchanges. The second
option is to take or send the product (prepaid) to a BLACK+DECKER
owned or authorized Service Center for repair or replacement at
BLACK+DECKER ’soption.Proofofpurchasemayberequired.
BLACK+DECKER owned and authorized service centers are listed
online at www.blackanddecker.com.
This warranty does not apply to accessories. This warranty gives
you specific legal rights and you may have other rights which vary
fromstatetostate.Shouldyouhaveanyquestions,contactthe
manager of your nearest BLACK+DECKER Service Center. This
product is not intended for commercial use, and accordingly, such
commercial use of this product will void this warranty. All other
guarantees, express or implied, are hereby disclaimed.
LATIN AMERICA: This warranty does not apply to products sold in
Latin America. For products sold in Latin America, check country
specific warranty information contained in the packaging, call the
local company or see the website for such information.
ProBLeM
Overfeeding
Line unravels when cap or spool
is removed.
Battery won’t charge.
SoLution
•Removethespoolandunwind
the cutting line, then wind it on
neatly again. Replace the spool
into the housing.
•Ensureyouarecuttingwith
the tip of the line (7 inches
(177.8mm) from the spool).
Use the edge guide if needed to
ensure proper space is
maintained.
•Ensureyouarenot
exceeding a 10° angle as
shown in figure N1.
•Makesuretoparkthelinesin
holding slots (S2) figure S
before removing.
•Insertbatteryintochargeruntil
green LED appears. Charge up to
8 hours if battery totally drained.
•Plugchargerintoaworking
outlet. Refer to “Important
Charging
Notes” for more details.
•Checkcurrentatreceptacleby
plugging in a lamp or other appliance.
•Checktoseeifreceptacle
is connected to a light switch
which turns power off when you
turn out the lights.
•Movechargerandtooltoa
surrounding air temperature of
above 40 degree F (4.5°C) or
below 105 degree F (+40.5°C).
Imported by
Black & Decker (U.S.) Inc.,
701 E. Joppa Rd.
Towson, MD 21286 U.S.A.
15
•Utiliseruniquementavecunbloc-pilesde
36 V ou de 40 V max* de série LB de B+D.
MANUEL D’ INSTRUCTIONS
TAILLE-BORDURE / COUPE-BORDURE
AVEC PILE AU LITHIUM DE 40 V MAX*
MERCI D’AVOIR CHOISI BLACK+DECKER !
àLIRE AVANT DE RETOURNER CE PRODUIT POUR qUELqUE RAISON qUE CE SOIT:
Si des questions ou des problèmes surgissent après l’achat d’un produit BLACK+DECKER , consulter le site Web www.
blackanddecker.com/instantanswers pour obtenir des réponses instantanément 24 heures par jour. Si la réponse est introuvable ou
en l’absence d’accès à l’Internet, composer le 1 800 544-6986 de 8 h à 17 h HNE, du lundi au vendredi, pour parler avec un agent.
Prière d’avoir le numéro de catalogue sous la main lors de l’appel. Pour l´achat d´un filtre de rechange composer le 1-888-678-7278
CONSERVER CE MODE D’EMPLOI POUR UN USAGE ULTÉRIEUR.
*La tension initiale maximale du bloc-piles (mesurée sans charge de travail) est de 40 volts. La tension nominale est de 36.
NUMÉRO DE MODèLE
LST136
Consulter le site Web www.BlackandDecker.com/NewOwner pour enregistrer votre nouveau produit.
VOICI DES RENSEIGNEMENTS IMPORTANTS
qU’IL VOUS FAUT CONNAÎTRE :
• Le pare-main doit être installé avant de débuter le taillage
ou la coupe sinon le moteur surchauffera.
• Utiliser seulement un fil ROND de 1,7 mm (0,065 po)
de diamètre lors du remplacement (modèle AF-100 de
B+D recommandé), sinon l’appareil ne fonctionnera pas
correctement.
• Éviter de frapper la tête d’alimentation contre le sol. En
effet, cela endommagera le mécanisme d’alimentation.

16
LIGNES DIRECTRICES EN MATIÈRE DE
SÉCURITÉ - DÉFINITIONS
Ilestimportantquevouslisiezetcompreniezcemoded’emploi.Les
informationsqu’ilcontientconcernentVOTRESÉCURITÉetvisent
àÉVITERTOUTPROBLÈME.Lessymbolesci-dessousserventà
vous aider à reconnaître cette information.
DANGER : Indiqueunesituationdangereuseimminente
qui,siellen’estpasévitée,causeralamortoudesgraves
blessures.
AVERTISSEMENT : Indiqueunesituationotentiellement
dangereusequi,siellen’estpasévitée,pourraitcauserla
mort ou de graves blessures.
MISE EN GARDE : Indiqueunesituationpotentiellement
dangereusequi,siellen’estpasévitée,pourraitcauserdes
blessures mineures ou modérées.
MISE EN GARDE : Utilisé sans le symbole d’alerte à la
sécurité,indiqueunesituationpotentiellementdangereuse
qui,siellen’estpasévitée,peutrésulterendesdommagesà
la propriété.
AVERTISSEMENTS DE SÉCURITÉ ET DIRECTIVES
DE PREMIÈRE IMPORTANCE
AVERTISSEMENT : Lorsquedesoutilsdejardinage
électriquessontutilisés,desprécautionsdebaseenmatièrede
sécuritédoiventtoujoursêtresuiviesafinderéduirelerisque
d’incendie,dechocélectriqueetdeblessurecorporelle,
notamment les suivantes.
LIRE TOUTES LES DIRECTIVES
•TOUJOURS PORTER UNE PROTECTION OCULAIRE - Porter
deslunettesoudeslunettesprotectricesentouttempslorsquecet
outil est branché.
•DISPOSITIF DE PROTECTION – Ne pas utiliser cet outil sans
les dispositifs de protection en place.
•S’HABILLER DE MANIÈRE APPROPRIÉE - Ne pas porter de
vêtements amples ni de bijoux. Ils peuvent s’enchevêtrer dans
lespiècesmobiles.Desgantsencaoutchoucetdeschaussures
adéquatesàsemellesencaoutchoucsontrecommandéslorsde
travaux à l’extérieur. Ne pas utiliser l’outil avec les pieds nus ou
des sandales ouvertes. Porter des pantalons longs pour protéger
vos jambes. Se couvrir les cheveux s’ils sont longs.
•FIL EN NYLON - Tenir le visage, les mains et pieds loin du fil de
nylon rotatif en tout temps.
•LE FIL EN ROTATION EXÉCUTE UNE COUPE - Être attentif
lors de taillage autour de grillages et de plates-bandes.
•TENIR ÉLOIGNÉ TOUS LES SPECTATEURS - À une distance
sécuritairedel’airedetravail,particulièrementlesenfants.
•AVERTISSEMENT IMPORTANT :lorsquel’outilestutilisé
comme coupe bordure, des pierres, morceaux de métal et autres
objets peuvent être projetés à haute vitesse par le fil. L’outil et
ledispositifdeprotectionsontconçuspourréduirelerisque.
Toutefois, les précautions spéciales suivantes doivent être prises
•S’ASSURERquetoutepersonneetanimauxsontéloignésd’au
moins 30 m (100 pi).
•POUR RÉDUIRE LE RISQUE de blessures par ricochet, travaillez
en vous éloignant de tout objet solide tel un mur, des marches, de
grossespierres,d’arbres,etc.Soyeztrèsprudentlorsdetravaux
prèsd’objetssolideset,lecaséchéant,taillezoucoupezmanuellement.
•ÉVITER LES DÉMARRAGES ACCIDENTELS - Ne pas
transporter d’outil branché avec le doigt sur la détente.
•NE PAS FORCER L’OUTIL - à tourner à une vitesse plus rapide
quecellepourlaquelleilestcapabledecouperefficacement.
•UTILISER LE BON OUTIL - Ne pas utiliser cet outil pour tout
autretypedetravailsaufpourceluipourlequelilestprévu.
•NE PAS TROP TENDRE LES BRAS-Conserversonéquilibre
en tout temps.
•OUTIL ENDOMMAGÉ - Si vous frappez ou devenez enchevêtrer
dans un objet, arrêtez immédiatement l’outil, débranchez-le puis
inspectezpourtoutetracededommagesquidevrontêtreréparés
avant une autre utilisation. Ne pas utiliser avec un moyeu ou une
bobine brisés.
•DÉBRANCHER L’OUTIL–Lorsqueinactif,lorsderemplacement
de fil ou avant un nettoyage.
•ÉVITER LES CONDITIONS ENVIRONNEMENTALES
17
SYMBOLES
L’étiquette apposée sur votre outil peut comprendre les symboles
suivants.
V ................volts A ................ampères
Hz ............. hertz W ............... watts
min ........... minutes
.............. courant alternatif
.......... courant continue non .............régime à vide
............. Construction classe II
..............
borne de terre
...........symbole d’alerte à la .../min or rpm ..révolutions ou
sécurité a
lternance par minute
................ Lisez le manuel d’instructions
.................Utiliser une protection respiratoire adéquate avant utilisation
.................Utiliser une protection oculaire appropriée
.............. Utiliser une protection auditive adéquate
DIRECTIVES DE SÉCURITÉ IMPORTANTES POUR
LES CHARGEURS DE PILES
Ce mode d’emploi comprend d’importantes directives de sécurité
pour les chargeurs de piles.
• Avant d’utiliser le chargeur, lire toutes les directives et tous les
avertissements figurant sur le chargeur, le bloc-piles et le produit
utilisé avec le bloc-piles.
AVERTISSEMENT : risque de choc
électrique. Éviterlapénétrationdetoutliquidedanslechargeur.
MISE EN GARDE : risque de brûlure. Pour
réduirelerisquedeblessures,chargerseulementdesbloc-piles
BLACK+DECKER . D’autres types de piles peuvent exploser et
provoquerdesblessurescorporellesetdesdommages.
MISE EN GARDE : dans certaines
DANGEREUSES-Nepasutiliserd’outilsélectriquesdansdes
lieux humides ou mouillés. Suivre toutes les directives de ce
moded’emploipouruneutilisationadéquatedevotreoutil.Nepas
utiliser l’outil sous la pluie.
•NE PAS UTILISERd’outilsélectriquesportatifsdansunmilieu
gazeux ou déflagrant. Les moteurs de ces outils produisent
normalementdesétincellesquipourraientenflammerdesvapeurs.
•RANGER LES OUTILS INUTILISÉS À L’INTÉRIEUR – Lorsqu’ils
ne sont pas utilisés, les outils doivent être rangés à l’intérieur, dans un
endroit sec et verrouillé, hors de portée des enfants.
– Ne pas utiliser l’appareil en cas de fatigue
ou de maladie ou sous l’influence d’alcool, de drogues ou de
médicaments.
•PRENDRE SOIN DES OUTILS ÉLECTRIQUES – Suivre les
directives figurant à la section Entretien. Maintenir les poignées
sèches,propresetexemptesd’huileetdegraisse.
•VÉRIFIER LES PIÈCES ENDOMMAGÉES – Avant toute
utilisationultérieuredel’appareilélectrique,undispositifde
protectionendommagé,outouteautrepièceendommagée,doit
être examiné soigneusement afin d’assurer un fonctionnement
adéquatselonsafonctionprévue.Vérifierl’alignementdespièces
mobiles,laprésencedegrippagedespiècesmobiles,derupture
•NEPASimmergerl’outildansl’eauoul’arroserauboyau.
ÉVITERlapénétrationdetoutliquidedansl’outil.
•NEPASrangerl’outilsurdesengraisoudesproduitschimiques
ouprèsdeceux-ci.
•NEPASnettoyeravecunnettoyeuràpression.
•Maintenirlespare-mainsenplaceetenétatdefonctionnement.
•Tenirlesmainsetlespiedséloignésdelazonedecoupe.
AVERTISSEMENT : Ne pas utiliser l’outil si la détente ne
fonctionnepas.Toutoutilquinepeutêtrerégléparladétenteest
dangereux et doit être réparé.
CONSERVER CES MESURES.

18
circonstances,lorsquelechargeurestbranchéaubloc
d’alimentation, les contacts de chargement du chargeur peuvent
êtrecourt-circuitéspardescorpsétrangersconducteurstelsque,
mais sans s’y limiter, la laine d’acier, le papier d’aluminium, ou toute
accumulationdeparticulesmétalliques.Ilsdoiventêtremaintenusà
distancedesouverturesduchargeur.Débranchersystématiquement
celui-ci si aucun bloc-piles n’y est inséré. Débrancher le chargeur
avant tout nettoyage.
• Le chargeur fourni avec ce produit est correctement branché
s’il est orienté en position verticale ou au plancher.
• NE PAS charger le bloc-piles au moyen de tout autre chargeur
que ceux qui sont mentionnés dans le présent mode d’emploi.
Le chargeur et le bloc-piles sont spécialement conçus pour
être utilisés ensemble.
• Ces chargeurs n’ont pas été conçus pour être utilisés à
d’autres fins que celles de charger les piles rechargeables
BLACK+DECKER . Toute autre utilisation risque de provoquer
un incendie, un choc électrique ou une électrocution.
• Pour la sécurité de l’utilisateur, utiliser une rallonge de calibre
adéquat (AWG, American Wire Gauge [calibrage américain
normalisé des fils]). Plus le numéro de calibre de fil est petit et
plus sa capacité est grande, par exemple un calibre 16 a plus
de capacité qu’un calibre 18. Si plus d’une rallonge est utilisée
pour obtenir la longueur totale, s’assurer que chaque rallonge
présente au moins le calibre de fil minimum.
Calibre de fil minimum recommandé pour les rallonges
• Protéger le chargeur de la pluie et de la neige.
• Tirer sur la fiche plutôt que sur le cordon pour débrancher le
chargeur. Cela permet de réduire le risque d’endommager la
fiche ou le cordon d’alimentation.
• S’assurer que le cordon est situé en lieu sûr de manière à ce
que personne ne marche ni ne trébuche dessus ou à ce qu’il ne
soit pas endommagé ni soumis à une tension.
• Ne pas utiliser de rallonge à moins que cela ne soit
absolument nécessaire. L’utilisation d’une rallonge inadéquate
risque d’entraîner un incendie, un choc électrique ou une
électrocution.
• Ne pas mettre d’objet sur le chargeur ni mettre ce dernier sur
une surface molle pouvant obstruer les fentes de ventilation
et ainsi provoquer une chaleur interne excessive. Éloigner
le chargeur de toute source de chaleur. La ventilation du
chargeur se fait par les fentes pratiquées dans les parties
supérieures et latérales du boîtier.
• Ne pas monter le chargeur sur un mur ni le fixer de manière
permanente sur une surface quelconque. Le chargeur est
destiné à une utilisation sur une surface plane et stable (c.-à-d.
un dessus de table).
• Ne pas faire fonctionner le chargeur si la fiche ou le cordon est
endommagé; les remplacer immédiatement.
• Ne jamais se servir d’un chargeur qui a subi un choc violent,
qui est tombé ou qui est endommagé. Le faire vérifier dans un
centre de réparation autorisé.
• Ne pas démonter le chargeur; l’apporter à un centre de
réparation autorisé lorsqu’un entretien ou une réparation est
requise. Le remontage non conforme du chargeur comporte
des risques de choc électrique, d’électrocution ou d’incendie.
• Débrancher le chargeur avant de le nettoyer. Cela réduira le
risque de choc électrique. Le risque ne sera pas éliminé en
enlevant simplement le bloc-piles.
• NE JAMAIS tenter de relier deux chargeurs ensemble.
• Le chargeur est conçu pour être alimenté en courant
domestique standard (120 V). Ne pas utiliser une tension
supérieure pour le chargeur.
CONSERVER CES MESURES
Calibre minimal des cordons de rallonge
Tension Longueur totale du cordon en pieds
120V 0-25 26-50 51-100 101-150
(0-7,6m) (7,6-15,2m) (15,2-30,4m) (30,4-45,7m)
240V 0-50 51-100 101-200 201-300
(0-15,2m) (15,2-30,4m) (30,4-60,9m) (60,9-91,4m)
Intensité (A)
Au Au Calibre moyen des fils (AWG)
moins plus
0 - 6 18 16 16 14
6 - 10 18 16 14 12
10 - 12 16 16 14 12
12 - 16 14 12 Non recommandé

19
DirectiveS De SÉcuritÉ iMPortanteS Pour LeS BLocS-PiLeS
AVERTISSEMENT : pour un fonctionnement sûr, lire le
présent mode d’emploi et les manuels fournis avec l’outil avant
d’utiliser le chargeur.
Lebloc-pilesn’estpascomplètementchargéàlasortiede
l’emballage. Avant d’utiliser le bloc-piles et le chargeur, lire les
directivesdesécuritéci-après.Respecterensuitelesconsignesde
chargement décrites.
LIRE TOUTES LES DIRECTIVES.
•Ne pas incinérer le bloc-piles, même s’il est très endommagé
ou complètement usé, car il peut exploser au contact de
flammes. Des vapeurs et des matières toxiques sont dégagées
lorsque les blocs-piles au LI-ION sont incinérés.
•Ne pas charger ou utiliser un bloc-piles dans un milieu
déflagrant, en présence de liquides, de gaz ou de poussière
inflammables. Insérer ou retirer un bloc-piles du chargeur peut
enflammer de la poussière ou des émanations.
•Si le contenu de la pile entre en contact avec la peau, laver
immédiatement la zone touchée au savon doux et à l’eau. Si le
liquidedelapileentreencontactaveclesyeux,rincerl’oeilouvert
àl’eaupendant15minutesoujusqu’àcequel’irritationcesse.
Si des soins médicaux sont nécessaires, l’électrolyte des piles
auLI-IONestcomposéd’unmélangedecarbonatesorganiques
liquidesetdeselsdelithium.
•Le contenu des cellules de pile ouvertes peut provoquer une
irritation respiratoire. Exposer la personne à de l’air frais. Si les
symptômes persistent, obtenir des soins médicaux.
AVERTISSEMENT : risque de brûlure. Le liquide du bloc-
piles peut s’enflammer s’il est exposé à des étincelles ou à une
flamme.
• Le chargeur fourni avec ce produit est correctement branché
s’il est orienté en position verticale ou au plancher.
•Charger les blocs-piles uniquement au moyen de chargeurs
BLACK+DECKER .
•
NE PAS éclabousser le bloc-piles ou l’immerger dans l’eau ou tout
autre liquide. Cela peut entraîner une défaillance prématurée de l’élément.
•Ne pas ranger ni utiliser l’outil et le bloc-piles dans un endroit
où la température peut atteindre ou dépasser les 40 °C (105
°F) (comme dans les remises extérieures ou les bâtiments
métalliques en été).
AVERTISSEMENT : ne jamais ouvrir le bloc-piles pour
quelque raison que ce soit. S
i le boîtier du bloc-piles est fissuré ou
endommagé, ne pas l’insérer dans un chargeur. Ne pas écraser, faire
tomber ou endommager le bloc-piles. Ne pas utiliser un bloc-piles ou un
chargeur qui a reçu un choc violent, qui est tombé, a été écrasé ou est
endommagé de quelque manière que ce soit (p. ex. percé par un clou,
frappé d’un coup de marteau, piétiné). Les blocs-piles endommagés
doivent être envoyés au centre de réparation pour être recyclés.
AVERTISSEMENT : risqued’incendie.Nepasrangerou
transporterlespilesdemanièreàcequedesobjetsmétalliques
puissent entrer en contact avec les bornes exposées des piles. Par
exemple, ne pas mettre un bloc-piles dans un tablier, une poche, une
boîte à outils, une boîte de nécessaire de produit ou un tiroir
contenantdesobjetstelsquedesclous,desvisoudesclés,cartout
contactaccidentelentrelesbornesàdécouvertetunobjetmétallique
conducteurcommeuneclé,unepiècedemonnaie,unoutilàmain,
etc.risquedeprovoquerunincendie.LaHazardousMaterial
Regulations (réglementation sur les produits dangereux) du
département américain des transports interdit en fait le transport des
blocs-piles pour le commerce et dans les avions (c.-à-d. dans des
valisesetlesbagagesàmain)ÀMOINSqu’ilsnesoientbien
protégés contre les courts-circuits. Pour le transport de piles
individuelles,ondoitdoncs’assurerquelesbornessontprotégéeset
bienisoléescontretoutematièrepouvantentrerencontactavecelles
etprovoqueruncourt-circuit.REMARQUE:ilnefautpaslaisserde
piles au LI-ION dans les bagages enregistrés.
RECOMMANDATIONS EN MATIÈRE DE RANGEMENT
1.Lemeilleurendroitderangementestceluiquiestfraisetsec,
loindetoutelumièredirectedusoleiletprotégéd’unetempérature
extrême (chaleur ou froid).
2. Un entreposage prolongé ne nuira pas au bloc-piles ou au chargeur.
20
PROCÉDURE DE CHARGE
Les chargeurs BLACK+DECKER sont conçus pour charger les blocs-
piles BLACK+DECKER: LCS36 (2 heures), LCS436 (6 heures).
1. Brancher le chargeur dans une prise appropriée avant d’insérer le
bloc-piles.
2. Insérer le bloc-piles dans le chargeur.
3.LevoyantDELvertclignoteraindiquantainsiquelapileest
en cours de charge.
4.LafindelachargeestindiquéeparlevoyantDELvertqui
demeure allumé. Le bloc-piles est chargé à plein et peut être
utilisé ou laissé sur le chargeur.
Recharger les piles épuisées aussitôt que possible après leur utilisation
pour prolonger leur durée de vie.
FONCTIONS DE DIAGNOSTIC DU CHARGEUR
Cechargeurestconçupourdétectercertainsproblèmespouvant
1. Interrupteur marche/
arrêt
2. Poignée
3. Bouton de
verrouillage
4. Bloc-piles
5. Indicateur de charge
6. Contrôle de
puissance
7. Poignée auxiliaire
8. Tendeur pour régler
la hauteur
9. Tête de coupe
10. Guide de coupe
11. Pare-main
12. Boîtier de la bobine
8
3
4
7
COMPOSANTS
2
10
1
11
12
9
5
6
A
BLACK+DECKER Systèmes batteries et chargeur
Chargeurs/Durée de charge** (Minutes) (0% - 100% charger)
Bloc-piles
40V MAX*
Heures
Watts
40V MAX* Chargeurs
LCS36 LCS40 LCS436
LBX36 47 1 1 3.25
LBXR36 60 1.25 1.25 3.75
LBX1540 60 1.25 1.25 3.75
LBXR2036 80 1.5 1.5 5
LBX2040 80 1.5 1.5 5
LBXR2540 100 1.75 1.75 6.25
LBX2540 100 1.75 1.75 6.25
**Lesduréesdechargesontapproximatives;laduréedecharge
rélle peut varier.
21
être associés au bloc-piles ou à la source d’alimentation. Le type de
clignotementdelaDELindiquelesproblèmes.
PILE EN MAUVAIS ÉTAT
Le chargeur est en mesure de détecter une pile faible ou
endommagée.LevoyantDELrougeclignoteselonlaséquence
indiquéesurl’étiquette.Silaséquencecodecorrespondantàunepileen
mauvais état est en clignotement, cesser de recharger la pile. Retourner la pile
à un centre de réparation ou à un site de cueillette pour le recyclage.
FONCTION DE SUSPENSION DU BLOC-PILES CHAUD/FROID
Lorsquelechargeurdétectequ’unepileestexcessivement
chaudeoufroide,ilcommenceautomatiquementla
suspension du bloc-piles chaud/froid, la charge est ainsi
interrompuejusqu’àcequel’étatdelapileredeviennenormal.Une
fois la température revenue à la normale, le chargeur passe
automatiquementaumodederechargedubloc-piles.Cettefonction
assure une durée de vie maximale des piles. La DEL rouge clignote
delamanièreindiquéesurl’étiquettelorsquelasuspensiondubloc-
piles chaud/froid est détectée.
PILE LAISSÉE DANS LE CHARGEUR
Le chargeur et le bloc-piles peuvent être laissés branchés, le voyant
DEL vert demeurant allumé. Le chargeur maintiendra le bloc-piles en
bonétatetcomplètementchargé.
REMARQUES IMPORTANTES SUR LE CHARGEMENT
1. Pour augmenter la durée de vie du bloc-piles et optimiser son
rendement, le charger à une température située entre 16 et 27 °C
(60 et 80 °F). NE PAS charger le bloc-piles à des températures
inférieures à 4,5 °C (40 °F) ou supérieures à 40,5 °C (105 °F). Ces
consignes sont importantes et permettent d’éviter d’endommager
gravement le bloc-piles.
2. Le chargeur et le bloc-piles peuvent devenir chauds au toucher
pendantlarecharge.Ils’agitd’unétatnormaletcelan’indiquepas
unproblème.Pourfaciliterlerefroidissementdubloc-pilesaprèsson
utilisation, éviter de mettre le chargeur ou le bloc-piles dans un endroit
chaudcommedansuneremisemétalliqueouuneremorquenonisolée.
3.Silebloc-pilesnesechargepasadéquatement,ondoit:
a. Vérifier le courant à la prise en branchant une lampe ou un autre
appareilélectrique.
b.Vérifiersilapriseestreliéeàuninterrupteurd’éclairagequicoupe
lecourantaumomentd’éteindrelalumière.
c. Déplacer le chargeur et le bloc-piles à un endroit où la température
ambiante est entre 16 °C et 27 °C (60 °F et 80 °F).
d.Sileproblèmepersiste,apporterouenvoyerl’outil,lebloc-pileset
le chargeur au centre de réparation de votre région.
4.Lebloc-pilesdoitêtrerechargélorsqu’iln’arrivepasàproduire
suffisammentdepuissancepourdestravauxquiétaientfacilement
réalisés auparavant. NE PAS CONTINUER à utiliser le bloc-piles
dans ces conditions. Suivre les procédures de charge. On peut
également recharger à tout moment un bloc-piles partiellement
déchargé sans affecter sa longévité.
5.Toutcorpsétrangerconducteur,telquenotammentlalaine
d’acier, le papier d’aluminium ou toute accumulation de particules
métalliques,doitêtremaintenuàdistancedesouverturesdu
chargeur.Débranchersystématiquementcelui-cisiaucunbloc-piles
n’y est inséré. Débrancher le chargeur avant tout nettoyage.
6. Ne pas congeler le chargeur, l’immerger dans l’eau ou dans tout
autreliquide.
AVERTISSEMENT : Risque de choc électrique. Éviter la
pénétration de tout liquide dans le chargeur. Ne jamais tenter d’ouvrir le
bloc-piles pour quelque raison que ce soit. Si le boîtier en plastique du
bloc-piles est brisé ou fissuré, le retourner à un centre de réparation
pour qu’il soit recyclé.return to a service center for recycling.
INDICATEUR DE L’ÉTAT DE CHARGE (FIGURE B)
Le bloc-piles est pourvu d’un indicateur d’état de charge. Cet
indicateur peut servir à afficher le niveau actuel de charge d’un
bloc-piles durant l’utilisation et durant la charge. Il ne donne aucune
indicationquantaufonctionnementde
l’outil. Son propre fonctionnement pourra
aussi varier en fonction des composants
produit, de la température et de
l’application d’utilisation.
Vérification de l’état de charge
durant l’utilisation :
•Enfoncerleboutondel’indicateurd’état
de charge (B1).
•LesquatrevoyantsDEL(B2)
s’allumerontpourindiquerle
pourcentage de charge du bloc-piles.
<18%
18% - 45%
45% - 72%
72% - 100%
B
B2
B1
22
Consulter le tableau à la figure B.
•SilevoyantàDELnes’allumepas,chargerlebloc-piles.
Insertion et retrait du bloc-piles
AVERTISSEMENT : S’assurerqueleboutondeverrouillage
est bien engagé pour empêcher
l’utilisation de la détente avant la
pose ou le retrait de la pile.
INSTALLATION DU BLOC-PILES :
Insérer le bloc-piles dans l’outil
demanièreàbienl’enfonceret
à entendre un déclic (figure C).
S’assurerquelebloc-pilesestbien
logé et enclenché.
RETRAIT DU BLOC-PILES
: Enfoncer le bouton de dégagement
du bloc-piles situé au dos du bloc-piles, puis retirer le bloc-piles de
l’outil.
MONTAGE ET RÉGLAGE
AVERTISSEMENT : Avantlemontage,s’assurerquel’outilest
éteintetquelebloc-pilesaétéretiré.
OUTILS REQUIS POUR L’ASSEMBLAGE (NON FOURNIS) :
- Tournevis cruciforme
AVERTISSEMENT :
Retirer le bloc-piles avant
d’essayer de fixer l’un des
composants suivants.
FIXATION DU PARE-MAIN
(FIGURES D ET E)
AVERTISSEMENT : NE
JAMAIS UTILISER L’OUTIL
SANS LE PARE-MAIN
SOLIDEMENTFIXÉ.Lepare-
main doit toujours être attaché
correctement à l’outil pour
protéger l’utilisateur.
•Retirerlavisdupare-main.
•Toutenmaintenantlepare-
mainàl’équerredelatêtede
coupe, le glisser en place de
manièreàentendreledéclic
de la languette de retenue
(s’assurerquelesguides(D1)
du pare-main (D2) sont bien
alignés sur ceux (D3) de la tête
de coupe (D4) (figure D).La
patte de verrouillage (D5) doit
encliquetédanslafentede
logement (D6).
•Bienfixerlepare-mainau
moyen de la vis (E1) (figure E).
FIXATION DE LA POIGNÉE
AUXILIAIRE (FIGURES F ET G)
•Pousserlapoignéeauxiliaire
(F1) sur le tube (F2).
•Insérerleboulon(G1)dansles
orificespratiquésdanslapoignée
auxiliaire.
•Serrerlebouton(G2)surleboulon
en le tournant dans le sens
horaire.
RÉGLER LA POSITION DE
LA POIGNÉE AUXILIAIRE
(FIG. G)
La poignée auxiliaire peut être
régléepourassurerunéquilibre
et un confort optimaux.
•Desserrerleboutondu
boulon en le tournant dans le
sens antihoraire.
•Monteroudescendre
doucement la poignée
auxiliaire le long du tube,
jusqu’àlahauteursouhaitée.
C
D
D2
D1
D3
D4
D6
D5
E
E1
F
F1
F2
G
G2
G1
23
•Serrerleboutonsurleboulonenletournantdanslesenshoraire.
RÉGLAGE DE LA HAUTEUR DE L’OUTIL (FIGURE H)
MISE EN GARDE : Réglez la longueur de la tondeuse à
obtenirdespostesdetravailappropriées,commeindiquédansla
figure N.
•Cetoutildisposed’unmécanisme
télescopiquepermettantdeleréglerà
une hauteur confortable.
Pour régler la hauteur :
•Relâcherletendeurpourréglerla
hauteur (H1).
•Monteroudescendredoucementle
tube (H2) à la hauteur souhaitée.
•Fermerletendeurpourréglerla
hauteur (H1).
LIBÉRATION DU FIL DE COUPE
Durant le transport, le fil de coupe est
collé au boîtier de la bobine.
•Retirerlerubanadhésifretenantlefil
de coupe au boîtier de la bobine.
NOTICE D’UTILISATION
AVERTISSEMENT: Toujours utiliser une protection oculaire
appropriée conforme à la norme ANSI Z87.1 (CAN/CSA Z94.3) lors
del’utilisationdecetoutilélectrique.
AVERTISSEMENT :
Débrancher la fiche de la source
d’alimentation avant de procéder au montage, d’effectuer des réglages
ou de changer d’accessoire. Une telle mesure de sécurité préventive
réduitlerisquedemettrel’outilenmarcheaccidentellement.
MISE EN GARDE : Avant de procéder au taillage, s’assurer
d’utiliseruniquementletypedefildecoupeadéquat.
MISE EN GARDE : Inspecterlazonequiseratailléeet
retirertoutmorceaudefilmétallique,decordeoud’objetssimilaires
quipourraients’enchevêtrerdanslefilrotatifouaveclabobine.Être
spécialement attentif et éviter, sur le parcours de l’outil, tout fil
métalliquecourbéversl’extérieurcommelesfilsaupiedd’uneclôture
à mailles losangées.
RÉGLAGE DE L’OUTIL POUR LA TAILLE OU LA COUPE EN
BORDURE (FIGURE I, J ET K)
•L’outilpeutêtreutilisépourla
taille comme le montre la figure I
ou pour la coupe en bordure pour
couper l’herbe haute sur les bords
du parterre et le long des massifs de
fleurs comme le montre la figure K.
MODE DE TAILLAGE
Pour la taille, la tête de coupe doit
êtredanslapositionindiquéeàla
figure I. Si ce n’est pas le cas :
•Retirerlebloc-pilesdel’outil.
•Enfoncerleboutonde
dégagement de la tête (I1) et le
maintenir dans cette position.
•Toutentenantlapoignéeauxiliaire,
tourner la tête dans le sens horaire.
•Relâcherleboutonde
dégagement de la tête.
•Souleverleguidedecoupe(J1)etlemettreenpositionfermée.
Remarque:Latêtenepivotequedansunseulsens.
CAUTION:
Wire edge guide should only be used when in the
edging mode. Keep wire edge guide in the retracted position when in
the trimming mode.
MODE DE COUPE-BORDURES
(FIGURE K)
AVERTISSEMENT :
lorsqueutilisécommeuncoupe-
bordure, des pierres, des morceaux
de métal et d’autres objets peuvent
être jetés à grande vitesse par la
ligne. La coupe et la garde sont
I
I1
J
J1
K
K2
K1
H
H1
H2
24
•Réglerlecadranàlaposition1pourchoisirladuréed’exécutionmax.
et ainsi augmenter la durée de vie du bloc-piles.
•Réglerlecadrandelaposition2à5pourobtenirunecombinaison
des deux fonctions.
FONCTIONNEMENT DU TAILLE-BORDURES
•Tenirl’outilcommeilestindiquéàlafigure N.
•Maintenirunangledecoupeentre5°et10°commele
montre la figure N1. Ne pas excéder 10° (figure N2).
Couper avec le bout du fil. Pour se tenir à distance des
surfaces dures, utiliser le guide de coupe (7). Sortir le
guidedemanièreàbienl’enclencherenplace.
•Maintenirunedistanceminimalede609,6mm(24po)entre
le dispositif de protection et vos pieds, comme le montre
la figure N3. Pour obtenir cette distance, régler la hauteur
globale du taille-bordures comme le montre la figure G.
COUPE EN BORDURE
Les meilleurs résultats de coupe sont
obtenus
sur des bords de plus de 50 mm (2
po) de
profondeur.
•Nepasutiliserl’outilpourcréerdesbordures.
•Guiderl’outilcommeilestindiquéàla figure O.
•Pourcouperdeplusprès,incliner
légèrementl’outil.
conçuspourréduireledanger.Cependant,s’assurerqued’autres
personnes et les animaux sont au moins 30m (100 pieds) de
distance.
Pour la coupe en bordure, la tête de coupe doit se trouver dans la
positionindiquéeparlafigureK.Sicen’estpaslecas:
•Retirerlebloc-pilesdel’outil.
•Enfoncerleboutondedégagementdelatête(K1)etlemaintenir
dans cette position.
•Toutentenantlapoignéeauxiliaire,tournerlatêtedanslesensantihoraire.
•Relâcherleboutondedégagementdelatête.
•Déplacerleguidedecoupe(K2)àlapositionouverte.S’assurerque
leguidedecoupeestbiendescendu;undéclicseferaentendre.
Remarque:Latêtenepivotequedansunseulsens.
Remarque:Lesystèmed’alimentationautomatiquerisquedemal
fonctionner si le guide de coupe n’est pas utilisé.
•Pourallumerl’outil,enfoncerle
bouton de verrouillage (L1) et le
maintenir dans cette position, puis
serrer le levier de déclenchement
(L2). Une fois l’outil en marche, le
bouton de verrouillage peut être
relâché(L1).
•Pouréteindrel’outil,relâcherle
levier de déclenchement.
AVERTISSEMENT: Ne jamais tenter de verrouiller le levier de
déclenchement en position de marche.
PUISSANCE MAX./DURÉE D’EXÉCUTION MAX.
La fonction de puissance max./durée
d’exécution max. (M1) se trouve sur la
poignée de l’outil. Cette fonction permet
d’optimiser le rendement de l’outil et
d’augmenter sa puissance au besoin.
•Réglerlecadranàlaposition6
pour choisir la puissance max. et
ainsis’attaquerauxmauvaises
herbes denses.
L
L1
L2
M
M1
O
N
N3
5
O
-10
O
N1
N2
25
CONSEJOS ÚTILES PARA CORTAR
•Utilicelapuntadelacuerdapararealizarelcorte;noempujeelcabezaldela
cuerda contra el césped sin cortar. Para lograr trabajos de calidad, utilice la guía
de borde a lo largo de elementos como cercos, casas y canteros.
•Loscercosdealambreydeestacasprovocanunmayordesgastedela
cuerda e incluso su rotura. Los muros de piedra y ladrillo, las cunetas y la
madera pueden desgastar la cuerda rápidamente.
•Nopermitaquelatapadelcarretesearrastresobreelsuelouotrassuperficies.
•Encrecimientoslargos,cortedesdearribahaciaabajoynoexcedaunaaltura
de 304,8 mm (12 pulgadas).
•Mantengalapodadorainclinadahaciaeláreaquesecorta;éstaeslamejor
área de corte.
•Lapodadoracortaalmoverlaunidaddederechaaizquierda.Estoevitaráque
se arrojen restos al usuario.
•Eviteárbolesyarbustos.Lacuerdafácilmentepuededañarlacortezade
árboles, las molduras de madera, los revestimientos exteriores y los
pilares de cercos.
ACCESSORIES DE RECHANGE
FIL DE COUPE/AVANCE DU FIL
Votre taille-bordures utilise un fil de nylon ROND de 1,65 mm (0,065
po)dediamètre.Encoursd’utilisation,lesextrémitésdesfilsdenylon
s’effilocherontets’useront.Labobinespécialeàavanceautomatiquede
filfourniraetcouperaautomatiquementunenouvellelongueurdefil.Ne
pas frapper l’appareil sur le sol pour alimenter l’appareil ou pour toute
autre raison. Le fil tranchant s’usera et sera avancé plus rapidement si
la coupe ou le taillage s’effectue le long de trottoirs ou d’autres surfaces
abrasives ou si des mauvaises herbes touffues sont coupées.
MISE EN GARDE : Avant de procéder au taillage, s’assurer
d’utiliseruniquementletypedefildecoupeadéquat.Utiliserla
bobinederechangemodèleAF-100deBLACK+DECKER.Recharger
le fil de nylon (en vrac ou préenroulé sur la bobine de rechange)
selon les directives de ce mode d’emploi.
(MONOFILAMENT)DE1,65mm(0,065po)DEDIAMÈTRE.
Ne pas utiliser de fil dentelé ou de plus gros calibre, car ces fils
surchargerontlemoteuretprovoquerontunesurchauffe.Cefilest
disponibleauprèsdudétaillantlocalouducentrederéparation
agréé.
•D’autrespiècesderechange(pare-mains,couverclesdebobine,
etc.) sont offertes aux centres de réparation BLACK+DECKER. Pour
trouver le centre de réparation local, composer le : 1 800 544-6986
ou consulter www.blackanddecker.com.
AVERTISSEMENT: L’utilisation de tout accessoire non
recommandé par BLACK+DECKER, avec cet outil, pourrait s’avérer
dangereuse.
REMPLACEMENT DE LA BOBINE (FIGURES P, Q ET R)
•Retirerlebloc-pilesdel’outil.
•Enfoncerleslanguettes(P1)et
retirer le couvercle de la bobine
(P2) du boîtier de la bobine
(P3) logé dans la tête du taille-
bordures (figure P).
•Pourobtenirdesrésultats
optimaux, remplacer la bobine
parunebobinedemodèle
AF-100 de BLACK+DECKER.
•Tenirlabobinevided’unemain
et le boîtier de bobine de l’autre,
puis sortir la bobine en tirant
dessus.
•Silelevier(Q1),situéàla
base du boîtier, se détache, le
remettre à la bonne position
avant d’insérer la bobine neuve
dans le boîtier.
•Retirerl’herbeetlessaletés
présentes dans la bobine et le
boîtier.
•Détacherl’extrémitédufilde
coupe et le faire passer dans
l’œillet (R2), figure R.
•Prendrelabobineneuve
et l’enfoncer sur la saillie
(Q2)duboîtier.Fairepivoter
P
P1
P2
P1
P3
Q
Q1
Q2
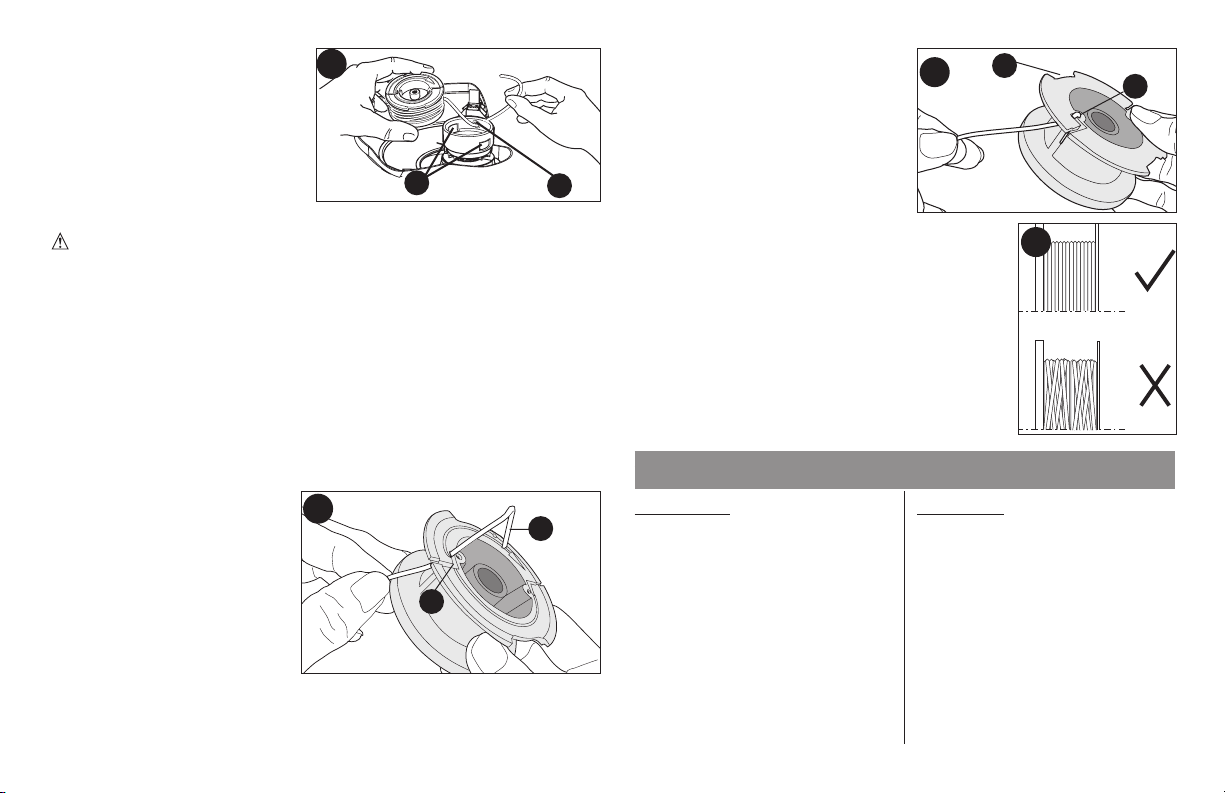
26
légèrementlabobinejusqu’à
cequ’ellesoitbieninstallée.
Le fil doit sortir d’environ 122
mm (4 13/16 po) du boîtier.
•Alignerleslanguettesdu
couvercle de la bobine sur
les encoches (R1) du boîtier
(figure R).
•Enfoncerlecouverclesurle
boîtierdemanièreàcequ’ils’enclenchebienenplace.
MISE EN GARDE : Pour éviter d’endommager l’outil, si le fil
dépasselalamedecoupe,lecouperdefaçonàcequ’ilatteigne
seulement la lame.
REMBOBINER LA BOBINE (UTILISER UNIQUEMENT UN FIL
ROND DE 1,65 MM (0,065 PO) DE DIAMÈTRE) (FIGURES S, T ET U)
REMARQUE:Lefilenvracdesbobinesenrouléesàlamainest
susceptibledes’enchevêtrerplussouventquelefildesbobines
enroulées dans une usine BLACK+DECKER. Pour obtenir des
résultats optimaux, il est recommandé d’utiliser des bobines
embobinées à l’usine.
Suivre les étapes ci-dessous pour installer du fil:
•Retirerlebloc-pilesdel’outil.
•Retirerlabobinevidedel’outilcommeledécritlasection«
REMPLACEMENT DE LA BOBINE ».
•Retirertoutlerestedefilde
coupe de la bobine.
•Replierl’extrémitédufilde
coupe d’environ 19 mm
(3/4 po) (S1). Insérer le fil
de coupe dans l’une de ses
en coches d’ancrage (S2)
comme le montre la figure S.
•Insérerl’extrémitéde19mm
(3/4 po) du fil en vrac dans
l’orifice (T1)
de la bobine, juste
àcôtédel’encoche,commelemontrelafigure T. Assurez-vousquela
ligne est tendue contre la bobine comme illustré à la figure T.
•Enroulerlefildecoupesurlabobinedanslesensindiquépar
ProBLÈMe
L’outil fonctionne lentement.
SoLution
•Retirerlapiledel’outil.
Vérifierqueleboîtierdelabobine
peut tourner librement. Le nettoyer
avec précaution si nécessaire.
•S’assurerquelefildecoupe
sort d’au plus 136 mm (5 3/8
po) de la bobine. Le cas
échéant,lecouperafinquesa
longueur atteigne juste la lame
de coupe pour le fil.
R
R1
R2
laflècheinscritesurlabobine.
Prendre soin d’enrouler le fil
de façon nette et ordonnée par
couches successives. Ne pas
croiser le fil (figure U).
•Couperlefildecoupeenroulé
lorsqu’ilatteintlesencoches(T2).
(Figure T.)
•Ajusterlabobinesurl’outil
commeledécritlasection«
REMPLACEMENT DE LA BOBINE ».
DePannage
U
S
S1
S2
T
T1
T2

27
entretien
AVERTISSEMENT :
Pour éviter des blessures graves, éteindre et
débrancher l’outil avant d’effectuer toute opération d’entretien.
1. Maintenir les orifices de ventilation dégagés pour éviter la surchauffe.
2. Votre fil rotatif peut sécher avec le temps. Pour tenir votre fil en
excellente condition, entreposer les bobines de rechange de
filpré-enrouléoulefilenvracdansunsacenplastiquescellé
contenantl’équivalentd’unecuilleréed’eau.
3.Lespiècesenplastiquesenettoientavecunsavondouxetun
chiffon humide.
4. Le coupe-fil sur le bord du dispositif de protection peut s’émousser
avecletemps.Ilestrecommandédes’assurerrégulièrementque
la lame est bien tranchante en utilisant une lime.
IMPORTANT :
PourgarantirlaSÉCURITÉetlaFIABILITÉduproduit,les
réparations, l’entretien et le réglage doivent être réalisés par un centre de
réparation autorisé ou tout autre centre de réparation professionnel, et des
piècesderechangeidentiquesdoiventêtreutilisées.
inforMation Sur LeS reParation
Tous les centres de réparation BLACK+DECKER sont dotés de personnel
qualifiéenmatièred’outillageélectrique;ilssontdoncenmesured’offrirà
leurclientèleunserviceefficaceetfiable.Quecesoitpourunavistechnique,
uneréparationoudespiècesderechangeauthentiquesinstalléesenusine,
ProBLÈMe
La alimentación automática de cuerda no
alimenta más cuerda.
SoLution
•Retirerlapiledel’outil.
•Enleverlecapuchondelabobine.
•Tirersurlefildecoupede
manièreàcequ’ilsorted’environ
136 mm (5 3/8 po) de la bobine. Si
la longueur de fil restant sur la
bobine est insuffisante, installer une
nouvelle bobine de fil.
•S’assurerquelefiln’estpasentrecroisé
sur la bobine comme l’illustre la figure
U. Si c’est le cas, dérouler le fil de
coupe, puis l’enrouler de nouveau
sur la bobine de façon ordonnée, de
manièreànepasentrecroiserlesfils.
•Alignerleslanguettes,logéessur
le couvercle de la bobine, sur les
fentespratiquéesdansleboîtier.
•Enfoncerlabobinesurleboîtierdemanièreà
cequ’elles’enclenchebienenplace.
•Inspecterlesrainurespratiquéessousla
bobine à la recherche de dommages. En cas
de dommages, remplacer la bobine.
•Lirelecodeinscritàl’endosdelabobine.Si
lecodeest«PA66»,appelerleserviceàla
clientèlepourfaireremplacerlabobine.Silecode
indiquéest«ABS»,cen’estpasleproblème.
•Silefildecoupedépasselalame
de coupe, le couper de façon à ce
qu’ilatteigneseulementlalame.Si
l’alimentationautomatiquedefilne
fonctionne toujours pas ou si la
bobinesebloque,procédercommesuit:
•Nettoyeravecprécautionlabobine
et son boîtier.
•Retirerlabobine,puisvérifiersile
levier, situé dans le boîtier de la
bobine, peut se déplacer librement.
•Retirerlabobineetdéroulerlefil
decoupe, puis l’enrouler à nouveau
de façon ordonnée. Remettre la
bobine dans le boîtier.
ProBLÈMe
Alimentation excédentaire
Lefilsedéroulelorsquelabobineou
le capuchon est enlevé.
SoLution
•S’assurerdecouperavecleboutdufil
(177,8 mm [7 po] de la bobine).
Utilise le guide de coupe si nécessaire
pour maintenir la bonne distance.
•S’assurerdenepasexcéderunangle
de 10° comme le montre la figure N1.
•S’assurerdefixerlesfilsdansles
encoches de retenue (T2) (figure T)
avant le retrait.

28
communiqueravecl’établissementBLACK+DECKERleplusprèsdechezvous.
Pour trouver l’établissement de réparation de votre région, composer le numéro
suivant : 1-800-544-6986 ou consulter le site www.blackanddecker.com
LE SCEAU SRPRC
MC
Le sceau SRPRC
MC
(Société de recyclage des piles
rechargeables) sur la pile au lithium-ion (ou sur le bloc-piles)
indiquequesoncoûtderecyclage(ouceluidubloc-piles)à
la fin de sa vie utile est déjà payé par BLACK+DECKER . La SRPRC
MC
, en
collaboration avec BLACK+DECKER et d’autres utilisateurs de piles, a établi
auxÉtats-UnisdesprogrammesfacilitantleramassagedespilesauLI-ION
épuisées. Aidez-nous à protéger l’environnement et à conserver nos ressources
naturelles en retournant les piles LI-ION épuisées à un centre de réparation
BLACK+DECKER ouaudétaillantdevotrerégionpourqu’ellessoientrecyclées.
Vouspouvezaussicommuniqueraveclecentrederecyclagedevotrerégionpour
obtenir des informations sur l’endroit où éliminer vos piles épuisées. SRPRCMC
estunemarquedecommercedéposée de la Société de recyclage des piles
rechargeables. Cet appareil numérique de la classe B est conforme à la
norme NMB-003 du Canada. Cet appareil est conforme aux dispositions
du paragraphe 15 des règlements de la FCC. Son fonctionnement est
régi par les deux conditions suivantes : (1) Cet appareil ne peut pas
causer d’interférence nuisible et (2) cet appareil doit accepter toutes
les interférences reçues, y compris celles qui risquent d’en gêner le
fonctionnement.
REMARQUE : ce matériel a été testé et a été déclaré conforme aux limites
en vigueur concernant les dispositifs numériques de classe B, en vertu de la
partie 15 de la réglementation FCC. Ces limites visent à assurer une protection
raisonnable contre tout brouillage nuisible dans une installation résidentielle. Ce
matériel produit, consomme et peut émettre une énergie de radiofréquence et,
s’il n’est pas installé et utilisé conformément aux directives qui l’accompagnent,
il peut entraîner un brouillage nuisible des communications radio. Cependant,
nous ne garantissons pas l’absence de brouillage dans tous les types
d’environnement. Si, après avoir effectué une vérification en mettant l’appareil
hors tension puis sous tension, l’utilisateur s’aperçoit que ce matériel provoque
un brouillage nuisible à la réception des signaux de radio ou de télévision, il
lui faudra essayer de corriger ce brouillage en prenant une ou plusieurs des
mesures ci-dessous :
• Réorienter ou repositionner l’antenne de réception.
• Éloigner le plus possible le matériel du récepteur.
• Brancher le matériel dans une prise électrique située sur un circuit différent de
celui du récepteur.
• Consulter le distributeur ou un technicien radio/télévision expérimenté pour
obtenir de l’aide.
Tout changement ou toute modification à cet appareil qui n’est pas
expressément approuvé par l’institution responsable de la conformité peut faire
annuler le droit de l’utilisateur d’utiliser ce matériel. Cet appareil numérique de
la classe B est conforme à la norme NMB-003 du Canada.
GARANTIE LIMITÉE DE TROIS ANS
Black&Decker(É.-U.)Inc.garantitqueleproduitestexemptdedéfautsde
matériau et de fabrication pendant trois (3) ans à partir de la date d’achat, à
conditionqueleproduitsoitutiliséenmilieudomestique.Laprésentegarantie
limitéenecouvrepaslesdéfaillancesprovoquéesparunabus,undommage
accidentel ou des réparations ou tentatives de réparations effectuées par toute
autrepersonnequelepersonneldeBLACK+DECKER et de ses centres de
réparationagréés.Unproduitdéfectueuxquiremplitlesconditionsstipulées
par la présente garantie sera remplacé ou réparé sans frais d’une des deux
façonssuivantes:Lapremièrefaçonconsisteenunéchangechezledétaillant
oùleproduitaétéacheté(àlaconditionquelemagasinsoitundétaillant
participant).Tout retour doit se faire durant la période correspondant à la
politiqued’échangedudétaillant.Unepreuved’achatpeutêtrerequise.Prière
devérifierlapolitiquederetourdudétaillantausujetdesdélaisimpartispour
lesretoursouleséchanges.Ladeuxièmeoptionestd’apporteroud’envoyer
le produit (en port payé) à un centre de réparation agréé ou à un centre de
réparation BLACK+DECKER pour faire réparer ou échanger le produit, à la
discrétion de BLACK+DECKER .Unepreuved’achatpeutêtrerequise.Les
centres de réparation de BLACK+DECKER et les centres de réparation ou
enlignesurwww.blackanddecker.com.Cettegarantienes’appliquepasaux
accessoires. Cette garantie accorde des droits légaux propres au propriétaire
del’outil.Cedernierpourraitavoird’autresdroitsselonl’Étatoulaprovince
qu’ilhabite.Pourtoutequestion,communiqueravecledirecteurducentre
de réparation BLACK+DECKER leplusprès.Ceproduitn’estpasdestiné
à un usage commercial. L’usage commercial de
ce produit annule par
conséquentcettegarantie.Toutesautresgaranties,expressesou
implicites, sont déclinées par la présente.
Imported by / Importé par
Black & Decker Canada Inc.
100 Central Ave.
Brockville (Ontario) K6V 5W6
29
•
Utilizar únicamente con una batería B&D serie
LB de 36 V o 40 V MAX*.
DE PODADORA / BORDEADORA
DE LITIO DE 40 V MAX*
MANUAL DE INSTRUCCIONES
GRACIAS POR ELEGIR BLACK+DECKER !
LEA EL MANUAL ANTES DE DEVOLVER ESTE PRODUCTO POR CUALqUIER MOTIVO:
Si tiene una consulta o algún inconveniente con su producto BLACK+DECKER , visite http://www.blackanddecker.com/instantanswers
para obtener respuestas instantáneas las 24 horas del día. Si no encuentra la respuesta o no tiene acceso a Internet, lame al 1-800-544-6986
de lunes a viernes de 8 a. m. a 5 p. m. hora del Este para hablar con un agente. Cuando lame, tenga a mano el número de catálogo.
CONSERVE ESTE MANUAL PARA FUTURAS CONSULTAS. SÓLO PARA USO DOMÉSTICO.
*Elmáximovoltajeinicialdelpaquetedebaterías(medidosinunacargadetrabajo)es40voltios.Sisemideconunacargadetrabajo,
el voltaje nominal es 36.
MODELO N°
LST136
Visite www.BlackandDecker.com/NewOwner para registrar su nuevo producto.
INFORMACION CLAVE qUE DEBE SABER:
• El protector debe instalarse antes de podar o bordear. De
lo contrario, el motor se sobrecalentará.
• Al reemplazar la cuerda, utilice sólo una cuerda
REDONDA de 1,7 mm (0,065 pulgada) de diámetro (Se
recomienda el modelo Nº AF-100 de B+D). De lo contrario,
la unidad no funcionará correctamente.
• No golpee el cabezal de alimentación contra el piso. Esto
interrumpirá el mecanismo de alimentación.

30
PAUTAS DE SEGURIDAD/DEFINICIONES
Esimportantequeleaycomprendaestemanual.Lainformación
quecontieneserelacionaconlaproteccióndeSUSEGURIDADy
laPREVENCIÓNDEPROBLEMAS.Lossímbolosquesiguense
utilizan para ayudarlo a reconocer esta información.
PELIGRO: indicaunasituacióndepeligroinminenteque,sinose
evita, provocará la muerte o lesiones graves.
ADVERTENCIA: indicaunasituacióndepeligropotencialque,si
no se evita, provocará la muerte o lesiones graves.
PRECAUCIÓN: indicaunasituacióndepeligropotencialque,sino
se evita, provocará lesiones leves o moderadas.
AVISO: utilizado sin el símbolo de alerta de seguridad indica una
situacióndepeligropotencialque,sinoseevita,puedeprovocardaños
en la propiedad.
INSTRUCCIONES Y ADVERTENCIAS DE SEGURIDAD
ADVERTENCIA: Al utilizar herramientas eléctricas para el
jardín, siempre se deben tomar ciertas precauciones básicas de
seguridad para minimizar el riesgo de incendio, descarga eléctrica y
lesiones personales, entre ellas:
Lea todas las instrucciones
• SIEMPRE UTILICE PROTECCIÓN PARA LOS OJOS: utilice
gafasoanteojosdeseguridadentodomomentoqueesta
herramienta esté enchufada.
• PROTECTOR: nunca utilice esta herramienta sin el protector.
• UTILICE LA VESTIMENTA ADECUADA: no utilice ropa holgada
ni joyas. Pueden atascarse en las piezas móviles. Se recomienda
utilizar guantes de goma y calzado con una suela de goma
considerable al trabajar al aire libre. No opere la herramienta
descalzo ni con sandalias abiertas. Utilice pantalones largos para
protegerse las piernas. Recójase y cubra el cabello largo.
• CUERDA DE NYLON: mantenga la cara, las manos y los pies
lejos de la cuerda de nylon giratoria en todo momento.
• LA CUERDA GIRATORIA REALIZA UNA FUNCIÓN DE CORTE:
tengaprecauciónalpodaralrededordepantallasyplantasquedesea.
• MANTENGA ALEJADOS A TODOS LOS ESPECTADORES: a
unadistanciasegura,especialmentealosniños.
• ADVERTENCIA IMPORTANTE: al utilizar la herramienta como
Bordeadora, las piedras, las piezas de metal y otros objetos
pueden ser arrojados a alta velocidad por la acción de la cuerda.
Laherramientayelprotectorestándiseñadosparareducirel
peligro. No obstante, se deben tener en cuenta las siguientes
precauciones especiales:
• ASEGÚRESEdequelasdemáspersonasymascotasesténano
menos de 30 m (100 pies) de distancia.
• PARA REDUCIR EL RIESGO de lesiones por repercusión
(rebote),trabajelejosdecualquierobjetosólidocercano,como
pared, escalones, piedras grandes, árboles, etc. Tenga suma
precaución al trabajar cerca de objetos sólidos y, cuando sea
necesario, pode o recorte los bordes en forma manual.
• EVITE EL ARRANQUE ACCIDENTAL: nunca transporte la
herramienta enchufada con el dedo en el interruptor.
• NO FUERCE LA HERRAMIENTA: a una velocidad más rápida de
lavelocidadparalaquefuediseñadaparacortarenformaeficaz.
• UTILICE LA HERRAMIENTA ADECUADA: no utilice esta
herramientaparauntrabajodiferenteaaquéllosparalosquefuediseñada.
• NO SE ESTIRE:conserveelequilibrioadecuadoymanténgase
parado correctamente en todo momento.
• DA—O A LA UNIDAD: si golpea la herramienta o ésta se atasca
conunobjetoextraño,deténgaladeinmediato,desenchúfela,
verifiquequenosehayadañadoyreparecualquierdañoantesde
seguir utilizándola. No opere la herramienta si la bobina o el
carreteestándañados.
• DESCONECTE LA HERRAMIENTA: cuando no la utilice, al
reemplazar la cuerda o antes de limpiarla.
• EVITE LAS CONDICIONES AMBIENTALES PELIGROSAS: no
utilice herramientas eléctricas en lugares húmedos o mojados.
Siga todas las instrucciones incluidas en este Manual de
instrucciones para una operación adecuada de la herramienta. No
utilice la herramienta bajo la lluvia.
• NO OPERE herramientas eléctricas portátiles en atmósferas
gaseosas o explosivas. Los motores de estas herramientas
normalmente chispean, y las chispas pueden encender los vapores.

31
o DC . corriente directa
n
o ................... velocidad sin
carga
..............
Construcción Class II
.....................
terminal a tierra
............. símbolo de alerta de .../min ...........revoluciones
seguridad por minuto
............ Lea el manual de instrucciones antes del uso
.................Use protección adecuada para las vías respiratorias
.................Use protección adecuada para los ojos
.................Use protección adecuada para los oídos
ADVERTENCIA: Parte del polvo generado por este
producto contiene sustancias químicas reconocidas por el
Estado de California como causantes de cáncer, defectos
congénitos u otros problemas reproductivos. Algunos ejemplos
de estas sustancias químicas:
•compuestosenlosfertilizantes
•compuestosenlosinsecticidas,herbicidasypesticidas
•arsénicoycromodelamaderacontratamientoquímico
Parareducirsuexposiciónaestassustanciasquímicas,utilice
elequipodeseguridadaprobado,comomáscarasparapolvo
especialmentediseñadasparafiltrarpartículasmicroscópicas.
INSTRUCCIONES DE SEGURIDAD IMPORTANTES
PARA CARGADORES DE BATERÍAS
Este manual contiene instrucciones de seguridad importantes para
los cargadores de baterías.
• Antes de utilizar el cargador, lea todas las instrucciones y las
prevenciones en el cargador, en el paquete de baterías y en el
producto que utiliza el paquete de baterías.
ADVERTENCIA: Riesgo de descarga
eléctrica. No permita que ningún líquido entre en el cargador.
PRECAUCIÓN: Riesgo de quemadura. Para
reducir el riesgo de lesiones, cargue solamente baterías
BLACK+DECKER . Otros tipos de baterías pueden estallar y
provocar daños personales y materiales.
PRECAUCIÓN: En determinadas
• GUARDE LAS HERRAMIENTAS QUE NO SE UTILICEN EN
EL INTERIOR: cuando no las utilice, las herramientas deben
guardarse en un lugar seco, alto o bajo llave, fuera del alcance
delosniños. MANTÉNGASE ALERTA: No haga funcionar esta
unidad si está cansado, enfermo o bajo la influencia del alcohol, drogas o
medicamentos.
•CONSERVE LAS HERRAMIENTAS ADECUADAMENTE: siga
las instrucciones en la sección de mantenimiento. Mantenga los
mangos secos, limpios y libres de aceite y grasas.
• VERIFIQUE LAS PIEZAS AVERIADAS: antes de volver a
utilizarlaherramienta,sedebecontrolarcualquierprotección
uotrapiezaqueestéaveriadaparadeterminarsifuncionará
correctamenteyrealizarálafunciónparalaquefuediseñada.
Verifiquelaalineaciónylasujecióndelaspiezasmóviles,la
roturadepiezas,elmontajeycualquierotracondiciónquepueda
afectarelfuncionamiento.Cualquierprotecciónuotrapiezaque
estédañadadebeserreparadacorrectamenteoreemplazada
poruncentrodemantenimientoautorizado,amenosqueeste
manualindiqueotracosa.
•NOsumerjalaherramientaenaguanilasalpiqueconuna
manguera.NOpermitaqueningúnlíquidoentreenella.
•NO guarde la herramienta sobre o cerca de fertilizantes o
productosquímicos.
•NOlimpieconunalavadoraapresión.
•Mantengalosprotectoresinstaladosadecuadamenteyen
funcionamiento.
•Mantengalasmanosylospiesalejadosdeláreadecorte.
ADVERTENCIA: No utilice la herramienta si el gatillo
interruptor no enciende o apaga la herramienta. Toda herramienta
quenopuedacontrolarsemedianteelgatillointerruptores
peligrosa y debe repararse.
CONSERVE ESTAS INSTRUCCIONES
Simbolos
La etiqueta de su herramienta puede incluir los siguientes
símbolos.
V ...............voltios A ....................amperios
Hz .............hertz W ...................vatios
min ............minutos
o AC .........corriente alterna

32
circunstancias, con el cargador enchufado en el tomacorriente,
algunos materiales extraños pueden provocar un cortocircuito
en el cargador. Se deben mantener lejos de las cavidades del
cargador los materiales extraños de naturaleza conductora,
entre los que se incluyen la lana de acero, el papel de aluminio
o cualquier acumulación de partículas metálicas. Éstos son sólo
algunos ejemplos y no constituyen una lista taxativa. Siempre
desenchufe el cargador del tomacorriente cuando no haya un
paquete de baterías en la cavidad. Desenchufe el cargador
antes de intentar limpiarlo.
• El cargador suministrado con este producto debe enchufarse
de manera que quede correctamente orientado en posición de
montaje vertical o en el piso.
• NO intente cargar el paquete de baterías con cargadores
distintos de los que se listan en este manual. El cargador y
el paquete de baterías están específicamente diseñados para
funcionar en conjunto.
• Estos cargadores no están diseñados para otro uso que no
sea la carga de baterías recargables BLACK+DECKER . Otros
usos pueden provocar riesgo de incendio, descarga eléctrica o
electrocución.
• No exponga el cargador a la lluvia ni a la nieve.
• Tire del enchufe en lugar del cable al desconectar el cargador.
Esto reducirá el riesgo de dañar el enchufe y el cable.
• Asegúrese de que el cable esté ubicado de modo que no
lo pise o se tropiece con él, y que no esté sujeto a daños o
tensiones de alguna otra forma.
• No utilice un cable prolongador a menos que sea absolutamente
necesario. El uso de un cable prolongador incorrecto puede
provocar riesgo de incendio, descarga eléctrica o electrocución.
• Para garantizar la seguridad, un cable prolongador debe tener
un tamaño de cable adecuado (AWG o Calibre de conductor de
Estados Unidos). Cuanto más pequeño sea el número de calibre
del conductor, mayor será la capacidad del cable; es decir, un
calibre 16 tiene más capacidad que un calibre 18. Cuando se utiliza
más de una prolongación para lograr la longitud total, asegúrese de
que cada prolongación tenga la medida mínima del conductor.
CALIBRE MÍNIMO PARA CABLES DE EXTENSIÓN
• No coloque objetos en la parte superior del cargador ni
coloque el cargador en una superficie blanda que pueda
bloquear las ranuras de ventilación y provocar un calor
interno excesivo. Coloque el cargador en una posición alejada de
cualquier fuente de calor. El cargador se ventila a través de ranuras
en la parte superior y en los lados de la cubierta.
• No monte el cargador en la pared ni lo instale en forma
permanente sobre ninguna superficie. El cargador está diseñado
para ser utilizado sobre una superficie plana y estable (por ej., un
banco o una mesa).
• No opere el cargador con un cable o enchufe dañados:
reemplácelos de inmediato.
• No opere el cargador si éste ha recibido un golpe fuerte,
se cayó o presenta algún daño. Llévelo a un centro de
mantenimiento autorizado.
• No desarme el cargador; cuando deba realizar un
mantenimiento o reparaciones, llévelo a un centro de
mantenimiento autorizado. El armado incorrecto puede implicar
un riesgo de descarga eléctrica, electrocución o incendio.
• Antes de limpiarlo, desconecte el cargador del tomacorriente.
Esto reducirá el riesgo de descarga eléctrica. Quitar el paquete
de baterías no reducirá este riesgo.
• NUNCA intente conectar 2 cargadores juntos.
• El cargador está diseñado para operar con corriente eléctrica
doméstica estándar (120 voltios). No intente utilizarlo con otro
voltaje.
CONSERVE ESTAS INSTRUCCIONES
Calibre mínimo para cables de extensión
Volts Longitud total del cable en pies
120V 0-25 26-50 51-100 101-150
(0-7,6m) (7,6-15,2m) (15,2-30,4m) (30,4-45,7m)
240V 0-50 51-100 101-200 201-300
(0-15,2m) (15,2-30,4m) (30,4-60,9m) (60,9-91,4m)
Amperaje
Más de No más de American Wire Gage
0 - 6 18 16 16 14
6 - 10 18 16 14 12
10 - 12 16 16 14 12
12 - 16 14 12 No se recomienda

33
INSTRUCCIONES DE SEGURIDAD IMPORTANTES PARA
LOS PAQUETES DE BATERÍAS
ADVERTENCIA: Para un funcionamiento
seguro, lea éste y todos los manuales de instrucciones incluidos con
la herramienta antes de usar el cargador.
Elpaquetedebateríasincluidoenlacajanoestácompletamente
cargado.Antesdeutilizarelpaquetedebateríasyelcargador,
lea las instrucciones de seguridad a continuación. Luego siga los
procedimientos de carga descritos.
LEA TODAS LAS INSTRUCCIONES
•No incinere el paquete de baterías, aun si tiene daños
importantes o está completamente desgastado. El paquete de
baterías puede explotar en el fuego. Cuando se queman paquetes
de baterías, se generan vapores y materiales tóxicos.
• No cargue ni use la batería en atmósferas explosivas, como
ambientes en los que hay líquidos, gases o polvo inflamables. Insertar
o retirar la batería del cargador puede encender el polvo o los vapores.
•Si el contenido de las baterías entra en contacto con la piel,
lave el área de inmediato con agua y jabón suave. Si el líquido
de la batería entra en contacto con los ojos, enjuague con agua
manteniendo los ojos abiertos durante 15 minutos o hasta que la
irritación cese. Si se necesita atención médica, el electrolito de las
baterías de LI-ION contiene una mezcla de carbonatos orgánicos
líquidos y sales de litio.
•El contenido de las células de la batería abierta puede generar
irritación respiratoria. Respire aire fresco. Si los síntomas
persisten, busque atención médica.
ADVERTENCIA:
Peligro de quemaduras.
El líquido de la batería puede encenderse si se expone a chispas o llamas.
• El cargador suministrado con este producto está diseñado
para ser enchufado correctamente en posición vertical u
horizontal.
•Cargue los paquetes de baterías sólo con cargadores de
BLACK+DECKER .
•NO salpique o sumerja en agua u otros líquidos. Esto puede
causar una falla prematura de las células.
•No almacene ni utilice la herramienta y el paquete de baterías
en lugares en los que la temperatura pueda alcanzar o superar
los 40 °C (105 °F) (como en toldos al aire libre o construcciones
de metal en verano).
ADVERTENCIA: Nunca intente abrir el paquete
de baterías por ningún motivo. Si la caja del paquete de baterías está
agrietada o dañada, no la introduzca en el cargador. No comprima,
deje caer ni dañe el paquete de baterías. No utilice un paquete
de baterías o un cargador que haya recibido un golpe fuerte, se
haya caído, esté agotado o dañado de alguna forma (por ejemplo,
perforado con un clavo, golpeado con un martillo, pisado). Los
paquetes de baterías dañados deben devolverse al centro de
mantenimiento para su reciclado.
ADVERTENCIA: Riesgo de incendio. No
guarde o transporte la batería de ninguna manera que permita
que los terminales expuestos de la batería entren en contacto
con objetos metálicos. Por ejemplo, no coloque la batería en
delantales, bolsillos, cajas de herramientas, cajas de juegos
de productos, cajones, etc. con clavos, llaves, tornillos sueltos,
etc. Transportar baterías puede provocar incendios si los
terminalesde la batería entran en contacto accidentalmente con
materiales conductores como llaves, monedas, herramientas
de mano u objetos similares. Las Normas para Materiales
Peligrosos del Departamento de Transporte de los EE.UU. (HMR)
concretamente prohíben transportar baterías comercialmente o en
aviones (es decir, empacadas en maletas y equipaje de mano) A
MENOS que estén debidamente protegidas de cortocircuitos. Por
lo tanto, cuando transporte baterías individuales, asegúrese de
que los terminales de la batería estén protegidos y bien aislados
de materiales que puedan hacer contacto y causar un cortocircuito.
NOTA: Las baterías de iones de LI-ION no deben colocarse
dentro del equipaje registrado.
RECOMENDACIONES CON RESPECTO AL ALMACENAMIENTO
1.Elmejorlugardealmacenamientoesunoqueseafrescoyseco
fuera de la luz solar directa y de un exceso de calor o frío.
2.Elalmacenamientoprolongadonodañaráelpaquetedebateríaso
el cargador.
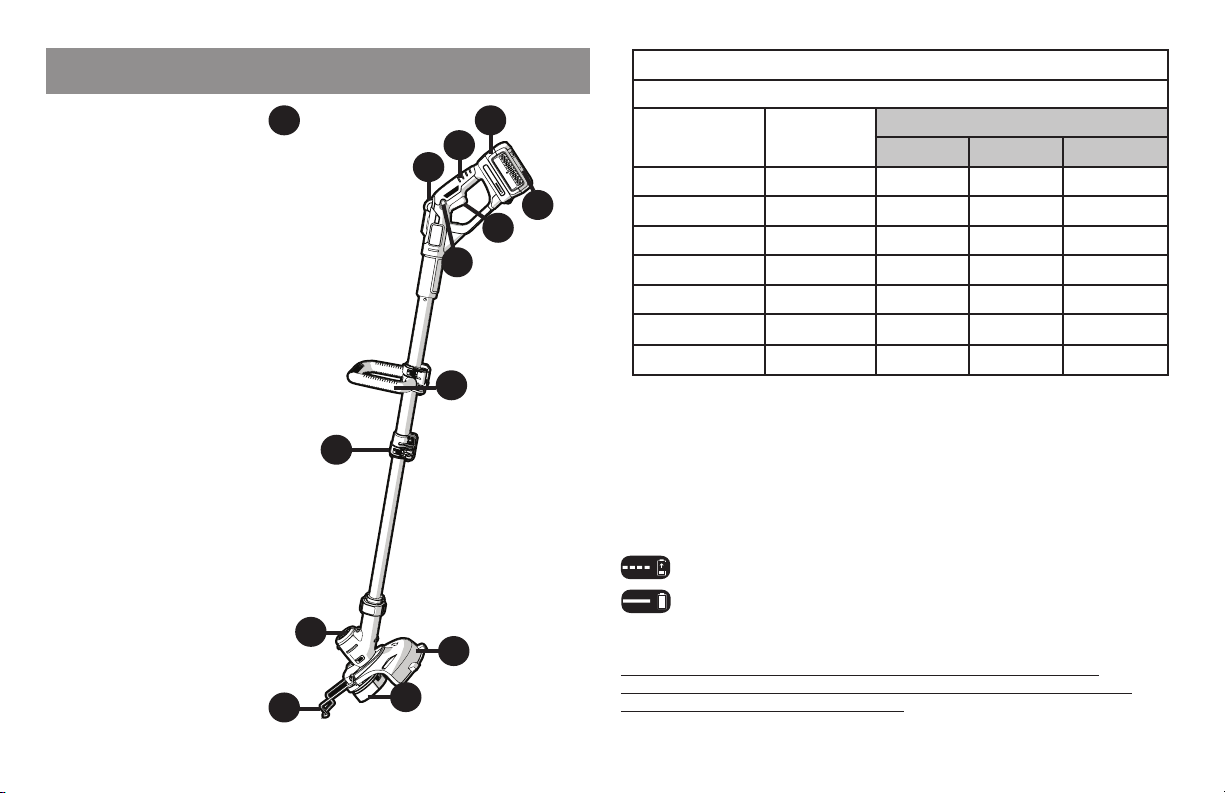
34
PROCEDIMIENTO DE CARGA
LoscargadoresBLACK+DECKERestándiseñadosparacargar
paquetesdebateríasBLACK+DECKER:LCS36(2horas),LCS436
(6 horas).
1. Enchufe el cargador en un tomacorriente adecuado antes de
insertarelpaquetedebaterías.
2.Introduzcaelpaquetedebateríasenelcargador.
3.ElindicadorLEDverdedestellaráindicandoquelabatería
se está cargando.
4. La batería está completamente cargada cuando el indicador
LEDverdepermaneceencendidocontinuamente.Elpaquete
está completamente cargado y puede utilizarse en este
momento o dejarse en el cargador.
Después del uso, recargue las baterías descargadas a la
brevedad posible o de lo contrario la vida útil de las baterías
podría acortarse en gran medida.
COMPONENTES
1. Interruptor de
encendido/apagado
2. Mango
3. Botón de bloqueo
4. Batería
5. Indicador de carga
6. Control de potencia
7. Mango auxiliar
8. Abrazadera de
bloqueo para ajuste de
altura
9. Cabezal de la
podadora
10. Guía de borde
11. Protector
12. Cubierta del carrete
8
3
4
7
2
10
1
11
12
9
5
6
A
BLACK+DECKER Sistemas de cargador y batería
Cargadores de baterías/Tiempo de carga (Minutos) (0% - 100% cargar)
Batería de
40V MAX*
Vatios por
hora
40V MAX* Cargadores
LCS36 LCS40 LCS436
LBX36 47 1 1 3.25
LBXR36 60 1.25 1.25 3.75
LBX1540 60 1.25 1.25 3.75
LBXR2036 80 1.5 1.5 5
LBX2040 80 1.5 1.5 5
LBXR2540 100 1.75 1.75 6.25
LBX2540 100 1.75 1.75 6.25
**Eltiempodeduracióndecargaesaproximado;laduraciónde
carga real puede variar.
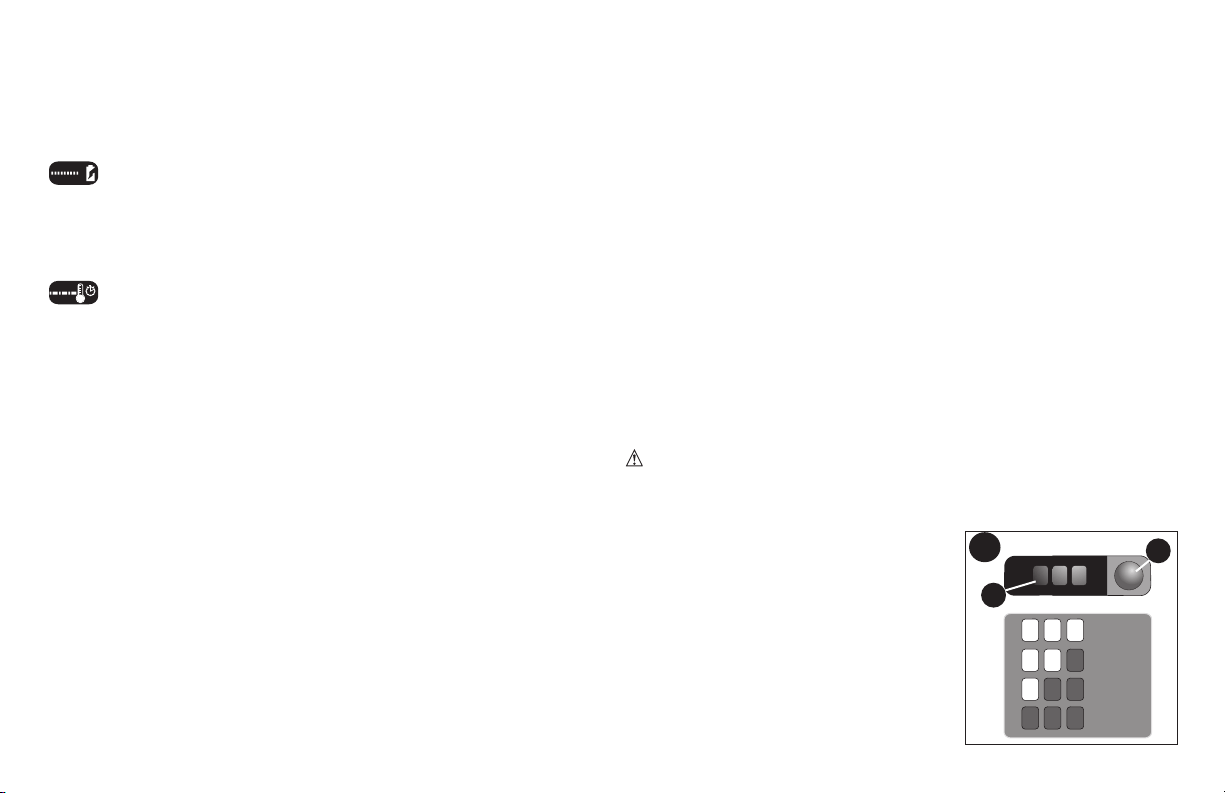
35
DIAGNÓSTICO DEL CARGADOR
Estecargadorestádiseñadoparadetectarciertosproblemasque
puedensurgirconlospaquetesdebateríasoelcargador.Los
problemasseindicanmedianteelindicadorLEDámbar,quedestella
en diferentes patrones.
BATERÍA DAÑADA
Elcargadorpuededetectarunabateríadébilodañada.El
indicadorLEDdestellaráenelpatrónindicadoenlaetiqueta.
Siobservaestepatróndedestellodebateríadañada,nocontinúe
cargando la batería. Devuélvala a un centro de mantenimiento o a un
lugar de recolección para reciclado.
RETRASO POR PAQUETE CALIENTE/FRÍO
Cuandoelcargadordetectaquelabateríaestáexcesivamente
calienteofría,comienzaunRetrasoporpaquetecaliente/
frío,ysuspendelacargahastaquelabateríasehayanormalizado.
Despuésqueocurraesto,elcargadorcambiaautomáticamente
almododePaquetecargando.Estafuncióngarantizaladuración
máxima de la batería. El indicador LED rojo destellará en un patrón
indicadoenlaetiquetacuandodetecteelretrasoporpaquete
caliente / frío.
DEJAR EL PAQUETE DE BATERÍAS EN EL CARGADOR
Elcargadoryelpaquetedebateríassepuedendejarconectados
con la luz verde encendida indefinidamente. El cargador mantendrá
elpaquetedebateríascomonuevoycompletamentecargado.
NOTAS IMPORTANTES SOBRE LA CARGA
1. Se puede obtener una mayor duración y óptimo rendimiento si se
cargaelpaquetedebateríascuandolatemperaturadelaireestá
entrelos16°Cylos27°C(60°Fy80°F).NOcargueelpaquetede
batería con una temperatura ambiental por debajo de +4,5 °C
(+40 °F) o por encima de +40,5 °C (+105 °F). Esto es importante y
evitarádañosgravesenelpaquetedebaterías.
2.Elcargadoryelpaquetedebateríaspuedenestarcalientesal
tacto durante la carga. Esto es una condición normal y no indica un
problema.Parafacilitarelenfriadodelpaquetedebateríasdespués
desuuso,evitecolocarelcargadoroelpaquetedebateríasenun
ambientecálido,comodebajodeuntoldodemetaloenunremolque
sin aislamiento.
3.Sielpaquetedebateríasnosecargaadecuadamente:
a. Revise el tomacorriente enchufando una lámpara u otro aparato
b.Verifiquesieltomacorrienteestáconectadoauninterruptorque
corta la energía cuando usted apaga la luz.
c.Muevaelcargadoryelpaquetedebateríasaunlugardondela
temperatura ambiental sea alrededor de 16 °C a 27 °C (60 °F a 80 °F).
d. Si los problemas de carga persisten, lleve la herramienta, el
paquetedebateríasyelcargadoralcentrodemantenimientolocal.
4.Sedeberecargarelpaquetedebateríascuandonoproduce
energíasuficienteparatareasquepreviamenterealizabacon
facilidad. NO CONTINÚE utilizando la herramienta en estas
condiciones. Siga el procedimiento de carga. También se puede
cargarunpaquetedebateríasparcialmenteagotadocuandose
desee, sin ningún efecto negativo sobre éstas.
5. Se deben mantener lejos de las cavidades del cargador los
materialesextrañosdenaturalezaconductora,entrelosque
seincluyenlalanadeacero,elpapeldealuminioocualquier
acumulación de partículas metálicas. Siempre desenchufe el
cargadordeltomacorrientecuandonohayaunpaquetedebaterías
en la cavidad. Desenchufe el cargador antes de intentar limpiarlo.
6.Nocongelenisumerjaelcargadorenaguanienningúnotrolíquido.
ADVERTENCIA: Riesgo de descarga eléctrica. No permita
queningúnlíquidoentreenelcargador.Nunca intente abrir el paquete
de baterías por ningún motivo. Si la cubierta protectora de plástico del
paquete de baterías se rompe o agrieta, devuélvala a un centro de
mantenimiento para su reciclado.
INDICADOR DEL ESTADO DE LA
CARGA (FIGURA B)
Labateríaestáequipadaconunindicador
de estado de la carga. Esto se puede
utilizar para visualizar el nivel actual
de carga de la batería durante el uso
y durante la carga. No indica el nivel
de funcionalidad de la herramienta y
puede variar de acuerdo a las piezas del
producto, la temperatura y la aplicación
queelusuarioledé.
<18%
18% - 45%
45% - 72%
72% - 100%
B
B2
B1
36
VERIFICACIÓN DEL ESTADO DE CARGA DURANTE EL USO:
•Oprimaelbotóndelindicadorde
estado de la carga (B1).
•LoscuatroLED(B2)seencenderán
para indicar el porcentaje de carga de
la batería. Consulte el recuadro en la
Figura B.
•SilaluzLEDnoenciende,cargue
la batería.
INSTALACIÓN Y EXTRACCIÓN
DEL PAQUETE DE BATERÍAS
ADVERTENCIA: Asegúrese de
queelbotóndebloqueoestéaccionadoparaevitarelaccionamiento
delinterruptorantesdequitaroinstalarlabatería.
PARA INSTALAR EL PAQUETE DE BATERÍAS:
Inserteelpaquetedebateríasenlaherramientahastaqueesté
completamente asentado y se oiga un clic (Figura C). Asegúrese
dequeelpaquetedebateríasestébiencolocadoycompletamente
asegurado en su lugar.
PARA QUITAR EL PAQUETE DE BATERÍAS: Oprima el botón de
liberacióndelabateríaenlaparteposteriordelpaquetedebateríasy
extraigaelpaquetedebateríasdelaherramienta.
ADVERTENCIA: Antesdelensamblaje,asegúresedequela
herramientaestéapagadaysehayaquitadolabatería.
ENSAMBLAJE
HERRAMIENTAS NECESARIAS PARA EL ENSAMBLAJE (NO
SUMINISTRADAS):
- Destornillador Phillips
ADVERTENCIA: Quitelabateríaantesdeintentarla
instalacióndecualquieradelossiguientescomponentes.
INSTALACIÓN DEL PROTECTOR (FIGURAS D Y E)
ADVERTENCIA: NUNCA OPERE LA HERRAMIENTA SIN EL
PROTECTOR ADECUADAMENTE INSTALADO. El protector
siempre debe estar correctamente instalado en la herramienta para
proteger al usuario.
•Quiteeltornillodelprotector.
•Mientrasmantieneelprotector
alineado con el cabezal
de la podadora, deslícelo
asuposiciónhastaque
la lengüeta de retención
encaje y haga clic en su
lugar(asegúresedequelos
rieles guía (D1) del protector
(D2) estén correctamente
alineados con los rieles
guía (D3) del cabezal de la
podadora (D4) (Figura D).
Lalengüetadebloqueo(D5)
debe encajado en la ranura de
la caja (D6).
•Fijeelprotectorconeltornillo
(E1) (Figura E).
F
F1
F2
C
E
E1
D
D2
D1
D3
D4
D6
D5

37
INSTALACIÓN DEL MANGO AUXILIAR (FIGURAS F Y G)
•Empujeelmangoauxiliar(F1)
sobre el tubo (F2).
•Inserteelperno(G1)porlos
orificios del mango auxiliar.
•Ajustelaperilla(G2)enel
perno girándolo en el sentido
de las agujas del reloj.
AJUSTE DE LA POSICIÓN DEL
MANGO AUXILIAR (FIG. G)
El mango auxiliar se puede
ajustar para proporcionar
óptimoequilibrioycomodidad.
•Aflojelaperilladelperno
girándola en sentido contrario a las agujas del reloj.
•Deslicesuavementeelmangoauxiliar
hacia arriba o hacia abajo por el tubo
hasta la altura deseada.
•Ajustelaperillaenelpernogirándola
en el sentido de las agujas del reloj.
AJUSTE DE LA ALTURA DE LA
HERRAMIENTA (FIGURA H)
PRECAUCIÓN: Ajuste la
longitud de la recortadora para obtener
puestos de trabajo adecuadas, como se muestra en la figura J.
•Estaherramientaposeeunmecanismotelescópico,quelepermite
ajustarla a una altura cómoda.
Para ajustar la configuración de altura:
•Sueltelaabrazaderadebloqueodeajustedealtura(H1).
•Muevasuavementedeltubo(H2)haciaarribaohaciaabajohasta
alcanzar la altura deseada.
•Cierrelaabrazaderadebloqueodeajustedealtura(H1).
LIBERACIÓN DE LA CUERDA DE CORTE
Al despacharse de la fábrica, la cuerda de corte está sujeta con cinta
a la cubierta del carrete.
•Quitelacintaquesujetalacuerdadecortealacubiertadelcarrete.
INSTRUCCIONES DE OPERACIÓN
ADVERTENCIA: Siempre utilice protección adecuada para los
ojosquecumpleconlanormaANSIZ87.1(CAN/CSAZ94.3)
mientras opera esta herramienta eléctrica.
ADVERTENCIA: Antesderealizarcualquierensamblaje,
ajuste o cambio de accesorios, desconecte el enchufe de la fuente
de alimentación. Dichas medidas de seguridad preventiva reducen el
riesgo de encender la herramienta en forma accidenta.
PRECAUCIÓN: Antes de comenzar a podar, asegúrese de
utilizar únicamente el tipo adecuado de cuerda de corte.
PRECAUCIÓN:
Inspeccioneeláreaquevaa
podarysaquelosalambres,
cables u objetos similares a un
cordel,quepodríanenredarseen
la cuerda giratoria o el carrete.
Tenga especial precaución a fin
deevitarcablesqueestén
doblados hacia afuera en el
trayecto de la herramienta, como
las púas en la base de una valla
de tela metálica.
AJUSTE DE LA HERRAMIENTA
EN MODO DE PODA O
BORDEADO (FIGURAS I, J Y K)
•Laherramientasepuede
utilizar en modo de poda
como se muestra en la Figura
I o en modo de bordeado
paracortarcéspedque
H
H1
H2
G
G2
G1
I
I1
J
J1
38
sobresale a lo largo de los bordes del prado y de macizos de flores
como se muestra en la Figura K.
MODO DE PODA
Parapodar,elcabezaldelapodadoradebeestarenlaposiciónque
se muestra en la Figura I. Si no es así:
•Quitelabateríadelaherramienta.
•Mantengaoprimidoelbotóndeliberacióndelcabezal(I1).
•Mientrassostieneelmangoauxiliar,gireelcabezalenelsentidode
las agujas del reloj.
•Suelteelbotóndeliberacióndelcabezal.
•Levantelaguíadeborde(J1)ala posición cerrada.
Nota: El cabezal girará únicamente en una dirección.
ATENCIÓN: La guía de alambre para bordes debe utilizarse
únicamente cuando está en modo de bordeado. Mantenga la guía de
borde de alambre en la posición retraída.
MODO DE BORDEADO (FIGURA K)
ADVERTENCIA:
Cuando se
utiliza como un Edger, piedras, trozos
demetalyotrosobjetosquepuedenser
lanzados a gran velocidad por la línea.
Elcorteylaprotecciónestándiseñados
para reducir el peligro. Sin embargo,
asegúresedequelasdemáspersonasy
los animales domésticos por lo menos
30m (100 pies) de distancia.
Para bordear, el cabezal de la
podadoradebeestarenlaposiciónquesemuestraenlaFiguraK.
Si no es así:
•Quitelabateríadelaherramienta.
•Mantengaoprimidoelbotóndeliberacióndelcabezal(K1).
•Mientrassostieneelmangoauxiliar,gireelcabezalensentidocontrario
a las agujas del reloj.
•Suelteelbotóndeliberacióndelcabezal.
•Bajelaguíadeborde(K2)alaposiciónabierta.Asegúresedequela
guía de borde esté completamente abajo (se oirá un clic).
Nota: El cabezal girará únicamente en una dirección.
Nota:Esposiblequeelsistemadeavanceautomáticonofuncione
correctamente si no se utiliza la guía de borde.
ENCENDIDO Y APAGADO
•Paraencenderlaherramienta,
mantenga oprimido el botón
debloqueoenapagado(L1)y
luego oprima el gatillo (L2). Una
vezquelaherramientaesté
funcionando puede soltar el botón
debloqueoenapagado(L1).
•Paraapagarlaherramienta,
suelte el gatillo.
ADVERTENCIA: Nunca
intentebloquearelgatilloenla
posición de encendido.
MÁXIMA POTENCIA/MÁXIMO
TIEMPO DE FUNCIONAMIENTO
La característica de máxima
potencia/máximo tiempo
de funcionamiento (M1) se
encuentra en el mango de la
herramienta.Éstalepermite
optimizar el rendimiento de las
herramientas y aumentar la
potencia según sea necesario.
•Paraelegirmáximapotenciaafindeencargarsedemalezas
gruesas, gire el dial a la posición 6.
•Paraelegirmáximotiempode
funcionamiento a fin
de aumentar
la vida útil de la batería, gire el dial a la
posición 1.
•Paraunacombinacióndeambasopciones,gireel
dial a las posiciones de 2 a 5.
FUNCIONAMIENTO DE LA PODADORA
•Sostenga la herramienta como se muestra en la
Figura N.
•Mantengaunángulodecortede5a10grados
como se muestra en la Figura N1. No exceda
los 10 grados (Figura N2). Corte con la punta
de la cuerda. Para mantener cierta distancia de
N
K
K2
K1
L
L1
L2
M
M1
39
las superficies duras, utilice la guía de
borde (7). Hale la guía hacia afuera
hastaqueencajefirmementeensulugar
produciendounchasquido.
•Mantengaunadistanciamínimade609,6
mm (24 pulgadas) entre el protector y
sus pies como se muestra en la Figura
N3. Para lograr esta distancia, ajuste la
altura general de la podadora como se
muestra en la Figura G.
BORDEADO
Los resultados óptimos de corte se obtienen en bordes de más de 50 mm (2
pulgadas) de profundidad.
•Noutilicelaherramientaparacrearbordes.
•GuíelaherramientacomosemuestraenlaFiguraO.
•Parahaceruncortemás a ras, incline levemente la herramienta.
CONSEJOS ÚTILES PARA CORTAR
•Utilicelapuntadelacuerdapararealizarelcorte;noempujeel
cabezal de la cuerda contra el césped sin cortar. Para lograr
trabajos de calidad, utilice la guía de borde a lo largo de elementos
como cercos, casas y canteros.
•Loscercosdealambreydeestacasprovocanunmayordesgaste
de la cuerda e incluso su rotura. Los muros de piedra y ladrillo, las
cunetas y la madera pueden desgastar la cuerda rápidamente.
•Nopermitaquelatapadelcarretesearrastresobreelsuelouotras
superficies.
•Encrecimientoslargos,cortedesdearribahaciaabajoynoexceda
una altura de 304,8 mm (12 pulgadas).
•Mantengalapodadorainclinadahaciaeláreaquesecorta;éstaes
la mejor área de corte.
•Lapodadoracortaalmoverlaunidaddederechaaizquierda.Esto
evitaráquesearrojenrestosalusuario.
•Eviteárbolesyarbustos.Lacuerdafácilmentepuededañarla
corteza de árboles, las molduras de madera, los revestimientos
exteriores y los pilares de cercos.
CUERDA DE CORTE/ALIMENTACIÓN DE LA CUERDA
Su podadora utiliza una cuerda de nailon REDONDA de 1,7 mm
(0,065 pulgada) de diámetro. Durante el uso, las puntas de las
cuerdas de nailon se deshilacharán y desgastarán, y el carrete
especial de autoalimentación alimentará y recortará automáticamente
un nuevo trozo de cuerda. No golpee la unidad contra el suelo para
intentar alimentar la cuerda ni por algún otro motivo. La cuerda de
corte se desgastará más rápido y necesitará más alimentación si
el corte o el bordeado se realizan a lo largo de aceras u otras
superficies abrasivas, o si se cortan malezas más espesas.
ACCESORIOS DE REPUESTO
ATENCIÓN: Antes de comenzar a podar, asegúrese de utilizar
únicamente el tipo apropiado de cuerda de corte.
Utilice el carrete de repuesto de BLACK+DECKER modelo N.º AF-100.
Recargue la cuerda de nailon (a granel o en carrete de repuesto pre-
enrollado) como se muestra en este manual.
•UTILICEÚNICAMENTECUERDADEMONOFILAMENTO
REDONDO DE NAILON DE 1,7 mm (0,065 pulgada) DE
DIÁMETRO. No utilice cuerdas dentadas o de mayor calibre ya
quesobrecargaránelmotoryprovocaránsobrecalentamiento.
Puede conseguir esta cuerda a través de su distribuidor local o
N3
5
O
-10
O
N1
N2
O
40
centro de mantenimiento autorizado.
•Otraspiezasderepuesto
(protectores, tapas de carrete,
etc.) están disponibles en los
centros de mantenimiento de
BLACK+DECKER. Para
encontrar su centro de
mantenimiento local llame al:
1-800-544-6986 o visite www.
blackanddecker.com.
ADVERTENCIA: El uso de
accesorios no recomendados por
BLACK+DECKER para esta
herramienta puede ser peligroso.
REEMPLAZO DEL CARRETE
(FIGURAS P, Q Y R)
•Quitelabateríadela
herramienta.
•Oprimalaslengüetas(P1)y
quitelatapadelcarrete(P2)
de la cubierta del carrete (P3)
en el cabezal de la podadora
(Figura P).
•
Para obtener óptimos resultados,
reemplace el carrete con
el modelo N.º AF-100 de
BLACK+DECKER.
•Sujeteelcarretevacíoconunamanoylacubiertadelcarreteconla
otraytiredeésteparaquitarlo.
•Silapalanca(Q1) de la base
de la cubierta se desprende,
vuelva a ponerla en la posición
correcta antes de insertar el
nuevo carrete en la cubierta.
•Eliminetodalatierra,
suciedad o césped del carrete
y la cubierta.
•Aflojeelextremodelacuerda
de corte e introduzca la cuerda en el orificio (R2) Figura R.
•Tomeelcarretenuevoy
empújelosobreelsoporte(Q2)enlacubierta.Gireelcarrete
ligeramentehastaqueestébiencolocado. Lacuerda
debe sobresalir aproximadamente 122 mm (4-13/16 pulgadas)
desde la cubierta.
•Alineelaslengüetasdelatapadelcarreteconlasranuras(R1)en
la cubierta (Figura R).
•Empujelatapadentrodelacubiertahastaqueencajefirmemente
ensulugarproduciendounchasquido.
ATENCIÓN: Paraevitarquesedañelaherramienta,sila
cuerda de corte sobresale más allá de la hoja de corte, recórtela de
maneraquelleguesólohastala
hoja.
REBOBINADO DEL CARRETE
(UTILICE ÚNICAMENTE CUERDA
REDONDA DE 1,7 MM [0,0065
PULGADA] DE DIÁMETRO)
(FIGURAS S, T Y U)
NOTA:Esmásprobablequelos
carretes enrollados a mano con una
cuerdaagranelseenredenconmayorfrecuenciaqueloscarretes
de BLACK+DECKER enrollados de fábrica. Para obtener mejores
resultados, se recomiendan los carretes enrollados de fábrica.
Para rebobinar la cuerda, siga los pasos a continuación:
•Quitelabateríadelaherramienta.
•Quiteelcarretevacíodela
herramienta como se describe en
“REEMPLAZO DEL CARRETE”.
T
T1
T2
P
P1
P2
P1
P3
Q
Q1
Q2
R
R1
R2
S
S1
S2

41
DETECCION DE PROBLEMAS
PROBLEMA
La herramienta
funciona lentamente.
La alimentación automática de
cuerda no alimenta más cuerda.
SOLUCIÓN
•Extraigalabateríadela
herramienta.
•Verifiquequelacubiertadel
carrete pueda girar libremente. Si es
necesario, límpiela cuidadosamente.
•Verifiquequelacuerdadecorte
no sobresalga más de 122 mm
(4-13/16 pulgadas) del carrete
aproximadamente. Si sobresale
más, corte el excedente de manera
queestéalaalturadelacuerdade
la hoja de corte.
•Sealimentamáscuerdacuando
ésta se acorta a aproximadamente
76,2 mm (3 pulgadas). Para
determinar si la cuerda no se está
alimentando,permitaquelamisma
se desgaste más allá de este punto.
•Extraigalabateríadela
herramienta.
•Retirelatapadelcarrete.
•Tiredelacuerdadecortehasta
que. sobresalga 122 mm (4-13/16
pulgadas) del carrete. Si la cuerda
decortequequedaenelcarretees
insuficiente, instale un nuevo carrete de
cuerda de corte.
•Asegúresedequelacuerdanose
haya entrecruzado con el carrete
como se detalla en la figura 18. Si
se ha entrecruzado, desenrolle la
cuerda de corte y nuevamente
enrolle la cuerda prolijamente en el
carretedemaneraquelascuerdas
no se entrecrucen.
•Alineelaslengüetasenlatapadel
PROBLEMA
La alimentación automática de
cuerda no alimenta más cuerda.
Sobrealimentación
SOLUCIÓN
carrete con las muescas de la cubierta.
•Empujeelcarretedentrodela
cubiertahastaqueencaje
firmemente en su lugar.
•Inspeccionesilossurcosenlabasedel
carretepresentandaños.Siestán
dañados,reemplaceelcarrete.
•Leaelcódigoqueseencuentraenla
parte posterior del carrete. Si aparece
“PA66”, llame a atención al cliente para
obtener un repuesto.
Si aparece “ABS”, éste no es el
problema.
•Silacuerdadecortesobresalemás
allá de la hoja de corte, corte el
excedentedemaneraqueestéala
altura de la hoja. Si la alimentación
automática de la cuerda aún no
funciona o el carrete está atascado,
haga lo siguiente:
•Limpiecuidadosamenteelcarreteyla
cubierta.
•Retireelcarreteyverifiquesila
palanca en la cubierta se puede
mover libremente.
•Retire el carrete y desenrolle la cuerda
de
corte, para luego volver a enrollarla
prolijamente. Reemplace el carrete de la
cubierta.
•Asegúresedeestarcortandoconlapunta
de la cuerda [177,8 mm (7 pulgadas) desde
el carrete].
Si es necesario, utilice la guía de borde para
mantener la distancia correcta.
•Asegúresedenoexcederunángulode10
grados como se muestra en la Figura N1.
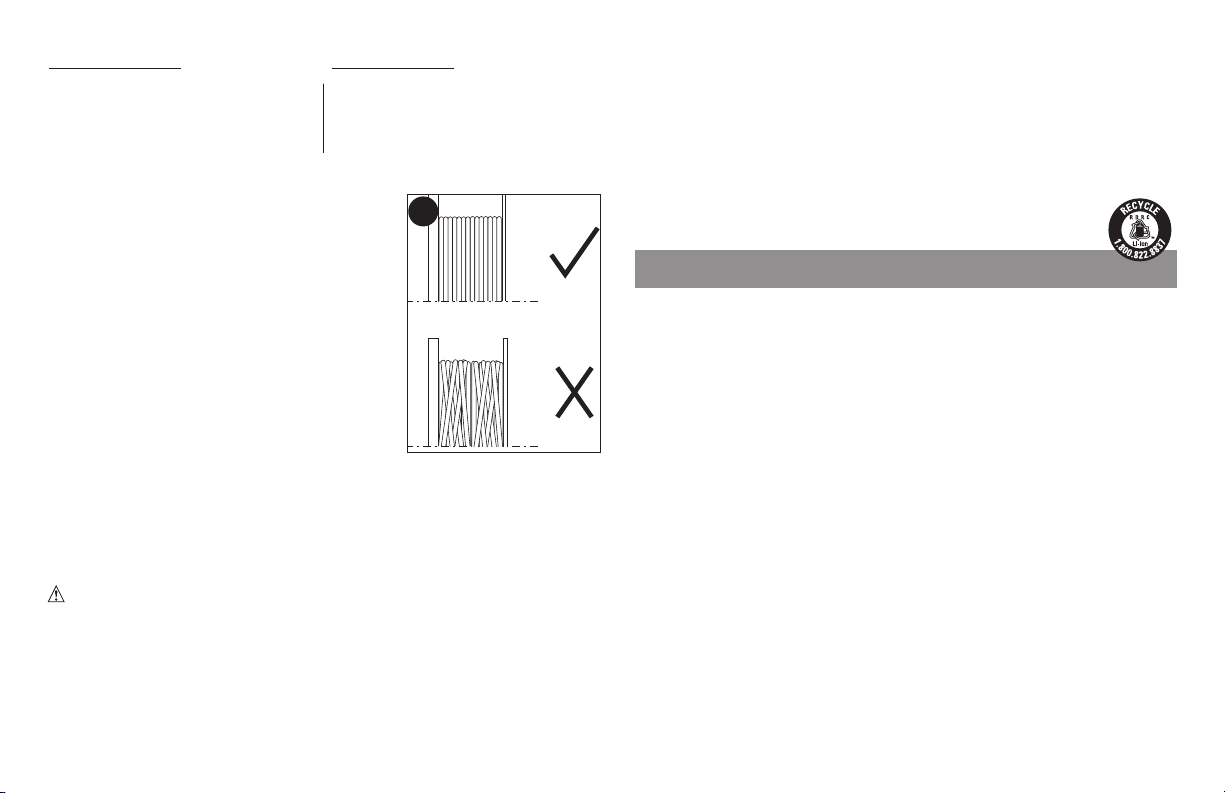
42
PROBLEMA
La cuerda se desenrolla al
quitarlatapaoelcarrete
SOLUCIÓN
•Antesdequitarlacuerda,
asegúrese de sujetarla en las
ranuras de retención (S2) (Figura
S).
•Eliminecualquierrestodecuerdadecorte
del carrete.
•Pliegueelextremodelacuerdadecorte
unos 19 mm (3/4 pulgada) (S1). Introduzca
la cuerda de corte dentro de una de las
ranuras de anclaje para la cuerda (S2)
como se muestra en la Figura S.
•Inserteelextremode19mm(3/4pulgada)
de la cuerda a granel en el orificio (T1)
del carrete adyacente a la ranura como
se muestra en la Figura T. Asegúrese
dequelalíneasetensacontraelcarrete
como se muestra en la figura T.
•Enrollelacuerdadecorteenelcarrete
en la dirección de la flecha del carrete. Asegúrese de enrollar la
cuerda con nitidez y en capas. No la entrecruce (Figura U).
•
Cuando la cuerda de corte enrollada llegue a los huecos (T2), corte la
cuerda (Figura T).
•Coloqueelcarreteenlaherramientacomosedescribeen
“REEMPLAZO DEL CARRETE”.
ADVERTENCIA: Para evitar lesiones graves, apague y
desenchufelaherramientaantesderealizarcualquiertipodemantenimiento.
1. Mantenga limpias las ranuras de admisión de aire para evitar el
sobrecalentamiento.
2. La cuerda de la podadora puede secarse con el tiempo. Para
conservar la cuerda en óptimas condiciones, guarde los carretes
pre-enrolladosderepuestoolacuerdaenpaqueteenunabolsa
sellada de plástico con una cucharada de agua.
U
3. Las piezas de plástico pueden limpiarse utilizando jabón suave y
unpañohúmedo.
4. La cortadora de cuerda en el extremo del protector puede perder
filo con el tiempo. Se recomienda mantener periódicamente el
filo de la hoja con una lima.
IMPORTANTE: Para garantizar la SEGURIDAD y la
CONFIABILIDAD del producto, las reparaciones, el mantenimiento
y el ajuste deben realizarse en los centros de mantenimiento
autorizados o en otras organizaciones de mantenimiento
calificadas, utilizando siempre piezas de repuesto
idénticas.
INFORMACIÓN DE MANTENIMIENTO
Todos los Centros de servicio de BLACK+DECKER cuentan con
personal altamente capacitado dispuesto a brindar a todos los clientes
un servicio eficiente y confiable en la reparación de herramientas
eléctricas. Si necesita consejo técnico, reparaciones o piezas de
repuesto originales de fábrica, póngase en contacto con el centro de
servicio de BLACK+DECKER más cercano a su domicilio. Para ubicar
su centro de servicio local, llame al 1-800-544-6986 o visite nuestro sitio
www.blackanddecker.com.
EL SELLO RBRC™ El sello RBRC™ (Corporación de reciclado de
bateríasrecargables)queseencuentraenlabateríadeionesdelitio
(opaquetedebaterías)indicaqueloscostosdereciclarlabatería(o
elpaquetedebaterías)alfinaldesuvidaútilyafueronpagadospor
BLACK+DECKER . RBRC™ en cooperación con BLACK+DECKER y
otros usuarios de baterías, ha establecido programas en los Estados
Unidos para facilitar la recolección de baterías de iones de litio
agotadas. Ayude a proteger nuestro medio ambiente y a conservar los
recursos naturales: devuelva las baterías de iones de litio agotadas
a un centro de mantenimiento autorizado de BLACK+DECKER o
auncomercianteminoristalocalparaquesereciclen.También
puede comunicarse con el centro local de reciclado para obtener
información sobre dónde dejar las baterías agotadas. RBRC™ es
una marca comercial registrada de la Corporación de reciclado de
baterías recargables. Este aparato digital Clase B cumple con la norma
canadiense ICES-003. Este mecanismo cumple con la parte 15 de las
normas de la Comisión Federal de Comunicaciones de Estados Unidos

43
(FCC). La operación está sujeta a las dos condiciones siguientes: (1)
Estemecanismoposiblementenocauseinterferenciaperjudicial;y(2)
estemecanismopuedeaceptarcualquierinterferenciarecibida,incluso
interferenciaquepodríaprovocarunaoperaciónnodeseada.NOTA:
Esteequipohasidoprobadoyseencontróquecumpleconloslímites
para dispositivo digital Clase B, según la parte 15 de las normas de la
FCC.Estoslímitesestándiseñadosparabrindarprotecciónrazonable
contra interferencia perjudicial en una instalación residencial. Este
equipogenera,usaypuedeirradiarenergíaenfrecuenciaderadioy,si
no se instala y se usa de acuerdo con las instrucciones, puede
provocar
interferencia perjudicial en las comunicaciones de radio. Sin embargo,
nohaygarantíadequelainterferencianoocurraenunainstalaciónen
particular.Siesteequipoprovocainterferenciaperjudicialenlarecepción
deradiootelevisión,loquesepuededeterminaralapagaryencenderel
equipo,elusuariodebetratardecorregirlainterferenciamedianteunao
más de las siguientes medidas:
•Cambiar la orientación o la ubicación de la antena de recepción.
•Aumentarlaseparaciónentreelequipoyelreceptor.
•Conectarelequipoauntomacorrientesobreuncircuitodiferentede
aquelalqueestáconectadoelreceptor.
• Consultar al vendedor o pedir la ayuda de un técnico en radio y televisión con
experiencia.
Loscambiosolasmodificacionesqueselerealicenaestaunidadsin
aprobación expresa del tercero responsable del cumplimiento pueden anular
laautorizacióndelusuarioparaoperarelequipo.Esteaparatodigitaldela
clase B se conforma con ICES-003 canadiense.
LIMPIEZA Y GUARDADO
PRECAUCIÓN: NO VACÍE O ROCÍE AGUA EN
LA HERRAMIENTA.
Utilice únicamente jabón suave y un trapo húmedo para limpiar la
herramienta.Nuncapermitaqueseintroduzcanlíquidosenla
herramienta;nuncasumerjaningunapartedelaherramientaen
ningúnlíquido.Subarredordebeguardarseenunlugarseco.Noguardela
herramientasobrefertilizantesoproductosquímicosnijuntoaellos.Dicho
almacenaje puede ocasionarle una rápida corrosión a las partes metálicas.
GARANTÍA LIMITADA DE TRES AÑOS
Black&Decker(U.S.)Inc.garantizaqueesteproductoestálibrede
defectos de material o mano de obra durante un período de tres (3)
añosdesdelafechadecompra,siempreycuandoelproductose
utilice en un entorno doméstico. Esta garantía limitada no cubre contra
fallasdebidasamaluso,dañoaccidentalocuandosehanrealizado
ointentadoreparacionesporpartedecualquierotrapersonaajenaa
BLACK+DECKER y sus centros de mantenimiento autorizados. Un
productodefectuosoquecumpleconlascondicionesdelagarantía
establecidas en el presente documento será remplazado o reparado
sincostodeunadosmaneras:Laprimera,queúnicamentedará
lugar a intercambios, consiste en devolver el producto al comerciante
minorista donde fue comprado (siempre y cuando la tienda sea un
comerciante minorista participante). Las devoluciones deben realizarse
dentro del período establecido en la política para intercambios del
comercianteminorista.Esposiblequeserequieraelcomprobante
de compra. Consulte al comerciante minorista sobre su política
específica de devoluciones con respecto a los límites de tiempo para
devoluciones o intercambios. La segunda opción es llevar o enviar
(pagado por adelantado) el producto a un centro de mantenimiento
de propiedad o con autorización de BLACK+DECKER para su
reparación o remplazo
a discreción de BLACK+DECKER .Esposibleque
serequierauncomprobantedecompra.Loscentrosdemantenimiento
de propiedad o con autorización de BLACK+DECKER en línea en www.
blackanddecker.com. Esta garantía no se aplica a los accesorios. Esta
garantíaleotorgaderechoslegalesespecíficosyesposiblequetengaotros
derechosquevaríandeunestadoaotro.Encasodequetengaalguna
pregunta,comuníqueseconelgerentedelcentrodemantenimientode
BLACK+DECKER máscercanoausted.Esteproductonoestádiseñado
para uso comercial y, en consecuencia, dicho uso comercial de este
producto anulará la garantía. Por medio del presente documento, se declina
la responsabilidad de todas las demás garantías, explícitas o implícitas.
AMÉRICA LATINA: Esta garantía no se aplica a productos vendidos en
AméricaLatina.ParalosproductosquesevendenenAméricaLatina,
consulte la información de garantía específica del país contenida en el
empaque,llamealacompañíalocalovisiteelsitiowebparaobtener
dicha información.

44
Grupo Realsa en herramientas,
S.A. de C.V.
Súper Manzana 69 MZ.01 Lote 30
(Av. Torcasita)
Col. Puerto Juárez
Cancún,QuintanaRoo
Tel. 01 998 884 72 27
Ferre Pat de Puebla, S.A. de C.V.
16 de Septiembre No. 6149
Col. El Cerrito
Puebla, Puebla
Tel. 01 222 264 12 12
Ferre Pat de Puebla, S.A. de C.V.
Ejército Mexicano No. 15
Col. Ejido 1ro. de Mayo
Boca del Rio, Veracruz
Tel. 01 229 167 89 89
Servicio de Fabrica BLACK+DECKER,
S.A. de C.V.
Lázaro Cardenas No. 18
Col. Obrera
Distrito Federal
Tel. 55 88 95 02
Representaciones Industriales Robles,
S.A. de C.V.
Tezozomoc No. 89
Col. La Preciosa
Distrito Federal
Tel. 55 61 86 82
Gpo. Comercial de Htas. y Refacciones
de Occidente, S.A. de C.V.
Av. La Paz No. 1779
Col. Americana, S. Juaréz
Guadalajara, Jalisco
Tel. 01 33 38 25 69 78
Herramientas y Equipos Profesionales
Av. Colón 2915 Ote.
Col. Francisco I. Madero
Monterrey, Nvo. León
Tel. 01 81 83 54 60 06
Htas. Portátiles de Chihuahua,
S.A. de C.V.
Av. Universidad No. 2903
Col. Fracc. Universidad
Chihuahua, Chihuahua
Tel. 01 614 413 64 04
SOLAMENTE PARA PROPOSITOS DE MEXICO
Fernando González Armenta
Bolivia No. 605
Col. Felipe Carrillo Puerto
Cd. Madero, Tampico
Tel. 01 833 221 34 50
Perfiles y Herramientas de Morelia
Gertrudis Bocanegra No. 898
Col. Ventura Puente
Morelia, Michoacán
Tel. 01 443 313 85 50
Enrique Robles
Av. de la Solidaridad No. 12713
Col. La Pradera
Irapuato, Guanajuato
Tel. 01 462 626 67 39
Hernández Martinez Jeanette
Prolongación Corregidora Nte. No. 1104
Col. Arboledas
Queretaro,Qro.
Tel. 01 442 245 25 80
PARA OTRAS LOCALIDADES LLAME AL 01 800 847 2309 o 01 800 847 2312.
BLACK&DECKER S.A. DE C.V.
BOSQUESDECIDROSACCESORADIATASNO.42
COL.BOSQUESDELASLOMAS.
05120MÉXICO,D.F
TEL. (01 55) 5326 7100 01 800 847 2309/01 800 847 2312
Cat. No. LST136 Form No. 90629223 August 2015
Copyright
©
2015 BLACK+DECKER Printed in China