
Model #129.05
1100W / 120Vac~ / 60Hz
• Operating Instructions
• Warranty
Read all instructions before operating the appliance
Touchscreen Espresso Machine

IMPORTANT SAFEGUARDS
Before using the electrical appliance, the following basic precautions should
always
be followed including:
1. READ ALL INSTRUCTIONS BEFORE USING THE APPLIANCE!
2. DO NOT touch hot surfaces; use handles or knobs. Do not touch the cup
warmingtray as it is HOT!
3. Before using the appliance, check that the voltage of the wall outlet
corresponds torated voltage marked on the machine.
4. To protect against re, electric shock and injury to persons, DO NOT
immerse the power cord, plug or appliance in water or in any other liquid.
5. Unplug appliance from outlet when not in use and before cleaning. Allow
applianceto cool down before putting on or taking o parts, and before
cleaning the appliance.
6. Close adult supervision is required when this appliance is used by or near
children to ensure that they do not play with the appliance.
7. This appliance is not intended for use by persons (including children) with
reduced physical, sensory or mental capabilities, or lack of experience and
knowledge unless they have been given supervision or instruction concerning
use of the appliances by a person responsible for their safety.
8. DO NOT operate any appliance with a damaged power cord or plug, or
operate it after the appliance malfunctions, or has been damaged in any
manner. Return this appliance to the nearest Authorized Service Center for
examination, repair or adjustment.
9. The use of accessory attachments other than those recommended by
Capresso may result in re, electric shock or injury to persons.
10. To reduce the risk of re or electric shock, do not remove the base. No user
serviceable parts are inside. Repair should be done by authorized service
personnel only.
11. DO NOT let the power cord hang over edge of table or counter or allow it to
come into contact with hot surfaces.
12. DO NOT place this appliance on or near a hot gas stove or electric burner or
in a heated oven.
13. To disconnect, press Power indicator to turn OFF machine, then remove the
plug from the electrical outlet. Always hold the plug and never pull on the
cord.
14. DO NOT use appliance for other than intended use.
15. Place the appliance on a hard, at level surface only, to avoid interruption of
airow underneath the appliance.
16. DO NOT use outdoors.

3
1. A short power supply cord is provided to reduce risks resulting from
becoming entangled in or tripping over a longer cord.
2. Longer detachable power supply cords or extension cords are available and
may be used if care is exercised in their use.
3. If a longer detachable power supply cord or extension cord is used
a. The marked electrical rating of the detachable power-supply cord or
extension cord must be as great as the electrical rating of the appliance,
b. If the appliance is of the grounded type, the extension cord should be a
grounding type 3-wire cord, and
c. The longer cord should be arranged so that it will not drape over the
countertop or tabletop where it can be pulled on by children or tripped
over.
4. This appliance has a polarized plug (one blade is wider than the other). To
reduce the risk of electric shock, this plug will t in a polarized outlet only one
way. If the plug does not t fully in the outlet, reverse the plug. If it still does
not t, contact a qualied electrician. Do not attempt to defeat this safety
feature.
FOR HOUSEHOLD USE ONLY
SAVE THESE INSTRUCTIONS
SPECIAL CORD SET INSTRUCTIONS
17. Always be sure to place the water tank tightly back onto the unit with its
lid closed and ll with water above the minimum ll line before turning the
appliance on. Do not operate the espresso machine without water as it can
damage the heating system.
18. DO NOT remove the portalter while brewing espresso. Please make sure
to press the Power indicator to turn OFF machine before you remove the
portalter to make more espresso. Caution should also be taken while
removing the portalter since
the metal parts will be hot. Please make sure to hold it by the handle and to
use the thumbguard to dispose of the grounds. See all “CAUTION” sections
on the following pages for additional warnings.
19. Use extreme caution when dispensing hot steam!

4
CAUTION
This appliance is for household use only. Any servicing other than cleaning
and user maintenance should be performed by an authorized service
representative.
1. Do not immerse in water or try to disassemble appliance.
2. Never use warm or hot water to ll the water tank. Use cold water only!
3. Keep hands and cord away from hot parts of the appliance during operation.
4. Never clean with scouring powders or hard implements.
5. Operate the appliance with the drip tray and drip tray grid in place.
6. Never heat ammable liquids using steam.
7. To maintain the life of your machine, follow the instructions for Decalcifying in
chapter 15.
8. If all 5 indicator lights are ashing during brewing, please check if the water
tank is empty or steam control knob is not in the OFF position.
9. Before brewing, the portalter must be turned to the right as tight as possible
to prevent it from loosening due to high pressure.

5
Fig. 1
Water Tank
Water Tank Lid
/ handle
Cup Warming Tray
Screen
Portalter
Sieve
Measuring Spoon / Tamp
Steam
Wand
Drip Tray
Drip Tray
Grid
Drip Tray
Overow
Indicator
Finger
Grip
Steam
Control
Knob
Brew
Head
6
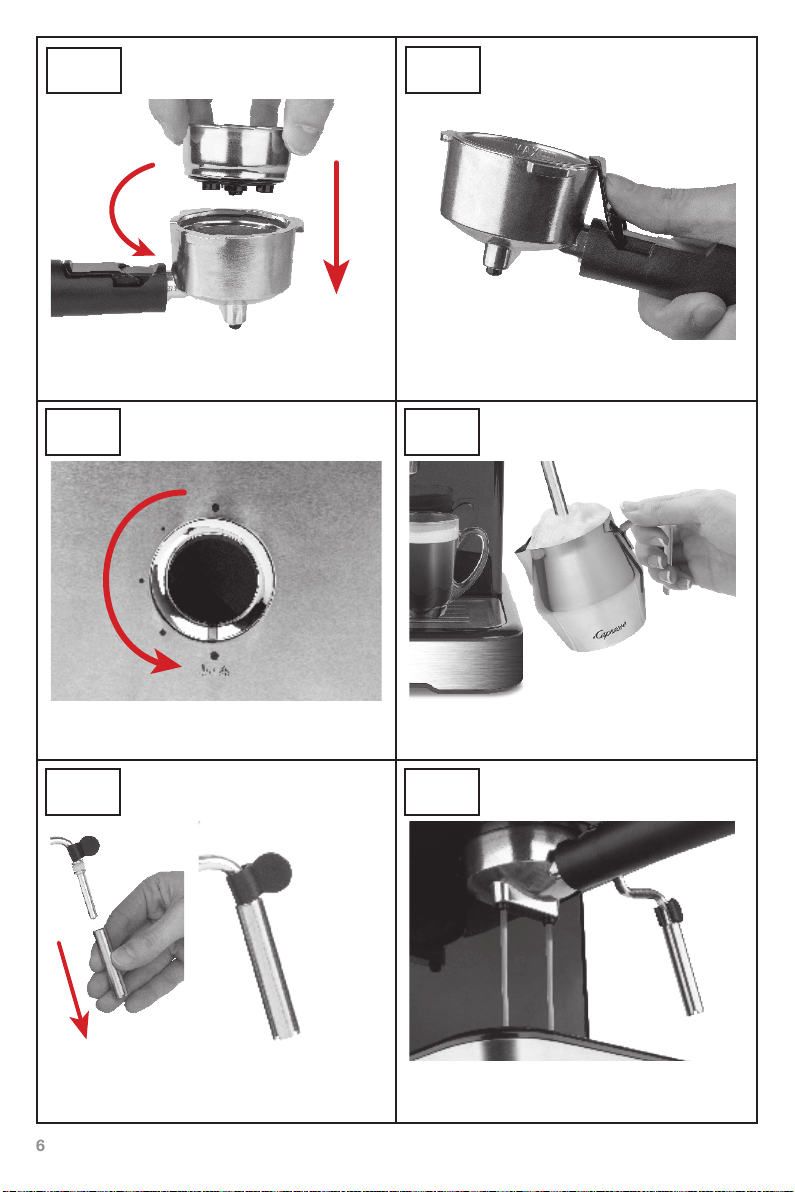
Fig. 2
Fig. 4
Fig. 6
Fig. 3
Fig. 5
Fig. 7
Align notch and bump on sieve with
notch in the portalter. Insert and twist.
Steam control knob
Steam Wand
Assembly
Brew head
Steam wand – remove stainless steel
frothing sleeve for steaming only
Thumb guard to secure during cleaning
Hole on
top
Notches on bottom

7
1. Tips for Brewing the Best Espresso
• To extract the fullest avor from your coee, we recommend using whole coee
beans that have been freshly ground each time espresso is prepared.
• Do not ll your sieve to the brim. Using the coee scoop included, add 1 level spoon
of ground coee per shot of espresso.
• Using fresh, cold water that is free of chlorine and other impurities will help improve
the taste of espresso
• To ensure your espresso stays at optimum temperature, we recommend that you
preheat your cups.
2. Before Using for the First Time
After carefully unpacking your Café TS, wash all removable parts with warm, soapy
water and rinse thoroughly. Familiarize yourself with the appliance and read the entire
instruction manual. Plug the power cord into a grounded wall outlet according to the
safety instructions. Rinse the internal components before making espresso as described
in chapter 6, Warming Internal Components and Cups.
3. Filling the Water Tank
Remove the water tank by lifting up on the handle. Open the lid and ll the water tank
with fresh, cold water between the MIN and MAX markings. Close the lid and replace the
water tank by pushing down rmly, to ensure the tank is properly engaged.
4. Control Panel
Hot Water
Hot
Water
Steam
Steam
Power
Power
Count Up Timer
will display
brewing time
2-Cup
2-Cup
1-Cup
1-Cup
Short
Press
run 15
seconds
run 25
seconds
turns
machine ON
runs 45
seconds
icon blinks while
machine heats
for frothing,
once illuminated
steaming can begin
starts
programming
starts
programming
turns
machine OFF
switches machine
back to espresso
brewing
Long
Press

8
Count Up Timer – will display brewing time
1-Cup – short press will run for 15 seconds – long press will start programming
2-Cup – short press will run for 25 seconds – long press will start programming
Power – short press will turn machine ON – long press will turn machine OFF
Hot Water – short press will run for 45 seconds
Steam – short press will start heating the machine for frothing - Steam indicator will
start to ash – once illuminated steaming can begin – long press to go back to
espresso brewing
Important: The machine is programmed to dispense espresso for 15 seconds when
using the 1-Cup indicator and 25 seconds when using the 2-Cup indicator. It is possible
to stop the ow of espresso by pressing the 1-Cup indicator or the 2-Cup indicator again.
Both the 1-Cup and the 2-Cup indicators can be programmed.
5. Turning OFF
We suggest turning OFF the machine when not in use. If you forget to turn OFF the
machine, it will automatically shut o after 25 minutes of inactivity. Press and hold the
Power indicator for 3 seconds to turn OFF the machine. The product indicator lights will
turn OFF and the Power indicator will stay illuminated. NOTE: When not in use, remove
the portalter. This will extend the life of the seal around the brew head.
6. Warming Internal Components and Cups
For the best results, we recommend that you preheat the portalter and sieve before
ground coee is added and prewarm the cups. When the machine is powered ON, cups
can be warmed on the cup warming tray for 10-15 minutes prior to brewing.
a) Press the illuminated Power indicator to turn the machine ON. Make sure steam
control knob is in the closed position (Fig. 4). The product indicator lights will slowly
ash while the machine heats up.
b) Insert the portalter, without any coee. Align the portalter at the inscription
“INSERT”, push the portalter up and turn it rmly to the right towards “LOCK”
until it feels tight.
c) Once the required temperature has been reached the product indicator lights will
stop ashing and all indicators will be illuminated. Place cup(s) under the
portalter spouts.
d) Press the 1-Cup or 2-Cup indicator to start brewing. Hot water will be pumped
through the lter into the cups.
e) When the water ow stops and the cups are lled with hot water, remove them
from the machine and empty into the sink. Unlock the portalter by turning the
handle to the left to release the portalter from the machine. Dry portalter before
adding ground coee.

9
7. Filling and Inserting the Portalter:
a) Place the 1-cup or 2-cup sieve rmly inside of the portalter as shown in Fig 2.
Ensure the sieve is dry so no coee sticks to it.
b) Fill the sieve with fresh, nely ground coee. Clean any excess coee from the rim
of the portalter. This will assure proper t under the brew head.
c) Tamp or compress coee using the at side of the coee scoop/tamper. Do not
overll the sieve. This might cause clogging or overow.
d) Position portalter underneath the brew head and align the portalter to “INSERT”
while pushing the portalter up. Turn the portalter rmly to the right towards
“LOCK” until it feels tight.
Tip! For stronger espresso, use two level scoops of ground coee in the 2-cup sieve and
brew into a single cup using the 1-Cup indicator.
8. Pre-Infusion
The Café TS features a pre-infusion function that will disperse hot water for approximately
4 seconds and then pause before brewing starts. This short burst of hot water will
saturate the ground coee and allow water to evenly penetrate the grounds to ensure
smooth extraction.
9. Preparing Espresso
The type of coee you choose strongly inuences the strength and avor of your
espresso. Always use coee beans ground to a relatively ne and uniform size, suitable
for espresso. Too ne a grind will result in an espresso that is over extracted and bitter.
Too coarse a grind will result in espresso that is under extracted and weak in avor. The
perfect espresso grind will feel slightly granular, with a texture between sugar and our.
Unevenly ground beans or beans exposed to excessive heat when grinding will also
aect the nal result, we recommend using a Capresso Burr Grinder that consistently
grinds beans to the proper size for even extraction without overheating the beans and
stripping them of their natural oils.
a) Make sure there is water in the water tank, the portalter with the sieve and
ground coee is securely in place and your cup(s) are prewarmed as described
in earlier chapters.
NOTE: For one cup of espresso use the 1-cup sieve, for two cups of espresso
use the 2-cup sieve.
b) As soon as the machine reaches the desired temperature, all 4 of the product
indicator lights stop ashing and will fully illuminate. Press the 1-Cup or 2-Cup
indicator to start brewing. Espresso will be dispensed from the portalter and the
1-Cup or 2-Cup indicator will start to slowly ash. The machine will stop
automatically once brewing is complete. Remove the cup(s) from under the
portalter and enjoy.
NOTE: If you would like to interrupt brewing, you may press the ashing 1-Cup or
2-Cup indicator to stop brewing before preset time.
c) Turn the portalter handle to the left and remove it from the machine. Lift the
thumbguard over the sieve and hold it down (Fig. 3). Turn the portalter upside
down and tap out the used coee grounds. Rinse the portalter under running
water and make sure the holes are free of coee deposits. Once the portalter has
been rinsed and dried, it can be used to prepare more espresso.
Important: To avoid unnecessary wear to the seal around the brew head, do not
store the portalter in the locked position when not in use.

10
10. Programming
The machine is programmed to dispense 1.5 oz. of espresso for 15 seconds when using
the 1-Cup indicator and 2 oz. of espresso for 25 seconds when using the 2-Cup indicator.
Depending on your taste preference, you may want to adjust this setting. Changing
the preset amount to less than 1.5 oz. will result in a stronger tasting cup of espresso.
Increasing the setting to more than 1.5 oz. will result in a milder tasting cup of espresso.
a) Make sure there is water in the water tank, the portalter with the sieve and
ground coee is securely in place and your cup(s) are prewarmed as described in
earlier chapters.
b) Place the desired cup(s) underneath the portalter spouts and press and hold the
desired 1-Cup or 2-Cup indicator for approx. 3 seconds. The selected cup indicator
will start ashing.
c) Espresso will start to ow into your cup while the timer counts up to show
brewing time.
d) Once the desired volume has been reached, press the selected cup indicator and
the ow of the espresso will stop. The machine will now produce the newly
programmed amount each time the selected indicator is pushed.
NOTE: The maximum programmable volume for the 1-Cup & 2-Cup indicator is
approximately 9 oz. which will take one minute to brew. To reset the machine back to
its original settings, press the 1-Cup & 2-Cup indicator simultaneously and hold for 3
seconds, once both indicators ash and the rest of the indicator lights are lit back up, the
reset is complete.
11. Preparing Cappuccino
Cappuccino is the combination of one or two shots of espresso with an equal or larger
amount of hot milk and milk froth (for Latte see chapter 12).
Important: During and after using the steam wand to make frothed milk or hot water, the
metal parts of the steam wand can become very hot. Place ngers on the black nger
grip when moving the hot steam wand. Take care when handling the steam wand to avoid
injury.
Frothing Milk
Always start with cold milk. Skim or fat-free milk will produce the most froth and provide
a stronger espresso taste. 1% and 2% milk will produce less froth, and whole milk will
produce less than half the amount of froth of skim milk.
a) First prepare espresso into a large, pre-heated cup as described in chapter 9,
Preparing Espresso.
b) Fill a small stainless steel or ceramic pitcher halfway with cold milk and set aside.
c) Press the Steam indicator and the light will begin to ash. During preheating, the
Power indicator will be illuminated, and the 1-Cup, 2-Cup and Hot Water lights will
turn OFF. Position the steam wand so that it points away from the machine. As soon
as the Steam indicator light stops ashing, the machine is ready for frothing.
d) Before frothing, it is recommended to purge the steam wand of any hot water.
Place an empty cup under the steam wand and turn the steam control knob to the
open position to release the small amount of water in the steam wand. Once steam
is dispensed, turn the steam control knob to the closed position.

11
e) Once the steam wand is purged and the steam control knob is in the closed
position, plunge the steam wand about two thirds of the way into the milk pitcher
(Fig. 5). Turn the steam control knob to the open position. For optimal results, start
frothing from the bottom of the pitcher and slowly move upward. Keep the steam
wand close to the bottom of the pitcher without touching for about 25 seconds.
Then gradually lower the container so that the steam wand moves up towards the
surface of the milk. Do not allow the tip of the steam wand to come completely out
of the milk or allow the milk level to cover the black rubber nger grip at the top of
the wand.
Important: To avoid dicult cleaning of the steam wand, make sure milk froth
does not cover the black nger grip at the top of the steam wand.
f) Once milk has developed froth or reached the temperature of 160°F, turn the steam
control knob to the closed position to stop the ow of steam from the steam wand.
g) Pour the milk froth over the espresso and enjoy!
h) It is important to clean the steam wand after each use to prevent milk from
hardening and drying inside the wand. To clean the wand, place the steam wand
in a small container lled with water and repeat above procedure for at least
30 seconds.
NOTE: For thorough cleaning of the steam wand see chapter 14.
Caution: The steam wand will be HOT after frothing. Only reposition the
steam wand using the black nger grip, especially after frothing or steaming milk or
preparing hot water.
i) After cleaning the steam wand, press the Steam indicator to transition back to
brewing espresso or preparing hot water.
j) If you would like to prepare an espresso immediately after steaming milk, place
a cup under the steam wand and turn the steam control knob to the open position
to release steam. Once all steam has been released from the steam wand, turn the
steam control knob to the closed position. Once the steam icon stops ashing and
all the icons come back on, espresso or hot water can now be prepared.
NOTE: If you do not release the steam from the steam wand and try to prepare an
espresso or hot water, you may receive an error, the indicator lights will start to ash
rapidly indicating the machine is too hot.
12. Preparing Latte
Latte is the combination of one or two shots of espresso with an equal or larger amount
of hot steamed milk with very little, or no froth.
NOTE: Without the frothing sleeve, the steam wand will steam, not froth the milk. Remove
the frothing sleeve (Fig. 6). Then proceed with steaming the milk as described in chapter
11. Pour hot steamed milk over espresso.
Caution: The steam wand will be HOT after steaming. Only reposition the
steam wand using the black nger grip, especially after frothing or steaming milk or
preparing hot water.

12
13. Hot Water
The Café TS can produce hot water for tea or Americanos by using the steam wand.
Always make sure the steam wand is well cleaned and free of dried milk deposits before
making hot water.
a) Turn the steam control knob to the open position. Place a cup under the steam
wand prior to pressing the Hot Water indicator.
b) Press Hot Water indicator, the 1-Cup, 2-Cup and Steam indicator lights will turn OFF
and the Hot Water indicator will start ashing, hot water will ow from the steam
wand. The timer will start counting up while the cup lls. When the cup is lled with
the desired amount of hot water, press Hot Water indicator again and hot water
stops owing immediately. Turn the steam control knob to the closed position.
c) Repeat above procedure if more hot water is needed.
14. Cleaning & Maintenance
To avoid injury, always turn OFF and unplug the machine before cleaning and allow
machine to cool down. Wipe the outside of the machine with a clean, damp cloth. Do not
immerse the appliance in water or any other liquid. Do not use harsh or abrasive cleaners
or alcohol/solvent-based cleaners to clean the machine. Use only gentle dishwashing
liquid and warm water. After each use, rinse out the water tank and empty before
replacing back onto the machine.
Cleaning the Steam Wand
It is important to clean the steam wand immediately after each use. If the steam wand is
blocked due to milk deposit build up, it is helpful to remove the blockage by cleaning the
steam wand and all parts. Make sure machine is turned OFF and steam wand has fully
cooled down before removing parts.
a) Remove the stainless steel frothing sleeve from the steam wand and rinse under
warm, running water. If dried milk remains on the frothing sleeve, you may clean with
gentle dishwashing liquid and warm water. Rinse well and dry all parts completely
before reassembling.
b) Wipe the steam wand with a damp cloth. If milk blocks the steam wand, use a
needle to clean the opening of the steam wand until no dried milk deposits remain.
c) Place the stainless steel frothing sleeve upward back onto steam wand pushing it
tightly in place. The steam wand must be assembled correctly to ensure proper
frothing of milk. Ensure the small hole on the frothing sleeve is at the top while the
notches on the frothing sleeve are on the bottom (Fig. 6).
Cleaning the Drip Tray
a) The drip tray should be emptied each time the machine is used or when the red
overow indicator in the drip tray rises above the drip tray grid.
b) When removing a drip tray full of water, carefully hold the drip tray by both sides
and slowly lift up and away from the machine. Remove the drip tray grid and slowly
pour water from drip tray into the sink.
c) Rinse both the drip tray and grid. If necessary, both the drip tray grid and drip tray
can be hand washed with warm water and a gentle dishwashing liquid. Rinse well
and dry completely before replacing the drip tray and grid back on the machine.

13
Cleaning the Brew Head and Portalter
a) Both the brew head and portalter should be cleaned frequently.
b) Wipe the brew head (Fig. 7) with a clean, damp cloth.
Caution: HOT! Danger of burning or scalding! Ensure the machine has completely
cooled down prior to cleaning.
c) If the inner screen inside the brew head, accumulates coee oils, it can be removed
for a thorough cleaning using a screwdriver. Ensure it is attached back onto the
machine the same way after cleaning.
d) After removing used coee from the portalter, unlock the sieve from the portalter
by aligning the bump on the sieve with the notch on the portalter and lift up (Fig. 2).
Wash the portalter and sieves with warm water. Do not use harsh or abrasive
cleaners, or alcohol/solvent-based cleaners to clean the brew head or portalter.
When cleaning the portalter and sieves, hold under running water. Rinse well and
dry carefully.
e) When the espresso machine is not in use, do not store the portalter in the locked
position. This will avoid unnecessary wear to the seal.
Important: Never wash the loose parts or accessories in the dishwasher. Hand
wash only!
15. Descaling the Machine
When making espresso always use cold, clean water. Using spring water or ltered water
will slow down calcium build up. We recommend descaling the machine after 100-200
uses or at least every 2-3 months. Empty the water tank and ll the tank with a mixture
composed of 30 oz. of water and one packet of Capresso Cleaning Solution or similar
descaling agent.
NOTE: Do not use vinegar as this will considerably shorten the life of the seal inside the
brew head.
Descaling the Brew Head
a) Remove the portalter.
b) For best results unscrew the screen inside the brew head. Wipe any coee residue
with a damp cloth.
c) Fill the water tank with the descaling solution and water.
d) Place a large container beneath the brew head.
e) Press the 2-Cup indicator and allow water to ow into the container. Repeat this
process again then allow machine to sit for 15 minutes. Press the 2-Cup indicator
again to run more Cleaning Solution through the machine. Empty the container of
used Cleaning Solution.
Descaling the Steam Wand
f) Place the empty container under the steam wand.
g) Press the Hot Water indicator and turn the steam control knob to the open position.
Let the remainder of the Cleaning Solution ow through the steam wand into the
container and then turn the steam control knob to the closed position.
Rinsing the System
h) Remove the water tank and rinse thoroughly, then ll with fresh, cold water and
place back onto the machine.
i) Repeat above steps (d through g) with fresh, cold water.
j) Replace screen in the brew head and tighten the screw securely.

14
16. Troubleshooting
Timer and indicator lights are blinking rapidly
• The machine has not been cooled down after frothing milk
Place an empty cup under the steam wand and turn the steam control knob to
the open position. Allow hot steam to be released from heating system. Once all
steam is released, turn the steam control knob to the closed position.
Water leaks from the bottom of the espresso machine.
• There is too much water in the drip tray.
Clean and dry the drip tray and replace.
• The machine has possible internal defect.
Contact Customer Service.
Coee runs down the side of the portalter.
• Portalter not properly inserted.
Turnthehandleoftheportalterfurthertotheright.
• Edge of sieve not free of ground coee.
TurnOFFtheappliance,removetheportalterandcleantheedgesofthesieve.
• Sealing ring inside brew head is dirty.
TurnOFFtheappliance,removetheportalterandbrewheadscreen(Fig.7)
and clean sealing ring with a hot damp cloth.CAUTION! HOT!
• Sealing ring no longer has elasticity.
Sealing ring must be replaced. Please contact Customer Service.
Very little or no coee ows through the portalter.
• No water in water tank.
Fill water tank with fresh, cold water.
• The screen inside the brew head is blocked.
Brewwaterthroughthescreenwithouttheportalterinserted.Ifnowater
comes through, unscrew the screen and clean and replace. See chapter 14.
• The sieve is blocked.
Cleanthesieve,insertintotheportalterandpumpwaterthroughwithout
coee.IfnowatercomesthroughthesievecallCustomerServicetoordera
replacement sieve.
Espresso brews out in slow drips.
• Coee grounds are too ne or packed down too rmly.
Donottampcoeegroundsashard.Useacoarsergrindofcoee.
• Machine blocked by calcium deposits.
Descale the appliance. See chapter 15.
No crema.
• Coee old or too dry.
Use fresh coee that is ground right before brewing.
• Water pushes through the coee too fast. Coee too coarse.
Use a ner grind. Use 1 scoop of ground coee per cup.

15
Acid (vinegar) taste in espresso coee.
• Did not fully rinse the system after descaling.
See chapter 15 for detailed instructions on rinsing the system after descaling.
• The coee is not fresh or of high quality.
Grindfreshwholebeancoeerightbeforebrewing.Afteropening,store
whole beans in a dark, air-tight container to maintain freshness. Use beans
within 1 week.
Espresso not hot enough.
• Prewarm cups and heating system.
Prewarm cups with hot water or on the cup warming tray. Purge brew head and
portalterimmediatelybeforebrewing.Dryportalterandsievebeforellingwith
groundcoee.Seechapter7.
Uneven cup lling.
• Outlet in sieve or portalter is blocked.
Removesievefromportalter.Cleanwithstibrush.Cleanportalter.
• Uneven dosing of ground coee into sieve.
Evenlydistributethenelygroundcoeeintothesieve.
Loud pump noise/no water from brew head.
• No water in water tank.
Fill water tank with fresh, cold water.
• Air blockage in pump.
Fill tank with fresh water, and run pump in intervals using the Hot Water function.
If no liquid pumps through the machine after numerous attempts, contact
Customer Service.
• Water tank is not in the correct position.
Pushdownrmlyonwatertanksoitisfullyengagedtothevalve.
No steam produced from the frothing wand.
• The Steam indicator is not selected.
Ensure you push the Steam indicator prior to opening the steam control knob.
• Steam wand is blocked by milk or calcium deposits.
Turn machine OFF. Carefully use a needle to loosen the milk residue. See
chapter 14 for cleaning the steam wand.
Not enough froth when frothing milk.
• Milk not fresh.
Use the freshest milk possible. Do not use milk that has been opened for a
fewdaysasthiscanaectthequalityoffroth.
• Milk not suitable.
Non-dairy, organic and ultra-pasteurized milks do not froth as well as fresh,
dairy milk.
• Milk was too warm before frothing began.
Use cold, refrigerated milk preferably at 34°F. Use a cold, stainless steel
frothing pitcher.

1-800-767-3554
Mon-Thu 8AM – 9PM • Fri 8AM – 8PM • Sat 9AM – 5PM
Eastern Time Zone
JURA Inc.
20 Craig Road, Montvale, NJ 07645
201-767-3999 • Fax: 201-767-9684
www.capresso.com
Customer Service
This warranty covers your CAPRESSO machine, model #129.05 Café TS
Touchscreen Espresso Machine. The model # can be found on the bottom
of the machine. This warranty is in eect for one year from the date of the
rst consumer purchase. This warranty covers all defects in materials or
workmanship (parts and labor).
This warranty does not cover:
• Any machine not purchased from an Authorized CAPRESSO Dealer.
• Commercial use of machine.
• Damage caused by accident, abuse, negligence, misuse, improper operation
or failure to follow instructions contained in this manual.
• Damaged caused to pump or ThermoBlock by running the machine
without water.
• Any service or alteration performed by an unauthorized person, company,
or association.
Other limitations and exclusions: Any implied warranties including tness
for use and merchantability are limited in duration to the period of the express
warranty set forth above and no person is authorized to assume for JURA
any other liability in connection with the sale of the machine. JURA expressly
disclaims liability for incidental and consequential damages caused by the
machine. The term “incidental damages” refers to the loss of the original
purchasers’ time, loss of the use of the machine or other costs relating to the
care and custody of the machine. The term “consequential damages” refers to
the cost of repairing or replacing other property which is damaged when this
machine does not work properly. The remedies provided under this warranty are
exclusive and in lieu of all others. This warranty gives you specic legal rights,
and you may also have other rights which vary from state to state.
LIMITED ONE-YEAR WARRANTY