Loading ...
Loading ...
Loading ...
T
I
M
E
R
N
I
G
H
T
L
I
G
H
T
/
S
L
E
E
P
M
IS
T
+
/
-
O
N
/
O
F
F
H
U
M
I
D
IS
T
A
T
15S
3
15-20
minutes
4
5
6
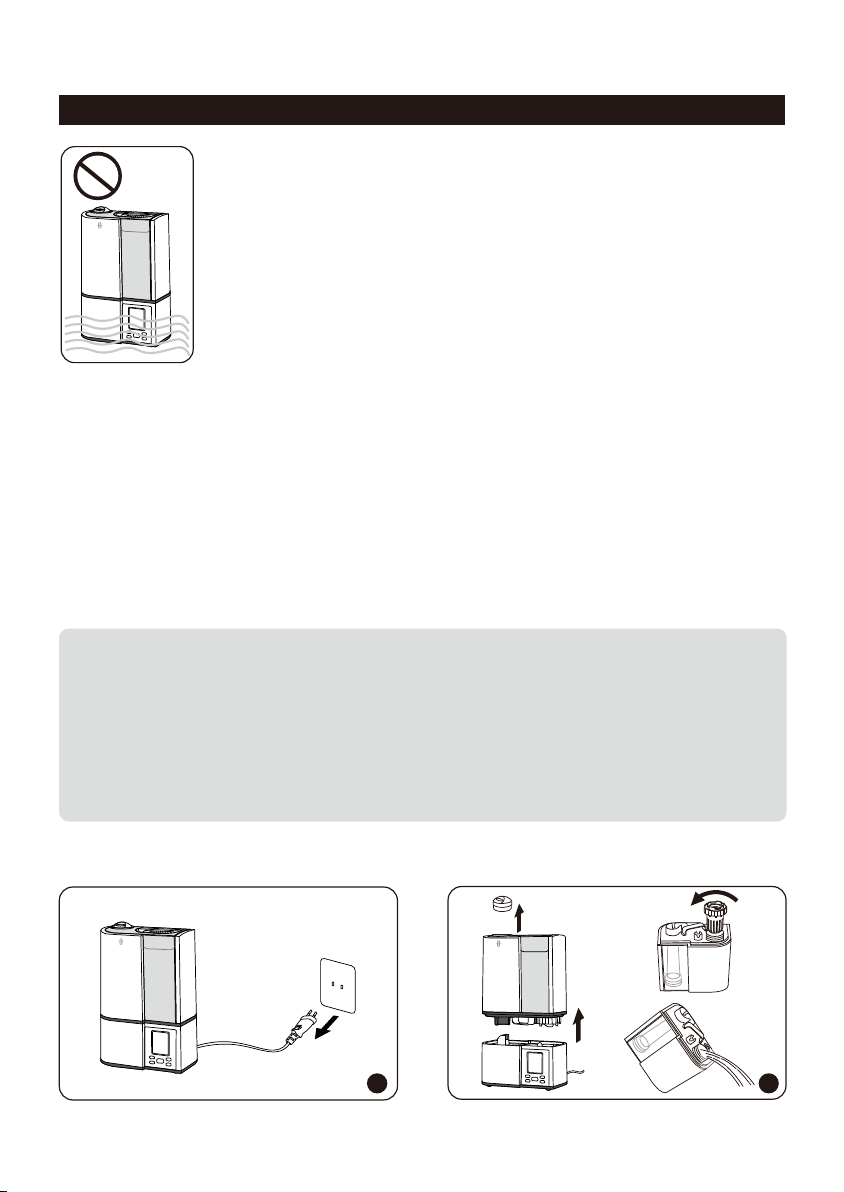
1. Turn off and unplug the humidier. Remove the nozzle.
2. Remove the water tank from the base. Remove the tank cap. Make sure that the white
sealing ring does not come off. Drain water from the water tank and base. Remove any
accessories and set aside.
3. Fill the water tank half full. Add in 1 teaspoon of undiluted distilled white vinegar. Attach the
tank cap and shake for 15 seconds.
4. Place the tank onto the base. The vinegar solution will enter the water reservoir to loosen
mineral buildup (scale) on the atomizer, water oater and the bottom of the water tank. Set
still for 15-20 minutes.
5. Uncap the tank cap and drain the solution. Wipe the atomizer and oater with a soft cloth
to remove loosened mineral deposits.
6. Rinse both the water reservoir and water tank until the smell of vinegar (for scale removal)
or bleach solution (for disinfecting, see below) is gone.
CLEANING AND MAINTENANCE
Caution
1. DO NOT submerge the base in water.
2. Make sure water does not enter the base through the air outlet, air inlet,
or the control buttons and LED display.
3. DO NOT wash any part of this humidier in dish washer which will
damage the humidier and void the warranty.
T
I
M
E
R
N
I
G
H
T
L
I
G
H
T
/S
L
E
E
P
M
I
S
T
+
/
-
O
N
/
O
F
F
H
U
M
I
D
I
S
T
A
T
Daily Maintenance
Turn off the humidier, unplug it from the power source. Drain water from the tank, reservoir
and base.
Weekly Maintenance
1. To properly clean your humidier, we recommend you to remove scale and disinfect the
humidier separately.
2. DO NOT mix vinegar and bleach solutions together. Do not use more than 1 tsp. of
bleach per gallon of water to avoid damaging your humidier.
3. Please make sure the rubber ring & rubber cap & spring on the tank cap is installed
properly after cleaning to avoid water leakage. Please refer to the diagram on page 14.
1 2
Scale Removal Instructions
12
11
T
I
M
E
R
N
I
G
H
T
L
IG
H
T
/S
L
E
E
P
M
I
S
T
+
/
-
O
N
/
O
F
F
H
U
M
I
D
I
S
T
A
T
T
I
M
E
R
N
I
G
H
T
L
I
G
H
T
/
S
L
E
E
P
M
IS
T
+/
-
O
N
/
O
F
F
H
U
M
I
D
I
S
T
A
T
T
I
M
E
R
N
I
G
H
T
L
IG
H
T
/S
L
E
E
P
M
IS
T
+
/-
O
N
/
O
F
F
H
U
M
I
D
I
S
T
A
T
T
I
M
E
R
N
I
G
H
T
L
I
G
H
T
/
S
L
E
E
P
M
I
S
T
+
/
-
O
N
/
O
F
F
H
U
M
I
D
I
S
T
A
T
T
I
M
E
R
N
I
G
H
T
L
I
G
H
T
/S
L
E
E
P
M
IS
T
+
/-
O
N
/
O
F
F
H
U
M
ID
I
S
T
A
T
Loading ...
Loading ...
Loading ...