Loading ...
Loading ...

3
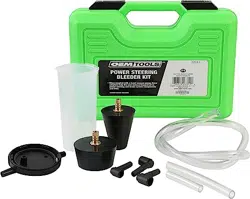
Operating Instructions and Parts Manual 27311
POWER STEERING AND BRAKE
AIR BLEED ADAPTER KIT
11/16
2016 OEMTOOLS
®
31. The manufacturer declines any and all responsibility for damage
to vehicles or components if said damage is the result of unskillful
handling by the operator or of failure to observe the basic safety
rules set forth in the instruction manual.
32. Used oil, antifreeze, brake fluid and transmission fluid contains
chemical compounds that can be harmful to humans and other
animals. When managed properly, used oil may again be of
beneficial use. Used oil may be blended and recycled as a heating
or industrial fuel and also may be re-refined and made into new
lubricants. Persons who perform maintenance on their own
vehicles are responsible for managing the used fluids in a manner
that is protective of human health and the environment and to
follow all local laws and regulations concerning their disposal.
DISPOSAL
At the end of the useful life of the OEMTOOLS
®
Power Steering
and Brake Air Bleed Adapter Kit, dispose of the components
according to all state, federal and local regulations.
PURPOSE
When coupled with a hand vacuum pump, these adapters allow
user to help remove trapped air in Power Steering and Brake
System components and lines.
PRODUCT SPECIFICATIONS
Reservoir Capacity: 4 oz.
POWER STEERING VACUUM BLEED PROCEDURE
1. Check and fill the pump reservoir.
2. Attach the 3-1⁄2" Clear Hose to the bottom of the Fluid
Reservoir Cap.
3. Attach the Fluid Reservoir Cap to the Fluid Reservoir.
4. Using the 1-1/2" Clear Hose, connect Fluid Reservoir Cap to
user supplied Hand Vacuum Pump.
NOTE: It is important to connect the Vacuum Pump to the Fluid
Reservoir Cap port that is NOT connected to the dip tube port on
the bottom the Fluid Reservoir Cap.
5. Determine which Rubber Stopper best fits your Power
Steering Pump Reservoir. Insert the Rubber Stopper tightly
into the Pump Reservoir fill neck.
6. Using the 24" Clear Hose, connect Fluid Reservoir assembly to
the Rubber Stopper.
WARNING
Make sure hose and pump are clear of all belts and other moving
engine parts before starting engine.
NOTE: When applying vacuum a small amount of fluid may collect
in the Fluid Reservoir. Be sure to monitor Fluid Reservoir and do
not allow fluid to completely fill the Reservoir.
NOTE: DO NOT allow fluid to be drawn into the Hand Vacuum
Pump. Damage to the Hand Vacuum Pump will occur.
NOTE: Be sure to hold the Vacuum Pump and Fluid Reservoir in
a vertical position. Otherwise fluid may bypass the Reservoir and
damage the Hand Vacuum Pump.
7. Apply 15" Hg. vacuum to the Power Steering Pump Reservoir
with the engine idling. Cycle the steering wheel from lock-
to-lock every 30 seconds for approximately five minutes. Do
not hold the steering wheel on stops while cycling. Be sure
to monitor the Vacuum Pump Gauge and maintain adequate
vacuum as the air purges.
8. Release the vacuum and remove the Rubber Stopper from
the Power Steering Pump Reservoir. Add additional fluid if
necessary and reinstall the Power Steering Pump Reservoir
Cap.
9. Restart the engine, cycle steering wheel and check for fluid
leaks.
NOTE: In severe cases of aeration, it may be necessary to repeat
this procedure several times.
BRAKE BLEEDING PROCEDURE
1. Assemble the components as above, attaching the Brake
Bleeder Adapter that best fits your bleeder screw.
2. Ensure the Master Cylinder is full of clean brake fluid.
NOTE: It is important to closely monitor the brake fluid level in
the master cylinder when bleeding brakes. If the brake master
cylinder reservoir is completely drained, you run the risk of
introducing additional air into the system.
3. Connect the Brake Bleeder Adapter to the bleeder screw
farthest from the master cylinder. On most vehicles this will be
the right rear.
4. Open bleeder screw and pump the Hand Vacuum Pump 10 to
15 times.
NOTE: DO NOT allow fluid to be drawn into the Hand Vacuum
Pump. Damage to the Hand Vacuum Pump will occur.
NOTE: Be sure to hold the Vacuum Pump and Fluid Reservoir in
a vertical position. Otherwise fluid may bypass the Reservoir and
damage the Hand Vacuum Pump.
5. After filling the Reservoir with about 2" of fluid, close the
bleeder screw and refill the master cylinder.
6. Drain the old fluid from the Reservoir.
7. Repeat the process until you see clean fluid with no bubbles
passing through the hose.
8. Repeat the entire process on each bleeder screw working
your way closer to the master cylinder each time.
Loading ...