@
Gas
Slide-in models
gas
Modelos deslizables
Models, Modelos 790.3667"I."
.,. = Color number, numero de color
0 0 0 0
!ii...............
Sears Roebuck and Co., Hoffman Estates, mL (}0179 U.S.A.
www, sears°com
P/N 318200877 RevoB (0410)
TabRe of Contents
Slide-in RangeWarranty .................................................. 2
Product Record ................................................................ 2
mMPORTANT SAFETY mNSTRUCTmONS......................... 3-5
Protection Agreements .................................................... 6
Grounding mnstructione ................................................... 7
Conversion to Liquified Petroleum Gas (or L.P. Gas) .... 7
Range Features ................................................................ 8
Setting Surface ControJs ............................................ 9-11
Before Setting Oven Controls ........................................ 12
Air circuJation in the Oven ............................................ 12
Control Pad Functions ................................................... 13
For a sitent controJ panel .............................................. 13
Temperature Conversion ................................................ 13
Setting Oven Controls ............................................... 14-19
Seff-CJeaning .............................................................. 20-21
General Cleaning ....................................................... 22-26
AdjustingYour Oven Temperature ................................. 26
BeforeYou Call ........................................................... 27-28
Notes ............................................................................... 29
Sears Service ................................................................. 30
Espa5ol .......................................................................... 31
Slide-In Range Warranty
ONE-YEAR FULL WARRANTY ON ALL PARTS
For one year from the date of purchase, when installed and operated according to the Installation Instructions and Use &
Care Guide, if any part of this appliance fails due to a defect in material or workmanship, Sears will repair or replace it, at
our option, free of charge,
ADDITIONAL FOUR-YEAR LIMITED WARRANTY ON APPLIANCE PARTS
For the second through the fifth year from the date of purchase, when installed and operated according to the
Installation Instructions and Use & Care Guide, Sears will supply the following appliance parts free of charge if they
fait for the reasons listed betow. Customer must pay tabor cost of installation.
o Cooktop glass if it fails due to thermal shock
o Cooktop cooking elements if they are defective
o Rubber seal if it cracks between the cooktop glass and the porcelain edge,
What Sears wilt not cover:
o Failure of the product if it is abused, misused, or used for other than the intended purpose,
o Damage to the cooktop glass caused by the use of cleaners or utensils other than the recommended cleaning cream
and tools,
o Damage to the cooktop glass caused by hardened spills of sugary materials (including starches from vegetables or
pastas) or melted plastic that are not cleaned off according to the directions in the Use & Care Guide.
o Repairs to parts or systems resulting from unauthorized modifications made to the appliance.
if this product is subjected to other than private residential use, all warranty coverage is effective for only 90 days.
WARRANTY SERWCE IS AVAILABLE BY CONTACTING SEARS AT 1-800-4-MY-HOME@.
This warranty gives you specific legal rights, and you may also have other rights which van, from state to state.
Sears, Roebuck and Co., Dept. 817WA, Hoffman Estates, IL 601790179
Product Record
in this space below, record the date of purchase, model and serial number of your
product. You will find the model and serial number printed on the serial plate.
Model No, 790.
Serial No,
Date of purchase
Save these instructions and your sales receipt for future reference.
P_ease carefully read and save these instructions
This Use & Care Manual contains general operating instructions for your appliance
and feature information for several models, Your product may not have all the
described features, The graphics shown are representative,The graphics on your
appliance may not look exactly like those shown, Common sense and caution must
be practiced when installing, operating and maintaining any appliance,
Seria P ate Location
Printed in United States 2
important Safety instructions
Read aH instructions before using this appliance.
Save these instructions for future reference.
This manuaUcontains important safety symboUsand instructions. Please pay attention to these symbols and follow all
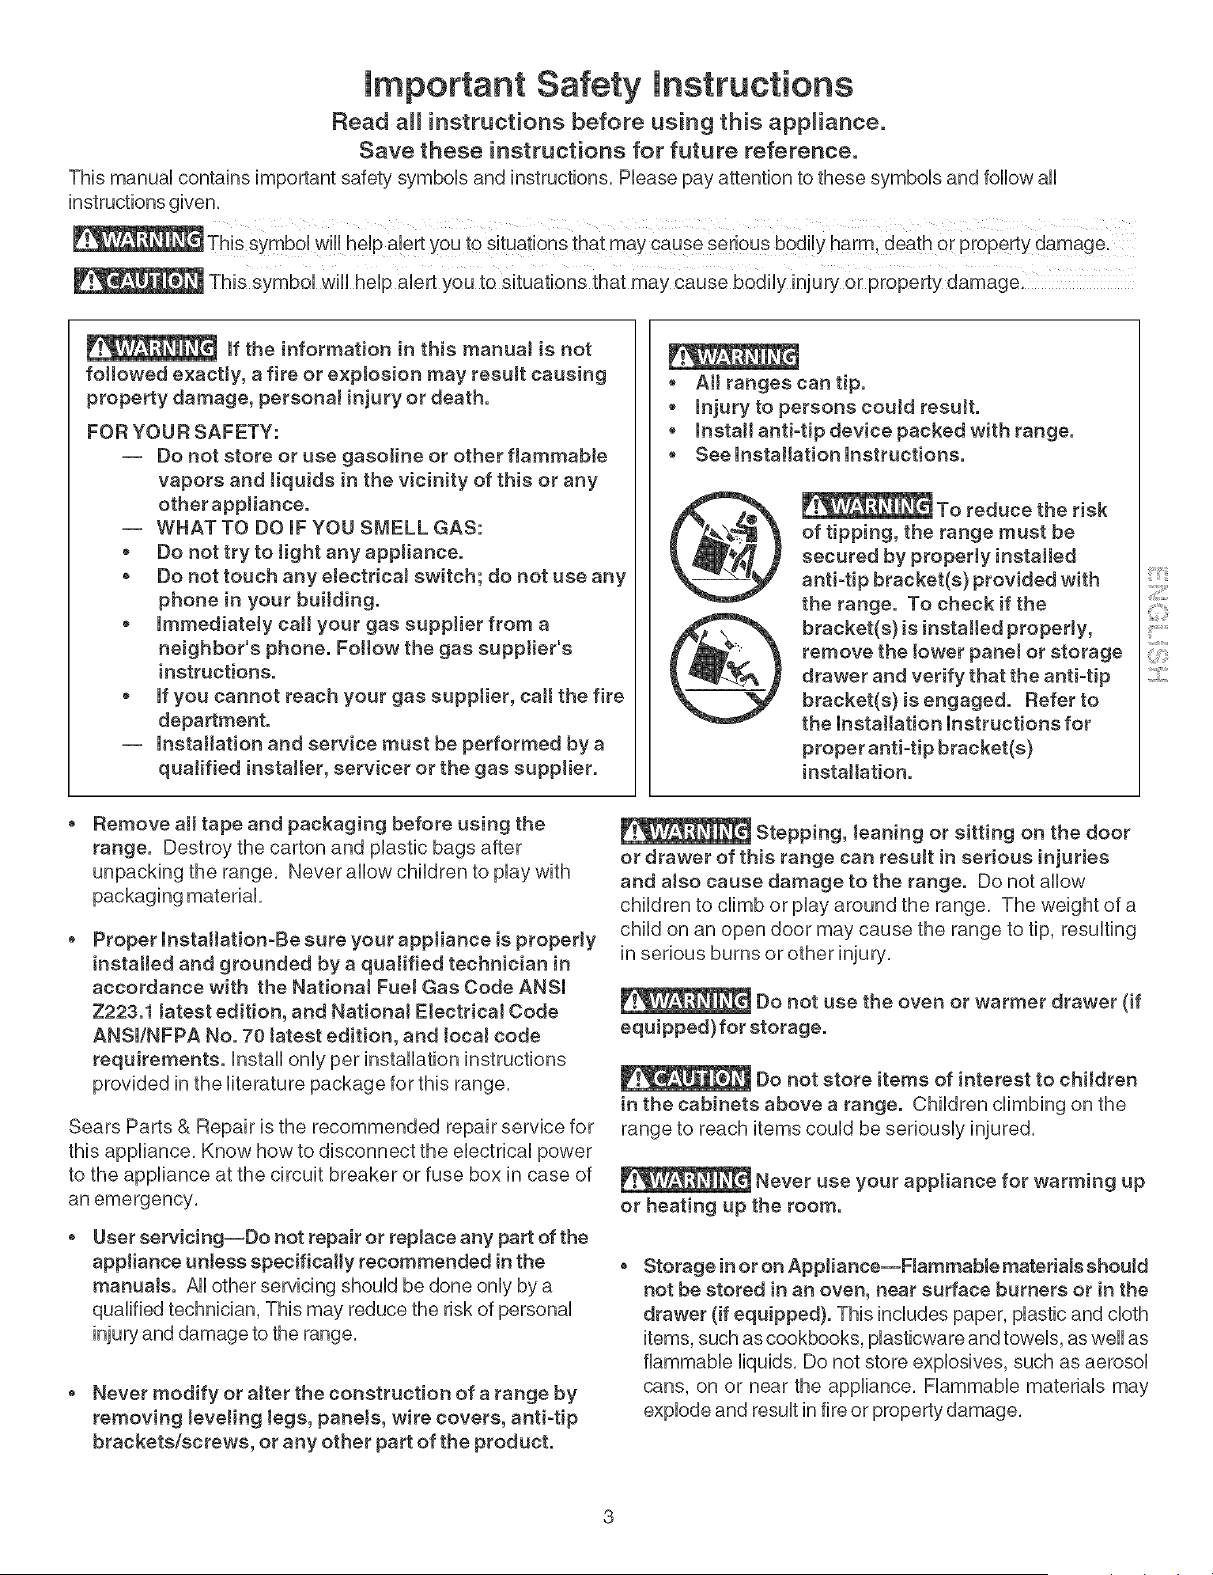
if the information in this manual is not
fotlowed exactly, a fire or e×plosion may result causing
property damage, personal injury or death.
FOR YOUR SAFETY:
-- Do not store or use gasoline or other flammable
vapors and tiquids in the vicinity of this or any
otherappliance.
-- WHAT TO DO IF YOU SMELL GAS:
, Do not try to tight any appliance.
o Do not touch any electricaI switch; do not use any
phone in your building.
, immediately call your gas supplier from a
neighbor's phone. Foltow the gas supptier's
instructions.
, if you cannot reach your gas supplier, calt the fire
department.
-- Installation and service must be performed by a
quaJified installer, servicer or the gas supplier.
o AJl ranges can tip.
o injury to persons could result.
o Install anti-tip device packed with range.
, SeelnstaJlationinstructions.
To reduce the risk
of tipping, the range must be
secured by property installed
anti-tip bracket(s) provided with
the range. To check if the
bracket(s) is installed properly,
remove the lower panel or storage
drawer and verify that the anti-tip
bracket(s) is engaged. Refer to
the Installation Instructions for
proper anti-tip bracket(s)
installation.
Remove all tape and packaging before using the
range. Destroy the carton and plastic bags after
unpacking the range. Never allow children to play with
packaging material.
Proper Installation-Be sure your appJiance is properly
installed and grounded by a qualified technician in
accordance with the NationaJ FueI Gas Code ANSI
Z223.1 tatest edition, and NationaI Electrical Code
ANSl/NFPA No. 70 tatest edition, and locaJ code
requirements. Install only per installation instructions
provided in the literature package for this range.
Sears Parts & Repair is the recommended repair service for
this appliance. Know how to disconnect the electrical power
to the appliance at the circuit breaker or fuse box in case of
an emergency.
User servicing--Do notrepair or replace any part of the
appliance unlessspecifically recommended inthe
manuaJs. All other servicing should be done only by a
qualified technician, This may reduce the risk of personal
injury and damage to the range.
o Never modify or aJter the construction of a range by
removing teveling Jegs, panets, wire covers, anti-tip
brackets/screws, or any other part of the product.
Stepping, teaning or sitting on the door
or drawer of this range can resuJt in serious injuries
and also cause damage to the range. Do not allow
children to climb or play around the range. The weight of a
child on an open door may cause the range to tip, resulting
in serious burns or other injury.
Do not use the oven or warmer drawer (if
equipped) for storage.
Do not store items of interest to children
in the cabinets above a range. Children climbing on the
range to reach items could be seriously injured.
Never use your appliance for warming up
or heating up the room.
Storage inor on Appliance--FJammaMe materials should
not be stored in an oven, near surface burners or in the
drawer (if equipped). This includes paper, plastic and cloth
items, such as cookbooks, plasticware and towels, as well as
flammable liquids. Do not store explosives, such as aerosol
cans, on or near the appliance. Flammable materials may
explode and result in fire or property damage.
important Safety instructions
Do not leave children alone--Children should not be
teft alone or unattended in the area where appliance
is in use. They shouUd never be aUUowedto sit or stand
on any part of the appliance,
DO NOTTOUCH SURFACE BURNERS, AREAS NEAR
THESE BURNERS, OVEN BURNERS OR iNTERiOR
SURFACES OF THE OVEN. Both surface burners and
oven burners may be hot even though flames are not
visible, Areas near surface burners may become hot
enough to cause burns, During and after use, do not
touch, or let clothing or other flammable materials touch
these areas until they have had sufficient time to cool,
Among these areas are the cooktop, surfaces facing the
cooktop, the oven vent openings and surfaces near
these openings, oven door and window,
mMPORTANT mNSTRUCTmONS FOR USmNG
YOUR COOKTOP
Use proper flame size--Adjust flame size
so it does not extend beyond the edge of the utensil, The
use of undersized utensils will expose a portion of the
burner flame to direct contact and may result in ignition of
clothing, Proper relationship of utensil to flame will also
improve efficiency,
Do not use stove top grills on the burner
grates of sealed gas burners, If you use a stove top grill on
a sealed gas burner, it will cause incomplete combustion
and can result in exposure to carbon monoxide levels above
allowable current standards, This can be hazardous to your
health,
Wear proper apparel--Loose-fitting or hanging
garments should never be worn white using the
appliance. Do not let clothing or other flammable
materials contact hot surfaces,
Do not use water or flour on grease fires--Smother
the fire with a pan tid, or use baking soda, a dry
chemicaJ or foam-type extinguisher.
Know which knob controls each surface burner.
Place a pan of food on the burner before turning it on,
and turn the burner off before removing the pan,
Atways turn the knob to the full LITE position when
igniting top burners. Visually check that burner has lit,
Then adjust the flame so it does not extend beyond the
o When heating fat or grease, watch it ctoseJy. Fat or
grease may catch fire if allowed to become too hot,
in case of fire or gas leak, be sure to turn
off the main gas shutoff vaJve.
Use onty dry pothoJders--Moist or damp potholders
on hot surfaces may result in burns from steam. Do
not let potholders touch hot heating burners, Do not use
a towel or other bulky cloth instead of a potholder,
o Do not heat unopened food containers--Buildup of
pressure may cause container to burst and result in
injury.
o Remove the oven door from any unused range if it is
to be stored or discarded.
IMPORTANT--Do not attempt to operate the oven during
a power failure. If the power falls, aJways turn off the
oven, If the oven is not turned off and the power resumes,
the oven may begin to operate again, Once the power
resumes, reset the clock and oven function,
EJectronic controllers can be damaged
by cotd temperatures. When you use your appliance for
the first time, or if it has not been used for a tong
period of time, make sure that it has been exposed to a
temperature above 0°C/32°F for at teast 3 hours before
connecting it to the power supply.
Use proper pan size. This appliance is equipped with
one or more surface burners of different sizes, Select
utensils having flat bottoms large enough to cover the
surface burner, The use of undersized utensils will
expose a portion of the surface burner to direct contact
and may result in ignition of clothing, Proper relationship
of utensil to the surface burner will also improve
efficiency,
Utensil handles shouJd be turned inward and not
extend over adjacent surface burners, To reduce the
risk of burns, ignition of flammable materials, and
spillage due to unintentional contact with the utensil, the
handle of the utensil should be positioned so that it is
turned inward, and does not extend to adjacent surface
burners,
Never Jeave surface burners unattended at high heat
settings--Boilovers cause smoking and greasy
spillovers that may ignite, or a pan that has boiled dry
may melt,
Protective liners--Do not use aluminum foil to line
surface burner pans, or oven bottom, except as
suggested in this manual. Improper installation of these
liners may result in risk of electric shock, or fire.
Gtazed cooking utensils--Only certain types of glass,
glass/ceramic, ceramic, earthenware, or other glazed
utensils are suitable for rangetop service without
breaking due to the sudden change in temperature
Check the manufacturer's recommendations for cooktop
use,
important Safety instructions
Do not use Searing Grill on the cooktop. The searing
grill is not designed for use on the cooktop, Doing so
may resuit in a fire,
Do not use decorative surface burner covers, Hfa
burner is accidentaliy turned on, the decorative cover wHi
o Do not touch a hot Hght buJb with a damp ctoth. Doing
so couid cause the bud to break, Disconnect the
appliance or turn off the power to the appliance before
removing and repiacing HightbuD,
mMPORTANT mNSTRUCTmONS FOR CLEANmNG
become hot and possibiy merit, Burns wHi occur if the hot YOUR RANGE
covers are touched, Damage may aiso be done to the
cooktop or burners because the covers may cause
overheating, Air wHi be Mocked from the burner and
cause combustion probiems,
FOR GLASS COOKTOPS ONLY
o Do not cJean or operate a broken cooktop--if cooktop
shouid break, cieaning solutions and spillovers may
penetrate the broken cooktop and create a risk of electric
shock, Contact a qualified technician immediately,
o Clean cooktop gtass with caution--if a wet sponge or
cioth is used to wipe spilis on a hot cooking area, be
carefui to avoid a steam burn, Some cieaners can
produce harmfui fumes if appiied to a hot surface,
o Avoid scratching the cooktop glass with sharp
objects.
, Ctean the range regularly to keep aH parts free of
grease that could catch fire. Exhaust fan ventilation
hoods and grease fiiters shouid be kept dean, Do not
allow grease to accumulate on hood or fiiter, Greasy
deposits in the fan couid catch fire, When you are flaming
food under the hood, turn the fan on, Refer to the hood
manufacturer's instructions for cieaning,
SELF-CLEANmNG OVENS
, mnthe serf-Cleaning cycte only cJean the parts listed in
this Use and Care Guide. Before seif-cieaning the oven,
remove the broiler pan and any utensiis or foods from the
oveR,
o Do not use oven cJeaners--No commerciai oven cieaner :
or oven iiner protective coating of any kind shouid be [
used in or around any part of the oven,
mMPORTANT mNSTRUCTmONS FOR USmNG
YOUR OVEN
Use care when opening oven door or warmer drawer
(if equipped)--Stand to the side of the range when
opening the door of a hot oven, Let hot air or steam
escape before you remove or repiace food in the oven/
warmerdrawer,
o Keep oven vent ducts unobstructed. The oven vent is
iocated at the center rear of the cooktop, Touching the
surfaces in this area when the oven is operating may
cause severe burns, Aiso, do not piace piastic or heat°
sensitive items on or near the oven vent, These items
couid merit or ignite,
o PJacement of oven/warmer drawer (if equipped) racks.
Aiways piace oven racks in desired iocation while oven/
warmer drawer (if equipped) is cool if rack must be
moved while oven is hot use extreme caution, Use
pothoiders and grasp the rack with both hands to
reposition, Do not Metpothoiders contact the hot heating
elements in the oven/warmer drawer (if equipped),
Remove aimutensils from the rack before moving,
o Do not cJean door gasket--The door gasket is essential
for a good seal Care shouid be taken not to rub, damage
or move the gasket,
o Remove oven racks. Oven racks color wili change if Heft
in the oven during a self-cleaning cycle,
The health of some birds is extremely
sensitive to the fumes given off during the serf-charting
cycJe of the range. Move the birds to another well
ventilated room.
mmportant Safety Notice
The California Safe Drinking Water and Toxic Enforcement
Act requires the Governor of California to pubiish a iist of
substances known to the state to cause cancer, birth
defects or other reproductive harm, and requires businesses
to warn customers of potentiai exposure to such
substances.
o Do not use the broiler pan without its insert. The
broiler pan and its insert allow dripping fat to drain and be
kept away from the high heat of the broiler,
o Do not cover the broiler insert with aJuminum foit.
Exposed fat and grease could ignite.
PROTECTION AGREEMENTS
h the U.S.A.
Master Protection Agreements
CongratuUations on making a smart purchase, Your new
Kenmore ®product is designed and manufactured for years
of dependabb operation, But Hke aft products, it may require
preventive maintenance or repair from time to time, That's
when having a Master Protection Agreement can save you
money and aggravation,
Purchase a Master Protection Agreement now and protect
yourself from unexpected hassle and expense.
The Master Protection Agreement aUsoheUpsextend the Hfe
of your new product, Here's what's incUudedin the
Agreement:
[Y_ Expert service by our 12,000 professionaU repair
speciafists
[_ Unlimited service and no charge for parts and labor on
aU[covered repairs
"Noqemon" guarantee- repUacement
of your covered product if four or more product failures
occur within twelve months
[_ Product replacement if your covered product can't be
fixed
[_ AnnuaJ Preventive Maintenance Check at your request
- no extra charge
[_ Fast hetp by phone- phone support from a Sears
technician on products requiring in-home repair, plus
convenient repair scheduling
[_ Power surge protection against electrical damage due
to power fluctuations
[_ RentaJ reimbursement if repair of your covered product
takes longer than promised
Once you purchase the Agreement, a simple phone call is
all that it takes for you to schedule service, You can call
anytime day or night, or schedule a service appointment
online,
In Canada
Maintenance Agreements
Your purchase has added value because you can depend
on Sears HomeCentraPfor sewice, With over 2400
Service Technicians and more than a million parts and
accessories, we have the tools, parts, knowledge and
skills to ensure our pledge: We Service What We Sell,
Your Kenmord_product is designed, manufactured
and tested to provide years of dependable operation, But
like all products, it may require service from time to time,
The Sears Maintenance Agreement offers you an
outstanding service program, affordably priced,
The Sears Maintenance Agreement:
is your way to buy tomorrow's service at today's price
Eliminates repair biffs resulting from normal wear and
tear
Provides phone support from a Sears technician on
products requiring
Even if you don't need repairs, provides an annual
Preventive Maintenance Check, at your request, to
ensure that your product is in proper running condition,
Some Jimitations apply. For more information about
Sears Canada Maintenance Agreements,
call 1-600-361-6665
Sears has over 12,000 professional repair specialists, who
have access to over 4,5 million quality parts and
accessories, That's the kind of professionalism you can
count on to help prolong the life of your new purchase for
years to come, Purchase your Master Protection Agreement
today!
Some limitations and exclusions apply,
For prices and additionaJ information call
1-800-827-6655.
Sears Installation Service
For Sears professional installation of home
appliances, garage door openers, water heaters,
and other major home items, in the U,S,A, carl
1-600-4-MY-HOME®
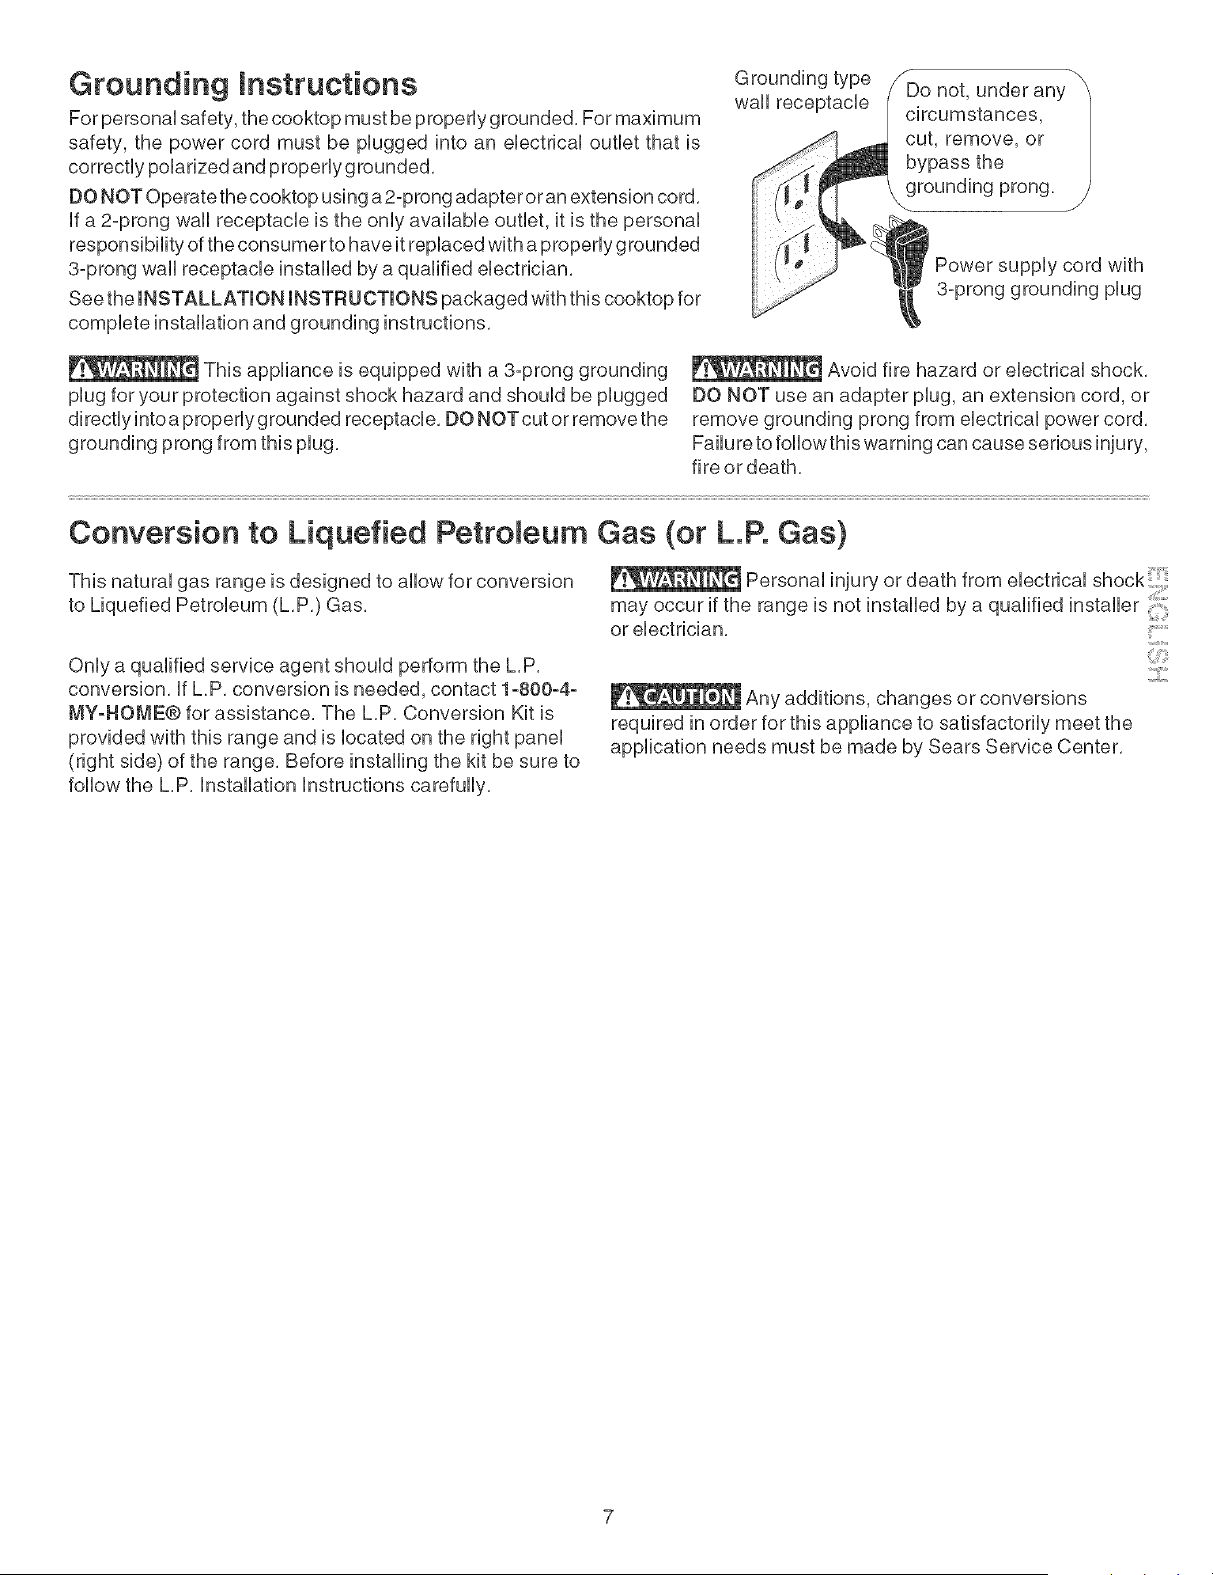
Grounding instructions
For personal safety, the cooktop must be propedy grounded, For maximum
safety, the power cord must be plugged into an ebctrbal outbt that is
correctly polarized and properly grounded.
DO NOT Operate the cooktop using a 2-prong adapter or an extension cord.
if a 2-prong wall receptacle is the only available outlet, it is the personal
responsibility of the consumer to have it replaced with a properly g rounded
3-prong wall receptacle installed by a qualified electrician.
See the INSTALLATION INSTRUCTIONS packaged with this cooktop for
complete installation and grounding instructions.
Grounding type Do not, under any "
wall receptacle
cut, remove, or
bypass the
grounding prong.
Power supply cord with
3°prong grounding plug
This appliance is equipped with a 3-prong grounding _ Avoid fire hazard or electrical shock.
plug for your protection against shock hazard and should be plugged DO NOT use an adapter plug, an extension cord, or
directlyintoaproperlygrounded receptacle. DONOTcutorremovethe remove grounding prong from electrical power cord.
grounding prong from this plug. Failu reto follow this warning can cause serious injury,
fire or death.
Conversion to Liquefied Petroleum Gas (or L.P. Gas)
This natural gas range is designed to allow for conversion
to Liquefied Petroleum (L.P.) Gas.
Only a qualified service agent should perform the L.P.
conversion, if L.P. conversion is needed, contact 1-800-4-
MY-HOME@ for assistance. The L.P. Conversion Kit is
provided with this range and is located on the right panel
(right side) of the range. Before installing the kit be sure to
follow the L.P. Installation instructions carefully.
or electrician.
Any additions, changes or conversions
required in order for this appliance to satisfactorily meet the
application needs must be made by Sears Service Center.
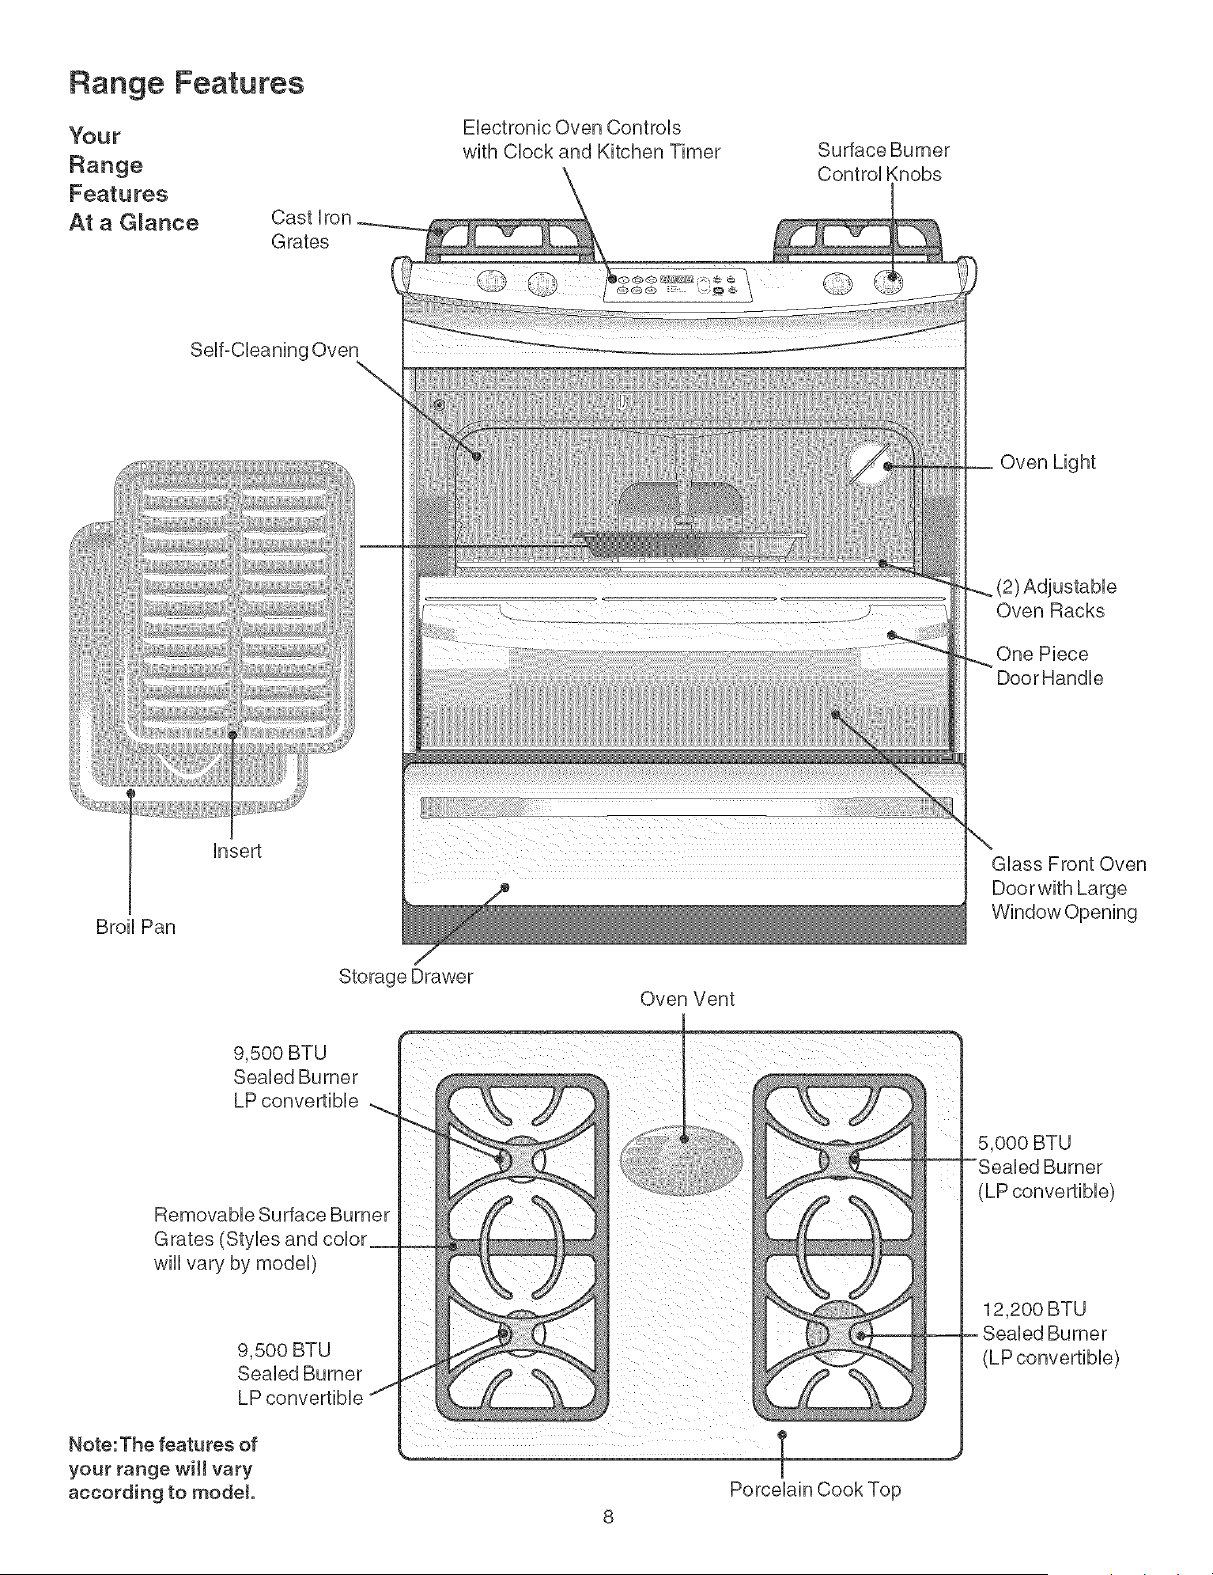
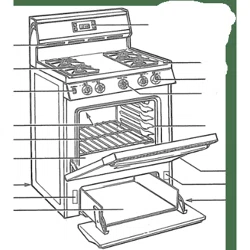
Range Features
Your
Range
Features
At a Gmance
Cast Iron
Grates
Ebctronb Oven ControUs
with Clock and Kitchen Timer
Surface Burner
ControUKnobs
SeUf-Cbaning Oven
\
Insert
BroH Pan
Storage Drawer
9,500 BTU
Sealed Burner
LP convertible
Removable Surface Burner
Grates (Styles and color
will vary by model)
9,500 BTU
Seabd Burner
LP convertible
Note: The features of
your range will vary
according to model.
Oven Vent
1'
m
Porcelain Cook Top
8
Oven Light
ustable
Oven Racks
One Piece
DoorHandb
Glass Front Oven
Doorwith Large
Window Opening
5,000 BTU
Burner
(LP convertible)
12,200 BTU
her
(LP convertibb)
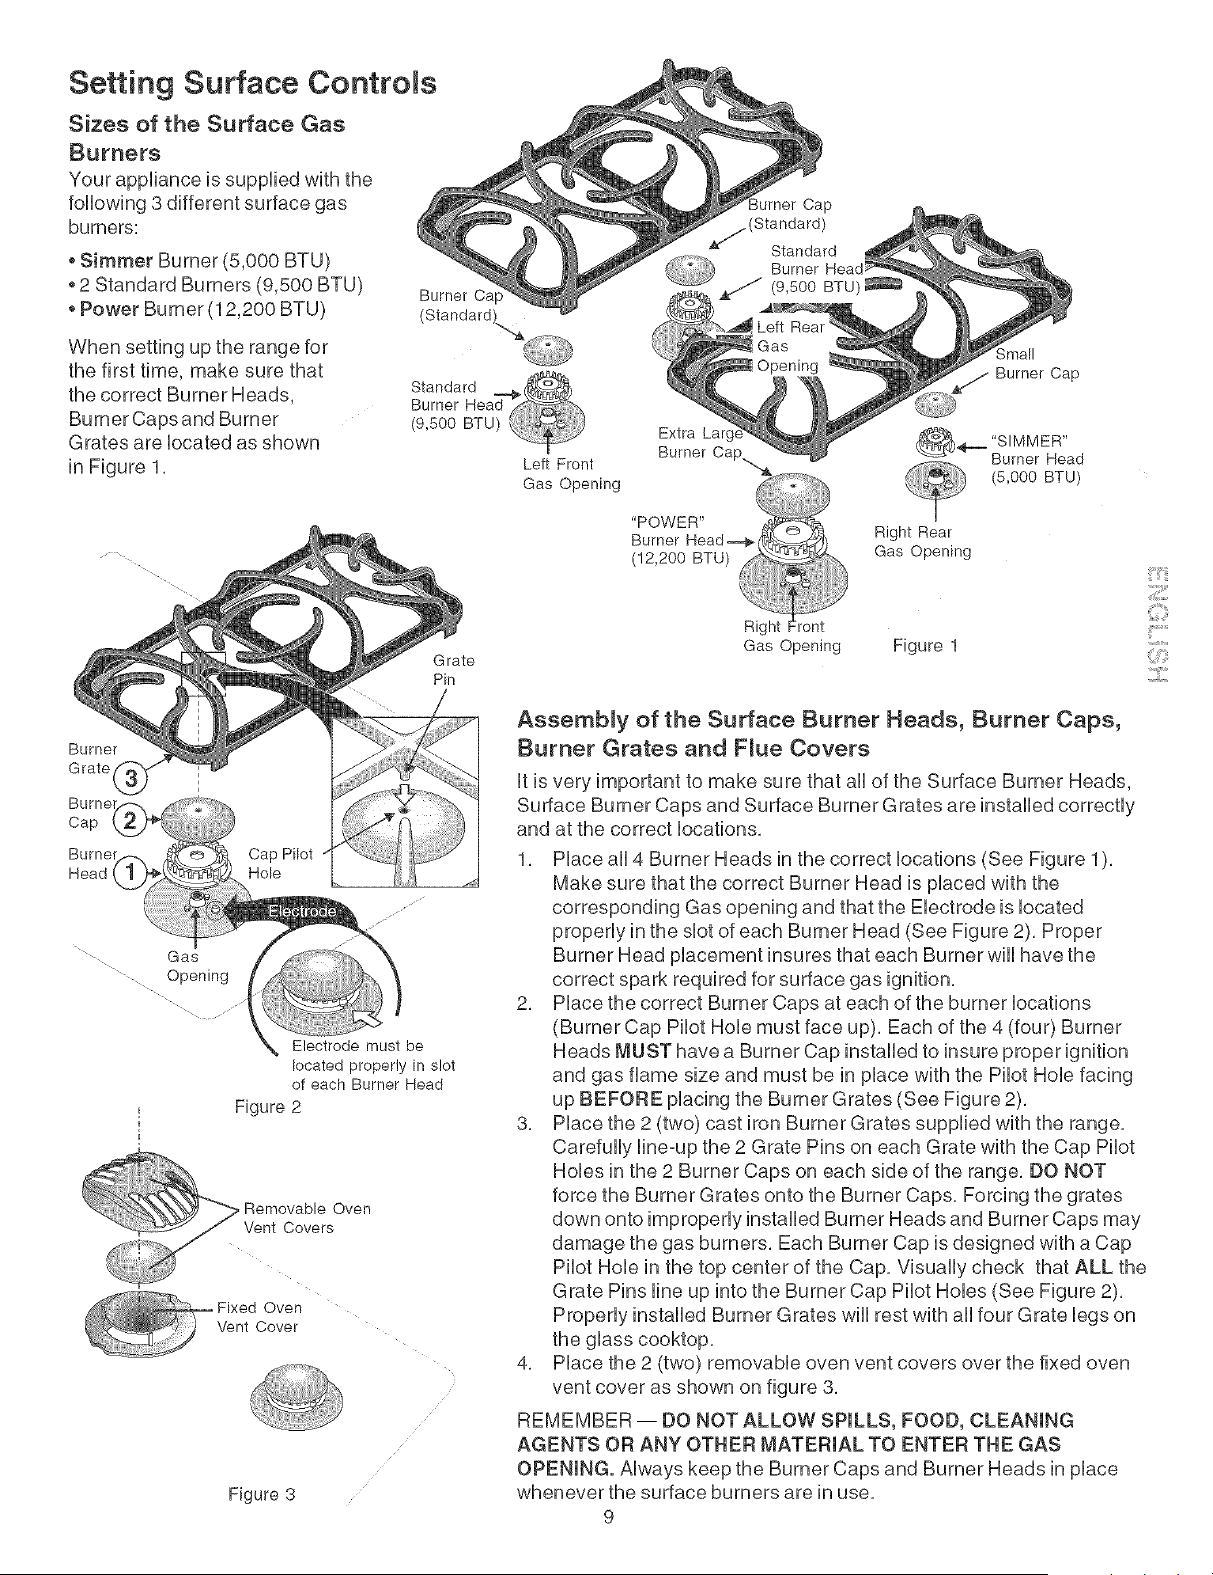
Setting Surface Controls
Sizes of the Surface Gas
Burners
Your appUiance is suppUied with the
foflowing 3 different surface gas
burners:
Simmer Burner (5,000 BTU)
2 Standard Burners (9,500 BTU)
Power Burner (12,200 BTU)
Burner Ca t
When setting up the range for
the first time, make sure that
the correct Burner Heads,
Grates are Uocated as shown
in Figure 1,
Grate
Pin
Burner
Grate
located properly in slot
of each Burner Head
Figure 2
Figure 3
Small
Burner Cap
Left Front
Gas Opening
Extra Lan
Burner Cap.
"POWER"
<_,_ S_MMER"
Burner Head
(5,000 BTU)
Right Rear
Gas Opening
Right
Gas Opening Figure 1
.......ii......
Assembly of the Surface Burner Heads, Burner Caps,
Burner Grates and F_ue Covers
It is very important to make sure that all of the Surface Burner Heads,
Surface Burner Caps and Surface Burner Grates are instafled correctUy
and at the correct Uocations,
1, PUaceaft 4 Burner Heads in the correct Uocations (See Figure 1),
Make sure that the correct Burner Head is placed with the
corresponding Gas opening and that the Electrode is located
properly in the slot of each Burner Head (See Figure 2), Proper
Burner Head placement insures that each Burner will have the
correct spark required for surface gas ignition,
2, Place the correct Burner Caps at each of the burner locations
(Burner Cap Pilot Hole must face up), Each of the 4 (four) Burner
Heads MUST have a Burner Cap installed to insure proper ignition
and gas flame size and must be in place with the Pilot Hole facing
up BEFORE placing the Burner Grates (See Figure 2),
3, Place the 2 (two) cast iron Burner Grates supplied with the range,
Carefully line-up the 2 Grate Pins on each Grate with the Cap Pilot
Holes in the 2 Burner Caps on each side of the range, DO NOT
force the Burner Grates onto the Burner Caps, Forcing the grates
down onto improperly installed Burner Heads and Burner Caps may
damage the gas burners, Each Burner Cap is designed with a Cap
Pilot Hole in the top center of the Cap, Visually check that ALL the
Grate Pins line up into the Burner Cap Pilot Holes (See Figure 2),
Properly installed Burner Grates will rest with all four Grate legs on
the glass cooktop,
4, Place the 2 (two) removable oven vent covers over the fixed oven
vent cover as shown on figure 3,
REMEMBER -- DO NOT ALLOW SPILLS, FOOD, CLEANING
AGENTS OR ANY OTHER MATERIAL TO ENTER THE GAS
OPENING. Always keep the Burner Caps and Burner Heads in place
whenever the surface burners are in use,
9
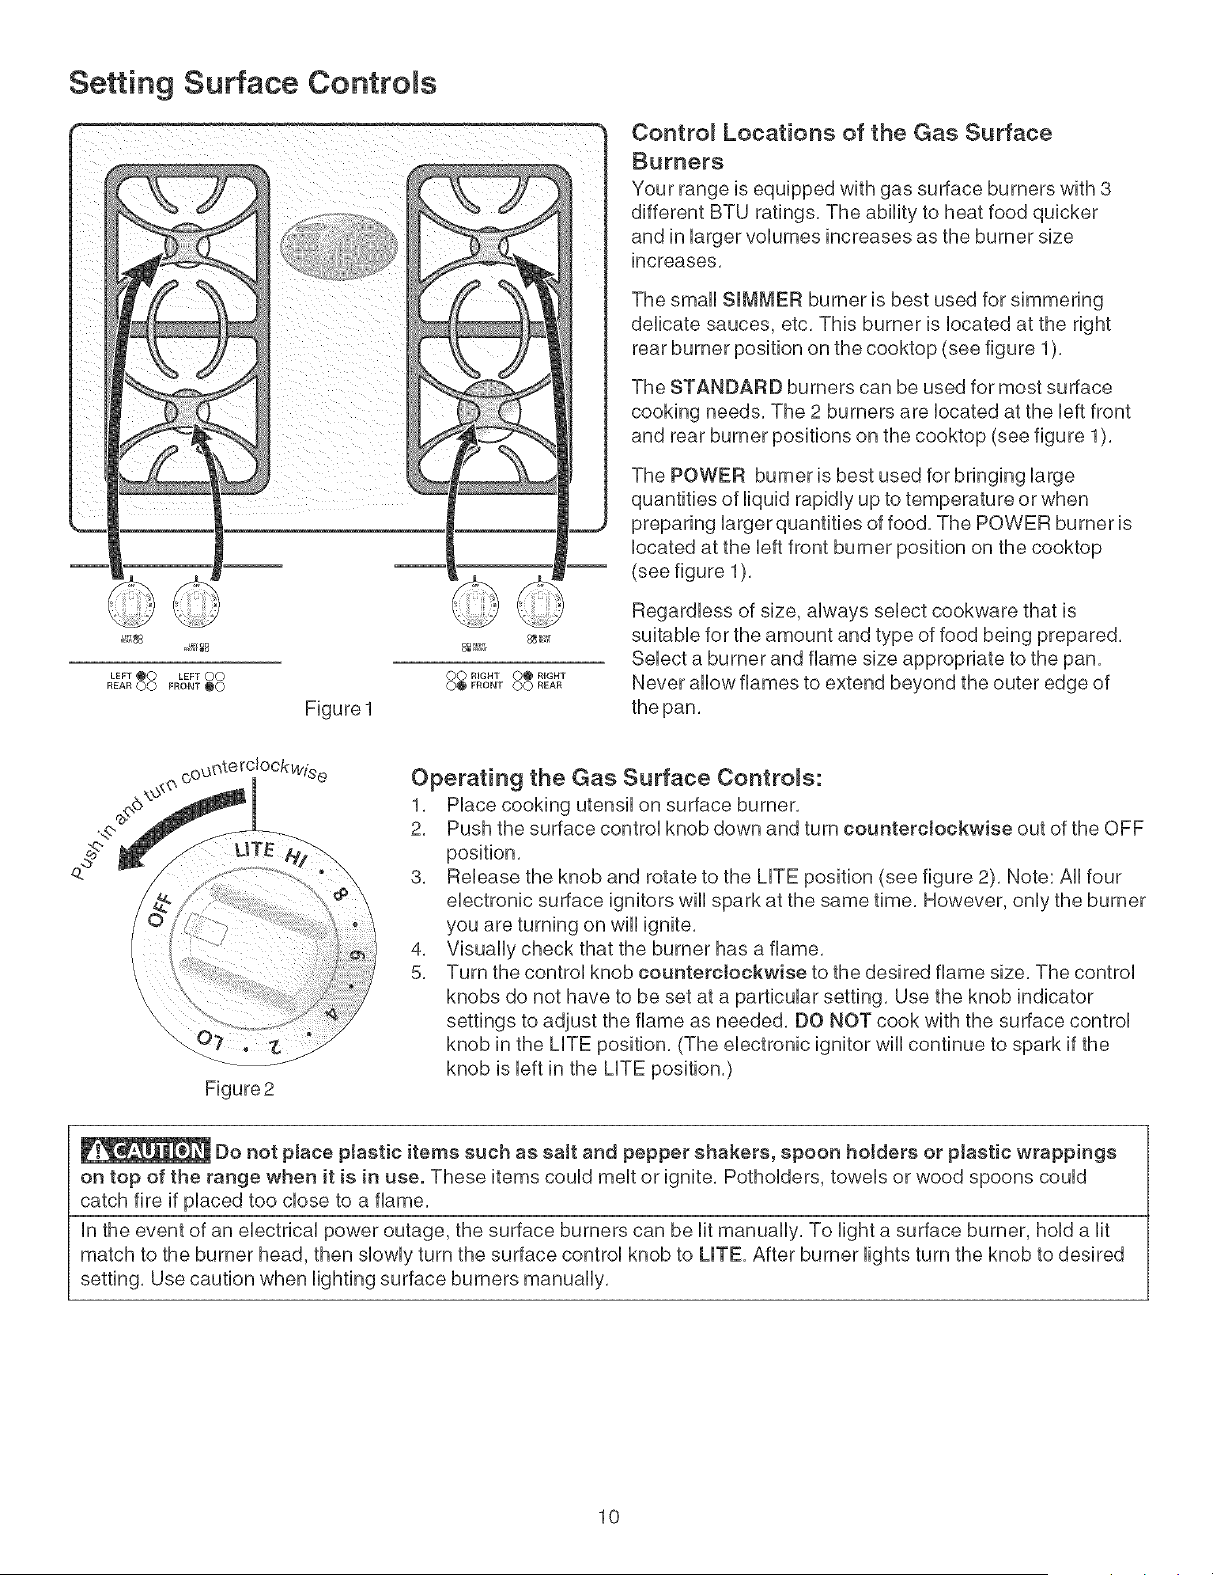
Setting Surface Controls
LEFT OO LEFT OO
REAR OO FRONT 00
Figure 1
OO RIGHT OO R{GHT
OO FRONT OO REAR
Contro_ Locations of the Gas Surface
Burners
Your range is equipped with gas surface burners with 3
different BTU ratings, The ability to heat food quicker
and in larger volumes increases as the burner size
increases,
The small SIMMER burner is best used for simmering
delicate sauces, etc, This burner is located at the right
rear burner position on the cooktop (see figure 1),
The STANDARD burners can be used for most surface
cooking needs, The 2 burners are located at the left front
and rear burner positions on the cooktop (see figure 1),
The POWER burner is best used for bringing large
quantities of liquid rapidly up to temperature or when
preparing larger quantities of food, The POWER burner is
located at the left front burner position on the cooktop
(see figure 1),
Regardless of size, always select cookware that is
suitable for the amount and type of food being prepared,
Select a burner and flame size appropriate to the pan,
Never allow flames to extend beyond the outer edge of
the pan,
Figure2
Operatin 9 the Gas Surface Controls:
1, Place cooking utensil on surface burner,
2, Push the surface control knob down and turn counterclockwise out of the OFF
position,
3, Release the knob and rotate to the LITE position (see figure 2), Note: All four
electronic surface ignitors will spark at the same time, However, only the burner
you are turning on will ignite,
4, Visually check that the burner has a flame,
5, Turn the control knob counterclockwise to the desired flame size, The control
knobs do not have to be set at a particular setting, Use the knob indicator
settings to adjust the flame as needed, DO NOT cook with the surface control
knob in the LITE position, (The electronic ignitor will continue to spark if the
knob is left in the LITE position,)
Do not place pJastic items such as salt and pepper shakers, spoon homers or ptastic wrappings
on top of the range when it is in use. These items could melt or ignite, Potholders, towels or wood spoons could
catch fire if placed too close to a flame,
in the event of an electrical power outage, the surface burners can be lit manually, To light a surface burner, hold a lit
match to the burner head, then slowly turn the surface control knob to LmTE,After burner lights turn the knob to desired
setting, Use caution when lighting surface burners manually,
10
Setting Surface Controls
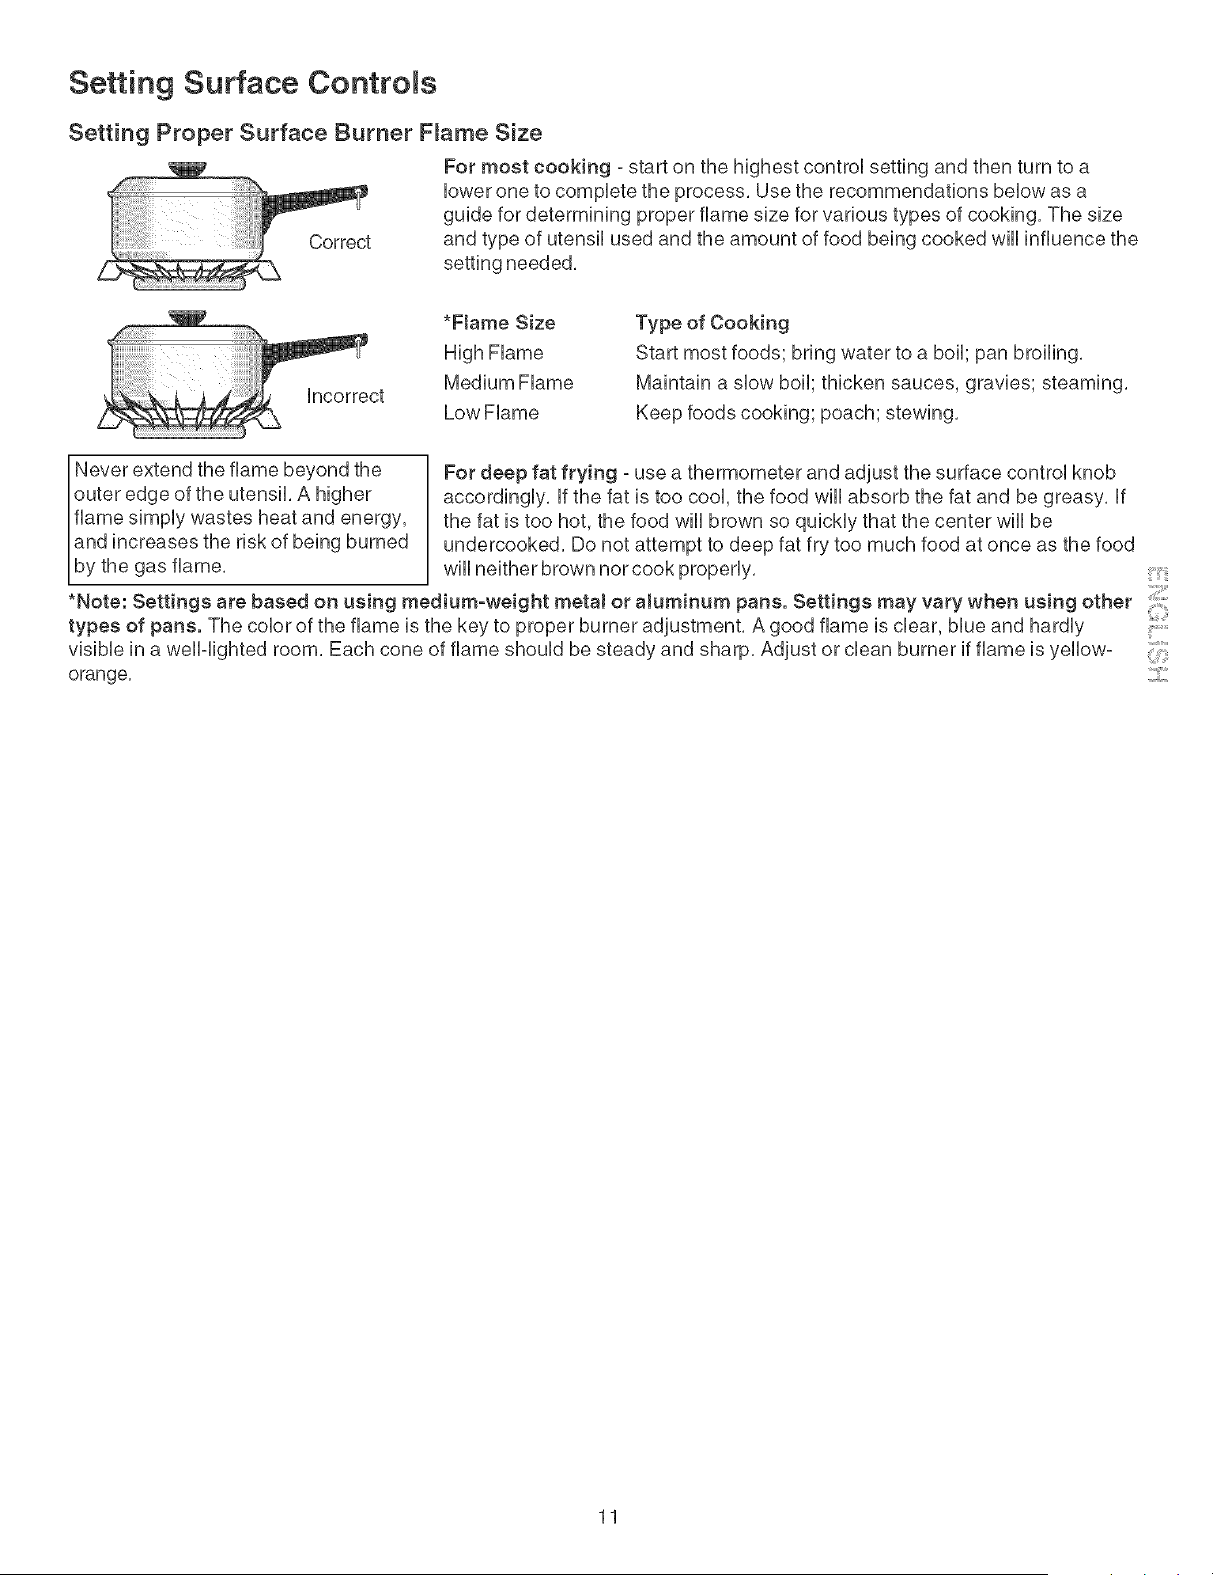
Setting Proper Surface Burner F_ame Size
For most cooking - start on the highest contro] setting and then turn to a
]ower one to compUete the process, Use the recommendations beUowas a
guide for determining proper flame size for various types of cooking, The size
and type of utensil used and the amount of food being cooked will influence the
setting needed,
incorrect
*Ftame Size
High Flame
Medium Flame
Low Flame
Type of Cooking
Start most foods; bring water to a boil; pan broiling.
Maintain a slow boil; thicken sauces, gravies; steaming.
Keep foods cooking; poach; stewing.
Never extend the flame beyond the For deep fat frying =use a thermometer and adjust the surface control knob
outer edge of the utensil. A higher accordingly, if the fat is too cool, the food will absorb the fat and be greasy, if
flame simply wastes heat and energy, the fat is too hot, the food will brown so quickly that the center will be
and increases the risk of being burned undercooked. Do not attempt to deep fat fry too much food at once as the food
by the gas flame, will neither brown nor cook properly.
*Note: Settings are based on using medium-weight metaJ or aJuminum pans. Settings may vary when using other :'
types of pans. The color of the flame is the key to proper burner adjustment. A good flame is clear, blue and hardly ..........
visible in a well-lighted room. Each cone of flame should be steady and sharp. Adjust or clean burner if flame is yellow-
orange, ....
11
Before Setting Oven Controls
l _ This range has a fan that will turn "ON" and "OFF" by itself to keep the electronics cool tt may 1
continue to run after the range has been turned "OFF" but may also stop immediately to turn "ON" after a whiJe.
]
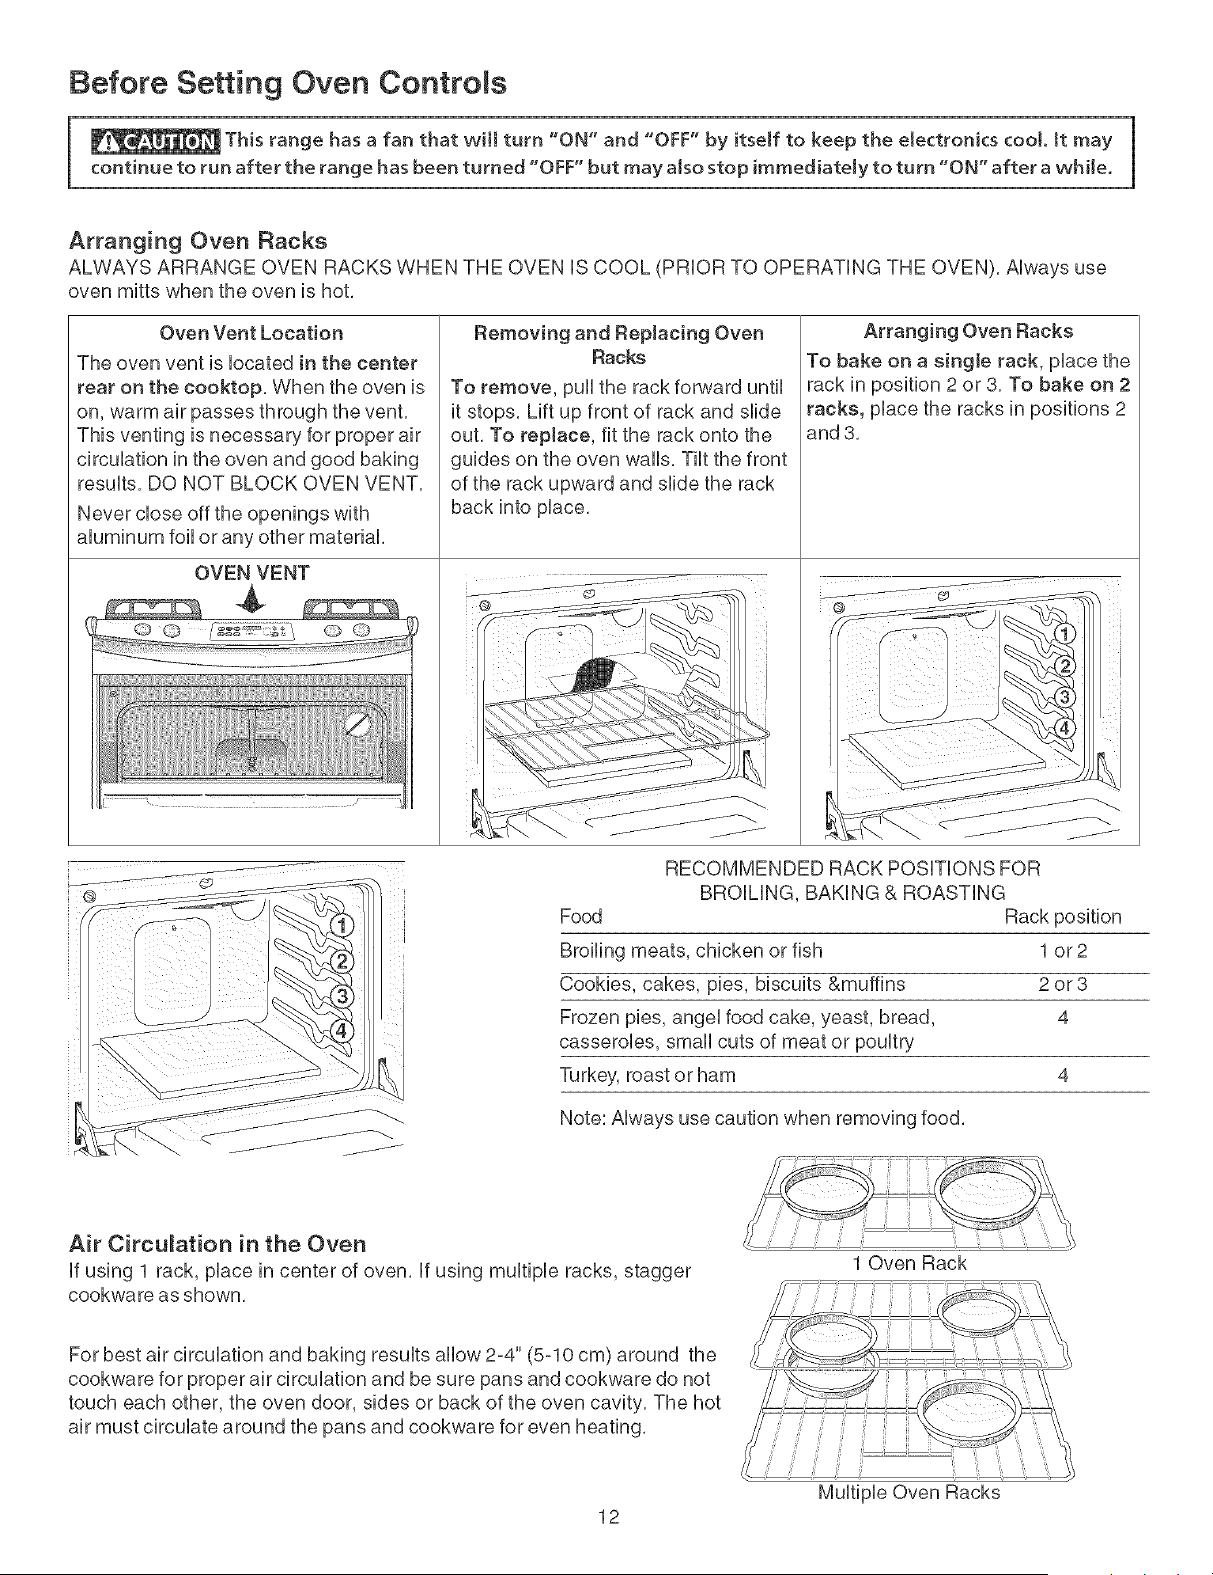
Arranging Oven Racks
ALWAYS ARRANGE OVEN RACKS WHEN THE OVEN USCOOL (PRUOR TO OPERATUNG THE OVEN), AUways use
oven mitts when the oven is hot,
Oven Vent Location
The oven vent is Uocated in the center
rear on the cooktop, When the oven is
on, warm air passes through the vent,
This venting is necessary for proper air
circuUation in the oven and good baking
resuUts, DO NOT BLOCK OVEN VENT,
Never dose off the openings with
aluminum foil or any other material,
OVEN VENT
Removing and Replacing Oven
Racks
To remove, pull the rack forward until
it stops, Lift up front of rack and slide
out, To replace, fit the rack onto the
guides on the oven walls, Tilt the front
of the rack upward and slide the rack
back into place,
@
J
Arranging Oven Racks
To bake on a single rack, place the
rack in position 2 or 3, To bake on 2
racks, place the racks in positions 2
and 3,
RECOMMENDED RACK POSITIONS FOR
BROILING BAKING & ROASTING
Food
Broiling meats, chicken or fish 1 or2
Cookies, cakes, pies, biscuits &muffins 2 or3
Frozen pies, angel food cake, yeast, bread, 4
casseroles, small cuts of meat or poultry
Turkey, roast or ham 4
Note: Always use caution when removing food,
Air Circulation in the Oven
If using 1 rack, place in center of oven, If using multiple racks, stagger
cookware as shown,
1 Oven Rack
For best air circulation and baking results allow 2-4" (5-10 cm) around the
cookware for proper air circulation and be sure pans and cookware do not
touch each other, the oven door, sides or back of the oven cavity, The hot
air must circulate around the pans and cookware for even heating,
Multiple Oven Racks
12
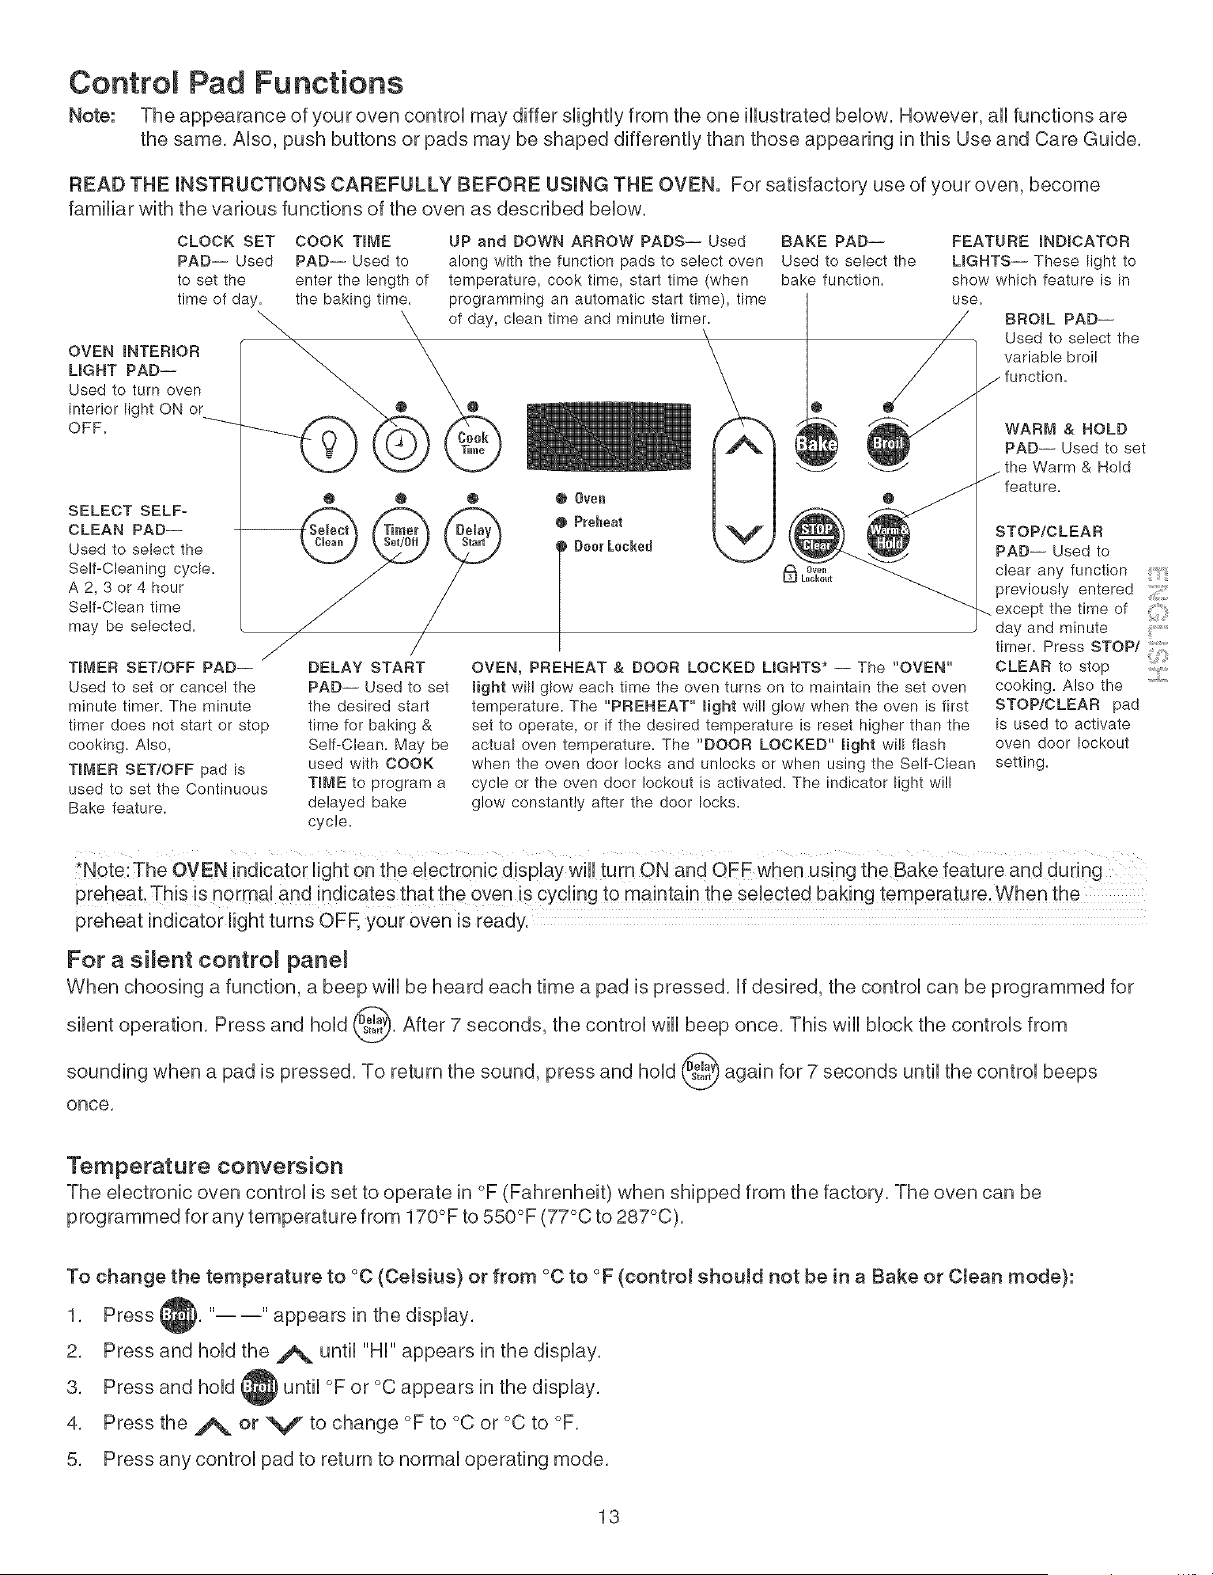
Control Pad Functions
Note: The appearance of your oven controU may differ sHghtUyfrom the one HUustratedbeUow, However, aH functions are
the same. AUso,push buttons or pads may be shaped differentUy than those appearing in this Use and Care Guide.
READ THE INSTRUCTIONS CAREFULLY BEFORE USING THE OVEN. For satisfactory use of your oven, become
familiar with the various functions of the oven as described beUow,
CLOCK SET COOK TIME FEATURE iNDICATOR
PAD-- Used PAD-- Used to UGRTS-- These light to
to set the enter the length of show which feature is in
time of day. the baking time. use.
_ BRO,L PAD--
Used to select the
OVEN INTERIOR variable broil
LIGHT PAD-- function,
Used to turn oven
interior light ON or
OFF,
SELECT SELF-
CLEAN PAD--
Used to select the
Self-Cleaning cycle.
A2,3or4hour
Self-Clean time
may be selected.
J
TIMER SET/OFF PAD--
Used to set or cancel the
minute timer. The minute
timer does not start or stop
cooking. Also,
TIMER SET/OFF pad is
used to set the Continuous
Bake feature.
UP and DOWN ARROW PADS-- Used BAKE PAD--
along with the function pads to select oven Used to select the
temperature, cook time, start time (when bake function.
programming an automatic start time), time
of day, clean time and minute timer.
\
• • o
/
DELAY START
PAD-- Used to set
the desired start
time for baking &
Self-Clean. May be
used with COOK
TIME to program a
delayed bake
cycle.
O Oven
• Preheat
#eorLocked
OVEN, PREHEAT & DOOR LOCKED LIGHTS* -- The "OVEN"
light will glow each time the even turns on to maintain the set even
temperature. The "PREHEAT" light will glow when the oven is first
set to operate, or if the desired temperature is reset higher than the
actual oven temperature. The "DOOR LOCKED" light will flash
when the oven door locks and unlocks or when using the Self-Clean
cycle or the oven door lockout is activated. The indicator light will
glow constantly after the door locks.
WARM & HOLD
PAD-- Used to set
the Warm & Hold
feature=
STOP!CLEAR
PAD-- Used to
clear any function
previously entered
except the time of
day and minute ........
timer. Press STOP!
_i__,i
CLEAR to stop
cooking. Also the
STOP!CLEAR pad
is used to activate
oven door lockout
setting.
*Note:The OVEN indicator light on the electronic display will turn ON and OFF when using the Bake feature and during
preheat, This is norto!! and indicates that the °ven is cycling to maintain the se!ected baking temperature. When the
preheat indicator light turns OFF, your oven is ready.
For a silent controm pane_
When choosing a function, a beep will be heard each time a pad is pressed. If desired, the control can be programmed for
silent operation. Press and hold @. After 7 seconds, the control will beep once. This will block the controls from
when a pad is pressed. To return the sound, press and hold @ again for 7 seconds until the control
sounding beeps
once,
Temperature comversion
The electronic oven control is set to operate in °F (Fahrenheit) when shipped from the factory, The oven can be
programmed for any temperature from 170°F to 550°F (77°C to 287°C),
To change the temperature to °C (Celsius) or from °C to °F (control should not be in a Bake or Ctean mode):
1,
2.
3.
4.
5.
Press "----" appears in the display.
Press and hold the ./_ until "HI" appears in the display.
Press and hold _until °F or °C appears in the display.
Press the ._ or V to change °F to °C or °C to °F.
Press any control pad to return to normal operating mode.
13
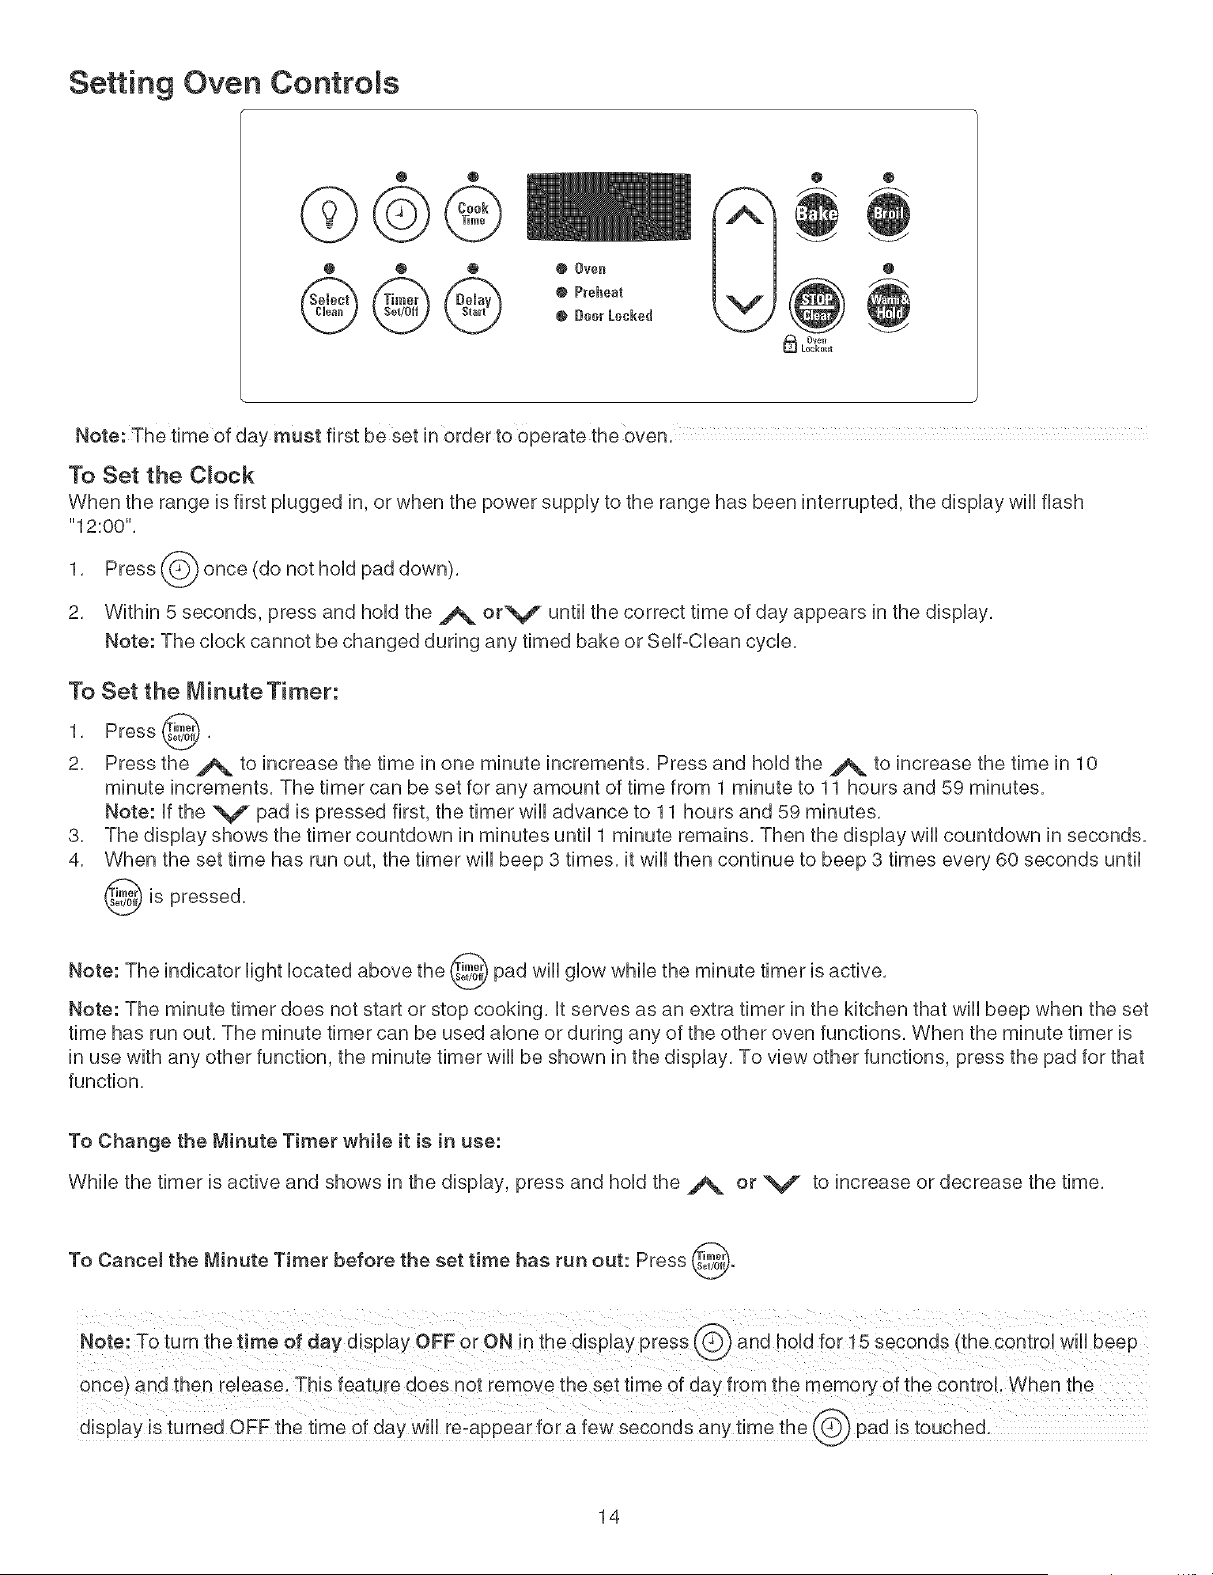
Setting Oven Controls
@ 0 @ @ Ovel_
@@@
@ Deor Locked
Note: The time of day must first be set in order to operate the Oven,
To Set the C_ock
When the range is first pUugged in, or when the power suppUyto the range has been interrupted, the dispUay wHUflash
"12:00",
(_ once (do not hoUdpad down),
1, Press
2, Within 5 seconds, press and hoUdthe A °rV until the correct time of day appears in the dispUay,
Note: The dock cannot be changed during any timed bake or SeUf-CUeancycle,
To Set the MinuteTimer:
1, Press _
d
2, Press the ._ to increase the time in one minute increments, Press and hoUdthe ._ to increase the time in 10
minute increments, The timer can be set for any amount of time from 1 minute to 11 hours and 59 minutes,
Note: If the V pad is pressed first, the timer will advance to 11 hours and 59 minutes,
3, The display shows the timer countdown in minutes until 1 minute remains, Then the display will countdown in seconds,
4, When the set time has run out, the timer will beep 3 times, it will then continue to beep 3 times every 60 seconds until
_is pressed,
Note: The indicator light located above the _ pad will glow while the minute timer is active,
Note: The minute timer does not start or stop cooking, It serves as an extra timer in the kitchen that will beep when the set
time has run out, The minute timer can be used alone or during any of the other oven functions, When the minute timer is
in use with any other function, the minute timer will be shown in the display, To view other functions, press the pad for that
function,
To Change the Minute Timer while it is in use:
While the timer is active and shows in the display, press and hold the _ or V to increase or decrease the time,
To Cancel the Minute Timer before the set time has run out: Press _.
14
Setting Oven Controls (cont'd)
To Bet or Change the Temperature for Baking
The oven can be programmed to bake at any temperature from 170°F to 550°F (77°C to 287°C),
To Set the Controls for Baking:
1, Press _,, .... appears in the dispUay,
2, Within 5 seconds, press the A or V, The dispUay wHUshow "350°F (177°C)," By pressing and hoUding the A or
V, the temperature can then be adjusted in 5°F increments (1 °C if the controU is set to dispUay CeUsius),
3, As soon as the A or V pad is rebased, the oven wHUbegin heating to the sebcted temperature, When the
dispUayed temperature reaches the desired baking temperature, the preheat indicator HghtwHUturn OFF and the control
will beep 3 times,
4, To cancel baking, press _,
To Change the Oven Temperature after Baking has Started:
1, Press and make sure the bake temperature is displayed,
2, Press the A or V pad to increase or decrease the set temperature,
To Set Contro_ for Continuous Bake or 12 Hour Energy Saving
The oven control has a built-in 12 Hour Energy Saving feature that will shut off the oven if the control is left on for more
than 11 hours and 59 minutes, The oven can be programmed to override this feature for continuous baking,
To set control for continuous baking:
1,
2,
f.,.-,,.
Press and hold _ down for 5 seconds until tone is heard, "---- hr" will appear in display for continuous
cooking,
The current time of day will return to the display,
To cancel the Continuous Bake function, press @ and hold for 5 seconds until tone is heard, "12hr" will appear in
display indicating that the control has returned to the 12 Hour Energy Saving feature,
TO Set Contro_ for Oven Lockout
The control can be programmed to lock the oven door and lockout the oven control pads,
To set Control for Oven Lockout feature:
1, Press ,and hold for 3 seconds, "Loc" will appear in display, the "Door Locked" indicator light will flash and the
motor driven door lock will begin to close automatically, DO NOT open oven door while the indicator light is flashing,
Allow about 15 seconds for the oven door to lock, Once the oven door is locked, the current time of day will appear in
the display,
2, To cancel the Oven Lockout feature, press (_ and hold for 3 seconds, The control will unlock the oven door and
Note: !f any control pad is pressed while in the oven Lockout mode' ,'Lo¢'! will appear in the display until the
€ontroJ pad is reJeaeed.
15
Setting Oven Controls (cont'd)
To Set the Timed Bake and De_ay Start Features
The cT_,,_COOK TIME and _ DELAY START pads operate the features that wHHturn the oven ON and OFF at the
times you seHectin advance, The oven can be programmed to start immediateHy and shut off automaticaHHy(Timed Bake)
or to begin baking at a later time with a delayed start time (Delay Start).
N0te: During Timed Bake the preheat indicator light wiHHnot function.
To Program the Oven to Begin Baking immediately and To Shut Off Automatically (Timed Bake):
1. Be sure that the clock shows the correct time of day.
2. Place the food in the oven.
3,
4.
Press
° " appears in the display.
Within 5 seconds, press the A or V, The display will show "350°F (177°C), '' By holding the A or V, the
temperature can then be adjusted in 5°F increments (1°C if the control is set to display Celsius),
5, Press _, "0:00" will flash in the dispHay (HR:MHN),
6, Press the A or V until the desired baking time appears in the display,
7, The oven will turn ON and begin heating,
To Program Oven for a Detayed Start Time and to Shut-Off Automatically (Delayed Start Bake):
1. Be sure that the clock shows the correct time of day.
2. Place the food in the oven.
3, Press ..... appears in the display,
4, Within 5 seconds, press the_ or V, The display will show "350°F (177°C)," By holding the_ or V, the
temperature can then be adjusted in 5°F increments (1°C if the control is set to display Celsius),
5, Press _, "0:00" will flash in the dispHay (HR:MHN),
6, Press the A or V until the desired baking time appears,
7, Press _$II,_,The earliest possible start time will appear in the
display.
8. Press theA or V until the desired start time appears in the display.
9. Once the controls are set, the control calculates the time when baking will stop in order to start at the time you have
set.
10. The oven will turn ON at the delayed start time and begin heating.
When the Set Bake Time Runs Out:
a. "END" wiii appear in the display window and the oven wiii shut-off automatically.
b. The control wiil beep 3 times every 60 seconds until _is pressed.
To Change the Oven Temperature or Bake Time after Baking has Started:
1. Press the function pad you want to change.
2. Press the ._ or V to adjust the setting.
Use caution with the Timed Bake and Delayed Start features. Foods that can easily spoil such as milk,
eggs, fish, meat or poultry, should be chilled in the refrigerator first. Even when chilled, they should not stand in the oven
for more than 1 hour before cooking begins, and should be removed promptly when cooking is completed.
16
Setting Oven Controls (cont'd)
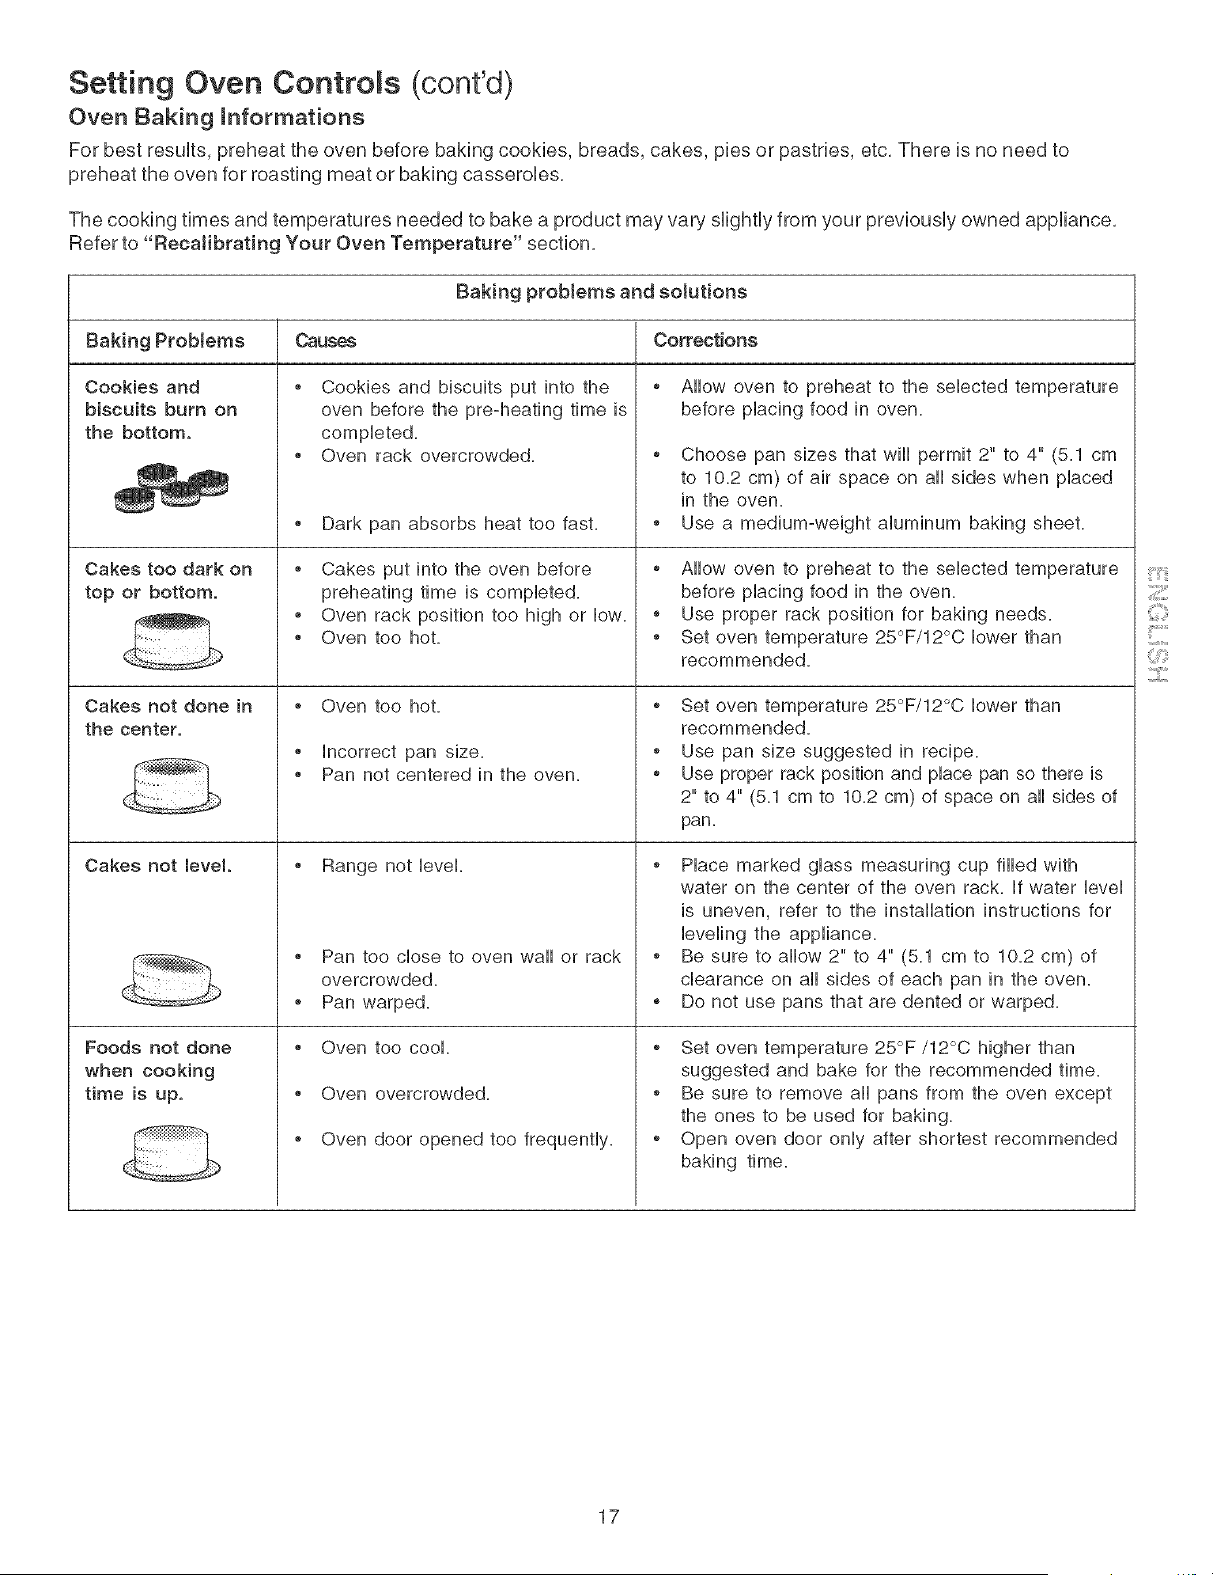
Oven Baking mnformations
For best results, preheat the oven before baking cookies, breads, cakes, pies or pastries, etc, There is no need to
preheat the oven for roasting meat or baking casseroles,
The cooking times and temperatures needed to bake a product may vary slightly from your previously owned appliance,
Refer to "ReeaJibrating Your Oven Temperature" section,
Baking problems and solutions
Baking Problems Causes Corrections
o
Cookies and
biscuits burn on
the bottom.
Cakes too dark on
top or bottom.
Cokes not done in
the center.
Cokes not level.
Foods not done
when cooking
time is up.
Cookies and biscuits put into the
oven before the pre-heating time is
completed,
Oven rock overcrowded,
,, Dark pan absorbs heat too fast.
o Cakes put into the oven before
preheating time is completed.
o Oven rack position too high or low.
o Oven too hot.
o Oven too hot.
o incorrect pan size.
o Pan not centered in the oven.
o Range not level.
o Pan too close to oven wail or rack
overcrowded.
o Pan warped.
o Oven too cool.
o Oven overcrowded.
o Oven door opened too frequently.
,, Allow oven to preheat to the selected temperature
before placing food in oven,
o Choose pan sizes that wiii permit 2" to 4" (5.1 cm
to 10.2 cm) of air space on all sides when placed
in the oven.
,, Use a medium-weight aluminum baking sheet.
o Allow oven to preheat to the selected temperature
before placing food in the oven.
o Use proper rack position for baking needs.
,, Set oven temperature 25°F/12°C lower than
recommended.
o Set oven temperature 25°F/12°C lower than
recommended.
o Use pan size suggested in recipe.
o Use proper rack position and place pan so there is
2" to 4" (5.1 cm to 10.2 cm) of space on all sides of
pan.
o Place marked glass measuring cup filled with
water on the center of the oven rack. if water level
is uneven, refer to the installation instructions for
leveling the appliance.
o Be sure to allow 2" to 4" (5.1 cm to 10.2 cm) of
clearance on all sides of each pan in the oven.
o Do not use pans that are dented or warped.
o Set oven temperature 25°F/12°C higher than
suggested and bake for the recommended time.
o Be sure to remove aii pans from the oven except
the ones to be used for baking.
o Open oven door only after shortest recommended
baking time.
ii:i,_i'i?
17
Setting Oven Controls (cont'd)
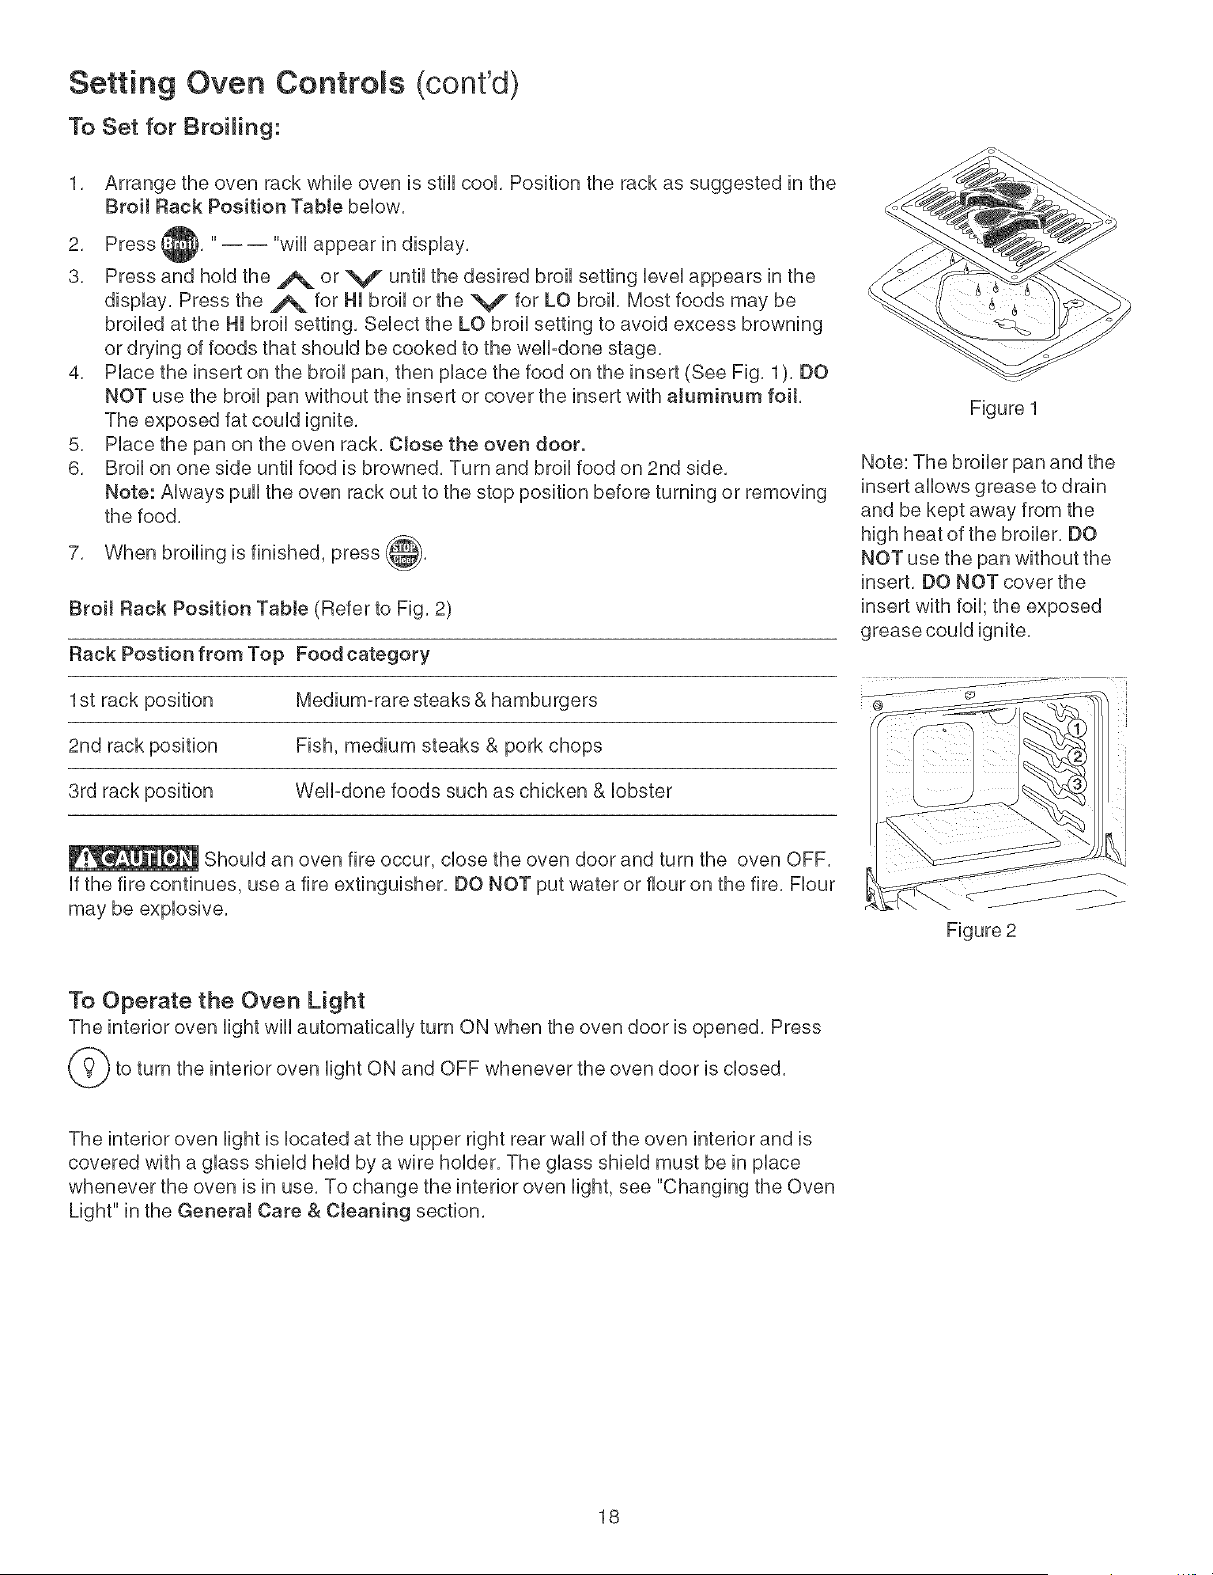
To Set for Broiling:
1,
2,
3,
Arrange the oven rack while oven is stHUcool Position the rack as suggested in the
Broit Rack Position Table bebw,
Press "---- "wHUappear in dispUay,
Press and hoUdthe A or V until the desired broil setting bveU appears in the
dispUay, Press the A for HI broil or the V for LO broil, Most foods may be
broiled at the HI broil setting, Sebct the LO broil setting to avoid excess browning
or drying of foods that shouUd be cooked to the weft-done stage,
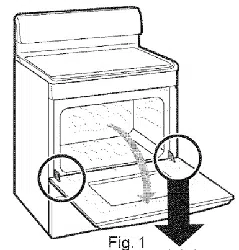
4, PUace the insert on the broil pan, then place the food on the insert (See Fig, 1 ), DO
NOT use the broil pan without the insert or cover the insert with aluminum foit,
The exposed fat could ignite,
5, Place the pan on the oven rack, Close the oven door.
6, Broil on one side until food is browned, Turn and broil food on 2nd side,
Note: Always pull the oven rack out to the stop position before turning or removing
the food,
broiling is finished, press _,
7, When
Broit Rack Position Table (Refer to Fig, 2)
Rack Postion from Top Food category
1st rack position Medium:rare steaks & hamburgers
2nd rack position Fish, medium steaks & pork chops
3rd rack position WelPdone foods such as chicken & lobster
Should an oven fire occur, close the oven door and turn the oven OFF,
If the fire continues, use a fire extinguisher, DO NOT put water or flour on the fire, Flour
may be explosive,
Figure 1
Note: The broiler pan and the
insert allows grease to drain
and be kept away from the
high heat of the broiler, DO
NOT use the pan without the
insert, DO NOT cover the
insert with foil; the exposed
grease could ignite,
/ j
Figure 2
To Operate the Oven Light
The interior oven light will automatically turn ON when the oven door is opened, Press
to turn the interior oven light ON and OFF whenever the oven door is closed,
The interior oven fight is located at the upper right rear waft of the oven interior and is
covered with a glass shield held by a wire holder, The glass shield must be in place
whenever the oven is in use, To change the interior oven light, see "Changing the Oven
Light" in the GeneraJ Care & Cteaning section,
18
Setting Oven Controls (cont'd)
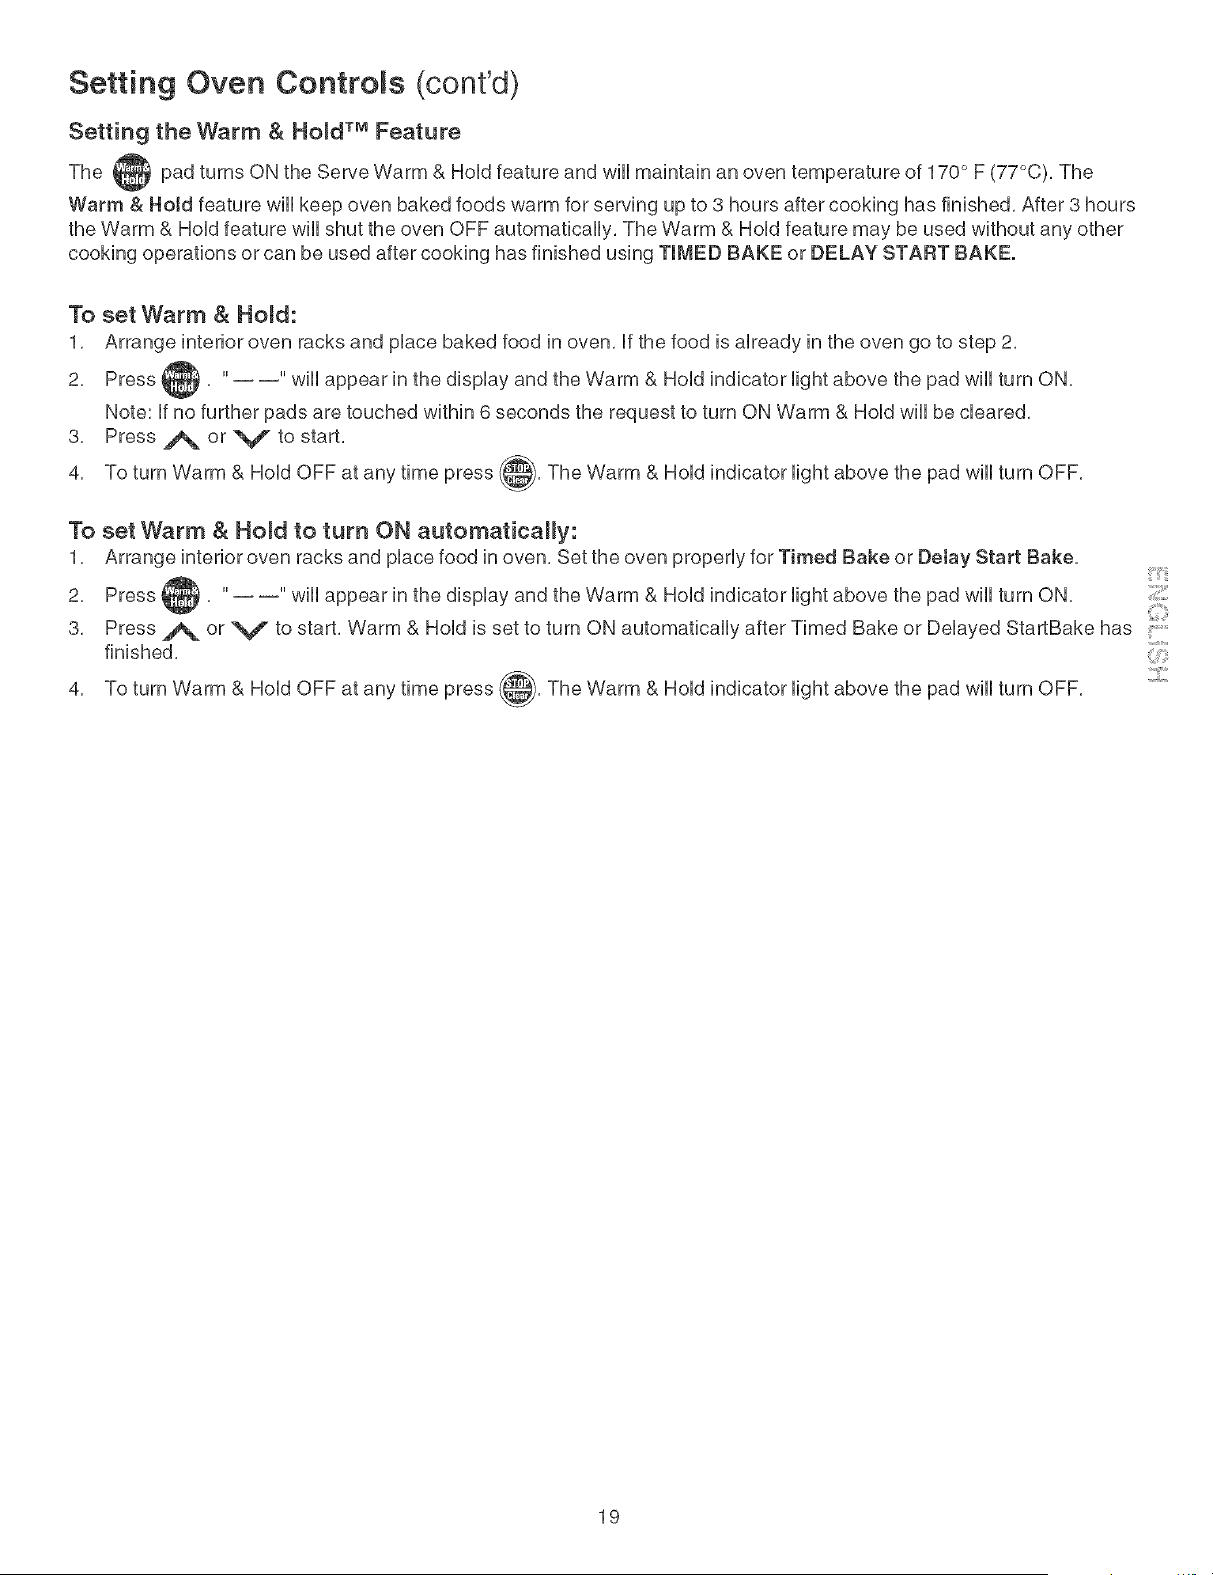
Setting the Warm & Hold TM Feature
The pad turns ON the Sewe Warm & Hold feature and w[[[ maintain an oven temperature of 170 ° F (77°C), The
Warm &Hoid feature w[[[ keep oven baked foods warm for serving up to 3 hours after cooking has finished, After 3 hours
the Warm & Hold feature w[[[ shut the oven OFF automatically, The Warm & Hold feature may be used without any other
cooking operations or can be used after cooking has finished using TIMED BAKE or DELAY START BAKE.
To set Warm & Hold:
1, Arrange interior oven racks and place baked food in oven, If the food is already in the oven go to step 2,
2, Press .... w[[[ appear in the display and the Warm & Hold indicator light above the pad w[[[ turn ON,
Note: If no further pads are touched within 6 seconds the request to turn ON Warm & Hold w[[[ be cleared,
3, Press A or V to start,
4, To turn Warm & Hold OFF at any time press _,The Warm & Hold indicator light above the pad w[[[ turn OFF,
To set Warm & Hold to turn ON automatically:
1, Arrange interior oven racks and place food in oven, Set the oven properly for Timed Bake or Delay Start Bake,
2, Press .... w[[[ appear in the display and the Warm & Hold indicator light above the pad w[[[ turn ON,
3, Press A or V to start, Warm & Hold is set to turn ON automatically after Timed Bake or Delayed StartBake has
finished,
4, To turn Warm & Hold OFF at any time press ,,The Warm & Hold indicator light above the pad w[[[ turn OFF,
19
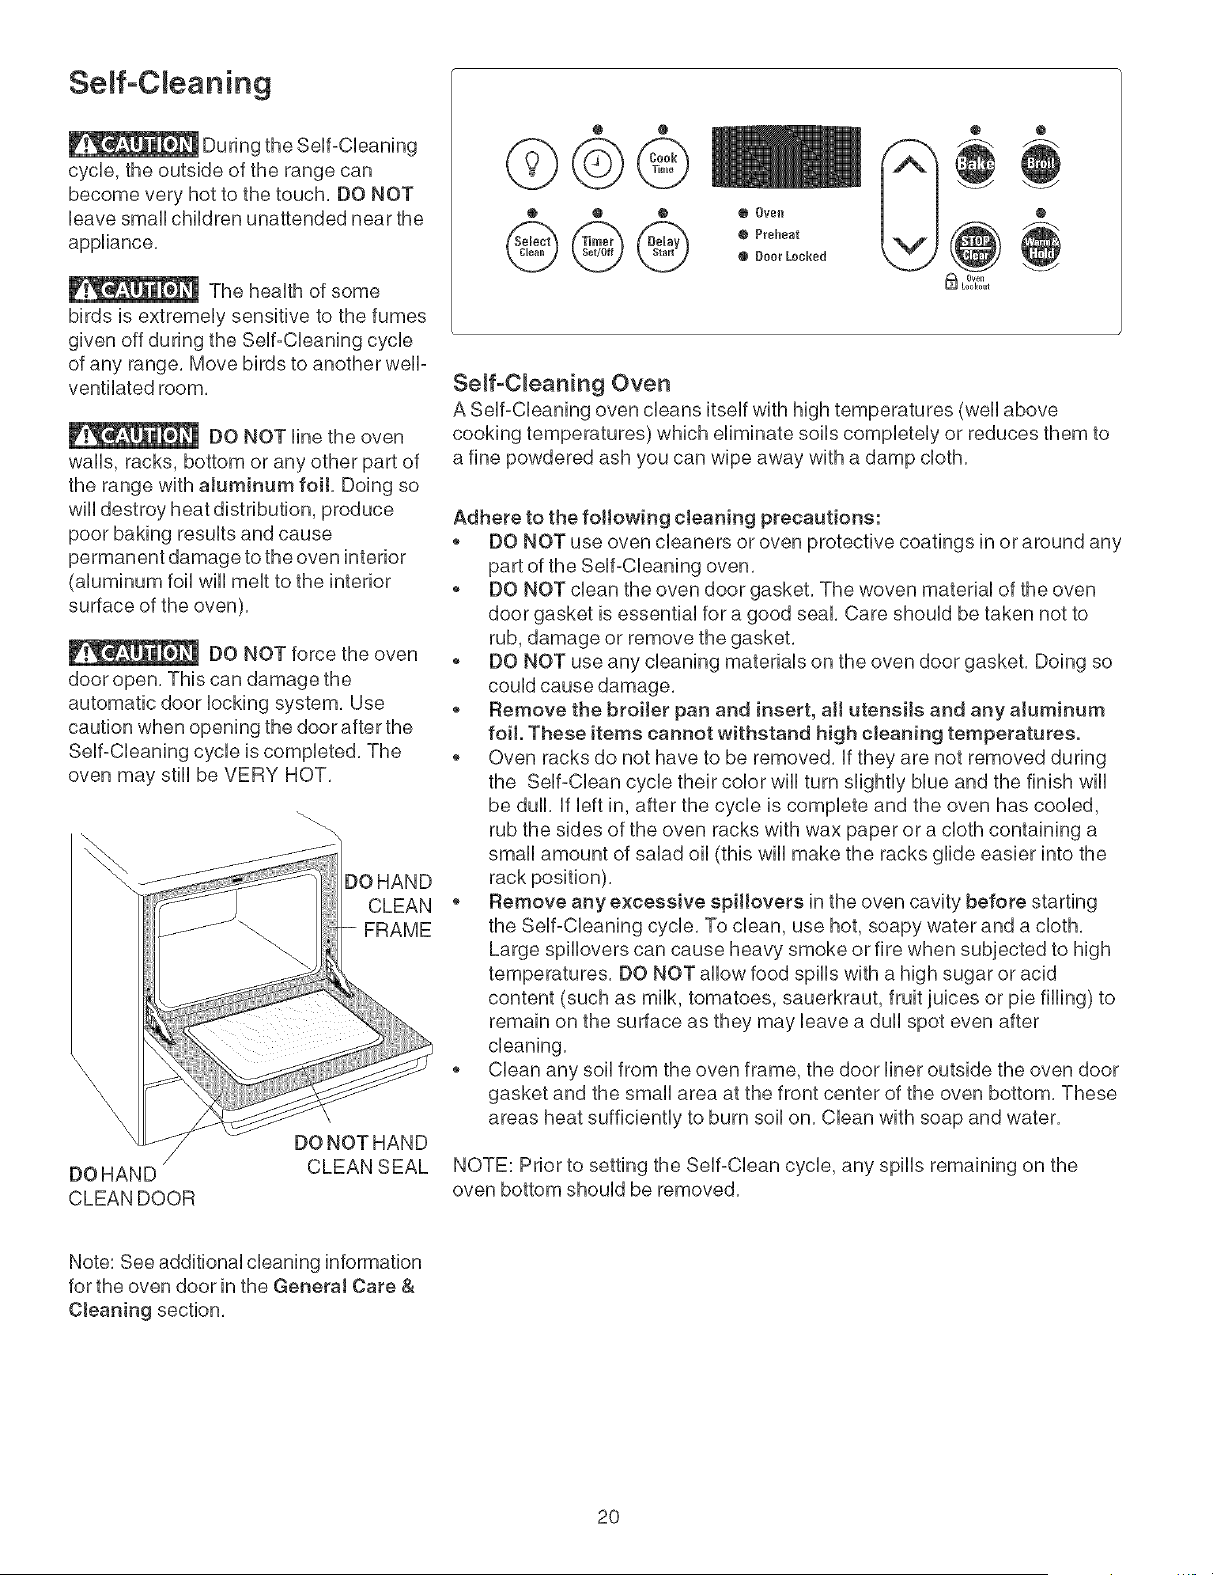
Seff-C eaning
During the Seff-Cbaning
cycb, the outside of the range can
become very hot to the touch. DO NOT
have small children unattended near the
appliance.
The heaUth of some
birds is extremeUy sensitive to the fumes
given off during the Seff-Cbaning cycb
of any range. Move birds to another well-
ventilated room.
DO NOT Hnethe oven
walls, racks, bottom or any other part of
the range with aluminum fo& Doing so
wHUdestroy heat distribution, produce
poor baking resuUts and cause
permanent damage to the oven interior
(aUuminum foil wHUmeUtto the interior
surface of the oven).
DO NOT force the oven
door open, This can damage the
automatic door locking system, Use
caution when opening the door after the
Self-Cleaning cycle is completed. The
oven may still be VERY HOT.
DOHAND
CLEAN DOOR
DOHAND
CLEAN
-- FRAME
DONOTHAND
CLEAN SEAL
@ @
©©@
@ • @ O Oven
@© @ :
@
Oven
_ Le6kout
Seff-C_eaning Oven
A Self-Cbaning oven cleans itself with high temperatures (well above
cooking temperatures) which eliminate soils completely or reduces them to
a fine powdered ash you can wipe away with a damp cloth,
Adhere to the following cteaning precautions:
o DO NOT use oven cleaners or oven protective coatings in or around any
part of the Self-Cbaning oven.
o DO NOT clean the oven door gasket. The woven material of the oven
door gasket is essential for a good seal. Care should be taken not to
rub, damage or remove the gasket.
o DO NOT use any cleaning materials on the oven door gasket. Doing so
could cause damage.
o Remove the broiler par and insert, aH utensils and any aluminum
foil These items cannot withstand high cJeaning temperatures.
o Oven racks do not have to be removed, If they are not removed during
the Self-Cban cycle their color will turn slightly blue and the finish will
be dull, If left in, after the cycle is complete and the oven has cooled,
rub the sides of the oven racks with wax paper or a cloth containing a
small amount of salad oil (this will make the racks glide easier into the
rack position),
o Remove any excessive spiHovers in the oven cavity before starting
the Self-Cleaning cycle, To clean, use hot, soapy water and a cloth,
Large spillovers can cause heavy smoke or fire when subjected to high
temperatures, DO NOT allow food spills with a high sugar or acid
content (such as milk, tomatoes, sauerkraut, fruit juices or pie filling) to
remain on the surface as they may leave a dull spot even after
cleaning,
o Clean any soil from the oven frame, the door liner outside the oven door
gasket and the small area at the front center of the oven bottom, These
areas heat sufficiently to burn soil on, Clean with soap and water,
NOTE: Prior to setting the Self-Clean cycle, any spills remaining on the
oven bottom should be removed,
Note: See additional cleaning information
for the oven door in the GeneraJ Care &
Cleaning section.
20
Seff-C eaning (cont'd)
SelfoC_ean Time Length
For satisfactory resuRs, use a 2 hour SeUf-CUeancycle for tight soils and a 3 hour cycUe for average or a 4 hour cycle for
heavy soils, NOTE: The kitchen area shouUdbe well ventilated using an open window, ventilation fan or exhaust hood
during the SeUf-CUeancycle, This wHUheUpeliminate the normaU odors associated with the SeUf-CUeancycle,
To Set the Controls for a Seff°C_ean Cycle or a De_ayed Start Seff°C_ean Cycle:
(Note: If you do not want to start a Detayed Self-Clean Cycle, skips steps 2 & 3,)
1, Be sure the clock shows the correct time of day,
2, Press @, The " : " in the time of day will flash,
3, Press and hold the .#_ pad to scroll to the time to start the delayed Self-Clean cycle, Release the pad when the
4,
5,
6,
desired time is displayed,
Press _._t ,, "appears in the display,
Press the A or V once, "3:00" appears in the display for a 3 hour cycle, To change to a 2 hour cycle press V,
"2:00" appears in the display or to select a 4 hour cycle press .#_, "4:00" appears in the display, ::
As soon as the controls are set, the motor driven lock will begin to close automatically and the "LOCK" indicator light : .........
will flash, DO NOT open the oven door while the light is flashing (it takes about 15 seconds for the oven door to lock), i
"CLn" will appear in the display during the Self-Clean cycle and the "LOCK" light will glow until the Self-Cleaning cycle
is complete or cancelled and the oven temperature has cooled,
When the Serf-Clean Cycle is Completed:
1, The time of day or "End" will appear in the display window and the "Clean" and "LOCK" light will continue to glow,
2, Once the oven has cooled down for about 1 HOUR and the "LOCK" light has gone out, the oven door can be opened,
3, If "End" is in the display and the Select Clean indicator light remains ON, press _, The time of day will appear in
the display,
NOTE: When the oven is cool, wipe away any residue or powdered ash with a damp cloth or paper towel,
Stopping or Interrupting a Serf-Cleaning Cycle
If it becomes necessary to stop or interrupt a Self-Cleaning cycle:
1, Press _,
2, Once the oven has cooled down for about 1 HOUR and the "LOCK" light has gone out, the oven door can be opened,
3, Restart the Self-Clean cycle once all conditions have been corrected,
To avoid possible burns use care when opening the oven door after the Self-Cleaning cycle, Stand to the
side of the oven when opening the door to allow hot air or steam to escape,
DO NOT force the oven door open, This can damage the automatic door locking system, Use caution and
avoid possible burns when opening the door after the Self-Cleaning cycle has completed, The oven may still be VERY
HOT,
21
Genera Care & CJeaning
CJeaning Various Parts of Your Range
Before cbaning any part of the oven, be sure all controls are turned OFF and the range is COOL, REMOVE SPILLOVERS
AND HEAVY SOiLiNG AS SOON AS POSSIBLE, REGULAR CLEANINGS NOW WILL REDUCE THE EXTENT AND
DiFFiCULTY OF MAJOR CLEANING LATER,
Surfaces How to Clean
Aluminum (trim pieces) & Use hot, soapy water and a cloth, Dry with a dean cloth,
Vinyl
Glass, Painted and Plastic
Body Parts, ControJ Knobs
& Decoratives Trim Pieces
Control Panel
Porcelain Enamel
Burner Orates, Cooktop
Surface, BeJow Cooktop,
Broibr Pan & insert, Door
Liner, Oven Bottom &
Burner Drip Pans
StainJess SteeJ (some
models) Oven door & drawer
front panel
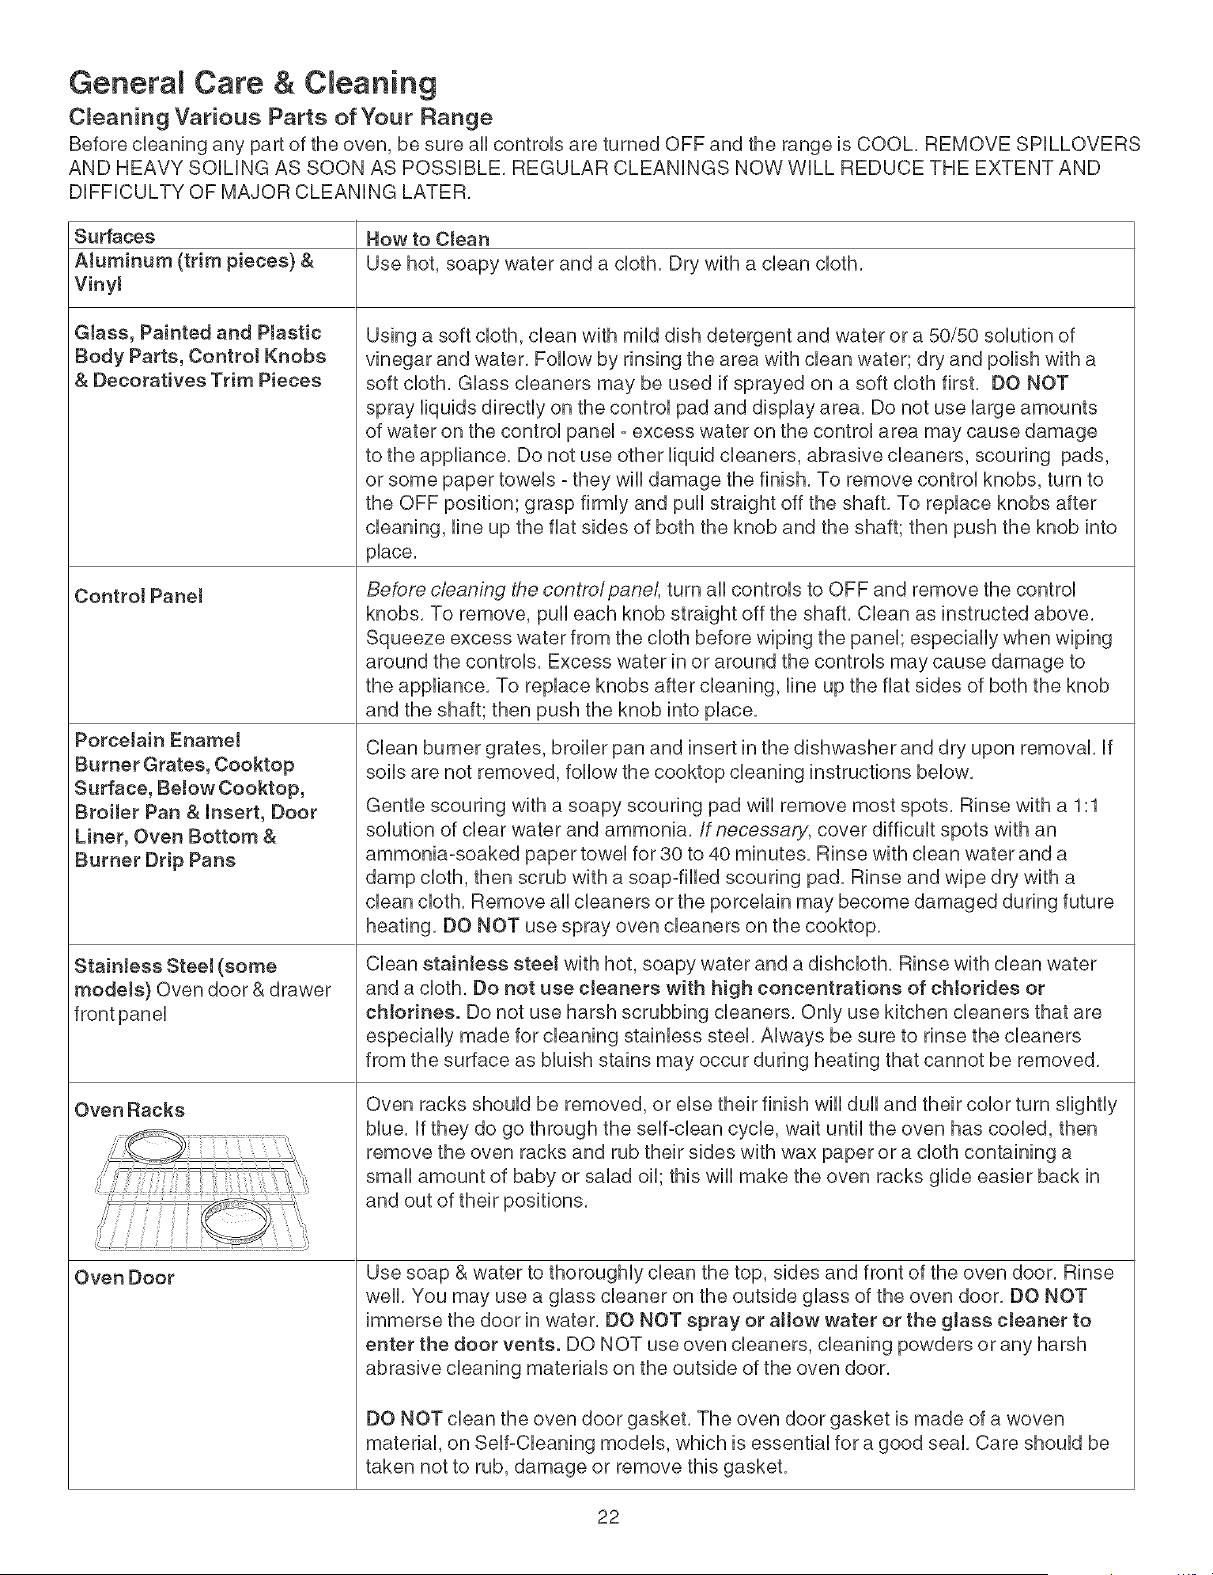
Oven Racks
Oven Door
Using a soft cloth, clean with mild dish detergent and water or a 50/50 solution of
vinegar and water, Follow by rinsing the area with clean water; dry and polish with a
soft cloth, Glass cleaners may be used if sprayed on a soft cloth first, DO NOT
spray liquids directly on the control pad and display area, Do not use large amounts
of water on the control panel o excess water on the control area may cause damage
to the appliance, Do not use other liquid cleaners, abrasive cleaners, scouring pads,
or some paper towels o they will damage the finish, To remove control knobs, turn to
the OFF position; grasp firmly and pull straight off the shaft, To replace knobs after
cleaning, line up the flat sides of both the knob and the shaft; then push the knob into
_lace,
Before cleaning the contro/panel, turn all controls to OFF and remove the control
knobs, To remove, pull each knob straight off the shaft, Clean as instructed above,
Squeeze excess water from the cloth before wiping the panel; especially when wiping
around the controls, Excess water in or around the controls may cause damage to
the appliance, To replace knobs after cleaning, line up the fiat sides of both the knob
and the shaft; then push the knob into place,
Clean burner grates, broiler pan and insert in the dishwasher and dry upon removak if
soils are not removed, follow the cooktop cleaning instructions below,
Gentle scouring with a soapy scouring pad will remove most spots, Rinse with a 1:1
solution of clear water and ammonia,/f necessary, cover difficult spots with an
ammonia°soaked paper towel for 30 to 40 minutes, Rinse with clean water and a
damp cloth, then scrub with a soap°filled scouring pad, Rinse and wipe dr}, with a
clean cloth, Remove all cleaners or the porcelain may become damaged during future
heating, DO NOT use spray oven cleaners on the cooktop,
Clean stainless steet with hot, soapy water and a dishcloth, Rinse with clean water
and a cloth, Do not use cJeaners with high concentrations of chtoddes or
cMorines. Do not use harsh scrubbing cleaners, Only use kitchen cleaners that are
especially made for cleaning stainless steel, Always be sure to rinse the cleaners
from the surface as bluish stains may occur during heating that cannot be removed,
Oven racks should be removed, or else their finish will dull and their color turn slightly
blue, if they do go through the selfoclean cycle, wait until the oven has cooled, then
remove the oven racks and rub their sides with wax paper or a cloth containing a
small amount of baby or salad oill this will make the oven racks glide easier back in
Use soap & water to thoroughly clean the top, sides and front of the oven door, Rinse
welk You may use a glass cleaner on the outside glass of the oven door, DO NOT
immerse the door in water, DO NOT spray or allow water or the gJass cleaner to
enter the door vents, DO NOT use oven cleaners, cleaning powders or any harsh
abrasive cleaning materials on the outside of the oven door,
DO NOT clean the oven door gasket, The oven door gasket is made of a woven
material, on SelfoCleaning models, which is essential fora good seal, Care should be
taken not to rub, damage or remove this gasket,
22
General Care & Cleaning (cont'd)
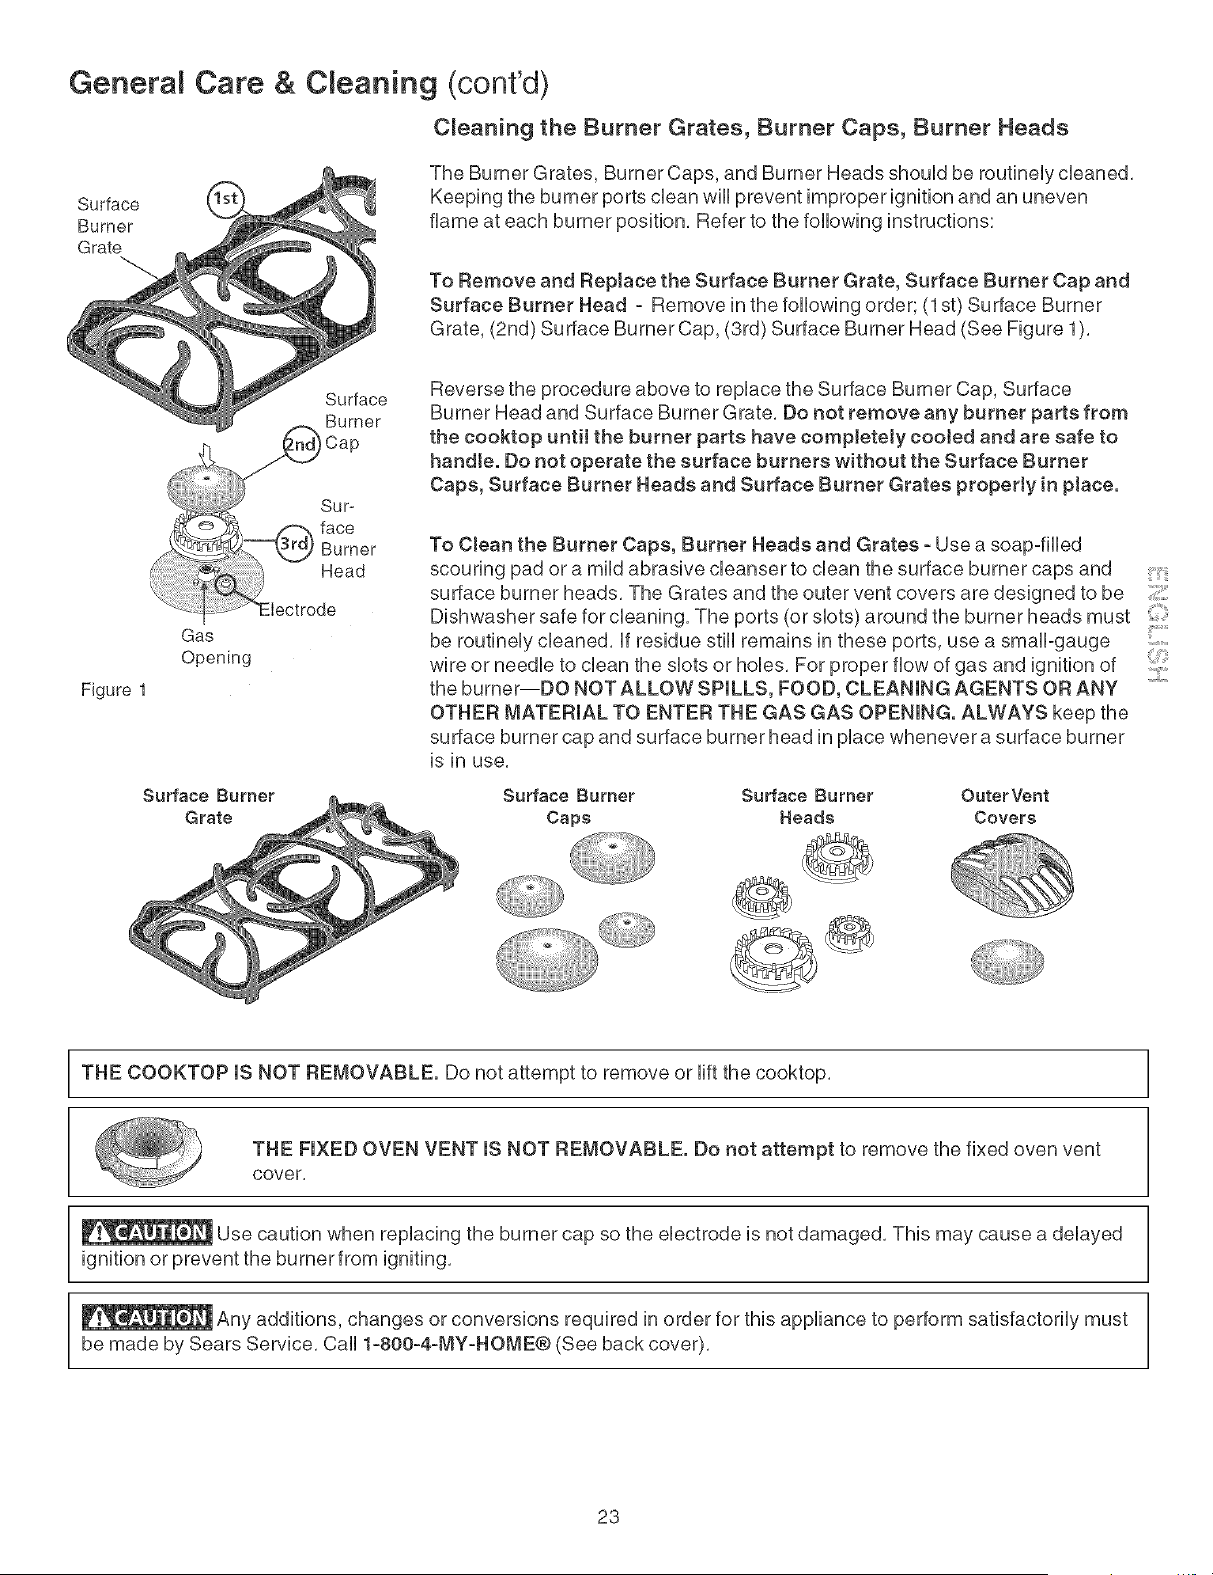
C_eaning the Burner Grates, Burner Caps, Burner Heads
Surface
Burner
Grate
The Burner Grates, Burner Caps, and Burner Heads shouUd be routineUy cUeaned,
Keeping the burner ports dean wHUprevent improper ignition and an uneven
flame at each burner position, Refer to the following instructions:
To Remove and Replace the Surface Burner Grate, Surface Burner Cap and
Surface Burner Head - Remove in the following order; (1st) Surface Burner
Grate, (2nd) Surface Burner Cap, (3rd) Surface Burner Head (See Figure 1),
Surface
Burner
Reverse the procedure above to repUacethe Surface Burner Cap, Surface
Burner Head and Surface Burner Grate, Do not remove any burner parts from
the cooktop until the burner parts have completely cooJed and are safe to
handte, Do not operate the surface burners without the Surface Burner
Caps, Surface Burner Heads and Surface Burner Grates properly in ptace,
Gas
Opening
Figure 1
To Clean the Burner Caps, Burner Heads and Grates - Use a soap=filled
scouring pad or a mild abrasive cleanser to clean the surface burner caps and
surface burner heads, The Grates and the outer vent covers are designed to be
Dishwasher safe for cleaning, The ports (or slots) around the burner heads must
be routinely cleaned, If residue still remains in these ports, use a smaIFgauge
wire or needle to clean the slots or holes, For proper flow of gas and ignition of
the burner--DO NOTALLOW SPILLS, FOOD, CLEANING AGENTS OR ANY
OTHER MATERIAL TO ENTER THE GAS GAS OPENING. ALWAYS keep the
surface burner cap and surface burner head in place whenever a surface burner
is in use,
Surface Burner Surface Burner Surface Burner OuterVent
Grate Caps Heads Covers
THE COOKTOP IS NOT REMOVABLE. Do not attempt to remove or lift the cooktop,
THE FIXED OVEN VENT IS NOT REMOVABLE. Do not attempt to remove the fixed oven vent
cover,
Use caution when replacing the burner cap so the electrode is not damaged, This may cause a delayed
ignition or prevent the burner from igniting,
Any additions, changes or conversions required in order for this appliance to perform satisfactorily must
be made by Sears Service, Call 1-800-4-MY-HOME® (See back cover),
23
Genera Care & C eaning (cont'd)
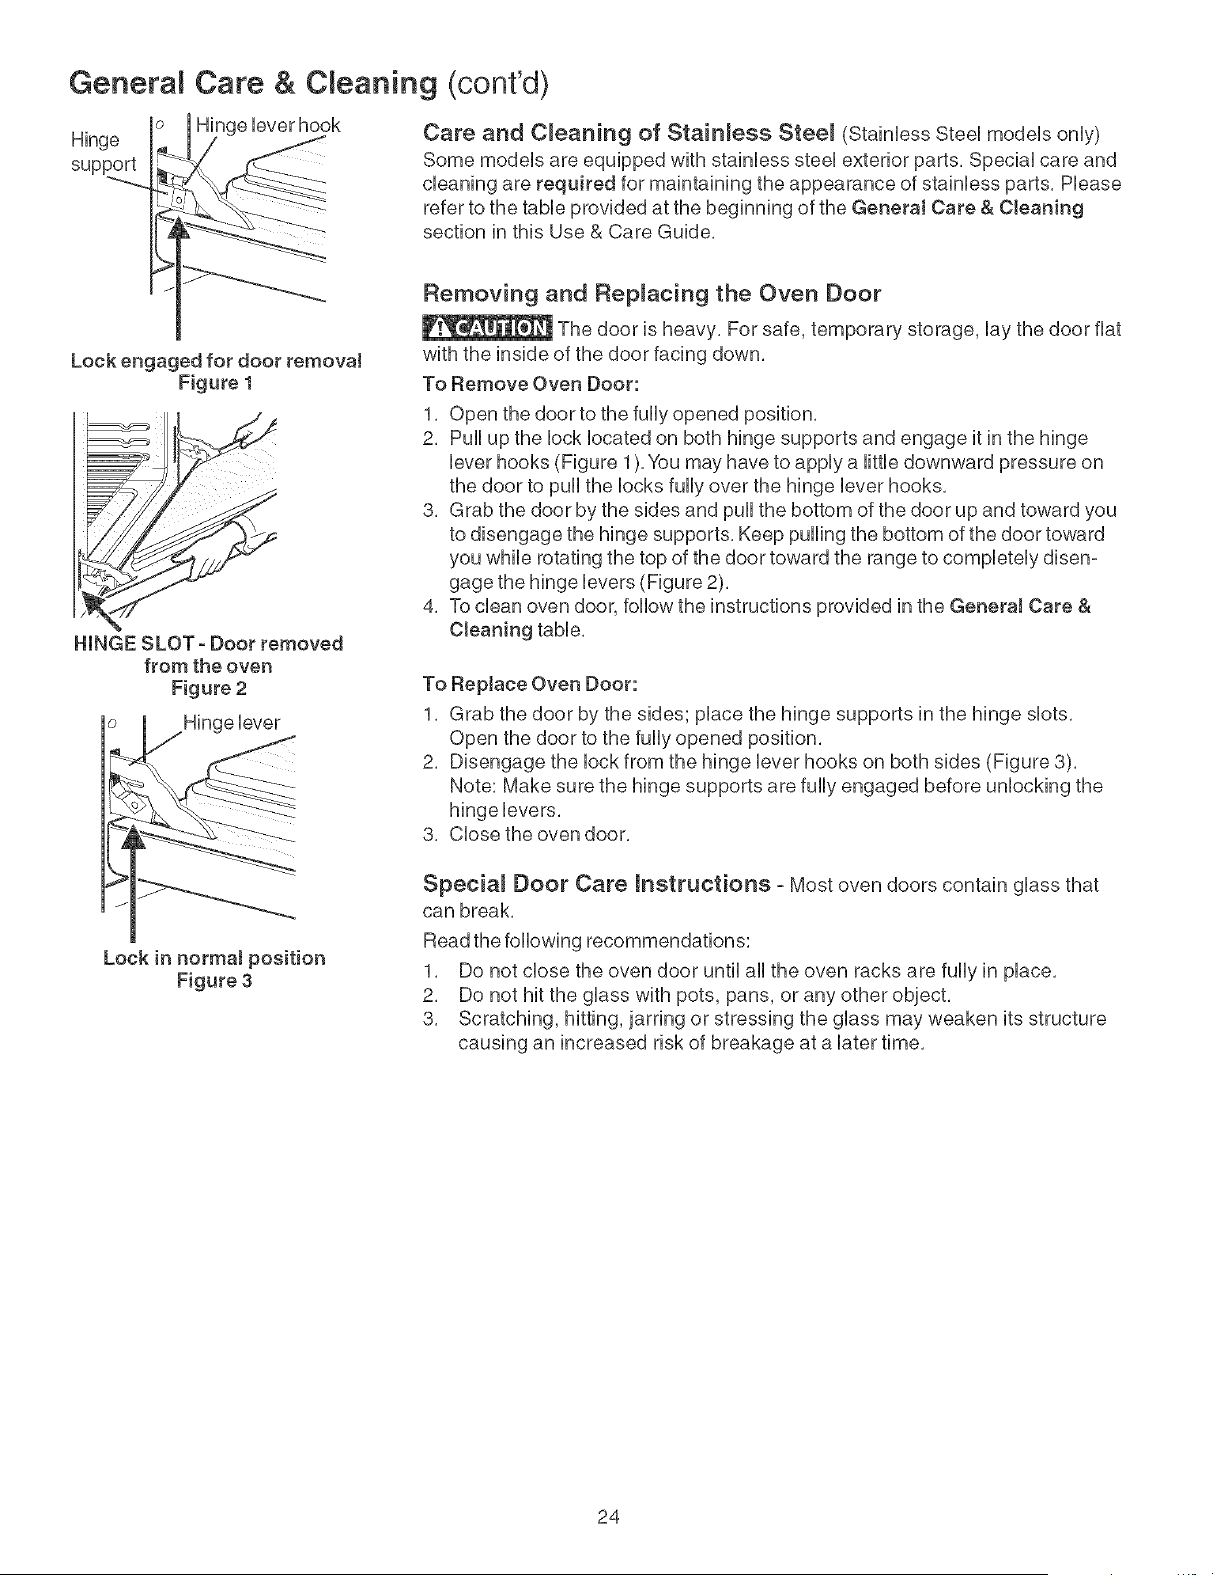
Hinge
support
ngeleverhook
Care and C_eaning of Stainless Stee_ (Stainless Steel models only)
Some models are equipped with stainless steel exterior parts. Special care and
cleaning are required for maintaining the appearance of stainless parts. Please
refer to the table provided at the beginning of the General Care & Cleaning
section in this Use & Care Guide.
Lock engaged for door removal
Figure 1
HINGE SLOT- Door removed
from the oven
Figure 2
Hinge lever
Lock in normal position
Figure 3
Removing and Replacing the Oven Door
The door is heavy. For safe, temporary storage, Uaythe door fiat
with the inside of the door facing down.
To Remove Oven Door:
1. Open the door to the fufly opened position.
2. Puff up the bck bcated on both hinge supports and engage it in the hinge
bver hooks (Figure 1).You may have to appUya fittb downward pressure on
the door to pull the locks fully over the hinge lever hooks.
3. Grab the door by the sides and pull the bottom of the door up and toward you
to disengage the hinge supports. Keep pulling the bottom of the door toward
you while rotating the top of the door toward the range to completely disen-
gage the hinge levers (Figure 2).
4. To clean oven door, follow the instructions provided in the GeneraJ Care &
Cteaning table.
To Replace Oven Door:
1. Grab the door by the sides; place the hinge supports in the hinge slots.
Open the door to the fully opened position.
2. Disengage the lock from the hinge lever hooks on both sides (Figure 3).
Note: Make sure the hinge supports are fully engaged before unlocking the
hinge levers.
3. Close the oven door.
Specia_ Door Care Instructions - Most oven doors contain glass that
can break.
Read the following recommendations:
1. Do not close the oven door until all the oven racks are fully in place.
2. Do not hit the glass with pots, pans, or any other object.
3. Scratching, hitting, jarring or stressing the glass may weaken its structure
causing an increased risk of breakage at a later time.
24

Genera Care & CReaning (cont'd)
Removing and Replacing the E×ternal Door G_ass Pane_
AppHcaMe onUyto modeUs with an externaU gUass paneUnot heUdwith frame, This design allows you to dean the inside
face of the exterior door paneU as well as the hidden face of the door inner gUass,
To Remove the External Door Glass Paneh
1, Remove the door as described in Removing and Replacing the Oven Door section and Uaythe door fiat,
2, Using a screwdreiver, remove the 5 screws fastening the gUass& moUding assemMy,
3, Grasp both sides of the glass panel and slowly pull it out of the door upper molding, Lay the glass flat,
To Reptace the ExternaJ Door Glass Paneh
1, Grasp the sides of the glass panel carefully insert the glass into the door top molding,
2, Replace the 5 locking screws,
3, Replace the door onto the range,
Handle the glass panel with care, When dropped on a corner, the glass panel may shatter, This can
cause several persona injury,
Storage Drawer
Use the storage drawer for storing cooking utensils, The drawer can de removed to facilitate cleaning under the range, Use
care when handling the drawer,
Roller
Roller
Guide
-(
Front
Frame
Storage
Drawer
Removing and Replacing Storage Drawer
To remove the drawer:
1, Pull empty drawer out to the roller guide stop,
2, Tilt the drawer up and pull it out over the rollers,
To replace the drawer:
1, Insert the rear end of the drawer into the opening,
2, Fit the drawer end rollers onto the guide rails,
3, Push the drawer in until it stops, then lift to allow the rollers to clear the
roller guide stop, and push in,
25
Genera Care & C eaning (cont'd)
Changing Oven Light
Be sure the oven is unpUugged and aHparts are COOL before repUacing the oven Hght buUb.Do not turn the
oven Hght on during a seUf-cbaning cycb. High temperature wHUreduce UampHfe.
On some modeUsan interior oven Hght wHUturn on automatbaHy when the oven is opened.
The oven Hght may be turned on when the door is dosed by using the oven Hght switch bcated on the Ebctronb Oven
control
The oven Hght buUbis covered with a gUassshbUd heUdin pUaceby a wire hoUder.THIS GLASS SHIELD MUST ALWAYS
BE IN PLACE WHEN THE OVEN IS IN USE.
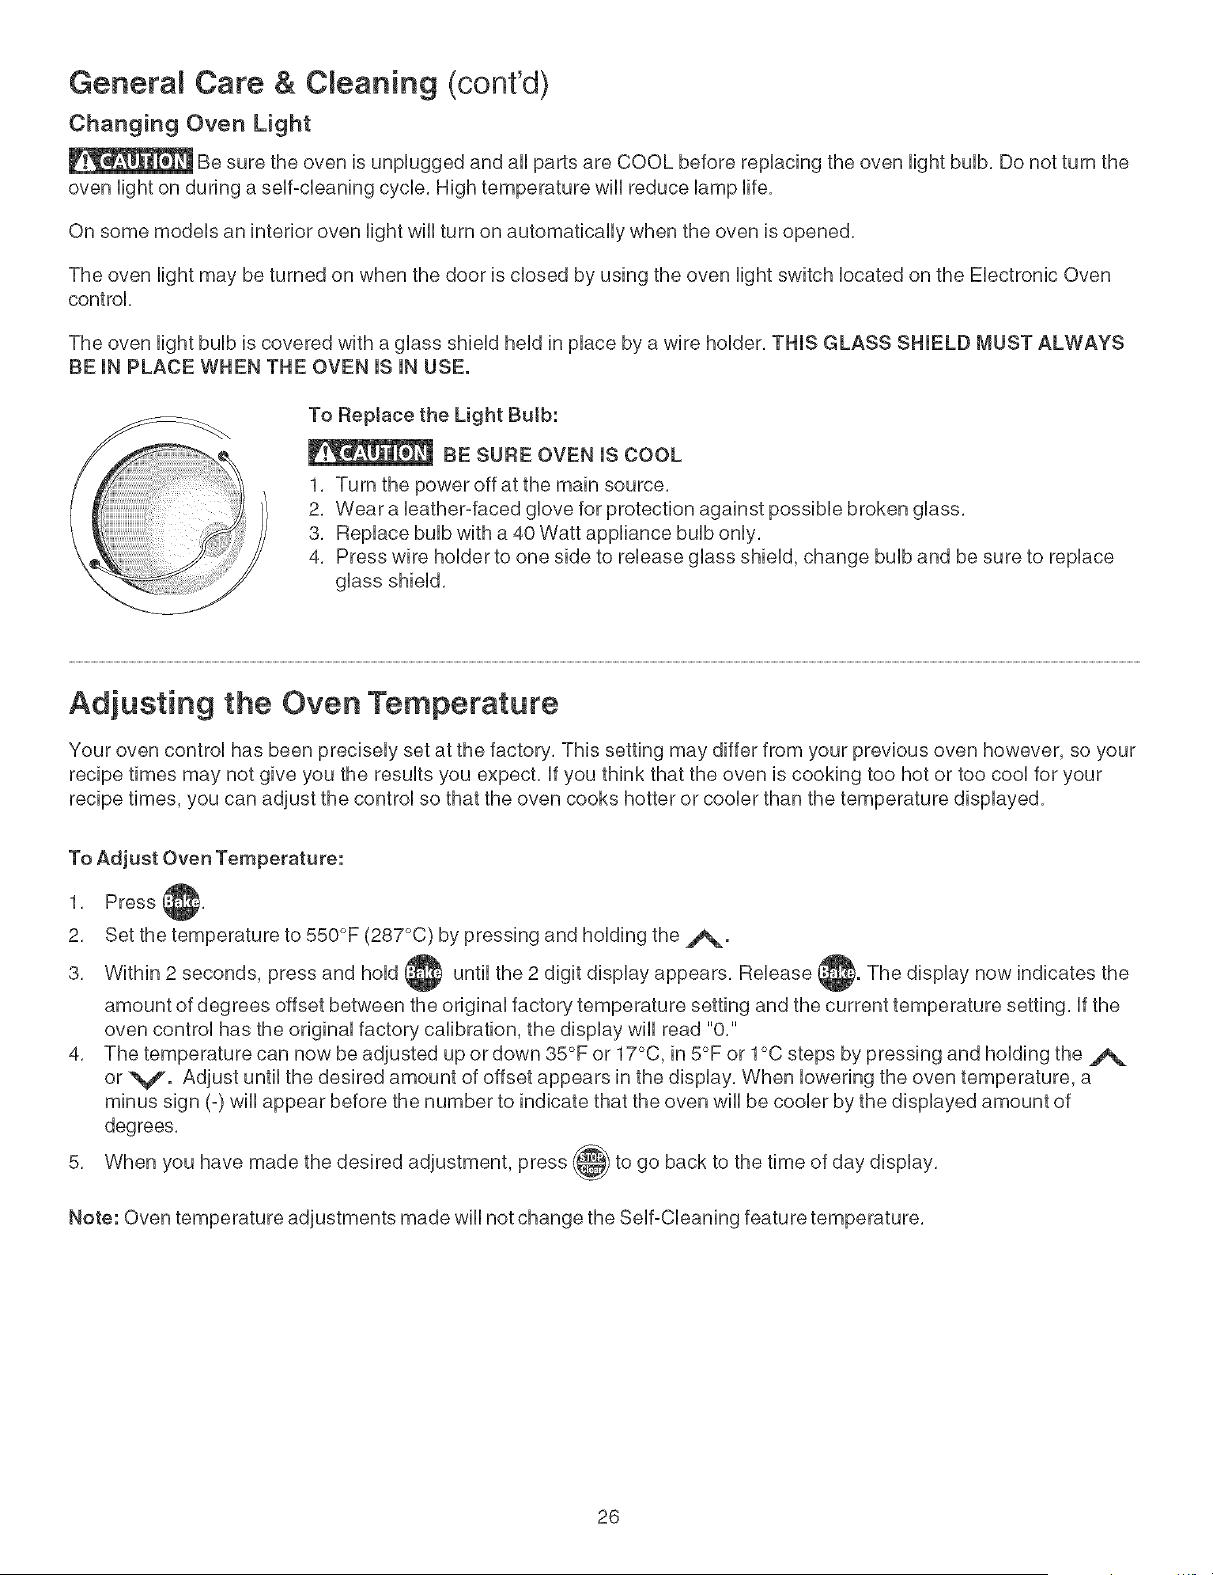
To Reptace the Light Butb:
BE SURE OVEN IS COOL
1. Turn the power off at the main source.
2. Wear a bather-faced glove for protection against possible broken glass.
3. Replace bulb with a 40 Watt appliance bulb only.
4. Press wire holder to one side to release glass shield, change bulb and be sure to replace
glass shield.
Adjusting the Oven Temperature
Your oven control has been precisely set at the factory, This setting may differ from your previous oven however, so your
recipe times may not give you the results you expect, if you think that the oven is cooking too hot or too cool for your
recipe times, you can adjust the control so that the oven cooks hotter or cooler than the temperature displayed,
To Adjust Oven Temperature:
1,
2.
3.
4,
Press
Set the temperature to 550°F (287°C) by pressing and holding the j%.
Within 2 seconds, press and hold I until the 2 digit display appears. Release The display now indicates the
amount of degrees offset between the original factory temperature setting and the current temperature setting, if the
oven control has the original factory calibration, the display will read "0."
The temperature can now be adjusted up or down 35°F or 17°C, in 5°F or 1°C steps by pressing and holding the ._
or V. Adjust until the desired amount of offset appears in the display. When lowering the oven temperature, a
minus sign (-) will appear before the number to indicate that the oven will be cooler by the displayed amount of
degrees.
When you have made the desired adjustment, press ,to go back to the time of day display.
Note: Oven temperature adjustments made will not change the Self-Cleaning feature temperature.
26
Before You Calt
Solutions to Common Problems
Before you ca/I for service, review this Hst, Utmay save you time and expense, The Hst incUudes common occurrences
that are not the resuUtof defective workmanship or materiaUs in this appliance,
OCCURRENCE
Range is not level
POSSmBLE CAUSE/SOLUTmON
Poor instailation= Place oven rack in center of oven= Place a Ievel on the oven rack=
Adjust leveling legs at base of range until the rack is Ievel. When range is level,
cooktop may appear out of aIignment if countertop is not level.
Weak, unstabIe floor. Be sure floor is leveI and can adequately support range. If floor
is sagging or slopping, contact a carpenter to correct the situation.
Kitchen cabinet misalignment may make range appear to be unlevel. Be sure
cabinets are square and have sufficient room for range clearance.
Cannot move appliance easily.
Appliance must be accessibme for
service.
Cabinets not square or are built in too tight. Contact a cabinet maker to correct the
problem.
Contact builder or installer to make appliance accessible.
Carpet interferes with range. Provide sufficient space so range can be lifted over
carpet.
Entire range or oven does not operate.
Gas line is hard-plumbed. Have a flexible C.S.A international approved metal
appliance connector installed.
Make sure cord/plug is plugged tightly into outlet.
iii_iiii!_i_!i!i_'i
,_iii,,,i!_ili_
Service wiring is not complete. Call 1=800-4-MY=HOME ® (See back cover).
Electrical power outage. Check house lights to be sure. GalI your local electric
company for service. Surface burners can be Ht manually.
*Oven control beeps and displays any F Electronic contro! has detected a fault condition. Press STOP!CLEAR to clear the
code error (for exempme Fll) display and stop beeping. Reprogram oven. If fault recurs, record fault number. Press
STOP/CLEAR and calI 1=800-4=MY-HOME ® for assistance (See back cover).
Oven light does not work.
Replace or tighten bulb. See Changing Oven Light section in this Use & Care Guide.
Electrical power outage. Check house lights to be sure. CalI your local electric
compagny for service.
Surface burners do not might,
Surface control knob has not been completely turned to LITE. Push in and turn the
surface control knob to MTE until burner ignites and then turn the surface control
knob to the desired flame size.
Burner ports are clogged. Clean burners. See "Cleaning the Burner Grates, Burner
Caps and Burner Heads" under General Cleaning.
Range power is disconnected from outlet. Be sure cord is securely plugged into the
outlet.
Electrical power outage.
Surface burner flame burns haft way
around.
Be sure the gas supply to the range is turned "ON".
Burner ports or slots are clogged. With the burner off, use a small-gauge wire or
needle to clean ports or slots.
Moisture is present after cleaning. Lightly fan the flame and allow the burner to
operate until flame is full= Dry the burners thoroughly following instructions under
General Cleaning.
27
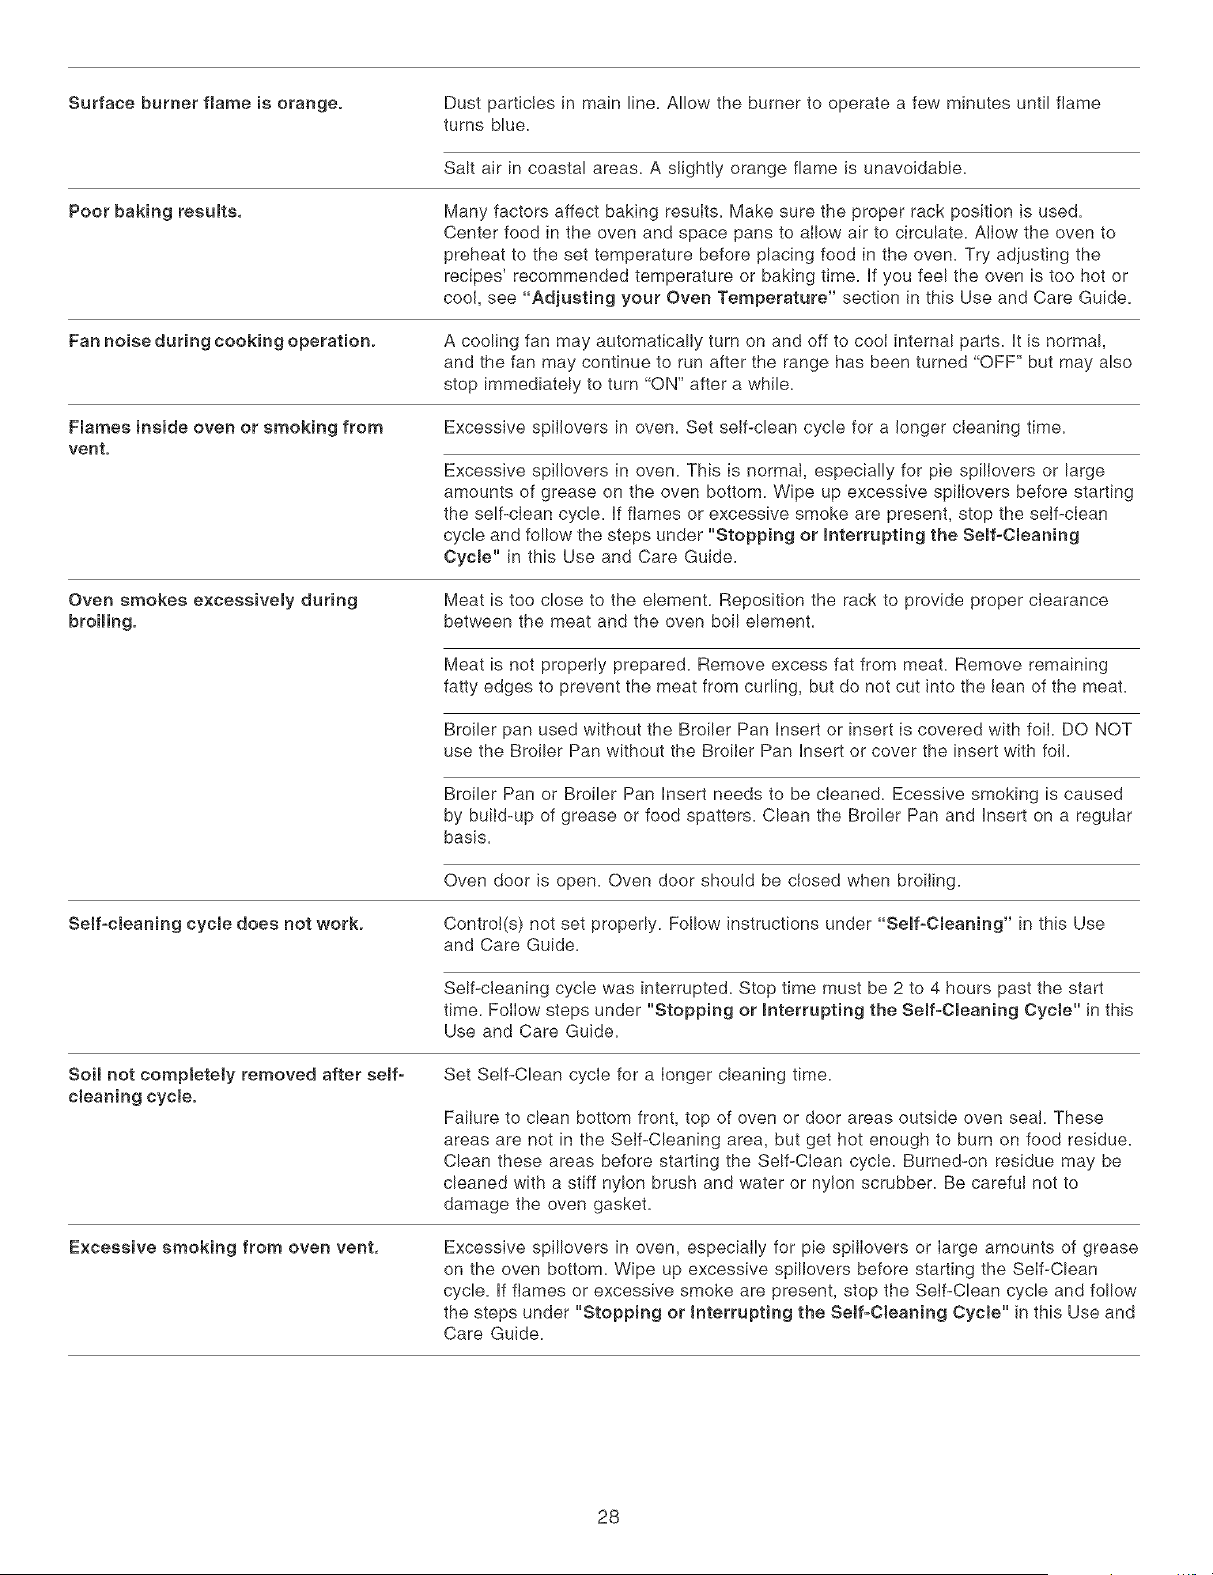
Surface burner flame is orange. Dust particles in main line. Allow the burner to operate a few minutes until flame
turns blue.
Salt air in coastal areas. A slightly orange flame is unavoidable.
Poor baking results. Many factors affect baking results. Make sure the proper rack position is used.
Center food in the oven and space pans to allow air to circulate. Allow the oven to
preheat to the set temperature before placing food in the oven. Try adjusting the
recipes' recommended temperature or baking time. if you feel the oven is too hot or
cool, see "Adjusting your Oven Temperature" section in this Use and Care Guide.
Fan noise during cooking operation. A cooling fan may automatically turn on and off to cool internal parts. It is normal,
and the fan may continue to run after the range has been turned "OFF" but may also
stop immediately to turn "ON" after a while.
Flames inside oven or smoking from Excessive spiIIovers in oven. Set self-clean cycle for a longer cleaning time.
vent.
Excessive spillovers in oven. This is normal, especially for pie spillovers or large
amounts of grease on the oven bottom. Wipe up excessive spilIovers before starting
the self-clean cycle. If flames or excessive smoke are present, stop the self-clean
cycle and follow the steps under "Stopping or _nterrupting the Seff-Cmeaning
Cycme" in this Use and Care Guide.
Oven smokes excessively during
broiling.
Meat is too close to the element. Reposition the rack to provide proper clearance
between the meat and the oven boil element.
Meat is not properly prepared. Remove excess fat from meat. Remove remaining
fatty edges to prevent the meat from curling, but do not cut into the lean of the meat.
Broiler pan used without the Broiler Pan Insert or insert is covered with foil. DO NOT
use the Broiler Pan without the Broiler Pan Insert or cover the insert with foil.
Broiler Pan or Broiler Pan Insert needs to be cleaned. Ecessive smoking is caused
by build-up of grease or food spatters. Clean the Broiler Pan and Insert on a regular
basis=
Oven door is open. Oven door should be closed when broiling.
Seff-c_eaning cycme does not work. Control(s) not set properly. Follow instructions under "Seff-Cmeaning" in this Use
and Care Guide.
Self-cleaning cycle was interrupted. Stop time must be 2 to 4 hours past the start
time. Foilow steps under "Stopping or _nterrupting the Seff-Cmeaning Cycle" in this
Use and Care Guide.
Soil not completely removed after serf-
cleaning cycle.
Set Self-Clean cycle for a Ionger cleaning time.
Failure to clean bottom front, top of oven or door areas outside oven seal These
areas are not in the Self-Cleaning area, but get hot enough to burn on food residue.
Clean these areas before starting the Self-CIean cycle. Burned-on residue may be
cleaned with a stiff nylon brush and water or nylon scrubber. Be careful not to
damage the oven gasket.
Excessive smoking from oven vent, Excessive spillovers in oven, especially for pie spiIIovers or large amounts of grease
on the oven bottom. Wipe up excessive spillovers before starting the SeIf-Clean
cycle. If flames or excessive smoke are present, stop the Self-Clean cycle and follow
the steps under "Stopping or Interrupting the Setf=O_eaning Cycle" in this Use and
Care Guide.
28

Notes
29

iiiiiiiiiiiiiiiiilj_¸'_¸¸¸¸¸¸ Your.ome
'"'"'"'"'"" iiiiiiiiiiiiiiiiiii
For repair-in your home-of aH major brand appHiances,
lawn and garden equipment, or heating and cooling systems,
no matter who made it, no matter who scrod it! ......................................
iiiiiiiiiiiiiiiii iiiiiiiiiiiiiiiiiii
For the replacement parts, accessories and
owner's manuaHs that you need to do-it-yourself. ......................................
For Sears professionam installation of home appliances
and items like garage door openers and water heaters.
_1°800-469°4683>
Call anytime, day or night (U.S.A. and Canada)
_orr_p_,ofc_rry-_o_to_smikov_coo_s,l_wo<o_p_oot,
and electronics, call or go on-line for the location of your nearest
Sears ?rts & Rep.air Center.
1 800 488 1222
Call anytime, day or night (U.S.A. only)
www.sears.com
To purchase a protection agreement (U.S.A.)
or maintenance agreement (Canada) on a product serviced by Sears:
1-8oo-827-6655_o.s._._ 1-8o0-361-686s_cooo0o_
Para pedir servicio de reparaoi6n Au Canada pour service en fran£;ais:
a domicilio, y para ordenar piezas: Io800oLEoFOYERMC
1"888-SU-HOGARSM (1°800°533°6937)
(1-888W84-6427)
TM SM
® Registered Trademark / Trademark / Service Mark of Sears, Roebuck and Co.
® Mama Registrada / TM Marca de Fabrica / sM Marca de Servicio de Sears, Roebuck and Co.
MD
MCMarque de commerce / Marque d6,pos6e de Sears, Roebuck and Co.
© Sears, Roebuck and Co.
@
Gas
Slide-in models
gas
Modelos deslizables
Models, Modelos 790.3667"I."
.,. = Color number, numero de color
0 0 0 0
!ii...............
Sears Roebuck and Co., Hoffman Estates, mL (}0179 U.S.A.
www, sears°com
P/N 318200877 Revo B (0410)
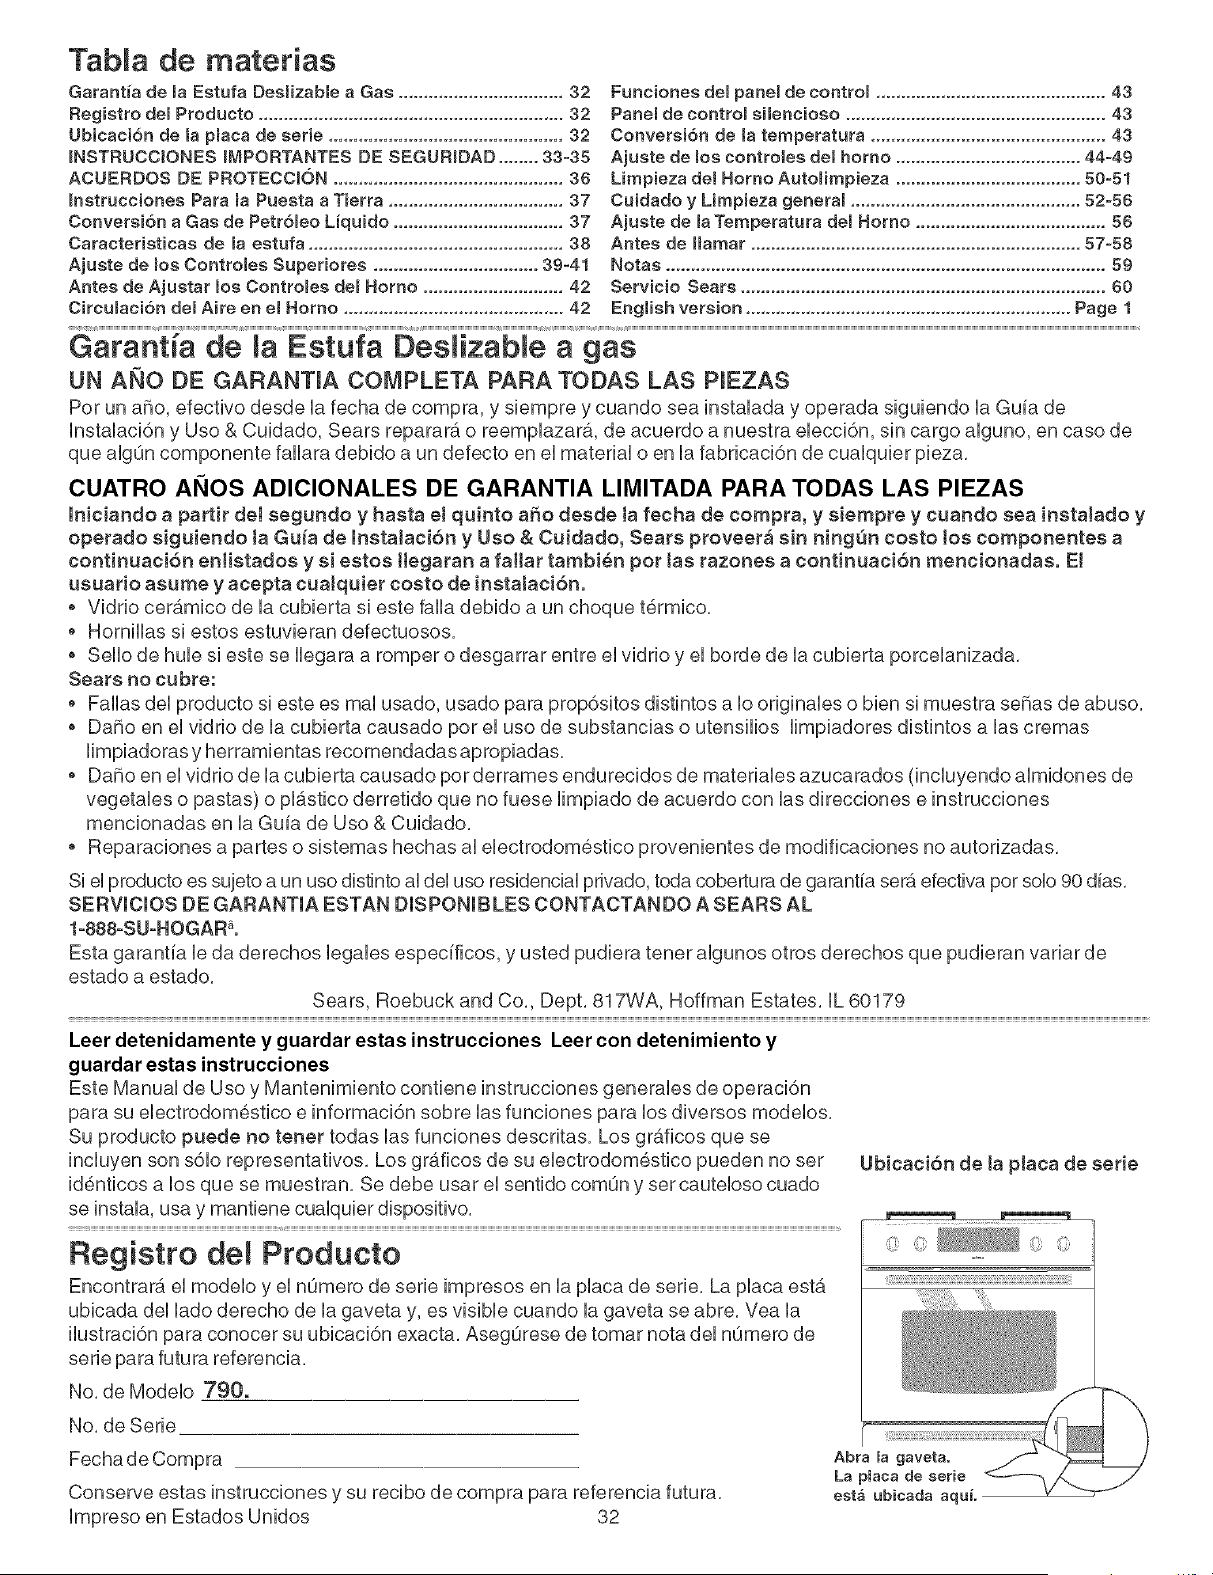
TabRa de materias
Garantta de maEstufa Deslizable a Gas ................................. 32
Registro demProducto ............................................................. 32
Ubicaci6n de la placa de serie ............................................... 32
_NSTRUCCJONES_MPORTANTESDE SEGURIDAD ........ 33-35
ACUERDOS DE PROTECCI6N .............................................. 36
_nstrucciones Para la Puesta a Tierra ................................... 37
Conversi6n a Gas de PetrSleo Liquido .................................. 37
Caracteristicas de la estufa ................................................... 38
Ajuste de los Controles Superiores ................................. 39-41
Antes de Ajustar los ContromesdemHomo ............................ 42
Circumaci6ndet Aire en el Homo ............................................ 42
Funciones deBpanemde controm .............................................. 43
Panel de control sileneioso .................................................... 43
Conversi6n de la temperatura ............................................... 43
Ajuste de los contre_es del homo ..................................... 44=49
Limpieza delHomo AutoHmpieza ..................................... 50=51
Cuidado y Limpieza generam .............................................. 52°56
Ajuste de la Temperatura deB Homo ...................................... 56
Antes de Hamar .................................................................. 57-58
Notas ........................................................................................ 59
Servicio Sears ......................................................................... 60
English version ................................................................. Page 1
Garant a de Estufa Des izab e a gas
UN ANO DE GARANT_A COMPLETA PARA TODAS LAS P_EZAS
Por un a_o, efectivo desde la fecha de compra, y siempre y cuando sea instalada y operada siguiendo la Guia de
Instalaci6n y Uso & Cuidado, Sears reparar_, o reemplazar_., de acuerdo a nuestra ebcci6n, sin cargo alguno, en caso de
que algQn componente fallara debido a un defecto en el material o en la fabricaci6n de cualquier pieza.
CUATRO ANOS ADICIONALES DE GARANTIA LIMITADA PARA TODAS LAS PIEZAS
lniciando a partir de_ segundo y hasta e_quinto a_o desde _afecha de compra, y siempre y cuando sea insta_ado y
operado siguiendo _a Gu_a de lnsta_aci6n y Uso & Cuidado, Sears proveer_ sin ningQn costo _os componentes a
continuaci6n enHstados y si estos Hegaran a faHar tambi_n pot tas razones a continuaci6n mencionadas. E_
usuario asume y acepta cua_quier costo de insta_aci6n.
o Vidrio ceramico de la cubierta si este falla debido a un choque t_rmico.
o Hornillas si estos estuvieran defectuosos.
o Sello de hub si este se Ibgara a romper o desgarrar entre el vidrio y el borde de la cubierta porcelanizada.
Sears no cubre:
o Fallas del producto si este es mal usado, usado pare prop6sitos distintos a Io originabs o bien si muestra sepias de abuso.
o Da_o en el vidrio de la cubierta causado por el uso de substancias o utensilios limpiadores distintos alas cremas
limpiadoras y herramientas recomendadas apropiadas.
o Da_o en el vidrio de la cubierta causado por derrames endurecidos de materiabs azucarados (incluyendo almidones de
vegetabs o pastas) o pl#,stico derretido que no fuese limpiado de acuerdo con las direcciones e instrucciones
mencionadas en la Guia de Uso & Cuidado.
o Reparaciones a partes o sistemas hechas al ebctrodomestico provenientes de modificaciones no autorizadas.
Si el producto es sujeto a un uso distinto al del uso residencial privado, toda cobertura de garantia sera efectiva por solo 90 dias.
SERViCIOS DE GARANTIA ESTAN DISPONIBLES CONTACTANDO A SEARS AL
1-888-SU-HOGAR _.
Esta garantia le da derechos bgabs especificos, y usted pudiera tener algunos otros derechos que pudieran variar de
estado a estado.
Sears, Roebuck and Co., Deist. 817WA, Hoffman Estates. IL 60179
Leer detenidamente y guardar estas instrueeiones Leer con detenimiento y
guardar estas instrueeiones
Este Manual de Use y Mantenimiento contiene instrucciones generales de operaci6n
para su electrodomestico e informaci6n sobre las funciones para los diversos modelos.
Su producto puede no tenet todas las funciones descritas. Los gr_.ficos que se
incluyen son s61o representatives. Los graficos de su electrodom6stico pueden no ser Ubioaoi6n de ta plaea de serie
id6nticos a los que se muestran. Se debe usar el sentido comQn y ser cauteloso cuado
se instala, usa y mantiene cualquier dispositivo. - _ ....
Producto }
Encontrar_. el modelo y el nQmero de serie impresos en la place de serie. La placa est,.
ubicada del lade derecho de la gaveta y, es visible cuando la gaveta se abre. Vea la
ilustraci6n para conocer su ubicaci6n exacta. AsegQrese de tomar nota del nOmero de
serie para futura referencia.
No. de Modelo 790.
No. de Serie
Fecha de Compra
Conserve estas instrucciones y su recibo de compra para referencia futura.
Impreso en Estados Unidos 32
Abra _a gaveta.
La p_aca de serie
est_ ubicada aqu_.
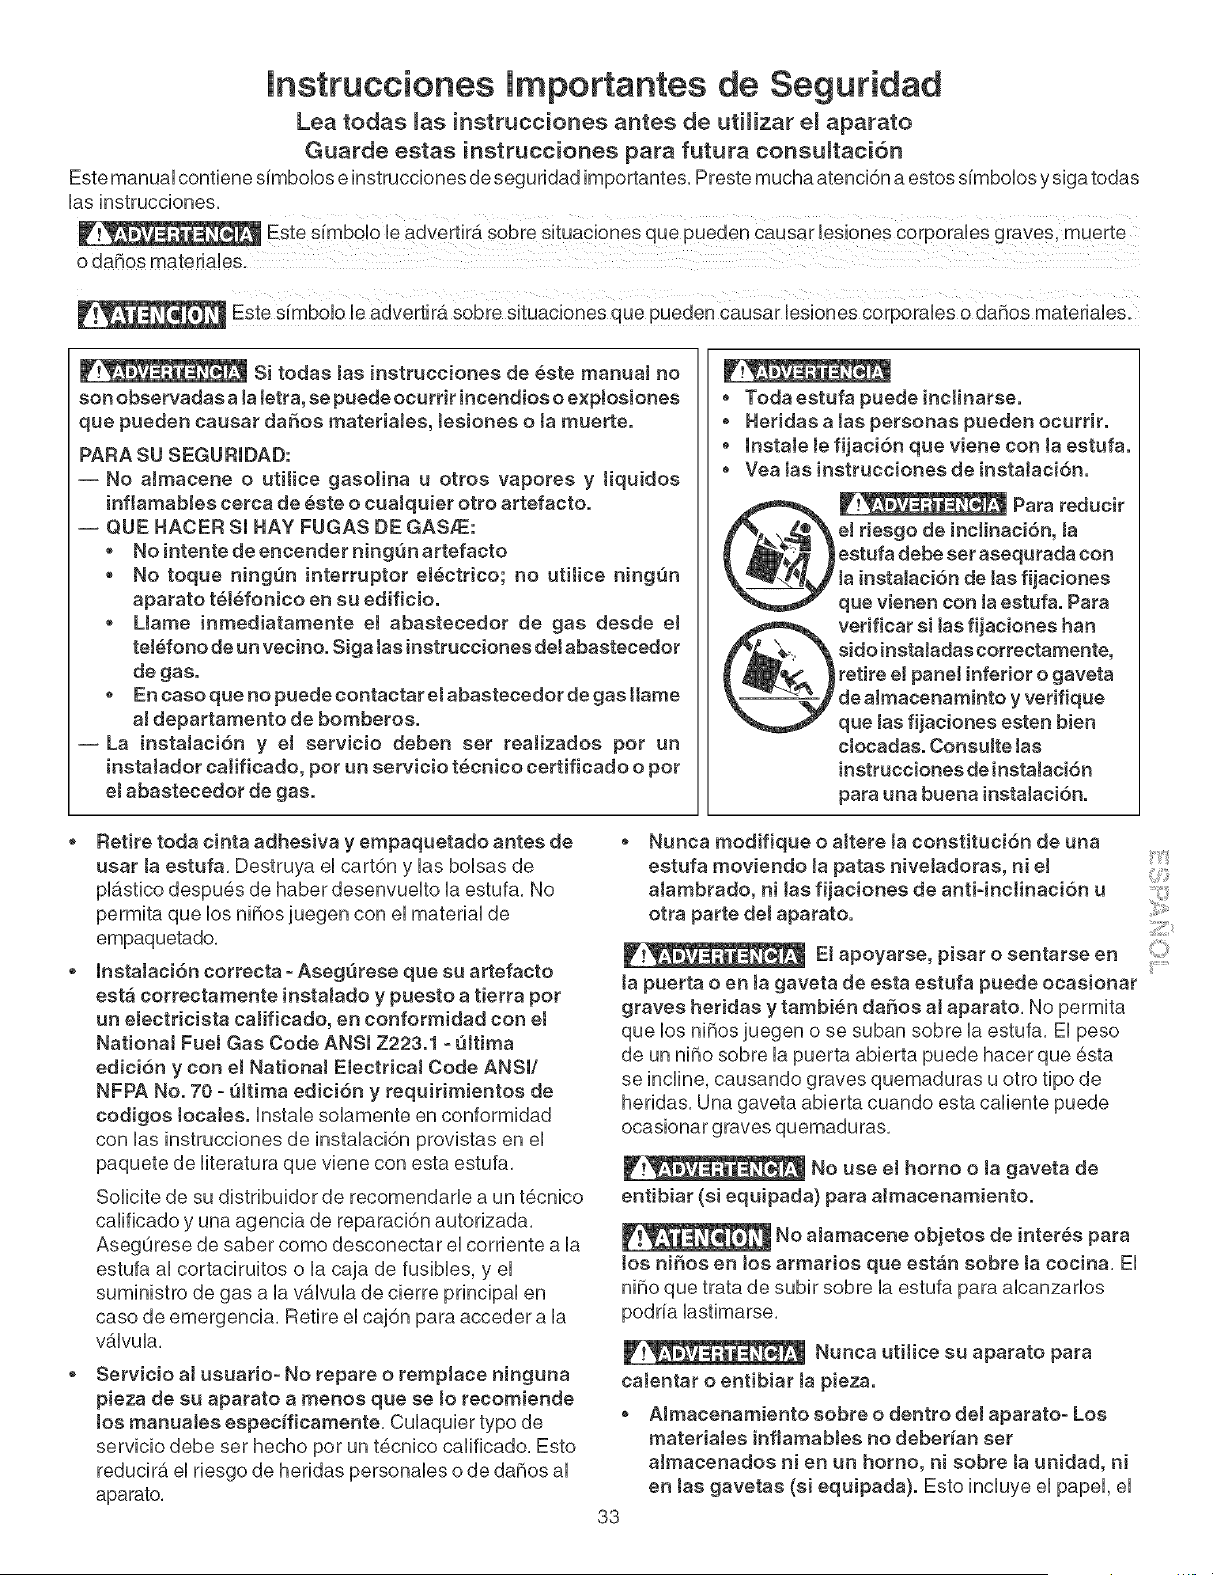
lnstrucciones lmportantes de Seguridad
Lea todas _as instruccionee antes de uti_izar e_aparato
Guarde estas instrucciones para futura consu_taci6n
Este manual contiene simbobs e instrucciones de seguridad importantes, Preste mucha atenci6n a estos simbolos y siga todas
las instrucciones,
Este simboio Beadvertira sobre situaciones que pueden causar lesiones corporales o daSos materiales.
Si todas 1as instrucciones de eete manual no
son observadas a la Jetra, se puede ocurrir incendios o expJosiones
que pueden causar daSos materiaJes, lesiones o ta muerte.
PARA SU SEGURIDAD:
-- No almacene o utilice gasoJina u otros vapores y tiquidos
inflamabJes cerca de _ste o cuaJquier otto artefacto.
-- QUE HACER Si HAY FUGAS DE GASlE:
, No intente de encender ning_n artefacto
o No toque ningQn interruptor eJ_ctrico; no utilice ningQn
aparato telefonico en su edificio.
, Uame inmediatamente eJ abastecedor de gas desde el
teJ_fono de un vecino. Siga tas instrucciones del abastecedor
de gas.
* En caso que no puede contactar el abastecedor de gas ttame
ai departamento de bornberos.
--La instalaci6n y eJ servicio deben set realizados pot un
instaJador calificado, pot un servicio tecnico certificado o pot
eJ abastecedor de gas.
, Toda estufa puede inclinarse.
o Heridas alas personas pueden ocurrir.
o lnstale Jefijaci6n que viene con Ja estufa.
o Vea Jas instrucciones de instaJaci6n.
_ Para reducir
el riesgo de incHnaci6n, la
estufa debe set asequrada con
la instalaci6n de tas fijaciones
que vienen con Jaestufa. Para
vedficar si Jasfijaciones hart
sido instaJadas correctamente,
retire el paneJ inferior o gaveta
de almacenaminto y verifique
que las fijaciones esten bien
ctocadas. ConsuJte Jas
instrucciones de instaJaci6n
para una buena instaJaci6n.
Retire toda cinta adhesiva y empaquetado antes de
usar ta estufa, Destruya el cart6n y las bolsas de
plastico despu6,s de haber desenvuelto la estufa, No
permita que los niSos juegen con el material de
empaquetado,
lnstaJaci6n correcta - AsegQrese que su artefacto
est_ correctamente instalado y puesto a tierra pot
un electricista caJificado, en conformidad con et
NationaJ FueJ Gas Code ANSi Z223.1 =Q_tima
edici6n y con el Nationa_ Ebctrica_ Code ANSi/
NFPA No. 70 - Q_tima edici6n y requirimientos de
codigos tocabs. Instab solamente en conformidad
con las instrucciones de instalaci6n provistas en el
paquete de literatura que viene con esta estufa,
Solicite de su distribuidor de recomendarle a un t6cnico
calificado y una agencia de reparaci6n autorizada,
AsegOrese de saber como desconectar el corriente a la
estufa al cortaciruitos o la caja de fusibles, y el
suministro de gas a la vbJvula de cierre principal en
case de emergencia, Retire el caj6n para acceder a la
v_.lvula,
Servicio a_ usuario- No repare o remp_ace ninguna
pieza de su aparato a menos que se to recomiende
tos manuabs especfficamente, Culaquier typo de
servicio debe ser hecho per un tecnico calificado, Esto
reducir_, el riesgo de heridas personales o de daSos al
aparato,
Nunca modifique o aitere _aconstituci6n de una
estufa moviendo _apatas nive_adoras, ni e_
aiambrado, ni _as fijaciones de anti-inctinaci6n u
otra parte det aparato.
E_apoyarse, pisar o sentarse en
ta puerta o en _agaveta de esta estufa puede ocasionar
graves heridas y tambi_n daSos a_aparato, No permita
que los niSos juegen o se suban sobre la estufa, El peso
de un niSo sobre la puerta abierta puede hacer que esta
se incline, causando graves quemaduras u otro tipo de
heridas, Una gaveta abierta cuando esta caliente puede
ocasionar graves quemaduras,
No use el homo o ta gaveta de
entibiar (si equipada) para a_macenamiento.
No a_amacene objetos de interns para
tos ni_os en _os armarios que est_n sobre ta cocina, El
niSo que trata de subir sobre la estufa para abanzarlos
podria lastimarse,
Nunca utilice su aparato para
ca_entar o entibiar _apieza.
o AImacenamiento sobre o dentro de_ aparato- Los
materia_es inflamab_es no deber_an set
a_macenados ni en un homo, ni sobre ta unidad, ni
en tas gavetas (si equipada). Esto incluye el papel, el
33
¸:¸112¸:i_
lnstrucciones lmportantes de Seguridad
pU6.stboy Uaropa como: Hbros de cocina, recipbntes de
pU_.stboo toaHas, asi como Uiquidos infiamabbs, No
aUmacene expbsivos como Uatasde aeros6U sobre o
dentro deUaparato, Los materHes inflamabbs pueden
expbtar y ocasionar fuego o da_os a Uapropbdad,
o No deje a tos niSos solos- Los ni_os no deben set
dejados solos o sin atenci6n donde el aparato est_
funcionando, No bs permita sentarse o pararse sobre
niguna parte deUaparato,
o NOTOQUEA LASUPERFICIE DE LOS
QUEMADORES, AREAS CERCA DE ESTOS
QUEMADORES, ELEMENTOS CALIENTES DEL
HORNO 0 LA SUPERFICIE AL INTERIOR DEL
HORNO 0 EL CAJON PARA CALENTAR (si est_
equipado). La supedicie de los quemadores y los
ebmentos del homo pueden estar calientes aOn cuando
est_.n de color moreno, Areas cerca de la supedicie de
los quemadores pueden estar suficientemente calientes
para causar quemaduras, Durante y despues uso, no
toque y no deje ropa o otro material infiamabb entrar en
contacto con estos _.reas antes de dejarbs enfriarse,
Entre estos areas son la plancha de cocinar y la
superficie en frente de la plancha de cocinar, las
aberturas de ventilaci6n del homo y la superficie cerca
de estas aberturas, la puerta del homo y la ventana,
o Use una vestimenta apropiada- No use ropa que es
suelta u holgada cuando utilice et aparato. No ponga
la ropa u otros materiabs infiamabbs en contacto con
las areas calientes,
No utiHce agua o hadna para apagar un fuego-
Apague el fuego con ta tapa de una sarten o use
soda c_ustica, un qu_mico seco o un e×tinguidor en
aeros61.
Cuando caJiente substancias grasosas, tenga
cuidado, Puede ocasionar un fuego si es cabntado por
En caso de incendio o fugas de gas,
asegQrese de cerrarta v_lvula de cierre principal
Utitiee unieamente los soportes para recipientes que
esten seeos- Los soportes que est_n hQmedos o
mojados puden ocasionar quemaduras a causa de1
vapor. No permita que los soportes est6n en contacto
con las superficies calientes, No utilice una toalla o un
papel para remplazar al soporte,
Los controles eJ@ctricos pueden
set
daSados con frias temperaturas. Cuando utiHce su
estufa pot Japrimera vez, o si no ha sido utHizada pot
mucho tiempo asegQrese que no haya sido expuestas
a temperaturas m&s altas que 0°0/32°F pot m_s de 3
horas antes de conectar su estufa aJsuministro
et_ctrico.
mNSTRUCCmONES mMPORTANTES PARA
UTmUZAR SU PLANCHA DE COCmNAR
Use un tamaSo de caJdera adecuada -
Gradue el tamaSo de ta ttama de modo que no
sobrepase el borde deJ utensitio de cocina. El uso de
utensilio de tama_o menor que Io normal expondr_.
directamente una parte de la llama del quemador y puede
causar a la ropa de encenderse, El tamaSo de utensilio
apropiado a la llama mejorara, tambi6n la eficacia,
No use parrillas de homo superiores
sobre las depresiones de los quemadores sellados a gas -
Si use una parrilla de homo superior sobre un quemador a
gas sellado, va a occurir una combusti6n incompbta, y
puede generar nivebs de mon6xido de carbono superiores
a los estandares permitidos, Esto puede ser perjudicial
para la salud,
Aseg_3rese de saber cual bot6n enciende carla
unidad de superficie, Use siempre la posici6n de
ENCENDIDO (Lite) para prender los quemadores,
AsegOrese de que el quemador halla encendido,
Entonces ajuste la llama de manera que no sobrepase
el borde del utensilio de cocina,
Utilice una sarten de tama_o apropiado, Este aparato
est,. equipado con quemadores de diferentes tama_os,
Elija utensilios con las bases aplanadas y Io
suficientemente grandes para cubrir todo el area del
quemador, Utilizar utensilios m_.s peque_os puede
exporter parte del quemador y ocasionar quemaduras
de las prendas que Ibva puesta,
Los mangos de Jos utensHios deben set coJocados
hacia eJ interior y no sobre otras unidades de
superficie- Para reducir el riesgo de quemaduras, el
encendido de materiabs inflamabbs y los derrames
ocasionados de casualidad, El mango del utensilio debe
ser colocado hacia el interior y no sobre otras unidades
de superficie,
o No caliente recipientes de comida que est_n
cerrados- La presi6n aJinterior de estos puede
hacertos explotar y ocasionar heridas.
o Retire la puerta de1 homo de toda estufa inutilizada
si esta va set a_macenada o destru_da.
iMPORTANTE- No trate de utHizar el homo durante un
corte de etectricidad. Si no hay electricidad, apaga su
estufa, Si no apaga el homo y que la ebctricidad es
restabbcida, el homo puede seguir funcionando, La comida
que deja sin cuidado puede quemarse o deteriorarse,
34
Nunca deje _os quemadoreas con a_ta temperatura
sin cuidado° Los derrames ocasionan humo y
derrames grasosos que pueden encenderse, o una
sart@,nque ha calentado por mucho tiempo puede
derretirse,
Detineadores protectores- No utilice pelicula de
aluminium a la base del homo u otra parte del aparato,
S61outilizela para cubrir la comida cuando est6
coci6ndola, Cualquier otra utilizaci6n puede ocasionar
un incendio, una electrocuci6n o un cortocircuito,
lnstrucciones lmportantes de Seguridad
UteRsilios de cocina enviddados° S61o algunos tipos
de utensilios de vidrio, de vidrio/cer6.mica, de ceramica
pueden resistir la temperatura del quemador de su
plancha de cocinar, Verifique las recomendaciones del
fabricante sobre el uso con las planchas de cocinar,
No use cubiertas decorativas de superficie de
quernador, Si un quemador se encbnde
accidentaUmente, Uacubbrta decorativa va a cabntarse
y posibbmente fundirse, Se puede occurir quemaduras
si toque a Uascubbrtas caHentes, Esto puede tambi6n
daSar UapUanchade cocinar o bs quemadores porque
Uascubbrtas pueden causar sobrecabntambnto, EU
aire va a bbquear desde eUquemador y causar
probbmas de combusti6n,
PARA PLANCHAS DE COCmNAR
SOLAMENTE
o No lirnpie o utilice una ptaRcha de cocinar que est_
rota- Si la plancha de cocinar se rompe, los productos
de limpieza o los derrames pueden penetrar en ella y
producir un riesgo de ebctrocuci6n, Llame a un tecnico
calificado inmediatamente,
. No utitice ta cubeta parrHlera sin su accesorio, La
cubeta parrilbra y su accesorio permiten que la grasa
gotee y est6 bjos del calor de la parrilla,
. No cubra el accesorio de ta parritla con pel_cuJa de
aJurniRiO, La grasa que queda fuera podria encenderse,
No toque ta bombitta de Juz caliente con URa tela
mojada, Esto puede romper la bombilla, Antes de
retirar o remplazar la bombilla desconecte el aparato o
corte el suministro el6ctrico,
mMPORTANTES mNSTRUCCmONES PARA
UMPIAR SU COCINA.
. Limpie ta estufa regularrnente para manteRer todas
tas partes sin grasa que puede enceRderse y causar
UR iRcendio, La cubierta del escape de ventilaci6n y
los filtros de grasa deben estar limpios, No permita que
la grasa se acumub en la cubierta o en el filtro, Los
dep6sitos grasosos pueden encenderse y causar un
incendio, Cuando caliente comida bajo la cubierta,
encienda el ventilador, Consulte las instrucciones del
fabricante para la limpieza,
o Limpie el vidrio de [a pJaneha de cocinar con
cuidado- Si utiliza una esponja mojada para [[mpiar
derrames en una superficie caliente, tenga cuidado de
no quemarse con el vapor, Algunos productos de
limpieza puden producir peligrosas emanaciones si se
les usa sobre areas muy calientes,
. Evite de raspar el vidr[o de ta plancha de cocinar
con objetos muy filados.
HORNO CON AUTO-UMPIEZA
o Limpie en eJ ciclo de autoqimpieza unicamente 1as
partes que ester en ta tista del Manual deJ usuario,
Antes de autoqimpiar el homo, retire la cubeta pardlbra
y cualquier otro utensilio o comida del homo.
o No utHice Hmpiadotes de homo° NingOn limpiador de
homo comemial o de capa protectora de ninguna dase
debe ser utilizada en en homo,
mNSTRUCCIONES mMPORTANTES PARA
UTmUZAR SU HORNO
. Tenga cuidado cuando abra la puerta deJ homo o la
gaveta de eRtibiar (si equipada). Parese al lado de la
estufa cuando abra la puerta de un homo caliente, Permita
que el humo y el vapor se escaper antes de retirar o de
colocar comida en el homo/gaveta de entibiar,
ManteRga el conducto de ventHaci6R del homo sin
obstrucci6R, La rejilla del homo est#. ubicada detr_.s de
la plancha de cocinar a la derecha, Tocar estas areas
cuando el homo esta encendido puede ocasionar
graves quemaduras, No coloque objetos de plastico o
sensibbs al calor cerca del conducto de ventilaci6n,
Estos pueden derretirse o encenderse,
COJOCaCi6Rde Jas rejiHas deJ homo/gaveta de eRtibiar
(si equipada), Siempre coloque las rejillas del homo en la
posici6n deseada cuando el homo o la gaveta esten frios,
Si la rejilla debe ser desplazada cuando el homo est6
funcionando tenga bastante cuidado, Utilice unos soportes
para recipientes y coja la rejilla con ambas manos hasta
recolocada, No permita que estos soportes est6n en
contacto con los ebmentos calientes del homo o de la
gaveta de entibiar, Retire todo utensilio de la rejilla antes
de moverla,
o No Hmpie tas empaquetaduras dei homo- Las
empaquetaduras del homo son importantes para un
buen sellado, Tenga cuidado de no frotar, daSar o
desplazar las empaquetaduras,
o Retire Jas rejiltas de1 homo- El color de las rejillas del
homo cambiara sise bs deja en el homo durante el
ciclo de autoqmpieza,
La saJud de aJgunos p_jaros est& muy
seRsitiva a los humos que proveeR deJ cicio de auto-
timpieza de cuaJquier cociRa. Desplace tos p_jaros eR
otra habitaci6R bier ventitada.
ADVERTENCIA DE SEGURIDADIMPORTANTE
Ei California Safe Drinking Water y Toxic Enforcement Act
requiere al Gobierno de California de publicar una lista de
sustancias conocidas por el estado como causa de
c_.ncer, defectos de nacimiento u otros da_os
reproductivos, y requiere que se avisen los usuarios sobre
la exposici6n eventual a sustancias.
35
¸:¸112¸:i_
ACUERDOS DE PROTECCION
En _os EU.
Acuerdos Maestro de Protecci6n
FeHcitaciones pot haber hecho una compra inteHgente. Su
nuevo producto Kenmord _es dise_ado y manufacturado
para muchos a_os de servicio confiabUe. Pero como todo
producto, pod ria reque rir mantenimiento preventivo o
reparaci6n entre tiempo. Ahi es cuando eUtenet un Acuerdo
Maestro de Protecci6n Uepodria ahorrar dinero y moUestias.
Compre ya un Acuerdo Maestro de Proteccidn y pretejase
de gastos y frustraciones inesperadas.
EUAcuerdo Maestro de Protecci6n tambi6n ayuda a extender
Uavida de su nuevo producto. Esto es Uoque se incUuye en
eUAcuerdo.
[_ Servicio ProfesionaJ pot nuestros 12,000 especiaHstas
profesionales en reparaci6n.
[_ Servicio Himitado sin cargo pot piezas y servicio en
toda reparaci6n cubierta
[_ Garantia de"No-Hm6n'- reemplaza su producto
cubierto si ocurren cuatro o m_.s desperfectos dentro de
doce meses.
[_ Reemplazo de Producto si el producto cubierto no
puede set reparado.
5_ Verificaci6n de Mantenimiento Preventivo Anua! a su
petici6n sin cargos adicionales.
[Y_ Pronta ayuda pot tel_fono- apoyo pot tel6fono pot un
t6cnico de Sears en los productos que requieran
reparaci6n en casa, m_.s la conveniencia de hacer cita
para reparaci6n.
[_ Protecci6n contra picos de energia o daSos el6ctricos
causados pot fiuctuaciones en energia.
[_ Reembolso de aJquiter si la reparaci6n de su producto
cubierto toma m_.s tiempo de Io prometido.
Una vez compres el Acuerdo, una simple Ilamada telef6nica
es todo Io que necesitas para hacer cita para su servicio.
Puedes Ilamar a cualquier hora, dia o noche o concertar una
cita para se_,icio via computadora.
En Canada
Acuerdos de Mantenimiento
Su compra tiene valor mayor porque puedes depender de
Sears HomeCentraP para sewicio. Con sobre 2,400
T6cnicos de Servicios y m_.s de un millTn de piezas y
accesorios, tenemos las herramientas, piezas,
conocimiento y destrezas para asegurar nuestro
compromiso: Le damos servicio a Io que vendemos.
Su producto Kenmore_es diseSado y puesto a prueba para
proveer muchos aSos de operaci6n confiable. Pero como
todo producto, podria requerir se_,icio entre tiempo. El
Acuerdo de Mantenimiento Sears le ofrece un programa de
servicio incomparable a un precio m6dico.
El Acuerdo de Mantenimiento Sears:
Es su manera de comprar servicio para el maSana a
precio de hoy
Elimina facturas pot reparaci6n como resultado de uso y
desgaste normal
Provee apoyo via tel6,fono de un t6cnico de Sears en
productos que requieran reparaci6n en casa
. Aunque no necesite reparaci6n, provee Verificaci6n de
Mantenimiento Preventivo anual, a su petici6n, para
asegurar que su producto est,. en condiciones apropiadas.
AJgunas Hmitacionee podrian aplicar. Para m_s
informaci6n sobre et Acuerdo de Mantenimiento de
Sears Canada,
ttame aJ1-800-381-8885.
Sears tiene sobre 12,000 especialistas profesionales de
reparaci6n, con acceso a sobre 4.5 millones de piezas y
accesorios de calidad. Esa es la dase de profesionalismo
con la que puedes contar para ayudar a prolongar la vida de
su nueva compra pot muchos aSos. iCompre su Acuerdo
Maestro de Protecci6n hoy!
AJgunae limitaciones y e×cJusionee podrian apJicar.
Para precioe e informaciTn adicionaJ, ttame aJ 1-800-827-
6855.
Servicio de lnstaJaci6n Sears
Para instafaci4n profesiona/ de Sears en enseres del hogar,
abridores de puertas de garaje, calentadores de agua y otros
articulos mayores del hogar, en EU. Ilame al
1-800-4-MY-HOME ®
36
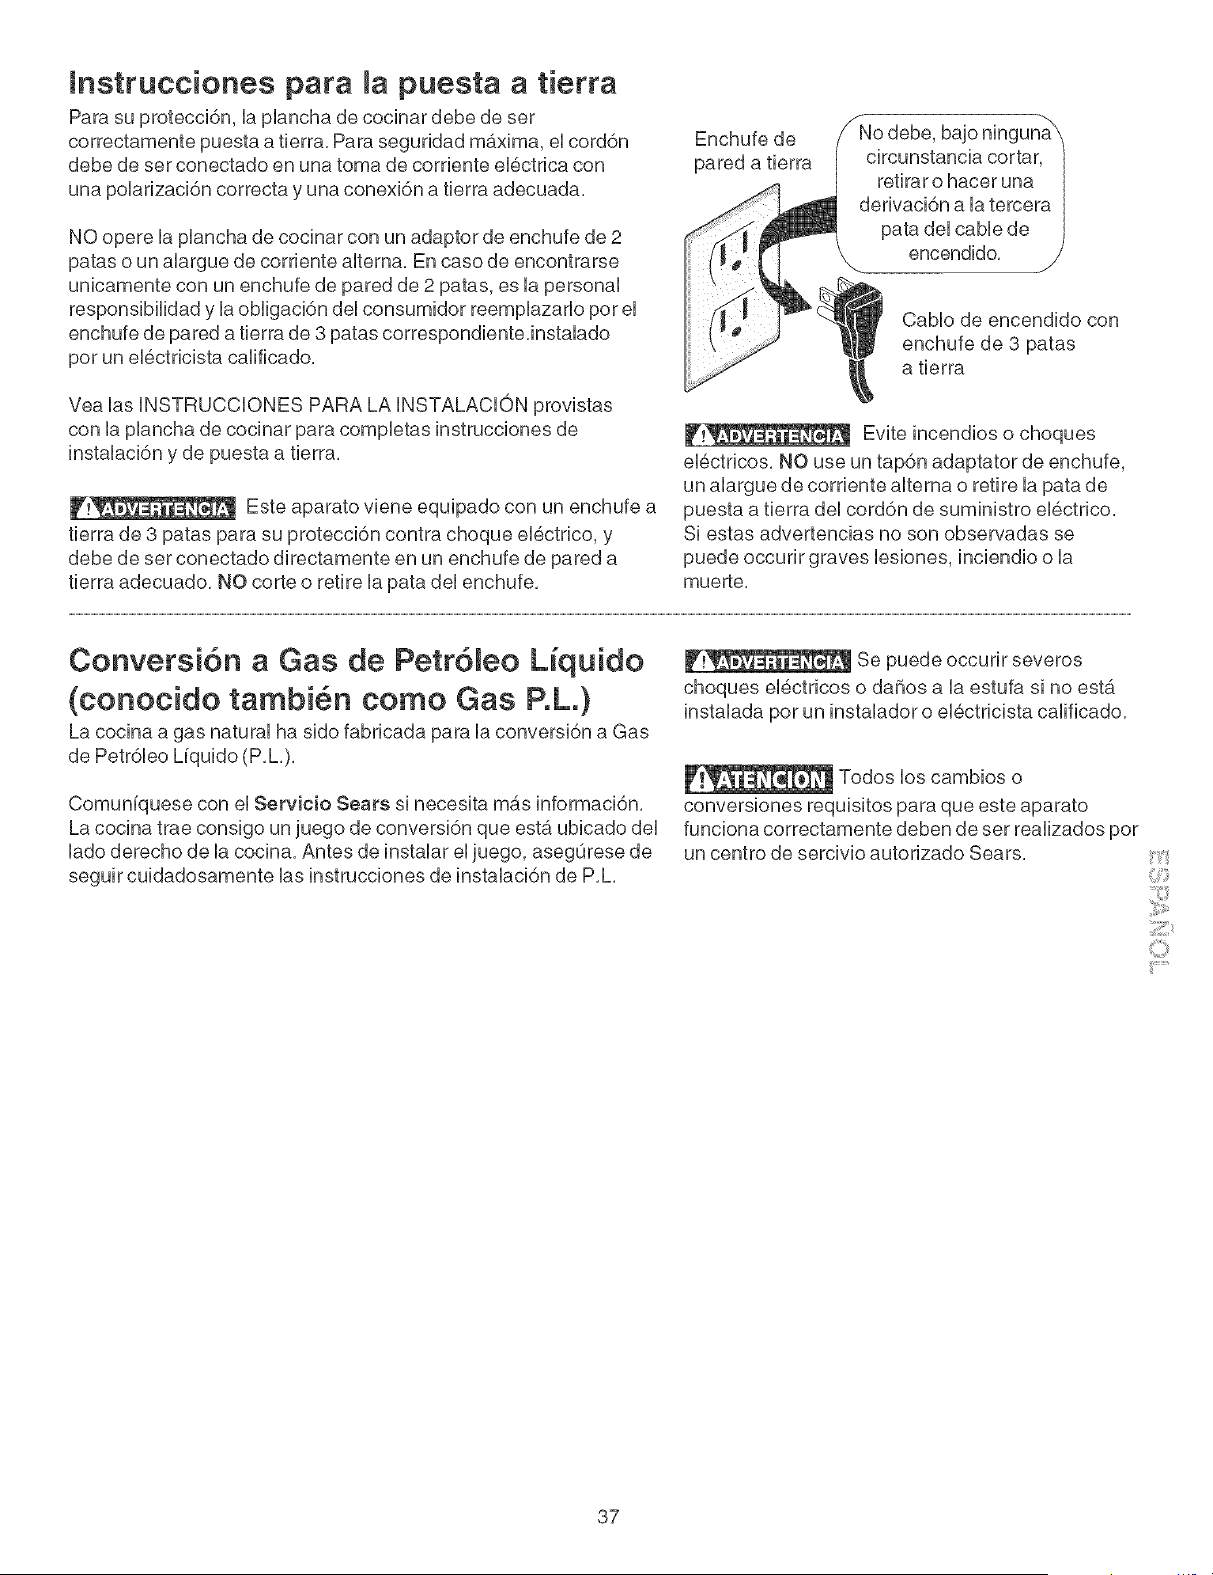
Instrucciones para la puesta a tierra
Para su protecci6n, UapUanchade cocinar debe de ser
correctamente puesta a tbrra. Para seguridad maxima, eUcorddn
debe de ser conectado en una toma de corrbnte eU6ctrba con
una poUarizacidn correcta y una conexidn a tbrra adecuada.
NO opere UapUanchade cocinar con un adaptor de enchufe de 2
patas o un aUarguede corrbnte aUterna.En case de encontrarse
unbamente con un enchufe de pared de 2 patas, es UapersonaU
responsibHidad y UaobHgaci6n deUconsumidor reempUazaHopor eU
enchufe de pared a tbrra de 3 patas correspondbnteJnstaUado
por un eU6ctrbista caHficado.
Yea UasUNSTRUCCUONES PARA LA UNSTALACUONprovistas
con UapUanchade cocinar para compbtas instrucciones de
instalaci6n y de puesta a tierra.
Este aparato viene equipado con un enchufe a
tierra de 3 patas para su protecci6n contra cheque el6ctrico, y
debe de ser conectado directamente en un enchufe de pared a
tierra adecuado. NO corte o retire la pata del enchufe.
Enchufe de
pared a tierra
encendido. _/
Cable de encendido con
enchufe de 3 patas
a tierra
Evite incendios o cheques
el6ctricos. NO use un tap6n adaptator de enchufe,
un alargue de corriente alterna o retire la pata de
puesta a tierra del cord6n de suministro el6ctrico.
Siestas advertencias no son observadas se
puede occurir graves bsiones, inciendio o la
muerte.
Conversi6n a Gas de Petr61eo L[quido
(conocido tambi n como Gas P.L.)
La cocina a gas natural ha sido fabricada para la conversi6n a Gas
Comuniquese con el Servicio Sears si necesita m_.s informaci6n.
La cocina trae consigo un juego de conversi6n que est,. ubicado del
lade derecho de la cocina. Antes de instalar el juego, asegOrese de
seguir cuidadosamente las instrucciones de instalaci6n de P.L.
Se puede occurir severos
choques el6ctricos o dafios a la estufa si no est6.
instalada per un instalador o el6ctricista calificado.
Todos los cambios
o
conversiones requisitos para que este aparato
funciona correctamente deben de set realizados pot
un centro de sercivio autorizado Sears,
¸:¸112¸:i_
37
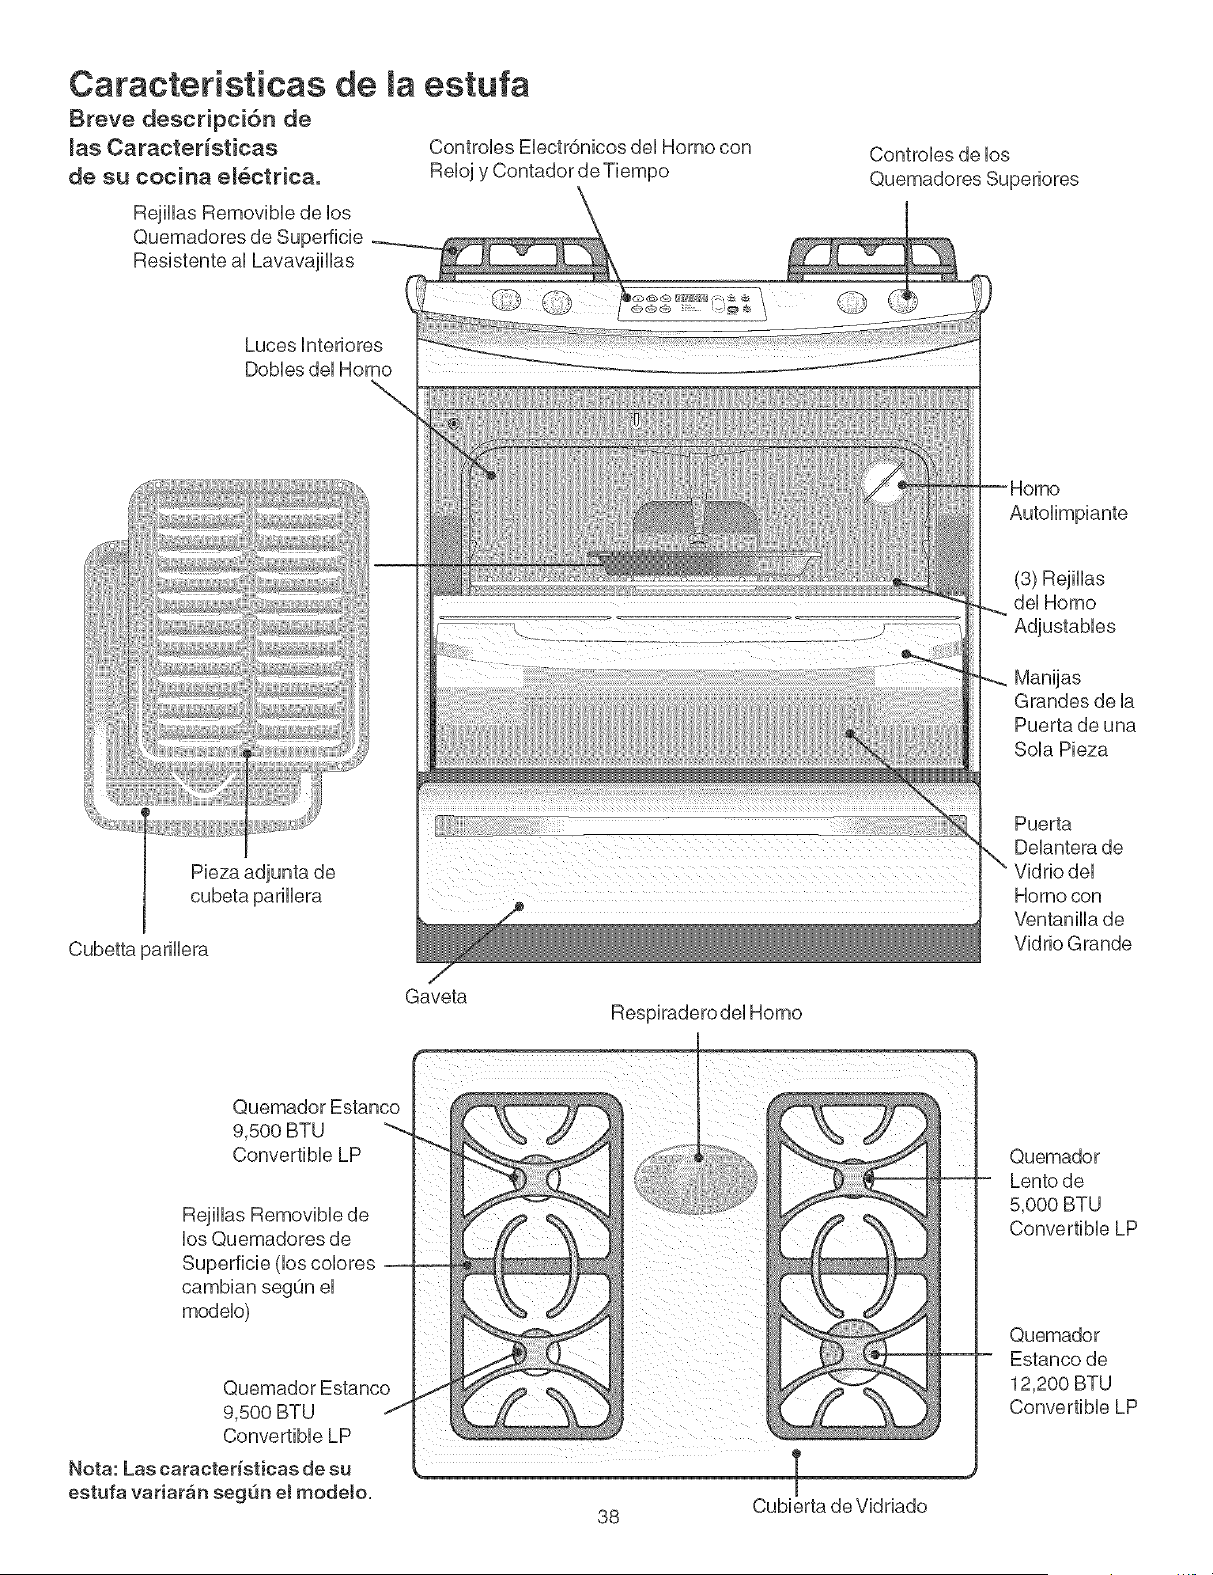
Caracteristicas de ta estufa
Breve descripci6n de
_as Caracter_sticas
de su cocina e_ctrica.
RejHHasRemovibHe de Hos
Quemadores de Superficie
Resistente aMLavavajHHas
ControHes EHectr6nicos dell Homo con
ReHojy Contador de Tiempo
Luces Hnteriores
DobHesdellHomo
Cubetta
Pieza adjunta de
cubeta parHHera
3arHHera
Gaveta
ControHes de Hos
Quemadores Superiores
...........................................
(3) RejHHas
dell Homo
AdjustabHes
Manijas
Grandes de Ha
Puerta de una
SoHaPieza
Puerta
DeHanterade
Vidrio dell
Homo con
VentaniHHade
Vidrio Grande
Quemador Estanco
9,500 BTU
ConvertibHe LP
RejiHHasRemovibHede
HosQuemadores de
Superficie dos coHores
cambian segOn eH
modeHo)
Quemador Estanco
9,500 BTU
ConvertibHe LP
Nota: Las caracteristicas de su
estufa variar_n seg_n et modeto,
Quemador
Lento de
5,000 BTU
ConvertibHe LP
Quemador
Estanco de
12,200 BTU
ConvertibHe LP
Cubierta de Vidriado
38
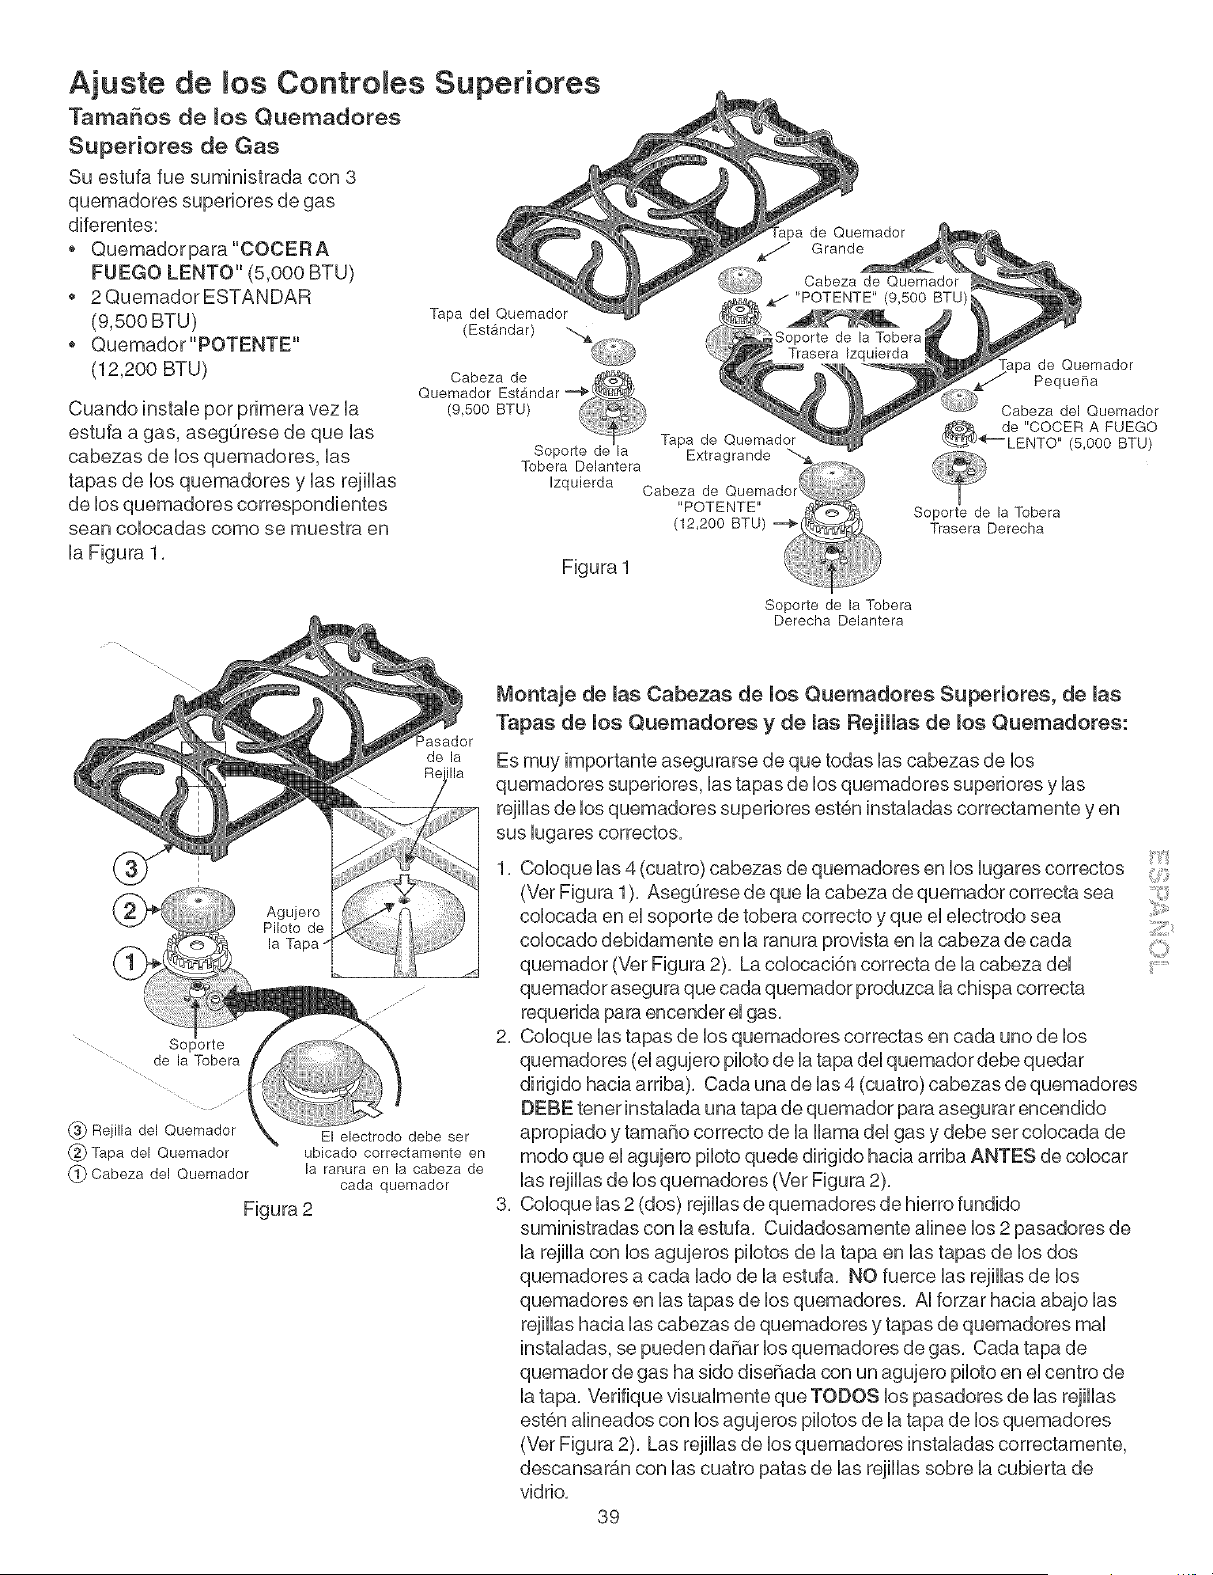
Ajuste de Contro es Supedores
TamaSos de _os Quemadores
Super[ores de Gas
Su estufa rue suministrada con 3
quemadores superiores de gas
diferentes:
o Quemadorpara"COCERA
FUE¢O LENTO" (5,000 BTU)
, 2QuemadorESTANDAR
(9,500 BTU) Tapa del Quemador
(Estandar)
o Quemador"POTENTE"
(12,200 BTU)
Cuando instale pot primera vez la
estufa a gas, aseg0rese de que las
cabezas de los quemadores, las
tapas de los quemadores y las rejillas
de los quemadores correspondientes
sean cobcadas como se muestra en
la Figura 1
Tobera Delantera
Izquierda
Figura 1
Tapa de Quemador
de Quemador
Peque[ia
Cabeza del Quemador
de "COCER A FUEGO
_'=LENTO" (5,000 BTU)
Soporte de la Tobera
Trasera Derecha
_sador
de la
• Sc
de la Tobera
(_) Rejilla del Quemador
(_ Tapa del Quemador
(_ Cabeza del Quemador
El electrodo debe set
ubicado correctamente en
la ranura en la cabeza de
cada quemador
Figura 2
Soporte de la Tobera
Derecha Delantera
Monta]e de masCabezas de los Quemadores Superiores, de mas
Tapas de los Quemadores y de las Rejillas de los Quemadores:
Es muy importante asegurarse de que todas las cabezas de los
quemadores superiores, las tapas de los quemadores superiores y las
rejillas de los quemadores superiores est@ninstaladas correctamente yen
sus lugares correctos.
1. Coloque las 4 (cuatro) cabezas de quemadores en los lugares correctos
(Vet Figura 1). Aseg0rese de que la cabeza de quemador correcta sea
colocada en el soporte de tobera correcto y que el electrodo sea
colocado debidamente en la ranura provista en la cabeza de cada
quemador (Vet Figura 2). La colocaci6n correcta de la cabeza del
quemador asegura que cada quemador produzca la chispa correcta
requerida para encender el gas.
2. Coloque las tapas de los quemadores correctas en cada uno de los
quemadores (el agqero piloto de la tapa del quemador debe quedar
dirigido hacia arriba). Cada una de las 4 (cuatro) cabezas de quemadores
DEBE tenet instalada una tapa de quemador para asegurar encendido
apropiado y tama_o correcto de la llama del gas y debe set colocada de
modo que el agujero piloto quede dirigido hacia arriba ANTES de colocar
las rejillas de los quemadores (Vet Figura 2).
3. Coloque las 2 (dos) rejillas de quemadores de hierro fundido
suministradas con la estufa. Cuidadosamente alinee los 2 pasadores de
la rejilla con los agujeros pilotos de la tapa en las tapas de los dos
quemadores a cada lado de la estufa. NO fuerce las rejillas de los
quemadores en las tapas de los quemadores. AI forzar hacia abajo las
rejillas hacia las cabezas de quemadores y tapas de quemadores real
instaladas, se pueden da_ar los quemadores de gas. Cada tapa de
quemador de gas ha sido dise_ada con un agujero piloto en el centro de
la tapa. Verifique visualmente que TODOS los pasadores de las rejillas
est@nalineados con los agujeros pilotos de la tapa de los quemadores
(Vet Figura 2). Las rejillas de los quemadores instaladas correctamente,
descansar6,n con las cuatro patas de las rejillas sobre la cubierta de
vidrio.
39
¸:¸112¸:i_
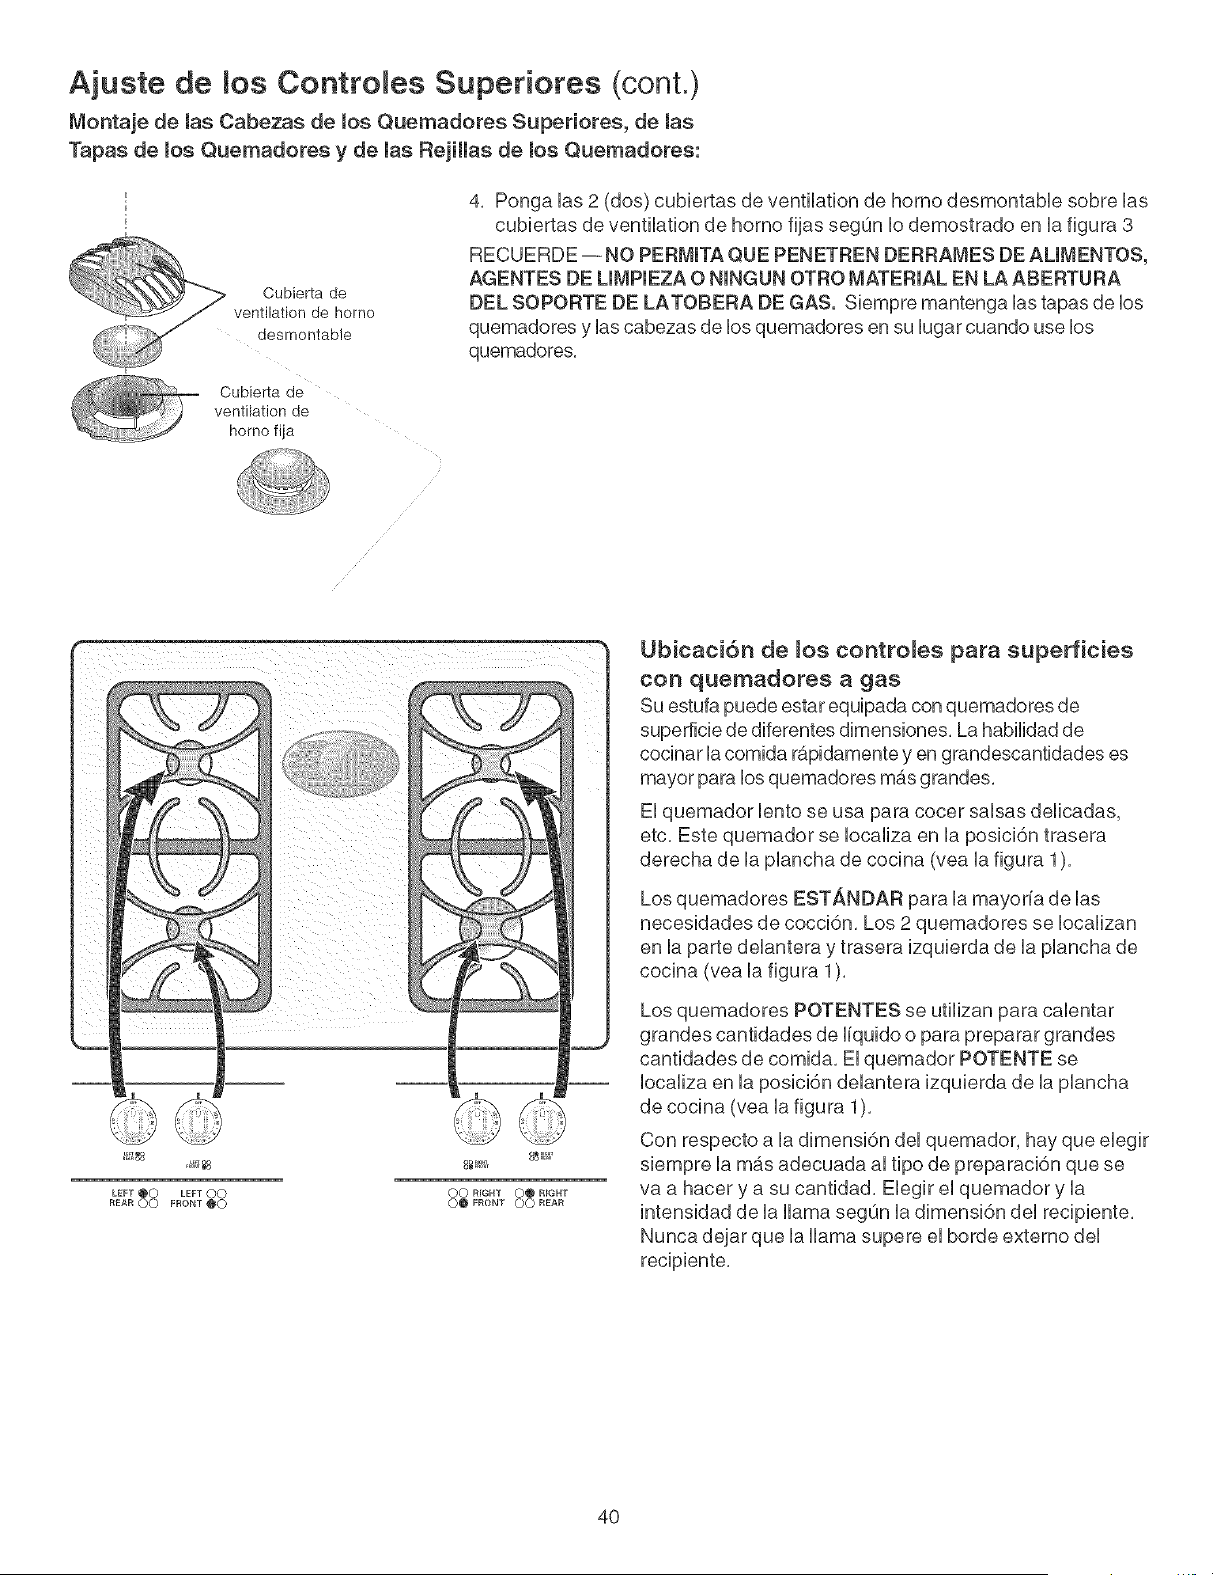
A]uste de Contro es Superiores (cont.)
Montaie de masCabezas de mosQuemadores Superiores, de mas
Tapas de los Quemadores y de las Rejillas de los Quemadores:
Cubierta de
ventilation de
homo ilia
4, Ponga Uas2 (dos) cubiertas de ventilation de homo desmontabUe sobre Uas
cubiertas de ventilation de homo fijas segOn Uodemostrado en Uafigura 3
RECUERDE-- NO PEFIMITA QUE PENETREN DEFIFtAMES DE ALIMENTOS,
AGENTES DE LIMPIEZA O NINGUN OTRO MATERIAL EN LA ABERTURA
DEL SOPOFiTE DE LATOBEFIA DE GAS. Siempre mantenga Uastapas de Uos
quemadores y Uascabezas de Uosquemadores en su Uugarcuando use Uos
quemadores,
LEFT O0 LEFT O0
REAR O0 FRONT@O
O0 RIGHT 00 RFGHT
00FRONT OOREAR
Ubicaci6n de _os contro_es para superficies
con quemadores a gas
Su estufa puede estar equipada con quemadores de
superficie de diferentes dimensiones, La habiWad de
cocinar la comida ra.pidamente yen grandescantidades es
mayor para los quemadores mas grandes,
El quemador lento se usa para cocer salsas delicadas,
etc, Este quemador se Iocaliza en la posici6n trasera
derecha de la plancha de cocina (vea la figura 1),
Los quemadores EST_,NDAR para la mayoria de las
necesidades de cocci6n, Los 2 quemadores se Iocalizan
en la parte delantera y trasera izquierda de la plancha de
cocina (vea la figura 1),
Los quemadores POTENTES se utilizan para calentar
grandes cantidades de liquido o para preparar grandes
cantidades de comida, El quemador POTENTE se
Iocaliza en la posici6n delantera izquierda de la plancha
de cocina (vea la figura 1),
Con respecto a la dimensi6n del quemador, hay que elegir
siempre la m_.s adecuada al tipo de preparaci6n que se
va a hacer y a su cantidad, Elegir el quemador y la
intensidad de la llama segOn la dimensi6n del recipiente,
Nunca dejar que la llama supere el borde extemo del
recipiente,
40
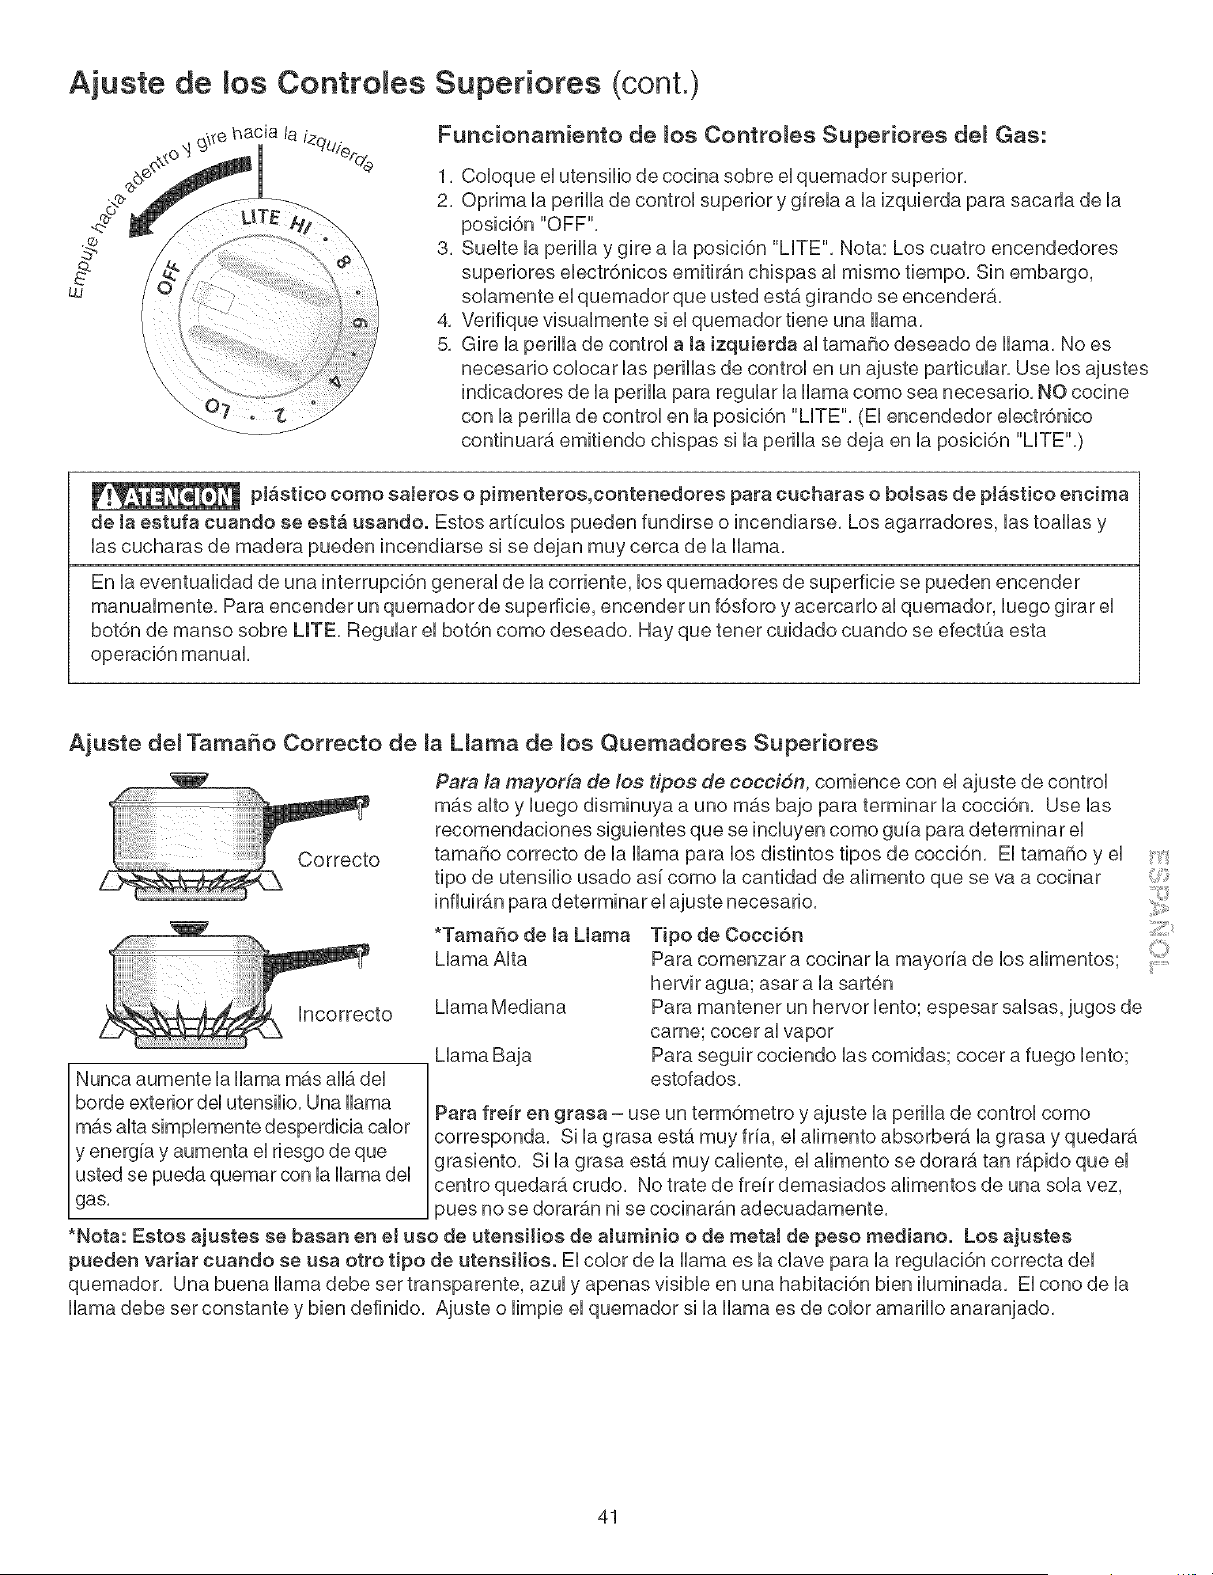
Ajuste de Contro es Supedores (cont.)
LU
e hacia la iequ.
'%
Funcionamiento de _os Contro_es Superiores de_ Gas:
1. Coloque el utensilio de cocina sobre el quemador superior.
2. Optima la perilla de control superior y girela a la izquierda para sacarla de la
posici6n "OFF".
3. Suelte la perilla y gire a la posici6n "LITE". Nota: Los cuatro encendedores
superiores electr6nicos emitir_.n chispas al mismo tiempo. Sin embargo,
solamente el quemador que usted est,. girando se encender6..
4. Verifique visualmente si el quemador tiene una llama.
5. Gire la perilla de control a ta izquiePda al tama_o deseado de llama. No es
necesario colocar las perillas de control en un ajuste particular. Use los ajustes
indicadores de la perilla para regular la llama como sea necesario. NO cocine
con la perilla de control en la posici6n "LITE". (El encendedor electr6nico
continuar6, emitiendo chispas si la perilla se deja en la posici6n "LITE".)
pl_stico como salePos o pimenteros,contenedoPes papa cuchaPas o bo[sas de p!_stico encima
de ta estufa cuando se est_ ueando. Estos articubs pueden fundirse o [ncendiarse. Los agarradores, [as toaHas y
[as cucharas de madera pueden [ncendiarse s[ se dejan muy cerca de [a Hama.
En [a eventuaHdad de una [nterrupci6n general de [a corriente, los quemadores de superficie se pueden encender
manuaimente. Para encender un quemador de superficie, encender un f6sforo y acercar[o a[ quemador, [uego girar el
bot6n de manso sobre LITE. Regular el bot6n como deseado. Hay que tener cuidado cuando se efectOa esta
Ajuste de_ TamaSo Correcto de _a L_ama de _os Quemadores Superiores
Incorrecto
*Tama_o de ta Llama
Mama AIta
Llama Mediana
Mama Baja
Nunca aumente la llama m_.s alia del
borde exterior del utensilio. Una llama
mas alta simplemente desperdicia calor
y energia y aumenta el riesgo de que
usted se pueda quemar con la llama del
gas.
Para la mayorfa de los tipos de cocci6n, comience con el ajuste de control
m_.s alto y luego disminuya a uno m_.s bajo para terminar la cocci6n. Use las
recomendaciones siguientes que se incluyen como guia para determinar el
tamaSo correcto de la llama para los distintos tipos de cocci6n. El tamafio y el
tipo de utensilio usado asi como la cantidad de alimento que se va a cocinar
infiuir_.n para determinar el ajuste necesario.
Tipo de Cocci6n
Para comenzar a cocinar la mayoria de los alimentos;
hervir agua; asar a la sart@n
Para mantener un hervor lento; espesar salsas, jugos de
came; cocer al vapor
Para seguir cociendo las comidas; cocer a fuego lento;
estofados.
Papa freiP en grasa - use un term6metro y ajuste la perilla de control como
corresponda. Si la grasa est,. muy fria, el alimento absorber_, la grasa y quedar_.
grasiento. Si la grasa est,. muy caliente, el alimento se dotard, tan r_.pido que el
centro quedar_, crudo. No trate de freir demasiados alimentos de una sola vez,
pues no se dorar6.n ni se cocinar6.n adecuadamente.
*Nota: Estos ajustee se basan en eJ ueo de utensiIios de aJuminio o de metaJ de peso mediano. Los ajustee
pueden vaPiaPcuando se usa otPo tipo de utensiHos. El color de la llama es la clave para la regulaci6n correcta del
quemador. Una buena llama debe set transparente, azul y apenas visible en una habitaci6n bien iluminada. El cono de la
llama debe set constante y bien definido. Ajuste o limpie el quemador si la llama es de color amarillo anaranjado.
¸:¸112¸:i_
41
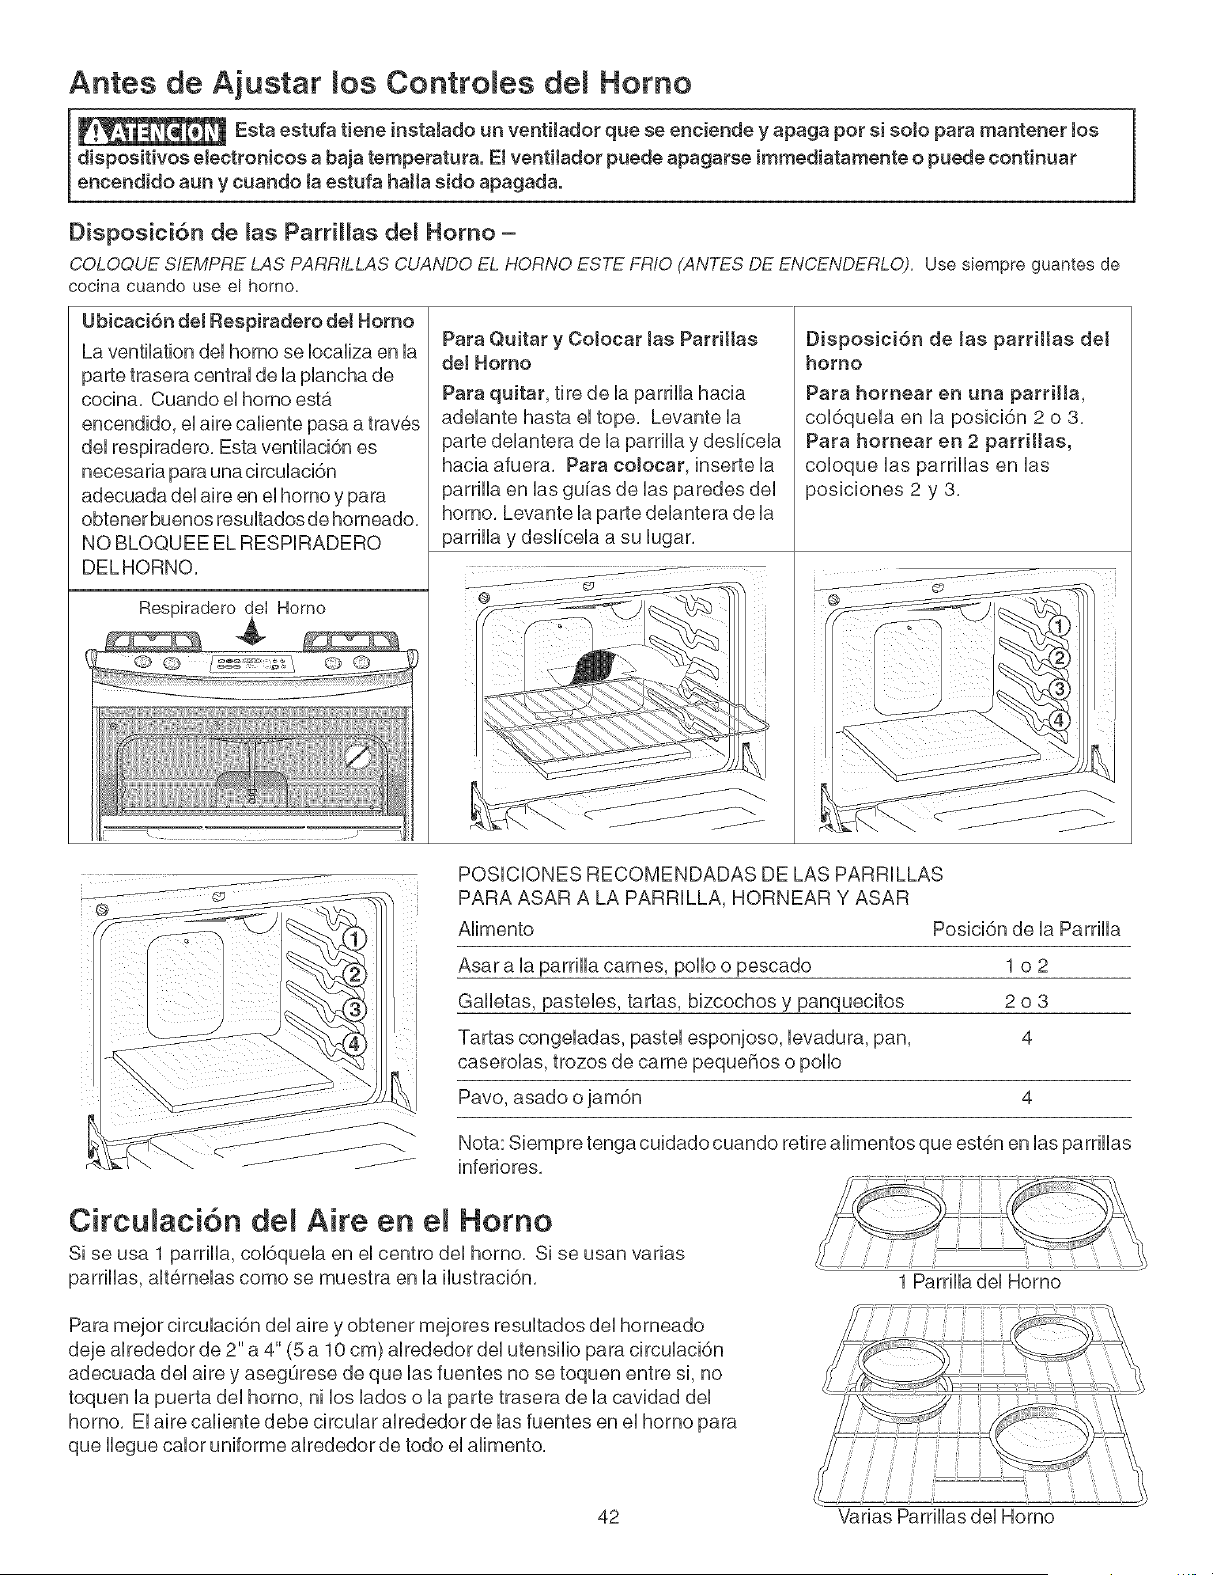
Antes de Ajustar los Contro[es de[ Homo
Disposici6n de las ParrHlas de[ Homo -
COLOQUE SIEMPRE LAS PARRILLAS CUANDO EL HORNO ESTE FRIO (ANTES DE ENCENDERLO). Use siempre guantes de
cocina cuando use el homo.
Ubicaci6n de[ Respicadero de[ Homo
La ventilation del homo se Iocaliza en la
parte trasera central de Hapiancha de
cocina. Cuando el homo est,.
encendido, elaire caliente pasa a traves
del respiradero. Esta ventilaci6n es
necesaria para una circulaci6n
adecuada del aire en el homo y para
obtener buenos resuitados de horneado.
NO BLOQUEE EL RESPIRADERO
DELHORNO.
Respiradero de[ Homo
Para Qu[tar y Co[ocar [as Parr[Has
de[ Homo
Para qu[tar, tire de Haparr[Ha hac[a
adeHante hasta eHtope. Levante Ha
parte deHantera de HaparrHHay desHiceHa
hacia afuera. Para colocar, [nserte Ha
parrHHaen Hasgalas de Hasparedes dell
homo. Levante Haparte deHantera de Ha
parrHHay desHiceHaa su Hugar.
@
Diepoeici6n de [as parri[[ae de[
homo
Para hornear en una parri[[a,
co[6queHa en Haposici6n 2 o 3.
Para homear en 2 parri[[as,
coHoque HasparriHHasen Has
posiciones 2 y 3.
@
POSHCHONESRECOMENDADAS DE LAS PARRHLLAS
PARA ASAR A LA PARRHLLA, HORNEAR Y ASAR
AH[mento Pos[c[6n de HaParr[Ha
Asara Haparr[Ha carnes, poHHoo pescado 1 o 2
GaHHetas,pasteHes, tartas, bizcochos y panquecitos 2 o 3
Tartas congeHadas, pasteHesponjoso, Hevadura, pan, 4
caseroHas, trozos de came pequeffos o poHHo
Pave, asado o jam6n 4
Nota: Siempre tenga cuidado cuando retire aHimentos que esten en [as parriHHas
infer[ores.
Circu[aci6n de[ Aire en e[ Homo
S[ se usa 1 parriHHa,coH6queHaen eHcentre dell homo. S[ se usan varias
parriHHas,aHtemeHascome se muestra en Ha[Hustraci6n. 1 Parr[Hadell Homo
Para meier c[rcuHac[6ndell a[re y obtener mejores resuHtadosdell homeado
deje aHrededor de 2" a 4" (5 a 10 cm) aHrededor dell utensiHiopara circuHaci6n
adecuada dell aire y asegOrese de que Hasfuentes no se toquen entre s[, no
toquen Hapuerta dell homo, n[ HosHadeso Haparte trasera de Hacavidad dell
homo. EHaire caHiente debe circuHaraHrededor de Hasfuentes en eHhomo para
que HHeguecaHoruniforme aHrededor de todo eHaHimento.
42 Var[as Parr[Has dellHomo
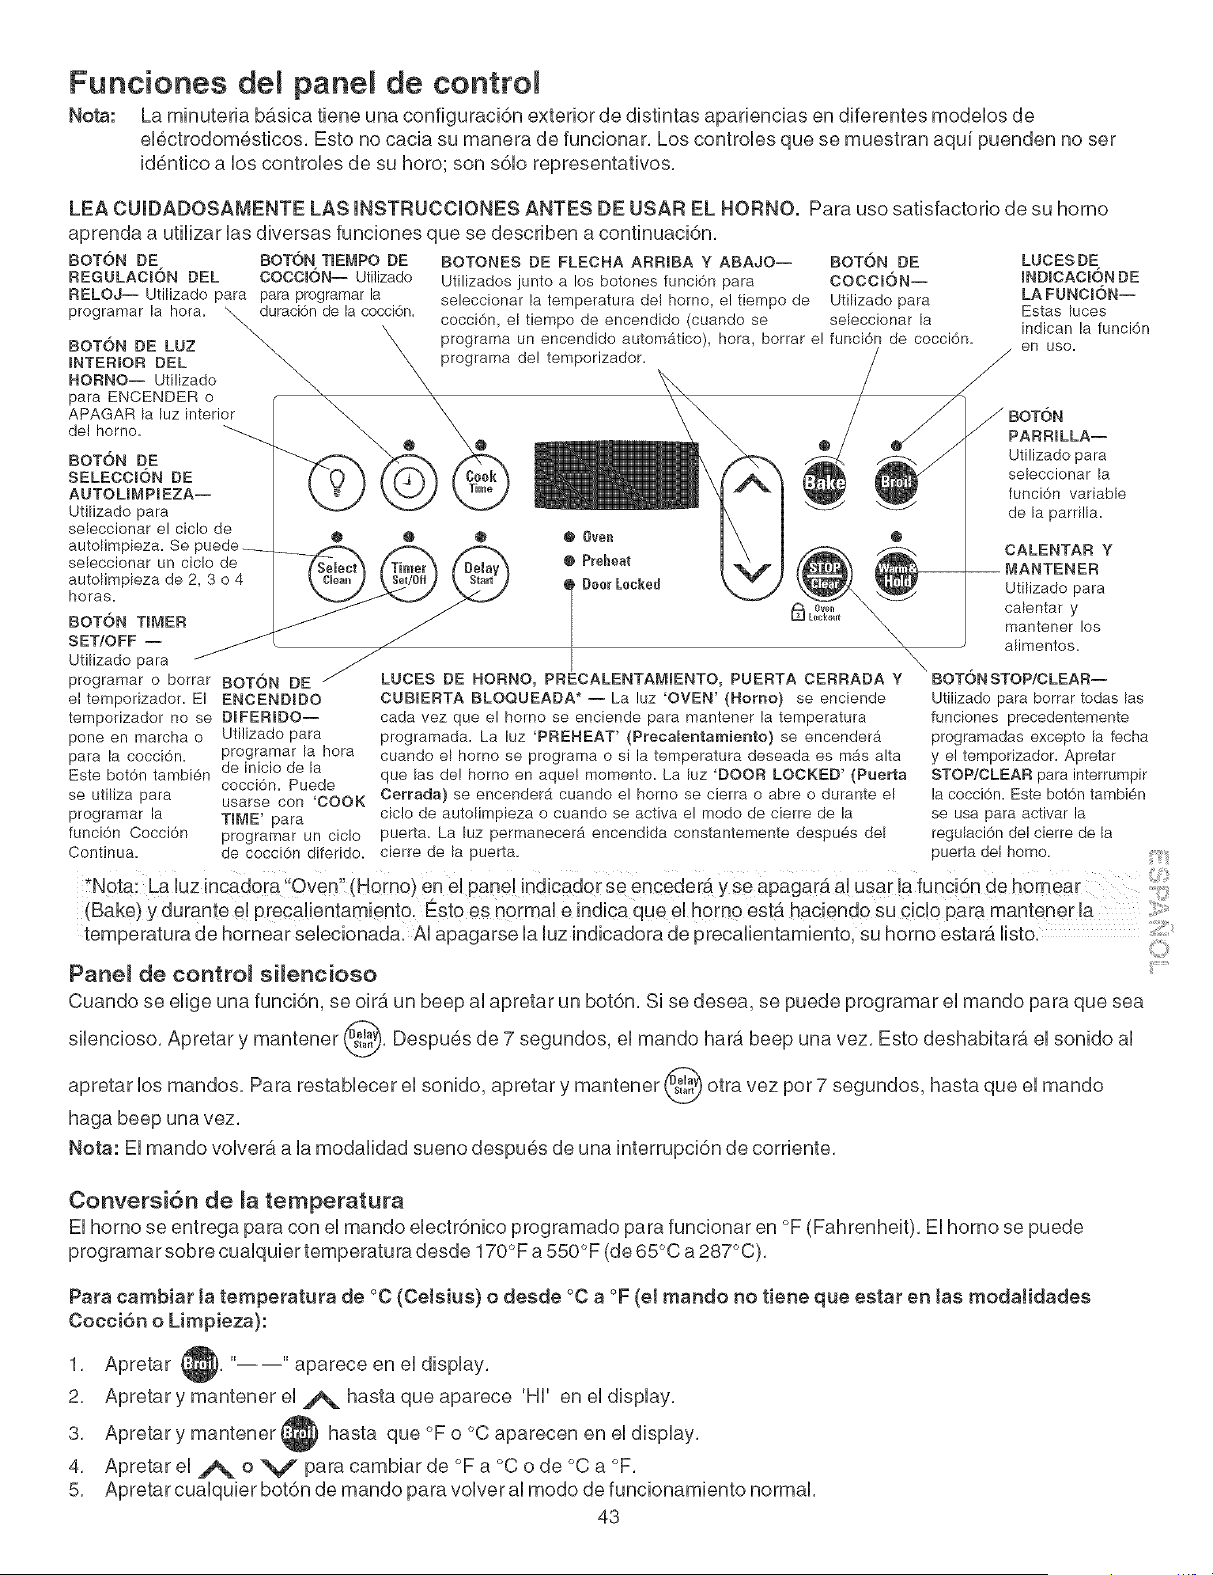
Funciones de[ pane[ de control
Nota: La minuteria b_.sica tiene una configuraci6n exterior de distintas apariencias en diferentes modelos de
electrodom6sticos, Esto no cacia su manera de funcionar, Los controles que se muestran aqui puenden no ser
id6ntico a los controles de su hero; son s61o representatives,
LEA CUIDADOSAMENTE LAS INSTRUCCIONES ANTES DE USAR EL HORNO. Para usa satisfactorio de su homo
aprenda a utilizar las diversas funciones que se describen a continuaci6n,
BOTON DE BOTON TIEMPO DE BOTONES DE FLECRA ARRIBA Y ABAJO-- BOTON DE
REGULAC[ON DEL COCCK)N-- Utilizado Utilizados junto a los botones funci6n para COCCK)N--
RELOJ-- Utilizado para para programar la seleccionar la temperatura del homo, e! tiempo de Utilizado para
programar la hora. _ duraci6n de la cocci6n, cocci6n, el tiempo de encendido (cuando se sebccionar la
BOT6N DE LUZ _ X programa un encendido automa.tico), hora, borrar e! funci6n de cocci6n.
INTERIOR DEL _\ X programa de! temporizador.
@
HORNO-- Utilizado
para ENCENDER o
APAGAR la luz interior
del homo.
BOTON DE
SELECCl6N DE
AUTOLIMPIEZA--
Utilizado para
sebccionar el ciclo de
autolimpieza. Se
sebccionar un ciclo de
autolimpieza de 2, 3 o 4
horas.
BOTON TIMER
SET/OFF --
Utilizado para
programar o borrar
el temporizador. El
temporizador no se
pone en marcha o
para la cocci6n.
Este bot6n tambi_n
se utiliza para
programar la
funci6n Cocci6n
Continua.
®
\
\\
\
LUCES DE
INDICAC[6N DE
LA FUNCION--
Estas luces
indican la funci6n
en usa.
/
/ BOTON
PARRILLA--
Utilizadopara
sebecionar la
funci6n variable
de la parrilla.
CALENTAR Y
-- MANTENER
Utilizado para
cabntar y
mantener los
alimentos.
BOTON DE LUCES DE HORNO, PRECALENTAM[ENTO, PUERTA CERRADA Y BOTONSTOP!CLEAR--
ENCENDIDO CNBIERTA BLOQNEADA* -- La luz 'OVEN' (Homo) se enciende Utilizado para borrar todas las
D[FER[DO-- cada vez qua el homo se enciende para mantener la temperatura funciones precedentemente
Utilizado para programada. La luz 'PREHEAT' (Preca[entamiento) se encenderA programadas excepto la fecha
programar la hora cuando el homo se programa o si la temperatura deseada es mAs alta y el temporizador. Apretar
de inicio de la que las de[ homo en aque[ momenta. La luz 'DOOR LOCKED' (Puerta STOP/CLEAR para interrumpir
cocci6n. Puede
usarse con 'COOK Cerrada) se encenderA cuando el homo se cierra o abre o durante el la cocci6n. Este bot6n tambi_n
ciclo de autolimpieza o cuando se activa el modo de cierre de la se usa para actNar la
TIME' para
programar un ciclo puerta. La luz permanecera encendida constantemente despu_s del regulaci6n del cierre de la
de cocci6n diferido, cierre de la puerta, puerta del homo.
*N0ta; La [uz incadoia,oven, (Heine) en el pane[ [ndioadei se encedeib. Y se apagara a[ Usar [a func!6n de h0inear
(Bake) y durante e[ precaiientamiento. Est0 es n0[ma[ e [ndica que e[ homo estb. hacienda su cic[0 para mantener [a
temperatura de hornear se[ecionadal A[ apagarse [a [uz [ndicadora de precaiientamiento, su homo estara [isto,
Panel de control si[encioso ............
Cuando se elige una funci6n, se air6, un beep al apretar un bot6n, Si se desea, se puede programar el mando para qua sea
silencioso, Apretar y mantener _, Despu6s de 7 segundos, el mando har6. beep una vez, Esto deshabitara el sonido al
los mandos, Para restablecer el sonido, apretar y mantener _ otra vez par 7 segundos, hasta que el mandoapretar
V
haga beep una vez,
Nota: El mando volvera a la modalidad sueno despu6s de una interrupci6n de corriente,
Conversi6n de [a temperatura
El homo se entrega para con el mando electr6nico programado para funcionar en °F (Fahrenheit), El homo se puede
programar sabre cualquier temperatura desde 170°F a 550°F (de 65°C a 287°C),
Para cambiar [a temperatura de °C (Celsius) o desde °C a °F (el mando no tiene qae estar en [as moda[idades
Cocci6n o Limpieza):
1, Apretar _, " " aparece en el display,
2, Apretar y mantener el A hasta qua aparece 'Hi' en el display,
3, Apretar y mantener, hasta qua °F o °C aparecen en el display,
4, Apretar el j_. o V para cambiar de °F a °C o de °C a °F,
5, Apretar cualquier bot6n de mando para volver al mode de funcionamiento normal,
43
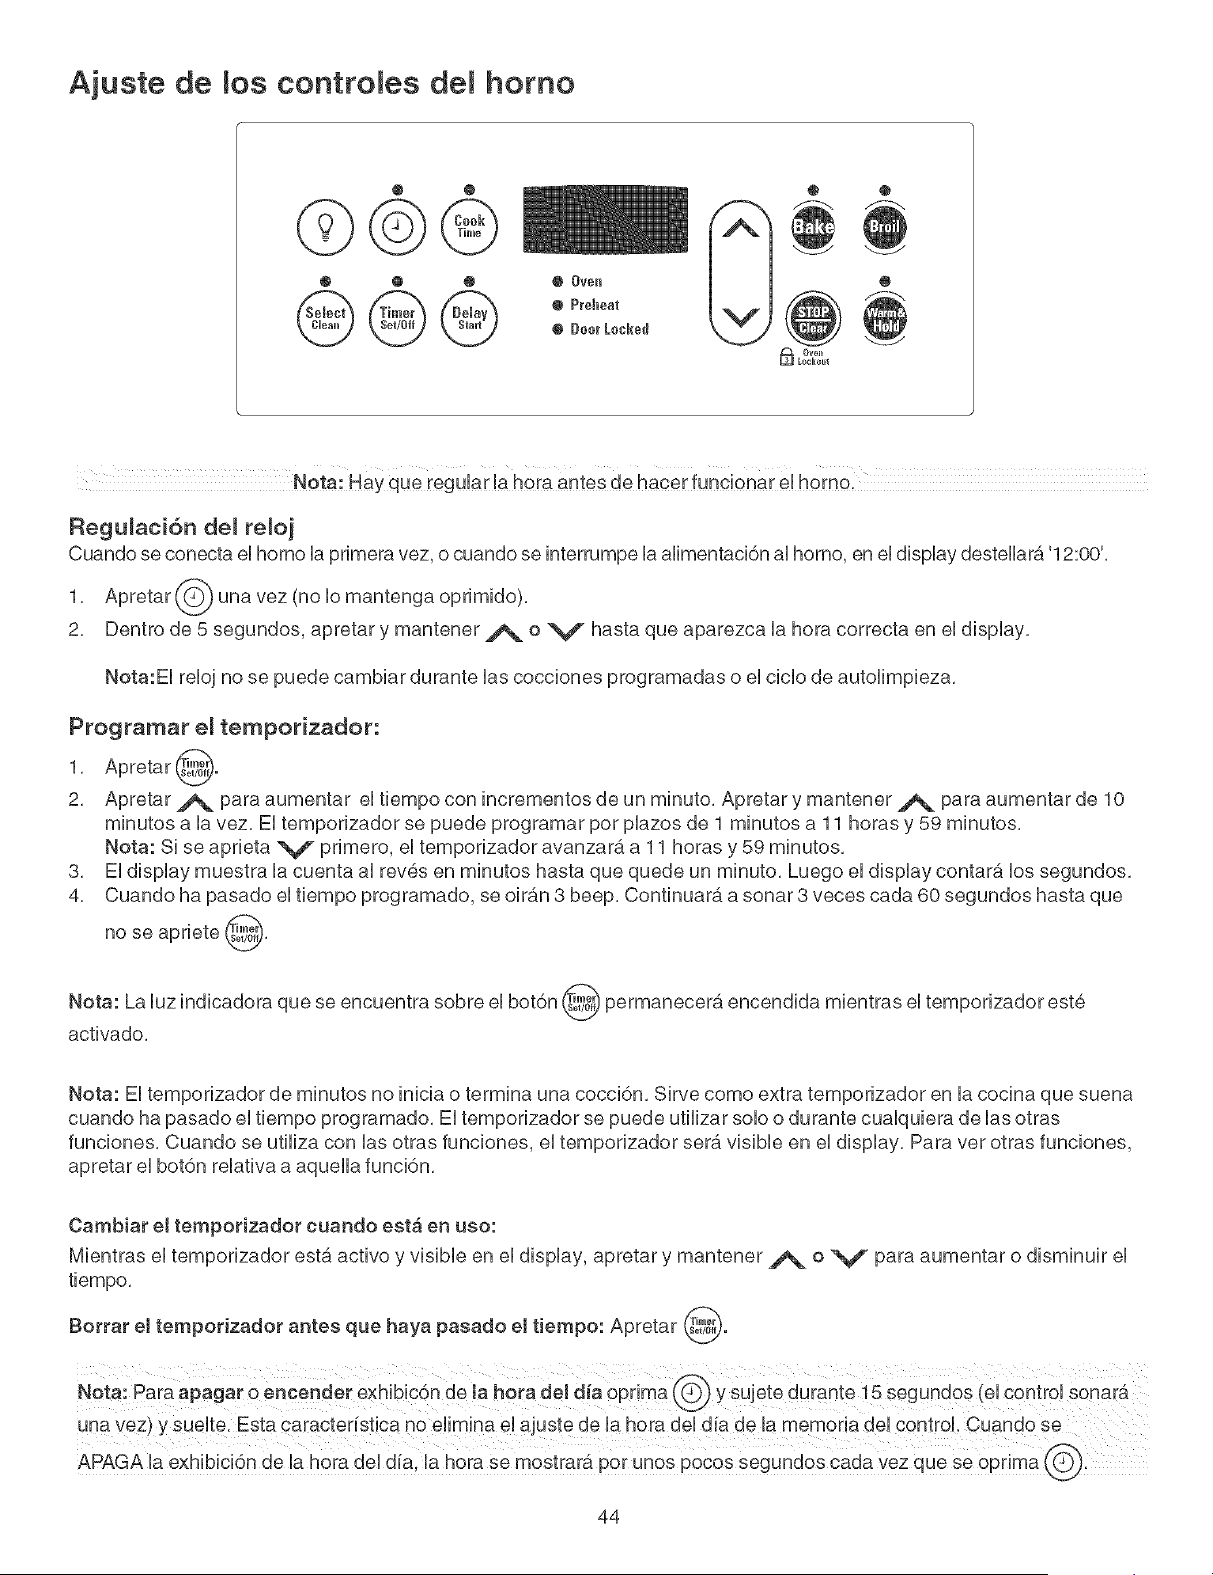
Ajuste de contro es homo
@ ®
@ @ @ @ Oven
@ Preheat
@ DoorLocked
@
Ovel_
_ Lockol_
@
@
Regu_aci6n de_ re_oj
Cuando se conecta eUhomo Uaprimera vez, o cuando se interrumpe UaaHmentaci6n al homo, en el display destellar& '12:00',
Apretar _1 _ una vez (no Io mantenga oprimido),
1,
2, Dentro de 5 segundos, apretar y mantener j_ o V hasta que aparezca la hora correcta en el display,
Nota:EI reloj no se puede cambiar durante las cocciones programadas o el ciclo de autolimpieza.
Programar el temporizador:
1. Apretar@.
2. Apretar A para aumentar el tiempo con incrementos de un minuto. Apretar y mantener A para aumentar de 10
minutos a la vez. El temporizador se puede programar por plazos de 1 minutos a 11 horas y 59 minutos.
Nota: Si se aprieta V primero, el temporizador avanzar& a 11 horas y 59 minutos.
3. El display muestra la cuenta al rev6s en minutos hasta que quede un minuto. Luego el display contar_, los segundos.
4. Cuando ha pasado el tiempo programado, se oir&n 3 beep. Continuar& a sonar 3 veces cada 60 segundos hasta que
no se apriete (_).
Nota: La luz indicadora que se encuentra sobre el bot6n (_"t_ permanecer_, encendida mientras el temporizador este
activado.
Nota: El temporizador de minutos no inicia o termina una cocci6n. Sirve como extra temporizador en la cocina que suena
cuando ha pasado el tiempo programado. El temporizador se puede utilizar solo o durante cualquiera de las otras
funciones. Cuando se utiliza con las otras funciones, el temporizador ser_. visible en el display. Para ver otras funciones,
apretar el bot6n relativa a aquella funci6n.
Cambiar el temporizador cuando est& en uso:
Mientras el temporizador est,. activo y visible en el display, apretar y mantener _ o V para aumentar o disminuir el
tiempo.
temporizador antes que haya pasado el tiempo: Apretar @.
Borrar e_
Nota: Para apagar o encender exhibic6n de Ia h0ra dei alia opdm a ,
una vez) y suelte. Esta caracter!stica no elimina el ajuste de la hora del dia de la memoria del control. Cuando se
44
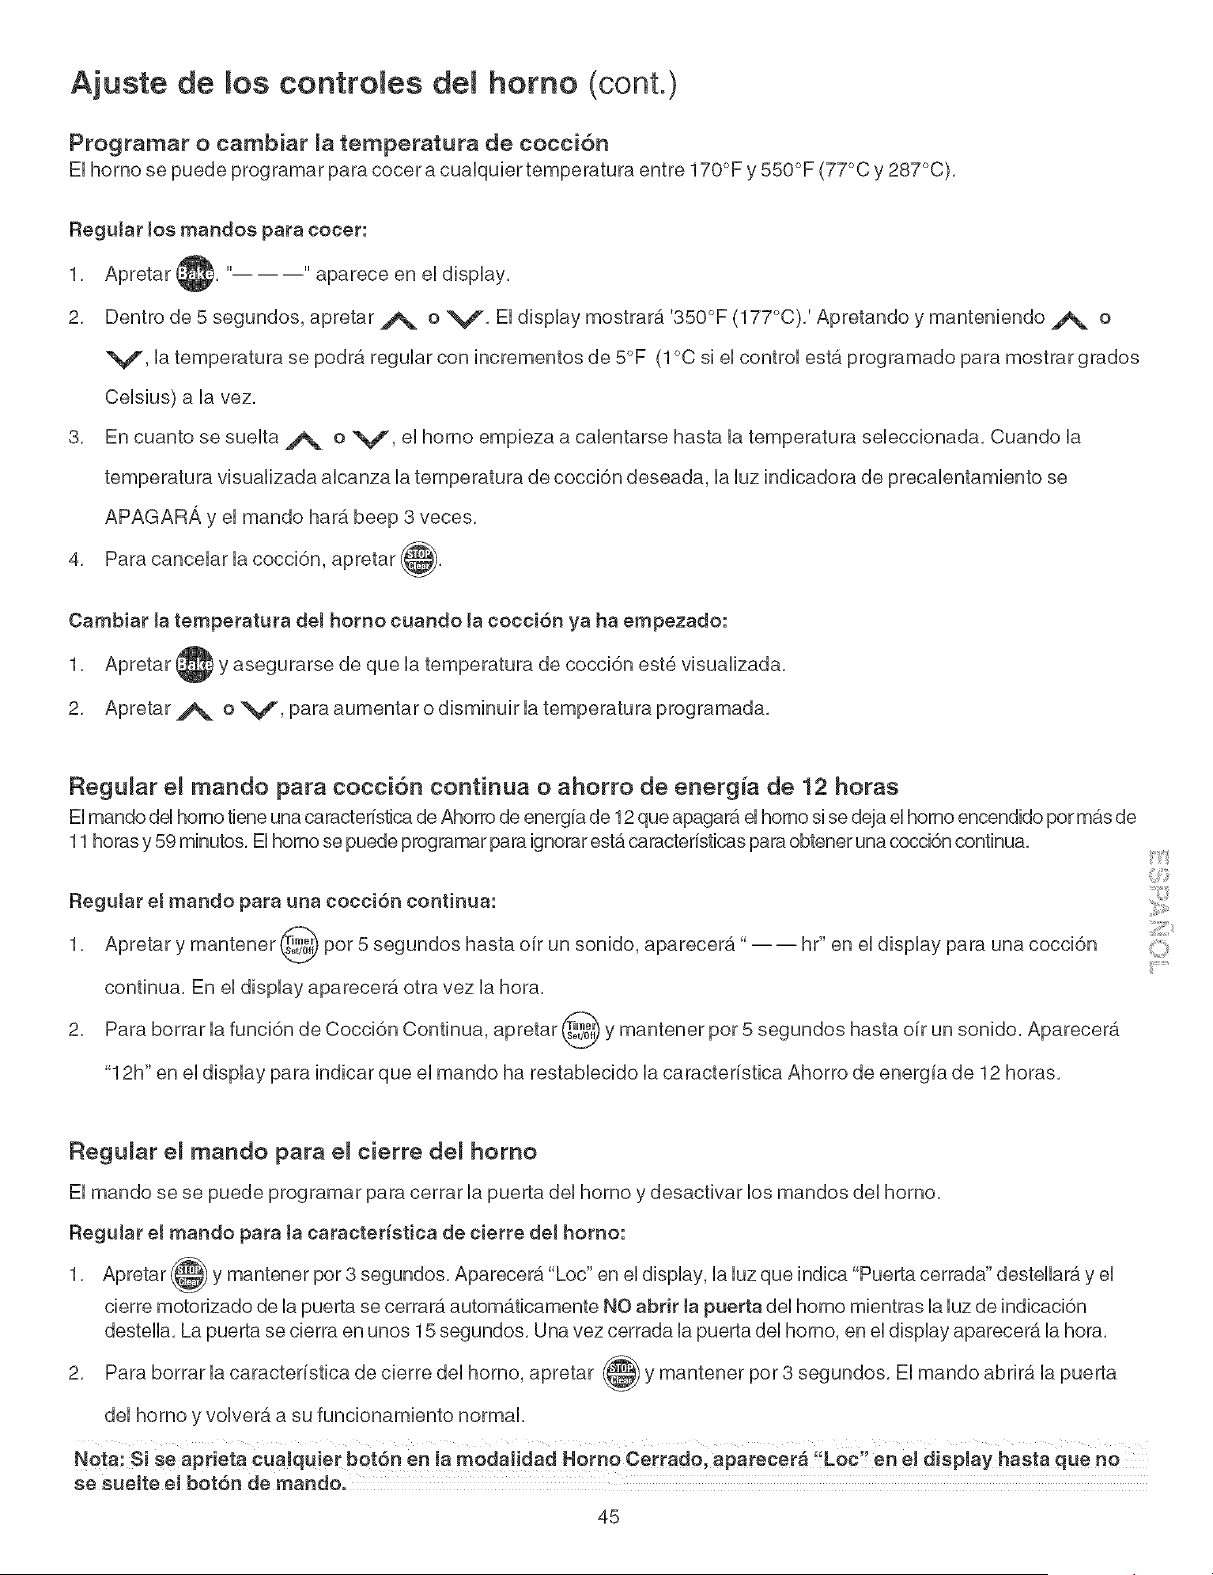
Ajuste de contro es homo (cont.)
Programar o cambiar _atemperatura de cocci6n
EUhomo se puede programar para cocer a cuaUquier temperatura entre 170°F y 550°F (77°C y 287°C),
Regular los mandos para cocer:
1. Apretar t. " " aparece en eUdispUay.
2. Dentro de 5 segundos, apretar j_ o V. EUdispUay mostrara '350°F (177°C). ' Apretando y manteniendo A o
V, Uatemperatura se pedrO,reguUarcon incrementos de 5°F (1°C si eUcontroU est,. programado para mostrar grados
CeUsius) a Uavez,
3, En cuanto se sueUta .j_ o V, eUhomo empieza a caUentarse hasta Uatemperatura seUeccionada, Cuando Ua
temperatura visuaHzada aUcanza Uatemperatura de cocci6n deseada, UaUuzindicadora de precaUentamiento se
APAGARA y eUmando har_. beep 3 veces,
4, Para canceUar Uacocci6n, apretar _,
Cambiar ta temperatura det homo cuando la cocci6n ya ha empezado:
1. Apretar _y asegurarse de que la temperatura de cocci6n est6 visualizada.
2. Apretar,#_ o V, para aumentar o disminuir la temperatura programada.
Regumar emmando para cocci6n continua o ahorro de energia de 12 horas
El mando del homo tiene una caracteristica de Ahorro de energia de 12 que apagarA el homo si se deja el homo encendido por mas de
11 horas y 59 minutes, El homo se puede programar para ignorar est,. caracteristicas para obtener una cocci6n continua,
Regular et mando para una cocci6n continua:
Apretar y mantener _ per 5 segundos hasta oir un sonido, aparecer_." ----1.
2,
hr" en el display para una cocci6n
continua, En el display aparecer6, otra vez la hera,
Para borrar la funci6n de Cocci6n Continua, apretar @-_ y mantener por 5 segundos hasta oir un sonido,
Aparecera
"12h" en el display para indicar que el mando ha restablecido la caracteristica Ahorro de energia de 12 horas,
Regular e_ mando para e_ cierre de_ homo
El mando se se puede programar para cerrar la puerta del homo y desactivar los mandos del homo,
Regutar et mando para ta caracteristica de cierre del homo:
1. Apretar _ y mantener por 3 segundos. Aparecer_. "Loc" en el display, la luz que indica "Puerta cerrada" destellarA y el
cierre motorizado de la puerta se cerrarA automAticamente NO abrir ta puerta del homo mientras la luz de indicaci6n
destella. La puerta se cierra en unos 15 segundos. Una vez cerrada la puerta del homo, en el display aparecer_, la hora.
2. Para borrar la caracteristica de cierre del homo, apretar _ y mantener por 3 segundos. El mando abrir_, la
puerta
del homo y volver#, a su funcionamiento normal,
Nota: Si se aprieta cuaiquier bot6n en la modaJidad Homo Cerrado, aparecera "Loc' en el display hasta que no
se suelte eJ botOn de mando.
45
Ajuste de contro es homo (cont.)
Para regular ias funciones de cocci6n programada y encendido diferido
Los mandos @ TIEMPO DE COCCION y @ ENCENDIDO DIFERIDO mandan la cocci6n programada para
ENCENDER o APAGAR el homo a los momentos precedentemente programados, El homo se puede programar para
iniciar inmediatamente y apagarse autom_.ticamente (Timed Bake) o para iniciar la cocci6n en un momento posterior con
un tiempo de encendido diferido (Delay Start),
Nota: Durante el homeado cronometrado (Timed Bake), la luz indicadora no funcionarA,
Para programar et homo para que inicie a cocer inmediatamente y se apague autom;_ticamente (Cocci6n
programada):
1, Asegurarse de que el reloj muestre la hora correcta,
2, Colocar la comida en el homo,
3,
4,
5,
6,
7,
Apretar " ° " se despliega en la pantalla,
Dentro de 5 segundos, apretar A o V. El display mostrar_. "350°F (177°C), '' Apretando y manteniendo A o
V, la temperatura se podr6, regular con incrementos de 5°F (1°C si el control est,, programado para mostrar grados
Celsius) a la vez,
Apretar @, '0:00' destellara en el display (HR:MIN),
Apretar _ o V hasta que el tiempo de cocci6n deseado no aparece en el display,
El homo se ENCIENDE e inicia a calentarse
Regutar et homo para un inicio posterior y apagamiento autom_tico Encendido diferido:
1, Asegurarse de que el reloj muestre la hora correcta,
2, Colocar la comida en el homo,
3, Apretar " ° " se despliega en la pantalla,
4, Dentro de 5 segundos, apretar _ o V, El display mostrara. "350°F (177°C)," Manteniendo apretadoj_ o V,
la temperatura puede ser regulada con incrementos de 5°F (1°C si el control est,. programado para mostrar grados
Celsius) a la vez,
Apretar @, "0:00" destellar6, en el display (HR:MIN),
5,
6, Apretar _ o V hasta que el tiempo de cocci6n deseado no aparece en el display,
7, Apretar _._, Destellara en el display el tiempo de encendido mas
pr6ximo posible,
8, Apretar A o V hasta que el tiempo de parada deseado no aparece en el display,
9, Una vez regulados los mandos, el mando calcula cuando terminar_, la cocci6n a fin de iniciar a la hora que se ha
programado,
10, El homo se encender_, a la hora de inicio programada y comenzar_, a calentarse,
Cuando termina eJtiempo de cocci6n programado:
a, aparecera "END" en la ventana del display y el homo se apagar_, autom_.ticamente,
b, El mando har_. beep 3 veces cada 60 segundos hasta que no se apriete
Para cambiar ta temperatura det homo despu_s que ha iniciado la cocci6n:
1, Apretar el bot6n funci6n que se desea cambiar,
2, Apretar _ o V para regular la programaci6n,
Tenga cuidado con las caracteristicas de cocci6n programada y encendido diferido, Las comidas que
se estropean facilmente tabs como la leche, los huevos, el pescado, las carnes o la came de ave deben estar
refrigeradas antes de la cocci6n, Sin embargo, incluso si se han refrigerado, estos alimentos no deberian estar en le
homo pot mas de 1 hora antes de empezar la cocci6n y deberian set removidos del homo inmediatamente despu6s de
terminar la cocci6n,
46

A]uste de contro es homo (cont.)
Horneado
Para mejores resultados, caliente el homo antes de hornear galletas, panes, tortas, pasteles o dulces, etc. No necesita
precalentar el homo para rostizar la came o para cocer caserolas.
Los tiempos de cocido y las temperaturas que se necesitan para hornear un producto pueden variar lijeramente de sus
aparatos antiguos.
ProbJemae
Lae galietae ee
queman pot enc[ma
Problemae de homeo y tabla de soluc[onee
Caueae Correcci6n
o Las galletas han sido puestas en
Los paeteJee eet_n
muy negroe pot
encima o debajo.
Los paete[ee no eet_n
bien homeadoe en el
centro.
Los pastelee no eet_n
niveJadoe.
La comida no eet_
t[eta cuando el
tiempo de cocci6n ee
termina.
precalentado completamente.
Muchas galletas en la rejilla del
homo.
El recipiente oscuro absorbe el
calor muy r_.pido.
Los pasteles han sido puestas en
precalentado completamente.
o La rejilla del homo est,. muy baja
o muy alta.
El homo muy caliente.
o El homo muy caliente.
Recipiente de talla incorrecta.
Recipiente no est,. en el centro
del homo.
La estufa est,. desnivelada.
El recipiente est,. muy cerca a la
pared del homo o la rejilla muy
llena.
La rejilla esta desnivelada.
o El homo est6. muy frio.
El homo est,. muy lleno.
o El homo se abre constantemente.
Permita que el homo precaliente antes de
colocar la comida.
(2"=4") de espacio per todos lades.
o Utilice una pelicula de aluminio lijera.
Permita que el homo precaliente antes de
colocar la comida.
o Posicione bien la rejilla del homo.
Ajuste la temperatura a 25°F/12°C menos que
Io recomendado.
Ajuste la temperatura a 25°F/12°C menos que
Io recomendado.
Use la talla del recipiente recomendada en la
receta.
o Posicione bien la rejilla del homo y coloque el
recipiente de tal manera que halla 5.1cm a
10.2 cm (2"'4") de espacio pot todos lados.
Coloque un vaso con agua en el centro del
homo. Si el nivel del agua est6. desigual,
consulte las instrucciones para nivelar el
aparato.
Aseg0rese que halla 5.1cm a 10.2 cm (2"'4")
de espacio pot todos lados.
No use recipientes que est_.n desnivelados o
edentados.
o Ajuste la temperatura a 25°F/12°C m_.s que Io
recomendado.
Aseg0rese de retirar todas ias rejiiiias excepto
las que va usar.
o Abra el homo solo despu@s que el tiempo de
cocci6n m_.s corto halla terminado.
47
Ajuste de contro es homo (cont.)
Para asar a _a parrHla
1, Coloque la parrilla del homo cuando el homo aQn este frio, Coloque la parrilla segL_n
se sugiere en ta tabla siguiente,
2, Optima "----" aparecera, en la pantalla,
3, Optima y mantenga oprimida A o V hasta que aparezca el niveI deseado para
asar en el indicador visual Optima A para asar en 'Hi' o V para asar en 'LO',
La mayoria de los alimentos se pueden asar en 'HI', Seleccione el ajuste 'LO' para
evitar que los alimentos que deben quedar bien asados a la parrilla se doren o
sequen demasiado,
4, Coloque el inserto en la asadera, luego coloque la comida sobre el inserto (vet
Figura 1), NO use la asadera sin el inserto ni Io cubra con papel de aluminio, La
grasa expuesta se puede incendiar,
5, Coloque la asadera sobre la parrilla del homo, Cierre la puerta del homo,
6, Ase un lade de los alimentos hasta que se doren; de vuelta y cocine el otto lade,
Nota: Siempre tire de la parrilla hasta que llegue al tope antes de dar vuelta o sacar
los alimentos,
7, Cuando termine de asar, optima _/,
Nota: La asadera y el inserto
permiten que la grasa se escu rra
y mantenga alejada del intenso
calor del asador, NO use la
asadera sin el inserto, NO cubra
el inserto con papel de aluminio,
La grasa expuesta puede
incendiarse,
Tabla de posiciones de las parrillas para asar (ver Fig. 3)
Poeiei6n de Ja ParrHJa deede Arriba AJirnento
la, posici6n Biftecs casi crudos y hamburguesas
2a, posici6n Pescado, biftecs a medio asar y chuletas
3a, posici6n Alimentos bien cocidos tal come polio y langosta
En caso de que se produzca un incendio en el homo, cierre la puerta
y APAGUE el homo, Si continOa el incendio, use un extinguidor, NO arroje agua o
harina en las llamas; la harina puede explotar,
Para usar _a _uz del homo
La luz interior del homo se ENCEN DERA autom_.ticamente cuando se abra la puerta,
Optima (0} para ENCENDER y APAGAR la luz interior del homo cuando la puerta
est6 cerrada,
La luz interior del homo se encuentra en la pared trasera del homo en la esquma
superior izquierda y est,. cubierta con una tapa de vidrio sostenido pot un alambre, La
cubierta de vidrio debe permanecer en su lugar cuando se use el homo, Para cambiar
la luz del homo, vea "Cambio de la luz del homo" en la secci6n de Cuidado y
[impieza,
48
Ajuste de controles del homo (cont.)
Ajuste de la funci6n Warm & Hold MR
El bot6n I ENCIENDE la funci6n "Warm & Hold" (Calentar y mantener caliente), la cual mantendr_, una temperatura de
170°F (77°C) en el homo. Esta caracteristica mantiene los alimentos horneados y listos para servir pot hasta 3 horas
despu@s de haber terminado el horneado. Despu@s de 3 horas, la funci6n "Warm & Hold" APAGARA el homo
autom6.ticamente. Esta funci6n puede set utilizada sin ninguna otra operaci6n, o puede set utilizada despu@s de la cocci6n
usando las funciones"TIMED BAKE" o"DELAY START BAKE".
Para activar la funci6n "Warm & Hold":
1. Coloque las parrillas del homo en las posiciones correctas y coloque el alimento horneado en el homo. Si el alimento
ya esta en el homo, siga con el paso 2.
2. Optima !. aparecer_, en la pantalla y la luz indicadora "Warm & Hold" se ENCENDERA.
Nota: Si no se oprime ninguna otra tecla dentro de los siguientes 6 segundos, la funci6n "Warm & Hold" se cancelar6..
3. Optima ,_ o V para activar la funci6n.
4. Para APAGAR la funci6n "Warm & Hold" en cualquier momento, optima _. La luz indicadora "Warm & Hold" sobre
el bot6n se apagara..
Para programar la funci6n "Warm & Hold" para ENCENDERSE autom_ticamente:
1. Coloque las parrillas del homo en las posiciones correctas y coloque el alimento horneado en el homo. Programe el
homo para "Timed Sake" o para Delay Start Sake" segOn su elecci6n.
2. Optima .... aparecer_, en la pantalla y la luz indicadora "Warm & Hold" se ENCENDERA.
3. Optima A o V para activar la funci6n. La funci6n "Warm & Hold" esta programada para ENCENDERSE
automaticamente despu@s de que el ciclo "Timed Bake" o "Delay Start Bake" haya finalizado.
4. Para APAGAR la funci6n "Warm & Hold" en cualquier momento, optima _}. La luz indicadora "Warm & Hold" sobre
el bot6n se apagara..
¸:¸112¸:i_
49
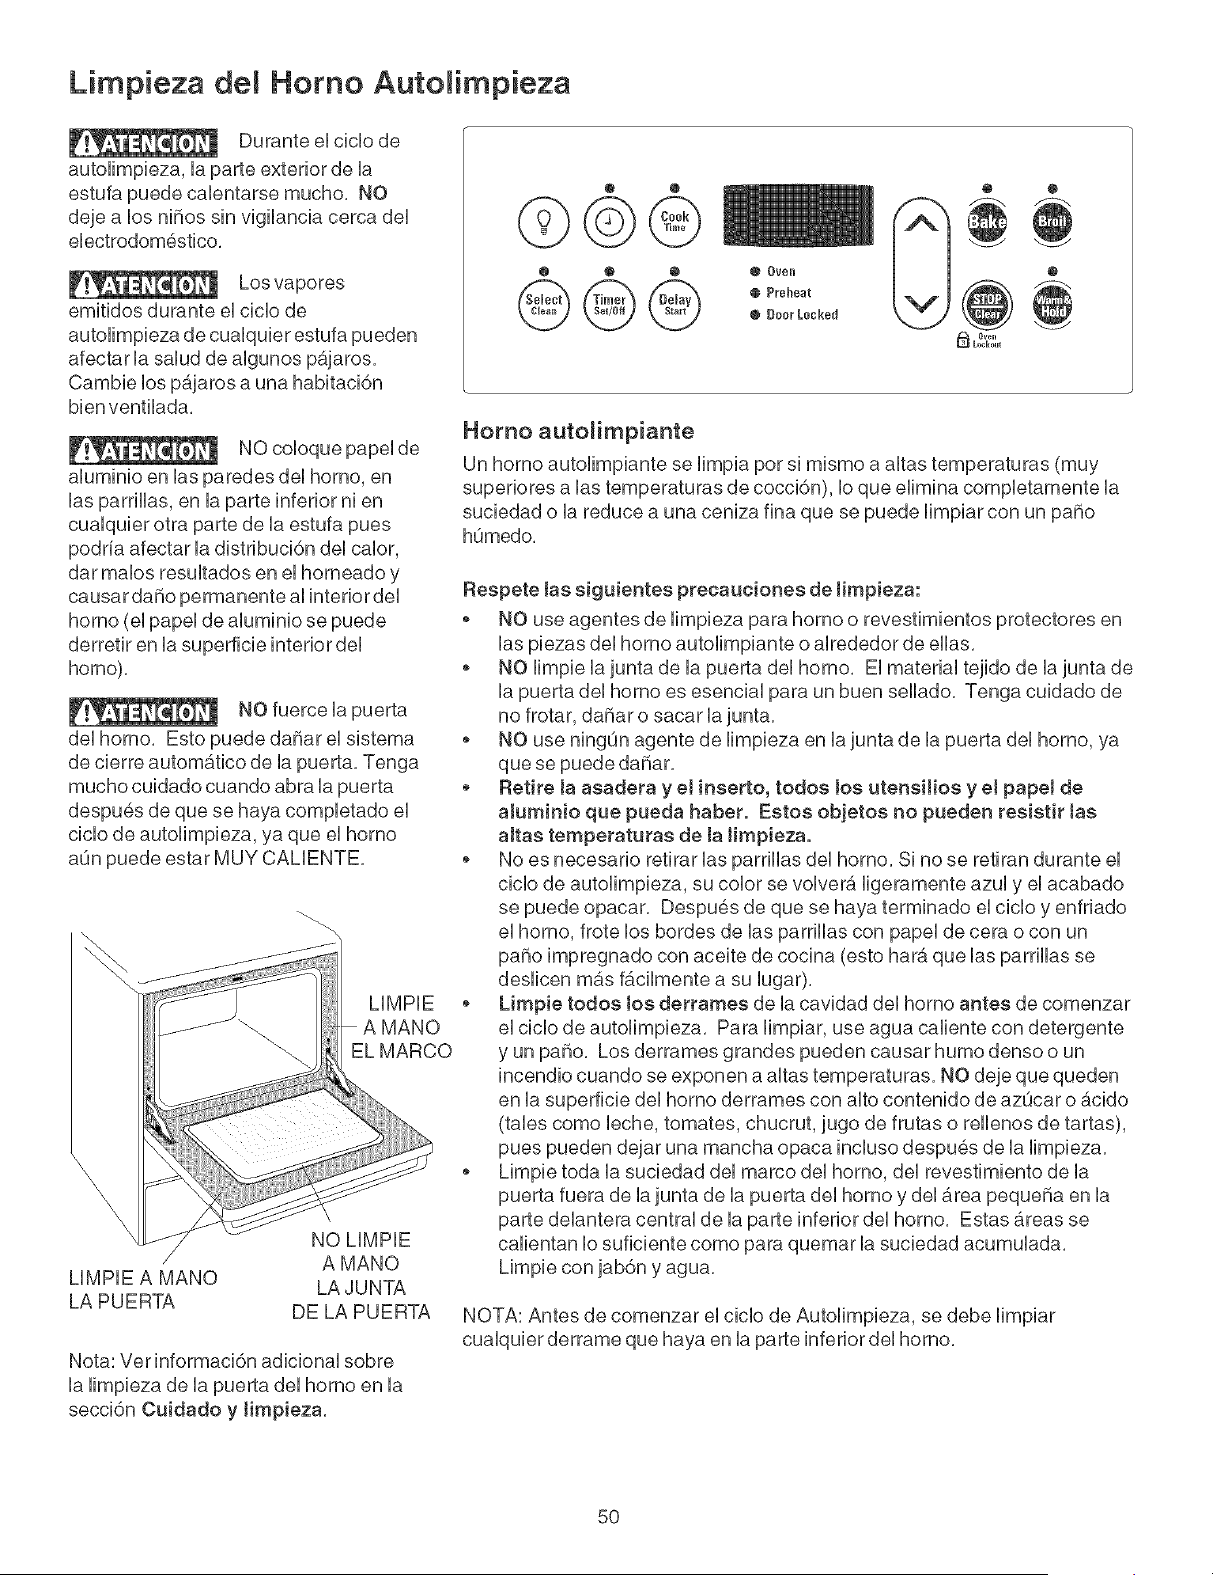
Limpieza del Homo Autolimpieza
Durante eUcicUode
autoHmpbza, Uaparte exterior de Ua
estufa puede cabntarse mucho. NO
deje a bs ni_os sin vigHancia cerca deU
eUectrodom6stbo,
Los vapores
emitidos durante eUcbb de
autoHmpbza de cuaUqubr estufa pueden
afectar UasaUudde aUgunosp_.jaros,
Cambb bs p_.jaros a una habitaci6n
bien ventHada,
NO coloque papel de
aluminio en las paredes del homo, en
las parrillas, en la parte inferior ni en
cualquier otra parte de la estufa pues
podria afectar la distribuci6n del calor,
dar malos resultados en el homeado y
causar da_o permanente al interior del
homo (el papel de aluminio se puede
derretir en la superficie interior del
horno).
NO fuerce la puerta
del homo. Esto puede daSar el sistema
de cierre autom_.tico de la puerta. Tenga
mucho cuidado cuando abra la puerta
despu6s de que se haya completado el
cicio de autolimpieza, ya que ei homo
ann puede estar MUY CALIENTE.
@ @
©©@
o
o
v NO LIblPIE
/ A MANO
LIMPIE A MANO LA JUNTA
LA PUERTA DE LA PUERTA
Nota: Vet informaci6n adicional sobre
la limpieza de la puerta del homo en la
secci6n Cuidado y timpieza.
@ @ @ @ Oven
® Door Locked
@
Ovel}
_L_;koUt
Homo autolimpiante
Un homo autolimpiante se limpia pot si mismo a altas temperaturas (muy
superiores alas temperaturas de cocci6n), Io que elimina completamente la
suciedad o la reduce a una ceniza fina que se puede limpiar con un paso
hOmedo,
Respete las siguientes precauciones de timpieza:
o NO use agentes de limpieza para homo o revestimientos protectores en
las piezas del homo autolimpiante o alrededor de elias,
o NO limpie la junta de la puerta del homo, El material tejido de la junta de
la puerta del homo es esencial para un buen sellado, Tenga cuidado de
no frotar, daSar o sacar la junta,
o NO use ningOn agente de limpieza en la junta de la puerta del homo, ya
que se puede daSar,
. Retire la asade_a y el inserto, todos los utensHios y el papeJ de
aiuminio que pueda haber. Estos objetos no pueden resistir tas
aJtas tempe_aturas de ta Hmpieza.
o No es necesario retirar las parrillas del homo, Si no se retiran durante el
ciclo de autolimpieza, su color se volvera ligeramente azul y el acabado
se puede opacar, Despues de que se haya terminado el ciclo y enfriado
el homo, frote los bordes de las parrillas con papel de cera o con un
paso impregnado con aceite de cocina (esto hara. que las parrillas se
deslicen mas facilmente a su lugar),
Limpie todos Jos der_ames de la cavidad del homo antes de comenzar
el ciclo de autolimpieza, Para limpiar, use agua caliente con detergente
y un paso, Los derrames grandes pueden causar humo denso o un
incendio cuando se exponen a altas temperaturas, NO deje que queden
en la superficie del homo derrames con alto contenido de azL_caro acido
(tabs como leche, tomates, chucrut, jugo de frutas o rellenos de tartas),
pues pueden dejar una mancha opaca incluso despu6s de la limpieza,
Limpie toda la suciedad del marco del homo, del revestimiento de la
puerta fuera de la junta de la puerta del homo y del area pequeSa en la
parte delantera central de la parte inferior del homo, Estas _.reas se
calientan Io suficiente como para quemar la suciedad acumulada,
Limpie con jab6n y agua,
NOTA: Antes de comenzar el cicio de Autolimpieza, se debe limpiar
cualquier derrame que haya en la parte inferior del homo.
50

Limpieza Homo Auto impieza (cont.)
Para iniciar el cicmo de autoHmpieza o un cic_o de autoHmpieza diferido:
Para obtener resuUtados satisfactorios, haga uso de un cicUode autoHmpbza de dos horas de duraci6n para manchas
tigeras, un cbb de 3 horas para manchas promedio, o un cbb de 4 horas para manchas dificHes, NOTA: EUArea de
Uacocina debe estar bien ventHada empbando una ventana abbrta, ventHador o campana de escape durante eUprimer
cbb de autolimpieza, Esto ayudar_, a eliminar los malos olores relacionados con el primer cido de autolimpieza:
Para configurar tos controles para un cicto de autoJimpieza o de autoHmpieza diferida:
(Nota: Si usted no desea iniciar un ciclo de autolimpieza diferido, omita los pasos 2 y 3,)
1, AsegOrese que el reloj muestre la hera correcta del dia,
Presione @, " : " parpadear_, en la hera del dia,
2,
3, Presione y mantenga presionado A hasta Ibgar a la hora a la que desea iniciar el cido de autolimpieza diferido,
Libere el bot6n cuando se despliegue la hera deseada,
4, Presione _, " "aparecer_. en la pantalla,
5, Presione ._ o V una vez, "3:00" aparecera en la pantalla para indicar un ciclo de 3 horas, Presione V hasta
que aparezca "2:00" en la pantalla para un cido de 2 horas o .,_ hasta que aparezca "4:00" para un cido de 4
horas,
Tan pronto come los controbs son configurados, el seguro accionado del motor empezar_, a cerrarse autom_.ticamente
y la luz del indicador de "BLOQUEO" resplandecer_., NO abra la puerta mientras la luz est,. relampagueando (demora
alrededor de 15 segundos para que puerta del homo se bloquee),
6, "CLn" aparecer_, en la pantalla durante el cido de autolimpieza y la luz de "BLOQU EO" resplandecer_, hasta que el
cido de limpieza haya sido terminado o cancelado, y la temperatura del homo se haya enfriado,
Cuando et cicto de autolimpieza ha terminado:
1, Aparecera en la ventana de la pantalla la hera del dia o "End" y la luz de "Limpio" y "BLOQUEO" seguir&n centelleando,
2, Una vez que el homo se ha enfriado durante casi 1 HORA y la luz de "RELOJ" se ha ido, la puerta del homo puede set
abierta,
3, Si "End" se encuentra en pantalla y la luz indicadora "Select Clean" permanece encendida, presione _, La hora
del dia aparecer_, en la pantalla,
NOTA: Cuando el homo est6 frio, limpie cualquier residue o ceniza en polvo con una tela hOmeda o papel toalla,
Parada o interrupci6n de un cicmo de autoHmpieza se_eccionado
Si fuera necesario detener o interrumpir un cido de autolimpieza:
1, Presione_.
2, Unavezqueelhornosehayaenfriadodurantecasil HORAylaluzde"gLOQUE"sehayaido, lapuertadelhornopuede
set abierta,
3, Vuelva a iniciar el ciclo de autolimpieza una vez que todas las condiciones hayan sido corregidas,
Para evitar posibles quemaduras, tenga cuidado al abrir la puerta del homo luego del cicio de
autolimpieza, P_.rese al costado del homo al abrir la puerta para dejar que el aire o humo caliente salga al exterior,
NO fuerce la puerta del homo al abrir, Esto puede daSar el sistema de cierre autom_.tico de la puerta,
Tenga precauci6n y evite posibles quemaduras al abrir la puerta despu6s que el cicio de autolimpieza ha terminado, Ei
homo alan puede encontrarse MUY CALIENTE.
¸:¸112¸:i_
51
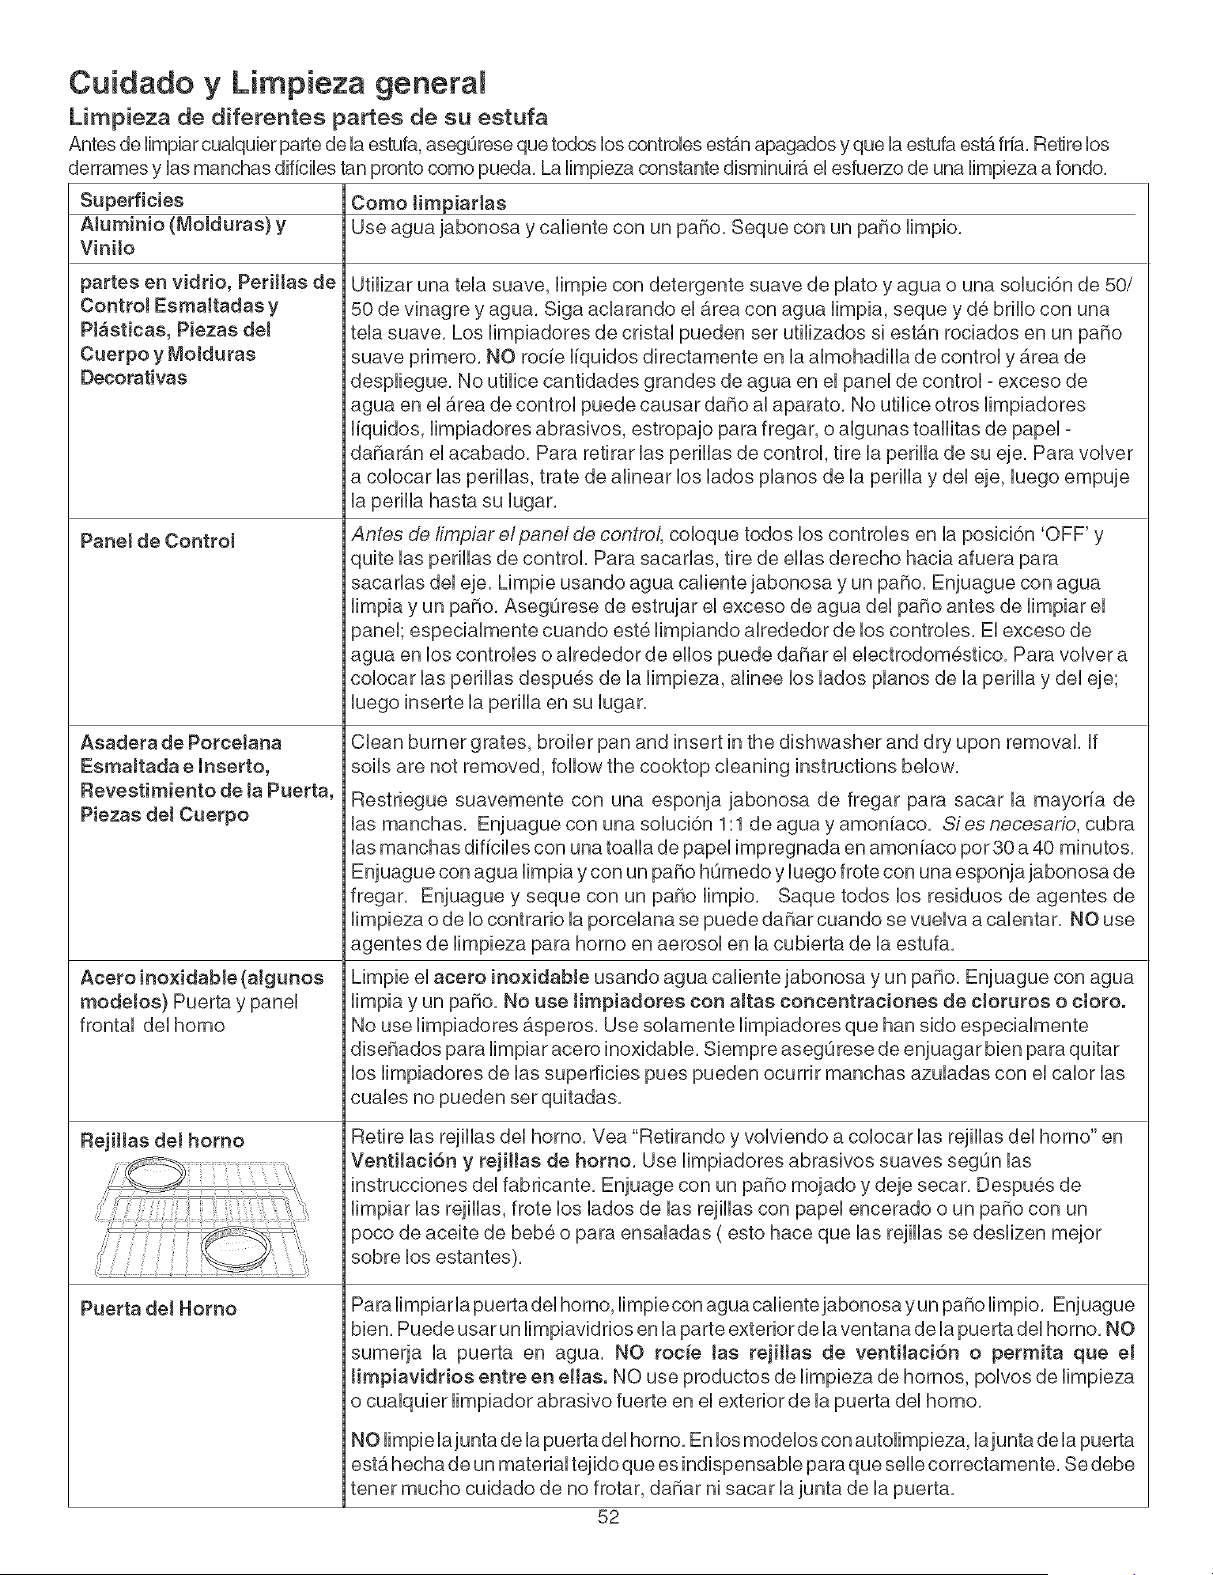
Superficies
AJuminio(Molduras)y
Vinilo
Cuidado y Limpieza genera
Limpieza de diferentes partes de su estufa
Antes de HmpiarcuaUqubrparte de ]a estufa, asegQreseque todos bs controbs estAnapagados y que ]a estufa estA fria, Retire bs
derrames y ]as manchas dificHes tan pronto como pueda, La Hmpbza constante disminuirA e] esfuerzo de una ]impieza a fondo,
Como timpiartas
Use agua jabonosa y caliente con un patio, Seque con un patio limpio,
partes en vidrio, PerHtas de
Contro! Esmaltadas y
PlAsticas, Piezas del
Cuerpo y Molduras
Decorativas
Panet de Control
Asadera de PorceJana
EsmaJtada e mnserto,
Revestimiento de JaPuerta,
Piezas del Cuerpo
Acero inoxidable (aJgunos
modetos) Puerta y panel
frontal del homo
Rejiltas del homo
Puerta del Homo
Utilizar una tela suave, limpie con detergente suave de plato y agua o una soluci6n de 50/
50 de vinagre y agua, Siga aclarando el Area con agua limpia, seque y de brillo con una
tela suave, Los limpiadores de cristal pueden ser utilizados si estan rociados en un patio
suave primero, NO rocie liquidos directamente en la almohadilla de control y Area de
despliegue, No utilice cantidades grandes de agua en el panel de control - exceso de
agua en el Area de control puede causar datio al aparato, No utilice otros limpiadores
liquidos, limpiadores abrasives, estropajo para fregar, o algunas toallitas de papel -
datiarAn el acabado, Para retirar las perillas de control, tire la perilla de su eje, Para volver
a colocar las perillas, trate de alinear los lades planes de la perilla y del eje, luego empuje
la perilla hasta su lugar,
Antes de limpiarelpane/de centre/, coloque todos los controbs en la posici6n 'OFF' y
quite las perillas de control, Para sacarlas, tire de elias derecho hacia afuera para
sacarlas del eje, Limpie usando agua calientejabonosa y un patio, Enjuague con agua
limpia y un patio, AsegQrese de estrujar el exceso de agua del patio antes de limpiar el
panel; especialmente cuando este limpiando alrededor de los controbs, El exceso de
agua en los controbs o alrededor de ellos puede datiar el ebctrodom6stico, Para volver a
colocar las perillas despu@s de la limpieza, alinee los lados planes de la perilla y del eje;
luego inserte la perilla en su lugar,
Clean burner grates, broiler pan and insert in the dishwasher and dry upon removal, If
soils are not removed, follow the cooktop cleaning instructions below,
Restriegue suavemente con una esponja jabonosa de fregar para sacar la mayoria de
las manchas, Enjuague con una soluci6n 1:1 de agua y amoniaco, Sies necesario, cubra
las manchas dificibs con una toalla de papel impregnada en amoniaco por30 a 40 minutos,
Enjuague con agua limpia y con un patio hQmedo y luego frote con una esponjajabonosa de
fregar, Enjuague y seque con un patio limpio, Saque todos los residuos de agentes de
limpieza o de Io contrario la porcelana se puede datiar cuando se vuelva a cabntar, NO use
agentes de limpieza para homo en aerosol en la cubierta de la estufa,
Limpie el acero inoxidabJe usando agua caliente jabonosa y un patio, Enjuague con agua
limpia y un patio, No use timpiadores con altas concentraciones de cJoruros o ctoro.
No use limpiadores Asperos, Use solamente limpiadores que hart sido especialmente
disetiados para limpiar acero inoxidabb, Siempre asegOrese de enjuagar bien para quitar
los limpiadores de las superficies pues pueden ocurrir manchas azuladas con el calor las
cuabs no pueden ser quitadas,
Retire las rejillas del homo, Yea "Retirando y volviendo a colocar las rejillas del homo" en
Ventitaci6n y rejitJas de homo, Use limpiadores abrasives suaves segQn las
instrucciones del fabricante, Enjuage con un patio mojado y deje secar, Despues de
limpiar las rejillas, frote los lades de las rejillas con papel encerado o un patio con un
)oco de aceite de bebe o para ensaladas ( esto hace que las rejillas se deslizen meier
sobre los estantes),
Para limpiarla puertadel homo, limpiecon agua calientejabonosa yun patio limpio, Enjuague
bien, Puede usar un limpiavidrios en la parte exterior de la ventana de la puerta del homo, NO
sumerja la puerta en agua, NO roche Jas rejiltas de ventHaci6n o permita que el
timpiavidrios entre en elias. NO use productos de limpieza de homos, pelves de limpieza
o cualquier limpiador abrasivo fuerte en el exterior de la puerta del homo,
NO limpie lajunta de la puerta del homo, En los modelos con autolimpieza, lajunta de la puerta
esta hecha de un material tejido que es indispensable para que selle correctamente, Se debe
tener mucho cuidado de no frotar, datiar ni sacar la junta de la puerta,
52
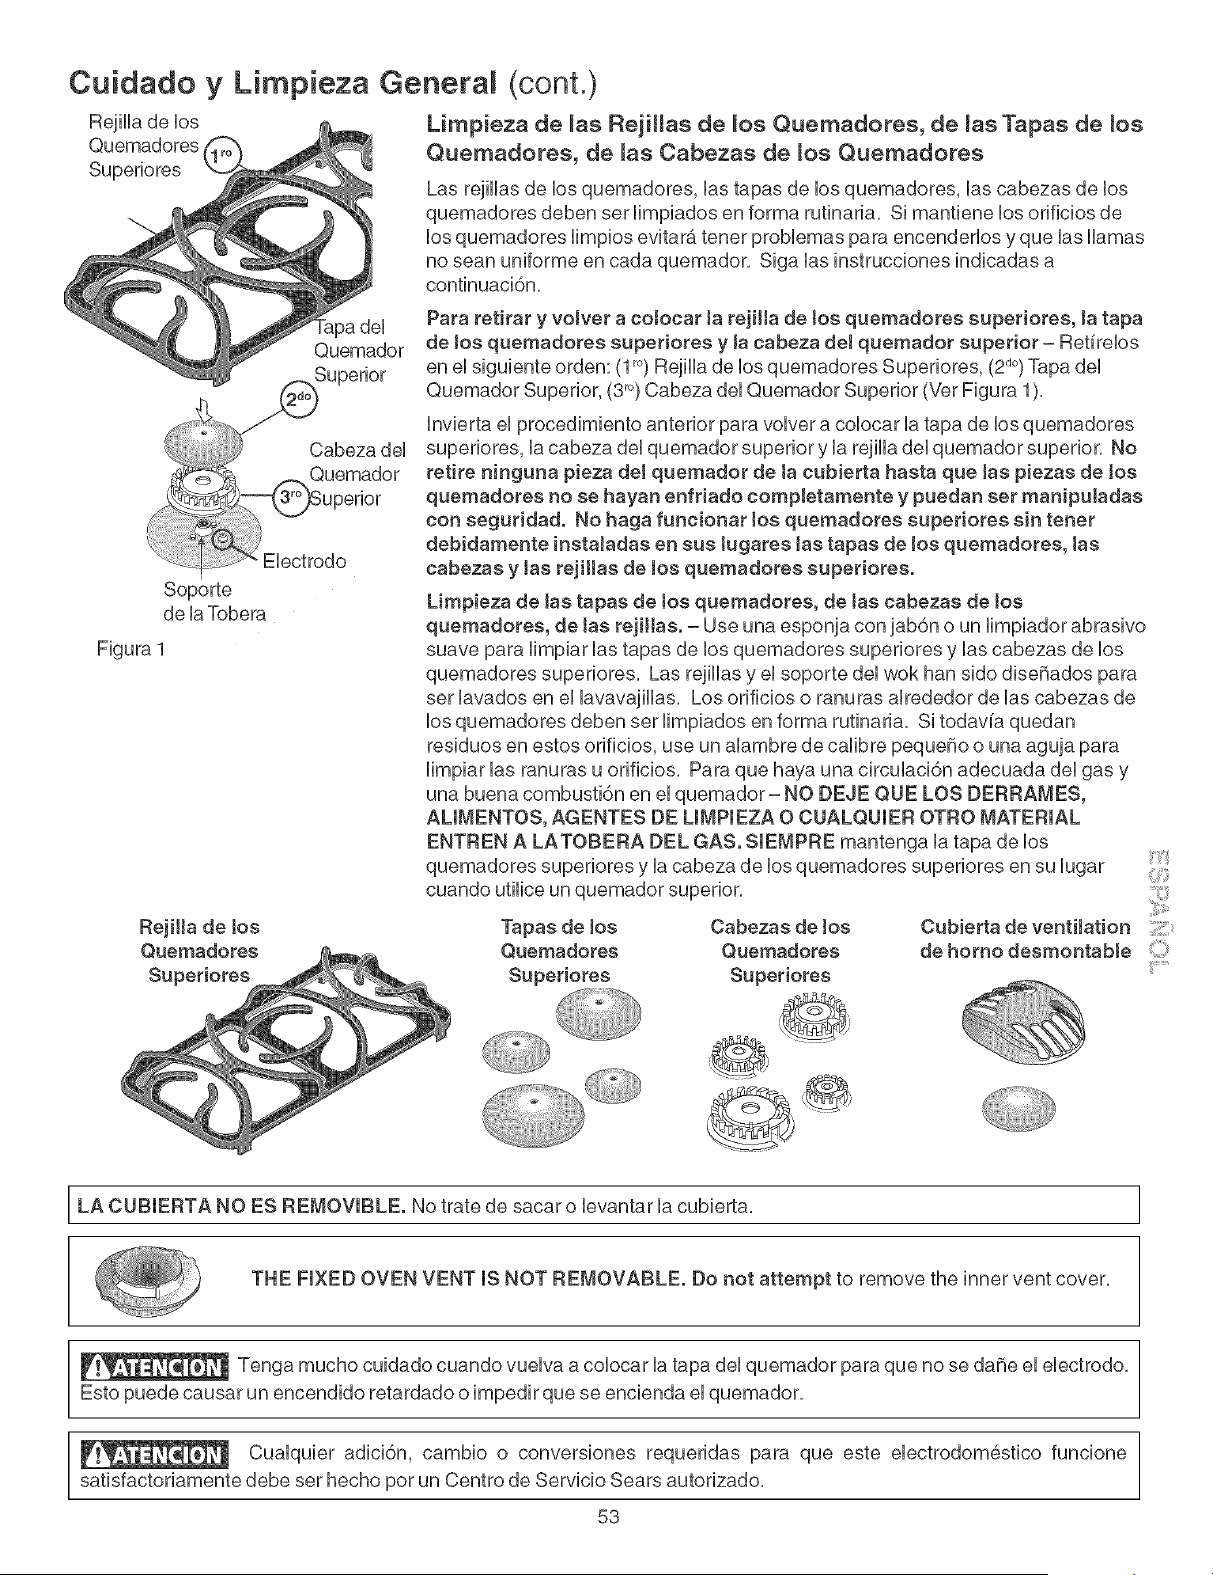
Cuidado y Limpieza Genera (cont.)
RejHUade bs Limpieza de _as RejiHas de _os Quemadores, de _as Tapas de _os
Quemadores Quemadores, de _as Cabezas de _os Quemadores
Superiores
Las rejHUasde bs quemadores, Uastapas de bs quemadores, Uascabezas de bs
quemadores deben ser Hmpiados en forma rutinaria, Si mantbne bs orificios de
bs quemadores Hmpios evitar_, tener probbmas para encenderbs y que UasHamas
no sean uniforme en cada quemador, Siga Uasinstrucciones indbadas a
continuaci6n,
Soporte
de UaTobera
del
Quemador
Superior
Cabeza del
_uemador
Para retirar y volver a coJocar la rejiHa de tos quemadores superiores, la tapa
de tos quemadores superiores y Jacabeza deJ quemador superior - Retirelos
en el siguiente orden: (1 to)Rejilla de los quemadores Superiores, (2a°)Tapa del
Quemador Superior, (3r°)Cabeza del Quemador Superior (Ver Figura 1),
Invierta el procedimiento anterior para volver a colocar la tapa de los quemadores
superiores, la cabeza del quemador superior y la rejilla del quemador superior, No
retire ninguna pieza del quemador de ta cubierta hasta que Jas piezas de tos
quemadores no se hayan enfriado compbtamente y puedan set manipuladas
con seguridad. No haga funcionar Jos quemadores superiores sin tenet
debidamente instaJadas en sus lugares las tapas de los quemadores, las
cabezas y Jas rejittas de Jos quemadores superiores.
Limpieza de tas tapas de Jos quemadores, de las cabezas de tos
quemadores, de tas rejiHas. = Use una esponja con jab6n o un limpiador abrasivo
suave para limpiar las tapas de los quemadores superiores y las cabezas de los
quemadores superiores, Las rejillas y el soporte del wok han sido dise_ados para
ser lavados en el lavavajillas, Los orificios o ranuras alrededor de las cabezas de
los quemadores deben ser limpiados en forma rutinaria, Si todavia quedan
residuos en estos orificios, use un alambre de calibre peque_o o una aguja para
limpiar las ranuras u orificios, Para que haya una circulaci6n adecuada del gas y
una buena combusti6n en el quemador-NO DEJE QUE LOS DERRAME$,
AUMENTOS, AGENTES DE uMPmEZA O CUALQUmER OTRO MATERmAL
ENTREN A LATOBERA DEL GAS. SmEMPRE mantenga la tapa de los
quemadores superiores y la cabeza de los quemadores superiores en su lugar
cuando utilice un quemador superior,
Figura 1
RejiHa de los
Quemadores
Superiores
Tapas de Jos
Quemadores
Superiores
Cabezas de !os
Quemadores
Superiores
/
@ @
Cubierta de ventiJation
de homo desmontabte
LA cUBmERTA NO ES REMOVmBLE. No trate de sacar o levantar la cubierta,
THE FmXEDOVEN VENT msNOT REMOVABLE. Do not attempt to remove the inner vent cover,
Tenga mucho cuidado cuando vuelva a colocar la tapa del quemador para que no se da_e el electrodo,
Esto puede causar un encendido retardado o impedir que se encienda el quemador,
Cualquier adici6n, cambio o conversiones requeridas para que este electrodom6stico funcione
satisfactoriamente debe ser hecho por un Centro de Servicio Sears autorizado,
53
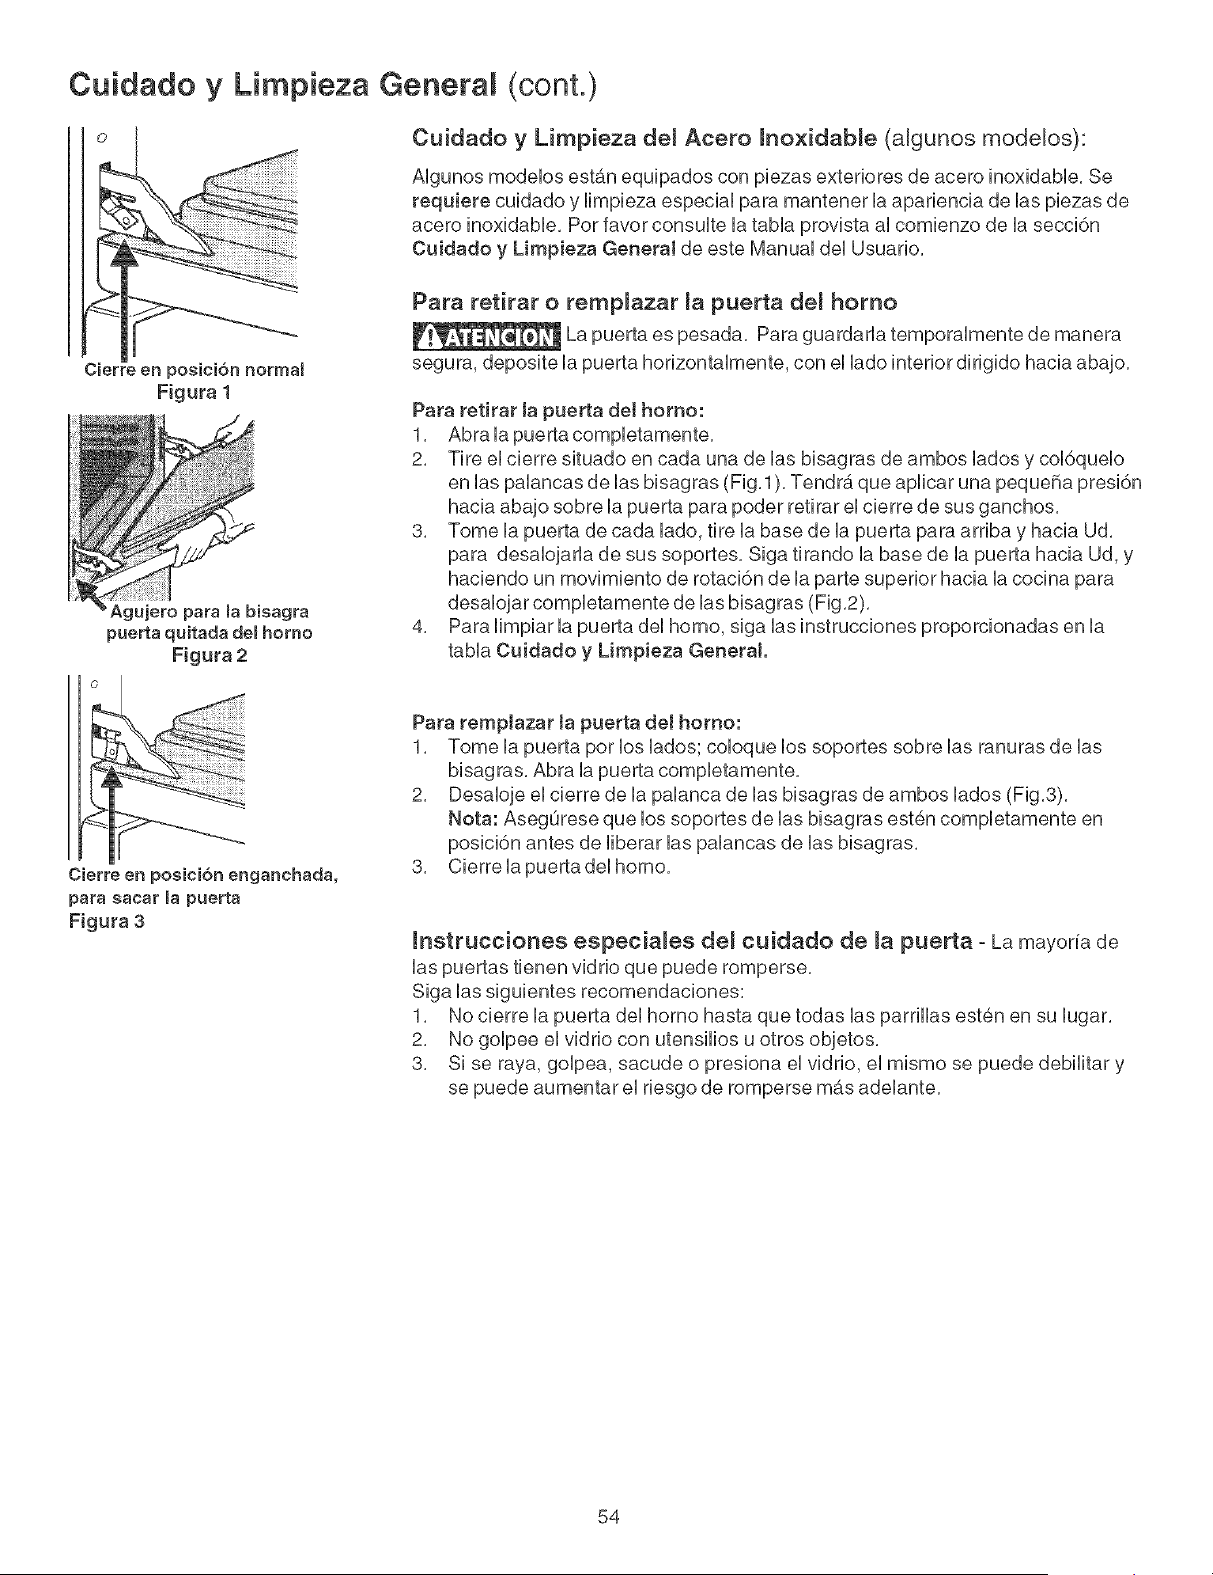
Cuidado y Limpieza Genera (cont.)
Cuidado y Limpieza de_ Acero hoxidab_e (algunos modelos):
AUgunos modeUos estan equipados con piezas exteriores de acero inoxidabUe, Se
requiere cuidado y Hmpieza especiaU para mantener Uaapariencia de Uaspiezas de
acero inoxidaMe, Por favor consuUte UataMa provista aUcomienzo de Uaseccidn
Cuidado y Limpieza General de este ManuaUdeUUsuario,
Agujero para Babisagra
puerta quitada deBhomo
Figura 2
Para refirar o remp[azar [a puerta de[ homo
La puerta es pesada, Para guardarla temporalmente de manera
segura, deposite la puerta horizontalmente, con el lado interior dirigido hacia abajo,
Para retirar Japuerta del homo:
1, Abralapuertacompletamente,
2, Tire el cierre situado en cada una de las bisagras de ambos lados y col6quelo
en las palancas de las bisagras (Fig,l), Tendra que aplicar una pequeSa presi6n
hacia abajo sobre la puerta para poder retirar el cierre de sus ganchos,
3, Tome la puerta de cada lado, tire la base de la puerta para arriba y hacia Ud,
para desalojarla de sus soportes, Siga tirando la base de la puerta hacia Ud, y
haciendo un movimiento de rotaci6n de la parte superior hacia la cocina para
desalojar completamente de las bisagras (Fig,2),
4, Para limpiar la puerta del homo, siga las instrucciones proporcionadas en la
tabla Cuidado y Limpieza General
Cierre en posicidn enganchada,
para sacar mapuerta
Figura 3
Para remplazar ta puerta de1 homo:
1, Tome la puerta por los lados; coloque los soportes sobre las ranuras de las
bisagras, Abra la puerta completamente,
2, Desaloje el cierre de la palanca de las bisagras de ambos lados (Fig,3),
Nota: AsegOrese que los soportes de las bisagras esten completamente en
posicidn antes de liberar las palancas de las bisagras,
3, Cierrela puertadel homo,
mnstrucciones especia[es de[ cuidado de [a puerta - La mayor[a de
las puertas tienen vidrio que puede romperse,
Siga las siguientes recomendaciones:
1, No cierre la puerta del homo hasta que todas las parrillas esten en su lugar,
2, No golpee el vidrio con utensilios u otros objetos,
3, Si se raya, golpea, sacude o presiona el vidrio, el mismo se puede debilitar y
se puede aumentar el riesgo de romperse mas adelante,
54
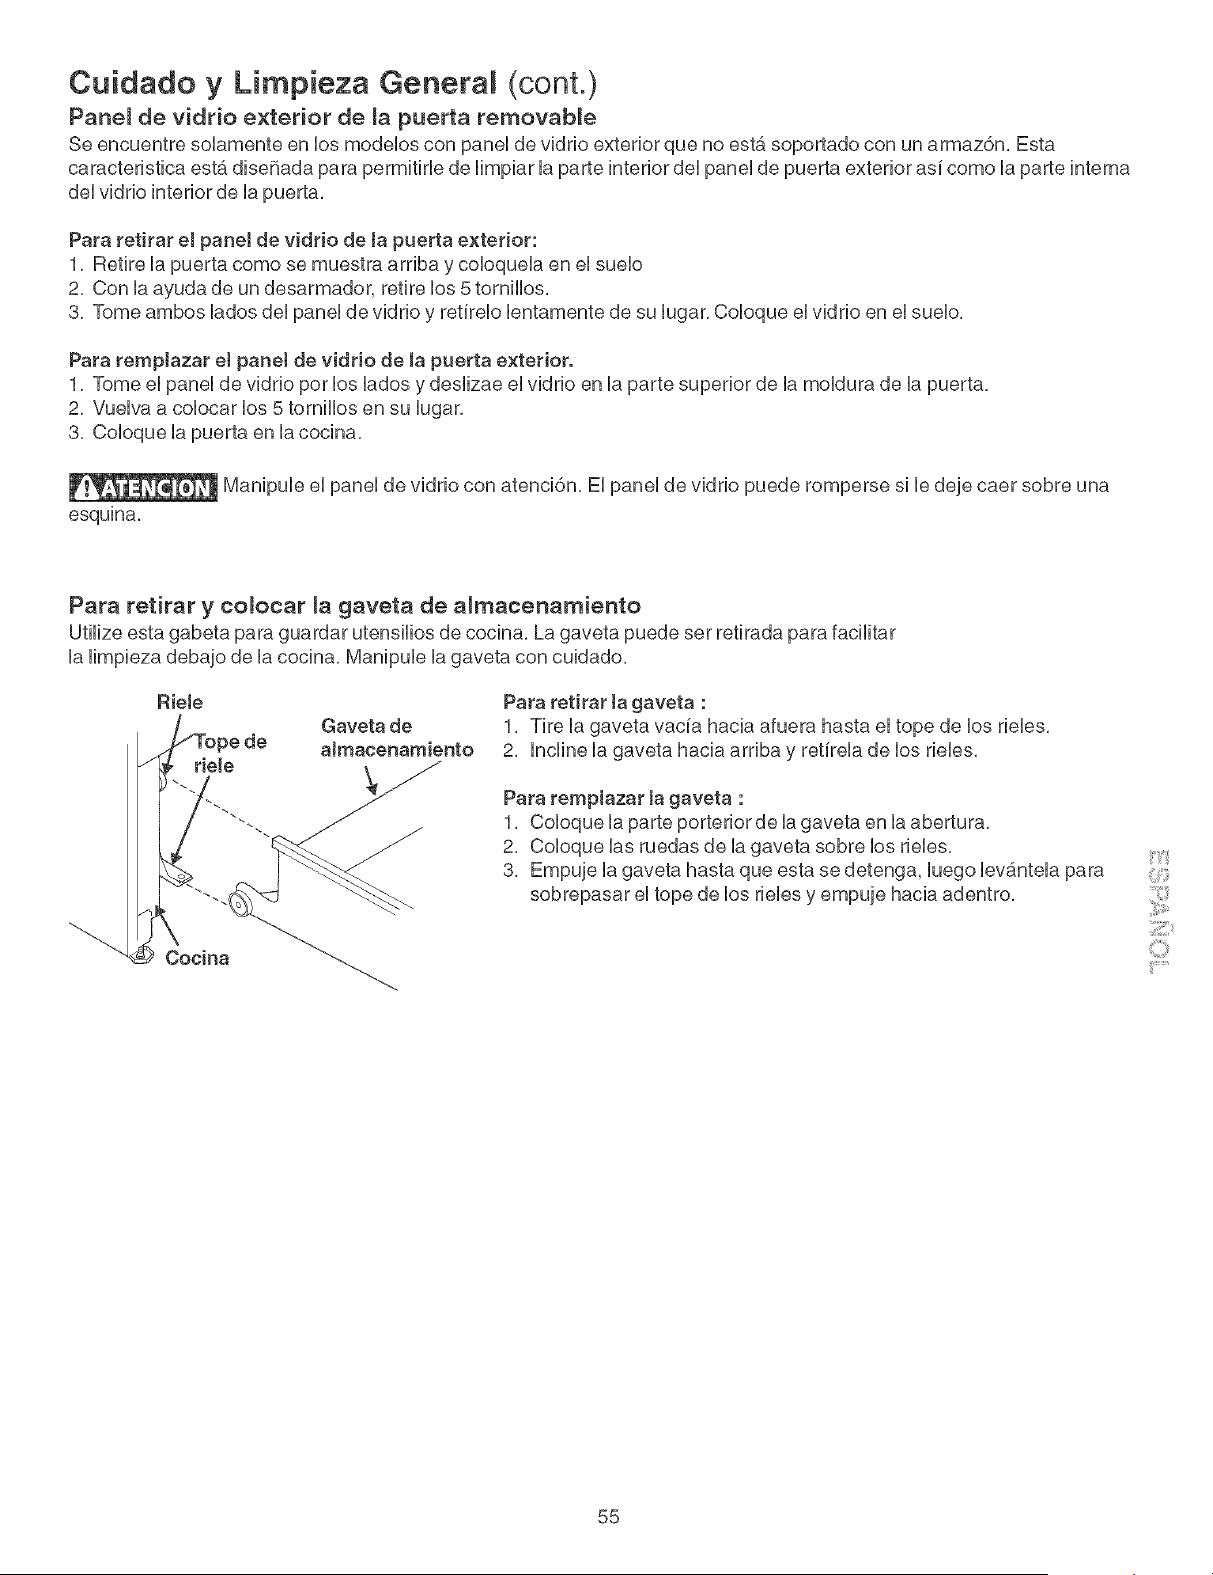
Cuidado y Limpieza Genera (cont.)
Pane_ de vidrio exterior de _a puerta removable
Se encuentre soUamente en UosmodeUoscon paneUde vidrio exterior que no esta soportado con un armaz6n. Esta
caracteristica est,. diseSada para permitMe de Hmpiar Uaparte interior deUpaneUde puerta exterior asi como Uaparte intema
deUvidrio interior de Uapuerta.
Para retirar el panel de vidrio de ta puerta exterior:
1. Retire Uapuerta como se muestra ardba y coUoqueUaen eUsueUo
2. Con la ayuda de un desarmador, retire los 5 tomillos.
3. Tome ambos lados del panel de vidrio y retirelo lentamente de su lugar. Coloque el vidrio en el suelo.
Para remplazar et panel de vidrio de la puerta e×terior.
1. Tome el panel de vidrio pot los lados y deslizae el vidrio en la parte superior de la moldura de la puerta.
2. Vuelva a colocar los 5 tomillos en su lugar.
3. Coloque la puerta en la cocina.
Manipule el panel de vidrio con atenci6n. El panel de vidrio puede romperse si le deje caer sobre una
esquina.
Para retirar y colocar _a gaveta de a_macenamiento
Utilize esta gabeta para guardar utensilios de cocina. La gaveta puede set retirada para facilitar
la limpieza debajo de la cocina. Manipule la gaveta con cuidado.
RieJe
Gaveta de
_e de aJmacenarniento
riele
Para retirar ta gaveta :
1. Tire la gaveta vacia hacia afuera hasta el tope de los rieles.
2. Incline la gaveta hacia arriba y retirela de los rieles.
Para _empJazar la gaveta :
1. Coloque la parte porteriorde la gaveta en la abertura.
2. Coloque las ruedas de la gaveta sobre los rieles.
3. Empuje la gaveta hasta que esta se detenga, luego levantela para
sobrepasar el tope de los rieles y empuje hacia adentro.
Cocina
55
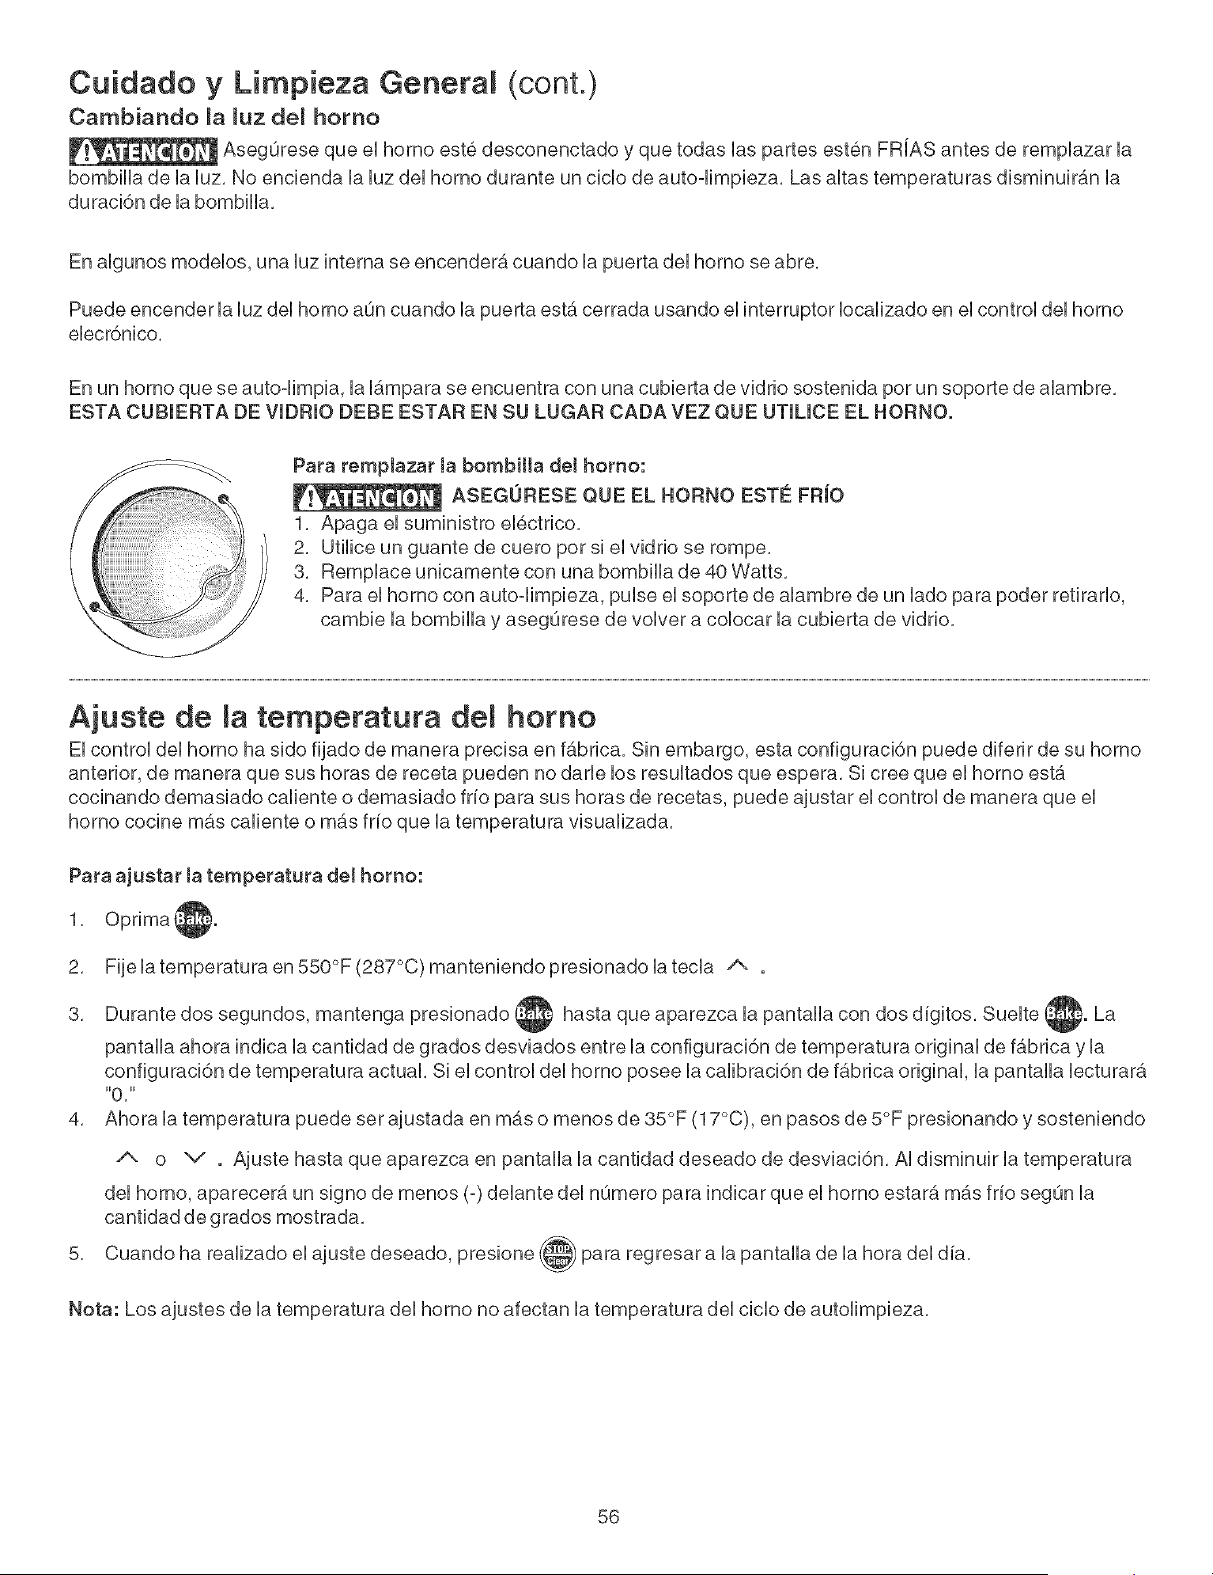
Cuidado y Limpieza Genera (cont.)
Cambiando _a _uz de_ homo
AsegQrese que el homo est@desconenctado y que todas las partes est@nFRiAS antes de remplazar la
bombilla de la luz. No encienda la luz del homo durante un ciclo de auto=limpieza. Las altas temperaturas disminuir6.n la
duraci6n de la bombilla.
En algunos modelos, una luz interna se encender6, cuando la puerta del homo se abre.
Puede encender la luz del homo ann cuando la puerta est6. cerrada usando el interruptor Iocalizado en el control del homo
elecr6nico.
En un homo que se auto=limpia, la I_.mpara se encuentra con una cubierta de vidrio sostenida pot un soporte de alambre.
ESTA CUBIERTA DE VlDRIO DEBE ESTAR EN SU LUGAR CADA VEZ QUE UTILICE EL HORNO.
Para remp[azar ta bomb[[[a de[ homo:
ASEGORESE QUE EL HORNO ESTE FFtJO
1. Apaga el suministro el@ctrico.
2. Utilice un guante de cuero pot si el vidrio se rompe.
3. Remplace unicamente con una bombilla de 40 Watts.
4. Para el homo con auto=limpieza, pulse el soporte de alambre de un lado para poder retirarlo,
cambie la bombilla y asegOrese de volver a colocar la cubierta de vidrio.
A]uste de temperatura homo
El control del homo ha side fijado de manera precisa en f_.brica. Sin embargo, esta configuraci6n puede diferir de su homo
anterior, de manera que sus horas de receta pueden no darle los resultados que espera. Si cree que el homo est,.
cocinando demasiado caliente o demasiado frio para sus horas de recetas, puede ajustar el control de manera que el
homo cocine mas caliente o mas frio que la temperatura visualizada.
Para a]uetar ta temperatuta de[ homo:
1. Optima4
2. Fije la temperatura en 550°F (287°C) manteniendo presionado la tecla A
3,
4,
Durante dos segundos, mantenga presionado I hasta que aparezca la pantalla con dos digitos. Suelte La
pantalla ahora indica la cantidad de grados desviados entre la configuraci6n de temperatura original de f_.brica y la
configuraci6n de temperatura actual. Si el control del homo posee la calibraci6n de f6.brica original, la pantalla lecturar_.
IIO, II
Ahora la temperatura puede set ajustada en m_.s o menos de 35°F (17°C), en pasos de 5°F presionando y sosteniendo
A o v . Ajuste hasta que aparezca en pantalla la cantidad deseado de desviaci6n. AI disminuir la temperatura
del homo, aparecer_, un signo de menos (=)delante del nSmero para indicar que el homo estate, m_.s frio segSn la
cantidad de grados mostrada.
Cuando ha realizado el ajuste deseado, presione _ para regresar a la pantalla de la hora del dia.
Nota: Los ajustes de la temperatura del homo no afectan la temperatura del cicio de autolimpieza.
56
Antes de JJamar
So[uciones a prob[emas comunes
Antes de Ilamara! servicio, revise 6sta [[sta, Puede ahorrar[e t[empo y d[nero, Esta [[sta cont[ene s[tuac[ones comunes que
no son e[ resu[tado de errores de fabr[cac[6n o mater[ales de este artefacto,
S[TUAC[ON POS[BLE CAUSA!SOLUCKSN
La estufa esta desnivemada,
Instalci6n inadecuada. Coloque la rejiiia en el centre del homo. Cotoque un nivel
sobre Ia rejilla. Ajuste Ias patas niveladoras en la base de Ia estufa hasta que la reiilJa
se nivele. Cuando la estufa est_ nivelada, Ia plancha de cocinar puede aparecer
desnivelada sila plancha de cocinar no esta nivelada.
Piso no solido, inestable. Aseg0rese que el piso esta nivelado y que puede soportar
la cocina. Llame su carpintero para corregir un piso inclinado.
El desniveI del armario de la estufa puede hacer aparecer Ia estufa desnivelada.
AsegOrese que los armarios estan cuadrados y tienen suficiente espacio para Ja
cocina.
No puede mover e[ aparato facilmente,E[
aparato no puede set accesibme
faeHmente.
Los armarios no son cuadrados o son fabricados muy angostos. Consulte un
carpintero para corregir el problema.
Consulte un carpintero para hacer el aparato mas accesible.
Las alfombras interfieren con la cocina. Deje suficentemente de espacio para que la
estufa pueda ser levantada sobre la alformbra.
Gas line is hard-plumbed. Have a flexible C.S.A international approved metal
appliance connector installed.
La estufa completa o el homo no
funcionan.
AsegOrese de que el cord6n electrico/enchufe este correctamente conectado.
El cableado de servicio no estb, complete. P6ngase en contacto Sears Servicio
1-800-4-MY-HOM E®. (Ver contraportada).
Interrupci6n de la energ[a electrJca. Para estar seguro, revise las Juces del hogar.
Llame al servJcio tecnico de su compaFffa de electricidad local.
E[ control de[ homo emite eeffa[es
eonorae y eB indicador visual mueetra
cuamquier c6digo 'F' (por ejemplo, 'Fll ')
El control electr6nico ha detectado una falla. Oprima 'STOP/CLEAR' para despejar el
indicador visual y detener las seF_ales sonoras. Vuelva a programar el homo. Si la
falla so repite, anote el nOmero de la falla, optima 'STOP/CLEAR' y p6ngase en _............
contacto Sears Servicio 1-800-4-MY-HOME®. (Ver contraportada).
La[uzde[horno(a[gunosmodetos)no Reemplace o apriete el foco. Ver la secci6n Cambio de [a [uz del homo (algunos
funciona, modelos) en este Manual del Usuario para obtener las instrucciones.
La unidad de superficie rio camienta. La perilla de control de superficie no ha side girada per complete hacia LITE.
EmpOjela y gire Ia periIIa de control de superficie hacia LITE hasta que el quemador
se encienda y Juego gire Ja perJHa de control segOn el tamaBo de llama deseado.
Los puertos det quemador estan atorados. Con el quemador apagado, use un cable de
diametro pequeSo ouna aguja para limpiar Ios puertos. Vease "Quemadores de supedJcie" en
la taNa de CuJdado y LimpJeza para instrucciones de limpieza adJcionales.
El cabie de corriente de la cocina se encuentra desconectada del enchufe.
AsegQrese que el cable este connectado de manera segura al enchufe.
Asegurese que el suministro de gas se encuentre encendido.
E[ quemador tiene [a mitad de [a
llama.
Los orificios del quemador estan obstruidos. Con ei quemador apagado, limpJe los
orificios utilJzando una esponia de alambres ouna aguia.
La humedad estb, presente despues de Ia JJmpieza. Sople Ia llama lentamente y
permita que el quemador funcione hasta que Ia llama este completa. Seque los
quemadores a rondo de acuerdo a Jas Jnstrucciones de Ja secci6n "Limpieza GeneraF
57
La Hama det quemador es anaranjadao Partfculas de polvo en la lfnea principal. Permita que el quemador funcione pot unos
minutos hasta que la llama se ponga azuL
Aire salado en las zonas de la costa. Una ligera llama anaranjada es inevitable.
Malos resultadoe amhornearo
Muchos factores afectan el horneo. AsegOrese que Ia rejilla esta en buen lugar.
Centre la comida y de]e espacio para permitir al aire de circular. Precaliente el homo
a la temperatura deseada antes de colocar Ia comida. Trate de ajustar Ias
temperaturas recomendadas y eI tiempo de homeo de sus recetas. Si cree que el
homo esta muy caliente o muy frfo, vea "Ajuete de matemperatura det homo" en el
Manual del usuario.
Ruido demventimador durante la funcion
de cucinadoo
El ventilador puede encenderse o apagarse automaticamente para enfriar algunos
componentes del electrodom6stico. EI ventilador puede apagarse immediatamente o
puede continuar encendido aun y cuando la estufa halla sido apagada.
Lmamaedeede eminterior de{ homo o
vapor de marejiHa de ventHaci6no
Derrames excesivos dentro del homo. Ajuste el ciclo de auto limpieza pot un tiempo
mb.s largo.
Derrames excesivos dentro del homo. Esto es normal, especialmente para los de
pasteles o grasas en la base del homo. Limpie los derrames excesivos antes de
comenzar Ia auto-Iimpieza. Si observa llamas o vapor, pare el ciclo de autoalimpieza
y siga Ias etapas en "Para parar o interrumpir el ciclo de auto-limpieza" en Guia de
contro_ demhomo electr6nico
Emhomo produce demasiado vapor al
asar.
Las carnes estan muy cerca del elemento deI asador.Vuelva a colocar la rejilla para
obtener un espacio suficiente entre las carnes y el elemento.
Came no debidamente preparada. Retire el exceso de grasa de Ia came. Corte los
bordes con grasa para que no se bvanten, pero no corte la came magra.
Bandaje de asador usada sin accesorio o accesorio cubierto con una lamina. NO
use la bandeja del asador sin el accesorio o cubra el accesorio con una I_mina.
EI gabinete deI asador requiere ser Iimpiado. El humo excesivo es ocasionado pot
una acumulaci6n de grasa o saIpicaduras de comida. Si el asador es usado con
frecuencia, limpie sobre una base regular.
EI gabinete del asador est_ abierto. El gabinete/puerta debe set cerrado cuando se
realiza el asado.
Emcicmo de auto-timpieza no funciona, Los controbs no estan programados adecuadamente. Siga las instrucciones en
"Limpieza del homo" en "Guia de control del homo ebctr6nico".
El cicio de Iimpieza rue interrumpido. EI tiempo de termino debe ser de 3 a 4 horas
despues de haber comenzado. Siga Ias etapas en "Para parar o interrumpir el ciclo
de autoqmpieza" en "Guia de control del homo electr6nico".
Las manchae no hart side retiradas
deepuee demciclo de auto-limpieza,
Derrames excesivos dentro del homo. Ajuste el cido de auto limpieza pot un
tiempo mas largo.
No ha Iimpiado la base, la parte superior, el cadre o Ia puerta al exterior de Ia
empaquetadura del homo. Estas areas no son Iimpiadas por el ciclo de auto-
limpieza, pero se catientan Io suficiente para crear residuos. Limpie estas partes
antes de comenzar un nuevo cic!o de autoqimpieza. Los residuos pueden set
limpiados con un paso de nylon y agua o con una esponja de nylon. Tenga cuidado
de no da_iar la empaquetadura del homo.
Lmamaedeede eminterior del homo o
vapor de marejiHa de ventHaci6no
Derrames excesivos dentro del homo. Esto es normal, especialmente para Ios de
pastetes o grasas en Ia base del homo. Limpie los derrames excesivos antes de
comenzar la autoqmpieza.
58

Notas
59

iiiiiiiiiiiiiiiiii _i_i_i_i_i_i_i_i_i_i_i_i_i_i_i_i_i_
For repair-in your home-of am[major brand appliances,
lawn and garden equipment, or heating and cooling systems,
no matter who made it, no matter who somd it! ..................................
iiiiiiiiiiiiiiiiii iiiiiiiiiiiiiiiii
For the replacement parts, accessories and
owner's manuals that you need to do-it-yourself. ..................................
iiiiiiiiiiiiiiiiii iiiiiiiiiiiiiiiii
For Sears professional installation of home appHiances
and items like garage door openers and water heaters. .................
l o800-4oNYoHONE ® (1-8oo-469-488a}
oo t,mo,oro, ,t U.S.A.oo0Cooo o> ..................................
www,sears,com www.sears.ca
Our Home
For repair of carry-in items like vacuums, lawn equipment,
and electronics, call or go on-line for the location of your nearest
SearsParts_ RepairCenter. ..............
HHHHHHHi_ HHHHHHH
1-800-488ol 222
Call anytime, day or night (U.S.A. only)
HHHHHHHi_ HHHHHHH
iiiiiiiiiiiiiii_ iiiiiiiiiiiiii
www.sears.oom ..............
HHHHHHHi_ HHHHHHH
HHHHHHHi_ HHHHHHH
To purchase a protection agreement (U.S.A.)
or maintenance agreement (Canada)on a product serviced by Sears:
1-800"827"8855 (U.S.A.) 1"800-361-6865 (Canada)
HHHHHHHi_ HHHHHHH
HHHHHHHi_ HHHHHHH
HHHHHHHi_ HHHHHHH
HHHHHHHi_ HHHHHHH
iiiiiiiiiiiiiii_ iiiiiiiiiiiiii
Para pedir servicio de reparacidn Au Canada pour service en fran_ais:
a domicilio, y para ordenar piezas: 1.800.LEE.FOYEERMc '"'"'""
1o888-SUoHOGAR S_ (1-800o533-6937)
Hi
(1-888-784-6427) www.sears.ca
TM SM
® Registered Trademark / Trademark / Service Mark of Sears, Roebuck and Co.
TM
® Marca Registrada / Marca de FAbrica/ SMMarca de Servicio de Sears, Roebuck and Co.
MCMarque de commerce / MDMarque deposee de Sears, Roebuck and Co.
(L&Sears, Roebuck and Co.