Loading ...
Loading ...
Loading ...
E-6
E-7
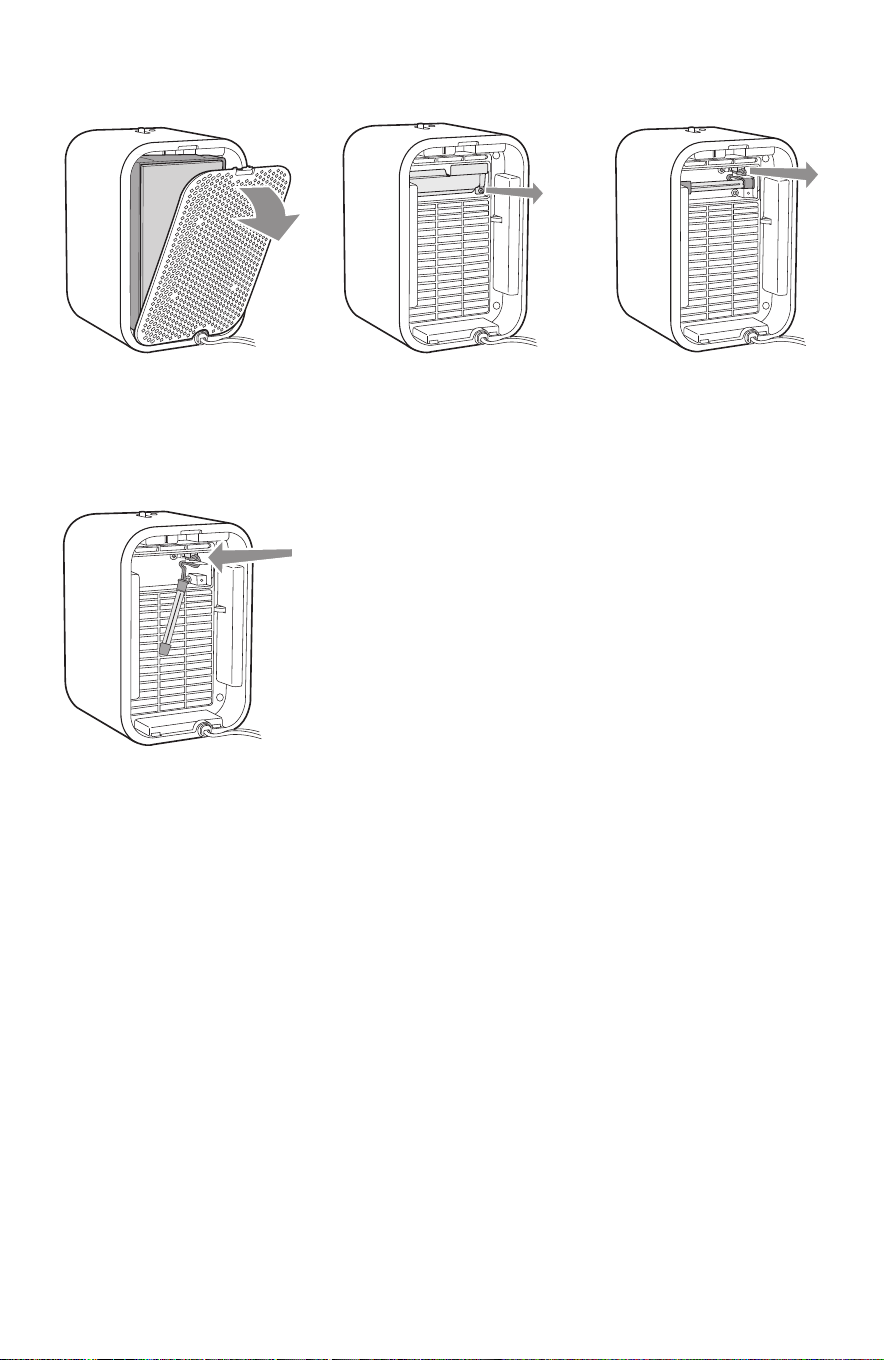
UV-C BULB REPLACEMENT
Unplug the unit. Press the
lock and release button and
remove the rear cover and
combination filter from the unit.
The UV-C Bulb is removed
by carefully grasping the
bulb connector and
squeezing to release
the bulb.
Use a Philips head
screwdriver to remove
screw and detach
the UV-C Shield.
IMPORTANT: The UV-C Bulb should be replaced
every 10 months depending on use.
Please contact Customer Service or visit us at
www.guardiantechnologies.com to purchase a
replacement bulb.
OPERATING THE AIR PURIFIER
Power & Variable
Speed Control
1. Plug the power cord into a 120V AC outlet.
2. To turn unit on slide the power / variable speed button to a higher position.
Select fan speed MODE 1 - 3 . I = lowest speed setting III = highest speed setting
3. Select UV-C ON or OFF using UV-C Power Button.
UV-C indicator light will illuminate when UV-C is selected.
4. To turn unit off place power / variable speed button in lowest position.
HEPA/UV RESET
HOLD 5 SECONDS TO RESET LIGHTS
UV
III
II
I
CONTROL PANEL
Power Light
UV Power Button/
HEPA Filter
and UV Reset
FIlter Replace
Indicator Light
FILTER REPLACEMENT
The filter replace indicator light will flash red when it is time to replace the filter.
Depending on usage and environmental conditions the filter will last approximately
6 months. The inside pleats of the filter will turn from white to grey when it is dirty and
needs replacing. It is important to maintain and change the filter to continue to optimize
the performance of the air purifier.
IMPORTANT: Do NOT wash and re-use the filter. Please contact Customer Service to
purchase a replacement filter or visit www.guardiantechnologies.com.
Unplug the unit. Press the
lock and release button and
remove the rear cover from
the unit.
Remove the used
combination filter and
dispose of it in the
garbage.
Insert the new filter into the
unit. Consult the arrow on the
filter for correct installation
direction. Replace the unit
back panel. Reset filter light
by holding UV button for
5 seconds.
Replace the bulb by plugging new bulb into unit. Reverse steps 1 and 2.
Reset by holding the UV button for 5 seconds.
CLEANING & MAINTENANCE
• Always unplug the appliance before you clean it.
• Never immerse the appliance in water or any other liquid.
• Never use aggressive or flammable cleaning agents such as bleach or alcohol to
clean any part of the appliance.
BODY OF THE APPLIANCE
Regularly clean the inside and outside of the body to prevent dust from collecting.
• Wipe away dust with a soft dry cloth from the body of the appliance.
• Clean the air inlet and the air outlet with a soft dry cloth.
PRE-FILTER SCREEN
The pre-filter/charcoal layer collects larger dust and debris and should be cleaned
monthly or more frequently depending on use. Remove and clean regularly with the
brush attachment of your vacuum cleaner. This will remove the lint and dirt and help
maintain the life of the filter. (See filter replacement to locate and clean or remove the filter).
The UV-C light will flash blue when it is time to replace the bulb.
Loading ...
Loading ...
Loading ...