Home
Bookmarks
Home
Bosch
Bosch DII31JM60/02 User Manual
Page 15
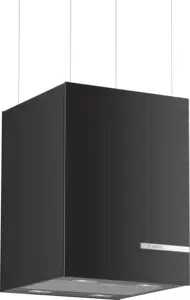
Bosch DII31JM60/02 Serie 6 Cube
User Manual - Page 15
For DII31JM60/02.
PDF File Manual
,
16 pages
,
Read Online
|
Download pdf file
[en] Instructions for installation and use
Extractor hood
Table of contents
[en] Instructions for installation and use
Instruction manual
8 Intended use
Intended use
( Important safety information
Important safety information
: Warning
Danger of suffocation!
: Warning
Risk of fire!
: Warning
Risk of burns!
: Warning
Risk of injury!
: Warning
Risk of injury!
: Warning
Risk of electric shock!
Causes of damage
Caution!
7 Environmental protection
Environmental protection
Saving energy
Environmentally-friendly disposal
1 Operating the appliance
Operating the appliance
Note:
Control panel
Symbol
Explanation
Setting the fan
Switching on
Selecting the fan setting
Switching off
Intensive setting
Switching on
Note:
Switching off
Lighting
2 Cleaning and maintenance
Cleaning and maintenance
: Warning
Risk of injury!
: Warning
Risk of electric shock!
: Warning
Risk of electric shock!
: Warning
Risk of injury!
: Warning
Risk of injury!
Cleaning agents
Note:
Note:
Area
Cleaning products
Removing metal grease filter
1. Open the lock and swing down the metal grease filter. When you do this, take hold of the metal grease filter from underneath with your other hand.
2. Take the metal grease filter out of the holder.
Notes
3. Clean the metal grease filter.
4. Clean the appliance support cables.
5. Clean the accessible parts of the housing. Clean the inside of the appliance.
: Warning
Risk of injury!
Cleaning the metal mesh grease filters
: Warning
Risk of fire!
Notes
By hand:
Note:
In the dishwasher:
Note:
Installing the metal mesh grease filter
: Warning
Risk of injury!
Notes
1. Insert the metal grease filter. When you do this, take hold of the metal grease filter from underneath with your other hand.
Note:
2. Swing the metal grease filter up and click it into place.
3. If the metal grease filter has not been inserted correctly, open the lock and reinsert the metal grease filter correctly.
Replacing the activated charcoal filter
Note:
1. Open the cover on the top of the appliance.
2. Remove the old activated charcoal filter and insert the new one.
3. Close the cover.
3 Trouble shooting
Trouble shooting
: Warning
Risk of electric shock!
Malfunction table
Problem
Possible cause
Solution
LED lights
: Warning
Risk of injury!
4 Customer service
Customer service
To book an engineer visit and product advice
Accessories
Note:
Note:
Installation instructions
Installation instructions
( Important safety information
Important safety information
: Warning
Risk of fire!
: Warning
Risk of injury!
: Warning
Risk of electric shock!
: Warning
Risk of electric shock!
: Warning
Risk of electric shock!
: Warning
Danger of suffocation!
K General information
General information
Preparing the ceiling
Electrical connection
: Warning
Risk of electric shock!
: Warning
Risk of electric shock!
5 Installation
Installation
Preparing for installation
Caution!
1. Cover the hob to protect it from damage.
2. Mark where the centre of the extractor hood should be on the ceiling above the centre of the hob.
3. Using the template provided, mark the locations where the bolts should be inserted on the ceiling.
4. Drill four 8 mm diameter holes to a depth of 80 mm for fastening the appliance and press in the wall plugs flush with the wall.
Preparing the appliance
1. Screw in the four bolts on the edge of the frame at the marked locations, leaving them protruding out of the frame by approx. 5 mm.
2. Remove the film from the frame cover.
3. Remove the activated charcoal filter from the film.
4. Open the cover on the top of the appliance and remove it ¨, insert the activated charcoal filter © and then close the cover.
Fitting the frame
1. Screw in the two bolts, leaving them protruding out of the ceiling by 5 - 9 mm ¨.
Note:
2. Insert the two bolts on the ceiling through the openings provided in the frame ¨. Move the frame to allow the bolts to be screwed into the keyhole openings ©.
3. Use two more bolts to screw the frame in place. ª Tighten all the bolts fully.
4. Insert the four cables into the openings provided in the frame and thread them through the labyrinth.
Establishing a connection to the mains
: Warning
Risk of electric shock!
Note:
1. Position the appliance underneath the frame.
2. Carefully thread the cables and the mains power cable through the opening in the frame cover. Place the frame cover down onto the appliance.
3. Mount the appliance on the wall and level it; see the section entitled "Wall-mounting the appliance and levelling it".
4. Thread the mains power cable through the opening in the frame and then through the strain relief.
Caution!
5. Connect the appliance to the power supply.
Caution!
6. Use an open-ended spanner (WAF 17) to tighten the strain relief until the mains power cable is held firmly and cannot move.
Fitting the frame cover
1. Slide the frame cover up.
Note:
2. Fit the frame cover onto the four bolts at the edge of the frame.
Note:
3. Tighten the bolts at the edge of the frame.
4. Secure the covers to the magnets to hide the bolts at the edges of the frame.
Attaching and aligning the appliance
1. Manually open the cable tensioners until the cable can be inserted in it. Do not use any tools.
Note:
2. Enlist the help of a second person to lift the appliance and thread the cables into the cable tensioners on the top of the appliance.
Note:
3. Taking care to comply with the safety clearances, slide the appliance up and level it.
4. If you need to position the appliance lower down, lift it up ¨, push the cable tensioners down © and pull the cables back out of the cable tensioners ª.
5. After aligning, tighten the cable tensioners so that they are hand-tight. Do not use any tools.
Page 15/16
Page 1
Page 2
Page 3
Page 4
Page 5
Page 6
Page 7
Page 8
Page 9
Page 10
Page 11
Page 12
Page 13
Page 14
Page 15
Page 16
Contents
Table of Contents
Search
Previous
Next
Troubleshooting
Bookmarks
Loading ...
Loading ...
Loading ...
6
Loading ...
File type: PDF
File name: 31340348_dii31jm60-01.pdf
File size: 1.98 MB
File Language: English
Pages: 16
Author: Bosch
File created: 2017-11-10
Published:
2023-12-17
Updated: 2023-12-17
Download File
Table of Contents
×
[en] Instructions for installation and use
1
Extractor hood
1
Table of contents
2
[en] Instructions for installation and use
2
Instruction manual
2
8 Intended use
2
Intended use
2
( Important safety information
3
Important safety information
3
: Warning
3
Danger of suffocation!
3
: Warning
3
Risk of fire!
3
: Warning
3
Risk of burns!
3
: Warning
3
Risk of injury!
3
: Warning
3
Risk of injury!
3
: Warning
3
Risk of electric shock!
3
Causes of damage
4
Caution!
4
7 Environmental protection
4
Environmental protection
4
Saving energy
4
Environmentally-friendly disposal
4
1 Operating the appliance
5
Operating the appliance
5
Note:
5
Control panel
5
Symbol
5
Explanation
5
Setting the fan
5
Switching on
5
Selecting the fan setting
5
Switching off
5
Intensive setting
5
Switching on
5
Note:
5
Switching off
5
Lighting
5
2 Cleaning and maintenance
5
Cleaning and maintenance
5
: Warning
5
Risk of injury!
5
: Warning
5
Risk of electric shock!
5
: Warning
5
Risk of electric shock!
5
: Warning
5
Risk of injury!
5
: Warning
5
Risk of injury!
5
Cleaning agents
5
Note:
5
Note:
5
Area
6
Cleaning products
6
Removing metal grease filter
6
1. Open the lock and swing down the metal grease filter. When you do this, take hold of the metal grease filter from underneath with your other hand.
6
2. Take the metal grease filter out of the holder.
6
Notes
6
3. Clean the metal grease filter.
6
4. Clean the appliance support cables.
6
5. Clean the accessible parts of the housing. Clean the inside of the appliance.
6
: Warning
6
Risk of injury!
6
Cleaning the metal mesh grease filters
6
: Warning
6
Risk of fire!
6
Notes
6
By hand:
6
Note:
6
In the dishwasher:
6
Note:
6
Installing the metal mesh grease filter
7
: Warning
7
Risk of injury!
7
Notes
7
1. Insert the metal grease filter. When you do this, take hold of the metal grease filter from underneath with your other hand.
7
Note:
7
2. Swing the metal grease filter up and click it into place.
7
3. If the metal grease filter has not been inserted correctly, open the lock and reinsert the metal grease filter correctly.
7
Replacing the activated charcoal filter
7
Note:
7
1. Open the cover on the top of the appliance.
7
2. Remove the old activated charcoal filter and insert the new one.
7
3. Close the cover.
7
3 Trouble shooting
8
Trouble shooting
8
: Warning
8
Risk of electric shock!
8
Malfunction table
8
Problem
8
Possible cause
8
Solution
8
LED lights
8
: Warning
8
Risk of injury!
8
4 Customer service
8
Customer service
8
To book an engineer visit and product advice
8
Accessories
8
Note:
8
Note:
8
Installation instructions
9
Installation instructions
9
( Important safety information
9
Important safety information
9
: Warning
9
Risk of fire!
9
: Warning
10
Risk of injury!
10
: Warning
10
Risk of electric shock!
10
: Warning
10
Risk of electric shock!
10
: Warning
10
Risk of electric shock!
10
: Warning
10
Danger of suffocation!
10
K General information
10
General information
10
Preparing the ceiling
10
Electrical connection
10
: Warning
10
Risk of electric shock!
10
: Warning
10
Risk of electric shock!
10
5 Installation
11
Installation
11
Preparing for installation
11
Caution!
11
1. Cover the hob to protect it from damage.
11
2. Mark where the centre of the extractor hood should be on the ceiling above the centre of the hob.
11
3. Using the template provided, mark the locations where the bolts should be inserted on the ceiling.
11
4. Drill four 8 mm diameter holes to a depth of 80 mm for fastening the appliance and press in the wall plugs flush with the wall.
11
Preparing the appliance
11
1. Screw in the four bolts on the edge of the frame at the marked locations, leaving them protruding out of the frame by approx. 5 mm.
11
2. Remove the film from the frame cover.
11
3. Remove the activated charcoal filter from the film.
11
4. Open the cover on the top of the appliance and remove it ¨, insert the activated charcoal filter © and then close the cover.
11
Fitting the frame
12
1. Screw in the two bolts, leaving them protruding out of the ceiling by 5 - 9 mm ¨.
12
Note:
12
2. Insert the two bolts on the ceiling through the openings provided in the frame ¨. Move the frame to allow the bolts to be screwed into the keyhole openings ©.
12
3. Use two more bolts to screw the frame in place. ª Tighten all the bolts fully.
12
4. Insert the four cables into the openings provided in the frame and thread them through the labyrinth.
12
Establishing a connection to the mains
13
: Warning
13
Risk of electric shock!
13
Note:
13
1. Position the appliance underneath the frame.
13
2. Carefully thread the cables and the mains power cable through the opening in the frame cover. Place the frame cover down onto the appliance.
13
3. Mount the appliance on the wall and level it; see the section entitled "Wall-mounting the appliance and levelling it".
13
4. Thread the mains power cable through the opening in the frame and then through the strain relief.
13
Caution!
13
5. Connect the appliance to the power supply.
13
Caution!
13
6. Use an open-ended spanner (WAF 17) to tighten the strain relief until the mains power cable is held firmly and cannot move.
13
Fitting the frame cover
13
1. Slide the frame cover up.
13
Note:
13
2. Fit the frame cover onto the four bolts at the edge of the frame.
13
Note:
13
3. Tighten the bolts at the edge of the frame.
13
4. Secure the covers to the magnets to hide the bolts at the edges of the frame.
13
Attaching and aligning the appliance
14
1. Manually open the cable tensioners until the cable can be inserted in it. Do not use any tools.
14
Note:
14
2. Enlist the help of a second person to lift the appliance and thread the cables into the cable tensioners on the top of the appliance.
14
Note:
14
3. Taking care to comply with the safety clearances, slide the appliance up and level it.
14
4. If you need to position the appliance lower down, lift it up ¨, push the cable tensioners down © and pull the cables back out of the cable tensioners ª.
14
5. After aligning, tighten the cable tensioners so that they are hand-tight. Do not use any tools.
14
Search:
×
Search