Loading ...
Loading ...
Loading ...

4
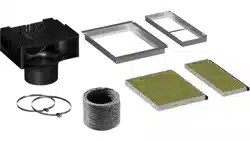
Lieferumfang
Prüfen Sie nach dem Auspacken alle Teile auf Trans-
portschäden und die Vollständigkeit der Lieferung.
→Abb.
1
, →Abb.
2
Umluftweiche montieren
1. Die Kaminverblendung demontieren.
Informationen zur Demontage der Kaminverblen-
dung finden Sie in der Montageanleitung Ihres Ge-
räts.
2. Die Umluftweiche in den Haltewinkel einhängen.
→Abb.
3
, →Abb.
4
3. Den Schlauch mit den 2Schlauchschellen an der
Umluftweiche und dem Luftstutzen befestigen.
→Abb.
5
4. Den Schlauch straffen und bei Bedarf kürzen.
5. Die Kaminverblendung montieren.
Die Schlitze der inneren Kaminverblendung zeigen
nach oben.
Informationen zur Montage der Kaminverblendung
finden Sie in der Montageanleitung Ihres Geräts.
Geruchsfilterhalter einbauen
1. Die Glasscheibe mit beiden Händen vollständig
öffnen, bis die Glasstütze einrastet.
→Abb.
6
2. Die Fettfilter ausbauen.
Informationen zum Ausbau der Fettfilter finden Sie
in der Gebrauchsanleitung Ihres Geräts.
3. Den vorderen Filterhalter schräg oben ansetzen
und in die Laschen einführen. Den Filterhalter un-
ten eindrücken, sodass er hörbar einrastet.
→Abb.
7
4. Den unteren Filterhalter einsetzen, sodass er hör-
bar einrastet.
→Abb.
8
Geruchsfilter einsetzen
1. Den vorderen Geruchsfilter unten ansetzen und
nach oben klappen .
→Abb.
9
Der Schaumstoff muss sich beim Einsetzen zu-
sammendrücken.
2. Den unteren Geruchsfilter hinten ansetzen und
nach oben klappen .
→Abb.
10
Der Schaumstoff muss sich beim Einsetzen zu-
sammendrücken.
3. Die Fettfilter einbauen.
→Abb.
11
4. Die Glasscheibe mit beiden Händen leicht anhe-
ben und vollständig schließen.
→Abb.
12
→Abb.
13
en
General information
¡ Read this instruction manual carefully.
¡ Keep the instruction manual and the
product information safe for future refer-
ence or for the next owner.
¡ The appliance can only be used safely if it
is correctly installed according to the
safety instructions. The installer is re-
sponsible for ensuring that the appliance
works perfectly at its installation location.
¡ This instruction manual is intended for the
installer of the optional accessory.
¡ Only a licensed expert may connect the
appliance.
¡ Switch off the power supply before carry-
ing out any work.
Safe installation
Observe the safety instructions when installing the
optional accessory.
WARNING‒Risk of injury!
Components inside the appliance may have sharp
edges.
▶ Wear protective gloves.
The appliance may fall down if it has not been prop-
erly fastened in place.
▶ All fastening components must be fixed firmly and
securely in place.
WARNING‒Danger: Magnetism!
The appliance contains permanent magnets. These
may affect electronic implants, e.g. heart pace-
makers or insulin pumps.
▶ Persons with electronic implants must stay at least
10cm away from the appliance.
WARNING‒Risk of electric shock!
Sharp-edged components inside the appliance may
damage the connecting cable.
▶ Do not kink or trap the connecting cable.
WARNING‒Risk of suffocation!
Children may put packaging material over their
heads or wrap themselves up in it and suffocate.
▶ Keep packaging material away from children.
▶ Do not let children play with packaging material.
Odour filter for recirculating air mode
Odour filters bind odorous substances in air recircu-
lation mode. Regularly replaced odour filters guaran-
tee a high level of odour removal.
With normal use (approx.onehour a day), the odour
filter must be replaced every 12 months. The odour
filter cannot be cleaned or regenerated.
You can obtain odour filters from the after-sales ser-
vice or the online shop. Only use original odour fil-
ters.
Included with the appliance
After unpacking all parts, check for any damage in
transit and completeness of the delivery.
→Fig.
1
, →Fig.
2
Fitting the air recirculation deflector
1. Remove the flue duct.
You can find information on how to remove the
flue duct in the installation instructions for your ap-
pliance.
2. Fit the circulating-air guide into the angle brackets.
→Fig.
3
, →Fig.
4
3. Use the 2 hose clips to secure the hose to the cir-
culating-air guide and the air-pipe connector.
→Fig.
5
4. Tighten and, if required, shorten the hose.
5. Fit the flue duct.
The slots on the inner flue duct section point up-
wards.
You can find information about the installation of
the flue duct in the installation instructions for your
appliance.
Loading ...
Loading ...
Loading ...