
ENGLISH
Lanyard Attachment Point Installation
To be used with DWE4222N, DWE43066N,
DWE43114N, DWE43115N, DWE43144N, DWE46144N,
DWE46166N Grinders
WARNING: The lanyard attachment point
1
may
only be added to certain models and must be installed
by an authorized service center.
WARNING: For your own safety, read the grinder
instruction manual before using any accessory. Failure
to heed these warnings may result in personal injury
and serious damage to the vacuum and the accessory.
WARNING: Retain this document with the tool
instruction manual for futurereference.
Lanyard Attachment Point (Fig. B)
Safety Warnings Specific for Use At Height
• If the tool is dropped for any reason, the lanyard
attachment point
1
must be inspected and properly
serviced prior to re-use. The lanyard attachment point
is designed to stretch to absorb the shock of a drop. Any
permanent stretch to the device exposing the red marked
internal coils indicates it has been compromised and must
be serviced prior toreuse.
• Always keep the tool and accessories tethered when
working "at height". (Maximum lanyard length: 6.5 ft
[2m])
• Use only with lanyards appropriate for this tool type and
rated for at least 6 lbs (2.72 Kg).
• Crush, cut or entanglement hazard. Do not use near
moving parts, mechanisms or runningmachinery.
• Do not anchor the tool lanyard to anything on your body.
Anchor to a rigid structure that can withstand the forces
of a droppedtool.
• Make sure the lanyard is properly secure at each end prior
touse.
• Inspect tool and lanyard before each use for damage and
proper function (including fabric and stitching). Do not
use if damaged or not functioningproperly.
• Do not alter the lanyard attachment point or use in a
manner other than as instructed in thismanual.
• Only attach tool to a lanyard with a locking carabiner. Do
not attach by looping or knotting the lanyard. Do not use
rope orcord.
• Electrical shock hazard. Be sure power is off when working
in high voltage areas. Some lanyards areconductive.
• Dropped tools will swing on the lanyard, which could
cause injury or loss ofbalance.
• Do not carry the tool by lanyard attachment point or
thelanyard.
• Do not attach more than one tool to eachlanyard.
final page size: 8.5 x 5.5 inches
• Only use appropriate
DeWALT
brand lanyard attachment
point. NEVER modify tools to create attachmentpoints.
• Only transfer the tool between hands while properly
balanced in a stableorientation.
• Do not attach lanyards to tool in a way that keeps guards,
switches or lock-offs from operatingproperly.
• Avoid getting tangled in thelanyard.
• Keep lanyard away from the cutting area of thetool.
• Do not use lanyards or attachment devices to get
additional leverage from thetool.
• Do not use for personal fallprotection.
• Falling object hazard! Only change accessories and
attachments where a dropped object won't cause
a hazard below you. Consult your Authority Having
Jurisdication (AHJ) or site supervisor for procedures for
working atheight.
• Use multi-action and screw gate type carabiners. Do not
use single action spring clipcarabiners.
The lanyard attachment point
1
is intended for use by
competent personnel, who are trained and knowledgeable
regarding working with tools in and around machinery and
"at height".
Installation
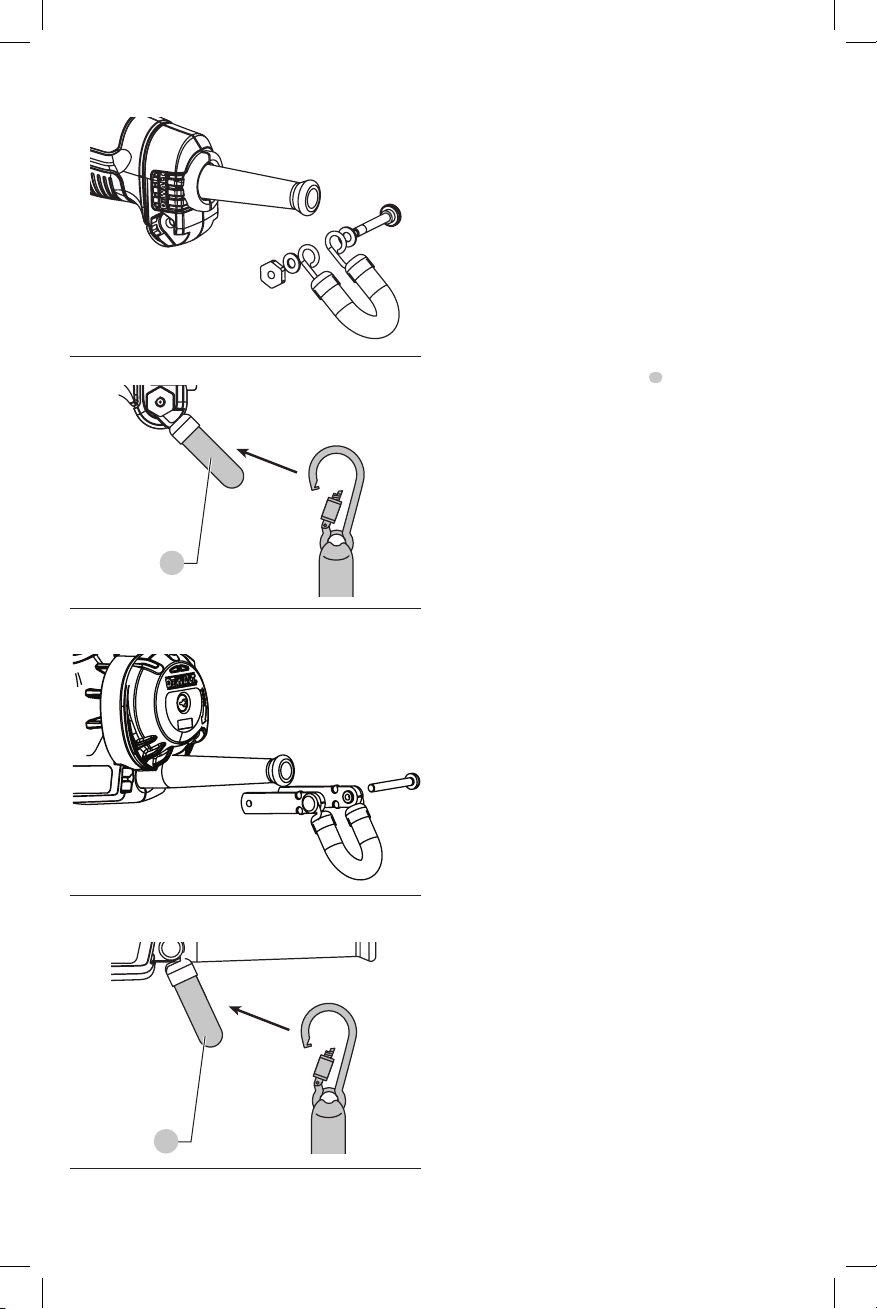
DWE43115N, DWE43066N, DWE46166N (Fig. A, B)
1. Position the loops of the lanyard attachment point on
each side of the tool housing.
2. Slide provided bolt through first washer, both loops and
the housing. Install second washer and nut onto bolt
and tighten securely.
IMPORTANT: Always use manual, torque-calibrated
screwdrivers and tighten to
15.9–18.6inlbs (1.8–2.1Nm). Do not use pneumatic or
electric screwdrivers.
DWE4222N, DWE43114N, DWE43144N, DWE46144N
(Fig. C, D)
1. Slide the metal bars of the lanyard attachment point
1
into the slots at the rear of the tool housing, making
note which has the threads.
2. Insert the screw into the housing side without the
threaded bar and feed it through until it engages the
threads of the other bar. Tighten the screw securely.
IMPORTANT: Always use manual, torque-calibrated
screwdrivers and tighten to 15.9–18.6inlbs (1.8–
2.1Nm). Do not use pneumatic or electric screwdrivers.
For more information, please contact
DeWALT
at the
address below or 1-800-4-
DeWALT
(1-800-433-9258).
FRANCAIS
Installation du point de fixation des
longes
À utiliser avec les meuleuses DWE4222N,
DWE43066N, DWE43114N, DWE43115N, DWE43144N,
DWE46144N, DWE46166N
AVERTISSEMENT: le point de fixation des longes
de sécurité
1
peut seulement être ajouté à certains
modèles et doit être installé par un centre de services
autorisé.
AVERTISSEMENT: pour votre propre sécurité,
lisez le manuel d'instructions de la meuleuse
avant d’utiliser tout accessoire. Ne pas suivre
ces avertissements peut entraîner une blessure
corporelle ou des dommages graves à l’aspirateur
ou à l’accessoire.
AVERTISSEMENT: conservez ce document avec
le manuel instructions de l’outil pour référence
ultérieure.
Point de fixation des longes (Fig. B)
Avertissements spécifiques de sécurité pour
l’utilisation en hauteur
• Si l’outil est échappé pour quelque raison que ce soit,
le point de fixation des longes
1
devra être inspecté
et réparé de façon appropriée avant d’être réutilisé. Le
point de fixation de la longe est conçu pour s’étirer afin
d’absorber l’impact de la chute. Toute déformation
permanente de l’outil exposant les ressorts intérieurs
rouges indique qu’il a été endommagé et qu’il doit être
réparé avant de le réutiliser.
• Gardez toujours l’outil et les accessoires attachés lorsque
vous travaillez «en hauteur». [Longueur maximum de
la longe: 2m (6,5 pi)]
• Utilisez seulement les longes appropriées pour ce type
d’outil et conçues pour au moins 2,72kg(6,0lb).
• Risque d’emmêlement, de coupure ou
d’écrasement. Ne pas utiliser près de pièces mobiles, de
mécanismes ou de machinerie enmarche.
• Ne pas fixer la longe de l’outil à quelque chose sur votre
corps. Fixez-la à une structure rigide qui peut résister à
un outiléchappé.
• Assurez-vous que la longe est bien sécurisée à chaque
extrémité avant de l’utiliser.
• Vérifiez l’outil et la longe avant chaque utilisation
pour des dommages et un fonctionnement approprié
(incluant le tissu et les coutures). Ne pas utiliser
si endommagée ou si le fonctionnement n’est
pasapproprié.
• Ne pas altérer le point de fixation des longes ou utiliser
d’une autre façon que celle indiquée dans ce manuel.
• Fixez seulement l’outil à la longe avec un mousqueton
de sécurité. Ne pas fixer en faisant une boucle ou
un nœud avec la longe. Ne pas utiliser une corde ou
uncordon.
• Risque de choc électrique. Assurez-vous que le courant
est coupé lorsque vous travaillez dans zone à haute
tension. Certaines longes sontconductives.
• Les outils échappés balanceront sur la longe ce qui
pourrait entre une blessure ou une perted’équilibre.
• Ne pas transporter l’outil par le point de fixation des
longes ou la longe.
• Ne pas fixer plus d’un outil à chaquelonge.
• Utilisez seulement le bon point de fixation des longes
de la marque
DeWALT
. NE JAMAIS utiliser les outils pour
créer des points defixation.
Fig. A
Fig. C
Fig. B
Fig. D
1
1

• Transférez seulement l’outil entre les mains lorsqu’il est
bien équilibré dans une orientationstable.
• Ne pas fixer les longes à l’outil de façon à empêcher
les protecteurs, les commutateurs ou les dispositifs de
verrouillage de bienfonctionner.
• Évitez de vous emmêler dans lalonge.
• Gardez la longe hors de portée de la zone coupante de
l’outil.
• Ne pas utiliser les longes ou les dispositifs de fixation pour
obtenir plus de force de l’outil.
• Ne pas utiliser pour de la protection personnelle en cas
dechute.
• Risque de chute d’objets! Changer seulement les
accessoires et les fixations à l’endroit où un objet
échappé ne causera pas un risque sous vous. Consultez
votre responsable ou votre superviseur de site pour les
procédures concernant le travail en hauteur.
• Utilisez un mousqueton à vis et à action multiple de type
mousqueton d’escalade. Ne pas utiliser de mousquetons
avec attache à effet deressort.
Le point de fixation des longes
1
est conçu pour être
utilisé par du personnel compétent qui est formé et qui sait
comment travailler avec ces outils près de la machinerie et
«en hauteur».
Installation
DWE43115N, DWE43066N, DWE46166N (Fig. A, B)
1. Placez les anneaux du point de fixation des longes de
chaque côté du boîtier de l’outil.
2. Glissez le boulon fourni dans la première rondelle, les
deux anneaux et le boîtier. Installez une deuxième
rondelle et un écrou sur le bouton et serrez solidement.
IMPORTANT: Utilisez toujours des tournevis
dynamométriques calibrés manuels et serrez de 15,9
à 18,6 po lb (1,8 à 2,1Nm). Ne pas utiliser de tournevis
électriques ou pneumatiques.
DWE4222N, DWE43114N, DWE43144N, DWE46144N
(Fig. C, D)
1. Glissez les barres métalliques du point de fixation des
longes
1
dans les fentes à l’arrière de boîtier de l’outil
en notant laquelle a des filets.
2. Insérez la vis dans le côté du boîtier sans la barre filetée
et passez-la à travers jusqu’à ce qu’elle s’engage dans les
filets de l’autre bar. Serrez solidement la vis.
IMPORTANT: Utilisez toujours des tournevis
dynamométriques calibrés manuels et serrez de 15,9
à 18,6 po lb (1,8 à 2,1Nm). Ne pas utiliser de tournevis
électriques ou pneumatiques.
Pour plus de renseignements, veuillez contacter
DeWALT
à l’adresse ci-dessous ou au 1-800-4-
DeWALT
(1-800-433-
9258).
ESPAÑOL
Instalación de Punto de Conexión de
Cordón
Para usarse con Pulidoras DWE4222N,
DWE43066N, DWE43114N, DWE43115N, DWE43144N,
DWE46144N, DWE46166N
ADVERTENCIA: Sólo se puede agregar un punto de
conexión para cordón
1
a ciertos modelos y se debe
instalar por medio de un centro de servicio autorizado.
ADVERTENCIA: Por su propia seguridad, lea el
manual de instrucciones de la esmeriladora antes
de usar cualquier accesorio. La falla en seguir estas
advertencias puede resultar en lesiones personales y
daño serio a la aspiradora y al accesorio.
ADVERTENCIA: Conserve este documento con el
manual de instrucciones de la herramienta para
referencia futura.
Punto de Conexión de Cordón (Fig. B)
Advertencias de seguridad específicas para uso en
lugares elevados
• Si se deja caer la herramienta por cualquier razón, se
debe revisar el punto de conexión del cordón
1
y recibir
servicio adecuadamente antes de volver a usarla. El punto
de conexión de cordón está diseñado para estirarse para
absorber el impacto de una caída. Cualquier estiramiento
permanente al dispositivo que exponga las bobinas
internas marcadas en rojo indica que se ha comprometido
y se debe dar servicio antes de volver a usarlo.
• Siempre mantenga la herramienta y los accesorios sujetos
cuando trabaje "en ubicaciones elevadas". [Longitud
máxima de cordón: 2 m (6,5 pies)]
• Sólo use con cordones apropiados para este tipo de
herramienta y con capacidad mínima de 2,72Kg(6,0 lbs).
• Peligro de aplastamiento, corte o enredo. No use
cerca de partes móviles, mecanismos o maquinaria
enoperación.
• No ancle el cordón de la herramienta a nada en su cuerpo.
Ancle a una estructura rígida que pueda soportar las
fuerzas dejar caer laherramienta.
• Asegúrese que el cordón esté seguro adecuadamente en
cada extremo antes deluso.
• Revise la herramienta y el cordón antes de cada uso
respecto a daño y función adecuada (incluyendo
la tela y costuras). No use si está dañado o no
funcionaadecuadamente.
• No altere el punto de conexión del cordón o lo use de una
manera diferente a la indicada en este manual.
• Sólo conecte la herramienta a un cordón con un
mosquetón de bloqueo. No la sujete enredando o
haciendo un nudo en el cordón. No use cuerda ocable.
• Peligro de descarga eléctrica. Asegúrese que la energía
esté apagada cuando trabaje en áreas de alto voltaje.
Algunos cordones sonconductivos.

• Las herramientas que se dejen caer se balancearán
en el cordón, lo que podría causar lesiones o pérdida
deequilibrio.
• No transporte la herramienta por el punto de conexión de
cordón o el cordón.
• No sujete más de una herramienta a cadacordón.
• Sólo use el punto de conexión de cordón marca
DeWALT
apropiado. NUNCA modifique las herramientas para crear
puntos deconexión.
• Sólo transfiera la herramienta entre manos mientras está
equilibrada apropiadamente en una orientaciónestable.
• No conecte cordones a la herramienta de manera que
evite que las protecciones, interruptores o bloqueos
operenadecuadamente.
• Evite quedar enredado en elcordón.
• Mantenga el cordón lejos del área de corte de
laherramienta.
• No use cordones o dispositivos de conexión para obtener
apoyo adicional de laherramienta.
• No lo use para protección personal contracaídas.
• ¡Peligro de caída de objetos! Sólo cambie los accesorios
y conexiones donde un objeto que caiga no cause un
peligro debajo de usted. Consulte a su Autoridad con
Jurisdicción (AHJ) o supervisor del sitio respecto a los
procedimientos para trabajar en lugares elevados.
• Use mosquetones tipo multi-acción y de abertura de
tornillo. No use mosquetones de sujetador de resorte de
acciónsencilla.
El punto de conexión de cordón
1
está diseñado para uso
por personal competente, que esté capacitado y tenga
conocimiento respecto a trabajo con herramientas en y
alrededor de maquinaria y «en ubicaciones elevadas».
Instalación
DWE43115N, DWE43066N, DWE46166N (Fig. A, B)
1. Coloque los lazos del punto de conexión de cordón en
cada lado del alojamiento de la herramienta.
2. Deslice el perno provisto a través de la primera arandela,
ambos lazos y el alojamiento. Instale la segunda
arandela y tuerca en el perno y apriete firmemente.
IMPORTANTE: Siempre use destornilladores manuales
con calibración de par de apriete y apriete a 15.9–18.6
pulg. lbs (1.8–2.1Nm). No use destornilladores
neumáticos o eléctricos.
DWE4222N, DWE43114N, DWE43144N, DWE46144N
(Fig. C, D)
1. Deslice las barras de metal del punto de conexión
de cordón
1
en las ranuras en la parte trasera del
alojamiento de la herramienta, observando cuál tiene
las roscas.
2. Inserte el tornillo en el lado del alojamiento sin la
barra roscada y páselo hasta que se conecte con las
roscas de la otra barra. Apriete el tornillo firmemente.
IMPORTANTE: Siempre use destornilladores manuales
con calibración de par de apriete y apriete a 15.9–18.6
pulg. lbs (1.8–2.1Nm). No use destornilladores
neumáticos o eléctricos.
Para más información, por favor póngase en contacto con
DeWALT
en la siguiente dirección o al 1-800-4-
DeWALT
(1-800-433-9258).
D
e
WALT Industrial Tool Co., 701 East Joppa Road, Towson, MD 21286
(APR18) Part No. N600759 Copyright © 2017, 2018 D
e
WALT
The following are trademarks for one or more D
e
WALT power tools: the yellow and black color scheme, the “D” shaped air
intake grill, the array of pyramids on the handgrip, the kit box configuration, and the array of lozenge-shaped humps on the
surface of thetool.