Loading ...
Loading ...
Loading ...
49-1000472 Rev. 4 25
INSTALLATION INSTRUCTIONS
REFRIGERATOR LOCATION
Ŷ'RQRWLQVWDOOWKHUHIULJHUDWRUZKHUHWKH
WHPSHUDWXUHZLOOJREHORZ)&EHFDXVH
it will not run often enough to maintain proper
temperatures.
Ŷ'RQRWLQVWDOOWKHUHIULJHUDWRUZKHUHWKH
WHPSHUDWXUHZLOOJRDERYH)&EHFDXVHLW
will not perform properly.
Ŷ 'RQRWLQVWDOOWKHUHIULJHUDWRULQDORFDWLRQH[SRVHG
to water (rain, etc.) or direct sunlight.
Ŷ,QVWDOOLWRQDIORRUVWURQJHQRXJKWRVXSSRUWLWIXOO\
loaded.
CLEARANCES
Allow the following clearances for ease of installation,
proper air circulation and plumbing and electrical
connections.
6LGHV ´PP
7RS ´PP&DELQHW+LQJH&RYHU
%DFN ´PP
Installation Instructions
INSTALLING THE REFRIGERATOR
IMPORTANT NOTES
This refrigerator without the handles ranges from
´WR´FPFPGHSHQGLQJRQ
your model (see dimension G on the previous page).
'RRUVDQGSDVVDJHZD\VOHDGLQJWRWKHLQVWDOODWLRQ
ORFDWLRQPXVWEHDWOHDVW´FPLQRUGHU
to leave the doors attached to the refrigerator
while transporting it into the installation location.
,ISDVVDJHZD\VDUHOHVVWKDQ´ (91.4 cm), the
refrigerator doors can easily be scratched and
damaged. The doors can be removed to allow the
refrigerator to be safely moved indoors.
•,I\RXQHHGWRUHPRYHWKHGRRUDQG\RXKDYHWKH
IUHQFKGRRUPRGHOVHH5HPRYLQJ)UHQFK'RRUV
•,I\RXQHHGWRUHPRYHWKHGRRUDQG\RXKDYHWKH
single refrigerator door model, see Reversing the
'RRU
• 7RUHPRYHWKHIUHH]HUGRRUDQG\RXKDYHWKH
PRGHOZLWKDIUHH]HUGUDZHUVHHRemoving
)UHH]HU'UDZHU
• ,I\RXKDYHWKHPRGHOZLWKWKHKLQJHGIUHH]HUGRRU
see 5HYHUVLQJWKH'RRU
•,ILWLVNOT necessary to remove doors, skip to
Page 31. Leave tape and all packaging on doors
until the refrigerator is in the final location. Once in
place, install door handles (see Steps 1 and 2).
• SKID REMOVAL: Tilt refrigerator to each side to
remove skid.
• NOTE: 8VHDSDGGHGKDQGWUXFNWRPRYHWKLV
refrigerator. Place the refrigerator on the hand
truck with a side against the truck. We strongly
recommend that TWO PEOPLE move and
complete this installation.
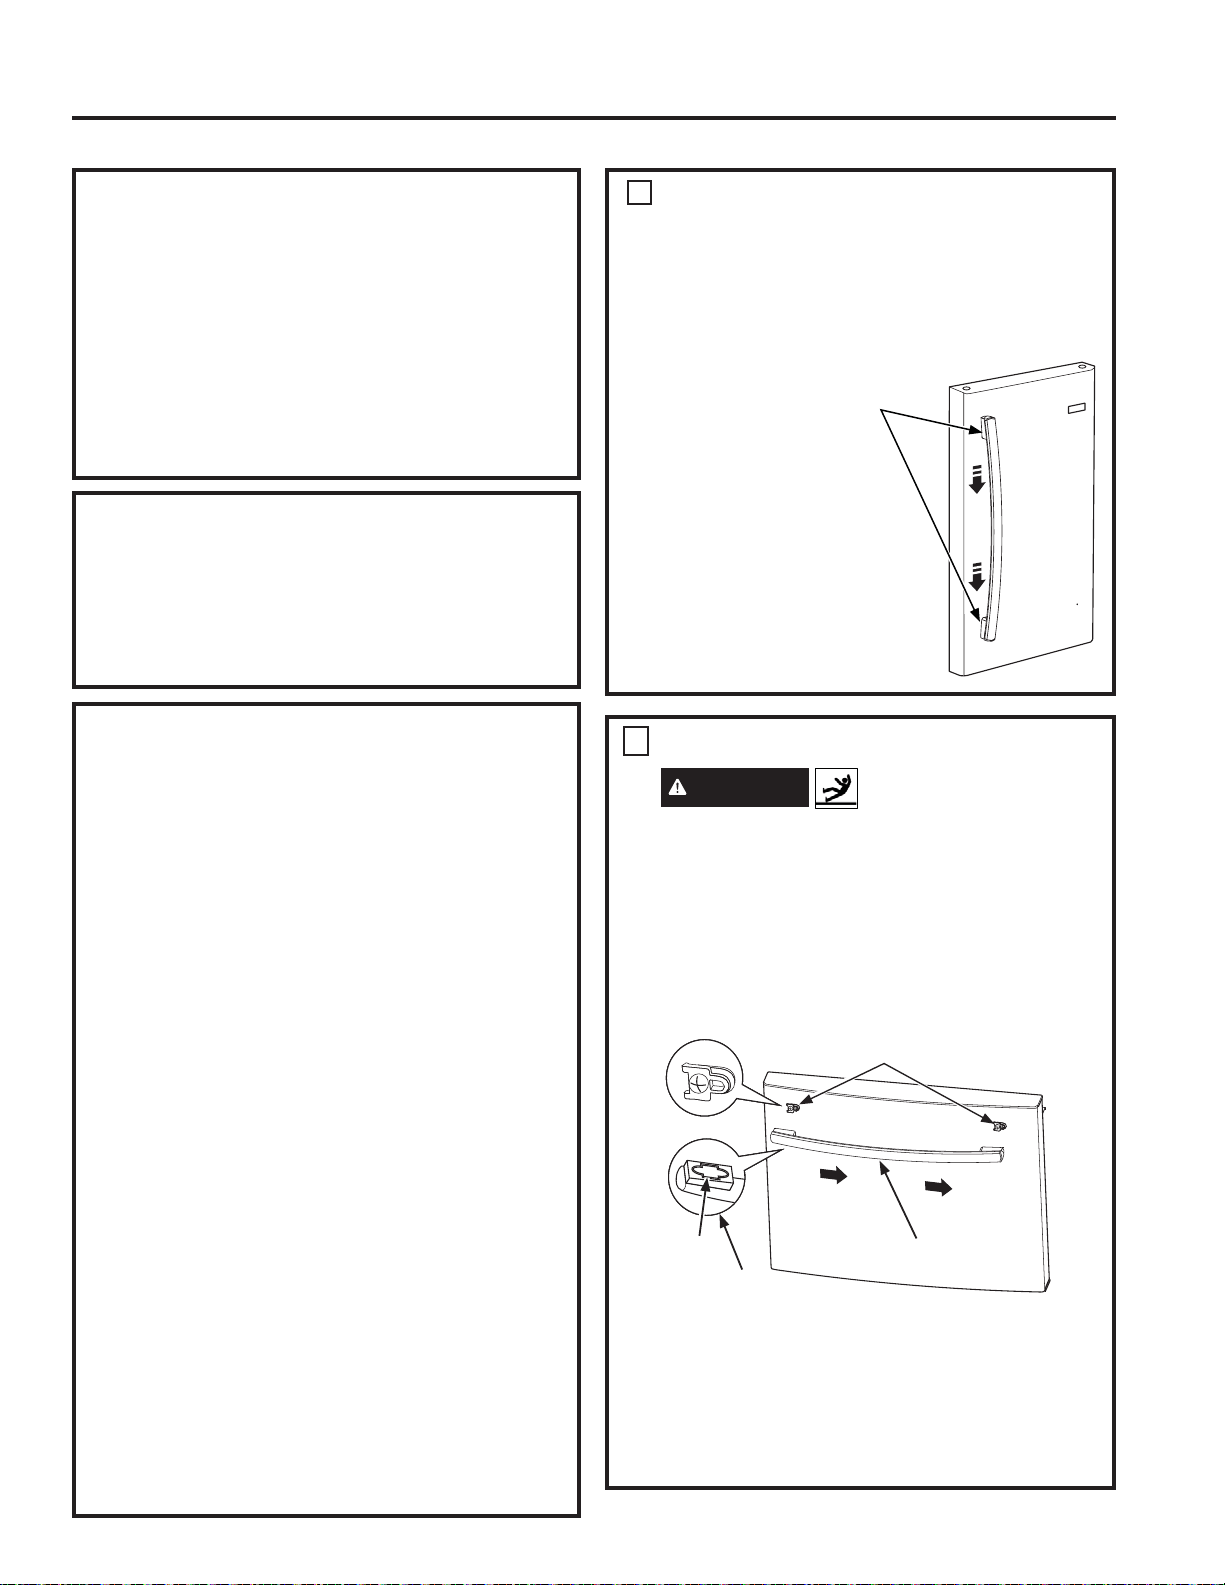
ATTACH FREEZER HANDLE
WARNING ,PSURSHUKDQGOHLQVWDOODWLRQ
may allow the handle to detach when it is used to
RSHQWKHIUHH]HUGRRU$KDQGOHWKDWGHWDFKHV
while in use may cause the user to lose their
balance, which creates a fall risk.
,QVWDOOWKHIUHH]HUKDQGOHWRWKHPRXQWLQJIDVWHQHUV
by aligning the slots inside the handle endcap with
the mounting fasteners. Being careful to avoid
scratching the door finish, slide the handle to the
right until it comes to a hard stop.
8VHDUXEEHUPDOOHWLIXQDYDLODEOHDKDPPHU
with a towel wrapped around head of hammer
can be used as well), to gently tap the left side
of handle until the handle no longer moves left or
right. A few taps should be used rather than
using heavy force witch can cause handle/
endcaps to get damaged.
2
)DVWHQHUV
Slot
Endcap
)UHH]HU+DQGOH
ATTACH REFRIGERATOR
HANDLES
Attach refrigerator handle to the mounting
fasteners by aligning the slots on the handle with
the mounting fasteners. Slide the handle down
until it comes to a hard stop.
NOTE: )RU)UHQFK
'RRUPRGHOV
follow the same
procedure for both
doors.
Verify handle is
securely attached
by pulling handle
upwards.
1
Mounting
)DVWHQHUV
Loading ...
Loading ...
Loading ...