
1
Owner’s Manual
Warranty
Registration:
register online today for a
chance to win a FREE Tripp Lite
product—www.tripplite.com/warranty
USB to VGA/DVI Adapter
Model #: U244-001-R
USB to VGA Adapter
Model #: U244-001-VGA-R
USB to HDMI Adapter
Model #: U244-001-HDMI-R
Copyright © 2011 Tripp Lite. All trademarks are the property of their respective owners.
Table of Contents
1. Introduction 2
1.1 Features 2
1.2 Package Contents 2
1.3 System Requirements 2
2. Installation 3
3. Using the Adapter 4
3.1 Display Properties 4
3.2 Extending Video to the Add-On Display 6
3.3 Mirroring Video on the Add-On Display 8
3.4 Making the Add-On Display the Primary Display 8
4. Troubleshooting 9
5. Specifications 11
6. Warranty And Warranty Registration 12
1111 W. 35th Street, Chicago, IL 60609 USA
www.tripplite.com/support
201108084-93-3099.indd 1 8/12/2011 4:40:37 PM

2
1. Introduction
1.1 Features
• Addsanadditionalmonitor,LCDorprojectorthroughasingleUSB2.0port
• Simultaneouslyconnectupto6displayadapterstoaWindowscomputerorupto4
on a Mac
• Hot-pluggable;addorremovemonitorwithouttheneedforasystemreboot
• Automaticallyresumesfromhibernationandsuspendmodes
• Supportsvideoresolutionsupto1920x1080(60Hz),1080p(60Hz)
• Setadditionalmonitorstoextendtheprimarydisplay,duplicatetheprimarydisplay,
or set an additional monitor as the primary display
• U244-001-RcomeswithaDVItoVGAadapter,allowingyoutoconnecteithera
DVIorVGAdisplay
1.2 Package Contents
Before installation, please check the items in the package. The package should
contain the following items:
•(1)U244-001-Ror(1)U244-001-VGA-Ror(1)U244-001-HDMI-R
• (1)DriverCD
•(1)USBCable
•(1)Owner'sManual
•(1)DVItoVGAAdapter(U244-001-Ronly)
1.3 System Requirements
Windows
• Windows2000orlater
• USB2.0port
• VGA,DVIorHDMImonitor
Mac
• AnIntel-basedMacrunningOSX10.4orlater.PowerPC-basedMacsarenot
supported.
• USB2.0port
• VGA,DVIorHDMImonitor
201108084-93-3099.indd 2 8/12/2011 4:40:38 PM

3
1. Introduction
Computer requirements when using 1 – 2 display adapters:
• 1.2GHzSingleCoreCPU
• 512MBmemory
Computer requirements when using 3 display adapters:
• 1.8GHzSingleCoreCPU
• 1GBmemory
Computer requirements when using 4 – 6 display adapters:
• 1.6GHzCoreDuoCPU
• 1GBmemory
Note: Only 1 added monitor can support DVD playback. In order to support
DVD playback, your computer must meet the following requirements:
• 2.0GHzCoreDuoCPU
• 1GBmemory
• Adapterscreenresolutionmustbesetto800x600with16-bitcolor
2. Installation
Note: Install the driver on your computer before connecting the display
adapter(s).
1.InsertthedriverCDintoyourcomputer’sCD-ROMdrive.Thesetupprogramshould
runautomatically.Ifthesetupprogramfailstostartonitsown,opentheCDand
double-clickontheappropriatedriverle,dependingonyourOS.
Note:
• ForWindows2000users,ifpromptedforasystempatch,youmust
download and install the required patch before the driver can be
installed.
• ForWindowsVistaand7users,ifyouencounteraUserAccountControl
popup, choose to allow the installation to proceed. This may require an
administrator’s password. If you encounter a driver signature dialog box,
choose to continue the installation anyways.
• Ifamessagestating“DisplayLinksoftwareforUSBdisplayadapteris
already up to date,” then the necessary software for this unit is already
installed, and you can proceed to step 5.
201108084-93-3099.indd 3 8/12/2011 4:40:38 PM

4
2.ForWindowsusers,theset-upprocesswillbeginautomatically.ForMacusers,an
install screen will appear with a Display Link Software Installer link. Click this link to
begininstallation.Followthepromptsthatappeartocompletetheprocess.
3.Whenthisprocessiscomplete,youwillneedtorestartyourcomputertonishthe
installation.
4.Afterrestartingyourcomputer,connecttheincludedUSBcablefromanavailable
USB2.0porttothedisplayadapter.
5.ConnectyourdisplayadaptertoamonitorusingaDVIorVGAcable,dependingon
your adapter/monitor connection type.
6.Onceconnected,thecomputerwillrecognizethedisplayadapter,andcomplete
theinstallation.Thevideoshouldnowbedisplayedontheadd-onmonitor.Note: It
may take a few moments before the screen appears on the add-on monitor.
Also,itisnormalforthescreentoickeronandoffafewtimeswhenrst
connected. If the add-on monitor remains blank, you may need to restart
your computer one more time.
Using Multiple Display Adapters
When using multiple display adapters, it is only necessary to install the driver software
once.Afterconnectingtherstdisplayadaptertothecomputer,simplymoveonto
connectingthenextdisplayadapter.
Note: When using Windows Vista XDDM mode, only one display adapter will
beabletobeconguredtouseExtendedmode,andtheremainingdisplay
adapters will be forced to use Mirror mode. Windows Vista XDDM mode is
a video card driver mode that provides a Windows XP interface on a Vista
computer.
2. Installation
3. Using the Adapter
3.1 Display Properties
Onceinstalled,thecomputervideocanbeExtended from the primary display to
theadd-ondisplay,Mirroredtodisplaythesamethingonboth,orchangedtouse
theadd-ondisplayastheprimarydisplay.ThiscanbedonebyopeningtheDisplay
Settingspageonyourcomputer(seebelow)andchangingthesettings.
201108084-93-3099.indd 4 8/12/2011 4:40:38 PM
5
3. Using the Adapter
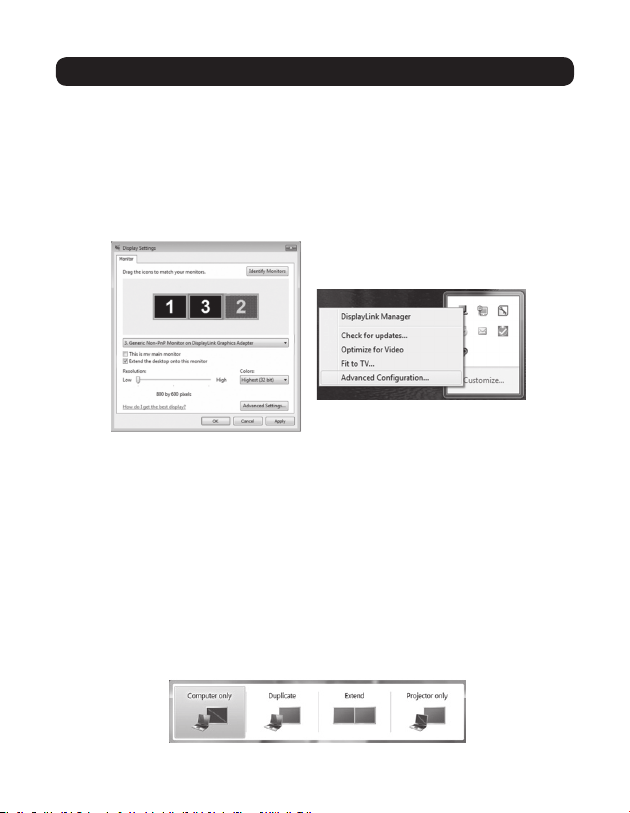
Windows
ToaccessthedisplaysettingsonaWindowscomputer,right-clickonyourcomputer’s
desktop, and select the Properties or Personalize option, depending on your Windows
operating system. From there you will need to access the Settings or Display option to
get to the Display Settings page. A quick way to access this page is to use the display
adaptericoninthelower-rightcornerofyourcomputerscreen.Right-clickonthis
icon and select the Advanced option to automatically pull up your computers Display
Settings page.
BelowareadditionalsettingsthatareavailabletoWindowsusersviathedisplay
adapterright-clickmenu:
• CheckforUpdates– Connects to Windows Update and checks for newer versions
oftheDisplayLinksoftware,anddownloadsthemifavailable.
• OptimizeforVideo–Whenplayingvideocontentonanadd-onmonitor,this
settingcanhelptoimproveplaybackperformance.Note: Text may appear less
clear when this is enabled.
• FittoTV–WhenusingyourdisplayadaptertoconnectaTVtoyourcomputer,the
Windows desktop may not always completely appear on the screen. This setting can
beusedtoadjustthepicturetodisplayproperly.
Inadditiontothedisplayadapterright-clickmenu,WindowsVistaand7userscan
pressthe[WindowsKey]andthe[P]keyatthesametimetopullupthemenubelow,
which quickly allows you to switch the display settings.
201108084-93-3099.indd 5 8/12/2011 4:40:38 PM
6
3. Using the Adapter
Note:
• Thedisplayadaptericononlyappearsinthelower-rightcornerofWindows
computers, and offers a quick way to adjust the display(s) settings. The
settings available in this right-click menu may vary depending on your
Windows operating system.
• OnlyMirrormodeissupportedunderWindowsVistaDisplayDriverModel
(WDDM)mode.Inaddition,theAeroExperience(Flip3Deffect)willbe
disabled under Windows Vista Display Driver Model (WDDM) mode as long
as the display adapter is connected.
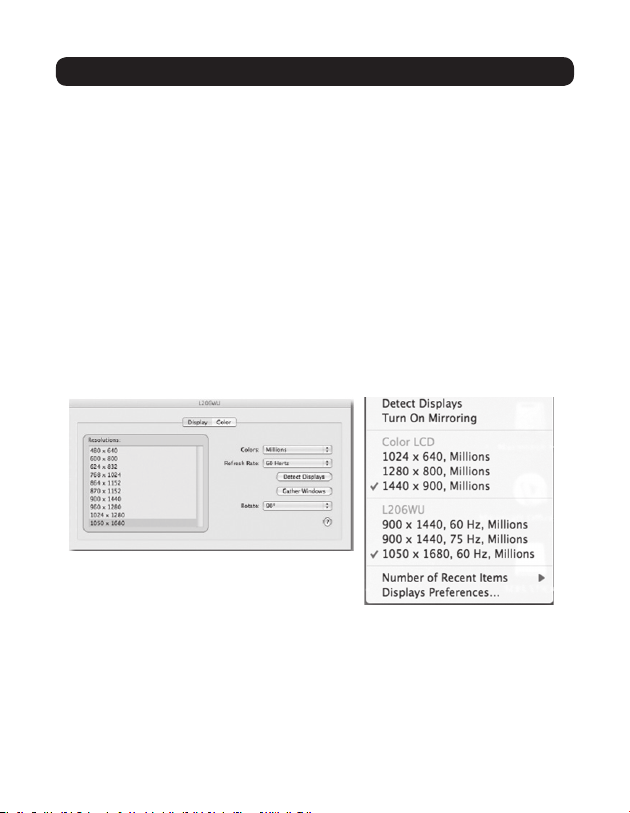
Mac
ToaccessthedisplaysettingsonaMaccomputer,openyourcomputer’sSystem
Preferences menu and selects the Displaysoption.Aquickwaytoadjustthese
settingsisbyclickingonthemonitoriconintheupper-rightcornerofthescreen.
When the Show displaysinmenubarsettingischeckedintheDisplay Settings menu,
clickingthemonitoriconwilldisplayamenuthatincludestheavailablemonitorsand
settings.
3.2 Extending Video to the Add-On Display
Toextendthevideooftheprimarymonitortotheadd-onmonitor,followthesteps
below:
Windows
1.Openyourcomputer’sDisplay Settings page.
201108084-93-3099.indd 6 8/12/2011 4:40:38 PM
7
2.Selectthemonitoriconthatrepresentstheadd-ondisplayyouwishtochange,or
choosetheadd-ondisplayfromthedrop-downmenu.Theprimary display is always
icon 1.
3. Onceyou’veselectedthemonitoriconfortheadd-ondisplay,checkthecheckboxto
extendvideoontothemonitor,orselecttheextensionoptionfromthedrop-downlist.
4.DragthemonitoriconsintheDisplay Settings page so that they are positioned to
replicatethelocationoftheactualdisplays.Forexample,ifdisplay1isdirectlyto
theleftofdisplay2,themonitoriconsshouldbepositionedthatway.Thisaffects
whichsideofthescreenthemouseisallowedtomovetothenextdisplayfrom,
andisthereforeessentialtoensuresmoothmousemovementbetweendisplays.
5. Click the Applybuttontoactivatethechanges.Thecomputervideowillnowbe
extendedfromtheprimarydisplaytotheadd-ondisplay.
Note: When playing a DVD, it is recommended that you play the DVD on a
monitor connected to the computer via standard cabling, and not an add-on
monitor connected via display adapter. If you need to play DVD on an add-on
monitor,youmusthavea2.0GHzCoreDuoCPUwith1GBmemory,andthe
screenresolutionmustbesetto800x600with16-bitcolor.Ifmultipledisplay
adapters are connected to a computer, only 1 of them can play DVD content.
Mac
1.Openyourcomputer’sDisplay Settings page.Bydefault,allmonitorsaddedtoyour
computerwillbeextendedtotherightoftheprimarydisplay.
2.Ifthedisplaysaresettobemirrored,theMirror Displayscheckboxwillbechecked.
Touncheckthischeckboxandextendthevideoamongstalldisplays,checkthe
Arrangement option in the Display Settings page.
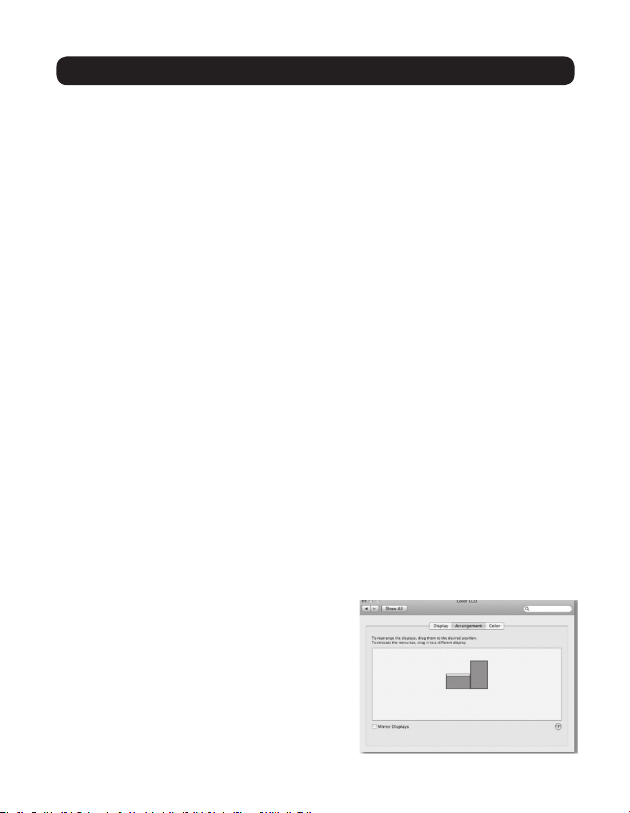
3.Whenunchecked,videowillbeextendedamongsttheconnectedmonitors,withthe
Arrangementscreendisplayiconstorepresentthelocationofthemonitors.Drag
the monitor icons so that they are positioned to replicate the location of the actual
displays.Forexample,ifdisplay1isdirectly
to the left of display 2, the monitor icons
shouldbepositionedthatway.Thisaffects
which side of the screen the mouse is allowed
tomovetothenextdisplayfrom,andis
therefore essential to ensure smooth mouse
movementbetweendisplays.Theprimary
displaywillalwaysbeindicatedbyawhitebar
at the top of its icon.
3. Using the Adapter
201108084-93-3099.indd 7 8/12/2011 4:40:38 PM

8
3.3 Mirroring Video on the Add-On Display
Todisplaythesamethingonboththeprimaryandadd-ondisplay,followthesteps
below:
Windows
1.Openyourcomputer’sDisplay Settings page.
2.Selectthemonitoriconthatrepresentstheadd-ondisplayyouwishtochange,or
choosetheadd-ondisplayfromthedrop-downmenu.Theprimarydisplayisalways
icon 1.
3.Un-checktheboxnexttoExtend the desktop onto this monitor, or select the option
fromthedrop-downmenutoduplicatethedisplay,andthenclicktheapplybutton.
Note: In Mirror mode, the add-on display settings are limited by those of the
primarydisplay.Iftheprimarydisplayonlysupportsaresolutionof1280x
1024,theadd-onmonitorwillbelimitedtoaresolutionof1280x1024orless.
Mac
1.Openyourcomputer’sDisplay Settings page.
2.BringuptheArrangementsscreenbyclickingontheArrangements option in the
Display Settings page.
3. (Setting all add-on displays to mirror mode)Tosetalloftheadd-ondisplaysto
mirror the primary display, simply check the Mirror Displays setting.
4.(Setting some add-on displays to mirror mode)Tosetsomeoftheadd-ondisplays
tomirrortheprimarydisplay,whileothersareleftasextended,unchecktheMirror
Displays setting.
5. Whileholdingdownthe[Cmd]and[Alt]keysonthekeyboard,dragtheiconofthe
add-onmonitorthatyouwishtomirrorontotheiconoftheprimarydisplay.
6.Repeatstep4foreachadd-ondisplayyouwishtomirror,whileleavingtheother
displaysextended.
3. Using the Adapter
3.4 Making the Add-On Display the Primary Display
Tomaketheadd-ondisplaytheprimarydisplayforthecomputer,followthesteps
below:
Windows
1.Openyourcomputer’sDisplay Settings page
201108084-93-3099.indd 8 8/12/2011 4:40:38 PM
9
3. Using the Adapter
2.Selectthemonitoriconthatrepresentstheadd-ondisplayyouwishtochange,or
choosetheadd-ondisplayfromthedrop-downmenu.Theprimarydisplayisalways
icon 1.
3.ChecktheboxnexttoThis is my main monitor and click the Applybuttontomake
theadd-ondisplaytheprimarydisplayforthecomputer.
Note:
• Somecomputersrequireyoutorstun-selecttheoriginalprimarydisplay
before setting a new primary display.
• Oncesetastheprimarydisplay,theadd-ondisplaywillcontinuetobethe
primary display as long as it is connected to the computer. Once disconnected,
the primary display will default back to the monitor connected to the computer
via standard cable.
Mac
1.Openyourcomputer’sDisplay Settings page.
2.BringuptheArrangementsscreenbyclickingontheArrangements option in the
Display Settings page.
3.Dragthewhitebaratthetopoftheprimarymonitoricontotheiconofthedisplay
that you wish to make the new primary monitor.
Q: Why is the display on the add-on monitor
blank?
A: IfthemonitorpowerLEDisGreen,waita
moment for the monitor to display the video,
asitmaytakesometimeforthevideotobe
displayedontheadd-onmonitor.Ifafterafew
minutes the video does not display, restart your
computer. Also, make sure the computer is not
instandbyorhibernationmode,whichwillcause
theadd-onmonitortobeblank.
IfthemonitorpowerLEDisRed,checkifthe
connection is properly made. If the connection
isneandtheproblemstillexists,uninstallthe
driver, unplug the adapter and reinstall the driver.
4. Troubleshooting
201108084-93-3099.indd 9 8/12/2011 4:40:38 PM

10
4. Troubleshooting
Q: Why is the add-on monitor flickering?
A: Thisisusuallycausedbyalowrefreshrate.Whenin“MirrorMode,”increase
the refresh rate of the main monitor. This will in turn increase the refresh rate of
theadd-onmonitor,whichshouldstoptheickering.Whenin“ExtendedMode,”
increasetherefreshrateoftheadd-onmonitor.
Q: When I play MPEG file by Windows Media Player on the extended monitor, why
does the display become abnormal when I switch it to full screen mode?
A: IfyoursystemisWindowsXPSP1,upgradingtoSP2willsolvethisproblem.
Q: Why does the video not display properly when in “Full-Screen” mode?
A: Trythefollowingtipstoimprovethesmoothnessofthemovieplayback:
•Reducetheresolutionofthedisplayto640x480or800x600.
•Usetheadapterinextendedmode.
•TerminateanyotherCPUintensiveapplicationsrunningonthecomputer.
•AssomemediaplayersrequireDirectXhardwaresupporttocorrectlyoperate,
tryadifferentmediaplayerwhichrequireslessDirectXsupport.
•Dragthemediaplayertotheadd-onscreenandclosetheplayer.Restartthe
playeranditshouldopenontheadd-onmonitor.Nowtryplayingthemediale
again.
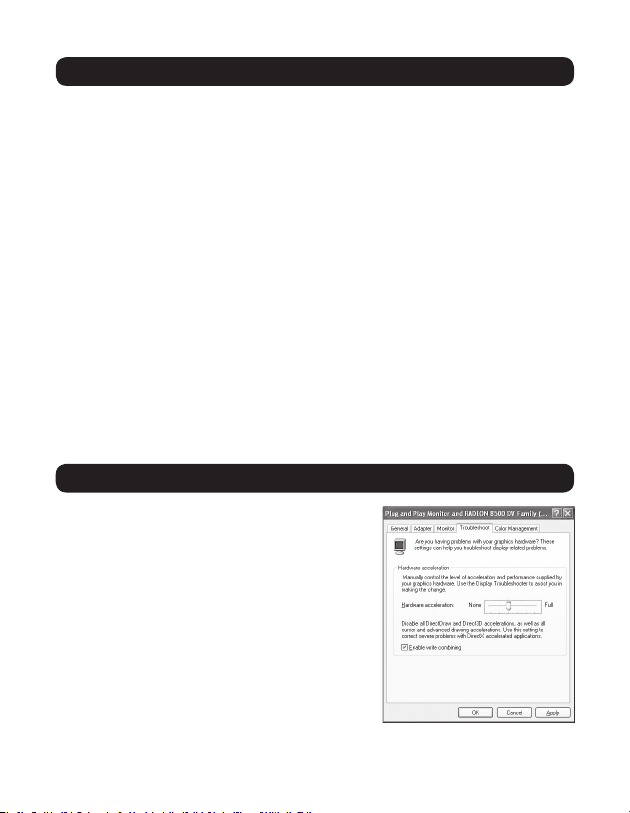
•Tryreducingthehardwareaccelerationleveloftheprimarydisplay(NOT
theadd-onmonitor)tolevels1,2or3andrestartingthemediaplayer.The
hardwareaccelerationcanbefoundbyright-clickingonyourdesktopandclick
“Properties>Settings>Advanced>Troubleshoot.”
•Thevideoplaybackmaybeunusualwhentheadd-onmonitorismirroring
theprimarydisplayandthereisanotherextendedscreenconnectedtothe
computer.Theextendedscreenmustbedisabledbeforethecontentwillbe
correctlyclonedtotheadd-onmonitor.
Q: In “Extended Mode,” why does the add-on monitor have a black border
around the desktop?
A: Thishappenswhentheresolutionusedbytheadd-onmonitorislargerthanthe
resolutionusedbytheprimarymonitor.Tosolvethisproblem,conguretheadd-
on monitor to use the same resolution as the primary monitor.
201108084-93-3099.indd 10 8/12/2011 4:40:39 PM
11
4. Troubleshooting
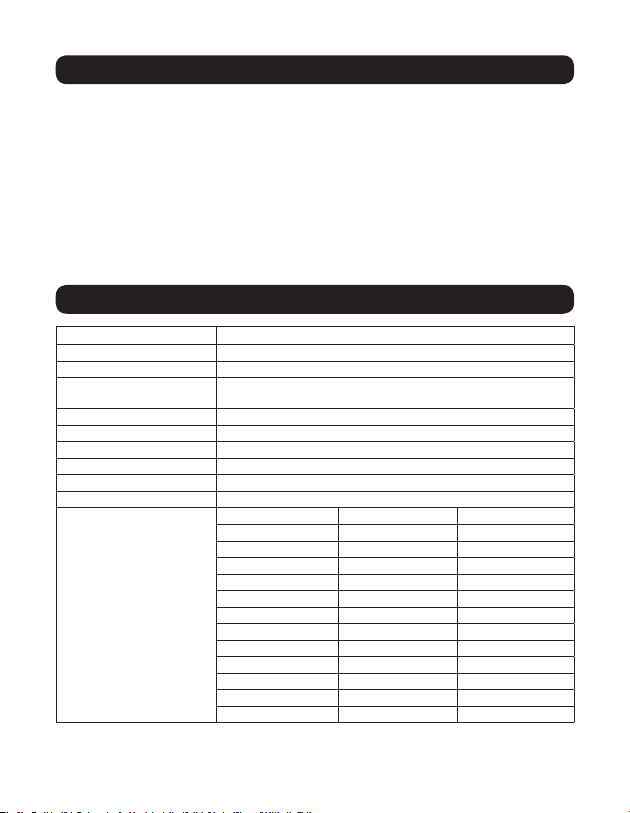
5. Specifications
Feature Specification
Source Connector USBAMale(viatheincludedUSB2.0cable)
DisplayConnector HDMIF,DVI-IForHD15F
MaximumNumberof
DisplayAdapters
6(Windows),4(Mac)
RAM 8Mx16DDRSynchronousDRAM(SDRAM)
Power Bus-powered
SupportedOperatingSystems Windows2000andabove,MacOSX10.4andabove
OperatingTemperature 10°to40°C(50°to104°F)
Storage Temperature -20°to70°C(-4°to158°F)
RelativeHumidity Lessthan85%,Non-Condensing
SupportedVideoResolutions
(Note: Interlaced and reduced
blanking modes are not
supported)
Resolution 16-Bit Refresh Rate 32-Bit Refresh Rate
640x480 60,72,75,85 60,72,75,85
800x600 56,60,72,75,85 56,60,72,75,85
1024x768 60,70,75,85 60,70,75,85
1280x720(720p) 60 60
1280x768 60,75,85 60,75,85
1280x800 60 60
1280x1024 60,75,85 60,75
1366x768 60 60
1400x1050 60,75,85 60,75,85
1600x1200 60 60
1680x1050 60 60
1920x1080(1080p) 60 60
Q: In “Extended” mode, why does the cursor disappear?
A: Ifyou’reinextendedmodebuthavenotyetconnectedtheadd-onmonitortothe
U244-001-R,thedesktopwillstillpantotheadd-onmonitor.It’spossiblethat
yourcursorhasmovedtotheextendeddesktopandisnolongervisibleonthe
primary display.
Whenthisoccurs,trythefollowing:
•Connecttheadd-onmonitortotheU244-001-R.Youshouldbeabletosee
the mouse cursor once the computer screen is displayed.
•Moveyourmousetotryanddragthecursorbackontotheprimarymonitor.
•UnplugtheU244-001-Rfromthecomputertorestorethecursor.
201108084-93-3099.indd 11 8/12/2011 4:40:39 PM

12
6. Warranty and Warranty Registration
1-Year Limited Warranty
TrippLitewarrantsitsproductstobefreefromdefectsinmaterialsandworkmanshipfora1-yearperiodfromthedateofretail
purchasebyenduser.
TrippLite’sobligationunderthiswarrantyislimitedtorepairingorreplacing(atitssoleoption)anysuchdefectiveproducts.Toobtain
serviceunderthiswarrantyyoumustobtainaReturnedMaterialAuthorization(RMA)numberfromTrippLiteoranauthorizedTrippLite
servicecenter.ProductsmustbereturnedtoTrippLiteoranauthorizedTrippLiteservicecenterwithtransportationchargesprepaid
andmustbeaccompaniedbyabriefdescriptionoftheproblemencounteredandproofofdateandplaceofpurchase.Thiswarranty
doesnotapplytoequipmentwhichhasbeendamagedbyaccident,negligenceormisapplicationorhasbeenalteredormodiedin
anyway,includingopeningoftheunit’scasingforanyreason.Thiswarrantyappliesonlytotheoriginalpurchaserwhomusthave
properly registered the product within 10 days of retail purchase.
EXCEPTASPROVIDEDHEREIN,TRIPPLITEMAKESNOWARRANTIES,EXPRESSORIMPLIED,INCLUDINGWARRANTIESOF
MERCHANTABILITYANDFITNESSFORAPARTICULARPURPOSE.Somestatesdonotpermitlimitationorexclusionofimplied
warranties;therefore,theaforesaidlimitation(s)orexclusion(s)maynotapplytothepurchaser.
EXCEPTASPROVIDEDABOVE,INNOEVENTWILLTRIPPLITEBELIABLEFORDIRECT,INDIRECT,SPECIAL,INCIDENTALOR
CONSEQUENTIALDAMAGESARISINGOUTOFTHEUSEOFTHISPRODUCT,EVENIFADVISEDOFTHEPOSSIBILITYOFSUCHDAMAGE.
Specically,TrippLiteisnotliableforanycosts,suchaslostprotsorrevenue,lossofequipment,lossofuseofequipment,lossof
software,lossofdata,costsofsubstitutes,claimsbythirdparties,orotherwise.
Warranty Registration
Visitwww.tripplite.com/warrantytoregisterthewarrantyofyournewTrippLiteproduct.You’llbeautomaticallyenteredintoadrawing
for a chance to win a FREE Tripp Lite product!*
* No purchase necessary. Void where prohibited. Some restrictions apply. See website for details.
Warning!
Useofthisequipmentinlifesupportapplicationswherefailureofthisequipmentcanreasonablybeexpectedtocausethefailureof
thelifesupportequipmentortosignicantlyaffectitssafetyoreffectivenessisnotrecommended.Donotusethisequipmentinthe
presenceofaammableanestheticmixturewithair,oxygenornitrousoxide.
FCC Notice, Class B
Thisdevicecomplieswithpart15oftheFCCRules.Operationissubjecttothefollowingtwoconditions:(1)Thisdevicemaynotcause
harmfulinterference,and(2)thisdevicemustacceptanyinterferencereceived,includinginterferencethatmaycauseundesired
operation.
Note:ThisequipmenthasbeentestedandfoundtocomplywiththelimitsforaClassBdigitaldevice,pursuanttopart15ofthe
FCCRules.Theselimitsaredesignedtoprovidereasonableprotectionagainstharmfulinterferenceinaresidentialinstallation.This
equipment generates, uses and can radiate radio frequency energy and, if not installed and used in accordance with the instructions,
maycauseharmfulinterferencetoradiocommunications.However,thereisnoguaranteethatinterferencewillnotoccurinaparticular
installation.Ifthisequipmentdoescauseharmfulinterferencetoradioortelevisionreception,whichcanbedeterminedbyturningthe
equipmentoffandon,theuserisencouragedtotrytocorrecttheinterferencebyoneormoreofthefollowingmeasures:
• Reorientorrelocatethereceivingantenna.
• Increasetheseparationbetweentheequipmentandreceiver.
• Connecttheequipmentintoanoutletonacircuitdifferentfromthattowhichthereceiverisconnected.
• Consultthedealeroranexperiencedradio/TVtechnicianforhelp.
AnychangesormodicationstothisequipmentnotexpresslyapprovedbyTrippLitecouldvoidtheuser’sauthoritytooperatethis
equipment.
WEEE Compliance Information for Tripp Lite Customers and Recyclers (European Union)
UndertheWasteElectricalandElectronicEquipment(WEEE)Directiveandimplementingregulations,whencustomersbuynew
electricalandelectronicequipmentfromTrippLitetheyareentitledto:
• Sendoldequipmentforrecyclingonaone-for-one,like-for-likebasis(thisvariesdependingonthecountry)
• Sendthenewequipmentbackforrecyclingwhenthisultimatelybecomeswaste
TrippLitefollowsapolicyofcontinuousimprovement.Productspecicationsaresubjecttochangewithoutnotice.
1111 W. 35th Street, Chicago, IL 60609 USA
www.tripplite.com/support
201108084•933099-EN
201108084-93-3099.indd 12 8/12/2011 4:40:39 PM