0
GEAppliances.com
Safety Instructions ........ 2-4
Operating Instructions
Control Panel ................. 5, 6
Control Settings .................. 7
Features ......................... 8
Loading and Using
the Dryer .................... 10-11
Reversing the Door ............... 9
Venting the Dryer ............... 11
Troubleshooting Tips... 12, is
Consumer Support
Consumer Support .............. 16
Warranty ....................... 15
Write the model and serial
numbers here:
Model #
Serial #
Youcanfindthemon a label
onthefrontofthedryerbehindthe
door.
Printedin Mexico 234D2238PO04 49-90532 09-24 GE
IMPORTANT SAFETY INFORMATION.
READ ALL INSTRUCTIONS BEFORE USING.
_j_ This is the safety alert symbol. This symbol alerts to potential hazards that can kill or hurt you and others.
you you
All safety messages will follow the safety alert symbol and the word "DANGER","WARNING",or "CAUTION".These
words are defined as:
_ Indicates a hazardous situation which, if not avoided, will result in death or serious injury.
Indicates a hazardous situation which, if not avoided, could result in death or serious injury.
Indicates o hazardous situation which, if not avoided, could result in minor or moderate injury.
IMPORTANT SAFETYINSTRUCTIONS
To reduce the riskof fire, explosion,electric shock, or injury to persons when using your appliance, follow
basic precautions, including the following:
[] Readall instructionsbeforeusingtheappliance.
[] DONOTdry articles that have been previously cleaned in,washed in, soaked in or spotted with gasoline, dry-cleaning
solvents, or other flammable or explosive substances, as they give off vapors that could ignite or explode.
[] DONOTallow children to play on or in this appliance. Close supervision of children is necessary when this appliance
is used near children. Before the appliance is removed from service or discarded, remove the door to the drying
compartment.
[] DONOTreach into the appliance if the drum is moving.
[] DONOTinstall or store this appliance where it will be exposed to the weather.
[] DONOTtamper with controls, repair or replace any part of this appliance or attempt any servicing unlessspecifically
recommended in the user maintenance instructions or in published user repair instructions that you understand and
have the skillsto carry out.
[] DONOTuse fabric softeners or products to eliminate static unless recommended by the manufacturer of the fabric
softener or product.
[] DONOTuseheat to dry articles containing foam rubber or similarlytextured rubber-like materials.
[] Clean lint screen before or after each load. DONOToperate the dryer without the lint filter in place.
[] Donot store combustible materials, gasoline or other flammable liquids near the dryer.Keeparea around the exhaust
opening and adjacent surrounding areas free from the accumulation of lint, dust and dirt. Keep dryer area clear and free
from items that would obstruct the flow of combustion and ventilation air.
[] The interior of the appliance and exhaust duct should be cleaned periodically by qualified service personnel.
[] DONOTplace items exposed to cooking oils in your dryer. Items contaminated with cooking oils may contribute to a
chemical reaction that could cause a load to catch fire.
[] Keepthe floor around your appliances clean and dry to reduce the possibilityof slipping.
[] Unplugthe appliance or turn offthe circuit breaker before servicing. Pressingthe Power or Stort/Pouse button DOESNOT
disconnect power.
[] DONOToperate this appliance if it isdamaged, malfunctioning, partially disassembled,or has missingor broken parts,
including a damaged cord or plug.
[] DONOTsprayany typeof aerosol into, on or near dryer at any time. Donot useany type of spray cleanerwhen cleaningdryer
interior. Hazardousfumes or electrical shock could occur.
[] See "Electrical Connection" located in the Installation Instructions for grounding instructions.
SAVETHESE INSTRUCTIONS
GEAppliances.com
ADDITIONAL GAS DRYERWARNINGS
Foryour safety,the information in this manual must befollowed to minimize the risk of fire or explosion 1
or to prevent damage,personal injury,or death.
I
- DONOTstore or usegasolineor other flammable vapors and liquids in the vicinity ofthis or any other appliance.
- WHATTODOIFYOUSHELLGAS:
• DONOTtry to light any appliance.
• DONOTtouch any electrical switch; DONOTuseany phone inyour building.
• Clearthe room, building, or area of any occupants.
• Immediately call your gassupplier from a neighboCsphone.Followthe gassupplier's instructions.
• Ifyou cannot reachyour gassupplier, call the fire department.
- Installation and service must be performed by aqualified installer, service agency,or the gas supplier.
State of California Proposition 65 Warnings:
TheCaliforniaSafeDrinkingWater andToxicEnforcementAct requiresthe governor of Californiato publisha list of substances
known to the state to cause cancer,birth defectsor other reproductiveharm and requires businessesto warn of potential
exposureto such substances.
Thisproduct contains one or morechemicals known to the Stateof Californiato causecancer, birth defects
or other reproductive harm.
Gasappliances cancause low-level exposureto some ofthese substances,including benzene,carbon monoxide,formaldehyde
and soot,caused primarily by the incomplete combustion of natural gasor LPfuels. Exposureto these substancescan be
minimizedby properlyventing the dryerto the outdoors.
SAVE THESE INSTRUCTIONS
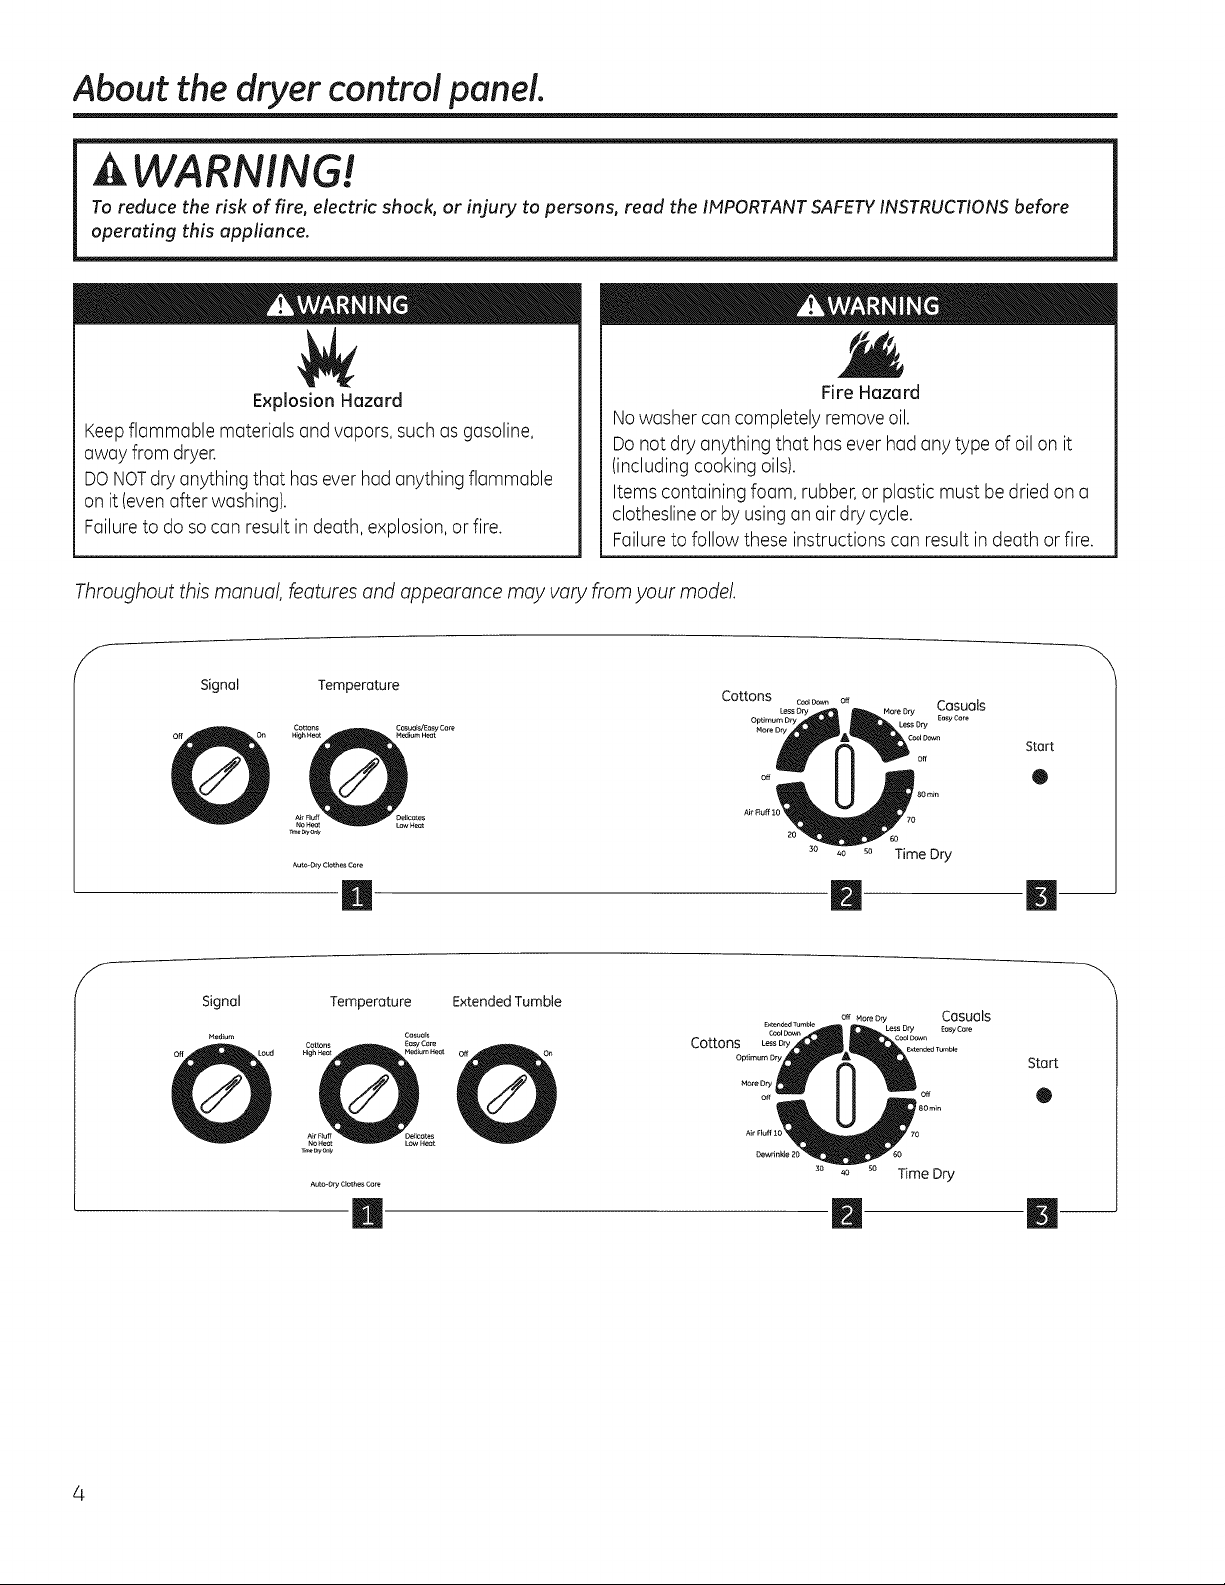
About the dryer control panel.
A WARNING!
To reduce the risk of fire, electric shock, or injury to persons, read the IIvIPORTANTSAFETYINSTRUCTIONSbefore
operating this appliance.
Explosion Hazard
Keepflammablematerialsand vapors,suchasgasoline,
away fromdryer.
DONOTdry anything that haseverhadanything flammable
on it (evenafter washing).
Failureto do socan result in death, explosion,or fire.
Fire Hazard
Nowasher can completely remove oil.
Donot dry anything that has ever had any type of oil on it
(including cooking oils).
Items containing foam, rubber,or plastic must be dried on a
clotheslineor by usinganair dry cycle.
Failureto follow these instructions can resultin death orfire.
Throughout this manual features and appearance may vary from your model.
f
Signal
Cottons _,_o o_
Optimum Dry
Casuals
Start
®
Time Dry
IB
/
Signal
Medium
Temperature
ExtendedTumble
Cottons LessDry
Optimum DI
More Dry i
o_Mo_eOry Casuals
Less Dry Easy Core
Start
®
30 to so Time Dry
m
GEAppliances.com
IMPORTANT'. Clean the lint filter each time you use the dryer.
_ Temperature (Not all features are on all models)
Cottons Forregal(Jrto he(ivy cottons.
High Heat
Casuals/ Forsynthetics, blends,delic(]tes (]nd items I(]beledperm(]nent press.
EasyCare
Medium Heat
DELICATESOn some models.Fordelic(]tes,synthetics (]nd items I(]beledtumble dry low.
Low Heat
Forfluffing items without he(It. Usethe Time Dry cycle.
Air Fluff
No Heat
Automatic cyclesautomatically determine fabric dryness.SelectLessDry ifyou want your clothesslightly damp at theend of
the drying cycle.SelectMore Dry ifyou want them to feeldrier.
Timedcyclesrun for a selectedtime.
l_ Drying Cycles (Not all features are on all models)
Cottons Forcottons (]nd most linens. Formost loads,selectOptimum Dry (onsome models).
Casuals/ For wrinkle-free, perm(]nent press (]nd delic(]te items, (]nd knits.
Easy Care
Delicates
Time Dry
Dewrinkle
Fordelic(]te items, speci(]l-c(]ref(]brics (]nd knits.
Setthe CycleSelector(it the desired drying time.
Forremoving wrinkles from items th(]t (]recle(]n (]nd dry or th(]t (]revery lightly d(]mp.
Air Fluff Forfreshening or fluffing up (]lre(]dydry clothing, fabrics, linens(]nd pillows.Usewith Air FluffNo Heat.
Provides 10 minutes of no he(]t tumbling.
Start-Close the dryer door. SelectStart. Openingthe door during oper(]tion will stop the dryer.
To rest(]rt the dryer, close the door (]nd selectStart to complete the cycle.
NOTE: Drying times will vary according to the type of heat used (Electric, Natural or LP gas), size of
load, types of fabrics, wetness of clothes and condition of exhaust ducts.
About the dryer features.
Extended Tumble
Off On
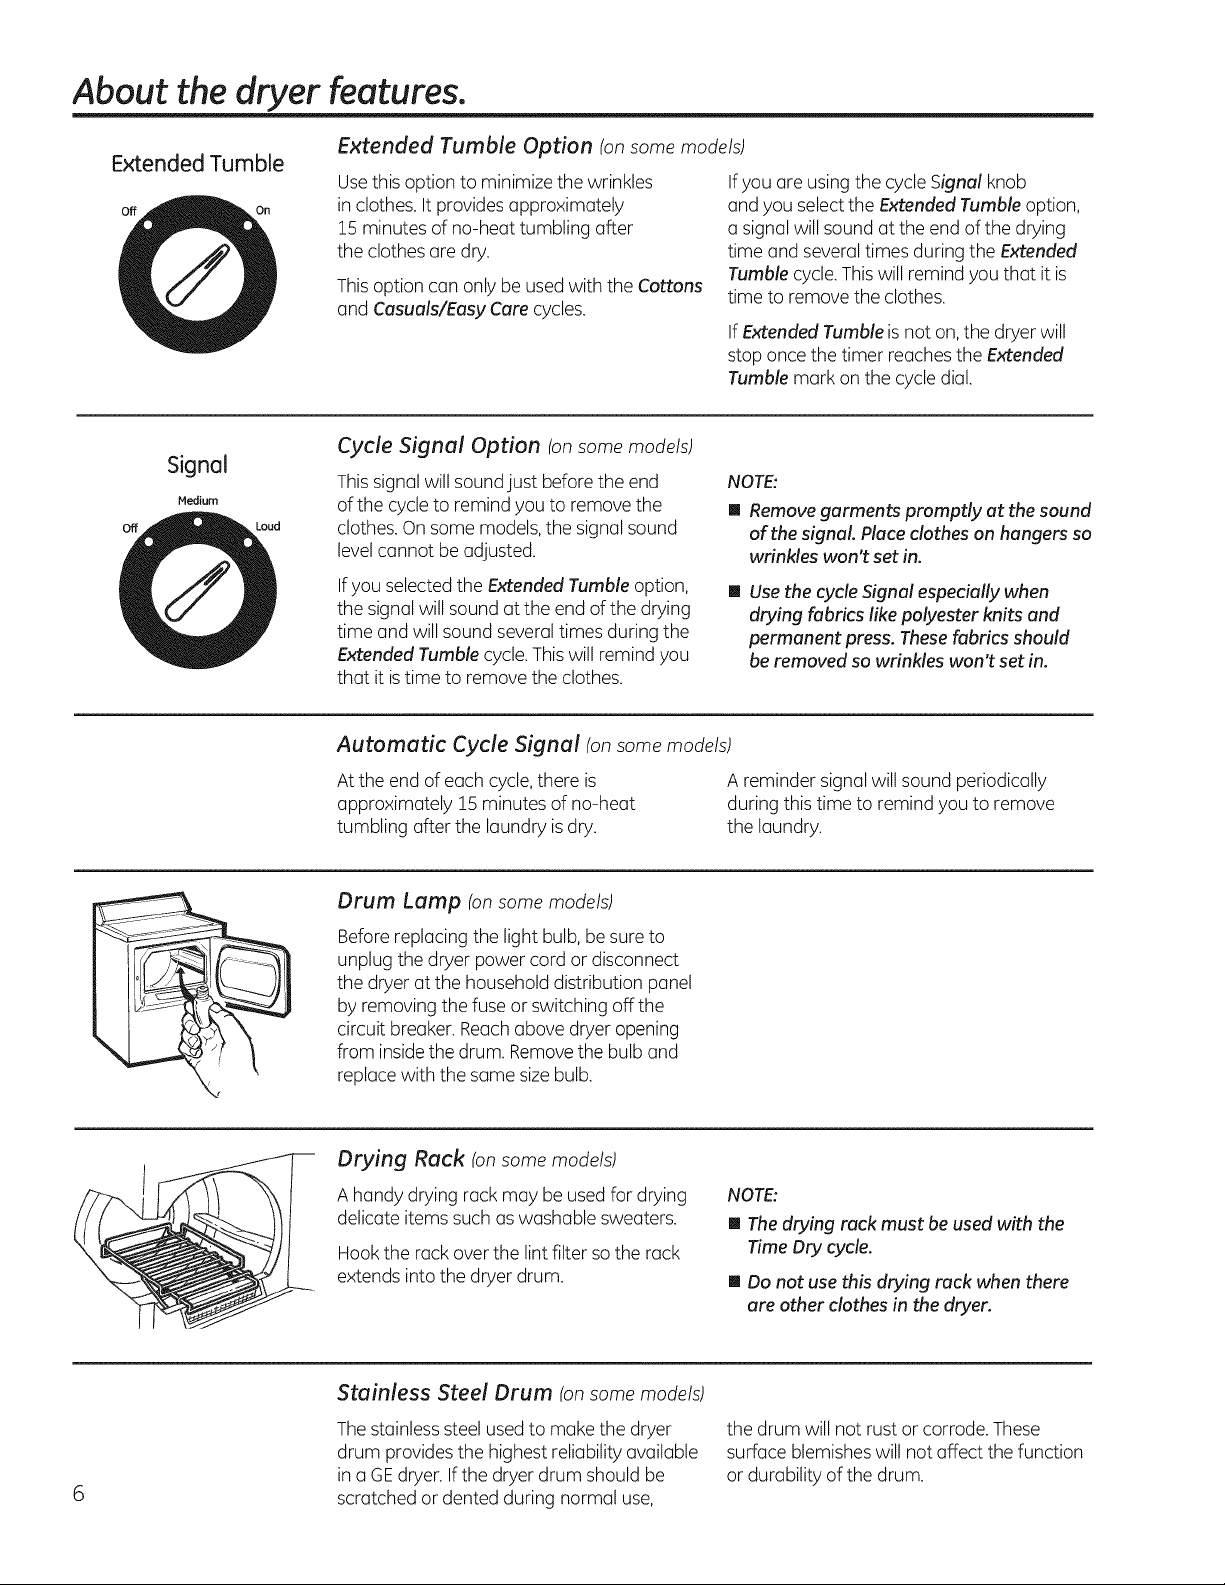
Extended Tumble Option (on some models)
Usethis option to minimize the wrinkles
in clothes.It provides approximately
15 minutes of no-heat tumbling after
the clothesare dry.
Thisoption can only be usedwith the Cottons
and Casuals/Easy Carecycles.
Ifyou are using the cycle Signal knob
and you selectthe Extended Tumble option,
a signalwill sound at the end of the drying
time and severaltimes during the Extended
Tumble cycle.Thiswill remind you that it is
time to removethe clothes.
If Extended Tumble is not on,the dryerwill
stop once the timer reachesthe Extended
Tumble murk on the cycle dial.
off
Signal
Medium
Loud
Cycle Signal Option (onsome models)
Thissignal will soundjust beforethe end
of the cycleto remind you to remove the
clothes. On some models,the signalsound
levelcannot beadjusted.
Ifyou selected the Extended Tumble option,
the signalwill sound at the end of the drying
time and will sound severaltimes during the
Extended Tumblecycle.This will remind you
that it istime to remove the clothes.
NOTE:
[] Removegarments promptly atthesound
of the signal. Placeclothes on hangers so
wrinkles won't set in.
[] Use the cycle Signal especially when
drying fabrics like polyester knits and
permanent press. These fabrics should
be removed so wrinkles won't set in.
Automatic Cycle Signal (on some models)
At the end of each cycle,there is
approximately !5 minutes of no-heat
tumbling after the laundry isdry.
A reminder signalwill sound periodically
during this timeto remind you to remove
the laundry.
Drum Lump (onsome models)
Beforereplacing the light bulb,be sure to
unplug the dryer power cord ordisconnect
the dryer at the householddistribution panel
by removing the fuse orswitching off the
circuit breaker. Reachabove dryer opening
from insidethe drum. Removethe bulb and
replace with the samesize bulb.
Drying Rack (on some models)
A handy drying rack may beused for drying
delicate items suchas washable sweaters.
Hookthe rack over the lint filter so the rock
extends into the dryer drum.
NOTE:
[] The drying rack must be used with the
Time Dry cycle.
[] Do not use this drying rack when there
are other clothes in the dryer.
Stainless Steel Drum (on some models)
Thestainless steel usedto make the dryer
drum provides the highest reliability available
in aGEdryer. Ifthe dryer drum should be
scratched or dented during normal use,
the drum will not rust or corrode. These
surface blemisheswill not affect the function
or durability of the drum.
About reversing the door. GEApUio.ces.com
Reversing the Door
Toolsneeded.
[] Standard #2 [] Tape-tipped
Phillipsscrewdriver putty knife
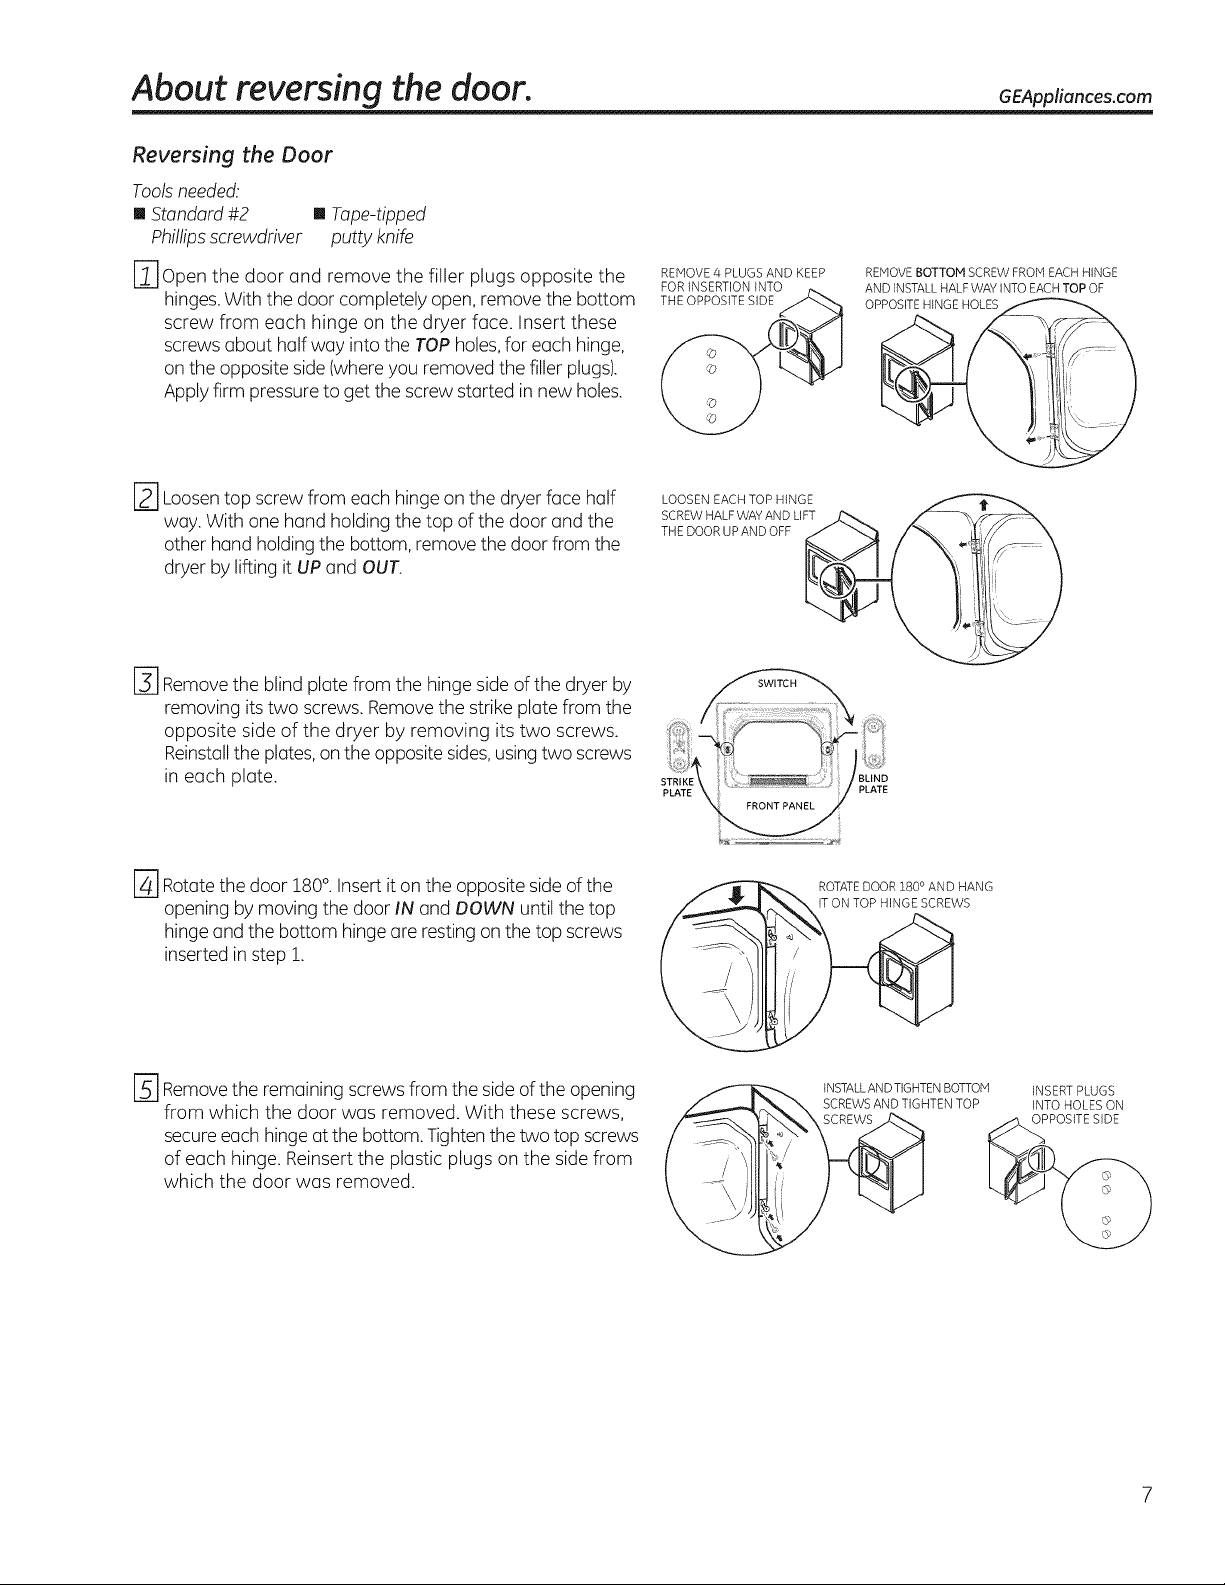
r-_ open the door and remove the filler plugs opposite the
hinges.With the door completely open, removethe bottom
screw from each hinge on the dryer face. Insert these
screws about half way into the TOPholes,for each hinge,
on the opposite side (whereyou removed the filler plugs).
Applyfirm pressureto get the screw started in new holes.
[] Loosentop screw from each hinge on the dryerface half
way. With one hand holding the top of the door and the
other hand holdingthe bottom, removethe door from the
dryer by lifting it UPand OUT.
[] Removethe blind plate from the hinge side ofthe dryer by
removing itstwo screws. Removethe strike plate from the
opposite side of the dryer by removing its two screws.
Reinstallthe plates,on the opposite sides,usingtwo screws
in each plate.
[_ Rotatethe door 180°.Insert it on the opposite side of the
opening by moving the door IN and DOWN until the top
hinge and the bottom hinge are resting on the top screws
inserted in step 1.
REMOVE 4 PLUGS AND KEEP
FOR INSERTION INTO
__THEOPPOSITE SIDE
REMOVE BOTTOM SCREW FROM EACH HINGE
AND INSTALL HALF WAY INTO EACH TOP OF
oPPOSiTEH NGEHOLES
LOOSEN EACH TOP HINGE __I__""A'_"-_ _
EWo Lu WAZ20 ;L'FTm- .....
STRIKE BLIND
PLATE PLATE
ROTATE DOOR 280 ° AND HANG
IT ON TOP HINGE SCREWS
[_ Removethe remaining screws from the sideof the opening
from which the door was removed. With these screws,
secureeach hinge at the bottom. Tightenthe two top screws
of each hinge. Reinsertthe plastic plugs on the side from
which the door was removed.
INSTALL AND TIGHTEN BOTTOM
_N SCREWSANDTIGHTEN TOP
, /
INSERTPLUGS
INTOHOLESON
Loading and using the dryer,
Always follow the fabric manufacturer's care label when laundering.
Sortingand Loading Hints
Asa general rule,if clothesare sorted properly for the
washer,they are sortedproperly for the dryer.
Do not overload. Thiswastes energy and causes
wrinkling.
Donot add fabric softener sheetsonce the load has
become warm. Theymay causefabric softener stains.
Bounce®Fabric Conditioner Dryer Sheetshave been
approved for usein all GEDryerswhen used in
accordance with the manufacturer's instructions.
Do not dry the following items: fiberglass items,
woolens, rubber-coated items, plastics,itemswith
plastic trim and foam-filled items.
Careand Cleaningof the Dryer
TheExterion Wipe or dust any spillsor washing
compounds with a damp cloth. Dryercontrol
panel and finishes may bedamaged by some laundry
pretreatment soil and stain remover products. Apply
these products away from the dryer.Thefabric may
then be washed and dried normally. Damage to your
dryer caused by these products is not covered by
your warranty.
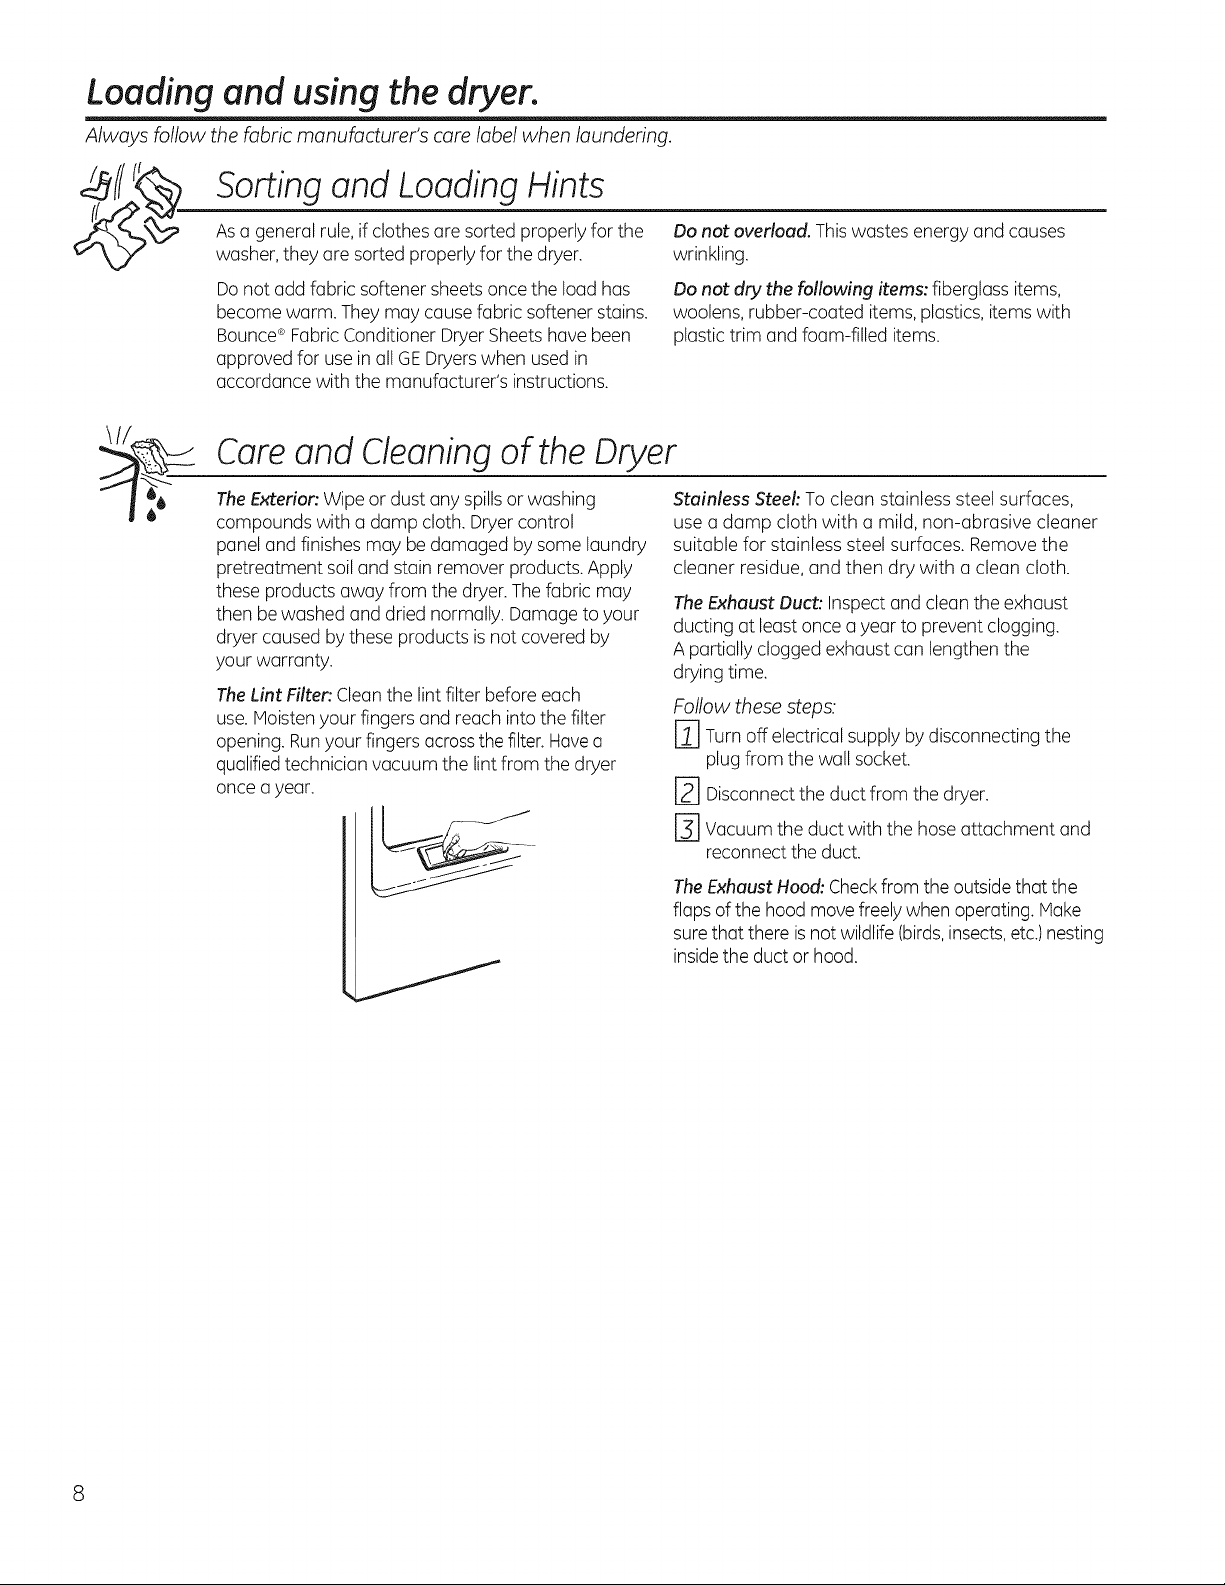
TheLint Filter'.Cleanthe lintfilter before each
use.Moistenyour fingers and reach into the filter
opening. Runyour fingers acrossthefilter.Havea
qualifiedtechnician vacuum the lint from the dryer
once a year.
J
Stainless Steel: Toclean stainless steel surfaces,
use a damp cloth with a mild, non-abrasive cleaner
suitable for stainless steel surfaces. Removethe
cleaner residue, and then dry with a clean cloth.
TheExhaust Duct: Inspectand clean the exhaust
ducting at least once a year to prevent clogging.
A partially clogged exhaust can lengthen the
drying time.
Follow these steps:
F_ Turnoff electrical supply by disconnecting the
plug from the wall socket.
-2---]Disconnectthe duct from the dryer.
F3] vacuum the duct with the hose attachment and
reconnect the duct.
TheExhaust Hood: Checkfrom the outside that the
flaps of the hood move freelywhen operating. Make
surethat there isnot wildlife (birds,insects,etc.)nesting
insidethe duct or hood.

GEAppliances.com
Venting the Dryer
Forthe best drying performance, the dryer needs to be properlyvented. Thedryer will use more energy
and run longer if it is not vented to the below specifications. Carefully follow the details on Exhausting in
the Installation Instructions.
[] Use only rigid metal 4" diameter ductwork inside the dryer cabinet. Useonly rigid metal or UL listed
flexible metal 4" diameter ductwork for exhausting to the outside.
[] Do not use plastic or other combustible ductwork.
[] Usethe shortest length possible.
[] Do not crush or collapse.
[] Avoid resting the duct on sharp objects.
[] Venting must conform to local building codes.
Correct
Venting
Incorrect
Venting
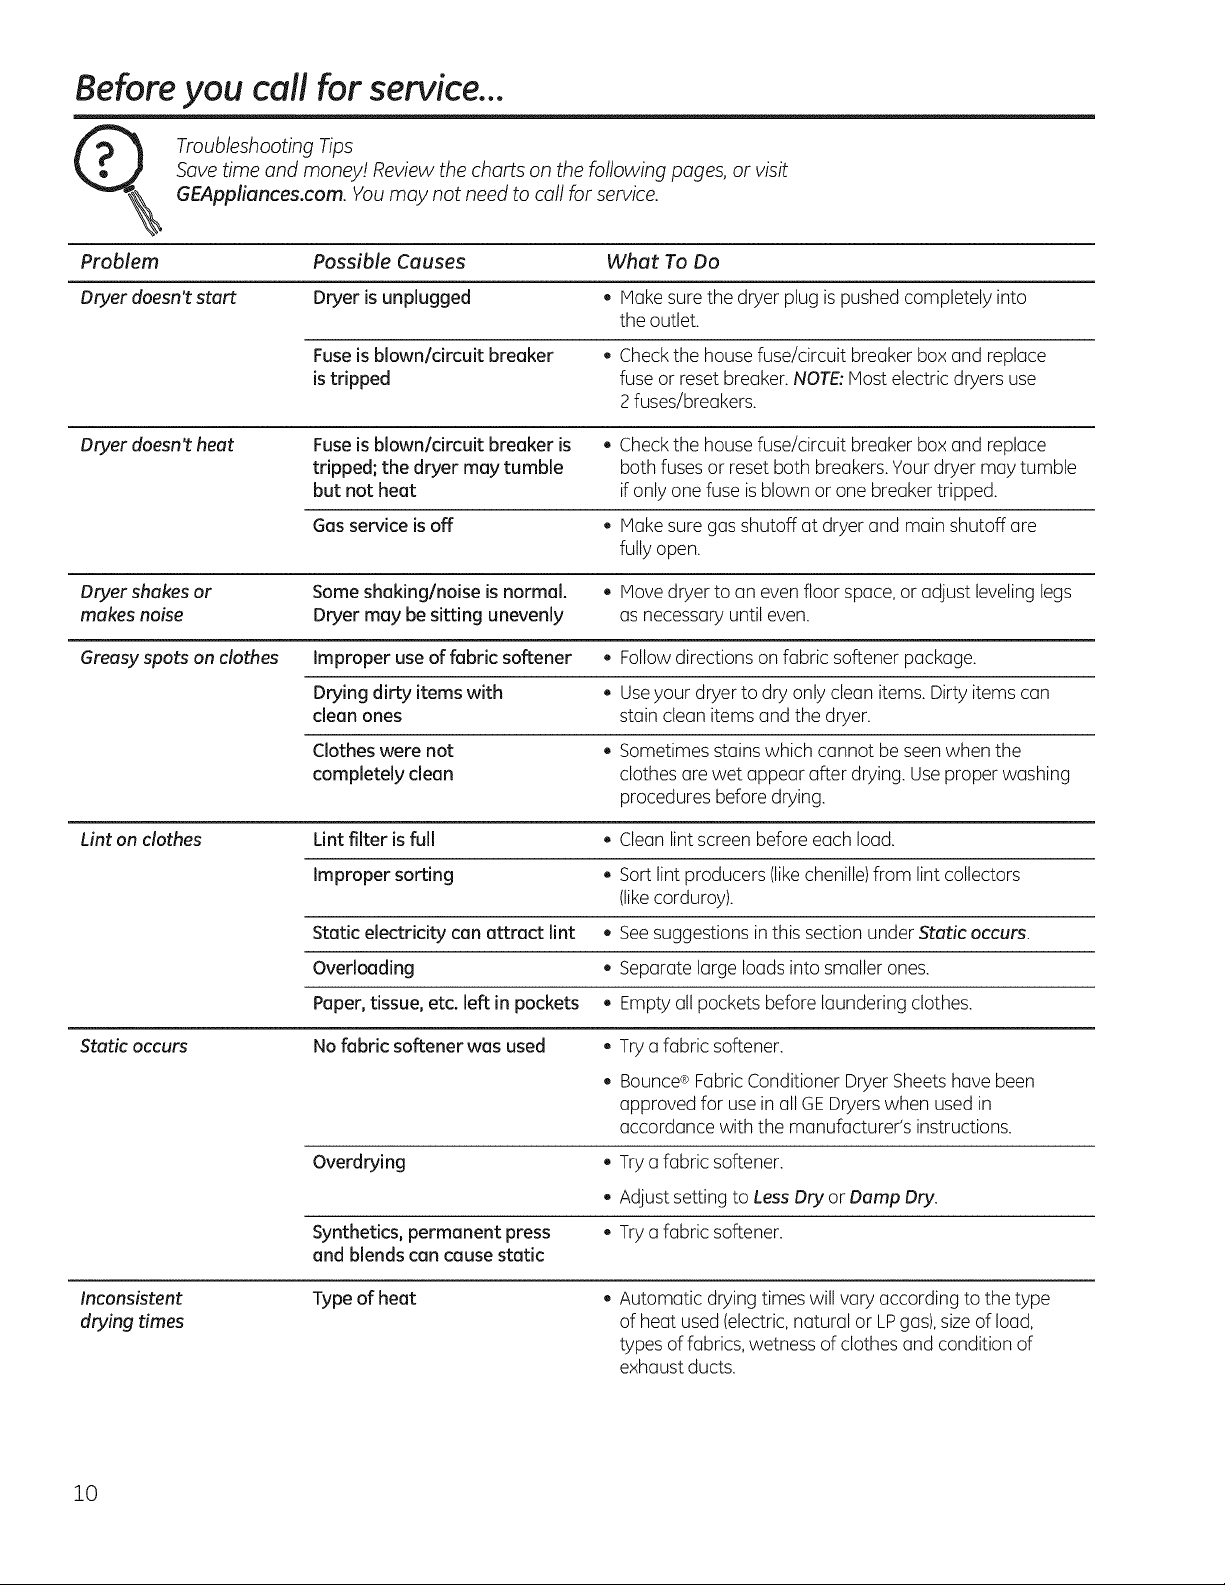
Save time and money! Review the charts on the following pages, or visit
GEAppliances.com. You may not need to call for service.
Before you call for service...
Troubleshooting Tips
Problem Possible Causes What To Do
Dryer doesn't start Dryer is unplugged . Makesure the dryer plug is pushedcompletely into
the outlet.
Fuse is blown/circuit breaker . Checkthe housefuse/circuit breaker box and replace
is tripped fuse orreset breaker. NOTE:Mostelectric dryers use
2fuses/breakers.
Dryer doesnt heat Fuse is blown/circuit breaker is . Checkthe housefuse/circuit breaker box and replace
tripped; the dryer may tumble both fusesor reset both breakers.Your dryer may tumble
but not heat ifonly one fuse isblown or one breaker tripped.
Gasservice is off , Makesure gas shutoff at dryer and main shutoff are
fully open.
Dryer shakes or Someshaking/noise is normal. . Movedryer to an evenfloor space, or adjust leveling legs
makes noise Dryer may be sitting unevenly as necessary until even.
Greasy spats an clothes Improper use of fabric softener • Followdirections on fabric softener package.
Drying dirty items with . Useyour dryer to dry only clean items. Dirty items can
clean ones stain clean items and the dryer.
Clothes were not . Sometimes stains which cannot beseenwhen the
completely clean clothes are wet appear after drying. Useproper washing
procedures before drying.
Lint on clothes Lint filter isfull . Clean lintscreen before each load.
Improper sorting . Sort lint producers (likechenille)from lint collectors
(likecorduroy).
Static electricity can attract lint • Seesuggestions inthis section under Static occurs.
Overloading • Separate large loadsinto smaller ones.
Paper, tissue, etc. left in pockets . Emptyallpockets before laundering clothes.
Static occurs No fabric softener was used . Try a fabric softener.
, Bounce®FabricConditioner DryerSheetshave been
approved for usein all GEDryerswhen usedin
accordance with the manufacturer's instructions.
Try a fabric softener.
Adjust setting to LessDry or Damp Dry.
Try a fabric softener.
Overdrying
e
Synthetics, permanent press
and blends can causestatic
Type of heat
Inconsistent
drying times
Automatic drying times will vary according to the type
of heat used(electric,natural or LPgas),sizeof load,
types of fabrics, wetness of clothes and condition of
exhaust ducts.
10

GEAppliances.com
Problem Possible Causes
Clothes take too long Improper sorting
to dry
Large loads of heavy fabrics
(like beach towels)
What To Do
Separate heavy itemsfrom lightweight items (generally,
a well-sorted washer load isa well-sorted dryer load).
Large,heavyfabrics contain more moisture and take
longer to dry. Separate large,heavyfabrics into smaller
loadsto speeddrying time.
Hatch control settingsto the load you are drying.
Clean lintfilter before every load.
Check installation instructions for proper
ducting/venting.
Hake sure ducting isclean,free of kinksand
unobstructed.
Checkto seeif outside wall damper operates easily.
Checkthe Installation Instructions to make surethe
dryer venting iscorrect.
Controls improperly set
Lint filter isfull
Improper or obstructed
ducting
Blown fuses or tripped _ Replacefuses or resetcircuit breakers.Sincemost dryers
circuit breaker use2 fuses/breakers, make sure both are operating.
Overloading/combining loads . Donot put more than one washer load inthe dryer
at a time.
Underloading _ Ifyou are drying only one or two items,add afew items
to ensure proper tumbling.
Clothes are wrinkled Overdrying _ Select a shorter drying time.
Removeitemswhile they still holda slight amount of
moisture. Selecta Less Dry or Damp Dry setting.
Letting items sit in dryer _ Removeitemswhen cycle endsand fold or hang
after cycle ends immediately.
Overloading _ Separate large loadsinto smaller ones.
Clothes shrink Somefabrics will naturally shrink . Toavoid shrinkage,follow garment care labelsexactly.
when washed. Others can be
Some items may be pressedback into shape after drying.
safely washed, but will shrink
in the dryer _ Ifyou are concerned about shrinkage in a particular
item,do not machine wash ortumble dry it.
11

Notes.
12
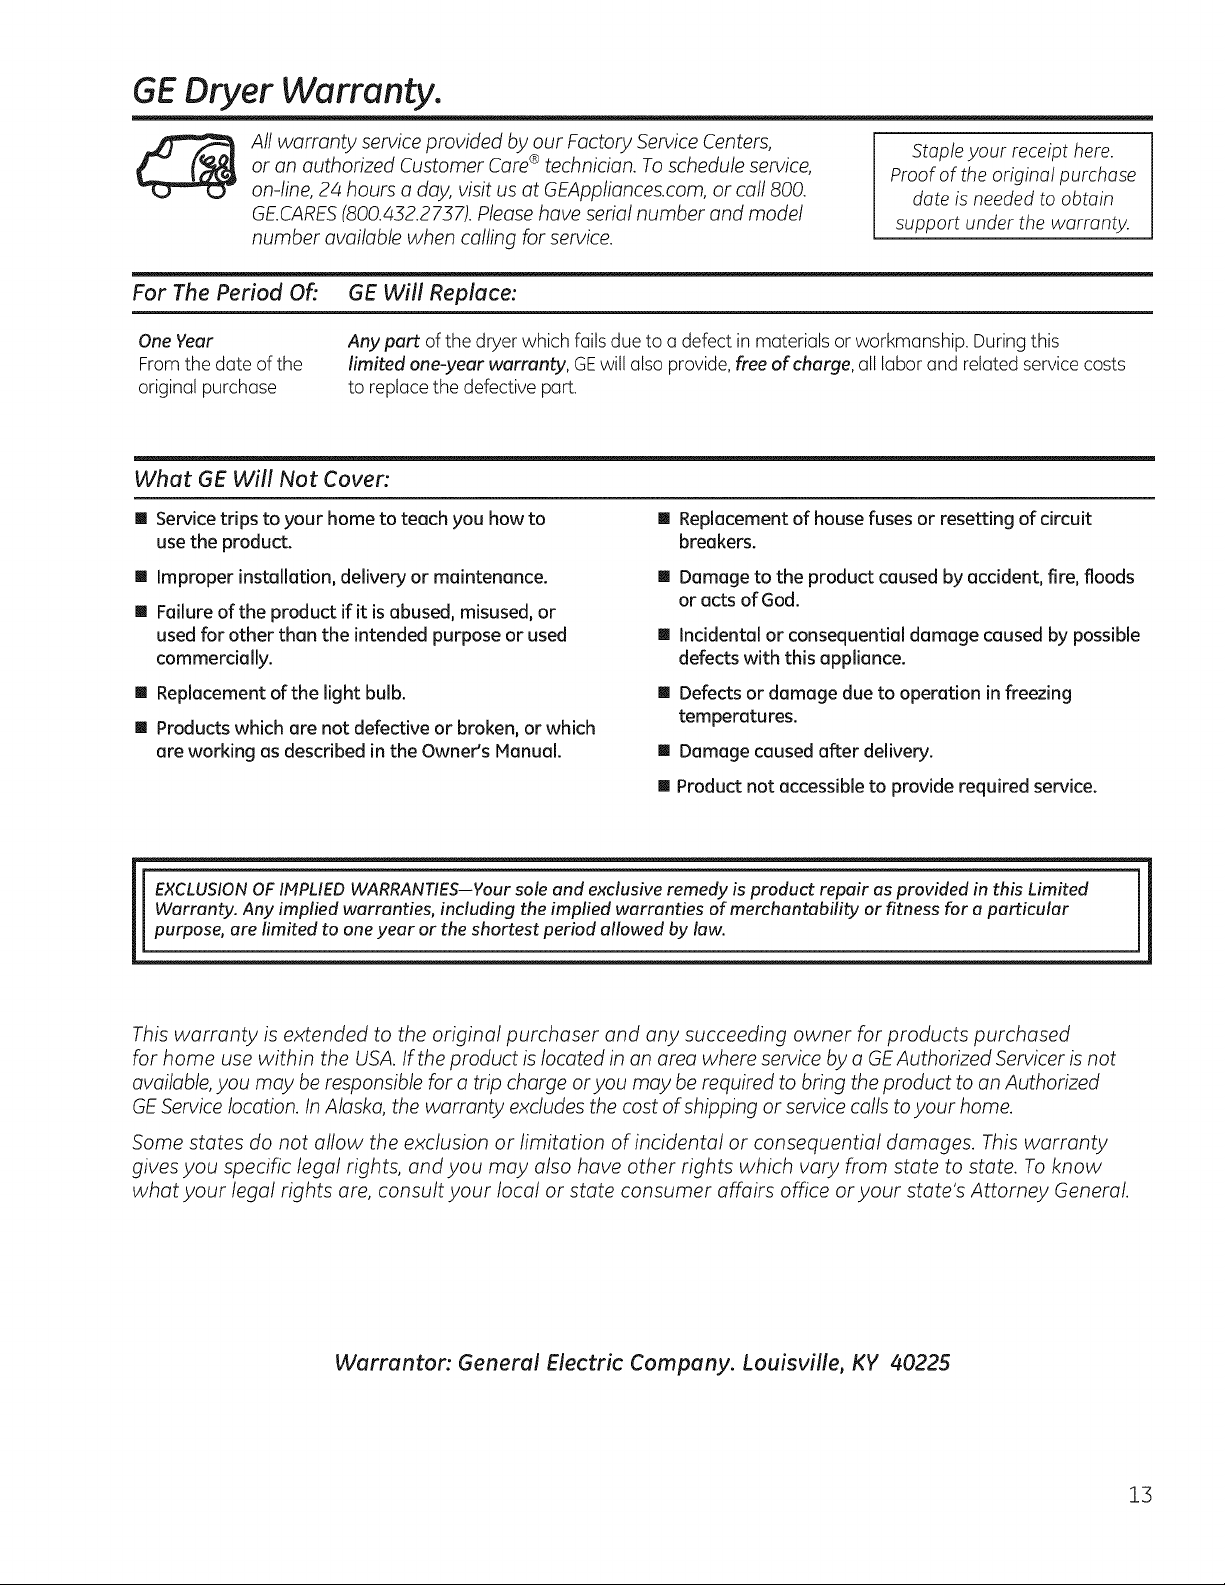
GE Dryer Warranty.
All warranty service provided by our Factory Service Centers,
or an authorized Customer Care®technician. Toschedule service,
on-line, 24 hours a day, visit us at GEAppliances.com, or call 800.
GE.CARES(800.432.2737). Please have serial number and model
number available when calling for service.
Staple your receipt here.
Proof of the original purchase
date is needed to obtain
support under the warranty.
For The Period Of: GE Will Replace:
One Year
From the date of the
original purchase
Any part of the dryer which fails due to a defect in materials or workmanship. During this
limited one:veer warranty, GEwill also provide,free of charge, all labor and related servicecosts
to replace the defective part.
What GE Will Not Cover..
[] Service trips to your home to teach you how to
use the product.
[] Improper installation, delivery or maintenance.
[] Failure of the product if it is abused, misused, or
used for other than the intended purpose or used
commerdally.
[] Replacement of the light bulb.
[] Products which are not defective or broken, or which
are working as described in the Owner's Manual.
[]
[]
Replacement of house fuses or resetting of circuit
breakers.
Damage to the product caused by accident, fire, floods
or acts of God.
[] Incidental or consequential damage caused by possible
defects with this appliance.
[] Defects or damage due to operation in freezing
temperatures.
[] Damage caused after delivery.
[] Product not accessible to provide required service.
EXCLUSION OF IMPLIED WARRANTIES--Your sole and exclusive remedy is product repair as provided in this Limited
Warranty. Any implied warranties, including the implied warranties of merchantability or fitness for a particular
purpose, are limited to one year or the shortest period allowed by law.
This warranty is extended to the original purchaser and any succeeding owner for products purchased
for home use within the USA. Ifthe product is located in an area where service by a GEAuthorized Servicer is not
available, you may be responsible for a trip charge or you may be required to bring the product to an Authorized
GE Service location. In Alaska, the warranty excludes the cost of shipping or service calls to your home.
Some states do not allow the exclusion or limitation of incidental or consequential damages. This warranty
gives you specific legal rights, and you may also have other rights which vary from state to state. To know
what your legal rights are, consult your local or state consumer affairs office or your state's Attorney General.
Warrantor'. General Electric Company. Louisville, KY 40225
13

Consumer Support.
GEAppliances Website GEAppliances.com
Have a question or need assistancewith your appliance?Try the GEAppliancesWebsite 24 hours a day,
any day of the year! Forgreater convenience and faster service,you can now download Owner's Hanuals,
order parts oreven scheduleserviceon-line.
ScheduleService
GEAppliances.com
Expert GErepair serviceisonly one step away from your door. Geton-line and schedule your service
at your convenience 24 hours any day ofthe year! Or call 800.GE.CARES(800.432.2737)during normal business
hours.
RealLifeDesignStudio GEAppliunces.com
GEsupports the Universal Design concept-products, services and environments that can be used by
people of all ages, sizes and capabilities. We recognize the need to design for a wide range of physical and
mental abilities and impairments. For details of GE's Universal Design applications, including kitchen design
ideas for people with disabilities, check out our Website today. Forthe hearing impaired, please call 800.TDD.
GEAC(800.833.4322).
ExtendedWarranties
GEAppliunces.com
Purchase a GEextended warranty and learn about special discounts that are available while your warranty
isstill ineffect. You can purchase it on-lineanytime, orcall 800.626.2224 during normal businesshours.
GEConsumer Home Serviceswill still be there after your warranty expires.
Partsand Accessories
GEAppliunces.com
Individuals qualified to servicetheir own appliances can have parts or accessoriessent directly to their homes
(VISA, MasterCard and Discovercards are accepted).Order on-line today, 24 hours every day or
by phone at 800.626.2002during normal businesshours.
Instructions contained in this manuel cover procedures to be performed by onv user. Other servicing
generully should be referred to quulified service personnel. Cuution must be exercised, since improper
servicing may cause unsafe operudon.
Contact Us
GEAppliunces.com
If you are not satisfied with the serviceyou receivefrom GE,contact uson ourWebsite with all the details
including your phone number,or write to: General Manager, Customer Relations
GEAppliances,Appliance Park
Louisville,KY40225
Register Your Appliance GEAppliances.com
Register your new oppliunce on-line--or your convenience! Timely product registration willallow for enhanced
communication and prompt service under the terms of your warranty, should the need arise.
You may also mail inthe pre-printed registration card included in the packing material.
14
0
GEAppliances.com
Instrucciones de seguridad ........ 2-4
Instrucciones de operaci6n
Ajustes de control ....................... 7
C6mo cambiar la puerta .................. 9
C6mo cargar y usar la secadora ....... 10, 11
Funciones ............................... 8
Tablero de control
de la secadora ......................... 5, 6
Ventilaci6n de la secadora .............. 11
Soluci6n a problemas
comunes ......................... t2, t]
Soporte al consumidor
Garant[a............................... 15
Soporte al consumidor .................. 16
Impreso en Mexico
Escribu los n_meros del
modelo y de serie uqu[:
No. de modelo
No. de serie
Estos nOmeros se encuentran
en una etiqueta en la parte
frontal de la secadora, detrds
de la puerta.
I11IIIIIIIIIIIIIIIIIIIIIIIEIIII
234D2238PO04 49-90531 09-14 GE
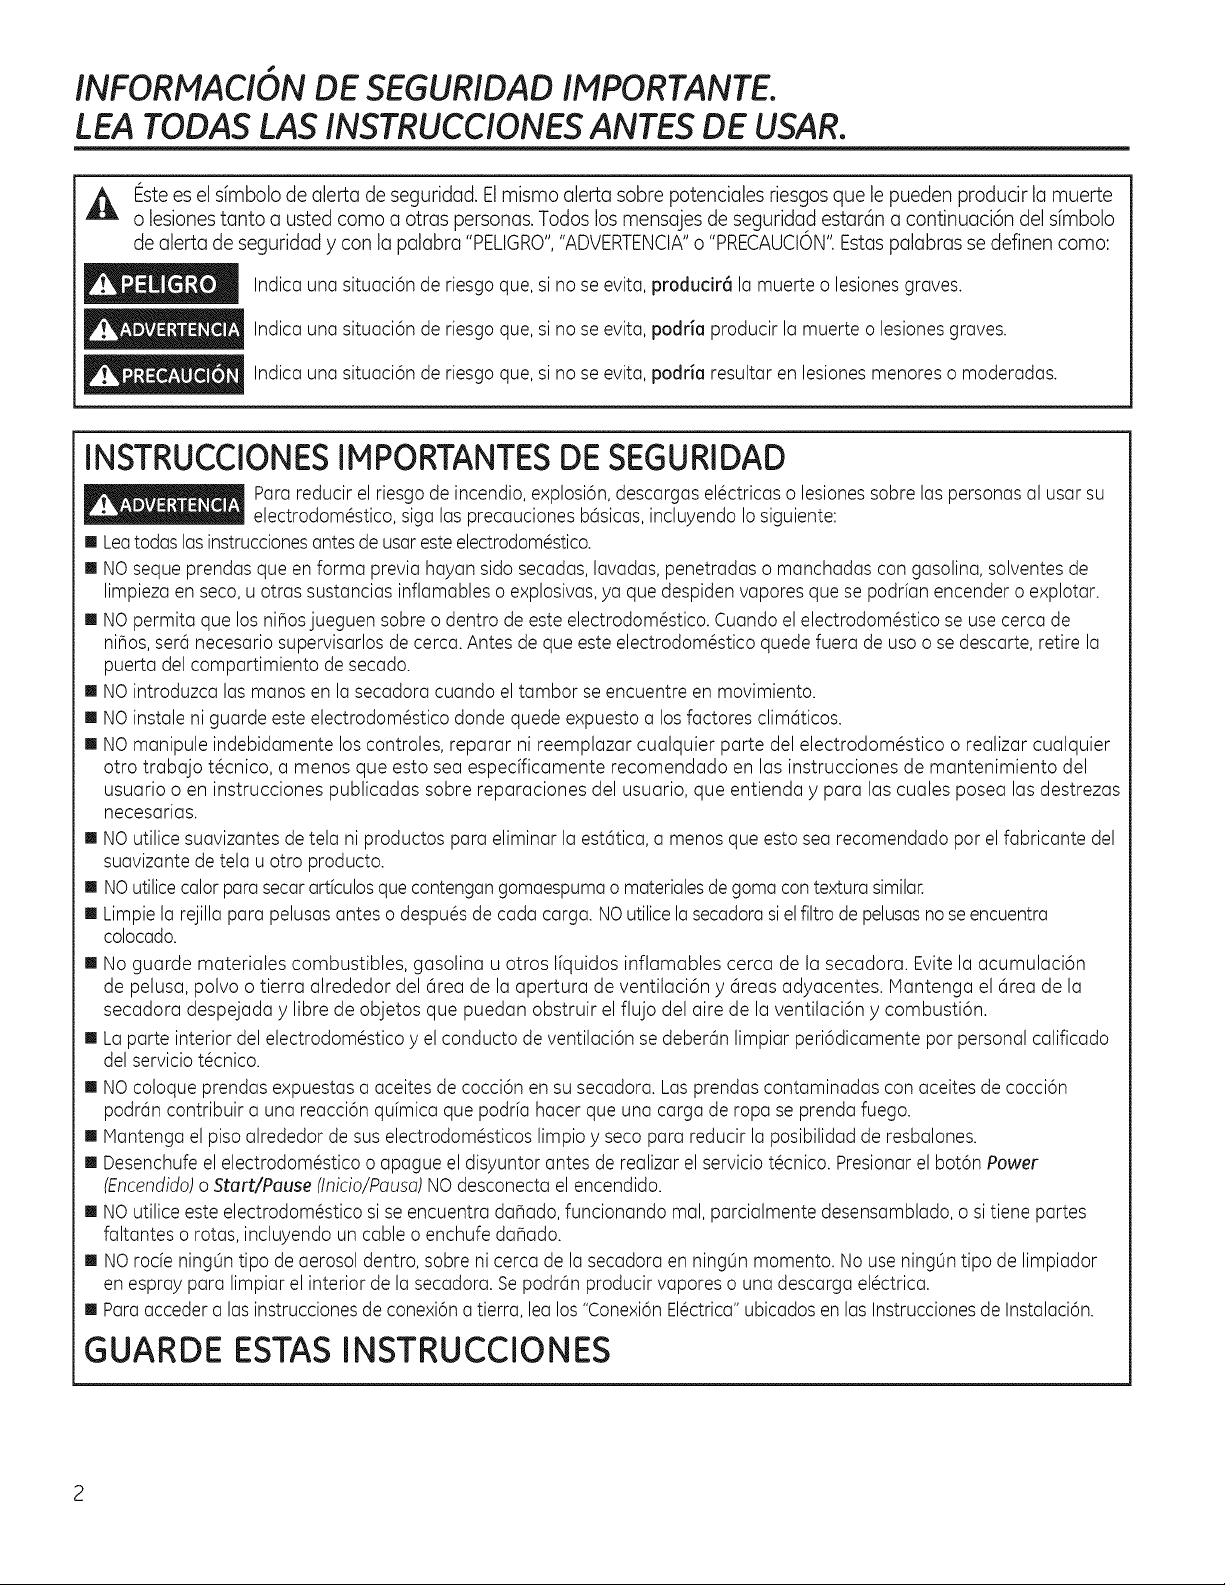
INFORMACiON DESEGURIDAD IMPORTANT&
LEATODASLASINSTRUCCIONESANTES DE USAR.
A
Estees el s[mbolo de alerta de seguridad. El mismo alerta sabre potenciales riesgos que le pueden producir la muerte
o lesiones tanto a usted coma a otras personas. Todos los mensajes de seguridad estarcin a continuaci6n del s[mbolo
de alerta de seguridad y con la palabra "PELIGRO","ADVERTENCIA"o "PRECAUCION'tEstaspalabras se definen coma:
Indica una situaci6n de riesgo que, sino seevita, producir6 la muerte o lesiones graves.
Indica una situaci6n de riesgo que, sino seevita, podria producir la muerte o lesionesgraves.
Indica una situaci6n de riesgo que, sino seevita, podria resultar en lesionesmenores omoderadas.
INSTRUCCIONESIMPORTANTESDESEGURIDAD
Para reducir el riesgode incendio, explosi6n,descargas el@ctricaso lesionessabre las personas al usar su
electrodom@stico,siga lasprecauciones b6sicas,incluyendo Iosiguiente:
[] Leatodas lasinstruccionesantesde usaresteelectrodom@stico.
[] NOseque prendas queen forma previa hayan sido secadas,lavadas, penetradas o manchadas con gasolina, solventes de
limpieza en seco,u otras sustancias inflamables o explosivas,ya que despiden vapores que se podrfan encender o explotar.
[] NOpermita que los ninosjueguen sobre o dentro de este electrodom6stico. Cuando el electrodom6stico se usecerca de
ninos,ser6 necesario supervisarlos de cerca. Antes de que este electrodom6stico quede fuera de usoo sedescarte, retire la
puerta del compartimiento de secado.
[] NOintroduzca lasmanos en la secadora cuando eltambor seencuentre en movimiento.
[] NOinstale ni guarde este electrodom@sticodonde quede expuesto a losfactores climdticos.
[] NOmanipule indebidamente los controles,reparar ni reemplazar cualquier parte del electrodom@stico o realizar cualquier
otro trabajo t@cnico,a menos que esto sea especfficamente recomendado en las instrucciones de mantenimiento del
usuario o en instrucciones publicadas sabre reparaciones del usuario, que entienda y para las cuales posea las destrezas
necesarias.
[] NOutilice suavizantes de tela ni productos para eliminar la est6tica, a menos que esto sea recomendado por el fabricante del
suavizante de tela u otro producto.
[] NOutilicecalorpara secarartfculosquecontengan gomaespumao materialesdegoma contextura similar.
[] Limpie la rejilla para pelusasantes o despu@sdecada carga. NOutilicela secadorasiel filtro de pelusasno seencuentra
colocado.
[] No guarde materiales combustibles, gasolina uotros Ifquidos inflamables cerca de la secadora. Evite la acumulaci6n
de pelusa, polvo o tierra alrededor del @reade laapertura de ventilaci6n y @reasadyacentes. IVlantenga el @reade la
secadora despejada y libre de objetos que puedan obstruir el flujo del aire de la ventilaci6n y combusti6n.
[] La parte interior del electrodom@sticoy el conducto de ventilaci6n se deber6n limpiar peri6dicamente par personal calificado
del servicio t@cnico.
[] NOcoloque prendas expuestas a aceites decocci6n en su secadora. Lasprendas contaminadas con aceites de cocci6n
podr6n contribuir a una reacci6n qufmica que podrfa hacer que una carga de ropa se prenda fuego.
[] Mantenga elpiso alrededor desus electrodom@sticoslimpioy seco para reducir la posibilidad de resbalones.
[] Desenchufe el electrodom@sticoo apague el disyuntor antes de realizar elservicio t@cnico.Presionarel bot6n Power
(Encendido)o Start/Pause (Inicio/Pausa)NOdesconecta el encendido.
[] NOutilice este electrodom@sticosi seencuentra daSado,funcionando mal,parcialmente desensamblado, ositiene partes
faltantes o rotas, incluyendo un cable oenchufe daSado.
[] NOrode ning0n tipo de aerosol dentro, sabre ni cerca de la secadoraen ning0n momenta. Nouse ning0n tipo delimpiador
en espray para limpiar el interior de la secadora. Sepodrcin producir vapores o unadescarga el@ctrica.
[] Para acceder alas instruccionesde conexi6n a tierra, lealos"Conexi6nEl@ctrica"ubicados en las Instruccionesde Instalaci6n.
GUARDE ESTAS INSTRUCCIONES
GEAppliances.com
ADVERTENCIAS ADICIONALES SABRE LASECADORA A GAS
Para suseguridad, siga los instrucciones de este manual a fin de minimizar riesgos de incendio o
explosi6n,o para evitar da_os,lesionespersonales o la muerte.
- NOguarde ni usegasolina uotros vaporesy liquidos inflamables cercade _ste ni de otros electrodom_sticos.
- QUt_DEBEHACERSIHUELEGAS:
• NOintente iluminar ningSnelectrodom_stico.
• NOtoque ningOninterruptor el_ctrico; NOusetel_fonos en su edificio.
• Hagaque seretiren losocupantes delasala, edificio o _rea.
• Deinmediato Ilamea su proveedorde gas desdeel tel_fono de un vecino.- Sigalas instruccionesdel proveedorde gas.
• Sino sepuedecomunicar con suproveedor de gas, Ilameal departamento de bomberos.
- Lainstalaci6n y las reparaciones deber_n ser realizadaspar un instalador calificado,agenciade servicios o el proveedor de gas.
Advertencias de la Proposici6n 65 del Estado de California:
La Leysabre Agua Potable Inocua y Tratamiento de ResiduosT6xicos de California (California Safe Drinking Water and
Toxic Enforcement Act)solicita al Gobernador de California que publique una lista de sustancias que el estado reconoce
que producen c6ncer, defectos de nacimiento u otros dahos reproductivos y solicita alas empresas que adviertan sabre la
posible exposici6n a tales sustancias.
Este producto contiene uno o mc_squ[micos que el Estado de California entiende que producen cancer,
defectos en el nacimiento u otros dahos reproductivos.
Los electrodom6sticos a gas puedan causar una exposici6n de bajo nivel a algunas de estas sustancias, incluyendo
benceno, mon6xido de carbono, formaldehido y hall[n, ocasionado principalmente par la combusti6n incompleta de
gas natural o combustibles de LRLa exposici6n a estas sustancias puede set minimizada ventilando correctamente la
secadora hacia el exterior.
GUARDE ESTASINSTRUCCIONES
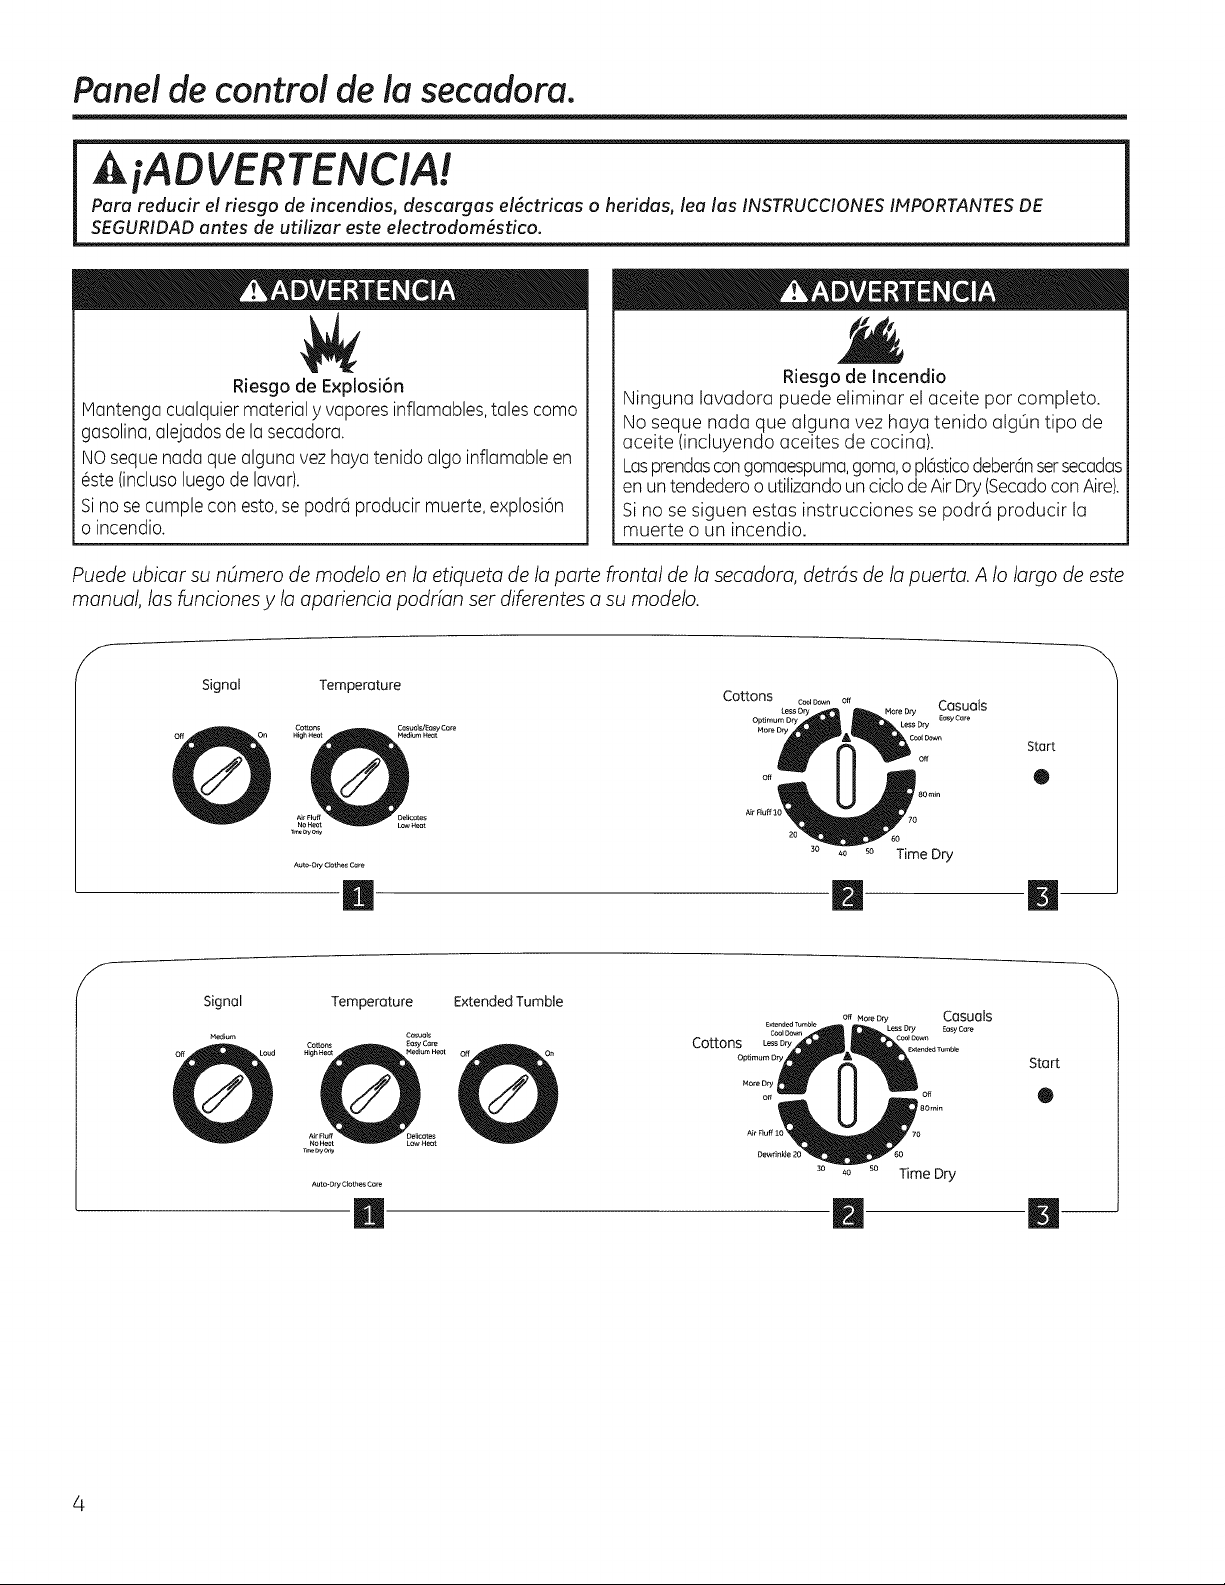
Panel de control de la secadora.
AiADVERTENCIA!
Para reducir el riesgo de incendios, descargas el_ctricas o heridas, lea los INSTRUCCIONESItfPORTANTESDE
SEGURIDADantes de utilizar este electrodom_stico.
Riesgo de Explosi6n
Mantenga cualquiermaterial yvapores inflamables,tales coma
gasolina, alejadosde lasecadora.
NOsequenada que alguna vez hayatenido alga inflamable en
6ste (inclusoluegode lavar).
Sino secumple con esto,sepodr6 producir muerte, explosi6n
o incendio.
Riesgo de Incendio
Ninguna lavadora puede eliminar elaceite par completo.
No seque nada que alguna vez haya tenido algOn tipo de
aceite (incluyendo aceites de cocina).
Lasprendascongomaespuma,goma,o pl6sticodeber6nsersecadas
en untendederoo utilizandoun ciclode AirDry(SecadoconAire).
Si no sesiguen estas instrucciones se podra producir la
muerte o un incendio.
Puede ubicar su nOmero de modelo en la etiqueta de la porte frontal de la secadora, detrds de la puerto. A Io largo de este
manual, los funciones y la apariencia podHan ser diferentes a su modelo.
Signal
Temperature Cottons c_,_,_ o. Casuals
Casals/Easy ca_ OptJmum Dry Easy Care
MediumH_t
Start
0
Time Dry
Aut_Orycbth_ Care
H m m--
/
Signal Temperature Extended Tumble
Off More D_ Casuals
Less Dry Eosy Core
Medium
Cottons LessD_
Start
0
30 ® so Time Dry
Auto4)ryOothesCare
M m m--
GEAppliances.com
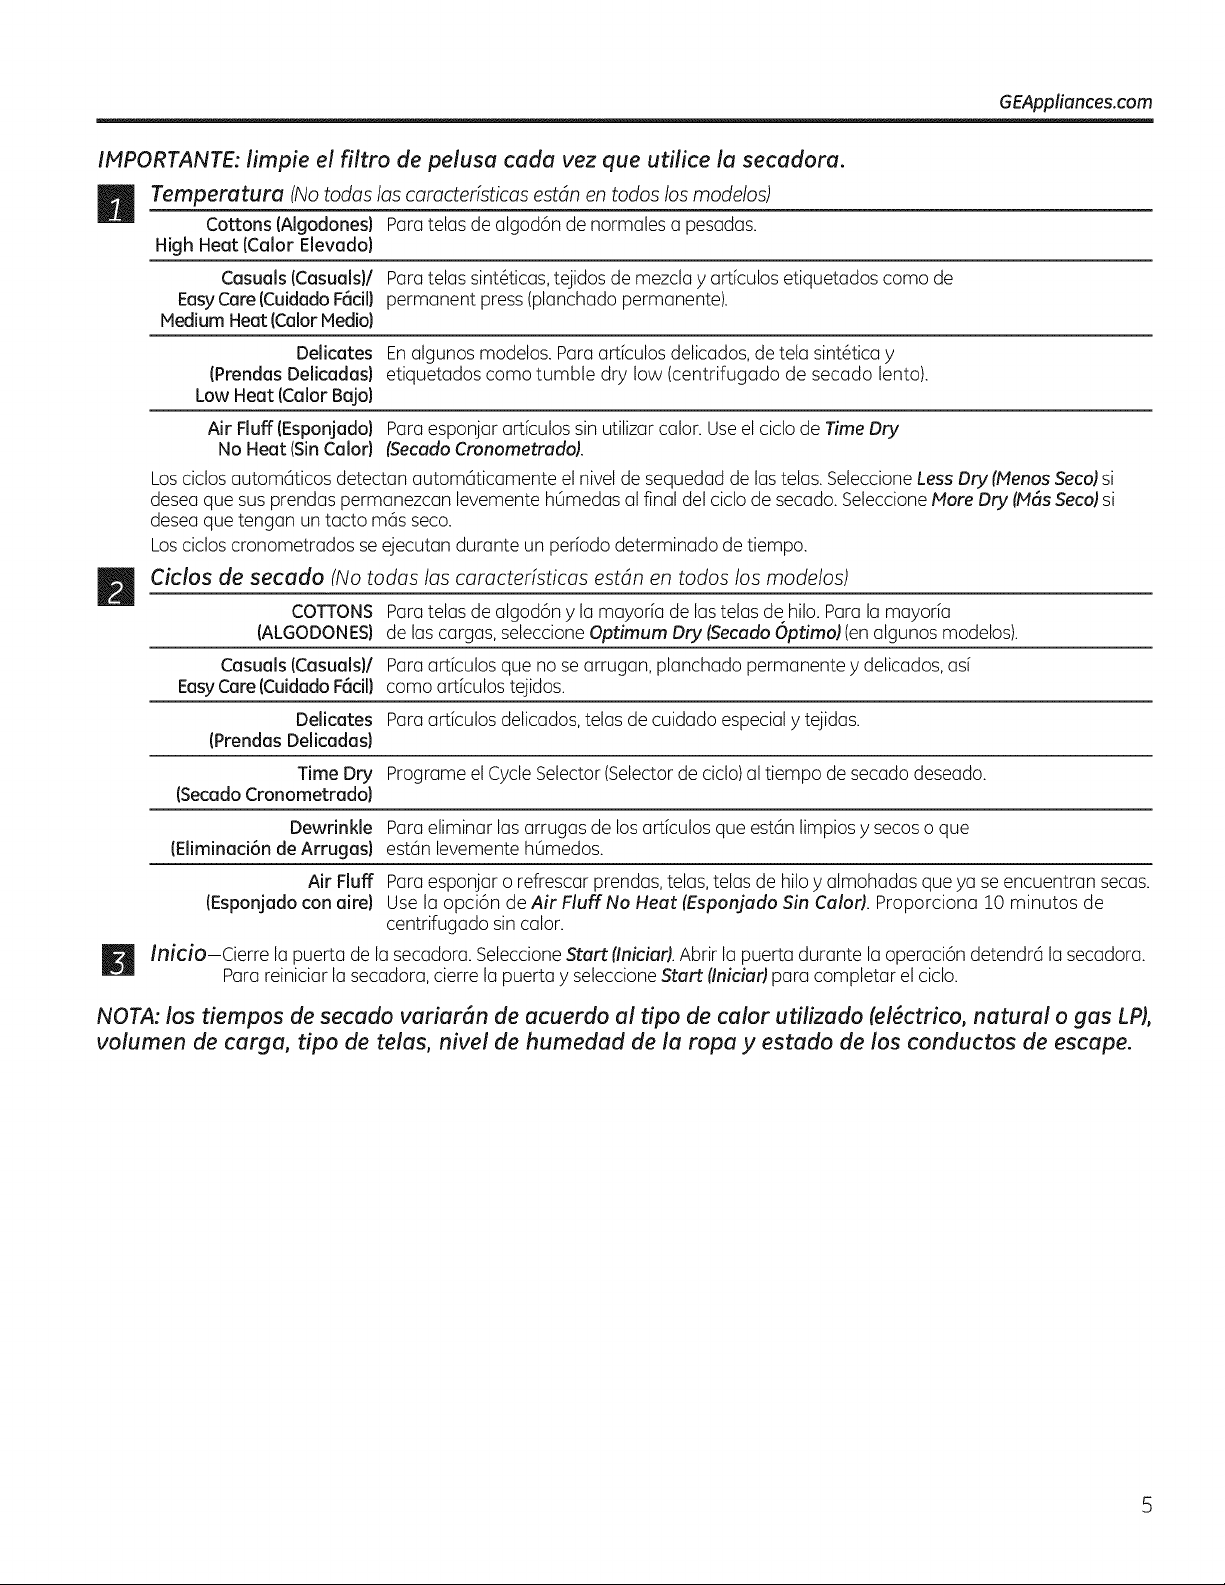
If4PORTANTE: limpie el filtro de pelusa coda vez que utilice la secadora.
Temperatura (No todas las caracteristicas estdn en todos los modelos)
Cottons (AIgodonesl Para telas de algod6n de normales a pesadas.
High Heat (Color Elevado}
Casuals (Casuals}/ Paratelas sint@icas,tejidos de mezcla y art[culos etiquetados coma de
EasyCare(CuidadoF6cil} permanent press (planchado permanente).
Medium Heat (Color Media}
B
Delicates Enalgunos modelos.Paraart[culosdelicados,de tela sint@icay
(PrendasDelicodos} etiquetados coma tumble dry low (centrifugado de secado lento).
Low Heat (Color Bojo)
Air Fluff (Esponjado} Para esponjar art[culos sin utilizar color. Useel ciclo de Time Dry
No Heat (SinColor} (SecudoCronometrudo).
Losciclosautom@icos detectan autom@icamente el nivel de sequedad de lastelas.SeleccioneLessDry (tffenos Seco)si
deseaque sus prendas permanezcan levemente h0medas al final del ciclo de secado.SeleccioneMore Dry (tiffs Seco)si
deseaque tengan un tacto mc_sseco.
Loscicloscronometrados se ejecutan durante un per[ado determinado de tiempo.
Ciclos de secado (No todas las caracterfsticas estdn en todos los modelos)
COTTONS Paratelas de algod6n y la mayor[a de lastelas de hilo.Para la mayor[a
(ALGOOONES}de las cargas,seleccioneOptimum Dry tSecudo6primal (enalgunos modelos).
Casuals (Casuals}/ Para art[culos que no searrugan, planchado permanente y delicados,as[
EasyCare(CuidadoF6cill coma art[culostejidos.
Oelicates Para art[culos delicados,telasde cuidado especial y tejidas.
(Prendas Oelicadas)
Time Dry Programe el CycleSelector(Selectorde ciclo)al tiempo desecado deseado.
(SecadoCronometrado}
Dewrinkle Para eliminar los arrugas de losart[culos que estc_nlimpios y secoso que
(Eliminaci6n de Arrugas} estc_nlevemente h0medos.
m
Air Fluff Para esponjar o refrescar prendas, telas,telasde hiloy almohadas queya seencuentran secas.
(Esponjadocon airel Use la opci6n de Air FluffNo Heat tEsponjudo Sin Culod. Proporciona !0 minutos de
centrifugado sin calor.
Inicio-Cierre la puerta de la secadora. SeleccioneStart tlniciud. Abrir lapuerta durante la operaci6n detendr6 la secadora.
Para reiniciar la secadora,cierre la puerta y seleccioneStart tlniciud para completar elciclo.
NOTA: los tiempos de secado variar(_n de acuerdo al tipo de color utilizado (el_ctrico, natural o gas LP),
volumen de cargo, tipo de telas, nivel de humedad de la ropa y estado de los conductos de escape.

Informaci6n sabre los funciones.
Extended Tumble
Off On
Opci6n de Secado prolongado (enalgunos modelos)
Utiliceesta opci6n para minimizar
lasarrugas en la ropa. Provee!5 minutos
aproximadamente decentrifugado sincalor
despu6s de que la ropa est6 seca.
una serialsonora al final del plaza de secado y
varias veces durante el ciclo Extended Tumble
(secado prolongadoJ. Esta le recordarc_ que es
momenta de retirarlas prendas.
Estuopci6n puede utilizarseOnicamentecon
losciclos Cottons (AlgodonesJe Casuals/Easy
Care (Cuidado F6cill.
Siest(_utilizando la perillacycleSignal (Se--AI
de CicloJy selecciona la opci6n Extended
Tumble (secudoprolongadoJ, seescuchar6
Sila opci6n Extended Tumble (secado
prolongadol no est(_encendida, la secadora
sedetendr6 cuando el cron6metro Ileguea la
marca Extended Tumble (secudo prolongudoJ
en el dial de ciclo.
off
Signal
Medium
Loud
Opci6n de Serial de ciclo (an algunos modelos)
Estaserial sonarc_justo antes de la finalizaci6n
del ciclo para recordarle que retire lasprendas.
Enalgunos modelos,nose puede regularel
nivel de serialsonora.
Si seleccion6 la opci6n Extended Tumble
(secado prolongado}, sonar6 laserial
sonora al finalizar el tiempo de secado
y sonar6 varias veces durante el ciclo Extended
Tumble (secudoprolongado). Estole recordar6
que esmomenta de retirar lasprendas.
NOTA:
[] Retire las prendas oportunamente al
momenta de la serial sonora. Coloque las
prendas en colgadores de modo que no se
produzcan arrugas.
[]
Utilice cycle Signal (Serial de ciclo)
especialmente cuando seque telas coma
tejidos de punto de poli_ster y prendas de
planchado permanente. Estus talus deben
retirarse para no se produzcan arrugas.
Serial autom6tica de ciclo (an algunos modelos)
AIfinalizar cada ciclo,se disponede
aproximadamente 15 min.de centrifugado sin
calor despu6s de que la colada est6 seca.
Seemitir(_una serial recordatoria de manera
peri6dica durante este lapsopara recordarle
que retire lacolada.
Bombilla del tambor giratorio (enalgunos modelos)
Antes de reemplazar la bombilla del tambor
giratorio, asegOresede desconectar la
secadora deltomacorriente o de desconectar
la secadora del panelde distribuci6n de su
casa removiendo elfusible ointerrumpiendo el
circuito el6ctrico. Heta la mano par encima de
la apertura de la secadora desdeel interior del
tambor. Quitela bombilla y reempl6cela con
una delmismo tamario.
Rejilla de secado (en algunos modelos)
La rejilla de secado se puede usar para
secar art[culos delicados tales como su@eres
lavables.
Enganche la rejilla sobre elfiltro de la pelusa de
forma tal que larejilla seextienda en el tambor
giratorio de la secadora.
NOTA:
[] La rejilla de la secadora solamente se debe
usar con los ciclos Secado Con Tiempo.
[] No use esta rejilla cuando est_ secando
otto ropa en la secadora.
Tambor de acero inoxidable (enalgunos modelos)
Eltambor de secado est6 fabricado de
acero inoxidable para proveer la m6s alta
confiabilidad disponible enuna secadora
GE.Aunquese abolle o raye eltambor de la
secadora durante eluso normal,
no seoxidar6 ni corroer(_.Estasimperfecciones
de la superficie no afectarc_nelfuncionamiento
o durabilidad deltambor.
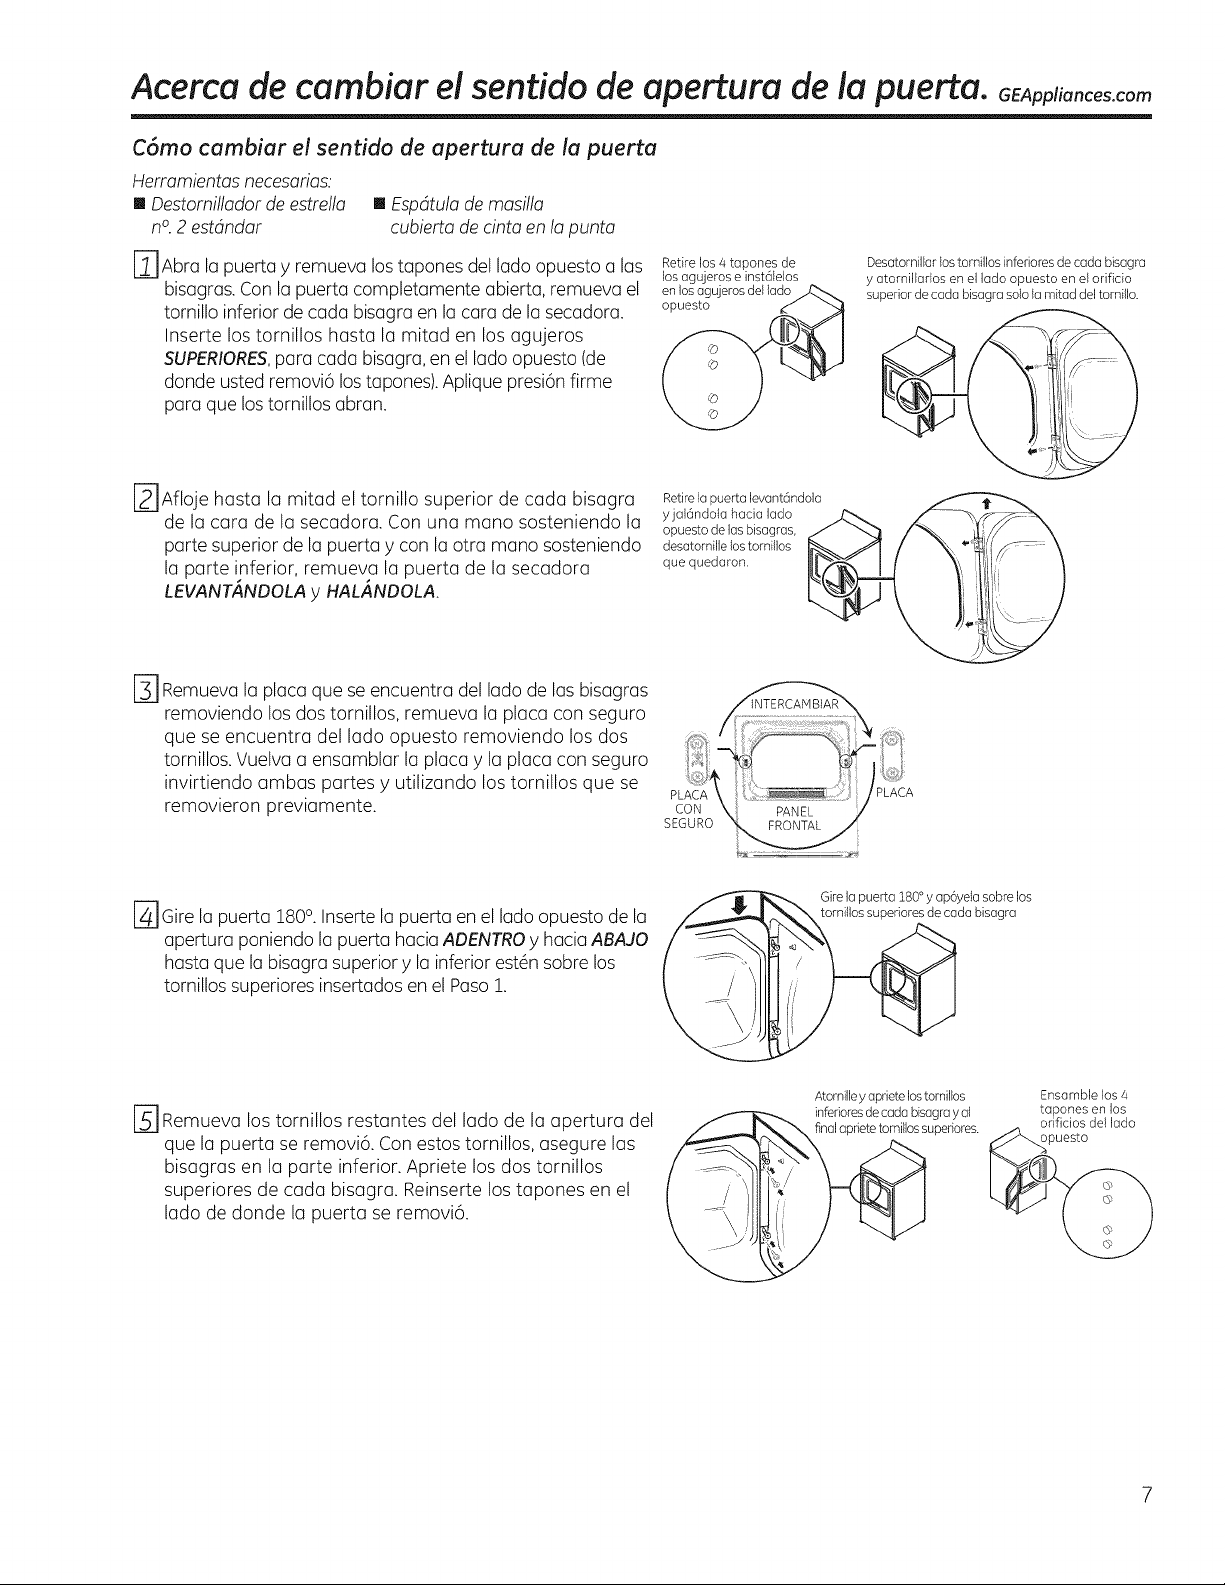
Acerca de cambiar el sentido de apertura de la puerta. GEAppliances.com
C6mo cambiar el sentido de apertura de la puerta
Herramientas necesorias:
[] Destomillador de estrella [] Espdtula de masilla
n°.2 estdndar cubierta de cinta en la punta
rl1Abra la puerta y remueva lostapones del lado opuesto a las
bisagras.Conla puerta completamente abierta, remueva el
tornillo inferior de cada bisagra en la cara de la secadora.
Inserte lostornillos hasta la mitad en los agujeros
SUPERIORES,para cada bisagra,en el lado opuesto (de
donde ustedremovi6 lostapones).Aplique presi6nfirme
para quelostornillos abran.
r21Afloje hasta la mitad el tornillo superior de cada bisagra
de la cara de la secadora. Con una mano sosteniendo la
parte superior de lapuerta y con la otra mano sosteniendo
la parte inferior, remueva la puerta de la secadora
LEVANT,_NDOLAy HAL,_NDOLA.
[-_ Remueva la placa que se encuentra dellado de lasbisagras
removiendo los dos tornillos, remueva la placa con seguro
que se encuentra del lado opuesto removiendo los dos
tornillos. Vuelva a ensamblar la placa y la placa con seguro
invirtiendo ambas partes y utilizando los tornillos que se
removieron previamente.
Retire los 4 tapones de
los agujeros e instc_lelos
enlosagujerosdellado
4
Desatornillar los tornillos inferiores de cada bisagra
y atornillarlosenel ladoopuestoenelorificio
superiordecadabisagrasololamitaddeltornillo.
t
Retirela puerta levantdndola ,,,--_T_
opuestodelasbisagras,
desatomille los tornillos _"
que quedaron.
r_ Girela puerta 180°. Insertelapuerta enel lado opuesto de la
apertura poniendo lapuerta hacia ADENTROy hacia ABA/O
hasta que labisagra superior}, la inferior est6n sobre los
tornillos superiores insertados en el Paso!.
r_ Remueva los tornillos restantes del lado de la apertura del
que la puerta se removi6. Con estos tornillos, asegure las
bisagras en la parte inferior. Apriete los dos tornillos
superiores de cada bisagra. Reinserte los tapones en el
lado de donde la puerta se removi6.
Girela puerta 180°y ap6yela sobre los
___da bisagra
/)
Atornilleyapriete lostornillos Ensamble los 4
inferioresdecada bisagray al tapones en los
C6mo cargar y usar la secadora.
Siempresiga losinstruccionesdel fabricante de la ropa cuando lave.
Ideaspara la clasificaci6ny carga de la ropa
Como regla general,si la ropa esclasificada
apropiadamente para la lavadora, estar6 clasificada
apropiadamente para la secadora.
Noagregue toallitas suavizantes una vez la ropa se
haya calentado. Estopodria causar que la ropa se
manche. Lastoallitas suavizantesacondicionadoras
Bounce®sehan aprobado para usarse con todas las
secadoras GEde acuerdo con lasinstrucciones del
fabricante.
No sobrecargue. Estodesperdicia energia y causa
arrugas.
Noseque los siguientes articulas: articulos de fibra
de vidrio, prendas de lana que nosean lavables,
articulos con recubrimientos de goma, plSsticos,
articulos con bordes plasticos o rellenosde espuma.
Cuidadoy limpiezadela secadora
El exterior'.Pc_seleun trapo y elimine el polvo
o cualquier derrame de productos de lavanderia con
un trapo h6medo. Losproductos de tratamiento para
quitar mugre y manchas podrian dahar el tablero
de control delasecadora y afectar suapariencia.
Aplique estos productos a cierta distancia de la
secadora. Luego lastelas podr6n lavarsey secarse
normalmente. LosdaBoscausados a la secadora por
estos productos no est@ncubiertos bajo sugarantia.
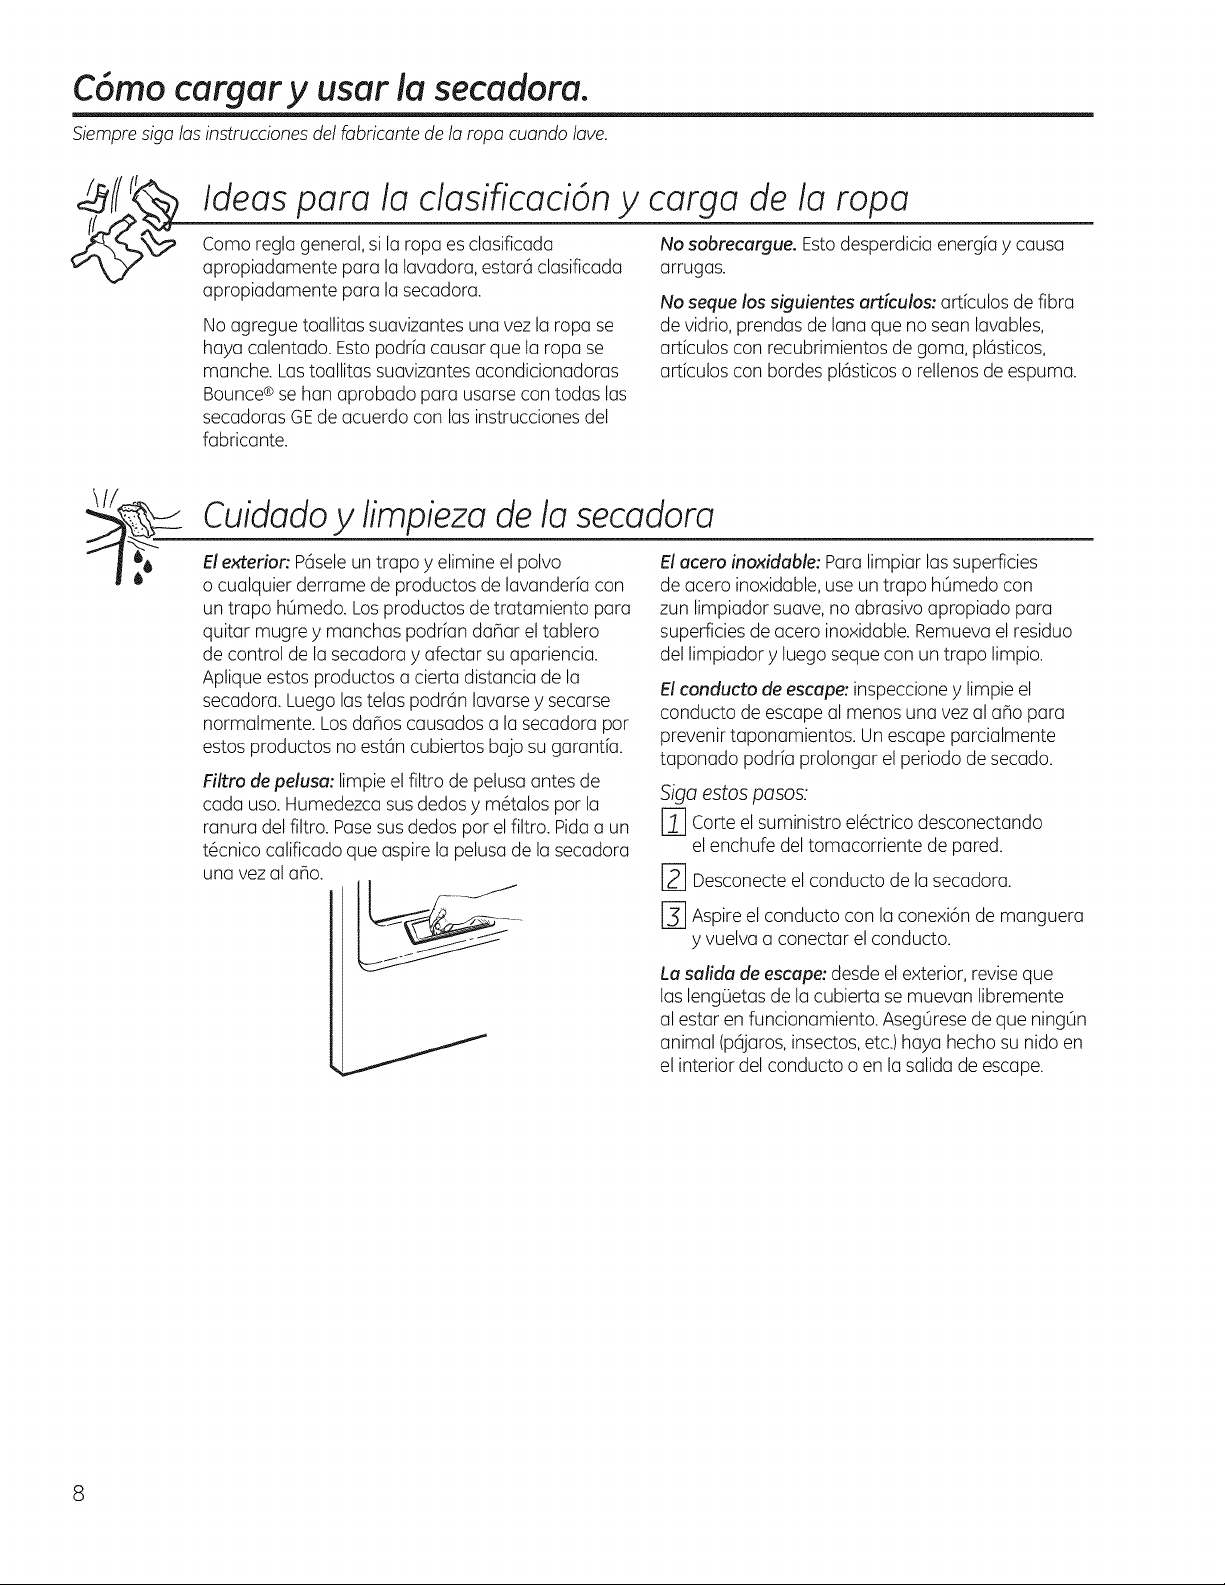
Filtro de pelusa: limpie elfiltro depelusa antesde
cada uso. Humedezca susdedos y m6talos por la
ranura delfiltro. Pasesus dedos por el filtro. Pidaa un
t6cnico calificado que aspirela pelusade lasecadora
una vezal aho.
J
Elacera inaxidable: Para limpiar las superficies
de acero inoxidable, use un trapo hL_medocon
zun limpiador suave,no abrasivo apropiado para
superficiesde acero inoxidable. Remuevaelresiduo
del limpiador y luego sequecon un trapo limpio.
Elcanducta de escape:inspeccioney limpie el
conducto de escape al menos una vez al aho para
prevenirtaponamientos. Unescape parcialmente
taponado podria prolongar elperiodo de secado.
Siga estos pasos:
rl1 corte elsuministro el6ctrico desconectando
elenchufe deltomacorriente de pared.
r2] Desconecteel conducto de lasecadora.
r31 Aspireel conducto con la conexi6n de manguera
y vuelva aconectar el conducto.
La salida de escape:desde elexterior, reviseque
lasleng(Jetasde la cubierta semuevan libremente
al estar en funcionamiento. AsegOresedeque ningOn
animal (p(_jaros,insectos,etc.)haya hecho sunido en
el interior del conducto o en la salida de escape.
GEAppliances.com
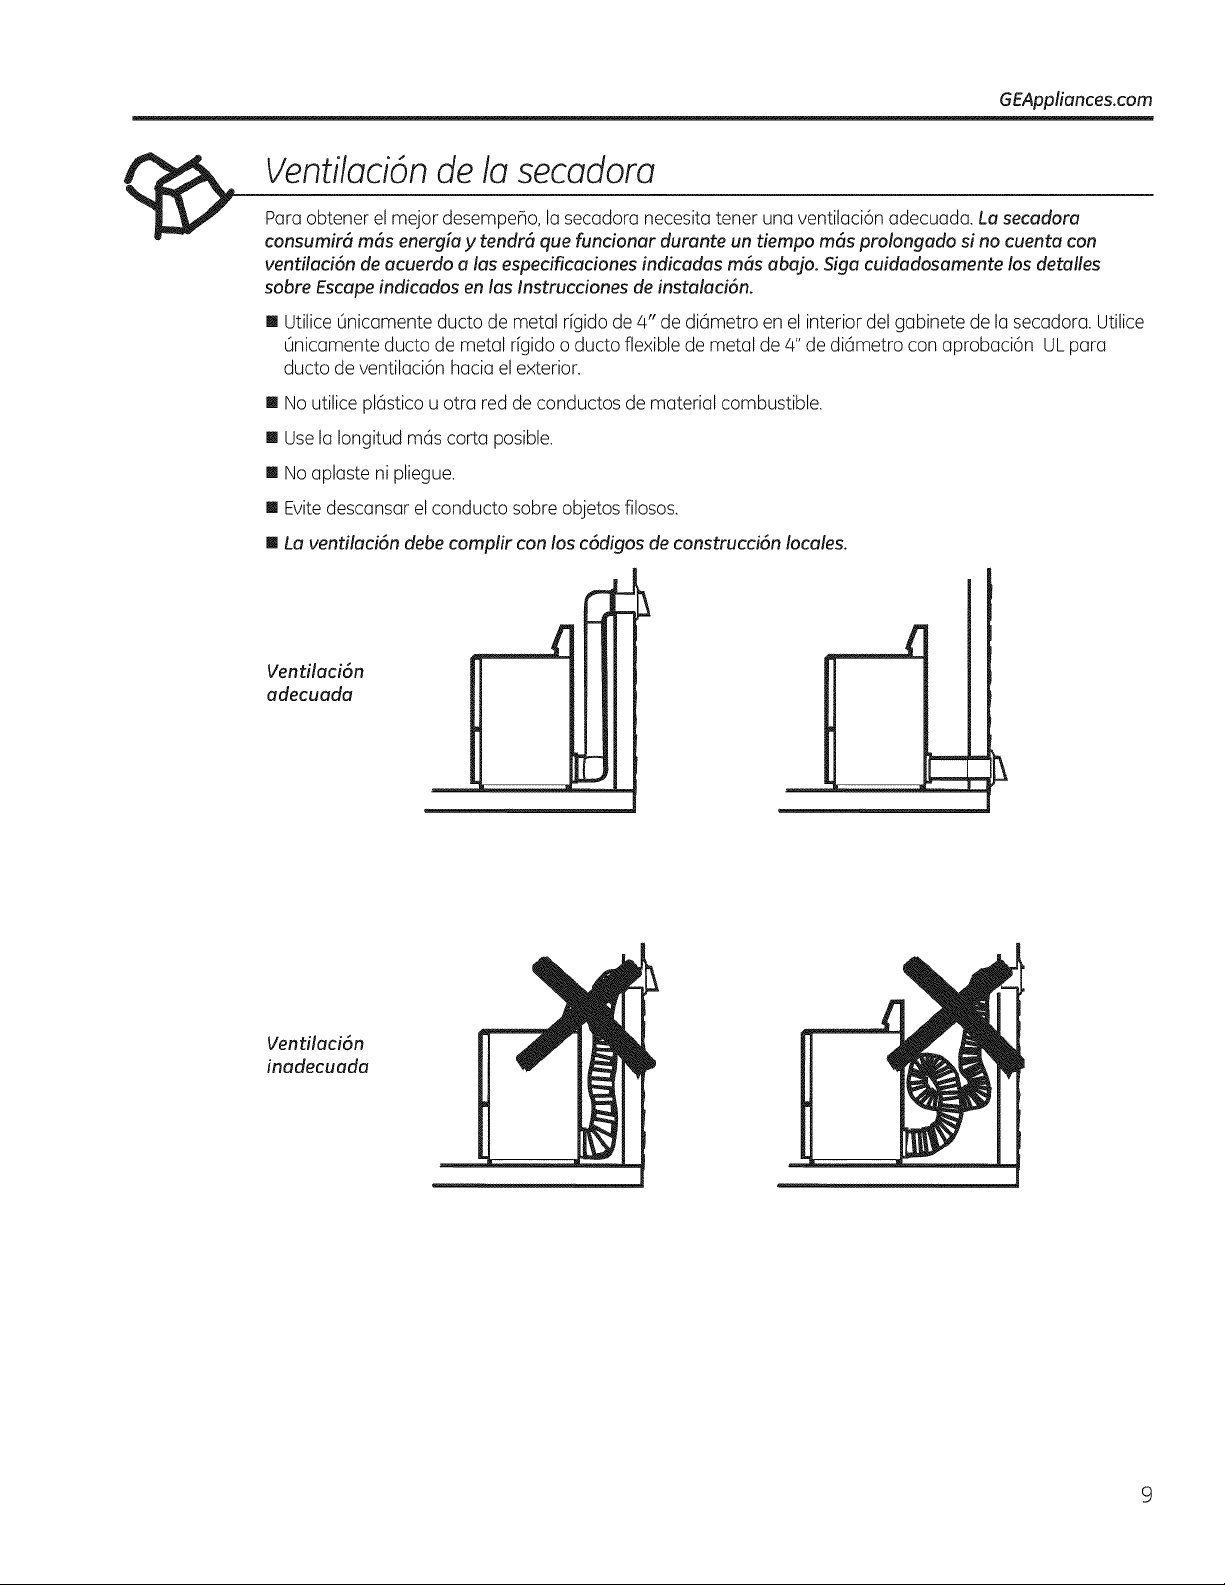
Ventilaci6ndelasecadora
Para obtener el mejor desempe_o, la secadora necesitatener una ventilaci6n adecuada. Lu secudora
consumir_ m_s energia y tendr6 que funcionar durante un tiempo m_s prolongado si no cuenta con
ventilaci6n de acuerdo alas especificaciones indicadas rn_s abajo. Siga cuidadosamente los detalles
sabre Escape indicados en las Instrucciones de instalaci6n.
[] UtiliceOnicamenteducto de metal r[gido de 4" de di@metroen el interior del gabinete de la secadora. Utilice
Ùnicamente ducto de metal rfgidoo ducto flexible de metal de 4"de diametro con aprobaci6n ULpara
ducto deventilaci6n hacia el exterior.
[] No utiliceplc_sticou otra red de conductos de material combustible.
[] Usela Iongitud m@scorta posible.
[] Noaplaste ni pliegue.
[] Evitedescansar el conducto sobre objetos filosos.
[] La ventilaci6n debe complir con los c6digos de construcci6n locales.
Ventilaci6n
adecuada
m
Ventilaci6n
inadecuada
|
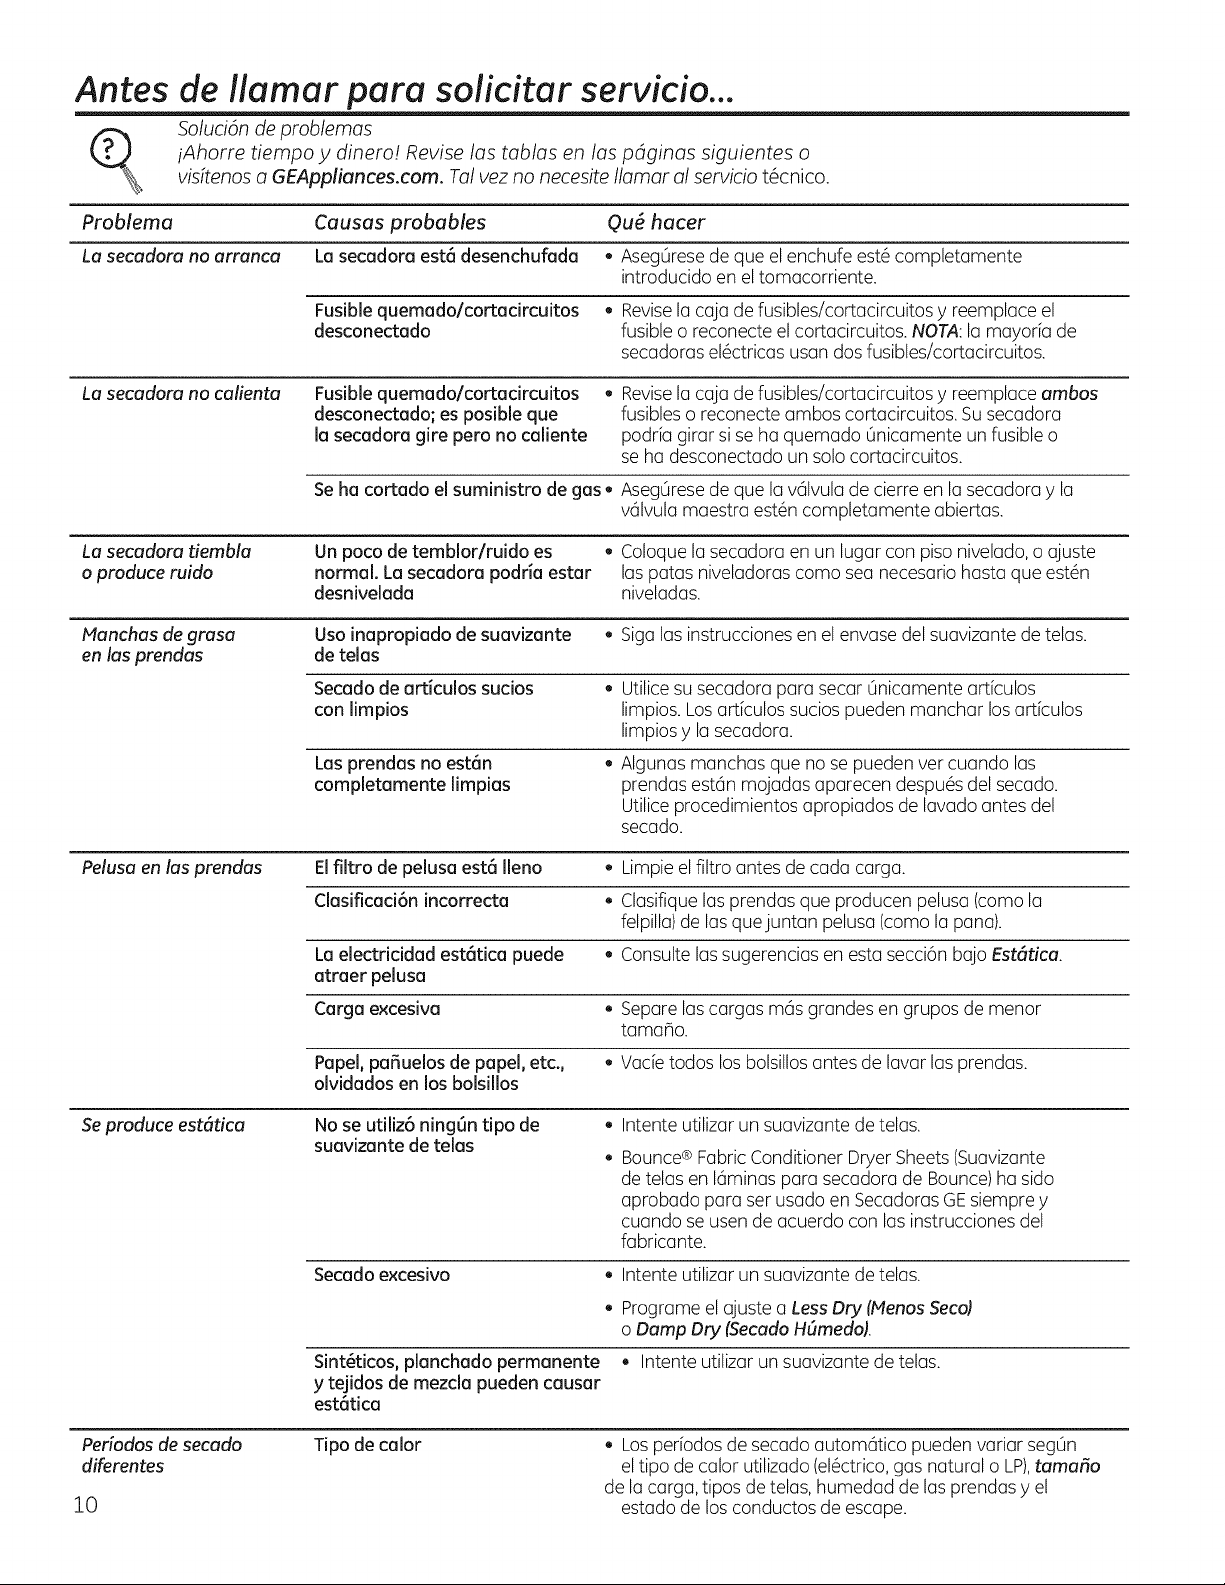
Antes de llamar para solicitar servicio...
_, Soluci6n de problemas
iAhorre tiempo y dinero! Revise las tablas en las pdginas siguientes o
visitenos a GEAppliances.com. Tal vez no necesite Ilamar al servicio t6cnico.
Problema Causas probables (2u_ hacer
La secadora no arranca La secadora est6 desenchufada . Aseg@esede que el enchufe est6 completamente
introducido en el tomacorriente.
Fusible quemado/cortacircuitos . Reviselacaja de fusibles/cortacircuitos y reemplace el
desconectado fusible o reconecte el cortacircuitos. NOTA:la mayor[a de
secadoras el6ctricas usan dosfusibles/cortacircuitos.
La secadora no calienta Fusible quemado/cortacircuitos . Revisela caja de fusibles/cortacircuitos y reemplace ambos
desconectado; esposible que fusibleso reconecte ambos cortacircuitos. Susecadora
la secadora gire pero no caliente podr[a girar sise ha quemado 0nicamente un fusible o
se ha desconectado un solocortacircuitos.
Seha cortado el suministro de gas. Aseg0resede que lavc_lvulade cierre en lasecadora y la
valvula maestra est6n completamente abiertas.
La secadora tiembla Un poco de temblor/ruido es . Coloquelasecadora en un lugar con pisonivelado,o ajuste
o produce ruido normal. La secadora podda estar las patas niveladorascoma sea necesariohasta queest6n
desnivelada niveladas.
Manchas de grasa Usa inapropiado de suavizante . Siga lasinstrucciones en el envase del suavizante de telas.
en las prendas de telas
Secadode articulos sucios . Utilicesu secadora para secar Onicamenteart[culos
con limpios limpios. Losartfculos sucios pueden manchar losartfculos
limpios y la secadora.
Las prendas no est6n , Algunas manchas que no se pueden ver cuando las
completamente limpias prendas estan mojadas aparecen despu6sdel secado.
Utiliceprocedimientos apropiados de lavado antes del
secado.
Pelusaen lasprendas Elfiltro de pelusa est6 Ileno • Limpieelfiltro antes decada carga.
Clasificaci6n incorrecta . Clasifiquelasprendas que producen pelusa(coma la
felpilla)de lasquejuntan pelusa(coma la pana).
La electricidad est6tica puede . Consultelassugerencias en esta secci6n bajo Est6tica.
atraer pelusa
Carga excesiva . Separe lascargas mas grandes en grupos de menor
tamaho.
Papel,paBuelos de papel, etc., . Vacietodos losbolsillosantes de lavar lasprendas.
olvidados en los bolsillos
Seproduce est6tica No se utiliz6 ning0n tipo de . Intente utilizar un suavizante de telas,
suavizante de telas
. Bounce®Fabric Conditioner DryerSheets(Suavizante
de telas en 16minaspara secadora de Bounce)ha sido
aprobado para serusado en SecadorasGEsiemprey
cuando seusen de acuerdo con las instruccionesdel
fabricante.
Secado excesivo . Intente utilizar un suavizante de telas.
Sint@ticos,planchado permanente
y tejidos demezcla pueden causar
est6tica
Programe el ajuste a Less Dry (Menos Seco)
o Damp Dry (Secado H(lmedo).
. Intente utilizar unsuavizante de telas.
Pedodos de secado
diferentes
10
TOo de calor . Losper[odos de secado autom@ico pueden variar segOn
el tipo de calor utilizado (el6ctrico,gas natural o LP),tamaflo
de la carga, tipos de telas, humedad de las prendasy el
estado delos conductos deescape.
GEAppliances.com
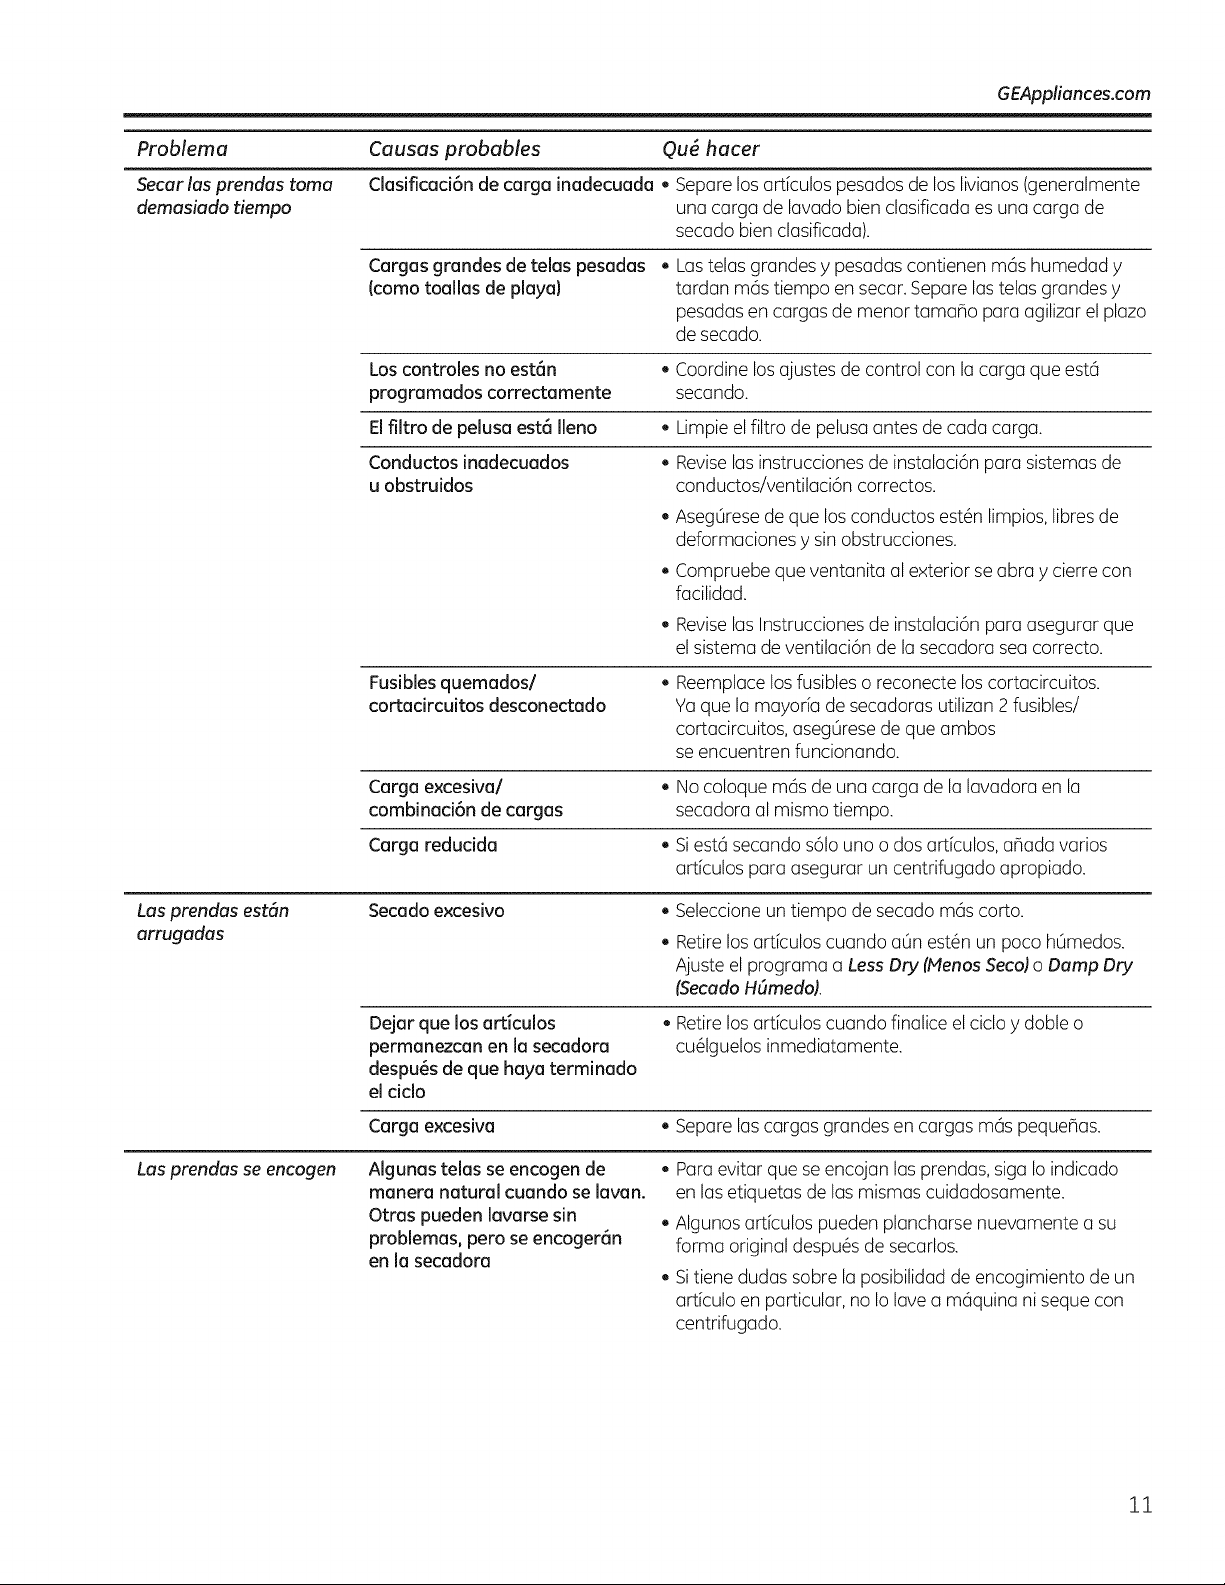
Problema Causas probables Qu_ hacer
Secarlas prendas tama Clasificad6n de carga inadecuada. Separe losarticulos pesados de los livianos(generalmente
demasiada tiempa una carga de lavado bien dasificada esuna carga de
secado biendasificada).
Cargas grandes de telas pesadas . Lastelas grandesy pesadas contienen ross humedad y
(como toallas de playa) tardan ross tiempo en secar.Separe lastelas grandes y
pesadasen cargas de menor tamaho para agilizar el plazo
de secado.
Loscontroles no est6n • Coordine losajustes de control con la carga que est5
programados correctamente secando.
Elfiltro de pelusa est6 Ileno • Limpieel filtro de pelusaantes de cada carga.
Conductos inadecuados . Reviselasinstrucciones de instalaci6n para sistemas de
u obstruidos conductos/ventilaci6n correctos.
AsegQresede que losconcluctosest6n limpios, libresde
deformaciones y sinobstrucciones.
Compruebe queventanita al exteriorse abra y cierrecon
facilidad.
. ReviselasInstrucciones de instalaci6n para asegurar que
el sistema de ventilaci6n de la secadora sea correcto.
Fusiblesquemados/
cortacircuitos desconectado
Reemplacelosfusibleso reconecte loscortacircuitos.
Ya que la mayor[a de secadoras utilizan 2 fusibles/
cortacircuitos, aseg@esede que ambos
se encuentren funcionando.
Carga excesiva/ . Nocoloque m6s de unacarga de lalavadora en la
combinad6n de cargas secadora al mismo tiempo.
Carga redudda . Siestc_secandos61ouno o dos articulos, ahada varios
articulos para asegurar un centrifugado apropiado.
Secadoexcesivo . Seleccioneun tiempo de secadomc_scorto.
Retirelosarticulos cuando aOnest6n un poco hOmedos.
Ajuste el programa a Less Dry (MenasSeca)o Damp Dry
(SecadoH_medo).
Lasprendas est6n
arrugadas
Dejar que los articulos
permanezcan en la secadora
despu6s deque haya terminado
el ciclo
. Retirelosart[culoscuando finaliceel ciclo y doble o
cu61guelosinmediatamente.
Carga excesiva . Separelascargas grandes en cargas mds peque_as.
Lasprendas se encagen Algunas telas seencogen de . Paraevitar que seencojan las prendas, siga Ioindicado
manera natural cuando selavan, en lasetiquetas de las mismas cuidadosamente.
Otras pueden lavarse sin . Algunos articulos pueden plancharse nuevamente a su
problemas, pero se encoger6n forma original despu6s de secarlos.
en la secadora
Sitiene dudas sobrela posibilidad de encogimiento de un
articulo en particular, no Iolave a maquina ni sequecon
centrifugado.
11

Notas.
12
Garanda de secadora GE.
_ odo el servicio de garantia es proporcionado par los Centros
de servicio de factoria o par un Tdcnico de Servicio (Customer
Core®) outorizodo. Poro plonificor servicio en internet,
24 horos ol dio, visitenos o GEAppliances.com o Ilome o 800.
GE.CARES(800.432.2737). Cuando Ilome paro solicitor servicio,
par favor tengo o maria el nOmero de serie y el nOmero de
modelo.
Engrape su recibo aquL Se
necesita un comprobante de
fecha de compra para obtener
servicio bajo la garantia.
Par el perlodo de: GE reemplazar(7:
Un a_o
Dela fecha de la
compra original
Cualquierparte de lasecadora quefalle debido adefectos enlos materiales o en la fabricaci6n.
Durante este garanda limitada de un ar_o,GEtambi_n proporcionar@,sin costa alguno, toda la
mano de obray servicios relacionados con el reemplazo de laspartes defectuosas.
Lo que no est_ cubierto:
[] Viajes del personal de servicio a su casa para
enseffarle c6mo usar su producto.
[] Instalaci6n, entrega o mantenimiento inapropiada.
[] Fallas del producto si es maltratado, real usado, o
usado para un prop6sito diferente del que se cre6
o si es usado para usos comerciales.
[] Reemplazo de la bombilla.
[] Productos que no seen defectuosos ni est6n daffados,
o que funcionen segOnel Manual del propietario.
[] Cambio de los fusibles de su case o reajuste del
circuito de interruptores.
[] Da_os el producto causados par accidentes,
incendios, inundaciones o actos de In naturaleza.
[] Daffos imprevistos resultantes causados par posibles
defectos con este electrodom6stico.
[] Defectos o daffos debido ala puesta enfundonamiento
en temperatures de congelamiento.
[] Daffos causados despu_s del envio.
[] Producto no eccesible pare fecilitar el servicio requerido.
EXCLUSION DE GARANT[AS IMPL[CITAS--Su 6nico y exclusivo derecho es la reparaci6n del producto,
tel y coma se indica en esta Garant[a limitada. Cualquier garant[a impficita, incluyendo los garantias
implicitas de comerciabilidad o adecuaci6n para un fin determinado, est6n limitadas a un aria o el
periodo de tiempo m6s breve permitido par la lay.
Esto garantio se extiende ol comprodor original y cualquier compmdor posterior de productos comprodos pore usa
residenciol dentro de Estados Unidos. Si el producto estd situado en un dreo que no dispone de servicio par porte
de un proveedor de servicio outorizodo de GE,podria tener que hocerse cargo de los castes de envfo o bien
podrio solicitdrsele que Ileve el producto o un centro de servicio de GE autorizodo poro reolizar Io reparoci6n.
En Alaska, Io gamntio excluye elcosta de envio o los visitos de servicio o su casa.
Algunos estodos no permiten Io exclusi6n o los limitociones de dohos incidentoles o consecuencioles. Esto gorontio
do derechos legoles espedficos, y usted podrio tener arras derechos que voriordn de estodo o estodo. Pore saber cudles
son sus derechos legales, consulte o Io oficino de osuntos del consumidor local o Io oficino del Attomey General en su
Iocolidod.
Garante: General Electric Company. Louisville, KY 40225
13
Soportea! consumidor.
Pdgina Webde GEAppliances GEAppliances.com
LTienealguna pregunta sabre suelectrodom6stico? iPruebela p6gina Web de GEAppliances 24 horas
al d[a, cualquier d[adel aho! Para mayor conveniencia y servicio m6sr6pido,ya puede descargar losIVlanuales
de los Propietarios,pedir piezaso incluso hacer una cita en I[neapara que vengan a realizar una reparaci6n.
Solicite una reparaci6n GEAppliances.com
Elserviciode expertosGEest6 a tan s61oun pasode su puerta. Visitela p6gina Web y solicite
su reparaci6n en I[neacuando usted prefiera 24horas al d[a, cualquier d[a del aho! O Ilame al 800.GE.CARES
(800./432.2737)durante horas normales de oficina para solicitar su reparaci6n.
GEAppliances.com
Red LifeDesignStudio (Estudiode disehopara /a vida red)
GEapoya el concepto de DiseBoUniversal-productos, serviciosy ambientes que pueden usar gente de todas
lasedades, tamaBosy capacidades. Reconocemosla necesidad de diseBarpara una gran gama de habilidades
y dificultades fisicasy mentales. Param6s detalles cobre las aplicaciones deGEDiseBoUniversal,incluyendo
ideas de diseBopara la cocina para personas con discapacidades, mire nuestra p6gina Web hay mismo. Para
personas con dificultades auditivas, favor de Ilamaral 800.TDD.GEAC(800.833./4322).
Gorontfos ampliadas GEAppliances.com
Compre una garant[a ampliada y obtenga detalles sobre descuentos especiales disponibles mientras su garant[a
est6 a0n activa. Puede comprarla en I[nea en cualquier momento, o Ilamar al (800.626.2224) durante horus
normales de oficina. GEConsumer Home Services estar6 a0n ah[ cuando su garant[a termine.
Piezos y occesorios GEAppliances.com
Aquellos individuos con la calificaci6n necesaria para reparar sus propios electrodom6sticos pueden pedir que
se les manden las piezas o accesorios directamente a sus hogares (aceptamos las tarjetas VISA,MasterCard y
Discover). Haga su pedido en I[nea hoy, 24 horas cada d[a o Ilamar por tel6fono a1800.626.2002 durante horas
normales de oficina.
Las instrucciones descritas en este manual cubren los procedimientos a seguir pot cualquier usuario.
Cualquier otra reparaci6n deberia, pot regla general, referirse a personal calificado autorizado. Debe
ejercerse precauci6n ya que las reparaciones incorrectas pueden causar condiciones de funcionamiento
inseguras.
14
P6ngase en contocto con nosotros GEAppliances.com
Sino estc_satisfecho con el servicio que recibe de GE,p6ngase en contacto con nosotros en nuestra pdgina
Web indicando todos los detalles as[ como su n0mero de tel6fono o escr[banos a:
General Manager, Customer Relations
GEAppliances,Appliance Park
Louisville,KY/40225
l Registre su electrodom_stico GEAppliances.corn
iRegistre su nuevo electrodom6stico en linea-cuando usted prefiera! Elregistrar su producto atiempo le
proporcionar6, si surgiera lanecesidad,una mejor comunicaci6n y un serviciomc_src_pidobajo lost6rminos de
su garant[a.Tambi6n puede enviar su tarjeta de registro pre-impresa que se incluye en el material de embalaje.

