
Model/Modelo:
PRF315300HW
PRF316300HS
3.1 CU.FT. REFRIGERATOR
REFRIGERADOR DE 3.1 CU.FT.

............................................................
............................................
...................................................
.............................................
.............................................
.........................................................
......................................................
P3
P4
P6
P7
P9
P12
P13
TABLE OF CONTENTS
English-2
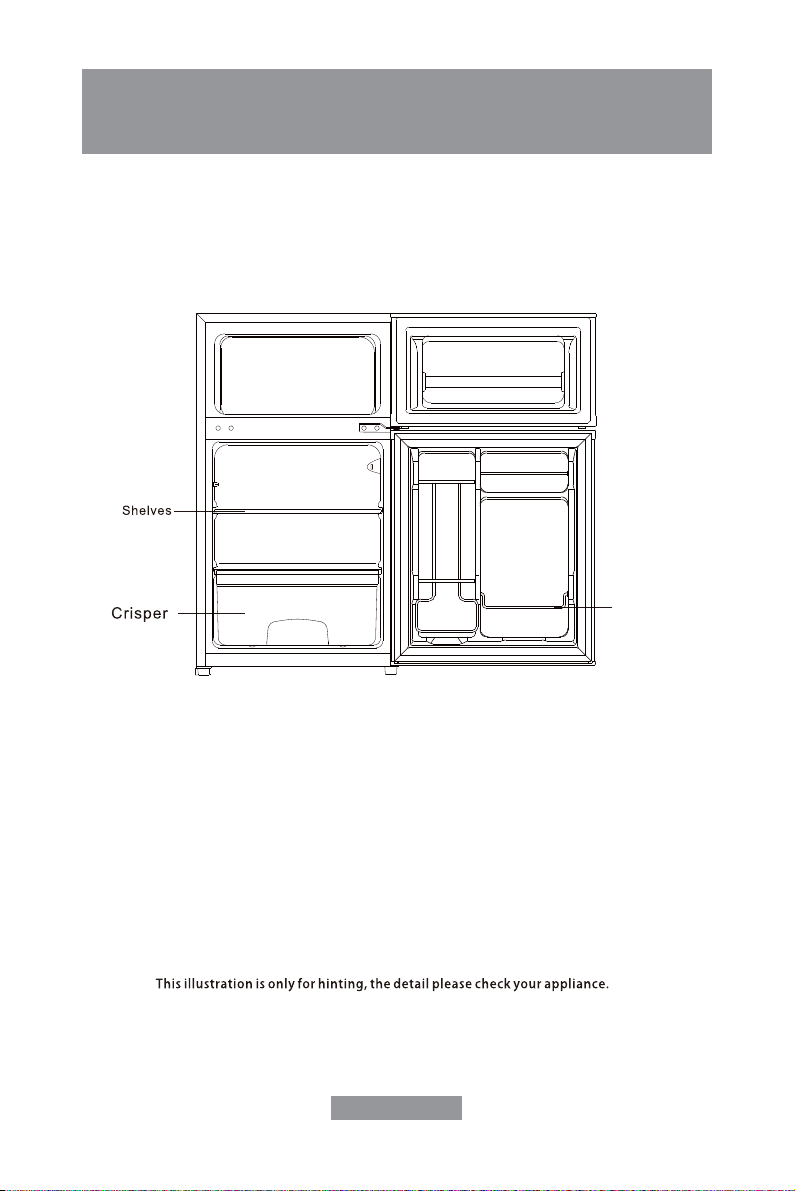
Can Holders
NAMES OF THE PARTS
English-3
WARNING
WARNING
IMPORTANT SAFETY INSTRUCTIONS
English-4

English-5
INSTALLATION INSTRUCTIONS
English-6
This unit is not designed to defrost automatically. In order to prevent damage to the interior liner of the
unit from excessive frost build-up, please manually defrost the unit every 3 months or when ice / frost
is approximately 1/4 " thick inside the freezer compartment.
When To Defrost
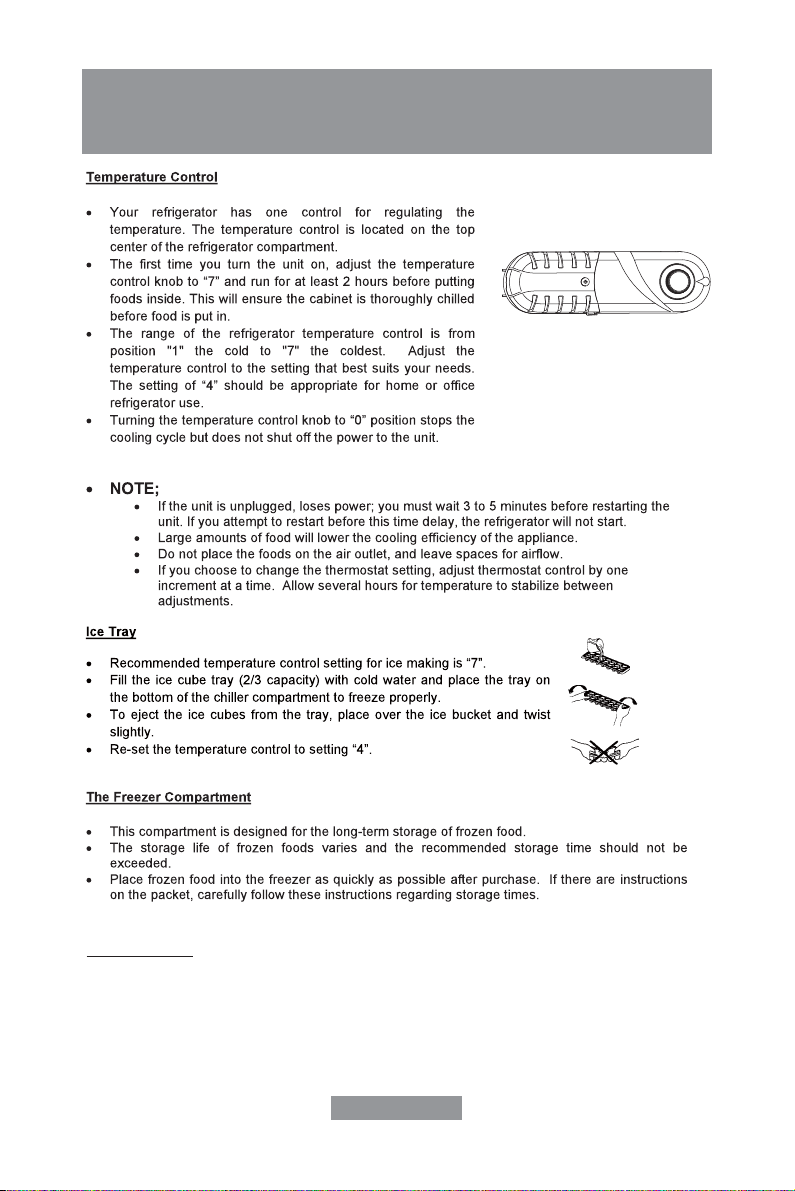
OPERATING YOUR REFRIGERATOR
English-7
How To Defrost
Defrost the freezer compartment when the ice / frost are approximately thick or every 3 months,
whichever comes first. Set the thermostat dial to " 0 " to defrost. Remove all contents from the freezer
compartment. Leave the freezer door open to allow accumulated ice / frost to melt. Remove large pieces
of ice as needed. Do not use hot water or other electric heating devices to melt the accumulated ice. After
defrosting, remove accumulated ice / water and wipe the freezer compartment dry with a soft cloth. In the
event that the ice is not visibly present in the freezer compartment, please allow the evaporator located
behind the freezer wall to completely defrost for approximately 2 hours before restarting the unit. Restart
the unit per starting instructions.
1/4 "
English-8
CHANGING THE REVERSIBLE DOOR
English-9
English-10
English-11
CARE AND MAINTENANCE
English-12

TROUBLESHOOTING GUIDE
English-13
English-14
P3
P4
P6
P7
P9
P12
P13
.....................................................
..........................................
.....................................................
.........................................
.....................................................
................................................
..............................
INDICE
Español-2
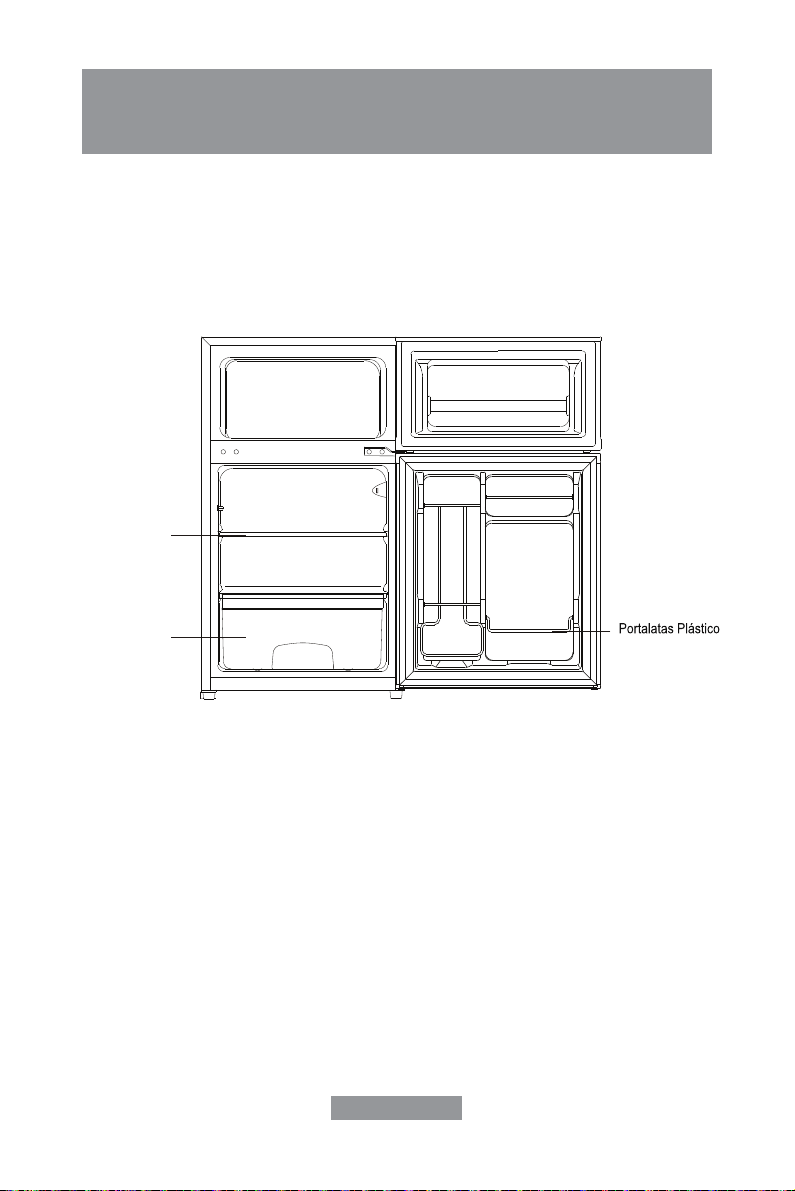
Esta ilustración es solo para una idea, el detalle por favor reviselo en su aparato.
Gaveta para
Estante
LOS NOMBRES DE LAS PARTES
Español-3
ADVERTENCIA
ADVERTENCIA
ADVERTENCIA
ADVERTENCIA
ADVERTENCIA
ADVERTENCIA
INSTRUCCIONES DE SEGURIDAD
IMPORTANTES
Español-4

Español-5
INSTRUCCIONES DE INSTALACIÓN
Español-6
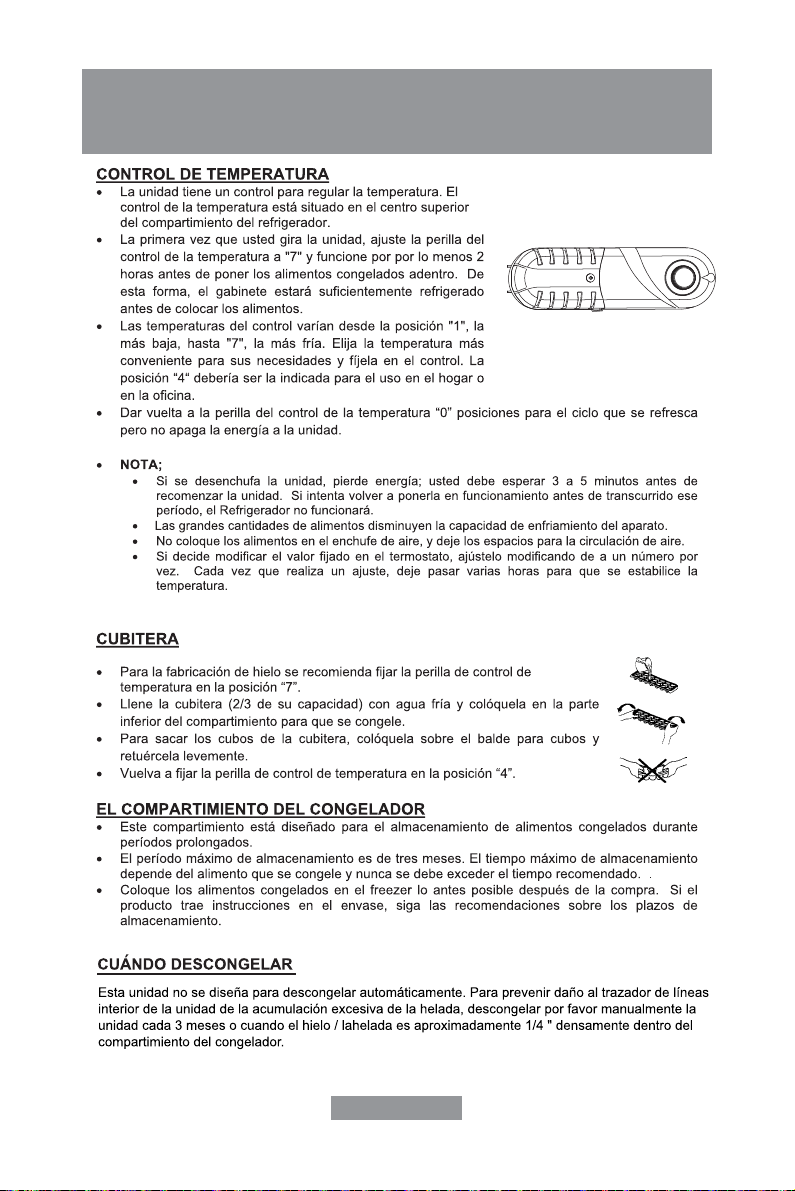
OPERAR SU REFRIGERADOR
Español-7
1. Quite la cubierta de la lámpara.
2. Desenroscar la bombilla antigua e instalar la nueva bombilla.
3. Vuelva a instalar la cubierta de la lámpara.
Español-8
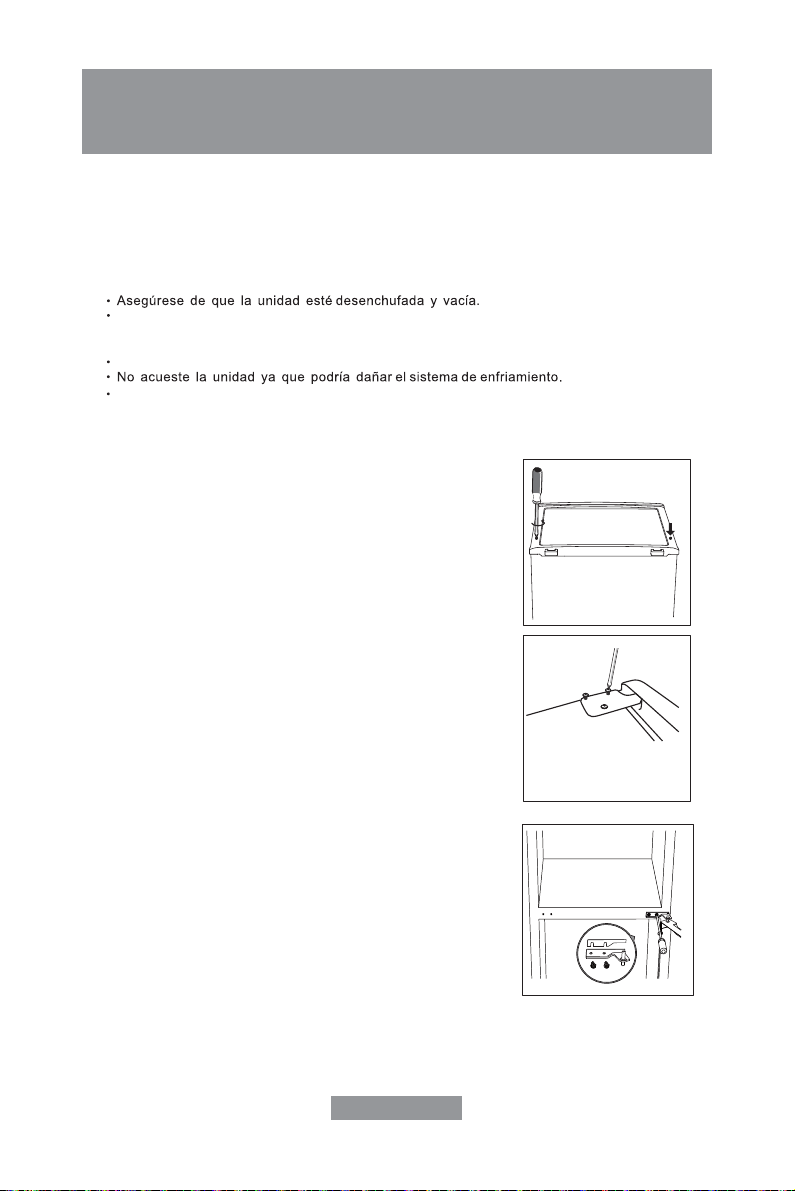
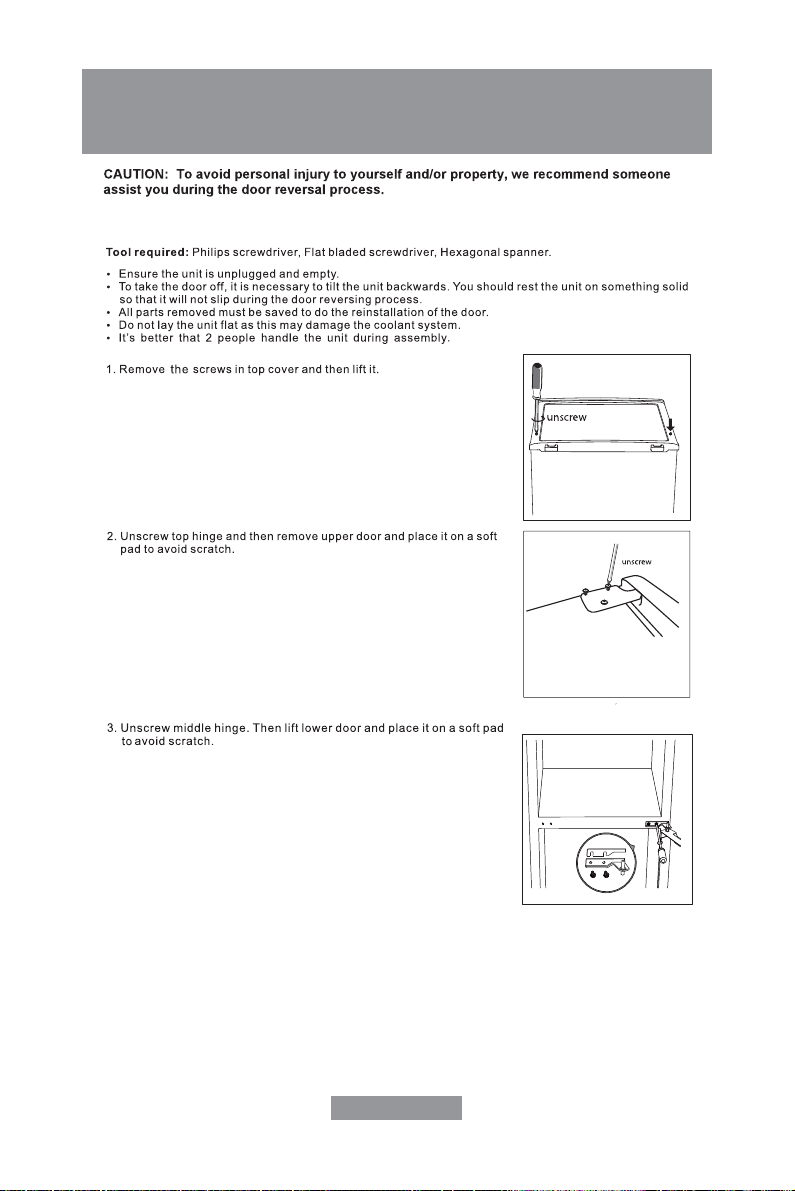
PRECAUCIÓN: Para evitar lesionarse a usted mismo o la propiedad, se recomienda
que alguien le ayude durante el proceso de inversión de la puerta.
Herramienta necesaria:Destornillador Philips, destornillador plano, llave hexagonal.
Todas las piezas quitadas deben guardarse para reinstalar la puerta.
Es mejor que 2 personas manejen la unidad durante el ensamblado.
Para quitar la puerta, es necesario inclinar la unidad hacia atrás. La unidad debe
descansar sobre algo sólido para que no resbale durante el proceso de inversión
de la puerta.
1. Retire los tornillos de la cubierta superior y
luego levántela.
2. Desatornille la bisagra superior y luego quite la puerta
superior y colóquela sobre una superficie suave para evitar
rayarla.
Desatornillar
3. Desatornille la bisagra central. Luego, levante la puerta
inferior y colóquela sobre una superficie suave para evitar
rayarla.
Desatornillar
CAMBIO DE LA PUERTA REVERSIBLE
Español-9
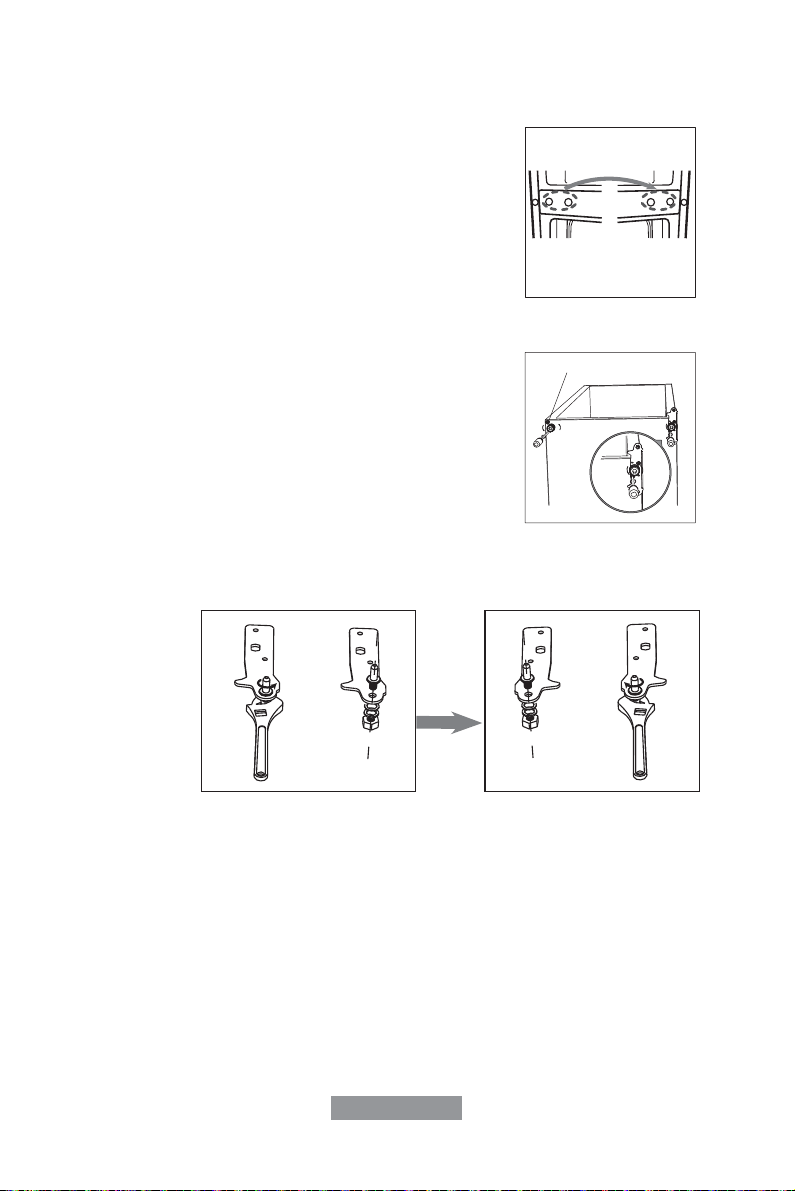
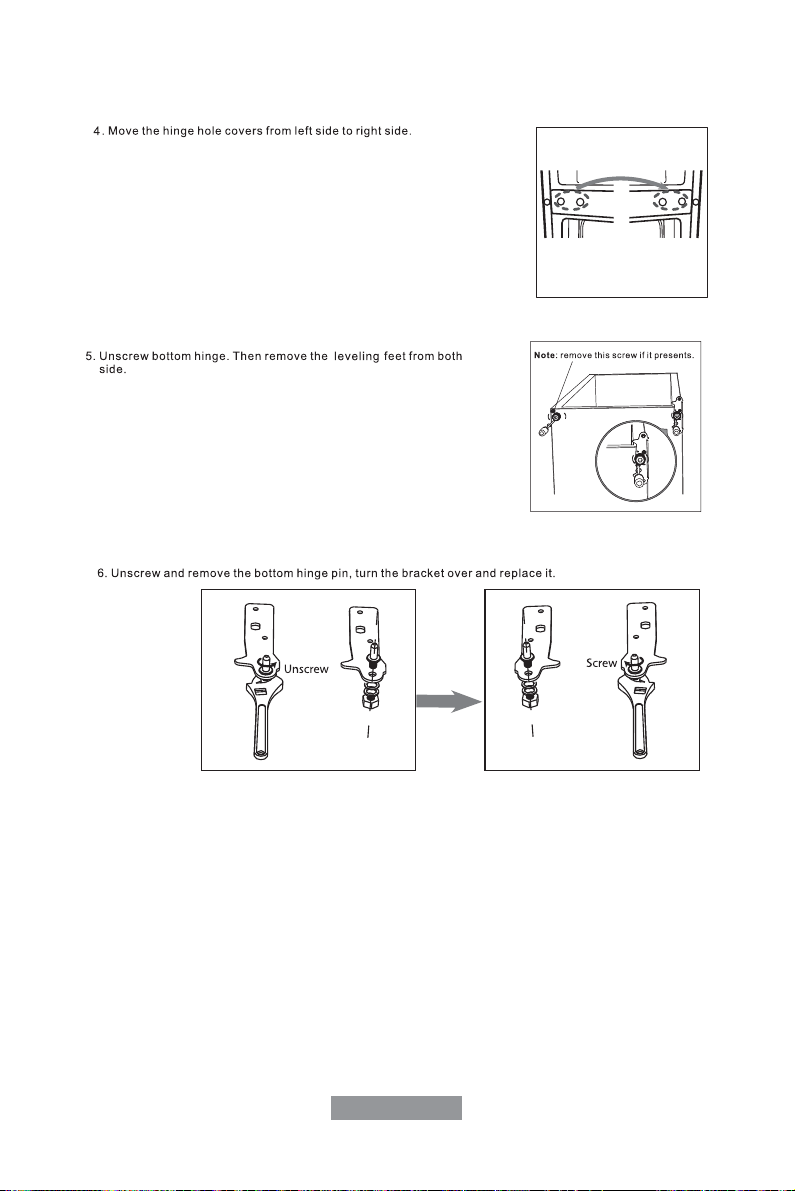
4. Mueva las cubiertas de los orificios de la bisagra del lado
izquierdo al lado derecho.
5. Desatornille la bisagra inferior. Luego, quite las patas
ajustables de ambos lados.
6. Desatornille y retire el pasador de la bisagra inferior, gire el soporte y reemplácelo.
Nota:quite este tornillo si se encuentra presente.
Atornillar
Desatornillar
Español-10
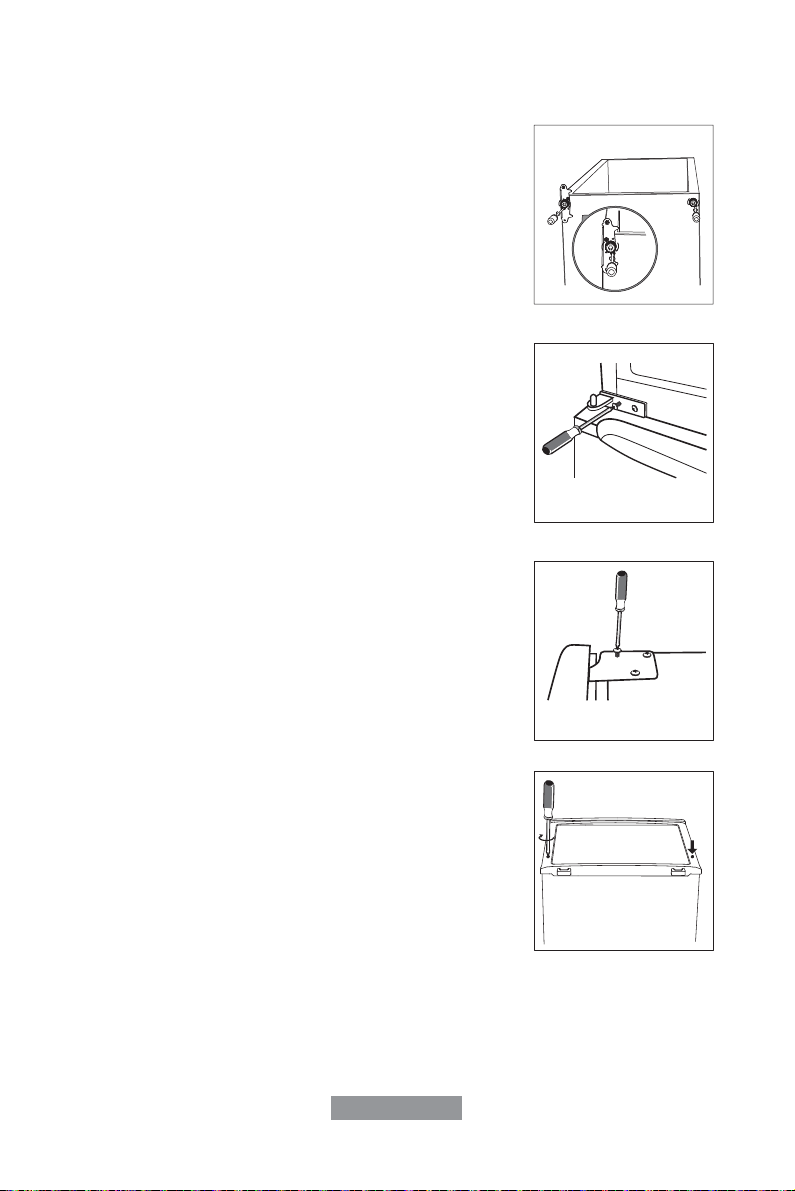
Atornillar
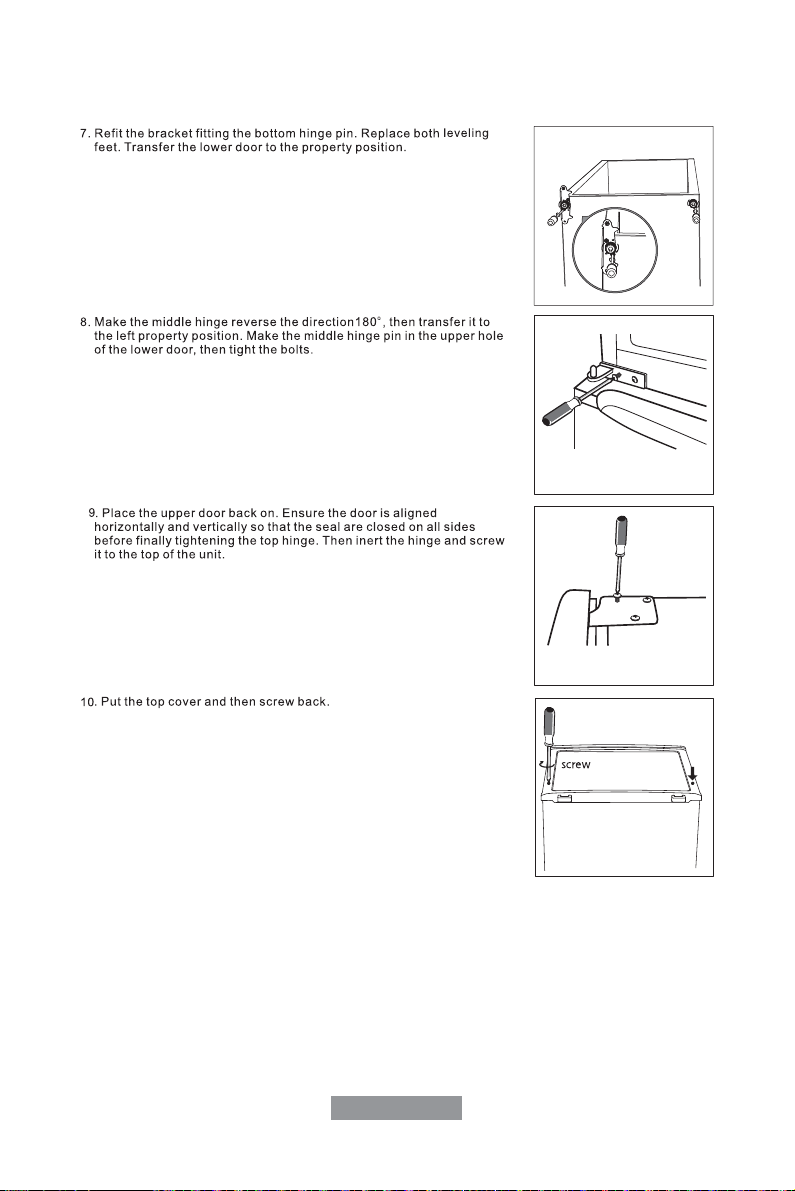
7. Vuelva a colocar el soporte para que encaje con el pasador
de la bisagra inferior. Vuelva a colocar ambas patas ajustables.
Transfiera la puerta inferior a la posición adecuada.
10. Coloque la cubierta superior y vuelva a atornillarla.
8. Haga revertir la dirección de la bisagra central 180º, luego
transfiérala a la posición izquierda adecuada. Haga que la bisagra
central atraviese el orificio superior de la puerta inferior, luego
ajuste los tornillos.
9. Vuelva a colocar la puerta superior nuevamente. Asegúrese
de que la puerta quede alineada horizontalmente y verticalm-
ente para que las juntas estén cerradas por todos los lados
antes de, finalmente, ajustar la bisagra superior. Luego inserte
la bisagra y atorníllela a la parte superior de la unidad.
Español-11
CUIDE Y LA CONSERVACION
Español-12
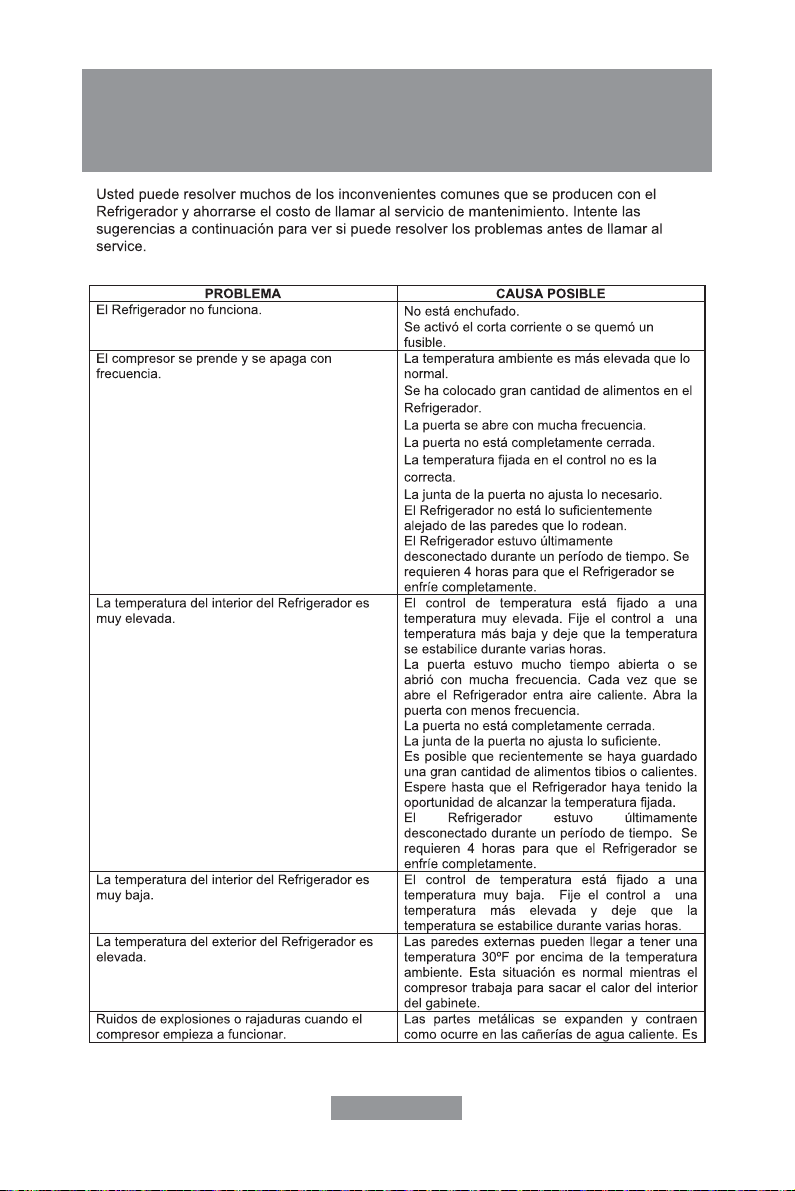
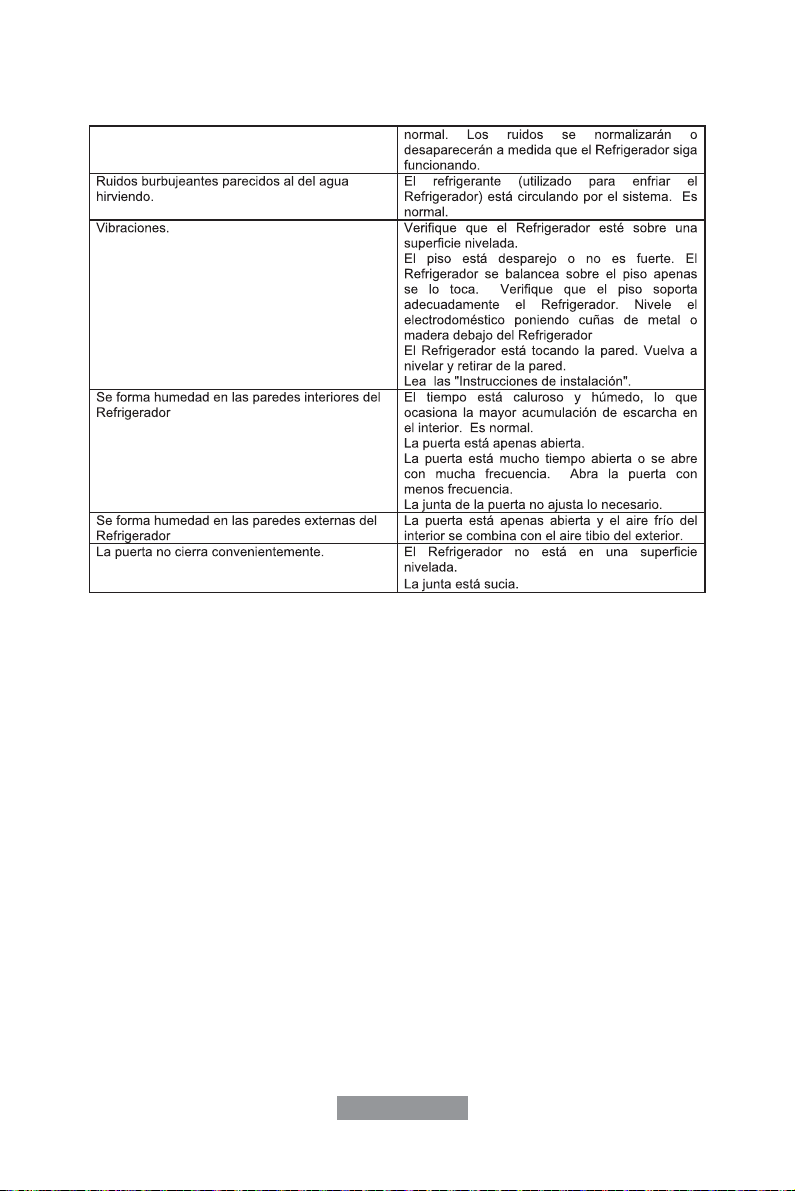
GUÍA DE RESOLUCIÓN
DE PROBLEMAS
Español-13
Español-14

CKPRE

