
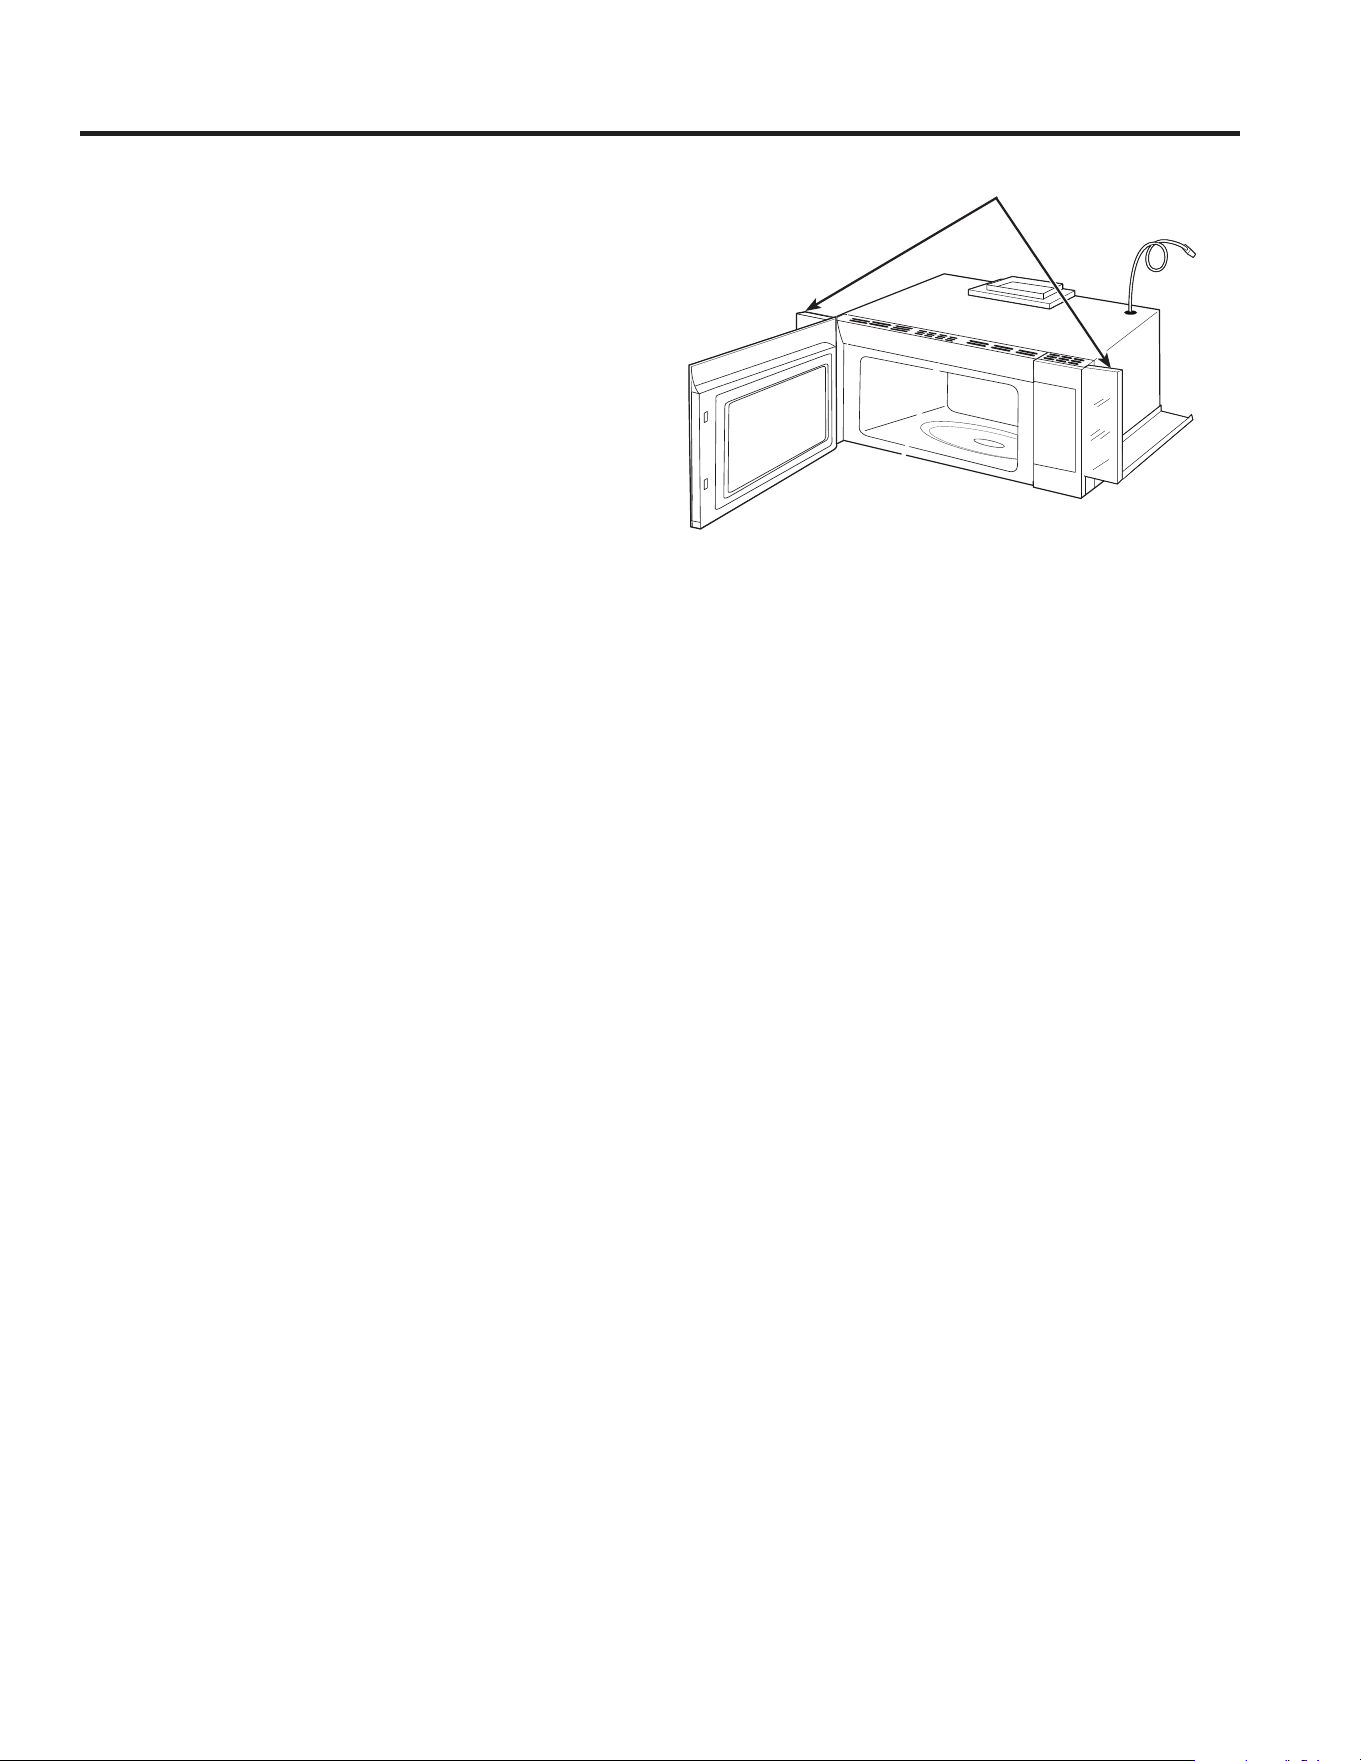
Write the model and serial
numbers here:
Model # _________________
Serial # _________________
You can find them on a label inside
the oven.
OWNER’S MANUAL
49-7000115 Rev. 0 04-20 GEA
JVM3160
JVM3162
JNM3163
GE is a trademark of the General Electric Company. Manufactured under trademark license.
MICROWAVE OVEN
Español
Para consultar una
version en español
de esta manual
de instrucciones,
visite nuestro
sitio de internet
GEAppliances.com
SAFETY INFORMATION ..........3
OPERATING INSTRUCTIONS
Controls ..............................6
Features ..............................8
Power Levels ..........................8
Time Features .........................8
Convenience Features ................. 11
Other Features .......................12
Microwave Terms .....................16
CARE AND CLEANING
Care and Cleaning ....................15
TROUBLESHOOTING
Things that are Normal ................18
CONSUMER SUPPORT
Limited Warranty .................... 20
Optional Kits .........................21
Consumer Support ....................22

2 49-7000115 Rev. 0
THANK YOU FOR MAKING GE APPLIANCES A PART OF YOUR HOME.
Whether you grew up with GE Appliances, or this is your first, we’re happy to have you in the family.
We take pride in the craftsmanship, innovation and design that goes into every GE Appliances
product, and we think you will too. Among other things, registration of your appliance ensures that we
can deliver important product information and warranty details when you need them.
Register your GE appliance now online. Helpful websites and phone numbers are available in the
Consumer Support section of this Owner’s Manual. You may also mail in the pre-printed registration
card included in the packing material.

49-7000115 Rev. 0 3
READ AND SAVE THESE INSTRUCTIONS
SAFETY INFORMATION
IMPORTANT SAFETY INSTRUCTIONS
READ ALL INSTRUCTIONS BEFORE USING THE APPLIANCE
WARNING
To reduce the risk of burns, electric shock, fire, injury to persons, or exposure to
excessive microwave energy:
When using electrical appliances, basic safety precautions should be followed, including the following:
Ŷ 5HDGDOOLQVWUXFWLRQVEHIRUHXVLQJWKLVDSSOLDQFH
Ŷ 5HDGDQGIROORZWKHVSHFLILFSUHFDXWLRQVLQWKH
PRECAUTIONS TO AVOID POSSIBLE EXPOSURE
TO EXCESSIVE MICROWAVE ENERGY section on
page 5.
Ŷ 8VHWKLVDSSOLDQFHRQO\IRULWVLQWHQGHGXVHDV
described in this manual. Do not use corrosive
chemicals or vapors in this appliance. This oven is
specifically designed to heat, dry or cook food, and is
not intended for laboratory or industrial use.
Ŷ 7KLVPLFURZDYHPXVWRQO\EHVHUYLFHGE\TXDOLILHG
service personnel. Contact nearest authorized
service facility for examination, repair or adjustment.
INSTALLATION
Ŷ ,QVWDOORUORFDWHWKLVDSSOLDQFHRQO\LQDFFRUGDQFH
with the provided installation instructions.
Ŷ This appliance must be grounded. Connect only
to properly grounded outlet. See “GROUNDING
INSTRUCTIONS” found on page 5.
Ŷ 7KLVPLFURZDYHRYHQLV8/OLVWHGIRULQVWDOODWLRQRYHU
both gas and electric ranges.
Ŷ 7KLVXQLWLVVXLWDEOHIRUXVHDERYHJDVRUHOHFWULF
FRRNLQJHTXLSPHQW´RUOHVVZLGH
Ŷ Do not operate this appliance if it has a damaged
power cord or plug, if it is not working properly, or if it
has been damaged or dropped.
Ŷ .HHSFRUGDZD\IURPKHDWHGVXUIDFHV
Ŷ Do not let cord hang over the edge of the table or
counter
Ŷ 'RQRWLPPHUVHFRUGRUSOXJLQZDWHU
Ŷ 'RQRWFRYHURUEORFNDQ\RSHQLQJVRQWKH
appliance.
Ŷ 'RQRWVWRUHWKLVDSSOLDQFHRXWGRRUV'RQRWXVHWKLV
product near water—for example, in a wet basement,
near a swimming pool, near a sink or in similar
locations.
Ŷ 'RQRWPRXQWWKLVDSSOLDQFHRYHUDVLQN
TO REDUCE THE RISK OF FIRE IN THE CAVITY:
Ŷ Do not overcook food. Carefully attend appliance
when paper, plastic or other combustible materials
are placed inside the oven to facilitate cooking.
Ŷ 5HPRYHZLUHWZLVWWLHVDQGPHWDOKDQGOHVIURP
paper or plastic containers before placing them in
the oven.
Ŷ 'RQRWVWRUHDQ\PDWHULDOV, other than our
recommended accessories, in this oven when not in
use. Do not leave paper products, cooking utensils
or food in the cavity when not in use. Microwave
rack should be removed from oven when not in use.
Ŷ ,IPDWHULDOVLQVLGHWKHRYHQLJQLWHNHHSWKHRYHQ
door closed, turn the oven off and disconnect the
power cord or shut off power at the fuse or circuit
breaker panel.
Ŷ 'RQRWRSHUDWHWKHPLFURZDYHIHDWXUHZLWKRXWIRRGLQ
the oven.
TO REDUCE THE RISK OF BURNS:
Ŷ %HFDUHIXOZKHQRSHQLQJFRQWDLQHUVRIKRWIRRG8VH
pot holders and direct steam away from face and
hands.
Ŷ 9HQWSLHUFHRUVOLWFRQWDLQHUVSRXFKHVRUSODVWLF
bags to prevent build-up of pressure.
Ŷ %HFDUHIXOZKHQWRXFKLQJWKHWXUQWDEOHGRRUUDFNV
or walls of the oven which may become hot during
use.
Ŷ HOT CONTENTS CAN CAUSE SEVERE BURNS.
DO NOT ALLOW CHILDREN TO USE THE
MICROWAVE. Use caution when removing hot items.

4 49-7000115 Rev. 0
READ AND SAVE THESE INSTRUCTIONS
SAFETY INFORMATION
IMPORTANT SAFETY INSTRUCTIONS
READ ALL INSTRUCTIONS BEFORE USING THE APPLIANCE
WARNING
Continued
OPERATING
Ŷ 'RQRWRSHUDWHWKHRYHQZLWKRXWWKHWXUQWDEOHLQ
place. The turntable must be unrestricted so it can
turn.
Ŷ 0DNHVXUHDOOFRRNZDUHXVHGLQ\RXUPLFURZDYH
oven is suitable for microwaving. Most glass
casseroles, cooking dishes, measuring cups, custard
cups, pottery, or china dinnerware, which does not
have metallic trim or glaze with a metallic sheen can
be used in compliance with cookware manufacturers’
recommendations.
Ŷ 'RQRWVWRUHDQ\WKLQJGLUHFWO\RQWRSRIWKH
microwave surface when the microwave is in
operation.
Ŷ 6RPHSURGXFWVVXFKDVZKROHHJJVDQGVHDOHG
containers - for example, closed jars - are able to
explode and should not be heated in the microwave
oven.
Ŷ 'RQRWRYHUFRRNSRWDWRHV7KH\FRXOGGHK\GUDWHDQG
catch fire.
Ŷ 'RQRWFRYHUDQ\RWKHUSDUWRIWKHRYHQZLWKPHWDO
foil. This will cause overheating of the oven.
Ŷ &RRNPHDWDQGSRXOWU\WKRURXJKO\²PHDWWRDWOHDVW
DQ,17(51$/WHPSHUDWXUHRI)DQGSRXOWU\WRDW
OHDVWDQ,17(51$/WHPSHUDWXUHRI)&RRNLQJ
to these temperatures usually protects against
foodborne illness.
Ŷ 7KLVRYHQLVQRWDSSURYHGRUWHVWHGIRUPDULQHXVH
CLEANING
Ŷ .HHSWKHRYHQIUHHIURPJUHDVHEXLOGXS
Ŷ 'RQRWFOHDQZLWKPHWDOVFRXULQJSDGV3LHFHVFDQ
burn off the pad and touch electrical parts involving
risk of electric shock.
Ŷ :KHQFOHDQLQJVXUIDFHVRIGRRUDQGRYHQWKDW
come together on closing the door, use only mild,
nonabrasive soaps, or detergents applied with a
clean sponge or soft cloth. Rinse well.
SUPER HEATED WATER
Ŷ /LTXLGVVXFKDVZDWHUFRIIHHRUWHDDUHDEOHWR
be overheated beyond the boiling point without
appearing to be boiling. Visible bubbling or boiling
when the container is removed from the microwave
oven is not always present. THIS COULD RESULT
IN VERY HOT LIQUIDS SUDDENLY BOILING
OVER WHEN THE CONTAINER IS DISTURBED
OR A SPOON OR OTHER UTENSIL IS INSERTED
INTO THE LIQUID.
Ŷ 7RUHGXFHWKHULVNRILQMXU\WRSHUVRQV
'RQRWRYHUKHDWWKHOLTXLG
6WLUWKHOLTXLGERWKEHIRUHDQGKDOIZD\WKURXJK
heating it.
- Do not use straight-sided containers with narrow
necks.
- After heating, allow the container to stand in the
microwave oven for a short time before removing
the container.
- Use extreme care when inserting a spoon or other
utensil into the container.
VENT FAN
The fan will operate automatically under certain conditions.
Take care to prevent the starting and spreading of accidental
cooking fires while the vent fan is in use.
Ŷ Clean the underside of the microwave often. Do not
allow grease to build up on the microwave or the fan
filters.
Ŷ In the event of a grease fire on the surface units
below the microwave oven, smother a flaming pan
on the surface unit by covering the pan completely
with a lid, a cookie sheet or a flat tray.
Ŷ Use care when cleaning the vent fan filters.
Corrosive cleaning agents, such as lye-based oven
cleaners, may damage the filters.
Ŷ When preparing flaming foods under the microwave,
turn the fan on.
Ŷ Never leave surface units beneath your microwave
oven unattended at high heat settings. Boilovers
cause smoking and greasy spillovers that may ignite
and spread if the microwave vent fan is operating.
7RPLQLPL]HDXWRPDWLFIDQRSHUDWLRQXVHDGHTXDWH
sized cookware and use high heat on surface units
only when necessary.
49-7000115 Rev. 0 5
GROUNDING INSTRUCTIONS
WARNING
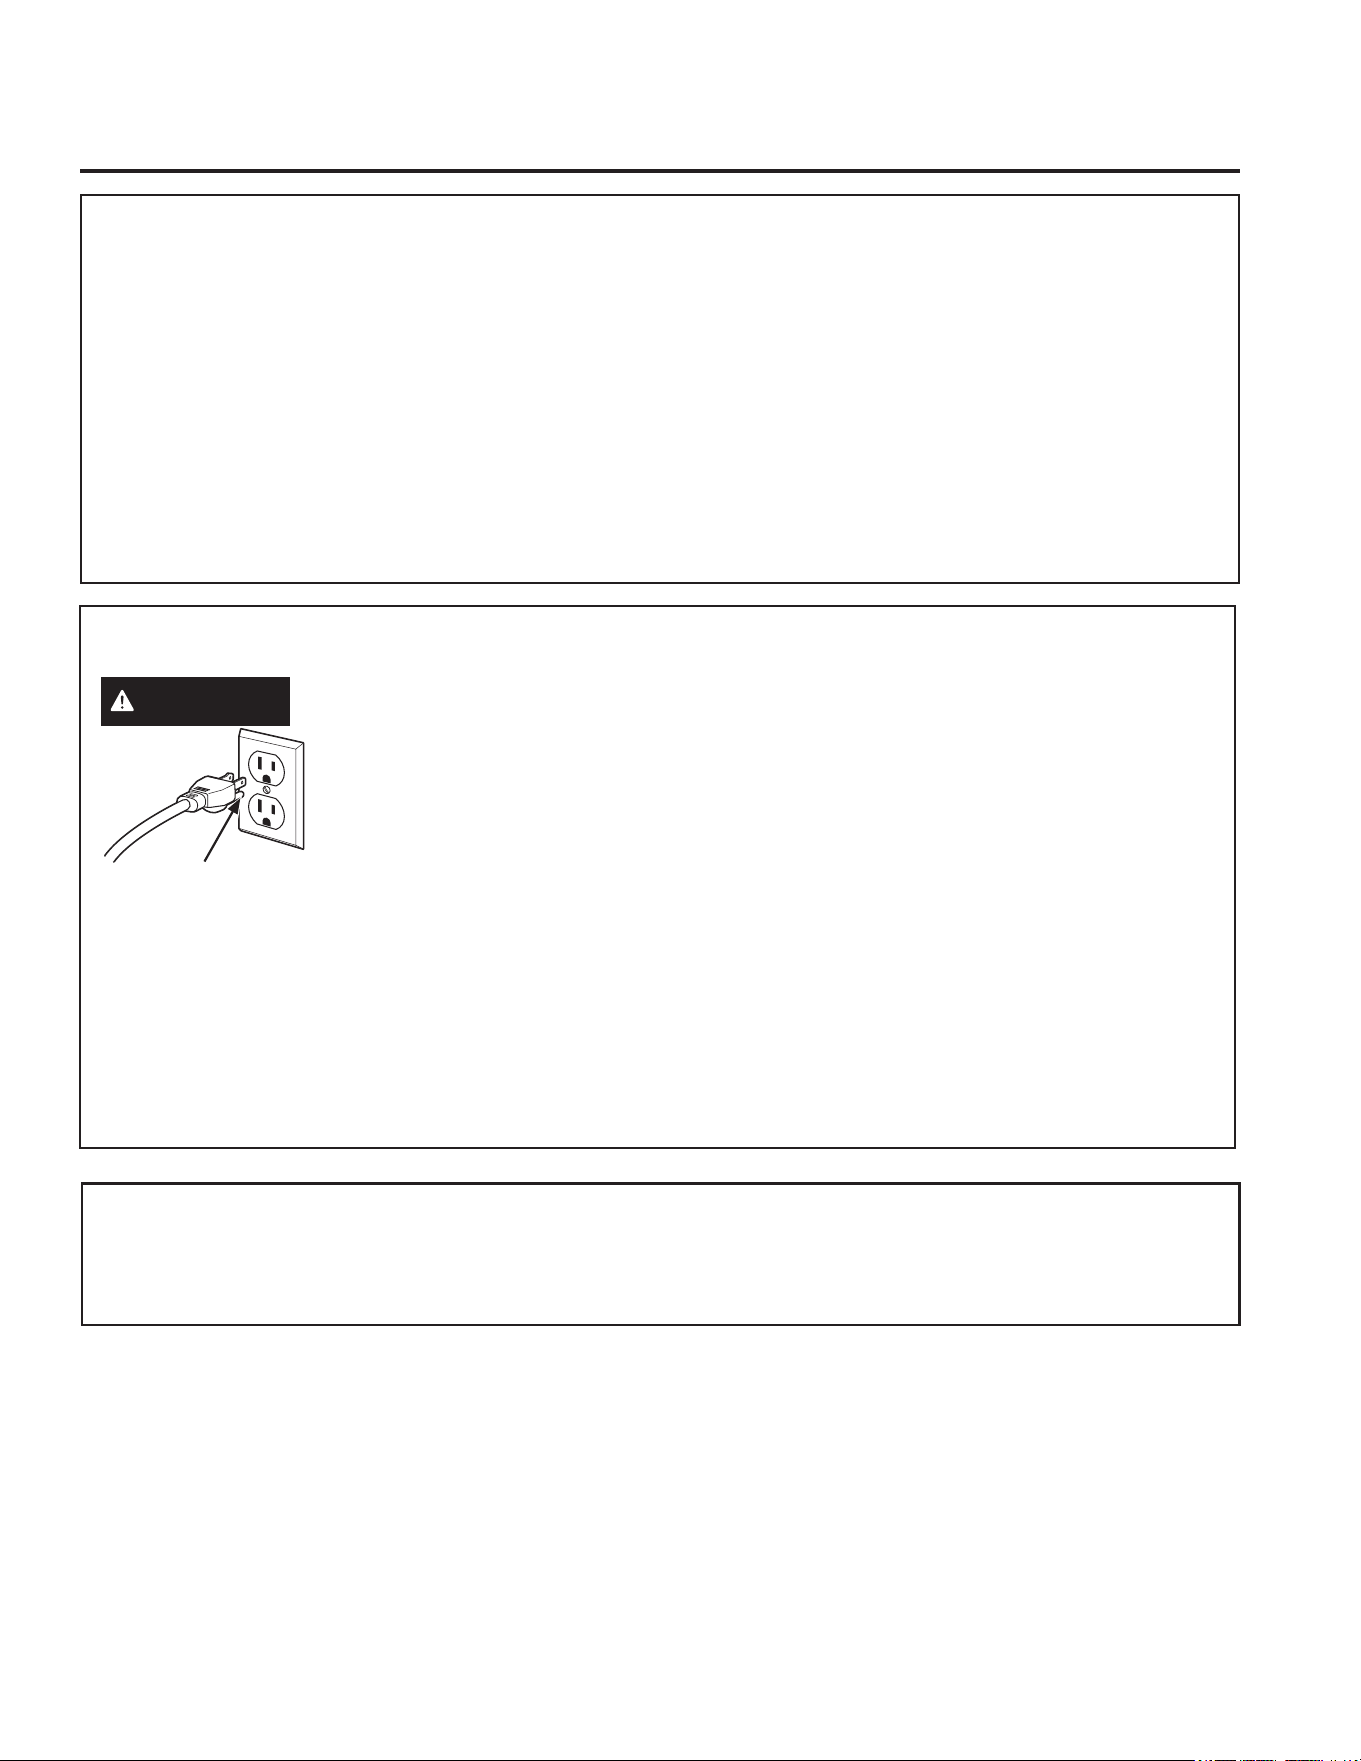
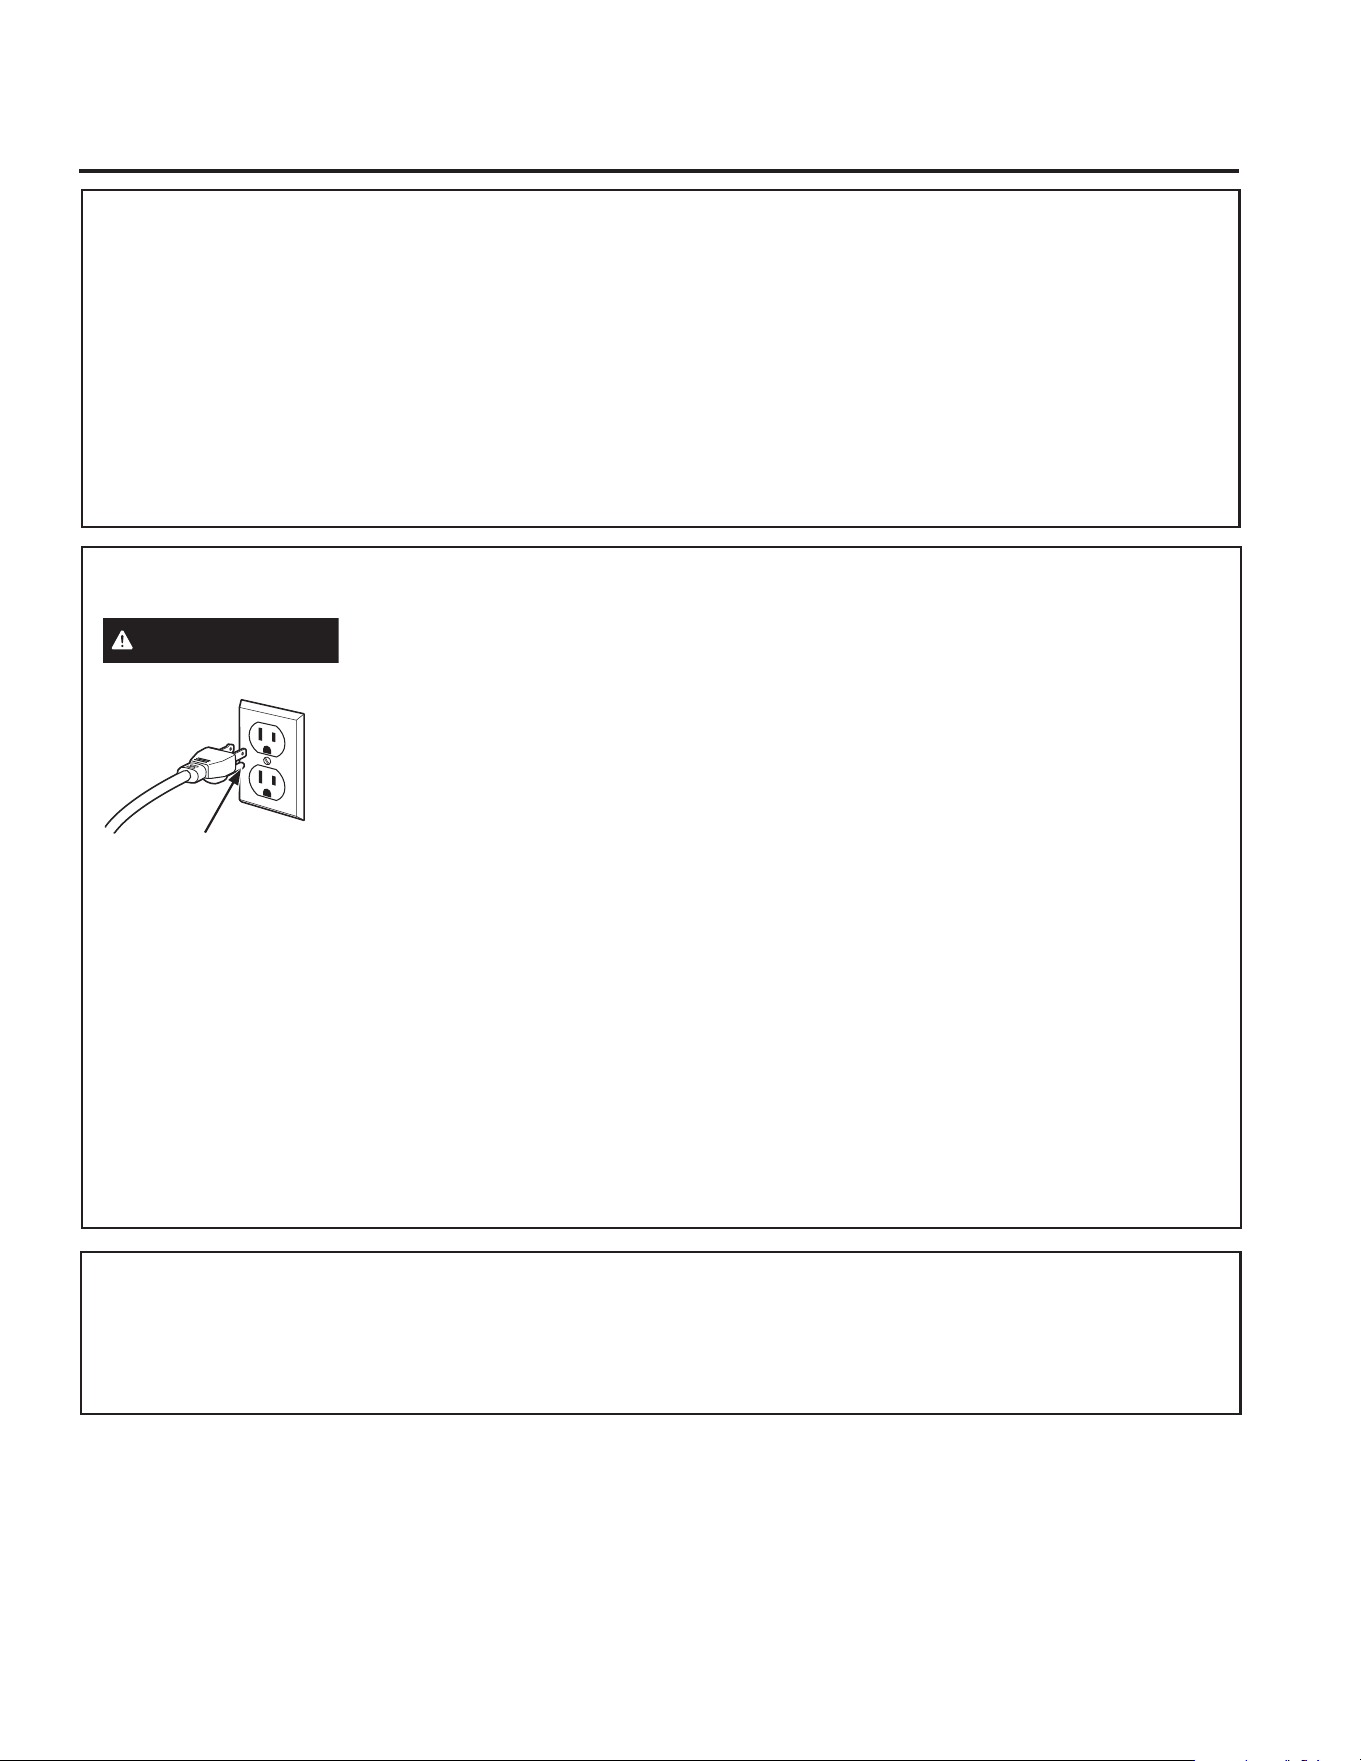
Improper use of the grounding plug can result in a risk of electric shock.
This appliance must be
grounded. In the event of an
electrical short circuit, grounding
reduces the risk of electric shock
by providing an escape wire for
the electric current.
7KLVDSSOLDQFHLVHTXLSSHGZLWKDSRZHUFRUGKDYLQJD
grounding wire with a grounding plug. The plug must
be plugged into an outlet that is properly installed and
grounded.
&RQVXOWDTXDOLILHGHOHFWULFLDQRUVHUYLFHWHFKQLFLDQLI
the GROUNDING INSTRUCTIONS are not completely
understood, or if doubt exists as to whether the
appliance is properly grounded.
If the outlet is a standard 2-prong wall outlet, it is
your personal responsibility and obligation to have it
replaced with a properly grounded 3-prong wall outlet.
Do not under any circumstances cut or remove the
third (ground) prong from the power cord.
Do not use an extension cord. If the power cord is too
VKRUWKDYHDTXDOLILHGHOHFWULFLDQRUVHUYLFHWHFKQLFLDQ
install an outlet near the appliance.
)RUEHVWRSHUDWLRQSOXJWKLVDSSOLDQFHLQWRLWVRZQ
electrical outlet to prevent flickering of lights, blowing
of fuse or tripping of circuit breaker.
READ AND SAVE THESE INSTRUCTIONS
IMPORTANT SAFETY INSTRUCTIONS
READ ALL INSTRUCTIONS BEFORE USING THE APPLIANCE
SAFETY INFORMATION
PACEMAKERS
Most pacemakers are shielded from interference from electronic products, including microwaves. However,
patients with pacemakers may wish to consult their physicians if they have concerns.
PRECAUTIONS TO AVOID POSSIBLE EXPOSURE
TO EXCESSIVE MICROWAVE ENERGY
(a) Do Not Attempt to operate this oven with the
door open since open-door operation can result
in harmful exposure to microwave energy. It is
important not to defeat or tamper with the safety
interlocks.
(b) Do Not Place any object between the oven front
face and the door or allow soil or cleaner residue to
accumulate on sealing surfaces.
(c) Do Not Operate the oven if it is damaged.
It is particularly important that the oven door close
properly and that there is no damage to the:
(1) door (bent),
(2) hinges and latches (broken or loosened),
(3) door seals and sealing surfaces.
(d) The Oven Should Not be adjusted or repaired by
DQ\RQHH[FHSWSURSHUO\TXDOLILHGVHUYLFHSHUVRQQHO
Ensure Proper ground
exists before use.
49-7000115 Rev. 0
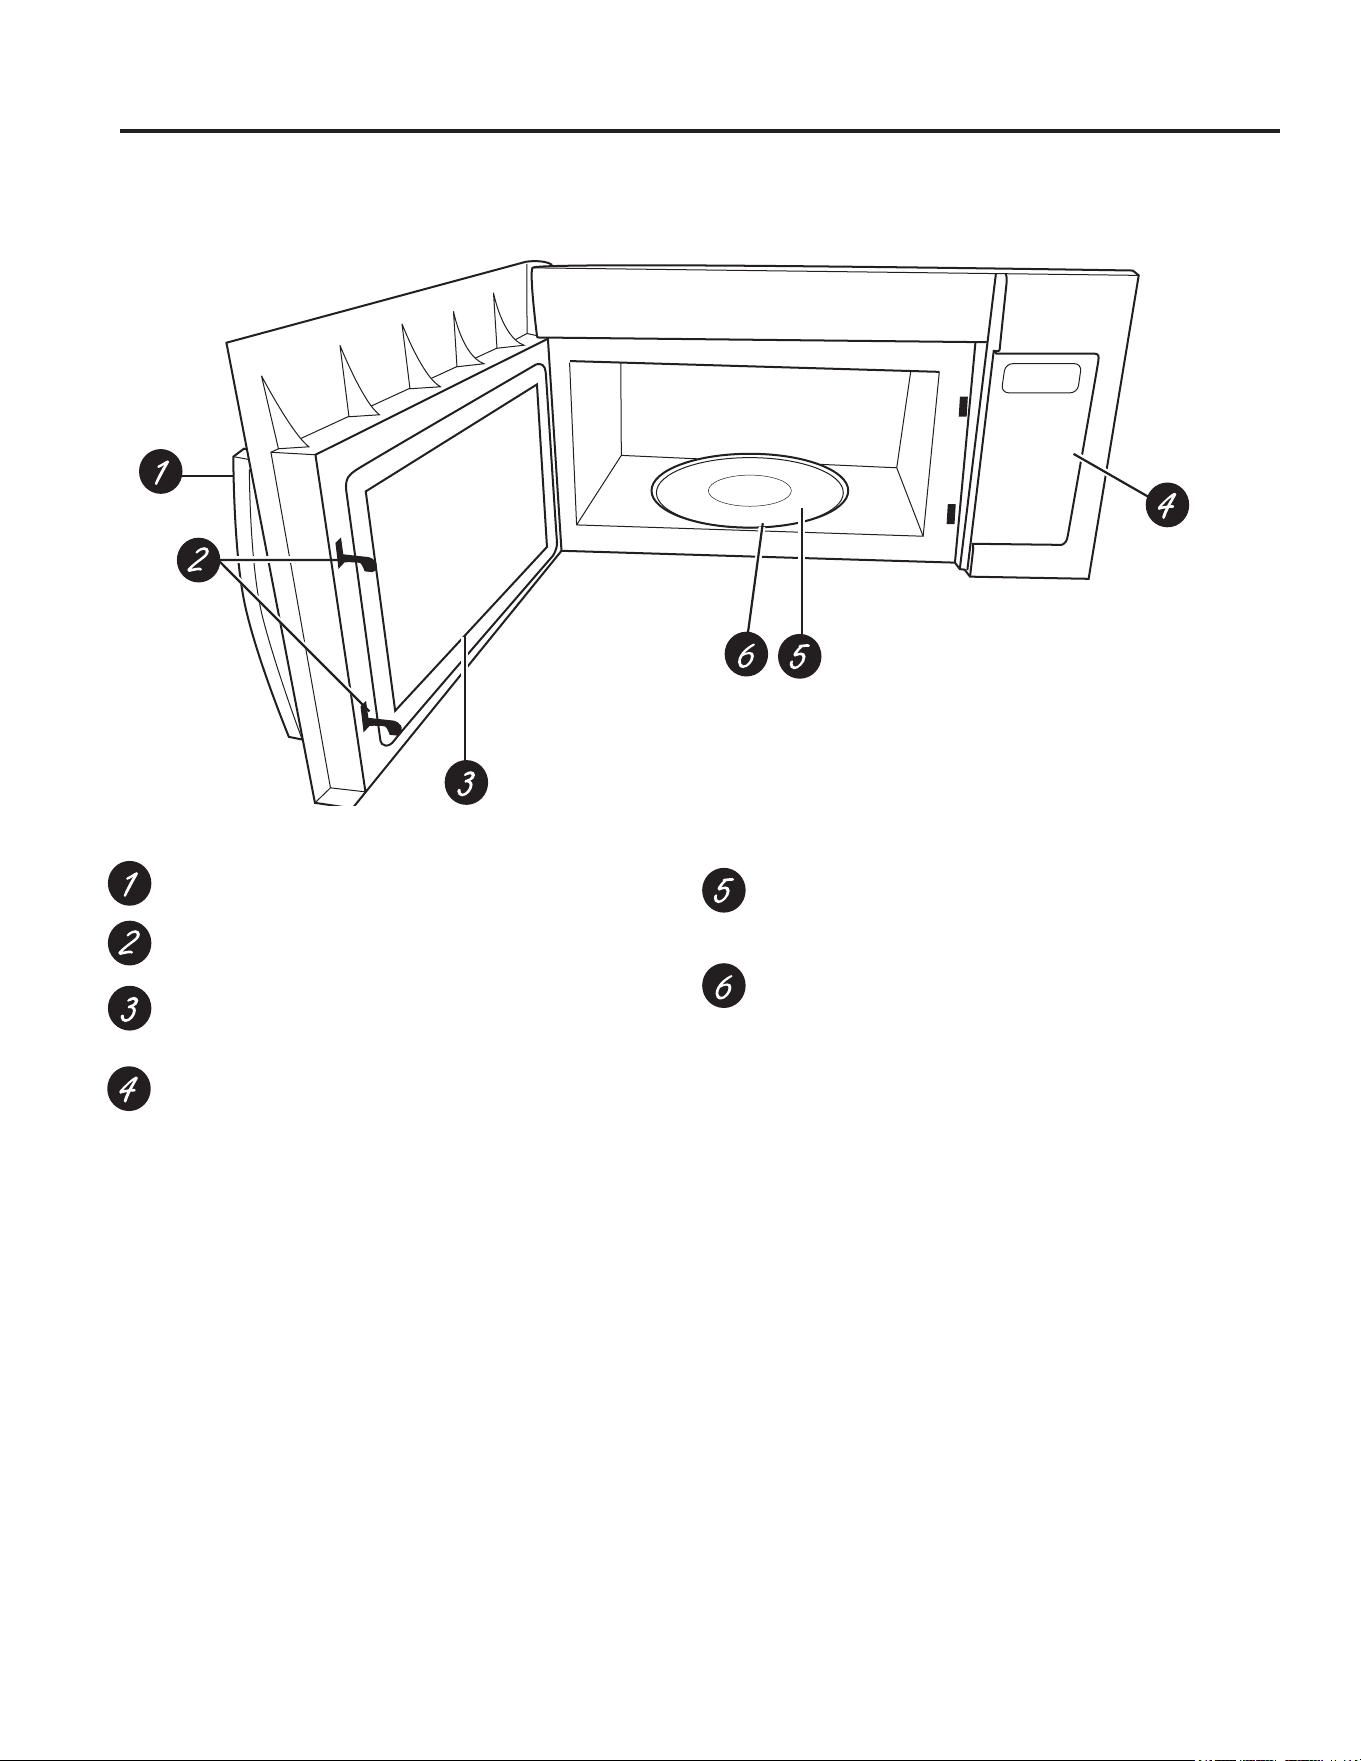
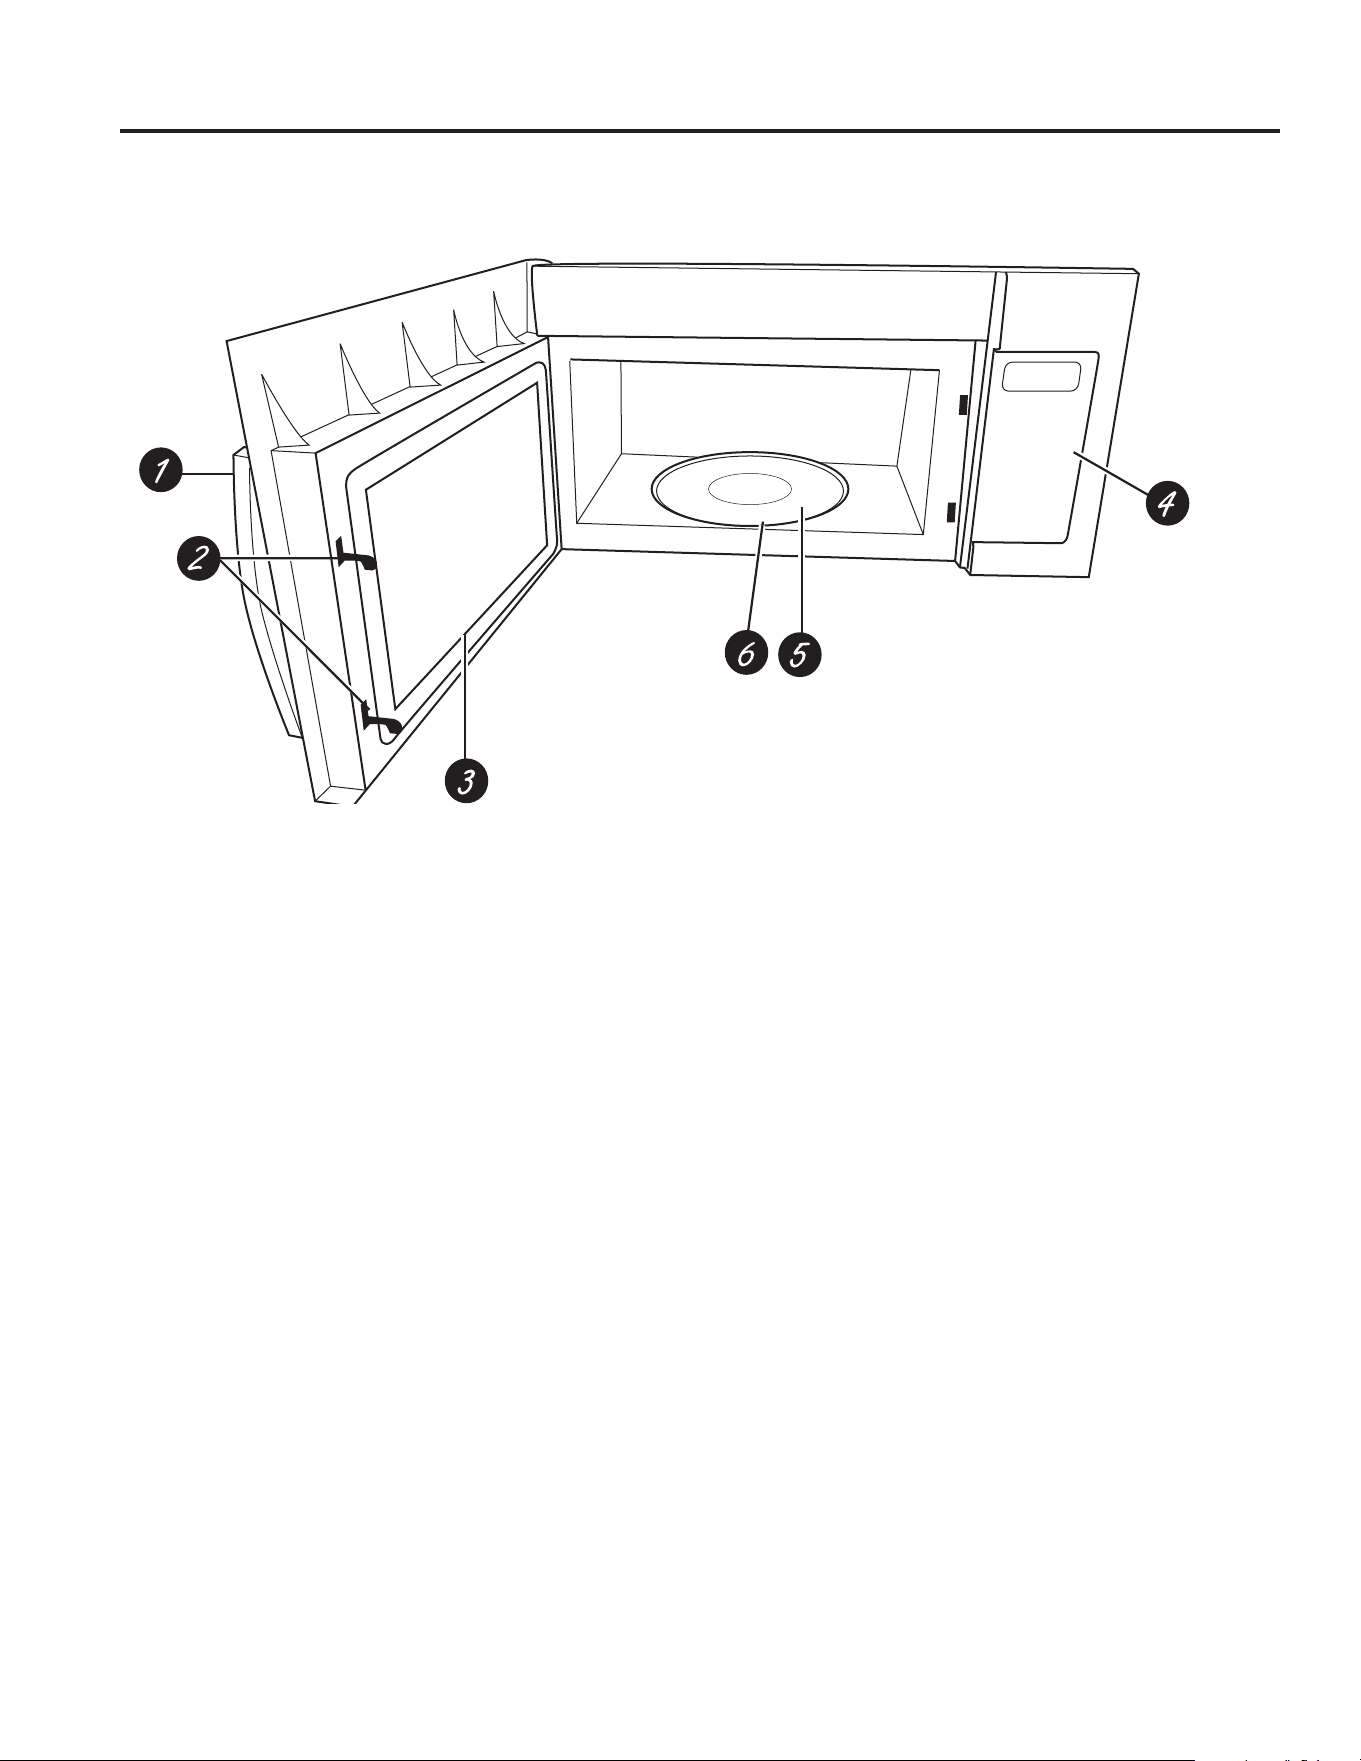
Throughout this manual, features and appearance may vary from your model.
Door Handle.
Door Latches.
Window with Metal Shield. Screen allows cooking to
be viewed while keeping microwaves confined in the
oven.
Control Panel.
Removable Turntable. Do not operate the oven in the
microwave mode without the turntable and turntable
support seated and in place.
Removable Turntable Support. Do not operate the
oven in the microwave mode without the turntable and
turntable support seated and in place.
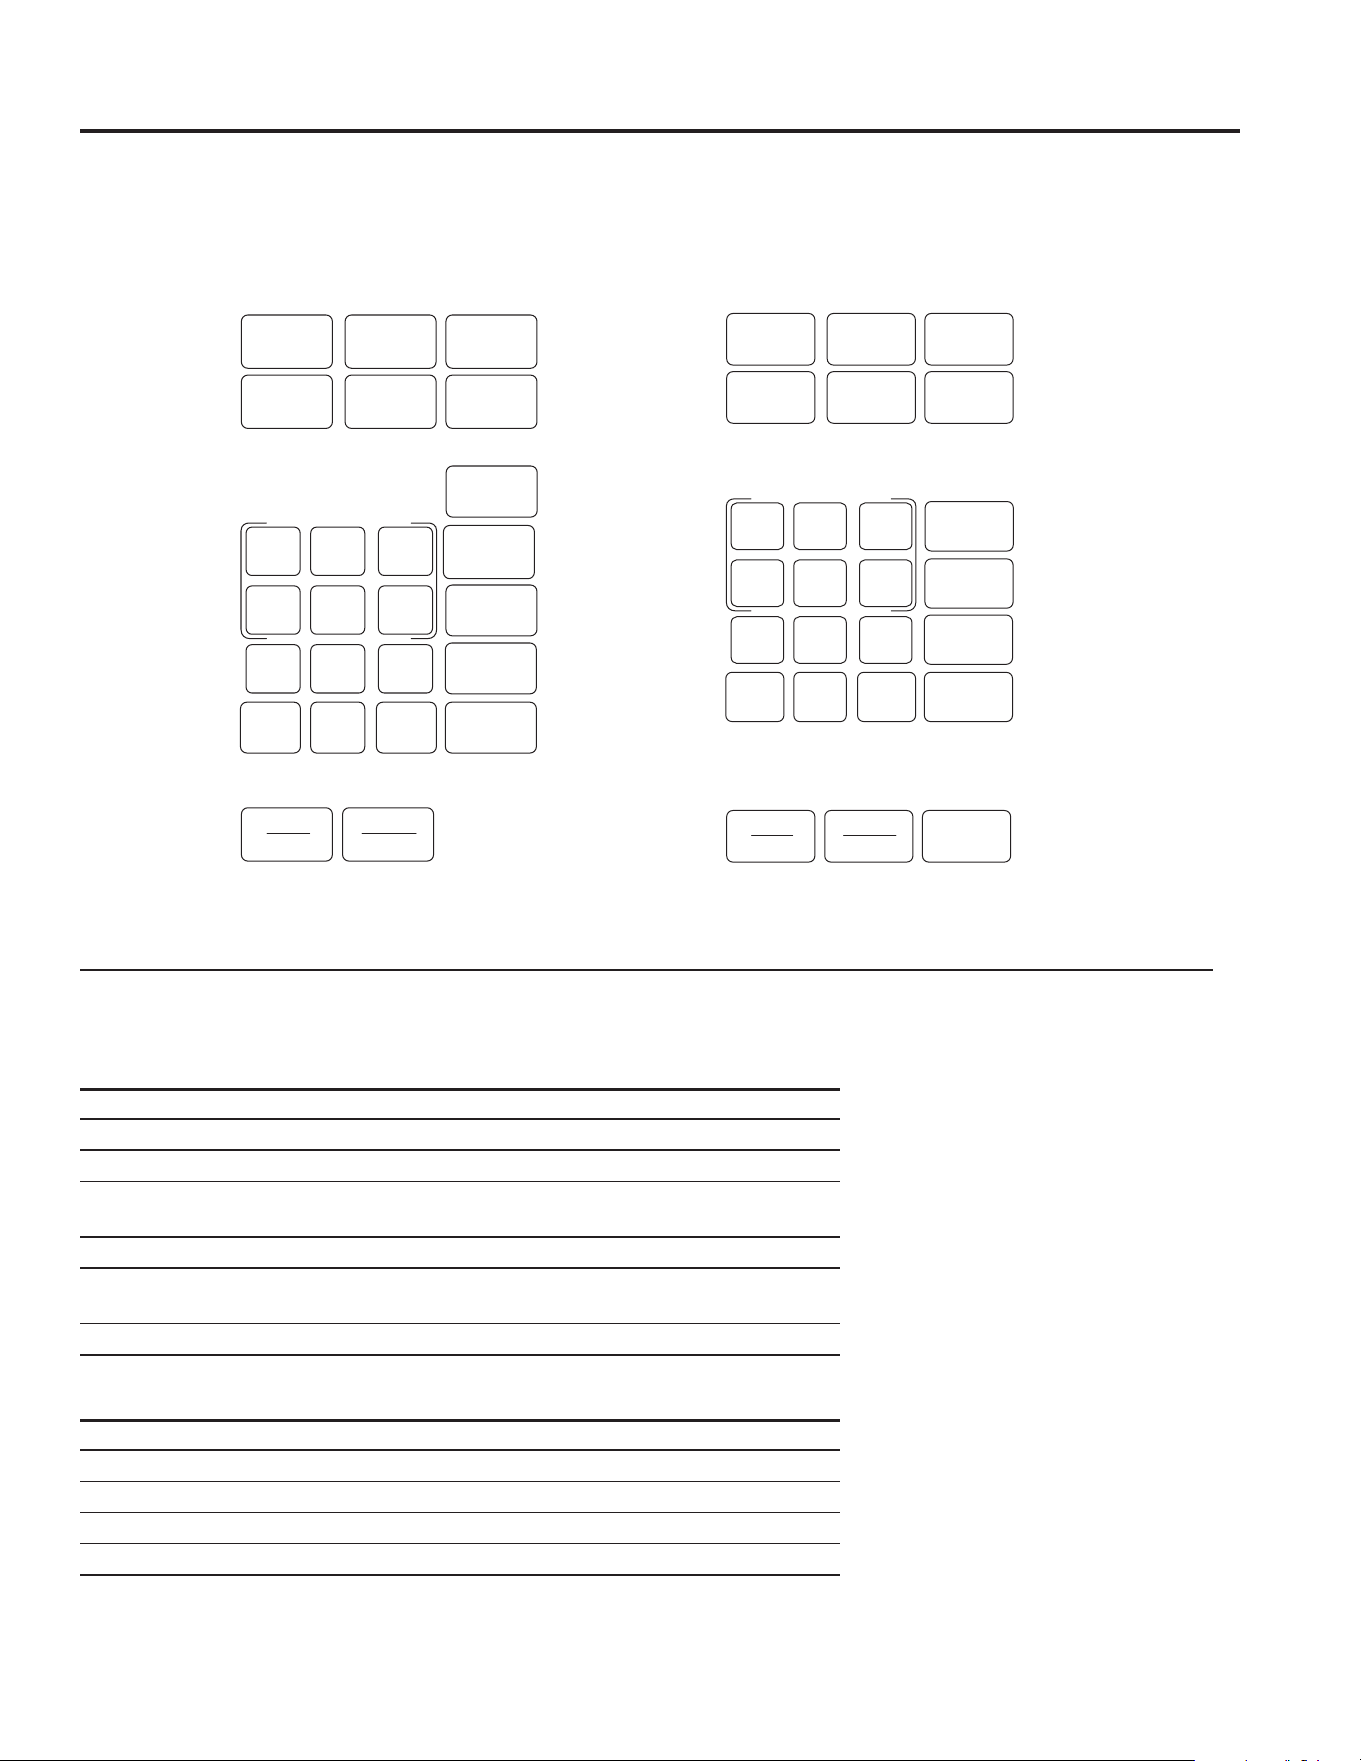
Controls
USING YOUR OVEN: Controls

49-7000115 Rev. 0 7
USING YOUR OVEN: Controls
Controls
You can microwave by time or with the sensor features. Not all features on all models.
Cooking Controls
Check the Convenience Guide before you begin.
0LFURZDYH&RRNLQJ7LPHDQG$XWR)HDWXUHV
Press Enter
Cook Time Amount of cooking time
Defrost Weight or time
Timer
3RZHU/HYHO 3RZHUOHYHOWR
$GG6HF 6WDUWVLPPHGLDWHO\
([SUHVV&RRN 6WDUWVLPPHGLDWHO\
&RQYHQLHQFH)HDWXUHV
Press Enter
3RSFRUQ 6WDUWVLPPHGLDWHO\
Reheat
Press pad to select food
%HYHUDJH 6WDUWVLPPHGLDWHO\
3RWDWR 6WDUWVLPPHGLDWHO\
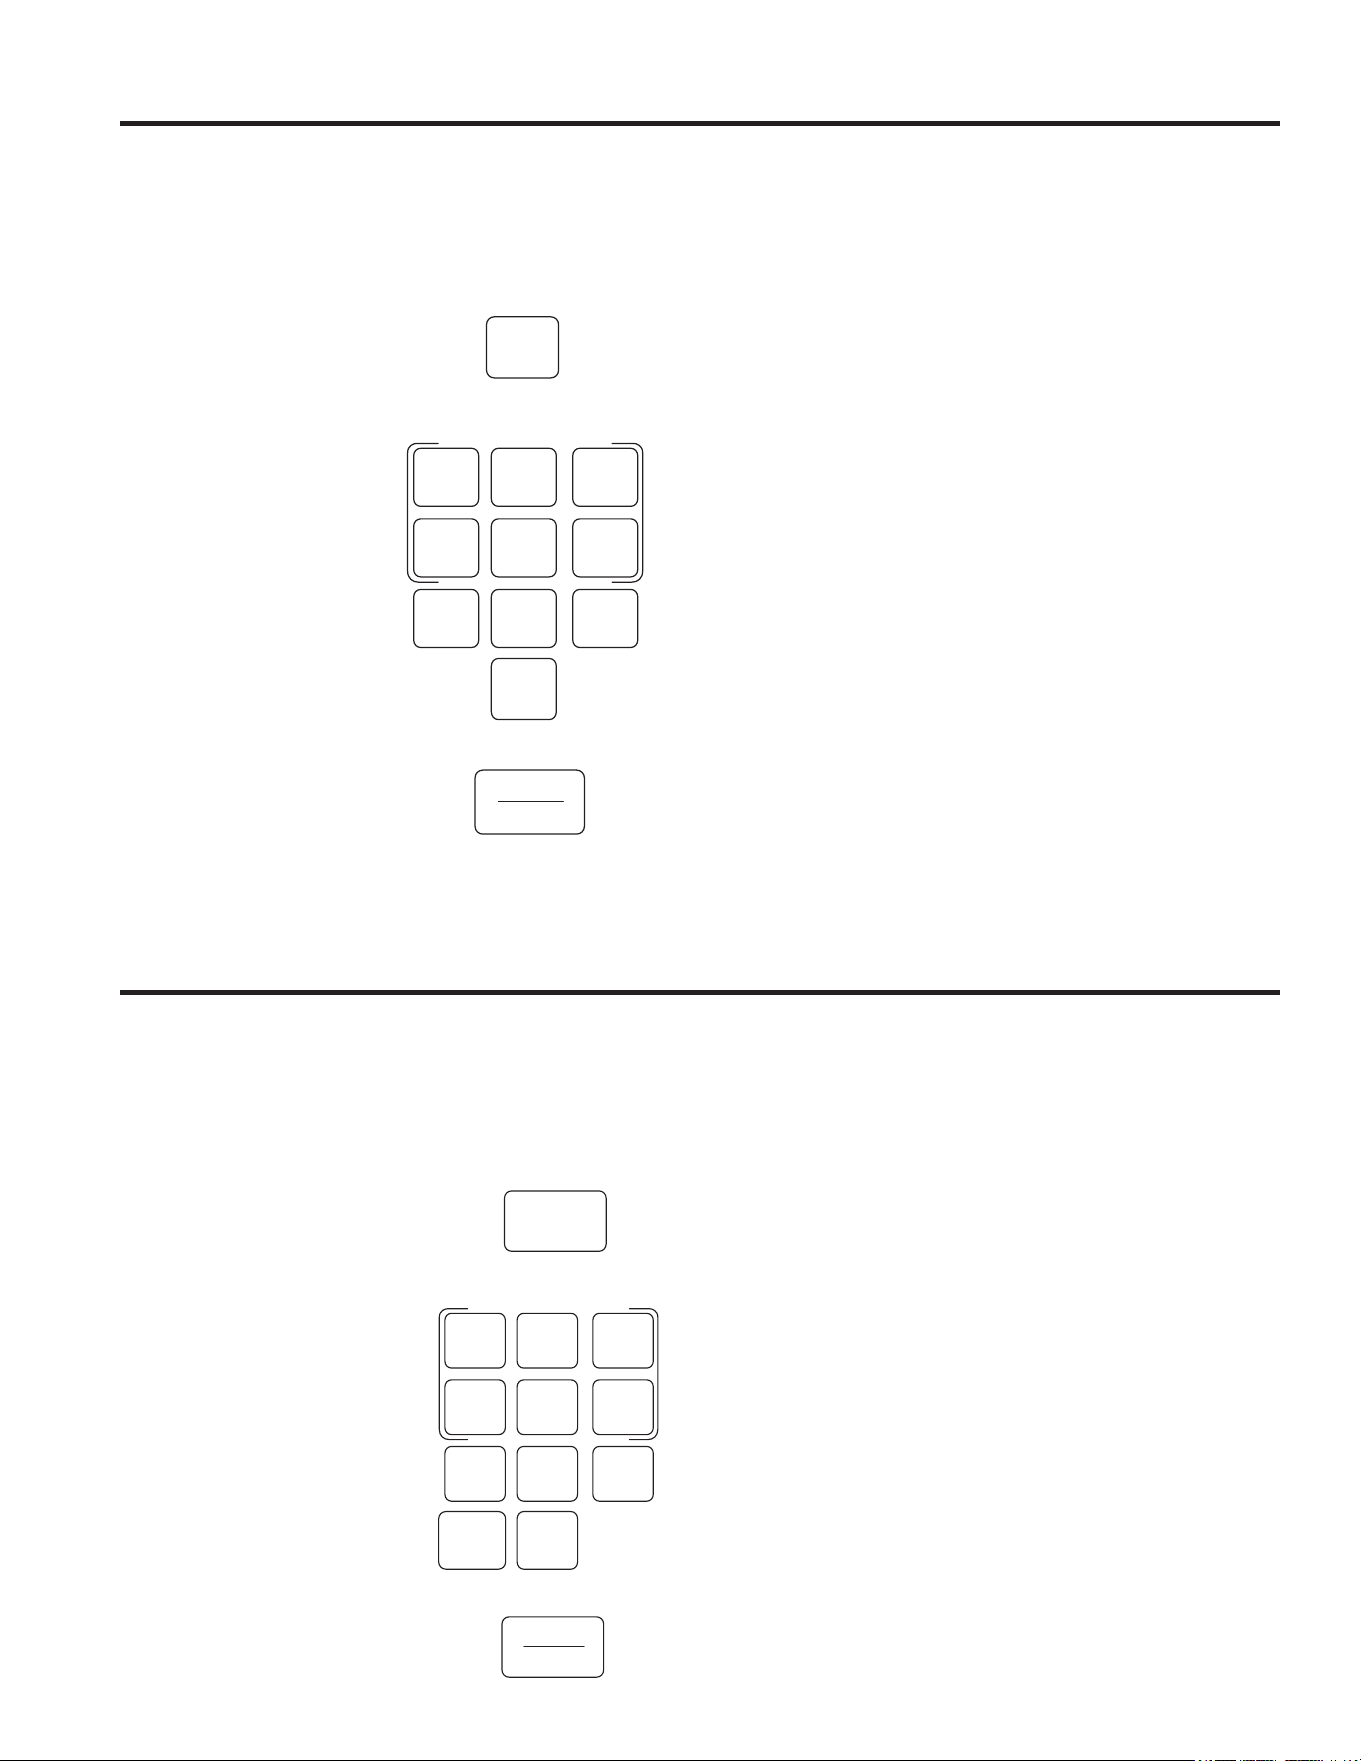
Popcorn
Convenience Cooking
Express Cook
Potato
Start
Pause
Cancel
Off
Beverage
Reheat
Set
Clock
Turntable
Surface
Light
Vent Fan
Add
30 Sec
Power
Level
0
8
5
2
7
4
1
9
6
3
Cook
Time
Defrost
Weight/Time
Timer
On/Off
Mute-
Hold 3 Sec
Lock Controls
Hold 3 Sec
JVM3162 / JNM3163
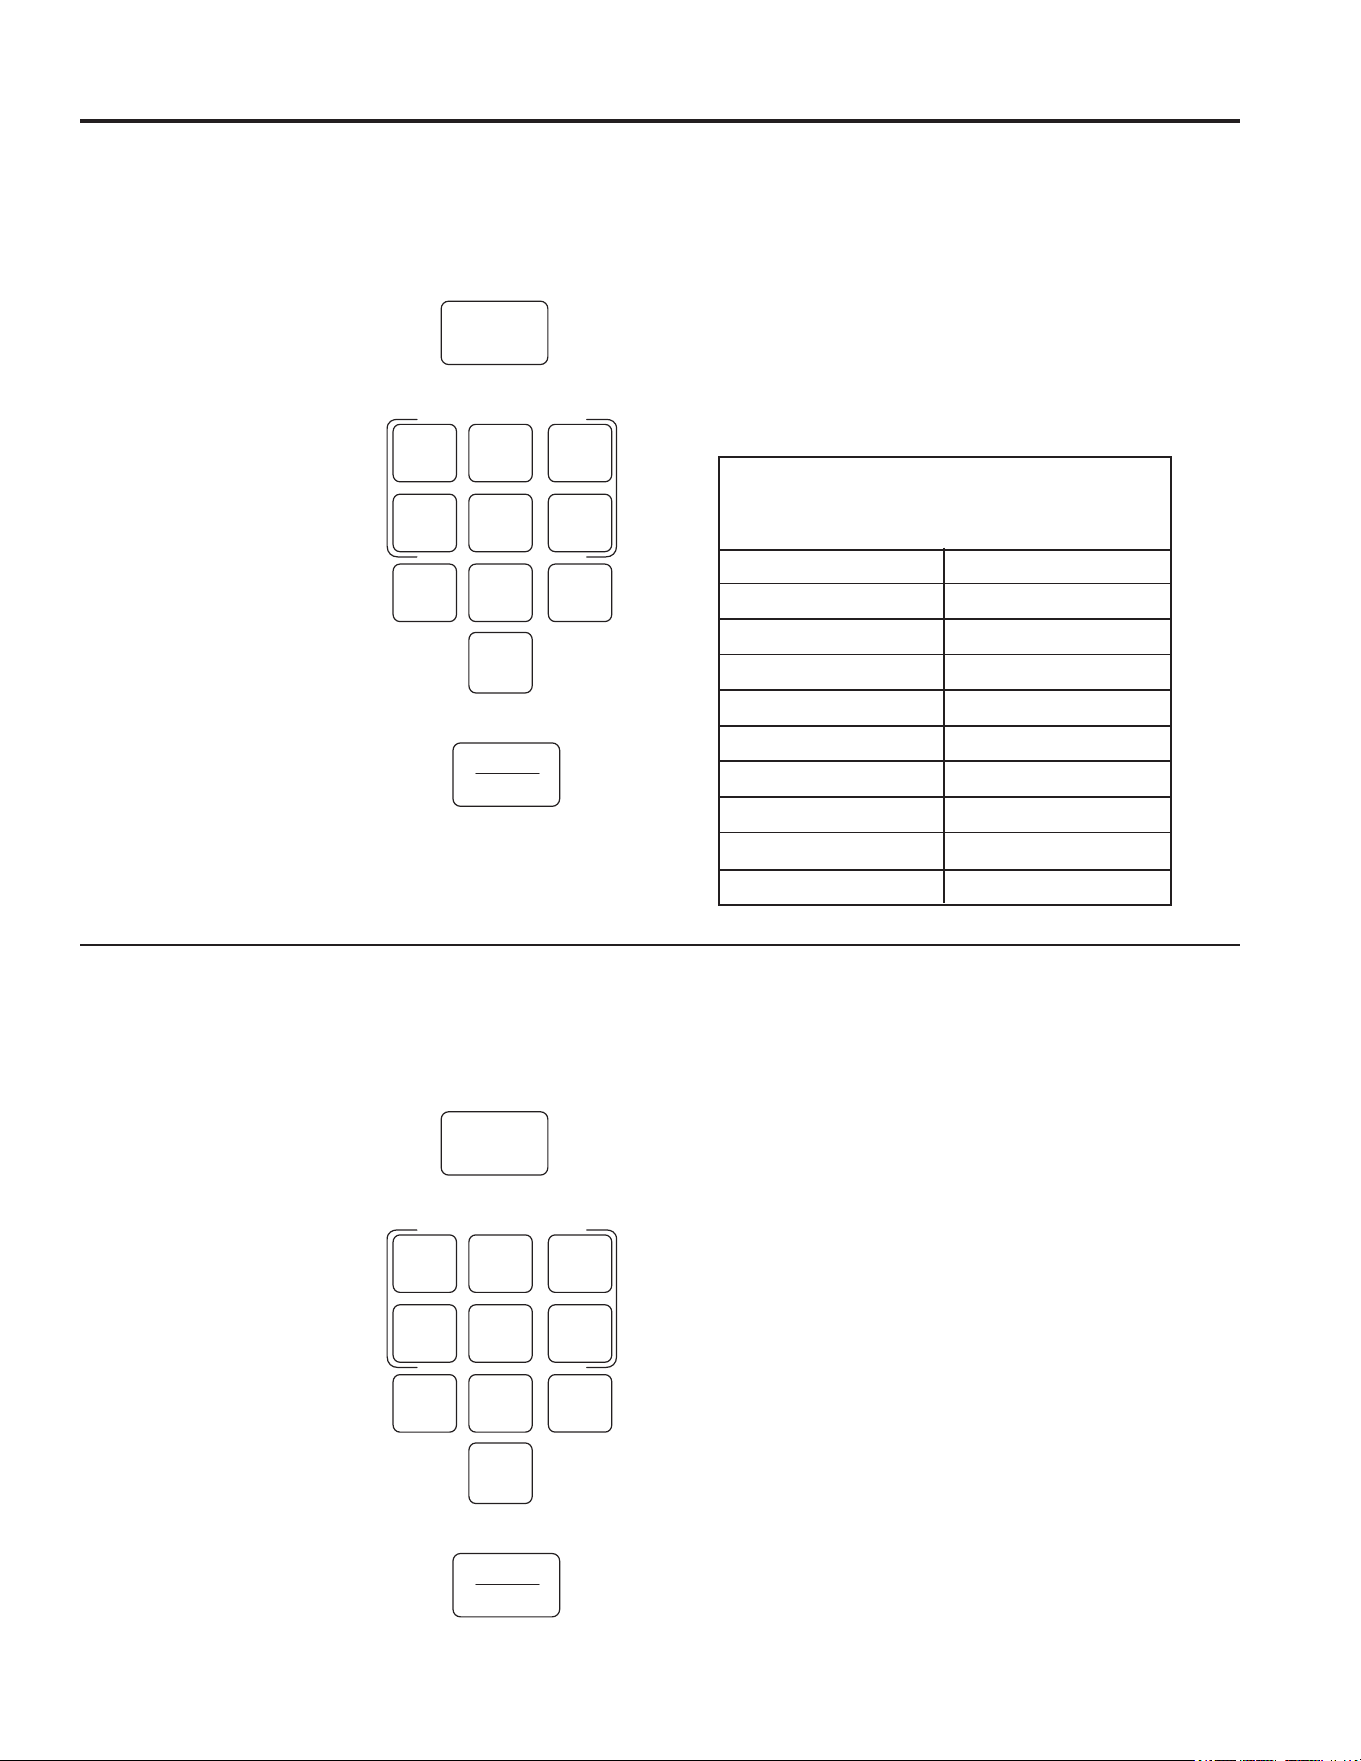
Popcorn
Convenience Cooking
Express Cook
Potato
Start
Pause
Cancel
Off
Beverage
Reheat
Set
Clock
Turntable
Surface
Light
Vent Fan
Add
30 Sec
Power
Level
0
8
5
2
7
4
1
9
6
3
Cook
Time
Defrost
Weight/Time
Timer
On/Off
Lock Controls
Hold 3 Sec
JVM3160
8 49-7000115 Rev. 0
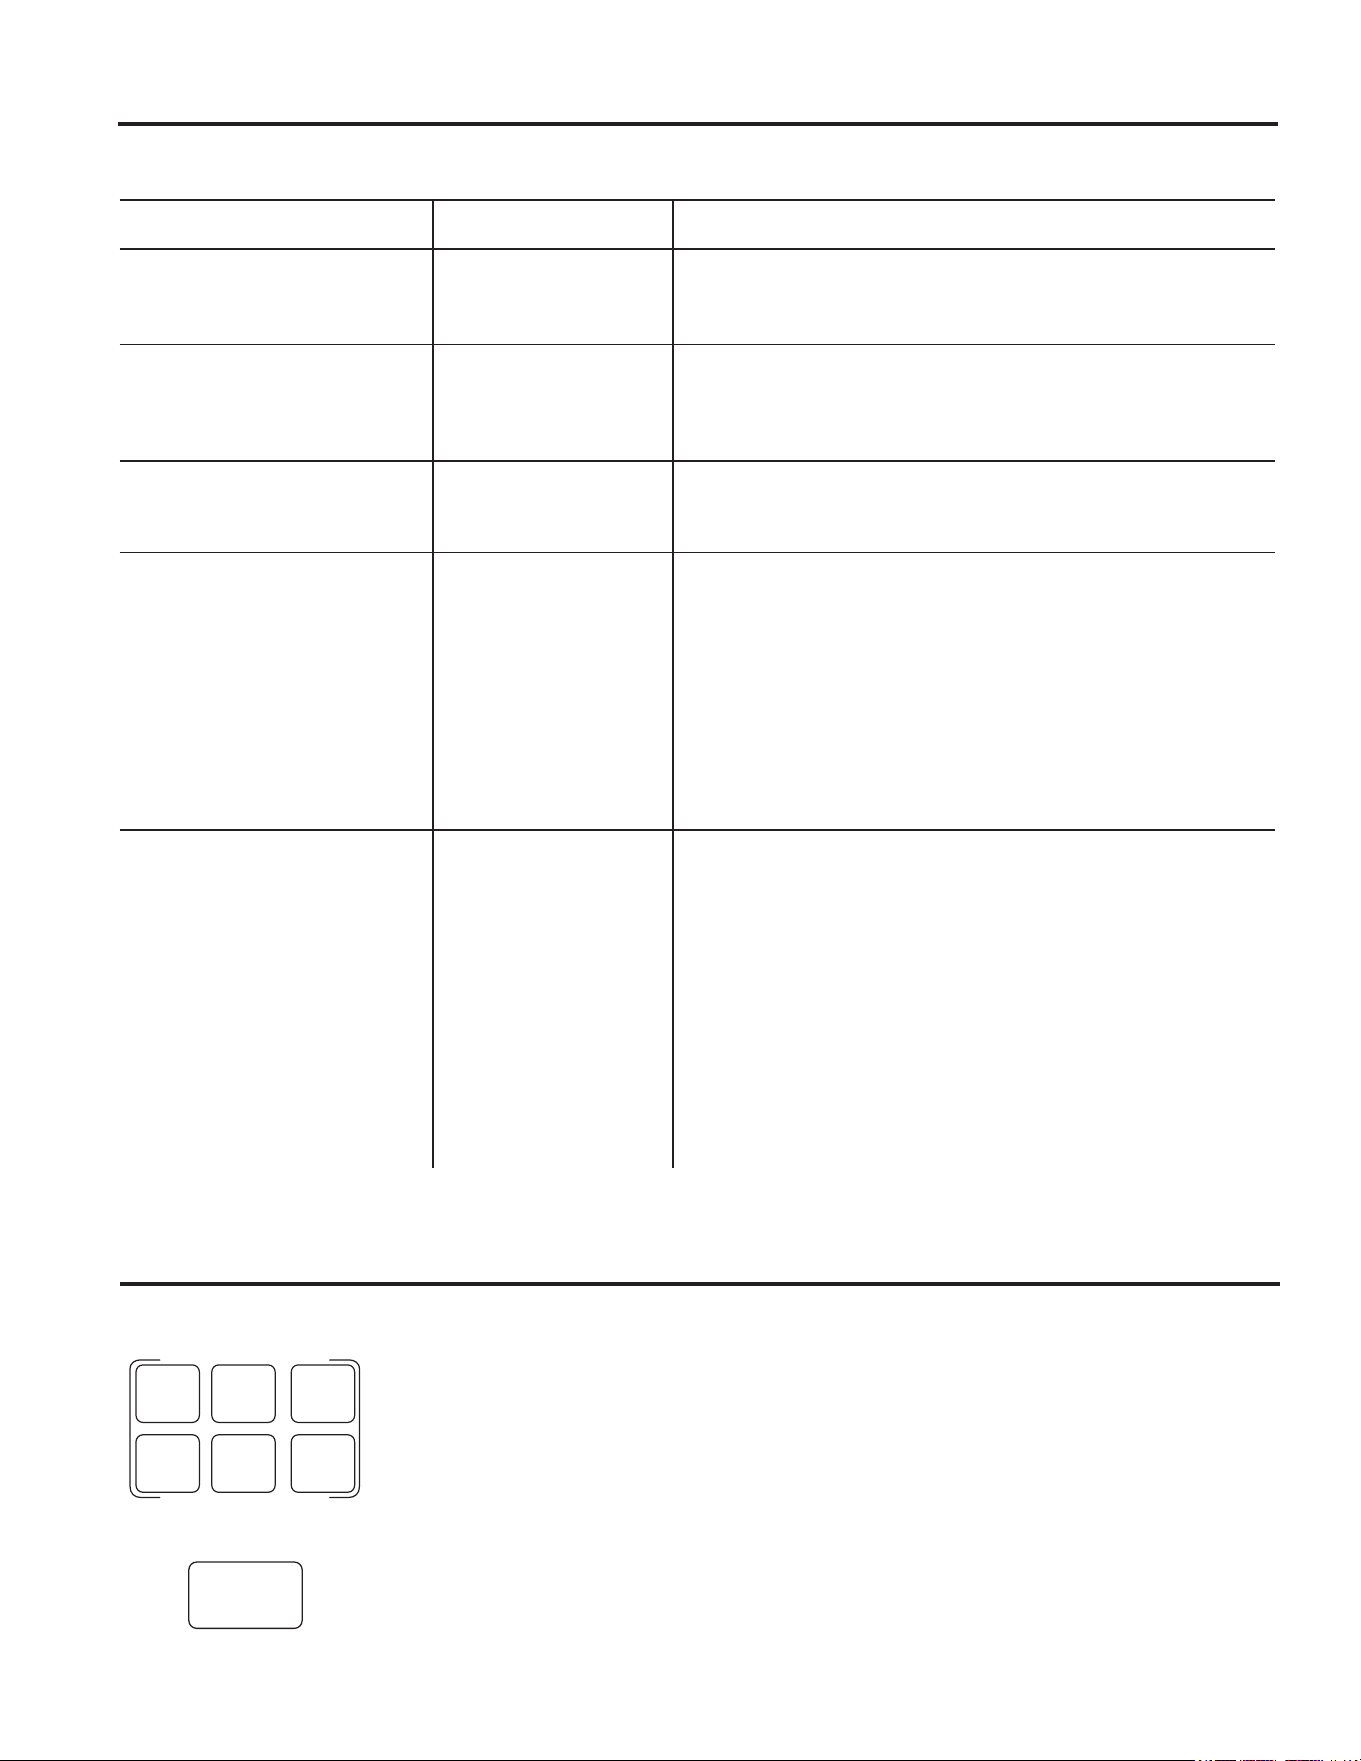
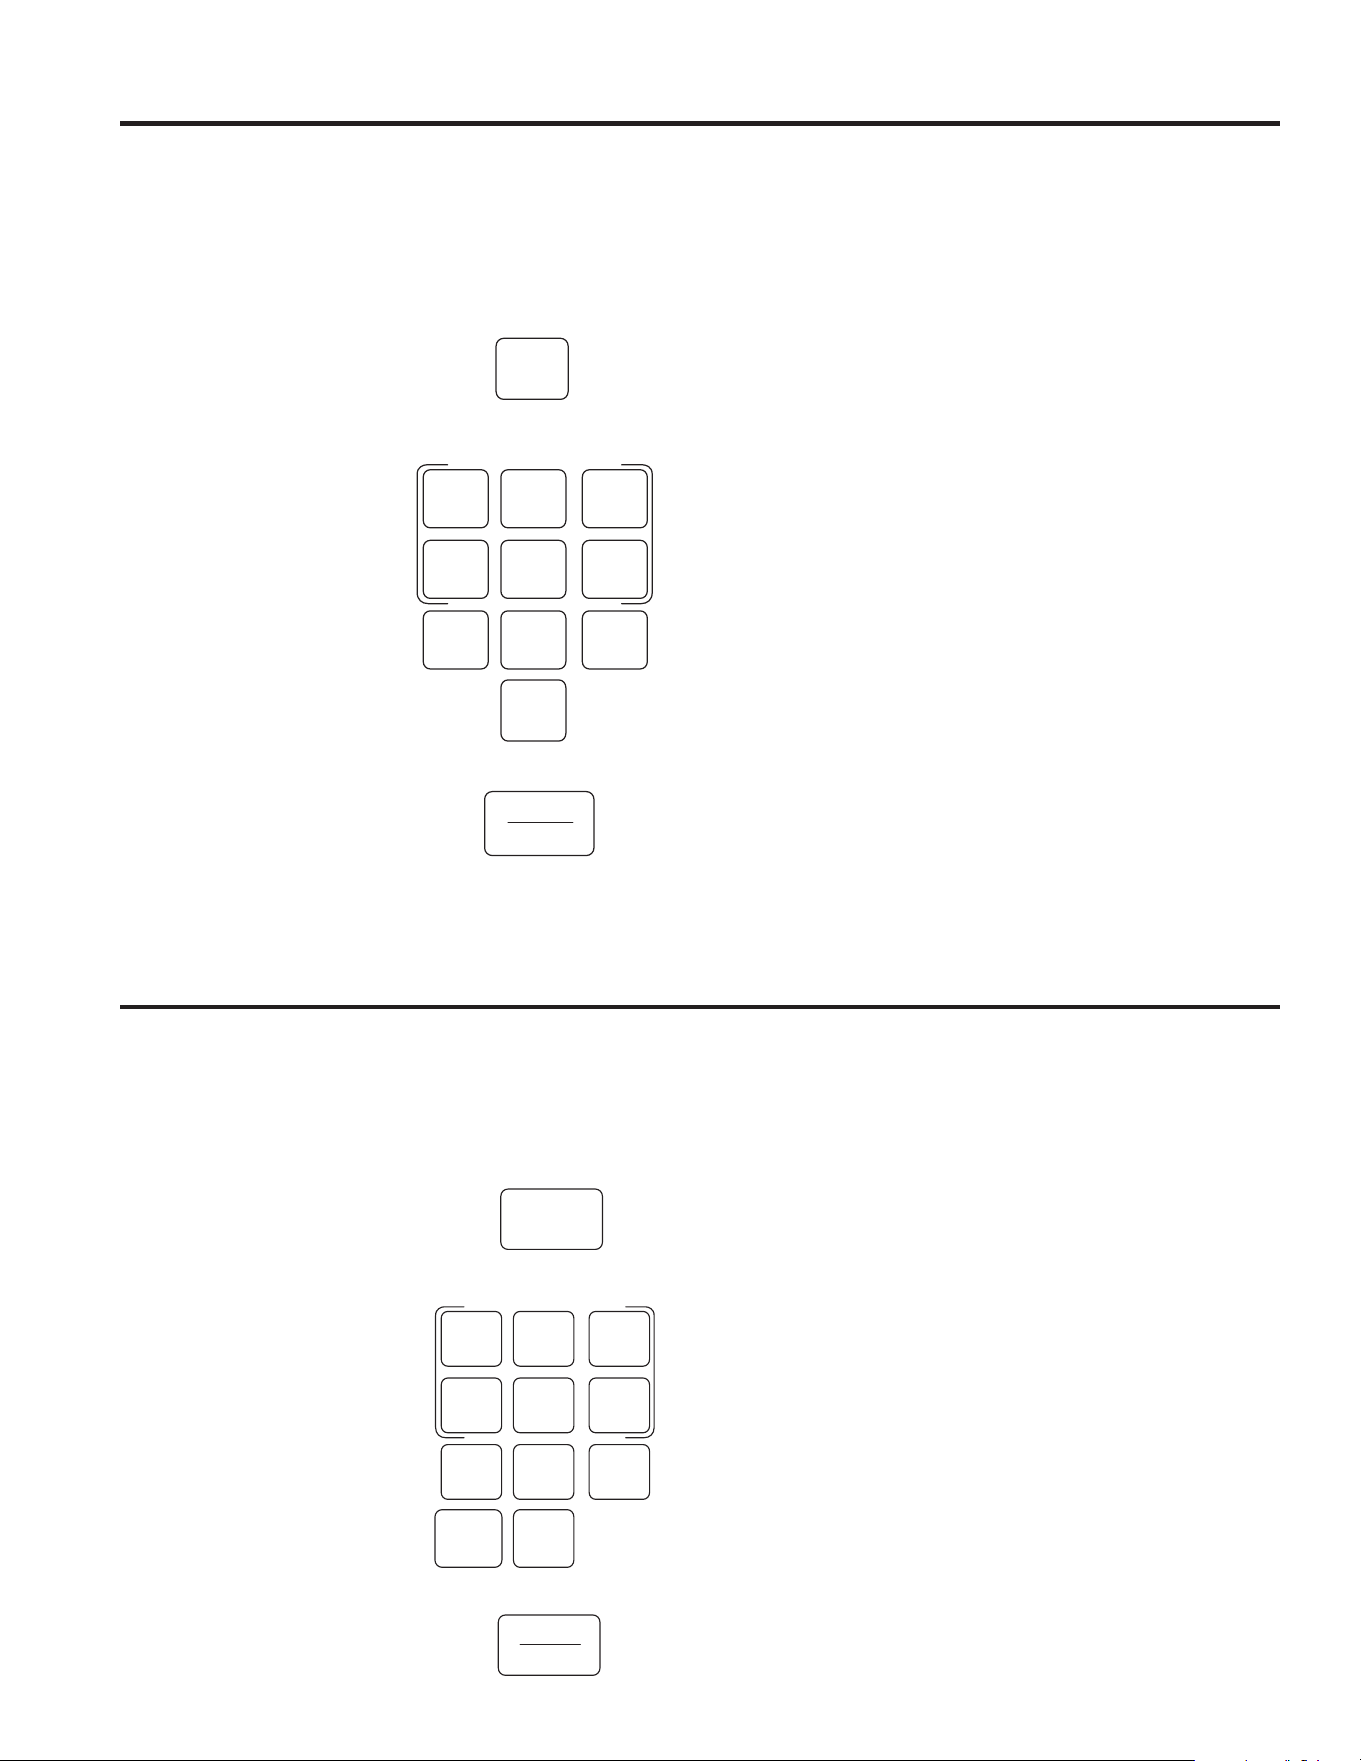
Changing the Power Level
The power level may be entered or changed immediately
after entering the feature time for Cook Time, Time
'HIURVW$GG6HFRU([SUHVV&RRN7KHSRZHUOHYHO
may also be changed during the time countdown.
1. Press Cook Time.
2. Enter cooking or
defrosting time
3. Press Power Level.
4. Select desired power
OHYHO
5. Press Start/Pause.
Pressing Start/Pause
is not necessary for
Express Cook buttons.
Variable power levels add
flexibility to microwave
cooking. The power levels
on the microwave oven
can be compared to the
surface units on a range.
Each power level gives you
microwave energy a certain
percent of the time. Power
OHYHOLVPLFURZDYHHQHUJ\RIWKHWLPH3RZHUOHYHO
LVHQHUJ\RIWKHWLPH0RVWFRRNLQJZLOOEHGRQH
RQ+,ZKLFKJLYHV\RXSRZHU
3RZHU/HYHOZLOOFRRNIDVWHUEXWIRRGPD\QHHGPRUH
IUHTXHQWVWLUULQJURWDWLQJRUWXUQLQJRYHU$ORZHUVHWWLQJ
will cook more evenly and need less stirring or rotating of
the food.
Some foods may have better flavor, texture or
appearance if one of the lower settings is used. Use
a lower power level when cooking foods that have a
tendency to boil over, such as scalloped potatoes.
Rest periods (when the microwave energy cycles off)
JLYHWLPHIRUWKHIRRGWR³HTXDOL]H´RUWUDQVIHUKHDWWR
the inside of the food. An example of this is shown with
power level 3—the defrost cycle. If microwave energy did
not cycle off, the outside of the food would cook before
the inside was defrosted.
Here are some examples of uses for various power
levels:
Power Level 10:)LVKEDFRQYHJHWDEOHVERLOLQJOLTXLGV
Power Level 7: Gentle cooking of meat and poultry;
baking casseroles and reheating.
Power Level 5: Slow cooking and tenderizing for stews
and less tender cuts of meat.
Power Level 2 or 3: Defrosting; simmering; delicate
sauces.
Power Level 1:.HHSLQJIRRGZDUPVRIWHQLQJEXWWHU
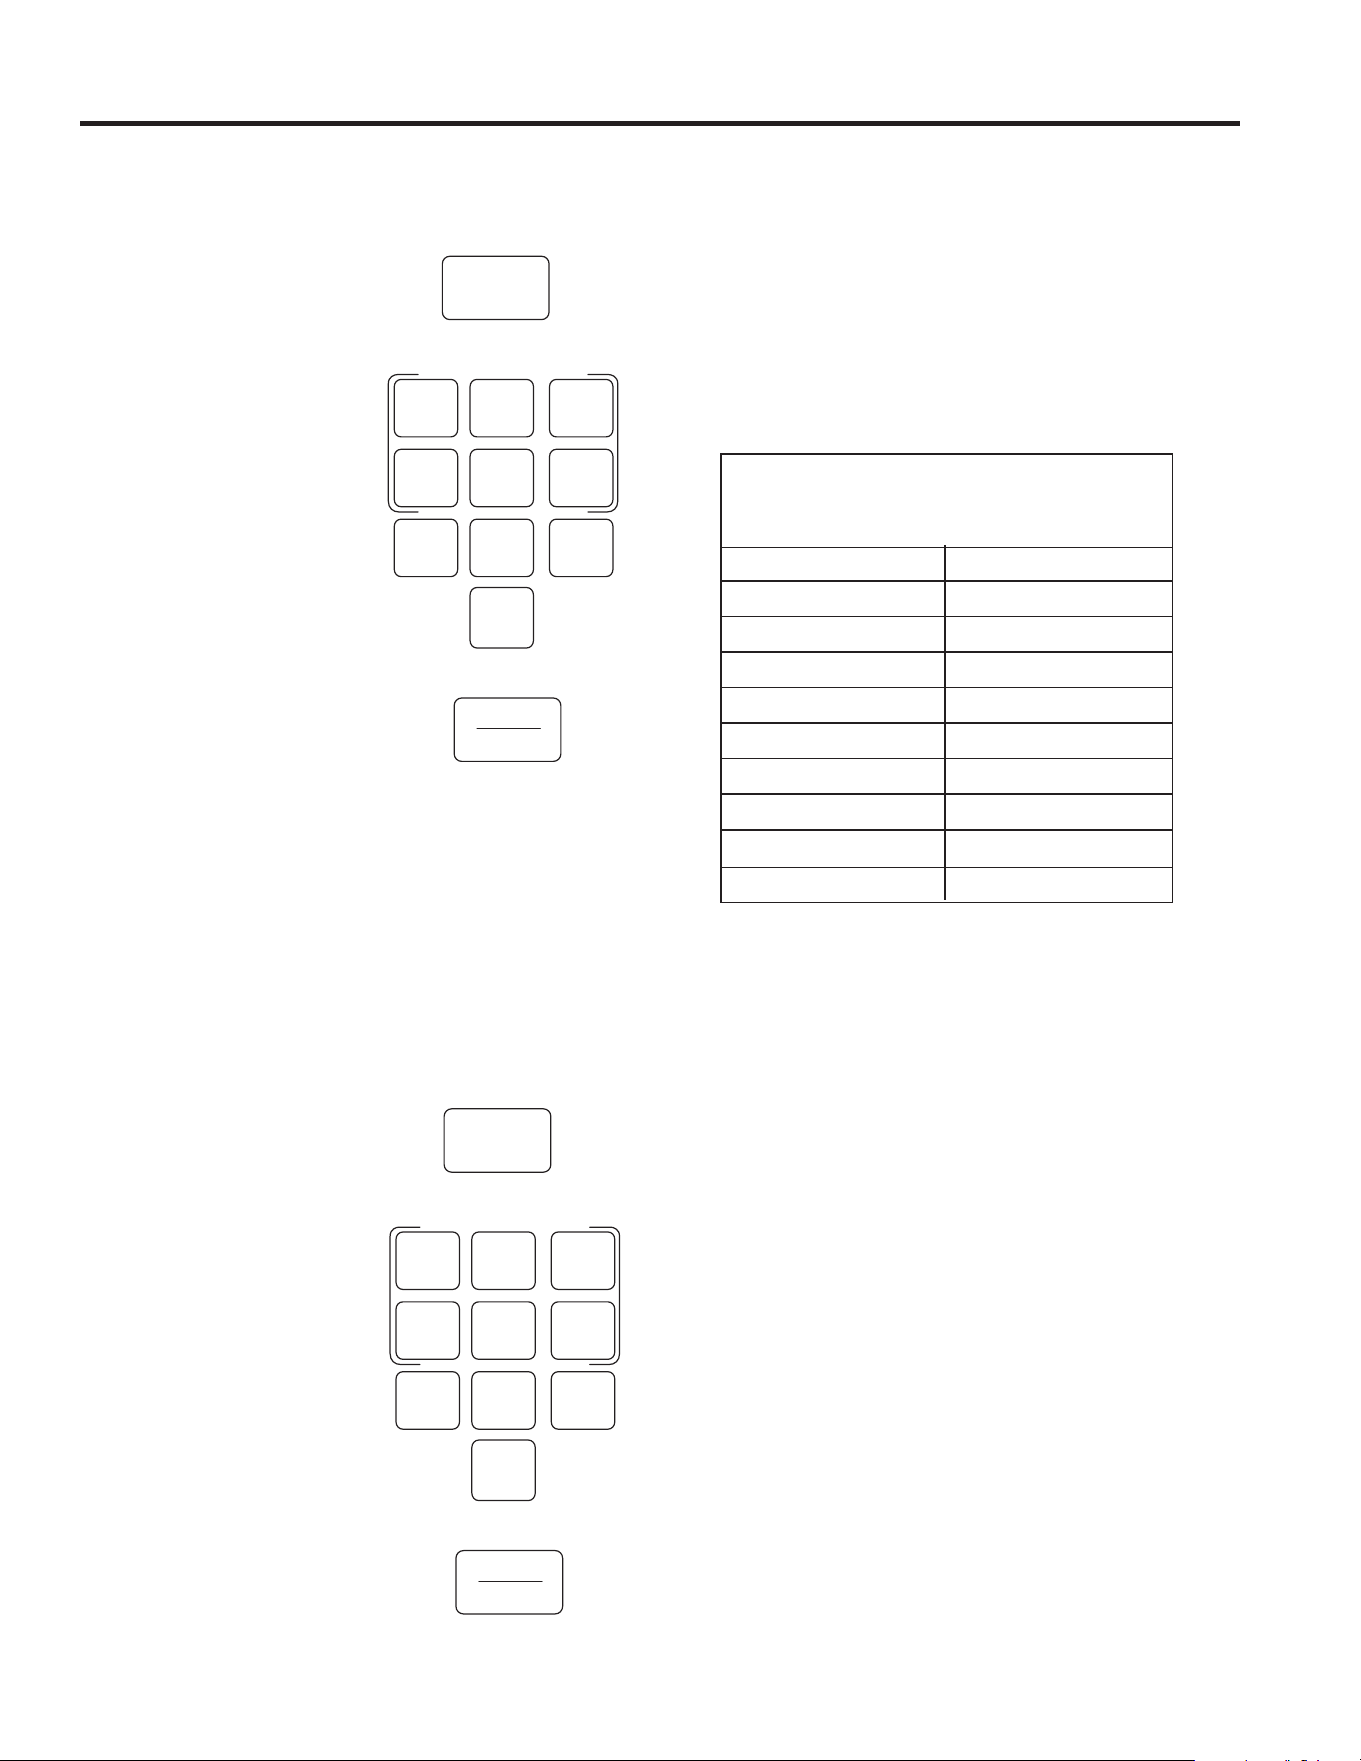
Cook Time I
Allows you to microwave for any time up to 99 minutes
and 99 seconds.
3RZHUOHYHOKLJKLVDXWRPDWLFDOO\VHWEXW\RXPD\
change it for more flexibility.
1. Press Cook Time.
2. Enter cooking time.
3. Change power level if
you don’t want full power.
(Press Power Level. Select
a desired power level
±
4. Press Start/Pause.
You may open the door
during Cook Time to check
the food. Close the door and
press Start/Pause to resume
cooking.
Cook Time II
Lets you change power levels automatically during
cooking. Here’s how to do it:
1. Press Cook Time.
2. Enter the first cook time.
3. Change the power level if you don’t want full power.
(Press Power Level. Select a desired power level
±
4. Press Cook Time again.
5. Enter the second cook time.
&KDQJHWKHSRZHUOHYHOLI\RXGRQ¶WZDQWIXOOSRZHU
(Press Power Level. Select a desired power level
±
7. Press Start/Pause.
At the end of Cook Time I, Cook Time II counts down.
Features
Time Features
USING YOUR OVEN
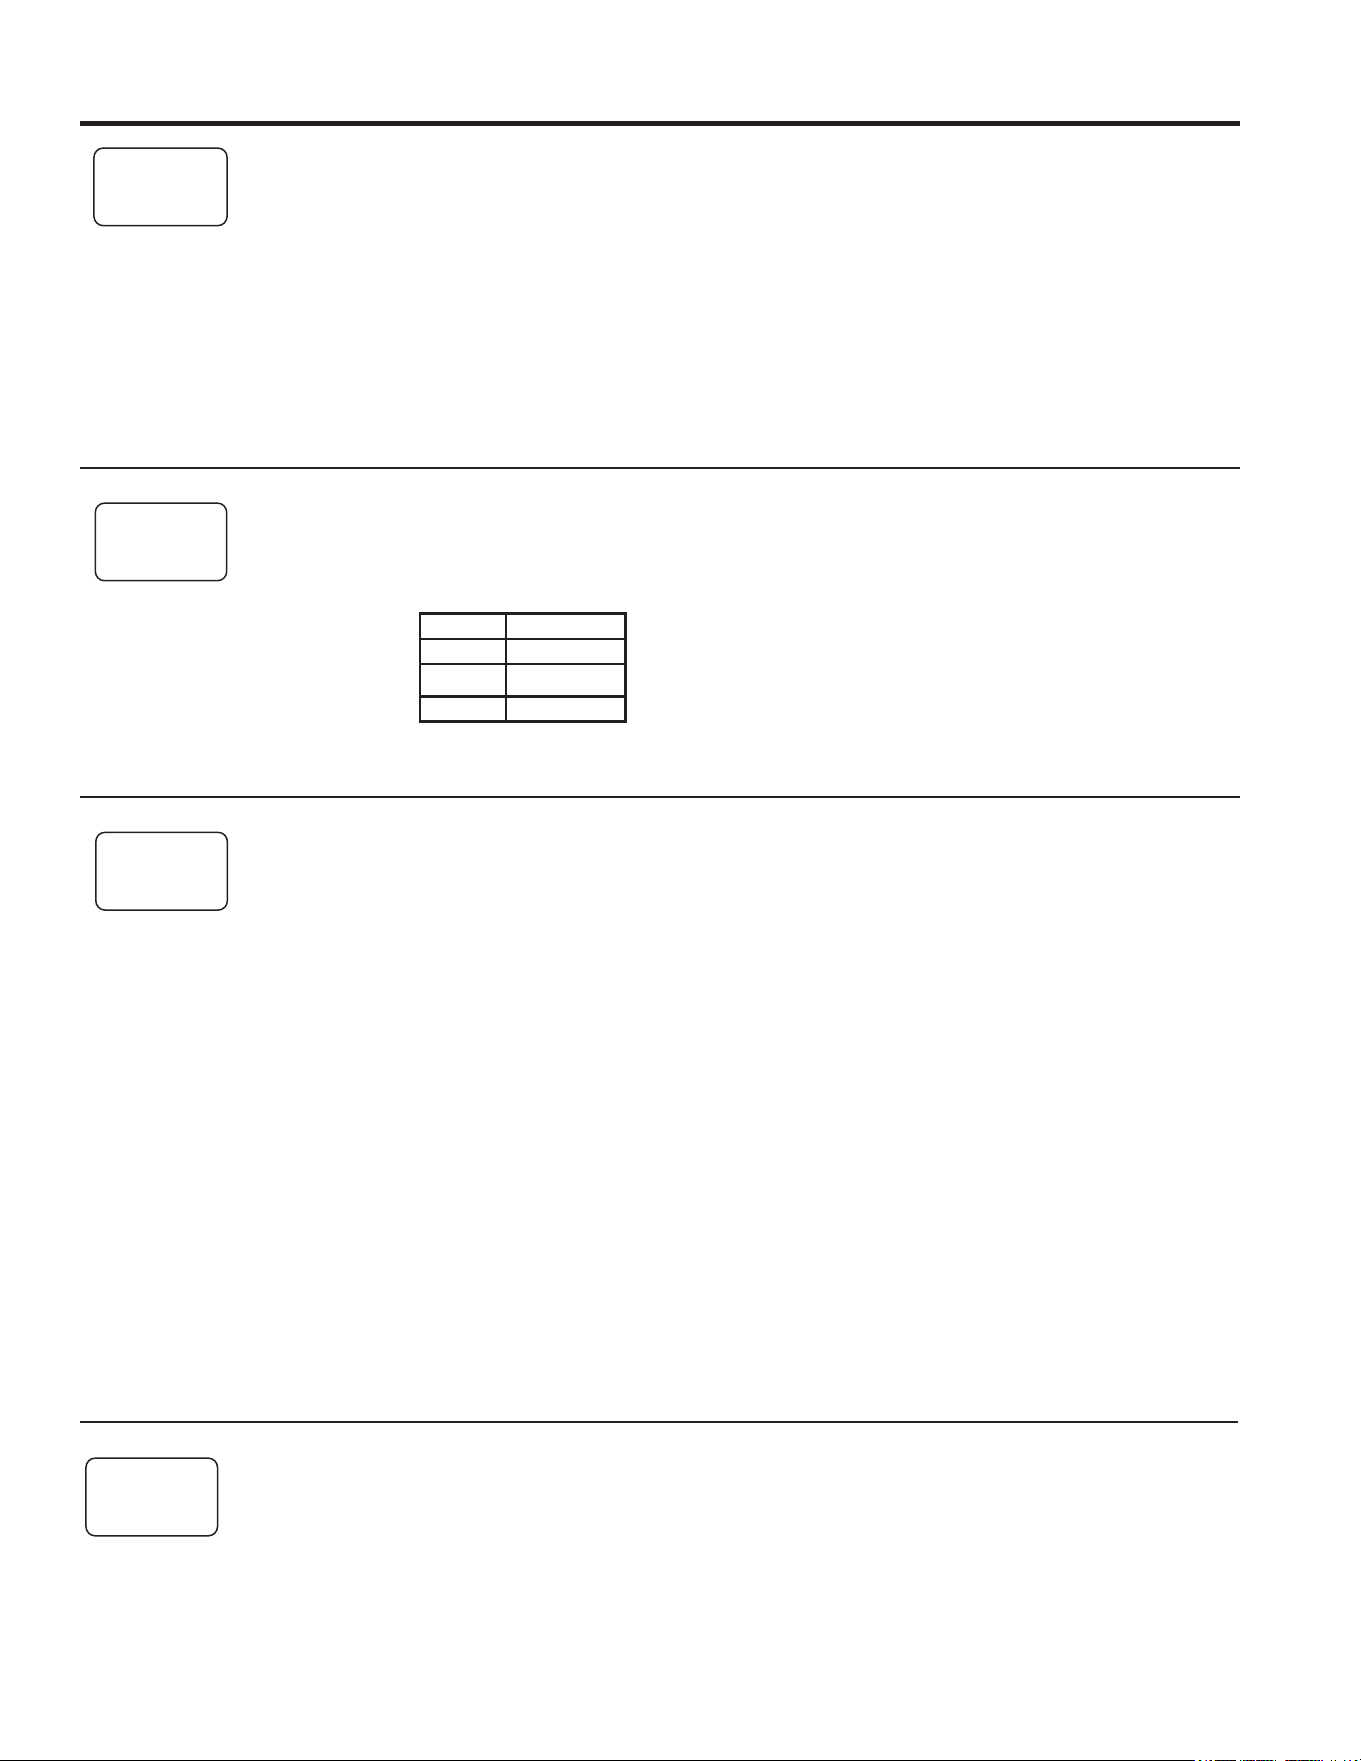
Express Cook
Start
Pause
0
8
5
2
7
4
1
9
6
3
Mute-
Hold 3 Sec
Power
Level
Express Cook
Start
Pause
Power
Level
0
8
5
2
7
4
1
9
6
3
Cook
Time
Mute-
Hold 3 Sec
49-7000115 Rev. 0 9
Weight Defrost
The Defrost Weight/Time feature gives you two ways to
defrost food.
Press Defrost Weight/Time once for weight defrost or
twice for Time Defrost.
Use Weight Defrost for meat,
SRXOWU\DQGILVKXSWR
pounds. Use Time Defrost for
most other frozen foods.
Weight Defrost automatically
sets the defrosting times and
power levels to give even
defrosting results for meats,
poultry and fish.
1. Press Defrost Weight/Time
once.
2. Using the conversion guide,
HQWHUIRRGZHLJKW)RU
example, press pads 1 and
2 for 1.2 pounds (1 pound,
3 ounces).
3. Press Start/Pause.
Remove meat from package and place on microwave-
safe dish.
• When the oven signals, turn the food over. Remove
defrosted meat or shield warm areas with small pieces
of foil.
• After defrosting, most meats need to stand 5 minutes
to complete defrosting. Large roasts should stand for
DERXWPLQXWHV
Time Features
USING YOUR OVEN
Express Cook
Start
Pause
0
8
5
2
7
4
1
9
6
3
Mute-
Hold 3 Sec
Defrost
Weight/Time
If the weight of food is stated in pounds
and ounces, the ounces must be
converted to tenths (.1) of a pound.
Ounces Pounds
1–2 .1
3 .2
4–5 .3
6–7 .4
8 .5
9–10 .6
11 .7
12–13 .8
14–15 .9
Time Defrost
Time Defrost allows you to defrost for a selected length
of time. See the Defrosting Guide for suggested times.
1. Press Defrost Weight/Time twice.
2. Enter defrosting time.
3. Press Start/Pause.
4. Turn food over when the
oven signal.
5. Press Start/Pause.
When the oven signals, turn
food over and break apart or
rearrange pieces for more
even defrosting. Shield any
warm areas with small pieces
of foil. The oven will continue
to defrost if you don’t open the
door and turn the food.
Power level is automatically
set at 3, but can be changed.
You can defrost small items
TXLFNO\E\UDLVLQJWKHSRZHU
level after entering the time.
Power level 7 cuts the total defrosting time in about half;
SRZHUOHYHOFXWVWKHWRWDOWLPHWRDSSUR[LPDWHO\
+RZHYHUIRRGZLOOQHHGPRUHIUHTXHQWDWWHQWLRQWKDQ
usual.
A dull thumping noise may be heard during defrosting.
This is normal when oven is not operating at High power.
Defrosting Tips
)RRGVIUR]HQLQSDSHURUSODVWLFFDQEHGHIURVWHGLQ
the package. Closed packages should be slit, pierced
RUYHQWHG$)7(5IRRGKDVSDUWLDOO\GHIURVWHG3ODVWLF
storage containers should be partially uncovered.
)DPLO\VL]HSUHSDFNDJHGIUR]HQGLQQHUVFDQEH
defrosted and microwaved. If the food is in a foil
container, transfer it to a microwave-safe dish.
)RUPRUHHYHQGHIURVWLQJRIODUJHUIRRGVVXFKDV
roasts, use Defrost Weight. Be sure large meats are
completely defrosted before cooking.
)RRGVWKDWVSRLOHDVLO\VKRXOGQRWEHDOORZHGWRVLW
out for more than one hour after defrosting. Room
temperature promotes the growth of harmful bacteria.
• When defrosted, food should be cool but softened in all
areas. If still slightly icy, return to the microwave very
briefly, or let it stand a few minutes counts down.
Express Cook
Start
Pause
0
8
5
2
7
4
1
9
6
3
Mute-
Hold 3 Sec
Defrost
Weight/Time
49-7000115 Rev. 0
Time Features
About the Time Features
Defrosting Guide
)RRG 7LPH &RPPHQWV
Breads, Cakes
Bread, buns or rolls (1 piece) 1 min.
Sweet rolls (approx. 12 oz.) 3 to 5 min. Rearrange after half of time.
)LVKDQG6HDIRRG
)LOOHWVIUR]HQOE WRPLQ
Shellfish, small pieces (1 lb.) 5 to 7 min. Place block in casserole.
Turn over and break up after first half of time.
)UXLW
3ODVWLFSRXFK²RU WRPLQ
R]SDFNDJH
Meat
Bacon (1 lb.) 2 to 5 min.
Place unopened package in oven. Let stand 5 minutes after
defrosting.
)UDQNVOE WRPLQ 3ODFHXQRSHQHGSDFNDJHLQRYHQ0LFURZDYHMXVWXQWLOIUDQNV
can be separated. Let stand 5 minutes, if necessary, to complete
defrosting.
Ground meat (1 lb.) 5 to 7 min. Turn meat over after first half of time.
5RDVWEHHIODPEYHDOSRUN WRPLQSHUOE 8VHSRZHUOHYHO:DUP
Steaks, chops and cutlets 5 to 7 min. per lb. Place unwrapped meat in cooking dish. Turn over after first half
of time and shield warm areas with foil. After second half of time,
separate pieces with table knife. Let stand to complete defrosting.
Poultry
Chicken, broiler-fryer, cut up 15 to 19 min. Place wrapped chicken in dish. Unwrap and turn over after first
(2
1
/2 to 3 lbs.) half of time. After second half of time, separate pieces and place
in cooking dish. Microwave 2 to 4 minutes more, if necessary. Let
stand a few minutes to finish defrosting.
Chicken, whole (2
1
/2 to 3 lbs.) 17 to 21 min. Place wrapped chicken in dish. After first half of time, unwrap
and turn chicken over. Shield warm areas with foil. To complete
defrosting, run cool water in cavity until giblets can be removed.
Cornish hen 7 to 13 min. per lb. Place unwrapped hen in oven breast-side-up. Turn over after first
half of time. Run cool water in cavity until giblets can be removed.
7XUNH\EUHDVWWROEV WRPLQSHUOE 3ODFHXQZUDSSHGEUHDVWLQPLFURZDYHVDIHGLVKEUHDVWVLGHGRZQ
After first half of time, turn breast-side-up and shield warm areas
with foil. Defrost for second half of time. Let stand 1 to 2 hours in
refrigerator to complete defrosting.
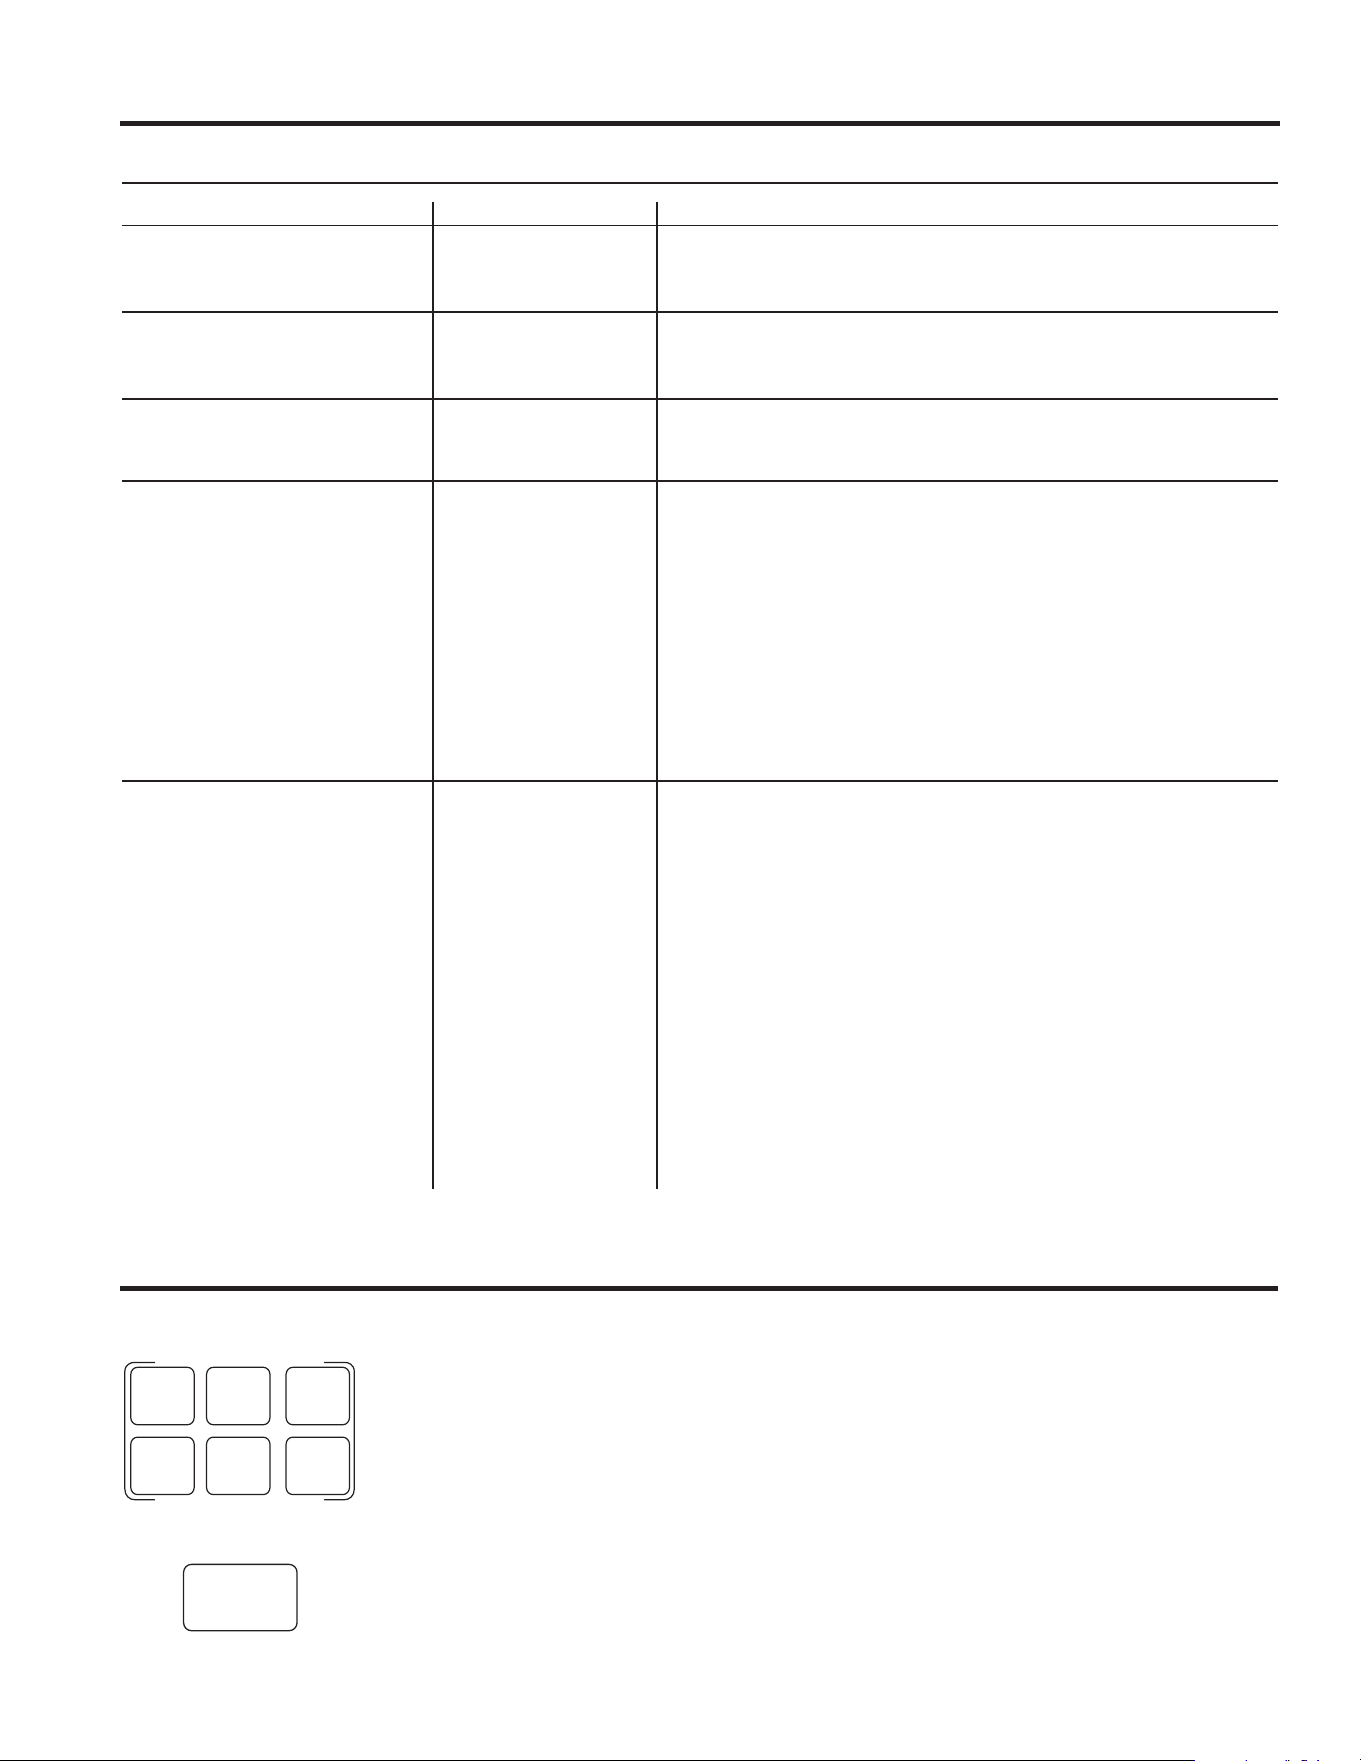
Add 30 Sec
You can use this feature two ways:
Ŷ,WZLOODGGVHFRQGVWRWKHWLPHFRXQWLQJGRZQHDFKWLPHWKHSDGLVSUHVVHG
Ŷ,WFDQEHXVHGDVDTXLFNZD\WRVHWVHFRQGVRIFRRNLQJWLPH
Express Cook
7KLVLVDTXLFNZD\WRVHWFRRNLQJWLPHIRU±PLQXWHV
3UHVVRQHRIWKH([SUHVV&RRNSDGVIURPWRIRUWRPLQXWHVRIFRRNLQJDWSRZHU
OHYHO)RUH[DPSOHSUHVVWKHSDGIRUPLQXWHVRIFRRNLQJWLPH
The power level can be changed as time is counting down. Press POWER LEVEL and
HQWHU±
Add
30 Sec
Express Cook
5
2
4
1
6
3
USING YOUR OVEN
49-7000115 Rev. 0 11
USING YOUR OVEN
Popcorn
To use the Popcorn feature:
Press PopcornRQFHIRURXQFHEDJWZLFHIRURXQFHEDJRUWKUHHWLPHVIRUDRXQFH
bag.
&RRNLQJVWDUWVLPPHGLDWHO\<RXFDQFKDQJHWKHVHOHFWLRQGXULQJWKHLQLWLDOVHFRQGV
If food is undercooked after the countdown, use Cook Time for additional cooking time. We
UHFRPPHQGVHFRQGVDQGZDWFKFDUHIXOO\
8VHRQO\ZLWKSUHSDFNDJHGPLFURZDYHSRSFRUQZHLJKLQJWRRXQFHV
NOTE: Do not use this feature twice in succession on the same food portion—it may result in
severely overcooked or burnt food.
Reheat
The Reheat feature reheats servings of
previously cooked foods or a plate of leftovers.
3ODFHWKHFXSRIOLTXLGRUFRYHUHGIRRGLQWKH
oven.
1. Press the Reheat button up to six times to
choose the correct selection.
Press once for a pizza.
Press twice for vegetables.
Press three times for a plate of leftovers.
Press four times for soup.
Press five times for meat.
Press six times for pasta.
2. Press the 1, 2, or 3 pad to select the serving
VL]H)RUDSODWHRIOHIWRYHUVRQO\RQH
servicing size is valid.
3. Press Start/Pause.
Cooking will start when the countdown begins
in the display.
After removing food from the oven, stir,
if possible, to even out the temperature.
Reheated foods may have wide variations
in temperature. Some areas of food may be
extremely hot.
If food is not hot enough after the countdown
use Cook Time for additional reheating time.
6RPH)RRGV1RW5HFRPPHQGHGIRU8VH
With Reheat
It is best to use Cook Time for these foods:
• Bread products.
)RRGVWKDWPXVWEHUHKHDWHGXQFRYHUHG
)RRGVWKDWQHHGWREHVWLUUHGRUURWDWHG
)RRGVFDOOLQJIRUDGU\ORRNRUFULVSVXUIDFH
after reheating.
NOTE: Do not use this feature twice in
succession on the same food portion—it may
result in severely overcooked or burnt food.
Potato
To use the Potato feature:
Place the potato(es) into the oven.
Press Potato up to four times to choose the
correct selection.
Press once for 1 item.
Press twice for 2 items.
Press three times for 3 items.
Press four times for 4 items.
Cooking starts immediately. You can change
WKHVHOHFWLRQGXULQJWKHLQLWLDOVHFRQGV
NOTE: Do not use this feature twice in
succession on the same food portion—it may
result in severely overcooked or burnt food.
About the Convenience Features
Beverage
Use the Beverage feature to heat various
DPRXQWVRIOLTXLGVPHDVXUHGLQRXQFHV3ODFH
WKHOLTXLGLQWRWKHPLFURZDYHRYHQ
4 oz. 1/2 cup
8 oz. 1 cup
12 oz. 1-1/2 cups
R] 2 cupls
Press Beverage up to four times to choose
the correct selection.
•
Press once for a 4 ounce beverage.
•
Press twice for an 8 ounce beverage.
•
Press three times for a 12 ounce beverage.
•
3UHVVIRXUWLPHVIRUDRXQFHEHYHUDJH
Cooking starts immediately. You can change
WKHVHOHFWLRQGXULQJWKHLQLWLDOVHFRQGV
Popcorn
Beverage
Reheat
Potato
12 49-7000115 Rev. 0
Other Features
USING YOUR OVEN: 2WKHU)HDWXUHV
Cooking Complete Reminder
7RUHPLQG\RXWKDW\RXKDYHIRRGLQWKHRYHQWKHRYHQZLOOGLVSOD\³)RRGLV5HDG\´DQGEHHS
once a minute until you either open the oven door or press Cancel/Off.
Set Clock
To change the time of day:
1. Press Set Clock. (The microwave should
not be running.)
2. Enter the appropriate time of day. Clock is
on a 12-hour scale by default.
3. Press Set Clock or Start/Pause to accept
the time.
Press and hold Set Clock for 3 seconds
to switch the clock between 12-hour and
24-hour scales. (The microwave should not be
running.)
Control Lock-Out
You may lock the control panel to prevent the
oven from being accidentally started during
cleaning or being used by children.
To lock or unlock the controls, press and hold
Cancel/Off for about three seconds. When the
control panel is locked, “Loc” will be displayed
briefly anytime a button is pressed.
Start/Pause
In addition to starting many functions, Start/Pause allows you to stop cooking without opening
the door or clearing the display. Press Start/Pause again to restart the oven.
Turntable
)RUEHVWFRRNLQJUHVXOWVOHDYHWKHWXUQWDEOH
on. It can be turned off for large dishes.
Press Turntable once to turn the turntable off.
Press again to turn the turntable back on.
Sometimes the turntable can become too hot
to touch. Be careful touching the turntable
during and after cooking.
Turntable can be turned off during Cook
Time or Express Cook features by pressing
Turntable. Note: At the conclusion of Cook
Time and Express Cook features, the turntable
will automatically return to ON.
Timer On/Off
NOTE: The Timer indicator will be lit while the
timer is operating.
The Timer operates as a minute timer and
can be used at any time, even when the oven
is operating.
1. Press Timer On/Off.
2. Enter a time.
3. Press Timer On/Off to start.
To cancel, press Timer On/Off again before
any entry is made or when Timer is shown
countdown on the display”.
NOTE: If you press Cancel/Off to cancel the
timer and you are cooking at the same time, it
will cancel your cooking selection also.
When time is up, the oven will signal. To turn
off the timer signal, press Timer On/Off.
Set
Clock
Cancel
Off
Lock Controls
Hold 3 Sec
Timer
On/Off
Start
Pause
Turntable

49-7000115 Rev. 0 13
Vent Fan
The vent fan removes steam and other vapors
from surface cooking.
3UHVV9HQW)DQRQFHIRUKLJKIDQVSHHGWZLFH
for low fan speed or three times to turn the fan
off.
Surface Light
Press Surface Light once for bright light, twice for the night light or a third time to turn the light off.
Sound On/Off (JVM3162/JNM3163 only)
3UHVVDQGKROG³´IRUVHFRQGVWRVZLWFKWKHVRXQGRQRURII)DXOWEHHSVLJQDOVFDQQRWEH
turned off.
Automatic Fan
An automatic fan feature protects the
microwave from too much heat rising from the
cooktop below it. It automatically turns on at
low speed if it senses too much heat.
If you have turned the fan on you may
find that you cannot turn it off. The fan will
automatically turn off when the internal
SDUWVDUHFRRO,WPD\VWD\RQIRUPLQXWHV
or more after the cooktop and microwave
controls are turned off.
Vent Fan
Surface
Light
Other Features
USING YOUR OVEN: 2WKHU)HDWXUHV
0
Mute-
Hold 3 Sec

14 49-7000115 Rev. 0
Microwave terms
Arcing Arcing is the microwave term for sparks in the
oven. Arcing is caused by:
• the metal shelf being installed incorrectly and
touching the microwave walls.
• metal or foil touching the side of the oven.
• foil that is not molded to food (upturned edges
act like antennas).
• metal such as twist-ties, poultry pins, gold-
rimmed dishes.
• recycled paper towels containing small metal
pieces.
• the turntable ring support being installed
incorrectly.
Covering Covers hold in moisture, allow for more even
heating and reduce cooking time. Venting plastic wrap or
covering with wax paper allows excess steam to escape.
Shielding In a regular oven, you shield chicken breasts
or baked foods to prevent over-browning. When
microwaving, use small strips of foil to shield thin parts,
such as the tips of wings and legs on poultry, which
would cook before larger parts.
Standing Time When you cook with regular ovens,
foods such as roasts or cakes are allowed to stand
to finish cooking or to set. Standing time is especially
important in microwave cooking. Note that a microwaved
cake is not placed on a cooling rack.
Venting After covering a dish with plastic wrap, you vent
the plastic wrap by turning back one corner so excess
steam can escape.
USING YOUR OVEN
49-7000115 Rev. 0 15
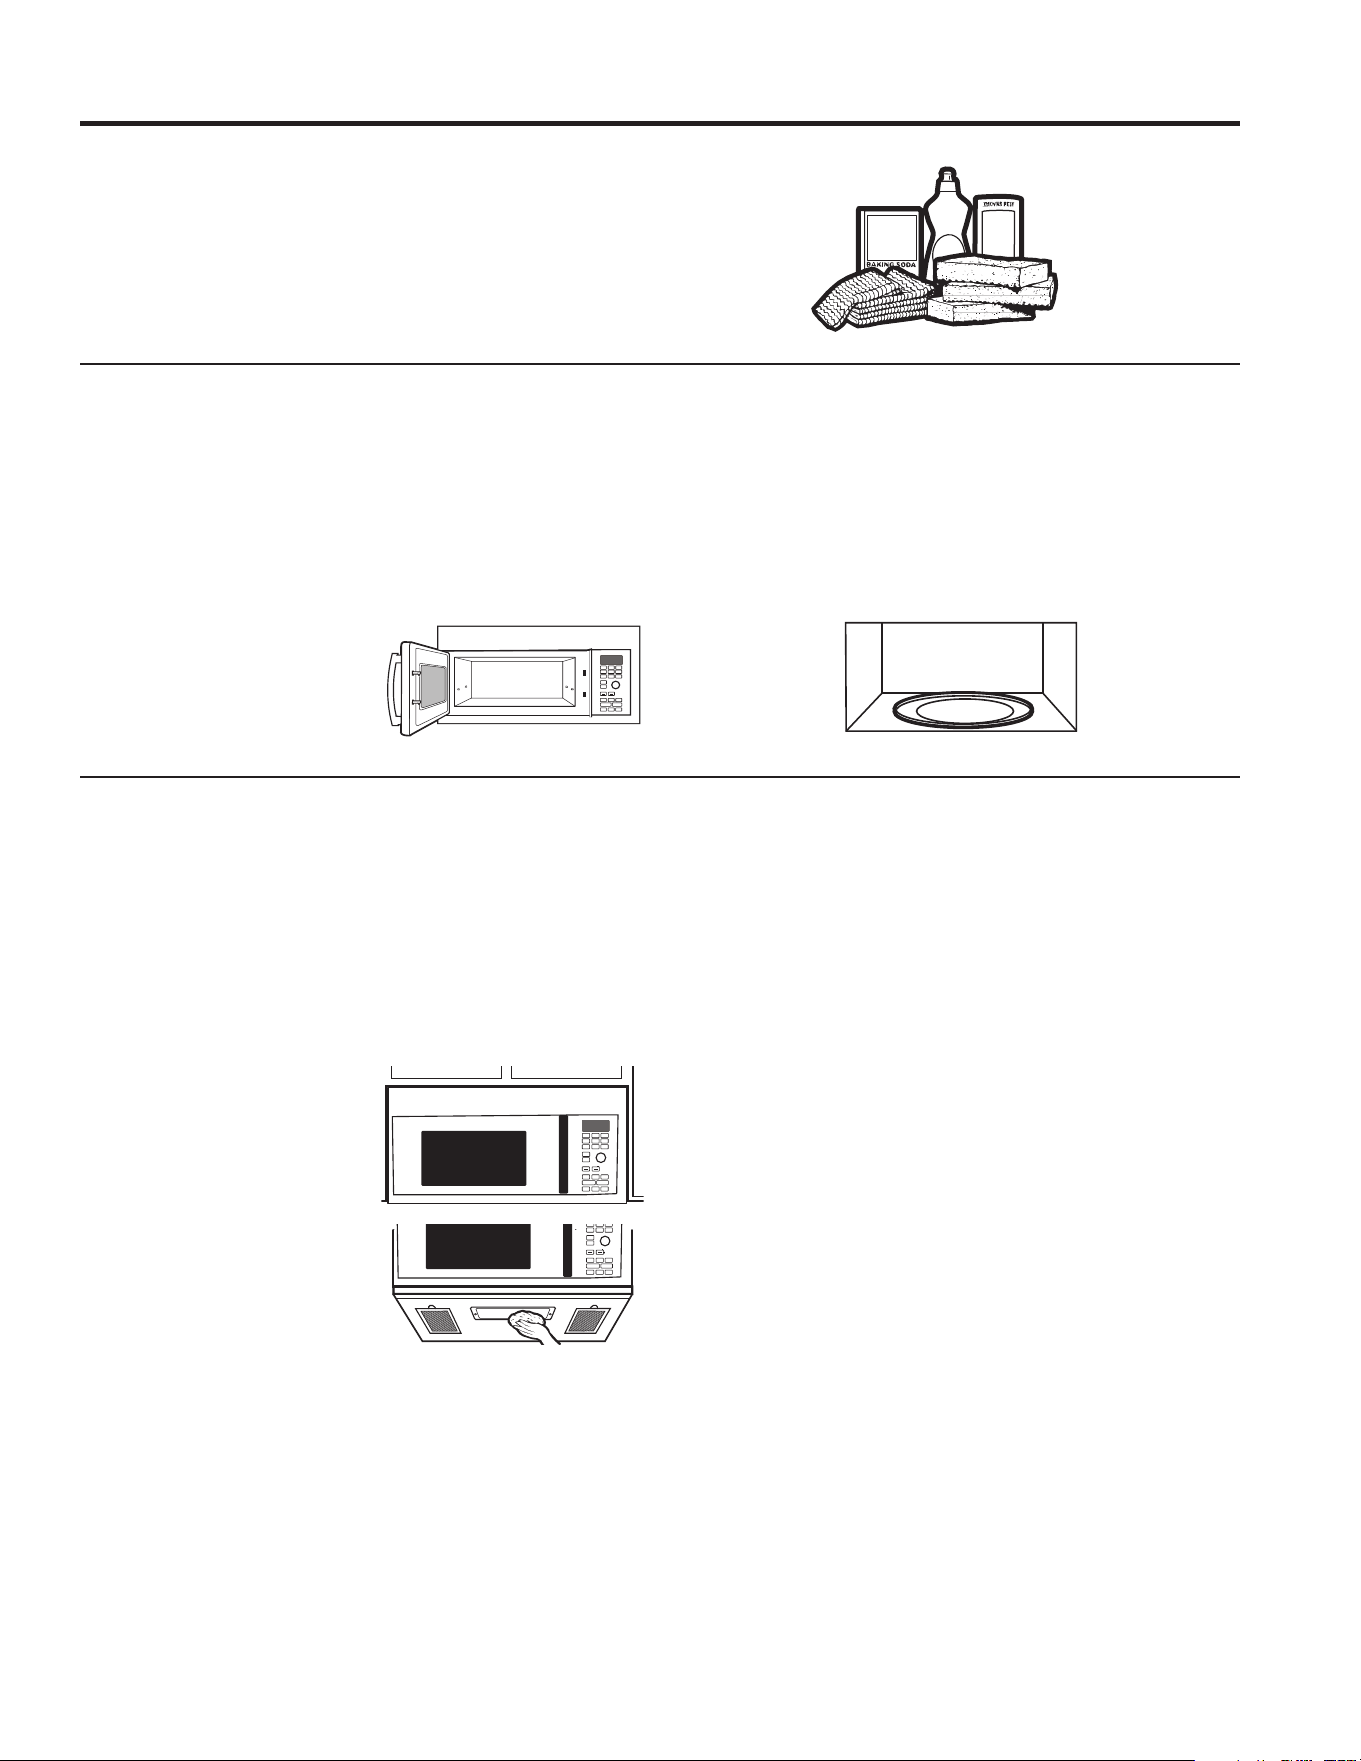
Helpful Hints
An occasional thorough wiping with a solution of baking
soda and water keeps the inside fresh.
Be sure the power is off before cleaning any part of this
oven.
How to Clean the Inside
Walls, Floor, Inside Window, Metal and Plastic Parts
on the Door
Some spatters can be removed with a paper towel;
RWKHUVPD\UHTXLUHDGDPSFORWK5HPRYHJUHDV\
spatters with a sudsy cloth, then rinse with a damp cloth.
Do not use abrasive cleaners or sharp utensils on oven
walls.
Never use a commercial oven
cleaner on any part of your
microwave.
Removable Turntable and Turntable Support
To prevent breakage, do not place the turntable into
water just after cooking. Wash it carefully in warm, sudsy
water or in the dishwasher. The turntable and support
can be broken if dropped. Remember, do not operate the
oven in the microwave mode without the turntable and
support seated and in place.
How to Clean the Outside
We recommend against using cleaners with ammonia
or alcohol, as they can damage the appearance of
the microwave oven. If you choose to use a common
household cleaner, first apply the cleaner directly to a
clean cloth, then wipe the soiled area.
Case
Clean the outside of the microwave with a sudsy cloth.
Rinse and then dry. Wipe the window clean with a damp
cloth.
Control Panel
Wipe with a damp cloth.
Dry thoroughly. Do not
use cleaning sprays, large
amounts of soap and water,
abrasives or sharp objects on
the panel—they can damage
it. Some paper towels can
also scratch the control panel.
Door Panel
Before cleaning the front door panel, make sure you
know what type of panel you have. Refer to the eighth
digit of the model number. “S” is stainless steel, “L” is
CleanSteel and “B”, “W” or “C” are plastic colors.
Stainless Steel (on some models)
The stainless steel panel can be cleaned with Stainless
Steel Magic or a similar product using a clean, soft cloth.
Apply stainless cleaner carefully to avoid the surrounding
plastic parts. Do not use appliance wax, polish, bleach or
products containing chlorine on Stainless Steel finishes.
Plastic Color Panels
Use a clean, soft, lightly dampened cloth, then dry
thoroughly.
Door Seal
It’s important to keep the area clean where the door
seals against the microwave. Use only mild, non-
abrasive detergents applied with a clean sponge or soft
cloth. Rinse well.
Bottom
Clean off the grease and dust on the bottom often. Use a
solution of warm water and detergent.
Care and Cleaning
T
u
r
n
t
o
S
e
l
e
c
t
P
r
e
s
s
t
o
E
n
t
e
r
Reheat
Timer
On/Off
Defrost
Weight/Time
Start
Pause
Cancel
Off
Lock Controls
Hold 3 Sec
Cook
Time
Set
Clock
Options Help
Surface
Light
Vent Fan
Popcorn
Beverage
Microwave
Express
Warm
Power
Level
Auto
Cook
Combination
Fast Bake
Convection
Roast
Turntable
Convection
Bake
T
u
r
n
t
o
S
e
l
e
c
t
P
r
e
s
s
t
o
E
n
t
e
r
Reheat
Timer
On/Off
Defrost
Weight/Time
Start
Pause
Cancel
Off
Lock Controls
Hold 3 Sec
Cook
Time
Set
Clock
Options Help
Surface
Light
Vent Fan
Warm
Power
Level
Auto
Cook
Combination
Fast Bake
Convection
Roast
Turntable
Convection
Bake
CARE AND CLEANING
T
u
r
n
t
o
S
e
l
e
c
t
P
r
e
s
s
t
o
E
n
t
e
r
Reheat
Timer
On/Off
Defrost
Weight/Time
Start
Pause
Cancel
Off
Lock Controls
Hold 3 Sec
Cook
Time
Set
Clock
Options Help
Surface
Light
Vent Fan
Popcorn
Beverage
Microwave
Express
Warm
Power
Level
Auto
Cook
Combination
Fast Bake
Convection
Roast
Turntable
Convection
Bake
49-7000115 Rev. 0
Cooktop Light/Nite Light
Replace with a 120 volt, 50 watt (max.) halogen bulb.
See back cover for ordering online at
GEAppliances.com.
1. To replace the cooktop light/nite light, first disconnect
the power at the main fuse or circuit breaker panel,
or pull the plug.
2. Remove the screw from the side of the light
compartment cover and lower the cover until it stops.
3. Be sure the bulb is cool before removing. Break the
adhesive seal by gently unscrewing the bulb.
4. Screw in the new bulb, then raise the light cover and
replace the screw. Connect electrical power to the
oven.
Remove screw.
Care and Cleaning
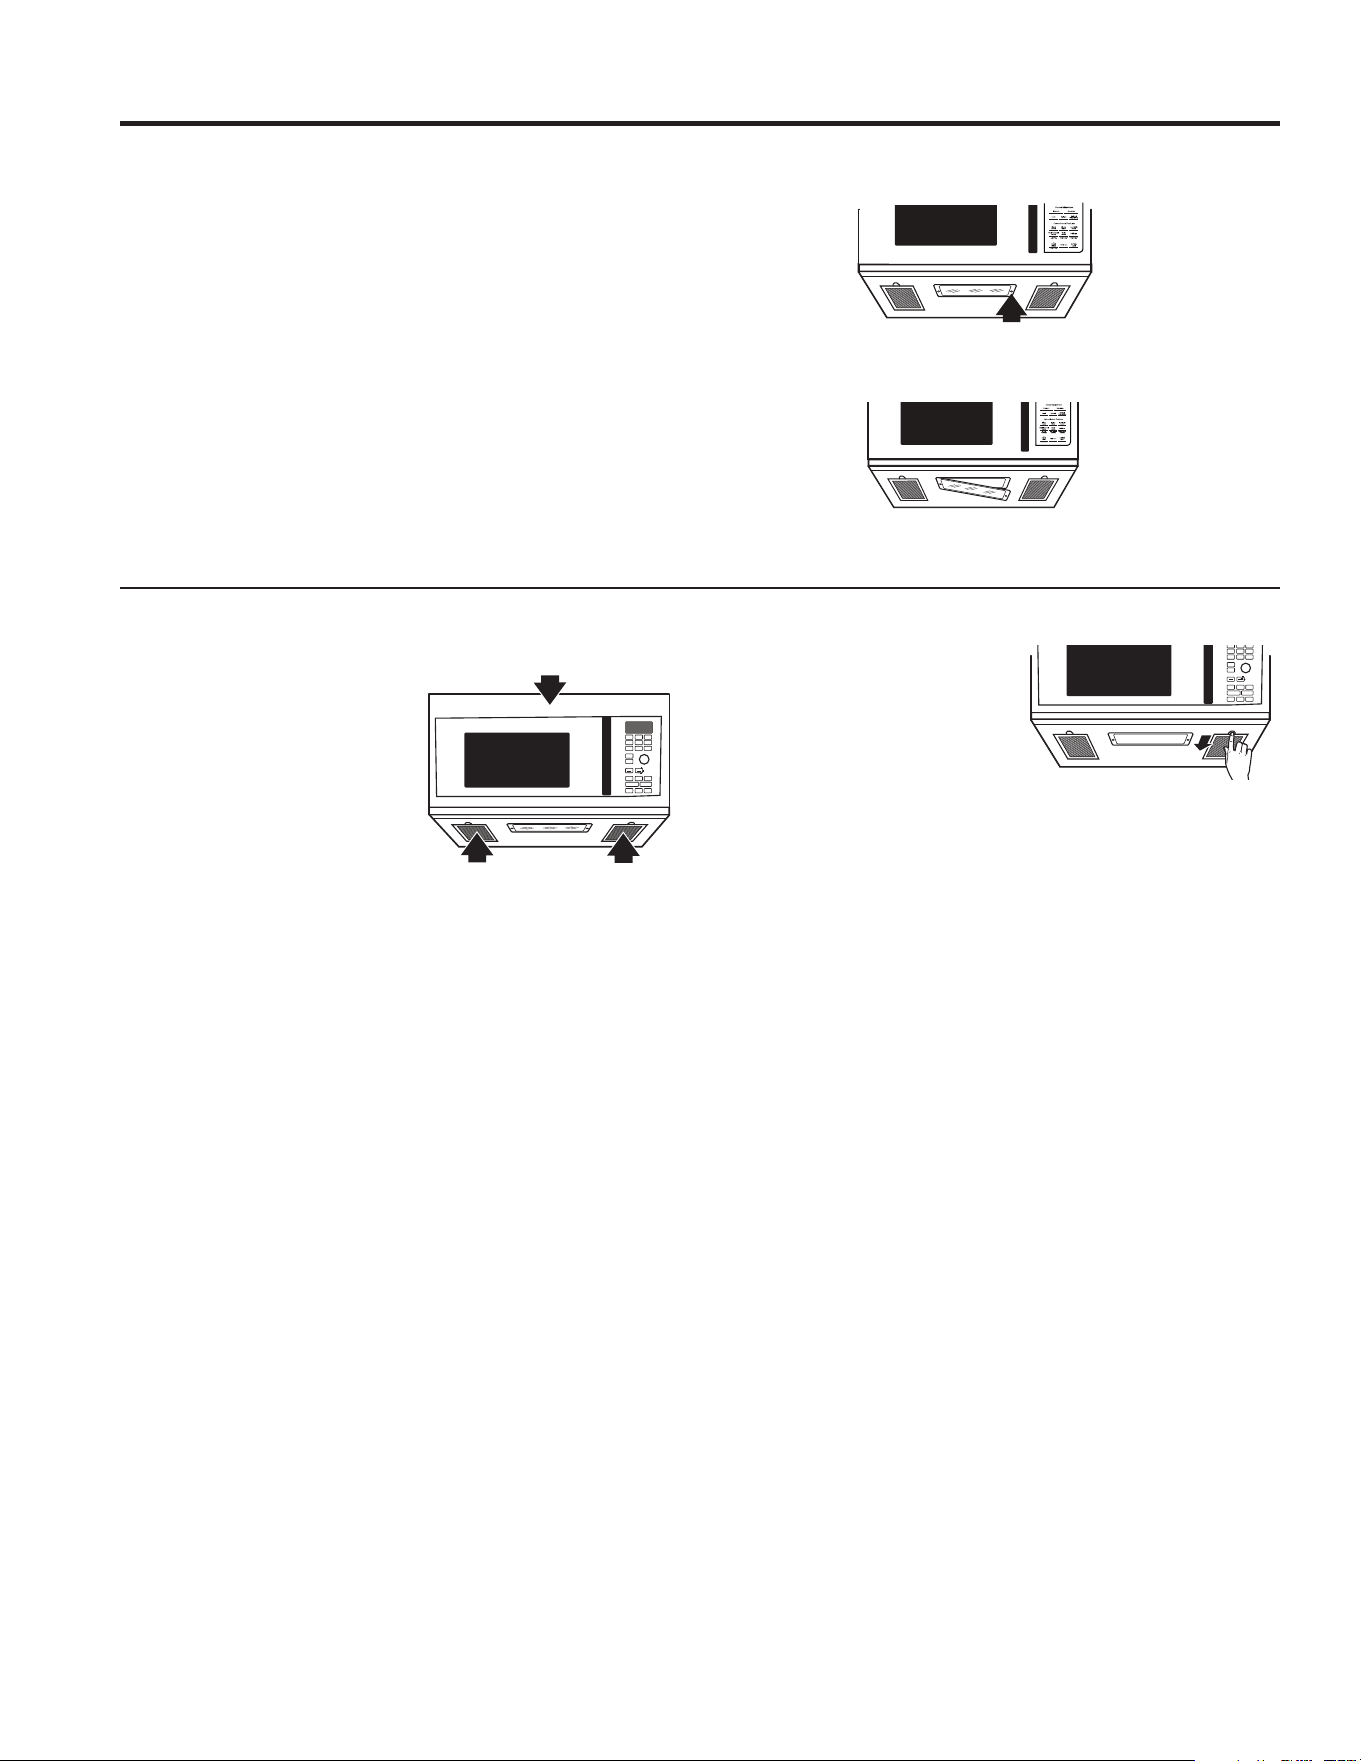
Vent Fan
The vent fan has two metal
reusable vent filters.
Models that recirculate air
back into the room also use a
charcoal filter.
Reusable Vent Filters
The metal filters trap grease released by foods on the
cooktop. They also prevent flames from foods on the
cooktop from damaging the inside of the oven.
)RUWKLVUHDVRQWKHILOWHUVPXVWDOZD\VEHLQSODFHZKHQ
the hood is used. The vent filters should be cleaned
once a month, or as needed.
Removing and Cleaning the Filters
To remove, slide them to the
rear using the tabs. Pull down
and out.
To clean the vent filters, soak
them and then swish around
in hot water and detergent.
Don’t use ammonia or ammonia products because they
will darken the metal. Light brushing can be used to
remove embedded dirt.
Rinse, shake and let dry before replacing.
To replace, slide the filters into the frame slots on the
back of each opening. Press up and to the front to lock
into place.
T
u
r
n
t
o
S
e
l
e
c
t
P
r
e
s
s
t
o
E
n
t
e
r
Reheat
Timer
On/Off
Defrost
Weight/Time
Start
Pause
Cancel
Off
Lock Controls
Hold 3 Sec
Cook
Time
Set
Clock
Options Help
Surface
Light
Vent Fan
Popcorn
Beverage
Microwave
Express
Warm
Power
Level
Auto
Cook
Combination
Fast Bake
Convection
Roast
Turntable
Convection
Bake
Reusable vent filters
(on all models).
Charcoal filter
T
u
r
n
t
o
S
e
l
e
c
t
P
r
e
s
s
t
o
E
n
t
e
r
Reheat
Timer
On/Off
Defrost
Weight/Time
Start
Pause
Cancel
Off
Lock Controls
Hold 3 Sec
Cook
Time
Set
Clock
Options Help
Surface
Light
Vent Fan
Popcorn
B
everage
Microwave
Express
Warm
Power
Level
Auto
Cook
Combination
Fast Bake
Convection
Roast
Turntable
Convection
Bake
CARE AND CLEANING
49-7000115 Rev. 0 17
Care and Cleaning
CARE AND CLEANING
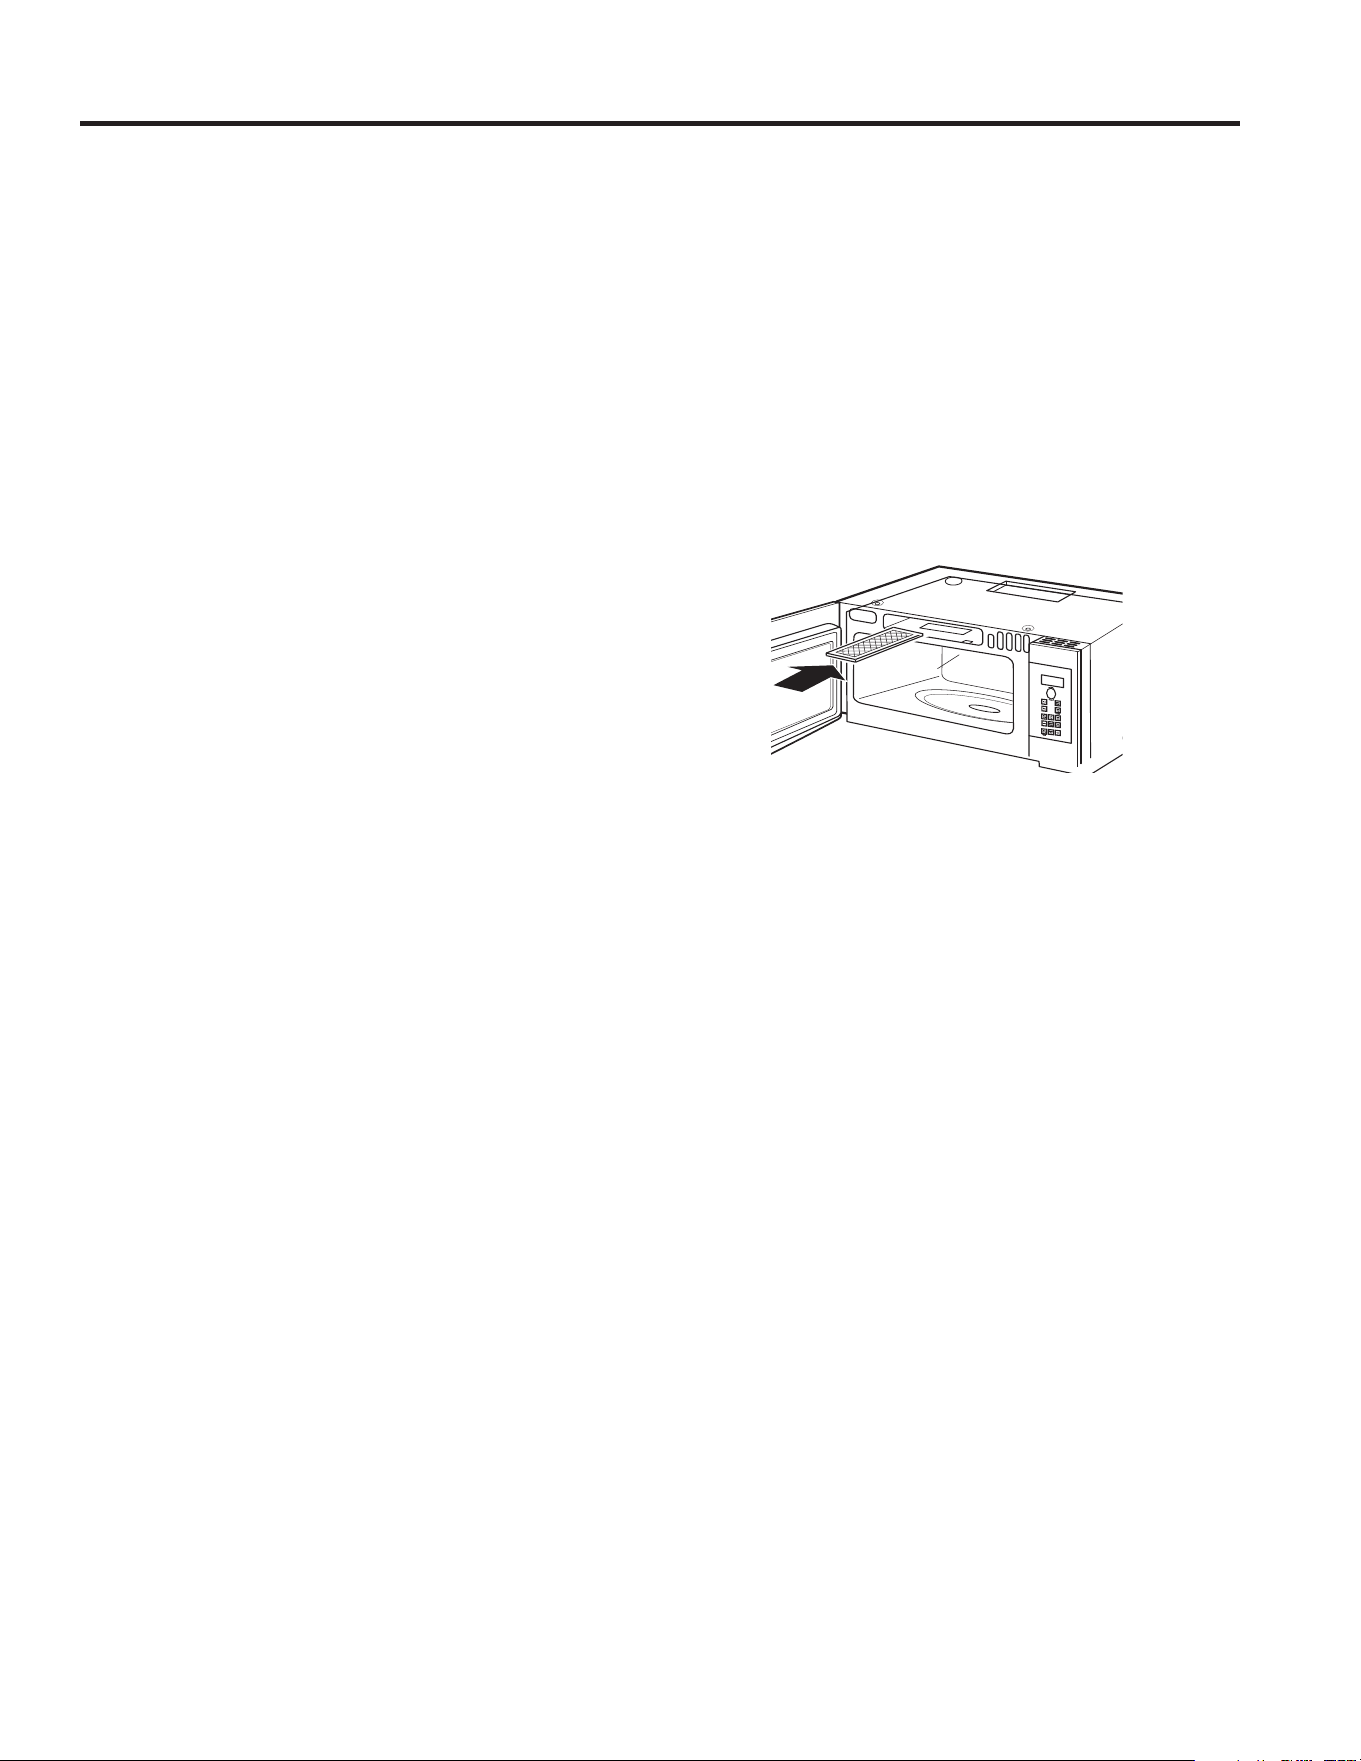
Charcoal Filter
The charcoal filter cannot be cleaned. It must be
replaced. See back cover for ordering online at
GEAppliances.com.
If the model is not vented to the outside, the air will be
recirculated through a disposable charcoal filter that
helps remove smoke and odors.
The charcoal filter should be replaced when it is
QRWLFHDEO\GLUW\RUGLVFRORUHGXVXDOO\DIWHUWR
months, depending on usage). See Optional Kits page
22, for more information.
CHARCOAL FILTER REPLACEMENT
1. Unplug the microwave oven.
2. Remove the vent grille mounting screws.
3. Tip the grille forward, then lift out to remove.
4. Remove the charcoal filter.
5. Slide a new charcoal filter into place.
Slide the bottom of the vent grille into place.
Push the top until is snaps into place.
Replace the mounting screws
7. Plug in the microwave oven.
18 49-7000115 Rev. 0
Troubleshooting Tips
Problem Possible Causes What To Do
Oven will not start A fuse in your home may be blown or
the circuit breaker tripped.
• Replace fuse or reset circuit breaker.
Power surge.
• Unplug the microwave oven, then plug it back
in.
Plug not fully inserted into wall outlet.
• Make sure the 3-prong plug on the oven is fully
inserted into wall outlet.
Door not securely closed. • Open the door and close securely.
Control panel lighted, yet
oven will not start
Door not securely closed • Open the door and close securely
Start/Pause button not pressed after
entering cooking selection.
Press Start/Pause
Another selection entered already in
oven and Cancel/Off button not pressed
to cancel it.
Press Cancel/Off
Cooking time not entered after pressing
Cook Time
Make sure you have entered cooking time after
pressing Cook Time
Cancel/Off was pressed accidentally Reset cooking program and press Start/Pause
Food weight not entered after selecting
Weight Defrost or Time Defrost
Make sure you have entered food weight after
selecting Weight Defrost or Time Defrost.
“LOCKED” appears on
display
The control has been locked.
• Press and hold Cancel/Off for about 3 seconds
to unlock the control.
Floor of the oven is warm
even when the oven has
not been used
The cooktop light is located below the
oven floor. When light is on, the heat it
produces may make the oven floor get
warm.
• This is normal.
You hear an unusual low-
tone beep
You have tried to change the power
level when it is not allowed.
• Many of the oven’s features are preset and
cannot be changed.
Vent fan comes on
automatically
The vent fan automatically turns on
to protect the microwave if it senses
too much heat rising from the cooktop
below.
• This is normal.
SENSOR ERROR appears
on the display
When using a Sensor feature, the door
was opened before steam could be
detected.
• Do not open door until steam is sensed and
time is shown counting down on the display.
Steam was not detected in a maximum
amount of time.
• Use Cook Time to heat for more time.
TROUBLESHOOTING TIPS

49-7000115 Rev. 0 19
Troubleshooting Tips
FCC Statement
Things That Are Normal With Your Microwave Oven
Steam or vapor escaping from around the door.
Light reflection around door or outer case.
Dimming oven light and change in the blower sound at
power levels other than high.
Dull thumping sound while oven is operating.
TROUBLESHOOTING TIPS / FCC STATEMENT
FEDERAL COMMUNICATIONS COMMISSION (U.S.A.)
RADIO FREQUENCY INTERFERENCE STATEMENT
7KLVHTXLSPHQWJHQHUDWHVDQGXVHV,60IUHTXHQF\
energy and if not installed and used properly, that
is in strict accordance with the manufacturer’s
instructions, may cause interference to radio and
television reception. It has been type tested and
IRXQGWRFRPSO\ZLWKOLPLWVIRUDQ,60(TXLSPHQW
SXUVXDQWWRSDUWRI)&&5XOHVZKLFKDUHGHVLJQHG
to provide reasonable protection against such
interference in a residential installation. However,
there is no guarantee that interference will not occur in
DSDUWLFXODULQVWDOODWLRQ,IWKLVHTXLSPHQWGRHVFDXVH
interference to radio or television reception, which can
EHGHWHUPLQHGE\WXQLQJWKHHTXLSPHQWRIIDQGRQWKH
user is encouraged to try to correct the interference by
one or more of the following:
Ŷ Reorient the receiving antenna of radio or television.
Ŷ Relocate the Microwave oven with respect to the
receiver.
Ŷ Move the microwave oven away from the receiver.
Ŷ Plug the microwave oven into a different outlet so
that microwave oven and receiver are on different
branch circuits.
The manufacturer is not responsible for any radio or
TV interference cause by unauthorized modification to
this microwave oven. It is the responsibility of the user
to correct such interference.

49-7000115 Rev. 0
GEAppliances.com
$OOZDUUDQW\VHUYLFHLVSURYLGHGE\RXU)DFWRU\6HUYLFH&HQWHUVRUDQDXWKRUL]HGVHUYLFHWHFKQLFLDQ7RVFKHGXOH
service online, visit us at GEAppliances.com/service
RUFDOO*(&$5(6GXULQJQRUPDOEXVLQHVVKRXUV
What GE Appliances will not cover:
Ŷ 6HUYLFHWULSVWR\RXUKRPHWRWHDFK\RXKRZWRXVH
the product.
Ŷ ,PSURSHULQVWDOODWLRQGHOLYHU\RUPDLQWHQDQFH,I\RX
have an installation problem, contact your dealer or
LQVWDOOHU<RXDUHUHVSRQVLEOHIRUSURYLGLQJDGHTXDWH
electrical, exhausting, and other connecting facilities.
Ŷ )DLOXUHRIWKHSURGXFWRUGDPDJHWRWKHSURGXFWLILWLV
abused, misused (for example, cavity arcing from wire
rack or metal/foil), or used for other than the intended
purpose or used commercially.
Ŷ 5HSODFHPHQWRIKRXVHIXVHVRUUHVHWWLQJRIFLUFXLW
breakers.
Ŷ 'DPDJHWRWKHSURGXFWFDXVHGE\DFFLGHQWILUH
floods or acts of God.
Ŷ ,QFLGHQWDORUFRQVHTXHQWLDOGDPDJHFDXVHGE\
possible defects with this appliance.
Ŷ 'DPDJHFDXVHGDIWHUGHOLYHU\
Ŷ 3URGXFWQRWDFFHVVLEOHWRSURYLGHUHTXLUHGVHUYLFH
Ŷ 6HUYLFHWRUHSDLURUUHSODFHOLJKWEXOEVH[FHSWIRU/('
lamps.
Ŷ 'DPDJHWRWKHILQLVKVXFKDVVXUIDFHUXVWWDUQLVKRU
small blemishes not reported within 48 hrs of delivery.
Microwave Oven Limited Warranty
EXCLUSION OF IMPLIED WARRANTIES
Your sole and exclusive remedy is product repair as provided in this Limited Warranty. Any implied warranties,
including the implied warranties of merchantability or fitness for a particular purpose, are limited to one year or
the shortest period allowed by law.
This limited warranty is extended to the original purchaser and any succeeding owner for products purchased for home
use within the USA. If the product is located in an area where service by a GE Appliances Authorized Servicer is not
DYDLODEOH\RXPD\EHUHVSRQVLEOHIRUDWULSFKDUJHRU\RXPD\EHUHTXLUHGWREULQJWKHSURGXFWWRDQ$XWKRUL]HG*(
Appliances Service location for service. In Alaska, the limited warranty excludes the cost of shipping or service calls to
your home.
6RPHVWDWHVGRQRWDOORZWKHH[FOXVLRQRUOLPLWDWLRQRILQFLGHQWDORUFRQVHTXHQWLDOGDPDJHV7KLVOLPLWHGZDUUDQW\
gives you specific legal rights, and you may also have other rights which vary from state to state. To know what your
legal rights are, consult your local or state consumer affairs office or your state’s Attorney General.
Warrantor: GE Appliances, a Haier company
/RXLVYLOOH.<
For the period of GE Appliances will replace
One year
)URPWKHGDWH
of the original
purchase
Any part of the oven which fails due to a defect in materials or workmanship. During this
limited one-year warranty, GE Appliances will also provide, free of charge, all labor and
related service costs to replace the defective part when the unit is serviced.
Staple your receipt here. Proof of the original purchase
date is needed to obtain service under the warranty.
LIMITED WARRANTY
49-7000115 Rev. 0 21
OPTIONAL KITS
Optional Kits
Filler Panel Kits
JX36BSS – Stainless
JX36BWW – White
JX36BBB – Black
JX36BES – Slate
:KHQUHSODFLQJD´UDQJHKRRGILOOHUSDQHONLWVILOO
in the additional width to provide a custom built-in
appearance.
)RULQVWDOODWLRQEHWZHHQFDELQHWVRQO\QRWIRUHQGRI
cabinet installation. Each kit contains two 3” wide filler
panels.
Recirculating Charcoal Filter Kit
)LOWHUNLWVDUHXVHGZKHQWKHPLFURZDYHRYHQFDQQRWEH
vented to the outside.
15” Cabinet Installation Kit
JX15BUMPBB - Black
JX15BUMPWW - White
)RUXVHZKHQLQVWDOOLQJZLWK´GHSWKFDELQHWV
Available at extra cost from your GE Appliances supplier.
See back cover for ordering online at GEAppliances.com.
)LOOHU3DQHO.LWV

22 49-7000115 Rev. 0
Consumer Support
CONSUMER SUPPORT
GE Appliances Website
+DYHDTXHVWLRQRUQHHGDVVLVWDQFHZLWK\RXUDSSOLDQFH"7U\WKHGE$SSOLDQFHV:HEVLWHKRXUVDGD\DQ\GD\RIWKH\HDU
You can also shop for more great GE Appliances products and take advantage of all our on-line support services designed for
your convenience. GEAppliances.com
Register Your Appliance
5HJLVWHU\RXUQHZDSSOLDQFHRQOLQHDW\RXUFRQYHQLHQFH7LPHO\SURGXFWUHJLVWUDWLRQZLOODOORZIRUHQKDQFHGFRPPXQLFDWLRQDQG
prompt service under the terms of your warranty, should the need arise. You may also mail in the pre-printed registration card
included in the packing material. GEAppliances.com/register
Schedule Service
Expert GE Appliances repair service is only one step away from your door. Get on-line and schedule your service at your
convenience any day of the year.
GEAppliances.com/service
RUFDOO*(&$5(6GXULQJQRUPDOEXVLQHVVKRXUV
Contact Us
If you are not satisfied with the service you receive from GE Appliances, contact us on our Website with all the details including
your phone number, or write to: General Manager,
*HQHUDO0DQDJHU&XVWRPHU5HODWLRQV_*($SSOLDQFHV$SSOLDQFH3DUN_/RXLVYLOOH.<
GEAppliances.com/contact
Parts and Accessories
,QGLYLGXDOVTXDOLILHGWRVHUYLFHWKHLURZQDSSOLDQFHVFDQKDYHSDUWVRUDFFHVVRULHVVHQWGLUHFWO\WRWKHLUKRPHV
(VISA, MasterCard and Discover cards are accepted). Order on-line today 24 hours every day.
GEAppliances.com/parts
RUFDOOGXULQJQRUPDOEXVLQHVVKRXUV
Instructions contained in this manual cover procedures to be performed by any user. Other servicing generally should
be referred to qualified service personnel. Caution must be exercised, since improper servicing may cause unsafe
operation.

Escriba los números de modelo
y de serie aquí:
Nº de Modelo ______________
Nº de Serie ________________
Los encontrará en una etiqueta
dentro del horno.
49-7000115 Rev. 0 04-20 GEA
JVM3160
JVM3162
JNM3163
GE Appliances es una marca de General Electric Company. Fabricado bajo licencia de la marca.
HORNO MICROONDAS
MANUAL DEL
PROPIETARIO
INFORMACIÓN DE SEGURIDAD .......3
INSTRUCCIONES DE
FUNCTIONAMIENTO
Controles .............................6
Funciones del Horno ...................8
Funciones del Temporizador ............8
Funciones de convenientes ............ 11
Otras Funciones ......................12
Términos del Microondas ..............16
CUIDADO Y LIMPIEZA ...............15
RESOLUCIÓN DE PROBLEMAS ......18
SOPORTE AL CONSUMIDOR
Garantía Limitada .................... 20
Kits Opcionales .......................21
Soporte al Consumidor ................22

2 49-7000115 Rev. 0
GRACIAS POR HACER QUE GE APPLIANCES SEA PARTE DE SU HOGAR.
Ya sea que haya crecido usando GE Appliances, o que ésta es su primera vez, nos complace
tenerlo en la familia.
Sentimos orgullo por el nivel de arte, innovación y diseño de cada uno de los electrodomésticos de
GE Appliances, y creemos que usted también. Entre otras cosas, el registro de su electrodoméstico
asegura que podamos entregarle información importante del producto y detalles de la garantía
cuando los necesite.
Registre su electrodoméstico GE ahora a través de Internet. Sitios Web y números telefónicos útiles
están disponibles en la sección de Soporte para el Consumidor de este Manual del Propietario.
También puede enviar una carta en la tarjeta de inscripción preimpresa que se incluye con
el material embalado.

49-7000115 Rev. 0 3
INFORMACIÓN DE SEGURIDAD
LEA Y GUARDE ESTAS INSTRUCCIONES
INFORMACIÓN IMPORTANTE DE SEGURIDAD
LEA TODAS LAS INSTRUCCIONES ANTES DE USAR
ADVERTENCIA
Para reducir el riesgo de quemaduras, descargas eléctricas, incendio, lesiones o
exposición a energía de microondas excesiva:
Cuando utilice aparatos eléctricos, se deben seguir las precauciones de seguridad básicas, entre las que se incluyen las
siguientes:
Ŷ /HDWRGDVODVLQVWUXFFLRQHVDQWHVGHXWLOL]DUHVWHDSDUDWR
Ŷ /HD\VLJDODVSUHFDXFLRQHVHVSHFtILFDVGHVFULWDVHQOD
VHFFLyQ35(&$8&,21(63$5$(9,7$5/$326,%/(
EXPOSICIÓN A ENERGÍA DE MICROONDAS EXCESIVA
de la página 5.
Ŷ 8WLOLFHHVWHDSDUDWRVRODPHQWHSDUDHOILQSUHYLVWR
como se describe en este manual. No utilice químicos
ni vapores corrosivos en este aparato. Este horno está
específicamente diseñado para calentar, secar o cocinar
alimentos y bebidas y no está diseñado para usarse en n
laboratorio ni para uso industrial.
Ŷ (VWHHOHFWURGRPpVWLFRVyORGHEHUtDVHUUHSDUDGRSRU
personal técnico con calificación. En caso de necesitar
una evaluación, reparación o ajuste, comuníquese con el
servicio autorizado más cercano.
INSTALACIÓN
Ŷ ,QVWDOHRXELTXHHVWHDSDUDWR~QLFDPHQWHGHDFXHUGRDODV
instrucciones de instalación suministradas.
Ŷ
Este aparato debe contar con una conexión a tierra.
Conecte sólo a un tomacorriente con adecuada conexión a
tierra. Ver la sección Instrucciones de conexión a tierra de
la página 5.
Ŷ (VWHKRUQRPLFURRQGDVILJXUDHQODOLVWDGH8/SDUDVX
posible instalación tanto en estufas a gas como eléctricas.
Ŷ Esta unidad fue diseñada para use sobre equipamientos
de cocción a gas o eléctricos, de un ancho de 36” o
menos.
Ŷ 1RXWLOLFHHVWHDSDUDWRVLWLHQHHOFDEOHHOpFWULFRRHO
enchufe dañados, si no funciona bien o si ha sufrido una
avería o una caída.
Ŷ 0DQWHQJDHOFDEOHDOHMDGRGHVXSHUILFLHVFDOLHQWHV
Ŷ 1RSHUPLWDTXHHOFDEOHHOpFWULFRFXHOJXHVREUHHOERUGH
de la mesa o del mostrador de encimera.
Ŷ 1RVXPHUMDHOFDEOHHOpFWULFRRHOHQFKXIHHQDJXD
Ŷ 1RFXEUDQLEORTXHHQLQJXQDDSHUWXUDGHHVWHDSDUDWR
Ŷ 1RDOPDFHQHHVWHDSDUDWRDODLUHOLEUH1RXWLOLFHHVWH
producto cerca del agua; por ejemplo, en un sótano
húmedo, cerca de una piscina, cerca de un lavabo o
lugares similares.
Ŷ 1RPRQWHHVWHDSDUDWRVREUHHOIUHJDGHUR
PARA REDUCIR EL RIESGO DE INCENDIO DENTRO DEL
HORNO:
Ŷ 1RFRFLQHH[FHVLYDPHQWHORVDOLPHQWRV9LJLOH
cuidadosamente el aparato cuandose coloque papel,
plástico u otros materiales combustibles dentro del
microondas para facilitar la cocción.
Ŷ 4XLWHODVWLULWDVGHVHJXULGDGWZLVWWLHV\DVDVPHWiOLFDV
de los recipientes de papel o plástico antes de colocarlos
dentro del microondas.
Ŷ 1RJXDUGHQLQJ~QPDWHULDODH[FHSFLyQGHQXHVWURV
accesorios recomendados, en este horno cuando no esté
en uso No deje productos de papel, utensilios de cocina
ni comida en el horno cuando no esté en uso. El estante
del microondas se deberá retirar del horno cuando no se
encuentre en uso.
Ŷ 6LORVPDWHULDOHVTXHVHHQFXHQWUDQGHQWURGHOKRUQR
prenden fuego, mantenga cerrada la puerta del horno,
apáguelo y desconecte el cable eléctrico, o corte la
energía desde el panel de fusibles o del interruptor de
circuitos.
Ŷ No opere el horno sin alimentos adentro.
A FIN DE REDUCIR RIESGOS DE QUEMADURAS:
Ŷ 7HQJDFXLGDGRDODEULUHQYDVHVFRQFRPLGDFDOLHQWH8VH
manijas y aleje el vapor del rostro y las manos.
Ŷ 9HQWLOHSHUIRUHRFRUWHHQYDVHVEROVDVREROVDV
plásticas para evitar la acumulación de presión.
Ŷ 7HQJDFXLGDGRDOWRFDUHOSODWRJLUDWRULRODSXHUWD
estantes o paredes del horno, los cuales se podrán
calentar durante el uso.
Ŷ /26&217(1,'26&$/,(17(638('(1
2&$6,21$548(0$'85$6*5$9(612
3(50,7$48(/261,f2687,/,&(1(/
MICROONDAS. Tenga cuidado al retirar ítems
calientes.

4 49-7000115 Rev. 0
INFORMACIÓN DE SEGURIDAD
INFORMACIÓN IMPORTANTE DE SEGURIDAD
LEA TODAS LAS INSTRUCCIONES ANTES DE USAR
LEA Y GUARDE ESTAS INSTRUCCIONES
VENTILADOR CON EXTRACTOR
El ventilador funcionará de forma automática bajo ciertas
condiciones. Asegúrese de evitar la activación y extensión
accidental del fuego de cocción mientras el ventilador esté
en uso.
Ŷ /LPSLHODFDUDLQIHULRUGHOKRUQRPLFURRQGDVHQIRUPD
frecuente. No permita que se acumule grasa en el horno
microondas ni en los filtros del ventilador.
Ŷ (QFDVRGHTXHKD\DIXHJRSURGXFLGRSRUODJUDVDHQODV
unidades de la superficie debajo del horno microondas,
apague una olla llameante sobre la unidad de la
superficie cubriendo la olla completamente con una tapa,
una asadera de galletitas o una bandeja plana.
Ŷ /LPSLHFRQFXLGDGRORVILOWURVGHOYHQWLODGRU$JHQWHVGH
limpieza corrosivos, tales como los limpiadores de horno
a base de soda cáustica, podrán dañar los filtros.
Ŷ Al preparar comidas llameantes debajo del horno
microondas, encienda el ventilador.
Ŷ Nunca deje de prestar atención a las unidades de
la superficie debajo de su horno microondas en
ODVFRQILJXUDFLRQHVDOWDVGHFDORU/DVHEXOOLFLRQHV
producen humo y derrames de grasa que pueden
encender y esparcir el fuego si el ventilador del horno
microondas está en funcionamiento. A fin de minimizar el
funcionamiento del ventilador automático, use utensilios
de tamaño adecuado y use un nivel de calor alto en las
unidades de la superficie sólo cuando sea necesario.
ADVERTENCIA
USO
Ŷ1RXVHHOKRUQRVLQHOSODWRJLUDWRULRHQVXSRVLFLyQ(O
plato giratorio no deberá tener restricciones, de modo que
pueda girar.
Ŷ$VHJ~UHVHGHTXHWRGRVORVXWHQVLOLRVXVDGRVHQHOKRUQR
microondas sean para uso en el mismo. Podrán ser
usadas la mayoría de las cacerolas de vidrio, platos de
cocción, tazas graduadas, tazas para postre, vajillas de
cerámica o juegos de platos de porcelana que no posean
bordes metálicos o vidriados con un brillo metálico, en
cumplimiento con las recomendaciones del fabricante de
utensilios.
Ŷ1RJXDUGHQDGDGLUHFWDPHQWHVREUHODVXSHUILFLHGHOKRUQR
microondas cuando el mismo se encuentre funcionando.
Ŷ$OJXQRVSURGXFWRVWDOHVFRPRKXHYRVHQWHURV\HQYDVHV
sellados – por ejemplo: tarros de vidrio cerrados – pueden
explotar y por esto no se deben calentar en el horno
microondas.
Ŷ1RFDOLHQWHODVSDSDVHQH[FHVR/DVPLVPDVVHSRGUiQ
deshidratar e incendiarse.
Ŷ1RFXEUDQLQJXQDRWUDSDUWHGHOKRUQRFRQSDSHOGH
aluminio. Esto ocasionará un sobrecalentamiento del horno.
Ŷ&RFLQHFDUQHV\FDUQHVGHDYHHQIRUPDFRPSOHWD±OD
carne por lo menos a una temperatura INTERIOR de
160°F y la carne de ave por lo menos a una temperatura
INTERIOR de 180°F. Normalmente la cocción a
estas temperaturas brinda una protección contra las
enfermedades transmitidas por la comida.
Ŷ(VWHKRUQRQRIXHDSUREDGRQLHYDOXDGRSDUDXVRHQOD
marino.
LIMPIEZA
Ŷ0DQWHQJDHOKRUQROLEUHGHDFXPXODFLyQGHJUDVD
Ŷ1ROLPSLHFRQDOPRKDGLOODVPHWiOLFDVSDUDIUHJDU/DV
piezas podrán quemar la almohadilla y tener contacto con
partes eléctricas y producir riesgos de descargas eléctricas.
Ŷ$OOLPSLDUVXSHUILFLHVGHSXHUWD\KRUQRTXHVHXQHQDO
cerrar la puerta, use sólo jabones o detergentes suaves y
no abrasivos, aplicando los mismos con una esponja limpia
o tela suave. Enjuague bien.
AGUA EXTREMADAMENTE CALIENTE
Ŷ/RVOtTXLGRVWDOHVFRPRHODJXDFDIpRWpVHSRGUiQ
sobrecalentar más allá de su punto de hervor sin que
parezca que esto está sucediendo. No siempre se
observan burbujas o hervor cuando el envase es retirado
GHOKRUQRPLFURRQGDV(67232'5È35292&$548(
/26/Ë48,'2608<&$/,(17(6'(352172+,(59$1
&8$1'26(08(9$(/(19$6(2&8$1'26(
,16(57(81$&8&+$5$8275287(16,/,2(1(/
/Ë48,'2
Ŷ3DUDUHGXFLUHOULHVJRGHOHVLRQHVSHUVRQDOHV
1RVREUHFDOLHQWHHOOtTXLGR
5HYXHOYDHOOtTXLGRWDQWRDQWHVFRPRDODPLWDGGHOWLHPSR
mientras lo calienta.
1RXVHHQYDVHVFRQODGRVUHFWRV\FXHOORVDQJRVWRV
'HVSXpVGHFDOHQWDUGHMHUHSRVDUHOHQYDVHHQHOKRUQR
microondas durante un período corto antes de retirar el
mismo.
7HQJDH[WUHPRFXLGDGRDOLQVHUWDUXQDFXFKDUDXRWUR
utensilio en el envase.
49-7000115 Rev. 0 5
LEA Y GUARDE ESTAS INSTRUCCIONES
INFORMACIÓN DE SEGURIDAD
INFORMACIÓN IMPORTANTE DE SEGURIDAD
LEA TODAS LAS INSTRUCCIONES ANTES DE USAR
MARCAPASOS
/DPD\RUtDGHORVPDUFDSDVRVSRVHHQSURWHFFLyQFRQWUDLQWHUIHUHQFLDVGHSURGXFWRVHOpFWULFRVLQFOX\HQGR
microondas. Sin embargo, es aconsejable que los pacientes con marcapasos consulten a sus médicos ante
cualquier duda.
INSTRUCCIONES DE CONEXIÓN A TIERRA
ADVERTENCIA
El uso inadecuado del enchufe de conexión a tierra puede provocar riesgos de
descargas eléctricas.
Este electrodoméstico deberá
estar conectado a tierra. En
caso de que se produzca un
cortocircuito, la conexión a tierra
reduce el riesgo de descarga
eléctrica, brindando un cable de
salida de la corriente eléctrica.
Este electrodoméstico está equipado con un cable de
corriente que posee un cable de conexión a tierra con
un enchufe a tierra. El enchufe se deberá conectar
en un tomacorriente instalado y conectado a tierra de
forma adecuada.
Consulte a un electricista calificado o al personal del
servicio técnico en caso de que las INSTRUCCIONES
DE CONEXIÓN A TIERRA no se entiendan
completamente o si tiene dudas sobre si el
electrodoméstico está conectado a tierra de forma
apropiada.
En caso de contar con un tomacorriente de pared
estándar de 2 cables, es su responsabilidad y
obligación reemplazarlo por un tomacorriente de pared
de 3 cables correctamente conectado a tierra.
%DMRQLQJXQDFLUFXQVWDQFLDFRUWHRHOLPLQHHOWHUFHU
FDEOHWLHUUDGHOFDEOHGHFRUULHQWH
No use un prolongador. Si el cable de corriente
es demasiado corto, solicítele a un electricista o a
personal del servicio técnico calificado la instalación
de un tomacorriente cerca del electrodoméstico.
Para un mejor funcionamiento, conecte este
electrodoméstico en su tomacorriente eléctrico a fin de
evitar parpadeos de las luces, explosión del fusible o
desactivación del disyuntor.
PRECAUCIONES PARA EVITAR LA POSIBLE
EXPOSICIÓN A ENERGÍA DE MICROONDAS EXCESIVA
(a) No intente hacer funcionar el horno con
la compuerta abierta ya que ésto puede provocar
exposición peligrosa a la energía de microondas. Es
importante no forzar ni dañar los seguros.
(b) No coloque ningún objeto entre la parte frontal del horno
y la compuerta, ni permita que se acumulen residuos de
producto limpiador o detergente, suciedad o polvo en las
superficies de sellado.
(c) No haga funcionar el horno si se encuentra dañado. Es
particularmente importante cerrar bien la compuerta
ODFRPSXHUWDGREODGDRFXUYDGD
ODVELVDJUDV\SHVWLOORVURWRVRIORMRV
VHOORVGHODFRPSXHUWD\VXSHUILFLHVGHVHOODGR
(d) El horno no debe ser ajustado o reparado por ninguna
persona, excepto por personal de mantenimiento
calificado.
Asegúrese de contar con
una conexión a tierra
adecuada antes de usar.
6 49-7000115 Rev. 0
1. Tirador.
2. Enganches de puerta.
9HQWDQDFRQHVFXGRPHWiOLFR/DYHQWDQDSHUPLWHYHUFRPR
se cocinan los alimentos y evita que salgan microondas del
horno.
4. Panel de control.
5. Dispositivo giratorio extraíble No ponga en marcha el horno
en el modo microondas sin que estén la base y el soporte
de la base colocados en su lugar.
6. Soporte del plato giratorio extraíble. El soporte del plato
giratorio debe estar en su lugar cuando se use el horno.
Es posible que las funciones y apariencias varíen con relación a su modelo a lo largo del manual.
Funciones
USO DE LA HORNO
49-7000115 Rev. 0 7
USO DE LA HORNO
Funciones
Puede usar el horno microondas por tiempo o con funciones sensor. No todos los modelos cuentan con
todas las funciones.
Controles de Cocción
Consulte la Guía de Acciones Convenientes antes de comenzar.
Funciones de tiempo de cocción por microondas y automáticas
Presione Iniciar
Cook Time (tiempo de cocción) Cantidad de tiempo de cocción
Defrost (descongelar) Peso o tiempo
Timer On/Off (Temporizador
Encendido/ Apagado
Power Level (nivel de potencia) Nivel de potencia de 1 a 10
Add 30 Sec (Agregar 30 segundos)
¡Comienza de inmediato!
Express Cook (cocción exprés) ¡Comienza de inmediato!
Convenience Features
Presione Iniciar
Popcorn (palomitas de maíz) ¡Comienza de inmediato!
Reheat (recalentar)
Presione la tecla para seleccionar la comida.
Beverage (bebida) ¡Comienza de inmediato!
Potato (papa) ¡Comienza de inmediato!
Popcorn
Convenience Cooking
Express Cook
Potato
Start
Pause
Cancel
Off
Beverage
Reheat
Set
Clock
Turntable
Surface
Light
Vent Fan
Add
30 Sec
Power
Level
0
8
5
2
7
4
1
9
6
3
Cook
Time
Defrost
Weight/Time
Timer
On/Off
Mute-
Hold 3 Sec
Lock Controls
Hold 3 Sec
JVM3162 / JNM3163
Popcorn
Convenience Cooking
Express Cook
Potato
Start
Pause
Cancel
Off
Beverage
Reheat
Set
Clock
Turntable
Surface
Light
Vent Fan
Add
30 Sec
Power
Level
0
8
5
2
7
4
1
9
6
3
Cook
Time
Defrost
Weight/Time
Timer
On/Off
Lock Controls
Hold 3 Sec
JVM3160
8 49-7000115 Rev. 0
Cómo Modificar el Nivel de Potencia
El nivel de potencia se podrá ingresar o modificar de forma
LQPHGLDWDOXHJRGHLQJUHVDUHOWLHPSRSDUD7LPH&RRN7LHPSR
GH&RFFLyQ7LPH'HIURVW7LHPSRGH'HVFRQJHODFLyQ$GG
6HF$JUHJDU6HJXQGRVR([SUHVV&RRN&RFFLyQ([SUHVV
El nivel de potencia también se puede modificar durante la cuenta
regresiva.
1. Presione Cook Time &RFFLyQ
SRU7LHPSR
2. Ingrese el tiempo de cocción o
descongelación.
3. Presione Power Level1LYHO
GH3RWHQFLD
4.
Seleccione el nivel de potencia
deseado de 1 a 10.
5. Presione Start/ Pause,QLFLR
3DXVD3UHVLRQDUStart/
Pause,QLFLDU3DXVDUQR
necesariamente activa los
botones de Express Cook
&RFFLyQ([SUHVV
/RVQLYHOHVGHSRWHQFLDYDULDEOHV
suman flexibilidad a la cocción
HQHOPLFURRQGDV/RVQLYHOHVGH
potencia del horno microondas
se pueden comparar con las
unidades de superficie de una
cocina. Cada nivel de potencia le
brinda energía de microondas un
cierto porcentaje del tiempo. El Nivel de Potencia 7 es energía de
microondas el 70% del tiempo.
(O1LYHOGH3RWHQFLDHVHQHUJtDHOGHOWLHPSR/DPD\RUtD
GHODVFRFFLRQHVVHKDUiQHQ+,$OWRORFXDOOHEULQGDHO
de potencia.
3RZHUOHYHO1LYHOGHSRWHQFLDKDUiODFRFFLyQPiVUiSLGR
pero será necesario revolver, rotar o dar vuelta la comida con
mayor frecuencia. Una configuración inferior hará la cocción más
pareja y se necesitará revolver y rotar menos la comida.
Algunas comidas podrán tener mejor sabor, textura o aspecto si se
usa una de las configuraciones inferiores. Use un nivel de potencia
inferior al cocinar comidas con tendencia a hervir, tales como
papas en escalope.
/RVSHUtRGRVGHGHVFDQVRFXDQGRORVFLFORVGHHQHUJtDGH
PLFURRQGDVILQDOL]DQEULQGDQWLHPSRSDUDTXHODFRPLGD
“equipare” o transfiera calor a su interior. Un ejemplo de esto se
PXHVWUDFRQHOQLYHOGHSRWHQFLDHOFLFORGHGHVFRQJHODPLHQWR
Si la energía del microondas no finalizó el ciclo, la parte externa de
la comida se cocinará antes de que el interior esté descongelado.
Estos son algunos ejemplos de usos de diferentes niveles de
potencia:
Nivel de Energía 10: Pescado, tocino, verduras, líquidos en
hervor.
Nivel de Energía 7: Cocción suave de carne y ave; cacerolas
para hornear y recalentar.
Nivel de Energía 5: Cocción lenta y ablandamiento para guisados
y cortes de carne menos tiernos.
Nivel de Potencia 2 o 3: Descongelar; hervir a fuego lento; platos
delicados.
Nivel de Energía 1: Mantener la comida caliente; ablandar la
manteca.
Tiempo de Cocción I
/HSHUPLWHFRFLQDUHQHOKRUQRPLFURRQGDVSRUFXDOTXLHU
tiempo hasta 99 minutos y 99 segundos.
3RZHUOHYHO1LYHOGHSRWHQFLDVHFRQILJXUDGH
forma automática, pero lo puede modificar para una mayor
flexibilidad.
1. Presione Cook Time7LHPSR
GH&RFFLyQ
2. Ingrese el tiempo de cocción.
3. Modifique el nivel de potencia
si no desea que esté en el
QLYHOPi[LPR3UHVLRQHNivel
de Potencia. Seleccione el
nivel de potencia deseado de
D
4. Presione Start/ Pause,QLFLDU
3DXVDU
Puede abrir la puerta durante
&RRN7LPH7LHPSRGH&RFFLyQ
para controlar la comida. Cierre
ODSXHUWD\SUHVLRQH6WDUW3DXVH
,QLFLDU3DXVDUSDUDUHDQXGDUOD
cocción.
Tiempo de Cocción II
/HSHUPLWHFDPELDUORVQLYHOHVGHHQHUJtDGHIRUPDDXWRPiWLFD
durante la cocción. Así es como funciona:
1. Presione Cook Time7LHPSRGH&RFFLyQ
2. Ingrese el primer tiempo de cocción.
3. Modifique el nivel de potencia si no desea que esté en el
QLYHOPi[LPR3UHVLRQHNivel de Potencia. Seleccione el
QLYHOGHSRWHQFLDGHVHDGRGHD
4. Presione nuevamente Time Cook 7LHPSRGH&RFFLyQ
5. Ingrese el segundo tiempo de cocción.
6. Modifique el nivel de potencia si no desea que esté en el
QLYHOPi[LPR3UHVLRQHNivel de Potencia. Seleccione el
QLYHOGHSRWHQFLDGHVHDGRGHD
7. Presione Start/ Pause,QLFLDU3DXVDU
Al finalizar Time Cook I, Time Cook II&RFFLyQSRU7LHPSR,
&RFFLyQSRU7LHPSR,,VHUHDOL]DODFXHQWDUHJUHVLYD
Funciones
Funciones del temporizador
USO DE LA HORNO
Express Cook
Start
Pause
0
8
5
2
7
4
1
9
6
3
Mute-
Hold 3 Sec
Power
Level
Express Cook
Start
Pause
Power
Level
0
8
5
2
7
4
1
9
6
3
Cook
Time
Mute-
Hold 3 Sec
49-7000115 Rev. 0 9
Descongelación por Peso
/DIXQFLyQ'HIURVW:HLJKW7LPH'HVFRQJHODFLyQSRU3HVR
7LHPSROHEULQGDGRVIRUPDVGHGHVFRQJHODUODVFRPLGDV
Presione Defrost Weight/Time
(Descongelar por Peso/ Tiempo)
una vez para descongelar por peso
o dos veces para descongelar por
tiempo
8VH:HLJKW'HIURVW'HVFRQJHODU
SRU3HVRSDUDFDUQHVDYHV\
pescados que pesen hasta 6 libras.
8VH7LPH'HIURVW'HVFRQJHODU
SRU7LHPSRSDUDODPD\RUtDGHODV
demás comidas congeladas.
:HLJKW'HIURVW'HVFRQJHODU
SRU3HVRGHIRUPDDXWRPiWLFD
configura los tiempos de
descongelación y niveles de
potencia para producir resultados
de descongelación parejos con
carnes, aves y pescados.
1. Presione Defrost Weight/ Time
(Descongelación por Peso/
Tiempo) una vez.
2. Usando la guía de conversión,
ingrese el peso de la comida. Por ejemplo: presione las teclas 1
\SDUDOLEUDVOLEUDRQ]DV
3. Presione Start/ Pause (Iniciar/ Pausar).
7LPH'HIURVW'HVFRQJHODFLyQSRU7LHPSRVHH[SOLFDHQOD
VHFFLyQ7LPH)HDWXUHV)XQFLRQHVGHO7HPSRUL]DGRU
• Retire la carne del paquete y coloque la misma en el plato de
cocción segura en el microondas.
• Cuando el horno dé la señal, dé vuelta la comida. Retire la carne
descongelada o cubra las partes calientes con trozos pequeños
de papel de aluminio.
/XHJRGHGHVFRQJHODUODPD\RUtDGHODVFDUQHVQHFHVLWDQ
reposar durante 5 minutos para completar la descongelación.
Al asar durante tiempo prolongado se debería dejar reposar por
unos 30 minutos.
Funciones del temporizador
USO DE LA HORNO
Si el peso de la comida se expresa el
libras y onzas, las onzas se deberán
convertir a décimas (.1)
Onzas Libras
1–2 .1
3 .2
4–5 .3
6–7 .4
8 .5
9–10 .6
11 .7
12–13 .8
14–15 .9
Descongelación por Tiempo
7LPH'HIURVW'HVFRQJHODFLyQSRU7LHPSROHSHUPLWHGHVFRQJHODU
durante un período de tiempo seleccionado. Consulte los tiempos
sugeridos en la Guía de Descongelación.
1. Presione Defrost Weight/ Time'HVFRQJHODFLyQSRU3HVR
7LHPSRGRVYHFHV
2. Ingrese el tiempo de
descongelación.
3. Presione Start/ Pause,QLFLDU
3DXVDU
4. Dé vuelta la comida cuando el
horno dé la señal.
5. Presione Start/ Pause,QLFLDU
3DXVDU
Cuando el horno dé la señal,
dé vuelta la comida y separe o
reordene los trozos para una
descongelación más pareja. Cubra
cualquier área caliente con trozos
pequeños de papel de aluminio. El
horno continuará descongelando
si no abre la puerta y da vuelta la
comida.
El nivel de potencia se configura
de forma automática en 3, pero se
puede cambiar. Puede descongelar
productos pequeños de forma
rápida, incrementando el nivel
de potencia luego de ingresar el
tiempo.
3RZHUOHYHO1LYHOGHSRWHQFLDUHGXFHHOWLHPSRGH
GHVFRQJHODFLyQWRWDODSUR[LPDGDPHQWHDODPLWDGSRZHUOHYHO
QLYHOGHSRWHQFLDUHGXFHHOWLHPSRWRWDODDSUR[LPDGDPHQWH
6LQHPEDUJRVHUiQHFHVDULRSUHVWDUPD\RUDWHQFLyQDOD
comida que lo usual.
Es posible que se escuchen ruidos de golpes secos durante
la descongelación. Esto es normal cuando el horno no está
IXQFLRQDQGRHQHOQLYHOGHSRWHQFLD+LJK$OWR
Consejos para la Descongelación
/DVFRPLGDVFRQJHODGDVHQSDSHORSOiVWLFRVHSRGUiQ
GHVFRQJHODUHQHOSDTXHWH/RVSDTXHWHVFHUUDGRVVHGHEHUiQ
FRUWDUSHUIRUDURYHQWLODU/8(*2GHTXHODFRPLGDVHKD\D
GHVFRQJHODGRSDUFLDOPHQWH/RVHQYDVHVGHSOiVWLFRVHGHEHUiQ
descubrir en forma parcial.
/DVFRPLGDVGHWDPDxRIDPLOLDUSUHHPSDTXHWDGDVVHSRGUiQ
descongelar y cocinar en el horno microondas. Si la comida se
encuentra en el envase de papel de aluminio, traslade la misma
a un plato para uso seguro en el horno microondas.
• Para una descongelación más pareja de comidas más grandes,
WDOHVFRPRDVDGRXVH:HLJKW'HIURVW'HVFRQJHODFLyQSRU
3HVR$VHJ~UHVHGHTXHODVFDUQHVTXHGHQWRWDOPHQWH
descongeladas antes de cocinar
/DVFRPLGDVTXHVHHFKDQDSHUGHUFRQIDFLOLGDGQRVHGHEHUiQ
dejar reposar por más de una hora luego de la descongelación.
/DWHPSHUDWXUDDPELHQWHHVWLPXODHOGHVDUUROORGHEDFWHULDV
nocivas.
• Una vez descongelada, la comida debería estar fría pero
ablandada en todas las áreas. Si aún está un poco congelada,
vuelva a colocarla en el horno microondas muy brevemente, o
deje reposar la misma por unos pocos minutos.
Express Cook
Start
Pause
0
8
5
2
7
4
1
9
6
3
Mute-
Hold 3 Sec
Defrost
Weight/Time
Express Cook
Start
Pause
0
8
5
2
7
4
1
9
6
3
Mute-
Hold 3 Sec
Defrost
Weight/Time
10 49-7000115 Rev. 0
Funciones del temporizador
Guía de Descongelación
Comida Tiempo Comentarios
Panes, Tortas
3DQHVEXxXHORVRSDQHFLOORVWUR]R PLQ
3DVWHOLWRVR]DSUR[ DPLQ 5HRUGHQHOXHJRGHODPLWDGGHOWLHPSR
Pescado y Mariscos
/RPRVFRQJHODGRVOE DPLQ &RORTXHHOEORTXHHQODFDFHUROD
0DULVFRVWUR]RVSHTXHxRVOE DPLQ &RORTXHHOEORTXHHQODFDFHUROD
Fruta
%ROVDGHSOiVWLFR²R DPLQ
SDTXHWHGHR]
Carne
7RFLQROE DPLQ
Coloque el paquete cerrado en el horno. Deje reposar por 5 minutos luego
de la descongelación.
6DOFKLFKDV7LSR)UDQNIXUWOE DPLQ &RORTXHHOSDTXHWHFHUUDGRHQHOKRUQR&RFLQHHQHOKRUQRPLFURRQGDV
hasta que las salchichas tipo Frankfort se puedan separar. Deje reposar
por 5 minutos, de ser necesario, para completar la descongelación.
&DUQHSLFDGDOE DPLQ 'pYXHOWDOXHJRGHODSULPHUDPLWDGGHWLHPSR
$VDU%LIHFRUGHURWHUQHUDFHUGR DPLQSRUOE 8VHHOQLYHOGHSRWHQFLD:DUPFDOLHQWH
%LVWHFVFKXOHWDV WRPLQSHUOE &RORTXHODFDUQHD~QHQYXHOWDHQHOSODWRGHFRFFLyQ'pYXHOWD
de cerdo y cordero vuelta luego de la primera mitad de tiempo y cubra las áreas
FDOLHQWHVFRQSDSHOGHDOXPLQLR/XHJRGHODVHJXQGDPLWDGGHWLHPSR
separe los trozos con un cuchillo de mesa. Espere hasta que se complete
la descongelación.
Ave
3ROORSDULOODIUHLGRUDFRUWH DPLQ &RORTXHHOSROORHQYXHOWRHQHOSODWR'HVHQYXHOYD\GpYXHOWDOXHJR
óDOLEUDV GHODSULPHUDPLWDGGHWLHPSR/XHJRGHODVHJXQGDPLWDGGHWLHPSR
separe los trozos y coloque los mismos en un plato de cocción. Cocine en
el horno microondas entre 2 y 4 minutos más, si es necesario. Deje
reposar por unos pocos minutos para finalizar la descongelación.
3ROORHQWHURóDOEV DPLQ &RORTXHHOSROORHQYXHOWRHQHOSODWR/XHJRGHODSULPHUDPLWDGGH
tiempo, desenvuelva y dé vuelta el pollo. Cubra las partes calientes con
papel de aluminio. Para completar la descongelación, deje correr agua
fría en la cavidad hasta que se puedan retirar los menudos.
Gallina de cornualles 7 a 13 min. por lb.. Coloque la gallina sin desenvolver en el horno con la pechuga hacia
arriba. Dé vuelta luego de la primera mitad de tiempo. Deje correr agua
por la cavidad hasta que se puedan quitar los menudos.
3HFKXJDGHSDYRDOLEUDV DPLQSRUOE &RORTXHODSHFKXJDVLQGHVHQYROYHUHQHOSODWRSDUDXVRVHJXURHQKRUQR
PLFURRQGDVFRQODSHFKXJDKDFLDDEDMR/XHJRGHODSULPHUDPLWDGGH
tiempo, dé vuelta la pechuga hacia arriba y cubra las partes calientes
con papel de aluminio. Descongele durante la segunda mitad del tiempo.
Deje reposar entre 1 y 2 horas en el refrigerador para completar la
descongelación.
Acerca de las funciones del temporizador.
Agregar 30 segundos
Puede usar esta función de dos formas:
Ŷ Agregará 30 segundos a la cuenta regresiva cada vez que la tecla se presione.
Ŷ Se puede usar como forma rápida para configurar 30 segundos de cocción.
Cocción Express
Ésta es una forma rápida de configurar el tiempo de cocción entre 1 y 6 minutos.
3UHVLRQHXQDGHODVWHFODVGH([SUHVV&RRN&RFFLyQ([SUHVVGHDSDUDXQDFRFFLyQGHHQWUH
\PLQXWRVHQSRZHUOHYHOQLYHOGHSRWHQFLD3RUHMHPSORSUHVLRQHODWHFODSDUDXQWLHPSR
de cocción de 2 minutos.
El nivel de potencia se puede modificar mientras se está realizando la cuenta regresiva. Presione
3RZHU/HYHO1LYHOGH3RWHQFLDHLQJUHVHXQDRSFLyQGHODO
Add
30 Sec
Express Cook
5
2
4
1
6
3
USO DE LA HORNO

49-7000115 Rev. 0 11
USO DE LA HORNO
Acerca de las funciones del temporizador.
Palomitas de Maíz
3DUDXVDUODIXQFLyQGH3RSFRUQ3DORPLWDVGH0Dt]
3UHVLRQHHOERWyQ3RSFRUQ3DORPLWDVGH0Dt]XQDYH]
para una bolsa de 2.0 onzas, dos veces para una bolsa
de 2.5 onzas, o tres veces para una bolsa de 3.0 onzas.
El horno empieza a funcionar inmediatamente. Puede
modificar la selección durante los 30 segundos iniciales.
Si la comida no termina de cocinarse luego de la
FXHQWDUHJUHVLYDXVH7LPH&RRN7LHPSRGH&RFFLyQ
para adicionar tiempo de cocción. Recomendamos 30
segundos y observar atentamente.
Use sólo palomitas de maíz preempaquetadas para
hornos de microondas que pesen entre 2 y 3 onzas.
NOTA: No use esta función dos veces seguidas en
la misma porción de comida; esto podrá hacer que la
comida se sobrecaliente de forma excesiva o que se
queme.
8VHODIXQFLyQ%HYHUDJH%HELGDSDUDFDOHQWDU
diferentes cantidades de líquidos medidos en onzas:
coloque el líquido en el horno microondas.Presione
HOERWyQ%HYHUDJH%HELGDKDVWDFXDWURYHFHVSDUD
elegir la selección correcta.
• Presione una vez para una bebida de 4 onzas.
• Presione dos veces para una bebida de 8 onzas
• Presione tres veces para una bebida de 12 onzas.
• Presione cuatro veces para una bebida de 16 onzas.
El horno empieza a funcionar inmediatamente. Puede
modificar la selección durante los 30 segundos
iniciales.
Recalentar
/DIXQFLyQ5HKHDW5HFDOHQWDUYXHOYHDFDOHQGDUODV
porciones de comidas cocinadas previamente o un
plato con restos de comida.
Coloque la taza de líquido o comida cubierta en el
horno.
3UHVLRQHHOERWyQ5HKHDW5HFDOHQWDUKDVWDVHLV
veces para elegir la selección correcta.
Presione una vez para una pizza.
Presione dos veces para verduras.
Presione tres veces para un plato con restos de
comida.
Presione cuatro veces para sopa
Presione cinco veces para carne.
Presione seis veces para pasta.
2. Presione la tecla 1, 2 o 3 para seleccionar el
tamaño de la porción. Para un plato con restos de
comida, sólo el tamaño de una porción es válido.
3UHVLRQH6WDUW3DXVH,QLFLDU3DXVDU
/DFRFFLyQVHLQLFLDUiFXDQGRODFXHQWDUHJUHVLYD
comience en la pantalla.
/XHJRGHUHWLUDUODFRPLGDGHOKRUQRUHYXHOYDVLHV
SRVLEOHSDUDHPSDUHMDUODWHPSHUDWXUD/DVFRPLGDV
recalentadas podrán tener amplias variaciones de
temperatura. Algunas partes de la comida podrán
estar extremadamente calientes.
Si la comida no se calentó lo suficiente luego de
ODFXHQWDUHJUHVLYDXVH7LPH&RRN7LHPSRGH
&RFFLyQpara adicionar tiempo de recalentamiento
Algunas comidas no recomendadas para uso con la
función de recalentamiento
(VPHMRUXVDU7LPH&RRN7LHPSRGH&RFFLyQSDUD
estas comidas:
• Productos con pan
• Comidas que se deben recalentar sin estar
cubiertas
• Comidas que se deben revolver o girar
• Comidas que deben tener un aspecto seco o una
superficie crocante luego de recalentar
NOTA: No use esta función dos veces seguidas en
la misma porción de comida; esto podrá hacer que la
comida se sobrecaliente de forma excesiva o que se
queme.
Papa
3DUDXVDUODIXQFLyQGH3RWDWR3DSD
&RORTXHODSDSDVHQHOKRUQR
3UHVLRQHHOERWyQ3RWDWR3DSDKDVWDFXDWURYHFHV
para elegir la selección correcta.
• Presione una vez para 1 producto.
• Presione dos veces para 2 productos.
• Presione tres veces para 3 productos.
• Presione cuatro veces para 4 productos.
El horno empieza a funcionar inmediatamente. Puede
modificar la selección durante los 30 segundos
iniciales.
NOTA: No use esta función dos veces seguidas
con la misma porción de comida. Como resultado la
comida se podrá cocinar en exceso o quemar.
Popcorn
Beverage
Reheat
Potato
12 49-7000115 Rev. 0
USO DE LA HORNO
Otras funciones
Recordatorio de Cocción Completa
3DUDUHFRUGDUOHTXHFRORFyFRPLGDHQHOKRUQRHVWH~OWLPRPRVWUDUi³(QG´)LQ\HPLWLUiXQSLWLGRXQDYH]SRU
minuto hasta que abra el horno o presione el botón Cancel/ Off&DQFHODU$SDJDU
Reloj
Para cambiar la hora del día.
3UHVLRQHHOERWyQ6HW&ORFN&RQILJXUDFLyQGHO
5HORM(OKRUQRPLFURRQGDVQRGHEHUtDHVWDUHQ
IXQFLRQDPLHQWR
2. Ingrese la hora del día correcta. El reloj está en una
escala de 12 horas.
3UHVLRQH6HW&ORFNRU6WDUW3DXVH&RQILJXUDUHO
5HORMR,QLFLDU3DXVDUSDUDDFHSWDUHOKRUDULR
0DQWHQJDSUHVLRQDGRHOERWyQ6HW&ORFN&RQILJXUDU
HO5HORMGXUDQWHVHJXQGRVSDUDSDVDUHOUHORMGH
ODHVFDODGHKRUDVDODGHKRUDV(OKRUQR
PLFURRQGDVQRGHEHUtDHVWDUHQIXQFLRQDPLHQWR
Bloqueo del Control
Puede bloquear el panel de control para evitar que el
horno se inicie de forma accidental durante la limpieza
o cuando sea usado por niños.
Para bloquear o desbloquear los controles, mantenga
SUHVLRQDGRHOERWyQ&DQFHO2II&DQFHODU$SDJDU
durante tres segundos.
Cuando el panel de control esté bloqueado, aparecerá
/2&.('%ORTXHDGREUHYHPHQWHHQFXDOTXLHU
momento en que un botón o dial sean presionados.
$SDUHFHUiOD³/RF´HQODSDQWDOOD
Iniciar/ Pausar
$GHPiVGHLQLFLDUPXFKDVIXQFLRQHV6WDUW3DXVH,QLFLDU3DXVDUOHSHUPLWHGHMDUGHFRFLQDUVLQDEULUODSXHUWD
ni reiniciar la pantalla y reiniciar la cocción más tarde.
Plato Giratorio
Para obtener mejores resultados en su cocción, deje
HOSODWRJLUDWRULRHQFHQGLGR/RSRGUiDSDJDUDOXVDU
SODWRVJUDQGHV3UHVLRQHODWHFOD7XUQWDEOH3ODWR
*LUDWRULRXQDYH]SDUDDSDJDUHOPLVPR3UHVLRQH
nuevamente si desea volver a activarlo.
A veces, es posible que el plato giratorio se caliente
demasiado como para que se pueda tocar. Se deberá
tener cuidado de no tocar el plato giratorio durante y
luego de la cocción.
El plato giratorio puede ser apagado durante las
IXQFLRQHV&RRN7LPH7LHPSRGH&RFFLyQR([SUHVV
&RRN&RFFLyQ([SUpVSUHVLRQDQGRODWHFOD7XUQWDEOH
(Plato Giratorio). Nota: Al concluir las funciones
Cook Time (Tiempo de Cocción) y Express Cook
(Cocción Exprés), el plato giratorio regresará a ON
(Encendido) de forma automática.
Temporizador
NOTA: El indicador del Temporizador se iluminará
mientras el temporizador esté funcionando.
El temporizador funciona como un temporizador por
minutos y puede ser usado en cualquier momento,
incluso cuando el horno está funcionando.
3UHVLRQHHOERWyQ7LPHU2Q2II7HPSRUL]DGRU
(QFHQGLGR$SDJDGR
2. Ingrese el tiempo.
3UHVLRQH7LPHU2Q2II7HPSRUL]DGRU(QFHQGLGR
$SDJDGRSDUDFRPHQ]DU
3DUDFDQFHODUSUHVLRQHHOERWyQ7LPHU2Q2II
7HPSRUL]DGRU(QFHQGLGR$SDJDGRQXHYDPHQWH
antes de que una entrada sea realizada o cuando se
visualiza el Temporizador en la cuenta regresiva en la
pantalla.
127$6LSUHVLRQHHOERWyQ&DQFHO2II&DQFHODU
$SDJDUSDUDFDQFHODUHOWHPSRUL]DGRU\HVWi
cocinando al mismo tiempo, esto también cancelará su
selección de cocción.
Cuando el tiempo concluya, el temporizador emitirá
una señal. Para apagar la señal del temporizador,
SUHVLRQH7LPHU2Q2II7HPSRUL]DGRU(QFHQGLGR
$SDJDGR
Set
Clock
Cancel
Off
Lock Controls
Hold 3 Sec
Timer
On/Off
Start
Pause
Turntable

49-7000115 Rev. 0 13
Otras funciones
USO DE LA HORNO
Ventilación
El ventilador de la ventilación elimina el vapor y otros
vapores de la cocción superficial.
3UHVLRQH9HQW)DQ9HQWLODGRUXQDYH]SDUDDFWLYDUHO
ventilador en velocidad alta, dos veces para activarlo
en velocidad baja o tres veces para apagar el mismo.
Luz Superficial
3UHVLRQH6XUIDFH/LJKW/X]6XSHUILFLDOXQDYH]SDUDDFWLYDUODOX]EULOODQWHGRVYHFHVSDUDDFWLYDUODOX]QRFWXUQD
o una tercera vez para apagar la luz.
Encender/Apagar Sonido (JVM3162/JNM3163 solamente)
0DQWHQJDSUHVLRQDGDODWHFOD³´GXUDQWHVHJXQGRVSDUDHQFHQGHURDSDJDUHOVRQLGR/DVVHxDOHVHPLWLGDVD
través de pitidos no pueden ser apagadas.
Ventilador Automático
/DIXQFLyQGHYHQWLODGRUDXWRPiWLFRSURWHJHHOKRUQR
microondas de una elevación de calor excesivo
proveniente de la cocina debajo de éste. Se enciende
de forma automática al sentir demasiado calor.
Si encendió el ventilador, es posible que observe
que no lo puede apagar. El ventilador se apagará de
forma automática una vez que las partes internas
estén apagadas. Podrá permanecer encendido por 30
minutos o más luego de que los controles de la cocina
o del horno microondas estén apagados.
Vent Fan
Surface
Light
0
Mute-
Hold 3 Sec

14 49-7000115 Rev. 0
Términos del Microondas
Arco Eléctrico Arco eléctrico es el término que se usa
para definir la producción de chispas en el
KRUQRPLFURRQGDV/RVDUFRVHOpFWULFRVVRQ
producidos por:
• Metal o papel de aluminio en contacto con el
costado del horno.
• Papel de aluminio no moldeado a la comida
ORVH[WUHPRVGREODGRVDFW~DQFRPR
DQWHQDV
• Metales, tales como precintos, pinchos de
ave, o platos con rebordes dorados.
• Toallas de papel reciclable que contengan
pequeños trozos de metal.
• Platos o vajillas con bordes metálicos o con
una capa de brillo metálico.
Tapa
/DVWDSDVUHWLHQHQODKXPHGDGSHUPLWHQFDOHQWDUGH
forma más pareja y reducen el tiempo de cocción. Ventilar
los envoltorios de plástico o tapas con papel para alimentos
permite la salida de vapor excesivo.
Cubrir En un horno normal, usted cubre las pechugas de
pollo o comidas asadas para evitar que se doren en exceso.
Al cocinar en el horno microondas, deberá usar pequeñas tiras
de papel de aluminio para cubrir partes pequeñas, tales como
puntas de alas y patas de aves, que se podrían cocinar antes
que las partes grandes.
Tiempo de Inactividad Al cocinar con hornos regulares, las
comidas asadas o las tortas se pueden dejar hasta finalizar
la cocción o el tiempo programado. El tiempo en espera
es especialmente importante en la cocción en el horno
microondas. Se debe observar que una torta cocinada en un
horno microondas no se coloca en un estante de refrigeración.
Ventilación
/XHJRGHFXEULUXQSODWRFRQXQHQYROWRULR
plástico, este último se ventila dando vuelta un extremo de
modo tal que el vapor pueda salir.
USO DE LA HORNO
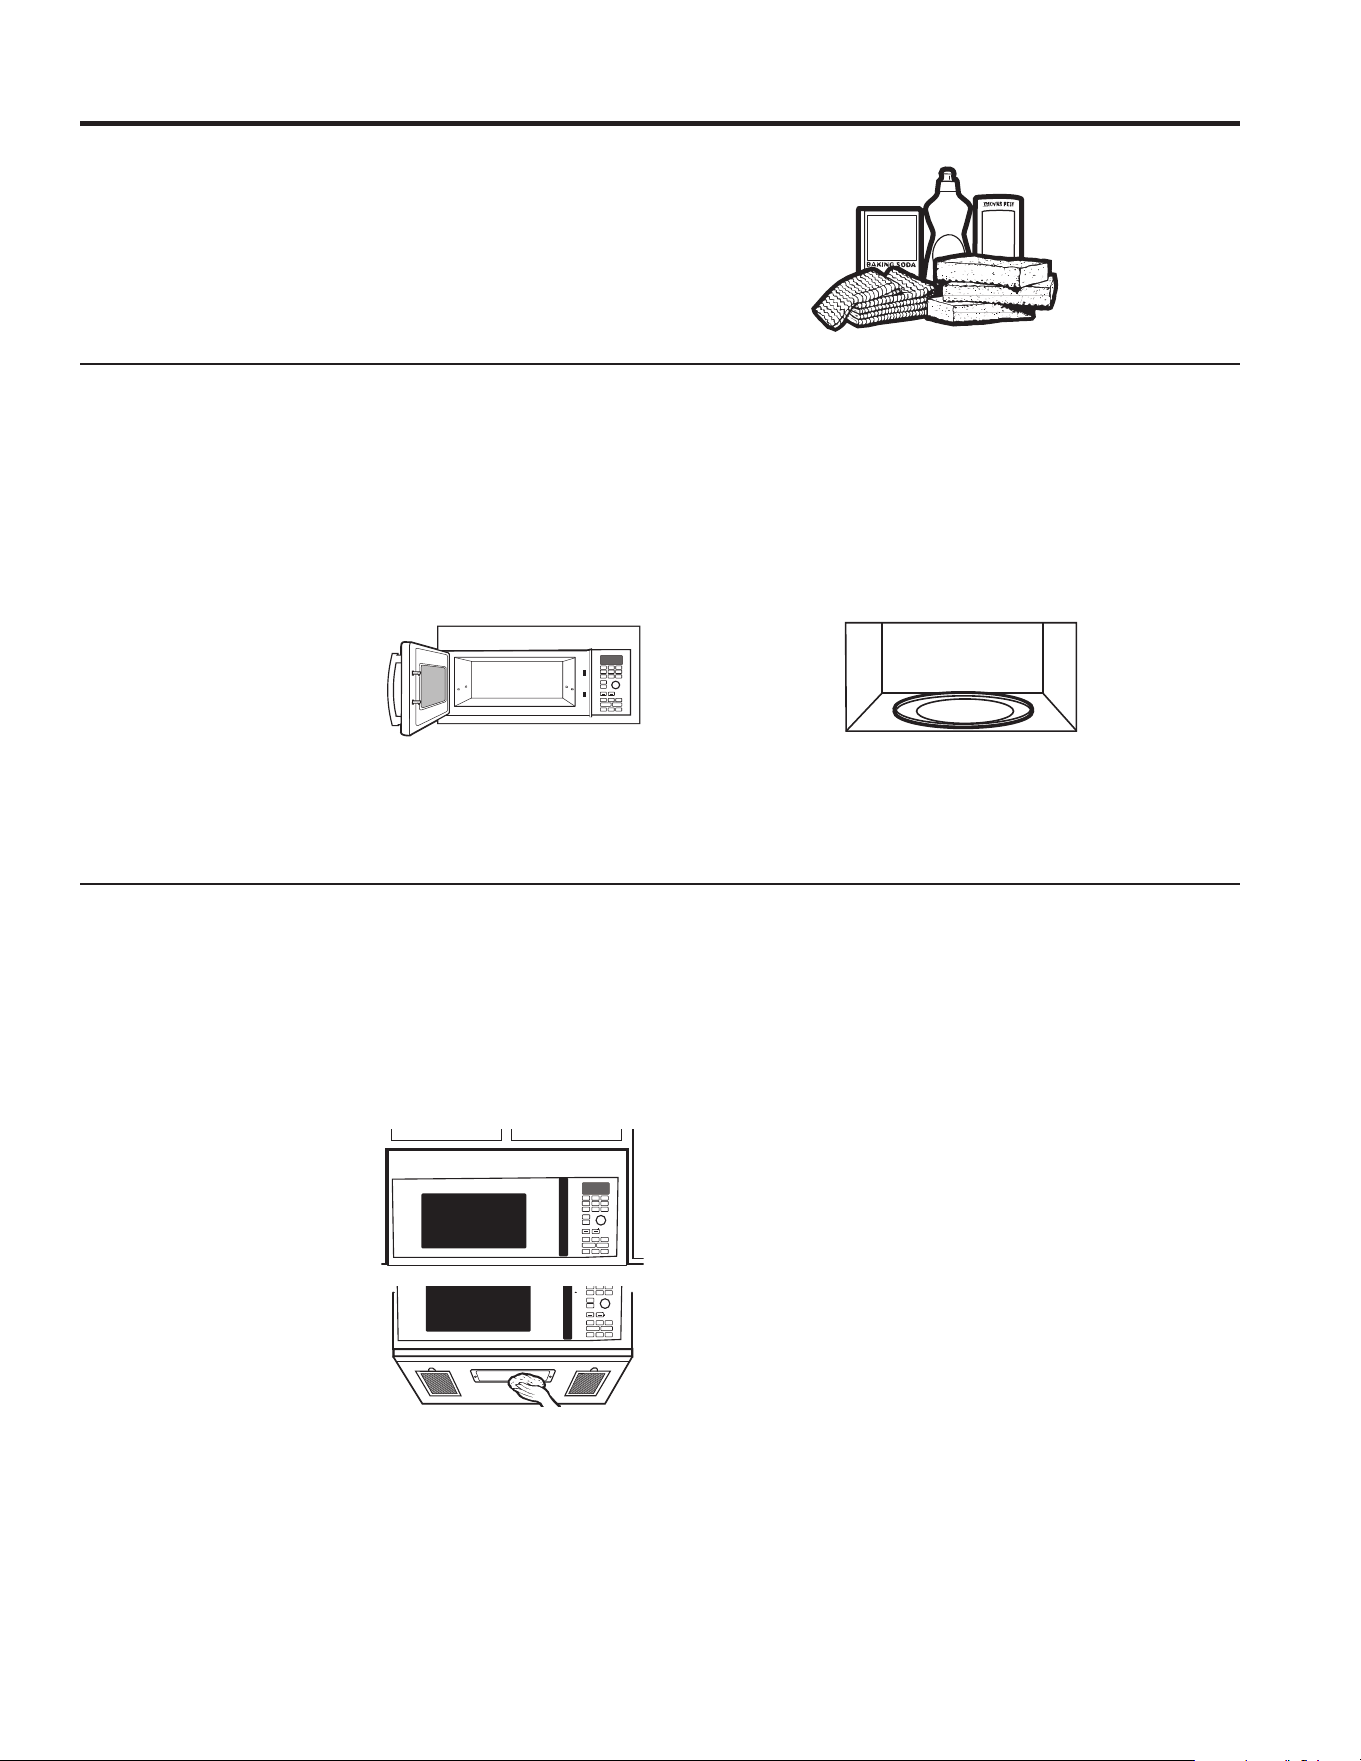
49-7000115 Rev. 0 15
Consejos Útiles
Una limpieza completa de forma ocasional con una solución de
bicarbonato y agua mantiene el interior fresco.
Desenchufe el cable antes de limpiar cualquier parte del horno.
Cómo Limpiar el Interior
Paredes, Piso, Ventana Interior, Partes Metálicas y
Plásticas de la Puerta
Algunas salpicaduras se pueden eliminar con una toalla
de papel; otras pueden requerir una tela húmeda. Elimine
salpicaduras de grasa con una tela con jabón, y luego
enjuague con una tela húmeda. No use limpiadores abrasivos
ni utensilios puntiagudos sobre las paredes del horno.
Para limpiar la superficie del
horno y la superficie del horno
que se une al cerrar, use sólo
jabones suaves y no ásperos o
detergentes con una esponja o
tela suave. Enjuague con una
tela húmeda y seca.
Nunca use un limpiador para hornos comerciales en ninguna
parte de su horno microondas.
Plato Giratorio y Soporte Giratorio Extraíbles
Para evitar roturas, no coloque el plato giratorio en agua luego
GHFRFLQDU/DYHHOPLVPRFXLGDGRVDPHQWHFRQDJXDWLELD
y jabón o en el lavavajillas. El plato giratorio y el soporte se
pueden romper en caso de caída. Recuerde que no se debe
usar el horno si el plato giratorio y el soporte no se encuentran
en su lugar.
Cómo Limpiar el Área Exterior
No use limpiadores que contengan amoníacos o alcohol en el
horno microondas. El amoníaco o el alcohol pueden dañar el
aspecto del horno microondas.
Cubierta Superior
/LPSLHHOiUHDH[WHULRUGHOKRUQRPLFURRQGDVFRQXQDWHODFRQ
MDEyQ(QMXDJXHFRQXQDWHODK~PHGD\OXHJRVHTXH/LPSLHOD
ventana con una tela húmeda.
Panel de Control y Puerta
/LPSLHFRQXQDWHODK~PHGD
Seque totalmente. No use
espráis limpiadores, grandes
cantidades de agua y
jabón, objetos abrasivos o
puntiagudos sobre el panel, ya
que lo pueden dañar. Algunas
toallas de papel también
pueden rayar el panel de
control.
Superficie de la Puerta
Es importante mantener el área limpia donde la puerta se selle
contra el horno microondas. Use sólo detergentes suaves y no
abrasivos con una esponja limpia o tela suave. Enjuague bien.
Cable de Corriente
Si el cable se ensucia, desenchufe y lave con una tela
húmeda. En caso de manchas difíciles de quitar, se podrá
usar agua con jabón, pero asegúrese de enjuagar con una tela
húmeda y de secar completamente antes de conectar el cable
en el tomacorriente.
Acero Inoxidable (en algunos modelos)
No use virutas de acero; éstas dañarán la superficie.
Para limpiar la superficie de acero inoxidable, use una tela
caliente y húmeda con un detergente suave adecuado para
superficies de acero inoxidable. Use una tela limpia, caliente
y húmeda para eliminar el jabón. Seque con una tela limpia y
seca. Siempre friegue la superficie en la dirección del veteado.
Cuidado y limpieza
T
u
r
n
t
o
S
e
l
e
c
t
P
r
e
s
s
t
o
E
n
t
e
r
Reheat
Timer
On/Off
Defrost
Weight/Time
Start
Pause
Cancel
Off
Lock Controls
Hold 3 Sec
Cook
Time
Set
Clock
Options Help
Surface
Light
Vent Fan
Popcorn
Beverage
Microwave
Express
Warm
Power
Level
Auto
Cook
Combination
Fast Bake
Convection
Roast
Turntable
Convection
Bake
T
u
r
n
t
o
S
e
l
e
c
t
P
r
e
s
s
t
o
E
n
t
e
r
Reheat
Timer
On/Off
Defrost
Weight/Time
Start
Pause
Cancel
Off
Lock Controls
Hold 3 Sec
Cook
Time
Set
Clock
Options Help
Surface
Light
Vent Fan
Warm
Power
Level
Auto
Cook
Combination
Fast Bake
Convection
Roast
Turntable
Convection
Bake
CUIDADO Y LIMPIEZA
T
u
r
n
t
o
S
e
l
e
c
t
P
r
e
s
s
t
o
E
n
t
e
r
Reheat
Timer
On/Off
Defrost
Weight/Time
Start
Pause
Cancel
Off
Lock Controls
Hold 3 Sec
Cook
Time
Set
Clock
Options Help
Surface
Light
Vent Fan
Popcorn
Beverage
Microwave
Express
Warm
Power
Level
Auto
Cook
Combination
Fast Bake
Convection
Roast
Turntable
Convection
Bake
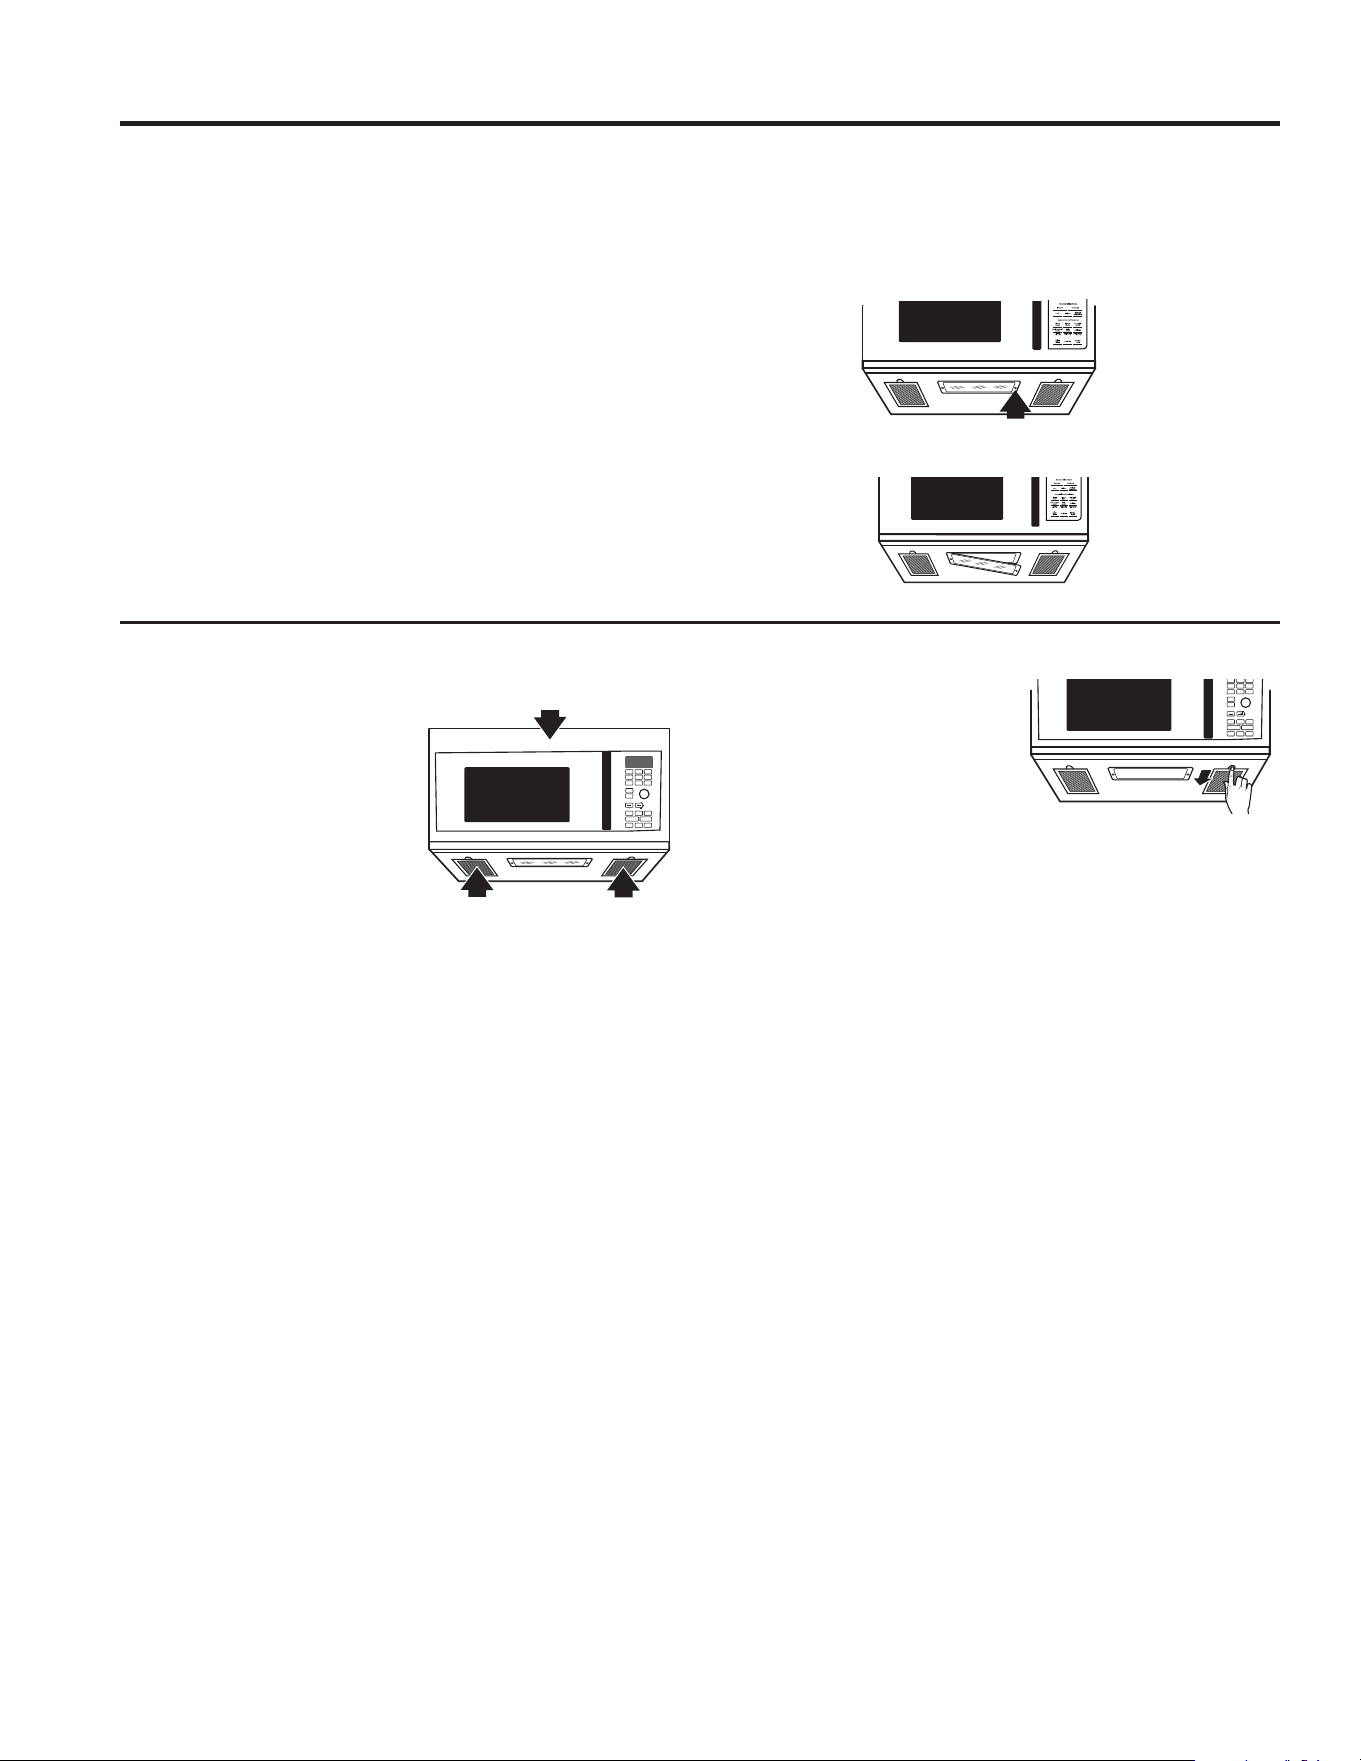
16 49-7000115 Rev. 0
Luz de la Cocina/ Luz Nocturna
Reemplace por lámparas halógenas de 120 voltios y 20
watts (máximo). Vea la contraportada para ordenar en línea
en GEAppliances.com.
3DUDUHHPSOD]DUODOX]GHODFRFLQDOX]QRFWXUQDSULPHUR
desconecte el encendido del fusible principal o del panel
del disyuntor, o desenchufe el cable.
2. Retire el tornillo del costado de la tapa del compartimiento
de la luz y baje la tapa hasta que se detenga.
3. Asegúrese de que la lámpara se enfríe antes de retirar
la misma. Rompa el sello adhesivo desenroscando la
lámpara de forma suave.
4. Enrosque la nueva lámpara, luego levante la tapa de
la luz y vuelva a colocar el tornillo. Conecte el cable de
electricidad del horno.
Cuidado y limpieza
Ventilador
El ventilador cuenta un filtro de
grasa metálico reusable.
/RVPRGHORVTXHKDFHQ
recircular el aire nuevamente
hacia la habitación también usan
un filtro de carbón.
Filtro de Grasa Rehusable
El filtro de grasa rehusable atrapa la grasa liberada por las
comidas en la placa de cocción. También evita que las llamas
de las comidas en la placa de cocción dañen el interior del
horno microondas.
Por esta razón, los filtros SIEMPRE deben estar en el lugar
FRUUHFWRFXDQGRVHXVHODFDPSDQD/RVILOWURVGHJUDVD
deberían ser limpiados una vez por mes, o cuando sea
necesario..
Retiro y Limpieza de los Filtros
Para retirarlos, deslice los
mismos sobre la parte trasera
usando las lengüetas. Empuje
hacia abajo y afuera.
Para limpiar los filtros de la
ventilación, moje los mismos y
luego agítelos en agua caliente y detergente. No use amoníaco
ni productos de amoníaco, ya que oscurecerán el metal. Se
podrá cepillar suavemente para retirar la suciedad incrustada.
Enjuague, sacuda y deje secar antes de realizar el reemplazo.
Para volver a colocarlos, deslice los filtros por las ranuras de la
estructura en la parte trasera de cada abertura. Presione hacia
arriba y hacia el frente para que queden bloqueados.
T
u
r
n
t
o
S
e
l
e
c
t
P
r
e
s
s
t
o
E
n
t
e
r
Reheat
Timer
On/Off
Defrost
Weight/Time
Start
Pause
Cancel
Off
Lock Controls
Hold 3 Sec
Cook
Time
Set
Clock
Options Help
Surface
Light
Vent Fan
Popcorn
Beverage
Microwave
Express
Warm
Power
Level
Auto
Cook
Combination
Fast Bake
Convection
Roast
Turntable
Convection
Bake
Filtros de extractor reutilizables
HQWRGRVORVPRGHORV
Filtro de carbón vegetal
T
u
r
n
t
o
S
e
l
e
c
t
P
r
e
s
s
t
o
E
n
t
e
r
Reheat
Timer
On/Off
Defrost
Weight/Time
Start
Pause
Cancel
Off
Lock Controls
Hold 3 Sec
Cook
Time
Set
Clock
Options Help
Surface
Light
Vent Fan
Popcorn
B
everage
Microwave
Express
Warm
Power
Level
Auto
Cook
Combination
Fast Bake
Convection
Roast
Turntable
Convection
Bake
CUIDADO Y LIMPIEZA
4XLWHHOWRUQLOOR
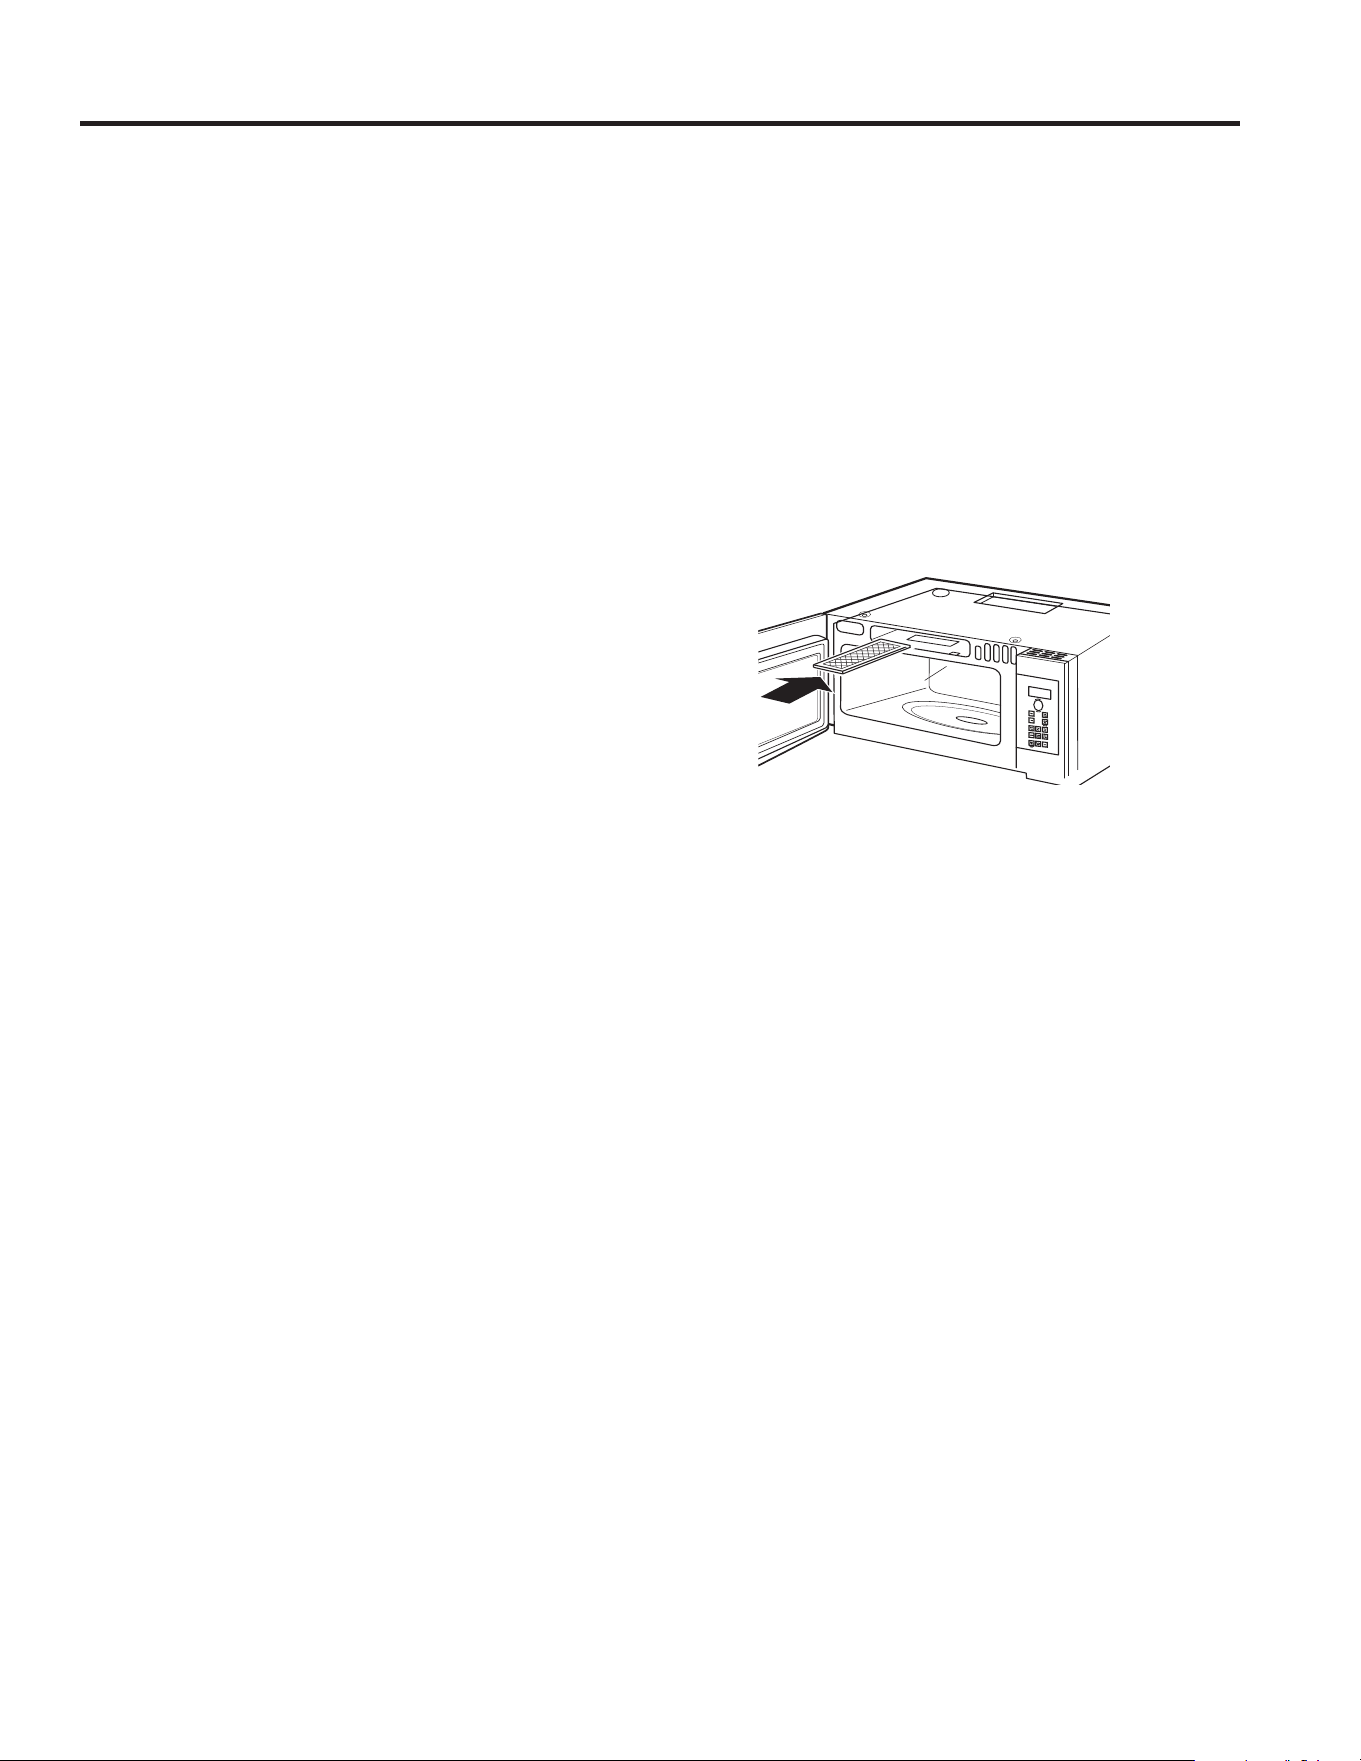
49-7000115 Rev. 0 17
Cuidado y limpieza
CUIDADO Y LIMPIEZA
Filtros de carbón vegeta
El filtro de carbón vegetal no puede limpiarse. Debe cambiarse
por otro. Vea la contraportada para ordenar en línea en
GEAppliances.com.
Si el modelo no realiza la extracción al exterior, el aire
recirculará a través de un filtro de carbón vegetal no
reutilizable que ayuda a quitar olores y humos.
El filtro de carbón vegetal debería cambiarse cuando está
YLVLEOHPHQWHVXFLRRGHVFRORULGRQRUPDOPHQWHWUiVR
PHVHVVHJ~QHOXVR&RQVXOWHKits opcionales en la página
22 para obtener más información.
REEMPLAZO DEL FILTRO DE CARBÓN
1. Desenchufe el horno microondas
2. Retire los tornillos de montaje de la rejilla de ventilación.
3. Incline la parrilla hacia adelante, y luego levante la misma
para su retiro.
4. Retire el filtro de carbón.
5. Deslice el nuevo filtro de carbón hasta su posición.
6. Deslice la parte inferior de la rejilla de la ventana hasta su
posición. Empuje la parte superior hasta que calce en su
posición. Reemplace los tornillos de montaje
7. Enchufe el horno microondas.

18 49-7000115 Rev. 0
Resolución de Problemas
RESOLUCIÓN DE PROBLEMAS
Problema Posibles causas Qué hacer
El horno no se pone en Puede que se haya fundido • Cambie el fusible o reconecte el diferencial.
marcha
un fusible de su casa o que haya
saltado el diferencial.
Apagón de corriente. • Desenchufe el horno microondas de la corriente y
vuélvalo a enchufar.
El enchufe no está completamente • Asegúrese de que el enchufe de 3 clavijas del horno esté
insertado en la toma de corriente completamente insertado en la toma de corriente de la
de la pared. pared.
La puerta no está cerrada del todo. • Abra la puerta y ciérrela por completo.
El panel de control está La puerta no está cerrada del todo. • Abra la puerta y ciérrela por completo.
encendido pero el horno
no se pone en marcha
No se presionó el botón • Presione Start/Pause.
Start/Pause tras seleccionar
el modo de cocción.
Ya se ha realizado otra selección • Presione Cancel/Off.
en el horno y no se presionó
Cancel/Off para cancelarla.
No se introdujo un tiempo • Asegúrese de introducir un tiempo de cocción tras
de cocción tras apretar Cook Time.
presionar Cook Time.
Se presionó Cancel/Off sin querer. • Vuelva a programar la cocción y presione Start/Pause.
No se introdujo el peso tras • Asegúrese de introducir el peso de la comida tras
seleccionar Auto Defrost seleccionar Auto Defrost o Fast Defrost.
o Fast Defrost.
CONTROL BLOQUEADO El control ha sido bloqueado. • Presione y mantenga Cancel/Off durante 3 segundos para
(CONTROL LOCKED)
desbloquear el control.
aparece en la pantalla
El suelo del horno está
La luz de la encimera está • Esto es normal.
templado incluso cuando
situada bajo el suelo del horno.
el horno no se ha usado
Cuando la luz está puesta,
el calor que produce puede
calentar el suelo del horno.
Se escucha un pitido
Ha intentado cambiar el nivel • Muchas de las funciones del horno están
con un tono
nivel de potencia cuando no preseleccionadas y no pueden cambiarse.
inusualmente bajo
estaba permitido.

49-7000115 Rev. 0 19
Resolución de Problemas
Cosas que son Normales de su Horno Microondas
&RVDVTXHVRQ1RUPDOHVGHVX+RUQR0LFURRQGDV
Reflejo de luz alrededor de la puerta o la cubierta exterior.
/X]GHOKRUQRWHQXH\FDPELRGHOVRQLGRGHOSLWLGRHQ
niveles de potencia que no son altos.
Ruido de golpes secos mientras el horno está en
funcionamiento.
RESOLUCIÓN DE PROBLEMAS
COMISIÓN DE COMUNICACIONES FEDERALES (EE.UU.)DECLARACIÓN
DE INTERFERENCIA DE RADIO FRECUENCIA
Este equipo genera y usa energía de frecuencia ISM y si no
es instalado y usado de forma adecuada, en cumplimiento
estricto con las instrucciones del fabricante, se podrán
ocasionar interferencias en la recepción de radio y televisión.
Se realizó una evaluación por tipo y se encontró en
cumplimiento con los límites de un equipo ISM, de acuerdo
con la parte 18 de las Reglas FCC, que fueron diseñadas
para brindar una protección razonable contra dichas
interferencias en una instalación residencial. Sin embargo,
no se garantiza que no se presenten interferencias en una
instalación en particular. Si el equipo provoca interferencias
en la recepción de radio o televisión, lo que se puede
determinar encendiendo y apagando el equipo, se aconseja
al usuario que intente corregir la interferencia a través de
una o más de las siguientes medidas:
Ŷ Reoriente la antena receptora de radio o televisión.
Ŷ Reubique el horno microondas con respecto al receptor.
Ŷ Coloque el horno microondas alejado del receptor.
Ŷ Enchufe el horno microondas en un tomacorriente
diferente, de modo que el horno microondas y el receptor
estén en diferentes circuitos de empalmes.
El fabricante no es responsable de cualquier interferencia de
radio o TV ocasionada por una modificación no autorizada
sobre este horno microondas. Es responsabilidad del
usuario corregir dicha interferencia.

20 49-7000115 Rev. 0
GEAppliances.com
Todo el servicio de garantía es provisto por nuestros Centros de Servicio de Fabricación, o un técnico autorizado de Servicio. Para
programar una visita del servicio técnico a través de Internet, visítenos en GEappliances.com/service o de forma telefónica al
800.432.2737 durante el horario de atención comercial.
Lo que GE Appliances no cubrirá:
Ŷ 9LDMHVGHOWpFQLFRGHOVHUYLFLRDVXKRJDUSDUDHQVHxDUOH
sobre cómo usar el producto.
Ŷ ,QVWDODFLyQHQWUHJDRPDQWHQLPLHQWRLQDGHFXDGRV6L
tiene un problema con la instalación, comuníquese con su
vendedor o instalador. Usted es responsable de brindar
instalaciones adecuadas de conexión eléctrica, escape u
otras instalaciones de conexión.
Ŷ )DOODGHOSURGXFWRRGDxRVREUHHOSURGXFWRVLVHSURGXFH
XQDEXVRXVRLQDGHFXDGRSRUHMHPSORDUFRHOpFWULFRHQ
XQDFDYLGDGGHODUHMLOODRPHWDOSDSHOGHDOXPLQLRRXVR
diferente para el cual fue diseñado o uso comercial.
Ŷ 5HHPSOD]RGHIXVLEOHVGHODFDVDRUHLQLFLRGHGLV\XQWRUHV
Ŷ 'DxRVRFDVLRQDGRVVREUHHOSURGXFWRSRUDFFLGHQWH
incendio, inundaciones o catástrofes naturales.
Ŷ 'DxRVFRQVHFXHQWHVRLQFLGHQWDOHVFDXVDGRVSRUSRVLEOHV
defectos sobre este producto.
Ŷ 'DxRFDXVDGRGHVSXpVGHODHQWUHJD
Ŷ 3URGXFWRQRDFFHVLEOHSDUDEULQGDUHOVHUYLFLRUHTXHULGR
Ŷ 6ROLFLWHHOVHUYLFLRWpFQLFRSDUDUHSDUDURUHHPSOD]DUODV
OiPSDUDVH[FHSWRODVOiPSDUDV/('
Ŷ 'DxRVVREUHHODFDEDGRWDOHVFRPRy[LGRVREUHOD
superficie, deslustres o manchas pequeñas no informadas
dentro de las 48 horas luego de la entrega.
Garantía Limitada de Horno Microondas GE Appliances
EXCLUSIÓN DE GARANTÍAS IMPLÍCITAS
6X~QLFD\H[FOXVLYDDOWHUQDWLYDHVODUHSDUDFLyQGHOSURGXFWRFRPRVHLQGLFDHQOD*DUDQWtD/LPLWDGD/DVJDUDQWtDV
implícitas, incluyendo garantías implícitas de comerciabilidad o conveniencia sobre un propósito particular, se limitan a un
año o al período más corto permitido por la ley.
Esta garantía limitada se extiende al comprador original y a cualquier dueño subsiguiente de productos comprados para uso hogareño
dentro de EE.UU. Si el producto está en un área donde no se encuentra disponible un Proveedor Autorizado del Servicio Técnico de
GE Appliances, usted será responsable por el costo de un viaje o se podrá requerir que traiga el producto a una ubicación del Servicio
Técnico de GE Appliances autorizado para recibir el servicio. En Alaska, la garantía limitada excluye el costo de envío o llamadas del
servicio a su hogar.
Algunos estados no permiten la exclusión o limitación de daños fortuitos o consecuentes. Esta garantía limitada le da derechos legales
específicos y es posible que tenga otros derechos legales que varían entre un estado y otro. Para conocer cuáles son sus derechos
legales, consulte a la oficina de asuntos del consumidor local o estatal o al Fiscal de su estado.
Garante: GE Appliances, a Haier Company
/RXLVYLOOH.<
Por el período de GE Appliances Reemplazará:
Un año
Desde la fecha de
compra original
Cualquier parte del horno que falle debido a un defecto en los materiales o mano de obra.
Durante esta garantía limitada de un año, GE Appliances también proveerá, sin costo, todo
el trabajo y los costos del servicio relacionado con el reemplazo de la parte que presente
defectos.
Abroche su recibo aquí. Para acceder al servicio técnico de acuerdo con la
garantía deberá contar con la prueba de la fecha original de compra.
GARANTÍA LIMITADA

49-7000115 Rev. 0 21
KITS OPCIONALES
Kits opcionales
Kits del Panel de Relleno
JX36BSS - Inoxidable
JX36BWW - Blanco
JX36BBB – Negro
JX36BES – Slate
Al reemplazar una campana de estufa de 36”, los kits del panel
de relleno completan el ancho adicional a fin de brindar un
aspecto de construcción a medida.
Sólo para instalación entre gabinetes; no apto para la
instalación al final del gabinete. Cada kit cuenta con dos
paneles de relleno de 3” de ancho.
Kit del Filtro de Carbón con
Recirculación
/RVNLWVGHOILOWURVHXWLOL]DQFXDQGRHOKRUQRPLFURRQGDVQR
puede ser ventilado hacia el exterior.
Kit de Instalación del Gabinete de 15”
JX15BUMPBB - Negro
JX15BAMPW - Blanco
Para uso al instalar con gabinetes de 15” de profundidad.
Disponible por un costo adicional a través de su proveedor
de GE Appliances. Consulte la contraportada para realizar
pedidos por teléfono o en GEAppliances.com.
.LWVGHO3DQHOGH5HOOHQR

22 49-7000115 Rev. 0
Impreso en China
Soporte para el Consumidor
SOPORTE PARA EL CONSUMIDOR
Sitio Web de GE Appliances
¿Desea realizar una consulta o necesita ayuda con su electrodoméstico? ¡Intente a través del Sitio Web de GE Appliances las
24 horas del día, cualquier día del año! Usted también puede comprar más electrodomésticos maravillosos de GE Appliances y
aprovechar todos nuestros servicios de soporte a través de Internet, diseñados para su conveniencia.
En EE.UU.: GEAppliances.com
Registre su Electrodoméstico
¡Registre su electrodoméstico nuevo a través de Internet, según su conveniencia! Un registro puntual de su producto permitirá
una mejor comunicación y un servicio más puntual de acuerdo con los términos de su garantía, en caso de surgir la necesidad.
También puede enviar una carta en la tarjeta de inscripción preimpresa que se incluye con el material embalado.
En EE.UU.: GEAppliances.com/register
Servicio Programado
El servicio de reparación de expertos de GE Appliances está a sólo un paso de su puerta. Conéctese a través de Internet y programe
su servicio a su conveniencia cualquier día del año. En EE.UU.: GEappliances.com/service o comuníquese al 800.432.2737
durante el horario de atención comercial.
Piezas y Accesorios
Aquellos individuos calificados para realizar el servicio técnico de sus propios electrodomésticos podrán solicitar el envío de
SLH]DVRDFFHVRULRVGLUHFWDPHQWHDVXVKRJDUHVVHDFHSWDQODVWDUMHWDV9,6$0DVWHU&DUG\'LVFRYHU2UGHQHKR\DWUDYpVGH
Internet durante las 24 horas, todos los días. En EE.UU.: GEApplianceparts.com o de forma telefónica al 800.432.2737 durante
el horario de atención comercial.
Contáctenos
Si no se encuentra satisfecho con el servicio que recibió de GE Appliances, comuníquese con nosotros a través de nuestro sitio
Web con todos los detalles, incluyendo su número telefónico, o escriba a:
(Q((88*HQHUDO0DQDJHU&XVWRPHU5HODWLRQV_*($SSOLDQFHV$SSOLDQFH3DUN_/RXLVYLOOH.<
GEAppliances.com/contact