Operating and Installation
Instructions
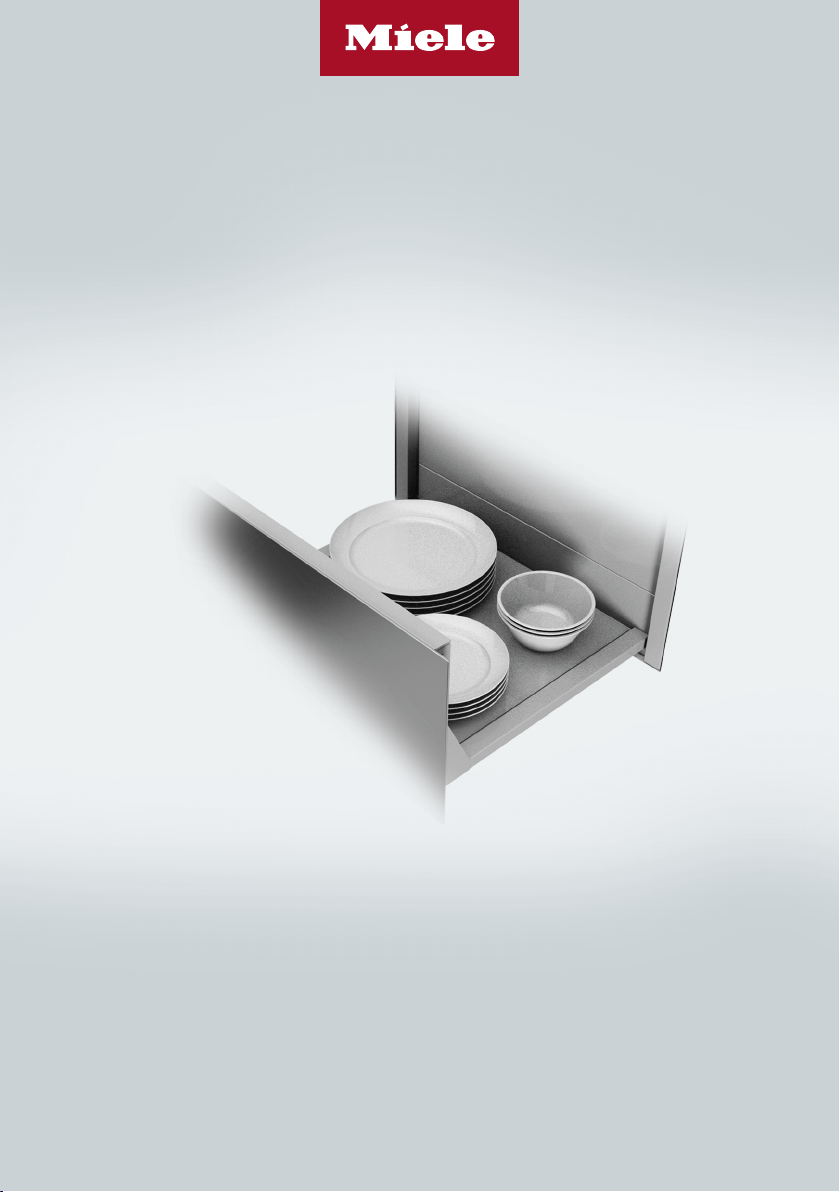
Gourmet Drawer
To prevent accidents and machine damage, read these instructions
before installation or use.
en-US M.-Nr. 11 924 070

Contents
2
IMPORTANT SAFETY INSTRUCTIONS ............................................................ 4
Caring for the environment .............................................................................. 12
Overview............................................................................................................. 13
ESW 7010, ESW 7110......................................................................................... 13
ESW 7570, ESW 7580, ESW 7670, ESW 7680 ................................................... 14
Controls and indicators ....................................................................................... 15
Included accessories........................................................................................... 16
Before first use .................................................................................................. 17
Cleaning the drawer for the first time.................................................................. 17
Heating up the drawer for the first time .............................................................. 17
Miele@home........................................................................................................ 18
Operation............................................................................................................ 22
Using the appliance............................................................................................. 22
Using MobileStart................................................................................................ 23
Operating modes................................................................................................. 23
Duration............................................................................................................... 23
Temperature settings........................................................................................... 24
Keeping food warm........................................................................................... 25
Warming dishes ................................................................................................. 28
Warming times .................................................................................................... 28
Capacity .............................................................................................................. 28
ESW 7010, ESW 7110.................................................................................... 29
ESW 7570, ESW 7580, ESW 7670, ESW 7680 .............................................. 30
Low temperature cooking ................................................................................ 31
Other uses.......................................................................................................... 36
Networking with Miele Built-in Appliances..................................................... 37
Sabbath mode.................................................................................................... 38
Cleaning and care ............................................................................................. 39
Frequently Asked Questions ............................................................................ 41
Optional accessories ........................................................................................ 43
Customer Service.............................................................................................. 44
Contact in the event of a fault ............................................................................. 44
Data plate ............................................................................................................ 44

Contents
3
Appliance warranty and product registration ...................................................... 44
Installation.......................................................................................................... 45
IMPORTANT SAFETY INSTRUCTIONS - INSTALLATION ................................... 45
Installation notes ................................................................................................. 46
Installation dimensions ESW 7010, ESW 7110 ................................................... 47
Combination with an H2840 or CVA/DGC/H7x4x........................................ 47
Combination with a DGC/H7x6x................................................................... 48
Side view ........................................................................................................ 49
Connections and ventilation........................................................................... 50
Installation dimensions ESW 7570, ESW 7670 ................................................... 51
Combination with a CVA/DGC/H7x7x........................................................... 51
Combination with a DGC/H7x8x................................................................... 52
Side view ........................................................................................................ 53
Connections and ventilation........................................................................... 54
Installation dimensions ESW 7580, ESW 7680 ................................................... 55
Installation in a tall or base cabinet................................................................ 55
Side view ........................................................................................................ 56
Connections and ventilation........................................................................... 57
Installation ........................................................................................................... 58
Electrical connection ........................................................................................... 59
Declaration of conformity................................................................................. 60

IMPORTANT SAFETY INSTRUCTIONS
4
Please note that the Gourmet Drawer is referred to in these operating instructions
as the drawer.
This drawer complies with all current local and national safety re-
quirements. Inappropriate use can, however, lead to personal in-
jury and material damage.
Read the operating and installation instructions carefully before
using the drawer. They contain important information on safety, in-
stallation, use, and maintenance. This prevents both personal in-
jury and damage to the drawer.
In accordance with standard IEC60335-1, Miele expressly and
strongly advises that you read and follow the instructions in the
chapter on installing the drawer as well as in the “IMPORTANT
SAFETY INSTRUCTIONS”.
Miele cannot be held liable for injury or damage caused by non-
compliance with these instructions.
Keep these operating and installation instructions in a safe place
and pass them on to any future owner.

IMPORTANT SAFETY INSTRUCTIONS
5
Appropriate use
This drawer is intended for domestic use and use in other similar
environments.
The drawer is not intended for outdoor use.
The warming drawer is intended for domestic use only as de-
scribed in these instructions. All other use is at the owner's own risk
and could be dangerous.
Persons who lack physical, sensory or mental abilities, or experi-
ence with the appliance should not use it without supervision or in-
struction by a responsible person.

IMPORTANT SAFETY INSTRUCTIONS
6
Safety with children
As with any appliance, close supervision is necessary when used
by children.
Do not leave children unattended: Children should not be alone or
unsupervised in the area where the appliance is installed. Do not al-
low them to sit or stand on the appliance.
Be sure to supervise any children in the vicinity of the drawer, and
do not let them play with it.
The drawer gets hot when in use and remains hot for quite a
while after being switched off. Keep children away from the drawer
until it has cooled down and there is no danger of burning.
Danger of suffocation. While playing, children may become entan-
gled in packaging material (such as plastic wrapping) or pull it over
their head, presenting the risk of suffocation. Keep packaging mate-
rial away from children.

IMPORTANT SAFETY INSTRUCTIONS
7
Technical safety
Unauthorized installation, maintenance, and repairs can cause
considerable danger for the user. Installation, maintenance, and re-
pairs must only be carried out by a Miele authorized technician.
A damaged drawer can be dangerous. Always check for visible
signs of damage. Never use a damaged appliance.
Reliable and safe operation of the drawer can only be assured if it
has been connected to the electrical supply.
Be certain the drawer is properly installed and grounded by a
qualified technician. To guarantee the electrical safety of this appli-
ance, continuity must exist between the appliance and an effective
grounding system. It is imperative that this basic safety requirement
be met. If there is any doubt, have the electrical system of the house
checked by a qualified electrician.
The connection data (voltage and frequency) on the data plate of
the drawer must match the domestic electrical supply in order to
avoid the risk of damage to the drawer.
Compare this data before connecting the appliance. If in any doubt,
consult a qualified electrician.
Do not connect the drawer to the electrical supply with a power
bar or extension cord. These are a fire hazard and do not guarantee
the required safety of the appliance.
For safety reasons, the drawer may only be used when it has been
fully installed.
This drawer may not be used in non-stationary locations (e.g. on a
ship).
Any contact with live connections or tampering with the electrical
or mechanical components of the drawer will endanger your safety
and may lead to appliance malfunctions.
Do not open the casing of the drawer under any circumstances.

IMPORTANT SAFETY INSTRUCTIONS
8
Any repairs not performed by a Miele authorized service techni-
cian will void the warranty.
Defective components should be replaced by Miele original parts
only. Only with these parts can safety of the appliance be assured as
intended by the manufacturer.
If the plug has been removed or the power cord is not supplied
with a plug, the drawer must be connected to the power supply by a
suitably qualified electrician.
If the power cord is damaged, it must be replaced with a special
power cord (see “Electrical connection” under “Installation”).
The drawer must be completely disconnected from the power
supply during installation, maintenance and repair work. This can be
ensured as follows:
- The circuit breaker has tripped, or
- The fuse of the electrical installation is completely removed, or
- The plug (if present) is removed from the outlet. In the process,
pull the plug not the cord.
If the drawer is installed behind a cabinet door, do not close the
door while the drawer is in operation. Heat and moisture can build up
behind the closed door and cause damage to the range and to the
surrounding cabinets and flooring. Do not close the door until the
drawer has completely cooled down.

IMPORTANT SAFETY INSTRUCTIONS
9
Correct use
You could burn yourself on the hot drawer or hot dishware. Pro-
tect your hands with heat-resistant pot holders or gloves when han-
dling hot items. Do not let them get wet or damp. Heat transfers
through damp and wet material more quickly with the risk of scalding
or burning yourself.
Risk of fire. Do not store any plastic containers or combustible ob-
jects in the drawer. They can melt or catch fire when the appliance is
switched on.
Due to the high temperatures radiated, objects left near the drawer
could catch fire. Do not use the drawer to heat up the room.
Never use paper towels or other similar objects in place of the
non-slip liner supplied with the appliance.
The maximum load capacity of the telescopic drawer rails is
55lbs (25kg). If you overload the drawer or lean/stand on it when it
is open, you will damage the rails.
The underside of the drawer gets hot when it is in use. Be careful
not to touch it when the drawer is open.
The non-slip liner is heat-resistant up to 395°F (200°C).
It is possible for the bottom of cookware to exceed this temperature,
especially after they have been used to sear food. Allow cookware to
cool down for a minute or two before placing them in the drawer.
Cookware made of plastic or aluminum foil will melt at high tem-
peratures. When keeping food warm, use only heat-resistant cook-
ware made of porcelain, glass, etc.
Liquids that get inside the warming drawer can cause the appli-
ance to short-circuit. Open and close a loaded drawer carefully to
prevent liquids from spilling.
IMPORTANT SAFETY INSTRUCTIONS
10
Keeping Warm mode is to be used for keeping hot dishes
warm, not for heating up cold food. Make sure that any food placed
in the drawer is at a high enough temperature.
In some foods, bacterial growth may occur if the temperature is
too low. Set the appliance to an adequate warming temperature.
Loose fitting or hanging garments present a fire hazard. Wear
proper apparel while operating the appliance.
Do Not Use Water on Grease Fires–Smother fire or flame or use
dry chemical or foam-type extinguisher.
Before serving, be sure food is at a safe temperature. This is par-
ticularly important when preparing food for babies and children.
Never warm undiluted alcohol in the warming drawer, this can
easily ignite.
Exercise caution when warming food with a high sugar content. If
heated for too long the sugar may caramelize or ignite.
Never add water to food in a hot drawer. The steam created could
cause serious burns or scalds.
IMPORTANT SAFETY INSTRUCTIONS
11
Cleaning and maintenance
Danger of electric shock. The steam from a steam cleaner could
reach live electrical components and cause a short circuit. Never use
a steam cleaner for cleaning.
SAVE THESE INSTRUCTIONS AND REVIEW THEM PERIODICALLY
Caring for the environment
12
Disposal of the packing mate-
rial
The cardboard box and packing materi-
als protect the appliance during ship-
ping. They have been designed to be
biodegradable and recyclable.
Ensure that any plastic wrappings,
bags, etc. are disposed of safely and
kept out of the reach of children. Dan-
ger of suffocation!
Disposal of your old appliance
Electrical and electronic appliances
contain valuable materials. They also
contain certain substances, compounds
and components which were essential
for the proper functioning and safe use
of the equipment. Handling these mate-
rials improperly by disposing of them in
your household waste can be harmful to
your health and the environment. There-
fore, please do not dispose of your old
appliance with regular household waste
and follow local regulations on proper
disposal.
Consult with local authorities, dealers or
Miele in order to dispose of and recycle
electrical and electronic appliances.
Miele assumes no responsibility for
deleting any personal data left on the
appliance being disposed. Please en-
sure that your old appliance is kept
away from children until removal. Ob-
serve safety requirements for appli-
ances that may tip over or pose an en-
trapment hazard.
Overview
13
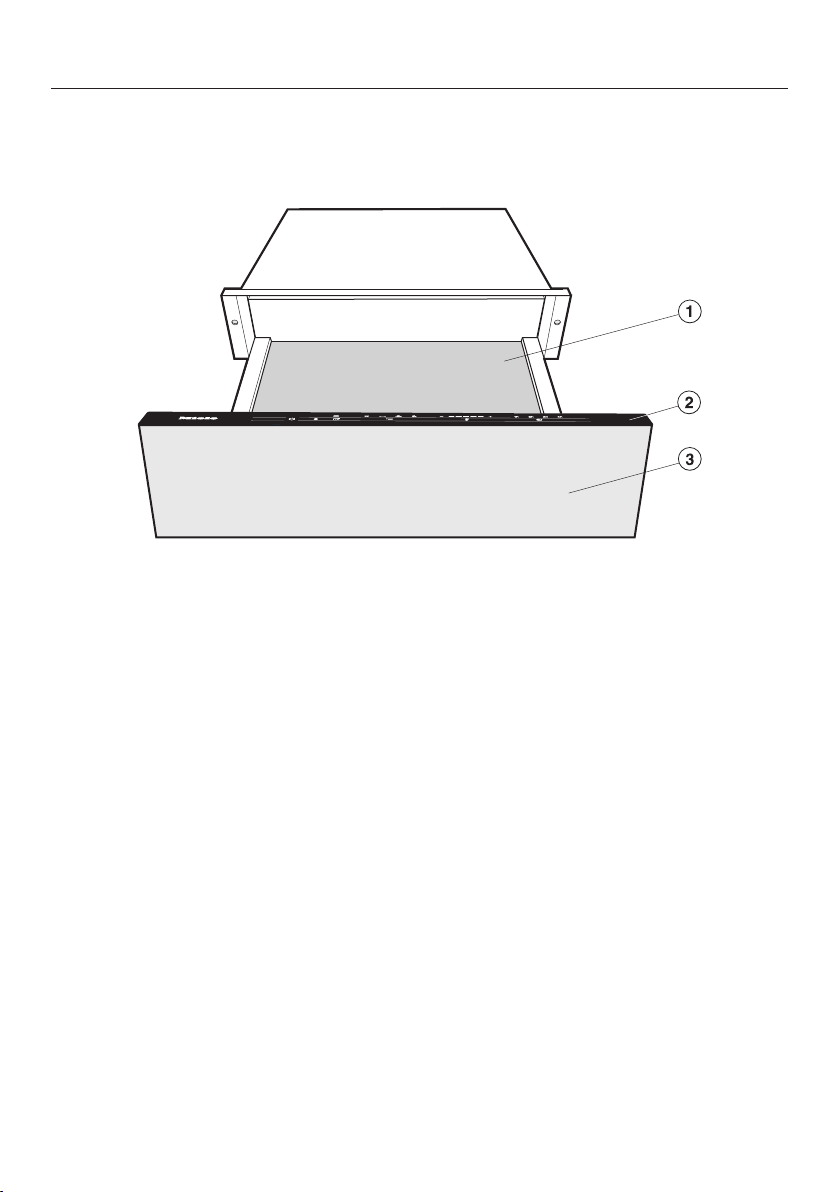
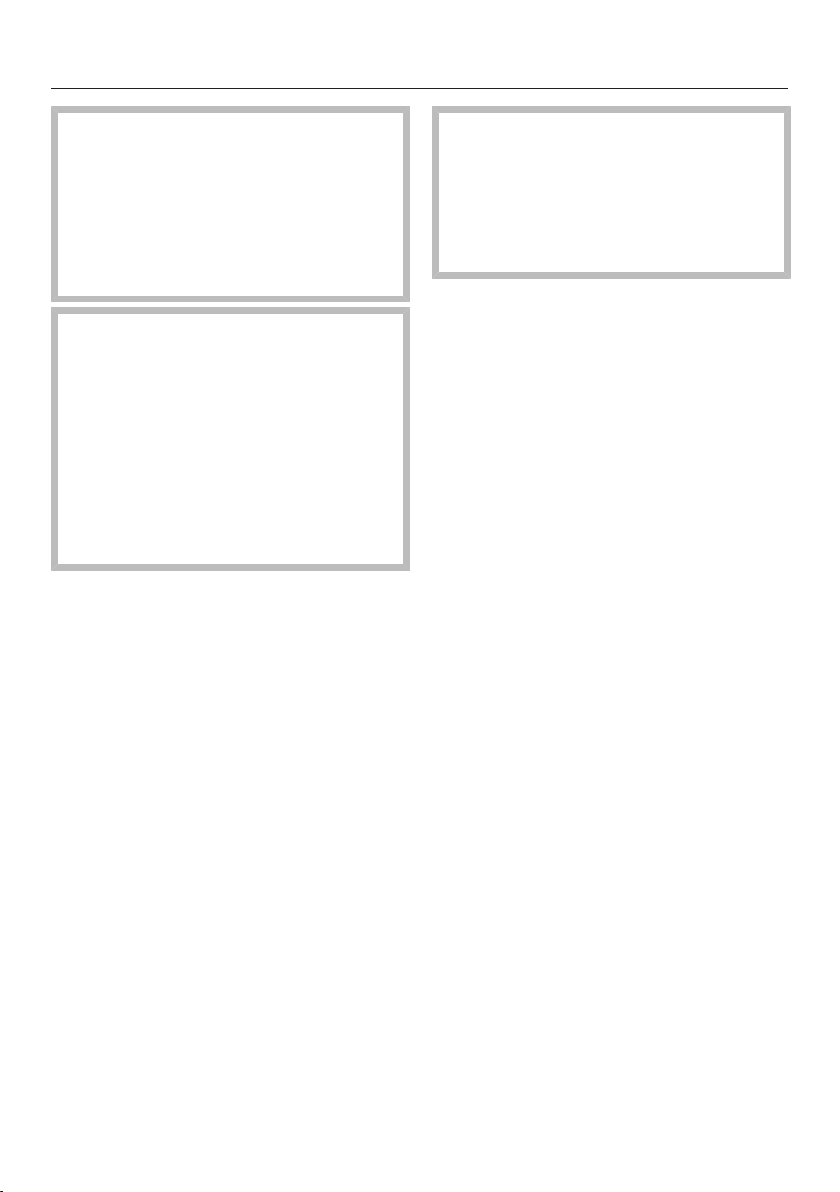
ESW 7010, ESW 7110
a
Non-slip liner
b
Controls and indicators
c
Drawer front with Push2open mechanism
The drawer can be opened and closed by lightly pressing the drawer front.
Overview
14
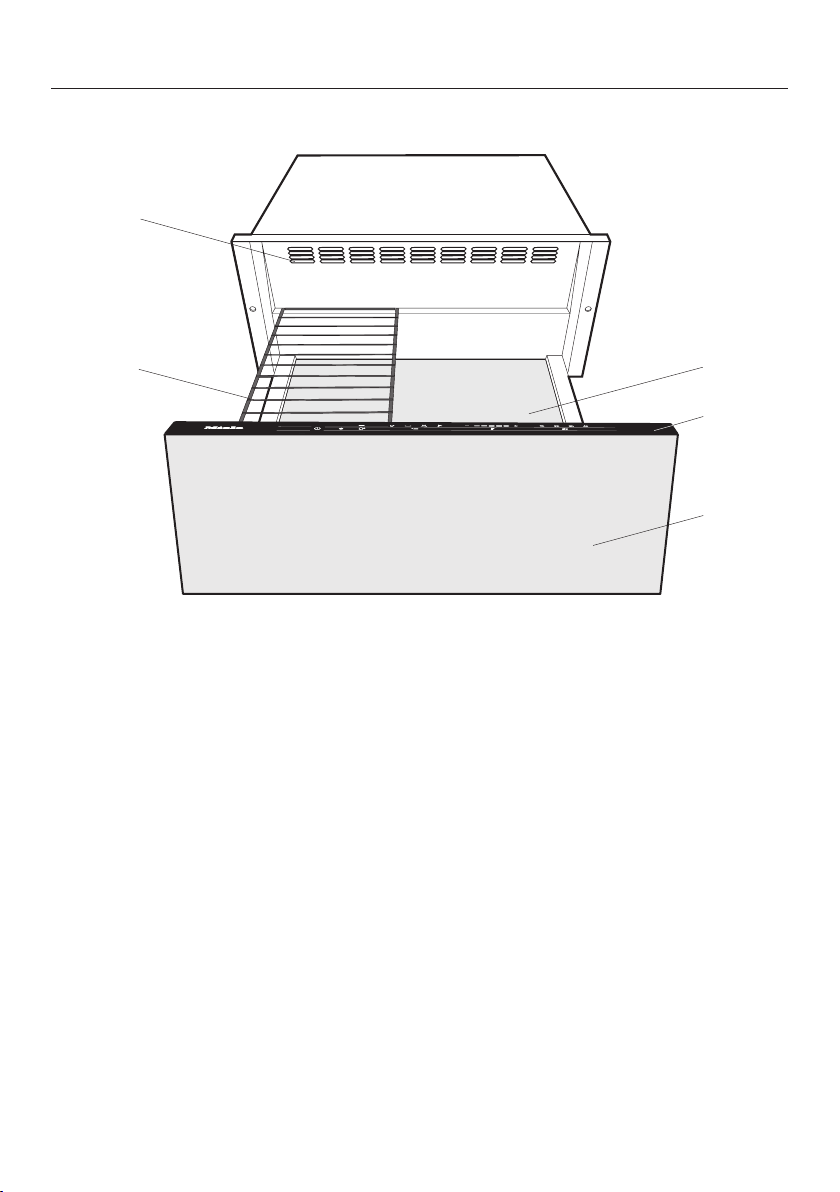
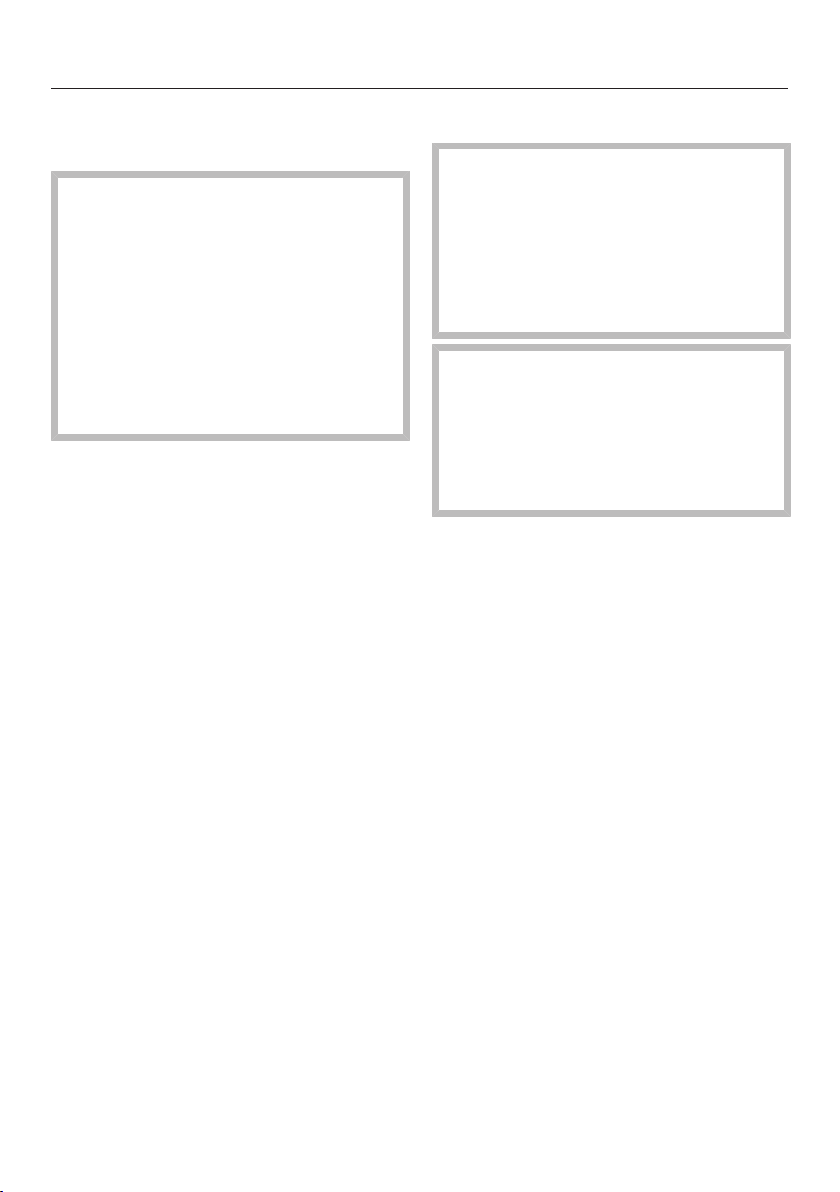
ESW 7570, ESW 7580, ESW 7670, ESW 7680
d
e
c
a
b
a
Non-slip liner
b
Controls and indicators
c
Drawer front with Push2open mechanism
The drawer can be opened and closed by lightly pressing the drawer front.
d
Wire Rack
e
Air vents

Overview
15
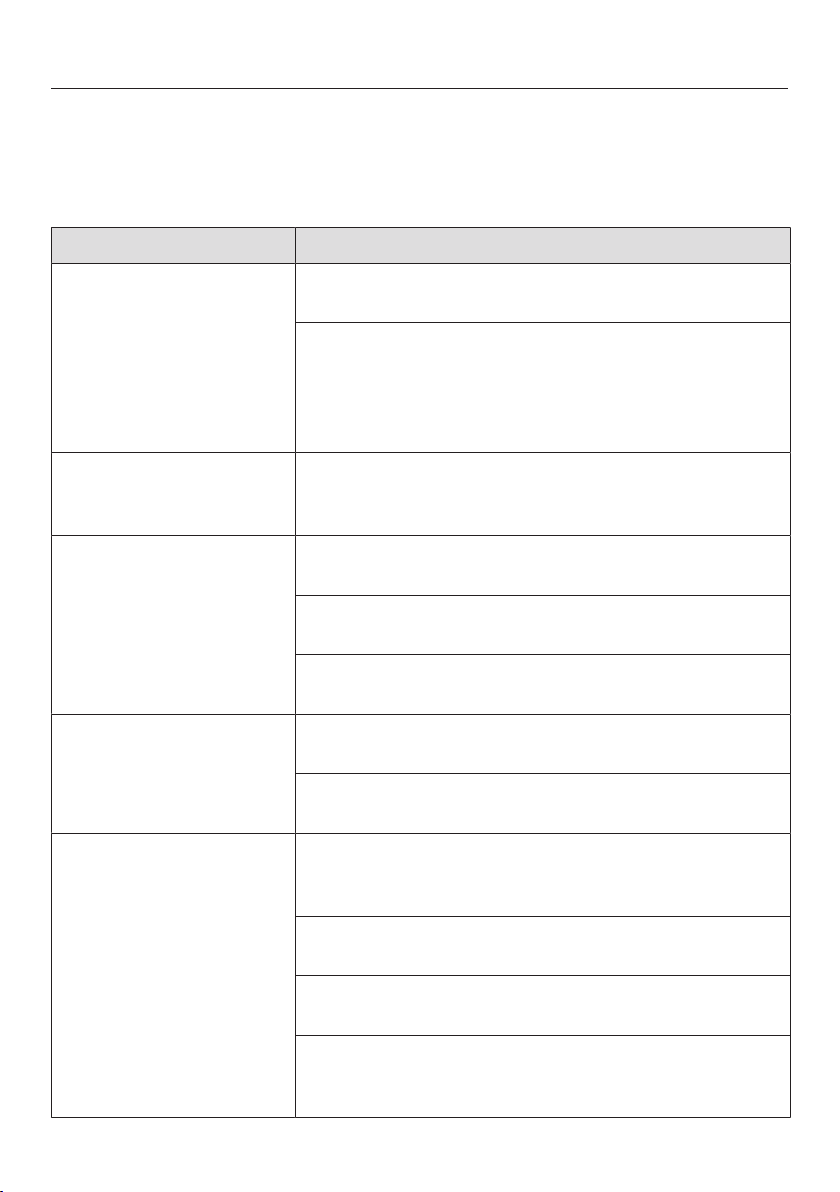
Controls and indicators
Sensor buttons
a
On/Offsensor control
For switching the drawer on and off
b
Remotesensor button
For controlling the drawer via your
mobile device
c
Menusensor button
For selecting the operating mode
d
Temperaturesensor button
For setting the temperature
e
Durationsensor button
For setting a specific duration or re-
verting to continuous operation.
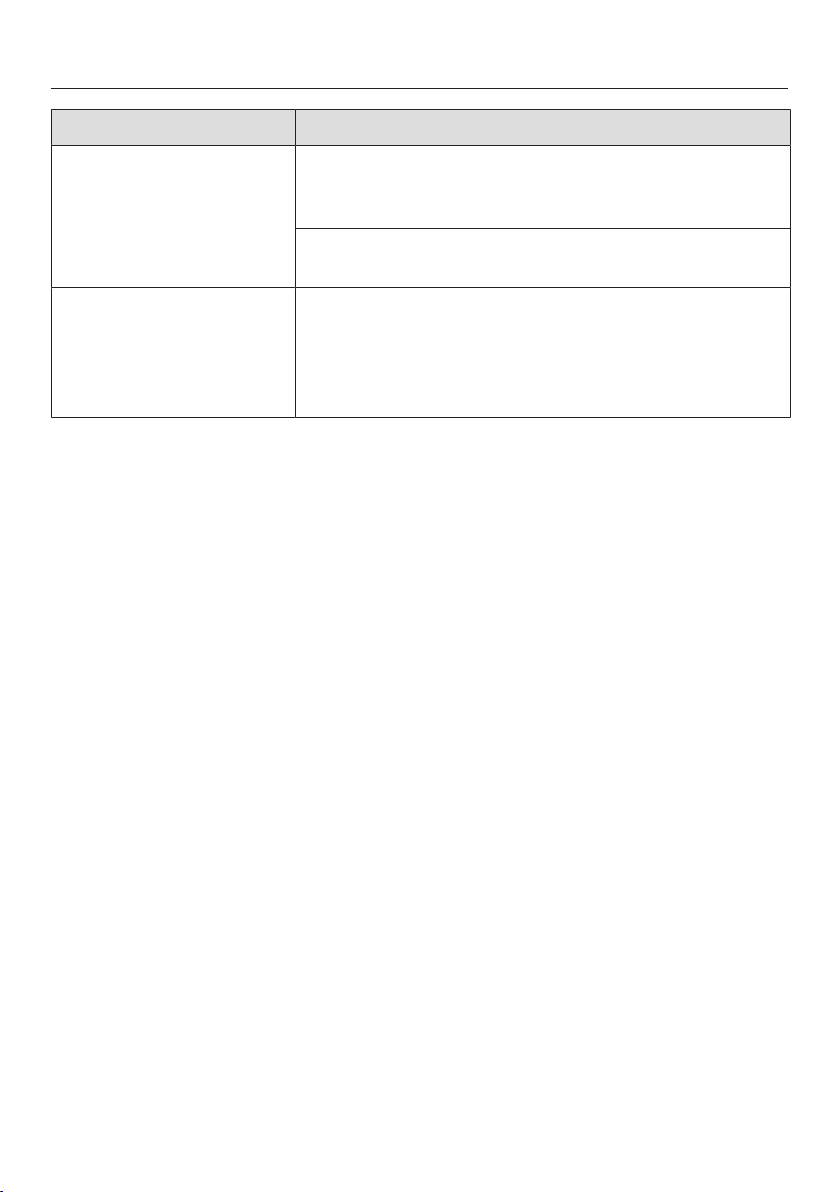
Displays/Indicator lights
f
sensor control
For setting a specific duration or re-
verting to continuous operation.
g
Segment bar indicator lights
For displaying the temperature
h
indicator light
Indicates that the
Low temperature cooking operating
mode is set.
i
indicator light
Indicates that the
Keeping food warm operating mode
is set.
j
indicator light
Indicates that the
Warm Dishes/Plates operating mode
is set.
k
indicator light
Indicates that the
Warm Cups/Glasses operating mode
is set.
l
indicator light
Indicates that the drawer can be
controlled via your mobile device.
m
Optical interface
(for Miele Service only)
Overview
16
Included accessories
The accessories supplied with your ap-
pliance, as well as a range of optional
ones, are available to order from Miele
(see “Optional accessories”).
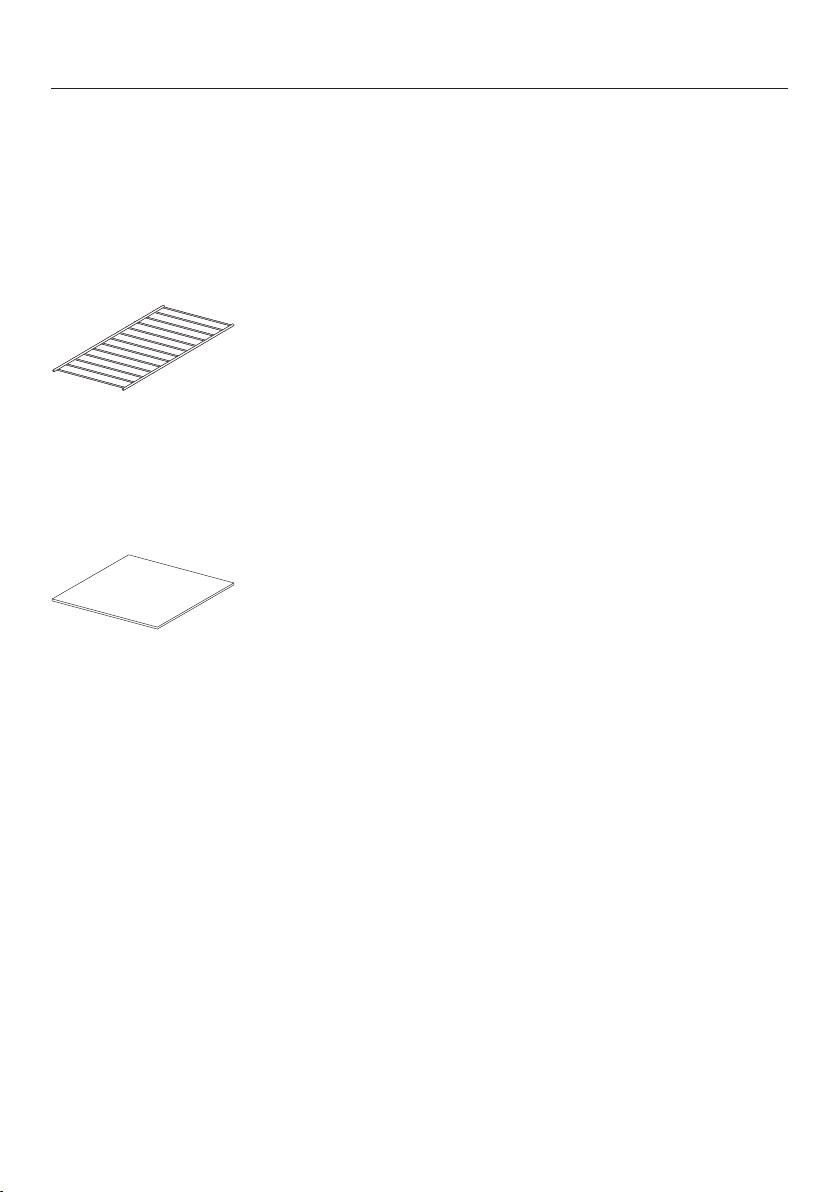
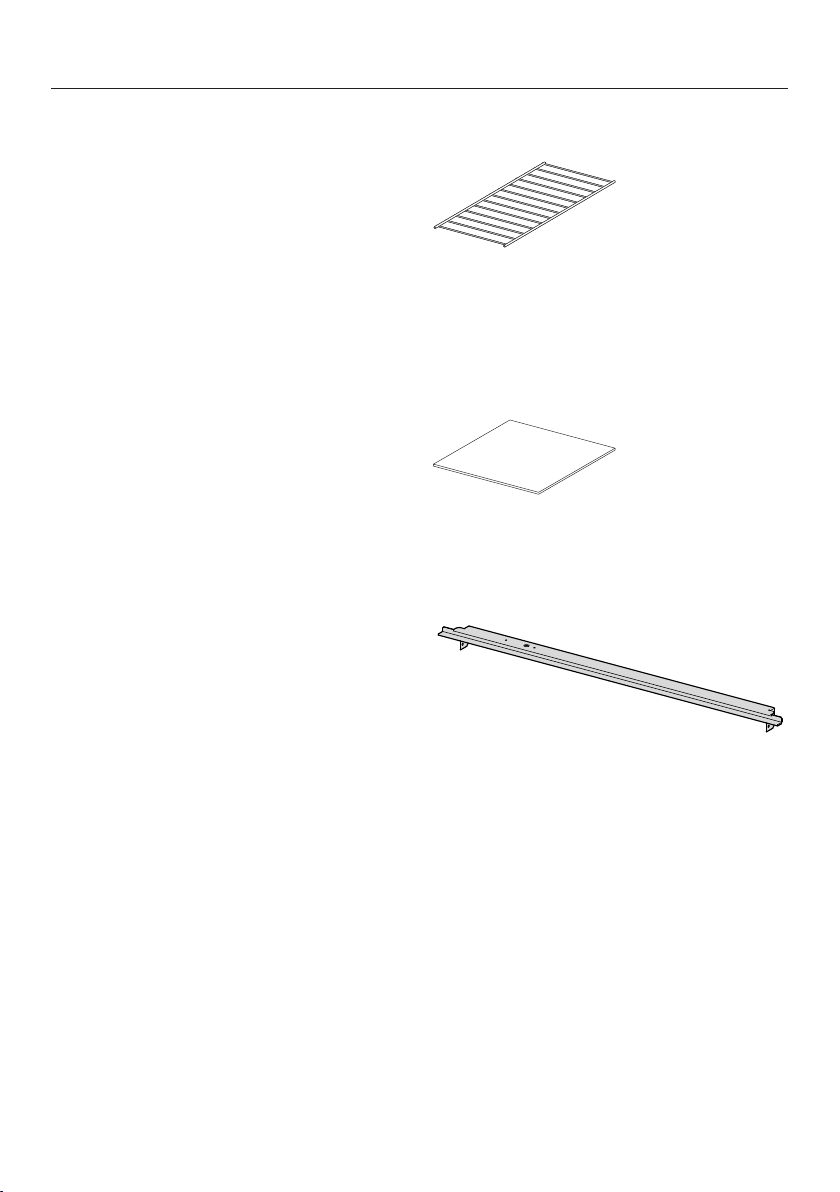
Wire Rack
For increasing the loading area (ESW
7570, ESW 7580, ESW 7670, ESW
7680).
Non-slip liner
For keeping dishware secure.

Before first use
17
Remove any protective foil and stick-
ers.
Do not remove stickers carrying
safety or installation information or
the data plate.
This makes it easier to perform servic-
ing and repair work.
Cleaning the drawer for the
first time
Remove the non-slip liner and (if
present) the wire rack from the
drawer. Clean both with warm water
and liquid dish soap, applied with a
soft sponge or microfiber cloth.
Dry the non-slip liner and the wire
rack with a soft cloth.
Wipe the drawer inside and out with a
damp cloth to remove any dust or
left-over packaging.
Dry all surfaces with a soft cloth.
Replace the non-slip liner and the
wire rack (if applicable) in the drawer.
Heating up the drawer for the
first time
Heat the empty drawer for at least
2hours.
Touch the sensor control to switch
the drawer on.
Touch the Menusensor control re-
peatedly until the symbol lights
up.
Touch the Temperaturesensor control
repeatedly until the segment on the
far right-hand side of the temperature
display lights up.
Touch the Durationsensor control re-
peatedly until 2h lights up.
Close the drawer.
The drawer is equipped with a contact
switch. This ensures that the heating
element and fan in the appliance only
work when the drawer is closed.
The drawer will switch itself off auto-
matically after 2hours.
The metal components have a protec-
tive coating. For that reason they will
give off a slight smell temporarily when
the drawer is heated for the first time.
The smell and any vapors given off will
dissipate after a short time and do not
indicate a faulty connection or appli-
ance.
It is important to ensure that the kitchen
is well ventilated when heating the
drawer for the first time.
Before first use
18
Miele@home
Your drawer is equipped with an inte-
grated WiFi module.
To use this feature, you will need:
- a WiFi network
- the Miele app
- a Miele user account You can create
a user account via the Miele app.
The Miele app will guide you as you
connect your drawer to your home WiFi
network.
Once your drawer is connected to your
WiFi network, you can use the app, for
example, to carry the following activi-
ties:
- access information about the operat-
ing status of your drawer
- retrieve information on cooking pro-
cesses that are in progress
- stop cooking programs that are in
progress
The drawer requires max. 2W in net-
worked standby.
Before installing the drawer in its in-
stallation site, ensure that the signal
of your WiFi network is strong
enough.
Availability of the WiFi connection
The WiFi connection shares a frequency
range with other appliances (including
microwave ovens and remote control
toys). This can cause sporadic or even
complete connection failures. There-
fore, the availability of featured func-
tions cannot be guaranteed.
Miele@home availability
The ability to use the Miele app de-
pends on the availability of the
Miele@home service in your country.
The Miele@home service is not avail-
able in every country.
For information about availability,
please visit www.miele.com.
Miele App
The Miele App is available to download
free of charge from the Apple App
Store
®
or from the Google Play Store™.
Before first use
19
Connecting via the app
The Miele@mobile app can be used to
connect to your network.
Install the Miele@mobile app on your
mobile device.
To log in you will need:
1. your WiFi network password
2. your drawer password
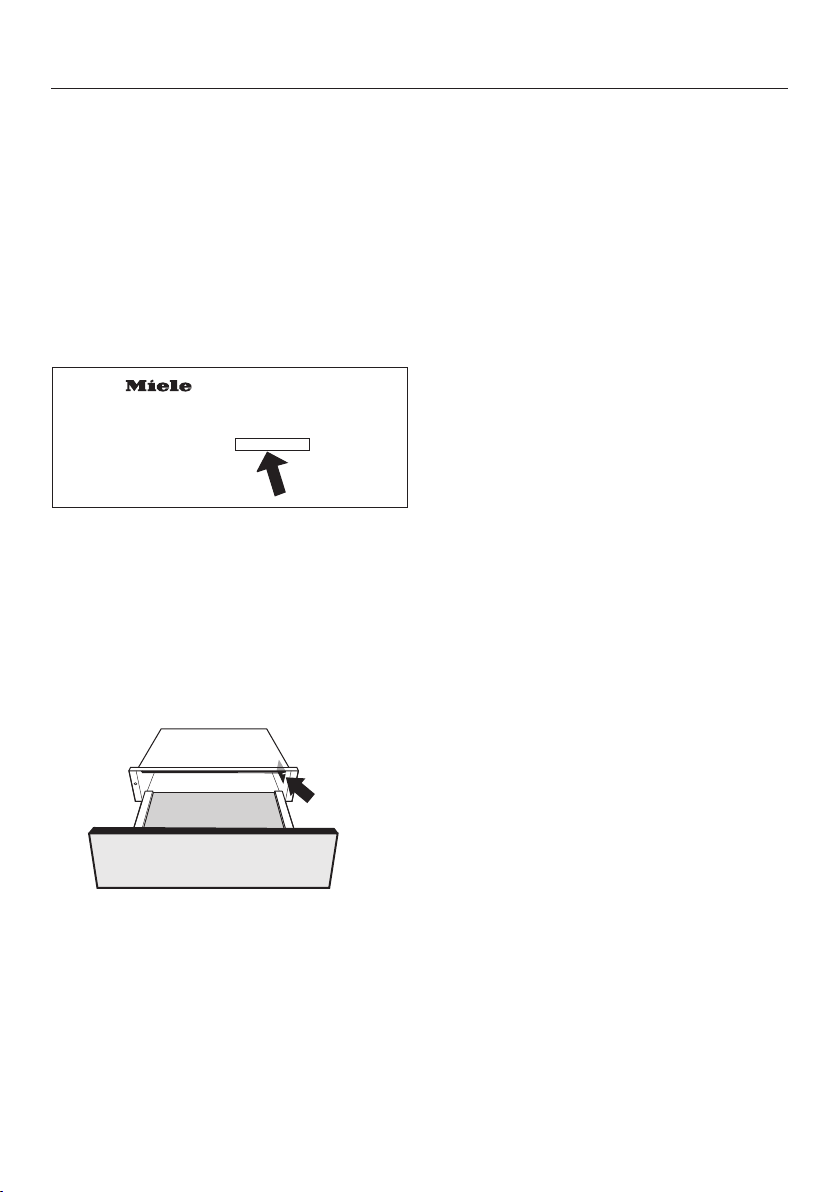
Made in Germany
Typ: ESW /XXXX XX XXX
Fabr.- Nr. : 00 / X /XXX XXXXXXXX XXX
M.- Nr. : XX XXX XXX
The password for your drawer consists
of the last nine digits of the serial num-
ber. This can be found on the appli-
ance’s data plate.
Data plate
The data plate is located here:
Start signing the appliance on in the
app. Follow the signing in instruc-
tions.
If requested to activate the WiFi on the
drawer, proceed as follows:
Turn the drawer off.
Press and hold the Durationsensor
control.
At the same time, touch the Re-
motesensor control.
2h will light up constantly, 3h will flash
on and off.
The drawer will be ready for connection
in the next 10minutes.
Follow the instructions in the app.
When successfully connected, 2h and
3h will light up constantly.
Quit the connection mode on the
drawer by touching the Tempera-
turesensor control.
The drawer can now be operated via
the app.

Before first use
20
Connecting via WPS
Your WiFi router must support WPS
(WiFi Protected Setup).
Turn the drawer off.
Press and hold the Durationsensor
control.
At the same time, touch the Re-
motesensor control.
2h will light up constantly, 3h will flash
on and off.
The WPS connection must be started
on the drawer at the same time as on
the WiFi router.
Touch the Durationsensor control on
the drawer after a few seconds.
After a short while, 2h will light up con-
stantly, and 3h and 4h will flash on
and off.
The drawer will be ready for connection
in the next 10minutes.
Start the WiFi connection on your
WiFi router.
When successfully connected, 2h and
3h will light up constantly.
Quit the connection mode on the
drawer by touching the Tempera-
turesensor control.
The drawer can now be operated via
the app.
If the connection fails, you have proba-
bly not activated WPS on your router
quickly enough. Repeat the steps
above.
Tip: If your WiFi router does not support
WPS, please connect via the
Miele@mobile app.

Before first use
21
Signing out of WiFi (resetting factory
defaults)
To set up a new WiFi connection, the
existing WiFi connection must be dis-
connected.
Turn the drawer off.
Press and hold the Temperaturesen-
sor control.
At the same time, touch the Re-
motesensor control.
With an existing WiFi connection, 2h
and 3h will light up constantly.
The drawer will be ready for disconnec-
tion in the next 10minutes.
Touch the Temperaturesensor con-
trol.
2h will light up constantly, 3h will flash
on and off.
After a few seconds, 2h and 3h will
start flashing on and off. The connec-
tion has now been disconnected.
Quit the signing off mode on the
drawer by touching the Durationsen-
sor control.
The WiFi connection has now been dis-
connected. A new connection can now
be set up.
Log off the WiFi if you are disposing of
your drawer, selling it, or putting a used
drawer into operation. This is the only
way to ensure that all personal data has
been removed and the previous owner
will no longer be able to access the
drawer.
Operation
22
Using the appliance
Malfunction can occur due to
dirty and/or covered sensor buttons.
The sensor buttons do not react or
unintentional switching procedures
result, perhaps even the automatic
deactivation of the drawer.
Keep the sensor buttons and indica-
tors clean.
Do not place anything over the sen-
sor buttons or indicators.
Damage caused by liquids.
Liquids that get inside the drawer
can cause a short circuit.
Open and close a loaded drawer
carefully to prevent liquids from
spilling.
Open the drawer.
Touch the sensor control to switch
the drawer on.
Touch the Menusensor control re-
peatedly until the required operating
mode lights up.
Touch the Temperaturesensor control
repeatedly until the segment for the
required temperature lights up in the
temperature display.
Touch the Durationsensor control re-
peatedly until the required number of
hours for the operating time lights up.
Close the drawer.
Operation
23
Using MobileStart
Touch the Remotesensor control to
activate MobileStart.
The indicator light above the Re-
motesensor control will light up. You
can operate your drawer remotely with
the Miele@mobile app.
Operation via the sensor buttons has
precedence over operation via the
app.
Operating modes
The following operating modes are
available:
- Warm Cups/Glasses
- Warm Dishes/Plates
- Keeping food warm
- Low temperature cooking
The last operating mode selected is au-
tomatically activated the next time the
drawer is switched on, and this is
shown in the control field.
The drawer is equipped with a fan
which distributes the warmed air within
the drawer. The fan runs continuously in
all operating modes.
The drawer can be used to keep food
warm at the same time as warming
dishware. Use the Keeping food
warm operating mode for this.
Risk of burning due to hot dish-
ware.
Empty dishware will become very hot
when heated using the Keeping
food warm operating mode.
Use pot holders when removing the
dishware.
Duration
Fire hazard due to dried-out
food.
Long warming times lead to the food
drying out, which may cause it to
catch fire.
Do not leave the drawer unattended
for long periods in continuous opera-
tion.
The drawer is set for continuous operat-
ing mode (exception: Low temperature
cooking). The safety shut-off will turn
off the drawer after a maximum of
12hours of continuous operation.
A limited operating duration can be se-
lected by touching the Durationsensor
control. One touch for 1hour (1h), two
touches for 2hours (2h), etc., up to a
maximum of 4hours.
Continuous operation is restored by
touching the sensor control a fifth time.
Operation
24
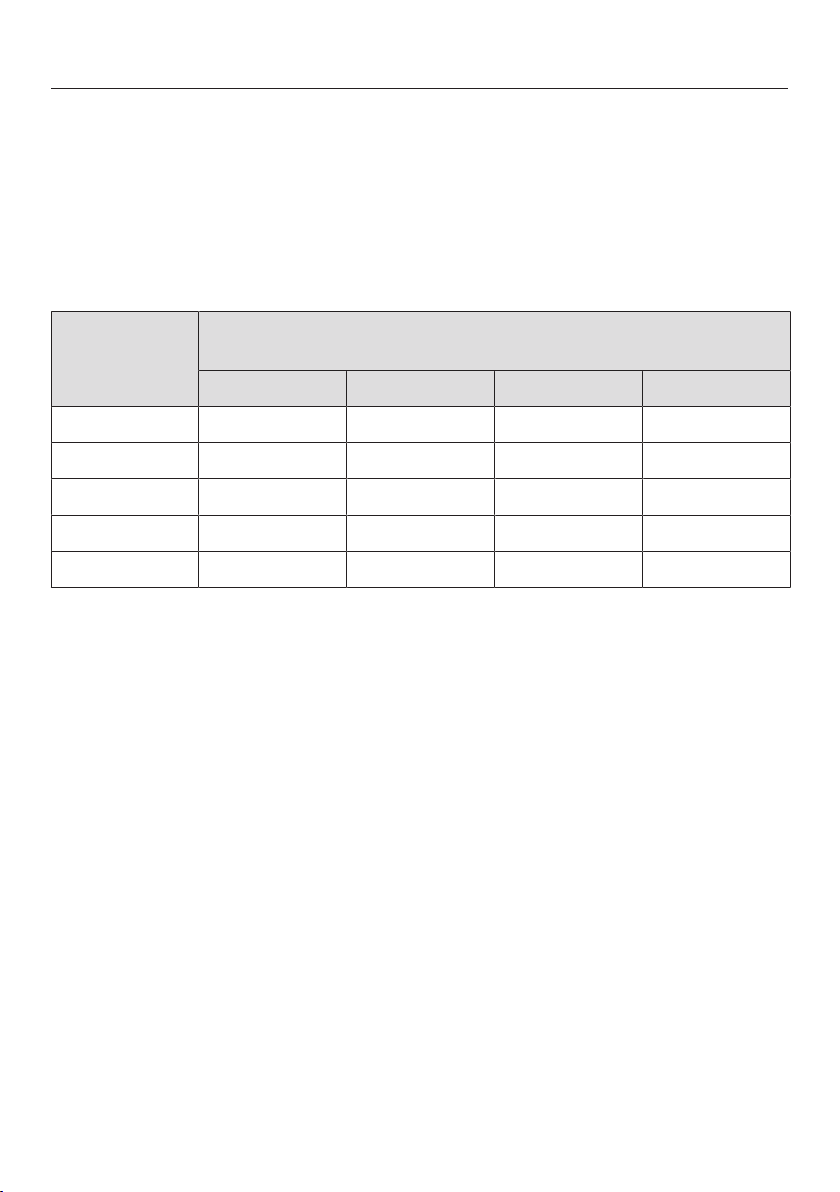
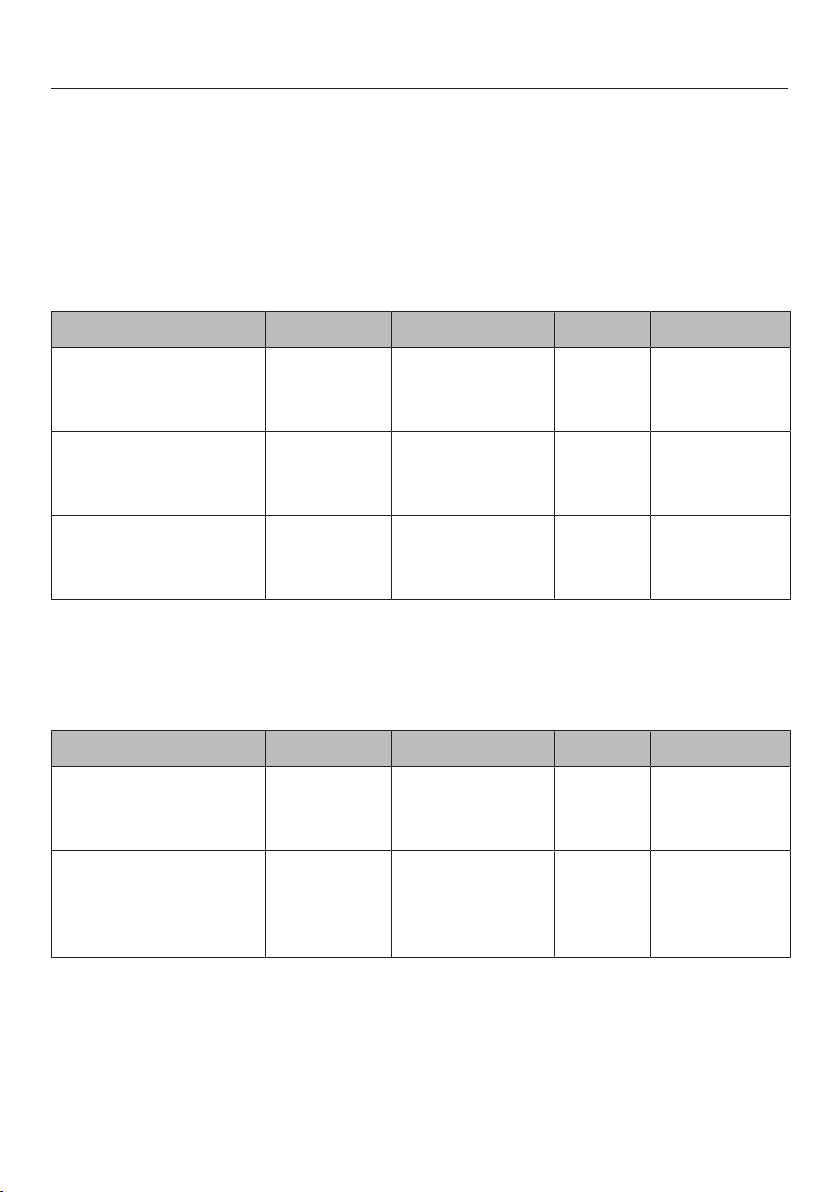
Temperature settings
Each operating mode has its own temperature range. The factory default recom-
mended temperatures are printed in bold. The temperature can be altered in
10°F (5°C) increments by touching the Temperaturesensor control.
The last temperature selected is automatically activated the next time the drawer is
switched on, and this is shown in the control field (exception: Low temperature
cooking).
Temperature
display
Temperature
°F [°C]*
105 (40) 140 (60) 150 (65) 150 (65)
115 (45) 150 (65) 160 (70) 160 (70)
120 (50) 160 (70) 165 (75) 165 (75)
130 (55) 165 (75) 175 (80) 175 (80)
140 (60) 175 (80) 185 (85) 185 (85)
* Approximate temperatures, measured in the center of an empty drawer

Keeping food warm
25
Tips
To maintain your food’s optimum quality
please note the following:
- Place the hot food in pre-heated
dishware. Place the dishware in the
drawer while it is being pre-heated.
- Do not cover roast or fried food
which you want to keep crisp. These
types of food need to be kept warm
at a higher temperature.
- Cover liquids and food with a high
moisture content with a suitable lid or
heat-resistant foil. This will prevent
moisture escaping and condensing
outside the dishware.
- To avoid spilling the food, do not
overfill the dishware.
- Freshly cooked food is hotter than
food which is being kept warm. Serve
food which has been kept warm on
pre-heated plates.
- Foods begin to lose their nutrients
during the cooking process and con-
tinue to do so while being kept warm.
The longer food is kept warm, the
greater the loss of nutrients.
- We do not recommend food being
kept warm for too long, as it will con-
tinue to cook.
- Food may cool down if the drawer is
opened and closed too often.
- Do not open the drawer too quickly or
slam it shut. Liquids could spill over
and get into the vents or into the in-
ner parts of the drawer.
Keeping food warm
26
Health risk caused by using too
low a temperature.
Bacteria may develop in the food if
the temperature used for keeping
food warm is too low.
Only use the Keeping food warm
operating mode.
This operating mode is for keeping food
warm which has just been cooked and
is still hot. It is not for reheating food
that has gone cold.
Select the Keeping food warm
operating mode.
Select the desired duration.
Pre-heat the drawer for approx.
15minutes to ensure that the interior
has reached the required minimum
temperature.
While the appliance is heating up,
place the empty dishware in the
drawer.
After 15minutes, remove the pre-
heated dishware from the drawer and
fill it with the hot food. Wear pot hold-
ers when removing dishware from the
drawer.
Then place the dishware in the
drawer and close it carefully to pre-
vent any liquids from spilling.
Keeping food warm
27
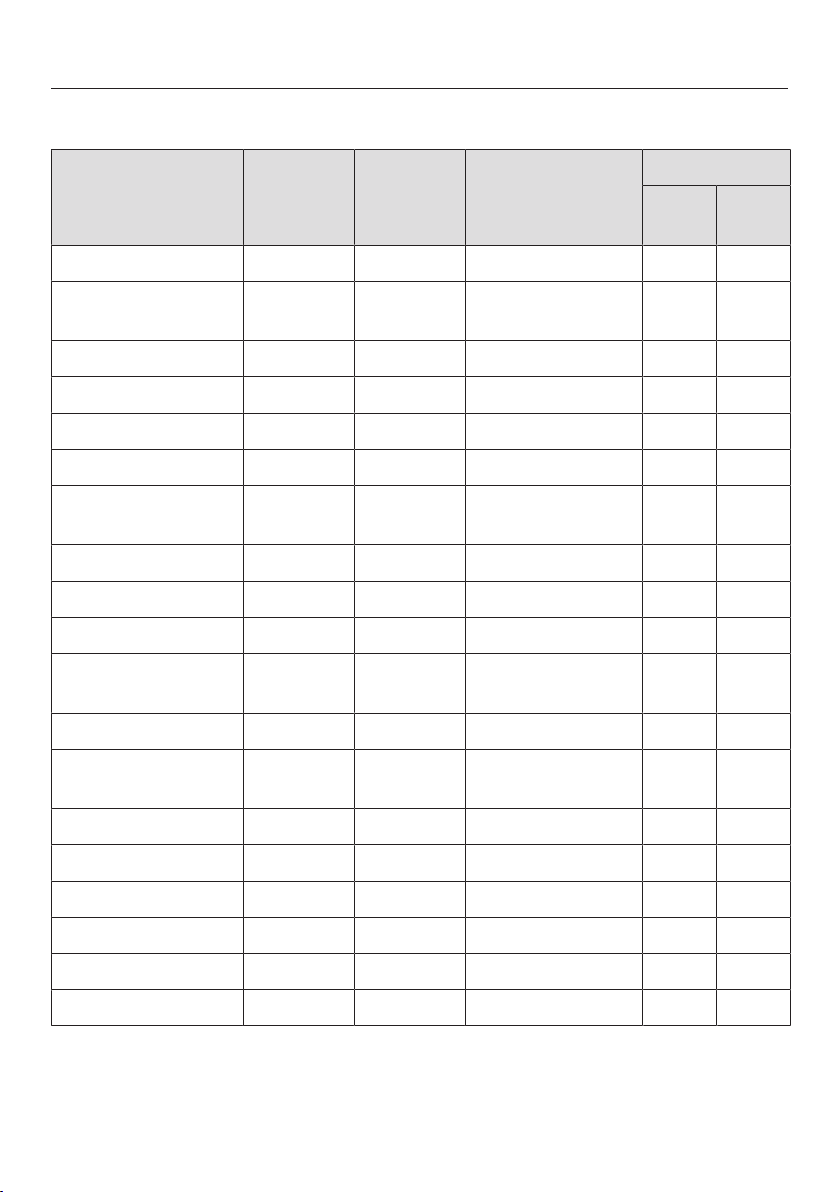
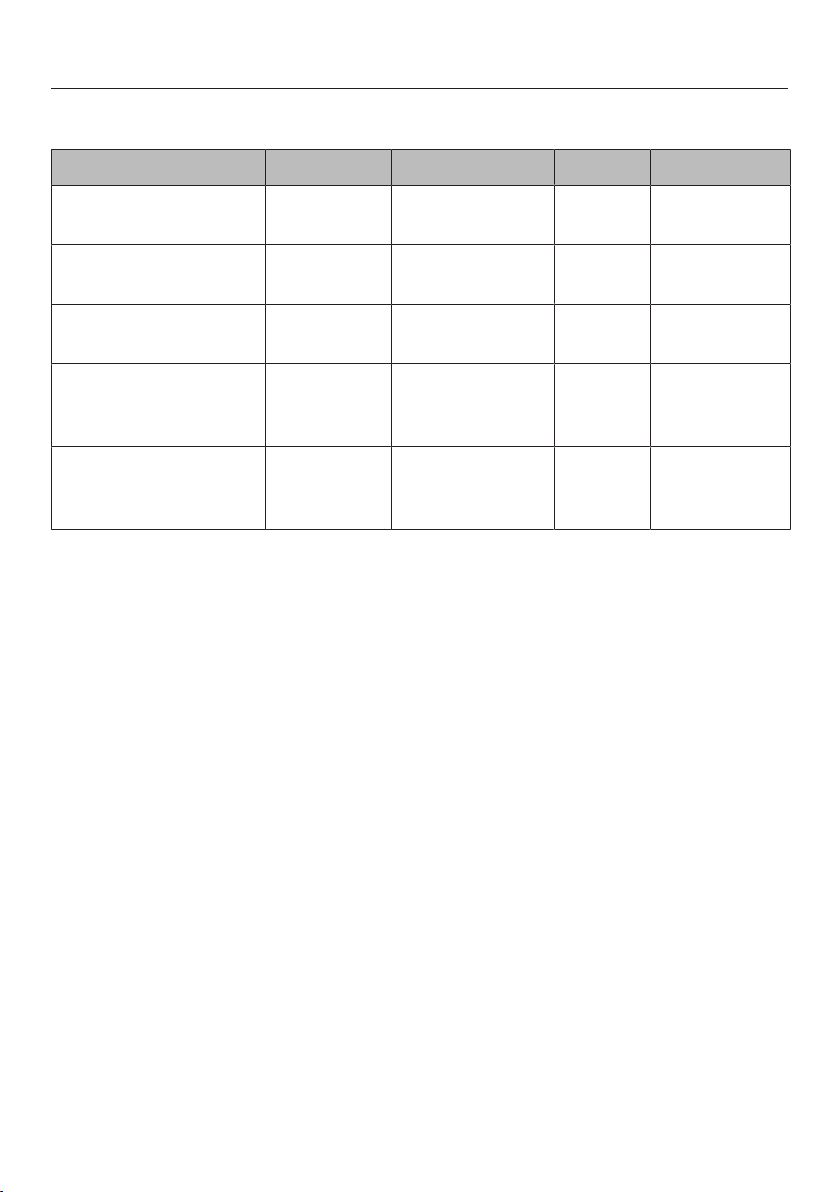
Settings
Food Dishware Cover
dishware
Temperature for
the setting
Position
Bot-
tom
Wire
Rack*
Steak rare Plates No X X
Bakes/gratin Gratin
dish
Yes X
Roasting Plates Yes X
Stew Pot Yes X
Fish strips Pan No X
Meat in a sauce Pot Yes X
Vegetables in
sauce
Pot Yes X
Goulash Pot Yes X
Mashed potatoes Pot Yes X
Menu Plates Yes X
Baked potatoes/
new potatoes
Plate/pot Yes X
Breaded cutlets Pan No X
Pancakes/
potato cakes
Plates No X X
Pizza Plates No X
Boiled potatoes Pot Yes X
Sauce Pot Yes X
Strudel Plates No X
Warming bread loaf – No X X
Warming rolls – No X X
* Depending on model
Warming dishes
28
Tips
- Spread the dishware out across the
whole surface if possible. Stacks of
plates heat up more slowly than indi-
vidual pieces of dishware. If you can-
not avoid stacking plates, place these
at the front of the drawer.
Use the wire rack (depending on
model).
- Do not place large serving dishes
right up against the vents. They will
cover the warm air outlets. The dish-
ware will not heat up evenly.
- For cups and glasses, only select the
Warm Cups/Glasses operating
mode to ensure that the maximum
temperature (140°F/60°C) is not ex-
ceeded.
- Heated dishware cools down very
quickly. For that reason you should
not remove it from the drawer until
just before you need it.
Warming times
Various factors will affect the warming
times:
- material and thickness of the dish-
ware
- load size
- how the load is arranged
- temperature setting
It is therefore not possible to state pre-
cise warming times. For even heating
with the Warm Dishes/Plates oper-
ating mode, the following values can be
used as a guide:
- 30–35minutes for 6place settings to
heat up evenly
- 40–45minutes for 12place settings
to heat up evenly
As you use the appliance, you will get
to know which settings suit your own
needs best.
Capacity
Risk of damage due to overload-
ing.
Overloading the drawer will damage
the telescopic runners.
The maximum load bearing capacity
of the drawer is 55 lb (25kg).
The capacity will depend to a great ex-
tent on the size and weight of your
dishware.
ESW 7570, ESW 7580, ESW 7670, ESW
7680: the loading area can be increased
by using the wire rack supplied with the
drawer. The wire rack can be used in a
variety of ways. You can also increase
the loading area using 2wire racks po-
sitioned on the left and right. An addi-
tional wire rack is available to order via
the Miele online shop, Miele Customer
Service, or from your Miele dealer (see
“Optional accessories”).
Warming dishes
29
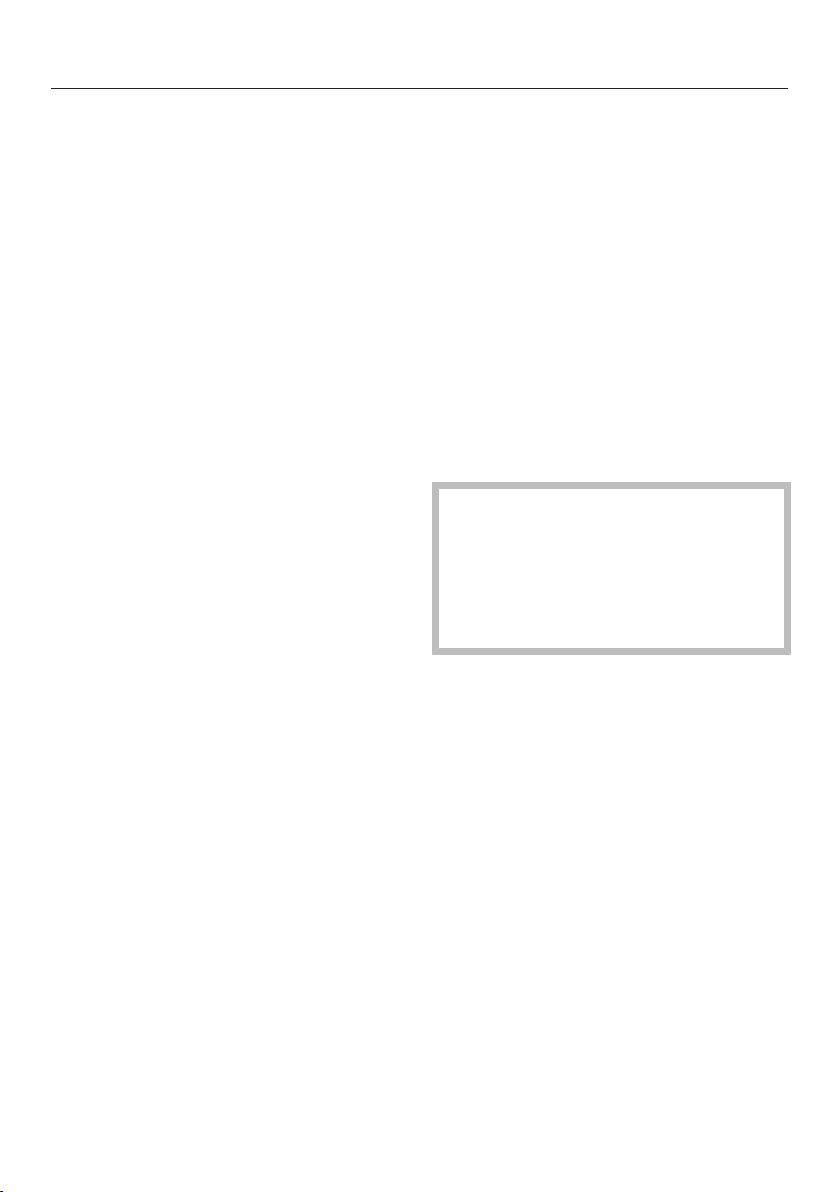
ESW 7010, ESW 7110
The following loading examples are intended to serve as a guide:
6 place settings
6dinner plates 10 1/4" (26cm)
6deep soup plates 9 1/16" (23cm)
6dessert plates 7 1/2" (19cm)
1oval platter 12 5/8" (32cm)
1serving bowl 6 5/16" (16cm)
1serving bowl 5 1/8" (13cm)
Or one of the following arrangements:
12dinner plates 10 1/4" (26cm)
18deep soup plates 9 1/16" (23cm)
16soup bowls 4" (10cm)
6dinner plates and
6deep soup plates
10 1/4" (26cm)
9 1/16" (23cm)
6pizza plates 14 3/16" (36cm)
72espresso cups 2 5/16" (5.9cm)
30cappuccino cups 3 7/16" (8.8cm)
30tea glasses 23/4" (6.7cm) (31/4", 8cm high)
Warming dishes
30
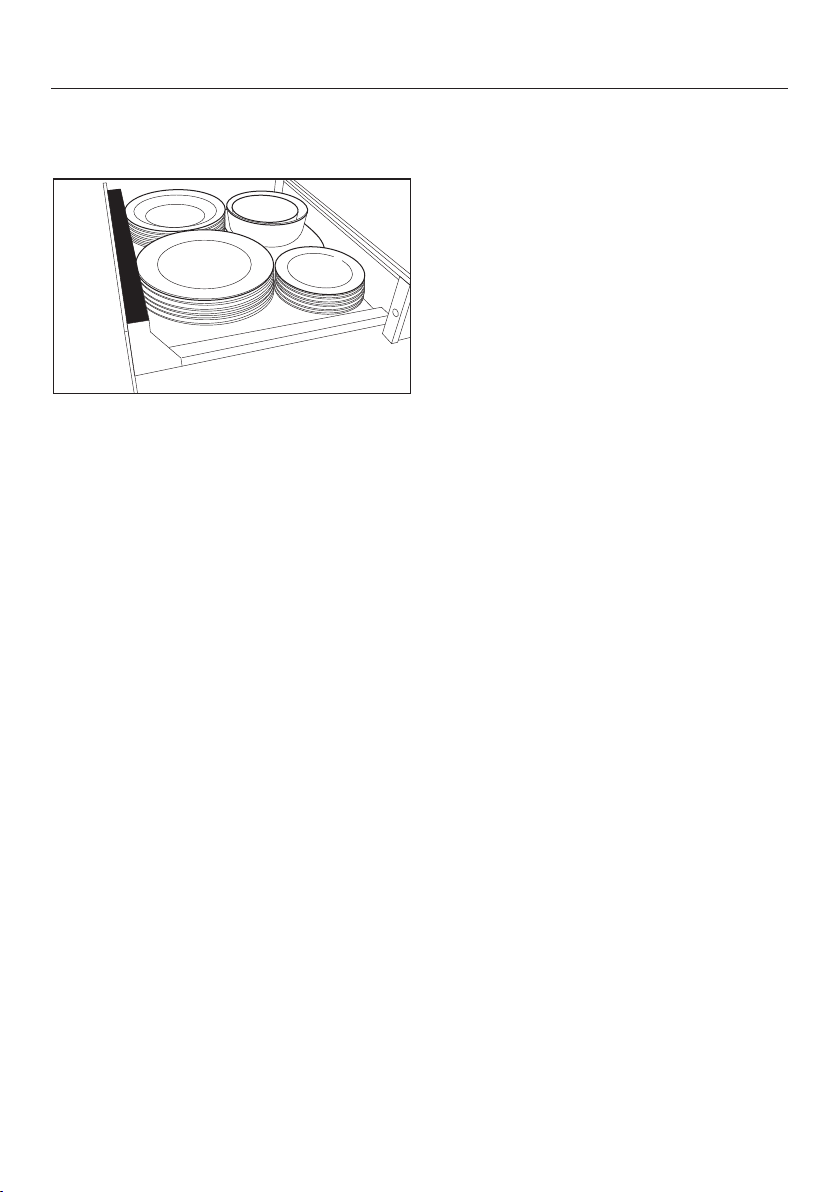
ESW 7570, ESW 7580, ESW 7670, ESW 7680
The following loading examples are intended to serve as a guide:
12 place settings
12dinner plates 10 1/4" (26cm)
12deep soup plates 9 1/16" (23cm)
12dessert plates 7 1/2" (19cm)
1oval platter 12 5/8" (32cm)
1serving bowl 7 1/2" (19cm)
1serving bowl 6 5/16" (16cm)
1serving bowl 5 1/8" (13cm)
Or one of the following arrangements:
40dinner plates 10 1/4" (26cm)
60deep soup plates 9 1/16" (23cm)
45soup bowls 4" (10cm)
20dinner plates
20deep soup plates
10 1/4" (26cm)
9 1/16" (23cm)
20pizza plates 14 3/16" (36cm)
142espresso cups 2 5/16" (5.9cm)
90cappuccino cups 3 7/16" (8.8cm)
30tea glasses 23/4" (6.7cm) (31/4", 8cm high)

Low temperature cooking
31
With Low temperature cooking, food is
cooked at a low temperature over a
long period of time. Using this method,
food loses less liquid as it is cooked
gently and so remains succulent and
tender.
If food probes from other Miele Built-
in Appliances are used in the drawer,
they may affect the built-in appli-
ances.
Only use the Miele Built-in Appliance
Food Probe with the built-in appli-
ance that it was supplied with.
For precision, we recommend using a
proprietary food probe to monitor the
core temperature. The food can then be
cooked to perfection.
Core temperature
Food can be cooked to a core tempera-
ture of up to 160°F (70°C) in the drawer.
Food which needs to be cooked to a
core temperature higher than 160°F
(70°C) is not suitable for cooking in the
drawer.
The core temperature indicates the de-
gree of doneness in the middle of the
food.
For meat, the lower the core tempera-
ture, the less cooked the meat is in the
middle:
- 113-122°F (45–50°C) = rare
- 131-140°F (55–60°C) = medium
- 149°F (65°C) = well done
Cooking time
The cooking time depends on the size
of the food, and can be between 1 and
6hours.
Pre-heat the drawer with the suitable
cooking containers for 15minutes. This
ensures that the dishware and the inte-
rior of the drawer reach the required
temperature.
Example:
Selected time: 1h
Actual operating time: 1hour 15min-
utes
Notes
- Use meat that has been properly
hung.
- The quality of the food is of vital im-
portance for a good result.
- The food must be at room tempera-
ture. Take it out of the fridge about
15minutes before cooking.
Low temperature cooking
32
Using the Low temperature
cooking operating mode
Select the Low temperature cook-
ing operating mode.
Place the heat-resistant dishware in
the bottom of the drawer.
The drawer will pre-heat automatically
for 15minutes and then operate at the
preset temperature of 185°F (85°C) for a
preset time of 4h.
If you wish to cook on a different set-
ting, please consult the cooking charts
on the following pages.
Select the temperature you want if
necessary.
Select the time you want if necessary.
After pre-heating, put the food in the
dishware.
If using a food probe:
Push the food probe into the food so
that the tip is in the center. Make sure
that it does not come into contact
with bones or layers of fat as these
can cause a false reading.
When the temperature is approx.
50°F (10°C) (guide value)) below the
core temperature, remove the food
from the drawer.
A smaller temperature difference is
recommended for large portions of
food.
Sear the food on all sides over a high
heat on the cooktop.
Tips
- Do not cook the food all the way
through. Sear the food again after
cooking.
- The food can be sliced straight away.
It does not need to rest.
- Serve the food on pre-heated plates
to stop it cooling too quickly.
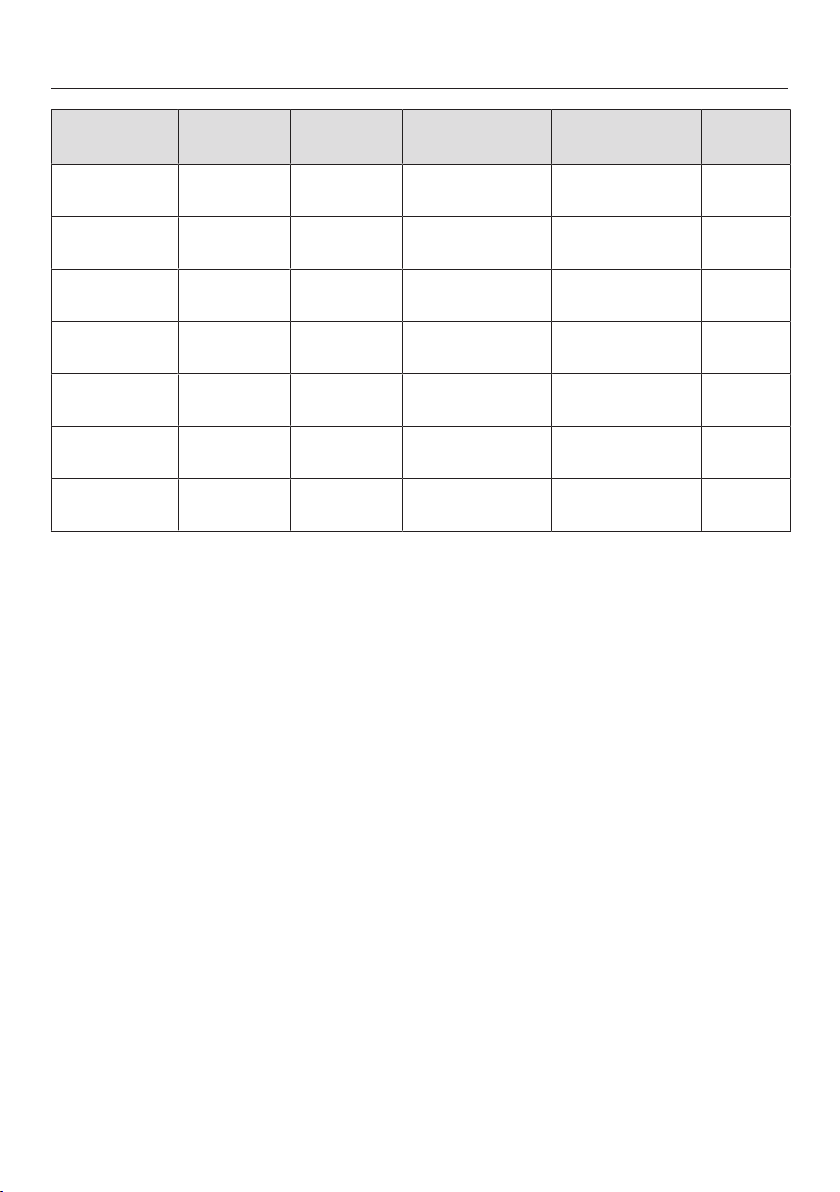
Low temperature cooking
33
Pre-heat the cooking container for 15minutes. In this time, rest the food at room
temperature.
Place the food into the pre-heated cooking container in the compartment.
The cooking durations given in the charts are guidelines only. The food can be
cooked further if required.
Beef cooking chart
Type of meat [min] *°F [°C] [min]
Medallions
1 1/4"-1 1/2" (3–4cm)
thick
1 per side
1–2 per side
2 per side
115-125 (45–50)
130-140 (55–60)
150 (65)
45–60
65–80
95–110
Sirloin steak
approx.0.4 lb (170g)
1 per side
2 per side
2 per side
115-125 (45–50)
130-140 (55–60)
150 (65)
45–60
65–80
95–110
Rump steak
approx.1/2 lb (200g)
1 per side
1–2 per side
2 per side
115-125 (45–50)
130-140 (55–60)
150 (65)
35–45
45–60
95–110
* 113-122°F (45–50°C) rare, 131-140°F (55–60°C) medium, 149°F (65°C) well done
Searing time, Core temperature, Cooking duration, Temperature setting
Veal cooking chart
Type of meat [min] *°F [°C] [min]
Medallions
1 1/4"-1 1/2" (3–4cm)
thick
1 per side
2 per side
2 per side
115-125 (45–50)
130-140 (55–60)
150 (65)
40–55
60–75
90–105
Steak
approx.0.35 lb
(160g)
3/4" (2cm) thick
1 per side
2 per side
2 per side
115-125 (45–50)
130-140 (55–60)
150 (65)
15–30
30–45
65–80
* 113-122°F (45–50°C) rare, 131-140°F (55–60°C) medium, 149°F (65°C) well done
Searing time, Core temperature, Cooking duration, Temperature setting

Low temperature cooking
34
Pork cooking chart
Type of meat [min] *°F [°C] [min]
Tenderloin
approx. 19 1/2 lb
(550g)
6–8 total 145 (60) 90–110
Medallions
approx.1 1/2" (4cm)
thick
2 per side 145 (60) 85–100
145°F (65°C) = well done
Searing time, Core temperature, Cooking duration, Temperature setting
Lamb cooking chart
Type of meat [min] *°F [°C] [min]
Rack of lamb
approx. 1/4lb (170g)
2–4
2–4
135 (60)
150 (65)
45–60
85–100
Rack of lamb
approx. 3/4lb (400g)
2–4
2–4
135 (60)
150 (65)
45–60
85–100
Saddle of lamb
deboned
approx. 1 1/4lb
(600g)
2 per side
2 per side
135 (60)
150 (65)
45–60
95–110
* 140°F (60°C) medium, 149°F (65°C) well done
Searing time, Core temperature, Cooking duration, Temperature setting
Game cooking chart
Type of meat [min] *°F [°C] [min]
Venison medallions
1 1/4" (3-4cm) thick
2 per side
2 per side
140 (60)
150 (65)
65–80
95–110
Saddle of roe deer
approx. 1 1/2lb
(800g)
2 per side
2 per side
140 (60)
150 (65)
55–70
95–110
* 140°F (60°C) medium, 149°F (65°C) well done
Searing time, Core temperature, Cooking duration, Temperature setting
Low temperature cooking
35
Fish cooking chart
Type of fish [min] °F [°C] [min]
Salmon
0.8lb (400g)
2 on the
skin side
126 (52) 45–60
Trout (whole)
approx.3/4lb (350g)
2 per side 126 (52) 15–30
Cod/skrei
0.4lb (200g)
No searing 126 (52) 75–90
Sea bream (whole)
approx.1-1.1lb (480–
500g)
2 per side 126 (52) 25–40
Branzino (whole)
approx.1-1.1lb (480–
500g)
2 per side 126 (52) 20–35
Searing time, Core temperature, Cooking duration, Temperature setting
Other uses
36
Food Cookware Cover
dishes
[h:min]
Defrosting
berries
Bowl/plate No 0:50
Dissolving
gelatin
Bowl No 0:15
Proofing Bowl Yes, with
plate
0:30
Preparing
yogurt
Yogurt jars
with lids
– 5:00
Soaking rice
pudding
Pot Yes, with lid 0:40
Melting
Chocolate
Bowl No 0:20
Defrosting
vegetables
Bowl No 1:00
Temperaturesetting / Temperaturesetting / Duration

Networking with Miele Built-in Appliances
37
Networking enables the drawer to oper-
ate automatically depending on the op-
erational state of another Miele Built-in
Appliance.
Example:
The drawer pre-heats dishware at the
right time before or after using the net-
worked built-in appliance.
Prerequisites
The following conditions must be met
for networking the drawer with other
built-in appliances:
- The drawer is connected to the
household WiFi network via
Miele@home.
- The other built-in appliance is con-
nected to the household WiFi net-
work via Miele@home.
Carrying out the networking
Networking is carried out via the
Miele@mobile app as normal.
See “Before using for the first time –
Setting up Miele@home” as well as the
Miele@mobile app for detailed informa-
tion about this function.
Operation via the sensor buttons has
precedence over operation via the
app.
Sabbath mode
38
To comply with religious requirements,
the drawer can be programmed for the
duration of the Sabbath. This mode
will be switched off automatically after
about 24 or 72hours, depending on
the setting, and normal operation will
resume. When this function is acti-
vated, the duration setting is deacti-
vated and the sensor controls must be
touched for longer than usual.
Activating Sabbath mode
Duration of 24hours
If necessary, switch the drawer off.
Press and hold the Durationsensor
control.
At the same time, touch the sen-
sor control.
2h and 4h will light up.
Set the required operating mode and
temperature.
Duration of 72hours
If necessary, switch the drawer off.
Press and hold the Durationsensor
control.
At the same time, touch the sen-
sor control.
2h and 4h will light up.
Touch the Durationsensor control.
1h, 2h, 3h, and 4h will light up.
Set the required operating mode and
temperature.
Deactivating Sabbath mode
You can deactivate the Sabbath mode
before the time has expired.
Press and hold the sensor control.
All displays switch off.
The drawer is in normal mode again.
Cleaning and care
39
Risk of damage due to moisture
ingress.
The steam from a steam cleaner
could reach live electrical compo-
nents and cause a short circuit.
Do not use a steam cleaner to clean
the drawer.
All surfaces could be discolored or
damaged if unsuitable cleaning
agents are used. All surfaces are
susceptible to scratching. Scratches
on glass can lead to breakage in
some circumstances.
Remove any residual cleaning agent
immediately.
Do not clean with any abrasive or
sharp pointed objects.
Danger of burning from hot inte-
rior.
The interior of the drawer will be hot
after use.
Allow the drawer to cool down to a
safe temperature before cleaning.
The drawer and accessories should
be cleaned and dried after each use.
Unsuitable cleaning agents
To avoid damaging the surfaces of your
appliance, do not use:
- cleaning agents containing soda, am-
monia, acids, or chlorides
- cleaning agents containing descaling
agents
- abrasive cleaning agents, e.g., pow-
der cleaners and cream cleaners
- solvent-based cleaning agents
- stainless steel cleaners
- cleaning agents for ceramic-glass
cooktops
- dishwasher cleaning agents
- oven cleaners or sprays
- glass cleaners
- hard, abrasive sponges and brushes,
e.g., pot scourers
- sharp metal scrapers
Cleaning and care
40
Cleaning the drawer front and
interior
Malfunction can occur due to
dirty and/or covered sensor buttons.
The sensor buttons do not react or
unintentional switching procedures
result, perhaps even the automatic
deactivation of the drawer.
Keep the sensor buttons and indica-
tors clean.
Do not place anything over the sen-
sor buttons or indicators.
It is best to remove normal soiling im-
mediately using a clean sponge and a
solution of warm water and liquid
dish soap or with a clean, damp mi-
crofiber cloth.
Wipe with clean water afterwards.
After cleaning, wipe the surfaces dry
using a soft cloth.
Cleaning the non-slip liner
Damage due to incorrect clean-
ing.
Washing the non-slip liner in a dish-
washer or washing machine will
damage it.
The non-slip liner should only be
cleaned by hand.
Damage caused by incorrect
drying.
Drying the non-slip liner in an oven
will damage it.
Never place the non-slip liner in the
oven to dry.
Remove the non-slip liner from the
drawer.
Clean the non-slip liner with warm
water and a small amount of liquid
dish soap.
Then dry the non-slip liner with a
cloth.
Replace the non-slip liner in the
drawer only when it is completely dry.
Frequently Asked Questions
41
With the help of the following guide minor faults in the performance of the ma-
chine, some of which may result from incorrect operation, can be remedied with-
out contacting the Service Department.
This guide may help you to find the reason for the fault, and how to correct it.
Problem Possible cause and solution
The drawer does not
heat up.
The electrical plug is not properly inserted.
Insert the electrical plug.
The breaker has tripped.
Reset the breaker (see data plate for the correct
fuse rating). If, after turning the breaker or GFCI
back on, the drawer will still not turn on, contact a
qualified electrician or Miele Customer Service.
Noise occurs during op-
eration
The noise is caused by the fan, which distributes
the heat evenly throughout the drawer. This is not a
fault.
The food is not hot
enough.
The “Keep Warm” mode is not set.
Set the correct operating mode.
The temperature setting is too low.
Select a higher temperature.
The air vents are covered.
Make sure that air can circulate freely.
The food is too hot. The “Keep Warm” mode is not set.
Set the correct operating mode.
The temperature setting is too high.
Select a lower temperature.
The dishware is not hot
enough.
The Warm Dishes/Plates operating mode was not
selected.
Set the correct operating mode.
The temperature setting is too low.
Select a higher temperature.
The air vents are covered.
Make sure that air can circulate freely.
The dishware has not been warmed long enough.
The heating time for dishware is affected by a
number of factors (see “Heating dishware”).
Frequently Asked Questions
42
Problem Possible cause and solution
The dishware is too hot. The Warm Dishes/Plates or Warm Cups/
Glasses operating mode was not selected.
Set the correct operating mode.
The temperature setting is too high.
Select a lower temperature.
Abrasion marks on the
top edge of the front
panel.
Installing or removing an appliance above the drawer
has caused abrasion marks.
Carefully remove the abrasion marks by rubbing
the top edge with the abrasive side of a standard
scouring pad.
Optional accessories
43
Miele offers a range of useful acces-
sories, as well as cleaning and condi-
tioning products for your appliance.
These products can be easily ordered
from the Miele webshop.
These products can also be ordered
from Miele Technical Service (see the
end of these operating instructions) or
your Miele dealer.
Wire Rack
For increasing the loading area (ESW
7570, ESW 7580, ESW 7670, ESW
7680).
Non-slip liner
For keeping dishware secure.
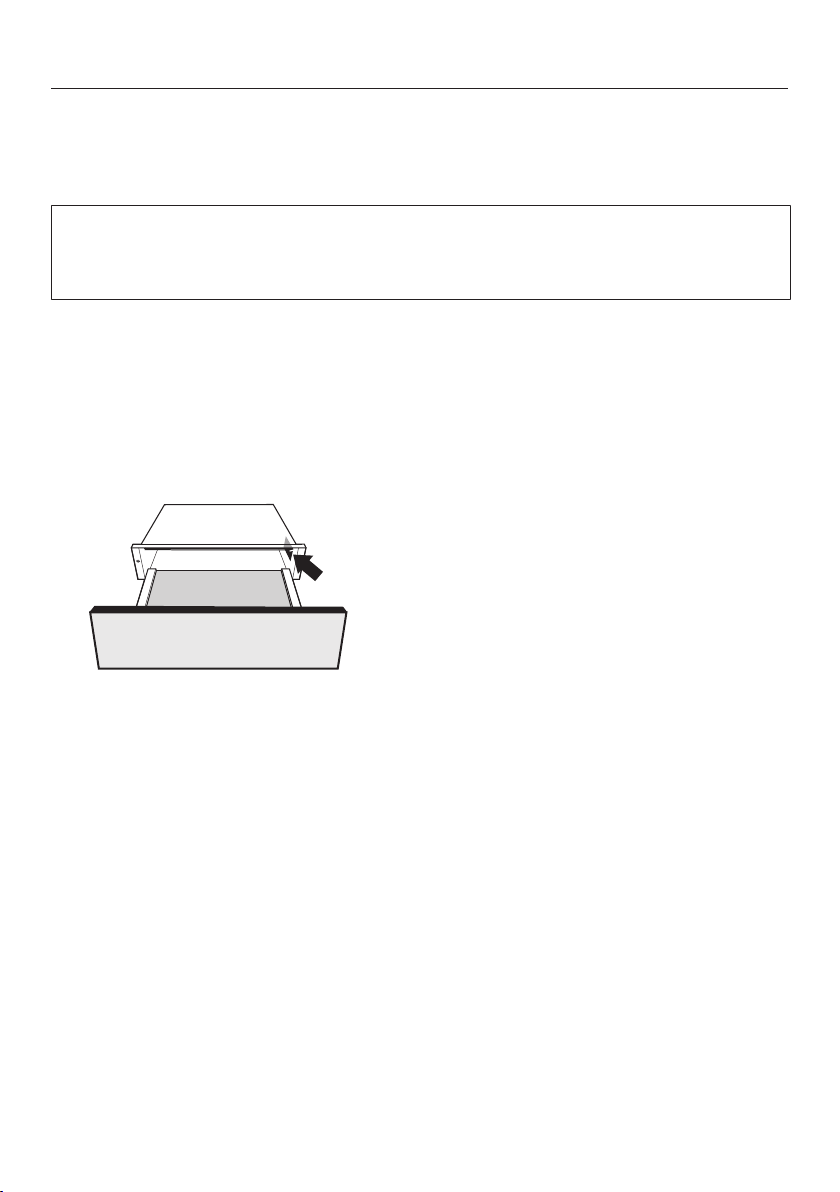
Cover strip
Covers the housing area between the
drawer and the combination appliance
above it.
Microfiber cloth
Removes finger marks and light soiling.
Customer Service
44
Contact in the event of a fault
In the event of a fault which you cannot remedy yourself, please contact your
Miele dealer or Miele Customer Service.
You can book a Miele Service Call online at www.miele.com/service.
Contact information for Miele Customer Service can be found at the end of this
document.
Please quote the model identifier and serial number of your appliance (SN) when
contacting Miele Customer Service. Both pieces of information can be found on
the data plate.
Data plate
The data plate is located here:
Appliance warranty and product registration
You can register your product and/or view the manufacturer´s warranty terms and
conditions for Miele appliances and vacuum cleaners at www.mieleusa.com.
Installation
*INSTALLATION*
45
IMPORTANT SAFETY INSTRUCTIONS - INSTALLATION
Risk of damage caused by incorrect installation.
Incorrect installation can cause damage to the drawer and/or the combination
appliance.
The appliance must only be installed by a qualified person.
The electrical outlet must be easily accessible after the installation
of the drawer.
The drawer may only be built in combination with those appli-
ances specified by Miele as being suitable. Miele cannot guarantee
trouble-free operation if the appliance is operated in combination
with appliances other than those quoted by Miele as being suitable.
The base on which the drawer and the combination appliance are
fitted must be fixed in place and must support the weight of both ap-
pliances.
When installing the combination appliance, it is essential to follow
the instructions given in the operating and installation instructions
supplied with it.
When installing the drawer, the following should be noted:
- The contents of the dishware must be visible. This is to avoid
scalding from hot food spilling over.
- There must be enough space for the drawer to be pulled out fully.
Installation
*INSTALLATION*
46
Installation notes
The drawer is available in 3models, which differ in height. The building-in dimen-
sions for the drawer must be added to the building-in dimensions for the combina-
tion appliance to establish the niche size required.
Combination options
ESW7010 ESW7110 ESW7570 ESW7670
CVA7x4x – –
CVA7x7x – –
DGC7x4x – –
DGC7x6x – –
DGC7x7x – –
DGC7x8x – –
H2840 – –
H7x4x – –
H7x6x – –
H7x7x – –
H7x8x – –
Can be combined
– Cannot be combined
The combination appliance is placed on top of the drawer without the need for an
interim shelf.
ESW 7580, ESW 7680: The drawer cannot be combined with another appliance
in a niche.
Install a protective base with a thickness of at least 5/8" (16mm) between the
drawer and another appliance.
Installation
*INSTALLATION*
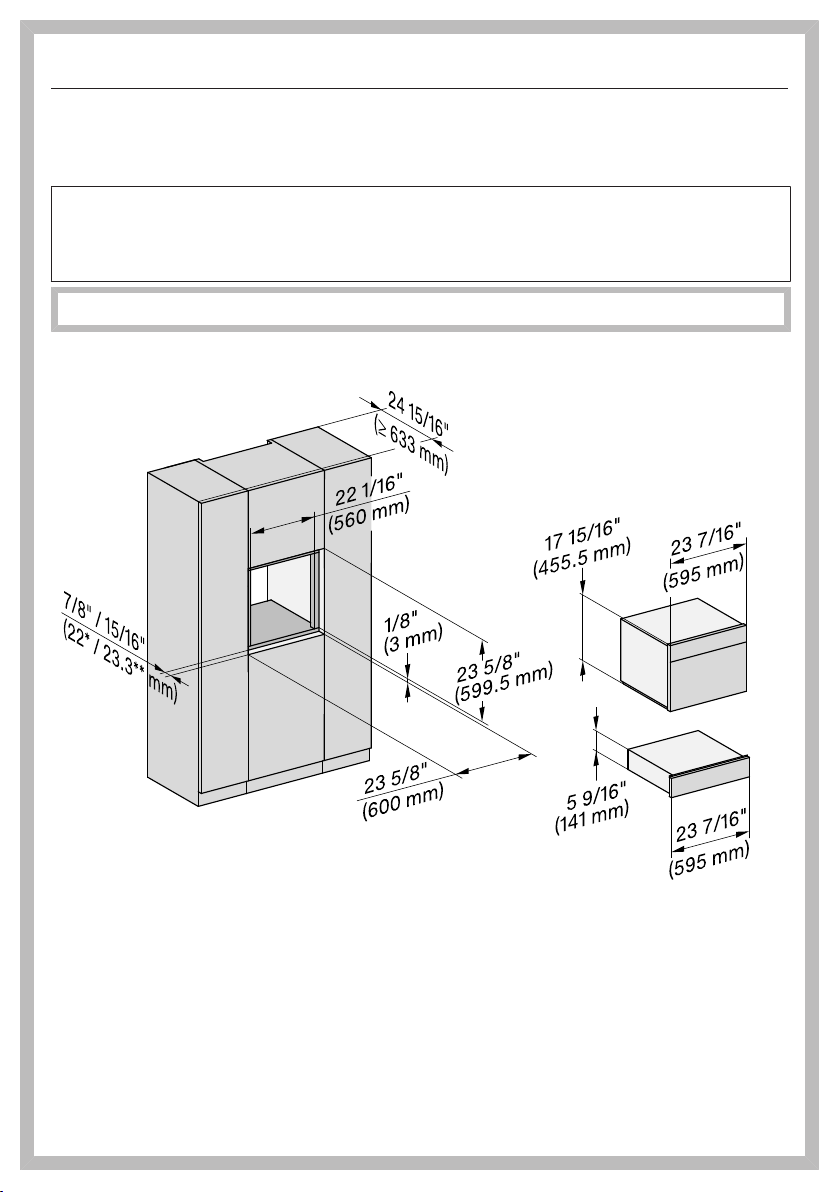
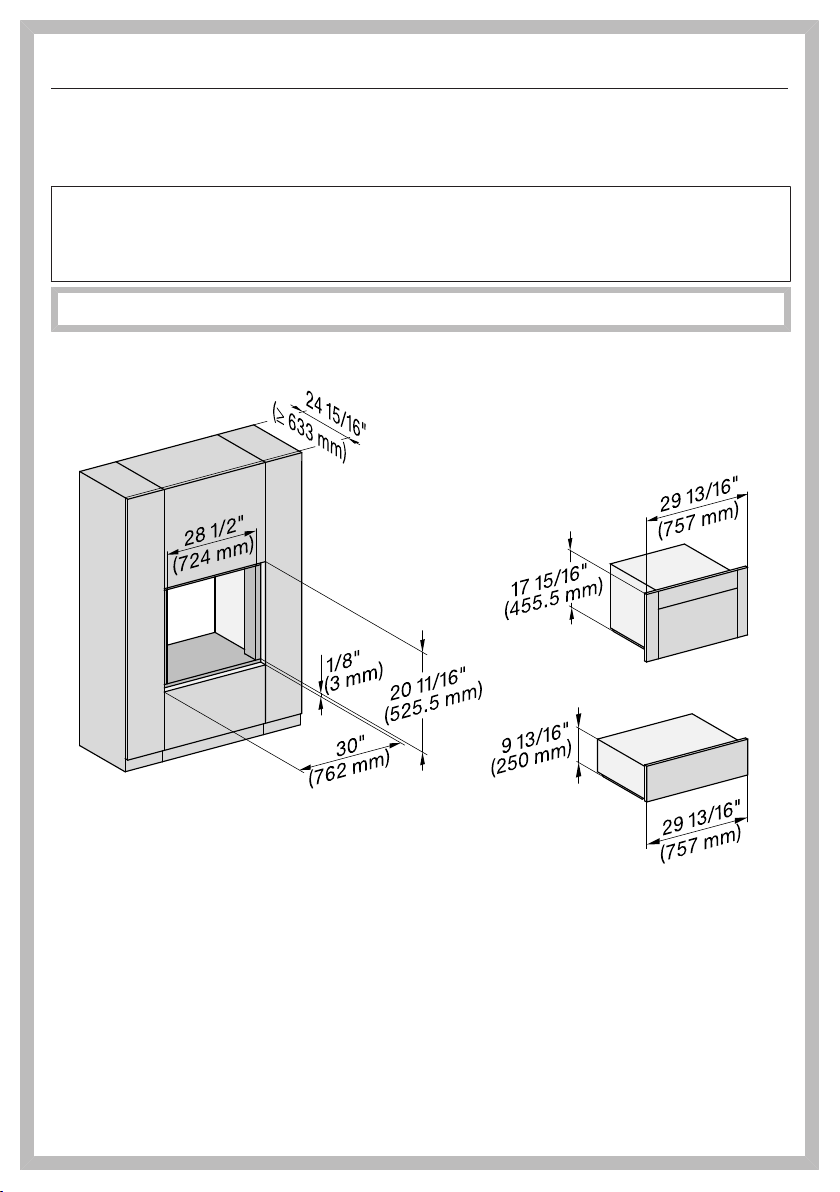
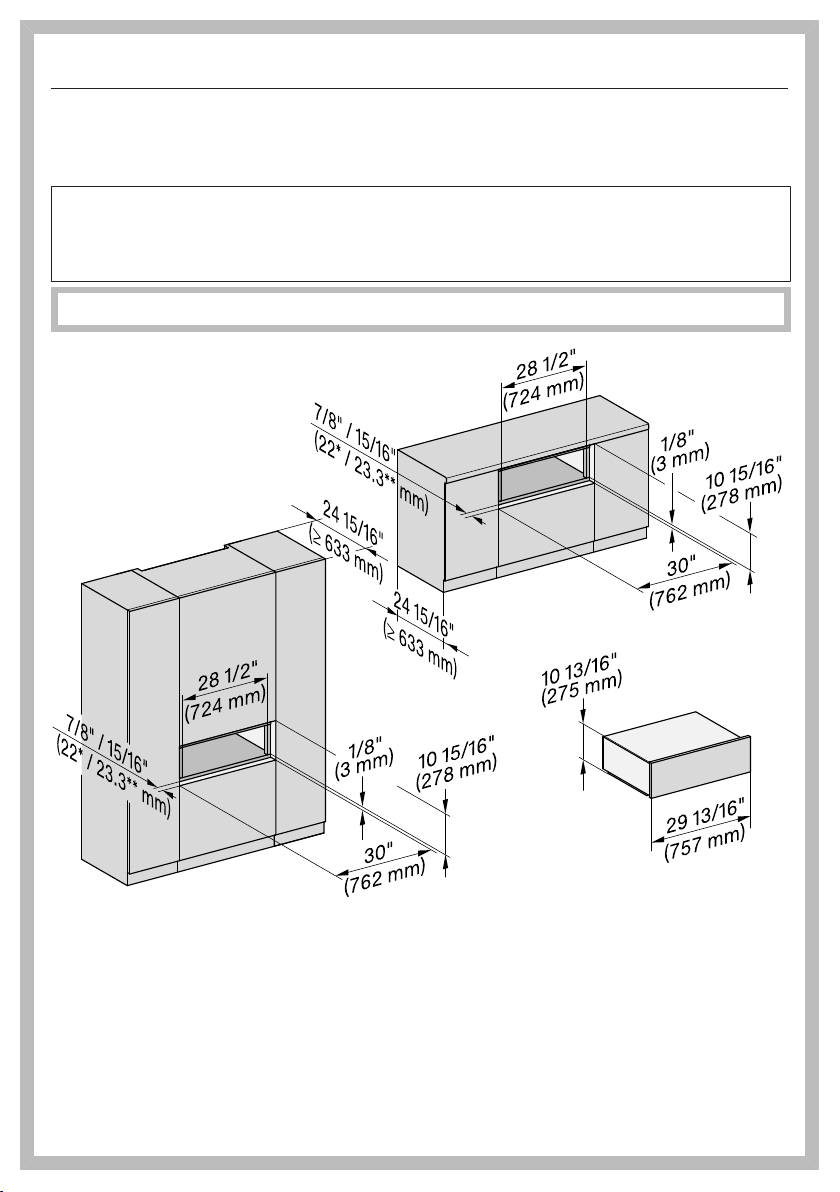
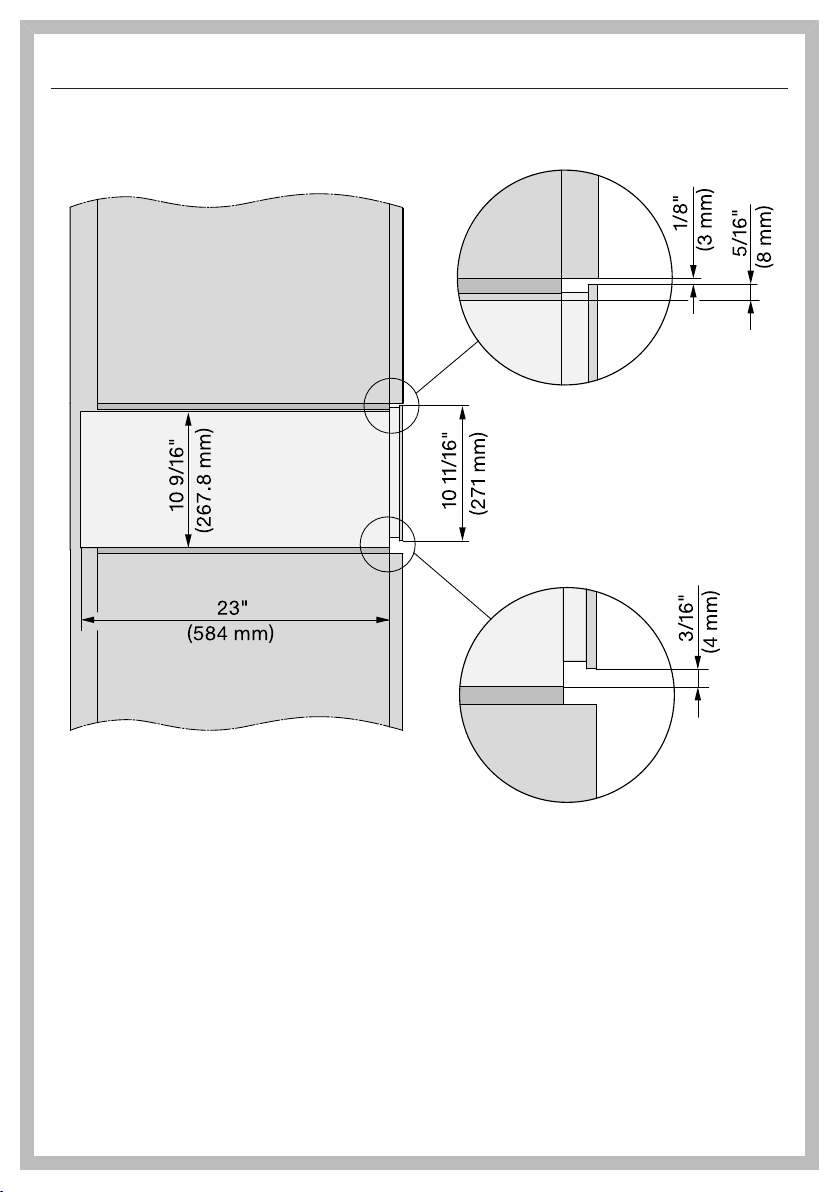
47
Installation dimensions ESW 7010, ESW 7110
Combination with an H2840 or CVA/DGC/H7x4x
Miele Drawers can be installed flush or proud. Discuss your requirements with
your architect, kitchen designer, and installer.
More installation drawings are available on the Miele website.
The housing unit must not have a back panel installed behind the built-in niche.
* Drawer with glass front (ESW 7010)
** Drawer with metal front (ESW 7110)
Installation
*INSTALLATION*
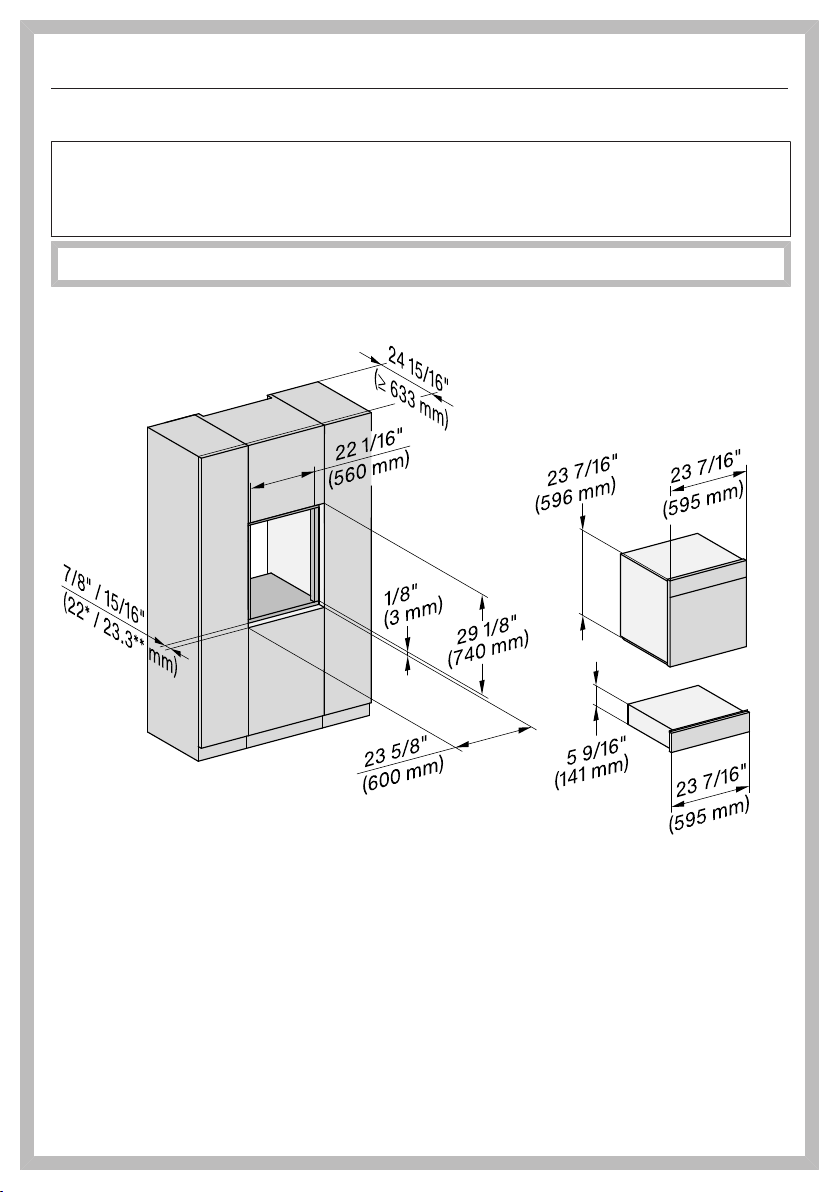
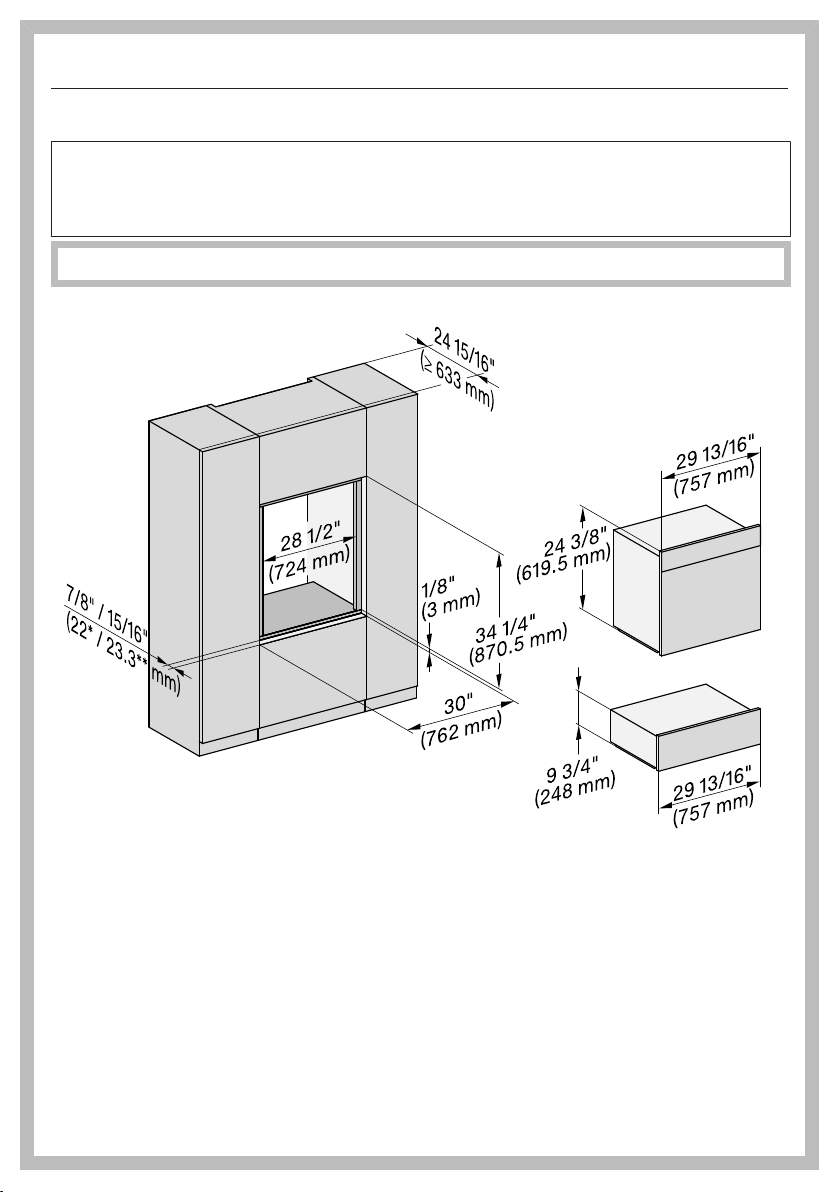
48
Combination with a DGC/H7x6x
Miele Drawers can be installed flush or proud. Discuss your requirements with
your architect, kitchen designer, and installer.
More installation drawings are available on the Miele website.
The housing unit must not have a back panel installed behind the built-in niche.
* Drawer with glass front (ESW 7010)
** Drawer with metal front (ESW 7110)
Installation
*INSTALLATION*
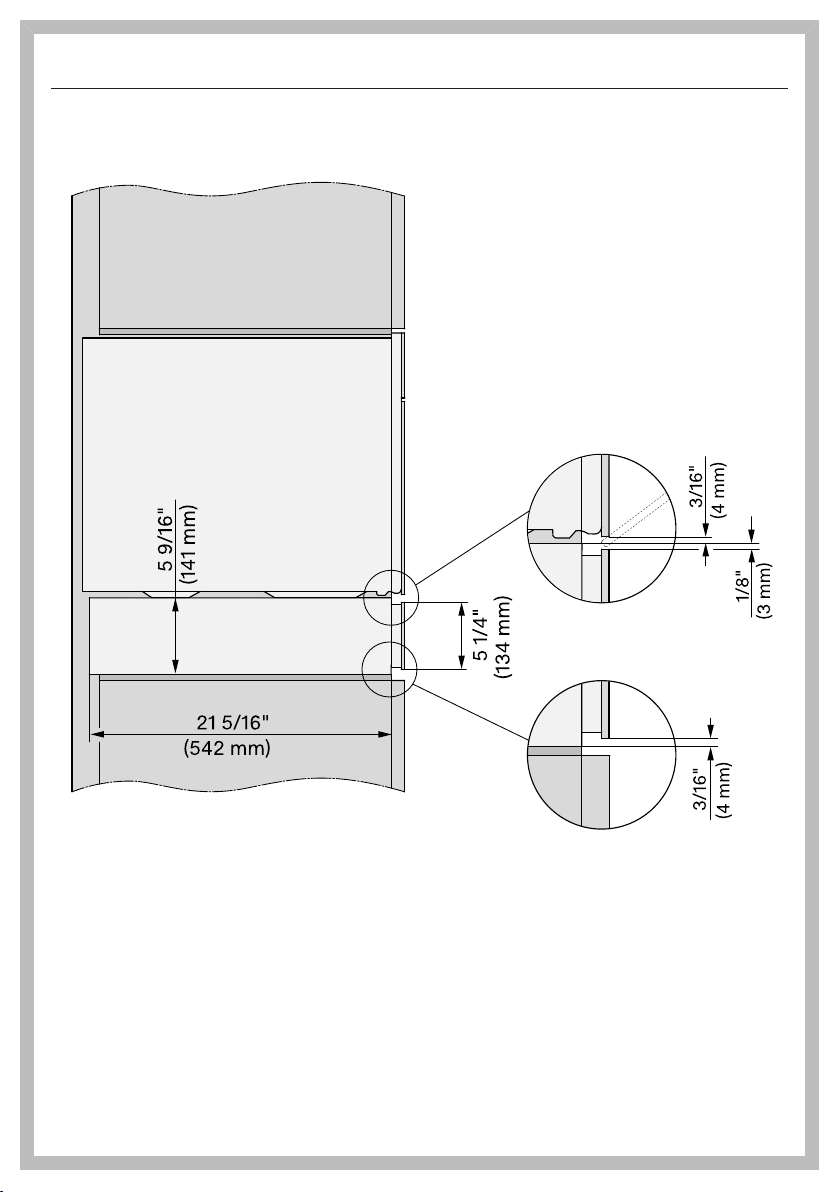
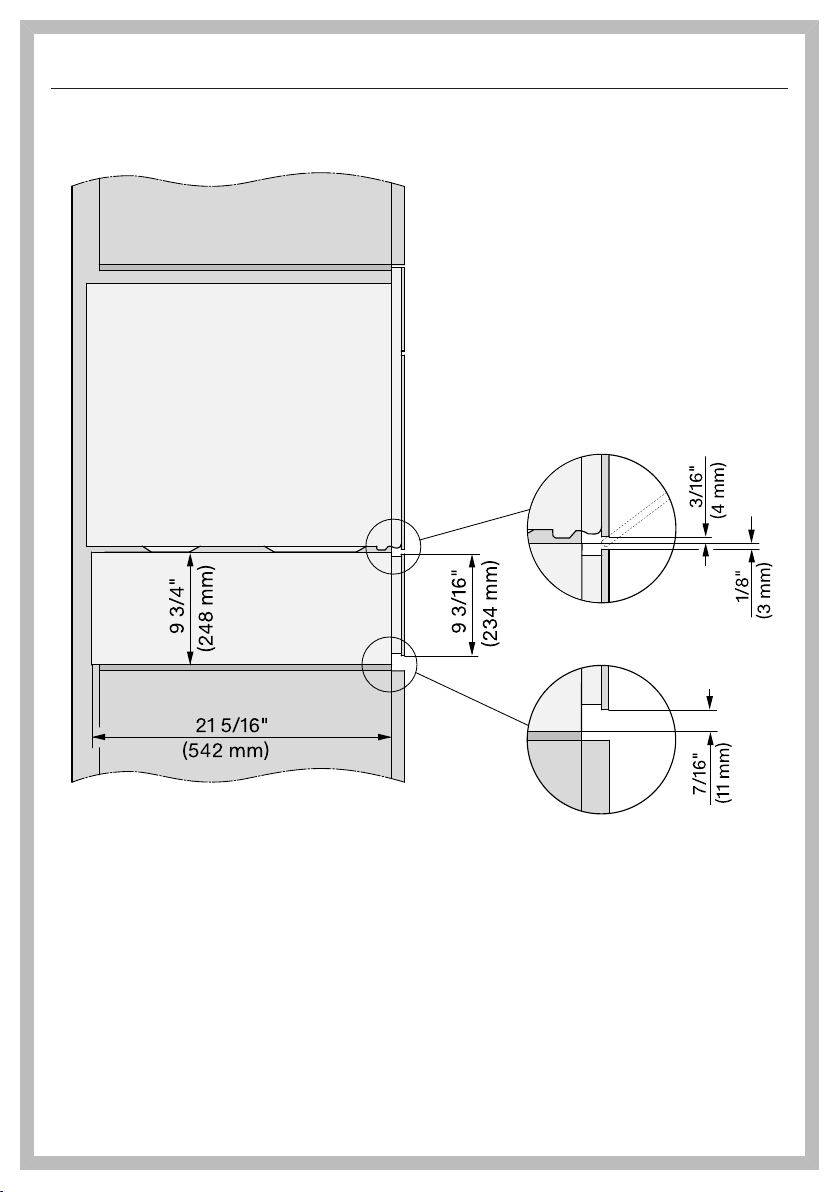
49
Side view
Installation
*INSTALLATION*
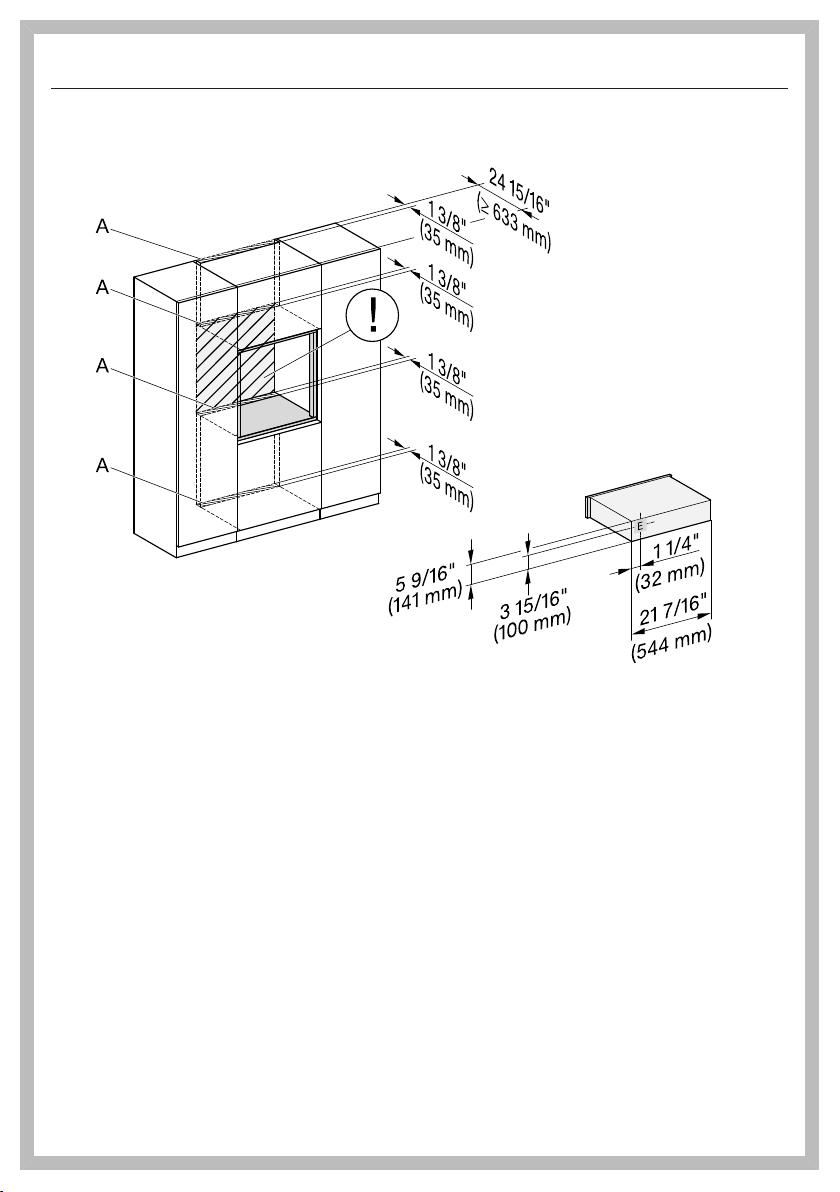
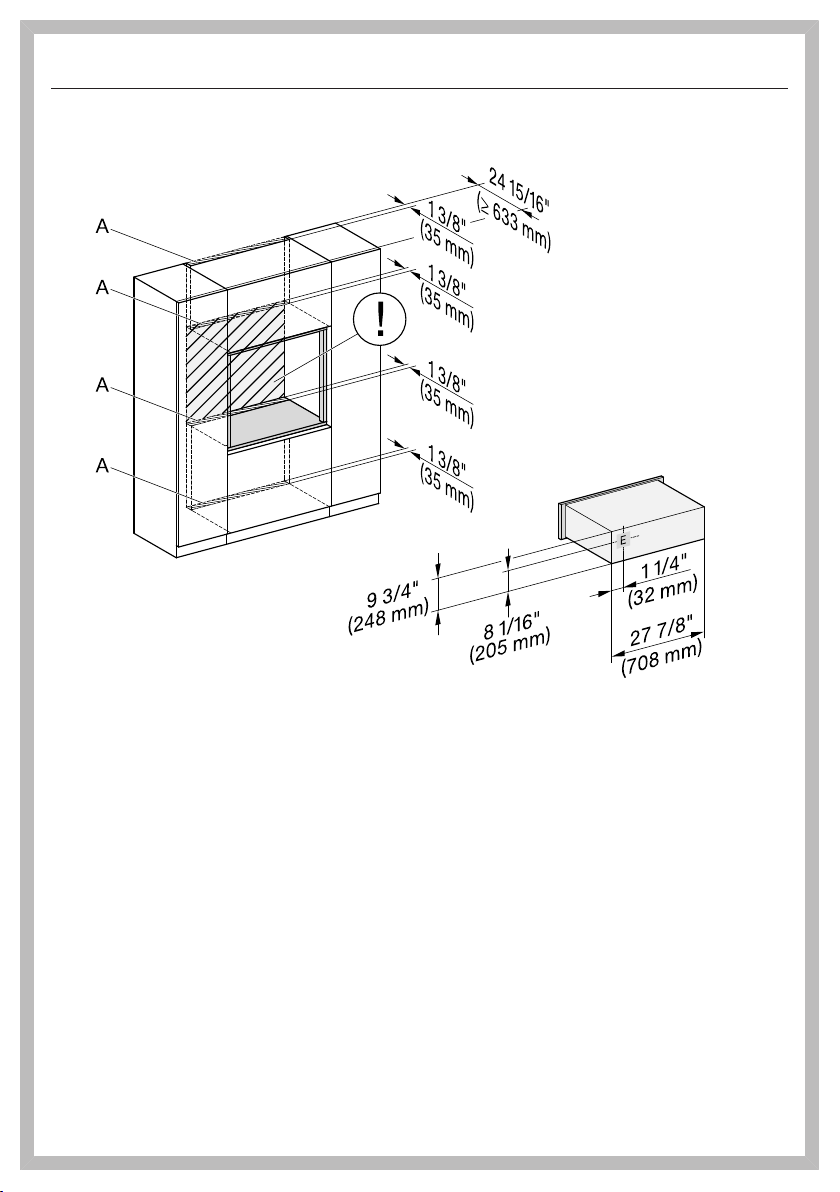
50
Connections and ventilation
A Cutout (min. 28sqin/ 18,000mm²) for power cord, water hoses, and ventilation
! No electrical connection in this area. The socket for the electrical connection
must be accessible, e.g., in an adjacent kitchen cabinet.
E Electrical connection
Installation
*INSTALLATION*
51
Installation dimensions ESW 7570, ESW 7670
Combination with a CVA/DGC/H7x7x
Miele Drawers can be installed flush or proud. Discuss your requirements with
your architect, kitchen designer, and installer.
More installation drawings are available on the Miele website.
The housing unit must not have a back panel installed behind the built-in niche.
* Drawer with glass front (ESW 76x0)
** Drawer with metal front (ESW 75x0)
Installation
*INSTALLATION*
52
Combination with a DGC/H7x8x
Miele Drawers can be installed flush or proud. Discuss your requirements with
your architect, kitchen designer, and installer.
More installation drawings are available on the Miele website.
The housing unit must not have a back panel installed behind the built-in niche.
* Drawer with glass front (ESW 76x0)
** Drawer with metal front (ESW 75x0)
Installation
*INSTALLATION*
53
Side view
Installation
*INSTALLATION*
54
Connections and ventilation
A Cutout (min. 28sqin/ 18,000mm²) for power cord, water hoses, and ventilation
! No electrical connection in this area. The socket for the electrical connection
must be accessible, e.g., in an adjacent kitchen cabinet.
E Electrical connection
Installation
*INSTALLATION*
55
Installation dimensions ESW 7580, ESW 7680
Installation in a tall or base cabinet
Miele Drawers can be installed flush or proud. Discuss your requirements with
your architect, kitchen designer, and installer.
More installation drawings are available on the Miele website.
The housing unit must not have a back panel installed behind the built-in niche.
* Drawer with glass front (ESW 76x0)
** Drawer with metal front (ESW 75x0)
Installation
*INSTALLATION*
56
Side view

Installation
*INSTALLATION*
57
Connections and ventilation
Installation
*INSTALLATION*
58
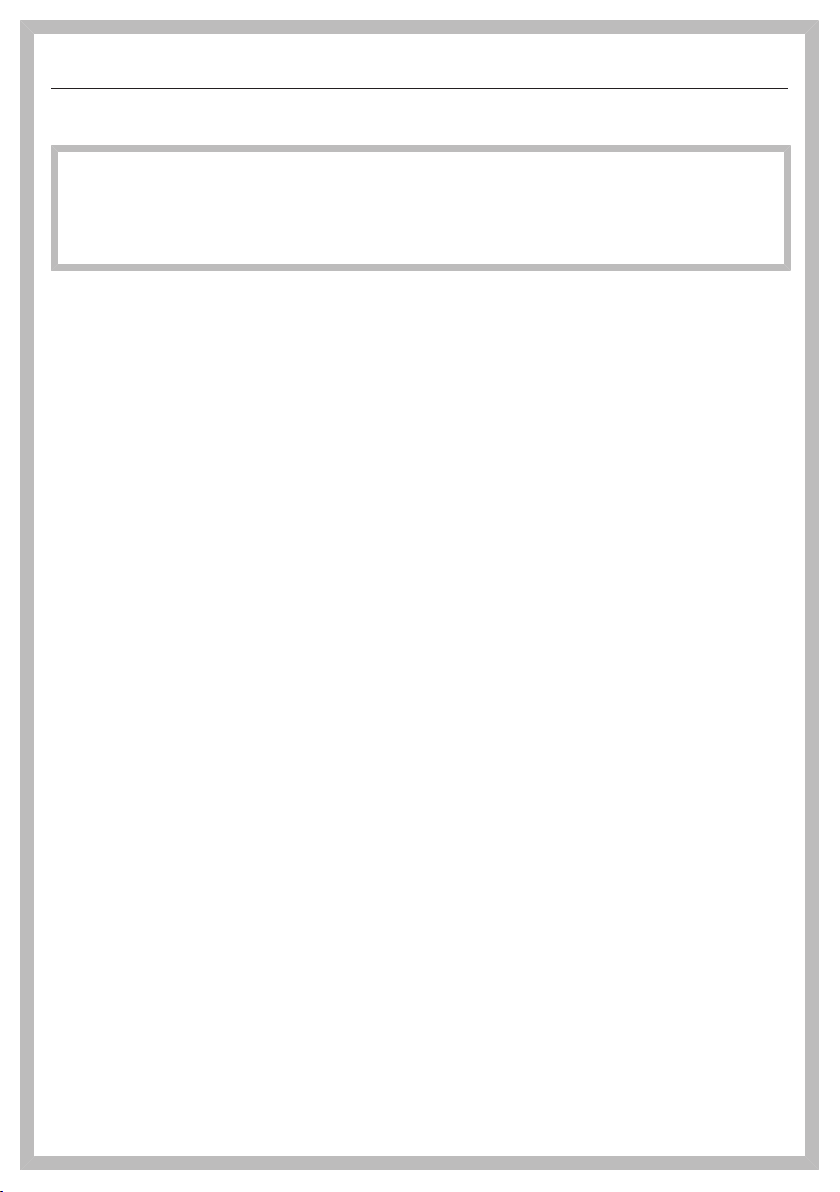
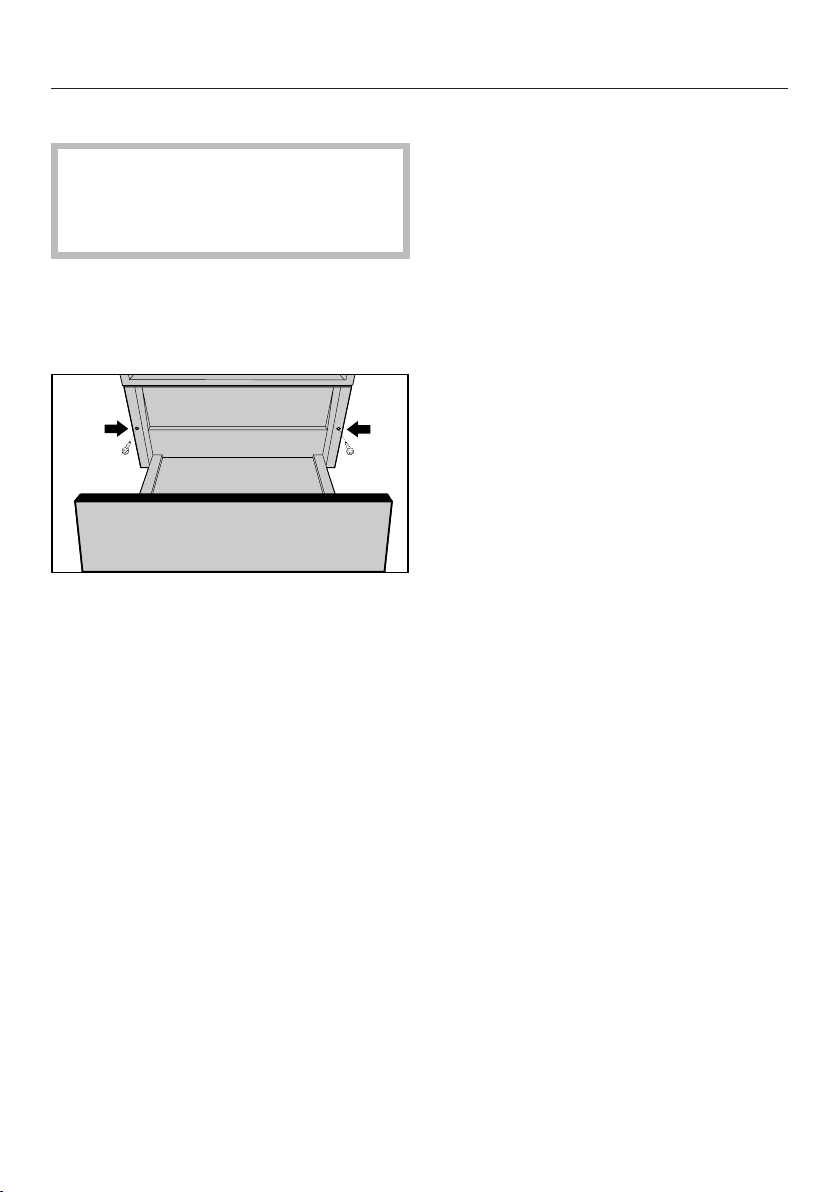
Installation
Check that the base on which the
drawer will sit is clean and level (use
a level). This is important for the ap-
pliance to function correctly.
Push the drawer into the housing unit
until the drawer front is flush with the
housing unit and make sure that it is
correctly aligned in the unit.
Open the drawer and use the
2screws supplied to secure it to the
side walls of the cabinet.
When installing the combination ap-
pliance, protect the top edge of the
front panel from abrasive marks.
Install the combination appliance in
accordance with the operating and
installation instructions supplied with
it.
Installation
*INSTALLATION*
59
Electrical connection
ATTENTION:
Before installation or servicing, dis-
connect the power supply by either
removing the fuse, manually “trip-
ping” the circuit breaker or unplug-
ging the appliance. Pull the plug not
the cord.
Repairs and service by unqualified
persons could be dangerous and the
manufacturer will not be held re-
sponsible.
Installation work and repairs should
only be performed by a qualified
technician in accordance with all ap-
plicable codes and standards. Instal-
lation, repair, and maintenance work
should only be performed by a
Miele-authorized service technician.
The voltage and frequency listed on
the rating label must correspond with
the household electrical supply to
prevent appliance damage.
Check these data before connection.
Consult an electrician if in doubt.
When another appliance is installed
in combination with the drawer to the
same circuit, operating both appli-
ances at the same time may cause
an overload.
If in doubt consult a qualified electri-
cian.
Connection
Make sure that the connection data
on the data plate matches that of
your electricity supply.
Connection data
The drawer is ready for connection and
equipped with a 6' 6'' (2,000 mm)
power cord with an electrical plug.
120V/15A/60Hz
Make sure that the connecting socket is
accessible after the installation of the
drawer.
Important –Save these instructions
for the local electrical inspector’s use.

Declaration of conformity
60
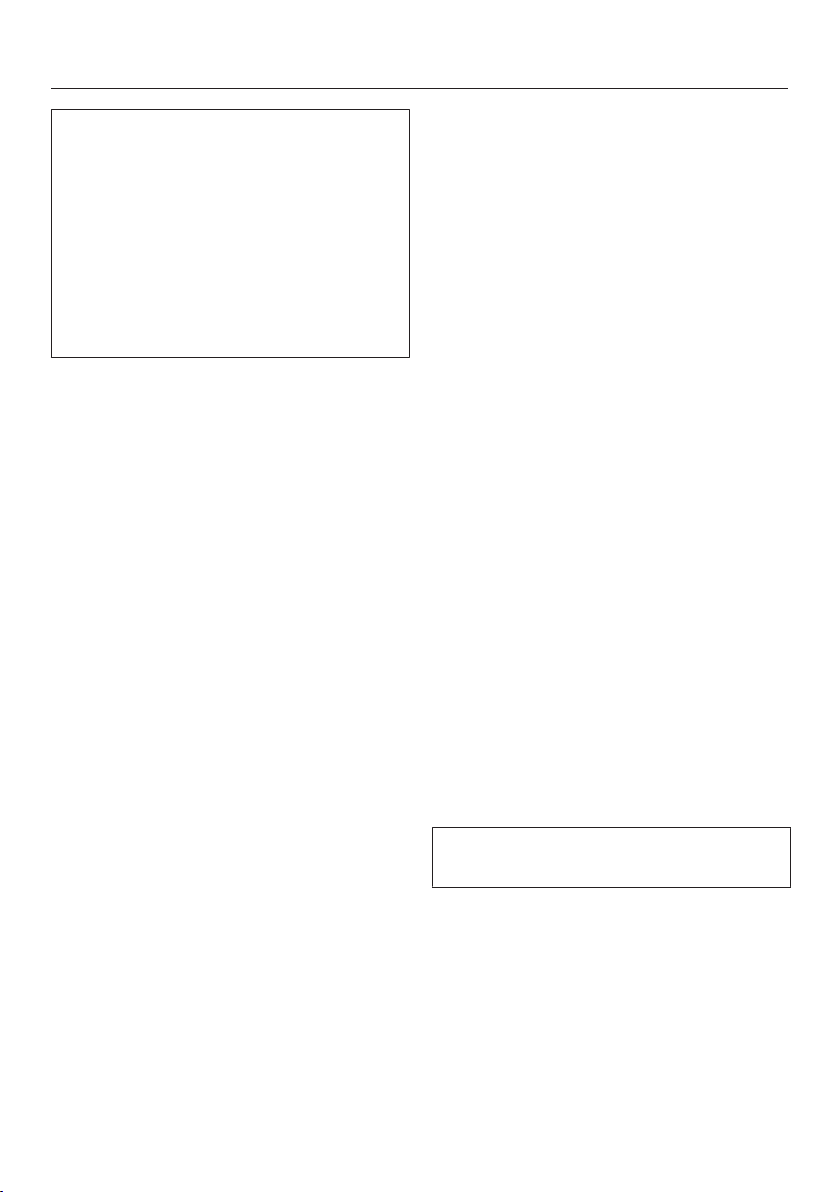
Radio Module
This device contains the following WiFi
module:
FCC ID 2ACU-EK037
IC ID 5669C-EK37
Frequency band 2.412GHz –
2.462GHz
Maximum trans-
mitting power
< 0.1W
Compliance Statement
This device complies with Part 15 of the
FCC Rules and contains licence-ex-
empt transmitter(s)/receiver(s) that com-
ply with Innovation, Science and Eco-
nomic Development Canada’s licence-
exempt RSS Standard(s).
Operation is subject to the following
two conditions:
(1) this device may not cause harmful
interference, and
(2) this device must accept any interfer-
ence received, including interference
that may cause undesired operation.
The construction of the device assures
that the FCC/IC exposure limits are ver-
ifiably met using the integrated radio
module.
Warning!
Any changes or modifications to this
unit not expressly approved by the
party responsible for compliance
could void the user’s authority to op-
erate the equipment.


9 Independence Way
Princeton, NJ 08540
www.mieleusa.com
U.S.A.
Miele, Inc.
National Headquarters
Please have the model and serial number
of your appliance available when
contacting Customer Service.
Canada
Importer
Miele Limited
Headquarters and Miele Centre
Customer Support
Phone: 888-99-MIELE (64353)
161 Four Valley Drive
Vaughan, ON L4K 4V8
www.miele.ca
Customer Care Centre
Phone:
1-800-565-6435
905-532-2272
International Headquarters
Miele & Cie. KG
Carl-Miele-Straße 29
33332 Gütersloh
Germany

M.-Nr. 11 924 070 / 01en-US
ESW7010, ESW7110, ESW7570, ESW7580, ESW7670,
ESW7680