
Loading ...
Loading ...
Loading ...
ENGLISH
8
Belt Hook (Fig. C)
WARNING: To reduce the risk of serious personal
injury, ONLY use the tool’s belt hook to hang
the tool from a work belt. DO NOT use the belt
hook for tethering or securing the tool to a person or
object during use. DO NOT suspend tool overhead or
suspend objects from the belthook.
WARNING: To reduce the risk of serious personal
injury, ensure the screw holding the belt hook
issecure.
WARNING: Before hanging the tool from a work
belt, ALWAYS remove the blade and ensure that the
lock-off button is in the locked postion to eliminate
unintentionalstarting.
IMPORTANT: When attaching or replacing the belt
hook
12
, use only the screw
13
that is provided. Be sure to
securely tighten thescrew.
The belt hook
12
can be attached to either side of the tool
using only the screw
13
provided, to accommodate left- or
right- handed users. If the belt hook is not desired at all, it
can be removed from thetool.
To move the belt hook, remove the screw that holds it in
place then reassemble on the opposite side. Be sure to
securely tighten thescrew.
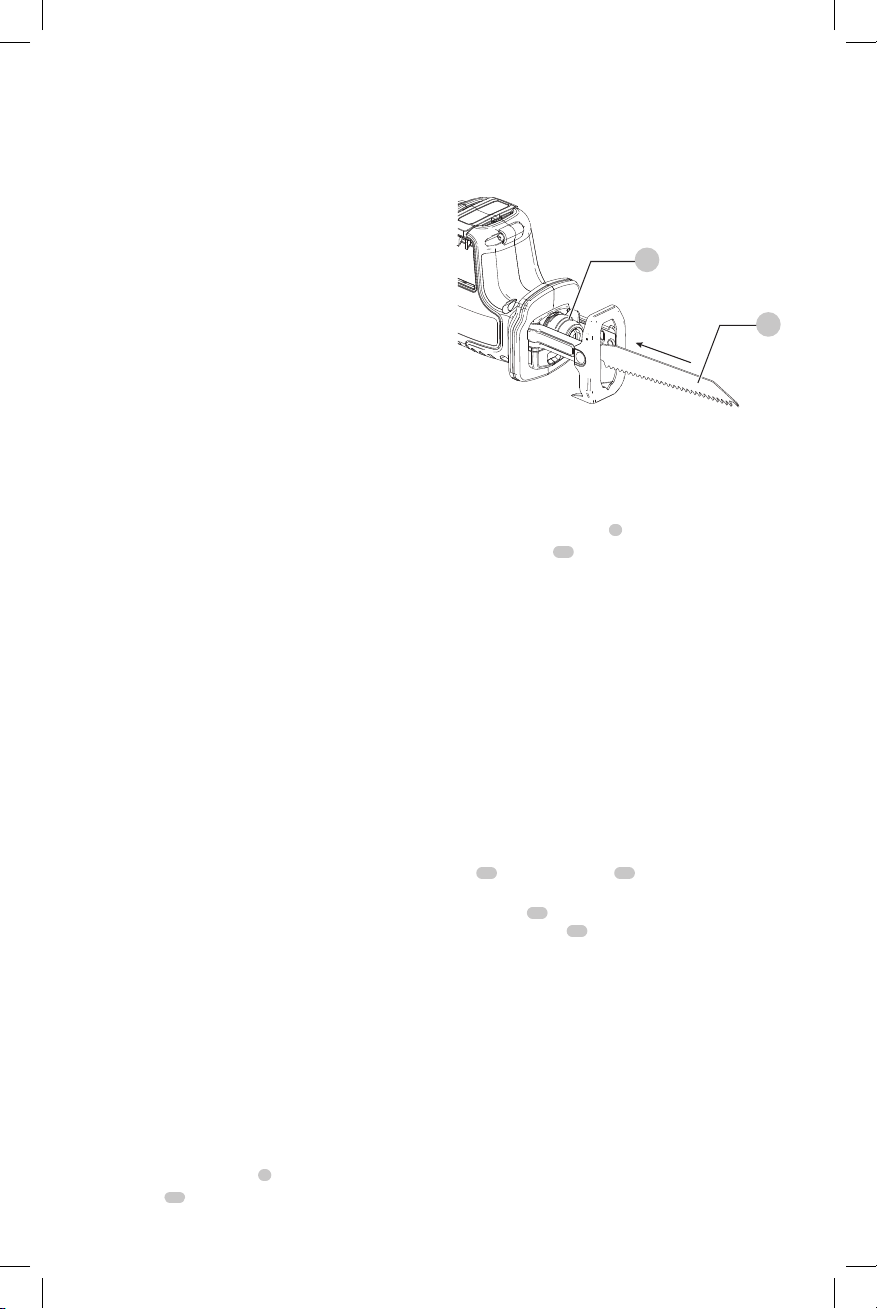
To Remove Blade from Saw (Fig. B)
WARNING: Burn hazard. Do not touch the the blade
immediately after use. Contact with the blade may
result in personalinjury.
1. Twist open blade clamp
3
to its full openposition.
2. Removeblade
11
.
Fig.B
3
11
WARNING: Cut hazard. Turn off and remove battery
from tool before making any adjustments or removing
or installing attachments or accessories.
WARNING: Cut hazard. Blade breakage may occur
if the blade does not extend past the adjustable shoe
and the workpiece throughout the cut. Increased risk
of personal injury, as well as damage to the adjustable
shoe and workpiece may result.
Blade Installation and Removal (Fig. B)
Different blade lengths are available. Use the appropriate
blade for the application. The blade should be longer than
3-1/2" (89 mm) and should extend past the shoe and the
thickness of the workpiece throughout the cut. Do not use
jigsaw blades with this tool.
To Install Blade into Saw
1. Twist open the blade clamp
3
to its full openposition.
2. Insert blade
11
fully into blade clamp.
ASSEMBLY AND ADJUSTMENTS
WARNING: To reduce the risk of serious personal
injury, turn unit off and remove the battery pack
before making any adjustments or removing/
installing attachments or accessories. An
accidental start-up can causeinjury.
Intended Use
This reciprocating saw is designed for professional
sawingapplications.
DO NOT use under wet conditions or
in presence of
flammable liquids orgases.
This reciprocating saw is a professional power tool.
DO NOT let children come into contact with the tool.
Supervision is required when inexperienced operators use
thistool.
Charger Cleaning Instructions
WARNING: Shock hazard. Disconnect the charger
from the AC outlet before cleaning. Dirt and grease
may be removed from the exterior of the charger using
a cloth or soft non-metallic brush. Do not use water or
any cleaningsolutions.
Wall Mounting
DCB107, DCB112, DCB113, DCB115, DCB118, DCB132
These chargers are designed to be wall mountable or to
sit upright on a table or work surface. If wall mounting,
locate the charger within reach of an electrical outlet,
and away from a corner or other obstructions which may
impede air flow. Use the back of the charger as a template
for the location of the mounting screws on the wall. Mount
the charger securely using drywall screws (purchased
separately) at least 1” (25.4 mm) long, with a screw head
diameter of 0.28–0.35” (7–9mm), screwed into wood to an
optimal depth leaving approximately 7/32” (5.5 mm) of the
screw exposed. Align the slots on the back of the charger
with the exposed screws and fully engage them in theslots.
3. Release blade clamp. Gently tug on the blade to ensure
blade is clampedsecurely.
NOTE: Blade can be installed upside-down to assist in
flush-to cutting.
Loading ...
Loading ...
Loading ...