
1
Register your
new device on
MyBosch now and
get free benefits:
bosch-home.com/
welcome
BBH3.../BCH3...
[en]
Instruction manual 12
[zf]
15
用說使書
2
1
2
19
20
8
3
4
6
5
7
9
10
11
12
15
16
18
17
14
13
3
2
1
1
2
1
1
2
5
1
2
1
3
4
2
4
Click!
11
6
2
1
1
Click!
2
1
10
9
8
7
Click!

5
13
Click!
b
15
a b
14
a
12
1
16
a
b
24h
16
c
13
6
17
17
1
2
Click!

7
en
Safety information .............................................................................................................................8
Your vacuum cleaner ........................................................................................................................12
zf
安全信息 ......................................................................................................................................... 10
您的吸塵機 ...................................................................................................................................... 15

8
reduced physical, sensory or
mental capacity or by per-
sons with a lack of experi-
ence or knowledge if they
are supervised or have been
instructed on the safe use of
the appliance and have un-
derstood the potential dan-
gers of using the appliance.
Children must never play
with the appliance.
Cleaning and user mainte-
nance must never be carried
out by children without su-
pervision.
Plastic bags and films must
be kept out of the reach of
children and disposed of.
>= There is a risk of suffoca-
tion.
Proper use
To charge, only use the charging cable included in the
scope of supply.
The charging cable must only be connected and oper-
ated as specified on the rating plate.
The appliance must only be stored and charged in-
doors.
Do not expose the appliance to temperatures below
0 °C or above 40 °C.
Never vacuum without the dust bag or dust container
,
motor protection or exhaust filter.
>= This may damage the vacuum cleaner.
Keep the vacuum cleaner away from your head when
using nozzles and tubes. => This could cause injury.
Do not use a damaged charging cable. Replace it with
an original charging cable.
When disconnecting the charging cable from the
mains, pull the plug itself to remove it; do not pull on
the powe
r cord.
Do not pull the charging cable over sharp edges or
allow it to become trapped.
Before carrying out any work on the vacuum cleaner,
switch off the appliance and disconnect it from the
charging cable and the mains.
Do not operate the vacuum cleaner if it is damaged.
If a fault is detected, switch off the appliance and dis-
connect it from the charging cable and the
mains.
For safety reasons, only authorised after-sales service
personnel are permitted to carry out repairs and fit
replacement parts to the vacuum cleaner.
Please keep this instruction manual for future refer-
ence.
When passing the vacuum cleaner on to a third party,
please also pass on this instruction manual.
Intended use
Please read the information on intended use to ensure
that you use the appliance correctly and safely.
Only use this appliance:
As specified in this instruction manual.
With genuine parts and accessories. Damage caused
by using third-party products is not covered under the
warranty.
For cleaning surfaces.
In private households and in enclosed spaces in a do-
mestic environment at room t
emperature.
Up to an altitude of max. 2000 m above sea level.
In order to prevent injuries and damage, the vacuum
cleaner must not be used for:
Vacuuming persons or animals.
Vacuuming up:
− Hazardous, sharp-edged, hot or red-hot substances.
−Damp or liquid substances.
− Highly flammable or explosive substances and
gases.
− Ash, soot from tiled stoves and central heating
syst
ems.
−Toner dust from printers and copiers.
Spare parts, accessories
Our original spare parts and original (special) acces-
sories are designed to work with the features and
requirements of our vacuum cleaners. We therefore
recommend that you only use our original spare parts
and original (special) accessories. This will ensure that
your vacuum cleaner has a long service life and that the
quality of its cleaning performance will remain consist-
ently high throughout.
!
Please note:
Using unsuitable or inferior-quality spare parts and
(special) accessories can damage your vacuum
cleaner. Damage caused by the use of such products
is not covere d by our guarantee.
Safety information
This vacuum cleaner complies
with the recognised rules of
technology and the relevant
safety regulations.
The appliance may be used
by children over the age of
8 years and by persons with
en

9
In the following cases, you must stop the appliance
immediately and contact the after-sales service:
− If you have accidentally vacuumed up some liquid
or liquid has entered the inside of the appliance;
− If the appliance has been dropped and damaged.
Protect the vacuum cleaner from outside weather con-
ditions, moisture and sources of he
at.
Do not pour flammable substances or substances con-
taining alcohol onto the filters (motor protection filter,
exhaust filter, etc.).
The vacuum cleaner is not suitable for use on con-
struction sites. => Vacuuming up building rubble may
damage the appliance.
Switch off the appliance when it is not in use.
For safety reasons, the appliance is fitted with an over-
heating protection system to saf
eguard the battery
and motors. The appliance will switch off automati-
cally if it or the battery is too hot.
>=The appliance will need around 30 minutes to cool
down before it can be used again.
The packaging is designed to protect the vacuum
cleaner from being damaged during transportation.
We therefore recommend keeping the packaging for
the purpose of future transportation.
Li-ion batteries
Read all the safety information and instructions.
>= Failure to act in accordance with the safety
information and instructions may result in electric
shock, fire and/or serious injury.
Keep all the safety information and instructions for
future reference.
Protect the battery from heat sources, for example
avoiding long periods in the sun and exposure to fire,
as well as from water and
moisture.
>= Risk of explosion.
Fumes may be released if the battery is damaged or
used improperly. Circulate fresh air, and seek medical
assistance in the event of physical symptoms arising
as a result of exposure.
>=The fumes may irritate the airway.
If the battery is used incorrectly, liquid may leak out of
the battery. Avoid touching the liquid. In the event of
accidental contact, rinse the affected area with water.
If the liquid comes into contact with the eyes, seek
medical assistance.
>= If battery liquid leaks, it can irritate or burn the
skin.
Transportation information
The Li-ion batteries in the appliance are subject to the
requirements of dangerous goods legislation. The bat-
teries can be
transported by the user by road without
any further requirements. In the event that they are
shipped by a third party (e.g. transported by air or
freight carrier), special requirements regarding packag-
ing and identification must be met. In this case, a dan-
gerous goods expert must be consulted when preparing
the goods for dispatch.
Information on disposal
Vacuum cleaners, batteries, accessories and packag-
ing should be recycled in an environmentally friendly
manner.
Do not dispose of the vacuum cleaner or the batteries in
the household rubbish.
Packaging
The packaging is designed to protect the vacuum
cleaner from being damaged during transportation.
It is made of environmentally friendly mat
erials and
can be recycled. Dispose of packaging that is no
longer required at an appropriate recycling point.
Old appliances
This appliance contains rechargeable lithium-ion
batteries. The appliance must therefore only be
disposed of by an authorised after-sales service or
dealer.
Batteries
Please follow the notes on transport.
Integrated batteries may only b
e removed by spe cial-
ist personnel for the purpose of disposal. Opening
the housing shell may damage the vacuum cleaner.
Only for qualified professional:
To remove the battery from the vacuum cleaner,
press the on/off switch (Fig.
4
) until the battery is
fully discharged. Unscrew the screws on the housing
and take off the housing shell to remove the battery.
To prevent a short circuit, disconnect the battery
connections individually one after the other and
then insulate the terminals.
Even in the case of complete discharge, the battery
still contains a residual capacity that may be re-
leased in th
e event of a short circuit.

10
zf
請妥善保存使用說明書。
將吸塵器轉交第三方時,請連同使用說明書
一併交付。
符合規定使用
為安全且正確使用本裝置,請注意使用須知中所
提供的提示說明。
使用本機時應符合以下要件:
根據使用說明書。
僅能搭配原廠零組件和附件使用。因使用其他
產品造成損壞,不得 主張保固。
用於清潔表面。
僅限私人家庭和室溫下的居家環境室內區域。
本機可在海拔最高 2000 公尺以下的環境使用。
為了避免人身受傷與機器損壞,不可將本吸
塵器用在:
人類和動物。
吸入:
− 有害健康、尖銳、高熱或灼熱的物質。
− 潮濕或液態的物質。
− 容易起燃或爆炸的物質和氣體。
− 煙灰、爐具和中央暖氣設備的煤灰。
− 印表機和複印機的碳粉塵。
備件、配件
與我們的原裝備件一樣,我們的原裝配件和特殊配件
都是根據真空吸塵器的特性進行特殊設計的。因此,
建議僅使用原裝備件,原裝零件和特殊配件。才可確
保您吸塵器能擁有長期使用壽命和持久的高品質清
潔性能。
!
注意事項:
使用非精確或劣質備件,配件/特殊配件可能會損壞
您的吸塵器如果因使用上述產品而造成損壞,則不
在保修範圍內。
安全注意事項
本吸塵器符合公認的技術規範以
及相關安全規定。
年滿 8 歲的兒童以及身體、感官
或智力有缺陷之人士及缺 乏相
關經驗和知識之人士,應 在負
責安全使用機器人員的監 督或
指導下,瞭解使用機器可 能帶
來的危險後,方能使用本 機。
請勿讓孩童將本機當成玩具玩
耍。
在無人監督的情況下,不可由
兒童進行清潔或保養。
塑料袋和包膜必須存放在兒
童 拿不到的地方並進行廢棄處
理。
>= 有造成窒息的危險!
適當使用
只可使用隨貨附送的充電線進行充電。
僅可依照銘牌資料連接充電線和使用。
本產品僅可存放於室內並充電。
不可使本產品曝露在溫度 0°C 以下和 40°C
以上。
未安裝集塵袋或集塵盒、馬達防護和排氣過濾
網時,絕不 可進行吸塵。
>= 可能會造成產品損壞!
吸塵時,避免將吸頭和吸氣管置於頭部附近。
>= 此舉可能
造成受傷危險!
電線如損壞則不得再使用,並應更換新的原廠
充電線。
不可拉住充電線將產品拔掉電源,而應拉住插
頭。
不可將電線拉往鋒利的邊緣並且不可擠壓。
在吸塵器上進行任何操作之前,請先關機或拔
掉充電線和 電源。
不可操作損壞的吸塵器。
出現故障時,請關機或拔掉充電線和電源。
為避免發生危險,僅可由授權的客服中心進行
吸塵器的維 修和備件更換。
發生以下狀況時,請立即關機停用並連絡客服
中心:
− 如不慎吸入液體,或液體滲入產品內部時
− 如產品掉落並受損時。
請保護吸塵器不受氣候、濕度和熱源的影響。
不可將可燃性或含酒精的物品放置在濾網(馬
達防 護濾網、排氣濾網等)上。
本吸塵器不適用於建築場所。=> 吸入建築碎片
可能造成本 產品損壞。
不需吸塵時,請將產品關機。
基於安全考量,電器的電池和馬達安裝有過熱
保護系統。電器或電池過熱時,電器將會自動
關閉。
>= 需要約30分鐘冷卻才能再次使用電器。
包裝可保護吸塵器在運送時不受損傷。因此我
們建議將保 留包裝,以備運輸之用。

11
鋰電池
請先詳讀重要安全資訊與說明。
>= 若不遵循安全資訊與說明,可能會造成觸
電、火災和/或嚴重受傷。
請妥善保存安全資訊與說明,以便日後參考。
請避免電池靠近熱源,例如長時間曝曬於太陽
下與靠近火源,並避免碰水與潮溼環境。
>= 爆炸風險。
若電池受損或使用不當,可能會冒出煙霧。請
立即確保空氣流通,若因接觸到煙霧而產生任
何身體不適,請尋求醫療協助。
>= 煙霧可能會造成呼吸道不適。
如果沒有正確使用電池,可能會有液體從電池
中滲出。請避免碰觸此液體。若不小心接觸此
液體,請用清水沖洗。若液體濺到眼睛,請尋
求醫療協助。
>= 如果電池漏液,可能會造成皮膚發炎或灼
傷。
運送資訊
此電器所使用的鋰電池需遵循危險貨品相關法規之要求。使用者
若無需額外要求,可透過陸運運送電池。若使用第三方運送例如
空運或貨運物流公司,則必須遵循特定包裝與識別要求。準備運
送貨品前,必須諮詢危險貨品專家。
回收注意事項
吸塵器、蓄電池、配件和包裝物應以符合環保的回收方式處理。
不可將本吸塵器和蓄電池/電池棄置於家用垃圾!
包裝
包裝可保護吸塵器在運送時不受損傷。它以環保材質製作而
成,因此可以回收再利用。請將不再需要的包裝材料送至「綠
點」回收系統的收集處。
老舊家電
本裝置含有可重複充電的鋰離子蓄電池。因此,本裝置只能
透過授權的客戶服務處和零售商進行回收處理。
蓄電池/電池
請留意運輸時的注意事項。
內建蓄電池僅可經由專業人員取出。打開機體外殼可能將吸
塵器損毀。
僅針對合格人員:
欲將蓄電池從吸塵器取出時,請持續操作開關(圖
4
),直
到蓄電池完全放電為止。將機殼的螺栓旋出,請取下外殼以
取 出蓄電池。為了 避 免 短 路 ,請依次個別拔掉蓄電池的接頭,
並立即將電極 絕緣。即使在完全放電狀態,蓄電池在短路時
仍可釋放內部的剩餘 電量。
12
en
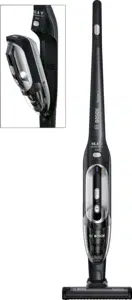
Congratulations on your purchase of a Bosch vacuum
cleaner from the BBH3/BCH3 series.
This instruction manual describes various BBH3/BCH3
mode ls, which means that some of the equipment fea-
tures and functions described may not apply to your
mode l. You should only use original Bosch accessories,
which have been specially developed for your vacuum
cleaner, to achieve the best possible vacuu
ming re-
sults.
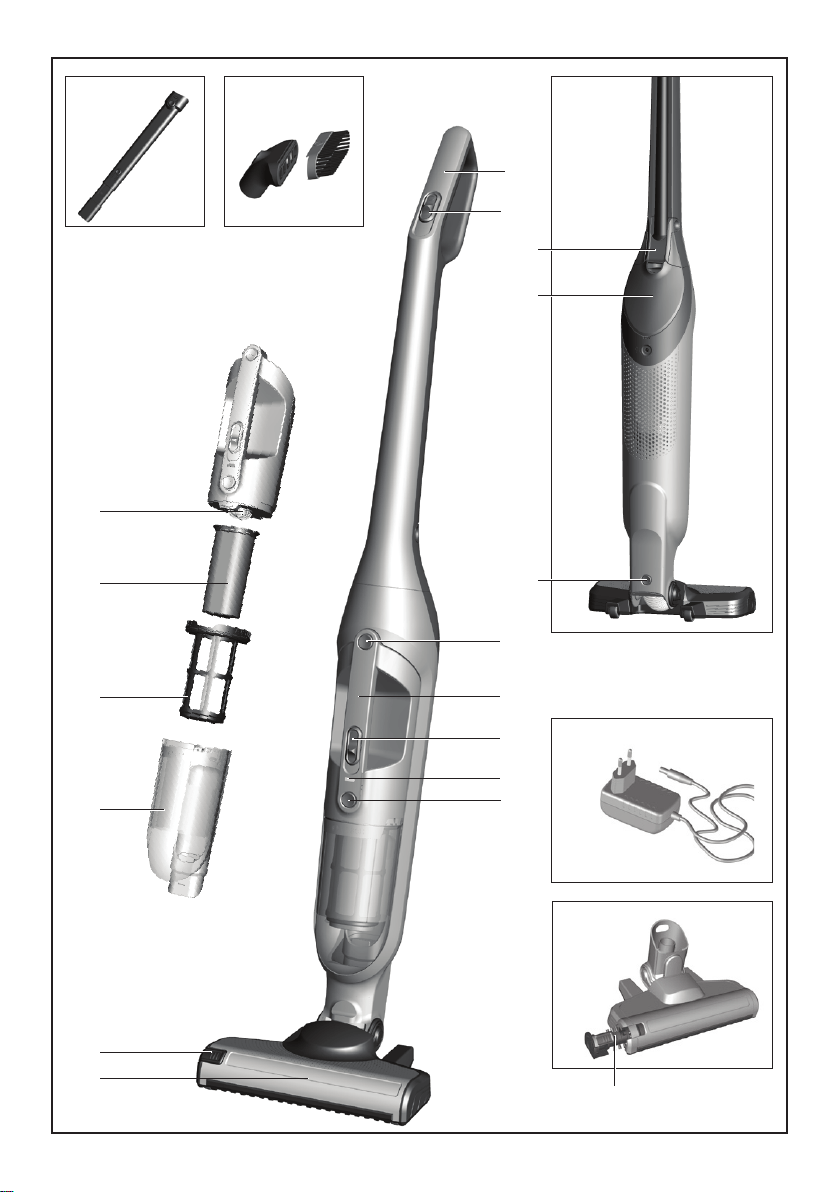
Your vacuum cleaner
1 Floor nozzle with electric brush
2 Brush roller release button
3 Dust container
4 Outer filter unit
5 Filter cartridge with motor protection filter and foam
filter
6 Motor unit
7 Extendable crevice nozzle*
8 Combination nozzle*
9 Hand stick handle
10 Hand stick sliding switch
11 Accessory holder for extendable crevice nozzle
12 Accessory compartment for combination nozzle
13 Floor nozzle release button
14 Hand-he
ld cordless vacuum cleaner release button
15 Hand-held cordless vacuum cleaner handle
16 Hand-held cordless vacuum cleaner sliding switch
17 Battery charging status indicator
18 Dust container release button
19 Charging cable*
20 Brush roller
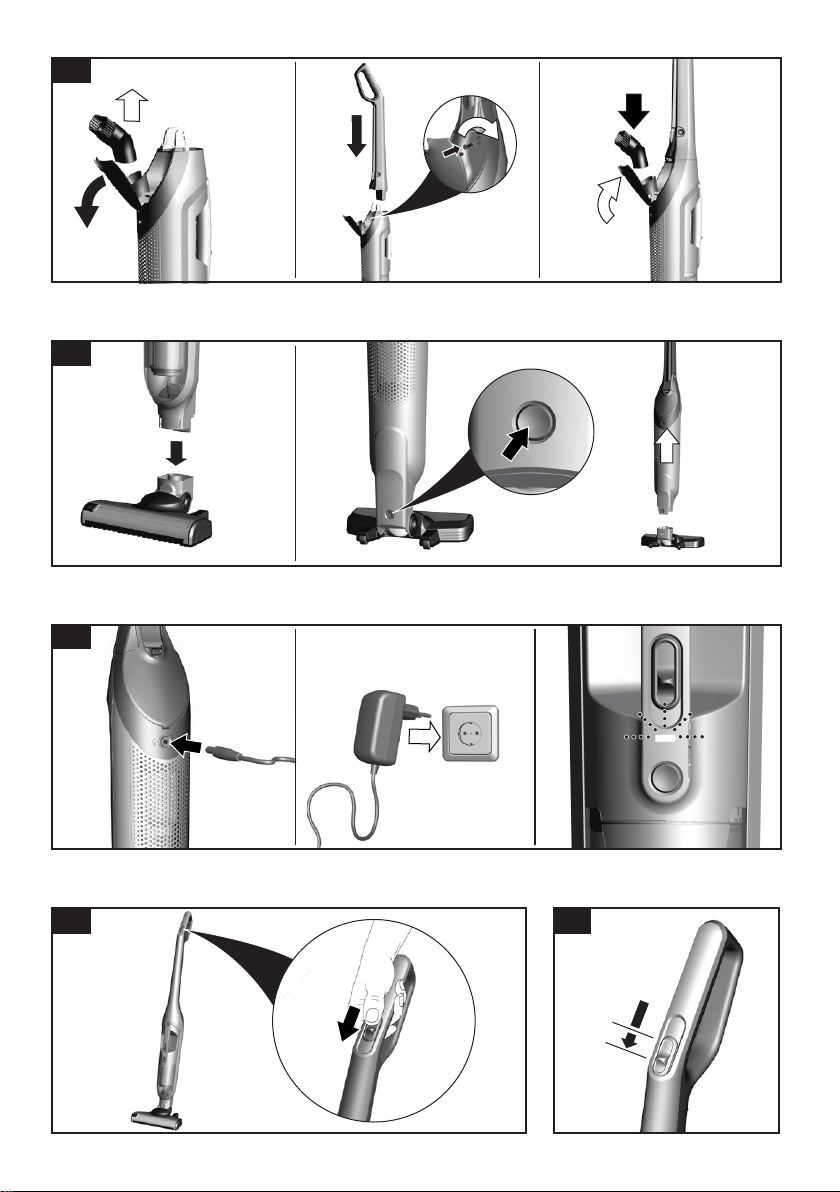
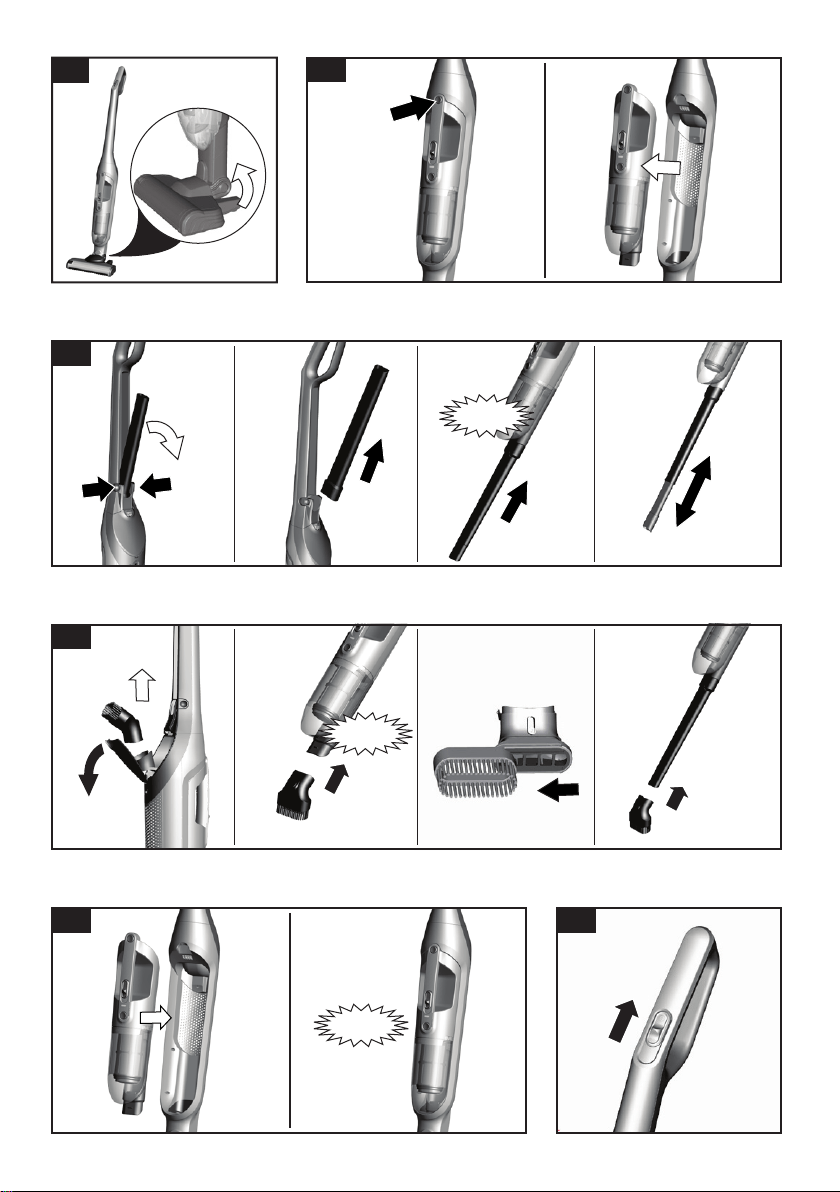
Before using the appliance for the first
time
Fig.
1
Open the accessory compartment and remove the
combination nozzle.
Carefully place the handle onto the main housing
and screw it into place.
Place the combination nozzle in the accessory com-
partment and close it.
Fig.
2
Plug the hand stick into the floor nozzle and lock it
into place.
To release the floor nozzle, press the release button
and pull the hand stick out of the nozzle.
Charging
!
Caution:
Before using the vacuum cleaner for the first time,
fully charge the batteries.
To charge the appliance, only use the charging cable
included with the appliance. The charging cable
must only be connected and operated as specified
on the rating plate. Do not charge the appliance at
temperatures below 0 °C or above 40 °C.
Fig.
3
To charge the vacuum cleaner, place it near to a so-
cket. The appliance can be left standing anywhere
on the floor.
Fig.
6
Plug the charging cable into the connection at the
rear of the appliance.
Plug the charging cable plug into the socket.
The charging indicator is flashing slowly in white
when the appliance is charging.
Once the battery is fully charged, the charging indi-
cator lights up white and goes out after a few minu-
tes. The battery will stop charging. Disconnect the
appliance from the mains briefly to check. The indi-
cator will then light up white again.
It is safe to leave the appliance connected to the
charging cable and socket even when it is fully char-
ged.
It is normal for the power adapter and vacuum clea-
ner to heat up and this is not a cause for concern.
Battery state indicator
Operating status LED indicator
Normal mode White LED lit
Battery capacity below
20%
Red LED flashing slowly
Battery flat LED off
Charging White LED flashing slow-
ly
Battery is fully charged White LED remains lit
continuously for 2 minu-
tes, then goes out
Over-/undertemperature
protection
Red LED remains lit
continuously for 10 se-
conds, then goes out
* Depending on model
13
Using the hand-held cordless vacuum
cleaner
Fig.
7
Unlock the hand-held cordless vacuum cleaner by
pressing the release button and remove it from the
hand stick.
Vacuuming with accessories
Fig.
8
Crevice nozzle
For vacuuming in difficult-to-reach places and over-
head.
Open the accessory holder using the recessed grip
and remove the crevice nozzle. Place it on the air
intake opening of the cordless handheld vacuum
cleaner and click into place.
The crevice nozzle can be extended as require d. To
do this, press the unlock button, pull out the crevice
nozzle and engage it in the end position.
After use, push the crevice nozzle together again,
place it in the accessory holder and close the holder.
Fig.
9
Combination nozzle
Combination nozzle with furniture brush and uphols-
tery nozzle for vacuuming window frames, cup-
boards, furniture, etc.
Open the accessory compartment and remove the
combination nozzle. Place it on the air intake ope-
ning of the upright vacuum cleaner and click into
place.
The furniture brush attachment can be pushed to the
side. The upholstery nozzle is located underneath.
The combination nozzle can also be placed on the tip
of the crevice nozzle.
After use, place the combination nozzle back in the
accessory compartment for storage, close the ac-
cessory compartment, clicking it into place.
Charging the hand-held cordless vacuum cleaner
Fig.
10
To charge the hand-held cordless vacuum cleaner,
inser t it into the hand stick and lock into place. Make
sure that it is seated correctly.
After using the appliance
Fig.
11
Switch off the appliance after vacuuming.
Emptying the dust container
In order to achieve the best possible vacuuming re-
sults, the dust container should be emptied after every
use or, at the latest, when dust at one point in the dust
container has reached the marking.
We recomme nd that you not fill the dust container bey-
ond the marking, as this leads to conside
rable soiling
of the filter.
Using the hand stick vacuum cleaner
Vacuuming
Fig.
4
Actuate the sliding switch in the direction of the ar-
row.
Controlling the suction level
Fig.
5
Slide the sliding switch into the required position in
order to set the suction power:
Position 1 1
Vacuuming with the electric brush switched on.
For routine cleaning tasks on all surfaces.
The appliance achieves the maximum run time at
this leve l.
Position 2 2
Vacuuming with the electric brush switched on.
For stubborn cleaning tasks on all surfaces (carpets,
in particular).
The appliance achieves a shorter runtime at this le-
vel.
Runtime
Like every other Li-Ion battery the battery is subject
to natural wear as well. That means the battery ca-
pacity and thus runtime decrease over time. This is a
natural aging process and not the result of a material/
production failure or a product defect.
BBH3/BCH3
25,2V
On normal mode with
electrical nozzle for
normal cleaning tasks
Up to 55 min.
Turbo mode with
electrical floor nozzle or
hand-he ld for demanding
cleaning tasks
Up to 20 min.
Fig.
6
During short pauses in vacuuming, the appliance can
be left standing anywhere in the room. To do this, tilt
the vacuum cleane r forwards slightly in the direction
of the nozzle.
!
Caution: When the appliance is left standing, it
must be switched off because, if the brush is
turning while the appliance is standing still, it could
cause damage to the floor covering.
* Depending on model

14
Fig.
12
Remove the hand-held cordless vacuum cleaner
from the hand stick.
Fig.
7
Using the release button, unlock the dust container
and remove it from the motor unit.
Fig.
13
Take the filter unit out of the dust container.
Empty the dust container.
Fig.
14
Remove any dirt which may have been lodged under-
neath the container ejector opening.
a) Insert the filter unit into the dust container, making
sure it is correctly seated
b) Insert the dust container in the appliance, so that it
'clicks' audibly into place
!
Caution: If you notice any resistance when inserting
the dust container, check that the filter is complete
and that the filter unit and dust container are correct-
ly seated.
Cleaning the filter
The outer filter unit and filter cartridge should be clea-
ned at regular intervals in order to ensure optimum
operation of the vacuum cleaner.
!
Caution: The filter can only be cleaned if the appli-
ance is switched off.
Never vacuum without the outer filter unit and its
fitted filter cartridge.
Fig.
15
Cleaning the outer filter unit
Switch off the appliance. Fig.
11
Remove the hand-held cordless vacuum cleaner
from the hand stick.
Fig.
7
Using the release button, unlock the dust container
and remove it from the motor unit.
Fig.
12
Take the filter unit out of the dust container.
a) It is usually sufficient to lightly shake or tap out the
whole filter unit when the dust container is emptied in
order to dislodge any particles of dirt.
b) If this is not sufficient, you can use a dry cloth to remo-
ve dirt particles from the surface.
Fig.
16
Cleaning the filter cartridge
a) Remove the filter cartridge from the filter unit.
b) Firstly, clean the filter cartridge by tapping out the dirt.
c) Pull out the foam filter from the motor protection and
rinse separately.
Allow the foam filter and motor protection filter to
dry completely (approx. 24 hours)
After fitting the foam filter, insert the filter unit into the
dust container.
New filters can be obtained from our after-sales ser-
vice, if required.
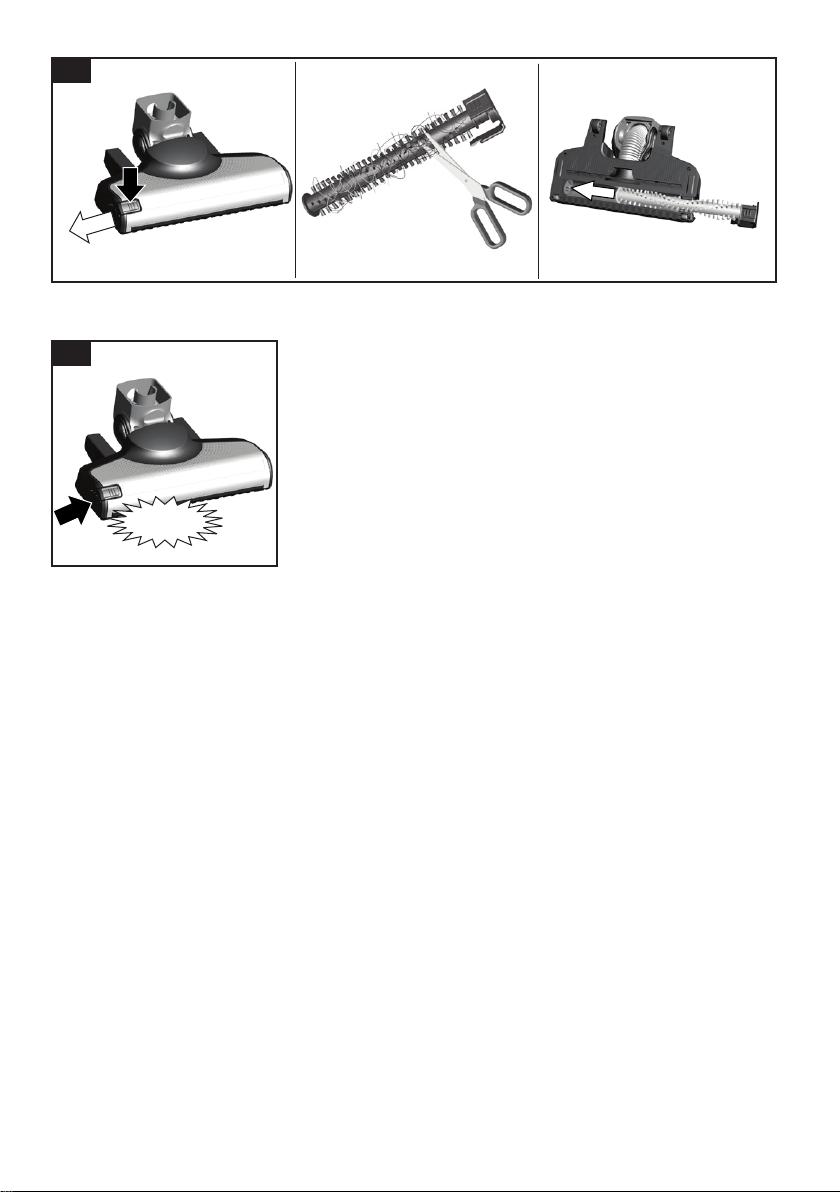
Cleaning the floor nozzle
Before carrying out any maintenance, switch off the
vacuum cleaner and disconnect it from the charging
cable.
Fig.
17
Use the release button to release the brush roller
and pull it sideways out of the floor nozzle.
Using the groove provided, cut through threads and
hairs wound round the rollers with scissors.
Push the brush roller in sideways along the guide rod
in the floor tool and lock in place using the release
button.
!
Caution: The floor nozzle must only be put into
operation with the brush roller fitted.
!
Caution:
Floor nozzles are subject to a certain amount of
wear, depending on the type of hard floors you have
(e.g. rough, rustic tiles). You must therefore check
the underside of the floor tool at regular intervals.
Worn undersides of floor nozzles may have sharp
edges that can damage delicate hard floors, such as
parquet or linoleum. The manufacturer does not ac-
cept any r
esponsibility for damage caused by worn
floor tools.
Care
Before cleaning the hand stick vacuum cleaner or hand-
held cordless vacuum cleaner, it must be switched off
and disconnected from the charging cable. The vacuum
cleaner and accessories can be cleaned using a stan-
dard commercially-available plastic cleaner.
!
Caution: Do not use abrasive materials, glass-
cleaning agents or all-purpose cleaning products.
Never immerse the vacuum cleaner in water.
Subject to technical modifications.
* Depending on model
15
zf
感謝您購買博世BBH3/BCH3系列吸塵器。
本說明書為BBH3/BCH3系列通用,某些功能與配備或不適用於
您的機型。請使用本吸塵器專用的博世原廠配件,以達到最佳吸
塵效果。
您的吸塵器
1 電動地吸
2 毛刷桿釋放按鈕
3 集塵盒
4 馬達保護濾網
5 濾芯,含馬達保護濾網和泡綿濾網
6 馬達部件
7 可伸縮式狹縫吸頭*
8 傢俱/軟墊二合一刷頭*
9 把手
10 電源開關
11 可伸縮式狹縫吸頭收納處
12 傢俱/軟墊二合一刷頭收納處
13 電動地吸釋放按鈕
14 手持式無線吸塵器釋放按鈕
15 手持式無線吸塵器把手
16 手持式無線吸塵器電源開關
17 充電指示燈
18 集塵盒釋放按鈕
19 充電器*
20 毛刷桿
首次使用前
圖
1
打開收納處並取出傢俱/軟墊二合一刷頭。
小心地將把手裝在機體上,並鎖至定位。
將傢俱/軟墊二合一刷頭放回收納處後關上。
圖
2
將吸塵器本體插入電動地吸中,並鎖至定位。
要拆下電動地吸,請按下釋放按鈕,並將吸塵器本體地吸上
拔出。
充電
!
小心:
首次使用吸塵器前,請先將電池充滿。
務必使用隨附的充電器為電器充電。充電器必須依照額定銘
牌上的指示連接與操作。請勿在低於 0°C或高於40°C的溫度
下充電。
圖
3
要為吸塵器充電,請將它放在插座旁。本電器可以直立放在地
板的各種位置。
圖
6
將充電線插入電器後方的接頭。
將充電線插頭插入插座中。
電器充電時,充電指示燈會緩慢地閃爍白燈。
電池充滿後,充電指示燈將會亮白燈,在幾分鐘後熄滅。電池
將會停止充電。如果不確定是否充滿,請暫時斷開電器的主電
源以確認。指示燈將會再次亮白燈。
即使電器已充滿,連接在充電線和插座上也很安全。
在充電時,電源變壓器和吸塵器會發熱,這是正常的現象。
電池狀態指示燈
操作狀態 LED指示燈
一般模式 白色LED燈
電池容量低於20% 紅色L ED緩慢閃爍
電池沒電了 LED關閉
充電 白色LED緩慢閃爍
電池已充滿 白色LED會持續亮起2分鐘,
然後熄滅
溫度過高/過低保護 LED紅燈會持續亮10秒,然
後熄滅
使用吸塵器
吸塵
圖
4
依箭頭方向操作滑動開關。
控制吸力
圖
5
將滑動開關推至所需的吸力位置:
位置1 1
啟動電動刷頭的吸塵。
適合所有日常清潔工作。
在這個功率等級下電器可以達到最長的運轉時間。
位置2 2
啟動電動刷頭的吸塵。
適合清潔所有頑強污漬(特別是地毯)。
在這個功率等級下電器的運轉時間較短。
* 視機型而定:
16
使用本電器後
圖
11
吸塵完成後請關閉電源。
清空集塵盒
為達最佳吸塵效果,每次使用後請清理集塵盒,或至少在集塵盒
內一部分灰塵累積達到標示時清理。
我們建議您在灰塵超過標示前清理,如果超過可能會造成濾網
附有過多灰塵。
圖
12
將手持式無線吸塵器從吸塵器本體上拆下。圖
7
使用釋放按鈕,將集盒器解鎖並從馬達部件上拆下。
圖
13
將濾芯從集塵盒取出。
清空集塵盒。
圖
14
清除堵塞在集塵盒下方排出口的所有灰塵。
a) 將濾芯裝回集塵盒中,並確認是否安裝妥當。
b) 將集塵盒裝回吸塵器中,發出喀噠聲即表示鎖至定位。
!
小心:裝回集塵盒時若明顯感覺到有任何阻力,請檢查濾
網齊全無缺且濾芯和集塵盒都位於正確位置上。
清潔濾網
定期清潔馬達保護濾網 和濾芯,以確保吸塵器保持在最佳運作
狀態。
!
小心:必須關閉吸塵器的電源才能清潔濾網。
請勿在未安裝外部過濾裝置和其中安裝的濾芯時操作吸
塵器。
圖
15
清潔外部過濾裝置
關閉本電器的電源。圖
11
將手持式無線吸塵器從吸塵器本體上拆下。圖
7
使用釋放按鈕,將集塵盒解鎖並從馬達部件上拆下。圖
12
將濾芯從集塵盒取出。
a) 於集塵盒清空後稍微搖晃或輕敲整組濾芯,通常就能抖落所有
灰塵顆粒。
b) 但這麼做無效時,您可以用乾布掃除表面的灰塵顆粒。
圖
16
清潔濾芯
a) 拆除馬達保護濾網中的濾芯。
b) 先輕敲,讓濾芯的灰塵彈落。
c) 抽出泡綿濾網並單獨清洗。
晾乾泡綿濾網和馬達保護濾網(約24小時)
安裝泡綿濾網後,將過濾裝置裝回集塵盒中。
如有需要,可向售後服務中心購買新濾網。
運作時間
電池與其他鋰電池一樣會自然耗損。這表示電池容量和運作時
間將會逐漸縮短。這屬於自然損耗現象,而非材料/生產問題
或產品瑕疵。
BBH3/BCH3
25,2V
普通模式: 整機配備電動地吸
用於一般清潔工作
最高可達55分鐘
高速模式: 整機配備電動地吸
或使用手持吸塵器進行高強
度清潔工作
最高可達20分鐘
圖
6
暫停吸塵時,本電器可以直立放在房間的各種位置。請將吸
塵器稍微朝地吸的方向推即可立起。
!
小心:電器在直立時必須關閉,如果立起時刷頭仍在轉
動,可能會造成地板表面受損。
使用手持式無線吸塵器
圖
7
按下手持式無線吸塵器的釋放按鈕解鎖,然後將它從吸塵器
本體中拆下。
使用配件吸塵
圖
8
可伸縮式狹縫吸頭
適合在難以觸及的地方和高於頭頂的位置吸塵。
使用凹槽式握把打開配件收納處並取下可伸縮式狹縫吸頭。
將它裝入手提式無線吸塵器的進氣口並卡至定位。
可伸縮式狹縫吸頭可視需要延伸。如要延伸,請按下解鎖按
鈕,拉出可伸縮式狹縫吸頭並卡入尾端。
使用後,請將可伸縮式狹縫吸頭收回並放入配件收納處,然
後將之收回原處。
圖
9
傢俱/軟墊二合一刷頭
配備雙重功能的傢俱/軟墊二合一刷頭,適合進行窗框、櫥
櫃、家具的吸塵等工作。
打開收納處並取出傢俱/軟墊二合一刷頭。將它裝入手提式無
線吸塵器上方的進氣口並卡至定位。
傢俱吸頭可水平推出。軟墊吸頭則位於其下方。
傢俱/軟墊二合一刷頭可以安裝在可伸縮式狹縫吸頭的前端。
使用後,將傢俱/軟墊二合一刷頭放回收納處存放,關上收納
處並卡至定位。
為手持式無線吸塵器充電
圖
10
要為手持式無線吸塵器充電,請將它插入吸塵器本體中並鎖
至定位。請確定已確實裝妥。
* 視機型而定:

17
清潔電動地吸
進行維護前,請先關閉吸塵器並將充電線拔除。
圖
17
利用毛刷桿釋放按鈕解開毛刷桿,然後將之從電動地吸的側
面拉出。
沿著隨附的槽溝,使用剪刀剪斷纏繞在刷頭上的線頭和毛
髮。
將毛刷桿從側面沿著毛刷桿固定導桿 推回地板工具中,並利
用釋放按鈕固定。
!
小心:電動地吸中必須裝有毛刷桿才能運作。
!
小心:
電動地吸會受到一定程度的磨損,依硬質地板的種類而定(例
如表面粗糙的瓷磗)。每隔一段時間必須檢查地板工具的底
部。地板工具底部因磨損所造成的尖銳表面,可能會造成實木
地板或亞麻地板等精緻的硬質地板表面受損。因電動地吸磨
損而造成的損壞,製造商概不負責。
保養
清潔吸塵器本體或手持式無線吸塵器前,必須關閉吸塵器並將充
電線拔除。您可以使用市售的一般塑膠清潔劑保養吸塵器和塑
膠配件。
!
小心:請勿使用具研磨效果的物品、玻璃清潔劑或多功能
清潔產品。切勿將吸塵器浸在水中。
本說明書可能因技術變更而修改。

18
DE Deutschland, Germany
BSH Hausgeräte Service GmbH
Zentralwerkstatt für kleine Hausgeräte
Trautskirchener Strasse 6-8
90431 Nürnberg
Online Auftragsstatus, Filterbeutel-
www.bosch-home.com
Reparaturservice, Ersatzteile & Zubehör,
AE United Arab Emirates,
BSH Home Appliances FZE
Jebel Ali Free Zone - Dubai
www.bosch-home.com/ae
AL Republika e Shqiperise, Albania
Elektro-Service sh.p.k
EXPERT Service
AM Armenia,
www.zigzag.am
AT Österreich, Austria
BSH Hausgeräte Gesellschaft mbH
1100 Wien
www.bosch-home.at
Reparaturservice, Ersatzteile & Zubehör,
Sie erreichbar.
AU Australia
www.bosch-home.com.au
Azerbaijan
Baku
www.ser-cen.az
www.optimal.az
BA Bosna i Hercegovina,
Bosnia-Herzegovina
BE Belgique, België, Belgium
www.bosch-home.be
BG Bulgaria
www.bosch-home.bg
BH Bahrain,
Khalaifat Est.
CA Canada
www.bosch-home.ca
CH Schweiz, Suisse,
Svizzera, Switzerland
BSH Hausgeräte AG
Bosch Hausgeräte Service
Reparaturservice, Ersatzteile & Zubehör,
www.bosch-home.ch
CN China,
中国江苏省南京市鼓楼区清江南路号幢
Gulou District,
Nanjing, Jiangsu Province
www.bosch-home.cn
CYN Turkish Rep. Of North Cyprus
Girne
DK Danmark, Denmark
Telegrafvej 4
EE Eesti, Estonia
www.renerk.ee
ES España, Spain
www.bosch-home.es
FI Suomi, Finland
-
Kundendienst – Customer Service
19
0,40 €
/ min
0,40 €
/ min
FR France
01 40 10 11 00
bosch-home.com
www.bosch-home.com/fr
GB Great Britain
Wolverton
please visit www.bosch-home.co.uk
Or call
GE Georgia,
Tbilisi
Central Branch Service
www.bosch-home.gr
HK Hong Kong,
ВࠑĥʆℽࡗнȔɢġઍęధ֛ة
Tsuen Wan, New Territories,
Hong Kong
www.bosch-home.com.hk
HR Hrvatska, Croatia
10000 Zagreb
www.bosch-home.com/hr
www.bosch-home.com/hu
IE Republic of Ireland
Walkinstown
please call
www.bosch-home.ie
IL Israel
1, Hamasger St.,
www.bosch-home.co.il
www.bosch-home.in
IS Iceland
Noatuni 4
www.sminor.is
IT Italia, Italy
www.bosch-home.com/it
JO Jordan,
Diab Qawasmi & Sons Co.
Amman
KG
Jibek Jolu str. 40
Bishkek
KR Republic Korea,
Daehan Minguk,
LB Lebanon,
LT Lietuva, Lithuania
www.agservice.lt
www.balticcontinent.lt
UAB Emtoservis
www.emtoservis.lt
LU Luxembourg
www.bosch-home.com/lu
LV Latvija, Latvia
www.serviscentrs.lv
1004 Riga
www.koroso.lv
Katlakalna 1
www.emta.lv
Sia Elektronika-Serviss
1004 Riga
www.elektronika.lv
MD Moldova
ME Crna Gora, Montenegro
Elektronika komerc
20
GORENEC
1000 Skopje
MT Malta
MV Raajjeyge Jumhooriyyaa,
Maledives
www.lintel.com.mv
NL Nederlande, Netherlands
Taurusavenue 36
www.bosch-home.nl
NO Norge, Norway
Grensesvingen 9
0661 Oslo
www.bosch-home.no
NZ New Zealand
Smales Farm Business Park
Takapuna
www.bosch-home.co.nz
PK Pakistan,
Plaza 46-A, Commercial Sector XX,
Phase 3, DHA
www.megahome.pk
PL Polska, Poland
Domowego Sp. z o.o.
Al. Jerozolimskie 183
www.bosch-home.pl
PT Portugal
www.bosch-home.pt
RO România, Romania
BSH Electrocasnice srl.
www.bosch-home.ro
www.bosch-home.com
SA Kingdom Saudi Arabia,
www.aljelectronics.com.sa
SE Sverige, Sweden
BSH Home Appliances AB
www.bosch-home.se
SG Singapore,
38C Jalan Pemimpin, #01-01
www.bosch-home.com.sg
SI Slovenija, Slovenia
www.bosch-home.com/si
SK Slovensko, Slovakia
TH Thailand,
Bangkok, 10310
www.bosch-home.com/th
TJ Tadschikistan, Ҷ
ҷ
Dushanbe
Dushanbe
www.volna.tj
TM Türkmenistan, Turkmenistan
Ashgabat
TR Türkiye, Turkey
www.bosch-home.com/tr
TW Taiwan,
台湾
āĵʿ๐ǷăבĀȈϱ֡뻟
ශઅͱ˖ө뻟DzઅϢ˖ʖϠ
хЀʯܯҟŔى8011֛
11F., No.80, Zhouzi St., Neihu Dist.
www.bosch-home.com.tw
www.bosch-home.com.ua
UZ O‘zbekiston Respublikasi,
Republic of Uzbekistan
Tashkent
XK Kosovo
Service-General SH.P.K.
XS Srbija, Serbia
www.bosch-home.rs
ZA South Africa
www.bosch-home.com/za
21
en
This appliance is labelled in accordance with European
Directive 2012/19/EU concerning used electrical and
electronic appliances (waste electrical and electronic
equipment - WEEE). The guideline determines the fra-
mework for the return and recycling of used applian-
ces as applicable throughout the EU.
hu
zf
本設備說明是根據歐洲電子及電氣舊設備準則
2012/19/EU(廢棄電子及電氣設備WEEE)。
此準則提供於歐盟成員對舊設備之報廢或使用標準。

22
Conditions of guarantee
For this appliance the guarantee conditions as set
out by our representatives in the country of sale
apply. Details regarding same may be obtained
from the dealer from whom the appliance was
purchased. For claims under guarantee the sales
receipt must be produced.
ZF 本產品適用本公司駐購買國代表所發佈的保固條款。您隨時可向購買本產品的經銷商諮詢
相關細節。在任何情況下,出示購買證明均是獲得保修服務的必要的條件。
GB
23
24
Robert Bosch Hausgeräte GmbH
Carl-Wery-Straße 34
81739 München
GERMANY
www.bosch-home.com
Register your new device on MyBosch now and profit directly from:
-*#$&&#%&$%"$+"'$##!
-$$!&+*&!%"!"#&"!%
-%"'!&%"$%%"$%%#$#$&%
-& !'!##!&&!
-%+%%&""%" ##!%$(
Free and easy registration – also on mobile phones:
)))"%" " )"
Expert advice for your Bosch home appliances, need help with problems
or a repair from Bosch experts.
Find out everything about the many ways Bosch can support you:
)))"%" " %$(
"!&&&""'!&$%$%&!&&&%$($&"$+
!+"'"$'+!
"%" ##!
""!"$#
"'.,!&$
8001204367
010319
博西家用電器股份有限公司
台北市內湖區洲子街80 號11 樓
客服專線: 0800-368-888
www.bosch-home.com.tw
Valid within Great Britain:
Imported to Great Britain by BSH Home Appliances Ltd.
Grand Union House
Old Wolverhampton Road
Wolverhampton, Milton Keynes
MK12 5PT
United Kingdom