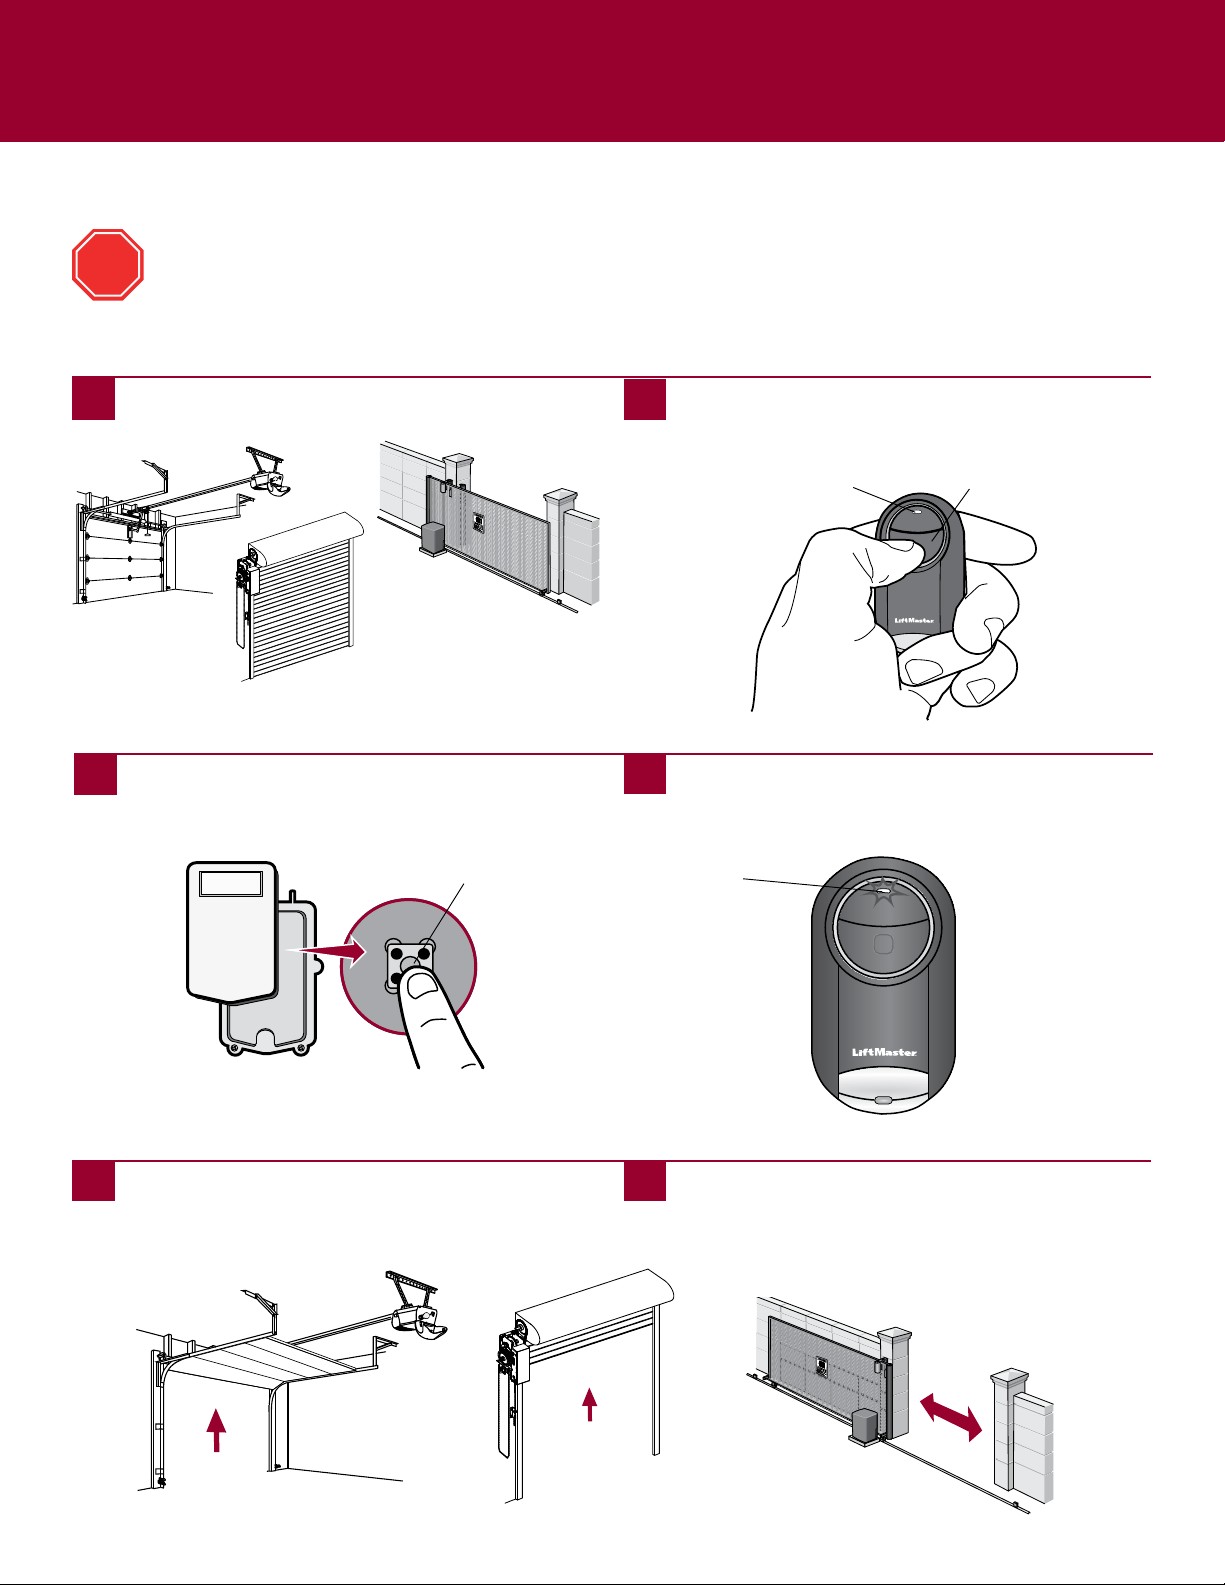
To prevent possible SERIOUS INJURY or DEATH from a moving gate or door:
• ALWAYSkeepremotecontrolsoutofreachofchildren.NEVERpermitchildrentooperate,orplaywithremotecontrol
transmitters.
• ActivategateordoorONLYwhenitcanbeseenclearly,isproperlyadjustedandtherearenoobstructionstodoortravel.
• ALWAYSkeepgateordoorinsightuntilcompletelyclosed.NEVERpermitanyonetocrosspathofmovinggateordoor.
Universal Mini Remote Control
Read instructions thoroughly BEFORE beginning.
If using the Universal Mini Remote Control with residential door openers, the remote control must be used only
with door openers manufactured after 1993 that utilize photoelectric sensors. The photoelectric sensors are
always located on or near the bottom of the door track.
STOP
MODEL 374UT
TABLE OF CONTENTS
GETTING STARTED .................................................... 2
LOCATE THE PROGRAM/LEARN BUTTON ........................ 3-7
Chamberlain
®
products ............................................. 3
Genie
®
products ..................................................... 4
Linear
®
products ..................................................... 5
Wayne Dalton
®
products ........................................... 5
LiftMaster
®
products ................................................ 6
Overhead Door
®
products .......................................... 6
Stanley
®
products ................................................... 7
GARAGE DOOR OPENERS .......................................... 8-9
Programming to a garage door opener with a
Program/LEARN button ............................................. 8
Programming to a Genie
®
Intellicode
®
2
garage door opener ................................................. 9
Programming to a LiftMaster garage door opener using
the LEARN button on the control panel ......................... 10
COMMERCIAL DOOR OPERATORS ................................. 11
Programming to a commercial door operator
with a RADIO button................................................ 11
GATE OPERATORS .................................................... 12
Program to a gate operator
with a Program/LEARN button .................................... 12
EXTERNAL RECEIVERS ............................................... 13
Programming to an external receiver
with a Program/LEARN button .................................... 13
MYQ
®
LIGHT CONTROLS ............................................ 14
Programming to a MyQ
®
Light Control .......................... 14
NEED HELP? ........................................................... 15
BATTERY ............................................................... 16
2
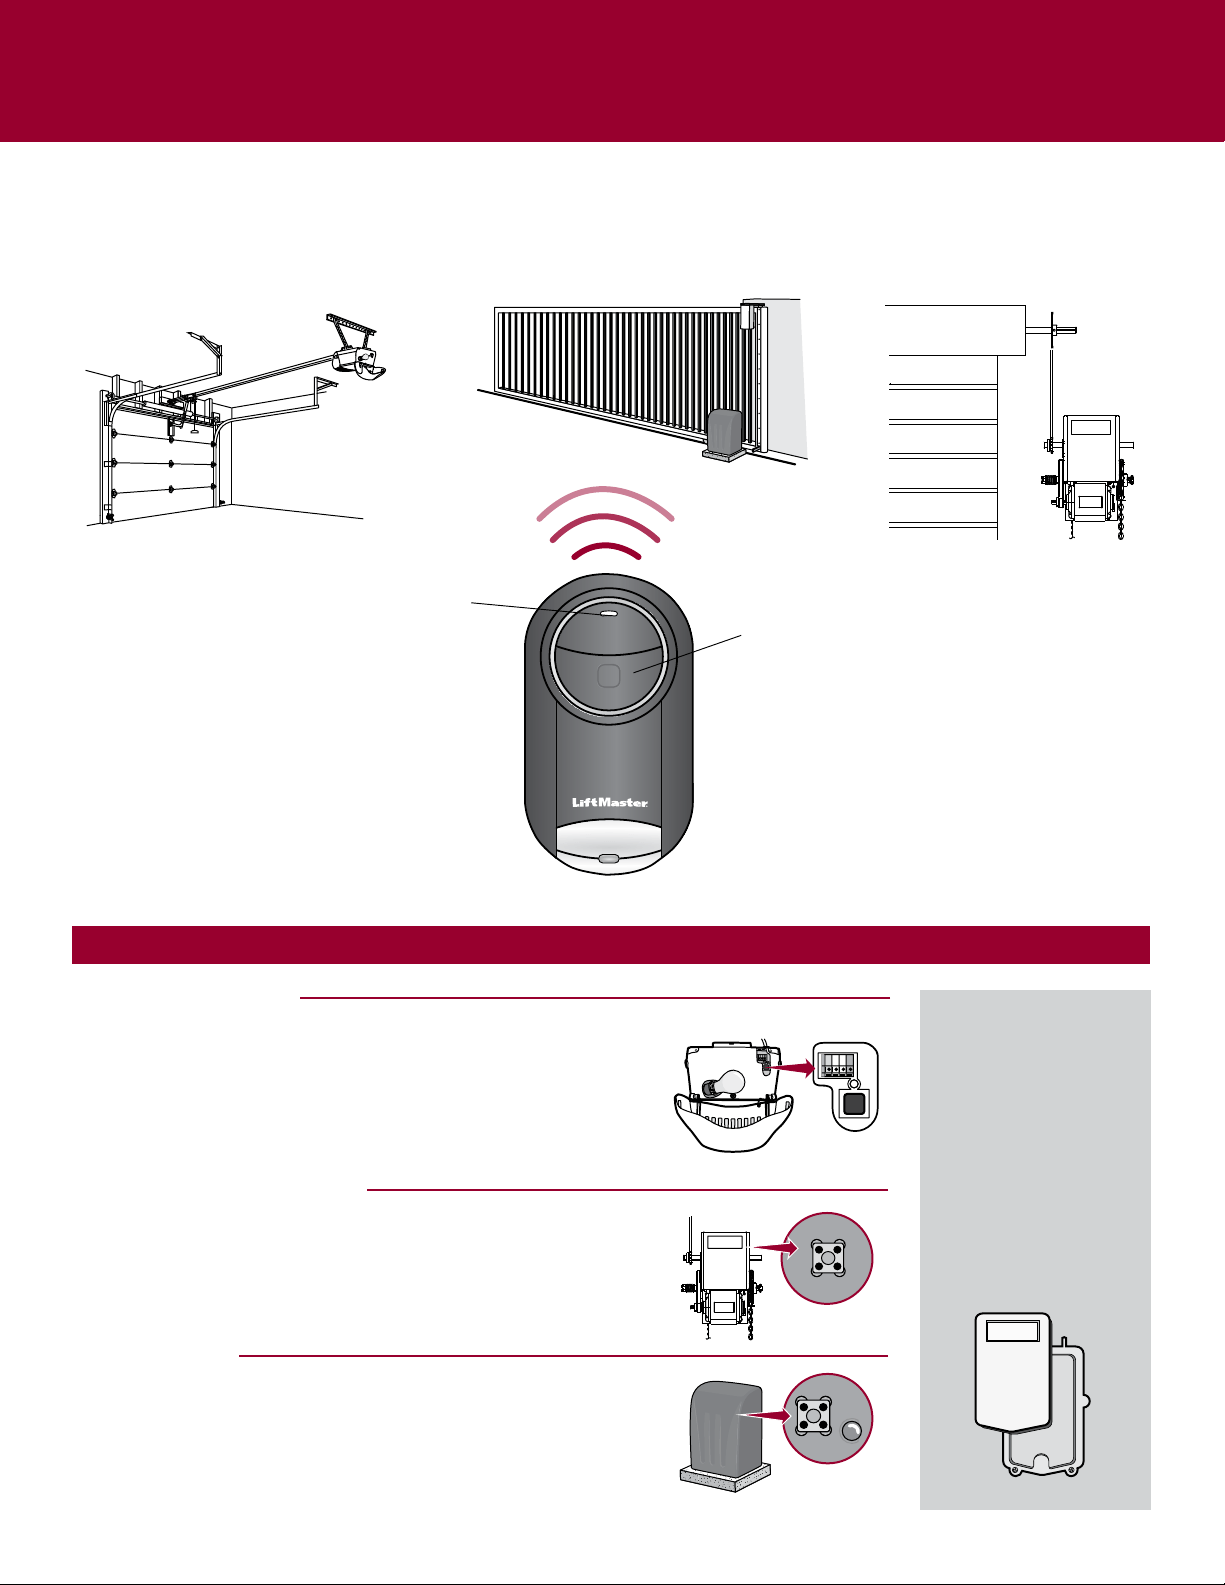
GETTING STARTED
The Universal Mini Remote Control can be programmed to activate up to two products, such as a garage door opener, MyQ
®
light
control, gate operator, or commercial door operator. Each button on the remote control works independently of the other and must
be programmed separately. The images throughout this manual are for reference only and your product may look different.
Bottom Button
Garage Door Opener
Commercial Door OperatorGate Operator
LED
You will need to locate the Program/LEARN button on your product before you start programming.
GARAGE DOOR OPENERS
TheProgram/LEARNbuttonistypicallylocatedonthebackorsidepanel
ofyourgaragedooropener.YourProgram/LEARNbuttonmayhavea
differentname(SMARTbutton,SETbutton,etc.).Forhelplocatingyour
Program/LEARNbuttonrefertotheTableofContentsinthismanualor
contactyourgaragedooropenermanufacturer.
COMMERCIAL DOOR OPERATORS
TheRADIObuttonistypicallylocatedonthelogicboardofyouroperator.
ForhelplocatingyourRADIObuttoncontactyourdooroperator
manufacturer.
GATE OPERATORS
TheProgram/LEARNbuttonistypicallylocatedonthecontrolboardof
youroperator.YourProgram/LEARNbuttonmayhaveadifferentname
(RADIObutton,XMITTERbutton,etc.).ForhelplocatingyourProgram/
LEARNbuttoncontactyourgateoperatormanufacturer.
EXTERNAL RECEIVER
Someproductsdonot
haveaProgram/LEARN
button.Inthiscase,the
Program/LEARNbutton
willbelocatedinan
externalreceiver.The
receiverwillbelocatedon
theproductormounted
nearby.Followthe
programminginstructions
foranexternalreceiver.
3
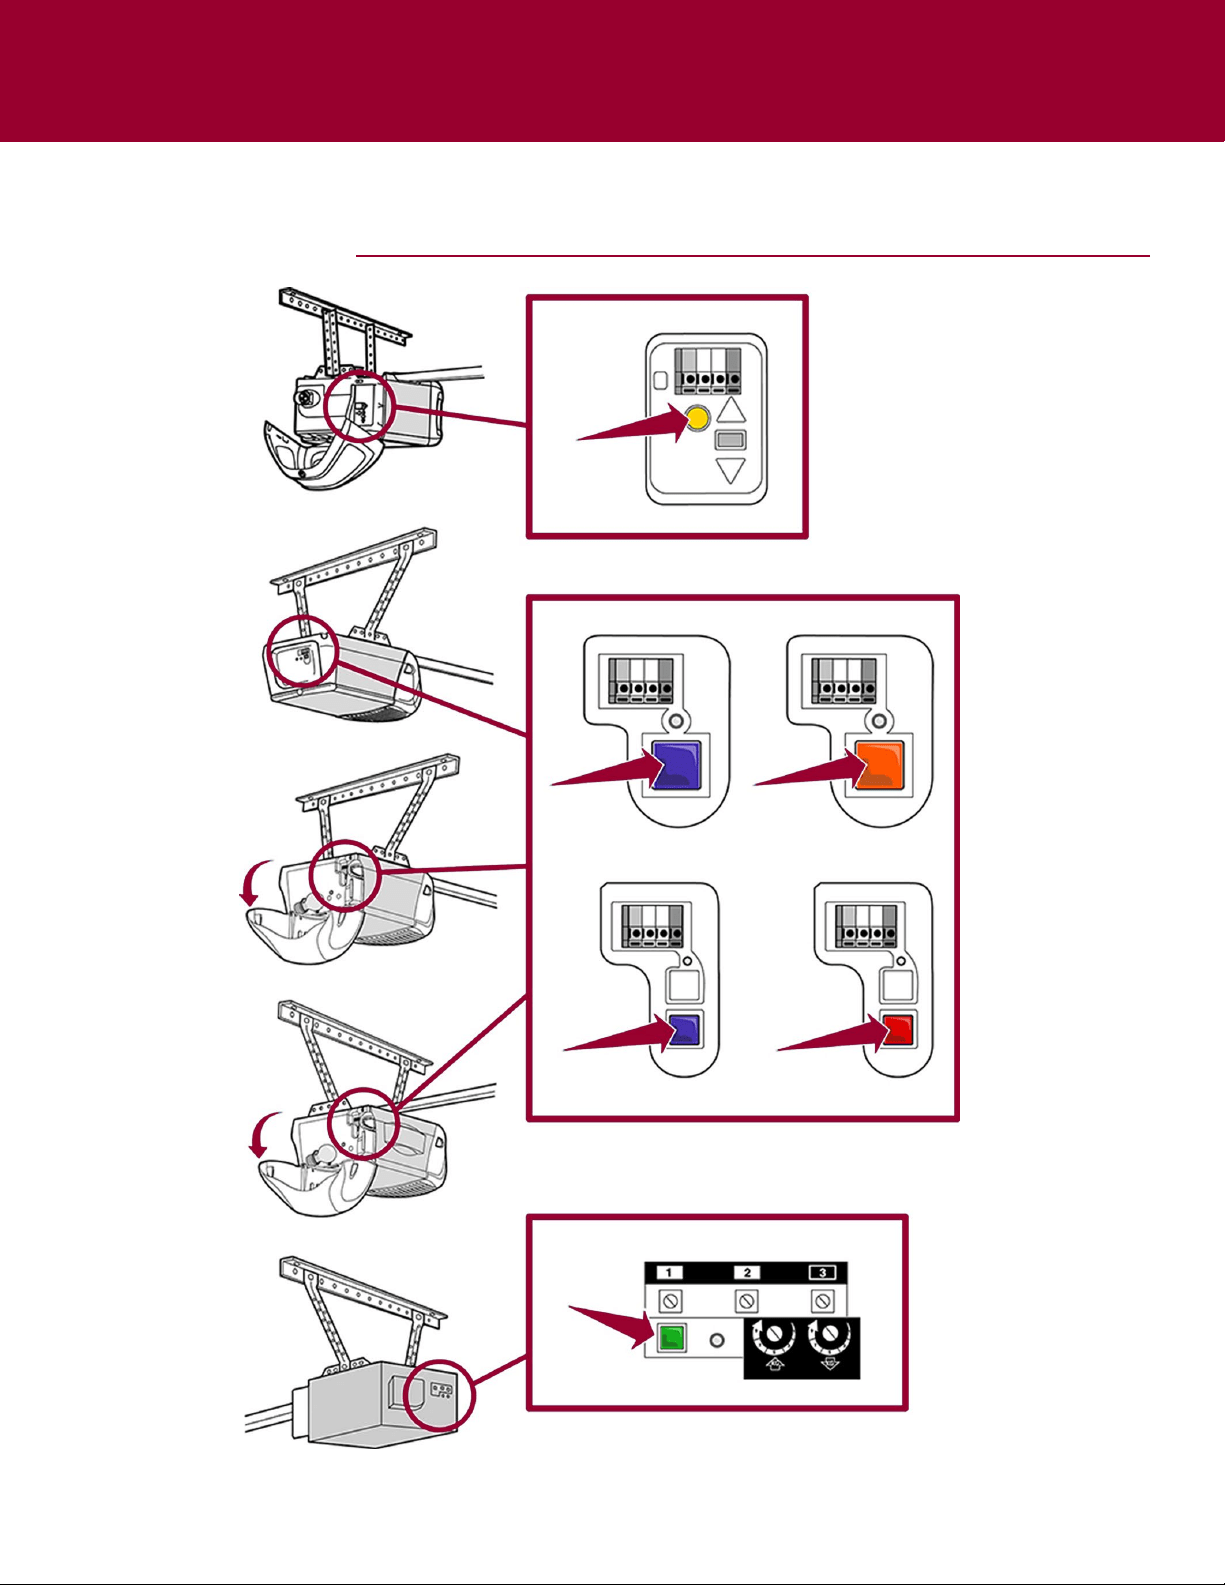
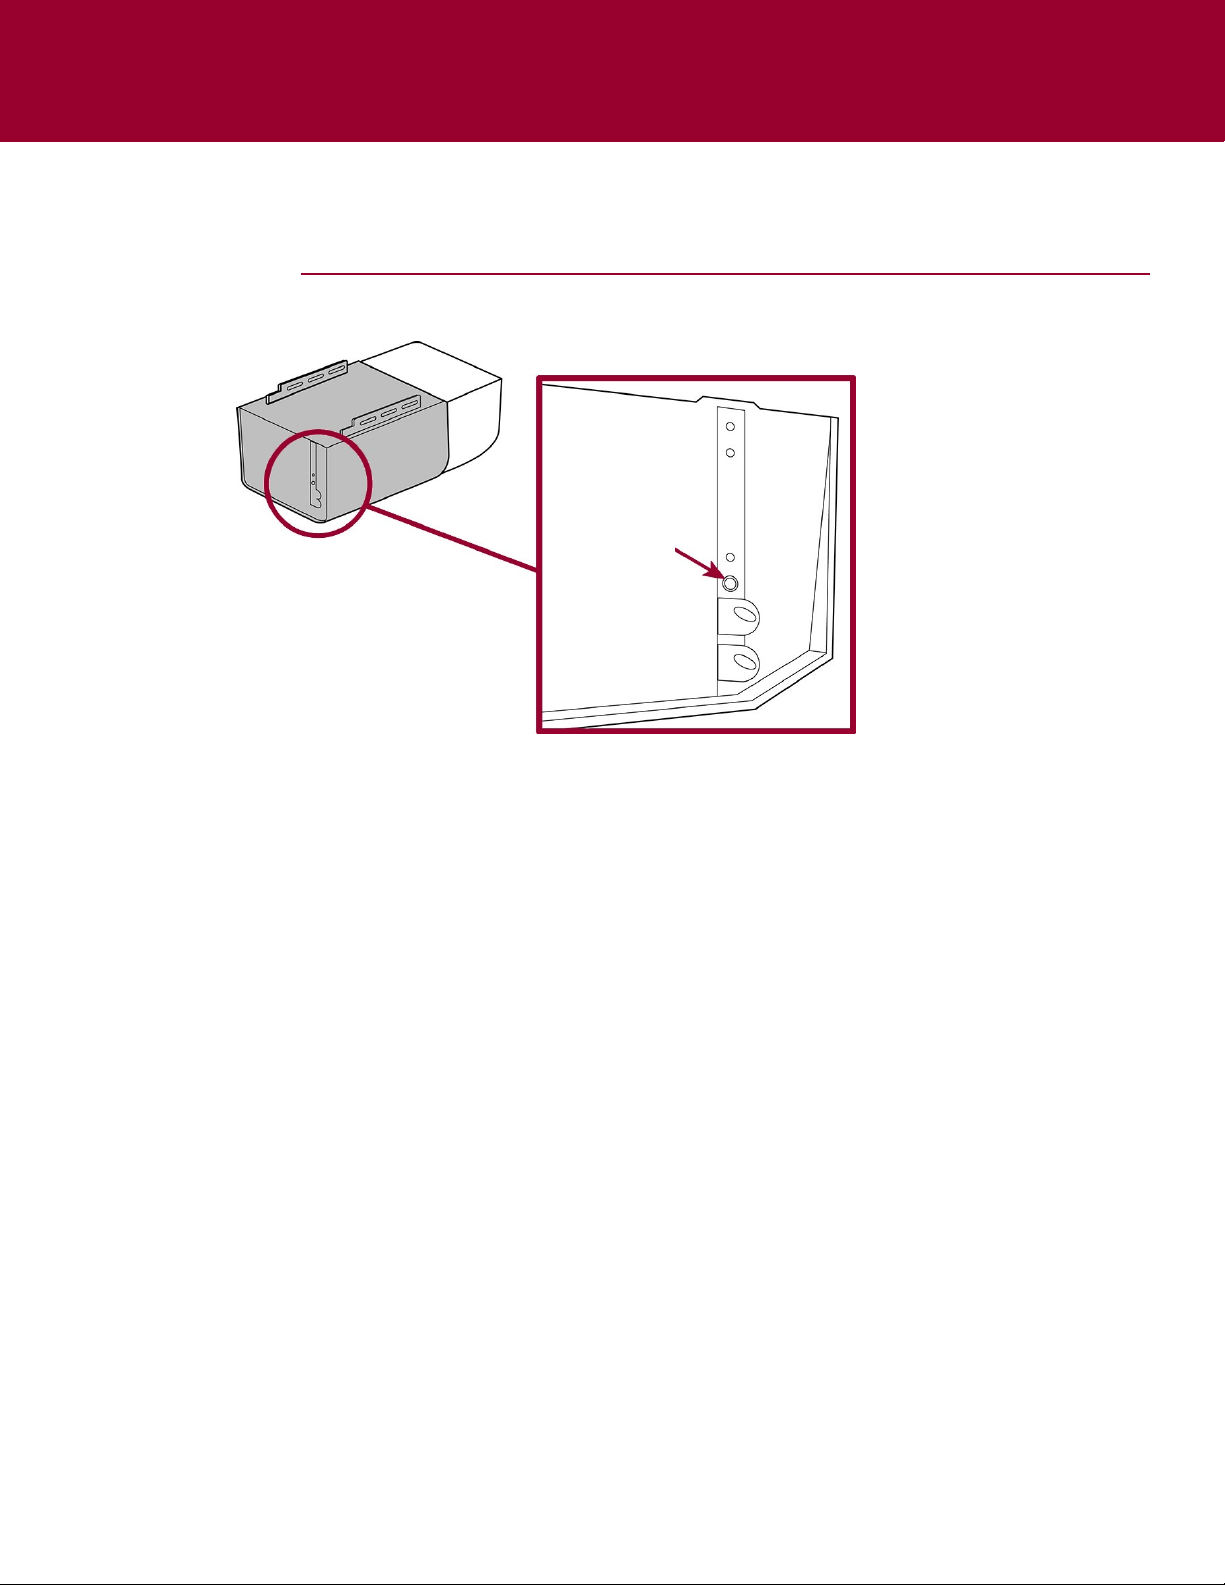
LOCATE THE PROGRAM/LEARN BUTTON
CHAMBERLAIN PRODUCTS
4
LOCATE THE PROGRAM/LEARN BUTTON
LearnCode
Button
ProgramSetButton
GENIE PRODUCTS
5
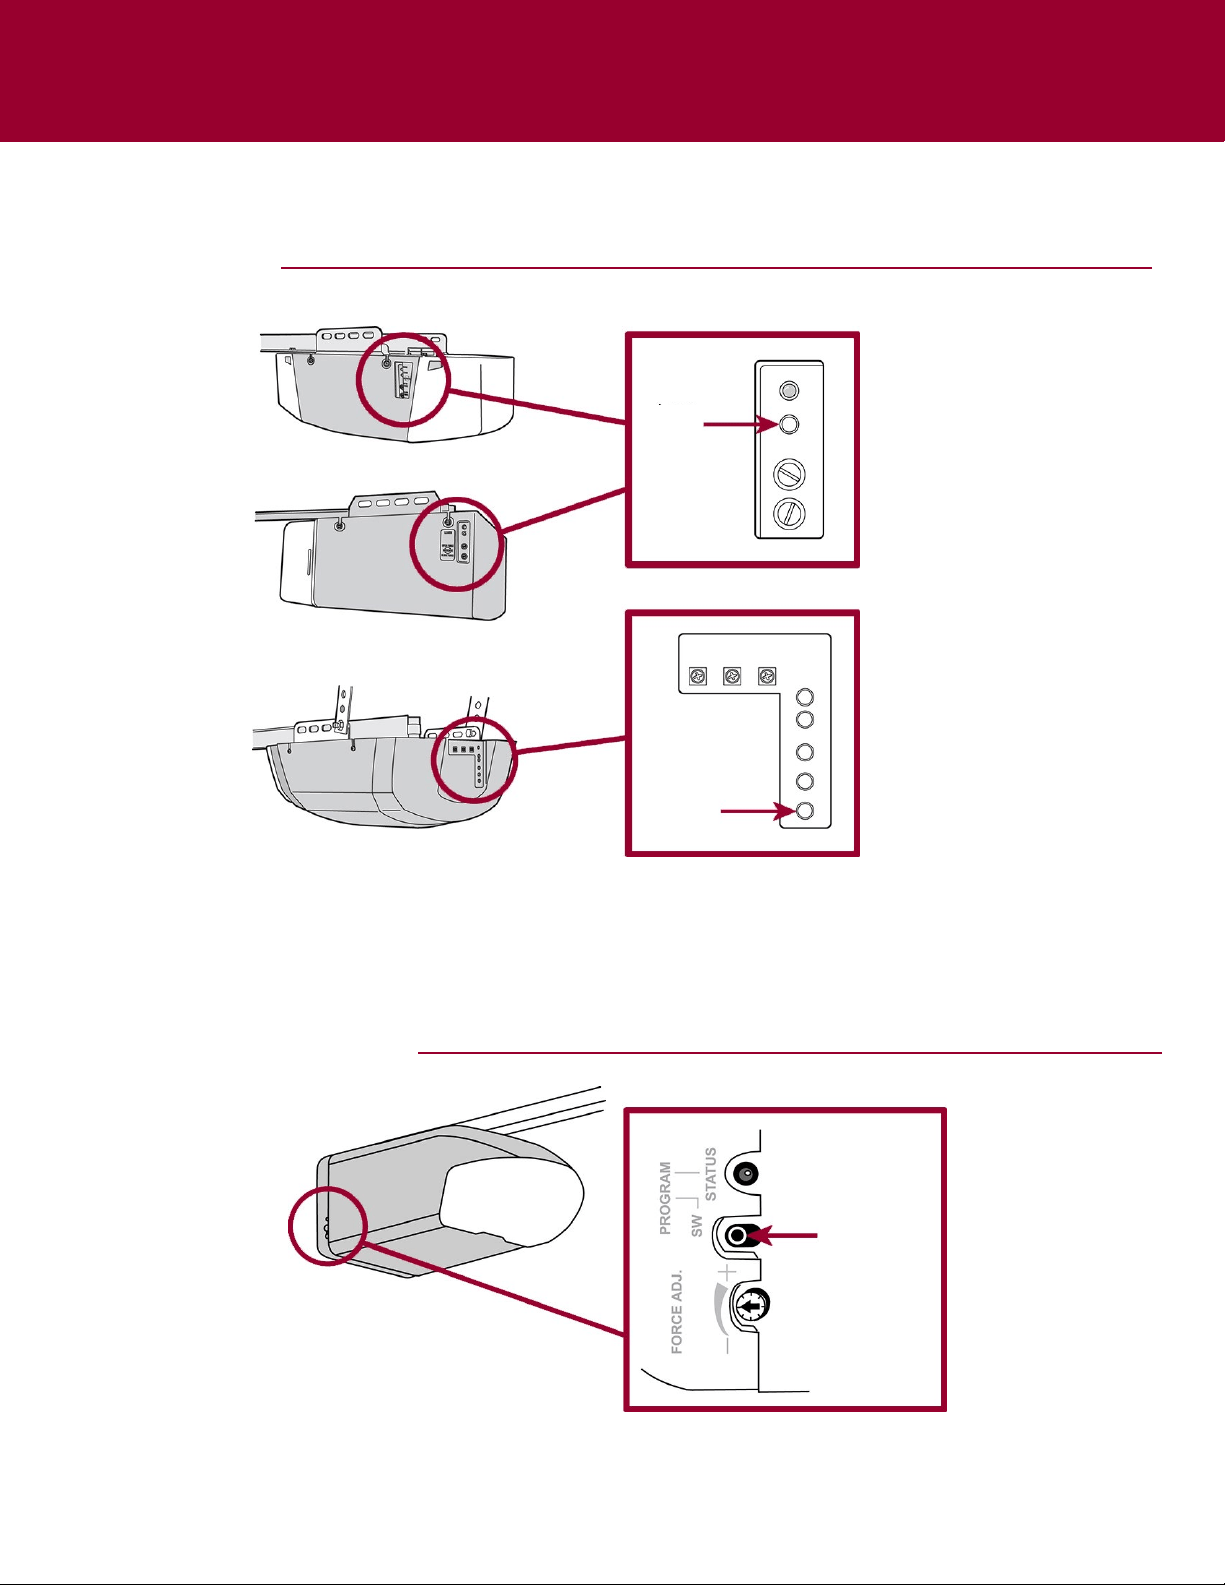
LOCATE THE PROGRAM/LEARN BUTTON
LINEAR PRODUCTS
Learn
Button
Learn
Button
ProgramSW
Button
WAYNE-DALTON PRODUCTS
6
Control Panel
LOCATE THE PROGRAM/LEARN BUTTON
LIFTMASTER PRODUCTS
OVERHEAD DOOR PRODUCTS
YellowLearn
Button
PurpleLearn
Button
OrangeLearn
Button
GreenLearn
Button
PresstheLEARN
buttontwice.
LearnCode
Button
7
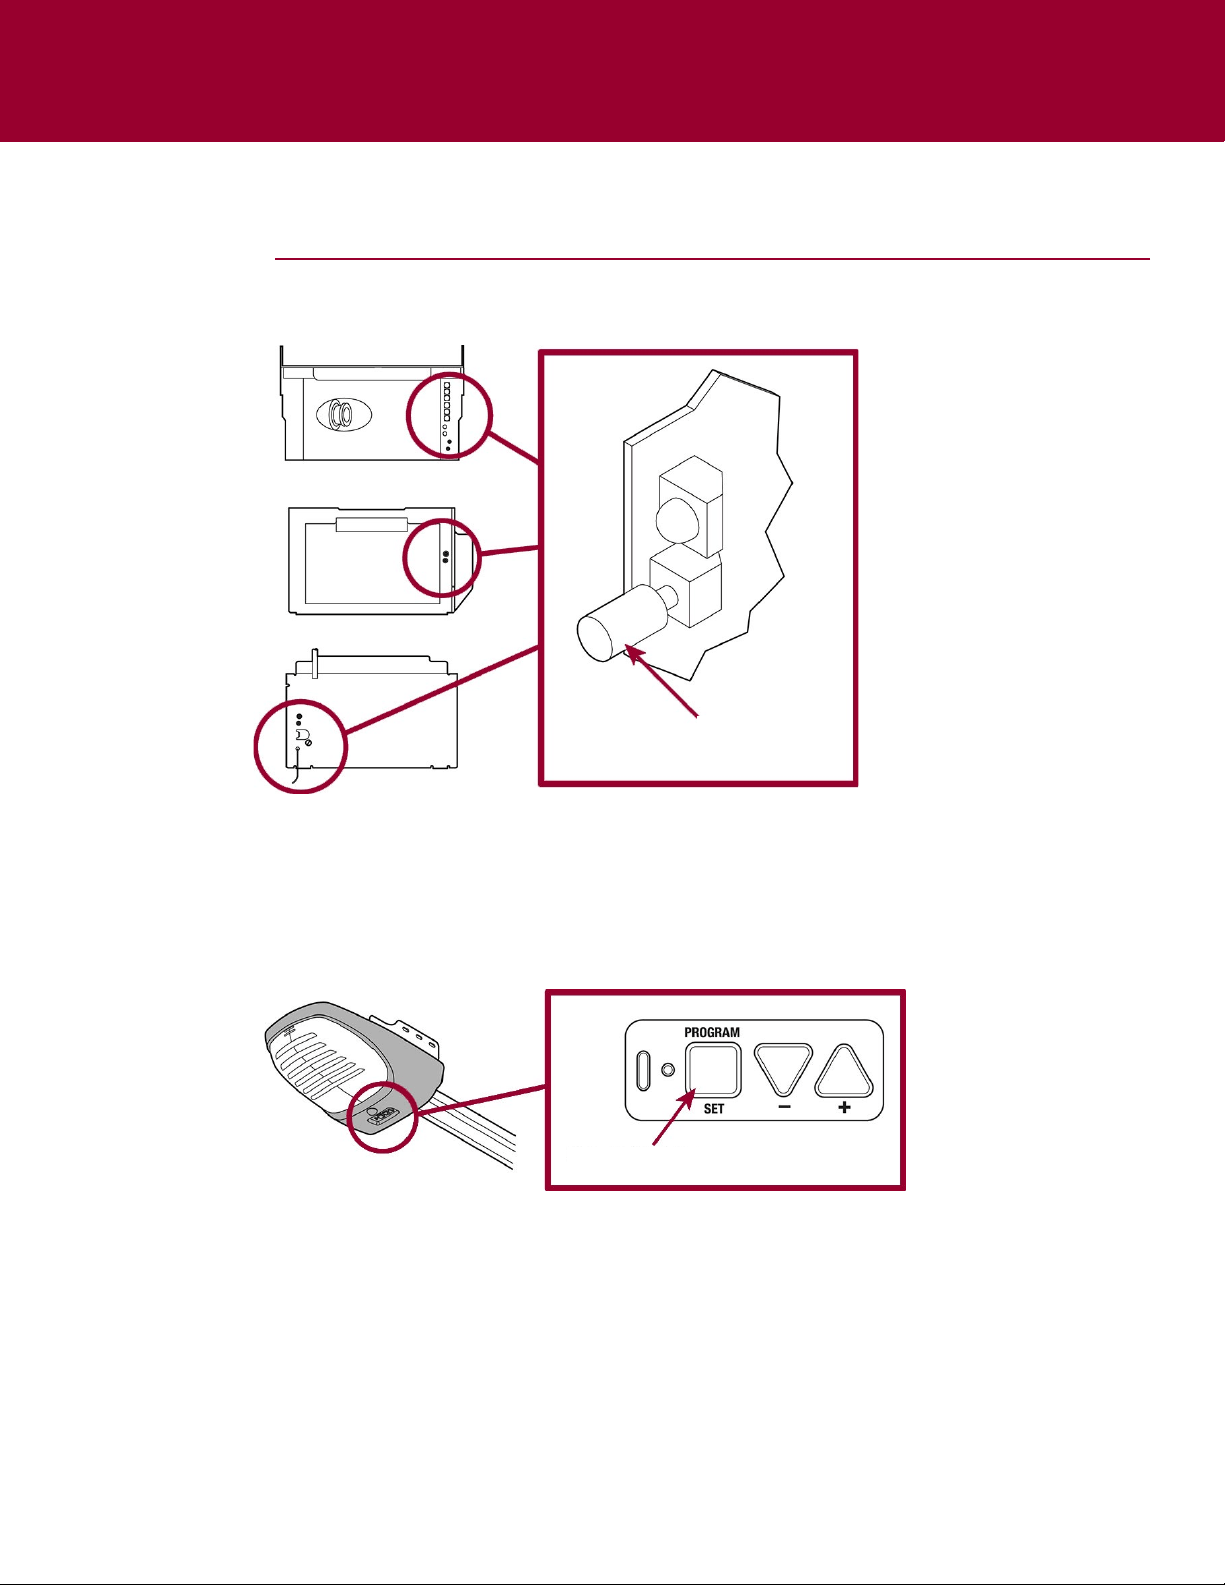
LOCATE THE LEARN BUTTON
STANLEY PRODUCTS
LearnButton
8
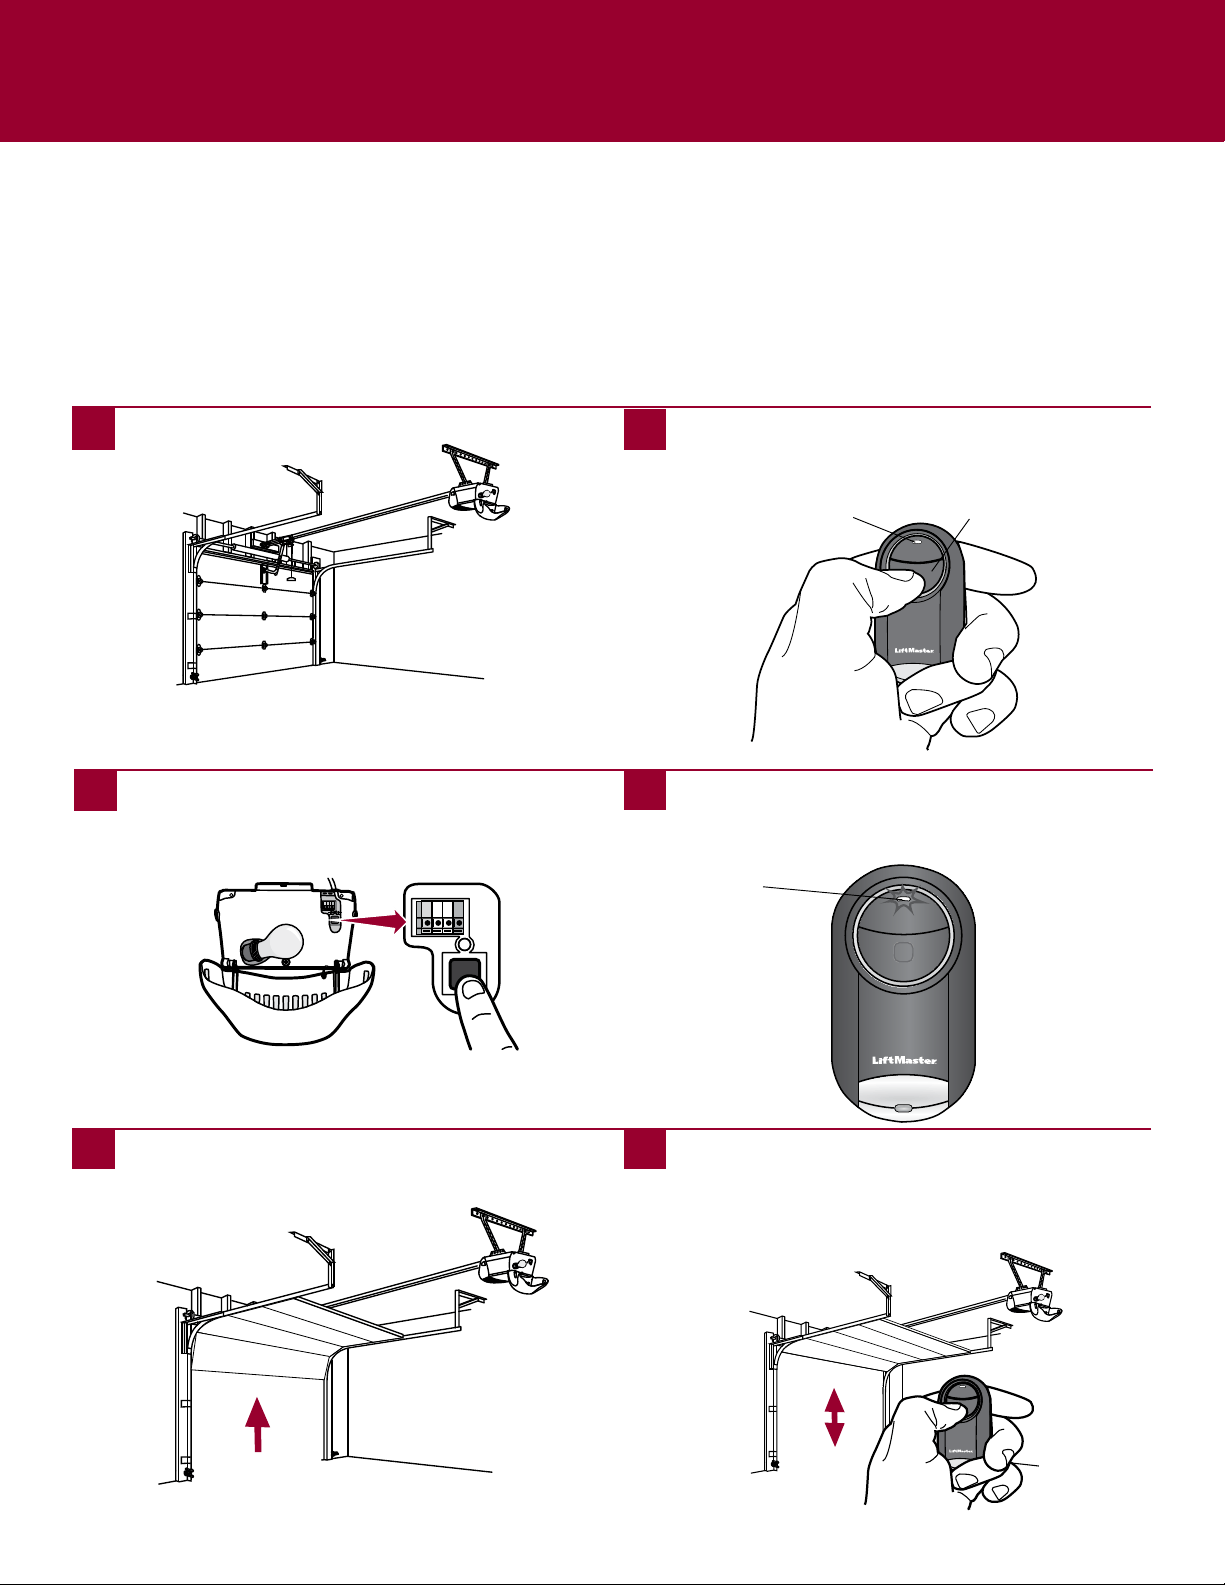
GARAGE DOOR OPENERS
Programming to a Garage Door Opener with a Program/LEARN Button
The Program/LEARN button is typically located on the back or side panel of the garage door opener or an external receiver. For
help locating your Program/LEARN button contact your garage door opener manufacturer.
If you have a LiftMaster or Chamberlain branded garage door opener with a yellow learn button, press and release the learn
button, then press and hold the button on the remote control you would like to use. If programming is not successful, proceed
through the steps below.
If you have a Genie
®
Intellicode
®
2 garage door opener go to the next page.
Theimagesthroughoutthismanualareforreferenceonlyandyourproductmaylookdifferent.
BottomButton
1
Startwithyourgaragedoorclosed.
2
Pressandholdbottombuttonontheremotecontroluntil
theblueLEDstayssolid(approximately15seconds)then
releasethebutton.
3
PressandreleasetheProgram/LEARNbuttononyour
garagedooropener.
4
Ontheremotecontrol,pressandreleasethebuttonthat
youwouldliketoprogramtwice.TheblueLEDwillblink
forupto60seconds.
5 6
Waitforthegaragedoortomove,thenpressandrelease
eitherofthebuttonsontheremote.
LED
Testtheremotecontrolbypressingthebuttonyou
programmedinstep4.Ifthegaragedooropenerdoesnot
activate,repeattheprogrammingsteps.
IMPORTANT: The remote will activate your garage door during
programming. Ensure garage door is clear of ALL obstructions.
LED
9
Programming to a Genie
®
Intellicode
®
2 Garage Door Opener
Before starting, you MUST have an existing Genie
®
Intellicode
®
2 remote control programmed to the garage door opener. For help
programming a Genie Intellicode 2 remote control, see your owner’s manual.
Theimagesthroughoutthismanualareforreferenceonlyandyourproductmaylookdifferent.
GARAGE DOOR OPENERS (continued)
1 2
3
4
Onthegaragedooropener,pressandholdthe
Program/SetbuttonuntilboththelongandshortLED’s
lightupBLUE.
5
WaitfortheroundLEDonthegaragedooropenerto
flashBLUEthenpressandreleaseeitherofthebuttons
ontheremote.
6
PressandreleasetheProgram/Setbuttonandthelong
LEDwillflashPURPLE.
7
8
OntheGenie
®
remotecontrol,pressandreleasethe
buttonthatisalreadyprogrammedtothegaragedoor
opener.BothLED’swillflashPURPLE.
BottomButton
Startwithyourgaragedoorclosed. Pressandholdbottombuttonontheremotecontroluntil
theblueLEDstayssolid(approximately15seconds)then
releasethebutton.
Ontheremotecontrol,pressandreleasethebuttonthat
youwouldliketoprogram3times.TheblueLEDwillblink
forupto60seconds.
Thegaragedoorwillopen.
LED
Testtheremotecontrolbypressingthebuttonyou
programmedinstep7.Ifthegaragedooropenerdoesnot
activate,repeattheprogrammingsteps.
IMPORTANT: The remote will activate your garage door during
programming. Ensure door is clear of ALL obstructions.
LED

10
Programming to a LiftMaster Garage Door Opener Using the LEARN Button on the
Control Panel
IfyouhaveaLiftMasterorChamberlainbrandedcontrolpanel,pressandreleasetheLEARNbuttontwice,thenpressandholdthebuttonontheremotecontrolyou
wouldliketouse.Ifprogrammingisnotsuccessful,followthestepsbelow.
Theimagesthroughoutthismanualareforreferenceonlyandyourproductmaylookdifferent.
BottomButton
1
Startwithyourgaragedoorclosed.
2
Pressandholdbottombuttonontheremotecontroluntil
theblueLEDstayssolid(approximately15seconds)then
releasethebutton.
3
PressthecontrolpanelLEARNbuttontwice,theredlearn
LEDwillturnon.
4
Ontheremotecontrol,pressandreleasethebuttonthat
youwouldliketoprogramtwice.TheblueLEDwillblink
forupto60seconds.
5 6
Waitforthegaragedoortomove,thenpressandrelease
eitherofthebuttonsontheremote.
LED
Testtheremotecontrolbypressingthebuttonyou
programmedinstep4.Ifthegaragedooropenerdoesnot
activate,repeattheprogrammingsteps.
IMPORTANT: The remote will activate your garage door during
programming. Ensure garage door is clear of ALL obstructions.
LED
GARAGE DOOR OPENERS (continued)
11
COMMERCIAL DOOR OPERATORS
Programming to a Commercial Door Operator with a RADIO Button
The RADIO button is typically located on the logic board of the operator or an external receiver. For help locating your RADIO
button contact your commercial door operator manufacturer.
Theimagesthroughoutthismanualareforreferenceonlyandyourproductmaylookdifferent.
RADIOButton
RADIOLED
RADIOButton
BottomButton
1
Startwithyourcommercialdoorclosed.
2
Pressandholdbottombuttonontheremotecontroluntil
theblueLEDstayssolid(approximately15seconds)then
releasethebutton.
3
PressandreleasetheRADIObuttononyourcommercial
dooroperator.TheRADIOLEDwillilluminate.
WaittoseeiftheLEDontheoperatorflashesrapidly,
indicatingtheremotecontrolisprogrammedtothe
operator.PressandreleasetheRADIObuttononyour
commercialdooroperatortoexitprogrammingmode.
4
Ontheremotecontrol,pressandreleasethebuttonthat
youwouldliketoprogramtwice.TheblueLEDwillblink
forupto60seconds.
5 6
Waitforcommercialdoortomove,thenpressandrelease
eitherbuttonontheremotecontroltoexitprogramming
mode.
LED
Testtheremotecontrolbypressingthebuttonyou
programmedinstep4.Ifthecommercialdooroperator
doesnotactivate,repeattheprogrammingsteps.
IMPORTANT: The remote will
activate your commercial door
during programming. Ensure
door is clear of ALL
obstructions.
7
LED

12
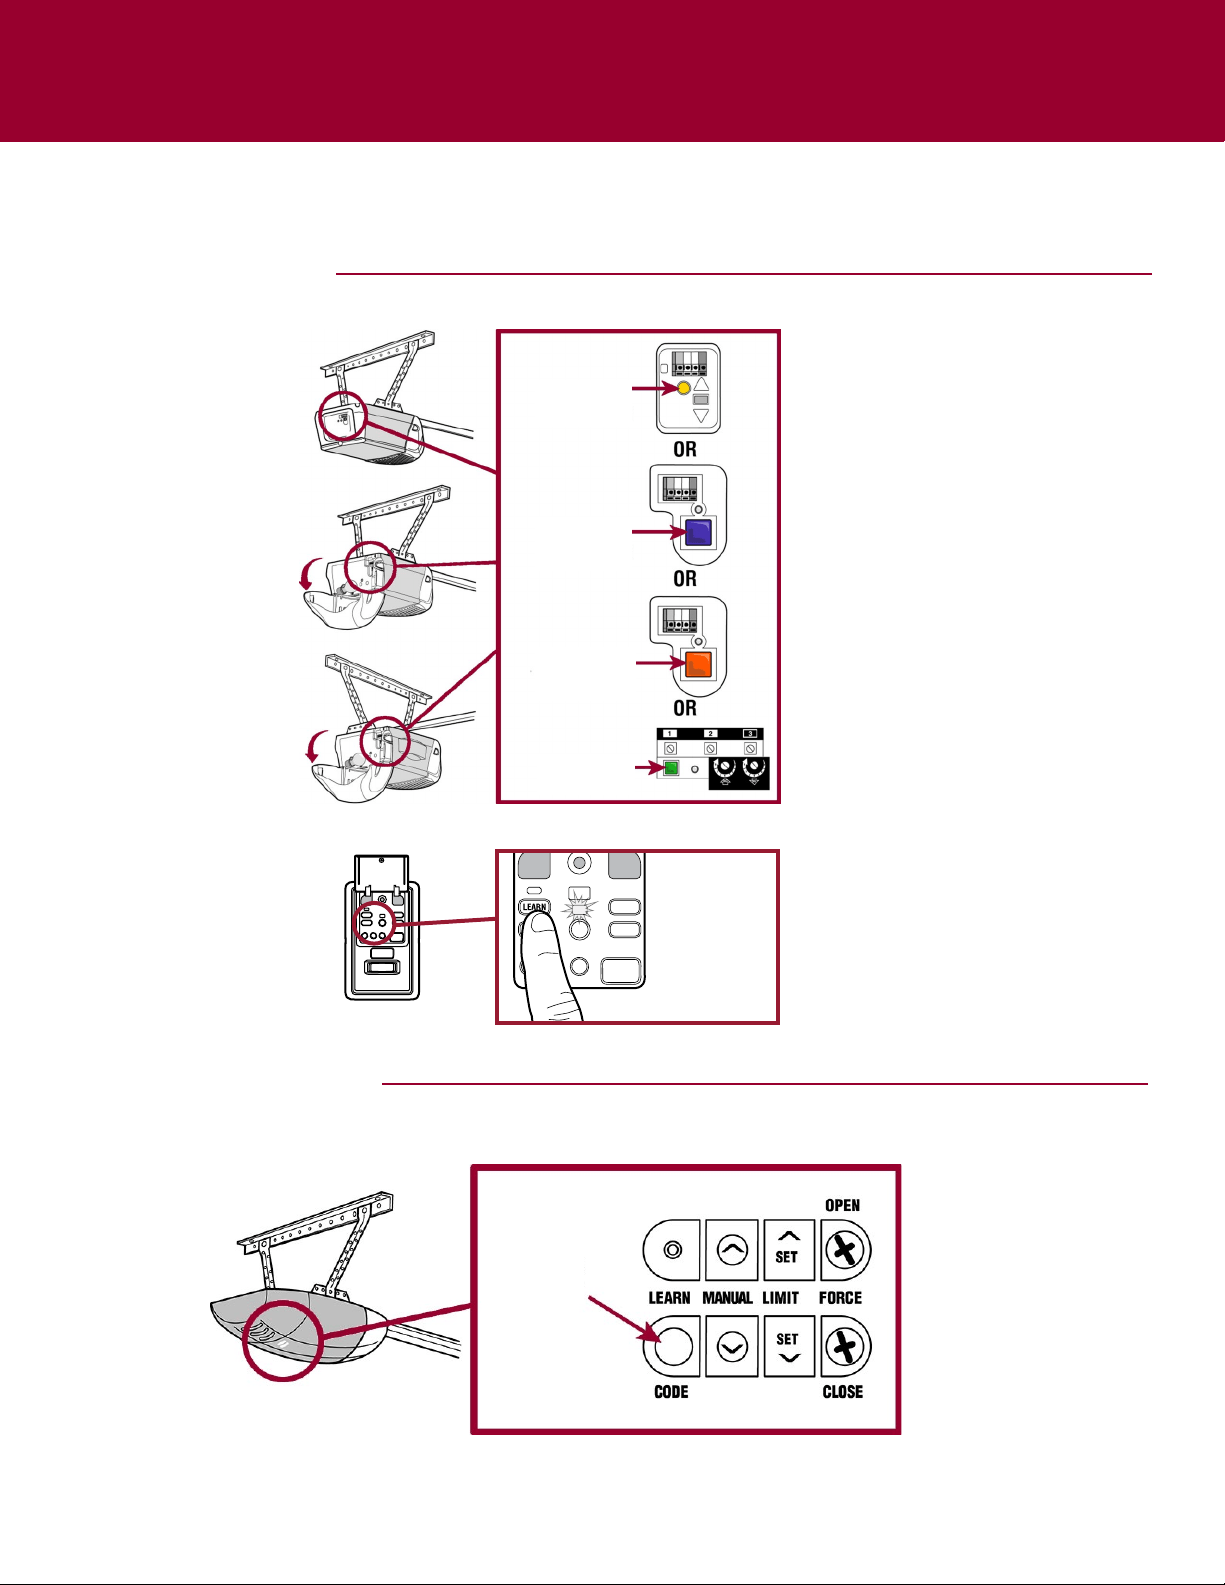
Programming to a Gate Operator with a Program/LEARN Button
The Program/LEARN button is typically located on the control board of the operator or an external receiver. For help locating your
Program/LEARN button contact your gate operator manufacturer.
Theimagesthroughoutthismanualareforreferenceonlyandyourproductmaylookdifferent.
GATE OPERATORS
PressandreleasetheProgram/LEARNbutton*onyour
gateoperator.TheProgram/LEARNLEDwillilluminate.
Program/LEARN
Button*
*Dependingonyourproduct,theProgram/LEARNbuttonmayhaveadifferent
name(usethebuttonforprogrammingremotecontrols).
BottomButton
1
Startwithyourgateclosed.
2
Pressandholdbottombuttonontheremotecontroluntil
theblueLEDstayssolid(approximately15seconds)then
releasethebutton.
3
4
Ontheremotecontrol,pressandreleasethebuttonthat
youwouldliketoprogramtwice.TheblueLEDwillblink
forupto60seconds.
5 6
Waitforthegatetomoveortheprogram/LEARNLEDon
thegateoperatorblinks,thenpressandreleaseeitherof
thebuttonsontheremote.
LED
Testtheremotecontrolbypressingthebuttonyou
programmedinstep4.Ifthegateoperatordoesnot
activate,repeattheprogrammingsteps.
IMPORTANT: The remote will activate your gate during
programming. Ensure gate is clear of ALL obstructions.
LED
Program/LEARN
LED
13
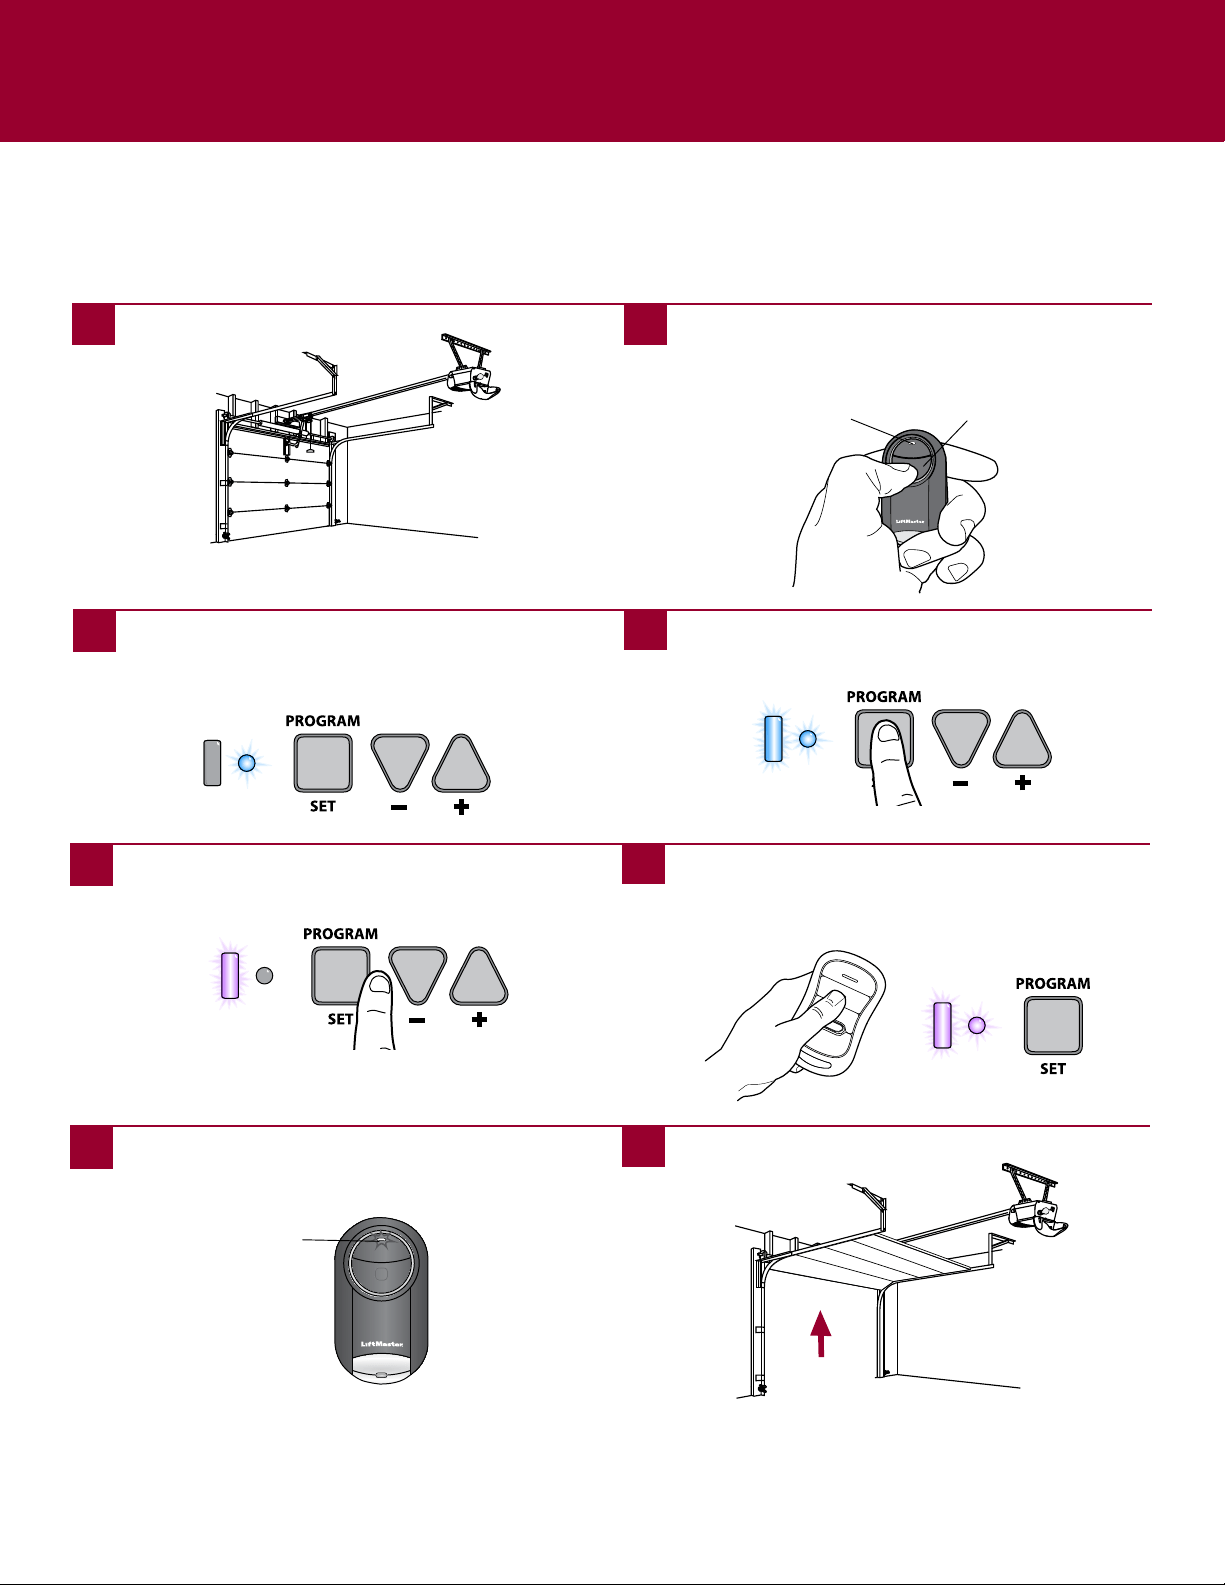
Programming to an External Receiver with a Program/LEARN Button
EXTERNAL RECEIVERS
PressandreleasetheProgram/LEARNbutton*onthe
externalreceiver.
Program/LEARN
Button*
If using the Universal Mini Remote Control with residential door openers, the remote control must be used only with
door openers manufactured after 1993 that utilize photoelectric sensors. The photoelectric sensors are always located
on or near the bottom of the door track.
The external receiver is typically located on the product or mounted near the product.
Theimagesthroughoutthismanualareforreferenceonlyandyourproductmaylookdifferent.
*Dependingonyourproduct,theProgram/SMART/LEARNbuttonmayhavea
differentname(usethebuttonforprogrammingremotecontrols).
STOP
BottomButton
1
Startwithyourgaragedoor,commercialdoor,orgate
closed.
2
Pressandholdbottombuttonontheremotecontroluntil
theblueLEDstayssolid(approximately15seconds)then
releasethebutton.
3
4
Ontheremotecontrol,pressandreleasethebuttonthat
youwouldliketoprogramtwice.TheblueLEDwillblink
forupto60seconds.
5 6
Waitforthedoororgatetomove,thenpressandrelease
eitherofthebuttonsontheremote.
LED
Testtheremotecontrolbypressingthebuttonyou
programmedinstep4.Ifthegaragedooropener,
commercialdooroperator,orgateoperatordoesnot
activate,repeattheprogrammingsteps.
IMPORTANT: The remote will activate your door or gate during
programming. Ensure door or gate is clear of ALL obstructions.
LED
14
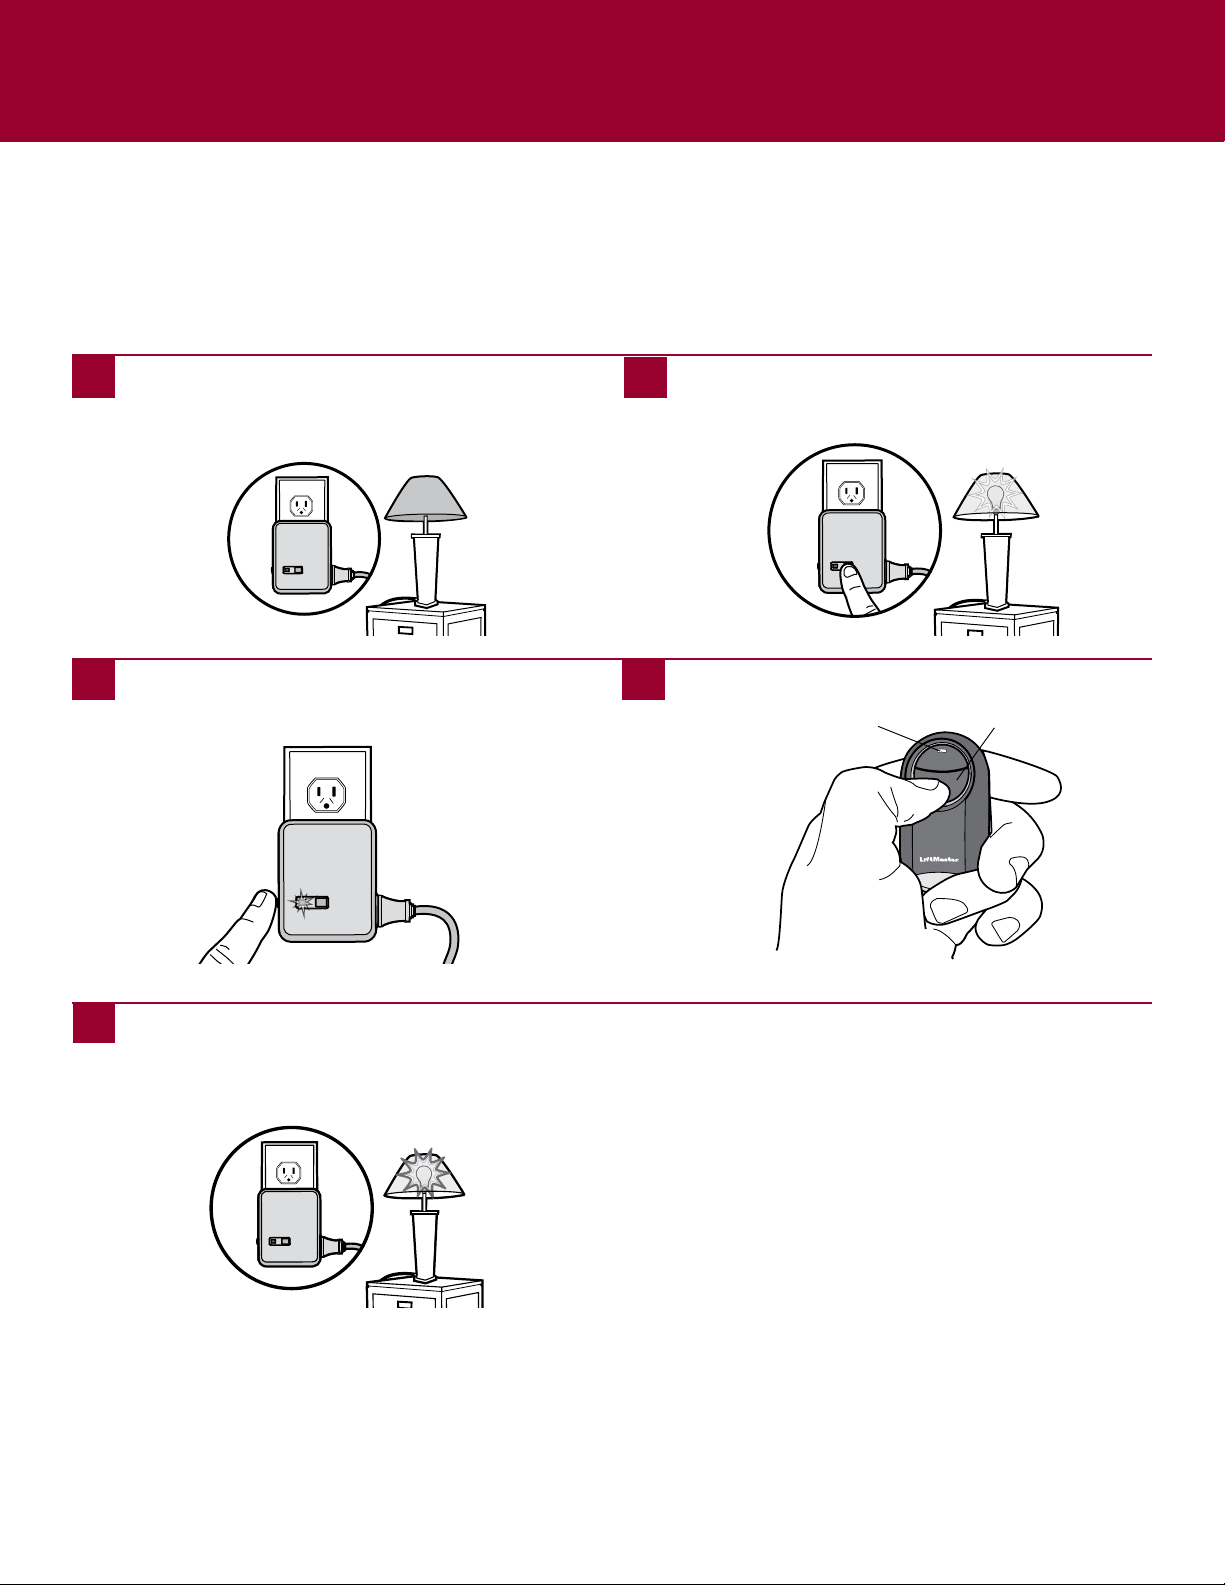
MYQ
®
LIGHT CONTROLS
Programming to a MyQ
®
Light Control
Theimagesthroughoutthismanualareforreferenceonlyandyourproductmaylookdifferent.
PressandreleasetheLEARNbuttononthemodule(the
LEDonthemodulewilllight).
Button
1
Plugthelampintothemoduleandplugthemodule
intoanelectricaloutlet(theLEDonthemodulewill
flash).NOTE: Make sure the lamp is switched ON.
2
IfthelampisnotON,pressandreleasethePowerbutton
onthemoduletoturnthelampON.
3
4
Pressthebuttonontheremotecontrol.
5
Thelamp’slightbulbwillblinkandtheLEDonthe
modulewillturnOFFwhenthedevicehasbeen
programmed.
LED

15
NEED HELP?
The remote control does not have good range.
• Therangeoftheremotecontrolmayvarydependingonvariousfactorsandenvironmentalfactors
The remote control will not program to a product with a Program/LEARN button.
• Checkthebatteryintheremotecontrol.TheLEDshouldlightwhenyoupressabutton.Replacethebatteryifnecessary.
The remote control LED will not light or it is dim.
• Replacethebattery.
The remote control LED does not activate the product until it is close to the product.
• Replacethebattery.
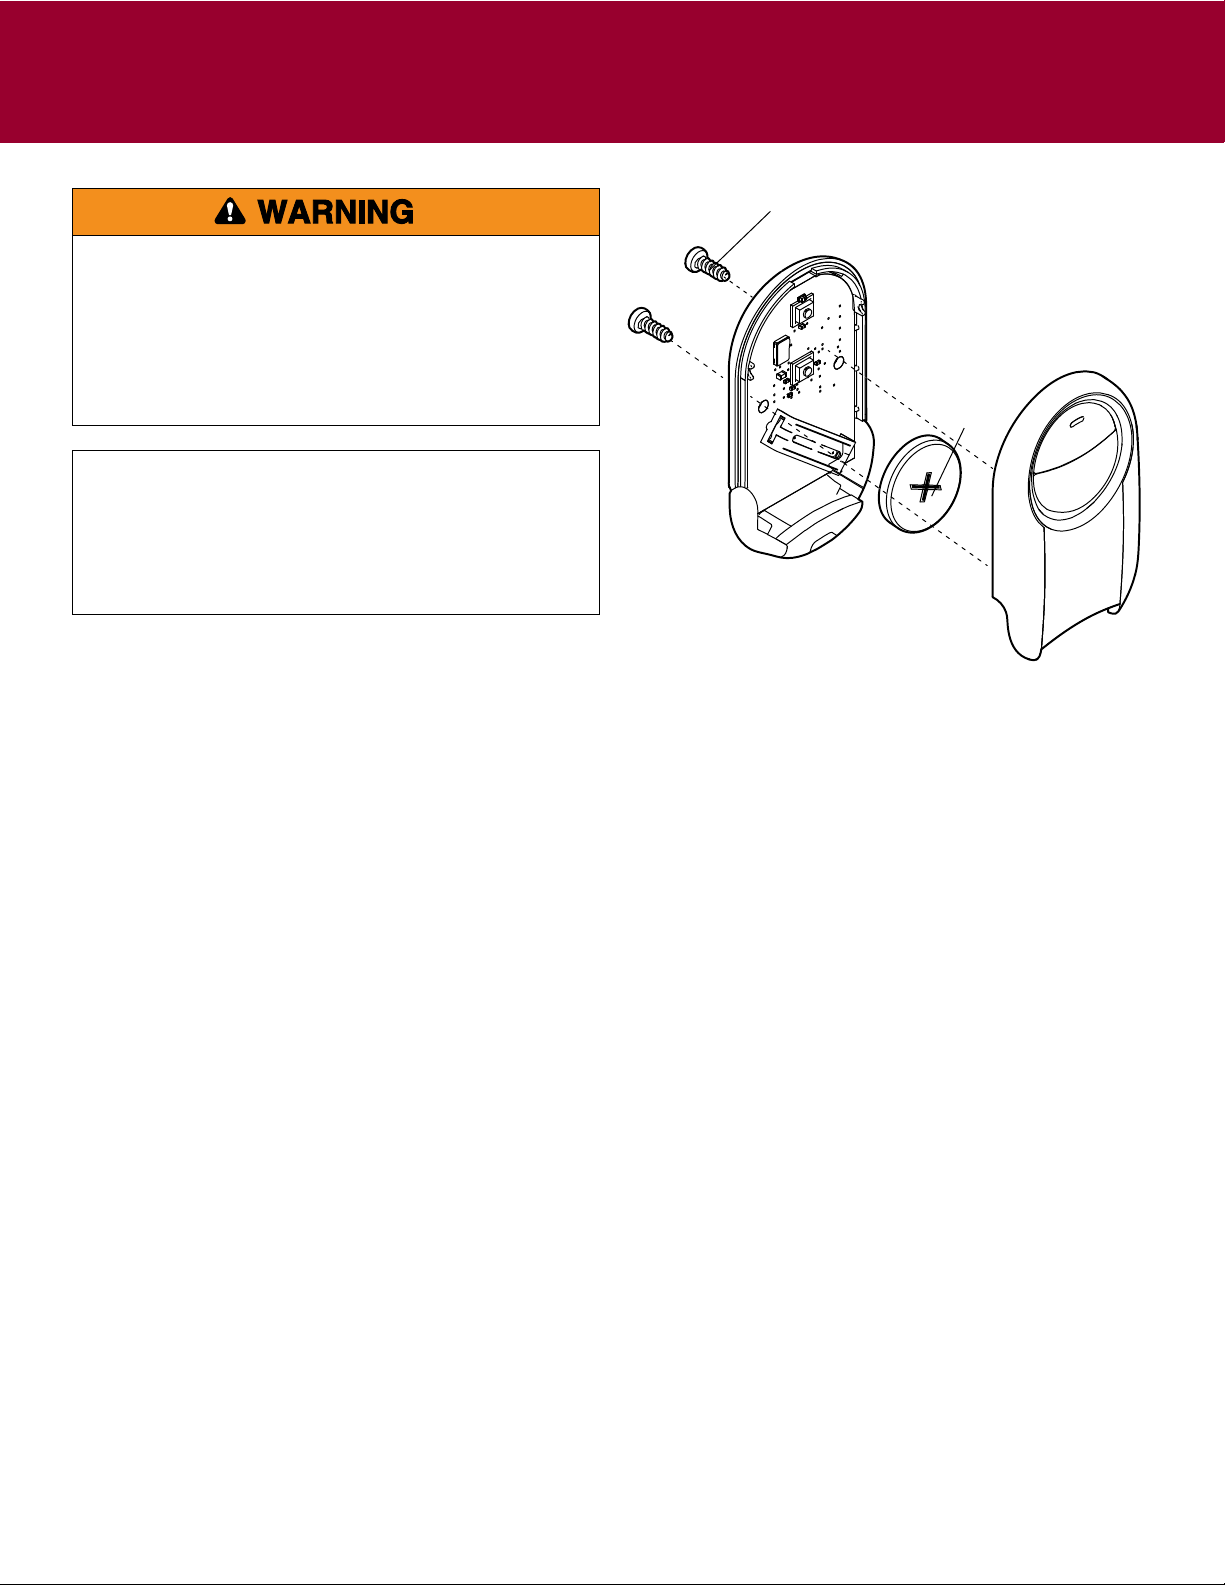
To prevent possible SERIOUS INJURY or DEATH:
• NEVERallowsmallchildrennearbatteries.
• Ifbatteryisswallowed,immediatelynotifydoctor.
Toreduceriskoffire,explosionorchemicalburn:
• ReplaceONLYwith3VCR2032coinbatteries.
• DONOTrecharge,disassemble,heatabove212°F(100°C)
orincinerate.
NOTICE:TocomplywithFCCandorIndustryCanada(IC)rules,adjustmentor
modificationsofthisreceiverand/ortransmitterareprohibited,exceptfor
changingthecodesettingorreplacingthebattery.THEREARENOOTHERUSER
SERVICEABLEPARTS.
TestedtoComplywithFCCStandardsFORHOMEOROFFICEUSE.Operation is
subjecttothefollowingtwoconditions:(1)thisdevicemaynotcauseharmful
interference,and(2)thisdevicemustacceptanyinterferencereceived,including
interferencethatmaycauseundesiredoperation.
ChamberlainandLiftMasterareTrademarksofChamberlainGroup.GenieisaTrademarkofOverheadDoorCorporation.
OverheadDoorisaTrademarkofOverheadDoorCorporation.LinearisaTrademarkofLinearCorporation.MasterMechanic
isaTrademarkofTruServ.SearsisaTrademarkofSears&Roebuck.StanleyisaTrademarkofTheStanleyWorks.Wayne
DaltonisatrademarkofWayneDaltonCorporation.DoItisatrademarkofDoItBestCorporation.
©2016,LiftMaster
GDOPro103B AllRightsReserved
LiftMaster.com
1-800-442-1255
BATTERY
Disposeofbatteriesproperly.ReplaceONLYwith3VCR2032coin
batteries.
Need Help?
GotoLiftMaster.com/374ut
orcall1-800-442-1255
Battery
Screw