
Version
V3.0 0223
Everything you need
for your 60cm
Freestanding Dishwasher
is in this User Manual
Model/s
EDW7CS

Welcome
Congratulations on purchasing your new Dishwasher. The Esatto brand
is proudly distributed within Australia by Residentia Group Pty Ltd.
Please refer to the warranty card at the rear of this manual for information
regarding your product’s parts and labour warranty, or visit us online at:
www.residentia.group
At Residentia Group, we are customer obsessed and our Support Team are
there to ensure you get the most out of your appliance. Should you want to
learn more about your new dishwasher, it's features or importantly taking
care of the appliance, our Support Team are here to help.
You can use our online Support Centre at anytime by visiting:
http://support.residentiagroup.com.au
Or you can contact us via phone by dialing: 1300 11 HELP (4357).
It is important that you read through the following use and care manual
thoroughly to familiarise yourself with the installation and operation
requirements of your appliance to ensure optimum performance.
Again, thank you for choosing an Esatto appliance and we look forward
to being of service to you.
Kind Regards,
The Residentia Team
Residentia Group
—
Head Office
165 Barkly Avenue
Burnley, Victoria
Australia 3121
—
ACN
600 546 656
—
Online
residentia.group
www.esatto.house
@esatto.house
—
Postage
PO Box 5177
Burnley, Victoria
Australia 3121
—
Telephone
1300 11 4357
www.esatto.house

02
Welcome
04
Important Safety
Instructions
06
Your
Dishwasher
07
Control Panel
08
Technical
Information
10
Installation
Instructions
12
Preparing Your
Dishwasher
18
Operating Your
Dishwasher
21
Maintenance
& Cleaning
25
Troubleshooting
27
Error Codes
28
Warranty
Contents

User Manual 04
Important Safety Instructions
GENERAL SAFETY INSTRUCTIONS
WARNING! When using your dishwasher, always follow
the precautions listed below. Failure to do so can cause
injury or damages. You may then not be covered by
warranty for this damage.
Only plug this appliance directly into an AC power supply
which is properly earthed and had the correct voltage.
Refer to the appliance rating plate (located on the rear
of your clothes dryer) for the voltage information. In the
event of a malfunction or breakdown, earthing will reduce
the risk of an electric shock by providing a path of least
resistance of electric current. This appliance is equipped
with an earthing conductor plug.
Caution! If this appliance is supplied from an extension
cord, power-board or other power adapter, the extension
cord/power-board must be positioned so that it is not
subject to moisture or risk of moisture. For safety reasons,
we strongly advise against the use of double adaptors,
power-boards, extension leads or other similar devices.
This appliance is not intended for use by persons
(including children) with reduced physical, sensory or
mental capabilities, or lack of experience and knowledge,
unless they have been given supervision or instruction
concerning use of the appliance by a person responsible
for their safety. Children should be supervised to ensure
that they do not play with the appliance.
Important!
• If the electrical cord of this appliance is damaged, it
must be replaced by the Manufacturer, Authorised
Service Agent or similarly qualied person in
order to avoid a hazard. Damage to the appliance,
including the power cord, is not covered under the
manufacturer’s warranty and a fee for service may
be payable.
• Installation and repair can only be carried out
by a qualied technician or suitably licensed
tradesperson.
• This appliance is intended to be used indoors only
in a household environment or similar applications
such as:
o sta kitchen areas in shops, oces and other
working environments;
o farm houses;
o by clients in hotels, motels and other residential
type environments;
o bed and breakfast type environments.
• It is not intended for use in Commercial
environments.
• Children shall not play with the appliance. Cleaning
and user maintenance shall not be done by children
without supervision.
• Packaging material could be dangerous for children!
• To protect against the risk of electrical shock, do
not immerse the unit, cord or plug in water or other
liquid.
• Please unplug before cleaning and performing
maintenance on the appliance. Use a soft cloth
moistened with mild soap, and then use a dry cloth
to wipe it again.
• Improper connection of the equipment-earthing
conductor can result in the risk of an electric
shock. Check with a qualied electrician or service
representative if you are in doubt whether the
appliance is properly grounded.
• Do not modify the plug provided with the appliance;
If it does not t the outlet. Have a proper outlet
installed by a qualied electrician.
• Do not abuse, sit on, or stand on the door or dish
rack of the dishwasher.
• Do not operate your dishwasher unless all enclosure
panels are properly in place. Open the door very
carefully if the dishwasher is operating, there is a
risk of water squirting out.
• Do not place any heavy objects on or stand on
the door when it is open. The appliance could tip
forward.
• When loading items to be washed:
1) Locate sharp items so that they are not likely to
damage the door seal;
2) Warning: Knives and other utensils with sharp
points must be loaded in the basket with their
points facing down or placed in a horizontal
position.
• Some dishwasher detergents are strongly alkaline.
They can be extremely dangerous if swallowed.
Avoid contact with the skin and eyes and keep
children away from the dishwasher when the door is
open.
• Check that the detergent powder is empty after
completion of the wash cycle. Do not wash plastic
items unless they are marked “dishwasher safe” or
the equivalent.
• For unmarked plastic items not so marked,check the
manufacturer’s recommendations.
• Use only detergent and rinse agents recommended
for use in an automatic dishwasher.
• Never use soap, laundry detergent, or hand washing
detergent in your dishwasher.

esatto.house 05
• The door should not be left open, since this could
increase the risk of tripping. If the supply cord is
damaged, it must be replaced by the manufacturer
or its service agent or a similarly qualied person in
order to avoid a hazard.
• During installation, the power supply must not be
excessively or dangerously bent or attened.
• Do not tamper with controls.
• The appliance needs to be connected to the main
water valve using new hose sets. Old sets should not
be reused.
• To save energy, in standby mode, the appliance
will switch o automatically while there is no any
operation in 30 minutes.
UNPACKING
During transportation, protective packaging was used
to protect the appliance against any damage. After
unpacking, please dispose of all elements of packaging
in a way that will not cause damage to the environment.
All materials used for packaging the appliance are
environmentally friendly; they are 100% recyclable and
are marked with the appropriate symbol. Check with
your local council on which packaging elements can be
recycled kerbside and which may need to be disposed of
at your local recycling drop o centre.
Tip! Soft plastics can be recycled at most major grocery
retailers. Polystyrene (EPS) foam may not be accepted by
your local council for recycling- check http://epsa.org.au/
for details of your local EPS recycler.
Caution! During unpacking, the packaging materials
(polythene bags, polystyrene pieces, etc.) should be kept
out of reach of children.
BEFORE FIRST USE
Ensure all packaging, user manuals, paper and plastic are
removed from within the clothes dryer before operation.
Ensure the vents aren’t blocked and adequate airow
exists with your chosen location.
Always check your clothing articles care instructions to
ensure they are suitable for use within a clothes dryer. Not
all fabric types/clothing articles are suitable for use within
vented clothes dryers.
DISPOSAL
Old appliances should not simply be disposed of with
normal household waste but should be delivered
to a collection and recycling centre for electric and
electronic equipment. A symbol shown on the product,
the instruction manual or the packaging shows that it is
suitable for recycling.
Materials used to manufacture the appliance are
recyclable and are labelled with information concerning
this. By recycling materials or other parts from used
devices you are making a signicant contribution to the
protection of our environment.
Information on appropriate disposal centres for used
devices can be provided by your local council or authority.
Important Safety Instructions (Continued)
User Manual 06
Your Dishwasher
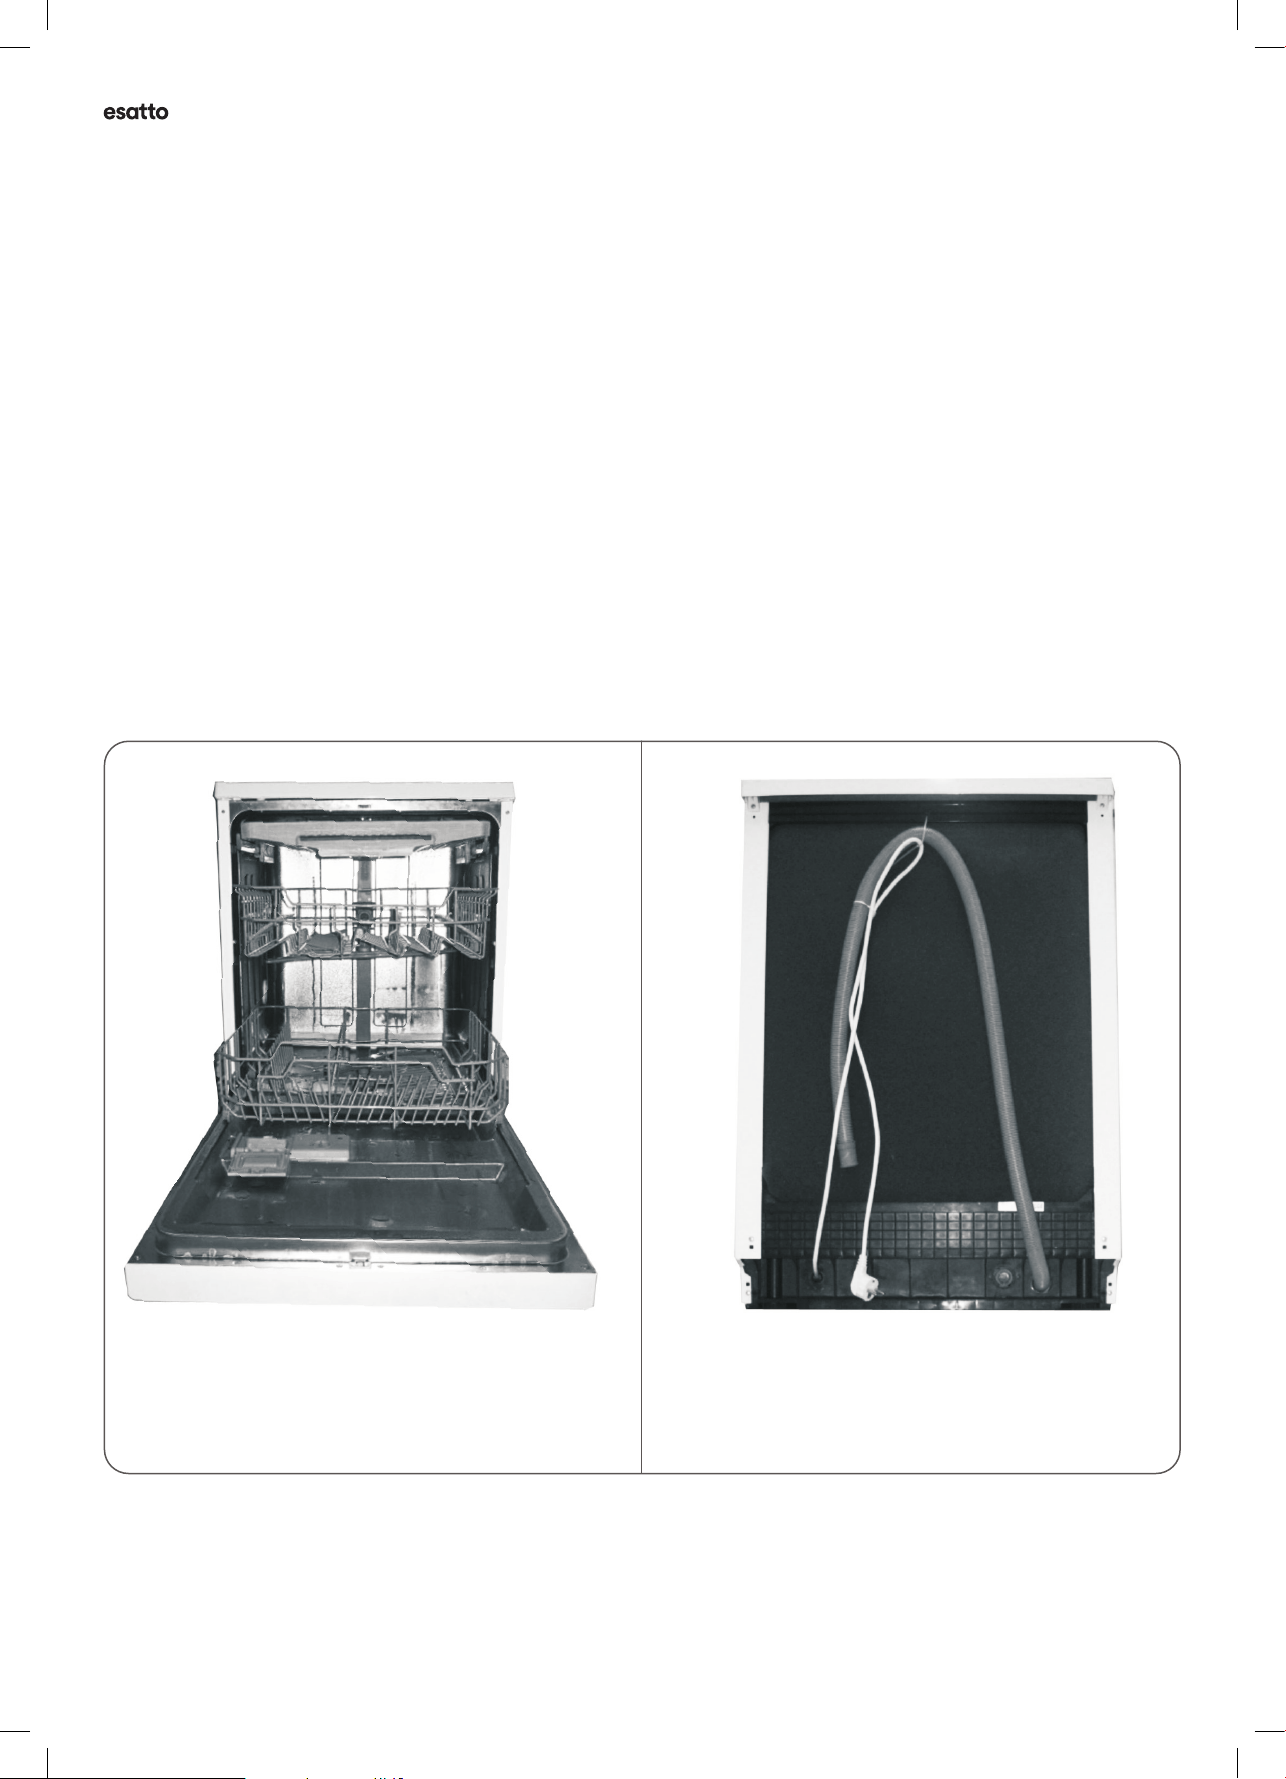
THE MAIN COMPONENTS
Note: The images may dier slightly to your model and are
for general reference only.
Figure 1: Front View Figure 2: Back View
esatto.house 07
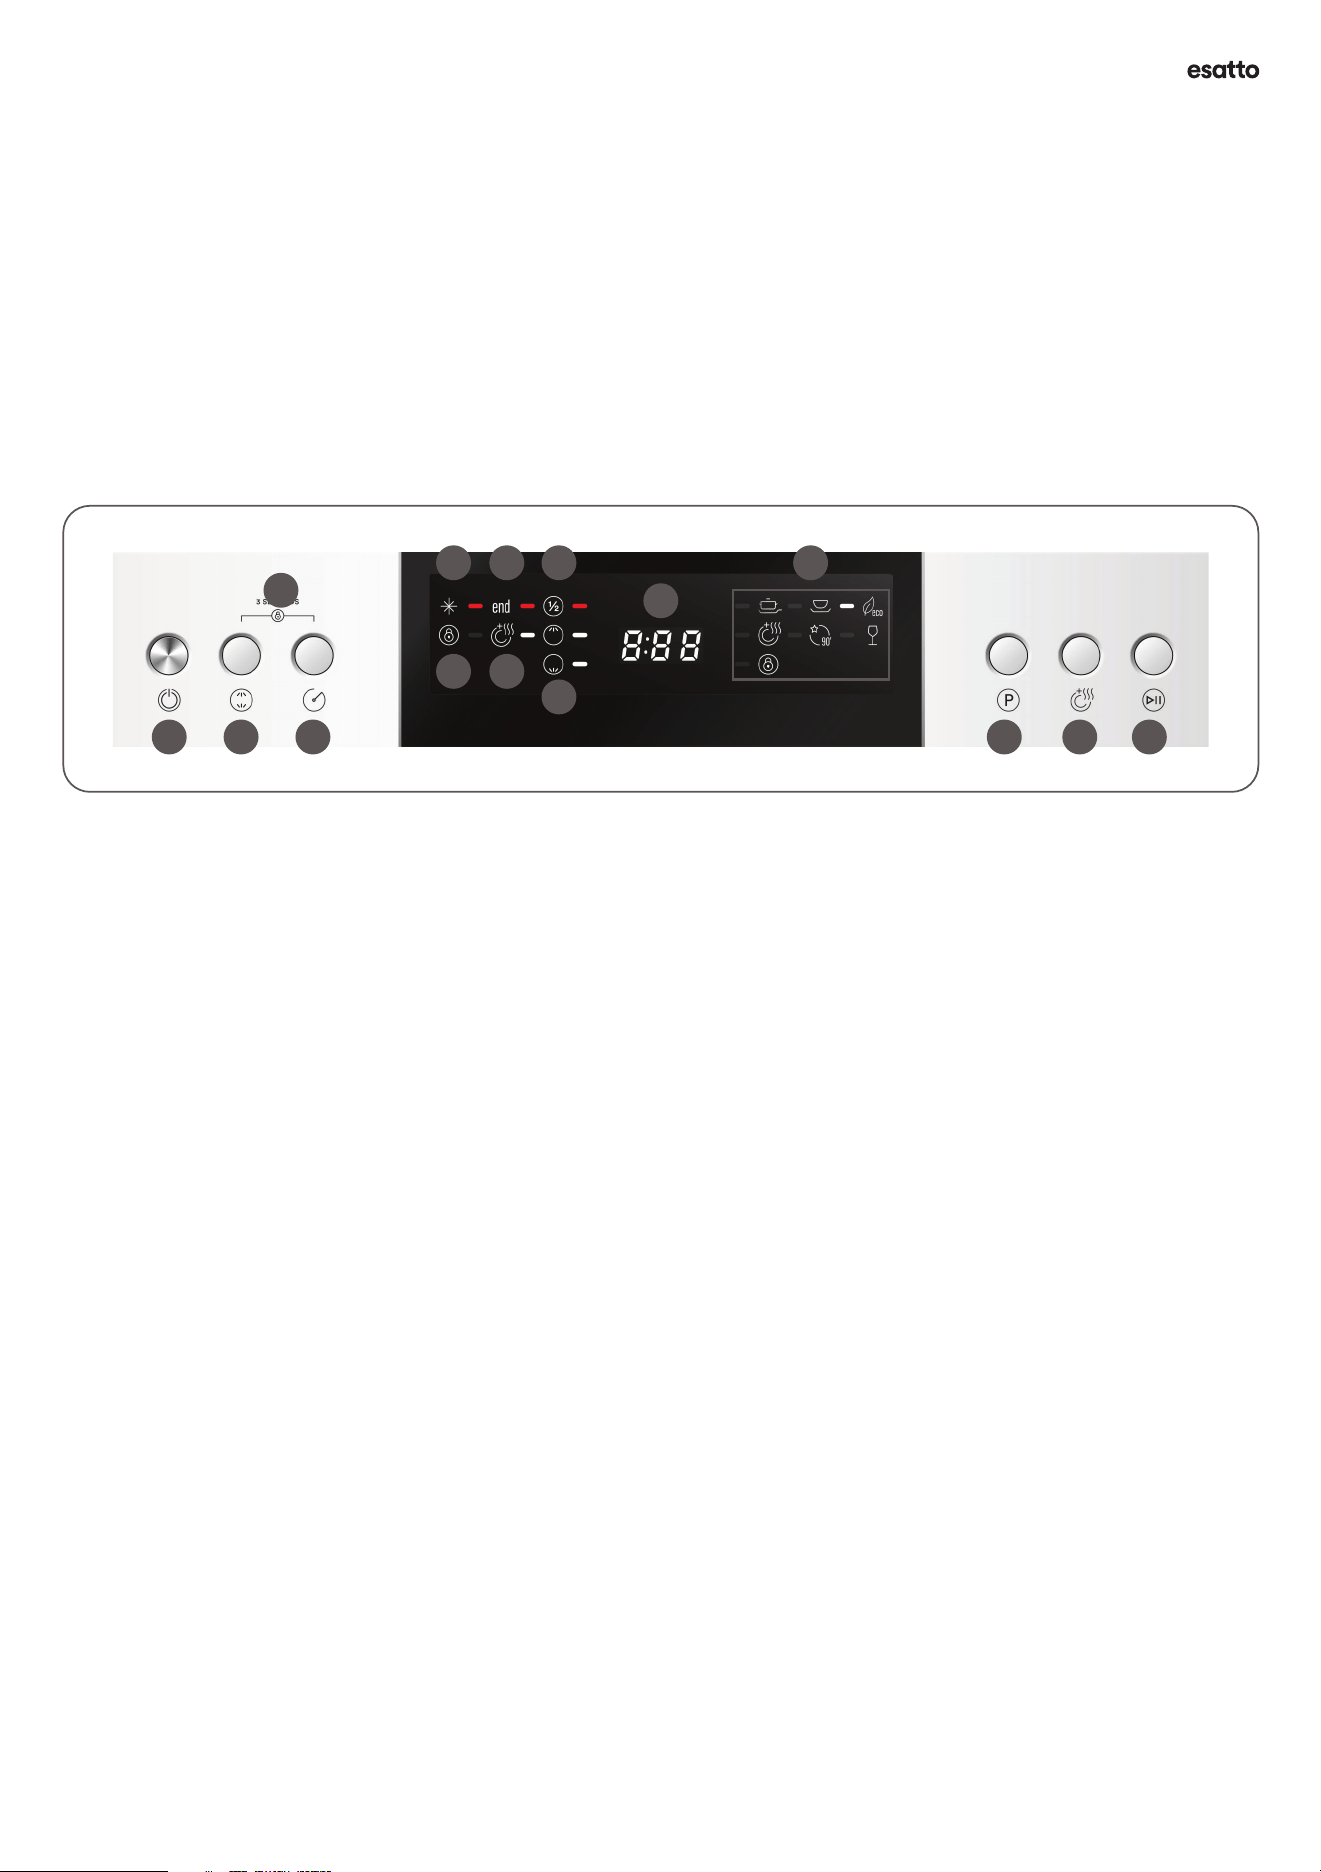
Control Panel
1. On/O Button: Switches the dishwasher On and O.
2. Wash Zone Button: Press this button to switch on/o
the upper wash zone and lower wash zones.
3. Delay Button: Press the button to set a delayed start
time.
4. Child Lock Function: Simultaneously press the Delay
and Wash Zone buttons to activate child lock.
5. Rinse Aid Indicator: Indicates when the rinse aid is
low and that the dispenser needs to be relled.
6. Program Ended Indicator: Indicates when the
dishwasher program has been completed.
7. Water Tap Indicator: LED indicates when the water
supply tap is closed and needs to be turned on.
8. LED Display: Displays the remaining time, delay time
and any error codes.
9. Program Indicators: LED will alight next to the
selected wash program.
10. Child Lock Indicator: LED indicates whether the child
lock function is activated or not.
11. Extra Drying Indicator: LED indicates whether the
Extra Drying function is activated or not.
12. Lower Basket Rack Zone Indicator: Indicates the
lower zone is activated (via the Wash Zone button).
Upper Basket Rack Zone Indicator: Indicates the
upper zone is activated (via the Wash Zone button).
13. Program Button: Press this button to cycle through
the program options (i.e. Intensive, Glass, Eco, etc)
14. Extra Drying Button: Press this button to activate
the Extra Drying function. This function will heat the
water to a hotter temperature during its nal rinse
cycle, creating extra heat. It can only be used with the
Intensive, Heavy, ECO, Glass and 90min programs.
15. Start/Pause Button: Press this button to start the
selected washing program or pause the washing
program when running.
Figure 3: Control Panel
1 2 3
4
5
15
6 7
8
9
10 11
12
13 14
User Manual 08
Height: 845mm
Width: 598mm
Depth: 610mm (with door closed), 1175mm (with door open)
Water Pressure: 0.04-1.0MPa=0.4-10 bar
Power Supply: AC 220-240V/50Hz
Power Consumption: 1760-2100W
Capacity: 14 Place Settings
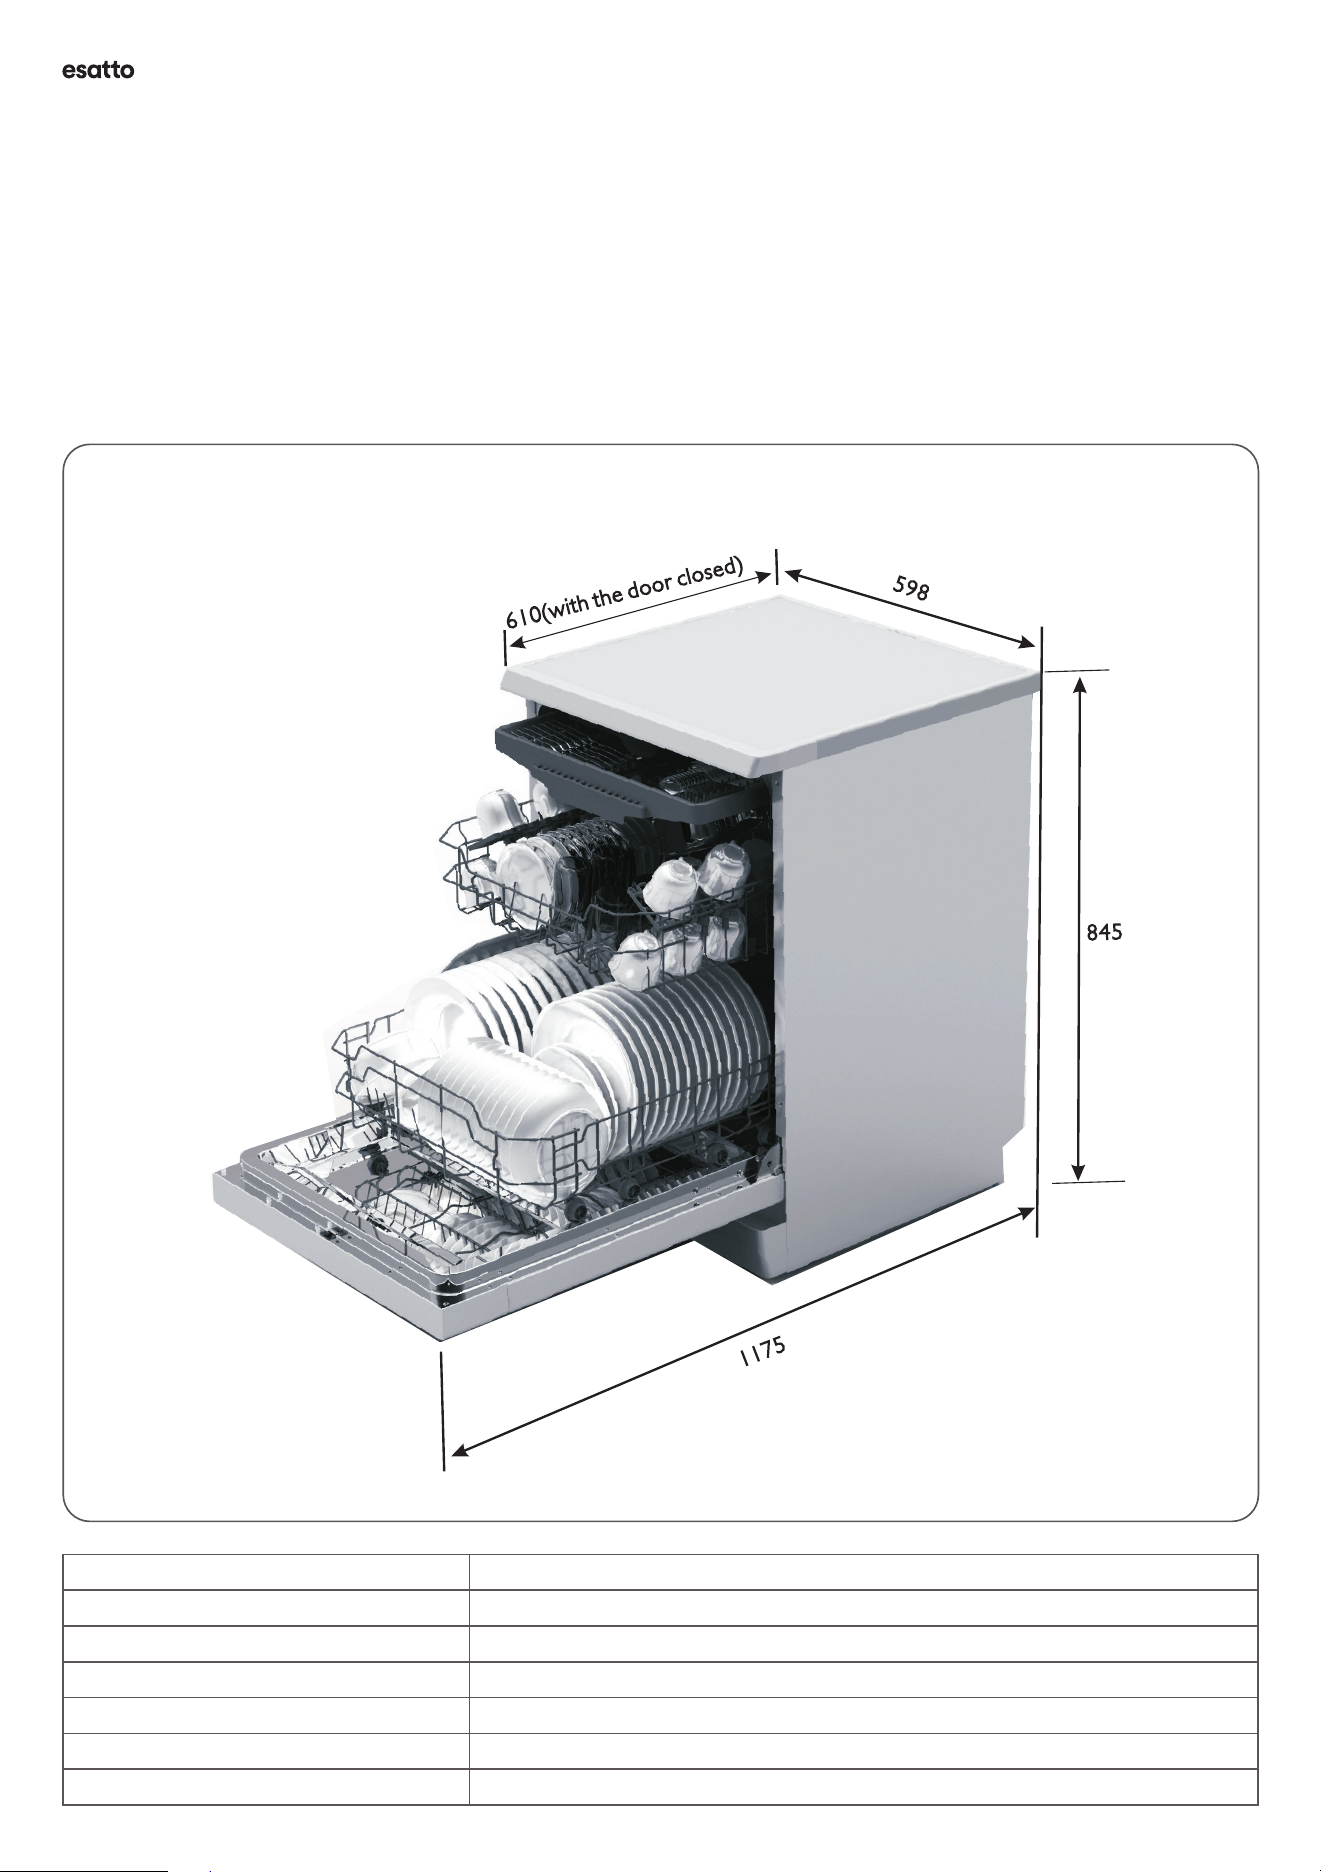
Technical Information
Page:
21
User Manual:
17
Height : 845mm
Width : 598m m
Depth : 610mm
(with the door closed)
Water pressure: 0.04-1.0MPa
Power supply: see rating label
Capacity: 14 place settings
Technical Information
598
WARNING!
If overflow occurs, turn off the main water supply before calling a service.
If there is water in the base pan because of an overfill or small leaks,
the water should be removed before restarting the dishwasher.
845
1175
610(with the door closed)

esatto.house 09
This page is intentionally blank
But if you want to draw something, make notes or even write
a recipe, it’s all yours!
User Manual 10
WARNING! ELECTRICAL SHOCK HAZARD
Disconnect electrical power before installing the
dishwasher. Failure to do so could result in death or
electrical shock.
Important! The installation of the dishwasher, plumbing
and electrical outlets should be completed by licenced
tradespeople.
POWER CONNECTION
WARNING! For personal safety:
• Do not use an extension cord, powerboard or a power
adapter with the dishwasher. It should be connected
directly into a power socket.
• Do not under any circumstances, cut or remove the
earthing connection from the power cord.
ELECTRICAL REQUIREMENTS
Please refer to the rating label on the dishwasher, to nd
out the rated voltage and ensure that the dishwasher
is connected to the appropriate power supply. Use the
required 10 Amp fuse and it should be connected to its
own dedicated circuit serving only this appliance.
ELECTRICAL CONNECTION
Ensure the voltage and frequency of the power
corresponds to that noted on the dishwasher’s appliance
rating plate. Only insert the plug into an electrical socket
which is earthed properly. If the electrical socket to which
the appliance must be connected is not appropriate for
the plug, have a licenced electrician replace the socket- do
not use a power adapter as this can lead to overheating.
POSITIONING THE DISHWASHER
Important! Ensure that the dishwasher is properly earthed
before use.
Position the appliance in the desired location. The back
should rest against the wall behind it, and the sides, along
the adjacent cabinets or walls. The dishwasher is equipped
with both a water supply hose and drain hose that can be
positioned either to the right or the left sides to facilitate
proper installation.
Ensure that your selected location has an accessible
power-point (power outlet) which the dishwasher’s power
cord can reach without strain. If there isn’t a suitable
power point (power outlet) located nearby, please engage
a licensed electrician to install a new power socket. Do not
use extension leads, power boards or adapters.
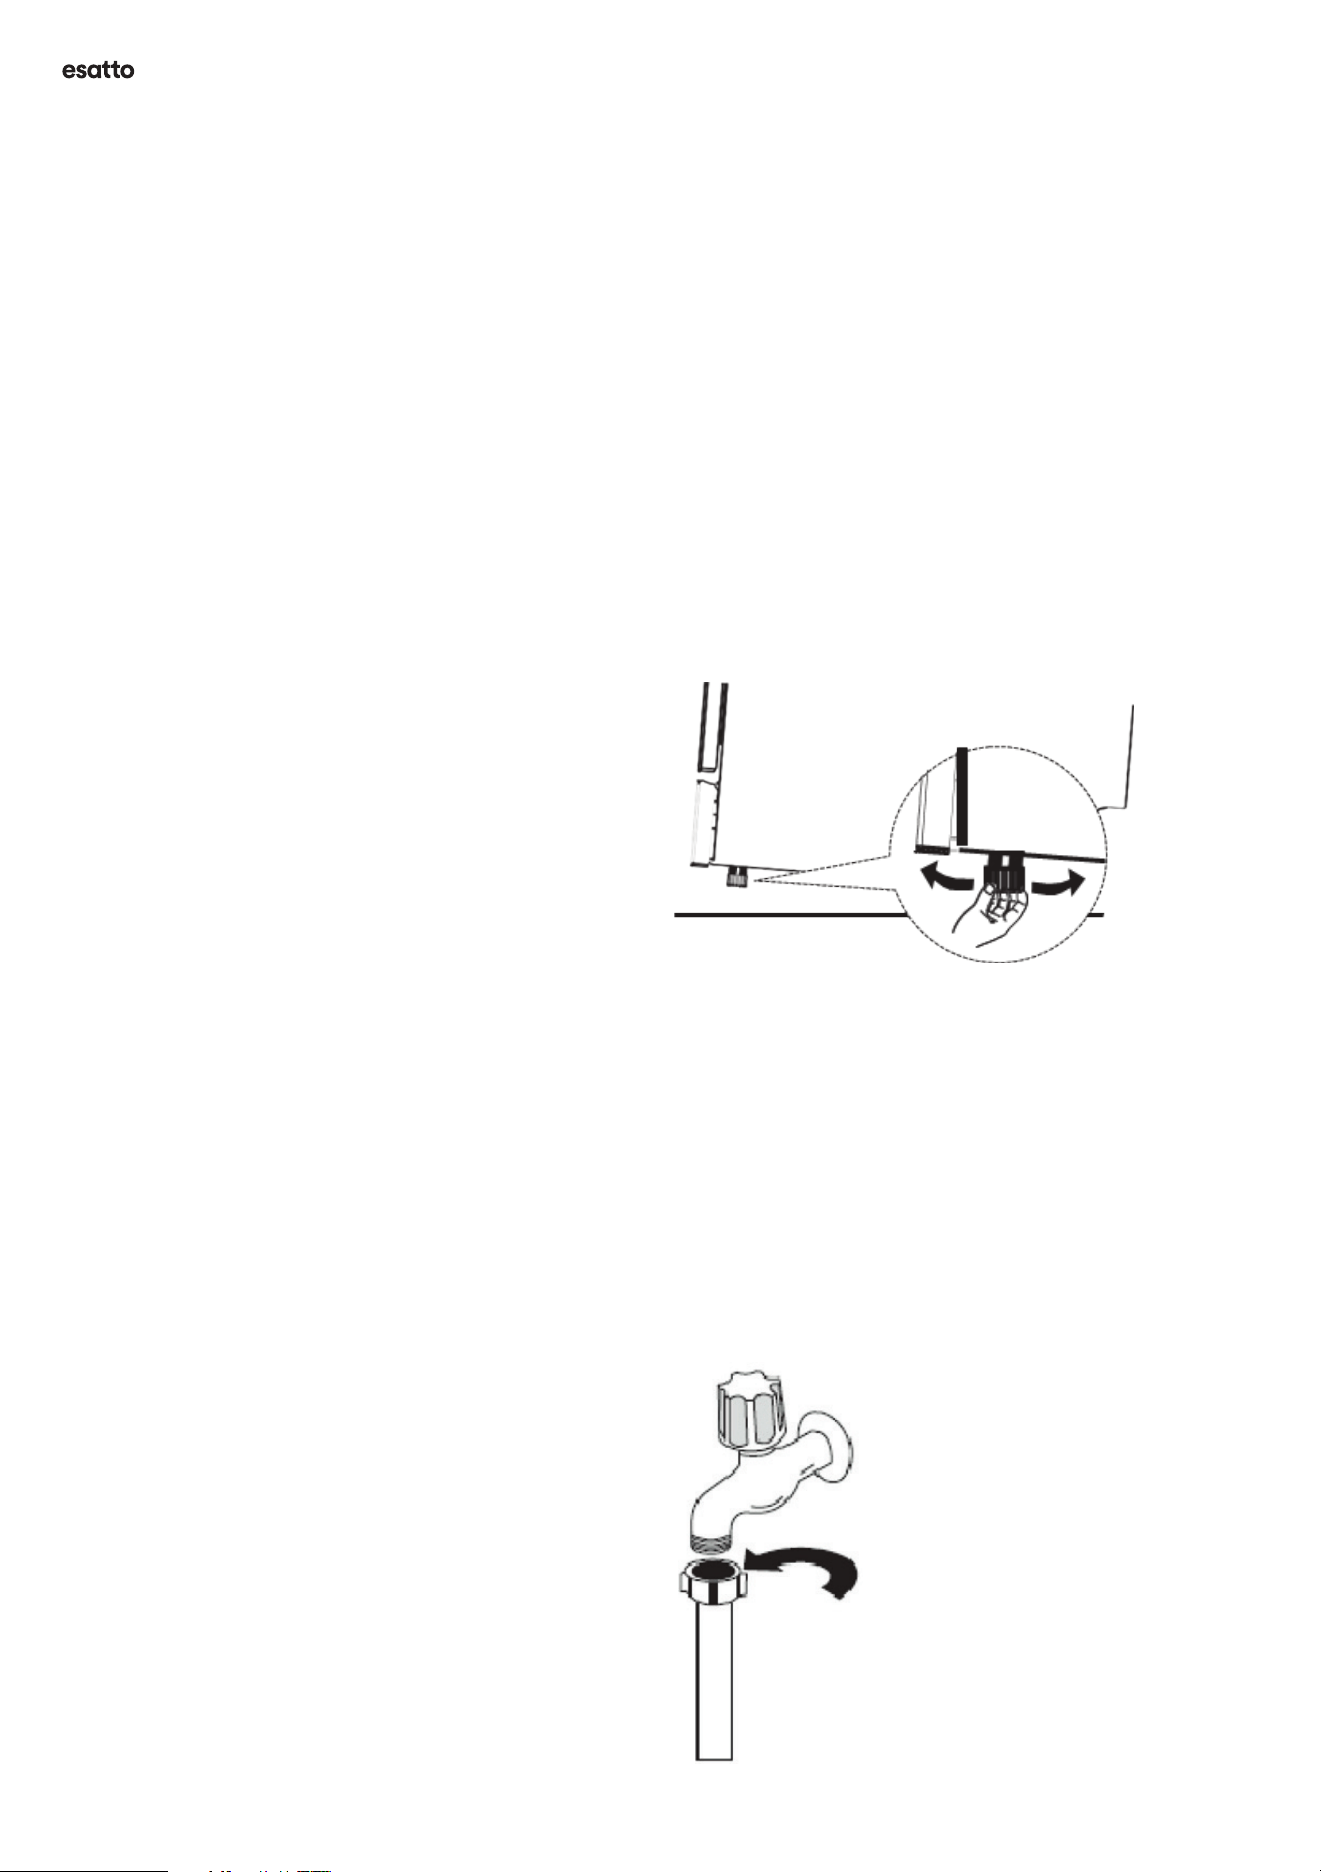
LEVELLING THE DISHWASHER
Once the dishwasher is positioned in your desired
location, the height and level of the dishwasher can be
altered by adjustment of the screwing legs/feet. In any
situation, the appliance must not be inclined more than
20º, as this will aect its operation and performance.
Figure 4: Screwing the dishwasher legs/feet clockwise or
anti-clockwise to adjust its level.
WATER SUPPLY AND DRAIN CONNECTION
Cold Water Connection
Important! Your dishwasher should only be connected to
the cold water outlet. It has an in-built heating element to
heat up the water to the required temperatures depending
on the selected wash program.
Connect the cold water supply hose to a threaded ¾ inch
tap connector and make sure that it is fastened tightly in
place.
Important! If the water pipes are new
or have not been used for an extended
period of time, let water pass through
them into a bucket until the water
runs clear. This precaution is required
to avoid the risk of the water inlet
becoming blocked or dirty water
damaging your new dishwasher.
Figure 5: Connecting the supply hose
to a ¾ inch tap.
Note: If your dishwasher is not going
to be used for an extended period of
time, please turn the water supply
to your dishwasher o at its supply
tap and switch o its power supply
at its power outlet (or unplug the
appliance).
Installation Instructions
esatto.house11
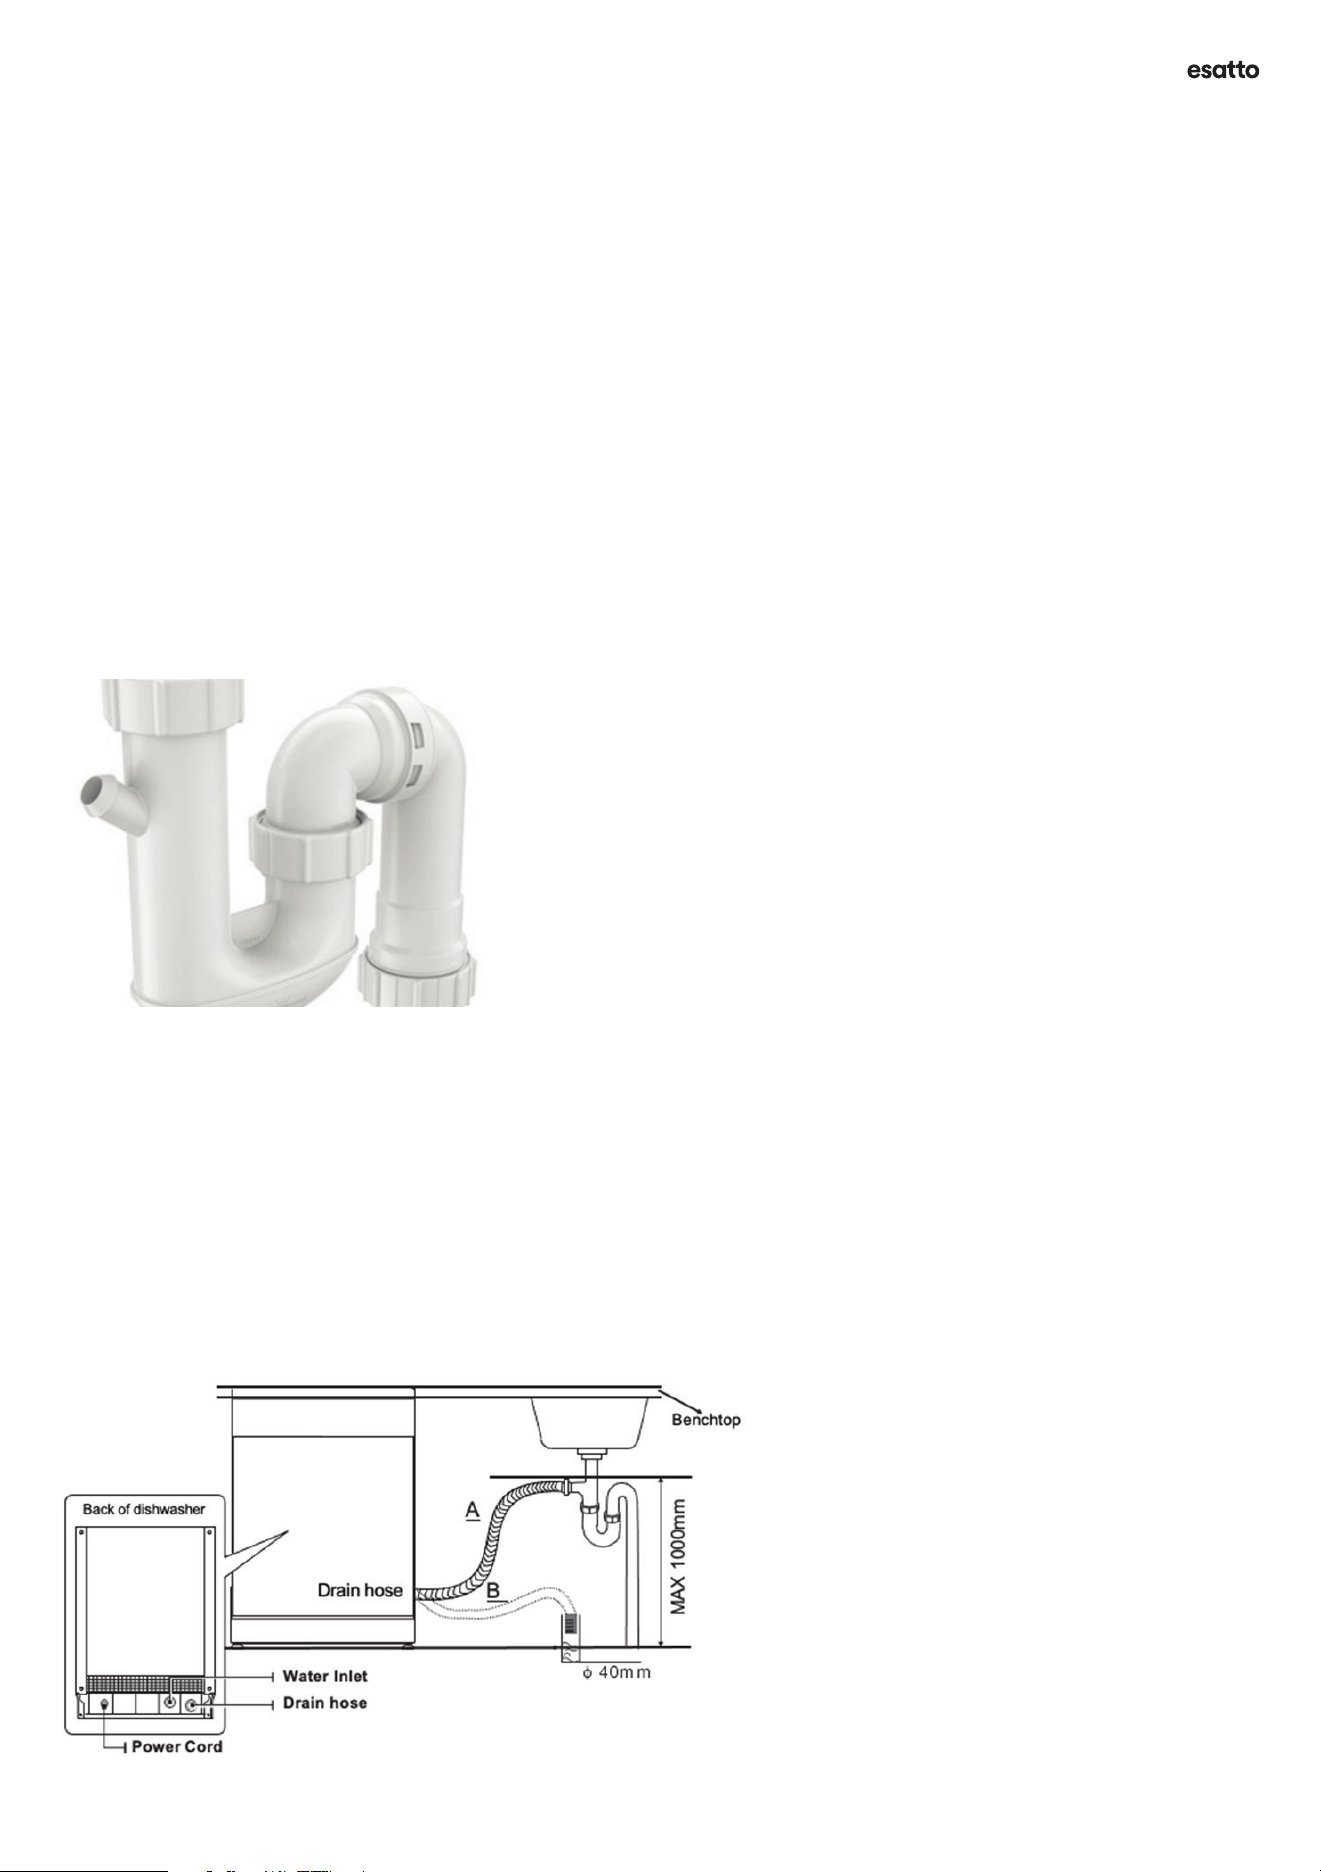
Connection of Drain Hose
The ideal connection of the dishwasher waste pipe is
straight on to your sinks’ PVC waste trap pipe with a
dishwasher spigot- an example of which is shown below in
Figure 6. Also refer to location A in Figure 7, showing this
connection method.
Figure 6: Typical waste trap from a sink with the
dishwasher spigot.
Important! New waste traps typically have the dishwasher
spigot sealed o with plastic and requires the plumber
or licensed installer to drill out the center of the spigot to
allow water to ow. It’s important to ensure this spigot is
drilled out before calling our Service team to respond to a
dishwasher failure, as there will be a fee payable should we
attend and nd this non-warranty installation fault.
If you do not have a waste trap with the dishwasher spigot,
you can also insert the drain hose directly into a drain
pipe, providing it’s diameter is a minimum of 4cm. Refer to
location B shown in Figure 7.
Figure 7: Shows the correct positioning of the drain hose.
Important! The height of the drain hose must be less than
1000mm at all times, including at its nal connection. If the
drain hose is higher at any point, the dishwasher will not
be able to drain eectively and will cause a fault during its
operation.
Note: It’s critical for the eective operation of your
dishwasher, that the waste pipe is not over-bent or kinked
as this will restrict ow and can cause a fault with the
dishwasher. When pushing the dishwasher back into it’s
housing, take special care to ensure that the waste pipe is
not kinked or the dishwasher sitting on the waste pipe.
Note: The end of the drain hose must not be immersed in
water to avoid back ow into the dishwasher.
You can also let the drain hose run directly into the sink,
ensuring that the waste pipe is not bent or kinked, only
when the sink is lower than the 1000mm maximum height.
Drain Hose Extensions
If you need to use a drain hose extension, please ensure
that your installer uses a similar drain hose. The total
length of drain hose must be no longer than 4 meters,
otherwise the cleaning performance of the dishwasher
will be impacted. This will also eect the manufacturer’s
warranty as a non-compliant installation.
Syphon Connection
The waste connection must be at a height less than
1000mm from the bottom of the dishwasher. The water
drain hose connection must be xed in place.
Installation Instructions (Continued)
User Manual 12
RINSE AID
Rinse aid is released during the dishwasher’s nal rinse to
prevent water from forming droplets on your dishes, which
can leave spots and streaks. It also improves drying by
allowing water to roll o the dishes. Your dishwasher has
been designed to use liquid rinse aids.
WARNING! Only use branded rinse aid suitable for use
in dishwashers. Never ll the rinse aid dispenser with any
other substances (i.e. Dishwasher cleaning agent, liquid
detergent). This would damage the appliance and void the
Manufacturer’s Warranty.
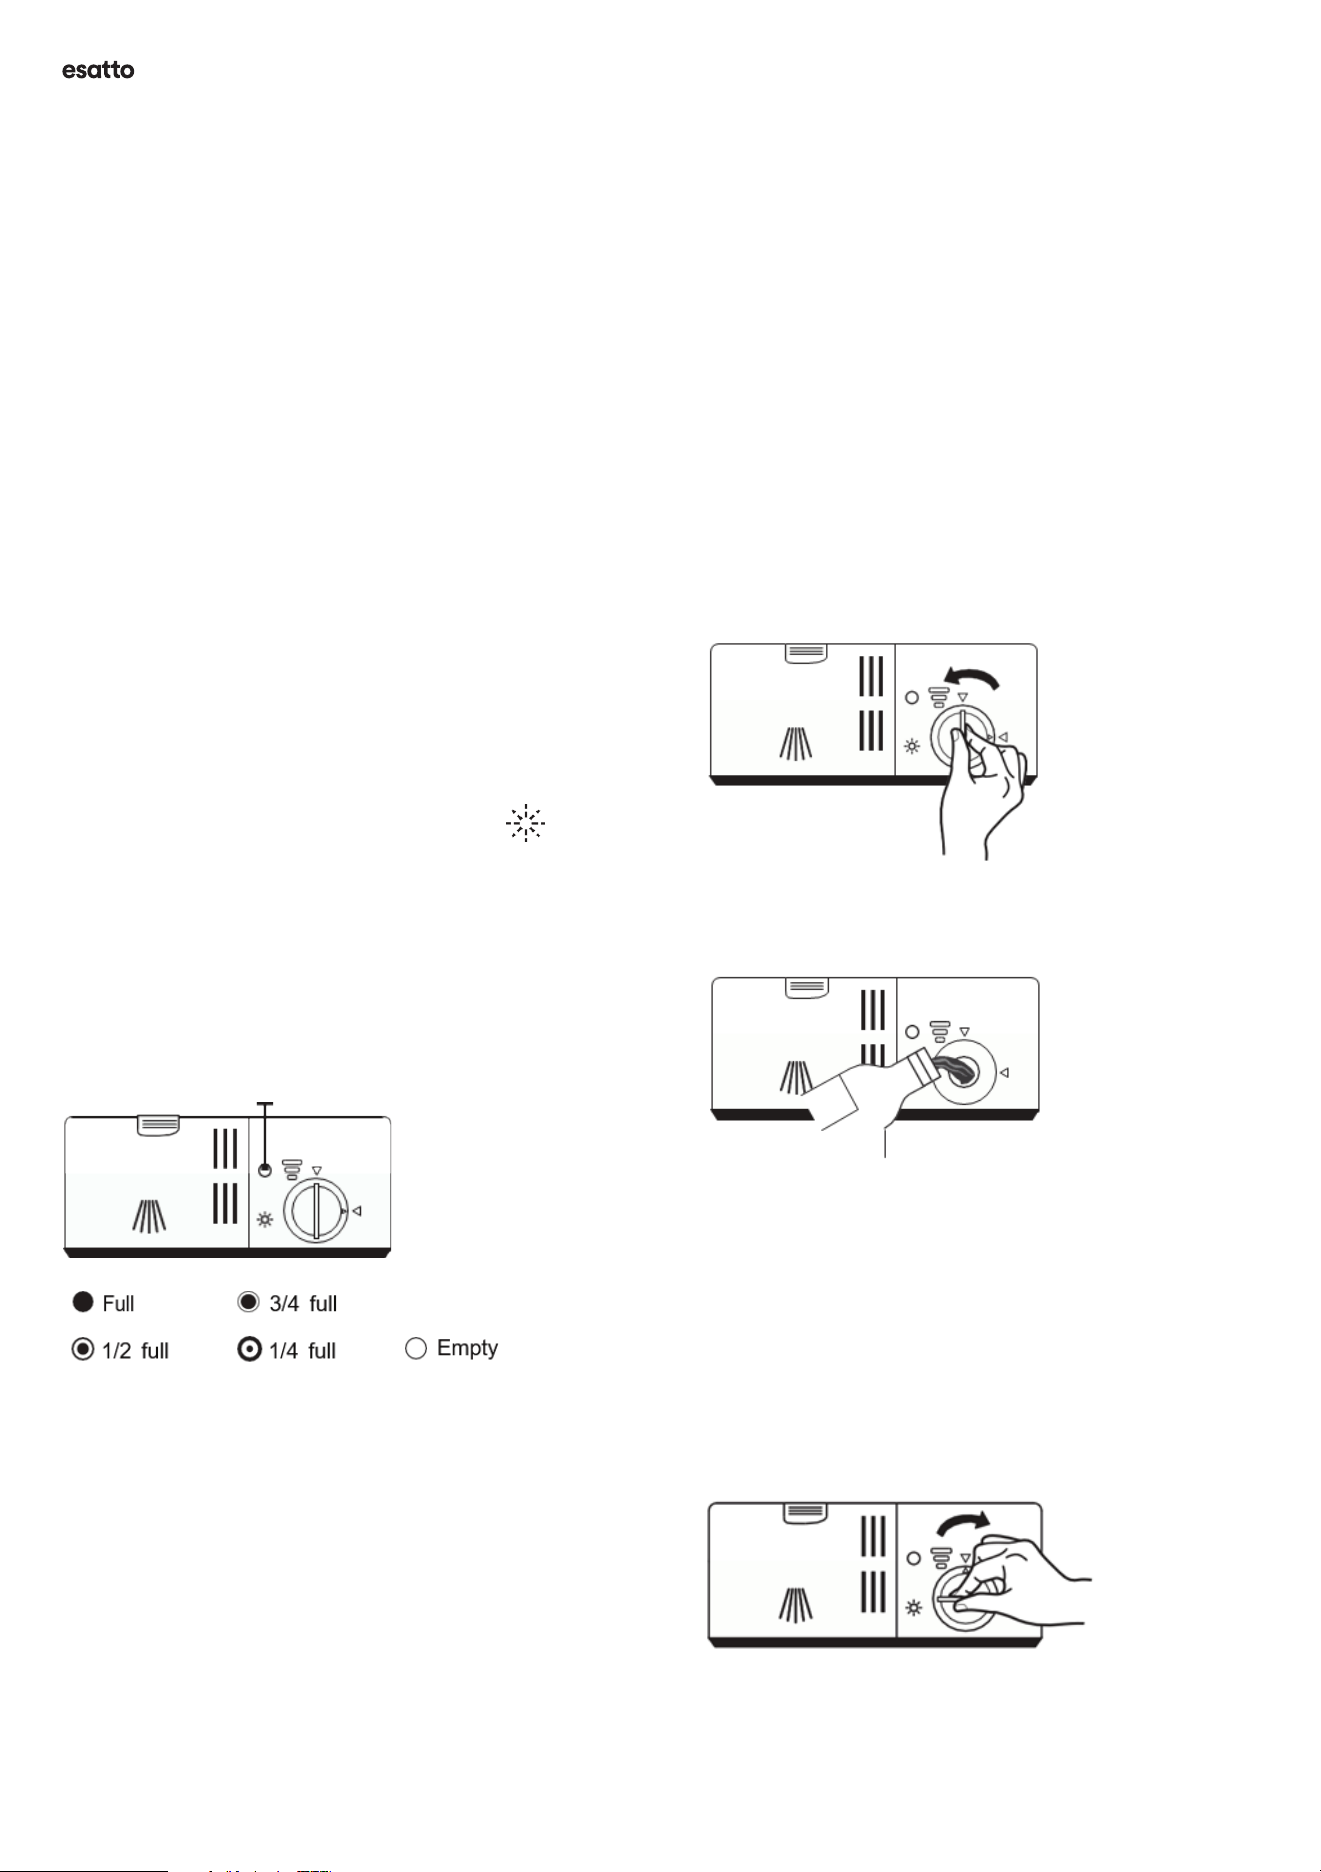
If the rinse-aid indicator light is illuminated (
) on the
control panel, then you will need to rell the dispenser,
following the instructions below. You can always estimate
the amount of rinse-aid within the reservoir from the
colour of the optical level indicator located next to the
cap. When the rinse-aid reservoir is full, the indicator will
be fully dark. The size of the dark dot decreases as the
rinse-aid diminishes. You should never let the rinse aid
level be less than 1/4 full.
Optical Level Indicator
Figure 8: Rinse-aid optical level indicator for reservoir.
Tip! A common complaint for all dishwashers is that dishes
are coming out wet after completing its program. Rinse aid
will greatly improve drying results, but there are a number
of factors which can eect drying performance, including
the crockery items you are washing. Refer to section 4.3 of
this manual for some more guidelines around this topic.
FILLING THE RINSE-AID DISPENSER
Step 1 Remove the Rinse-aid dispenser cap by screwing it
in an anti-clockwise direction. Refer to Figure 9.
Figure: Removing the Rinse-aid dispenser cap.
Figure 10: Filling the Rinse-aid reservoir.
Step 2 Carefully pour the dishwasher rinse-aid into the
reservoir, whilst being careful to avoid it overowing. Refer
to Figure 10.
Tip! Wipe up any overow or spilled rinse-aid as this can
lead to excessive foaming in the next dishwasher cycle.
Step 3 Re-insert the Rinse-aid cap and screw in a
clockwise direction to lock it in place. Refer to Figure 11.
Figure 11: Re-tting the cap onto the Rinse-aid dispenser.
Preparing Your Dishwasher
esatto.house13
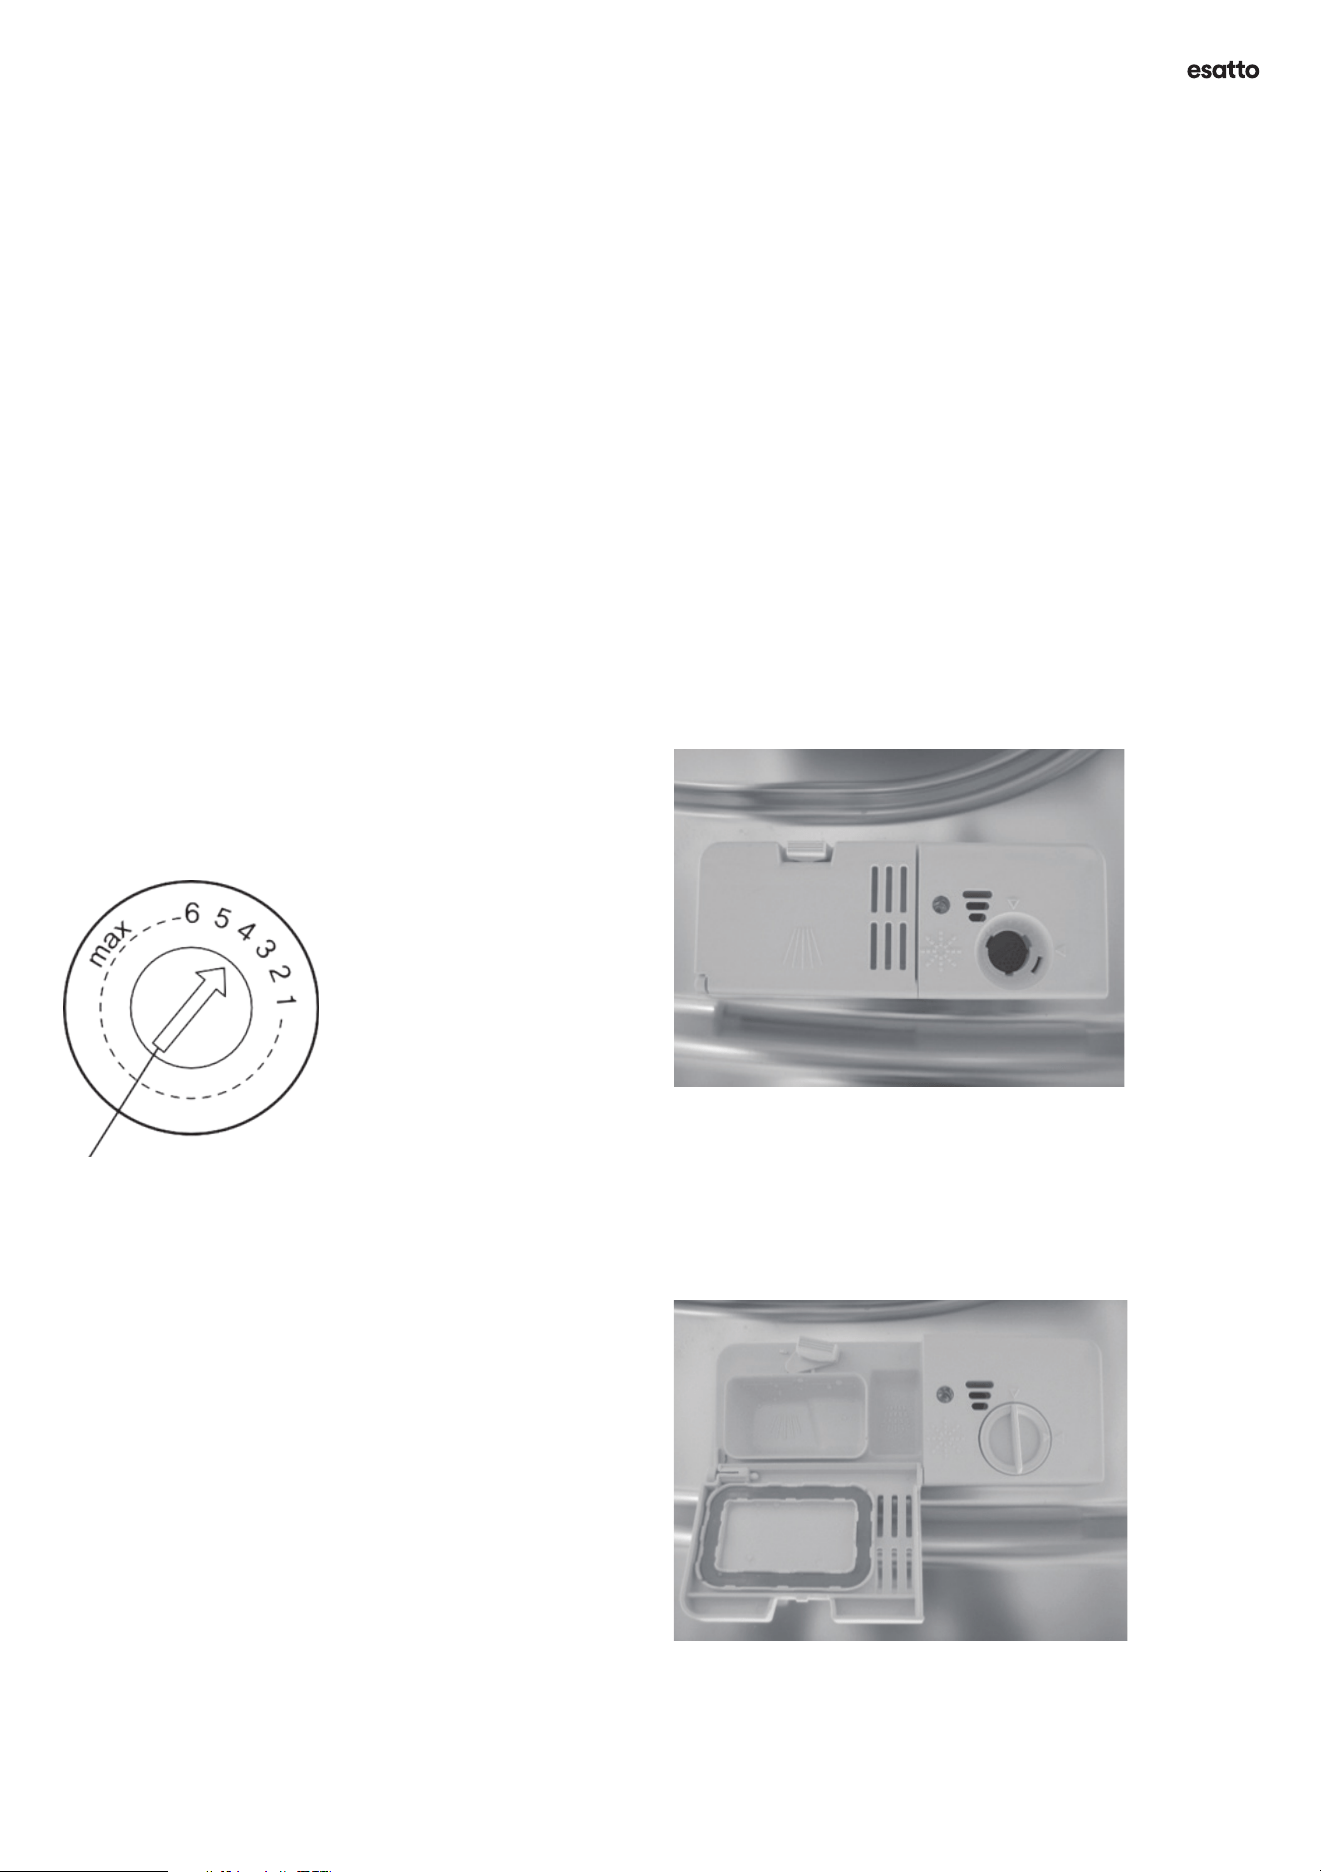
ADJUSTING THE RINSE-AID DISPENSER
You can increase or decrease the amount of Rinse-aid
being dispensed by your dishwasher for each cycle, using
the adjustment dial.
Turn the Rinse-aid dispenser dial to a number between 1
and 6, where the higher number dispensers more rinse-
aid. If you are nding your dishes are not drying properly
or a spotted after the program has nished, adjust the dial
to the next higher number until you nd that your dishes
are spot-free. Reduce the setting if there are sticky whitish
coloured stains on your dishes or a bluish lm on your
glassware or knife blades.
Note: The factory default setting is 4, for the rinse-aid.
Figure 12: Rinse aid dispenser dial.
DISHWASHER DETERGENT
The chemical ingredients that compose the dishwasher
detergent are necessary to remove, break-down and
dispense all dirt out of the dishwasher. Most of the
commercial quality detergents are suitable for this
purpose.
Tip! If you are nding that you are unhappy with the
washing performance of your dishwasher, try using
alternative wash programs (i.e. a more intensive program)
and also try using alternative dishwasher detergents. We
do nd that some brands outperform others in terms of
washing results.
WARNING! Proper use of dishwashing detergent.
• Use only detergent specically made for dishwashers.
Keep your detergent dry and fresh.
• Don’t put powdered detergent into the dispenser until
you are ready to start a new wash cycle.
WARNING! Dishwasher detergent is corrosive and
highly dangerous! Always keep dishwasher detergent out
of reach of children and follow the instructions provided
by the dishwasher detergent brand for handling and
storage.
FILLING THE DISHWASHER DETERGENT DISPENSER
Step 1 Press the release catch on the detergent dispenser,
to open the cover. Refer to Figure 13.
Figure 13: Release catch to open detergent dispenser cover.
Step 2 Add the detergent (powder or tablet) into the larger
cavity (labelled A in gure 14 below) which is used for
the main wash cycle. For more heavily soiled wash loads,
you can also add some detergent into the smaller cavity
(labelled B in gure 14 below) which is used for the pre-
wash cycle.
Figure 14: The open dishwasher detergent dispenser.
Preparing Your Dishwasher (Continued)
User Manual 14
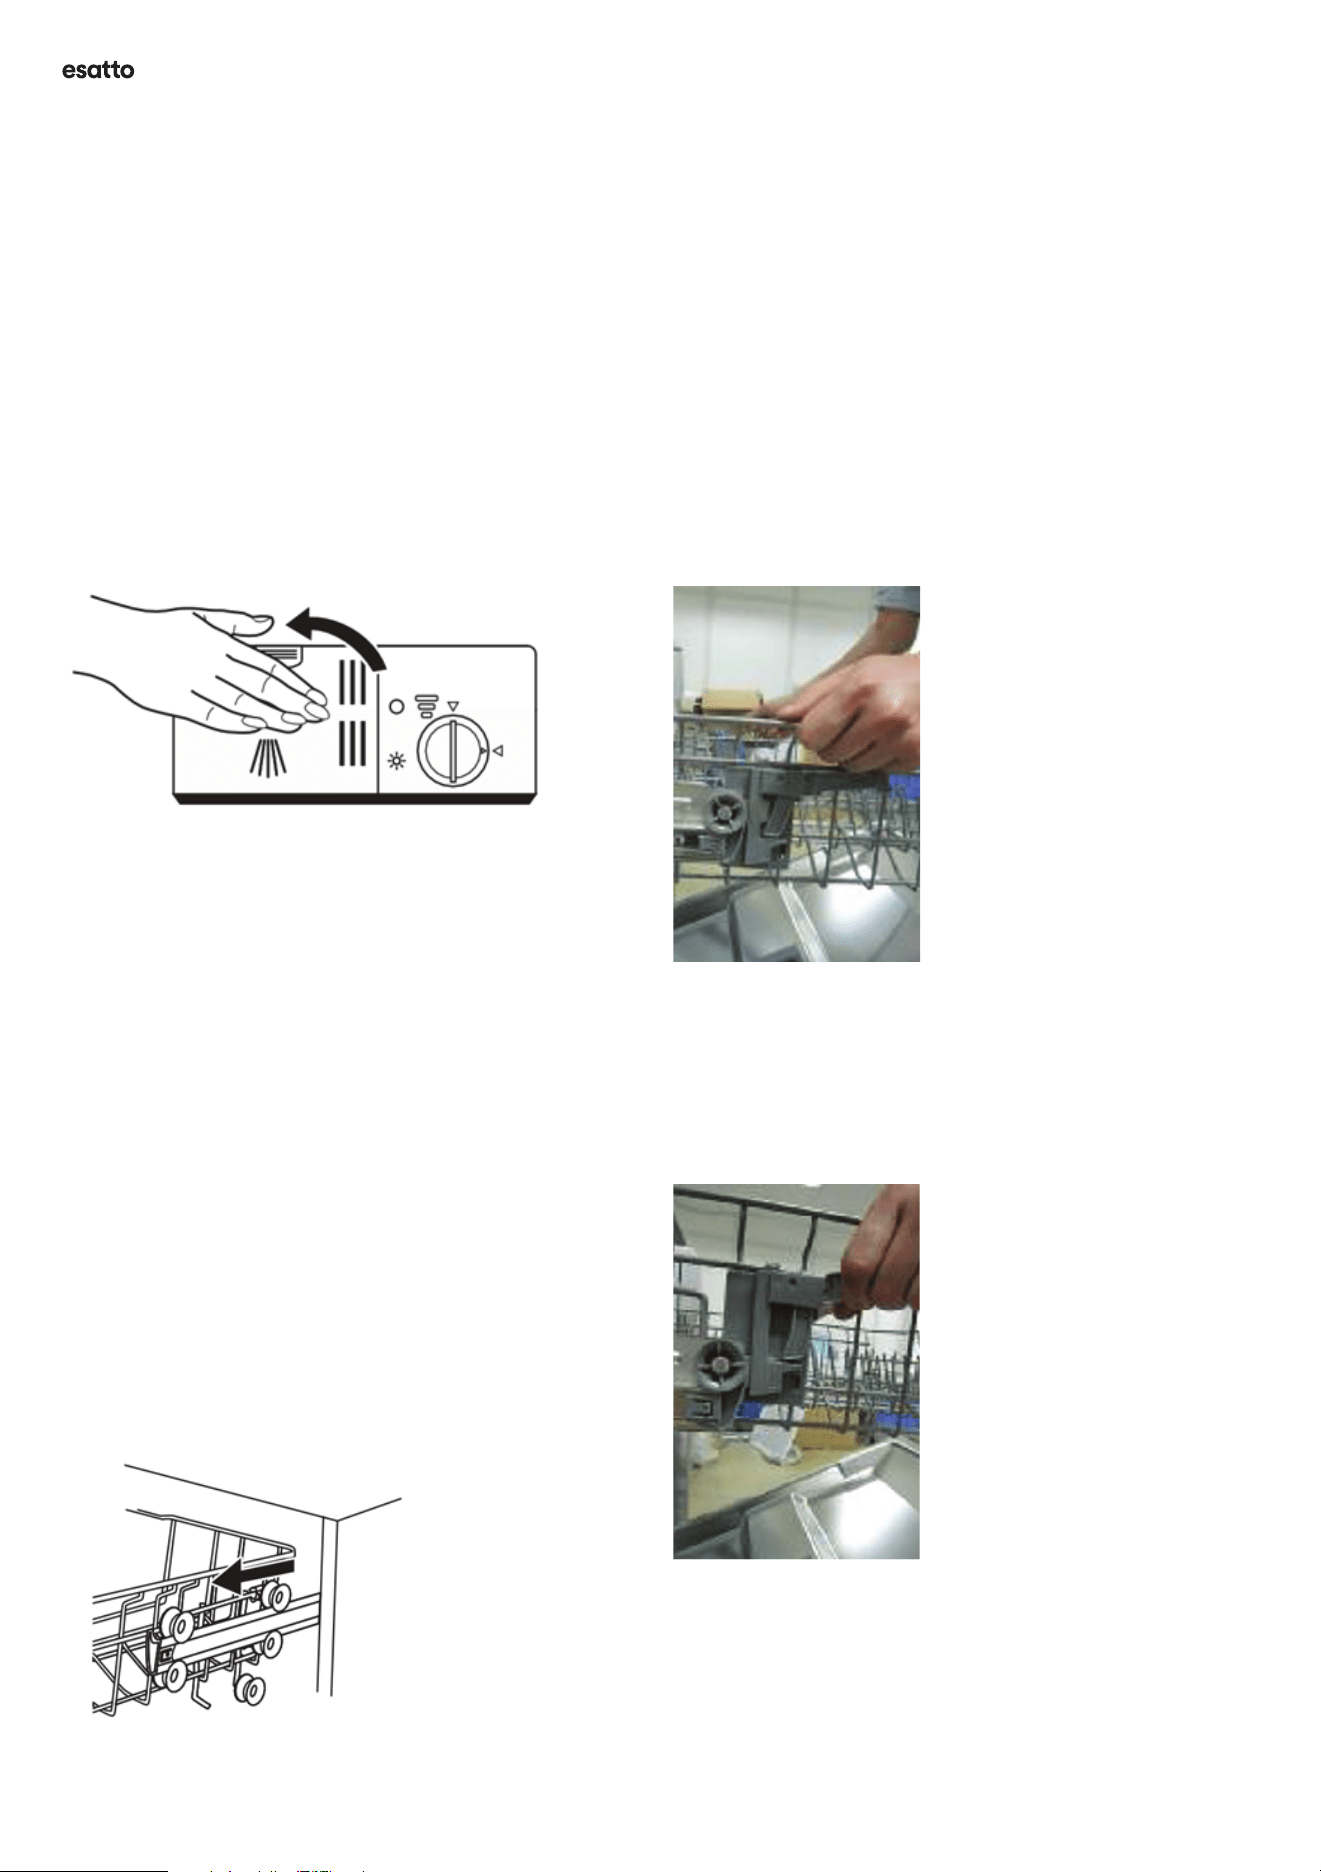
Step 3 Close the dispenser cover and press on it until it
locks in to place (you’ll hear a click).
Figure 15: Closing the dispenser cover.
Note: Please refer to the Manufacturer’s instructions on the
dishwasher detergent you are using. Dosage instructions
will vary.
USING THE BASKETS
Your dishwasher is supplied with an upper and lower
basket, along with a removable plastic cutlery basket
which is designed to sit in the lower basket.
Adjusting the Upper Basket Height
The height positioning of your upper basket can easily
be adjusted between two settings, allowing you to
accommodate taller dishes in either the upper or lower
basket. Your Esatto dishwasher model (EDW7CS) is tted
with quick adjust handles on either side of the upper
basket.
To adjust the height of the upper basket, follow these
steps.
Step 1 Slide out the upper basket to the end of its
extension arms.
Figure 16: Slide out the upper basket.
Step 2 Lift the basket rack upwards until it locks into the
upper position. If the basket is already locked in its upper
position and you wish to lower it, go to step 3.
Figure 17: Lifting the upper basket into its upper position
by holding and lifting the two sides of the
basket rack.
USING THE BASKETS CONTINUED
Step 3 To lower the upper basket, simply pull the quick
release levers on either side to lower the basket rack.
Figure 18: Using the quick release levers on both sides of
the upper basket rack to move lower it.
Preparing Your Dishwasher (Continued)
esatto.house15
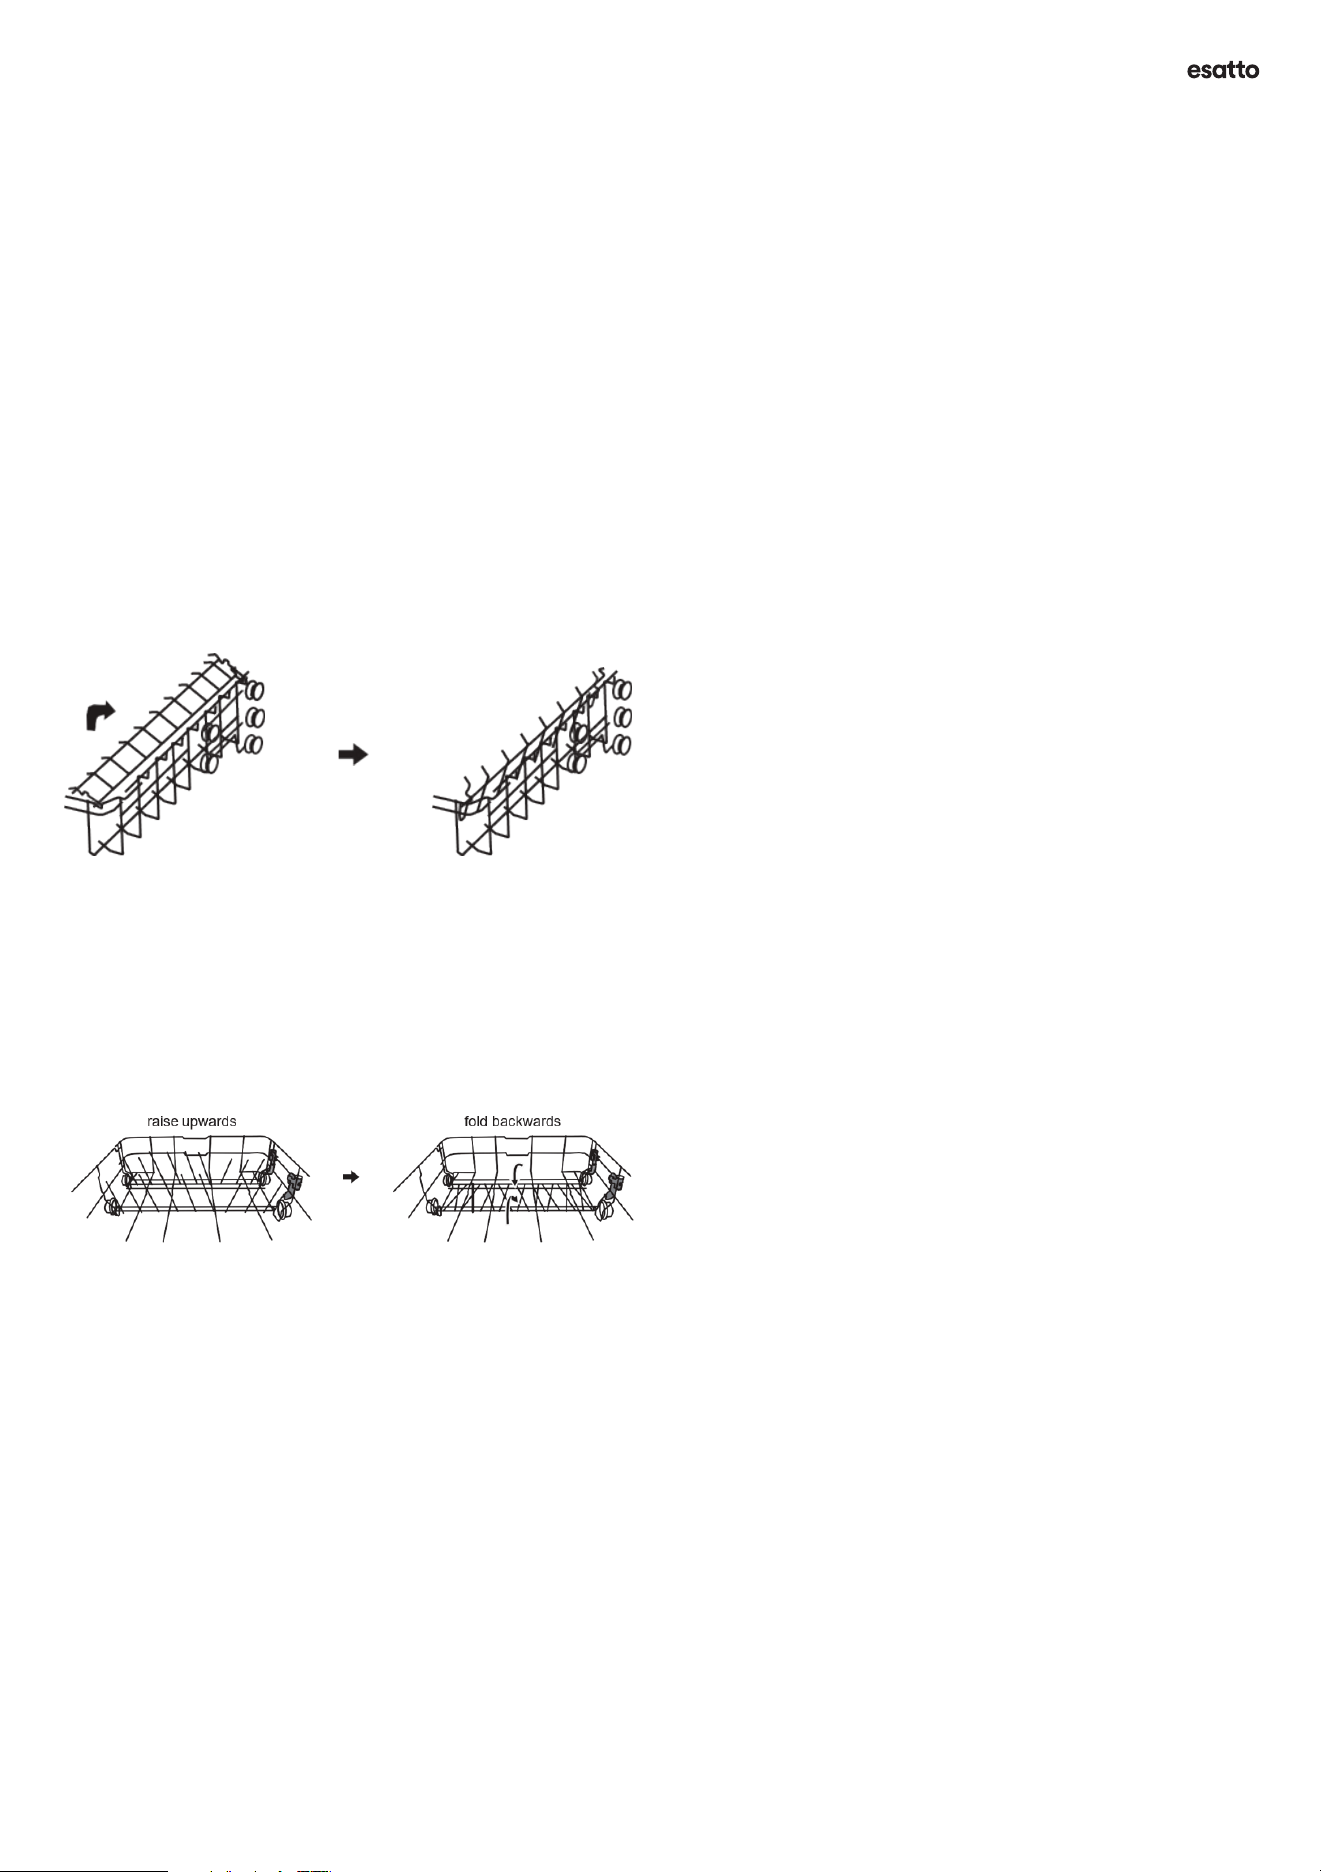
FOLDING BACK THE GLASS RACKS
To make room for taller items in the upper basket, you can
raise the glass rack upwards, allowing you to lean the tall
glasses against it (i.e. holding wine glass stems). You can
also remove it when it is not required for use.
Figure 19: Adjusting the upper basket glass racks.
FOLDING BACK THE RACK ARMS
The rack arms (or spikes) of the lower basket are used for
holding and organising plates and bowls. These can be
lowered to make room for large items as required. Simply
click them downwards using light force, or click them into
the upright position- refer to gure 21 below.
Figure 20: Raising and lower the rack arms within the
lower basket.
PREPARING AND LOADING DISHES INTO YOUR
BASKET RACKS
Caution! Some items are not safe for use in dishwashers
and can be damaged or become discoloured when washed
within a dishwasher. Always check the care information on
your utensils and crockery to ensure they are dishwasher
safe.
Note: Some items may require washing on a lower
temperature program to prevent damage.
Tip! To prevent damage to glass and cutlery, avoid
removing it immediately after the program has ended as
they will be at their hottest temperature at this time.
The following items are not suitable for washing within
your dishwasher:
• Cutlery with handles made from wood, horn china or
mother of pearl
• Plastic items that are not heat resistant
• Older cutlery with glued parts that are not
temperature resistant
• Bonded dishes
• Pewter or copper items
• Crystal glassware
• Steel items subject to rusting
• Wooden platters
• Items made from synthetic bres
The following items have limited suitability for washing in
your dishwasher:
• Some types of glassware can become dull after a large
number of washes
• Silver and aluminium parts have a tendency to
discolour during washing
• Glazed patterns on ceramics may fade if they are
washed frequently
RECOMMENDATIONS FOR LOADING
Before loading your dishes into the dishwasher, please
consider:
• Scraping o any large amounts of residual food on
your plates and bowls.
• Soften any remnants of burnt food in pots or pans.
Note: The features and appearance of your basket racks
and cutlery basket may vary slightly by model.
Preparing Your Dishwasher (Continued)
User Manual 16
For optimal performance of the dishwasher, follow these
loading guidelines:
• Items such as cups, glasses, pots, pans, etc. are faced
downwards, so as not to collect water.
• Curved items, or ones with recesses, should be
loaded so that water can run o, rather than sit in any
crevasse.
• All utensils are stacked securely and can not tip over.
• All utensils are placed in the way that the spray arms
can rotate freely during washing.
• Load hollow items such as cups, glasses, pans etc.
With the opening facing downwards so that water
cannot collect in the container or a deep base.
• Dishes and items of cutlery must not lie inside one
another, or cover each other. To avoid damage, glasses
should not touch one another.
• The upper basket is designed to hold more delicate
and lighter dishware such as glasses, coee and tea
cups.
• Long bladed knives stored in an upright position are a
potential hazard! Long and sharp items of cutlery such
as carving knives must be positioned horizontally in
the upper basket.
• Please do not overload your dishwasher. This is
important for good results and for reasonable
consumption of energy.
Tip! Avoid washing very small items within your dishwasher
as they could easily fall out of the basket and interfere with
a spray arm for the lter.
Caution! When loading the basket racks, be careful in
particular when loading sharp items or large pots to ensure
no damage is caused to the protective coating on the racks.
If this protective coating is scratched of cut, it can lead
to potential rusting over time. This type of damage is not
covered under the Manufacturer’s warranty.
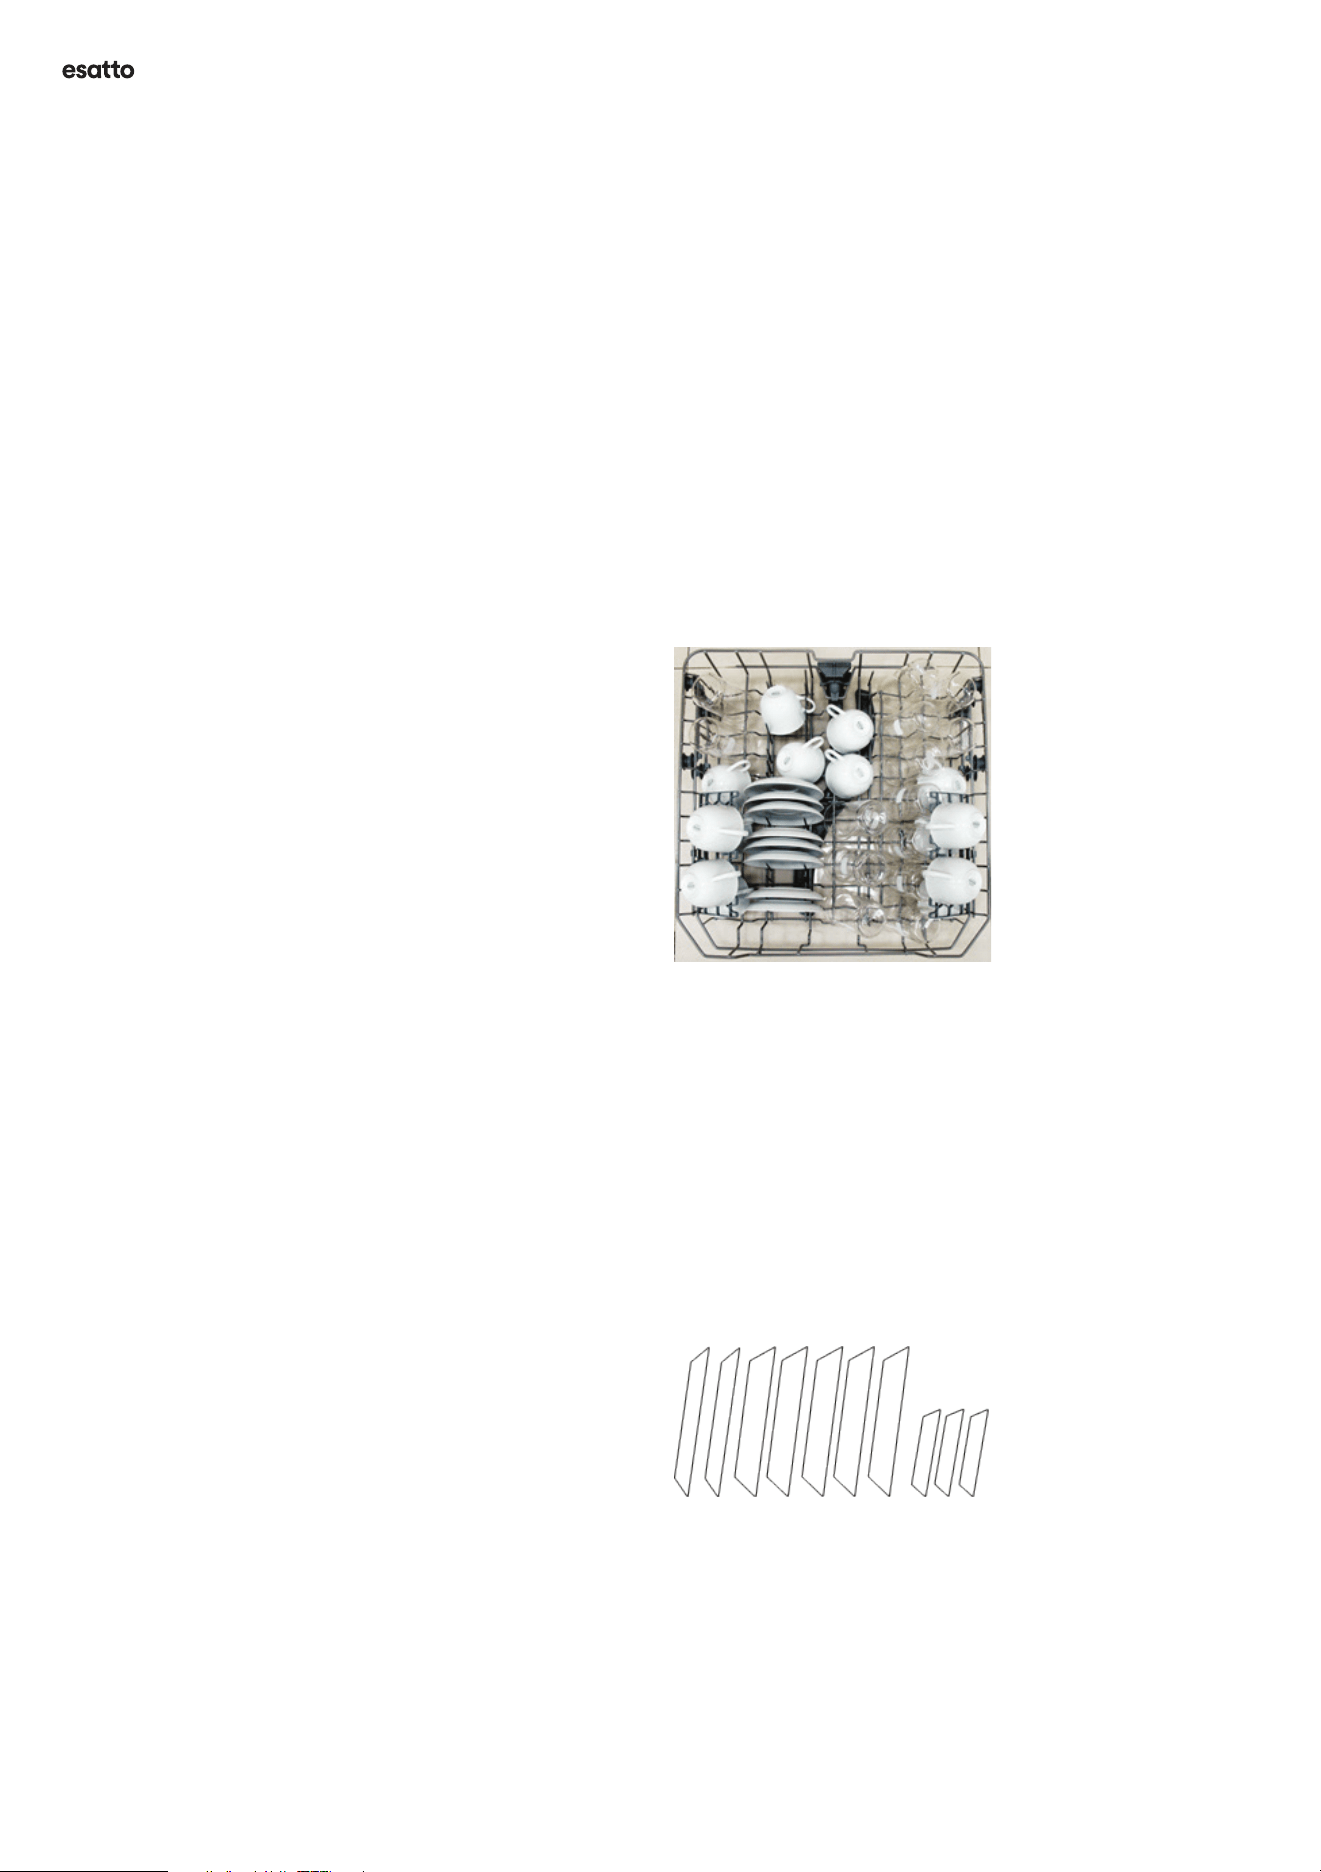
Loading the Upper Basket Rack
The upper basket rack is designed to hold more delicate
and lighter dishware such as glass, coee/tea cups,
saucers, small plates and small bowls. Position the dishes
so that they will not get moved by the spray of the water.
Figure 21: Example loading of the upper basket rack.
Loading the Lower Basket Rack
The lower basket rack is designed to hold the larger items
and those most dicult to clean. Items such as pots, pans,
lids, serving dishes, dinner plates, bowls, etc, as shown in
gure 22 below.
It is preferable to place serving dishes and lids on the side
of the racks in order to avoid blocking the rotation of the
upper spray arm.
The maximum diameter advised for plates in front of the
detergent dispenser is 19cm, to avoid interfering with the
opening of the detergent dispenser.
Figure 22: Example loading of the lower basket rack.
Preparing Your Dishwasher (Continued)
esatto.house17
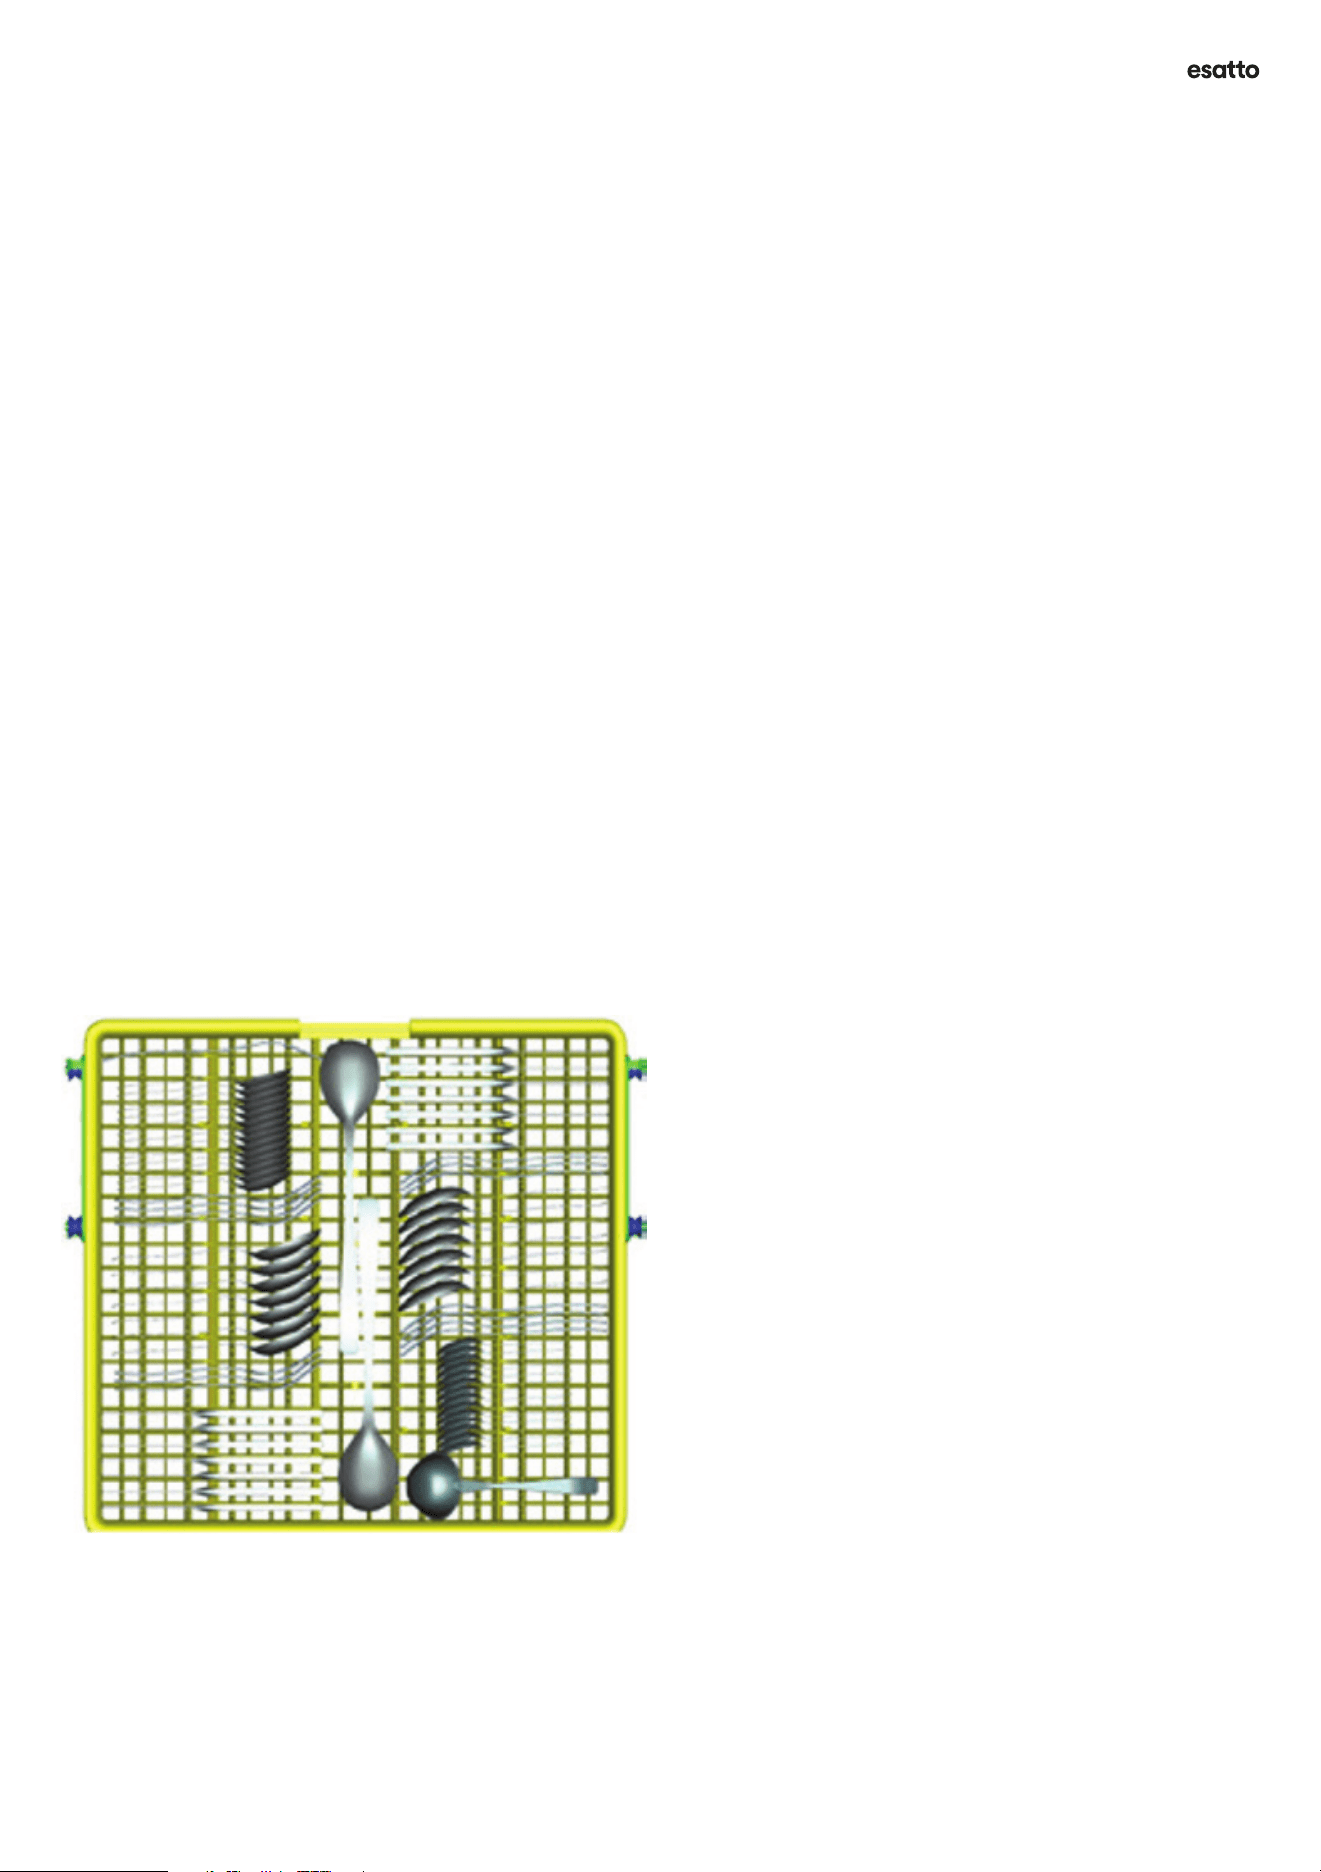
Loading the Cutlery Tray
Your dishwasher is tted with an upper cutlery tray which
can be lifted out of your dishwasher for convenience of
unloading. This retracting cutlery tray allows for optimal
loading and cleaning of your cutlery whilst maximising
space in the lower basket rack (where traditionally a
cutlery basket would be located).
Cutlery should be placed into the plastic cutlery tray
separately from each other to ensure that the utensils do
not nest together. When the cutlery (in particular spoons)
is stacked in close proximity and nesting together, the
washing performance will be impacted.
WARNING! Do not let any utensils protrude down through
the bottom of the cutlery basket as this can interfere with
the spray arm. Always load sharp utensils with the sharp
point downwards, to avoid risk of injury.
Tip! Long utensils can be washed by sitting them in the
centre of the tray, as pictured in Figure 23 below.
Figure 23: Optimum loading of your cutlery tray.
Removing the Dishes at the End of a Cycle
To prevent water dripping from the upper basket onto your
dishes in the lower basket rack, we recommend that you
slide out and empty the lower basket rack rst, followed
by the upper basket rack.
Caution! Items will be hot immediately after the wash
program is complete! To prevent damage, do not take glass
and cutlery out of the dishwasher for around 15 minutes
after the program has ended.
Tip! To maximise the drying performance of your
dishwasher, once the wash program has completed and the
audible tone has sounded, simply open your dishwasher
door slightly to allow for some of the steam to escape.
Leave your dishwasher for at least 15-30 minutes and you’ll
nd the drying results will improve greatly.
Preparing Your Dishwasher (Continued)

User Manual 18
TURNING YOUR DISHWASHER ON AND
STARTING A WASH CYCLE
Step 1 Load your dishwasher according to the guidelines in
the Preparing Your Dishwasher section of this manual.
Step 2 Load the dishwasher detergent dispenser (refer to
section Preparing Your Dishwasher in this manual).
Step 3 Close the dishwasher door and press the Power
button to turn on your dishwasher, located on the control
panel.
Step 4 Press the Program button (located on the control
panel) to cycle through the various dishwasher programs,
to select your desired wash program. It will cycle through
the options in the following order: ECO > Glass > Super
90’ > Quick 30’ > Pre-wash > Intensive > Heavy > ECO etc.
The LED will alight alongside the corresponding program
selected.
Step 5 (optional) Add any additional options to the wash
program, including Half Load or Extra Drying.
• To activate the Half Load function, press the Half Load
button.
• To activate the Extra Drying function, press the Option
button.
Note: Extra Drying cannot be added to the Quick 30’ or
Soak programs.
Step 6 (optional) Add any Delay start, if you would like to
postpone the wash cycles start by 3, 6 or 9 hours. Simply
press the Delay button to cycle through the options.
Step 7 Press the Start/Pause button to start the wash
program, using the settings you’ve selected.
Tip! Whilst your dishwasher is operating a wash cycle, you
can pause the program at any time by pressing the Start/
Pause button. To un-pause, simply press the Start/Pause
button once again and it will resume its’ wash program.
When the dishwasher is in its paused status, the colon
symbol between the Hours and Minutes remaining (i.e.
H:MM) will stop blinking and be displayed solid.
Operating Your Dishwasher
CHANGING THE PROGRAM
Once the dishwasher has started a wash cycle program,
you can change the selected program within the rst
minute or so, otherwise the detergent may have been
already released. When you start a new program, the
dishwasher will drain any residual water, hence you will
need to re-ll the detergent dispenser in the event that it’s
already dispensed it.
To change the program within the rst minute, press
the Start/Pause button and the dishwasher will enter it’s
standby state. Press and hold the Program button for 3
seconds. You can now press the program button to cycle
through the programs and select an alternative wash
program. Once you’ve selected the new program, press
the Play/Pause button once more to start.
The colon symbol between the Hours and Minutes
remaining (i.e. H:MM) will ash intermittently once
running again.
Note: If you open the door during a wash cycle, the
dishwasher will automatically pause. The colon symbol
between the Hours and Minutes remaining (i.e. H:MM) will
stop ashing to indicate that the dishwasher is in standby
mode. An audible tone will sound every 1 minute until you
close the door. After you close the dishwasher door, it will
automatically resume its wash program after 10 seconds.
Caution! It is dangerous to open the dishwasher door
during operation. The hot water or steam inside can easily
scald you.
FORGOT TO ADD A DISH
A forgotten dish can be added any time before the
detergent dispenser has been released.
Step 1 Press the Start/Pause button to put the dishwasher
into standby mode.
Step 2 Open the door a little, allowing for the spray arms
to stop spinning, before opening the door fully.
Step 3 Add any forgotten dishes or cutlery.
Step 4 Close the door.
Step 5 Press the Start/Pause button for the machine to
resume its program after 10 seconds.
esatto.house19
Operating Your Dishwasher (Continued)
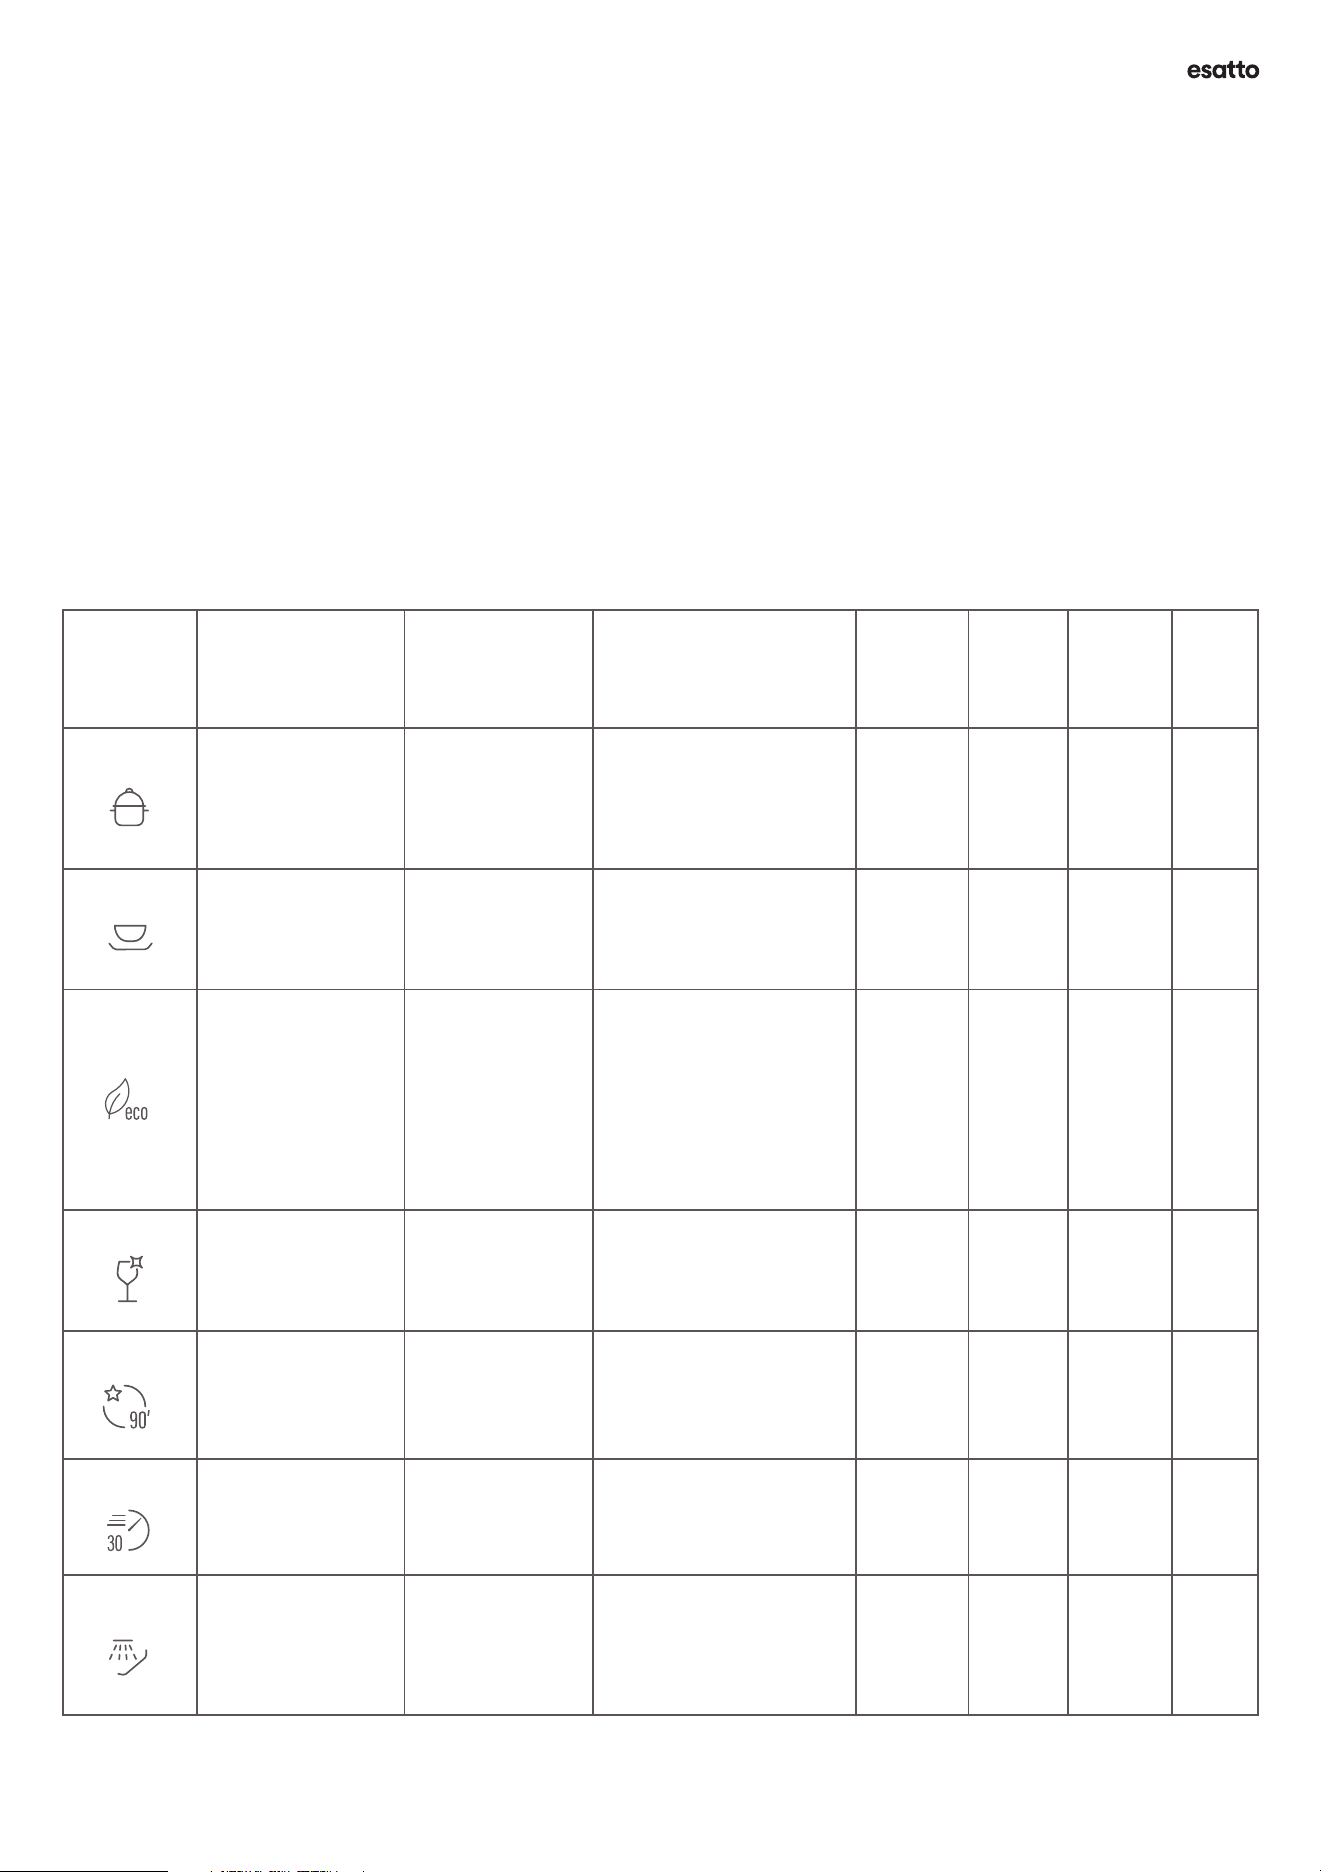
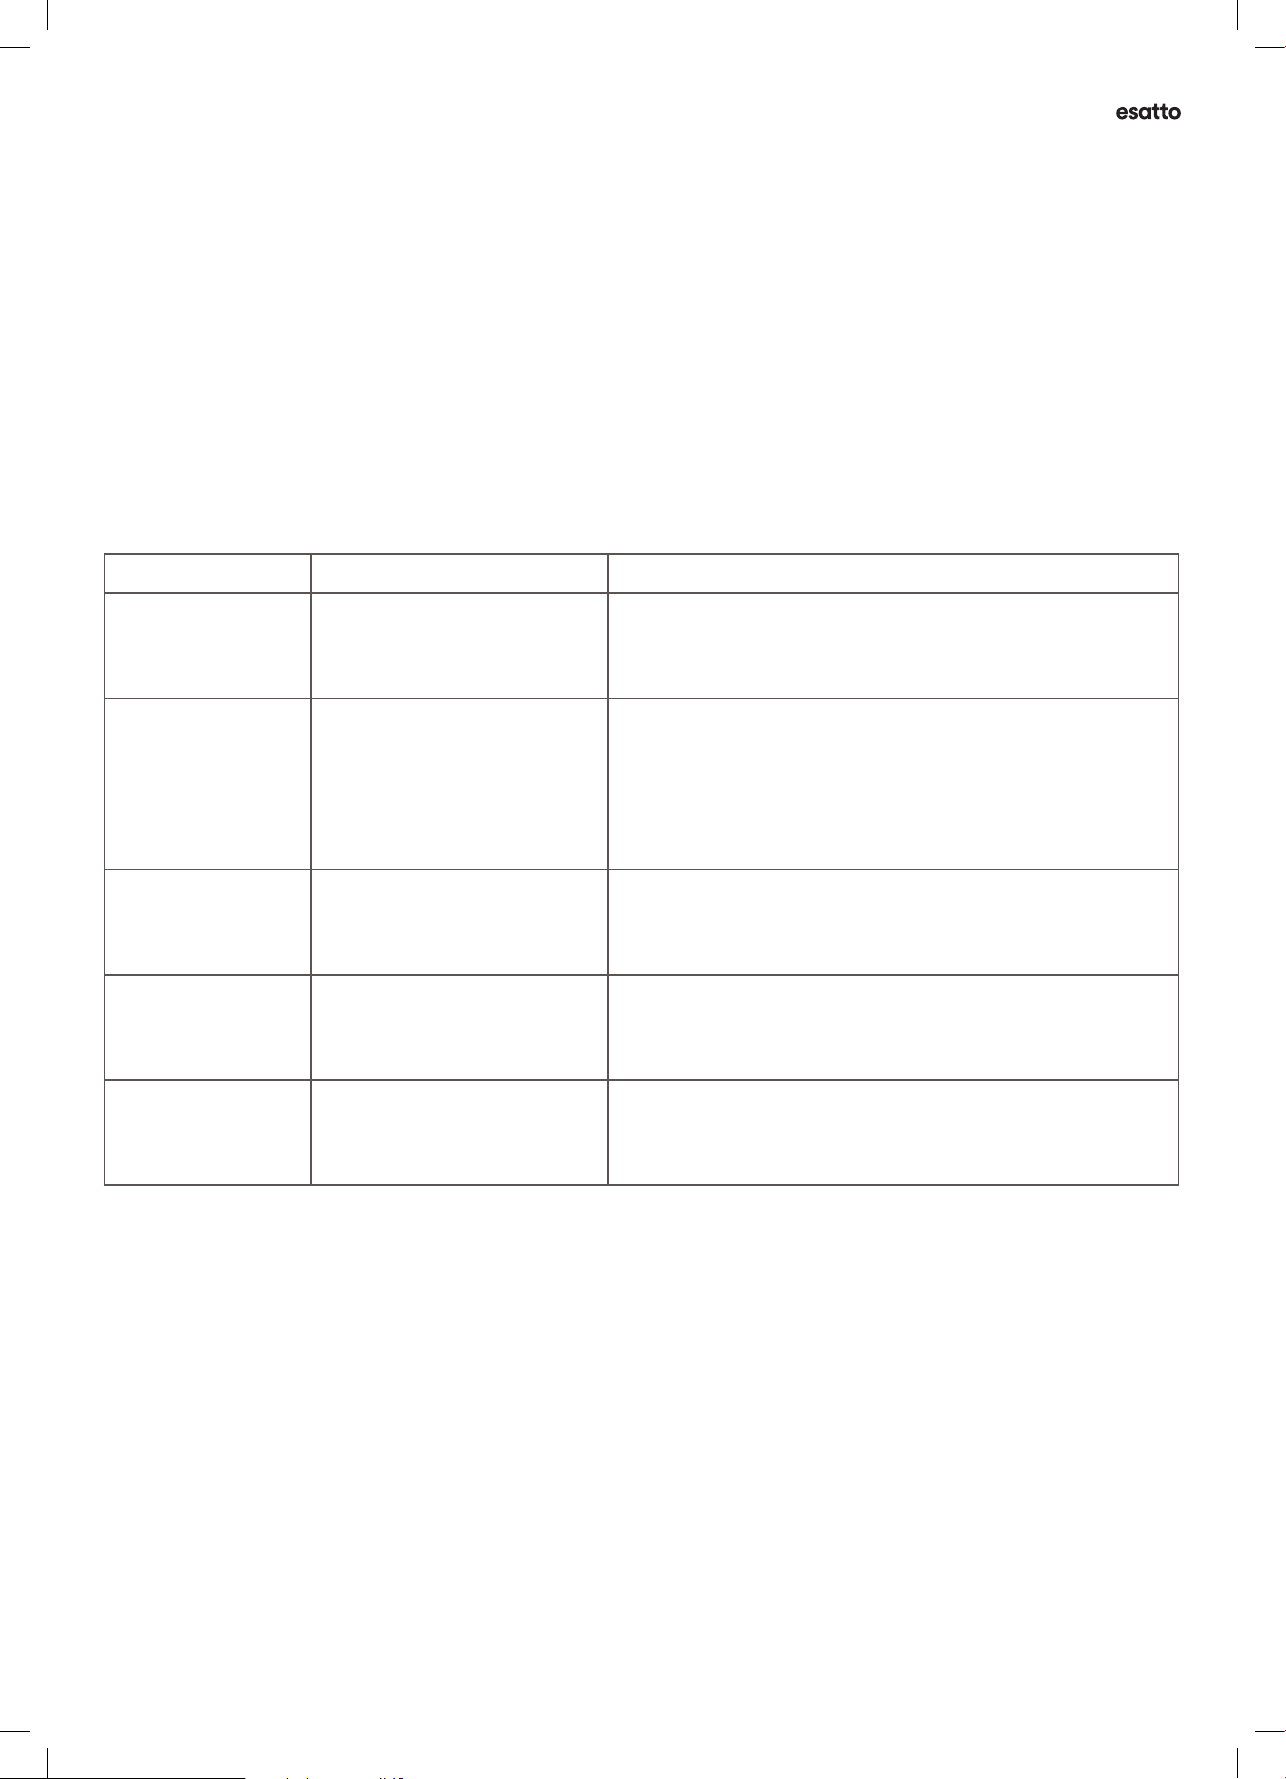
YOUR DISHWASHER’S WASH PROGRAMS
Your Esatto dishwasher has the following wash programs. Please refer to the table below to determine which program is
most suitable for each load.
Program Use Process of
the Cycle
Suggested
Detergent for Both
Pre-wash and Main
Compartments
Running
Time
(mins)
Energy
Use
(kWh)
Water
Use (L)
Rinse
Aid
Intensive
For heavily soiled
crockery and
normally soiled pots/
pans and dishes with
dried on soiling.
Prewash 50º
Wash 60º
Rinse
Rinse
Rinse 65º
Drying
5g / 27.5g
(or all-in-1 tablet)
170 1.5 17. 5 Yes
Heavy
For heavily soiled
loads such as plates,
glasses and lightly
soiled pots and pans.
Prewash 45º
Wash 55º
Rinse
Rinse 65º
Drying
5g / 27.5g
(or all-in-1 tablet)
160 1.3 13.5 Yes
ECO
This is the
standard program
and is suitable to
clean normally
soiled crockery and
cutlery. It is the most
ecient program for
energy and water
consumption for a
normal load.
Prewash
Wash 45º
Rinse 48º
Drying
5g / 27.5g
(or all-in-1 tablet)
170 0.7 12 Yes
Glass
Ideal for lightly
soiled crockery
and glassware
Prewash
Wash 42º
Rinse
Rinse 60º
Drying
5g / 25g
(or all-in-1 tablet)
125 0.8 13 Yes
Super 90’
Ideal for daily
normally soiled loads
that need a quick
wash, glassware, etc.
Wash 65º
Rinse
Rinse 65º
Drying
0g / 25g
(or all-in-1 tablet)
90 1.2 11.5 Yes
Quick 30’
A shorter wash
for lightly soiled
loads that do not
need drying
Wash 40º
Rinse
Rinse 45º
0g / 25g 30 0.6 11.5 No
Pre-wash
To rinse dishes that
you plan to wash later
that day
Pre-wash - 8 0.02 4 No
Note: ECO program was used for the test cycle to obtain this dishwasher’s MEPS and WELS rating in accordance with
AS/NZS 2007.1, as follows: Capacity = 14 Place Settings, Position of Upper Basket = Upper Wheels on Rails, Rinse Aid
Setting = 6. Tip: Open the door slightly (~50mm) to assist with the drying of dishes after the completion of each wash.

User Manual 20
Operating Your Dishwasher (Continued)
AT THE COMPLETION OF A WASH CYCLE
When your dishwasher has completed its wash program
cycle, an audible tone will sound for 8 seconds,
before stopping. Follow these steps for optimal drying
performance.
Tip! The colon symbol between the Hours and Minutes
remaining (i.e. H:MM) will be solid (i.e. not ashing/
blinking) to indicate the program has ended. The LED next
to the Program Ended Indicator will also be illuminated.
Step 1 Switch o your dishwasher using the Power button.
Turn the water supply o at its tap.
Step 2 Open the door slightly (around 50mm) to allow for
the steam to escape. Leave the dishwasher for 15 minutes
where possible, to allow for your dishes to cool a little.
This will also assist the drying process.
Step 3 Unload the dishwasher, starting with the lower
basket rack rst, before unloading the upper basket rack.
This will help to avoid water dripping from the upper
basket rack onto your lower dishes.
Note: It is normal for the dishwasher and it’s racks to be
wet inside. Plasticware will not dry as well as ceramic
crockery, porcelain or metal cutlery, as plastic by nature
won’t get as hot nor retain heat in the same way. Due to
this, plastic very rarely dries within a dishwasher.
Caution! Be careful when opening the dishwasher door.
The hot water or steam inside can easily scald you.
esatto.house21
Some simple maintenance and cleaning steps must be
followed to ensure that your dishwasher continues to
operate at its optimum and without issue.
Failure to follow these basic maintenance and cleaning
steps may void your Manufacturer’s warranty or result in
a service fee in the event of a technician attending site
under warranty.
EXTERNAL CARE
Doors and Seals
Using a soft, lightly damp cloth, wipe down the door seals
to remove any residual food deposits. We recommend
this process at least monthly, or when an accidental spill
occurs dirtying the door seal area.
When the dishwasher is being loaded, it’s common
for food and drink residues to drip onto the sides of
the dishwasher door and the rubber seals themselves.
These surfaces are outside the wash cabinet and are not
accessed by water from the spray arms. Any deposits
should be wiped o before the door is closed.
The Control Panel
Using a soft, lightly damp cloth, wipe down the control
panel when cleaning is required. After cleaning, ensure
that you dry the control panel thoroughly.
WARNING! To avoid penetration of water into the door
lock and other electrical components, do not use a
spray cleaner or pressure cleaner, of any kind. Never use
abrasive cleaners or scouring pads on the outer surfaces
as these may scratch the nish.
INTERNAL CARE
Base of the Dishwasher
Residual food can build up at the base of the dishwasher,
in particular near where the door meets the base. Using
a soft, damp cloth, wipe any residual food residue away
and around the rubber seals. This should be undertaken at
least monthly or more if required.
Filter System
Having a clean lter system is critical to the ongoing
cleaning performance of your dishwasher and this basic
cleaning process is often neglected. The lter system
is located in the base of the wash cabinet and it retains
coarse debris from the washing cycle. This collected
debris does cause the lters to clog over time and its
important to regularly check your lters and clean them
as required. We recommend this to be done weekly when
regularly using your dishwasher.
Follow the steps below to clean your lter system.
Note: Pictures are for reference only and your lter design
may vary slightly depending on your model.
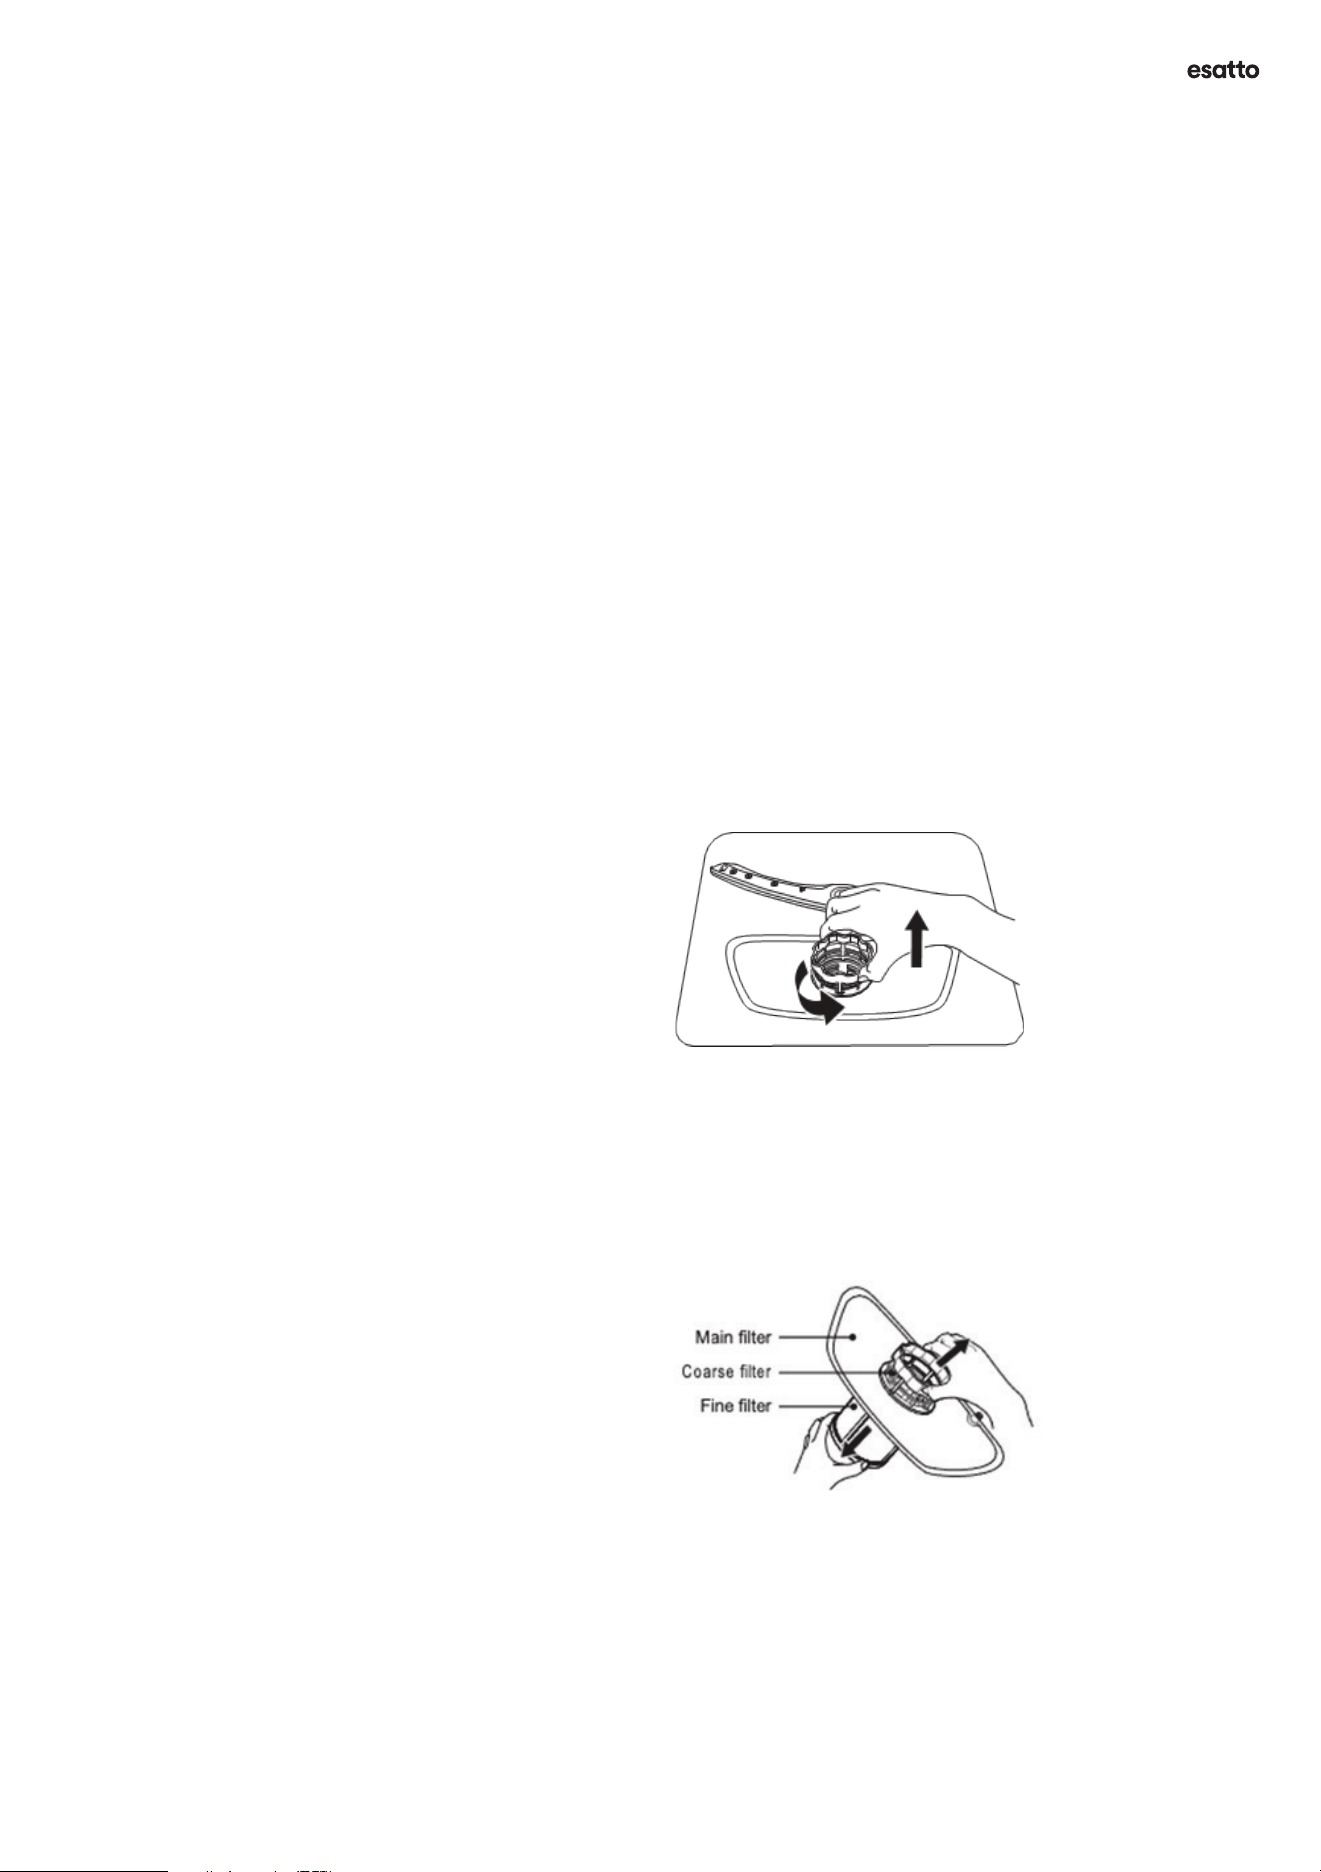
Step 1: Hold the coarse lter (round plastic head
protruding from the metal mesh lter) and rotate anti-
clockwise to unlock the lter. Lift the lter upwards and
out of the dishwasher, including the metal mesh main lter.
Figure 24: Unlocking the lter system from the
base housing.
Step 2: With the lter assembly removed from the
dishwasher, the ne lter can be pulled o the bottom,
(refer to gure 25 below). This ne lter is covered by a
ne mesh. Rinse this under running water from your tap
and wipe any residual food residue o the lter.
Figure 25: Filter assembly once removed from the
dishwasher cabinet base.
Maintenance & Cleaning
User Manual 22
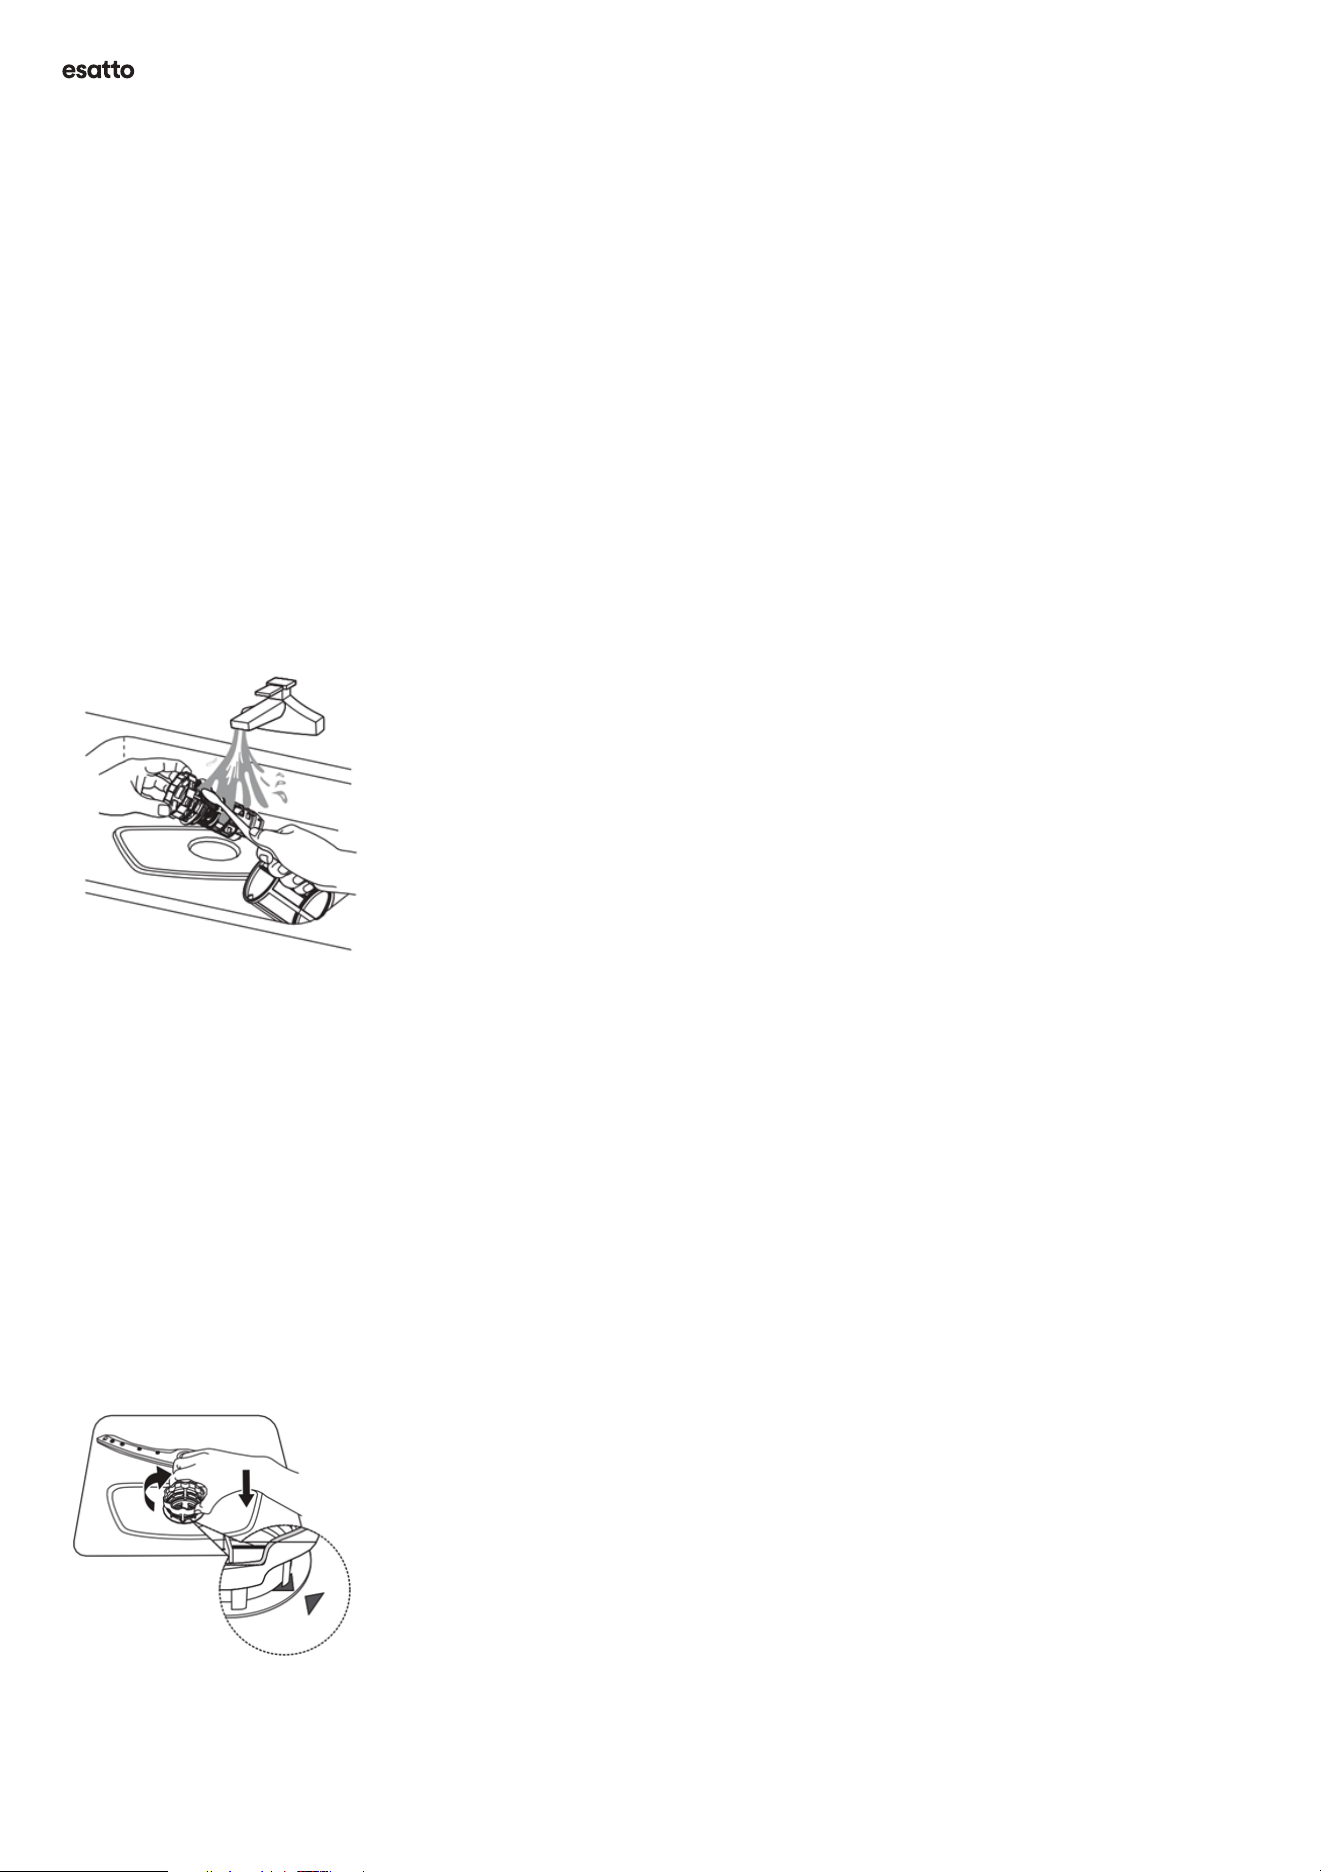
Step 3: Detach the course lter by gently squeezing the
tabs at the top and pulling it away from the mesh main
lter. Under running tap water, clean both the mesh main
lter and the course lter, removing any residual food or
foreign objects. For a more thorough clean you may like to
use a soft cleaning brush (i.e. a soft bristled toothbrush).
Figure 26: Rinse and scrub any residual food particles or
foreign objects from the lter components.
Step 4: Before re-tting the lter housing into your
dishwasher, it’s worth checking that the housing in the
base of the dishwasher is clean and clear of foreign
objects (including bone fragments, broken glass, etc).
Caution! We recommend wearing gloves to protect your
hands from any potential broken glass or sharp foreign
objects that may be sitting in the base of the lter housing.
Step 5: Reassemble the lter in the reverse order of
disassembly. Replace the lter into the base of the
dishwasher and turn the coarse lter head in a clockwise
direction until it locks back into place. You will notice the
arrows to align on the course lter and the metal main
lter when locked in position.
Figure 27: Retting the lter system into dishwasher base.
WARNING! Do not over tighten the lters. Put the lters
back in the correct s`equence and securely lock in place,
otherwise coarse debris could get into the system and
cause a blockage or damage internally.
WARNING! Never use the dishwasher without the lters
in place. Improper replacement of the lter will reduced
the performance level of the dishwasher and may
damage your dishes and utensils.
Note: Failure to regularly clean the lter will increase the
risk of debris entering the internal system and causing
damage to your appliance. Failure to follow the regularly
maintenance steps outlined may lead to voiding your
Manufacturer’s warranty.
Maintenance & Cleaning (Continued)
esatto.house23
Cleaning the Spray Arms
It is necessary to clean the spray arms regularly, as hard
water chemicals will clog the spray arm jets and bearings.
To clean the spray arms, follow the steps below:
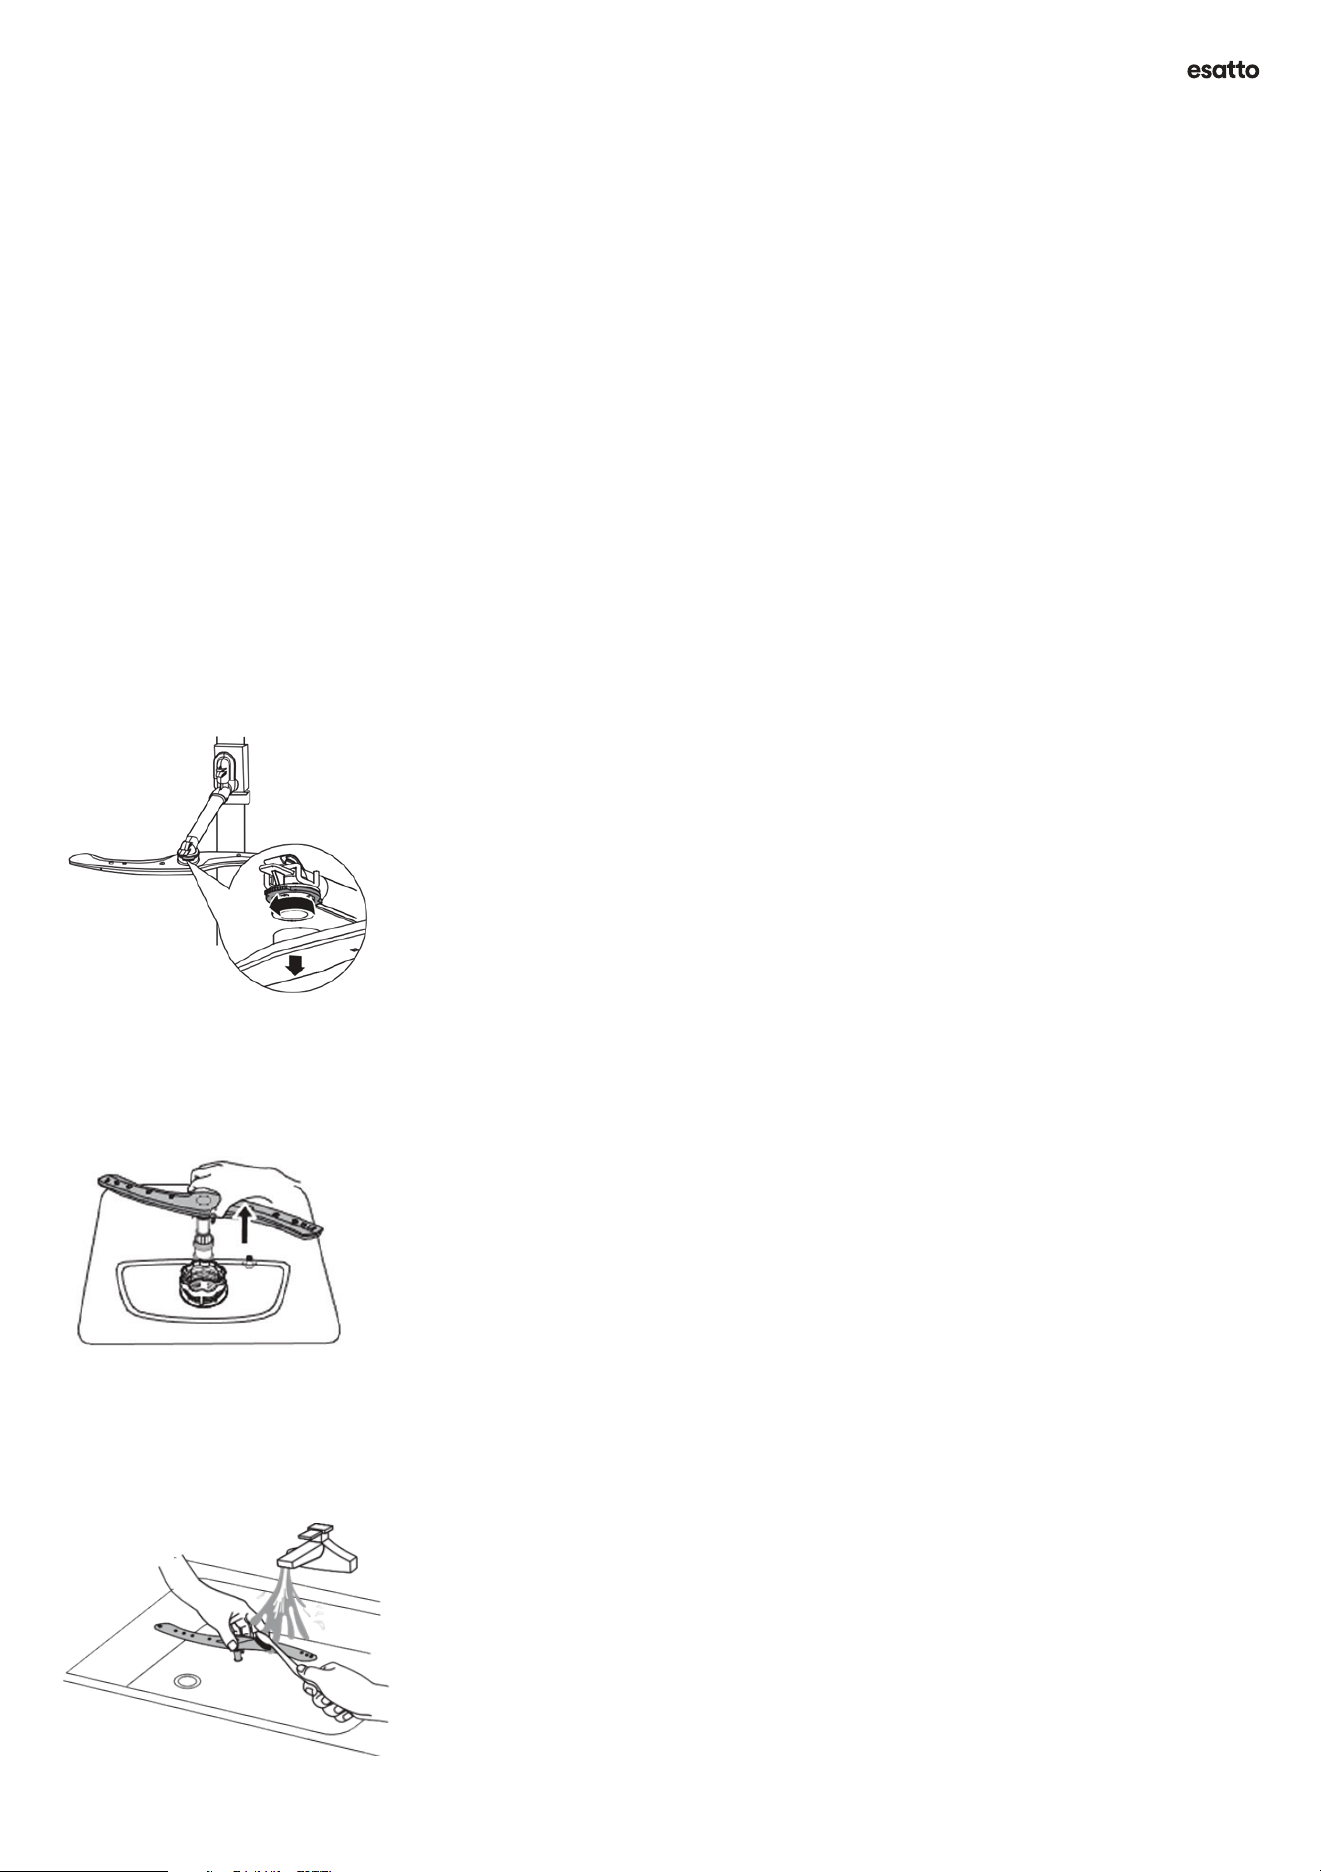
Step 1: To remove the upper spray arm, hold the nut and
rotate the arm clockwise to remove it.
Figure 28: Removing the upper spray arm.
Step 2: To remove the lower spray arm, simply lift it in an
upwards direction.
Figure 29: Removing the lower spray arm.
Step 3: Wash both spray arms in soapy warm water and
use a soft brush (i.e. a tooth brush) to clean the jets. Rinse
well and replace them in your dishwasher.
Figure 30: Cleaning the spray arms.
Cleaning the Interior Cabinet
Over time, grime can accumulate on the interior walls
of the appliance. A quick wipe down will do wonders for
removing any dishwasher odour which can develop over
time.
Step 1: Remove both the upper and lower basket racks and
run them under hot water within the kitchen sink.
Step 2: Scrub the inside of the dishwasher with a rag or
sponge dampened with hot water. If there is stuck on food
residue, use some white vinegar to help remove it. Wipe
down the rubber door gaskets (attached to the dishwasher
cabinet) as these can collect food residue, mould and
mildew.
Removing Dishwasher Odour
If your dishwasher has developed an odour and you’ve
completed all of the internal cleaning steps listed above,
you may like to try a cleaning cycle using some white
vinegar and baking soda. Follow the steps below.
Step 1: Empty the appliance of all dishes.
Step 2: Place one cup of white vinegar in a stable bowl in
the upper basket rack of your dishwasher.
Step 3: Set your dishwasher to the Intensive program
and run for a full cycle. This is the hottest program for
your dishwasher and the acids within the vinegar will
help to break down any deposits on the interior of your
dishwasher.
Step 4: Remove the bowl from the dishwasher once your
cycle is complete. Sprinkle a cup of baking soda on the
oor of the dishwasher.
Step 5: Set your dishwasher to the Super 90’ program and
run another empty cycle. This will dissolve all the baking
soda and eliminate any remaining odour within your
dishwasher.
Maintenance & Cleaning (Continued)

User Manual 24
FROST PROTECTION
Please take frost protection measures with your
dishwasher in winter, particularly when you reside in cold
regions.
After each washing cycle, follow these steps:
• Ensure you turn o the power to your dishwasher at
the power point.
• Turn o the water supply to your dishwasher, at the
supply tap and disconnect the water inlet pipe from
the water valve on the rear of your dishwasher.
• Drain the water from the inlet pipe and water valve.
Use a bucket to capture the water.
• Reconnect the water inlet pipe to the water valve at
the rear of your dishwasher.
• Remove the lter assembly from the bottom of your
dishwasher and use a sponge to soak up any residual
water sitting in the lter housing.
Caution! Failure to follow these steps in regions prone
to freezing can result in damage to your dishwasher. The
manufacturer’s warranty will not apply if these steps
haven’t been followed.
GENERAL CARE ADVICE
After Every Wash
After every wash cycle, turn o the water supply to
the dishwasher and leave the door slightly ajar to that
moisture and odours are not trapped inside.
Remove the Plug
Before undertaking any cleaning or maintenance steps,
always remove the dishwasher’s plug from it’s power
outlet (power socket).
WARNING! Risk of electrocution if this step is not
followed.
No Solvents or Abrasive Cleaning
To clean the exterior and rubber parts of the dishwasher,
never use solvents or abrasive cleaning products. Only
use a cloth with warm soapy water. To remove stubborn
stains or spots from the surface of the interior, use a clothe
dampened with water and some white vinegar, or use a
specially designed dishwasher cleaner available from your
local supermarket.
When Your Dishwasher Will Not Be Used for Some Time
It is recommended that you run a wash cycle with the
dishwasher empty and then remove the plug from its
power outlet (power socket), turn o the water supply at
its supply tap and leave the door of the dishwasher slightly
open. This will help the door seals to last longer, prevent
odours from forming inside the appliance and prevent
mould and mildew from developing.
Moving the Appliance
In the event that the appliance must be moved, please try
to keep it in its vertical position. If absolutely necessary,
it can be positioned on its back. Failure to follow this step
can lead to internal damage.
Door Seals
One of the factors that cause odours to form within a
dishwasher is the residual food that remains trapped
within the seals. Periodic cleaning with a damp cloth will
prevent this from occurring.
Maintenance & Cleaning (Continued)

esatto.house25
Troubleshooting
GENERAL TROUBLESHOOTING STEPS
Having an issue with your dishwasher? Before contacting our service team, please refer to the troubleshooting table
below. Most issues can easily be rectied with some basic troubleshooting.
Problem Possible Causes Actions to try
My dishwasher
won’t start
Fuse blown, or the circuit
breaker has tripped.
Power supply is not turned on.
Water pressure is low.
Door of dishwasher not prop-
erly closed.
Replace fuse or reset circuit breaker. Remove any other ap-
pliances sharing the same circuit with the dishwasher.
Make sure the dishwasher is turned on and the door is
closed securely. Make sure the power cord is properly
plugged into the wall socket.
Check that the water supply is connected
properly and the water tap is turned on fully.
Make sure to close the door properly and click it closed.
Sometimes the incorrect loading of the basket racks can
cause them to prevent the door from closing fully.
The water is not
draining from my
dishwasher
Twisted or trapped drain hose.
Filter clogged.
Kitchen sink or waste pipe is
clogged.
Check the drain hose.
Check coarse the lter.
Check the kitchen sink to make sure it is draining well. If
the problem is the kitchen sink that is not draining, you may
need a plumber rather than a serviceman for dishwashers.
Suds are remaining
within the dish-
washer base
Wrong detergent
or
Spilled rinse-aid
Use only the special dishwasher detergent to avoid suds. If
this occurs, open the dishwasher and let suds evaporate.
Add 3-4 litres of cold water to the bottom of the dishwasher.
Close the dishwasher door, then select any cycle. Initially,
the dishwasher will drain out the water. Open the door after
draining stage is complete and check if the suds have disap-
peared. Repeat if necessary.
Always wipe up rinse-aid spills immediately
Stained tub interior Detergent with colourant may
have been used.
Make sure that the detergent has no colourant. Refer to
interior cleaning steps.
White lm on inside
surface
Hard water minerals. To clean the interior, use a damp sponge with dishwasher
detergent and wear rubber gloves. Never use any other
cleaner than dishwasher detergent otherwise, it may cause
foaming or suds.
There are rust stains
on cutlery
The aected items are not
corrosion resistant.
The items should be corrosion resistant.
Knocking noise in
the dishwasher
A spray arm is knocking
against an item in a basket
Interrupt the program and rearrange the items which are
obstructing the spray arm.
Rattling noise in the
dishwasher
Items of crockery are loose in
the dishwasher.
Interrupt the program and rearrange the items of
crockery.
User Manual 26
Knocking noise in
the water pipes
This may be caused by on-site
installation or the cross-sec-
tion of the piping.
This has no inuence on the dishwasher function. If in
doubt, contact a qualied plumber.
The dishes are not
clean
The dishes were not loaded
correctly.
The program was
not powerful enough.
Not enough detergent was
dispensed.
Items are blocking the move-
ment of the spray arms.
The lter combination is not
clean or is not correctly tted
in the base of wash cabinet.
This may cause the spray arm
jets to get blocked.
See notes in “Loading & unloading your
dishwasher”.
Select a more intensive program.
Use more detergent, or change your detergent.
Rearrange the items so that the spray can rotate freely.
Clean and/or t the lter correctly. Clean the spray arm jets.
Cloudiness on glass-
ware.
Combination of soft water and
too much detergent.
Use less detergent if you have soft water and select a short-
er cycle to wash the glassware and to get them clean.
Black or grey marks
on dishes
Aluminium utensils have
rubbed against dishes
Use a mild abrasive cleaner to eliminate those marks.
Detergent left in
dispenser
Dishes block detergent dis-
penser
Re-loading the dishes properly.
The dishes aren’t
drying.
Improper loading
Too little rinse-aid
Dishes are removed too soon
Wrong program has been
selected.
Use of cutlery with a
low-quality coating.
Load the dishwasher as suggested in the
directions.
Increase the amount of rinse-aid/rell the
rinse-aid dispenser.
Do not empty your dishwasher immediately after
washing. Open the door slightly so that the steam can come
out. Take out the dishes until the inside temperature is
safe to touch. Unload the lower basket rst to prevent the
dropping water from the upper basket.
With a short program, the washing temperature is lower,
decreasing cleaning performance.
Choose a program with a longer washing time or higher
wash temperature. Try adding the Extra Drying function to
your program.
Water drainage is more dicult with these items. Cutlery
or dishes of this type are not suitable for washing in the
dishwasher.
Troubleshooting (Continued)
esatto.house27
Error Codes
If there is a malfunction the dishwasher will display error codes to identify the fault.
Code Indicator Meanings Possible Causes
E1 will be displayed
on the LED display
and the buzzer will
sound.
Water entering the dishwash-
er has exceeded the pre-set
time, or the ow of water into
the dishwasher is restricted.
Ensure that the water supply hose is un-kinked and that the
water supply tap is fully open.
E3 will be displayed
on the LED display
and the buzzer will
sound.
The dishwashers on board
sensors have detected that
the water isn't reaching the
desired temperature within
the pre-set time.
Potential malfunction of the heating element. Try turning the
appliance power o at the power point for 15 minutes before
re-starting.
Also ensure the lter system is clean and free of foreign
objects (such as broken glass).
Check the drain hose isn’t kinked or blocked.
If issue persists, please contact our Customer Care team.
E4 will be displayed
on the LED display
and the buzzer will
sound.
Overow. The onboard
computer has detected a leak
(correctly or incorrectly).
Check that your dishwasher is level, an un-level dishwasher
can trigger this alarm.
If the problem persists Contact our Customer Care team.
E6 will be displayed
on the LED display
and the buzzer will
sound.
Potential component failure. Try turning the appliance power o at the power point for 15
minutes before re-starting.
If issue persists, please contact our Customer Care team.
E7 will be displayed
on the LED display
and the buzzer will
sound.
Potential component failure. Try turning the appliance power o at the power point for 15
minutes before re-starting. If issue persists, please contact
our Customer Care team.
WARNING! If the E4 Overow error is occurring, turn o the main water supply at the tap as a pre-caution, before
calling our Customer Care team.
Note: If there is water in the base of the dishwasher because of an overll or small leak, the water should be removed
before re-starting the dishwasher.

User Manual 28
AUSTRALIAN WARRANTY TERMS & CONDITIONS
APPLIANCES
This document sets out the terms and conditions of the
product warranties for Residentia Group Appliances. It is
an important document. Please keep it with your proof of
purchase documents in a safe place for future reference
should you require service for your Appliance.
1. IN THIS WARRANTY
(a) ‘acceptable quality’ as referred to in clause 10 of this
warranty has the same meaning referred to in the ACL;
(b) ‘ACL’ means Trade Practices Amendment (Australian
Consumer Law) Act (No.2) 2010;
(c) ‘Appliance’ means any Residentia Group product
purchased by you accompanied by this document;
(d) ‘ASR’ means Residentia Group authorised service
representative;
(e) ‘Residentia Group’ means Residentia Group Pty Ltd
of 165 Barkly Avenue Burnley VIC, ACN 600 546 656 in
respect of Appliances purchased in Australia;
(f ) ‘major failure’ as referred to in clause 10 of this warranty
has the same meaning referred to in the ACL and includes
a situation when an Appliance cannot be repaired or it
is uneconomic for Residentia Group, at its discretion, to
repair an Appliance during the Warranty Period;
(g) ‘Warranty Period’ means:
(i) where the Appliance is used for personal, domestic or
household use (i.e. normal single family use) as set out in
the instruction manual, the Appliance is warranted against
manufacturing defects for 24 months,
following the date of original purchase of the Appliance;
(h) ‘you’ means the purchaser of the Appliance not having
purchased the Appliance for re-sale, and ‘your’ has a
corresponding meaning.
2. This warranty only applies to Appliances purchased
and used in Australia and is in addition to (and does not
exclude, restrict, or modify in any way) any non-excludable
statutory warranties in Australia.
3. During the Warranty Period Residentia Group or its
ASR will, at no extra charge if your Appliance is readily
accessible for service, without special equipment and
subject to these terms and conditions, repair
or replace any parts which it considers to be defective.
Residentia Group or its ASR may use remanufactured parts
to repair your Appliance. You agree that any replaced
Appliances or parts become the property of Residentia
Group. This warranty does not apply to light globes,
batteries, lters or similar perishable/consumable parts.
This warranty does not cover any additional installation
services, including wall-mounting, plastering, caulking, etc.
4. Parts and Appliances not supplied by Residentia Group
are not covered by this warranty.
5. You will bear the cost of transportation, travel and
delivery of the Appliance to and from Residentia Group or
its ASR. If you reside outside of the service area, you will
bear the cost of:
Warranty

esatto.house29
(a) travel of an authorised representative;
(b) transportation and delivery of the Appliance to and
from Residentia Group or its ASR, in all instances, unless
the Appliance is transported by Residentia Group or its
ASR, the Appliance is transported at the owner’s cost and
risk while in transit to and from Residentia Group or its
ASR.
6. Proof of purchase is required before you can make a
claim under this warranty.
7. You may not make a claim under this warranty unless
the defect claimed is due to faulty or defective parts
or workmanship. Residentia Group is not liable in the
following situations (which are not exhaustive):
(a) the Appliance is damaged by:
(i) accident
(ii) misuse or abuse, including failure to properly maintain
or service
(iii) normal wear and tear
(iv) power surges, electrical storm damage or incorrect
power supply
(v) incomplete or improper installation
(vi) incorrect, improper or inappropriate operation
(vii) insect or vermin infestation
(viii) failure to comply with any additional instructions
supplied with the Appliance;
(b) the Appliance is modied without authority from
Residentia Group in writing;
(c) the Appliance’s serial number or warranty seal has been
removed or defaced;
(d) the Appliance was serviced or repaired by anyone other
than Residentia Group, an authorised repairer or ASR.
(e) the maintenance guidelines within the product’s user
manual have not been followed.
(f) the installation of the appliance is not in accordance
with the guidelines within the product’s user manual.
8. This warranty, the contract to which it relates and
the relationship between you and Residentia Group are
governed by the law applicable where the Appliance was
purchased.
9. To the extent permitted by law, Residentia Group
excludes all warranties and liabilities (other than as
contained in this document) including liability for any loss
or damage whether direct or indirect arising from your
purchase, use or non use of the Appliance.
10. For Appliances and services provided by Residentia
Group in Australia, the Appliances come with a
guarantee by Residentia Group that cannot be excluded
under the Australian Consumer Law. You are entitled
to a replacement or refund for a major failure and for
compensation for any other
reasonably foreseeable loss or damage. You are also
entitled to have the Appliance repaired or replaced if the
Appliance fails to be of acceptable quality and the failure
does not amount to a major failure. The benets to you
given by this warranty are in addition to your other rights
and remedies under a law in relation to the Appliances or
services to which the warranty relates.
11. At all times during the Warranty Period, Residentia
Group shall, at its discretion, determine whether repair,
replacement or refund will apply if an Appliance has a valid
warranty claim applicable to it.
12. To enquire about claiming under this warranty, please
follow these steps:
(a) carefully check the operating instructions, user manual
and the terms of this warranty;
(b) have the model and serial number of the Appliance
available;
(c) have the proof of purchase (e.g. an invoice) available;
(d) telephone the numbers shown below.
13. You accept that if you make a warranty claim,
Residentia Group and its ASR may exchange information
in relation to you to enable Residentia Group to meet its
obligations under this warranty.
IMPORTANT
Before calling for service, please ensure that the steps in
point 12 have been followed.
Telephone contact
– Please call 1300 ESATTO (1300 372 886)
Online portal
– http://support.residentiagroup.com.au
Our goods come with guarantees that cannot be excluded under the Australian Consumer Law.
You are entitled to a replacement or refund for a major failure and for compensation for any other
reasonably foreseeable loss or damage. You are also entitled to have the goods repaired or replaced if
the goods fail to be of acceptable quality and the failure does not amount to a major failure.
The Australian Consumer Law requires the
inclusion of the following statement with this
warranty:
Warranty (Continued)

User Manual 30
NEW ZEALAND WARRANTY TERMS & CONDITIONS
APPLIANCES
To help care for your investment, be sure to register your
appliance online. Registration will help you if you need to
arrange service in the future, and serves as a record of your
purchase – including critical information like model number
and serial number – that you can refer to at any time.
Simply visit the below website, or ask your retailer for help:
www.esatto.house/warranty
WARRANTY:
These products are covered by a warranty for a period
of 24 months from the date of purchase, subject to the
following conditions*. The warranty covers rectication
free of charge of any fault arising from defective materials
or components, or faulty workmanship or assembly.
* The conditions above mentioned are:
1. That the purchaser carefully follows all instructions
packed with the product;
2. That the purchaser and/or installer carefully follows
the installation instructions provided and complies with
electrical wiring regulations, gas and/or plumbing codes;
3. That the purchaser carefully follows instructions
provided in the owner’s handbook relating to the proper
use and care of the product and does not use the product
for any purpose other than the domestic use for which it
has been designed;
4. Commercial use of the product for professional or
industrial purposes will void this warranty.;
5. That the product was purchased and installed in New
Zealand;
6. That this warranty does not extend to:
a) optional glass lids for hobs apart from claims which
relate to mechanical or physical damage thereof at the
date of purchase;
b) ‘consumable’ parts such as light bulbs or lters;
c) damage to ceramic glass caused by liquid or solid spill-
overs, lack of maintenance, or impact;
d) damage to surface coatings caused by cleaning or
maintenance using products not recommended by the
owner’s handbook;
e) defects caused by normal wear and tear, accident,
negligence, alteration, misuse or incorrect installations;
f) a product dismantled, repaired or serviced by any
serviceman other than an authorised service agent;
g) a product not in possession of the original purchaser;
h) damage caused by power outages or surges
i) damage caused by pests (eg. rats, cockroaches etc.)
7. That if the product is a freestanding microwave oven or
small appliance it must be returned to the dealer/ retailer
for servicing. These products, unless stated otherwise,
have a 12 month warranty from original date of purchase
with 24 months on the microwave magnetron; Waste
disposers have a 12 month warranty.
8. The provision of service under this warranty is limited by
a 25km boundary from the retailer where the product was
purchased except for microwaves. Such travelling outside
of these limits will incur commercial cost to be paid by you,
regulated by the number of kilometres travelled beyond
the 25km limit (50km return trip). Microwaves are to be
delivered to the nearest authorised service agent by the
customer.
Please refer to your user manual for any further conditions
that may apply to your specic model.
Nothing herein contained shall be construed in any way
as excluding or limiting your rights under the Consumer
Guarantees Acts 1993.
For Service please visit www.applico.co.nz/service or
contact the dealer/retailer from whom you purchased the
product from or call the 0800 number listed below. If you
are unable to establish the date of purchase, or the fault is
not covered by this warranty, or if the product is found to
be in working order, you will be required to bear all service
call charges.
Registration of this warranty constitutes acceptance of the
terms and conditions of this warranty. Should you require
any assistance, please call Customer Services on 0800 763
448.
Distributed by Applico Ltd under licence from Residentia
Group Pty Ltd.
www.applico.co.nz
July 2019
After registering your appliance online, we recommend you
ll out the below information for your reference and keep
this warranty card in a safe place.
THIS WARRANTY IS VALID IN NEW ZEALAND ONLY.
Warranty (Continued)
esatto.house31
Attach your receipt to this page
Purchase Details
For future reference, please record the following information which can be found on the rating plate and the date
of purchase which can be found on your sales invoice.
STORE DETAILS
STORE NAME
|
ADDRESS
|
TELEPHONE
|
PURCHASE DATE
|
PRODUCT DETAILS
MODEL NO.
|
SERIAL NO.
|

A RESIDENTIA
GROUP INITIATIVE
everything
you need