Loading ...
Loading ...
Loading ...
General Care & Cleaning
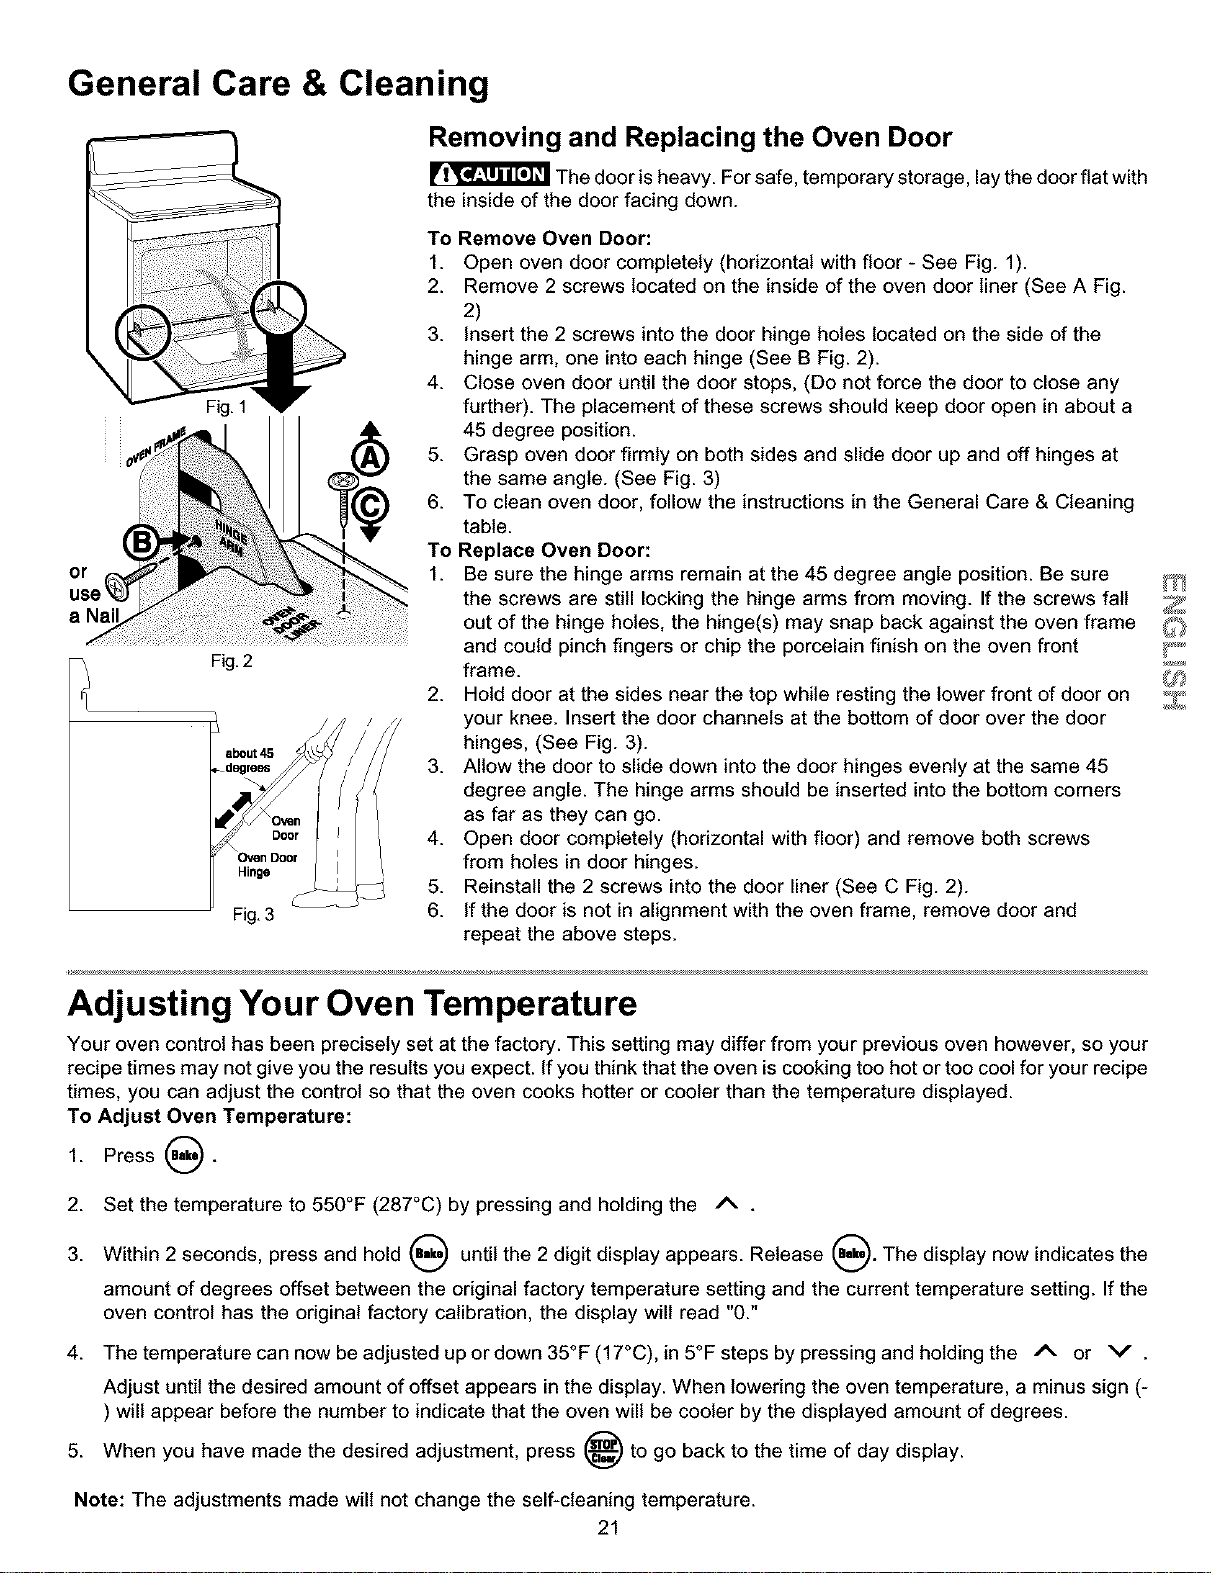
Fig. 1
or
a Na
Fig.2
about 45
lagre_
\_n Door
Hinge
Fig.3
Removing and Replacing the Oven Door
The door is heavy. For safe, temporary storage, lay the door flat with
the inside of the door facing down.
To Remove Oven Door:
1. Open oven door completely (horizontal with floor - See Fig. 1).
2. Remove 2 screws located on the inside of the oven door liner (See A Fig.
2)
3. Insert the 2 screws into the door hinge holes located on the side of the
hinge arm, one into each hinge (See B Fig. 2).
4. Close oven door until the door stops, (Do not force the door to close any
further). The placement of these screws should keep door open in about a
45 degree position.
5. Grasp oven door firmly on both sides and slide door up and off hinges at
the same angle. (See Fig. 3)
6. To clean oven door, follow the instructions in the General Care & Cleaning
table.
To Replace Oven Door:
1. Be sure the hinge arms remain at the 45 degree angle position. Be sure
the screws are still locking the hinge arms from moving. If the screws fall
out of the hinge holes, the hinge(s) may snap back against the oven frame
and could pinch fingers or chip the porcelain finish on the oven front
frame.
2. Hold door at the sides near the top while resting the lower front of door on
your knee. Insert the door channels at the bottom of door over the door
hinges, (See Fig. 3).
3. Allow the door to slide down into the door hinges evenly at the same 45
degree angle. The hinge arms should be inserted into the bottom corners
as far as they can go.
4. Open door completely (horizontal with floor) and remove both screws
from holes in door hinges.
5. Reinstall the 2 screws into the door liner (See C Fig. 2).
6. If the door is not in alignment with the oven frame, remove door and
repeat the above steps.
Adjusting Your Oven Temperature
Your oven control has been precisely set at the factory. This setting may differ from your previous oven however, so your
recipe times may not give you the results you expect. If you think that the oven is cooking too hot or too cool for your recipe
times, you can adjust the control so that the oven cooks hotter or cooler than the temperature displayed.
To Adjust Oven Temperature:
1. Press @.
2. Set the temperature to 550°F (287°C) by pressing and holding the A
3. Within 2 seconds, press and hold (_) until the 2 digit display appears. Release _,). The display now indicates the
amount of degrees offset between the original factory temperature setting and the current temperature setting. If the
oven control has the original factory calibration, the display will read "0."
4. The temperature can now be adjusted up or down 35°F (17°C), in 5°F steps by pressing and holding the A. or v .
Adjust until the desired amount of offset appears in the display. When lowering the oven temperature, a minus sign (-
) will appear before the number to indicate that the oven will be cooler by the displayed amount of degrees.
5. When you have made the desired adjustment, press _ to go back to the time of day display.
Note: The adjustments made will not change the self-cleaning temperature.
21
Loading ...
Loading ...
Loading ...