Loading ...
Operation Guide 2689
2
❚
Charging Guide
Starting from a full charge, it
should take approximately six
months of operation without
further charging under the
conditions described below
before battery drops to Level 3.
Daily Use (All time values are
approximate.)
• Display Illumination: 1.5
seconds
• Alarms: 10 seconds
• Signal reception: 4 times
• Digital display: 18 hours
Making sure the watch is
regularly exposed to light ensure
stable operation. S
• Charge Times Required to Advance to a Higher Level
Exposure Level
(Brightness)
Outdoor Sunlight
(50,000 lux)
Sunlight Through a
Window (10,000 lux)
Daylight Through a
Window on a Cloudy
Day (5,000 lux)
Indoor Fluorescent
Lighting (500 lux)
Approximate Charging Time
Level 4 \ Level 3 \ Level 2 \ Level 1
14 hours1 hour 3 hours
70 hours3 hours 14 hours
143 hours
5 hours
57 hours
28 hours
– – – – – –
• Note that the above charging times are for reference only. Actual
charging time depends on a variety of environmental factors.
❚
Charging Precautions
Avoid charging the watch in the following locations, and anywhere
else where the watch may become very hot.
• On the dashboard of an automobile parked in the sun
• Very close to an incandescent light source or other sources of
heat
• In a location exposed to direct sunlight for long periods
Note that the display panel may become black under very high
temperatures. This is temporary, and the display will appear
normal again at lower temperatures.
Depending on the light source you are using, the
case of the watch may become quite hot during
charging. Take care to guard against burn injury after
charging.
❚
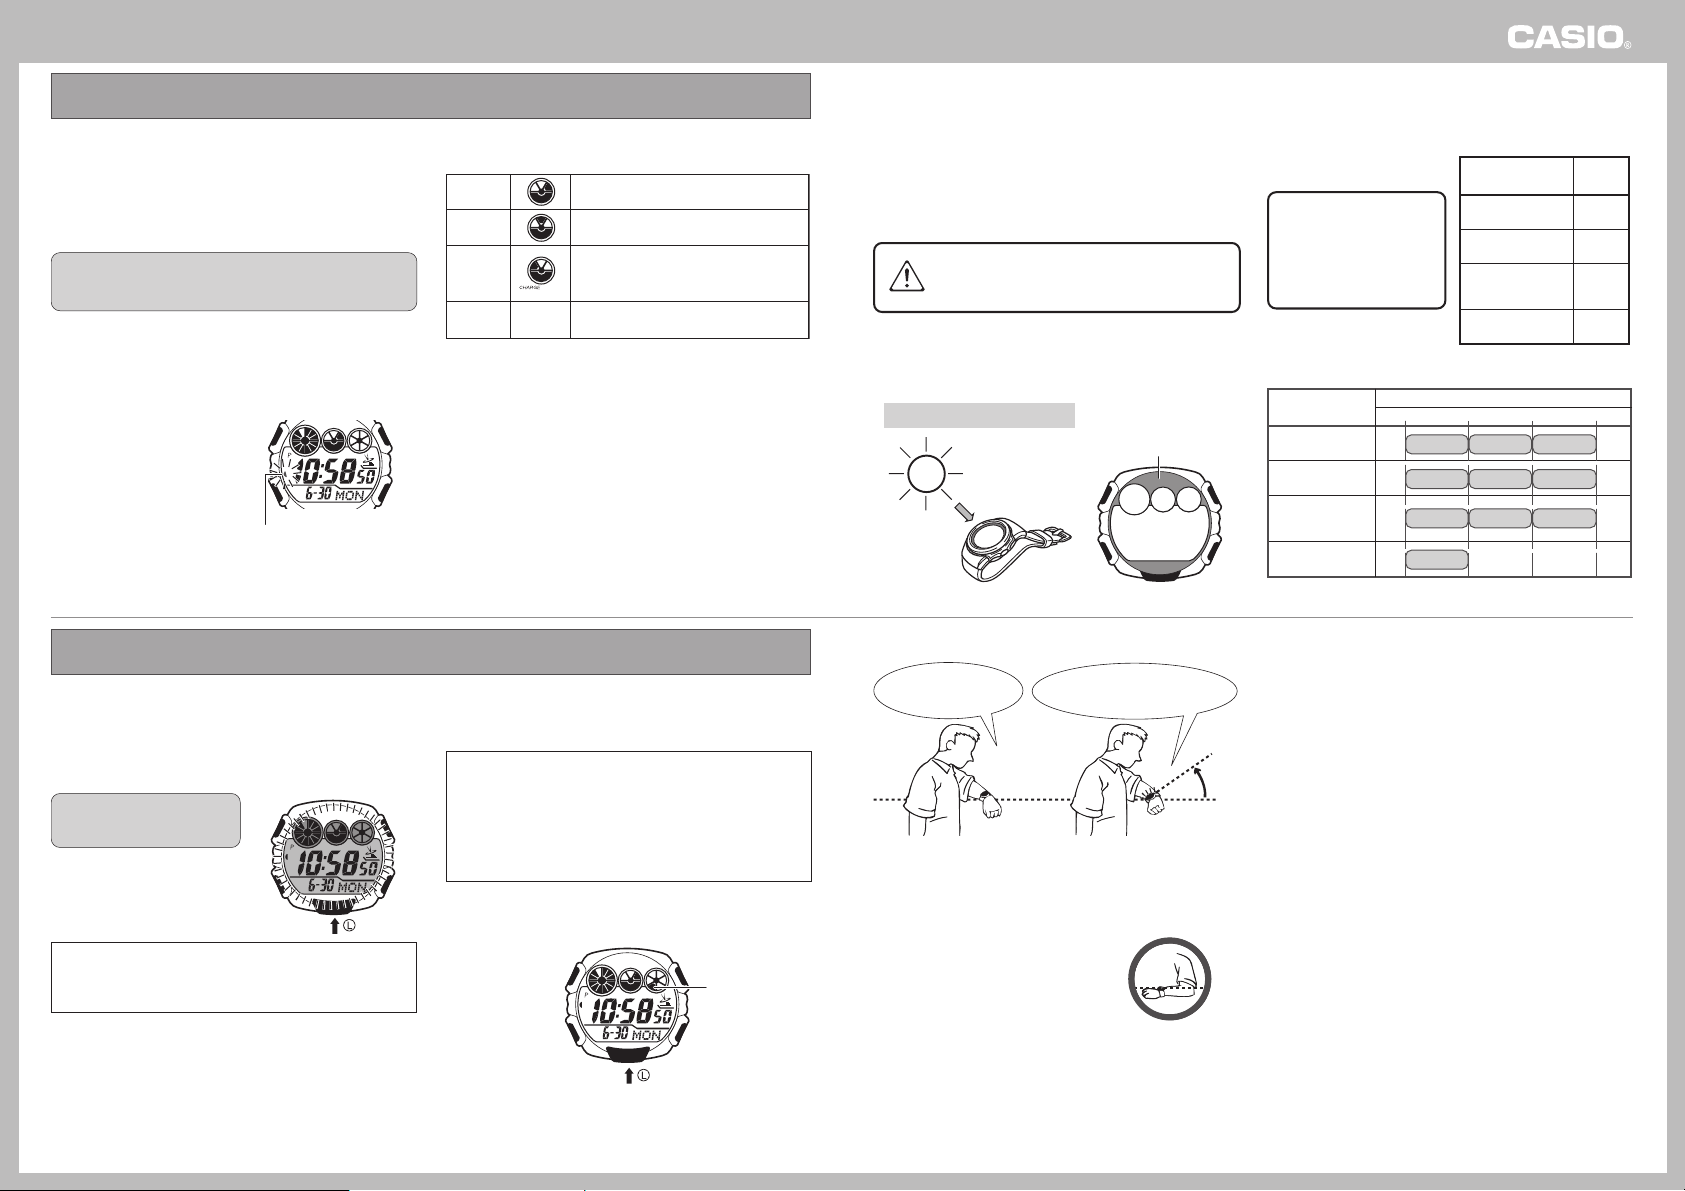
To charge the battery
Point the solar panel (face) of the watch at a light source.
• Remember that even a partial blockage of the solar cell reduces
charging efficiency.
Example: Positioning the watch
Solar Cell
• The illustration shows the resin band mode.
The power supply of this watch uses a solar cell to generate
electrical power, which is stored by a rechargeable battery. Using
or storing the watch where it is not regularly exposed to light, or
allowing it to be blocked from light by your sleeve as you are
wearing it can cause the power of the rechargeable battery to run
down. To ensure stable operation, be sure to allow the watch to
be exposed to light as much as possible when you are wearing or
storing it.
Note that all data in memory and all settings are cleared
whenever you allow the level of the rechargeable battery to
drop to Level 4.
❚
Flashing Recovery Indicator
If you use the light or alarms a number of times during a short
period, a Recovery indicator flashes on the display and the
following operations become disabled as battery power recovers.
• Display illumination
• Alarm and hourly time signal
• Time calibration signal reception
Normal operation will return after the battery recovers.
❚
Battery Indicator
All functions enabled.
All functions enabled.
Display, display illumination, alarms,
hourly time signal, and signal reception
disabled.
All functions, including digital
timekeeping, disabled.
Level 1
Level 2
Level 3
Level 4
(No display)
• Exposing the watch to direct sunlight or other strong light may
cause the battery level indicator to momentarily indicate a level
that is higher than the actual battery level. Because of this, you
should wait for a short while after charging to check the battery
level indicator.
• Even if the battery level drops all the way to Level 4, you will still
be able to recharge the battery and use the watch again.
• When recharging from Level 4, set the current time and date after
the battery level recharges to Level 3. At this time you should
continue to expose the watch to light so it can charge up the Level
2 or Level 1.
❚
Start charging at Level 3!
Battery Level 3 indicates that remaining battery power is very low.
Be sure to expose the watch to light for recharging as soon as
possible after the Level 3 indicator starts to flash.
Recovery Indicator
Power Supply
❚
To illuminate the display
1
2
At least
40°
With the watch on your
wrist, position it parallel
with the ground.
Rotate your arm so the watch is
angled at about 40 degrees, so you
can read its face.
• You should be wearing the watch on the outside of your wrist
when using the auto light switch.
• Make sure that the left (9 o’clock) and
right (3 o’clock) sides of the watch are
within ±15 degrees of being parallel
with the ground. The auto light switch
may not operate properly if the angle is
greater
Display Illumination Precautions
• The light may be difficult to see if you turn it on under bright
sunlight.
• If you press the L button or if an alarm operation starts while the
display is illuminated, illumination will turn off.
• You may notice a slight sound from the watch while the display is
illuminated. This is the sound of EL panel vibration, and does not
indicate malfunction.
Auto Light Precautions
• Frequent use of the auto light can run down the battery.
• The display may not illuminate immediately when you angle the
watch towards your face. This does not indicate malfunction.
• The display remains lit for about 1.5 seconds only, even if you
leave the watch angled towards your face.
• The display may illuminate unintentionally when you wear the
watch on the inside of your wrist, when you shake your arm, or
when you raise your arm. Be sure to turn off the auto light
switch whenever you do not need display illumination.
• Keep the auto light switch turned off whenever you are wearing
the watch on the inside of your wrist.
• Electro-static charge and magnetism can interfere with auto light
operation and even make operation impossible. If this happens,
lower your arm to the starting position and then raise it again. If
you still have trouble with display illumination, try lowering your
arm down to your side and then raise it to your face for reading.
An EL (electro luminescent) panel is used to illuminate the display
for easy reading in the dark. An auto light switch automatically
illuminates the display when you angle the watch towards your
face for reading.
❚
To illuminate the display manually
Pressing the L button in any
mode illuminates the digital
display for about 1.5 seconds.
• Pressing the L button
illuminates the display regardless
of whether the auto light switch is
on or off.
You may hear a faint rattling sound when you move the watch
around. This sound is caused by the movement of a metal
bulb that controls operation of the auto light switch, and does
not indicate malfunction.
Illuminating the Display with the
Auto Light Switch
The full auto light switch automatically illuminates the display
display for about 1.5 seconds whenever you angle the watch
towards your face for reading, but only when it is dark.
• The full auto light switch does not illuminate the display
when surrounding light is bright.
The light is very convenient when reading the current time
and other data in the dark.
The auto light switch illuminates the display in all modes.
In the Timekeeping Mode, hold down the L button for about two
seconds to toggle the auto light switch on (auto light switch on
indicator displayed) and off (no indicator displayed).
Auto Light Switch
On Indicator
In any mode, hold down the L button for about two seconds to
toggle the auto light switch on (auto light switch on indicator
displayed) and off (no indicator displayed).
Display Illumination
Required Daily Charging Time
• The following is the daily
amount of charging required
each day to support the
operations under “Daily Use”.
Exposure Level
(Brightness)
Outdoor Sunlight
(50,000 lux)
Sunlight Through a
Window (10,000 lux)
Daylight Through a
Window on a Cloudy Day
(5,000 lux)
Indoor Fluorescent
Lighting (500 lux)
5 min.
24 min.
48 min.
8 hr.
Approximate
Charging
Time
Loading ...
Loading ...
Loading ...