_ltra Wash Dishwasher
Use & Care Guide
Table of Contents ............. 1 (English section)
3378919 _Roebuck and Co, Hoffman Estates, IL 60779 US A. MODELS/MODELOS/MOD _'LES
17731, 17735
Table of Contents
Page
<;ears Dishwasher Warranty ........................................... 1
_)shwasher Safety ........................... 2
Parts and Features .......................................................... 3
America's Cleanest Dishes
How the ULTRA WASH* System works ..................... 4
Start Up Guide
Before using your dishwasher .................................... 5
Attaching the faucet adapter ...................................... 6
Before starting ............................................................ 7
While the dishwasher is running ................................ 8
When the cycle isfinished.......................................... 8
Starting your dishwasher for everyday loads ............. 9
Loading Your Dishwasher
Preparing to load your dishwasher ........................... 10
Loading the top rack................................................. 10
Loading the bottom rack ........................................... 11
Loading the silverware basket .................................. 12
Quiet operating tips .................................................. 12
Page
Your Part in Cleaning Dishes
Using the detergent dispenser ................................. 13
Using the rinse agent dispenser ............................... 14
Water temperature tips ............................................. 14
Cycles ....................................................................... 15
Options ..................................................................... 17
Status indicator light ................................................. 18
Caring for Your Dishwasher
Cleaning your dishwasher ........................................ 19
Storingyour dishwasher ........................................... 20
Tips for washing special items ................................. 21
Troubleshooting Guide ................................................. 22
We Service What We Sell ............................................. 25
Ordering a New White Door Panel ............................... 25
Sears Repair Services in U.S,A. and Canada ............. 26
Sears Dishwasher Warranty
FULL ONE YEAR WARRANTY ON KENMORE ULTRA WASH* DISHWASHERS
For one year from the date of purchase, when the dishwasher is installed and operated in accordance with the
',_structions provided in the Installation Instructions and Owners Manual, Sears will repair, free of charge, defects in
,nsterials or workmanship.
FULL WARRANTY FOR THE LIFE OF THE DISHWASHER ON ULTRA LIFE* TUB MODELS AGAINST
LEAKS IN THE TUB AND INNER DOOR PANEL
Forthe life of the dishwasherifaleakshould occuras aresultof failureof the polypropyienetub or inner door panel due to
cracking, chipping or peering, Sears will replace, free of charge, the tub or inner door panel.
LIMITED TWO YEAR WARRANTY ON THE ULTRA WASH* WASH SYSTEM
After the first year and until two years from the date of purchase, when the dishwasher is installed and operated in accordance
with the instructions provided in the Installation Instructions and Owners Manual, Sears will furnish free of charge, replacement
parts for any part of the ULTRA WASH wash system (motor, pump, spray arms, nozzle cap, water feed assembly, spray tower,
motor seats, and pump gasket) which is defective in materials or workmanship. Customer assumes any labor costs associated
with replacement of these parts.
If the dishwasher is subject to other than private fatuity use, the above warranty coverage is effective for onty 90 days.
WARRANTY SERVICE IS AVAILABLE BY CONTACTING THE NEAREST SEARS SERVICE CENTER IN THE UNITED STATES
OR CANADA. This warranty applies only while the product is in use in the United States or Canada. This warranty gives you
specific legal rights, and you may also have other rights which vary from state to state or province to province.
Sears, Roebuck and Co. Sears Canada, Inc.
Dept. 817WA, Hoffman Estates, IL 60179 Toronto, Ontario, Canada M5B2B8
* Indicates symbol for Trademark
Dishwasher Safety
/
Your safety and the safety of others is very important. (_
We have provided many important safety messages in this manual and on your appliance. Always read and obey all
safety messages.
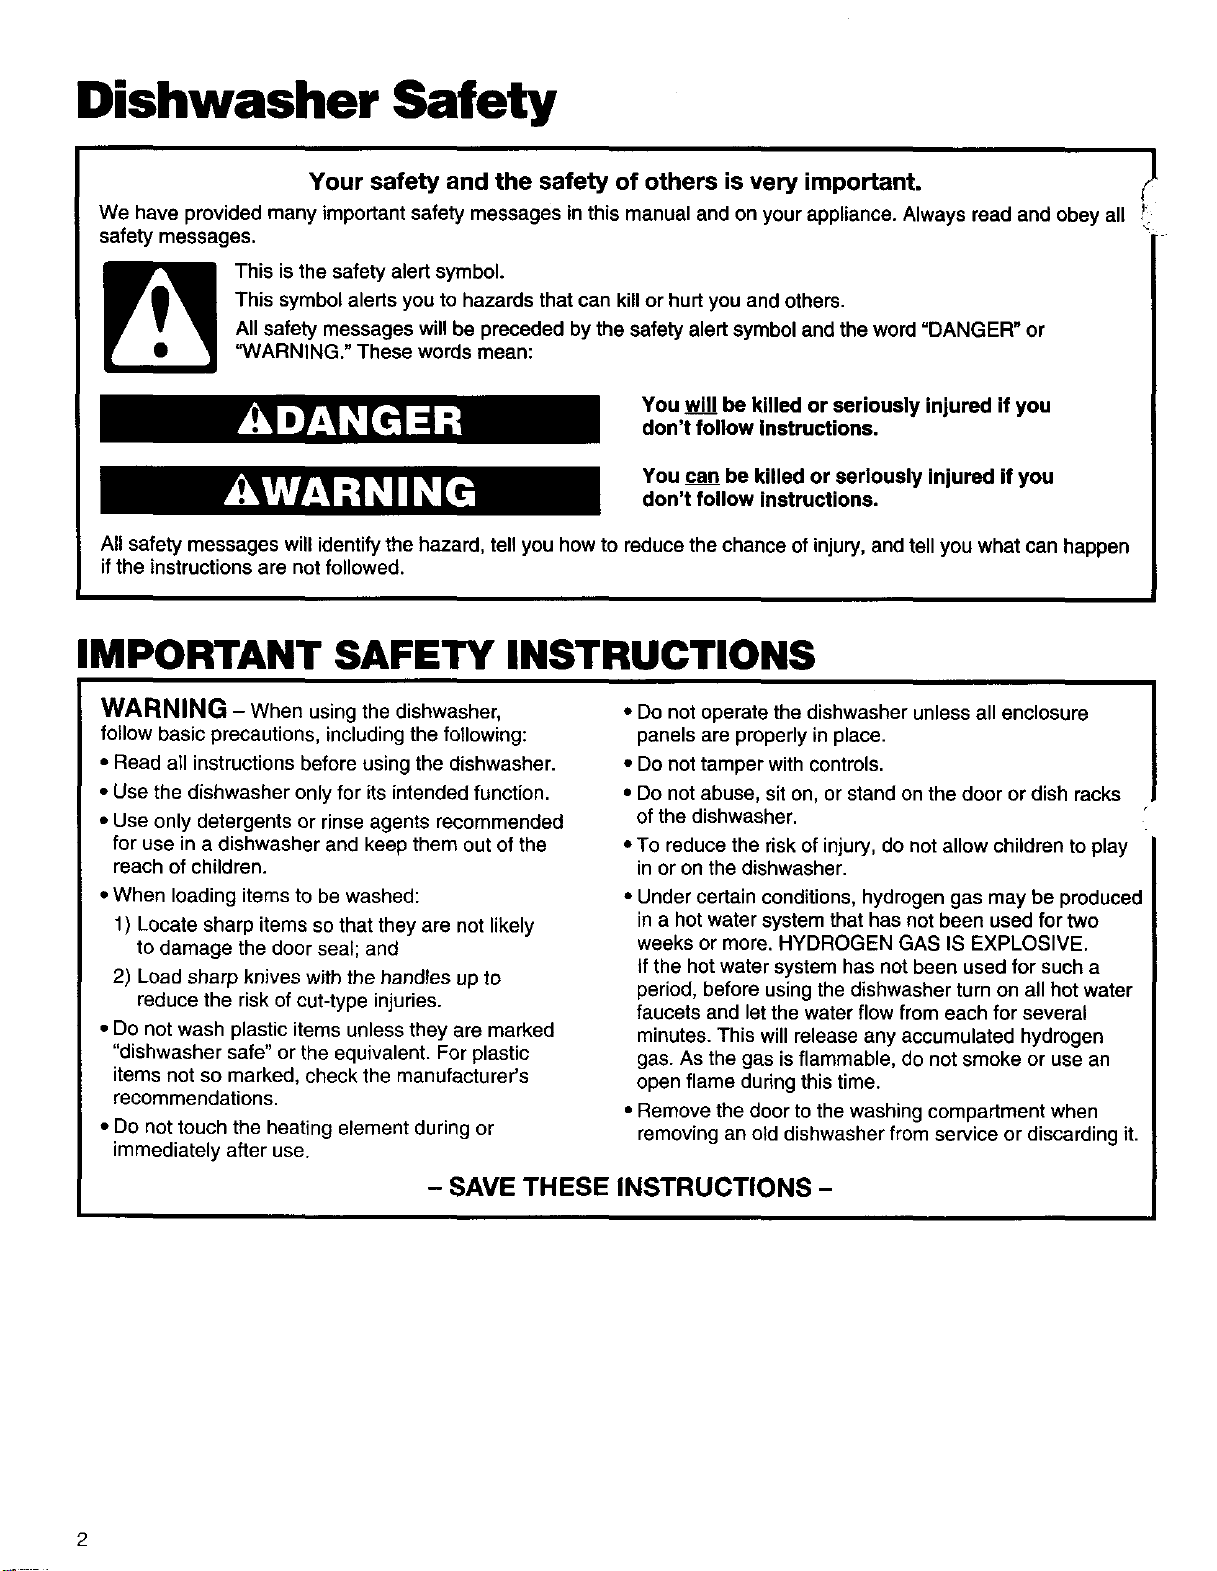
This is the safety alert symbol.
This symbol alerts you to hazards that can kill or hurt you and others.
All safety messages will be preceded by the safety alert symbol and the word "DANGER" or
"WARNING." These words mean:
You wll__/Ibe killed or seriously injured if you
don't follow Instructions.
You can be killed or seriously injured if you
don't follow instructions.
All safety messages will identifythe hazard, tell you how to reduce the chance of injury, and tell you what can happen
if the instructionsare not followed.
IMPORTANT SAFETY INSTRUCTIONS
WARNING - When using the dishwasher,
follow basic precautions, including the following:
•Read all instructions before using the dishwasher.
• Use the dishwasher only for its intended function.
• Use only detergents or rinse agents recommended
for use in a dishwasher and keep them out of the
reach of children.
•Do not operate the dishwasher unless all enclosure
panels are properly in place.
• Do not tamper with controls.
• Do not abuse, sit on, or stand on the door or dish racks
of the dishwasher.
• To reduce the risk of injury, do not allow children to play
in or on the dishwasher.
• When loading items to be washed:
1) Locate sharp items so that they are not likely
to damage the door seal; and
2) Load sharp knives with the handtes up to
reduce the risk of cut-type injuries.
• Do not wash plastic items unless they are marked
"dishwasher safe" or the equivalent. For plastic
items not so marked, check the manufacturer's
recommendations.
• Do not touch the heating element during or
immediately after use.
• Under certain conditions, hydrogen gas may be produced
in a hot water system that has not been used for two
weeks or more. HYDROGEN GAS IS EXPLOSIVE.
tf the hot water system has not been used for such a
period, before using the dishwasher turn on all hot water
faucets and let the water flow from each for several
minutes. This will release any accumulated hydrogen
gas. As the gas is flammable, do not smoke or use an
open flame during this time.
• Remove the door to the washing compartment when
removing an old dishwasher from service or discarding it.
- SAVE THESE INSTRUCTIONS -
2
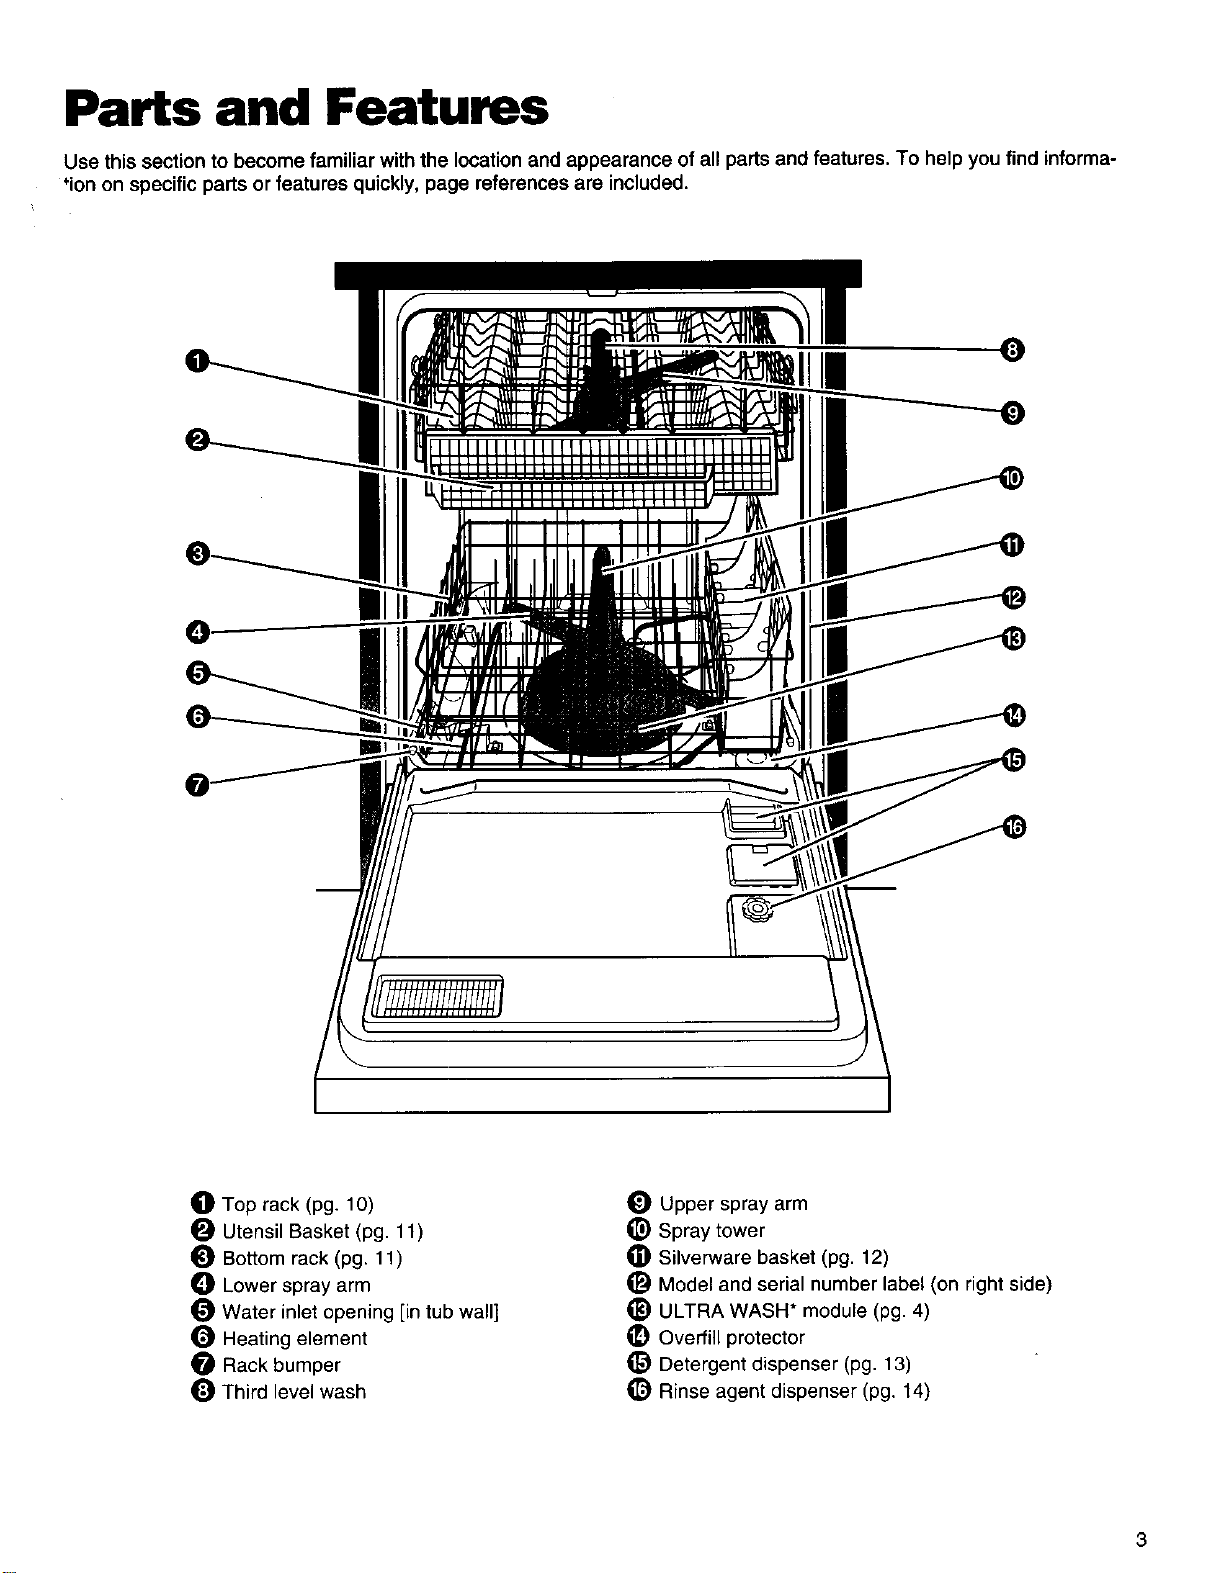
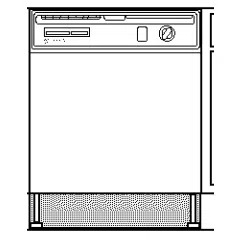
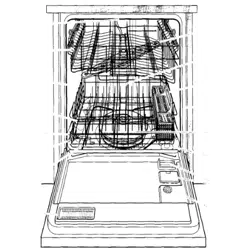
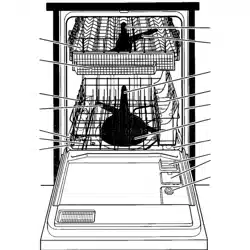
Parts and Features
Use this section to become familiar with the location and appearance of all parts and features. To help you find informa-
*ion on specific parts or features quickly, page references are included.
_]) Top rack (pg. 10)
Utensil Basket (pg. 11)
_) Bottom rack (pg. 11)
_]) Lower spray arm
Water inlet opening [in tub wall]
Heating element
Rack bumper
Third level wash
Upper spray arm
_) Spray tower
Silverware basket (pg. 12)
_) Model and serial number label (on right side)
_) ULTRA WASH* module (pg. 4)
_) Overfill protector
_) Detergent dispenser (pg. 13)
_) Rinse agent dispenser (pg. 14)
America's Cleanest Dishes
How the ULTRA WASH* System works
Your dishwasher's new ULTRA WASH Soil Removal
System is designed to give you sparkling clean dishes in
the shortest amount of time with the least amount of
energy necessary. The ULTRA WASH System includes
a heavy duty grinder that acts as a food disposer to grind
and dispose of large food particles.
Here's how the ULTRA WASH Soil Removal
System works:
1. When you load the dishwasher, all you need to do is
remove bones, large chunks, or burned-on food. Any
remaining food will be ground up and disposed.
2. Hot water fills the dishwasher to alevel near the
bottom ofthe overfill protector.
3. Detergent is added at the correct times from the
detergent dispenser, and hot water is pumped through
the ULTRA WASH pump.
4. Food particles are removed from dishes, pots and
pans, tableware, and cutlery as the dishwasher sprays
amixture of hot water and detergent through two spray
arms against their soiled surfaces.
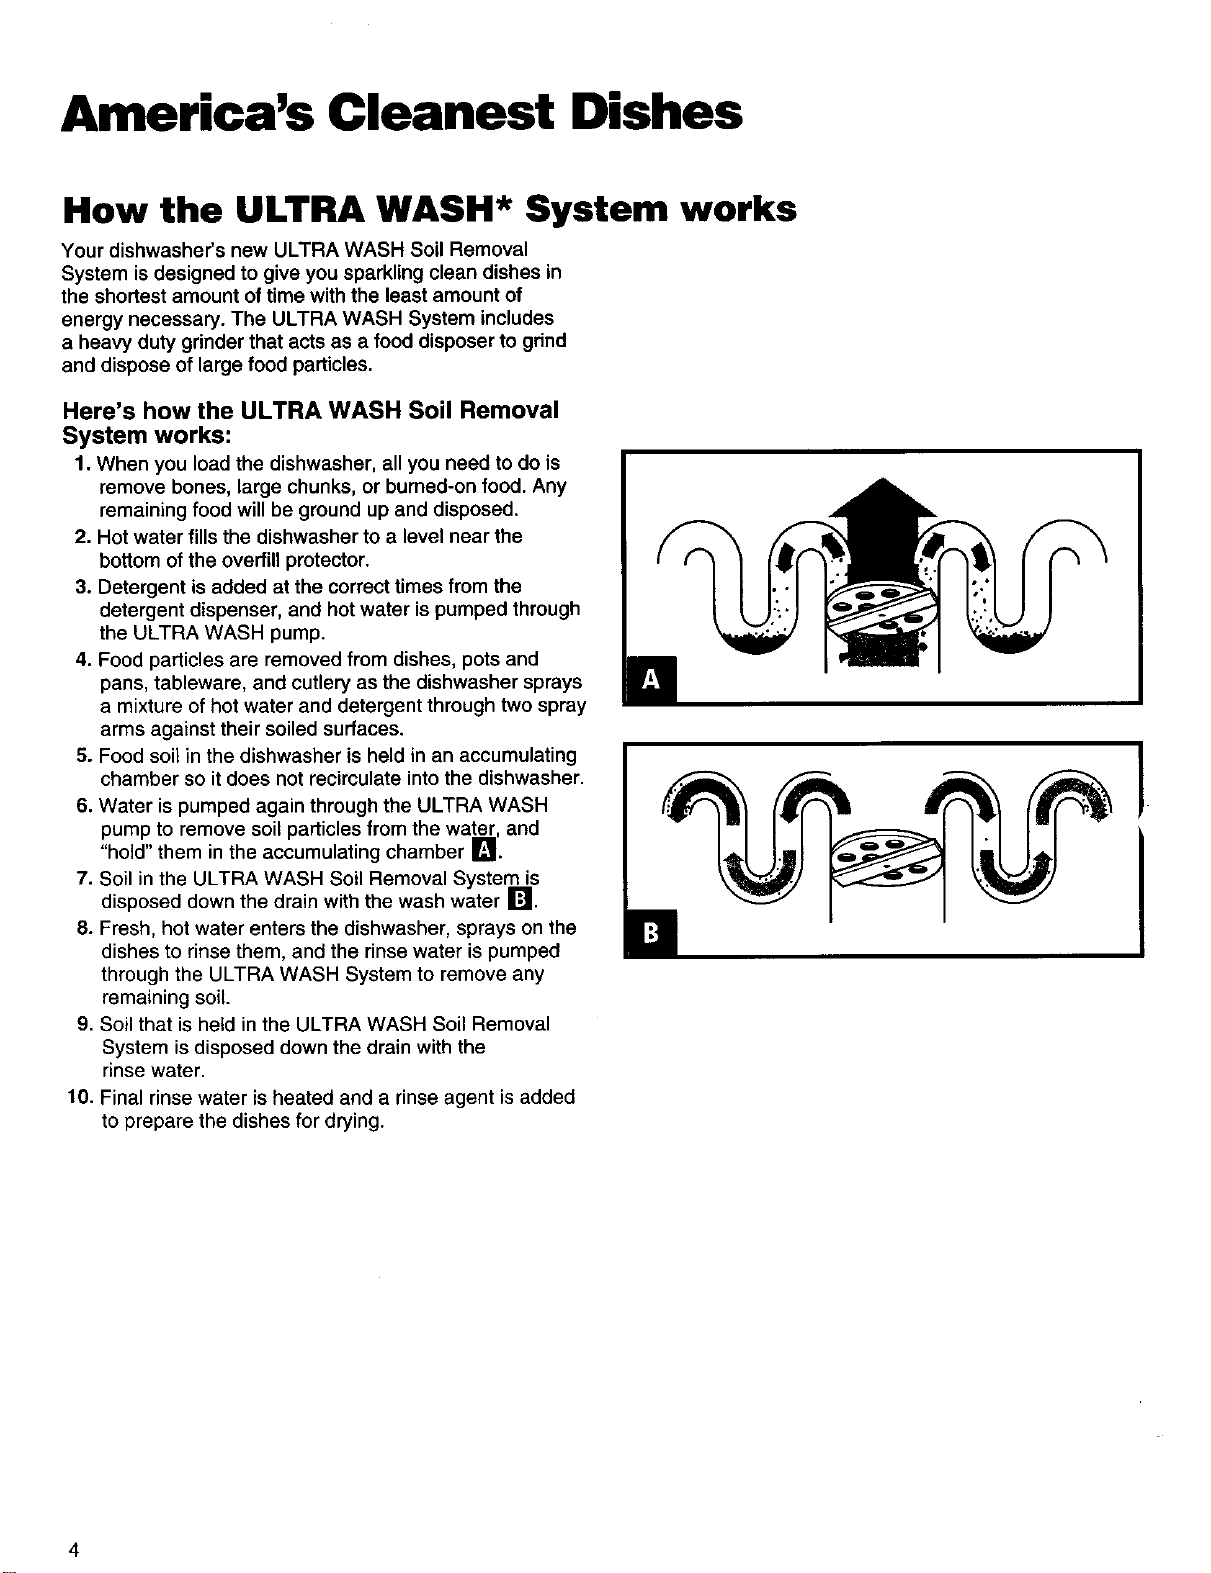
5. Food soil in the dishwasher is held in an accumulating
chamber so it does not recirculate into the dishwasher.
6. Water is pumped again through the ULTRA WASH
pump to remove soil particles from the water, and
"hold" them in the accumulating chamber I_1.
7. Soil in the ULTRA WASH Soil Removal System is
disposed down the drain with the wash water I_1.
8. Fresh, hot water enters the dishwasher, sprays on the
dishes to rinse them, and the rinse water is pumped
through the ULTRA WASH System to remove any
remaining soil.
9. Soil that is hetd in the ULTRA WASH Soil Removal
System is disposed down the drain with the
rinse water.
10. Final rinse water is heated and a rinse agent is added
to prepare the dishes for drying.
!
4
Start Up Guide
6efore using your dishwasher
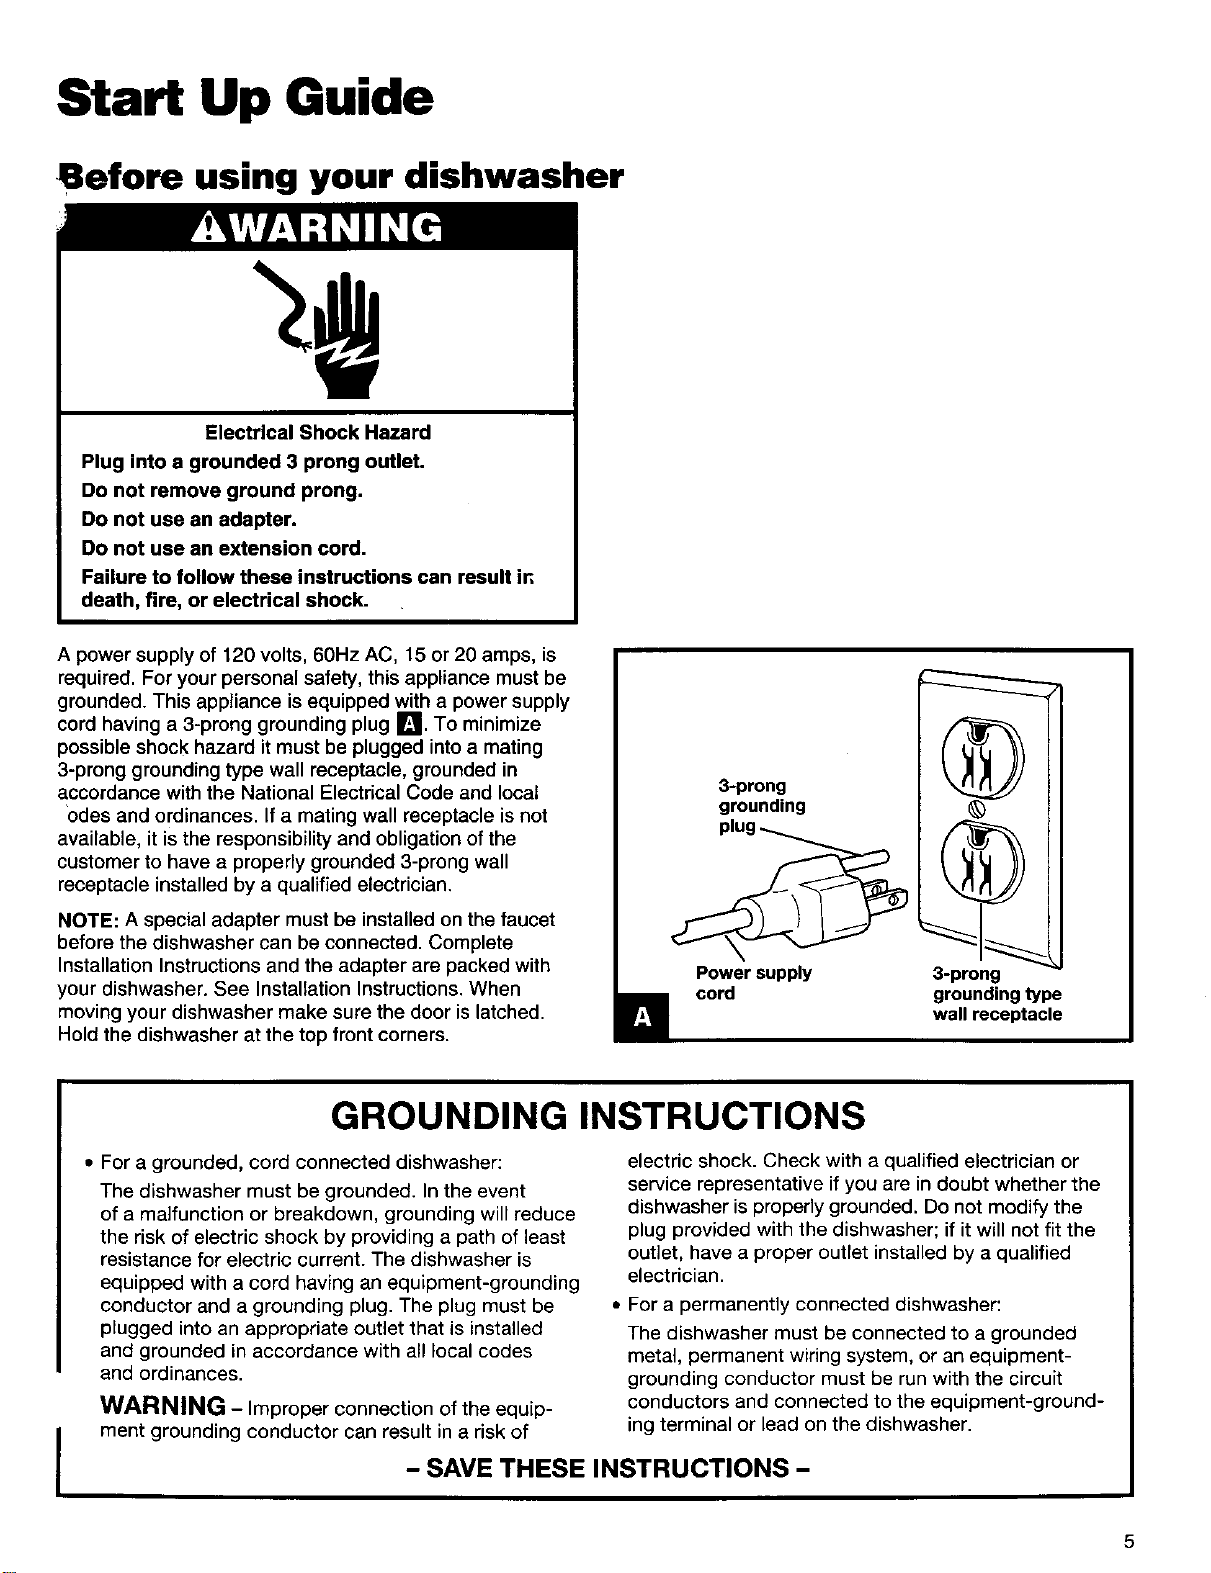
Electrical Shock Hazard
Plug into a grounded 3 prong outlet.
Do not remove ground prong.
Do not use an adapter.
Do not use an extension cord.
Failure to follow these instructions can result in
death, fire, or electrical shock.
A power supply of 120 volts, 6OHz AC, 15 or 20 amps, is
required. For your personal safety, this appliance must be
grounded. This appliance is equipped with a power supply
cord having a 3-prong grounding plug I_'1.To minimize
possible shock hazard it must be plugged into a mating
3-prong grounding type wall receptacle, grounded in
accordance with the National Electrical Code and local
Odes and ordinances. If a mating wall receptacle is not
available, it is the responsibility and obligation of the
customer to have a properly grounded 3-prong wall
receptacle installed by a qualified electrician.
NOTE: A special adapter must be installed on the faucet
before the dishwasher can be connected. Complete
Installation Instructions and the adapter are packed with
your dishwasher. See Installation Instructions. When
moving your dishwasher make sure the door is latched.
Hold the dishwasher at the top front corners.
3-prong
grounding
Power supply
cord 3-prong
groundingtype
wall receptacle
I
GROUNDING INSTRUCTIONS
• For a grounded, cord connected dishwasher:
The dishwasher must be grounded. In the event
of a malfunction or breakdown, grounding will reduce
the risk of electric shock by providing a path of least
resistance for electric current. The dishwasher is
equipped with a cord having an equipment-grounding
conductor and a grounding plug. The plug must be
plugged into an appropriate outlet that is installed
and grounded in accordance with all local codes
and ordinances.
WARNING -Improper connection of the equip-
ment grounding conductor can result in a risk of
electric shock. Check with a qualified electrician or
service representative if you are in doubt whether the
dishwasher is properly grounded. Do not modify the
plug provided with the dishwasher; if it will not fit the
outlet, have a proper outlet installed by a qualified
electrician.
•For a permanently connected dishwasher:
The dishwasher must be connected to a grounded
metal, permanent wiring system, or an equipment-
grounding conductor must be run with the circuit
conductors and connected to the equipment-ground-
ing terminal or lead on the dishwasher.
- SAVE THESE INSTRUCTIONS -
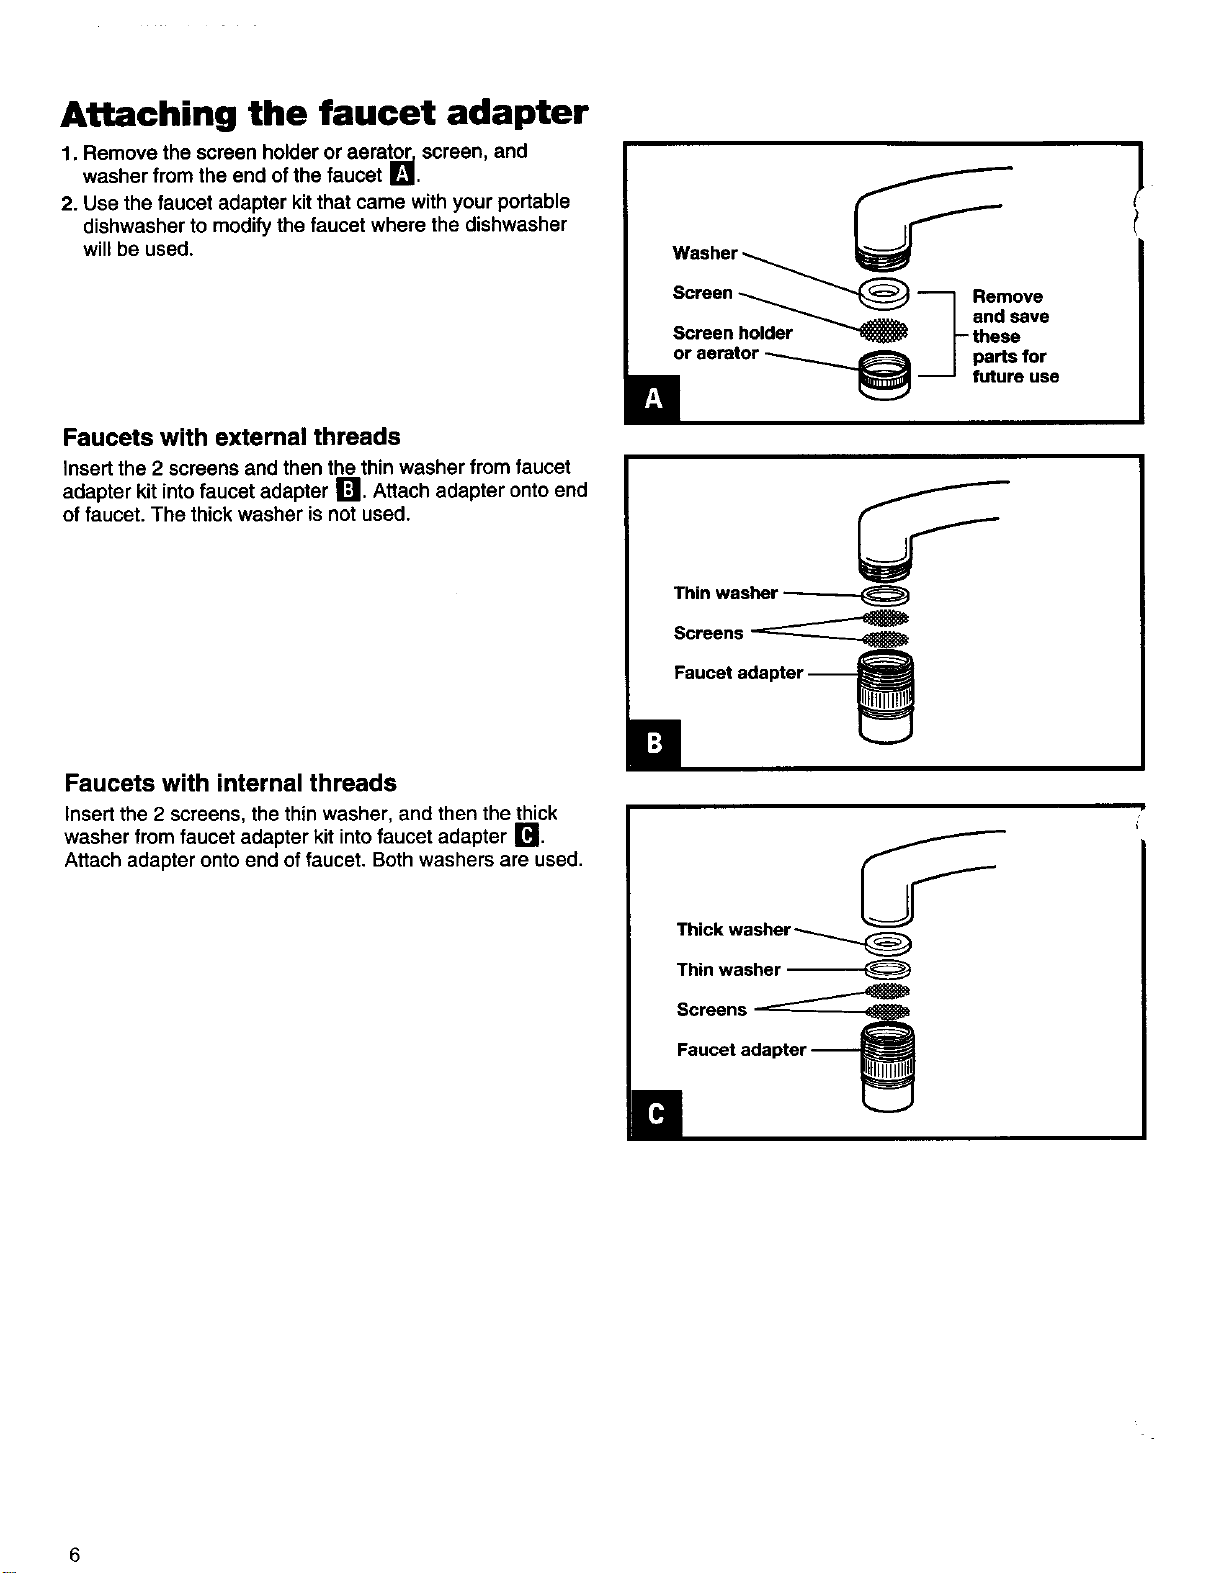
Attaching the faucet adapter
1. Remove the screen holder or aerator, screen, and
washer from the end of the faucet I_11.
2. Use the faucet adapter kitthat came with your portable
dishwasher to modify the faucet where the dishwasher
will be used.
Faucets with external threads
Insert the 2 screens and then the thin washer from faucet
adapter kit intofaucet adapter I'_ll. Attach adapter onto end
of faucet. The thick washer is not used.
Faucets with internal threads
Insert the 2 screens, the thin washer, and then the thick
washer from faucet adapter kit into faucet adapter r4.
Attach adapter onto end of faucet. Both washers are used.
Washer
Screen _ _ -_ Remove
_/ and save
Screen holder _I- these
or aerator _ | parts for
__ future use
J
Thin washer
Screens
Faucet
Thick washer
Thin washer
Screens
Faucet ada
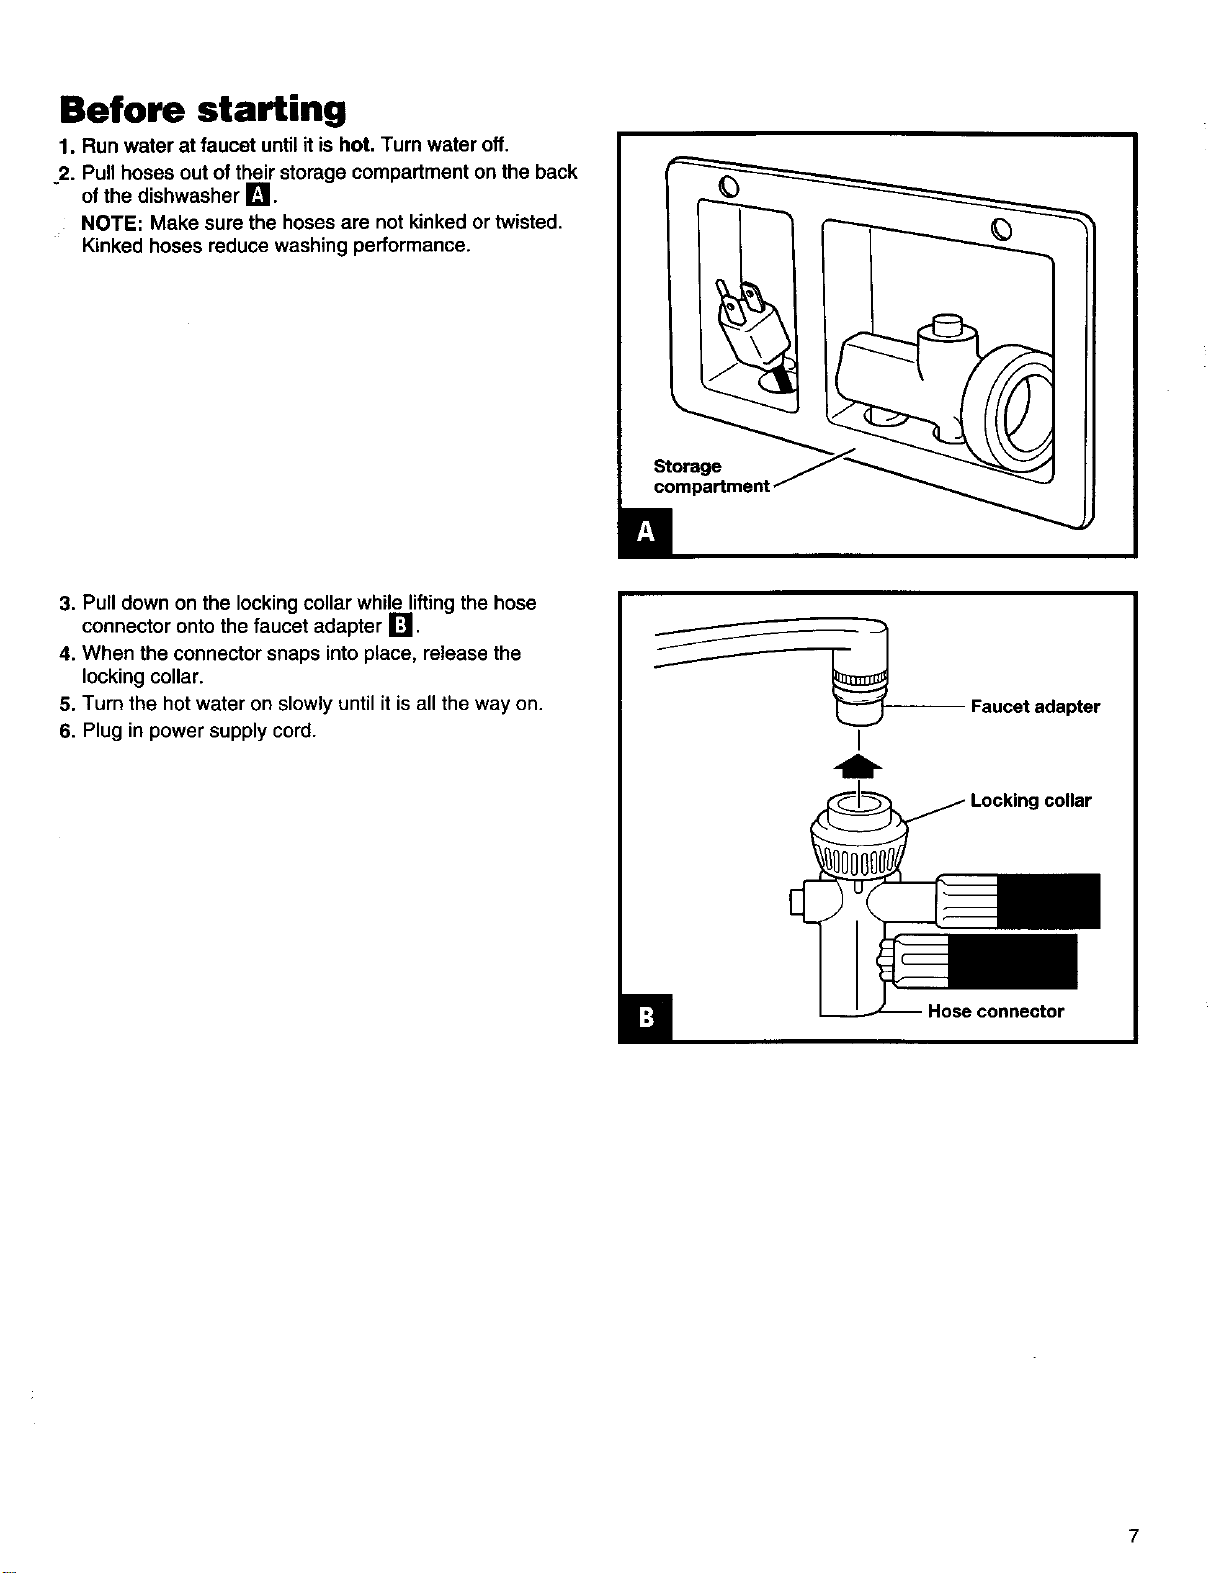
Before starting
1. Run water at faucet until it is hot. Turn water off.
2. Pull hoses out of their storage compartment on the back
of the dishwasher I_1.
NOTE: Make sure the hoses are not kinked or twisted.
Kinked hoses reduce washing performance.
compgartment
3. Pull down on the lockingcollar while liftingthe hose
connector onto the faucet adapter I'_11.
4. When the connector snaps into place, release the
locking collar.
5. Turn the hot water on slowly until it is all the way on.
6. Plug in power supply cord. IFaucet adapter
icollar
7

While the dishwasher is running
You can draw water from the faucet while the dishwasher
isconnected. Do not draw water while the dishwasher is
filling or while water is being pumped out. (This helps
prevent a low fill when dishwasher is filling or mixing drain
water with fresh water when dishwasher is draining.)
Press the red button on the hose connector to draw
water from faucet F_'I.(The faucet is set on hot. Adjust
faucet for the water temperature you want.)
NOTE: Turn hot water back on after you draw water
from faucet. Turn off cold water.
Red buRon
When the cycle is finished
1. Turn hot water off. (This can be done after the last rinse.)
2. Press the red button on the connector to release the
water pressure I_.
3. Liftslightly on the hose connector while pulling down the
lockingcollar. Pulldown on the connector.
4. Empty any remaining water from the connector byturning
the connector upside-down.
5. Unplug power supply cord and return to storage
compartment.
6. Return hoses to storage compartment.
. _ Faucet adapter
I
collar
Red buRon
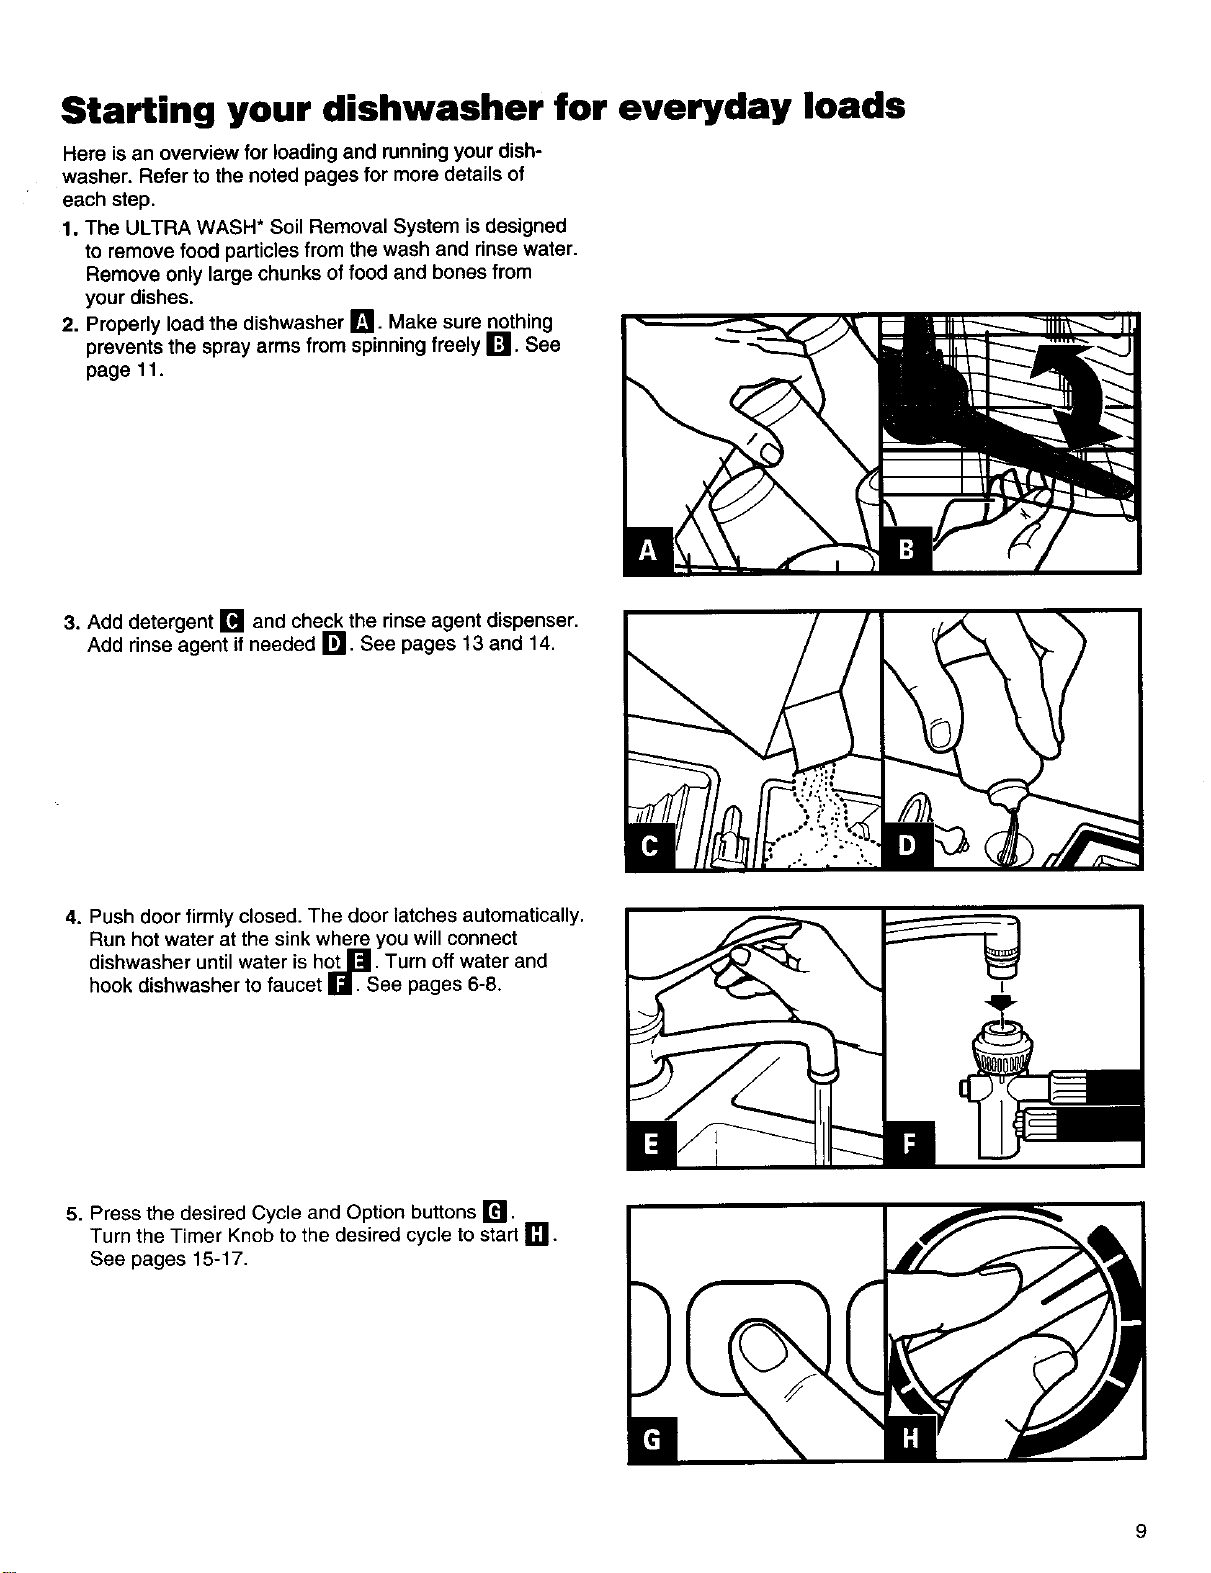
Starting your dishwasher for everyday loads
Here is an overview for loading and runningyour dish-
washer. Refer to the noted pages for more details of
each step.
1. The ULTRA WASH* Soil Removal System is designed
to remove food particles from the wash and rinse water.
Remove only large chunks of food and bones from
your dishes.
2. Properly load the dishwasher ira'1.Make sure nothing
prevents the spray arms from spinning freely i=]l. See
page 11.
3. Add detergent [] and check the rinse agent dispenser.
Add rinse agent if needed []. See pages 13 and 14.
4. Push door firmly closed. The door latches automatically.
Run hot water at the sink where you will connect
dishwasher until water is hot.,_. Turn off water and
hook dishwasher to faucet HI. See pages 6-8.
5. Press the desired Cycle and Option buttons r'_.
Turn the Timer Knob to the desired cycle to start [].
See pages 15-17.
Loading Your Dishwasher
This section tells you how to load your dishwasher properly for the best washing and rinsing results.
Preparing to load your dishwasher
•Load correctly for best washing results. Incorrect loading
may cause poor washing and the need to rewash all or
part of the load.
• Wash full loads. Running a half-filled dishwasher uses
the same amount of electricity and hot water as a fully
loaded machine.
•To save water and energy, do not rinse dishes before
putting them into the dishwasher.
• Remove large pieces of food, fruit pits, bones, and other
hard items. The ULTRA WASH* module will remove food
particles from the water. The module contains a chopping
device which will reduce the size of food items.
NOTE: If hard items such as fruit seeds, nuts, and egg
shells enter the ULTRA WASH module, you might hear
chopping, grinding, crunching, or buzzing sounds. Those
sounds are normal when hard items enter the module.
Do not let metallic items (such as pot handle screws) get
into the ULTRA WASH module. They could damage the
ULTRA WASH module.
• Foods like eggs, rice, pasta, spinach, and cooked
cereals may be hard to remove if they are left to dry over
a period of time. Run a Quick Rinse cycle to keep dishes
moist if you do not plan to wash them soon.
• Load dishes so soiled surfaces face the rotating
spray arms.
• Load dishes so they are not stacked or overlapping, if
possible. It is important for the water spray to reach all
soiled surfaces for best washing. For best drying, water
must be able to drain from all surfaces.
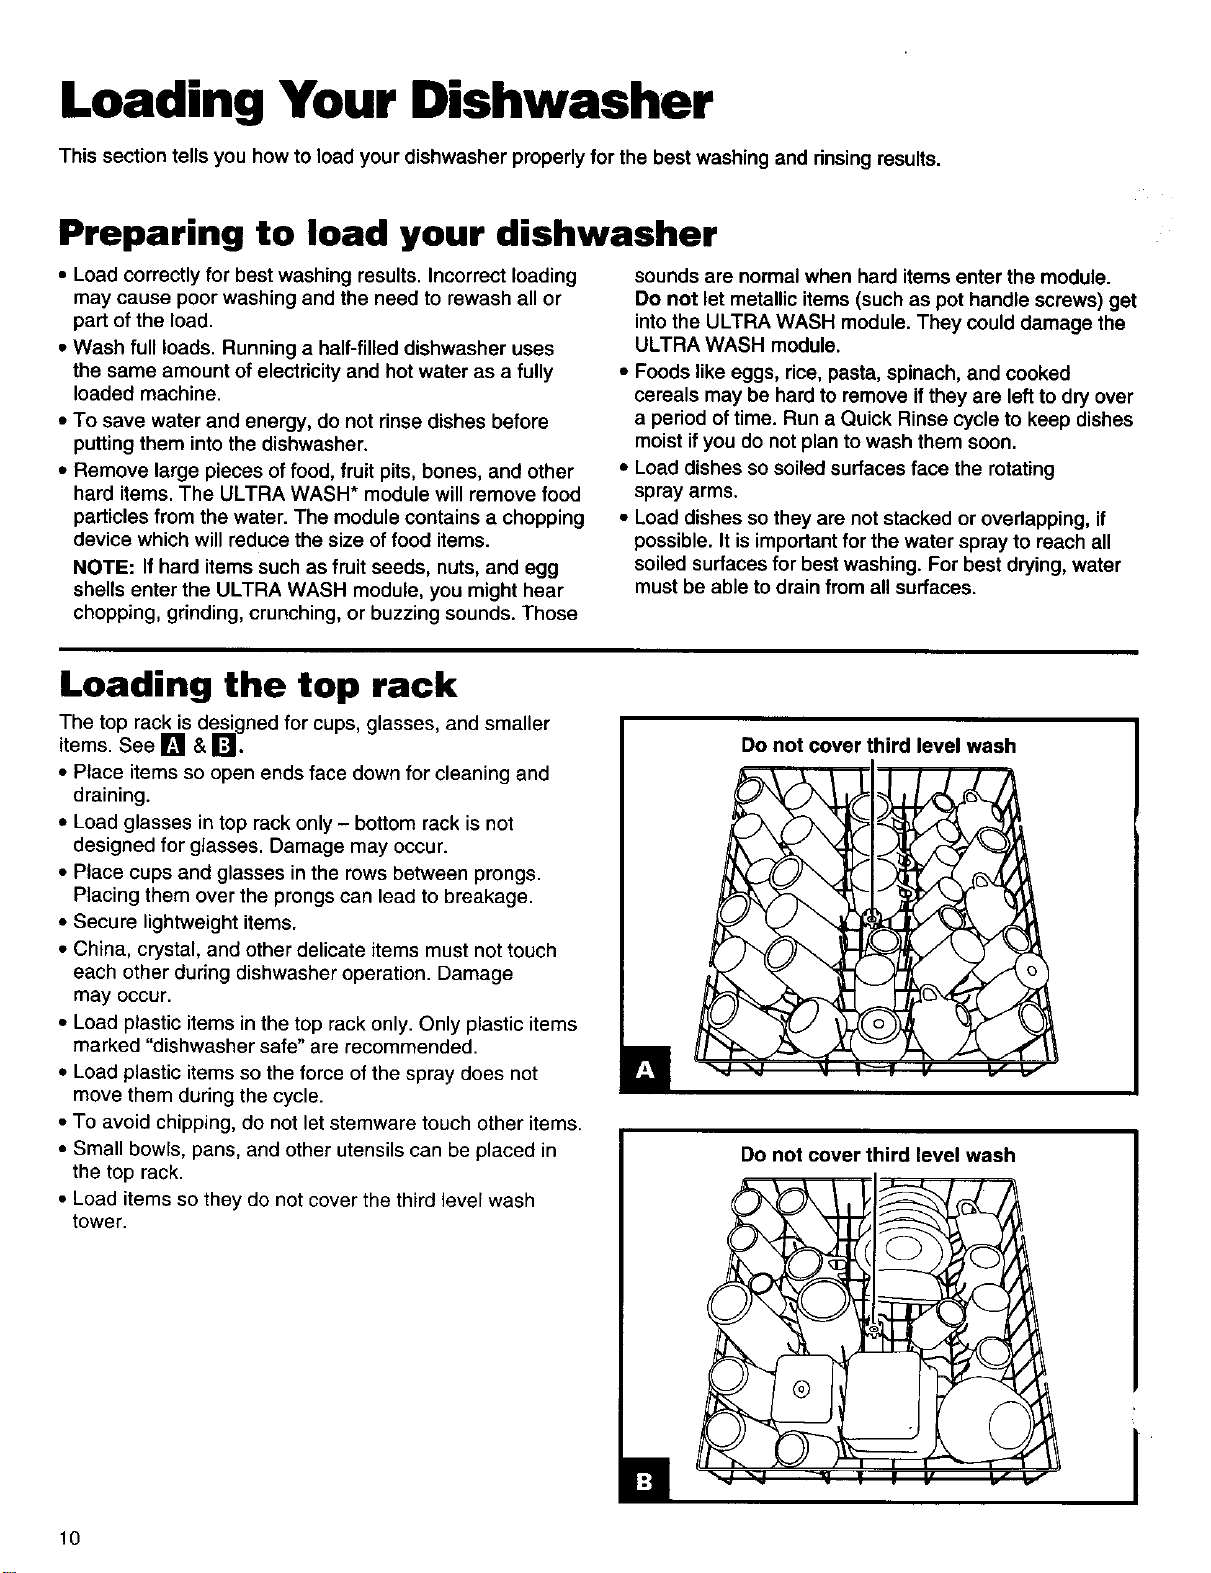
Loading the top rack
The top rack is designed for cups, glasses, and smaller
items. See [] & I_11.
• Ptace items so open ends face down for cleaning and
draining.
• Load glasses in top rack only - bottom rack is not
designed for glasses. Damage may occur.
• Place cups and glasses in the rows between prongs.
Placing them over the prongs can lead to breakage.
• Secure lightweight items.
• China, crystal, and other delicate items must not touch
each other during dishwasher operation. Damage
may occur.
• Load plastic items in the top rack only. Only plastic items
marked "dishwasher safe" are recommended.
• Load plastic items so the force of the spray does not
move them during the cycle.
• To avoid chipping, do not let stemware touch other items.
• Small bowls, pans, and other utensils can be placed in
the top rack.
• Load items so they do not cover the third level wash
tower.
Do not cover third level wash
10
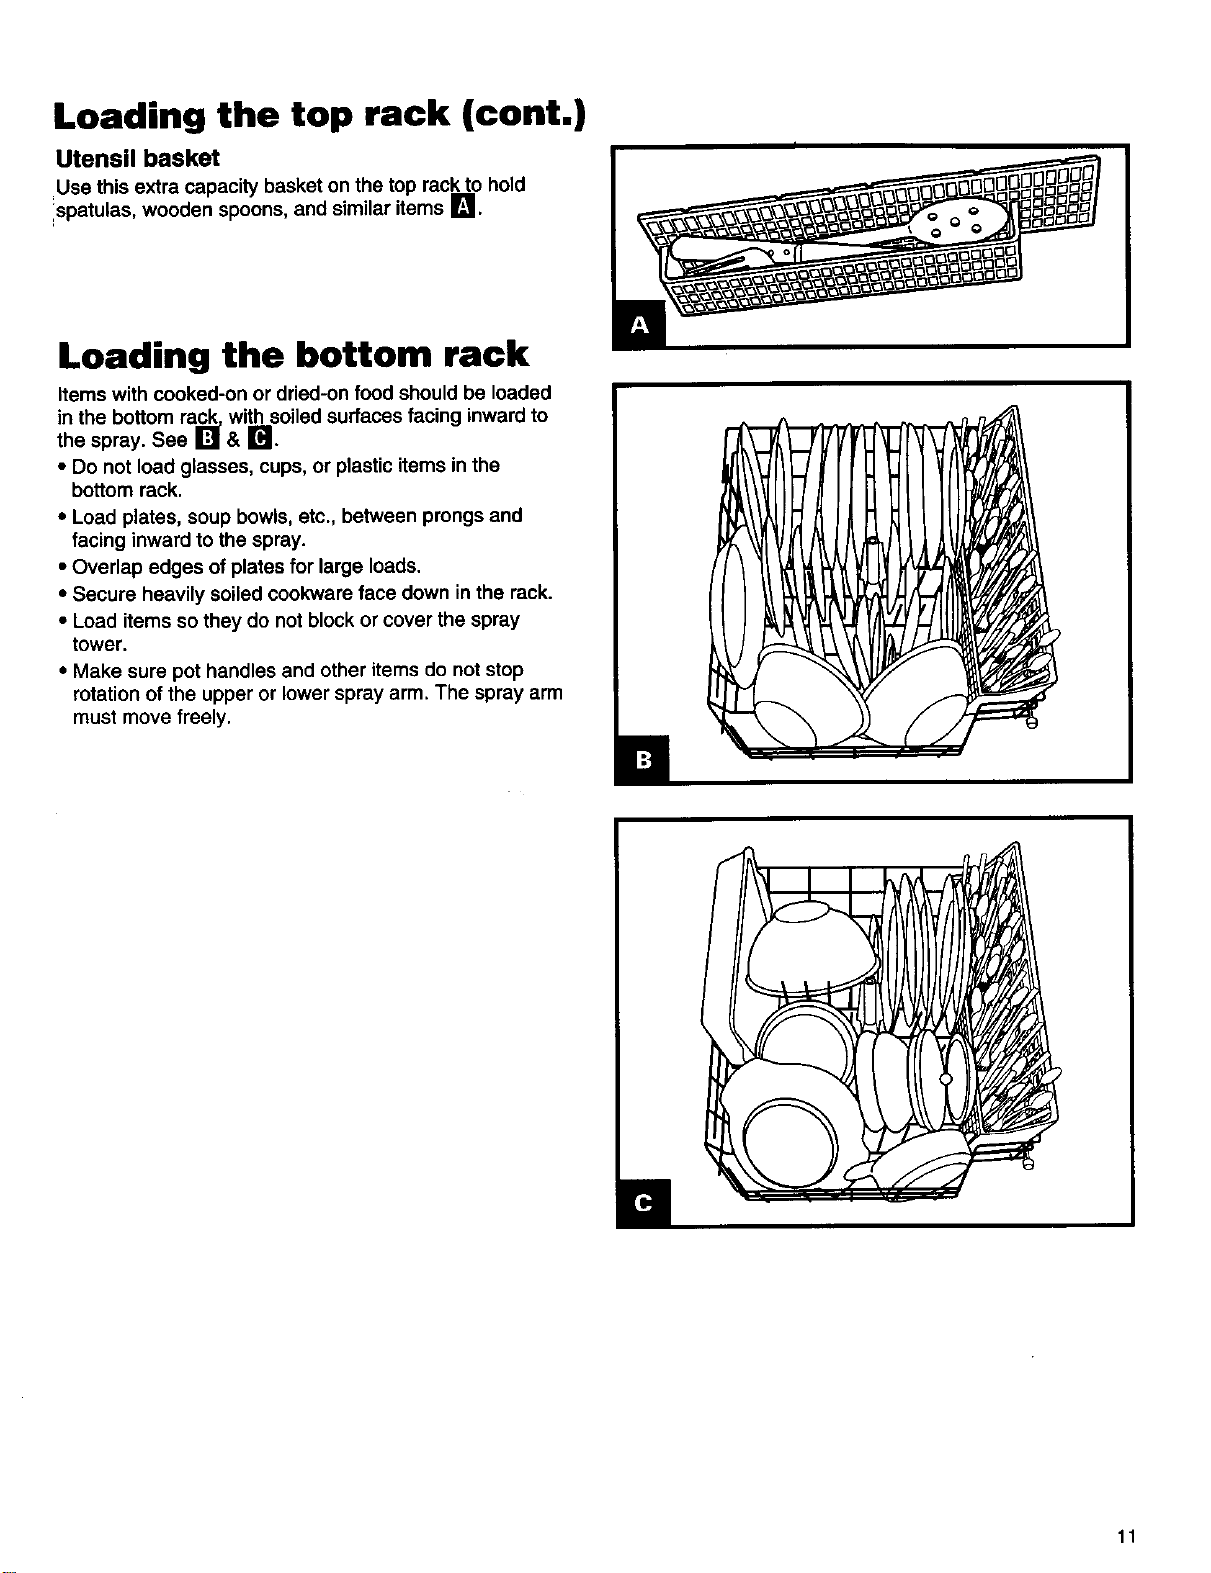
Loading the top rack (cont.)
Utensil basket
Use this extra capacity basket on the top rack to hold
spatulas, wooden spoons and similar items _1.
Loading the bottom rack
Items with cooked-on or dried-on food should be loaded
in the bottom rac._kwith soiled surfaces facing inward to
the spray. See Z_ & Ir_.
•Do not load glasses, cups, or plastic items in the
bottom rack.
•Load plates, soup bowls, etc., between prongs and
facing inward to the spray.
•Overlap edges of plates for large loads.
•Secure heavily soiled cookware face down in the rack.
•Load items so they do not block or cover the spray
tower.
•Make sure pot handles and other items do not stop
rotation of the upper or lower spray arm. The spray arm
must move freely.
11
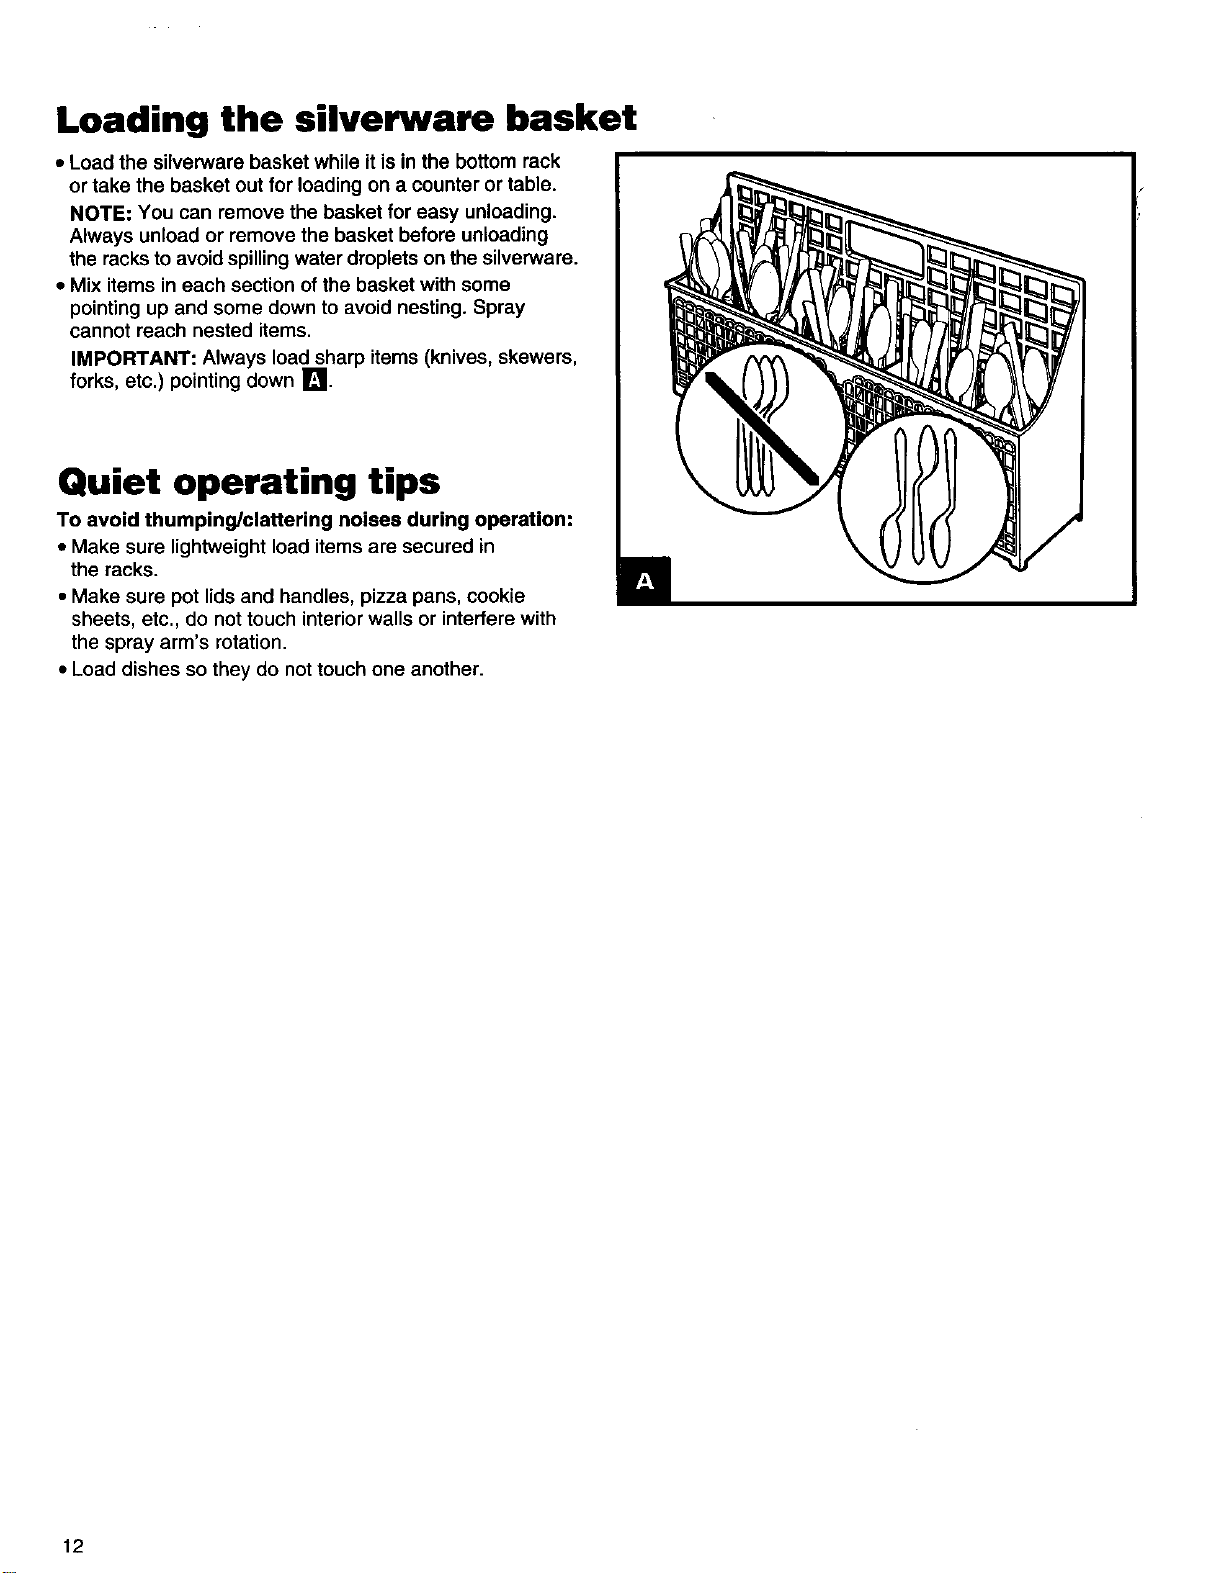
Loading the silverware basket
•Load the silverware basket while it is in the bottom rack
or take the basket out for loading on a counter or table.
NOTE: You can remove the basket for easy unloading.
Always unload or remove the basket before unloading
the recks to avoidspilling water droplets on the silverware.
•Mix items in each section of the basket with some
pointing up and some down to avoid nesting. Spray
cannot reach nested items.
IMPORTANT: Always load sharp items (knives, skewers,
forks, etc.) pointing down [].
Quiet operating tips
To avoid thumping/clattering noises during operation:
• Make sure lightweight load items are secured in
the racks.
• Make sure pot lids and handles, pizza pans, cookie
sheets, etc., do not touch interior walls or interfere with
the spray arm's rotation.
• Load dishes so they do not touch one another.
12

Your Part in Cleaning Dishes
Operating your dishwasher properly enables you to obtain the best possible results. This section explains proper
dishwasher operation.
Using the detergent dispenser
• Use automaUc dishwashing detergent only. Other
detergents are too mild and much too sudsy.
• Add detergent just before startingcycle.
• Store tightly closed detergent in a cool, dry place. Fresh
automatic dishwasher detergent results In better
cleaning.
Filling the detergent dispenser
The detergent dispenser [] has one section with a cover
and one without. Push the cover down firmly until it
latches. Detergent in the open sectionfalls into the dish-
washer when closing the door. The covered section opens
automatically for the main wash. It isnormal for the cover
to open partially when dispensing detergent.
NOTE: Use both sections for cycles with two washes. Use
only the covered section for cycles with one wash. See the
cycles chart for more details.
How much detergent to use
,The amount of detergent to use depends on the hard-
ness of your water and the type of detergent. Ifyou use
too little, dishes won't be clean. If you use too much in
soft water, glassware will etch.
•Find out your water's hardness by asking the water
softener department in your local Sears store or your
local water department.
NOTE: Fill amounts shown are for standard powdered
detergent. Amounts may vary if you use liquid or concen-
trated powdered detergent. Follow instructions on the
package when using liquid dishwasher detergent or
concentrated powdered detergent.
Cover Cover latch
Water Type Where to fill standard
powdered detergent
Hard Top of
8+ grains per gallon 3rd step
136+ parts per million (3 tbs.)
Medium Top of
5-7 grains per gallon 2nd step
85-119 parts per million (2 tbs,)
Soft Top of I_
0-4 grains per gallon 1st step
0-68 parts per million (1 tbs.)
13
Using the rinse agent dispenser
Arinse agent greatly improves dish drying and helps
prevent spots or streaks. The dnse agent helps water flow
off dishes and keeps water from forming droplets. A small
amount of rinse agent automatically releases into the final
rinse water.
Keep the rinse agent dispenser filled with a liquid
rinse agent. For best drying results, periodically check the
dispenser as follows to see if it needs filling:
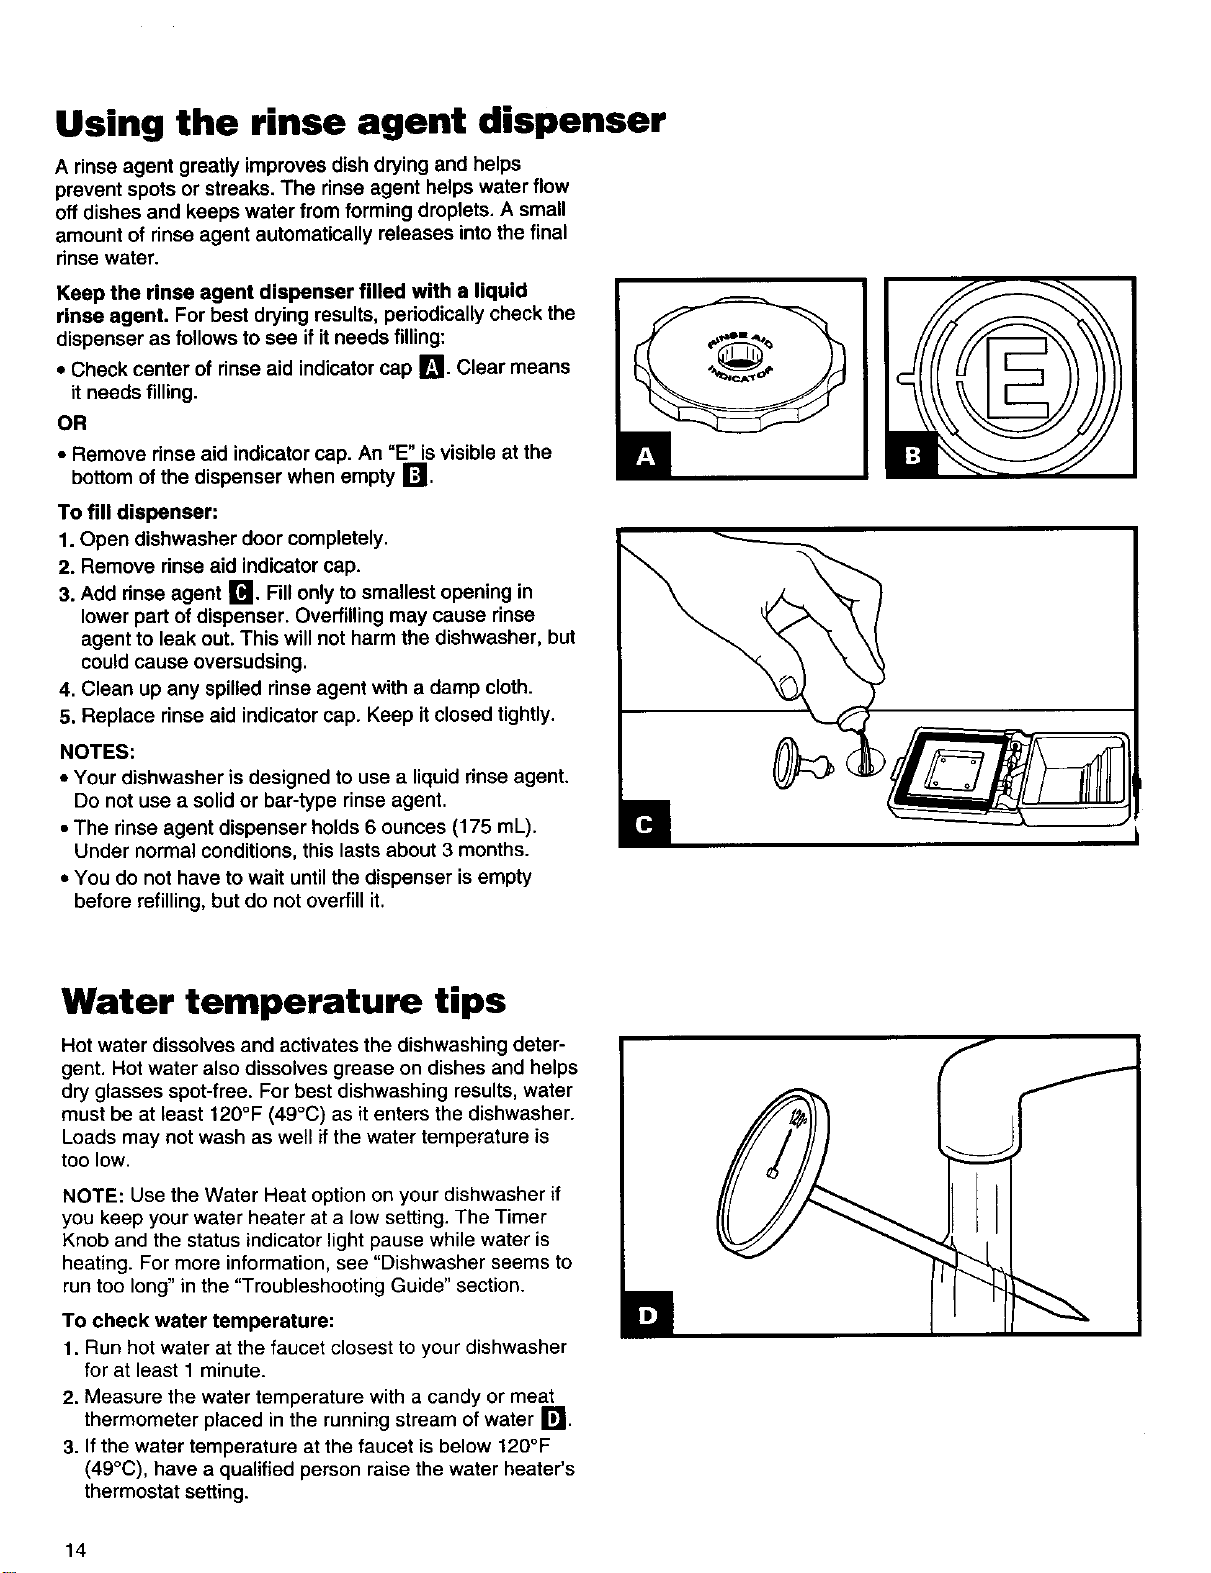
• Check center of rinse aid indicator cap _. Clear means
it needs filling.
OR
•Remove rinse aid indicator cap. An "E" isvisible at the
bottom of the dispenser when empty [:'!.
To fill dispenser:
1. Open dishwasher door completely.
2. Remove rinse aid indicator cap.
3. Add rinse agent r4. Fill only to smallest opening in
lower part of dispenser. Overfilling may cause rinse
agent to leak out. This will not harm the dishwasher, but
could cause oversudsing.
4. Clean up any spilled rinse agent with a damp cloth.
5. Replace rinse aid indicator cap. Keep it closed tightly.
NOTES:
•Your dishwasher is designed to use a liquid rinse agent.
Do not use a solid or bar-type rinse agent.
• The rinse agent dispenser holds 6 ounces (175 mL).
Under normal conditions, this lasts about 3 months.
• You do not have to wait until the dispenser is empty
before refilling, but do not overfill it.
Water temperature tips
Hot water dissolves and activates the dishwashing deter-
gent. Hot water also dissolves grease on dishes and helps
dry glasses spot-free. For best dishwashing results, water
must be at least 120°F (49°C) as it enters the dishwasher.
Loads may not wash as well ifthe water temperature is
too low.
NOTE: Use the Water Heat option on your dishwasher if
you keep your water heater at a low setting. The Timer
Knob and the status indicator light pause while water is
heating. For more information, see "Dishwasher seems to
run too long" in the "Troubleshooting Guide" section.
To check water temperature:
1. Run hot water at the faucet closest to your dishwasher
for at least 1 minute.
2. Measure the water temperature with a candy or meat
thermometer placed in the running stream of water r_.
3. if the water temperature at the faucet is below 120°F
(49°C), have a qualified person raise the water heater's
thermostat setting.
ff
14
Cycles
It- -.cL--
NaqmLL W*TU
CYCLE
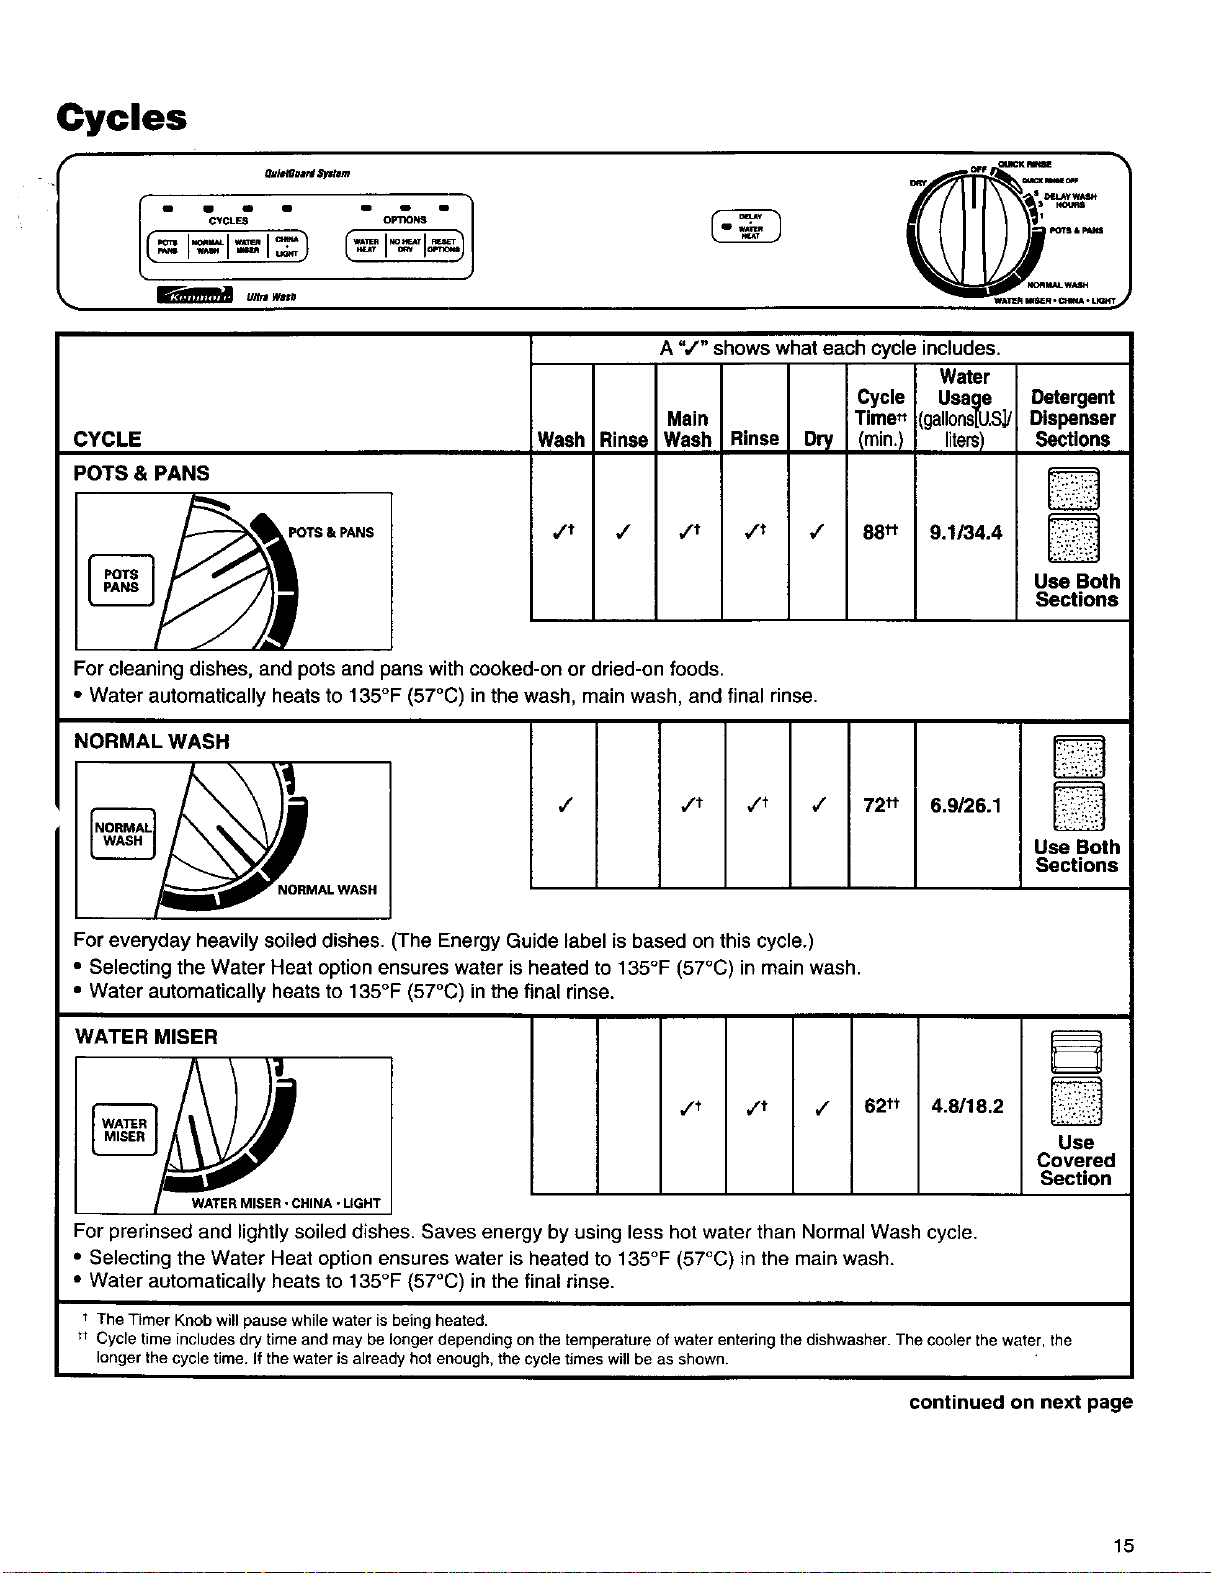
POTS & PANS
A",/" shows what each cycle includes.
Water
iCycle Usage
Main iTime- (gallons[U.s_/
Wash Rinse Wash Rinse Dry Imin.! liters/
TS & PANS /t /
i
i
Forcleaningdishes,and potsand pans withcooked-onordried-onfoods.
• Water automaticallyheatsto135°F (57°C)inthewash, main wash, and finalrinse.
,/t _/t I/ 88tt 9.1/34.4
Detergent
Dispenser
Sections
D
D
Use Both
Sections
NORMAL WASH D
Use Both
Sections
AL WASH
For everyday heavily soiled dishes. The Energy Guide label is based on this cycle.)
_Selecting the Water Heat option ensures water is heated to 135°F (57°C) in main wash.
Water automatically heats to 135°F (57°C) in the final rinse.
WATER MISER D
t/t /t / 62 tt 4.8/18.2
Use
Covered
Section
WATER MISER •CHINA •LIGHT
For prerinsed and lightly soiled dishes. Saves energy by using less hot water than Normal Wash cycle.
• Selecting the Water Heat option ensures water is heated to 135°F (57°C) in the main wash.
• Water automatically heats to 135°F (57°C) in the final rinse.
The Timer Knob will pause while water is being heated.
tt Cycle time includes d_ time and may be longer depending on the temperature of water entering the dishwasher. The cooler the water, the
longer the cycle time. If the water is already hot enough, the cycle times will be as shown.
continued on next page
15
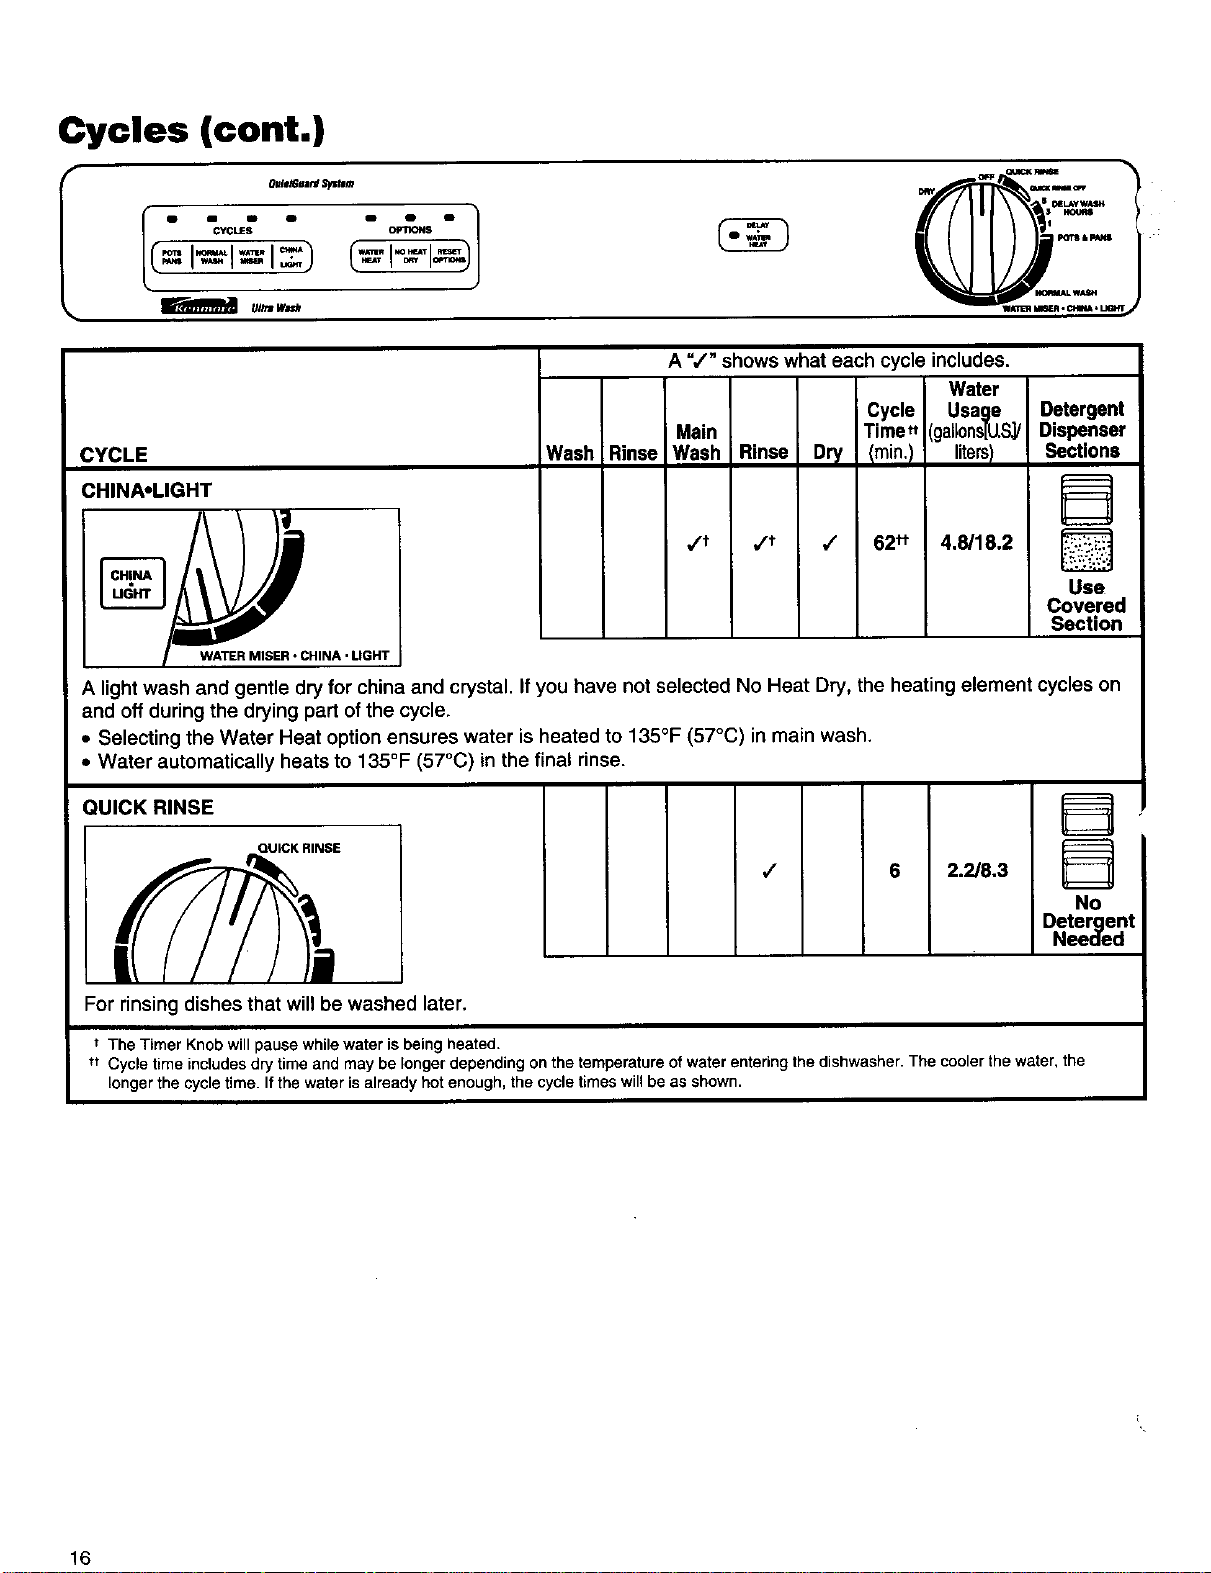
Cycles (cont.)
mul_ w_ Q
A",/" shows what each cycle includes.
CYCLE Wash
CHINA-LIGHT
WATER MISER • CHINA •LIGHT
A light wash and gentle dry for china and crystal. If
and off during the drying part of the cycle.
• Selecting the Water Heat option ensures water
• Water automatically heats to 135°F (57°C) in
Water
Cycle Usage
Main Time- (gallons[U.S_/
Rinse Wash Rinse Dry /rain.) liters)
/t /t / 62" 4.8/18.2
Detergent
Dispenser
Sections
D
D
Use
Covered
Section
rou have not selected No Heat Dry, the heating element cycles on
heated to 135°F (57°C) in main wash.
final rinse.
QUICK RINSE
QUICK RINSE B
D
No
Detergent
Needed
,/ 6 2.2/8.3
For rinsing dishes that will be washed later.
t The Timer Knobwill pause while water is being heated.
tt Cycle time includesdry time and may be longerdepending on the temperature of water entering the dishwasher.The coolerthe water, the
longer the cycle time. If the water is already hot enough,the cycle times will be as shown.
16
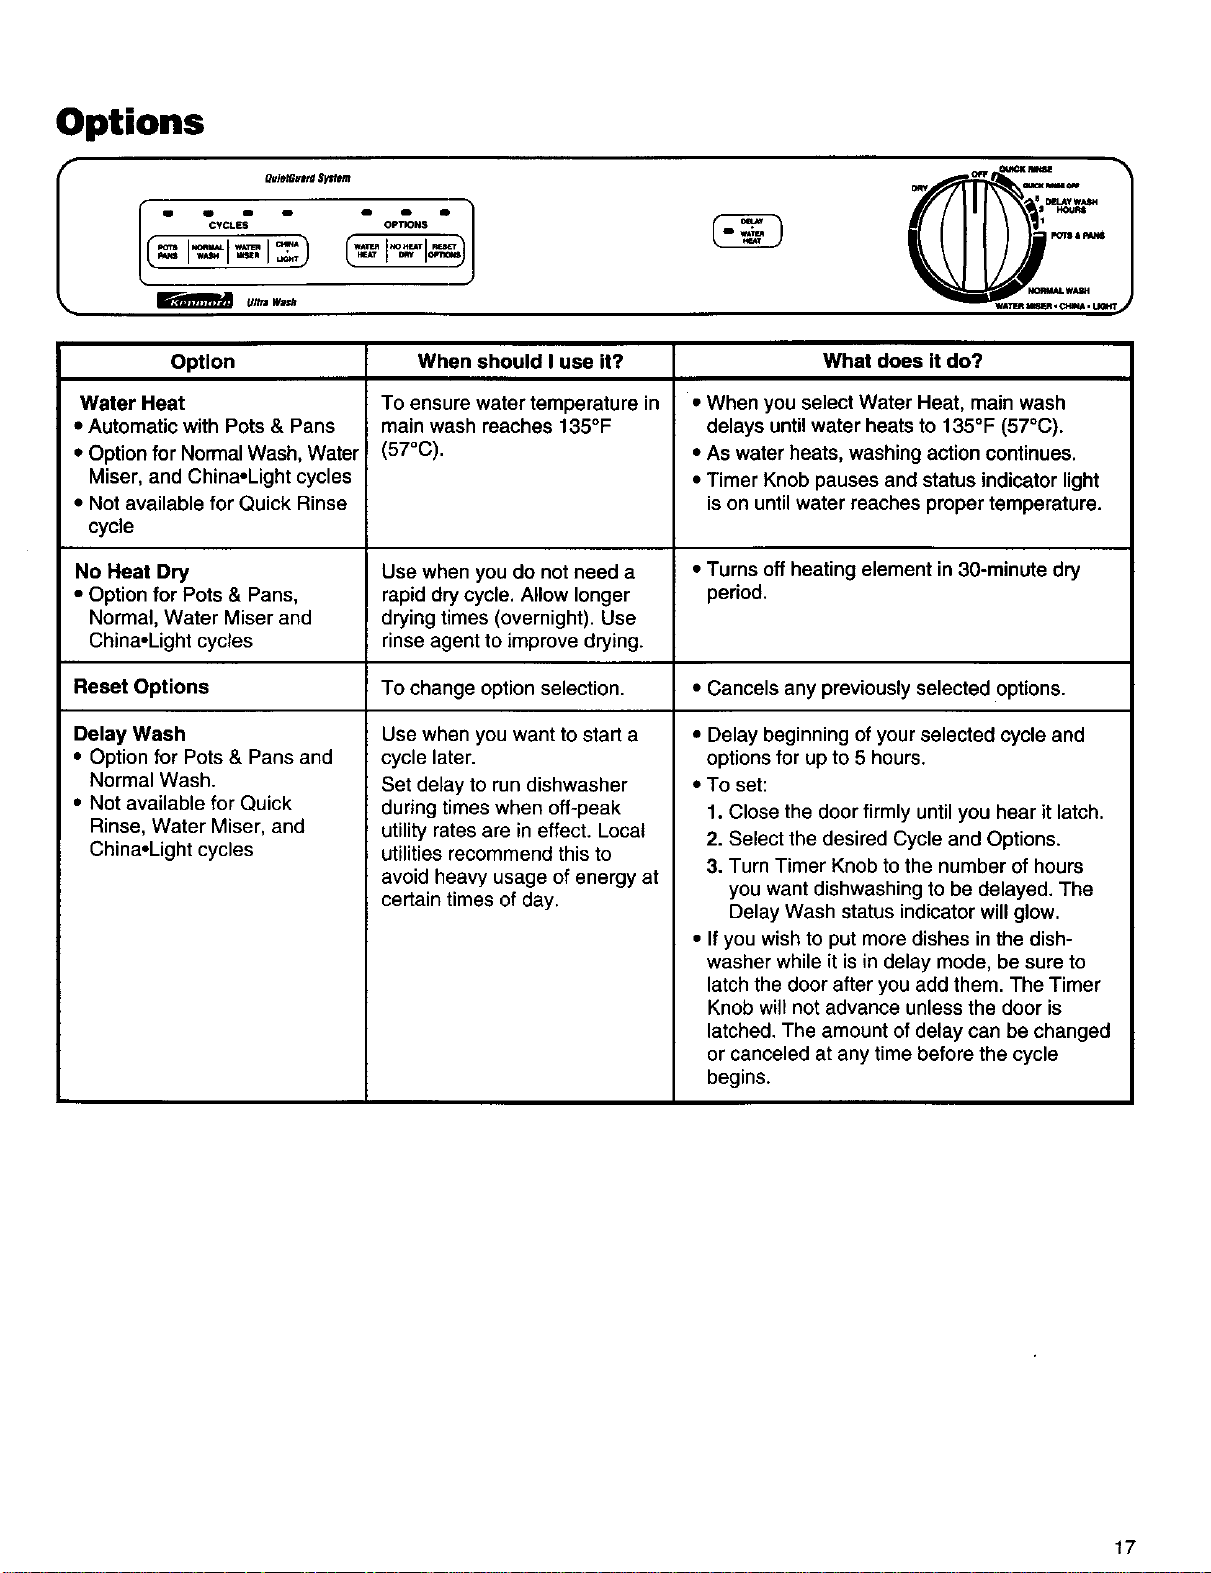
Options
wmlm cm_
=1-1-1
Option
Water Heat
•Automatic with Pots & Pans
• Option for Normal Wash, Water
Miser, and China.Light cycles
• Not available for Quick Rinse
cycle
When should I use it?
To ensure water temperature in
main wash reaches 135°F
(57°C).
What does it do?
• When you select Water Heat, main wash
delays until water heats to 135°F (57°C).
•As water heats, washing action continues.
•Timer Knob pauses and status indicator light
is on untilwater reaches proper temperature.
No Heat Dry Use when you do not need a • Turns off heating element in 30-minute dry
• Option for Pots & Pans, rapid dry cycle. Allow longer period.
Normal, Water Miser and drying times (overnight). Use
China.Light cycles rinseagent to improve drying.
Reset Options To change option selection. • Cancels any previously selected options.
Delay Wash
•Option for Pots & Pans and
Normal Wash.
• Not available for Quick
Rinse, Water Miser, and
China.Light cycles
Use when you want to start a
cycle later.
Set delay to run dishwasher
during times when off-peak
utility rates are in effect. Local
utilities recommend this to
avoid heavy usage of energy at
cerLain times of day.
• Delay beginning of your selected cycle and
options for up to 5 hours.
• To set:
1. Close the door firmly until you hear it latch.
2. Select the desired Cycle and Options.
3. Turn Timer Knob to the number of hours
you want dishwashing to be delayed. The
Delay Wash status indicator will glow.
• If you wish to put more dishes in the dish-
washer while it is in delay mode, be sure to
latch the door after you add them. The Timer
Knob will not advance unless the door is
latched, The amount of delay can be changed
or canceled at any time before the cycle
begins.
17
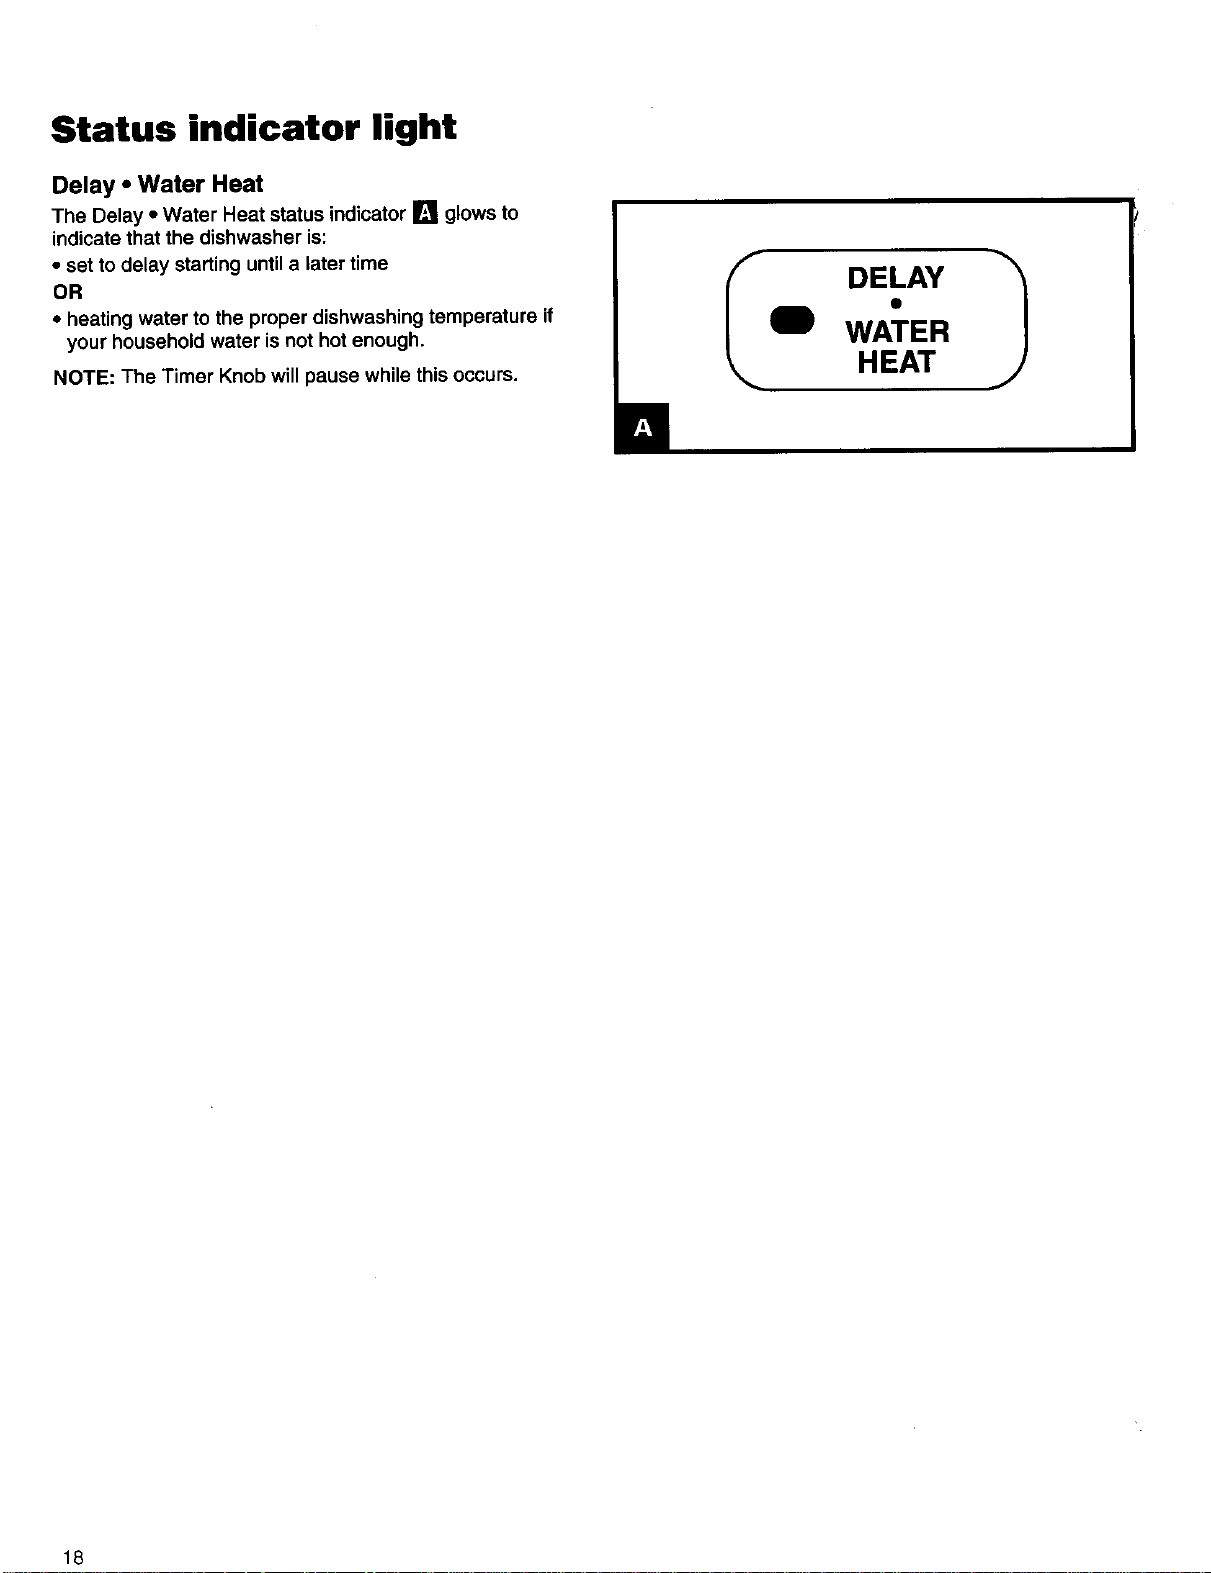
Status indicator light
Delay • Water Heat
The Delay •Water Heat status indicator [] glows to
indicate that the dishwasher is:
• set to delay starting until a later time
OR
•heating water to the proper dishwashing temperature if
your household water is not hot enough.
NOTE: The Timer Knob will pause while this occurs.
DELAY
e
WATER
HEAT
18
Caring for Your Dishwasher
Your new dishwasher is designed to give you many years of dependable service. There are a few things you can do to
maintain your dishwasher properly. This section tells you how to clean and care for your dishwasher. Refer to the
_rroubleshootJng Guide" section for special cleaning problems.
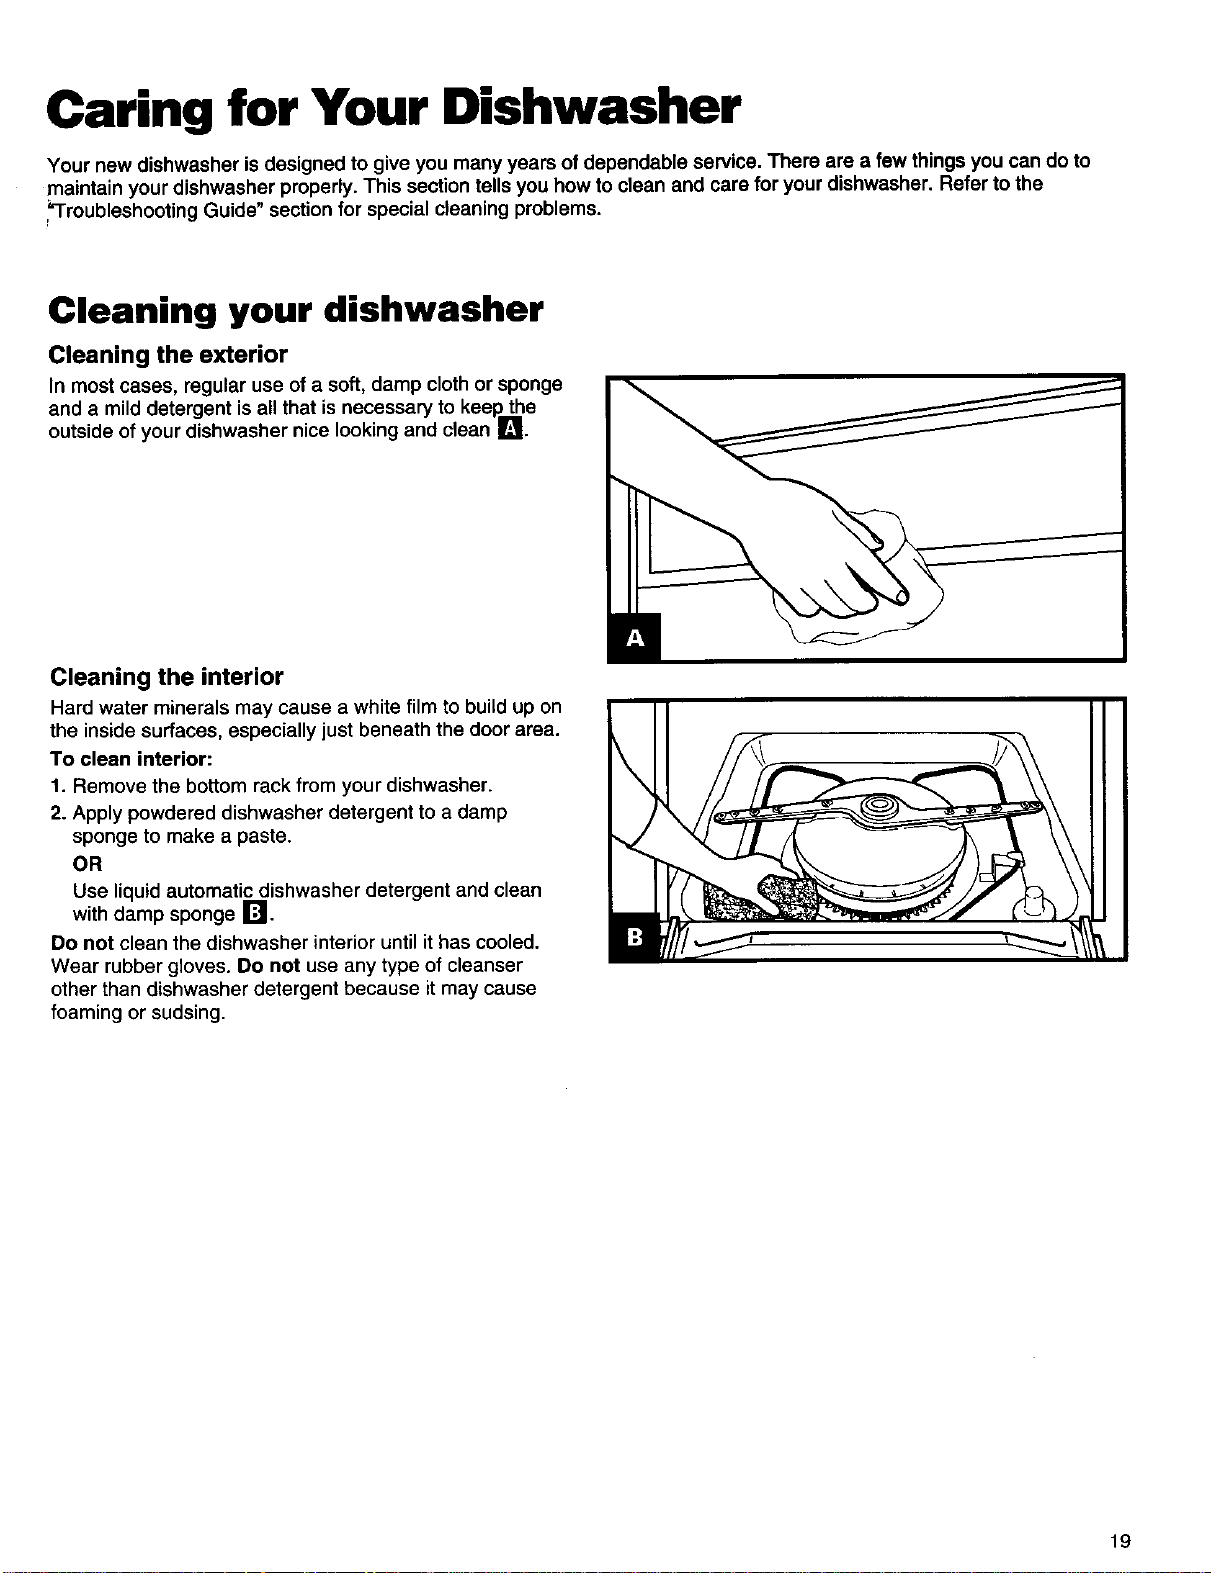
Cleaning your dishwasher
Cleaning the exterior
In most cases, regular use of a soft, damp cloth or sponge
and a mild detergent is all that is necessary to keep the
outside of your dishwasher nice looking and clean I_1
Cleaning the interior
Hard water minerals may cause a white film to build up on
the inside surfaces, especially just beneath the door area.
To clean interior:
1. Remove the bottom rack from your dishwasher.
2. Apply powdered dishwasher detergent to a damp
sponge to make a paste.
OR
Use liquid automatic dishwasher detergent and clean
with damp sponge I'_1.
Do not clean the dishwasher interior until it has cooled.
Wear rubber gloves. Do not use any type of cleanser
other than dishwasher detergent because it may cause
foaming or sudsing.
19
Storing your dishwasher
Moving or winterizing your dishwasher
Protect your dishwasher and home against water damage
due to freezing water lines• If your dishwasher is left in a
seasonal dwelling or could be exposed to near freezing
temperatures, have a qualified person do the following:
1. Disconnect power supply to the dishwasher•
2. Turn off water supply to the dishwasher•
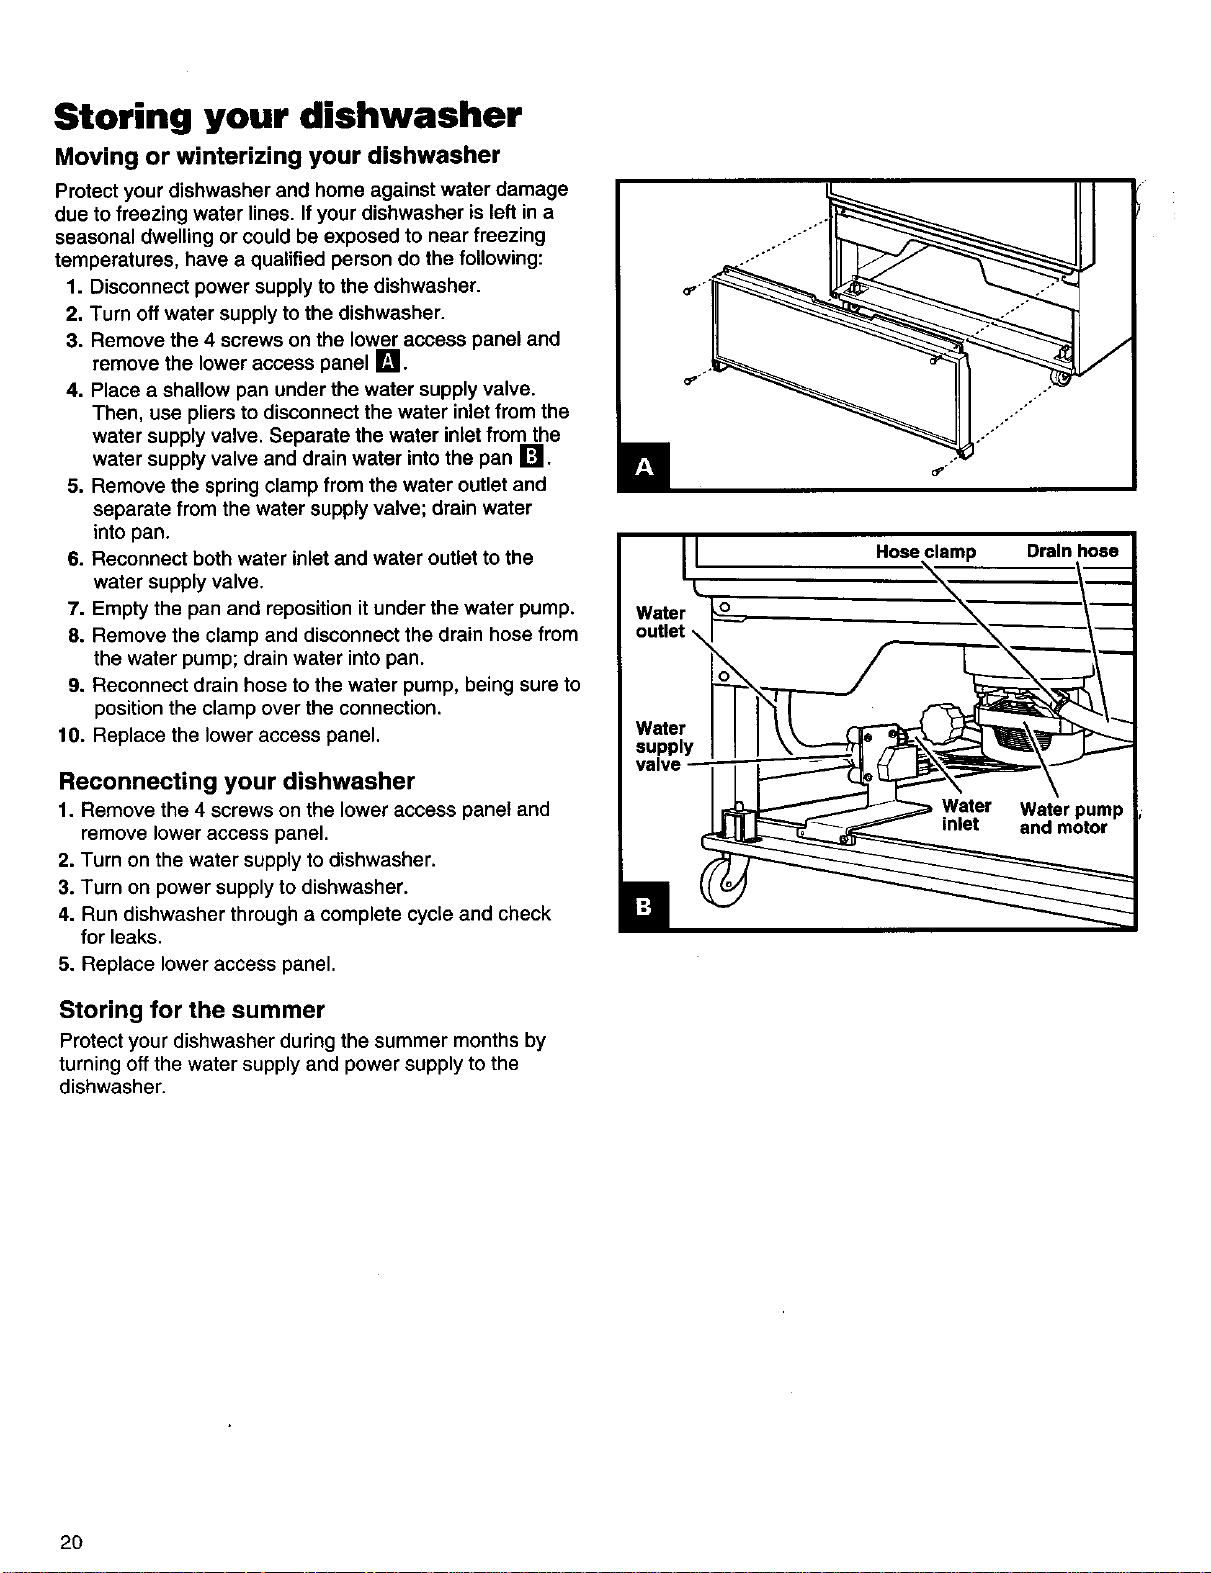
3. Remove the 4 screws on the lower access panel and
remove the lower access panel JF_'I.
4. Place a shallow pan under the water supply valve.
Then, use pliers to disconnect the water inlet from the
water supply valve. Separate the water inlet from the
water supply valve and drain water into the pan _1
5. Remove the spring clamp from the water outlet and
separate from the water supply valve; drain water
into pan.
6. Reconnect both water inlet and water outlet to the
water supply valve.
7. Empty the pan and reposition itunder the water pump.
8. Remove the clamp and disconnect the drain hose from
the water pump; drain water intopan.
9. Reconnect drain hose to the water pump, being sure to
position the clamp over the connection.
10. Replace the lower access panel.
Reconnecting your dishwasher
1. Remove the 4 screws on the lower access panel and
remove lower access panel.
2. Turn on the water supply to dishwasher.
3. Turn on power supply to dishwasher.
4. Run dishwasher through a complete cycle and check
for leaks•
5. Replace lower access panel.
Storing for the summer
Protect your dishwasher during the summer months by
turning off the water supply and power supply to the
dishwasher.
2O
Tips for washing special items
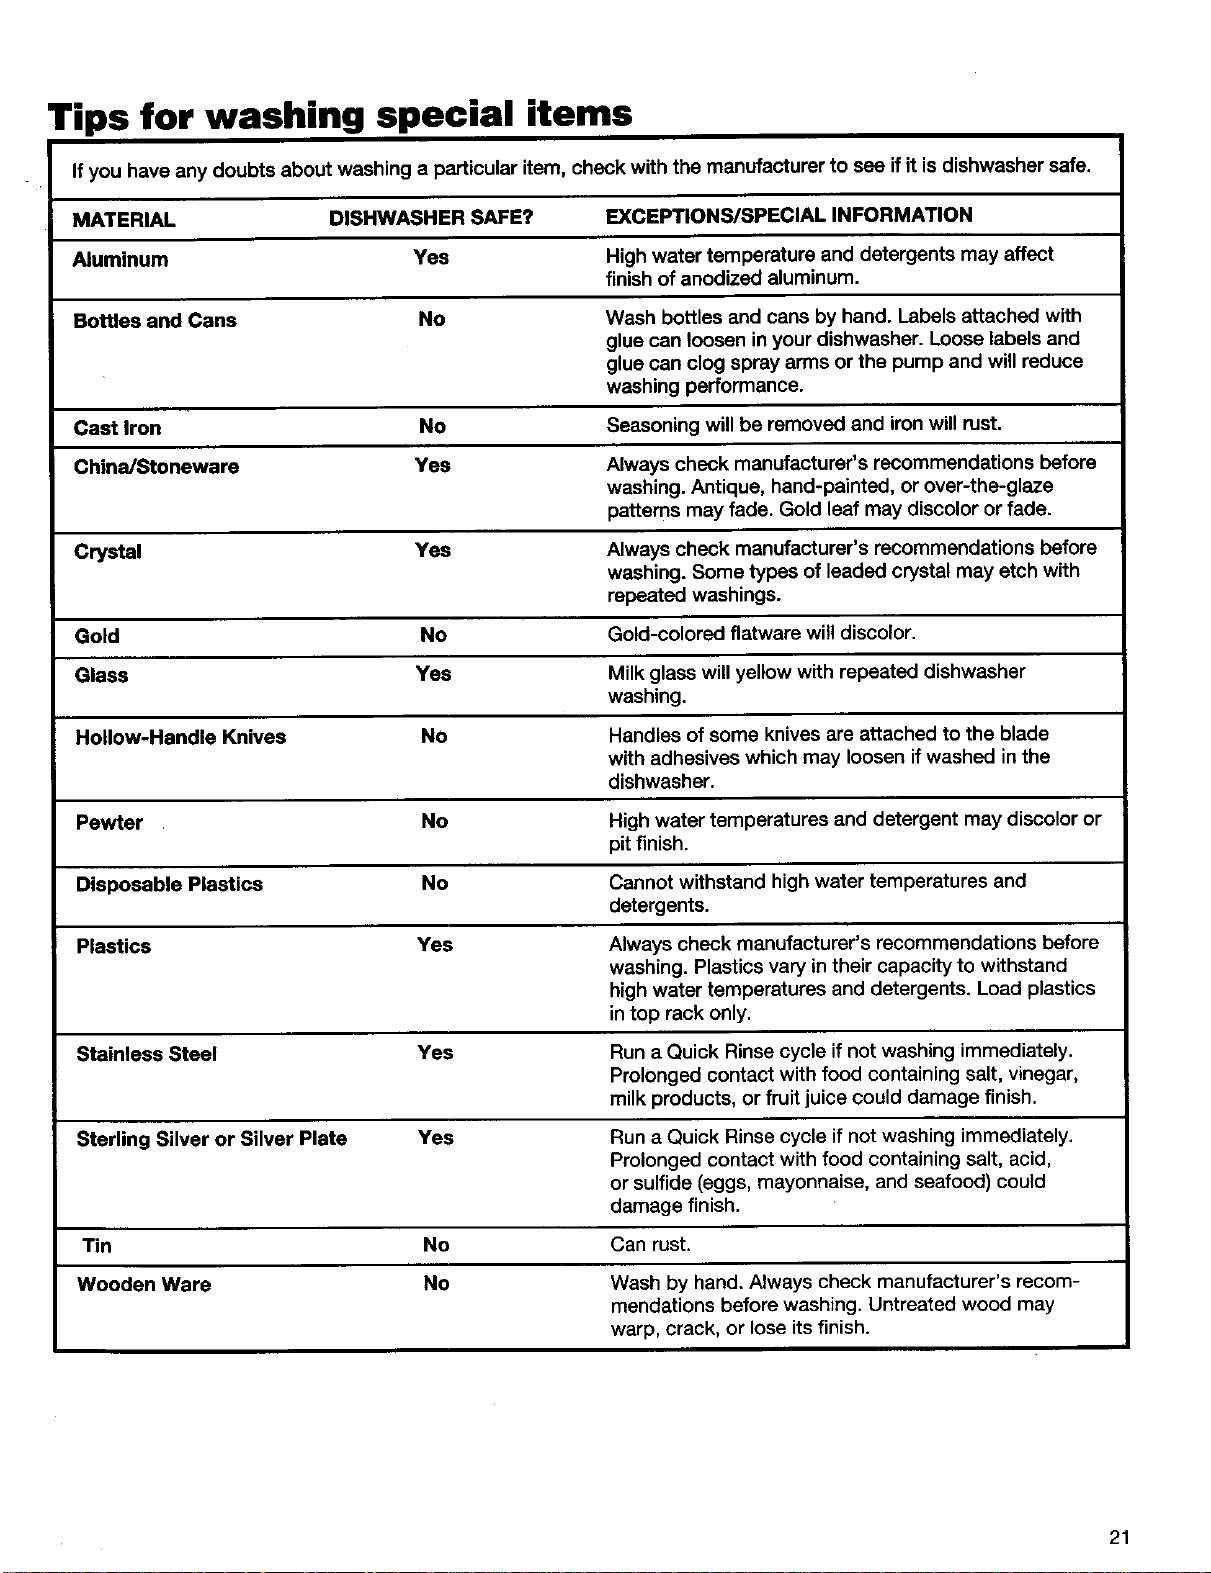
If you have any doubts about washing a particular item, check with the manufacturer to see ifit isdishwasher safe.
MATERIAL DISHWASHER SAFE? EXCEPTIONS/SPECIAL INFORMATION
Aluminum Yes High water temperature and detergents may affect
finish of anodized aluminum.
Bottles and Cans No Wash bottles and cans by hand. Labels attached with
glue can loosen in your dishwasher. Loose labels and
glue can clog spray arms or the pump and will reduce
washing performance.
Cast Iron No Seasoning will be removed and iron will rust.
China/Stoneware Yes Always check manufacturer's recommendations before
washing. Antique, hand-painted, or over-the-glaze
patterns may fade. Gold leaf may discolor or fade.
Crystal Yes Always check manufacturer's recommendations before
washing. Some types of leaded crystal may etch with
repeated washings.
Gold No Gold-colored flatware will discolor.
Glass Yea Milk glass will yellow with repeated dishwasher
washing.
Hollow-Handle Knives NO Handles of some knives are attached to the blade
with adhesives which may loosen ifwashed in the
dishwasher.
Pewter No High water temperatures and detergent may discolor or
pit finish.
Disposable Plastics No
Plastics Yes
Cannot withstand high water temperatures and
detergents.
Always check manufacturer's recommendations before
washing. Plastics vary in their capacity to withstand
high water temperatures and detergents. Load plastics
in top rack only.
Stainless Steel Yes Run a Quick Rinse cycle if not washing immediately.
Prolonged contact with food containing salt, vinegar,
milk products, or fruit juice could damage finish.
Sterling Silver or Silver Plate Yes Run aQuick Rinse cycle if not washing immediately.
Prolonged contact with food containing salt, acid,
or sulfide (eggs, mayonnaise, and seafood) could
damage finish.
Tin No Can rust.
Wooden Ware No Wash by hand. Always check manufacturer's recom-
mendations before washing. Untreated wood may
warp, crack, or lose itsfinish.
21
Troubleshooting Guide
Dishwasher is not operating properly
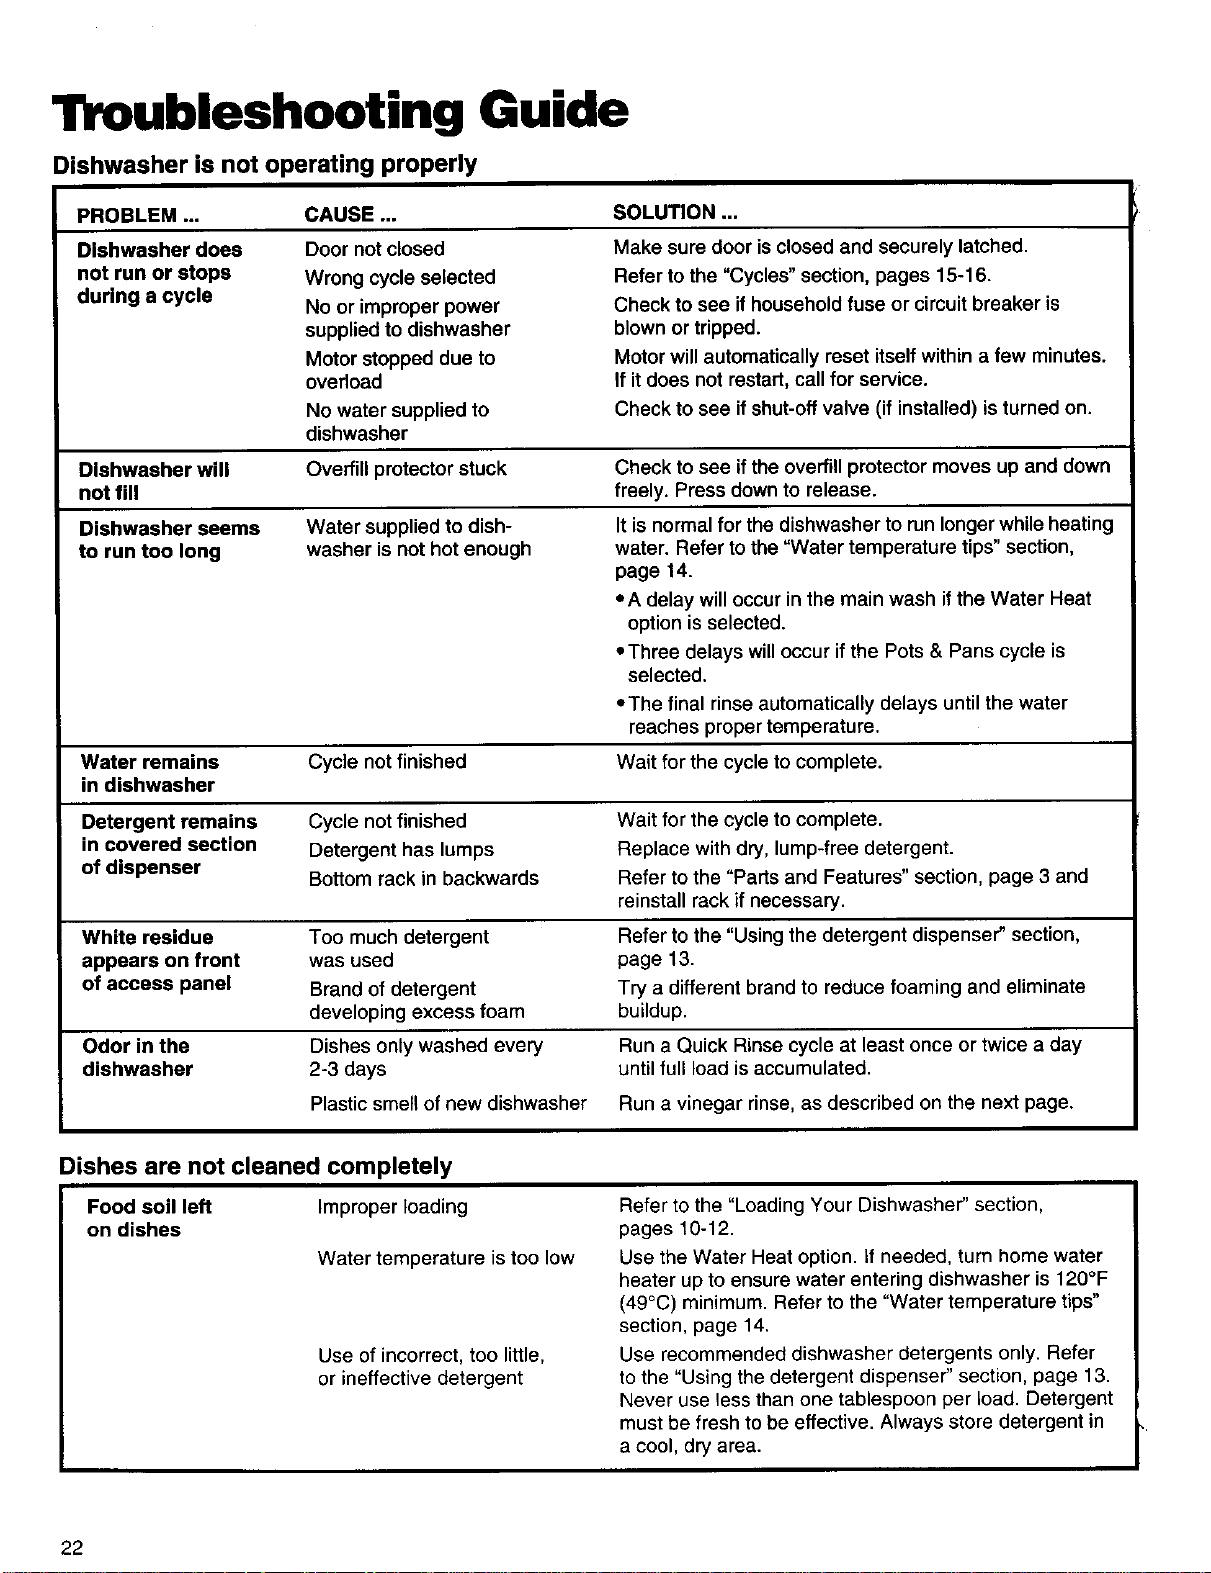
PROBLEM ...
Dishwasher does
not run or stops
during a cycle
SOLUTION ...
CAUSE...
Dishwasher seems
to run too long
Door not closed
Wrong cycle selected
No or improper power
supplied to dishwasher
Motor stopped due to
overload
Make sure door is closed and securely latched.
Refer to the "Cycles" section, pages 15-16.
Check to see if household fuse or circuit breaker is
blown or tripped.
Motor will automatically reset itself within a few minutes.
If it does not restart, call for service.
No water supplied to Check to see if shut-off valve (if installed) is turned on.
dishwasher
Dishwasher will Overfill protector stuck Check to see if the overfillprotector moves up and down
not fill freely. Press down to release.
Water supplied to dish-
washer is not hot enough It is normal for the dishwasher to run longer while heating
water. Refer to the "Water temperature tips" section,
page 14.
°A delay will occur in the main wash if the Water Heat
option is selected.
oThree delays will occur if the Pots & Pans cycle is
selected.
oThe final rinse automatically delays until the water
reaches proper temperature.
Water remains Cycle not finished Wait for the cycle to complete.
in dishwasher
Detergent remains Cycle not finished Wait for the cycle to complete.
in covered section Detergent has lumps Replace with dry, lump-free detergent.
of dispenser Bottom rack in backwards Refer to the "Parts and Features" section, page 3 and
reinstall rack if necessary.
White residue Too much detergent Refer to the "Using the detergent dispenser" section,
appears on front was used page 13.
of access panel Brand of detergent Try a different brand to reduce foaming and eliminate
developing excess foam buildup.
Odor in the Dishes only washed every Run a Quick Rinse cycle at least once or twice a clay
dishwasher 2-3 days untilfull load isaccumulated.
Plastic smell of new dishwasher Run a vinegar rinse, as described on the next page.
Dishes are not cleaned completely
Food soil left Improper loading
on dishes
Water temperature is too low
Use of incorrect, too little,
or ineffective detergent
Refer to the "Loading Your Dishwasher" section,
pages 10-12.
Use the Water Heat option. If needed, turn home water
heater up to ensure water entering dishwasher is 120°F
(49°C) minimum. Refer to the "Water temperature tips"
section, page 14.
Use recommended dishwasher detergents only. Refer
to the "Using the detergent dispenser" section, page 13.
Never use less than one tablespoon per load. Detergent
must be fresh to be effective. Always store detergent in
a cool, dry area.
22
Troubleshooting Guide (cont.)
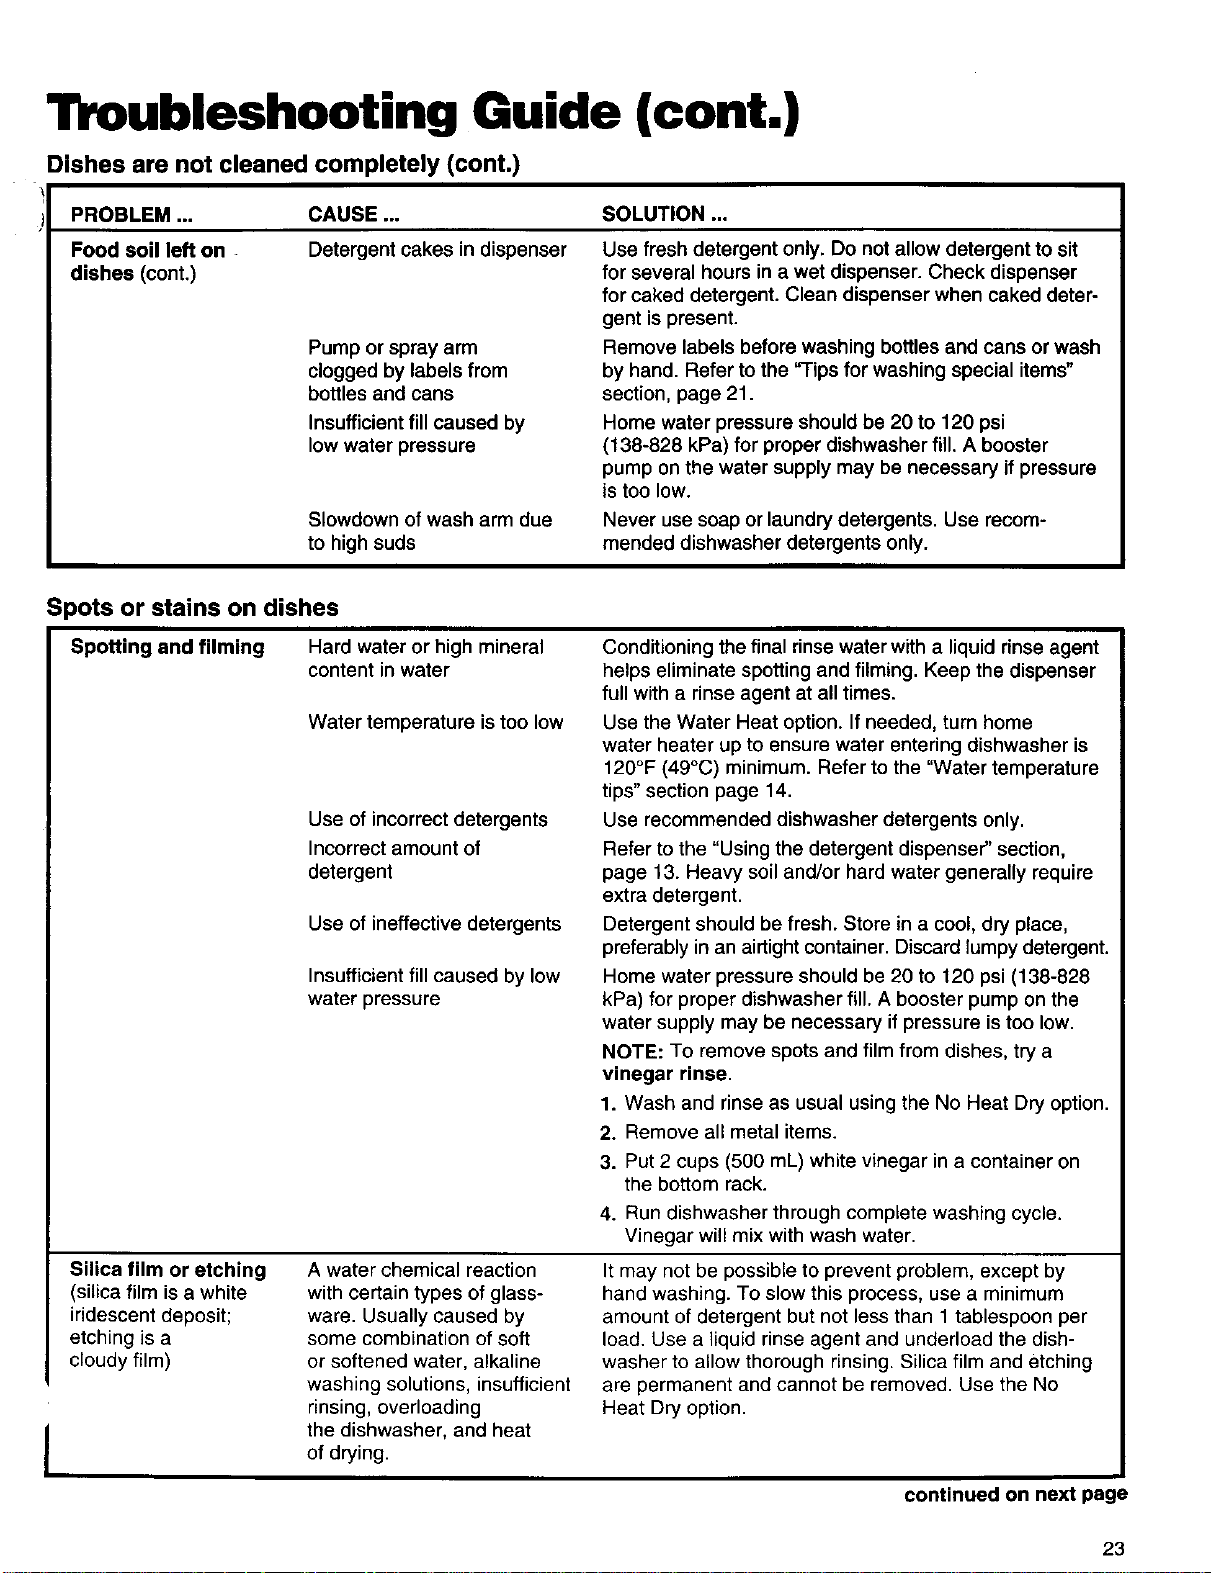
Dishes are not cleaned completely (cont.)
)PROBLEM... CAUSE...
Food soil left on -
dishes (cont.)
SOLUTION ...
Detergent cakes in dispenser
Pump or spray arm
clogged by labels from
bottles and cans
Insufficient fill caused by
low water pressure
Slowdown of wash arm due
to high suds
Use fresh detergent only. Do not allow detergent to sit
for several hours in a wet dispenser. Check dispenser
for caked detergent. Clean dispenser when caked deter-
gent is present.
Remove labels before washing bottles and cans or wash
by hand. Refer to the "rips for washing special items"
section, page 21.
Home water pressure should be 20 to 120 psi
(138-828 kPa) for proper dishwasher fill. A booster
pump on the water supply may be necessary if pressure
is too low.
Never use soap or laundry detergents. Use recom-
mended dishwasher detergents only.
Spots or stains on dishes
I
Spotting and filming Hard water or high mineral
content in water
Water temperature istoo low
Use of incorrect detergents
Incorrect amount of
detergent
Use of ineffective detergents
Insufficient fill caused by low
water pressure
Conditioning the final rinse waterwith a liquid rinse agent
helps eliminate spotting and filming. Keep the dispenser
full with a rinse agent at all times.
Use the Water Heat option. If needed, turn home
water heater up to ensure water entering dishwasher is
120°F (49°C) minimum. Refer to the "Water temperature
tips" section page 14.
Use recommended dishwasher detergents only.
Refer to the "Using the detergent dispenser" section,
page 13. Heavy soil and/or hard water generally require
extra detergent.
Detergent should be fresh. Store in a cool, dry place,
preferably in an airtight container. Discard lumpy detergent.
Home water pressure should be 20 to 120 psi (138-828
kPa) for proper dishwasher fill. A booster pump on the
water supply may be necessary if pressure is too low.
NOTE: To remove spots and film from dishes, try a
vinegar rinse.
1. Wash and rinse as usual using the No Heat Dry option.
2. Remove all metal items.
3. Put 2 cups (500 mL) white vinegar in a container on
the bottom rack.
4. Run dishwasher through complete washing cycle.
Vinegar will mix with wash water.
Silica film or etching
(silica film isa white
iridescent deposit;
etching is a
cloudy film)
Awater chemical reaction
with certain types of glass-
ware. Usually caused by
some combination of soft
or softened water, alkaline
washing solutions, insufficient
rinsing, overloading
the dishwasher, and heat
It may not be possible to prevent problem, except by
hand washing. To slow this process, use a minimum
amount of detergent but not less than 1 tablespoon per
load. Use a liquid rinse agent and underload the dish-
washer to allow thorough rinsing. Silica film and etching
are permanent and cannot be removed. Use the No
Heat Dry option.
of drying.
continued on next page
23
Troubleshooting Guide (cont.)
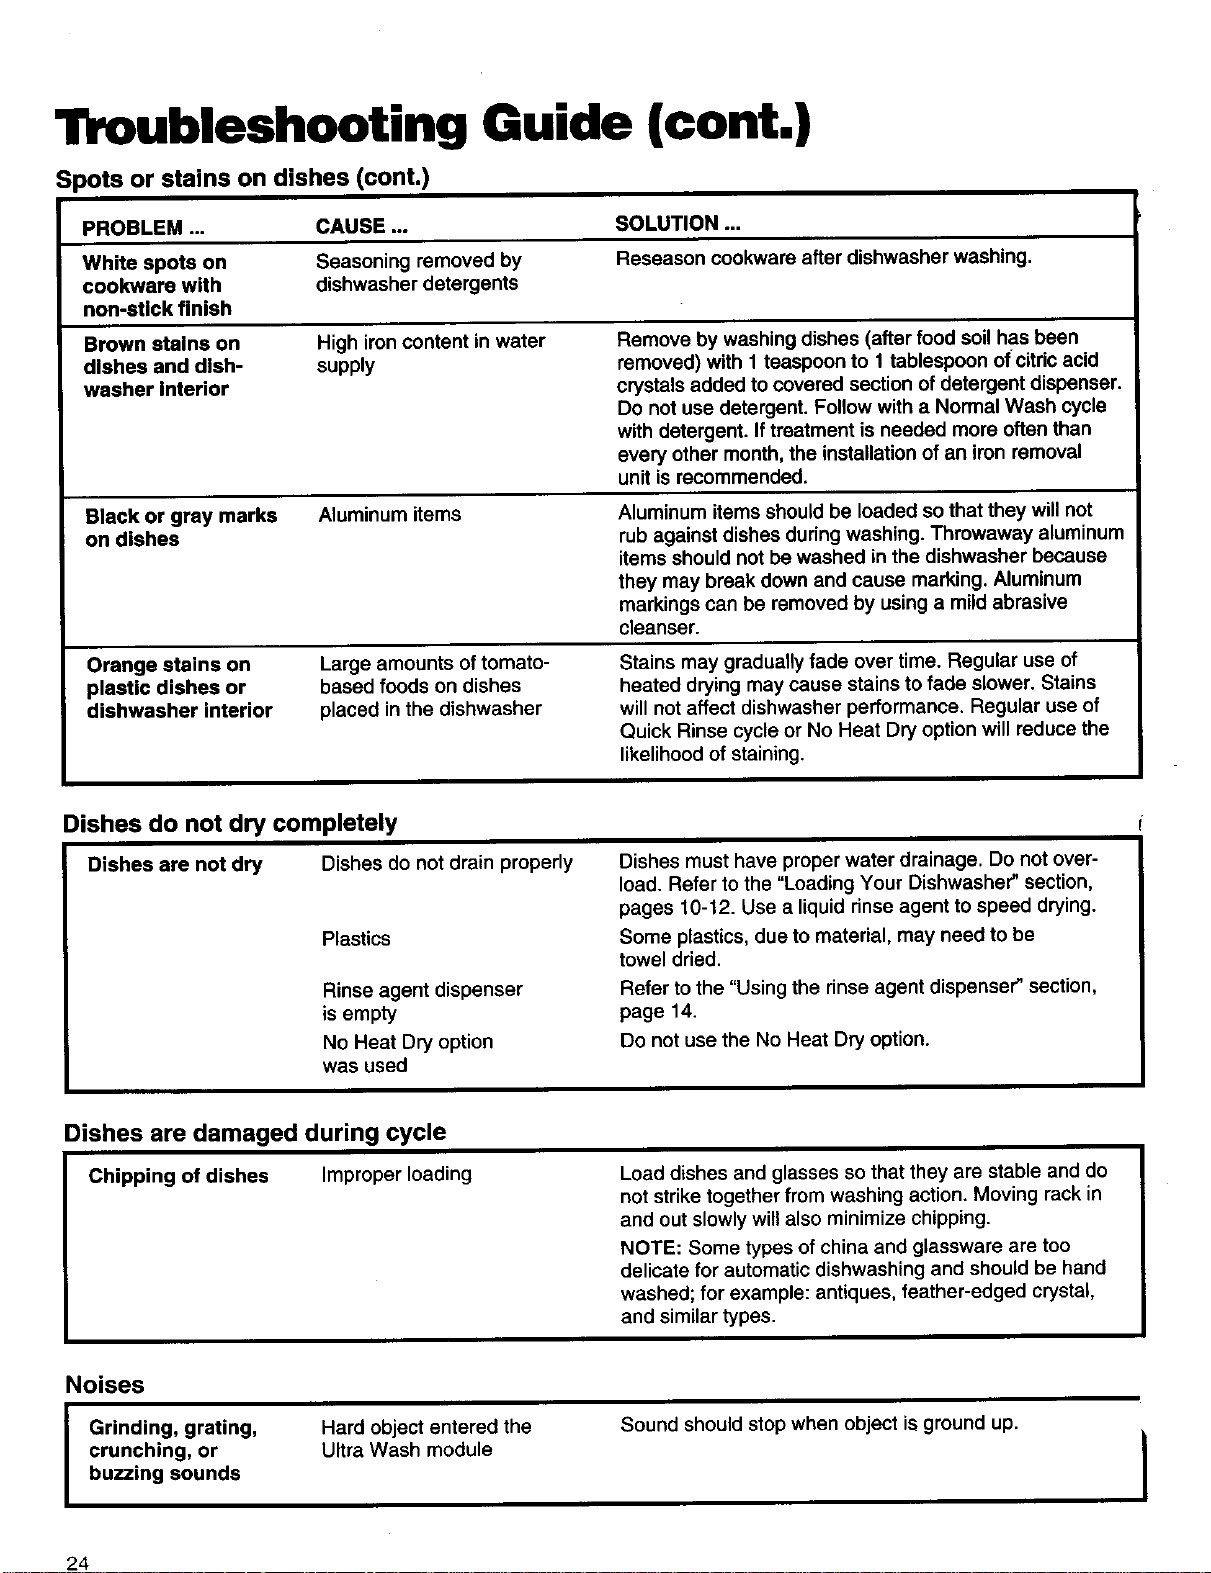
Spots or stains on dishes (cont.)
PROBLEM ... CAUSE ... SOLUTION ...
White spots on Seasoning removed by Reseason cookware after dishwasher washing.
cookware with dishwasher detergents
non-stick finish
Brown stains on High ironcontent in water Remove by washing dishes (after food soil has been
dishes and dish- supply removed) with 1 teaspoon to 1 tablespoon of citdc acid
washer Interior crystals added to covered section of detergent dispenser.
Do not use detergent. Follow with a Normal Wash cycle
with detergent. Iftreatment is needed more often than
every other month, the installationof an iron removal
unitis recommended.
Black or gray marks
on dishes
Orange stains on
plastic dishes or
dishwasher interior
Aluminum items Aluminum items should be loaded so that they will not
rub against dishes during washing. Throwaway aluminum
items should not be washed in the dishwasher because
they may break down and cause marking. Aluminum
markings can be removed by using a mild abrasive
cleanser.
Large amounts of tomato-
based foods on dishes
placed in the dishwasher
Stains may gradually fade over time. Regular use of
heated drying may cause stains to fade slower. Stains
will not affect dishwasher performance. Regular use of
Quick Rinse cycle or No Heat Dry option will reduce the
likelihood of staining.
Dishes do not dry completely
Dishes are not dry Dishes do not drain properly
Plastics
Rinse agent dispenser
is empty
No Heat Dry option
was used
Dishes must have proper water drainage. Do not over-
load. Refer to the "Loading Your Dishwasher" section,
pages 10-12. Use a liquid dnse agent to speed drying.
Some plastics, due to material, may need to be
towel dried.
Refer to the "Using the rinse agent dispenser" section,
page 14.
Do not use the No Heat Dry option.
Dishes are damaged during cycle
Chipping of dishes Improper loading Load dishes and glasses so that they are stable and do
not strike together from washing action. Moving rack in
and out slowly will also minimize chipping.
NOTE: Some types of china and glassware are too
delicate for automatic dishwashing and should be hand
washed; for example: antiques, feather-edged crystal,
and similar types.
Noises
Grinding, grating,
crunching, or
buzzing sounds
Hard object entered the
Ultra Wash module Sound should stop when object is ground up.
24
We Service What We Sell
"We Service What We Sell" is our assuranceyou can depend on Sears for service.Your dishwasher has added value when you
considerthat Sears hasservice unitsnationwide, staffedwith professionaltechniciansspecificallytrained on Sears appliances
and havingthe parts, tools, and equipment to ensure that we meet our pledge to you ... "We Service What We Sell."
Sears Maintenance Agreement
Maintainthe value ofyour KENMORE Dishwasherwith a Sears Maintenance Agreement. Sears dishwashers are designed,
manufactured, and tested for years of dependable operation.Yet, any modem appliance may require service from timeto time.
The Sears Maintenance Agreement:
•Isyour way to buytomorrow's serviceat today's prices.
•Eliminatesrepair billsresultingfrom normal use.
• Allows for as manyservice calls as required.
•Providesfor service by professionalSears TrainedTechnicians.
•Evenifyou don't need repairs,the MaintenanceAgreement offers an annual preventativemaintenance check-up at
your request!
This Maintenance Agreement does not cover original installation,reinstallation, or damage resulting from externalcauses such
as acts of abuse, theft, fire, flood, wind, lightning, freezing, power failure, power reduction, etc.
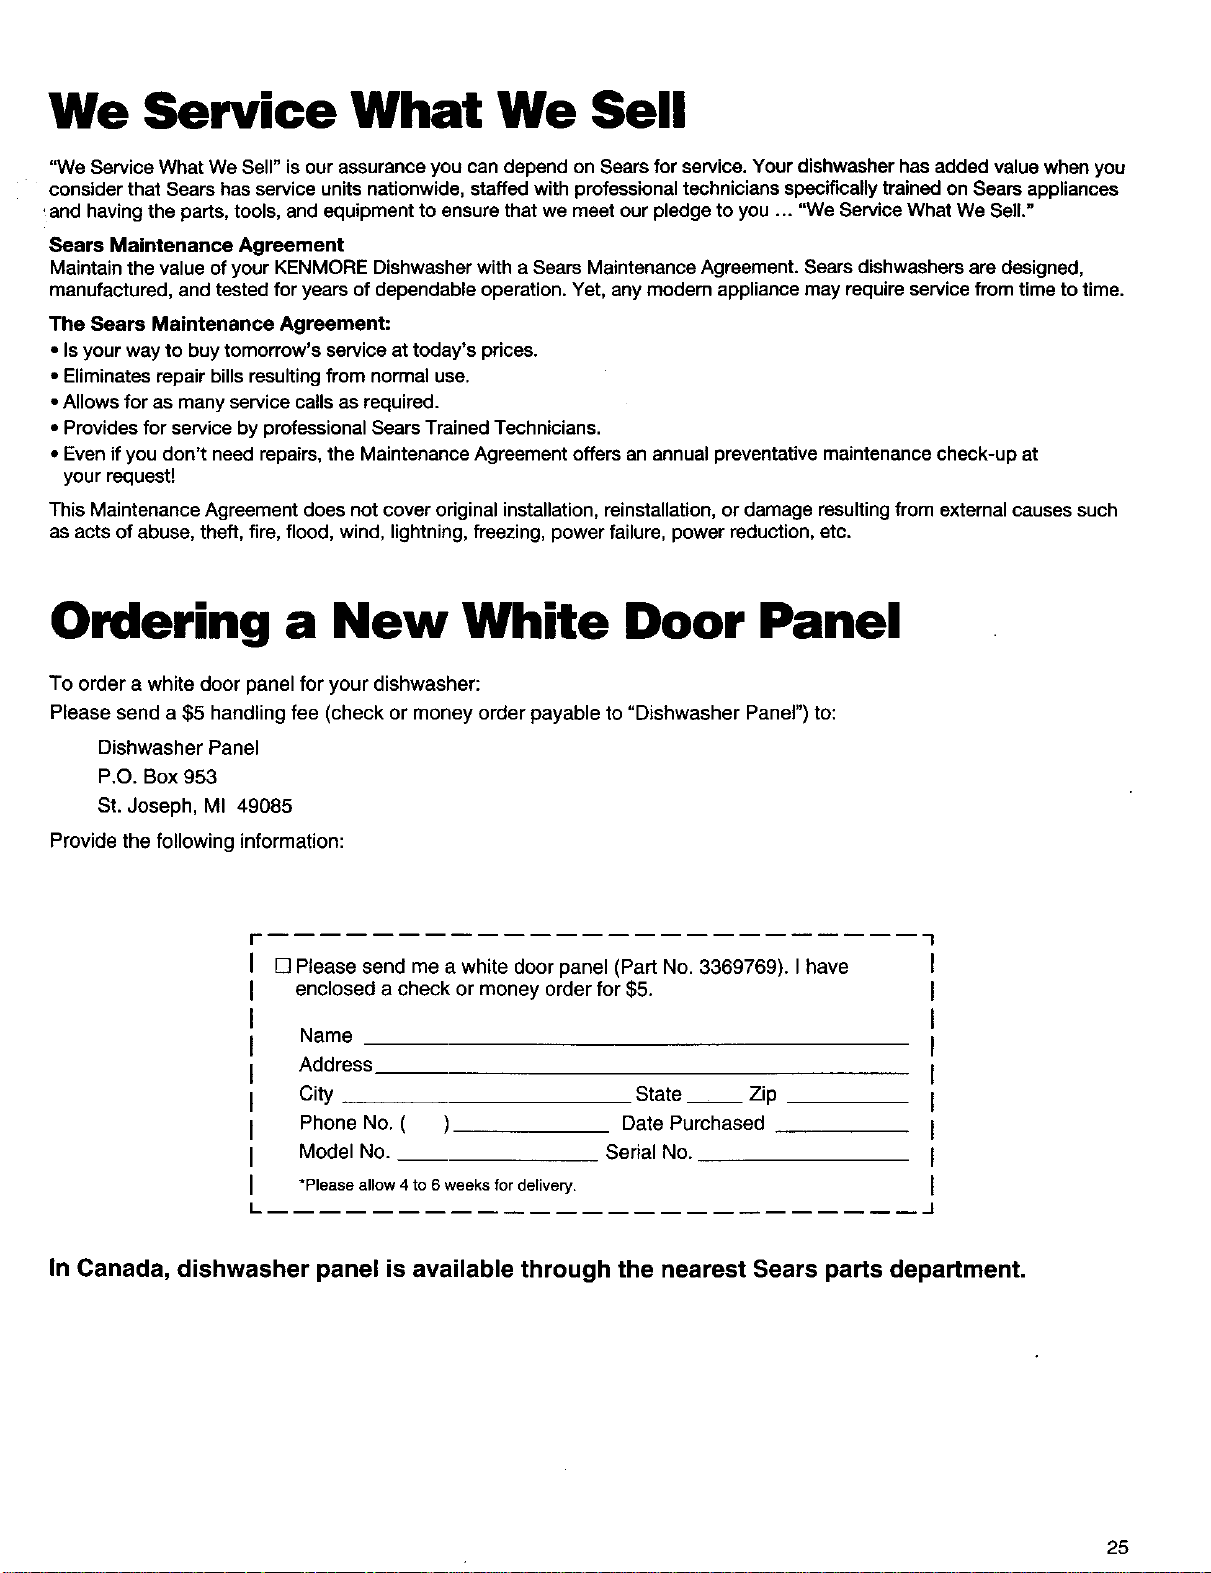
Ordering a New White Door Panel
To order awhite door panel for your dishwasher:
Please send a $5 handling fee (check or money order payable to "Dishwasher Panel") to:
Dishwasher Panel
P.O. Box 953
St. Joseph, MI 49085
Provide the following information:
[] Please send me a white door panel (Part No. 3369769). I have
enclosed a check or money order for $5.
Name
Address
City State Zip
Phone No. ( ) Date Purchased
Model No. Serial No.
*Please allow 4 to 6 weeks for delivery.
In Canada, dishwasher panel is available through the nearest Sears parts department.
25
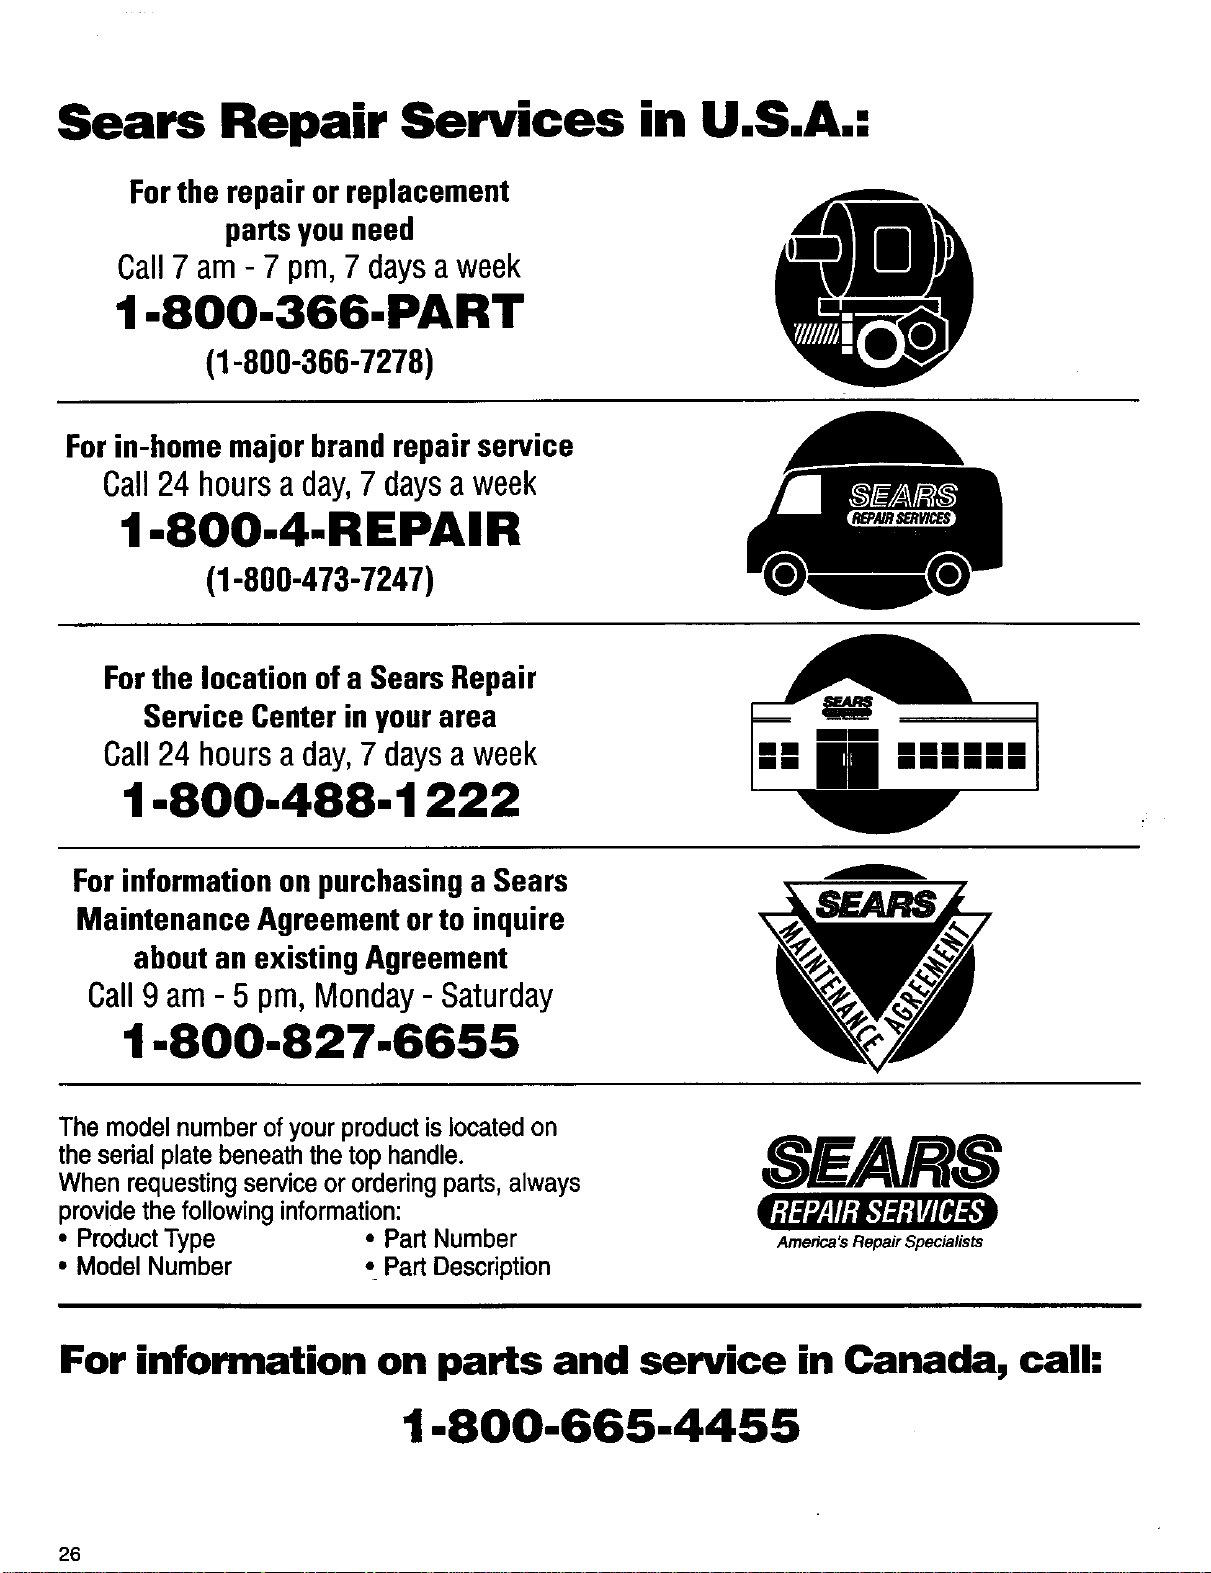
Sears Repair Services in U.S.A.:
Fortherepairorreplacement
parts youneed
Call7 am - 7 pm,7 daysaweek
1-800-366-PART
(1-800-366-7278)
Forin-homemajorbrandrepairservice
Call24 hours aday,7 daysaweek
1-800-4-REPAIR
(1-800-473-7247)
Forthelocationofa SearsRepair
ServiceCenterinyourarea
Call24 hoursaday,7 daysaweek
1-800-488-1222
ForinformationonpurchasingaSears
MaintenanceAgreementorto inquire
aboutanexistingAgreement
Call9 am- 5 pro,Monday- Saturday
1-800-827-6655
A
The model number of your product is located on
the serial plate beneath the top handle.
When requesting service or ordering parts, always
provide the following information:
• Product Type •Part Number
,Model Number •Part Description
BE,A/R8
America's Repair Specialists
For information on parts and service in Canada, call:
1-800-665-4455
26

2/97
plinted in U.S.A.
Impresso en los EE. UU.
3378919 ,.p,i___tats-un_