
IT
Tosaerba a batteria con conducente a piedi
MANUALE DI ISTRUZIONI
ATTENZIONE: prima di usare la macchina, leggere attentamente il presente libretto.
EN
Pedestrian-controlled walk-behind battery powered lawn mower
OPERATOR’S MANUAL
WARNING: read thoroughly the instruction booklet before using the machine.
171506843/4EN 02/2023
T 300 Li 20 series
B
G
A
C
D
E
F
J
I
H
K
1
4
2
3
6 8
5 7
11
W
1210
9
Type:
- s/n
Art.N.
d.c.
1
2
3
IA
3 mm
IB
II
A.1
A
4
5
6
7
B
A
C
A
2
1
B
I
II
8
K
M
L
I II
III
9
10
12
11
I
II

ITALIANO -
Istruzioni Originali ...................................................................................................
IT
ENGLISH - Translation of the original instruction
..........................................................................
EN

[1] EN - TECHNICAL DATA
[2] Nominal power*
[3] Max. motor operating speed *
[4] Power supply voltage MAX
[5] Power supply voltage NOMINAL
[6] Machine weight *
[7] Cutting width
[8] Cutting blade code
[9] Acoustic pressure level (max.)
[10] Measurement uncertainty
[11] Measured acoustic power level (max.)
[12] Guaranteed acoustic power level
[13] Vibration level (max.)
[14] Accessories available on request
[15] Mulching kit
[16] Batteries, mod.
[17] Battery charger, mod.
[18] Cutting height spacer
** Recommended machine/battery application for optimal performance.
IMPORTANT
Both batteries must be present in the appropriate housing. If only one battery is inserted, the machine does not
work.
For best performance, it is recommended the 4.0 Ah two batteries and that they are fully charged.
DATI TECNICI T 300 Li 20
Potenza nominale * W 750
Velocità mass. di funzionamento motore * min
-1
6200
Tensione di alimentazione MAX V / d.c. 40
Tensione di alimentazione NOMINAL V / d.c. 36
Peso macchina* kg 7
Ampiezza di taglio cm 30
181004477/1
Livello di pressione acustica (max.)
Incertezza di misura
dB(A)
dB(A)
82
3
Livello di potenza acustica misurato (max.)
Incertezza di misura
dB(A)
dB(A)
92,43
0,43
Livello di potenza acustica garantito dB(A) 93
Livello di vibrazioni (max.)
Incertezza di misura
m/s
2
m/s
2
0,47
1,5
ACCESSORI A RICHIESTA
Batterie, mod.
BT 20 Li 2.0 A - S
BT 20 Li 4.0 A -S **
Carica batteria, mod.
CG 20 Li
CGD 20 Li
Distanziatore 118811465/0
**
Applicazione macchina/batteria raccomandata per ottenere prestazioni ottimali.
IMPORTANTE
Entrambe le batterie devono essere presenti nell’apposito alloggiamento. In caso di una
sola batteria inserita la macchina non funziona .
Per migliori prestazioni si raccomanda l'uso delle due batterie da 4.0 Ah e che siano completamente
cariche.

IT - 1
1. GENERALITÀ
1.1 COME LEGGERE IL MANUALE
NOTA
oppure
|
IMPORTANTE fornisce precisazioni
o altri elementi a quanto già precedentemente indicato,
nell’intento di non danneggiare la macchina, o causare
danni.
Il simbolo evidenzia un pericolo. Il mancato rispet-
to dell’avvertenza comporta possibilità di lesioni perso-
nali o a terzi e/o danni.
grigio indicano caratteristiche opzionali non presenti in
se la caratteristica è presente nel proprio modello.
Tutte le indicazioni “anteriore”, “posteriore”,
“destro” e “sinistro” si intendono riferite alla
posizione di lavoro dell’operatore.
1.2 RIFERIMENTI
1.2.1 Figure
3, e così via.
le lettere A, B, C, e così via.
1.2.2 Titoli
paragrafo “2.1 Addestramento” è un sottotitolo di “2. Norme
di sicurezza”.
cap. o par. e il numero relativo. Esempio: “cap. 2” o “par. 2.1”
2. NORME DI SICUREZZA
2.1 ADDESTRAMENTO
Leggere attentamente le presenti istruzioni prima
di usare la macchina. Prendere familiarità con i coman-
di e con un uso appropriato della macchina. Imparare
ad arrestare rapidamente il motore. L’inosservanza
delle avvertenze e delle istruzioni può causare scosse
elettriche, incendi e/o gravi lesioni. Conservare tutte le
avvertenze e le istruzioni per consultarle in futuro.
•
Non permettere mai che la macchina venga utilizzata da
bambini o da persone che non abbiano la necessaria
dimestichezza con le istruzioni. Le leggi locali possono
•
L’apparecchio può essere utilizzato da bambini di età non
ATTENZIONE!: PRIMA DI USARE LA MACCHINA, LEGGERE ATTENTAMENTE
IL PRESENTE LIBRETTO. Conservare per ogni futura necessità.
IT
INDICE
1. GENERALITÀ ............................................................... 1
1.1 Come leggere il manuale .................................... 1
1.2 Riferimenti ........................................................... 1
2. NORME DI SICUREZZA .............................................. 1
2.1 Addestramento .................................................... 1
2.2 Operazioni preliminari ......................................... 2
2.3 Durante l’utilizzo .................................................. 2
2.4 Manutenzione, rimessaggio ............................... 2
2.5 Batteria / carica batteria ...................................... 2
2.6 Tutela ambientale ................................................ 3
3. CONOSCERE LA MACCHINA ..................................... 3
3.1 Descrizione macchina e uso previsto ................. 3
3.2 Componenti principali (Fig. 1) ............................. 3
...................... 4
3.4 Segnaletica di sicurezza (Fig. 2). ........................ 4
4. MONTAGGIO ................................................................ 4
4.1 Disimballaggio (Fig.2) ......................................... 4
4.2 Montaggio del manico (Fig.3) ............................. 4
4.3 REGOLAZIONE ALTEZZA DI TAGLIO (Fig.4).... 4
5. COMANDI DI CONTROLLO ......................................... 4
5.1 Chiave di sicurezza (Dispositivo di
disattivazione) ..................................................... 4
5.2 Comando interruttore .......................................... 5
6. USO DELLA MACCHINA ............................................. 5
6.1 Operazioni preliminari ......................................... 5
6.2 Controlli di sicurezza ........................................... 5
6.3 Avviamento ......................................................... 5
6.4 Lavoro ................................................................ 6
6.5 Arresto ................................................................. 6
6.6 Dopo l’utilizzo ..................................................... 6
7. MANUTENZIONE ......................................................... 6
7.1 Batter ia ................................................................ 6
7.2 Pulizia .................................................................. 7
7.3 Dispositivo di taglio ............................................ 7
8. RIMESSAGGIO ............................................................ 7
8.1 Rimessaggio della macchina .............................. 7
8.2 Rimessaggio della batteria ................................. 7
10. ASSISTENZA E RIPARAZIONE ................................... 8
11. COPERTURA DELLA GARANZIA ............................... 8
.............................. 8
13. ACCESSORI A RICHIESTA .......................................... 9
13.1 Batterie ................................................................ 9
13.2 Carica batteria ..................................................... 9

IT - 2
sensoriali o mentali, o prive di esperienza o della necessaria
conoscenza, purché sotto sorveglianza oppure dopo che
le stesse abbiano ricevuto istruzioni relative all’uso sicuro
dell’apparecchio e alla comprensione dei pericoli ad esso
inerenti. I bambini non devono giocare con l’apparecchio.
senza sorveglianza.
•
Non utilizzare mai il rasaerba con persone, in particolare
bambini, o animali nelle vicinanze. È necessario che i
bambini vengano sorvegliati da un altro adulto.
•
Non utilizzare mail la macchina se l’utilizzatore è in
condizione di stanchezza o malessere, oppure ha assunto
farmaci, droghe, alcool o sostanze nocive alle sue capacità
•
Ricordare che l’operatore o utilizzatore è responsabile di
persone o alle loro proprietà. Rientra nella responsabilità
dell’utilizzatore la valutazione dei rischi potenziali del
terreno su cui si deve lavorare, nonché prendere tutte
le precauzioni necessarie per garantire la sua e altrui
sicurezza, in particolare sui pendii, terreni accidentati,
scivolosi o instabili.
•
Nel caso si voglia cedere o prestare ad altri la macchina,
assicurarsi che l’utilizzatore prenda visione delle istruzioni
d’uso contenute nel presente manuale
2.2 OPERAZIONI PRELIMINARI
• Indossare indumenti adeguati, calzature da lavoro
resistenti con suole antiscivolo, e pantaloni lunghi. Non
azionare la macchina a piedi scalzi o con sandali aperti.
• Non indossare sciarpe, camici, collane, braccialetti,
indumenti con parti svolazzanti, o provvisti di lacci o
cravatte e comunque accessori pendenti o larghi che
potrebbero impigliarsi nella macchina o in oggetti e
materiali presenti sul luogo di lavoro.
• Raccogliere adeguatamente i capelli lunghi.
• Indossare guanti di lavoro in tutte le situazioni di rischio
per le mani.
• Ispezionare a fondo tutta l’area di lavoro e togliere tutto
ciò che potrebbe venire espulso dalla macchina o
danneggiare il dispositivo di taglio/organi rotanti (sassi,
2.3 DURANTE L’UTILIZZO
• Non usare la macchina in ambienti a rischio di esplosione,
Gli utensili elettrici generano scintille che possono
incendiare la polvere o i vapori.
• Non esporre la macchina alla pioggia o ambienti bagnati.
L’acqua che penetra in un utensile aumenta il rischio di
scossa elettrica.
• Lavorare solamente alla luce del giorno o con buona luce
• Evitare di lavorare nell’erba bagnata, sotto la pioggia e
con rischio di temporali, specialmente con probabilità di
lampi.
• Prestare particolare attenzione alle irregolarità del
terreno (dossi, cunette), ai pendii, ai pericoli nascosti
e alla presenza di eventuali ostacoli che potrebbero
limitare la visibilità.
•
La macchina non deve essere utilizzati su pendii superiori
a 20°, a prescindere dal senso di marcia
•
erba alta.
• Prestare estrema attenzione quando tirate il rasaerba
verso di voi. Guardare dietro di sè prima e durante la
retromarcia per assicurarsi che non vi siano ostacoli.
• Non correre mai, ma camminare.
• Evitare di farsi tirare dal raserba.
• Tenere sempre mani e piedi lontani dal dispositivo di
taglio sia durante l’avviamento sia durante l’utilizzo della
macchina.
• Non utilizzare mai la macchina con protezioni
danneggiate, mancanti o non correttamente posizionate.
• Non disinserire, disattivare, rimuovere o manomettere i
sistemi di sicurezza/microinterruttori presenti.
In caso di rotture o incidenti durante il lavoro,
arrestare immediatamente il motore e allontanare la
macchina in modo da non provocare ulteriori danni; nel
caso di incidenti con lesioni personali o a terzi, attiva-
re immediatamente le procedure di pronto soccorso
più adeguate alla situazione in atto e rivolgersi ad una
Struttura Sanitaria per le cure necessarie. Rimuovere
accuratamente eventuali detriti che potrebbero arrecare
danni o lesioni a persone o a animali qualora rimanes-
sero inosservati.
2.4 MANUTENZIONE, RIMESSAGGIO
rimessaggio preserva la sicurezza della macchina ed il
livello delle sue prestazioni.
• Non usare mai la macchina con parti usurate o
danneggiate. I pezzi guasti o deteriorati devono essere
sostituiti e mai riparati. Usare solo ricambi originali.
• Durante le operazioni di regolazione della macchina,
prestare attenzione ad evitare che le dita rimangano
intrappolate fra il dispositivo di taglio in movimento e le
• Per ridurre il rischio di incendio, non lasciare contenitori
con i materiali di risulta all’interno di un locale.
• Assicurarsi che la movimentazione della macchina non
causi danni o lesioni.
Il livello di rumorosità e di vibrazioni riportato
nelle presenti istruzioni, sono valori massimi di utilizzo
della macchina. L’impiego di un elemento di taglio sbi-
lanciato, l’eccessiva velocità di movimento, l’assenza
di manutenzione inuiscono in modo signicativo nel-
le emissioni sonore e nelle vibrazioni. Di conseguenza
è necessario adottare delle misure preventive atte ad
eliminare possibili danni dovuti ad un rumore elevato e
alle sollecitazioni da vibrazioni; provvedere alla manu-
tenzione della macchina, indossare cue antirumore,
eettuare delle pause durante il lavoro.
2.5 BATTERIA / CARICA BATTERIA
IMPORTANTE Le seguenti norme di sicurezza integrano
le prescrizioni di sicurezza presenti nello specico libretto
della batteria e del carica batteria allegato alla macchina.
• Per caricare la batteria utilizzare solo carica batteria
raccomandati dal produttore. Un carica batteria
inadeguato può provocare una scossa elettrica, un
surriscaldamento o una fuoriuscita di liquido corrosivo
della batteria.
IT - 3
•
vostro utensile. L’uso di altre batterie può provocare
lesioni e rischio di incendio.
• Assicurarsi che la macchina sia spenta prima di inserire
la batteria. L’inserimento di una batteria in una macchina
accesa può causare un incendio.
2.6 TUTELA AMBIENTALE
• Seguire scrupolosamente le norme locali per lo
smaltimento di imballi, parti deteriorate o qualsiasi
devono essere gettati nella spazzatura, ma devono
essere separati e conferiti agli appositi centri di raccolta,
che provvederanno al riciclaggio dei materiali.
• Seguire scrupolosamente le norme locali per lo
smaltimento dei materiali di risulta.
• Al momento della messa fuori servizio, non abbandonare
la macchina nell’ambiente, ma rivolgersi a un centro di
raccolta, secondo le norme locali vigenti.
Non gettare le apparecchiature elettriche tra
Secondo la Direttiva Europea
ed elettroniche e la sua attuazione in conformità
alle norme nazionali, le apparecchiature
elettriche esauste devono essere raccolte separatamente,
Se le apparecchiature elettriche vengono smaltite in
una discarica o nel terreno, le sostanze nocive possono
raggiungere la falda acquifera ed entrare nella catena
alimentare, danneggiando la vostra salute e benessere. Per
informazioni più approfondite sullo smaltimento di questo
prodotto, contattare l’Ente competente per lo smaltimento
batterie con la dovuta attenzione per il nostro
ambiente. La batteria contiene materiale che è
pericoloso per voi e per l’ambiente. Essa deve
essere rimossa e smaltita separatamente in una
struttura che accetta le batterie agli ioni di litio.
imballaggi usati, consente il riciclaggio dei
materiali e la riutilizzazione. Il riutilizzo dei
materiali riciclati aiuta a prevenire l’inquinamento
ambientale e riduce la domanda di materie prime.
3. CONOSCERE LA MACCHINA
3.1 DESCRIZIONE MACCHINA E USO PREVISTO
Questa macchina è un tosaerba con conducente a
piedi.
La macchina si compone essenzialmente di un motore che
aziona un dispositivo di taglio racchiuso in un carter e di
un manico. Una volta azionato, il motore crea un cuscino
d’aria che tiene sospesa la macchina in modo da non creare
attrito col terreno.
L’operatore è in grado di condurre la macchina e di azionare
i comandi principali mantenendosi sempre dietro al manico,
e quindi a distanza di sicurezza dal dispositivo di taglio
rotante.
L’allontanamento dell’operatore dalla macchina provoca
l’arresto del motore e del dispositivo rotante entro alcuni
secondi.
3.1.1 Uso previsto
Questa macchina è progettata e costruita per lo sfalcio
dell’erba in giardini e aree erbose, eseguita con la presenza
di un operatore a piedi.
3.1.2 Uso improprio
Qualsiasi altro impiego da quello citato può rivelarsi
pericoloso e causare danni a persone e/o cose.
Rientrano nell’uso improprio (come esempio, ma non solo):
– Trasportare sulla macchina altre persone, bambini o
animali poiché potrebbero cadere e procurarsi lesioni
gravi o pregiudicare una guida sicura.
– Farsi trasportare dalla macchina.
– Usare la macchina per trainare o spingere carichi.
– Azionare il dispositivo di taglio nei tratti non erbosi.
– Utilizzare la macchina per la raccolta di foglie o detriti.
– Usare la macchina per regolarizzare siepi, o per il
taglio di vegetazione di tipo non erboso.
– Utilizzare la macchina in più di una persona.
IMPORTANTE L’uso improprio della macchina
comporta il decadimento della garanzia e il declino di ogni
responsabilità del Costruttore, riversando sull’utilizzatore
gli oneri derivanti da danni o lesioni proprie o a terzi.
3.1.3 Tipologia di utente
Questa macchina è destinata all’utilizzo da parte di
consumatori, cioè operatori non professionisti.
È destinata ad un “uso hobbistico”.
IMPORTANTE La macchina dev’essere
utilizzata da un solo operatore.
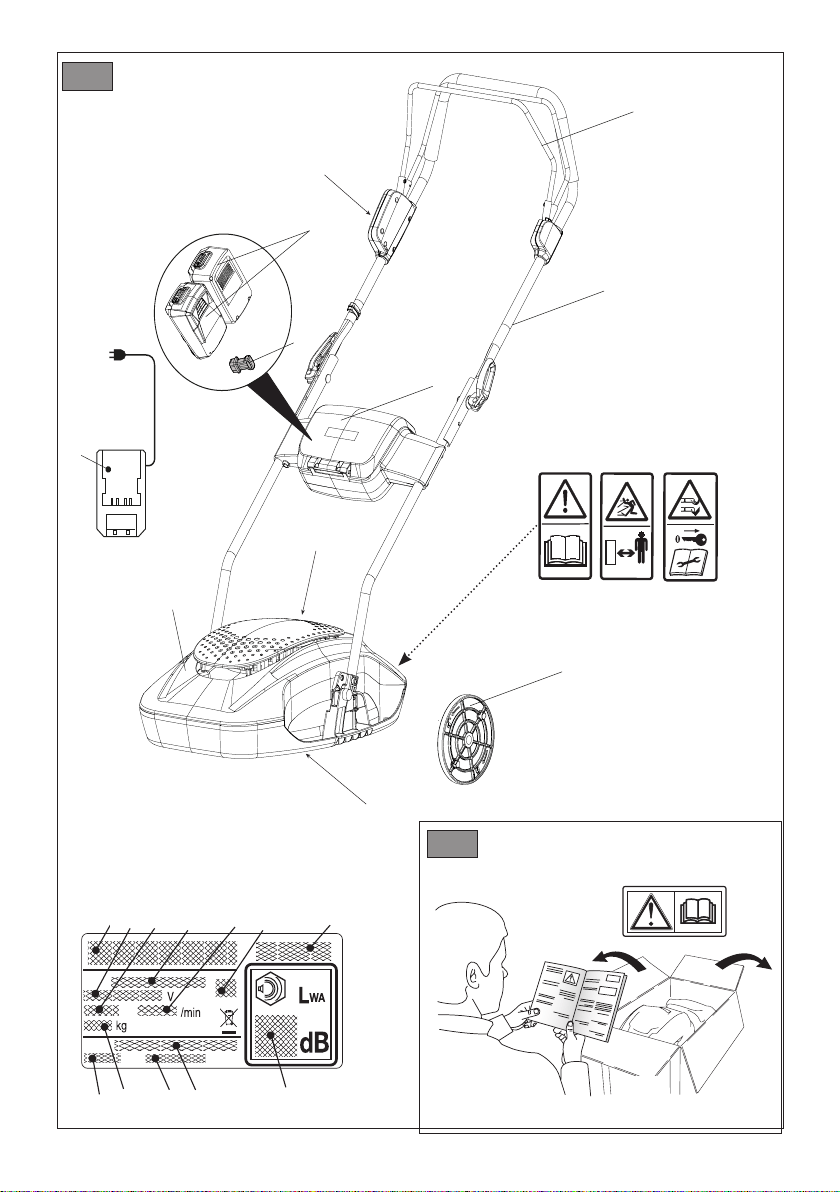
3.2 COMPONENTI PRINCIPALI Fig
A. Chassis: è il carter che racchiude il dispositivo di
taglio rotante.
B. Motore: fornisce il movimento del dispositivo di
taglio.
C. Dispositivo di taglio: è l’elemento preposto al
taglio dell’erba.
D Manico: è la postazione di lavoro dell’operatore.
La sua lunghezza fa si che l’operatore durante il
lavoro mantenga sempre la distanza di sicurezza
dal dispositivo di taglio rotante.
E. Leva presenza operatore: è la leva che abilita
l’innesto del dispositivo di taglio e il sollevamento
dal suolo. Il motore si arresta automaticamente al
rilascio della leva.
F. Comando interruttore: avvia/arresta il motore
e contemporaneamente innesta/disinnesta il
dispositivo di taglio.
G. Sportello di accesso al vano batteria
H. Chiave di sicurezza (Dispositivo di
disattivazione): La chiave attiva / disattiva il
circuito elettrico della macchina.
I. Batteria (se non fornita con la macchina, vedi
cap. 13 “accessori a richiesta”): fornisce l’energia
per l’avviamento del motore; le sue caratteristiche
manuale.
IT - 4
J. Carica batteria (se non fornito con la macchina,
vedi cap. 13 “accessori a richiesta”): dispositivo che
si utilizza per ricaricare la batteria.
K
Distanziatore: per regolare l’altezza di taglio
3.3 ETICHETTA DI IDENTIFICAZIONE (Fig. 1)
1. Livello potenza sonora.
2. Marchio di conformità.
3. Anno di fabbricazione.
4. Tipo di macchina.
5. Numero di matricola.
6. Nome e indirizzo del Costruttore.
7. Codice articolo.
8. Velocità mass. di funzionamento motore.
9. Peso in kg.
10. Tensione di alimentazione.
11. Grado di protezione elettrica.
12. Potenza nominale.
appositi spazi dell’etichetta riportata nel retro della copertina.
IMPORTANTE Utilizzare i dati riportati sull’etichetta di
identicazione prodotto ogni volta che si contatta l’ocina
autorizzata.
3.4 SEGNALETICA DI SICUREZZA (Fig. 2).
Sulla macchina compaiono vari simboli.
Attenzione. Leggere le istruzioni prima di
usare la macchina.
Pericolo! Rischio di espulsione di
oggetti. Tenere le persone al di fuori
dell’area di lavoro, durante l’uso.
Attenzione al dispositivo di taglio
tagliente. Non introdurre mani o piedi
all’interno dell’alloggiamento del dispositivo
di taglio. Il dispositivo di taglio continua
a girare anche dopo lo spegnimento del
motore. Togliere la chiave di sicurezza
(dispositivo di disattivazione) prima della
manutenzione.
IMPORTANTE Le etichette adesive rovinate o divenute
illeggibili devono essere sostituite. Richiedere le nuove
etichette al proprio centro di assistenza autorizzato.
4. MONTAGGIO
Le norme di sicurezza da seguire sono descritte al
cap. 2. Rispettare scrupolosamente tali indicazioni per
non incorrere in gravi rischi o pericoli.
Per motivi di magazzinaggio e trasporto, alcuni componenti
della macchina non sono assemblati direttamente in
fabbrica, ma devono essere montati dopo la rimozione
dall’imballo, seguendo le istruzioni seguenti.
Lo sballaggio e il completamento del montaggio
devono essere eettuati su una supercie piana e so-
lida, con spazio suciente alla movimentazione della
macchina e degli imballi, avvalendosi sempre degli
attrezzi appropriati. Non utilizzare la macchina prima
di aver portato a termine le indicazioni della sezione
“MONTAGGIO”.
Prima di eettuare il montaggio, vericare che la
chiave di sicurezza non sia inserita nella sua sede.
4.1 DISIMBALLAGGIO (Fig.2)
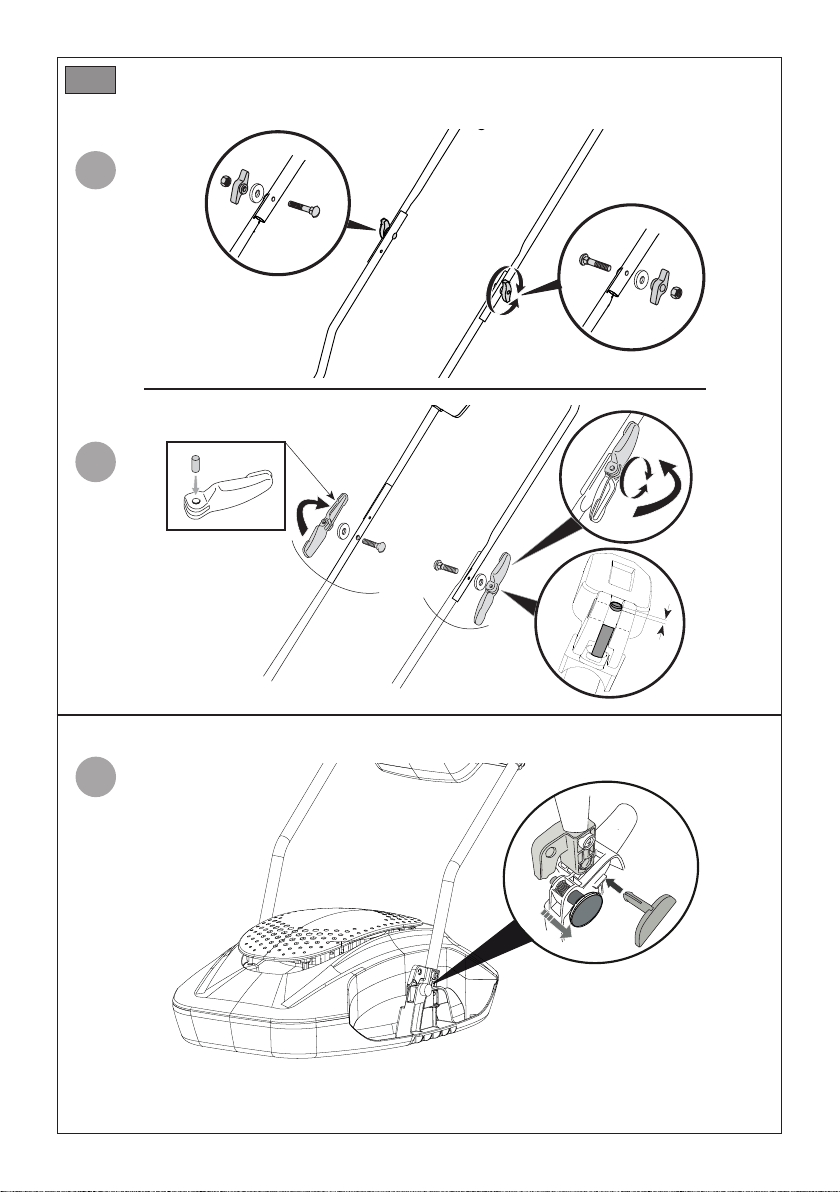
4.2 MONTAGGIO DEL MANICO (Fig.3)
illustrato.
4.3 REGOLAZIONE ALTEZZA DI TAGLIO (Fig.4)
Utilizzando una chiave, si può regolare l’altezza di taglio
aggiungendo o rimuovendo i distanziatori (Fig. 1K)
1. Rimuovere la lama dalla macchina: tenendo ferma la
lama, ruotare il bullone (L) in senso antiorario (Fig.
4. I)
2. Posizionare i 2 distanziatori (K) e il nuovo bullone (M)
sulla macchina (Fig. 4. II)
3.
orario (Fig. 4. III).
4. Dopo il montaggio, controllare che la lama sia
Di seguito riportiamo le altezze di taglio con 1 o 2
distanziatori
Nr distanziatori
Altezza di taglio
1 30 mm
2 20 mm
Non toccare il dispositivo di taglio ntanto che
non sia stata tolta la chiave e che il dispositivo di taglio
non sia completamente fermo. Fare attenzione che il di-
spositivo di taglio può muoversi, anche se la chiave è
stata tolta.
Tutte le operazioni riguardanti i dispositivi di ta-
glio (smontaggio, alatura, equilibratura, riparazione,
rimontaggio e/o sostituzione) sono lavori impegnativi
che richiedono una specica competenza oltre all’im-
piego di apposite attrezzature; per ragioni di sicurezza,
occorre pertanto che siano sempre eseguite presso un
Centro Specializzato.
5. COMANDI DI CONTROLLO
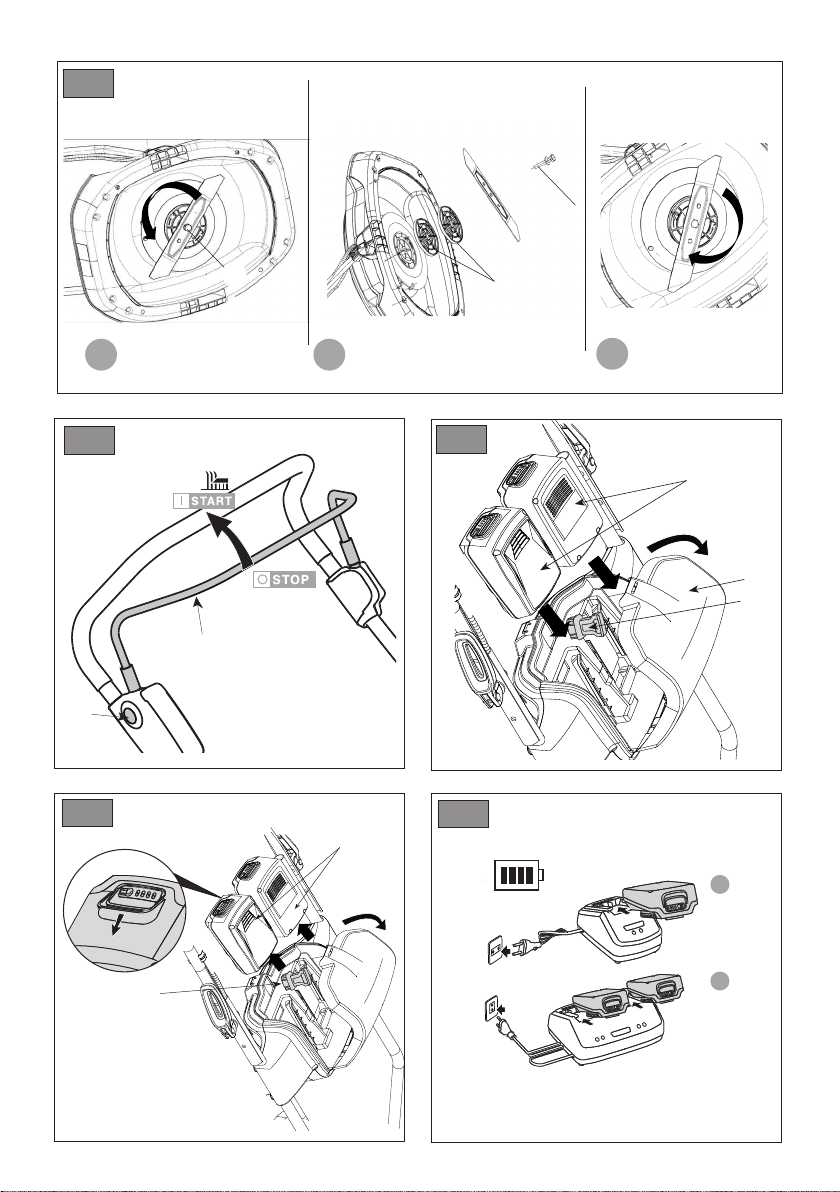
5.1
La chiave (Fig. 1.H), posta all’interno del vano batteria,
attiva e disattiva il circuito elettrico della macchina.
Rimuovendo la chiave, si disattiva completamente il circuito
elettrico per impedire un uso incontrollato della macchina.
IT - 5
IMPORTANTE Rimuovere la chiave di sicurezza ogni
qualvolta si lasci la macchina inutilizzata o incustodita.
5.2 COMANDO INTERRUTTORE
Il comando interruttore (Fig. 5) avvia/arresta il motore e
contemporaneamente innesta/disinnesta il dispositivo di
taglio.
Le posizioni indicate corrispondono a:
Avviamento. Per l’avviamento, premere il
.
Innesto del dispositivo di taglio. L’avviamento
del motore provoca l’innesto contemporaneo del
dispositivo di taglio.
Arresto. Il motore si arresta automaticamente al
rilascio della leva (Fig. 5.A).
NOTA L’innesto del dispositivo di taglio è possibile
solo premendo il pulsante giallo sulla destra del manico e
portando la leva presenza operatore verso il manico.
6. USO DELLA MACCHINA
Le norme di sicurezza da seguire sono descritte al
cap. 2. Rispettare scrupolosamente tali indicazioni per
non incorrere in gravi rischi o pericoli.
6.1 OPERAZIONI PRELIMINARI
Accertarsi che la chiave di sicurezza non sia inserita nella
sua sede. Mettere la macchina in posizione orizzontale e
ben appoggiata sul terreno.
6.1.1 Controllo della batteria
Prima di utilizzare la macchina per la prima volta dopo
l’acquisto, procedere alla completa ricarica della batteria,
seguendo le indicazioni contenute nel libretto della batteria.
batteria seguendo le indicazioni contenute nel libretto della
batteria.
Eseguire l’operazione a dispositivo di taglio fer-
mo.
6.2 CONTROLLI DI SICUREZZA
Eettuare sempre i controlli di sicurezza prima
dell’uso.
6.2.1 Controllo di sicurezza generale
Oggetto Risultato
Impugnature Pulite, asciutte.
Manico Fissato correttamente
e saldamente alla
macchina.
Dispositivo di taglio Pulito, non danneggiato
o usurato, integro,
Comando interruttore La leva deve avere un
movimento libero, non
forzato e al rilascio deve
tornare automaticamente
e rapidamente nella
posizione neutra.
Batteria Nessun danno al suo
involucro, nessun
Viti/dadi sulla macchina
e sul dispositivo di taglio
Ben serrati (non allentati).
Non danneggiati o usurati.
Passaggi dell’aria di
Non ostruiti
Macchina Nessun segno di
danneggiamento o usura.
Nessuna vibrazione
anomala.
Nessun suono anomalo.
Azione Risultato
1. Avviare la macchina
(par. 6.3).
2. Rilasciare il comando
interruttore (Fig. 5.A).
1. Il dispositivo di taglio
deve muoversi.
2. La leva di sicurezza
deve avere un movi-
mento libero, non for-
zato e al rilascio deve
tornare automatica-
mente e rapidamente
nella posizione neutra
determinando l’arresto
del dispositivo di taglio
Se uno qualsiasi dei risultati si discosta da quan-
to indicato nelle tabelle, non utilizzare la macchina!
Rivolgersi ad un centro di assistenza per i controlli del
caso e per la riparazione.
6.3 AVVIAMENTO
NOTE Avviare la macchina su una superficie
piana, senza ostacoli o erba alta.
1. Aprire lo sportello di accesso al vano batteria (Fig.
6.A).
2. Inserire correttamente le batterie nel loro
alloggiamento (Fig.
6.
ad avvertire il “clic” che le blocca in posizione e
assicura il contatto elettrico.
3. Inserire a fondo la chiave di sicurezza (Fig.
6.C).
4. Richiudere completamente lo sportello.
5. Innestare il dispositivo di taglio premendo prima il
pulsante di sicurezza (Fig. 5.A.1) e poi premendo la
leva presenza operatore (Fig. 5.A).

IT - 6
L’avviamento del motore provoca l’innesto con-
temporaneo del dispositivo di taglio.
6.4 LAVORO
IMPORTANTE Durante il lavoro mantenere sempre la
distanza di sicurezza dal dispositivo di taglio, data dalla
lunghezza del manico.
lavorabile prima della ricarica) è condizionata da vari fattori
descritti al par. 7.1.
IMPORTANTE
Nel caso il motore si arresti per
surriscaldamento durante il lavoro, è necessario attendere
circa 5 minuti prima di poterlo riavviare.
6.5 ARRESTO
Per arrestare la macchina :
• rilasciare la leva presenza operatore (Fig. 5.A)
• attendere l’arresto del dispositivo di taglio.
Dopo aver arrestato la macchina, occorrono diver-
si secondi prima che il dispositivo di taglio si arresti.
IMPORTANTE Arrestare sempre la macchina.
• Durante gli spostamenti fra zone di lavoro.
• Nell’attraversamento di superci non erbose.
• Ogni volta che si rendesse necessario superare un
ostacolo.
6.6 DOPO L’UTILIZZO
1.
1. Aprire lo sportello e rimuovere la chiave di sicurezza.
2. Rimuovere la batteria dalla sua sede e provvedere alla
sua ricarica (par 7.1.2).
3.
macchina in un qualsiasi ambiente.
4.
5. Controllare che non ci siano componenti allentati o
danneggiati. Se necessario, sostituire i componenti
danneggiati e serrare eventuali viti e bulloni allentati o
contattare il centro di assistenza autorizzato.
6.
Se necessario, contattare il centro di assistenza
autorizzato.
IMPORTANTE Rimuovere la chiave di sicurezza ogni
qualvolta si lasci la macchina inutilizzata o incustodita.
7. MANUTENZIONE
Le norme di sicurezza da seguire sono descritte
al cap. 2. Rispettare scrupolosamente tali indicazioni
per non incorrere in gravi rischi o pericoli.
Prima di eettuare qualsiasi controllo, pulizia o
intervento di manutenzione/regolazione sulla macchi-
na:
• Arrestare la macchina.
• Togliere la chiave di sicurezza, (non lasciare mai la
chiave inserita o alla portata di bambini o persone
non idonee).
• Rimuovere la batteria.
• Accertarsi che tutte le parti in movimento si siano
completamente arrestate.
• Lasciare rareddare il motore prima di collocare la
macchina in un qualsiasi ambiente.
• Indossare indumenti adeguati e guanti da lavoro in
tutte le situazioni a rischio per le mani.
• Leggere le relative istruzioni.
IMPORTANTE Tutte le operazioni di manutenzione e
di regolazione non descritte in questo manuale devono
essere eseguite dal vostro Rivenditore o da un Centro
specializzato.
7.1 BATTERIA
7.1.1 Autonomia della batteria
prato lavorabile prima della ricarica) è principalmente
condizionata da:
a. Fattori ambientali, che producono un maggiore
fabbisogno di energia:
– Taglio con erba densa, alta, umida.
b. Ampiezza di taglio della macchina; maggiore è
l’ampiezza, maggiore è il fabbisongo di energia.
c. Comportamenti dell’operatore,
che dovrebbe evitare:
– Accensioni e spegnimenti frequenti durante il lavoro.
–
NOTA Durante il lavoro la batteria è protetta contro lo
scaricamento totale tramite un dispositivo di protezione che
spegne la macchina e ne blocca il funzionamento.
Per ottimizzare l’autonomia della
batteria è sempre opportuno:
– Tagliare l’erba quando il prato è asciutto.
– Tagliare l’erba frequentemente in modo da non farle
raggiungere un’altezza elevata.
Nel caso si volesse utilizzare la macchina in sessioni di
lavoro più lunghe rispetto a quanto consentito dalla batteria
standard, è possibile:
– Acquistare una seconda batteria standard per
sostituire immediatamente la batteria scarica, senza
pregiudicare la continuità di utilizzo.
– Acquistare una batteria con autonomia maggiorata
rispetto alla batteria standard.
7.1.2 Rimozione e ricarica della batteria (Fig.
7)
1. Aprire lo sportello di accesso al vano batteria ed estrar-
re la chiave di sicurezza (Fig.
7.A).
2. Premere il pulsante posto sulle batterie e rimuoverle
(Fig.
7.B).
3. Inserire la batteria nel suo alloggiamento del carica
batteria (Fig. 8
).
4. Collegare il carica batteria a una presa di corrente,
con tensione corrispondente a quella indicata sulla
targhetta.

IT - 7
5. Procedere alla completa ricarica, seguendo le indica-
zioni contenute nel libretto della batteria /carica batte-
ria.
NOTA La batteria è dotata di una protezione che impedisce
la ricarica se la temperatura ambiente non è compresa fra
0 e +45 °C.
NOTA La batteria può essere ricaricata in ogni momento,
anche parzialmente, senza il rischio di danneggiarla.
7.1.3 Rimontaggio della batteria sulla macchina
Completata la ricarica:
1. Rimuovere la batteria dal suo alloggiamento nel carica
batteria.
2. Scollegare il carica batteria dalla rete elettrica.
3. Inserire la batteria nel suo alloggiamento nella mac-
china
4. Richiudere completamente lo sportello.
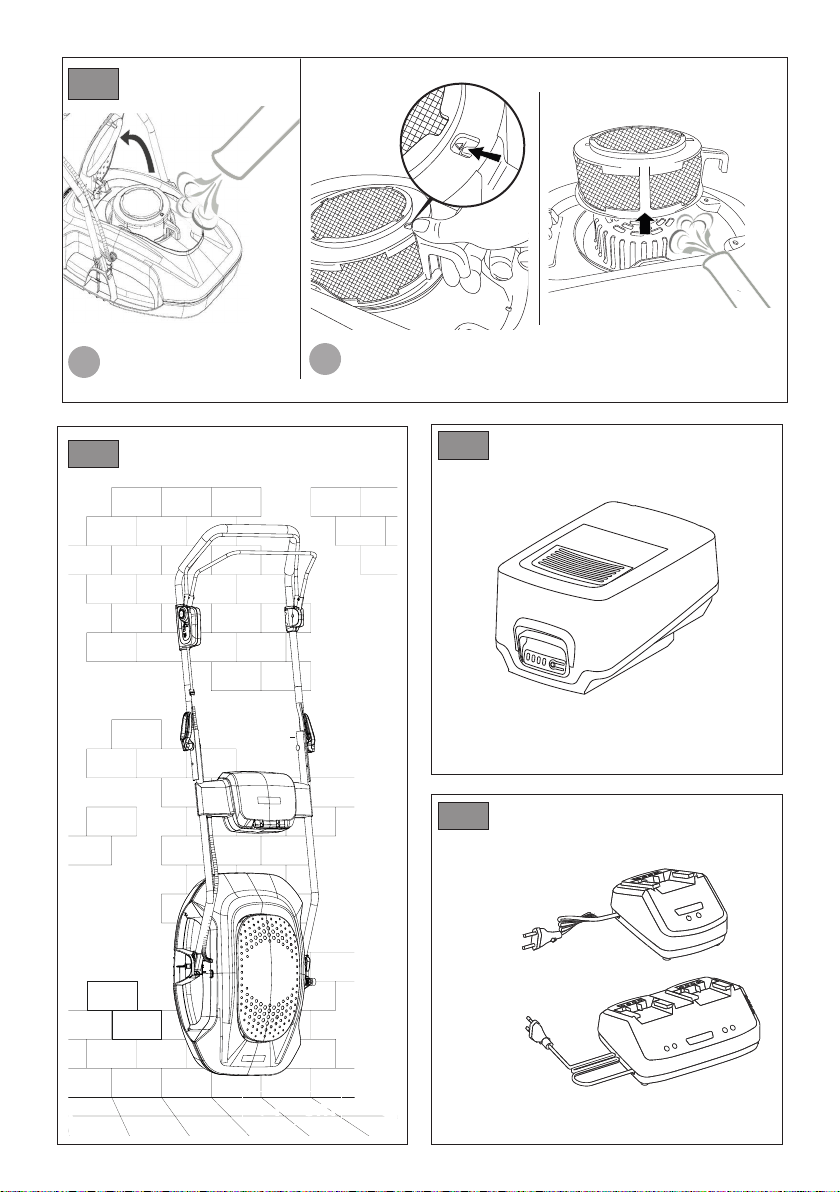
7.2 PULIZIA
seguenti istruzioni.
7.2.1 Pulizia della macchina
• Non usare getti d’acqua ed evitare di bagnare il motore e
componenti elettrici.
• Non impiegare liquidi aggressivi per la pulizia dello
chassis.
• Per ridurre il rischio di incendio, mantenere la macchina
ed in particolare il motore liberi da residui d’erba, foglie o
grasso eccessivo.
7.2.2 Pulizia dell’assieme dispositivo di taglio
IMPORTANTE Inclinare la macchina lateralmente,
accertandosi della stabilità della macchina prima di
eseguire qualsiasi tipo di intervento.
7.2.3
7.3 DISPOSITIVO DI TAGLIO
un ingiallimento del prato.
Non toccare il dispositivo di taglio ntanto che
non sia stata tolta la chiave e che il dispositivo di taglio
non sia completamente fermo. Fare attenzione che il di-
spositivo di taglio può muoversi, anche se la chiave è
stata tolta.
Tutte le operazioni riguardanti i dispositivi di ta-
glio (smontaggio, alatura, equilibratura, riparazione,
rimontaggio e/o sostituzione) sono lavori impegnativi
che richiedono una specica competenza oltre all’im-
piego di apposite attrezzature; per ragioni di sicurezza,
occorre pertanto che siano sempre eseguite presso un
Centro Specializzato.
Far sostituire sempre il dispositivo di taglio dan-
neggiato, storto o usurato, assieme alle proprie viti, per
mantenere l’equilibratura.
IMPORTANTE Utilizzare sempre dispositivi di taglio
originali, riportanti il codice indicato nella tabella “Dati
Tecnici”.
Data l’evoluzione del prodotto, i dispositivi di taglio citati
nella tabella “Dati Tecnici” potrebbero essere sostituiti
nel tempo da altri, con caratteristiche analoghe di
intercambiabilità e sicurezza di funzionamento.
8. RIMESSAGGIO
8.1 RIMESSAGGIO DELLA MACCHINA
Quando la macchina deve essere rimessata:
1.
2. Rimuovere la chiave di sicurezza.
3. Rimuovere la batteria dalla sua sede e provvedere alla
ricarica (par 7.1.2).
4.
5. Rimessare la macchina (Fig. 10):
– in un ambiente asciutto;
– al riparo dalle intemperie;
– possibilmente ricoperta con un telo;
– in un luogo inaccessibile ai bambini;
– assicurandosi di aver rimosso chiavi o
utensili usati per la manutenzione..
– appeso al muro.
8.2 RIMESSAGGIO DELLA BATTERIA
Se la batteria non viene caricata per un lungo periodo di
tempo, è necessario conservarla sempre all’ombra, al
fresco e in ambienti privi di umidità con una temperatura
ambiente tra 0~45°C.
IMPORTANTE In caso di prolungata inattività, ricaricare
la batteria ogni due mesi per prolugarne la durata.
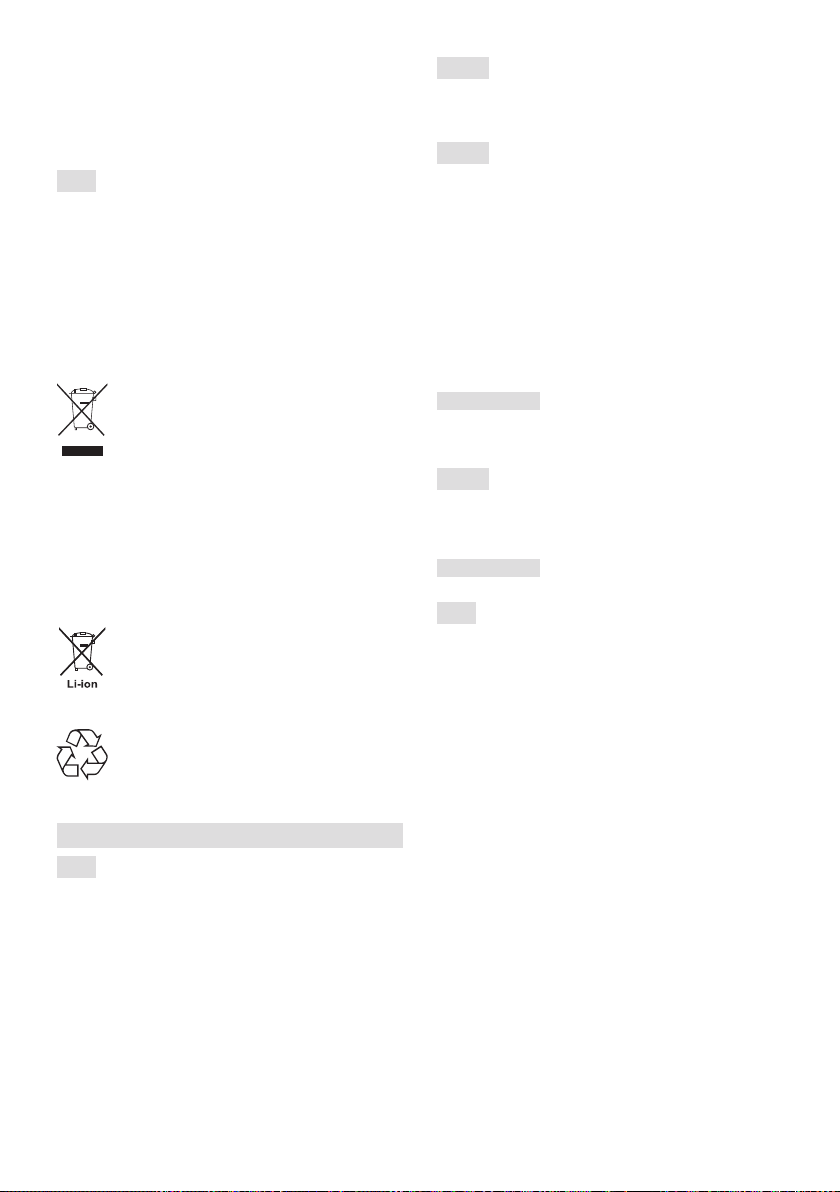
9. MOVIMENTAZIONE E TRASPORTO
Ogni volta che è necessario movimentare, sollevare,
trasportare o inclinare la macchina occorre:
– arrestare la macchina (par. 6.5);
– togliere la chiave di sicurezza;
– accertarsi che tutte le parti in movimento si siano
completamente arrestate;
– indossare robusti guanti da lavoro;
–
sicura, tenendo conto del peso e della sua ripartizione;
– impiegare un numero di persone adeguato al peso
della macchina e alle caratteristiche del mezzo di
trasporto o del posto nel quale deve essere collocata
o prelevata;
IT - 8
– assicurarsi che la movimentazione della macchina non
causi danni o lesioni.
Quando si trasporta la macchina con un automezzo o
rimorchio, occorre:
1. utilizzare rampe di accesso di resistenza, larghezza e
lunghezza adeguate;
2. abbassare l’assieme dispostivo di taglio;
3. posizionarla in modo da non costituire pericolo per
nessuno;
4. bloccarla saldamente al mezzo di trasporto mediante
funi o catene per evitarne il ribaltamento.
10. ASSISTENZA E RIPARAZIONE
Questo manuale fornisce tutte le indicazioni necessarie
per la conduzione della macchina e per una corretta
manutenzione di base eseguibile dall’utilizzatore. Tutti gli
interventi di regolazione e manutenzione non descritti in
questo manuale devono essere eseguiti presso il vostro
Rivenditore o un Centro specializzato.
Operazioni eseguite presso strutture inadeguate o da
ogni forma di Garanzia e di ogni obbligo o responsabilità
del Costruttore.
• I ricambi e gli accessori non originali non sono
approvati; l’impiego di ricambi ed accessori non originali
compromette la sicurezza della macchina e solleva il
Costruttore da ogni obbligo o responsabilità.
•
assistenza e dai rivenditori autorizzati.
11. COPERTURA DELLA GARANZIA
Le condizioni di garanzia sono destinate solamente ai
consumatori, cioè operatori non professionisti.
La garanzia copre tutti i difetti di qualità dei materiali e di
fabbricazione, accertati durante il periodo della garanzia
dal vostro Rivenditore o da un Centro specializzato.
L’applicazione della garanzia si limita alla riparazione o alla
sostituzione del componente ritenuto difettoso.
l’assistenza e il controllo dei dispositivi di sicurezza.
L’applicazione della garanzia è subordinata ad una
manutenzione regolare della macchina.
La garanzia non copre i danni conseguenti a:
• Mancata familiarizzazione con la documentazione di
accompagnamento (Manuali di Istruzioni).
• Uso professionale.
• Disattenzione, negligenza.
• Causa esterna (fulmine, urti, presenza di corpi estranei
all’interno della macchina) o incidente.
• Uso e montaggio impropri o non consentiti dal costruttore.
• Scarsa manutenzione.
•
• Utilizzo di pezzi di ricambio non originali (pezzi adattabili).
• Utilizzo di accessori non forniti o non approvati dal
costruttore.
La garanzia non copre inoltre:
• Le operazioni di manutenzione (descritte nel manuale di
istruzioni).
• La normale usura di materiali di consumo come dispositivi
di taglio, bulloni di sicurezza e cablaggi.
• Normale usura.
• Deterioramento estetico della macchina dovuto al suo
utilizzo.
• I supporti dei dispositivi di taglio.
• Le spese accessorie eventualmente connesse
all’attivazione della garanzia, quali il trasferimento
presso l’utilizzatore, il trasposto della macchina verso il
Rivenditore, noleggio di attrezzature per la sostituzione
o la chiamata ad una società esterna per tutti i lavori di
manutenzione.
L’utilizzatore è protetto dalle proprie leggi nazionali. I diritti
dell’utilizzatore previsti dalle proprie leggi nazionali non
sono in alcun modo limitati dalla presente garanzia.
12. IDENTIFICAZIONE INCONVENIENTI
Se gli inconvenienti perdurano dopo aver applicato i rimedi descritti, contattare il vostro Rivenditore.
INCONVENIENTE CAUSA PROBABILE RIMEDIO
1. Azionando l’interruttore, il
motore non si avvia
Chiave di sicurezza mancante o
non inserita correttamente.
Inserire la chiave (Fig. 6.C).
Batteria mancante o non
inserita correttamente.
Aprire lo sportello ed assicurarsi che la
batteria sia ben alloggiata (Fig.6.B)
Batteria scarica. Controllare lo stato di carica e
ricaricare la batteria (par. 7.1.2).
Avviamento non immediato del motore. Tenere premuto il comando interruttore
per 2-3 secondi (par. 5.2).
Intervento della protezione termica
per surriscaldamento del motore.
Attendere almeno 5 minuti e poi
riavviare la macchina.
2. Il motore è in moto ma
il dispositivo di taglio
non gira
Fissaggio del dispositivo
di taglio allentato.
Arrestare immediatamente il motore
e togliere la chiave di sicurezza.
Contattare un Centro Assistenza per

IT - 9
3. Il motore si arresta du-
rante il lavoro.
Batteria non inserita correttamente. Aprire lo sportello ed assicurarsi che la
batteria sia ben alloggiata (par. 7.1).
Batteria scarica. Controllare lo stato di carica e
ricaricare la batteria (par. 7.1.2).
Ostruzioni che impediscono la
rotazione del dispositivo di taglio.
Togliere la chiave di sicurezza, indossare
guanti da lavoro e rimuovere erba o
detriti presenti nella parte inferiore della
macchina e/o nel canale di scarico.
Intervento della protezione termica
per surriscaldamento del motore.
Pulire le griglie di aspirazione dell’aria
Attendere almeno 5 minuti e poi
riavviare la macchina.
3. Il motore si arresta du-
rante il lavoro.
Intervento della protezione termica
per un assorbimento troppo
alto di corrente dovuto a:
• Taglio di erba troppo alta.
• Ostruzioni che impediscono la
rotazione del dispositivo di taglio.
• Troppi detriti d’erba accumulati
all’interno dello chassis e
nel canale di scarico.
• Rimuovere le ostruzioni (par. 7.2.2).
• Pulire la macchina (par. 7.2.1, 7.2.2, 7.2.3)
Attendere almeno 5 minuti e poi
riavviare la macchina.
4. L’erba si taglia
Il dispositivo di taglio non
è in buono stato.
o sostituzione del dispositivo di taglio.
5. Si avvertono rumori e/o
vibrazioni eccessive
durante il lavoro.
Fissaggio del dispositivo di
taglio allentato o dispositivo
di taglio danneggiato.
Arrestare immediatamente il motore
e togliere la chiave di sicurezza.
Contattare un Centro Assistenza per
6. L’autonomia della
batteria è scarsa.
Condizioni di utilizzo gravose con
maggiore assorbimento di corrente.
Ottimizzare l’utilizzo (par. 7.1.1).
esigenze operative.
Utilizzare una seconda batteria o una
batteria maggiorata (par. 13.1).
7. Il carica batteria non
della batteria.
Batteria non inserita correttamente
nel carica batteria.
Controllare che l’inserimento
sia corretto (par. 7.1.2)
Condizioni ambientali non idonee. Eseguire la ricarica in ambiente con
temperatura adeguata (vedi libretto
istruzioni della batteria/carica batteria).
Contatti sporchi. Pulire i contatti.
Mancanza di tensione al carica batteria. Controllare che la spina sia inserita e che
vi sia tensione alla presa di corrente.
Carica batteria difettoso. Sostituire con un ricambio originale.
Se l’inconveniente perdura consultare il
manuale della batteria / carica batteria.
13. ACCESSORI A RICHIESTA
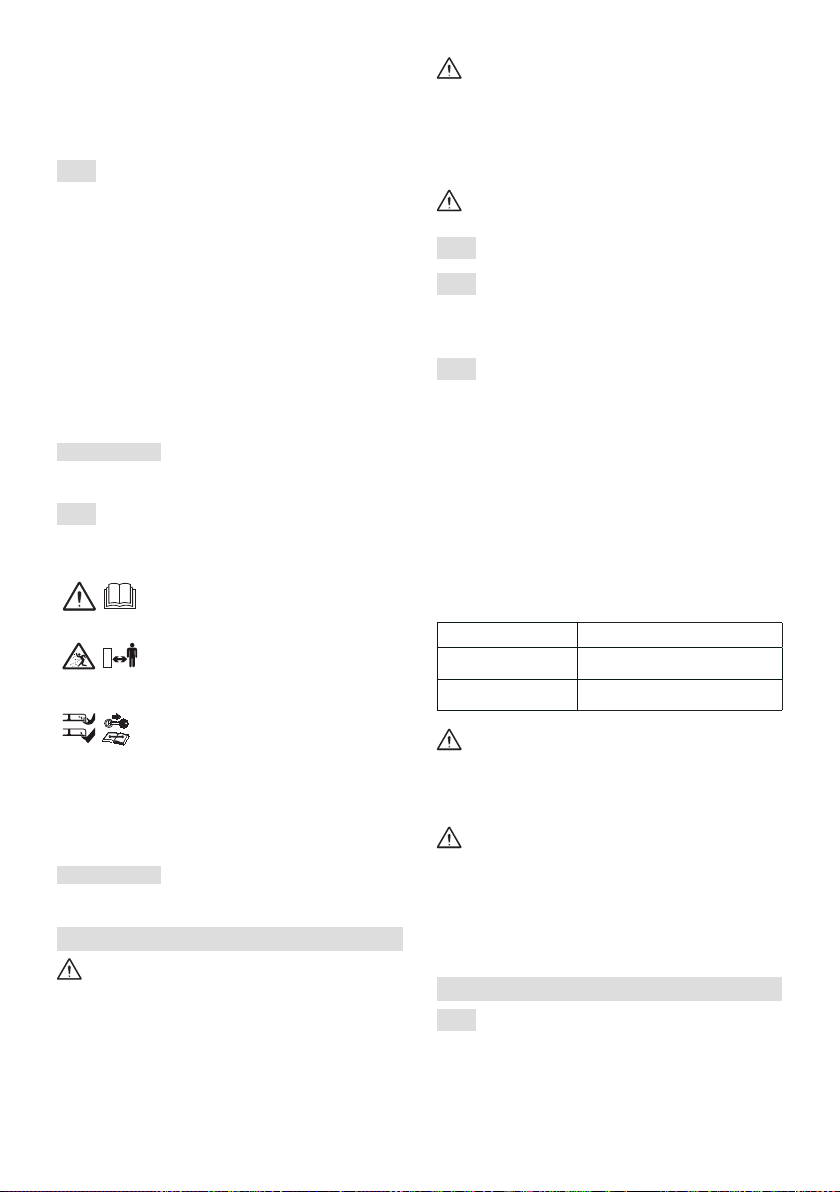
13.1 BATTERIE
Sono disponibili batterie
(esempio in Fig.11) di diverse
.
L’elenco delle batterie omologate per questa macchina si
trova nella tabella “Dati Tecnici”.
13.2 CARICA BATTERIA
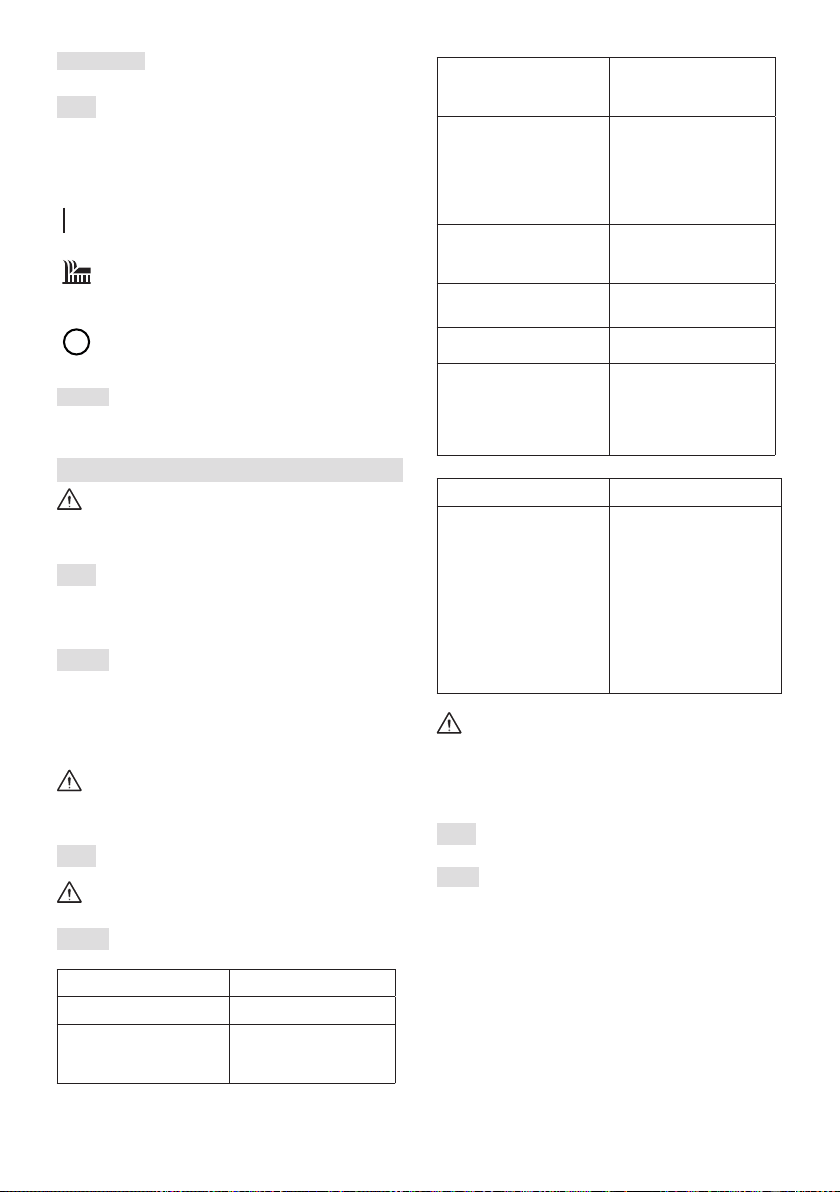
Dispositivo che si utilizza per ricaricare la batteria (F
ig.12).
EN - 1
1. GENERAL INFORMATION
1.1 HOW TO READ THE MANUAL
NOTE
or IMPORTANT these give details or
further information on what has already been said,
and aim to prevent damage to the machine.
The symbol highlights danger. Failure to observe
the warning can lead to the risk of injury to oneself and
others and/or damage.
The paragraphs highlighted in a square with
grey spots indicate the optional characteristics
not on all models documented in this manual.
Check if the characteristic is on this model.
Whenever reference is made to a position on the
machine "front", "back", "left" or "right" hand side,
this refers to the operator's working position.
1.2 REFERENCES
1.2.1 Figures
3, etc.
letters A, B, C, and so on.
1.2.2 Titles
The manual is divided into chapters and paragraphs. The
title of paragraph “2.1 Training” is a subtitle of “2. Safety
regulations".
References to titles or paragraphs are marked with the
abbreviation chap. or par. and the relevant number. Example:
“chap. 2” or “par. 2.1"
2. SAFETY REGULATIONS
2.1 TRAINING
Read these instructions carefully before operat-
ing the machine. Become acquainted with the controls
and the proper use of the machine. Learn how to stop
the motor quickly. Failure to follow the warnings and in-
structions may result in electric shock, re and/or seri-
ous injury. Save all warnings and instructions for future
reference.
•
Never allow children or persons unfamiliar with these
instructions to use the machine. Local regulations may restrict
the age of the operator.
•
This appliance can be used by children aged from 8 years and
above and persons with reduced physical, sensory or mental
WARNING!: READ THE INSTRUCTION BOOKLET THOROUGHLY
BEFORE USING THE MACHINE. Keep for future reference.
EN
INDEX
1. GENERAL INFORMATION ............................................ 1
1.1 How to read the manual ....................................... 1
1.2 References ........................................................... 1
2. SAFETY REGULATIONS .............................................. 1
2.1 Training ................................................................ 1
2.2 Preliminary procedures ........................................ 2
2.3 During operation................................................... 2
2.4 Maintenance, storage........................................... 2
2.5 Battery / battery charger ....................................... 2
2.6 Environmental protection ..................................... 2
3. GETTING TO KNOW THE MACHINE ............................ 3
3.1 Description of the machine and planned use ....... 3
3.2 Main components (Fig. 1) ..................................... 3
.................................... 4
3.4 Safety warning signs (Fig. 1)................................. 4
4. ASSEMBLY.................................................................... 4
4.1 Unpacking (Fig.2) ................................................. 4
4.2 assembly THE HANDLE (Fig.3) ........................... 4
4.3 CUTTING HEIGHT ADJUSTMENT (Fig.4) .......... 4
5. CONTROLS .................................................................. 4
5.1 Safety key (Deactivation device) .......................... 4
5.2 Control lever ......................................................... 4
6. USING THE MACHINE .................................................. 5
6.1 Preliminary procedures ........................................ 5
6.2 Safety checks ....................................................... 5
6.3 Ignition ................................................................. 5
6.4 Working .............................................................. 5
6.5 Stop 5
6.6 After use ............................................................... 6
7. MAINTENANCE ............................................................ 6
7.1 Battery ................................................................. 6
7.2 Cleaning ............................................................... 6
7.3 Cutting means ..................................................... 7
8. STORAGE ..................................................................... 7
8.1 Storing the machine ............................................. 7
8.2 Storing the battery ................................................ 7
10. ASSISTANCE AND REPAIRS ........................................ 7
11. WARRANTY COVERAGE ............................................. 7
........................................... 8
13. OPTIONAL ATTACHMENTS ......................................... 9
13.1 Batteries ............................................................... 9
13.2 Battery charger .................................................... 9

EN - 2
capabilities or lack of experience and knowledge if they
have been given supervision or instructions concerning use
of the appliance in a safe way and understand the hazards
involved. Children shall not play with the appliance. Cleaning
and user maintenance shall not be made by children without
supervision.
•
Never use the lawnmower while people, especially children, or
pets are nearby. Get another adult to keep the children under
supervision.
•
Never use the machine if the user is tired or unwell, or has
taken medicine, drugs, alcohol or any substances which may
•
Bear in mind that the operator or user is responsible for
accidents or unexpected events occurring to other people
or their property. It is the user’s responsibility to assess the
potential risk of the area where work is to be carried out and
to take all the necessary precautions to ensure his own safety
and that of others, particularly on slopes or rough, slippery and
unstable ground.
•
If the machine is sold or lent to others, make sure that the
operator reads the user instructions contained in this manual
2.2 PRELIMINARY PROCEDURES
•
Always wear suitable work attire, hard-wearing safety
footwear with non-slip soles and long trousers. Do not
operate the machine when barefoot or wearing open
sandals. Wear hearing protection devices.
• Never wear scarves, shirts, necklaces, bracelets, loose
or materials in the work area.
• Tie your hair back if it is long.
• Wear protective gloves whenever your hands are at risk.
• Thoroughly inspect the entire work area and remove
anything that could be thrown by the machine or damage
the cutting means/rotating units (stones, branches, iron
wire, bones, etc.).
2.3 DURING OPERATION
• Do not use the machine in environments at risk of explosion,
tools create sparks which may ignite the dust or fumes.
•
Do not expose the machine to rain or wet environments.
Water entering a power tool will increase the risk of electric
shock.
•
visibility conditions.
• Avoid working with wet grass, in the rain and when there is a
risk of a thunderstorm, especially lightening.
• Pay careful attention to uneven ground (hills, dips), slopes,
hidden hazards and obstacles that could limit visibility.
• The machine must not be used on slopes of over 20°,
regardless of the mowing direction.
•
Do not incline the lawnmower during start up. Start up the
• Be extremely careful when pull the lawnmower toward
you. Look behind you to make sure there are no obstacles
before and during operations in reverse gear.
• Never run, always walk.
• Do not allow the lawnmower to pull you along.
• Always keep hands and feet away from the cutting means,
when starting and when using the machine.
• Never operate the machine with damaged, missing or
incorrectly assembled guards.
• Never disengage, deactivate, remove or tamper with the
safety systems/micro switches installed.
If something breaks or an accident occurs during
mowing, turn o the motor immediately and move the
machine away to prevent further damage; if an accident
occurs with injuries or third parties are injured, carry
out the rst aid measures most suitable for the situa-
tion immediately and contact the medical authorities for
any necessary health care. Carefully remove any debris
which could cause damage or injury to persons or ani-
mals if ignored.
2.4 MAINTENANCE, STORAGE
Ensure regular maintenance and correct storage to maintain
machine safety and high performance levels.
• Never use the machine with worn or damaged parts. Faulty
or worn-out parts must always be
replaced and never
repaired. Only use original spare parts.
•
•
inside a room.
• Make sure that machine movements do not cause damage
The noise and vibration levels shown in these
instructions are the maximum levels for use of the ma-
chine. The use of an unbalanced cutting element, the
excessive speed of movement, or the absence of main-
tenance have a signicant inuence on noise emissions
and vibrations. Consequently, it is necessary to take
preventive steps to eliminate possible damage due to
high levels of noise and stress from vibration. Maintain
the machine well, wear ear protection devices, and take
breaks while working.
2.5 BATTERY / BATTERY CHARGER
IMPORTANT The following safety instructions are in
addition to the safety requirements provided in the specic
battery and battery charger manual delivered with this
machine.
• Only use battery chargers recommended by the
manufacturer to recharge batteries. An inadequate battery
charger may cause electric shock, overheating or corrosive
liquid to leak from the battery.
•
•
the battery. Inserting a battery into a machine that is
2.6 ENVIRONMENTAL PROTECTION
• Scrupulously comply with local regulations for the disposal
of packaging, deteriorated parts or any elements with
a strong environmental impact; this waste must not be
disposed of as normal waste, it must be separated and
material will be recycled.
• Scrupulously comply with local regulations for the disposal
of waste materials.
EN - 3
• When the machine is withdrawn from service, do not
dispose of it in the environment, but take it to a waste
disposal facility in accordance with the local regulations in
force.
Do not throw electrical equipment away with
domestic waste. According to the European
Directive 2012/19/EU on electrical and electronic
equipment waste and its implementation,
according to UK regulation “The waste electrical
and electronic equipment regulations 2013 (as amended)” in
compliance with national standards, old electrical equipment
must be collected separately, for eco-compatible recycling. If
hazardous substances can leak into the groundwater and
contaminate the food chain, damaging your health and well-
being. For further information on the disposal of this product,
contact your dealer or a domestic waste collection service.
At the end of their working life, dispose
of batteries paying due attention to the
environment.
as hazardous for you and the environment. They
must be removed and disposed of separately at a
facility that accepts lithium-ion batteries.
Separate waste collection of the products
and packaging used allows the materials to
be recycled and reused. Reuse of recycled
materials help to prevent environmental pollution
and reduces the demand for raw materials.
3. GETTING TO KNOW THE MACHINE
3.1 DESCRIPTION OF THE MACHINE
AND PLANNED USE
This machine is pedestrian controlled lawnmower.
The machine is essentially composed of a motor which drives
a cutting means enclosed in a casing equipped with a handle.
Once switched on, the motor creates an air cushion that holds
the machine in a suspended position so that it doesn't create
friction with the ground.
The operator is able to operate the machine and use the main
controls, always staying behind the handle at a safe distance
from the rotating cutting means.
If the operator leaves the machine, the motor and cutting
means will stop within a few seconds.
3.1.1 Intended use
This machine was designed and manufactured for
cutting
grass in gardens and grassy areas, to be carried out by a
pedestrian operator.
3.1.2 Improper use
Any other usage may be hazardous and
harm persons and/or damage things.
Examples of improper use may include, but are not limited to:
– Allowing children, animals or other passengers to
themselves or compromise safe driving by the operator;
– Letting oneself be transported by the machine.
– Using the machine to tow or push loads.
– Using the cutting means on surfaces other than grass.
– Using of the machine for leaf or debris collection.
– Using the machine to trim hedges, or for
cutting vegetation other than grass.
– Use of the machine by more than one person.
IMPORTANT Improper use of the machine will invalidate
the warranty, relieve the Manufacturer from all liabilities, and
the user will consequently be liable for all and any damage or
injury to himself or others.
3.1.3 User types
This machine is intended for use by consumers, i.e. non-
professional operators.
It is intended for "DIY" use only.
IMPORTANT The machine must be used by one operator.
3.2
MAIN COMPONENTS Fig
A. Chassis: this is the casing that houses the rotating
cutting means.
B. Motor: provides the drive power to the cutting
means.
C. Cutting means: the element designed to cut the
grass.
D Handle: this is the operator’s work station. It is long
enough to ensure the operator remains at a safe
distance from the rotary cutting means whilst working.
E.
Operator presence lever: this lever enables the
ground. The motor stops when the lever is released.
F. Control lever: starts/stops the motor and
simultaneously engages/disengages the cutting
means.
G. Hatch for accessing the battery compartment
H. Safety key (Deactivation device): The key
enables / disables the machine electric circuit.
I. Battery (if it is not supplied with the machine, see
chapter 13 “attachments on request”): provides the
J. Battery charger (if it is not supplied with the
machine, see chapter 13 “attachments on
request”): device used to recharge the battery.
K Spacer:
EN - 4
3.3 IDENTIFICATION LABEL (Fig. 1)
1. Sound power level.
2. Conformity marking.
3. Year of manufacture.
4. Type of machine.
5. Serial number.
6. Name and address of Manufacturer.
7. Article code.
8. Max. motor operation speed.
9. Weight in kg.
10. Power supply voltage
11. Electrical protection rating.
12. Nominal power.
space on the label on the back of the cover page.
IMPORTANT Quote the data on the product identication
label whenever you contact an Authorised Service Centre.
3.4
SAFETY WARNING SIGNS (Fig. 1).
The machine has various symbols on it.
Meaning of symbols:
Warning. Read the instructions before
operating the machine.
Danger! Risk of hurled objects. Keep
all persons away from the work area whilst
working.
Be careful when using the sharp cutting
means. Do not put hands or feet near or
under the opening of the cutting means. The
cutting means continues to turn even after
safety key (deactivation device) before doing
maintenance.
IMPORTANT Any damaged or illegible decals must be
replaced. Order replacement decals from an authorised
service centre.
4. ASSEMBLY
The safety regulations to follow are described in
chap. 2. Strictly comply with these indications to avoid
serious risks or dangers.
For storage and transport purposes, some components of
the machine are not installed in the factory and have to be
assembled after unpacking. Follow the instructions below.
Unpacking and completing the assembly should
be done on a at and stable surface, with enough space
for moving the machine and its packaging, always mak-
ing use of suitable equipment. Do not use the machine
until all the indications provided in the “ASSEMBLY”
section have been carried out.
Before assembling, make sure the safety key is
not inserted in its housing.
4.1 UNPACKING (Fig.2)
4.2 ASSEMBLY THE HANDLE (Fig.3)
shown.
4.3
or removing spacers (Fig. 1K
)
1. Remove the blade from the machine: holding the
blade still, turn the bolt (L) counter-clock wise (Fig. 4.I)
2. Place the 2 spacers (K) and the new bolt (M) onto the
machine (Fig. 4.II)
3. Holding the blade, tighten the new bolt clockwise (Fig.
4. III).
4. After assembly, check that the blade is properly
secured.
Below are the cutting heights with 1 or 2 spacers
Nr of spacers
Cutting height
1 30 mm
2 20 mm
Do not touch the cutting means until the key has
been removed and the cutting means is completely sta-
tionary. Bear in mind that, even though the key has been
removed, the cutting means can still move.
All work on the cutting means (disassembly,
sharpening, balancing, repairing, reassembly and/or re-
placing) are demanding jobs that require special skills
as well as special tools. For safety reasons, these jobs
are best carried out at a Specialised Centre.
5. CONTROLS
5.1
The key (Fig.1.H) found inside the battery compartment
enables / disables the machine electric circuit.
Removing the key, the electric circuit is completely deactivated
to prevent uncontrolled use of the machine.
IMPORTANT Remove the safety key whenever the machine
is unused or left unattended.
5.2 CONTROL LEVER
The control lever (Fig.5) starts/stops the motor and
simultaneously engages/disengages the cutting means.
The positions indicated correspond to:
Ignition
Cutting means engagement. Ignition of the
motor simultaneously engages the cutting means.
EN - 5
Stop. The motor stops automatically
when the lever is released (Fig.5.A).
NOTE The cutting means engagement is possible only
by pressing the button on the right side of the handle and
bringing the operator presence lever towards the handle.
6.
USING THE MACHINE
The safety regulations to follow are described in
chap. 2. Strictly comply with these indications to avoid
serious risks or dangers.
6.1 PRELIMINARY PROCEDURES
Make sure the safety key is not inserted in its housing. Place
the machine in a stable horizontal position on the ground.
6.1.1 Checking the battery
fully charge the battery following the instructions in the battery
booklet.
Before every use of the machine, check the battery charge
status according to the instructions in the battery booklet.
Do this when the cutting means is stationary.
6.2 SAFETY CHECKS
Always carry out the safety checks before use.
6.2.1 General safety check
Object Result
Grips Clean, dry.
Handle
the machine.
Cutting means Clean, not damaged
or worn, intact,
well-sharpened.
Control lever The lever must move
freely, it must not need
forcing and should return
automatically and rapidly
back to the neutral
position.
Battery No damage to the casing,
no liquid leakage.
Screws/nuts on the machine
and on the cutting means
Correctly tightened
(not loose). Not
damaged or worn.
Cooling air ducts Not clogged
Machine No signs of damage
or wear.
No abnormal vibrations.
No abnormal sound.
Action Result
1. Start the machine (par.
6.3 ).
2. Release the control
lever (Fig.5.A).
1. The cutting means
should move.
2. Don't force the safety
lever as it must move
freely; it should return
automatically and rap-
idly back to the neutral
position, resulting in the
stopping of the cutting
device
If any of the results fail to match the indications
provided in the tables, do not use the machine! Contact
a service centre to have it checked and repaired if nec-
essary.
6.3 IGNITION
NOTE Ignite the machine on a level surface, without
obstacles or high grass.
1. Open the battery housing hatch (Fig. 6.A)
2. Insert the batteries correctly in the battery
compartment (Fig. 6.A) pressing down until you hear
contact.
3.
4. Completely close the hatch again.
5.
button (Fig.6.A.1) and then pressing the operator
presence lever (Fig. 6.A).
Ignition of the motor simultaneously engages the
cutting means.
6.4 WORKING
IMPORTANT When working, always keep a safe distance
from the cutting means, given by the length of the handle.
Battery power reserve (and therefore the movable lawn
surface before recharging is required) depends on many
factors described in (par. 7.1).
IMPORTANT If the motor stops while mowing due to
overheating, you must wait approximately 5 minutes before
restarting it.
6.5 STOP
To stop the machine:
• release the operator presence lever (Fig 5.A)
• wait until the cutting means stops.
When you have stopped the machine, it will take a
few seconds for the cutting means to stop.

EN - 6
IMPORTANT Always stop the machine.
•
When moving between work areas.
• When driving on grass free surfaces.
• Every time it is necessary to overcome an obstacle.
6.6 AFTER USE
1. Open the hatch and remove the safety key.
2. Remove the battery from its housing and recharge it
(par.7.1.2).
3. Allow the motor to cool before storing in an enclosed
space.
4. Carry out the cleaning (par. 7.2).
5. Check there are no loose or damaged components.
If necessary, replace the damaged components and
tighten any screws and loose bolts or contact the
authorised service centre.
6. Checking for any damage to the machine. If necessary,
contact the authorised service centre.
IMPORTANT Remove the safety key whenever the machine
is unused or left unattended.
7. MAINTENANCE
The safety regulations to follow are described in
chap. 2. Strictly comply with these indications to avoid
serious risks or dangers.
Before conducting any inspections, cleaning or
maintenance/adjustment interventions on the machine:
• Stop the machine.
• Remove the safety key, (never leave the key in the
ignition or within reach of children or unauthorised
persons).
• Remove the battery.
•
Make sure that all moving parts have come to a
complete stop.
• Allow the motor to cool before storing in an enclosed
space.
• Wear proper clothing and protective gloves whenever
your hands are at risk.
•
Read the relevant instructions.
IMPORTANT Any maintenance and adjustment operations
not described in this manual must be carried out by your
Authorised Service Centre.
7.1 BATTERY
7.1.1 Battery power reserve
Battery power reserve (and therefore the movable lawn
surface before recharging is required) mainly depends on:
a. environmental factors that cause
higher energy requirements:
–
mowing dense, high and/or wet grass.
b. machine cutting width: the wider the width,
the greater is the energy need.
c. Operator behaviour that should be avoided:
–
frequently whilst working.
–
NOTE During use, the battery is protected against total
drainage with a protective device that switches o the
machine and stops it from working.
To optimise battery power reserve it
is always recommended to:
– Cut the grass when the lawn is dry.
– Cut the grass frequently so that it doesn’t grow too tall.
If the need arises to use the machine for sessions which
exceed the capability of a standard battery, it is possible to:
– purchase a second standard battery to immediately
replace the discharged battery, without compromising
the continuity of operations;
– Purchase a battery with an extended power reserve
compared to the standard version.
7.1.2 Battery removal and recharging (Fig.7)
1. Open the battery housing hatch and remove the safety
key (Fig.7.A);
2. Press the button on the battery and remove it (Fig.7.B .
3. Insert the battery in its housing in the battery charger
(Fig.8)
4. Connect the battery charger to a power socket with the
voltage indicated on the rating plate.
5. Fully charge the battery according to the instructions in
the battery/battery charger booklet.
NOTE The battery is equipped with a guard that inhibits
recharging if the environmental temperature is not between
0 and +45 °C.
NOTE The battery can be recharged at any time, even
partially, with no risk of damaging it.
7.1.3
When recharging is completed:
1. Remove the battery from its housing in the battery charg-
er.
2. Disconnect the battery charger from the mains power
supply.
3. Fit the battery inside its housing on the machine
7.2 CLEANING
Clean thoroughly following the instructions below every time
it is used.
7.2.1 Cleaning the machine
• Do not spray water onto the motor and electrical
components and prevent them from getting wet.
• Do not use aggressive liquids to clean the chassis.
•
particular, the motor free of grass, leaves, or excessive
grease.

EN - 7
7.2.2 Cleaning the cutting-means assembly
IMPORTANT Tilt the machine laterally and make sure that it
is stable before starting any work.
7.2.3
)
7.3 CUTTING MEANS
A badly sharpened cutting means pulls at the grass and
causes the lawn to turn yellow.
Do not touch the cutting means until the key has
been removed and the cutting means is completely sta-
tionary. Bear in mind that, even though the key has been
removed, the cutting means can still move.
All work on the cutting means (disassembly,
sharpening, balancing, repairing, reassembly and/or re-
placing) are demanding jobs that require special skills
as well as special tools. For safety reasons, these jobs
are best carried out at a Specialised Centre.
Make sure damaged, misshapen or worn cut-
ting-means are replaced, together with its own screws
in place to preserve balance.
IMPORTANT Always use original cutting devices with the
code shown in the "Technical Data" table.
Given product evolution, the cutting means listed in the
"Technical Data" table may be replaced in time with others
having similar interchangeable and operating safety features.
8. STORAGE
8.1 STORING THE MACHINE
When the machine is to be stored away:
1. Wait for the motor to cool
2. Remove the safety key.
3. Remove the battery from its housing and recharge it (par
7.1.2).
4. Carry out the cleaning (par. 7.2)
5. Store the machine (Fig.10):
– in a dry place;
– protected from inclement weather;
– and covered with a sheet where possible;
– in a place where children cannot get to it;
– making sure that keys or tools used for maintenance are
removed;
– hanging from the wall.
8.2 STORING THE BATTERY
If the battery is not charged for a long time, it should always be
stored in the shade, in a cool and dry place with an ambient
temperature of between 0~45°C.
IMPORTANT If unused for any length of time, recharge
the battery every two months to prolong its working life.
9. HANDLING AND TRANSPORTATION
Whenever the machine is to be handled,
raised, transported or tilted you must:
– stop the machine (par. 6.5);
– remove the safety key;
– make sure that all moving parts have come to a complete
stop;
– wear heavy work gloves;
–
into account the weight and its division;
– use an appropriate number of people for the weight of
the machine and the characteristics of the vehicle or the
place where it must be placed or collected;
– make sure that machine movements do not cause
When transporting the machine on a vehicle or trailer, always:
1. use an access ramp of suitable strength, width and
length;
2. lower the cutting-means assembly;
3. position it so that it can not cause a hazard for anybody;
4.
chains to prevent it from tipping over.
10. ASSISTANCE AND REPAIRS
This manual provides all the necessary information to run
the machine and for correct basic maintenance operations
which can be performed by the user. Any maintenance and
carried out by your dealer or an Authorised Service Centre.
Any operations performed in unauthorized centres or by
obligations and responsibilities of the Manufacturer.
• Non-original parts and attachments are not approved; use
the safety of the machine and relieve the Manufacturer
from all obligations or liabilities.
• Genuine spare parts are supplied by authorised assistance
workshops and dealers.
11.
WARRANTY COVERAGE
The warranty conditions are intended for consumers only, i.e.
non-professional operators.
The warranty covers all material quality and manufacturing
defects recognised during the warranty period by your Dealer
or Authorised Service Centre.
The warranty is restricted to the repair or replacement of
components recognised as faulty.
It is advisable to send your machine once a year to an
authorized service workshop for servicing, assistance and
safety device inspection.
maintenance.
The warranty does not cover damages resulting from:
• Failure to become familiar with the documentation
accompanying the machine (Instruction manuals).
• Professional use.
• Carelessness, negligence.
• External causes (lightning, impact, presence of foreign
bodies inside the machine) or incidents.

EN - 8
•
Incorrect use or assembly or prohibited by the manufacturer.
• Poor maintenance.
•
• Use of non-genuine spare parts (adaptable parts).
• Use of accessories not supplied or approved by the
manufacturer.
The warranty does not cover:
• Maintenance operations (described in the instruction
manual).
• Normal wear and tear of consumables, such as cutting
means, safety bolts and cabling.
• Normal wear and tear.
• Deterioration in the appearance of the machine due to use.
• Cutting means supports.
• Any ancillary expenses related to the enforcement
of the warranty, such as costs incurred to travel to
the user's location, transfer of the machine to the
Dealer, rental of replacement equipment or calling of
independent enterprises to perform maintenance work.
The user is protected by his or her own national legislation.
The user’s rights under the national laws or his or her own
country are not in any way restricted by this warranty.
12. PROBLEM IDENTIFICATION
If problems persist after having performed the above operations, contact your dealer.
PROBLEM PROBABLE CAUSE SOLUTION
1. The motor does not start when
the switch is pressed
Safety key is not inserted or is inserted
incorrectly.
Insert the key (Fig. 6.C).
Battery is not inserted or is inserted incorrectly. Open the hatch and check that the battery is
Low battery. Check the battery status and recharge
if necessary (par. 7.1.2).
Motor start-up is slow. Press and hold the control lever for 2-3 seconds (par. 5.2).
The thermal protection has tripped
due to overheating of the motor.
Wait for at least 5 minutes and then restart the machine.
2. The motor is running but the
cutting means is stationary
Contact an authorised Technical Assistance Centre
for checks, replacements or repairs (par. 7.3).
3. The motor shuts down whilst
working.
Battery is not inserted correctly. Open the hatch and check that the battery is
Low battery. Check the battery status and recharge
if necessary (par. 7.1.2).
Obstructions that prevent rotation
of the cutting means.
Remove the safety key, put on your work gloves and
remove any grass remains or debris from the lower
part of the machine and/or the discharge channel.
The thermal protection has tripped
due to overheating of the motor.
Clean the cooling air intake vents (par. 7.2.3).
Wait for at least 5 minutes and then restart the machine.
3. The motor shuts down whilst
working.
Thermal protection has tripped due to
excessive current absorption caused by:
• Excessively high grass cutting.
• Obstructions that prevent rotation
of the cutting means.
• Too much grass debris accumulated in
the chassis and discharge channel.
• Remove the obstructions (par. 7.2.2).
• Clean the machine (par. 7.2.1, 7.2.2, 7.2.3)
Wait for at least 5 minutes and then restart the machine.

EN - 9
4. The cutting means is not in good condition. Contact a Technical service centre for the
sharpening or replacement of the cutting means.
5. Excessive noise and/
or vibration is experi-
enced whilst working.
the cutting means is damaged.
Contact an authorised Technical Assistance Centre
for checks, replacements or repairs (par. 7.3).
6. Battery power reserve is low. Severe working conditions requiring
greater current absorption.
Optimise operations (par. 7.1.1).
Use a second battery or extended battery (par. 13.1).
7. The battery charger is not
recharging the battery.
Battery is not correctly inserted
in the battery charger.
Check it is correctly inserted (par. 7.1.2)
Unsuitable environmental conditions. Recharge the battery in places with suitable temperatures
(see battery/battery charger instruction manual).
Dirty contacts. Clean the contacts.
The battery charger is not energised. Check it is plugged in and the power socket is energised.
Faulty battery charger. Replace with an original spare part.
If the problem persists, refer to the
battery/battery charger manual.
13. OPTIONAL ATTACHMENTS
13.1 BATTERIES
(Example in Fig.11) are available
batteries for this machine is found in the "Technical Data"
table.
13.2 BATTERY CHARGER
Device used to recharge the battery (Fig.12)

DICHIARAZIONE CE DI CONFORMITÀ (Istruzioni Originali)
(Direttiva Macchine 2006/42/CE, Allegato II, parte A)
1. La Società: ST. S.p.A. – Via del Lavoro, 6 – 31033 Castelfranco Veneto (TV) – Italy
2. Dichiara sotto la propria responsabilità, che la macchina:
Tosaerba con conducente a piedi (taglio erba)
• MD: 2006/42/EC
• OND: 2000/14/EC, ANNEX VI - 2005/88/EC
• EMCD: 2014/30/EU
Sean Robinson
171516267/
30 cm
ST. S.p.A.
Via del Lavoro, 6
31033 Castelfranco Veneto (TV) - Italia
Riferimento alle norme armonizzate::
EN 60335-2-77:2010
EN 55014-1:20
EN 55014-2:20
EN IEC 63000:2018
Livello di potenza sonora misurato:
Livello di potenza sonora garantito:
Ampiezza di taglio:
Persona autorizzata a costituire il Fascicolo Tecnico:
Castelfranco Veneto, /2/202
T 300 Li 20
c) Numero di Serie:
d) Motore:: a batteria

UK DECLARATION OF CONFORMITY
1. The company: ST. S.p.A. – Via del Lavoro, 6 – 31033 Castelfranco Veneto (TV) – Italy
3. Conforms to UK Regulations:
4. Reference to harmonised standards:
Castelfranco Veneto, 01/2/202
Sean Robinson
171516267/
ST. S.p.A.
Via del Lavoro, 6
31033 Castelfranco Veneto (TV) - Italia
30 cm
T 300 Li 20
c) Serial number:
d) Engine: battery-operated
UK Importer:

© by ST. S.p.A.
IT • Il contenuto e le immagini del presente manuale d’uso sono stati realizzati per conto di ST. S.p.A. e sono tutelati da diritto d’autore – E’
vietata ogni riproduzione o alterazione anche parziale non autorizzata del documento.
EN • The content and images in this User Manual were produced expressly for ST. S.p.A. and are protected by copyright – any unauthori-


ST. S.p.A.
Via del Lavoro, 6
31033 Castelfranco Veneto (TV) ITALY
STIGA LTD (UK Importer)
Unit 8, Bluewater Estate Plympton,
Devon, PL7 4JH, England

