5KSM150PSP Series
5K45SSP Series
5KSM6583P Series
W11371189A.indd 1 6/6/2019 6:34:00 PM
2
3
1
2
4
5
6
7
89
10
11
12
13
14
15
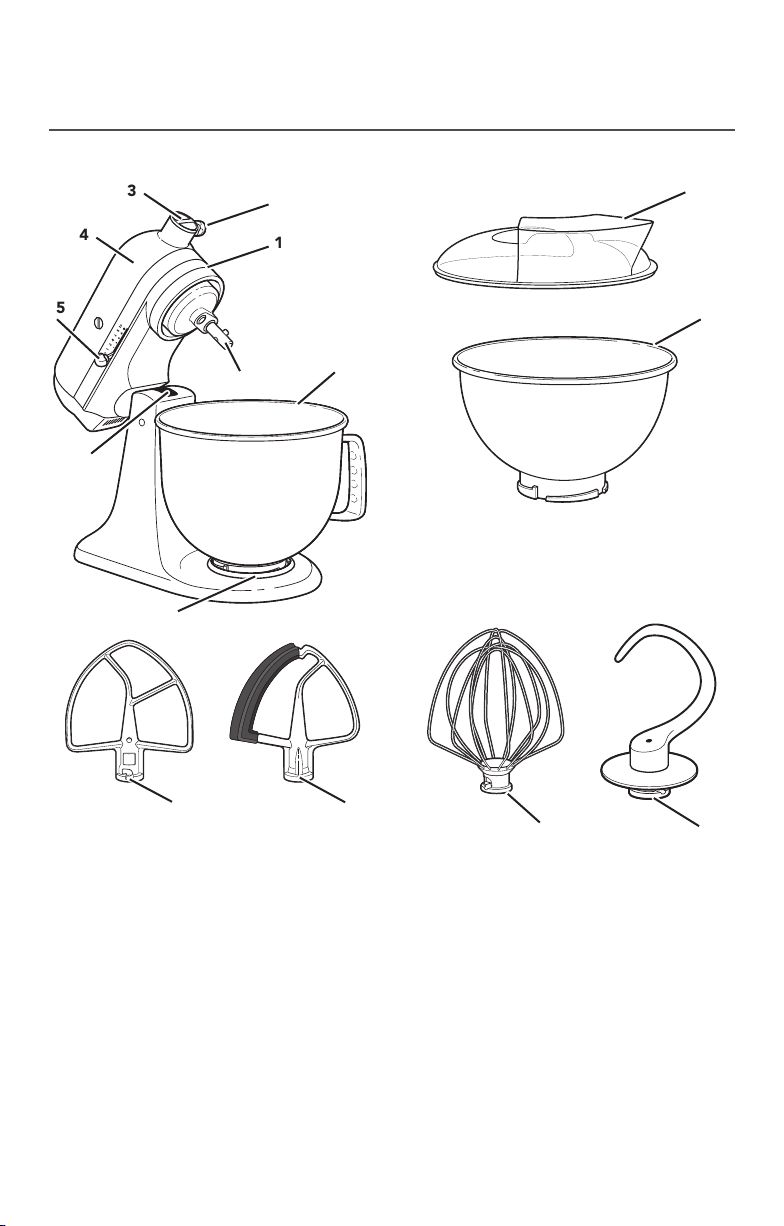
1 Motor Head (locking lever not shown)
2 Attachment Knob
3 Attachment Hub
4 Motor Head
5 Speed Control Lever
6 Beater Height Adjustment screw
(not shown)
7 Bowl Clamping Plate
8 Bowl**
9 Beater Shaft
10 Pouring shield*
11 3 L Stainless Steel Bowl*
12 Flat Beater
13 Flex Edge Beater*
14 Wire Whip
15 Dough Hook
PARTS AND FEATURES
*Included with select models only. Also available as an optional accessory.
**The bowl design and material depend on the Stand Mixer model.
TILT HEAD STAND MIXER PARTS AND ACCESSORIES
W11371189A.indd 2 6/6/2019 6:34:01 PM
ENGLISH
3
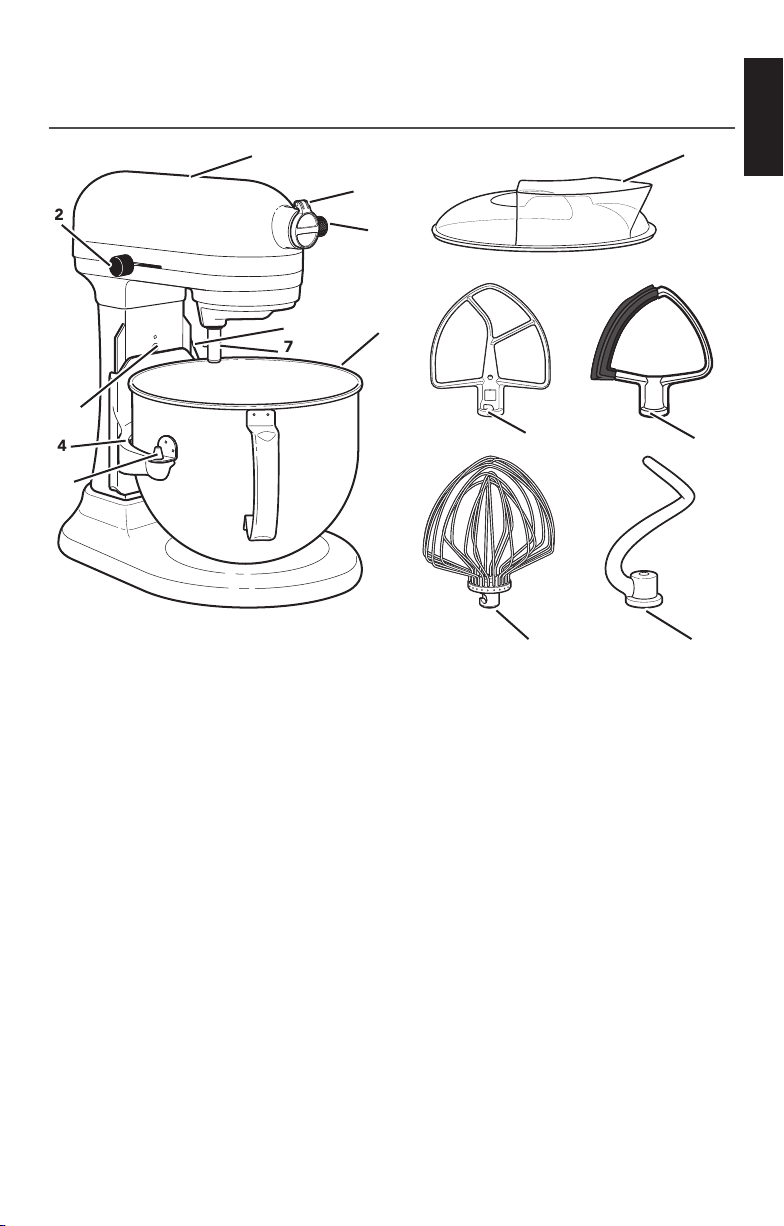
PARTS AND FEATURES
BOWL LIFT STAND MIXER PARTS AND ACCESSORIES
1
2
3
4
6
10
11
12
13
14
15
5
7
9
8
1 Motor Head
2 Speed Control Lever
3 Beater Height Adjustment screw
4 Bowl Support
5 Locating Pins
6 Stainless Steel Bowl**
7 Beater Shaft
8 Bowl Lift Lever (not shown)
9 Attachment Knob
10 Attachment Hub
(see the “Optional Attachments”
section)
11 Pouring Shield*
12 Flat Beater
13 Flex Edge Beater*
14 Wire Whip
15 Dough Hook
* Included with select models only. Also available as an optional accessory.
**Capacity and handle design vary by model.
W11371189A.indd 3 6/6/2019 6:34:02 PM
4
PRODUCT SAFETY
IMPORTANT SAFEGUARDS
When using electrical appliances, basic safety precautions should always
be followed, including the following:
1. Read all instructions. Misuse of appliance may result in personal injury.
2. To protect against risk of electrical shock, do not put Stand Mixer in water or
other liquid.
3. This appliance is not intended for use by persons (including children) with
reduced physical, sensory or mental capabilities, or lack of experience
and knowledge, unless they have been given supervision or instruction
concerning use of the appliance by a person responsible for their safety.
4. Children should be supervised to ensure that they do not play with the
appliance.
5. Turn the appliance OFF, then unplug from the outlet when not in use, before
assembling or disassembling parts, and before cleaning. To unplug, grasp
the plug and pull from the outlet. Never pull from the power cord.
6. Avoid contacting moving parts. Keep hands, hair, and clothing, as well
as spatulas and other utensils, away from beater during operation to reduce
the risk of injury to persons and/or damage to the Stand Mixer.
7. Do not operate any appliance with a damaged cord or plug or after the
appliance malfunctions, or is dropped or damaged in any manner. Contact
the manufacturer at their customer service telephone number for information
on examination, repair, or adjustment.
8. If the supply cord is damaged, it must be replaced by the manufacturer, its
service agent or similarly qualified persons in order to avoid a hazard.
9. The use of accessories or attachments not recommended or sold by the
manufacturer may cause fire, electric shock or injury.
10. Do not use the Stand Mixer outdoors.
W11371189A.indd 4 6/6/2019 6:34:02 PM
ENGLISH
5
SAVE THESE INSTRUCTIONS
PRODUCT SAFETY
11. Do not let the cord hang over the edge of table or counter.
12. Remove the beaters, wire whip, or dough hook from the Stand Mixer before
washing.
13. Do not leave the Stand Mixer unattended while it is operating.
14. Refer to the “Care and Cleaning” section for instructions on cleaning the
surfaces in contact with food.
15. This appliance is intended to be used in household and similar applications
such as:
- staff kitchen areas in shops, offices or other working environments;
- farmhouses;
- by clients in hotels, motels and other residential type environments;
- bed and breakfast type environments.
ELECTRICAL REQUIREMENTS
Electrical Shock Hazard
Plug into an earthed outlet.
Do not remove earth prong.
Do not use an adapter.
Do not use an extension cord.
Failure to follow these
instructions can result in
death, fire, or electrical shock.
5KSM150PSP Series
Wattage: 300 W
Volts: 230V
Hertz: 60 Hz
5K45SSP Series
Wattage: 275 W
Volts: 230V
Hertz: 60 Hz
5KSM6583P Series
Wattage: 500 W
Volts: 230V
Hertz: 60 Hz
NOTE: If the plug does not fit in the
outlet, contact a qualified electrician. Do
not modify the plug in any way. Do not
use an adapter.
Do not use an extension cord. If the
power supply cord is too short, have a
qualified electrician or service technician
install an outlet near the appliance.
W11371189A.indd 5 6/6/2019 6:34:02 PM
6
SPEED CONTROL GUIDE
Speed Action
Description
1 Stir For slow stirring, combining, mashing, starting all mixing
procedures. Use to add flour and dry ingredients to batter
and to add liquids to dry ingredients. Do not use Speed 1
to mix or knead yeast doughs.
2 Slow mixing For slow mixing, mashing, faster stirring. Use to mix and
knead yeast doughs, heavy batters and candies, start
mashing potatoes or other vegetables, cut shortening into
flour, or mix thin or splashy batters.
4 Mixing, beating For mixing semi-heavy batters, such as cookies. Use to
cream sugar and shortening and to add sugar to egg
whites for meringues. Medium speed for cake mixes. Use
with attachments: Food Grinder, Rotor Slicer/Shredder, and
Fruit/ Vegetable Strainer.
6 Beating, creaming For medium fast beating (creaming) or whipping. Use
to finish mixing cake, doughnut, and other batters. High
speed for cake mixes. Use with Citrus Juicer attachment.
8 Fast beating,
whipping
For whipping cream, egg whites, and boiled frostings.
10 Fast whipping For whipping small amounts of cream and egg whites. Use
with Pasta Maker and Grain Mill attachments.
Note: The speed control can be set to obtain speeds 1, 3, 5, 7, and 9 if a finer adjustment is
required. Do not exceed Speed 2 when preparing yeast doughs as this may cause damage to
the Stand Mixer.
GETTING STARTED
Accessories Use to mix Suggested items
Flat Beater
Flex Edge Beater
Normal
to heavy
mixtures
Cakes, creamed frostings, candies, cookies,
biscuits, pie pastry, meatloaf, mashed potatoes
Wire Whip
Mixtures
that need air
incorporated
Eggs, egg whites, heavy cream, boiled frostings,
sponge cakes, mayonnaise, some candies
Dough Hook
Mixing and
kneading yeast
doughs
Breads, rolls, pizza dough, buns, coffee cakes
CHOOSING THE RIGHT ACCESSORY
W11371189A.indd 6 6/6/2019 6:34:03 PM

ENGLISH
7
PRODUCT USAGE
ASSEMBLING/DISASSEMBLING YOUR TILT HEAD STAND MIXER
To attach bowl:
1. Turn speed control to 0 (off).
2. Tilt motor head back.
3. Place bowl on bowl clamping plate.
4. Turn bowl gently in clockwise direction
(see illustration above).
5. Place the pouring shield on bowl.*
To remove bowl:
1. Turn speed control to 0 (off).
2. Tilt motor head back.
3. Turn bowl in counterclockwise direction.
To attach Flat Beater, Wire Whip, Dough
Hook or Flex Edge Beater*:
1. Turn speed control to 0 (off) and
unplug.
2. Raise motor head.
3. Slip beater onto beater shaft and press
upward as far as possible.
4. Turn beater to right, hooking beater
over pin on shaft.
To remove Flat Beater, Wire Whip, Dough
Hook or Flex Edge Beater*:
1. Turn speed control to 0 (off) and
unplug.
2. Raise motor head.
3. Press beater upward as far as possible
and turn left.
4. Pull beater from beater shaft.
To lock motor head in raised position:
1. Push locking lever up into unlock
position and hold.
2. Tilt motor head back.
3. Move locking lever into lock position.
To lock motor head in operating position:
1. Turn speed control to 0 (off) and
unplug.
2. Unlock the motor head and move it
down.
3. Lock the head to keep it down
4. Before mixing, test lock by attempting
to raise the motor head.
NOTE: Motor head should always
be kept in lock position when using Stand
Mixer.
To operate speed control:
1. Speed control lever should always be
set on lowest speed for starting, then
gradually moved to desired higher
speed to avoid splashing ingredients
out of bowl. See “Speed control
guide.”
Ki
t
c
hen
A
i
d
St.J
os
e
p
h
,
M
i
ch
i
g
a
n
,
U
S
A
1
2 4 6
8
10
OFF
ON
*Included with select models only. Also available as an optional accessory.
W11371189A.indd 7 6/6/2019 6:34:03 PM

8
PRODUCT USAGE
ASSEMBLING/DISASSEMBLING YOUR BOWL LIFT STAND MIXER
*Included with select models only. Also available as an optional accessory.
Electrical Shock Hazard
Plug into an earthed outlet.
Do not remove earth prong.
Do not use an adapter.
Do not use an extension cord.
Failure to follow these
instructions can result in
death, fire, or electrical shock.
To Attach Bowl
1. Turn speed control to “0” (Off).
2. Unplug Stand Mixer or disconnect power.
3. Place bowl lift lever in down position.
4. Fit bowl supports over locating pins.
5. Press down on back of bowl until bowl pin
snaps into spring latch. Raise bowl before
mixing.
6. Plug into an earthed outlet
or reconnect power.
To Remove Bowl
1. Turn speed control to “0” (Off).
2. Unplug Stand Mixer or disconnect power.
3. Place bowl lift lever in down position.
4. Remove flat beater, wire whip, or dough
hook.
5. Grasp bowl handle and lift straight up and
off locating pins.
To Raise Bowl
1. Rotate lever to straight-up position.
2. Bowl must always be in raised, lock
position when mixing.
To Lower Bowl
1. Rotate lever back and down.
To Attach Flat Beater, Wire Whip, Dough
Hook or Flex Edge Beater*:
1. Turn speed control to “0” (Off).
2. Unplug Stand Mixer or disconnect power.
3. Slip flat beater
on beater shaft
and press upward
as far as possible.
4. Turn beater to right, hooking beater over
the pin on shaft.
5. Plug into an earthed outlet or reconnect
power.
To Remove Flat Beater, Wire Whip, Dough
Hook or Flex Edge Beater*:
1. Turn speed control to “0” (Off).
2. Unplug Stand Mixer or disconnect power.
3. Press beater upward as far as possible and
turn left.
4. Pull beater from beater shaft.
5. Plug into an earthed outlet or reconnect
power.
Stand Mixer Speed Control and Lever
Guard
The Stand Mixer has a feature that
minimizes splash-out by starting the
mixer slowly before increasing to the
selected speed. To further reduce the
potential for splash-out, always begin
mixing using speed 1, then gradually
move to higher speeds as needed.
See “Speed Control Guide.”
Auto-Reset Motor Protection
If the Stand Mixer stops due to overload,
slide the speed control lever to “0” (Off).
After a few minutes, the stand mixer will
automatically reset. Slide the speed control
lever to the desired speed and continue
mixing. If the Stand Mixer does not restart,
see “Troubleshooting Guide.”
W11371189A.indd 8 6/6/2019 6:34:04 PM

ENGLISH
9
PRODUCT USAGE
Your Stand Mixer is adjusted at the factory
so that the flat beater just clears the
bottom of the bowl. If for any reason the
flat beater strikes the bottom of the bowl
or is too far away from the bowl, clearance
can be corrected as follows:
Tilt head
1. Lift motor head.
2. Turn screw (A) slightly to the left to raise
flat beater and to the right to lower flat
beater.
3. Make adjustment with flat beater, so it
just clears surface of bowl.
Bowl lift
1. Place bowl lift
handle in down
position.
2. Turn screw (B)
slightly to the
left to raise
flat beater and to the right to lower flat
beater.
3. Make adjustments with flat beater,
so it just clears surface of bowl.
NOTE: Flat beater must not strike on
bottom or side of bowl when properly
adjusted. If beater or wire whip is
adjusted too close so that it strikes
bottom of bowl, coating may wear off of
beater or wires may wear through on wire
whip.
Scraping sides of bowl may be necessary
under certain conditions regardless of
beater adjustment. Stand Mixer must be
stopped to scrape bowl or damage to
Stand Mixer may occur.
BEATER TO BOWL CLEARANCE
A
B
To attach Pouring Shield*:
1. Turn speed control to “0” (Off).
2. Unplug Stand Mixer or disconnect power.
3. Attach Flat Beater, Wire Whip, Dough
Hook or Flex Edge Beater* and Bowl.
Front the front
of the mixer,
slide the
Pouring Shield*
over the bowl
until it is
centered.
4. The bottom rim of the pouring shield*
should fit within the bowl.
W11371189A.indd 9 6/6/2019 6:34:04 PM
10
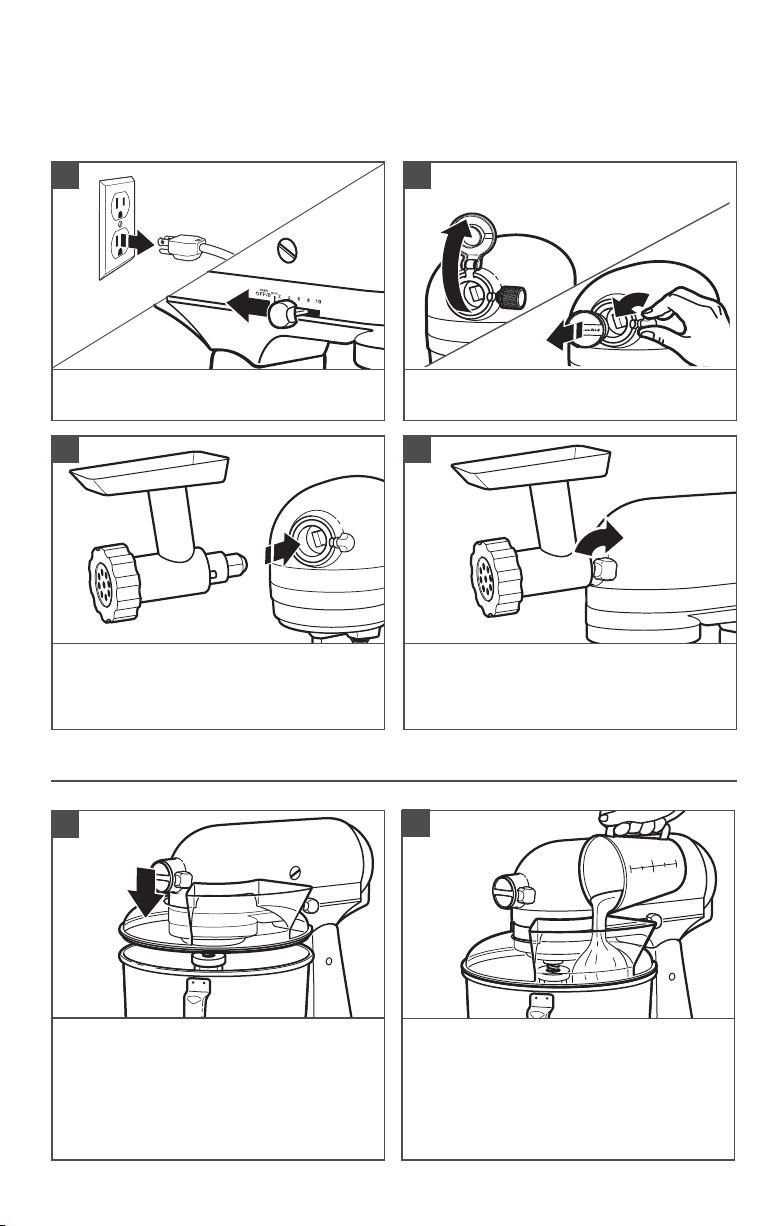
Insert attachment into attachment hub,
making certain that attachment power
shaft fits into the square attachment hub
socket.
3
Tighten the attachment knob by turning it
clockwise until the attachment is secured
to the Stand Mixer.
4
OPTIONAL ATTACHMENTS
USING THE POURING SHIELD*
For best results, rotate the Pouring
Shield* so the motor Head Covers the
U-shaped gap in the shield. The pouring
chute will be just to the right of the
Attachment Hub as you face the mixer
Pour ingredients into the bowl through
the pouring chute.
*Included with select models only. Also available as an optional accessory.
1
2
Turn the Stand Mixer to “0” (Off) and
then unplug the stand mixer.
1
KitchenAid offers a wide range of optional attachments such as the Spiralizer, Pasta
Cutters, or Food Grinder that may be attached to the Stand Mixer attachment power hub
as shown below.
Remove the attachment hub cover.
2
W11371189A.indd 10 6/6/2019 6:34:05 PM
ENGLISH
11
IMPORTANT: Do not immerse the Stand Mixer body in water or other liquids.
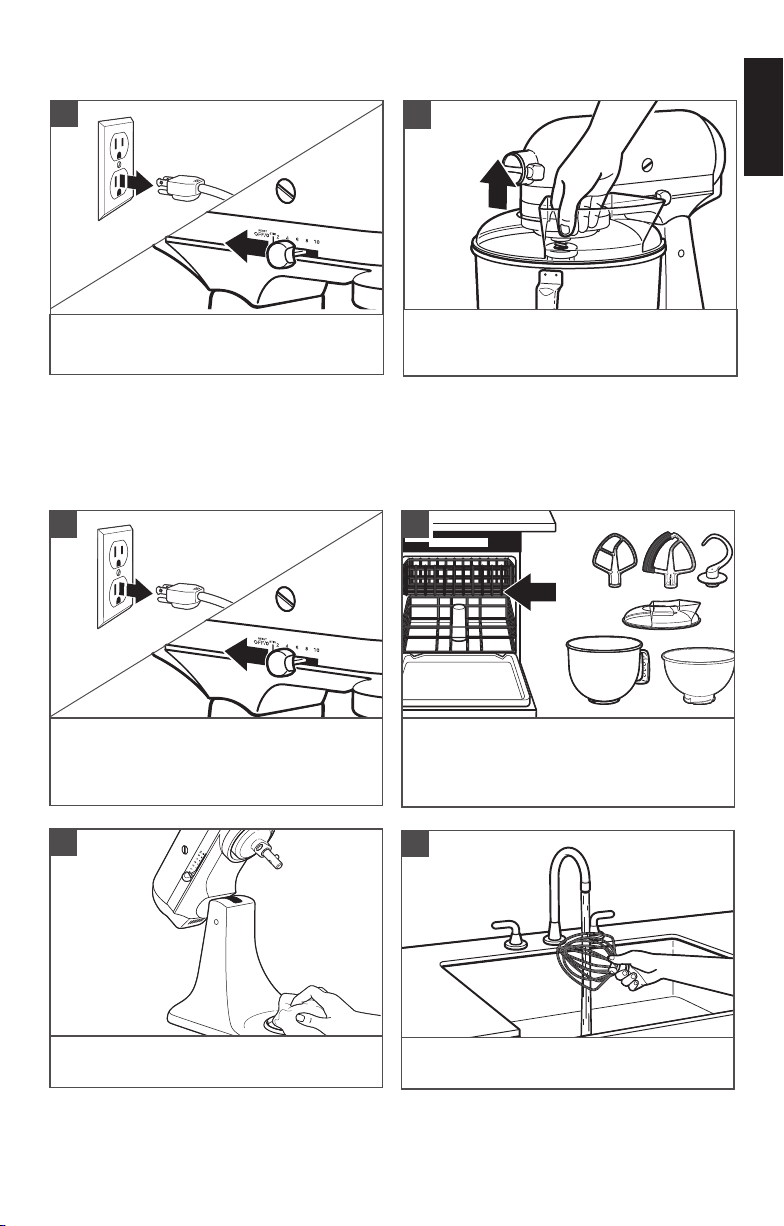
CARE AND CLEANING
Turn the Stand Mixer to “0” (Off) and
then unplug the stand mixer.
1
Dishwasher-safe parts, top rack only:
Stainless steel bowl*, bowl , flat beater,
dough hook, Flex Edge beater*, and
pouring shield*.
2
Wipe the Stand Mixer body with a soft,
damp cloth.
3
Clean the wire whip thoroughly with hand
wash only.
4
Turn the Stand Mixer to “0” (Off) and
then unplug the stand mixer.
Lift the front of the pouring shield* clear
of the rim of the bowl. Pull away from the
Stand Mixer.
3
4
*Included with select models only. Also available as an optional accessory.
OPTIONAL ATTACHMENTS
W11371189A.indd 11 6/6/2019 6:34:05 PM
12
TROUBLESHOOTING GUIDE
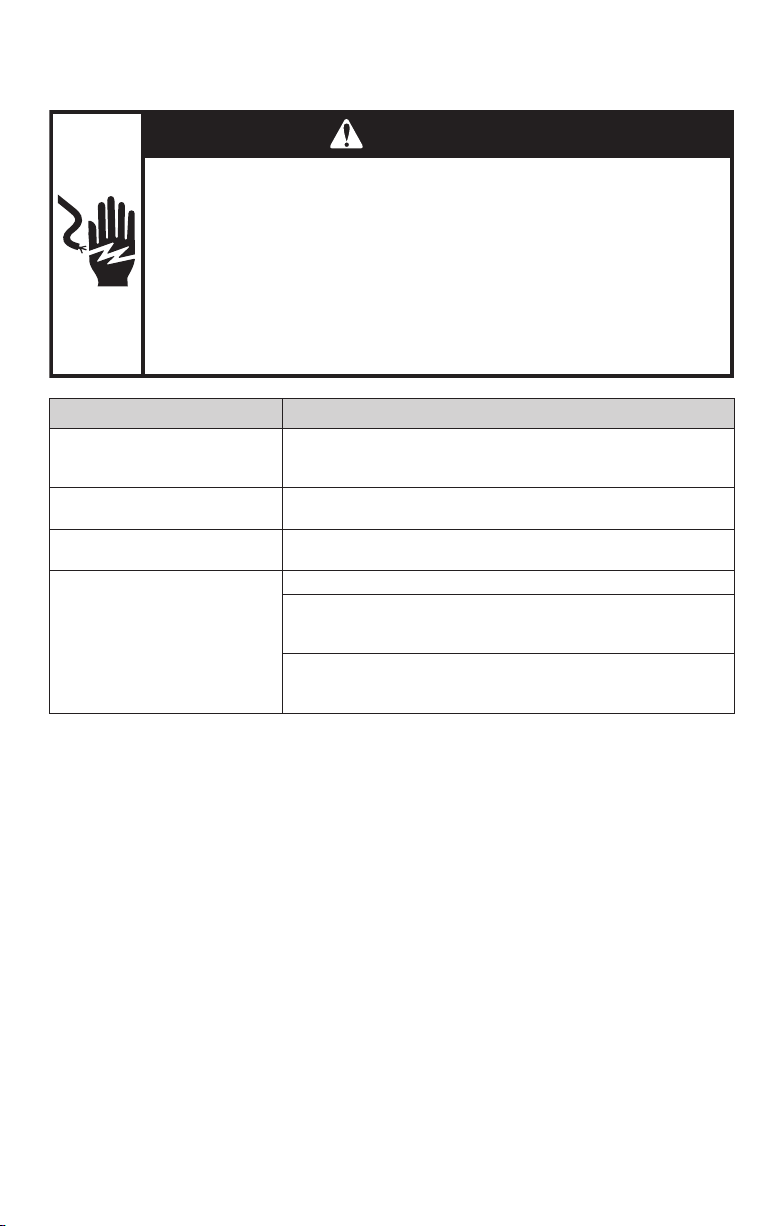
WARNING
Electrical Shock Hazard
Plug into an earthed outlet.
Do not remove an earth prong.
Do not use an adapter.
Do not use an extension cord.
Failure to follow these instructions can result in death, re,
or electrical shock.
Problem Solution
If Stand mixer warms up
during use:
Under heavy loads with extended mixing time periods, you
may not be able to comfortably touch the top of the unit.
This is normal.
If the flat beater hits the bowl:
Stop the Stand mixer. See the “Product Assembly” section
and adjust the beater to bowl clearance.
The speed control lever does
not move smoothly or easily:
To move the speed control lever with ease, lift slightly up as
you move it across the settings in either direction.
If your Stand Mixer should fail
to operate, please check the
following:
Is the Stand Mixer plugged in?
Is the fuse in the circuit to the Stand Mixer in working
order? If you have a circuit breaker box, be sure the circuit
is closed.
Turn off the Stand Mixer for 10-15 seconds, then turn it back
on. If the Stand Mixer still does not start, allow it to cool for
30 minutes before turning it back on.
W11371189A.indd 12 6/6/2019 6:34:05 PM

WARRANTY AND SERVICE
CUSTOMER SERVICE
STAND MIXER WARRANTY
Units that did not conform to the above conditions may still be serviced at any
Authorised Focus Global Inc. and Coleman Service Centres nationwide at a
minimal fee. Shipping fee or transport of unit will be charged to customer.
Length of Warranty: Focus Global Inc. Pay For: Focus Global Inc. will repair
and service for free under the
following conditions:
Philippines:
1 year full warranty
from date of
purchase.
The replacement parts
and repair labour
costs to correct
defects in materials or
workmanship. Service
will be provided by Focus
Global Inc.
- The unit was purchased from a
local authorised store / dealer.
- Proof of purchase must
be presented to claim the
warranty.
- Unit has been used for normal
household food preparation
purpose only.
- Damage to the unit is not due
to accident, alteration, misuse,
abuse, installation or operation
not in accordance with local
electrical codes.
- Spare part damaged is non-
consumable.
- Replacement of the unit
shall only be made after 3
unsuccessful attempts to
repair /remedy the same issue.
In Philippines:
For any questions, or to find the nearest Authorised Service Centre, please find
our contact details below.
NOTE: All service should be handled locally by an Authorised Focus Global Inc.
Service Centre.
For Warranty / Repair, p/s to contact -
Company: Focus Global Inc.
Address: Pioneer corner Reliance St., Mandaluyong City
Customer Service: +632 6553590 local 118 | +632 7059999
Email: [email protected]
Facebook: /KitchenAidPHL
Business Hours: Monday to Friday, 7:30AM to 4:30PM
For more information, visit our website at:
www.focusglobalinc.com
Focus Global Inc. DOES NOT ASSUME ANY RESPONSIBILITY FOR INDIRECT
DAMAGES.
©2019 KitchenAid. All rights reserved. KITCHENAID and the
design of the stand mixer are trademarks in the U.S. and elsewhere.
W11371189A.indd 13 6/6/2019 6:34:05 PM

W11371189A.indd 14 6/6/2019 6:34:05 PM

W11371189A.indd 15 6/6/2019 6:34:05 PM

W11371189A 06/19
©2019 KitchenAid. All rights reserved. KITCHENAID and the
design of the stand mixer are trademarks in the U.S. and elsewhere.
W11371189A.indd 16 6/6/2019 6:34:06 PM