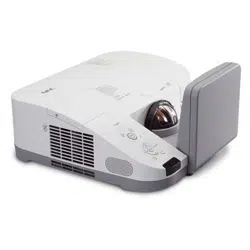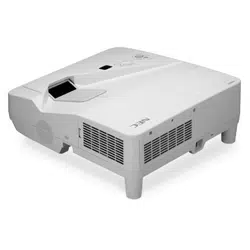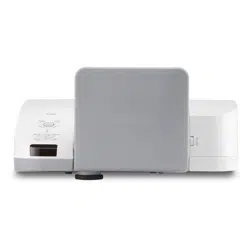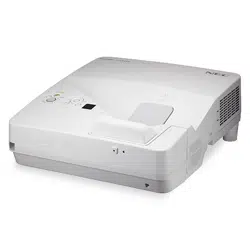

Projector
UM 352W
User’s Manual
Model No.
NP-UM352W

Ver. 1 3/15
• Apple,Mac,MacOS,MacBook,andiMacaretrademarksofAppleInc.registeredintheU.S.andothercountries.
• AppStoreisaservicemarkofAppleInc.
• IOSisatrademarkorregisteredtrademarkofCiscointheU.S.andothercountriesandisusedunderlicense.
• Microsoft,Windows,WindowsVista,InternetExplorer,.NETFrameworkandPowerPointareeitheraregistered
trademarkortrademarkofMicrosoftCorporationintheUnitedStatesand/orothercountries.
• MicroSaverisaregisteredtrademarkofKensingtonComputerProductsGroup,adivisionofACCOBrands.
• VirtualRemoteToolusesWinI2C/DDClibrary,©NicomsoftLtd.
• ThetermsHDMIandHDMIHigh-DenitionMultimediaInterface,andtheHDMILogoaretrademarksorregistered
trademarksofHDMILicensingLLCintheUnitedStatesandothercountries.
• MHL,MobileHigh-DenitionLinkandtheMHLLogoaretrademarksorregisteredtrademarksoftheMHL,LLC.
• TrademarkPJLinkisatrademarkappliedfortrademarkrightsinJapan,theUnitedStatesofAmericaandother
countriesandareas.
• Wi-Fi
®
,Wi-FiAlliance
®
,Wi-FiProtectedAccess
®
,Wi-FiDirect
®
areregisteredtrademarksoftheWi-FiAlliance
®
.
WPA™,WPA2™,Wi-FiProtectedSetup™,Miracast™aretrademarksoftheWi-FiAlliance
®
.
• Blu-rayisatrademarkofBlu-rayDiscAssociation
• CRESTRONandROOMVIEWareregisteredtrademarksofCrestronElectronics,Inc.intheUnitedStatesandother
countries.
• EthernetiseitheraregisteredtrademarkortrademarkofFujiXeroxCo.,Ltd.
• GooglePlayandAndroidaretrademarksofGoogleInc.
• Otherproductnamesandcompanylogosmentionedinthisuser’smanualmaybethetrademarksorregistered
trademarksoftheirrespectiveholders.
• GPL/LGPLSoftwareLicenses
TheproductincludessoftwarelicensedunderGNUGeneralPublicLicense(GPL),GNULesserGeneralPublic
License(LGPL),andothers.
Formoreinformationoneachsoftware,see“readme.pdf”insidethe“aboutGPL&LGPL”folderonthesuppliedCD-
ROM.
NOTES
(1)Thecontentsofthisuser’smanualmaynotbereprintedinpartorwholewithoutpermission.
(2)Thecontentsofthisuser’smanualaresubjecttochangewithoutnotice.
(3)Greatcarehasbeentakeninthepreparationofthisuser’smanual;however,shouldyounoticeanyquestionable
points,errorsoromissions,pleasecontactus.
(4)Notwithstandingarticle(3),NECwillnotberesponsibleforanyclaimsonlossofprotorothermattersdeemed
toresultfromusingtheProjector.
i
Important Information
Safety Cautions
Precautions
PleasereadthismanualcarefullybeforeusingyourNECprojectorandkeepthemanualhandyforfuturereference.
CAUTION
Toturnoffmainpower,besuretoremovetheplugfrompoweroutlet.
Thepoweroutletsocketshouldbeinstalledasneartotheequipmentaspossible,andshouldbeeasily
accessible.
CAUTION
TOPREVENTSHOCK,DONOTOPENTHECABINET.
THEREAREHIGH-VOLTAGECOMPONENTSINSIDE.
REFERSERVICINGTOQUALIFIEDSERVICEPERSONNEL.
Thissymbolwarnstheuserthatuninsulatedvoltagewithintheunitmaybesufcienttocauseelectrical
shock.Therefore,itisdangeroustomakeanykindofcontactwithanypartinsideoftheunit.
Thissymbolalertstheuserthatimportantinformationconcerningtheoperationandmaintenanceofthis
unithasbeenprovided.
Theinformationshouldbereadcarefullytoavoidproblems.
WARNING:TOPREVENTFIREORSHOCK,DONOTEXPOSETHISUNITTORAINORMOISTURE.
DONOTUSETHISUNIT’SPLUGWITHANEXTENSIONCORDORINANOUTLETUNLESSALLTHEPRONGS
CANBEFULLYINSERTED.
DOC Compliance Notice (for Canada only)
ThisClassBdigitalapparatuscomplieswithCanadianICES-003.
Machine Noise Information Regulation - 3. GPSGV,
Thehighestsoundpressurelevelislessthan70dB(A)inaccordancewithENISO7779.
CAUTION
Avoiddisplayingstationaryimagesforaprolongedperiodoftime.
DoingsocanresultintheseimagesbeingtemporarilysustainedonthesurfaceoftheLCDpanel.
Ifthisshouldhappen,continuetouseyourprojector.Thestaticbackgroundfrompreviousimageswill
disappear.
Disposing of your used product
EU-widelegislationasimplementedineachMemberStaterequiresthatusedelectricalandelectronicprod-
uctscarryingthemark(left)mustbedisposedofseparatelyfromnormalhouseholdwaste.Thisincludes
projectorsandtheirelectricalaccessoriesorlamps.Whenyoudisposeofsuchproducts,pleasefollowthe
guidanceofyourlocalauthorityand/orasktheshopwhereyoupurchasedtheproduct.
Aftercollectingtheusedproducts,theyarereusedandrecycledinaproperway.Thiseffortwillhelpus
reducethewastesaswellasthenegativeimpactsuchasmercurycontainedinalamptothehumanhealth
andtheenvironmentattheminimumlevel.
ThemarkontheelectricalandelectronicproductsonlyappliestothecurrentEuropeanUnionMemberStates.

ii
Important Information
WARNING TO CALIFORNIA RESIDENTS:
Handlingthecablessuppliedwiththisproductwillexposeyoutolead,achemicalknowntotheStateofCalifornia
tocausebirthdefectsorotherreproductiveharm.WASHHANDSAFTERHANDLING.
RF Interference (for USA only)
WARNING
TheFederalCommunicationsCommissiondoesnotallowanymodicationsorchangestotheunitEXCEPTthose
speciedbyNECDisplaySolutionsofAmerica,Inc.inthismanual.Failuretocomplywiththisgovernmentregu-
lationcouldvoidyourrighttooperatethisequipment.Thisequipmenthasbeentestedandfoundtocomplywith
thelimitsforaClassBdigitaldevice,pursuanttoPart15oftheFCCRules.Theselimitsaredesignedtoprovide
reasonableprotectionagainstharmfulinterferenceinaresidentialinstallation.Thisequipmentgenerates,uses,and
canradiateradiofrequencyenergyand,ifnotinstalledandusedinaccordancewiththeinstructions,maycause
harmfulinterferencetoradiocommunications.However,thereisnoguaranteethatinterferencewillnotoccurina
particularinstallation.
Ifthisequipmentdoescauseharmfulinterferencetoradioortelevisionreception,whichcanbedeterminedby
turningtheequipmentoffandon,theuserisencouragedtotrytocorrecttheinterferencebyoneormoreofthe
followingmeasures:
• Reorientorrelocatethereceivingantenna.
• Increasetheseparationbetweentheequipmentandreceiver.
• Connecttheequipmentintoanoutletonacircuitdifferentfromthattowhichthereceiverisconnected.
• Consultthedealeroranexperiencedradio/TVtechnicianforhelp.
ForUKonly:InUK,aBSapprovedpowercordwithmouldedplughasaBlack(veAmps)fuseinstalledforusewith
thisequipment.Ifapowercordisnotsuppliedwiththisequipmentpleasecontactyoursupplier.
Important Safeguards
Thesesafetyinstructionsaretoensurethelonglifeofyourprojectorandtopreventreandshock.Pleasereadthem
carefullyandheedallwarnings.
Installation
• Donotplacetheprojectorinthefollowingconditions:
- Outdoors
- onanunstablecart,stand,ortable.
- nearwater,baths,ordamprooms.
- indirectsunlight,nearheaters,orheatradiatingappliances.
- inadusty,smokyorsteamyenvironment.
- onasheetofpaperorcloth,rugsorcarpets.
• Donotinstallandstoretheprojectorinthebelowcircumstances.Failuretodosomaycauseofmalfunction.
- Inpowerfulmagneticelds
- Incorrosivegasenvironment
• Ifyouwishtohavetheprojectorinstalledontheceiling:
- Donotattempttoinstalltheprojectoryourself.
- Theprojectormustbeinstalledbyqualiedtechniciansinordertoensureproperoperationandreducetherisk
ofbodilyinjury.
- Inaddition,theceilingmustbestrongenoughtosupporttheprojectorandtheinstallationmustbeinaccordance
withanylocalbuildingcodes.
- Pleaseconsultyourdealerformoreinformation.
iii
Important Information
WARNING
• Donotplaceanyobjects,whichareeasilyaffectedbyheat,infrontoftheprojectionwindow.Doingsocould
leadtotheobjectmeltingfromtheheatthatisemittedfromthelightoutput.
• Donotuseaspraycontainingammablegastogetridofaccumulateddustanddirtontheltersandtheprojection
window.Itmaycauseofre.
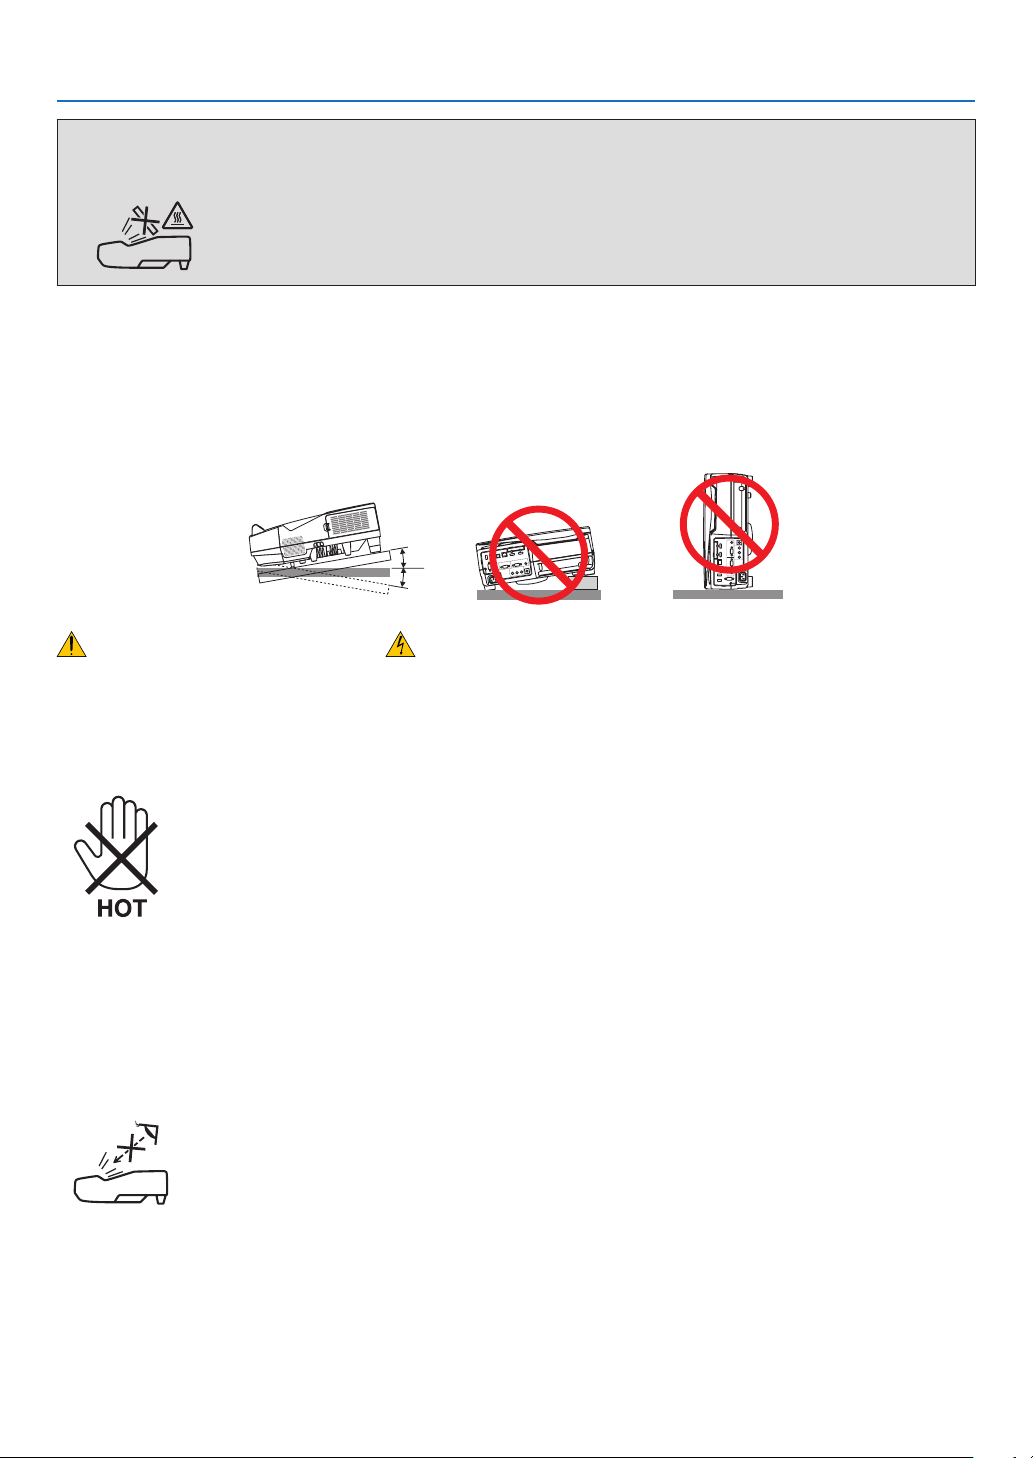
Place the projector in a horizontal position
Thetiltangleoftheprojectorshouldnotexceed10degrees,norshouldtheprojectorbeinstalledinanywayother
thanthedesktopandceilingmount,otherwiselamplifecoulddecreasedramatically.
+10˚
−10˚
Fire and Shock Precautions
• Ensurethatthereissufcientventilationandthatventsareunobstructedtopreventthebuild-upofheatinsideyour
projector.Allowatleast4inches(10cm)ofspacebetweenyourprojectorandawall.
• Donottrytotouchtheexhaustventasitcanbecomeheatedwhiletheprojectoristurnedonandimmediatelyafter
theprojectoristurnedoff.Partsoftheprojectormaybecometemporarilyheatediftheprojectoristurnedoffwith
thePOWERbuttonoriftheACpowersupplyisdisconnectedduringnormalprojectoroperation.
Usecautionwhenpickinguptheprojector.
• Preventforeignobjectssuchaspaperclipsandbitsofpaperfromfallingintoyourprojector.Donotattempttoretrieve
anyobjectsthatmightfallintoyourprojector.Donotinsertanymetalobjectssuchasawireorscrewdriverintoyour
projector.Ifsomethingshouldfallintoyourprojector,disconnectitimmediatelyandhavetheobjectremovedbya
qualiedservicepersonnel.
• Donotplaceanyobjectsontopoftheprojector.
• Donottouchthepowerplugduringathunderstorm.Doingsocancauseelectricalshockorre.
• Theprojectorisdesignedtooperateonapowersupplyof100-240VAC50/60Hz.Ensurethatyourpowersupply
tsthisrequirementbeforeattemptingtouseyourprojector.
• Donotlookintotheprojectionwindowwhiletheprojectorison.Seriousdamagetoyoureyescouldresult.
• Keepanyitemssuchasmagnifyingglassoutofthelightpathoftheprojector.Thelightbeingprojectedfromthe
projectionwindowisextensive,thereforeanykindofabnormalobjectsthatcanredirectlightcomingoutofthe
projectionwindow,cancauseunpredictableoutcomesuchasreorinjurytotheeyes.
• Donotplaceanyobjects,whichareeasilyaffectedbyheat,infrontofaprojectorexhaustvent.
Doingsocouldleadtotheobjectmeltingorgettingyourhandsburnedfromtheheatthatisemittedfromtheexhaust.
• Donotsplashwaterovertheprojector.Doingsocancauseelectricalshockorre.Iftheprojectorgetswet,turnoff
theprojector,unplugthepowercordandhavetheprojectorservicedbyaqualiedservicepersonnel.

iv
Important Information
• Handlethepowercordcarefully.Adamagedorfrayedpowercordcancauseelectricshockorre.
- Donotuseanypowercordotherthantheonesuppliedwiththeprojector.
- Donotbendortugthepowercordexcessively.
- Donotplacethepowercordundertheprojector,oranyheavyobject.
- Donotcoverthepowercordwithothersoftmaterialssuchasrugs.
- Donotheatthepowercord.
- Donothandlethepowerplugwithwethands.
• Turnofftheprojector,unplugthepowercordandhavetheprojectorservicedbyaqualiedservicepersonnelunder
thefollowingconditions:
- Whenthepowercordorplugisdamagedorfrayed.
- Ifliquidhasbeenspilledintotheprojector,orifithasbeenexposedtorainorwater.
- Iftheprojectordoesnotoperatenormallywhenyoufollowtheinstructionsdescribedinthisuser’smanual.
- Iftheprojectorhasbeendroppedorthecabinethasbeendamaged.
- Iftheprojectorexhibitsadistinctchangeinperformance,indicatinganeedforservice.
• Disconnectthepowercordandanyothercablesbeforecarryingtheprojector.
• Turnofftheprojectorandunplugthepowercordbeforecleaningthecabinetorreplacingthelamp.
• Turnofftheprojectorandunplugthepowercordiftheprojectorisnottobeusedforanextendedperiodoftime.
• WhenusingaLANcable(onlymodelswiththeRJ-45LANport):
Forsafety,donotconnecttotheterminalforperipheraldevicewiringthatmighthaveexcessivevoltage.
CAUTION
• Besuretotightenthescrewsafterattachingthecablecover.Failuretodosomaycausethecablecovertocome
offandfall,resultingininjuryordamagetothecablecover.
• Donotputbundledcablesinthecablecover.Doingsomaydamagethepowercord,resultinginare.
• Donotholdthecablecoverwhilemovingtheprojectorordonotapplyexcessiveforcetothecablecover.Doing
somaydamagethecablecover,resultingininjury.
• Donotusethefeetforpurposesotherthanoriginallyintended.Misusessuchasgrippingthetilt-footorhanging
onthewallcancausedamagetotheprojector.
• Donotsendtheprojectorinthesoftcasebyparceldeliveryserviceorcargoshipment.Theprojectorinsidethe
softcasecouldbedamaged.
• Select[HIGH]inFanmodeifyoucontinuetousetheprojectorforconsecutivedays.(Fromthemenu,select
[SETUP]→[OPTIONS(1)]→[FANMODE]→[HIGH].)
• DonotturnofftheACpowerfor60secondsafterthelampisturnedonandwhilethePOWERindicatorisblink-
ingblue.Doingsocouldcauseprematurelampfailure.
Remote Control Precautions
• Handletheremotecontrolcarefully.
• Iftheremotecontrolgetswet,wipeitdryimmediately.
• Avoidexcessiveheatandhumidity.
• Donotshort,heat,ortakeapartbatteries.
• Donotthrowbatteriesintore.
• Ifyouwillnotbeusingtheremotecontrolforalongtime,removethebatteries.
• Ensurethatyouhavethebatteries’polarity(+/−)alignedcorrectly.
• Donotusenewandoldbatteriestogether,orusedifferenttypesofbatteriestogether.
• Disposeofusedbatteriesaccordingtoyourlocalregulations.

v
Important Information
Note for US Residents
Thelampinthisproductcontainsmercury.PleasedisposeaccordingtoLocal,StateorFederalLaws.
Lamp Replacement
• Usethespeciedlampforsafetyandperformance.
• Toreplacethelamp,followallinstructionsprovidedonpage116.
• Besuretoreplacethelampandlterwhenthemessage[THE LAMP HAS REACHED THE END OF ITS USABLE
LIFE. PLEASE REPLACE THE LAMP AND FILTER.]appears.Ifyoucontinuetousethelampafterthelamphas
reachedtheendofitsusablelife,thelampbulbmayshatter,andpiecesofglassmaybescatteredinthelampcase.
Donottouchthemasthepiecesofglassmaycauseinjury.
Ifthishappens,contactyourdealerforlampreplacement.
A Lamp Characteristic
Theprojectorhasadischargelampforspecialpurposesasalightsource.
Alamphasacharacteristicthatitsbrightnessgraduallydecreaseswithage.Alsorepeatedlyturningthelampon
andoffwillincreasethepossibilityofitslowerbrightness.
Theactuallamplifemayvarydependingupontheindividuallamp,theenvironmentalconditionsandusage.
CAUTION:
• DONOTTOUCHTHELAMPimmediatelyafterithasbeenused.Itwillbeextremelyhot.Turntheprojectoroff
andthendisconnectthepowercord.Allowatleastonehourforthelamptocoolbeforehandling.
• Whenremovingthelampfromaceiling-mountedprojector,makesurethatnooneisundertheprojector.Glass
fragmentscouldfallifthelamphasbeenburnedout.
About High Altitude mode
• Set[FANMODE]to[HIGHALTITUDE]whenusingtheprojectorataltitudesapproximately5500feet/1700meters
orhigher.
Usingtheprojectorataltitudesapproximately5500feet/1700metersorhigherwithoutsettingto[HIGHALTITUDE]
cancausetheprojectortooverheatandtheprotectorcouldshutdown.Ifthishappens,waitacoupleminutesand
turnontheprojector.
• Usingtheprojectorataltitudeslessthanapproximately5500feet/1700metersandsettingto[HIGHALTITUDE]
cancausethelamptoovercool,causingtheimagetoicker.Switch[FANMODE]to[AUTO].
• Usingtheprojectorataltitudesapproximately5500feet/1700metersorhighercanshortenthelifeofopticalcom-
ponentssuchasthelamp.
About Copyright of original projected pictures:
Pleasenotethatusingthisprojectorforthepurposeofcommercialgainortheattractionofpublicattentioninavenue
suchasacoffeeshoporhotelandemployingcompressionorexpansionofthescreenimagewiththefollowingfunc-
tionsmayraiseconcernabouttheinfringementofcopyrightswhichareprotectedbycopyrightlaw.
[ASPECTRATIO],[KEYSTONE],Magnifyingfeatureandothersimilarfeatures.
Turkish RoHS information relevant for Turkish market
EEE Yonetmeliğine Uygundur.
Thisdeviceisnotintendedforuseinthedirecteldofviewatvisualdisplayworkplaces.Toavoidincommodingreec-
tionsatvisualdisplayworkplacesthisdevicemustnotbeplacedinthedirecteldofview.

vi
Important Information
Power management function
Theprojectorhaspowermanagementfunctions.Toreducepowerconsumption,thepowermanagementfunctions(1
and2)arefactorypresetasshownbelow.TocontroltheprojectorfromanexternaldeviceviaaLANorserialcable
connection,usetheon-screenmenutochangethesettingsfor1and2.
1. STANDBY MODE (Factory preset: NORMAL)
To control the projector from an external device, select [NETWORK STANDBY] for [STANDBY MODE].
NOTE:
• When[NORMAL]isselectedfor[STANDBYMODE],thefollowingconnectorsandfunctionswillnotwork:
MONITOROUTconnector,AUDIOOUTconnector,LANfunctions,MailAlertfunction,DDC/CI(VirtualRemoteTool).Pleaserefer
topage67aboutdetails.
2. AUTO POWER OFF (Factory preset: 1 hour)
To control the projector from an external device, select [OFF] for [AUTO POWER OFF].
NOTE:
• When[1:00]isselectedfor[AUTOPOWEROFF],youcanenabletheprojectortoautomaticallyturnoffin60minutesifthereis
nosignalreceivedbyanyinputorifnooperationisperformed.
Cautions on using the stylus pen
• Useaatandhardscreenwithascreensizeof100inchesorless.
• Somescreensurfacescanbescratchedbythestyluspentip.Beforeusingthestyluspen,testitinaninconspicuous
partofthescreentobesurethepentipwillnotdamagethescreensurface.
• Donotusethestyluspeninthebelowmentionedareas.
Itmaycauseofmalfunctionofthestyluspen.
- Intheareadirectsunlightstrikesthescreensurfaceandthecameraunit.
- Inthearealightofhalogenorlamentlampsdirectlystrikesthescreensurfaceandthecameraunit.
- Inthecase,materialsreectslightisusedwithinthestyluspenoperationarea.(ex.screenframe)
• Donotusethestyluspeninthebelowmentionedenvironment.Itmaycauseofmalfunctionofthestyluspen.
- Whentheinfraredremoteisused.
Model Number of Wireless LAN unit
WirelessLANunitisanoptionalitem.
Tondtheappropriatemodeltoyourarea,pleasevisitthecompanywebsite:
URL:http://www.nec-display.com/global/support/index.html

vii
Table of Contents
Important Information ............................................................................................ i
1. Introduction ...........................................................................................................1
❶What’sintheBox? ..........................................................................................................1
❷IntroductiontotheProjector ...........................................................................................2
Featuresyou’llenjoy: ................................................................................................2
Aboutthisuser’smanual ........................................................................................... 3
❸PartNamesoftheProjector ...........................................................................................4
TopandScreenSideofProjector .............................................................................4
TerminalPanelSideofProjector ...............................................................................4
RemovingandAttachingtheCableCover ................................................................5
TopFeatures .............................................................................................................7
TerminalPanelFeatures ...........................................................................................8
❹PartNamesoftheRemoteControl ................................................................................9
BatteryInstallation ..................................................................................................10
RemoteControlPrecautions ................................................................................... 10
OperatingRangeforWirelessRemoteControl ....................................................... 10
❺Partnamesofthesuppliedstyluspen..........................................................................11
Chargingthestyluspen ..........................................................................................11
Cautionsonusingthestyluspen ............................................................................11
2. Projecting an Image (Basic Operation) ...............................................12
❶FlowofProjectinganImage .........................................................................................12
❷ConnectingYourComputer/ConnectingthePowerCord ..............................................13
❸TurningontheProjector ...............................................................................................14
NoteonStartupscreen(MenuLanguageSelectscreen) ....................................... 15
❹SelectingaSource .......................................................................................................16
Selectingthecomputerorvideosource..................................................................16
❺AdjustingthePictureSizeandPosition ........................................................................17
Adjustinghorizontal/verticalposition ....................................................................... 18
Adjustingthefocus(Focusring) .............................................................................18
Adjustingthetilt(Tiltfoot) .......................................................................................19
Adjustingthesize[DigitalZoom] ............................................................................. 20
❻CorrectingKeystoneDistortion[KEYSTONE] ..............................................................21
❼OptimizingComputerSignalAutomatically ..................................................................23
AdjustingtheImageUsingAutoAdjust ...................................................................23
❽TurningUporDownVolume .........................................................................................23
❾TurningofftheProjector ...............................................................................................24
❿WhenMovingtheProjector ..........................................................................................25
3. Convenient Features ......................................................................................26
❶TurningofftheImageandSound .................................................................................26
❷FreezingaPicture/ScreenCapture ..............................................................................26
Savingtheprojectedscreenimagestemporarilyonthebuild-inmemory/
ScreenCapture ....................................................................................................... 27
❸MagnifyingaPicture .....................................................................................................28
❹ChangingEcoMode/CheckingEnergy-SavingEffect .................................................29

viii
Table of Contents
UsingEcoMode[ECOMODE] ...............................................................................29
CheckingEnergy-SavingEffect[CARBONMETER] ..............................................30
❺Using4-PointCornertoCorrectKeystoneDistortion[CORNERSTONE] ....................31
Cornerstone ............................................................................................................31
Pincushion ..............................................................................................................33
❻PreventingtheUnauthorizedUseoftheProjector[SECURITY] ..................................35
❼ConnectingYourMicrophone ........................................................................................ 38
❽OperatingYourComputer’sMouseFunctionsfromtheProjector’sRemoteControl
viatheUSBCable(RemoteMouseFunction) ........................................................39
❾ProjectingYourComputer’sScreenImagefromtheProjectorviatheUSBCable
(USBDisplay) .........................................................................................................40
❿Usingthestyluspen(Calibration) .................................................................................42
AutomaticCalibration ..............................................................................................42
ManualCalibration ..................................................................................................42
RemotePen ............................................................................................................43
4. Using On-Screen Menu .................................................................................44
❶UsingtheMenus ...........................................................................................................44
MenuElements .......................................................................................................45
❷ListofMenuItems ........................................................................................................46
❸MenuDescriptions&Functions[SOURCE] .................................................................49
COMPUTER ...........................................................................................................49
HDMI1/MHLandHDMI2 .........................................................................................49
VIDEO ..................................................................................................................... 49
USB-B .....................................................................................................................49
APPS ......................................................................................................................49
❹MenuDescriptions&Functions[ADJUST] ................................................................... 50
[PICTURE] ..............................................................................................................50
[IMAGEOPTIONS] .................................................................................................53
[AUDIO] ................................................................................................................... 57
❺MenuDescriptions&Functions[SETUP] ..................................................................... 58
[GENERAL] ............................................................................................................. 58
[MENU] ...................................................................................................................60
[INSTALLATION] .....................................................................................................62
[OPTIONS(1)] .........................................................................................................65
[OPTIONS(2)] .........................................................................................................67
❻MenuDescriptions&Functions[INFO.] .......................................................................70
[USAGETIME] ........................................................................................................70
[SOURCE(1)] ..........................................................................................................71
[SOURCE(2)] ..........................................................................................................71
[WIREDLAN] ..........................................................................................................71
[WIRELESSLAN] ...................................................................................................72
[VERSION(1)] .........................................................................................................72
[VERSION(2)] .........................................................................................................72
[OTHERS] ...............................................................................................................73
❼MenuDescriptions&Functions[RESET] ..................................................................... 74
ReturningtoFactoryDefault[RESET] ....................................................................74

ix
Table of Contents
5. Installation and Connections ....................................................................75
❶SettingUptheScreenandtheProjector ......................................................................75
❷MakingConnections .....................................................................................................77
ConnectingYourComputer .....................................................................................77
ConnectinganExternalMonitor .............................................................................79
ConnectingYourDVDPlayerorOtherAVEquipment ............................................. 80
ConnectingComponentInput .................................................................................81
ConnectingHDMIInput...........................................................................................82
Connectingasmartphoneandatabletterminal ....................................................83
Connectingyourdocumentcamera ........................................................................84
Tableprojection .......................................................................................................84
ConnectingtoaWiredLAN ....................................................................................85
ConnectingtoaWirelessLAN(Optional:NP05LMseries) ..................................... 86
6. APPS MENU .........................................................................................................88
❶WhatcanyoudowiththeAPPSMENU? .....................................................................88
7. User Supportware ............................................................................................92
❶SoftwareIncludedonCD-ROM ....................................................................................92
❷ProjectingYourComputer’sScreenImagefromtheProjectoroveraLAN(Image
ExpressUtilityLite) .................................................................................................93
StartingImageExpressUtilityLitefromaUSBMemoryorSDCard .....................96
❸ProjectinganImagefromanAngle(GeometricCorrectionToolinImageExpress
UtilityLite) ...............................................................................................................98
WhatyoucandowithGCT .....................................................................................98
ProjectinganImagefromanAngle(GCT) ..............................................................98
❹ControllingtheProjectoroveraLAN(PCControlUtilityPro4/Pro5) ........................101
❺UsingtheComputerCable(VGA)toOperatetheProjector(VirtualRemoteTool) ....105
❻ProjectingphotosordocumentssavedonthesmartphoneoverawirelessLAN
(WirelessImageUtility) .........................................................................................111
8. Maintenance .....................................................................................................112
❶CleaningtheFilters.....................................................................................................112
❷CleaningtheProjectionWindow ................................................................................. 115
❸CleaningtheCabinet ..................................................................................................115
❹ReplacingtheLampandtheFilters ............................................................................ 116
9. Appendix ..............................................................................................................122
❶Troubleshooting ..........................................................................................................122
IndicatorMessages ............................................................................................... 122
CommonProblems&Solutions ............................................................................124
Ifthereisnopicture,orthepictureisnotdisplayedcorrectly. ............................... 125
❷Specications .............................................................................................................126
❸CabinetDimensions ...................................................................................................128
❹Mountingthewirelessreceiver(soldseparately) .......................................................129
❺PinAssignmentsofD-SubCOMPUTERInputTerminal ............................................130
❻CompatibleInputSignalList .......................................................................................131

x
Table of Contents
❼PCControlCodesandCableConnection ..................................................................132
❽UpdatetheSoftware ...................................................................................................133
❾TroubleshootingCheckList ......................................................................................... 135
❿TCOCertication ........................................................................................................137
⓫REGISTERYOURPROJECTOR!(forresidentsintheUnitedStates,Canada,and
Mexico) .................................................................................................................138

1
1. Introduction
❶ What’s in the Box?
Makesureyourboxcontainseverythinglisted.Ifanypiecesaremissing,contactyourdealer.
Pleasesavetheoriginalboxandpackingmaterialsifyoueverneedtoshipyourprojector.
Projector
Cable cover (24FU2001)
(attached to the projector
at the time of shipment →
page 5)
Remote control
(7N901121)
Batteries (AAA × 2)
Power cord
(US: 7N080240/7N080243)
(EU: 7N080027/7N080029)
Computer cable (VGA)
(7N520089)
Wireless receiver strap
Stylus Pen × 2
(7N901111)
USB cable (for charging a stylus pen)
(7N520090)
USB cable (5m)
(7N520091)
For North America only
Limited warranty
For customers in Europe:
You will find our current valid Guar-
antee Policy on our Web Site:
www.nec-display-solutions.com
• ImportantInfomation(ForNorth
America: 7N8N5641) (For Other
countries than North America:
7N8N5641 and 7N8N5651)
• QuickSetupGuide(7N8N5661)/
(7N8N5671)
NEC Projector CD-ROM
User’s manual (PDF) and the utility
software
(7N952151)
NOTE:
• Performcalibrationforthestyluspenbeforeusingit.

2
1. Introduction
❷ Introduction to the Projector
Thissectionintroducesyoutoyournewprojectoranddescribesthefeaturesandcontrols.
Features you’ll enjoy:
• Ultrashortthrowdistances
Ultrashortfocallensesprovideforalargerimageusingashorterthrowdistancewhencomparedtoatypical
projectorlens.
Max110",throwdistance:51cm/20inches
(Thethrowdistancereferstothedistancebetweenthescreenandthescreensideoftheprojector)
• Quickstart(6seconds*
1
),QuickPowerOff,DirectPowerOff
6seconds*
1
afterturningonthepower,theprojectorisreadytodisplayPCorvideoimages.
Theprojectorcanbeputawayimmediatelyaftertheprojectorispowereddown.Nocooldownperiodisrequired
aftertheprojectoristurnedofffromtheremotecontrolorcabinetcontrolpanel.
Theprojectorhasafeaturecalled“DirectPowerOff”.Thisfeatureallowstheprojectortobeturnedoff(evenwhen
projectinganimage)byusingtheMainPowerSwitchordisconnectingtheACpowersupply.
ToturnofftheACpowersupplywhentheprojectorispoweredon,useapowerstripequippedwithaswitchand
abreaker.
*
1
Thequickstarttimeisonlywhen[STANDBYMODE]issetto[NETWORKSTANDBY]intheon-screenmes-
sage.
• 0.22W(100-130VAC)/0.39W(200-240VAC)instandbyconditionwithenergysavingtechnology
Selecting[NORMAL]for[STANDBYMODE]fromthemenucanputtheprojectorinpower-savingmodethatcon-
sumesonly0.22W(100-130VAC)/0.39W(200-240VAC).
• CarbonMeter
Thisfeaturewillshowenergy-savingeffectintermsofCO
2
emissionreduction(kg)whentheprojector’s[ECO
MODE]issetto[AUTOECO],[NORMAL],or[ECO].
TheamountofCO
2
emissionreductionwillbedisplayedintheconrmationmessageatthetimeofpower-offand
intheINFOoftheon-screenmenu.
• Lamplifeupto6000hours
UsinginEcoMode(ECO)allowsyoutoprolongtheprojector’slamplifeupto6000hours(upto3800hoursin
ECOMODEOFF).
• TwoHDMIinputssupportsdigitalsignals
ThetwoHDMIinputsprovideHDCPcompatibledigitalsignals.TheHDMIinputalsosupportsaudiosignal.
• Projecttheimageonasmartphoneandatablet
SincetheprojectorsupportsMHL(MobileHigh-denitionLink),itcanprojectvideosandphotosonasmartphone
andatabletterminalbyconnection,andoutputtheirsoundfromthebuilt-inspeaker.
• 20Wbuilt-inspeakerforanintegratedaudiosolution
Powerful20wattmonauralspeakerprovidesvolumeneedforlargerooms.
• MICInputprovided
AMICinputjackforacommerciallyavailabledynamicmicrophoneisusefulforyourpresentationinaconference
roomorlectureinaclassroom.
• Thestyluspensuppliedwiththeprojectorcanbeusedtoconvertyourwhiteboardintoavirtualtouch
screen.
Bythestyluspen,it'sabletodirectlywrite-intotheprojectedimagethatrealizesmoreeffectivepresentationand
lecture.

3
1. Introduction
• Correspondtovariousinstallation
Besidesinstallationonthewall,itcancorrespondvariousinstallationasprojectingimageupontotheceiling,onto
thetable,andontotheoor,etc.
• ThesuppliedremotecontrolallowsyoutoassignaCONTROLIDtotheprojector
Multipleprojectorscanbeoperatedseparatelyandindependentlywiththesamesingleremotecontrolbyassigning
anIDnumbertoeachprojector.
• USBDisplay
UsingtheUSBcable(compatiblewithUSB2.0specications)suppliedwiththeprojectortoconnectthecomputer
withtheprojectorallowsyoutosendyourcomputerscreenimagetotheprojectorwithouttheneedofatraditional
computercable(VGA).
• IntegratedRJ-45terminalforwirednetworkingcapabilityalongwithwirelessnetworkingcapabilities
AnRJ-45terminalisstandard.AnoptionalUSBWirelessLANUnitisrequiredforwirelessLANconnection.
• Softwareprograms(UserSupportware)containedinthesuppliedCD-ROM
ThesuppliedNECProjectorincludesthreeprograms:VirtualRemoteTool,ImageExpressUtilityLite(forWindows/
MacOS),andPCControlUtilityPro4(forWindows)/5(forMacOS).
ImageExpressUtilityLite(forWindows)canbestartedfromacommerciallyavailableUSBmemoryorSDcard
withouttheneedofinstallingonyourcomputer.
• AUTOPOWERONandAUTOPOWEROFFfeatures
TheDIRECTPOWERON,AUTOPOWERON,AUTOPOWEROFF,andOFFTIMERfeatureseliminatetheneed
toalwaysusethePOWERbuttonontheremotecontrolorprojectorcabinet.
• Preventingunauthorizeduseoftheprojector
Enhancedsmartsecuritysettingsforkeywordprotection,cabinetcontrolpanellock,securityslot,andsecurity
chainopeningtohelppreventunauthorizedaccess,adjustmentsandtheftdeterrence.
• HighresolutionuptoWUXGA*
2
Highresolutiondisplay-uptoWUXGAcompatible,WXGAnativeresolution.
*
2
WhenWXGAMODEissettoON.
• CRESTRONROOMVIEWcompatibility
TheprojectorsupportsCRESTRONROOMVIEW,allowingmultipledevicesconnectedinthenetworktobeman-
agedandcontrolledfromacomputerorcontroller.
About this user’s manual
Thefastestwaytogetstartedistotakeyourtimeanddoeverythingrightthersttime.Takeafewminutesnowto
reviewtheuser’smanual.Thismaysaveyoutimelateron.Atthebeginningofeachsectionofthemanualyou’llnd
anoverview.Ifthesectiondoesn’tapply,youcanskipit.
4
1. Introduction
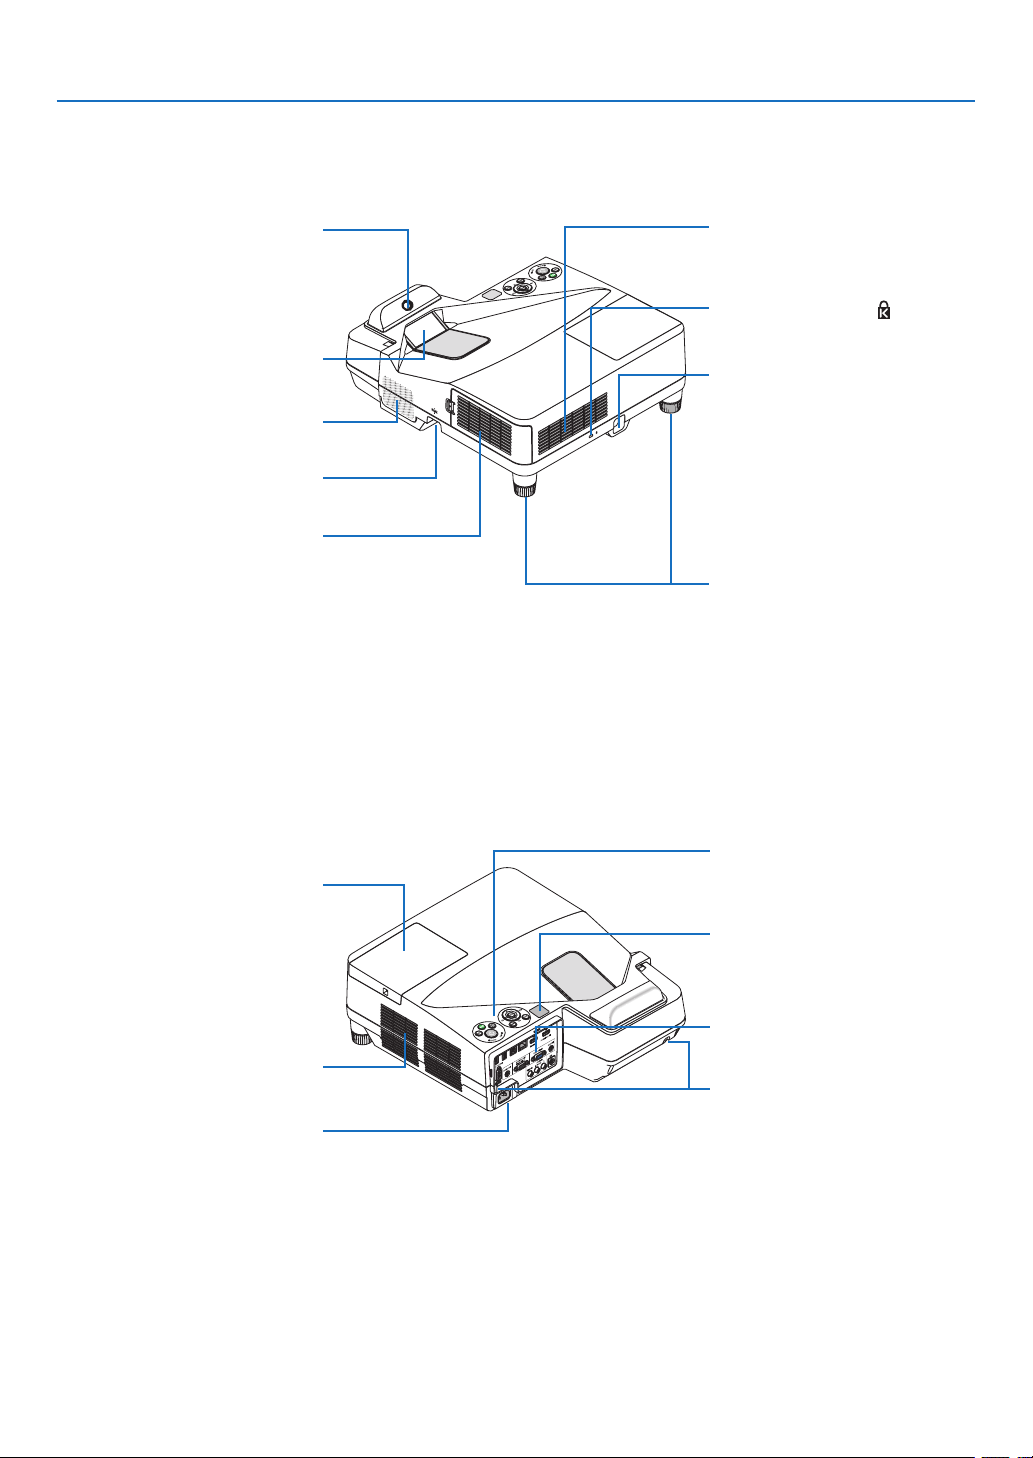
❸ Part Names of the Projector
Top and Screen Side of Projector
Controls
(→ page 7)
FilterCover/IntakeVent/Filter
(→ page 112, 119)
Camera
For utilizing the Whiteboard func-
tion, photograph the screen for
detecting the stylus pen position.
Focus Ring
(→ page 18)
Tilt Foot
(→ page 19)
Built-in Security Slot (
)*
Lamp Cover
(→ page 117)
Security chain opening
Attach an anti-theft device.
The security chain opening accepts
security wires or chains up to 0.18
inch/4.6 mm in diameter.
* Thissecurityslot supportsthe
MicroSaver
®
SecuritySystem.
MonauralSpeaker(20W)
Terminal Panel (→ page 8)
ACInput
Connect the supplied power cord’s
three-pin plug here, and plug the
other end into an active wall outlet.
(→ page 13)
Remote Sensor
(→ page 10)
Screw Hole for Cable Cover (Left/
Right)
(→ page 6)
Terminal Panel Side of Projector
IntakeVent/Filter
(→ page 112, 119)
Exhaust Vent
Projection Window
5
1. Introduction
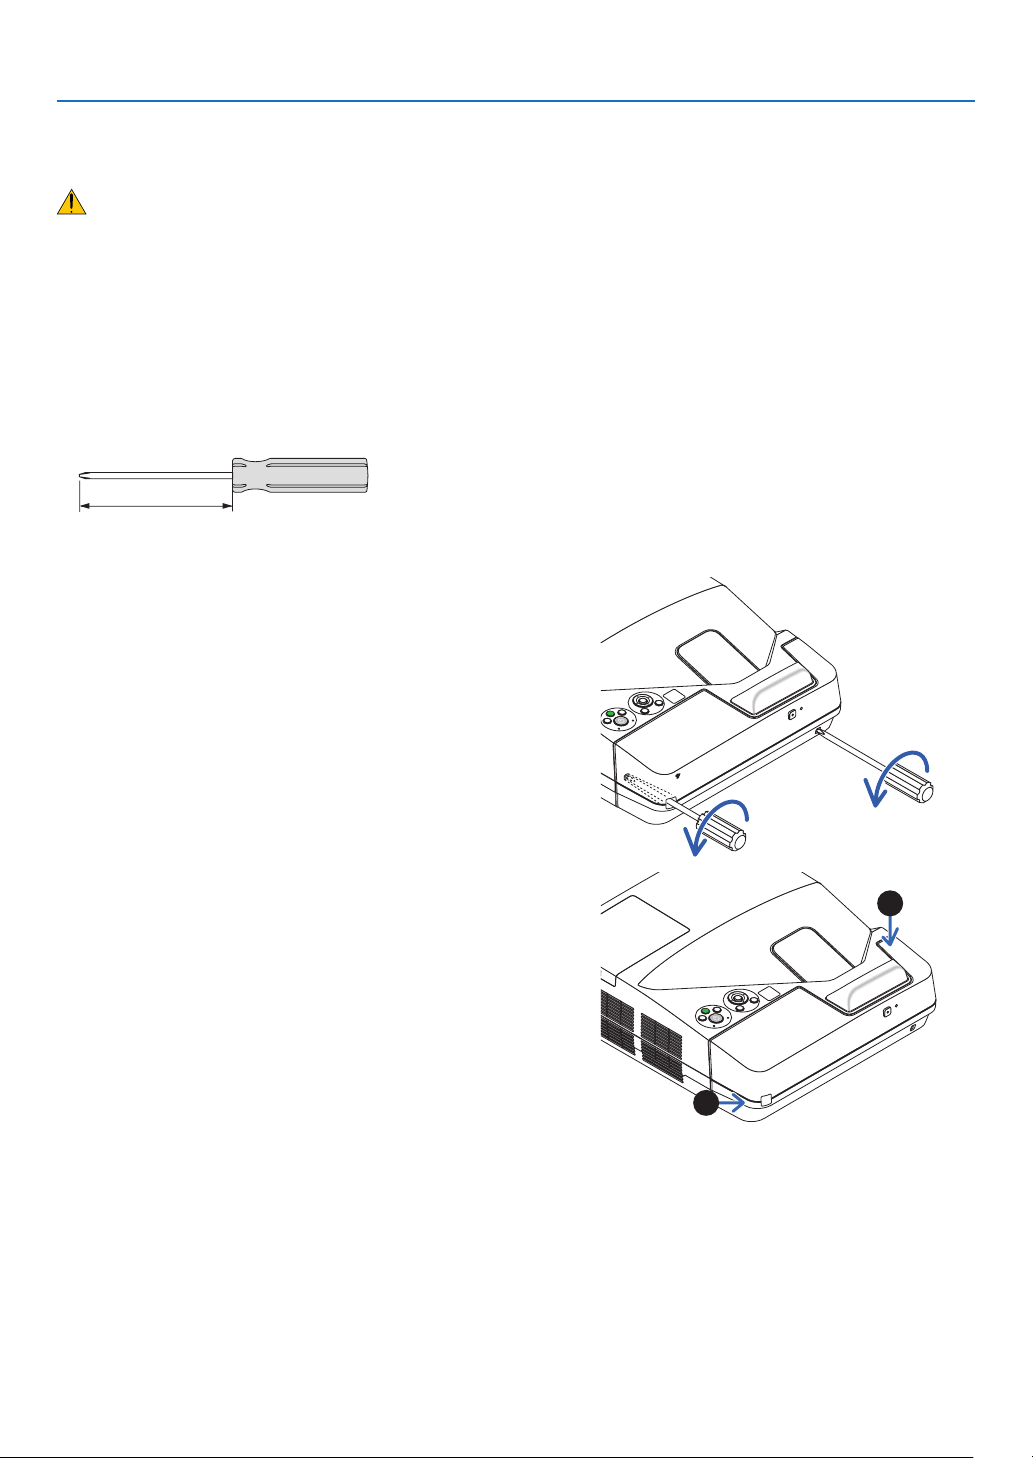
Removing and Attaching the Cable Cover
Afternishingconnections,attachthesuppliedcablecovertoproperlyhidethecables.
CAUTION:
• Besuretotightenthescrewsafterattachingthecablecover.Failuretodosomaycausethecablecovertocome
offandfall,resultingininjuryordamagetothecablecover.
• Donotputbundledcablesinthecablecover.Doingsomaydamagethepowercord,resultinginare.
• Donotholdthecablecoverwhilemovingtheprojectorordonotapplyexcessiveforcetothecablecover.Doingso
maydamagethecablecover,resultingininjury.
Removingthecablecover
Toolneeded:
• Phillipsscrewdriver(plus-head)about9cm/4inchesinlength
9 cm/4 inches
1. Loosen the cable cover screws until the Phillips screw-
driver goes into a freewheeling condition.
•Thesescrewsremaintostay.
2. Remove the cable cover.
❶Push up the cable cover slightly and rotate it to release.
❷Pull the cable cover while pushing and holding the arrow
part
Ifyoundittohardtoreleasethecablecover,tryholdingit
slightly up.
1
2
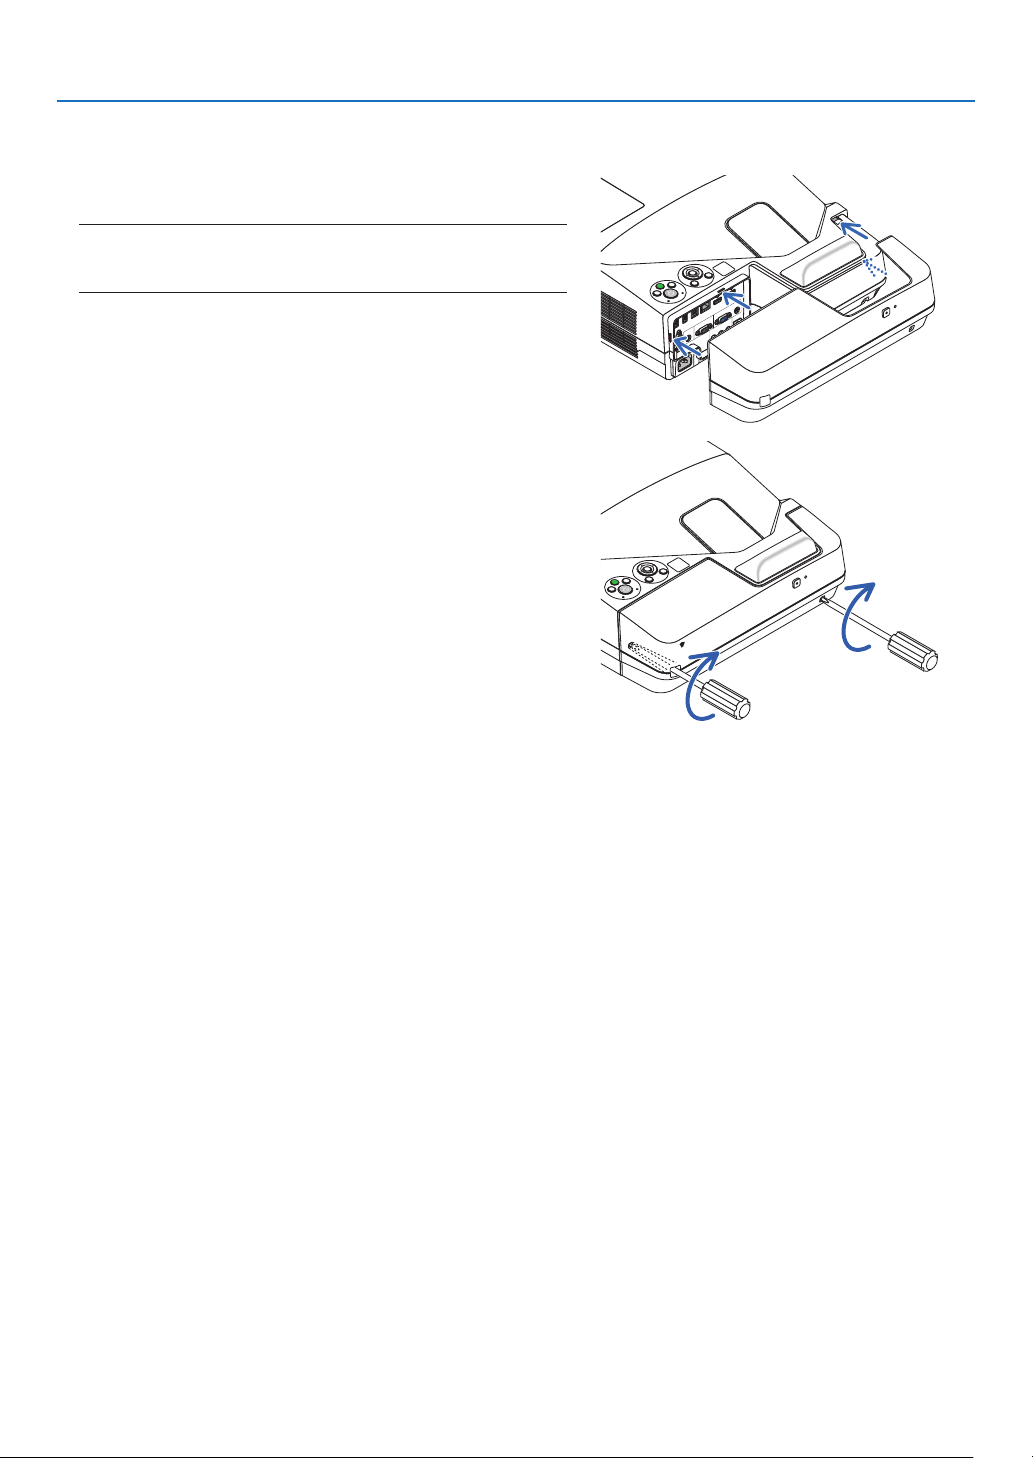
6
1. Introduction
Attachingthecablecover
1. Align four tabs of the cable cover with grooves of the pro-
jector and push the cable cover until you click it.
NOTE:
• Becarefulnottogetcablescaughtinbetweenthecablecoverand
theprojector.
2. Tighten the cable cover screws.
• Besuretotightenthescrews.
7
1. Introduction
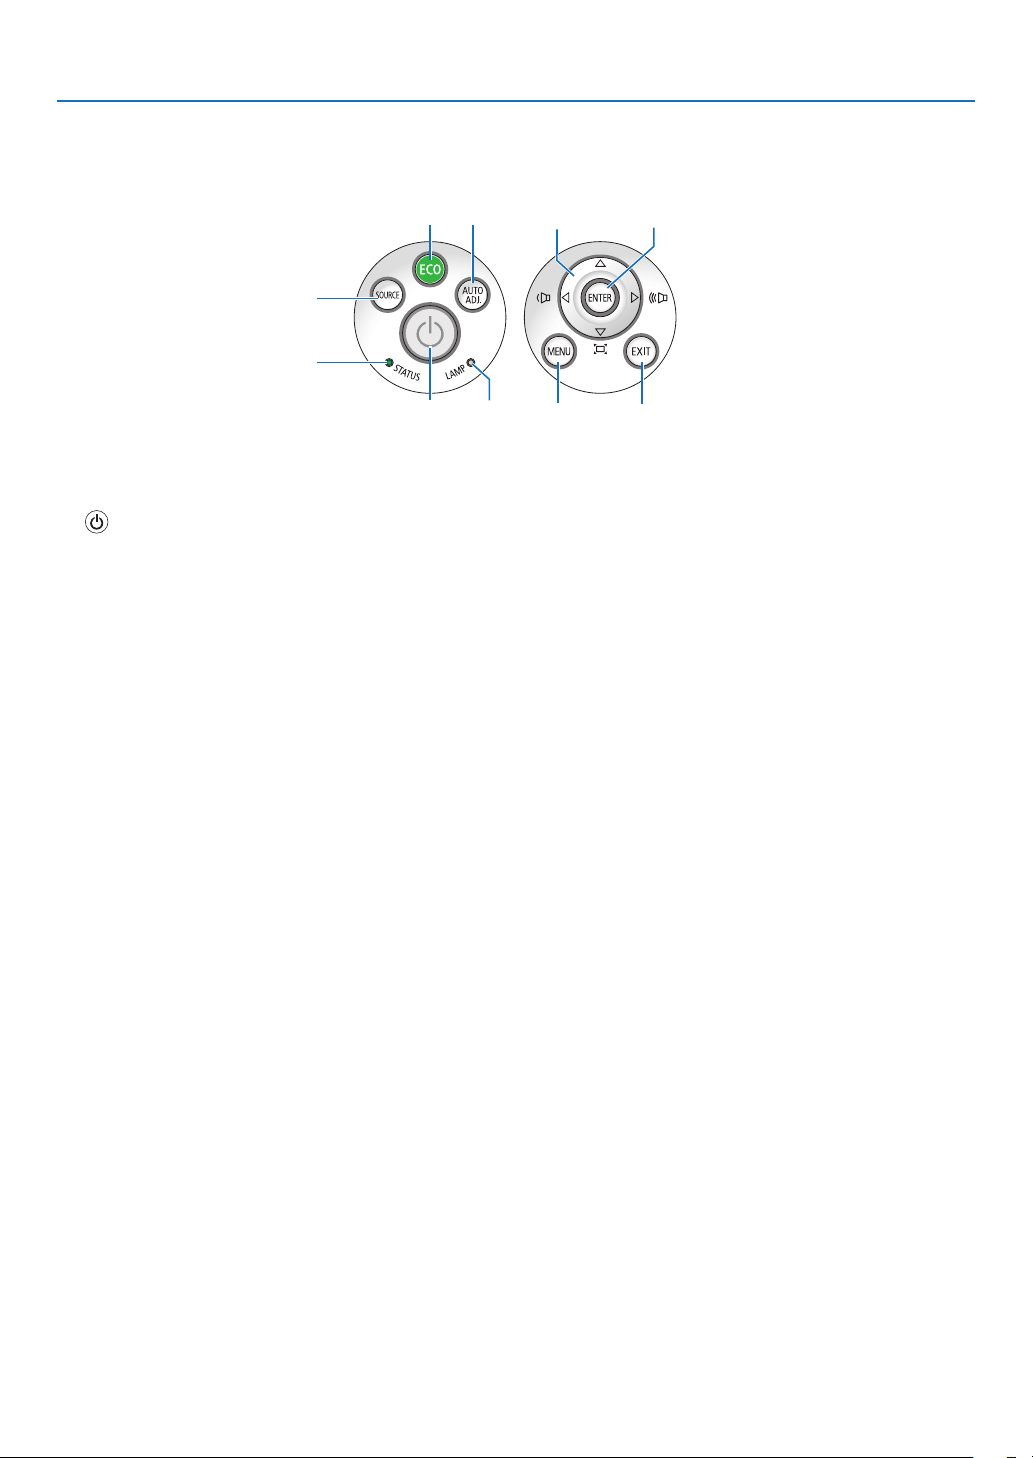
Top Features
1, 2
7
4
8
9
11
5
6
10
3
1. (POWER)Button
(→page14,24)
2. POWER Indicator
(→page13,14,24,122)
3. STATUSIndicator
(→page122)
4. LAMPIndicator
(→page116,122)
5. ECOButton
(→page29)
6. SOURCEButton
(→page16)
7. AUTOADJ.Button
(→page23)
8. MENUButton
(→page44)
9. ▲▼◀▶
/VolumeButtons◀▶/KeystoneButtons
(→page15,21,23,44)
10.ENTERButton
(→page44)
11.EXITButton
(→page44)
8
1. Introduction
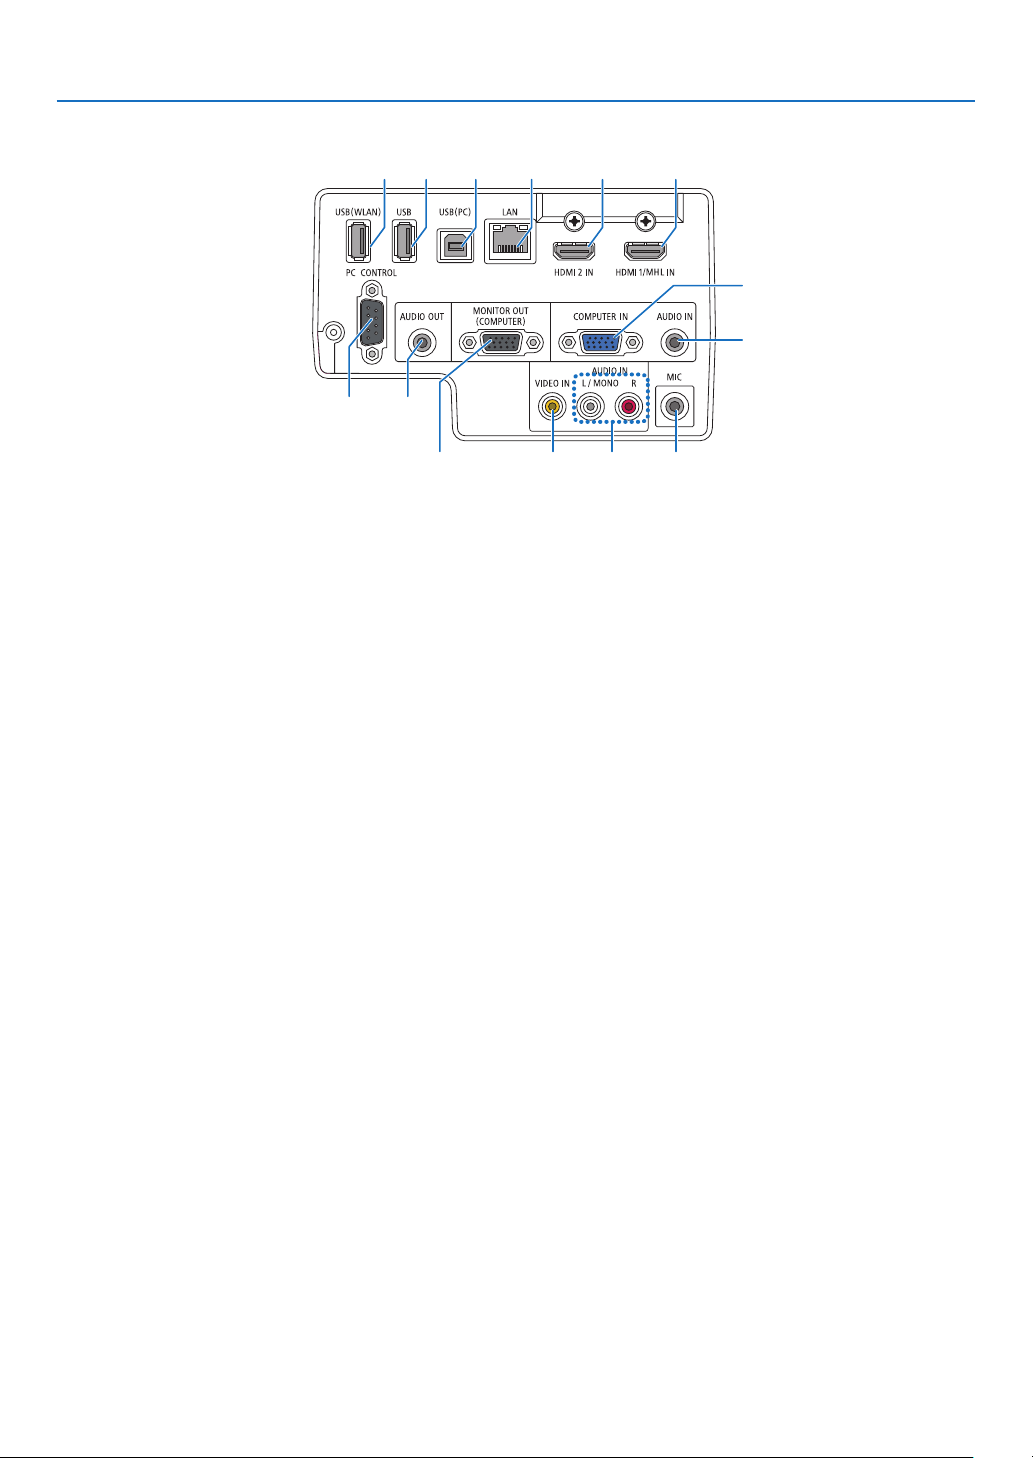
Terminal Panel Features
1. COMPUTERIN/ComponentInputTerminal(Mini
D-Sub15Pin)
(→page77,81,84)
2. COMPUTERAUDIOINMiniJack(StereoMini)
(→page77,78,81)
3. HDMI1/MHLINTerminal(TypeA)
(→page77,78,82,83)
4. HDMI2INTerminal(TypeA)
(→page77,78,82)
5. USB(PC)Port(TypeB)
(→page39,40,77)
6. MONITOROUT(COMPUTER)Terminal(MiniD-
Sub15Pin)
(→page109)
7. AUDIOOUTMiniJack(StereoMini)
(→page109)
8. VIDEOINTerminal(RCA)
(→page80,114)
9. VIDEO/S-VIDEOAUDIOINL/MONO,R(RCA)
(→page80)
10.MICInputJack(MonauralMini)
(→page38)
11.LANPort(RJ-45)
(→page85)
12.USB(WirelessLAN)Port
(→page86)
13.USBPort(TypeA)
(→page89)
14.PCCONTROL[PCCONTROL]Port(D-Sub9Pin)
(→page132)
Usethis port to connect a PC orcontrol system.
Thisenablesyoutocontroltheprojectorusingserial
communicationprotocol.Ifyouarewritingyourown
program,typicalPCcontrolcodesareonpage132.
1
2
45
7
6
9
14
8 10
111312 3
9
1. Introduction
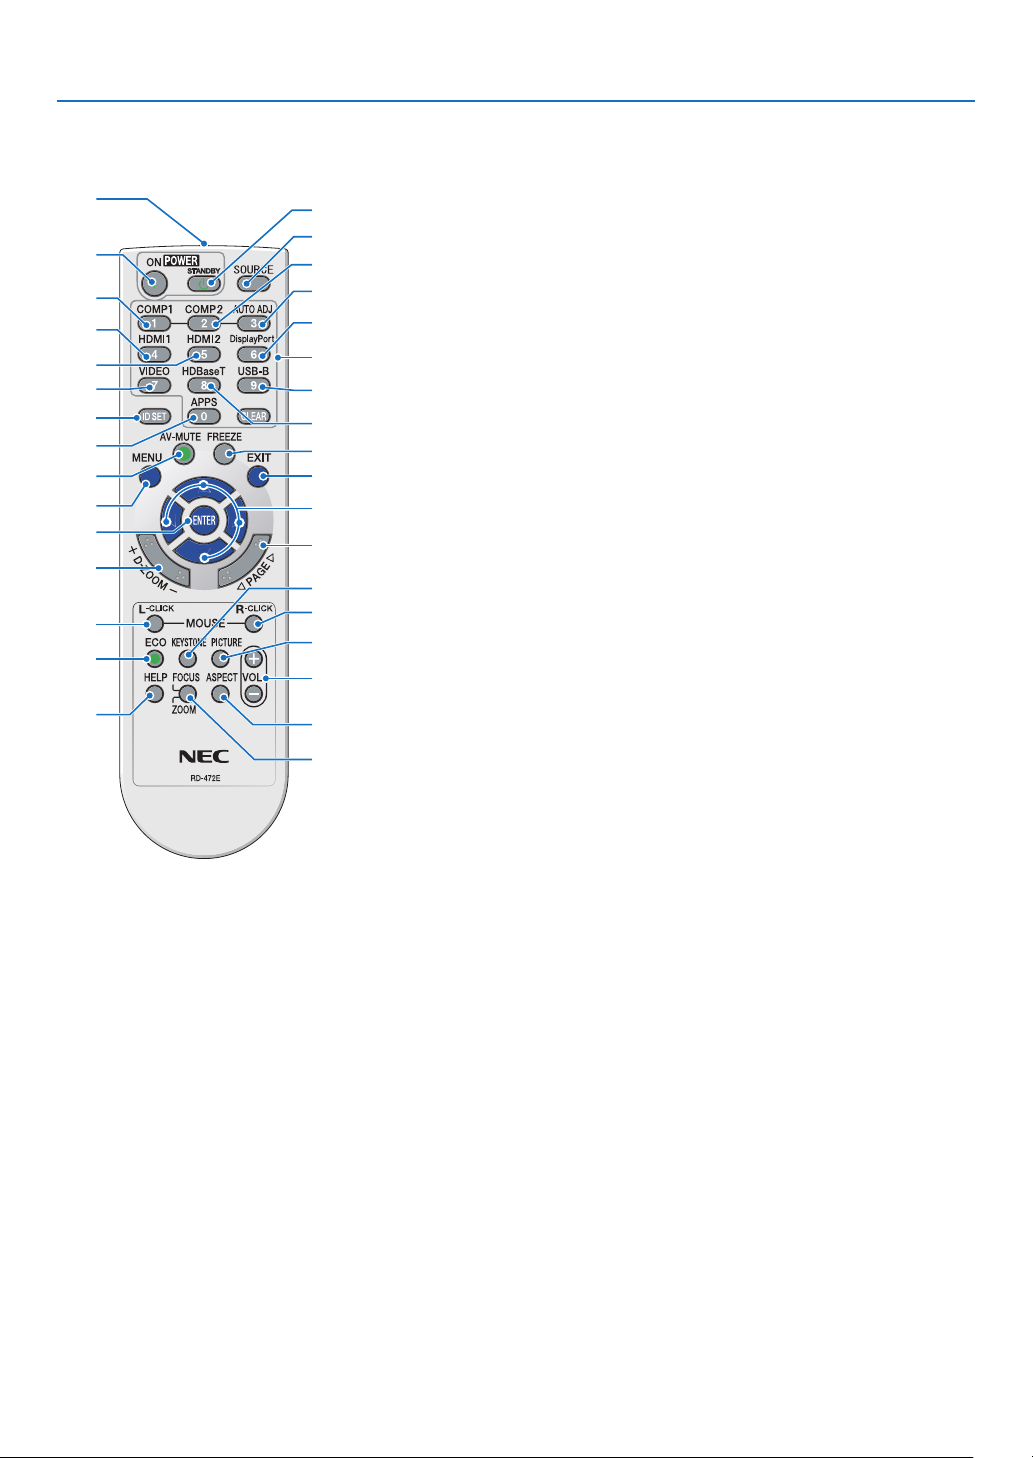
❹ Part Names of the Remote Control
+
3
4
6
7
1
2
10
16
17
15
14
9
5
8
13
30
31
32
20
21
26
28
29
25
24
23
22
27
33
19
18
12
11
1. Infrared Transmitter
(→page10)
2. POWERONButton
(→page14)
3. POWERSTANDBYButton
(→page24)
4. SOURCEButton
(→page16)
5. COMPUTER1Button
(→page16)
6. COMPUTER2Button
(Thisbuttondoesnotworkinthis
seriesofprojectors)
7. AUTOADJ.Button
(→page23)
8. HDMI1/MHLButton
(→page16)
9. HDMI2Button
(→page16)
10.DisplayPortButton
(Thisbuttondoesnotworkinthis
seriesofprojectors)
11.VIDEOButton
(→page16)
12.HDBaseTButton
(Thisbuttondoesnotworkinthis
seriesofprojectors)
13.USB-BButton
(→page16,77)
14.APPSButton
(→page16,88)
15.IDSETButton
(→page63)
16.NumericKeypadButton/
CLEARButton
(→page64)
17.FREEZEButton
(→page26)
18.AV-MUTEButton
(→page26)
19.MENUButton
(→page44)
20.EXITButton
(→page44)
21. ▲▼◀▶Button
(→page44)
22.ENTERButton
(→page44)
23.D-ZOOM(+)(–)Button
(→page28)
24.MOUSEL-CLICKButton*
(→page39)
25.MOUSER-CLICKButton*
(→page39)
26.PAGE▽/△Button
(→page39)
27.ECOButton
(→page29)
28.KEYSTONEButton
(→page31)
29.PICTUREButton
(→page50,52)
30.VOL.(+)(–)Button
(→page23)
31.ASPECTButton
(→page55)
32.FOCUS/ZOOMButton
TheZOOMbuttonwilldisplaythe
DIGITALZOOMbar.
(→page20,58)
TheFOCUSbuttondoesnotwork
onthisseriesofprojectors.
33.HELPButton
(→page70)
* TheMOUSEL-CLICKandMOUSER-CLICKbuttonsworkonlywhenaUSBcableisconnectedwithyourcomputer.
10
1. Introduction
Remote Control Precautions
• Handletheremotecontrolcarefully.
• Iftheremotecontrolgetswet,wipeitdryimmediately.
• Avoidexcessiveheatandhumidity.
• Donotshort,heat,ortakeapartbatteries.
• Donotthrowbatteriesintore.
• Ifyouwillnotbeusingtheremotecontrolforalongtime,removethebatteries.
• Ensurethatyouhavethebatteries’polarity(+/−)alignedcorrectly.
• Donotusenewandoldbatteriestogether,orusedifferenttypesofbatteriestogether.
• Disposeofusedbatteriesaccordingtoyourlocalregulations.
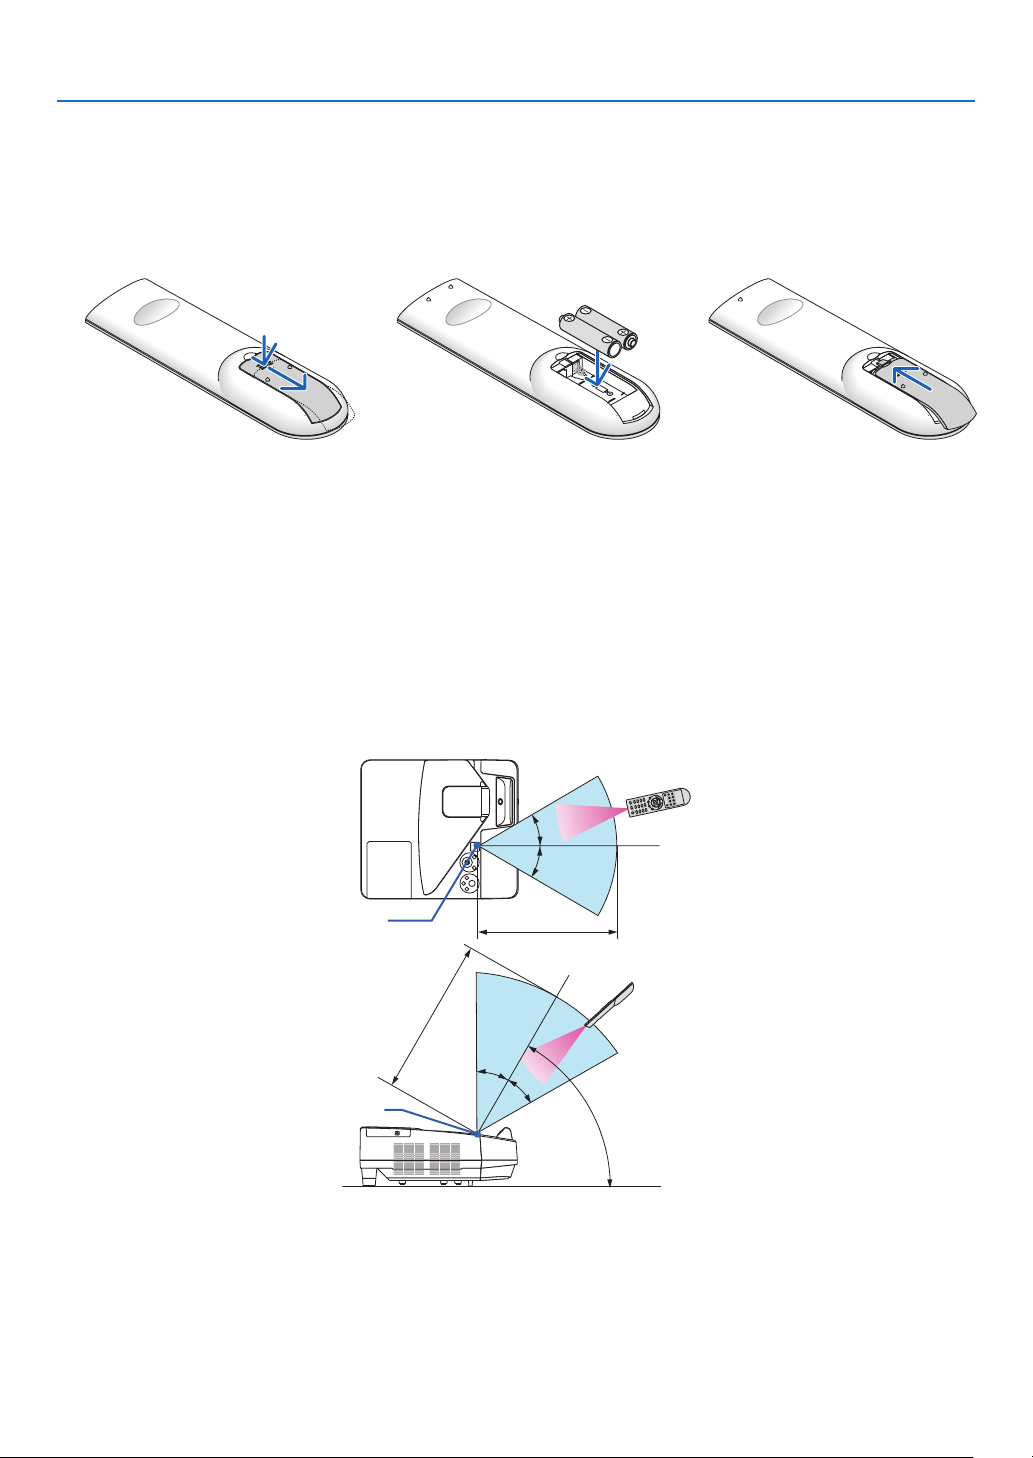
Operating Range for Wireless Remote Control
30°
30°
30°
30°
60°
22 feet/7 m
19.7 feet/6 m
Remote sensor on projector cabinet
Remote sensor on projector cabinet
Remote control
Remote control
• Theinfraredsignaloperatesbyline-of-sightuptoadistanceofabout22feet/7mandwithina60-degreeangleof
theremotesensorontheprojectorcabinet.
• Theprojectorwillnotrespondifthereareobjectsbetweentheremotecontrolandthesensor,orifstronglightfalls
onthesensor.Weakbatterieswillalsopreventtheremotecontrolfromproperlyoperatingtheprojector.
1
Pressrmlyandslidethebattery
coveroff.
2
Installnewbatteries(AAA).Ensure
thatyouhavethebatteries’polarity
(+/−)alignedcorrectly.
Battery Installation
3
Slipthecoverbackoverthebat-
teriesuntilitsnapsintoplace.Do
notmixdifferenttypesofbatteries
ornewandoldbatteries.
OPEN
OPEN
11
1. Introduction
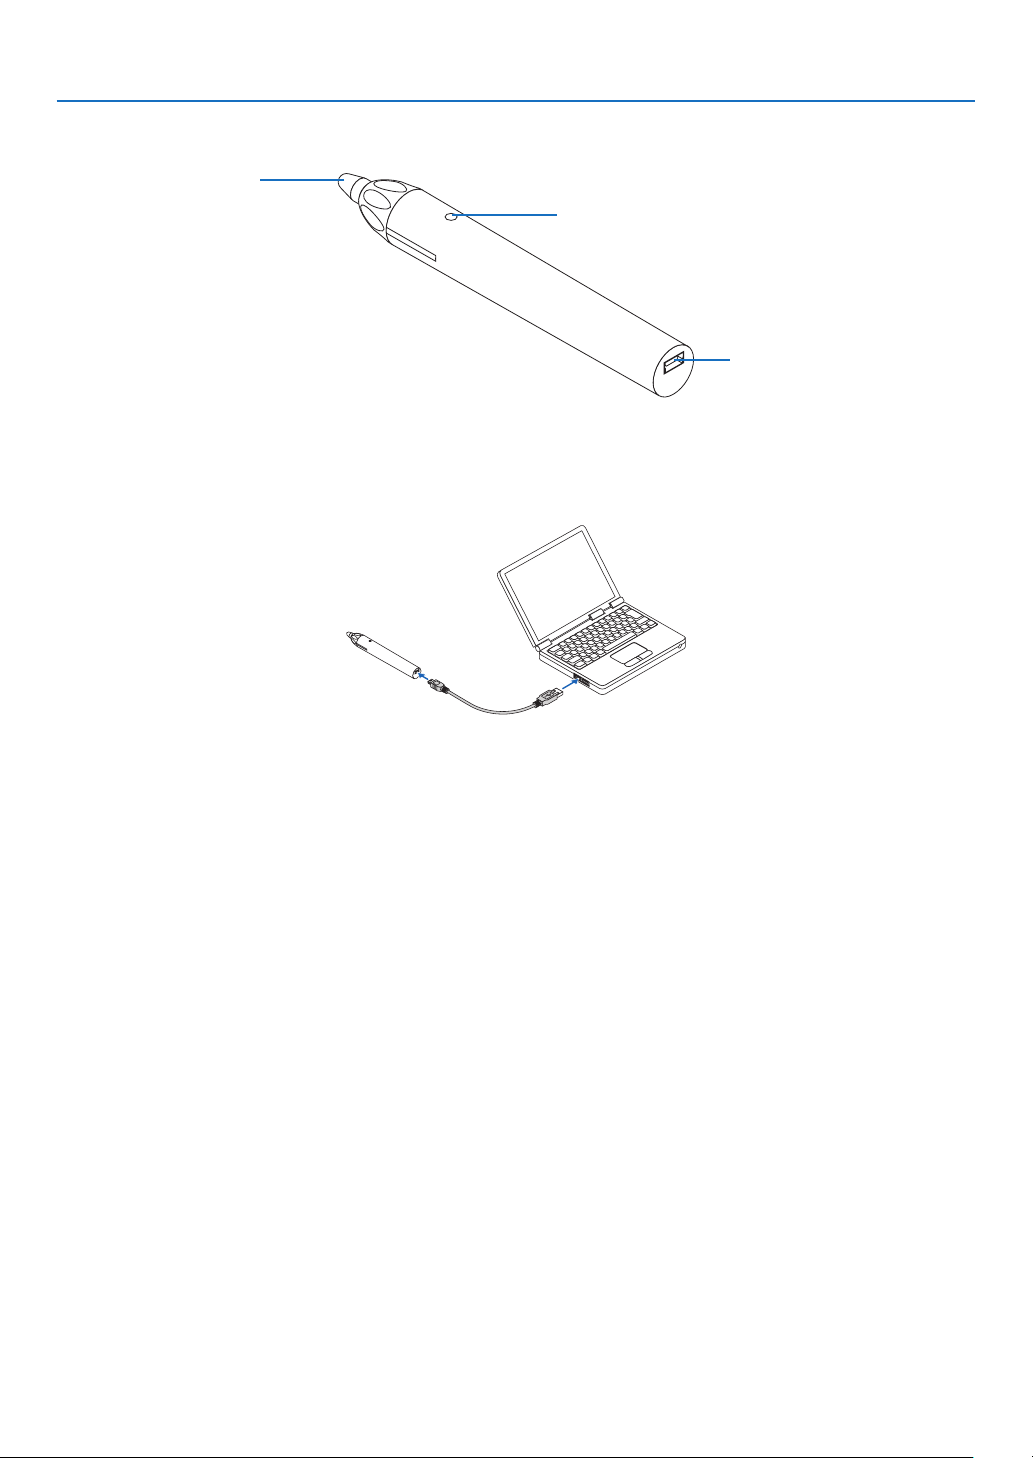
❺ Part names of the supplied stylus pen
Indicator(LED)
Charging port (USB)
Pen tip
Charging the stylus pen
1. Use the supplied USB cable for charging the stylus pen to connect the charging port (USB) of the stylus
pen with the USB port of the computer.
2. Automatically start charging the stylus pen. It takes about 3 minutes to complete.
• PressingthepentipagainstascreenorwhiteboardwillturntheindicatorLEDtored,whichindicatesthat
charging is completed and you are ready to use the stylus pen.
• IftheredLEDturnsoff,chargethestyluspen.
Cautions on using the stylus pen
• Donotdamagethestyluspenbydroppingitontheoorormishandlingit.
• Keepthestyluspenawayfromwaterandotherliquids.Ifthestyluspengetswet,wipethestyluspendryimmediately.
• Avoidheatandhumidityasmuchaspossible.

12
Thissectiondescribeshowtoturnontheprojectorandtoprojectapictureontothescreen.
❶ Flow of Projecting an Image
Step 1
• Connectingyourcomputer/Connectingthepowercord(→ page 13)
Step 2
• Turningontheprojector(→ page 14)
Step 3
• Selectingasource(→ page 16)
Step 4
• Adjustingthepicturesizeandposition(→ page 17)
• Correctingkeystonedistortion[KEYSTONE](→ page 21)
Step 5
• Adjustingapictureandsound
- Optimizing a computer signal automatically (→ page 23)
- Turning up or down volume (→ page 23)
Step 6
• Makingapresentation
Step 7
• Turningofftheprojector(→ page 24)
Step 8
• WhenMovingtheProjector(→ page 25)
2. Projecting an Image (Basic Operation)
13
2. Projecting an Image (Basic Operation)
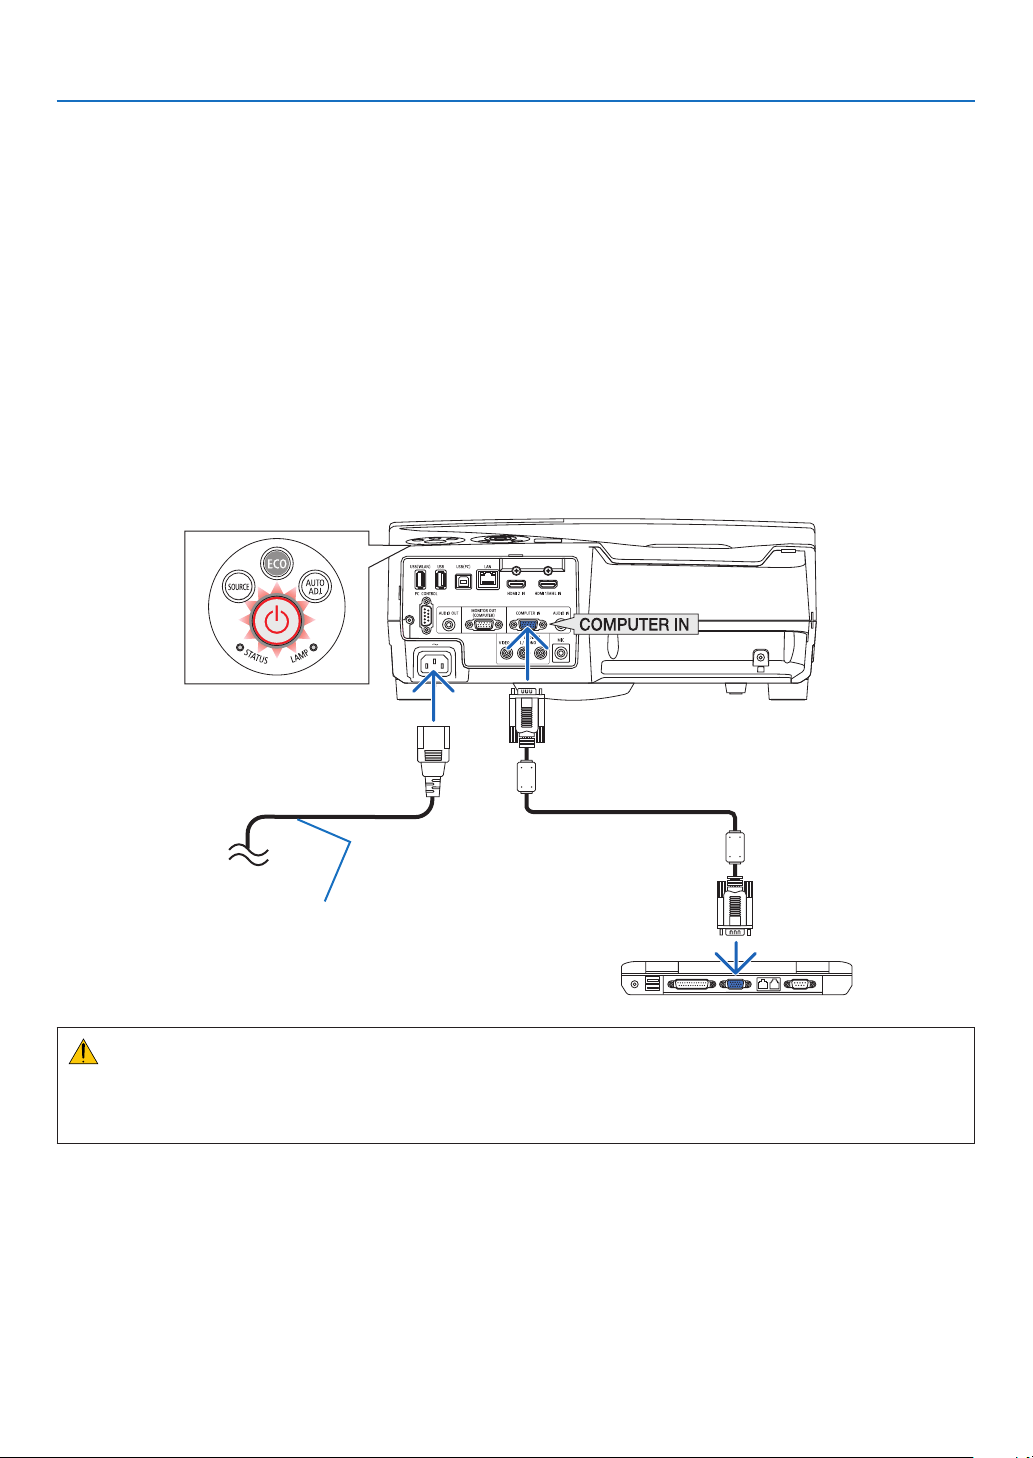
❷ Connecting Your Computer/Connecting the Power Cord
1. Connectyourcomputertotheprojector.
This section will show you a basic connection to a computer. For information about other connections, see “5.
InstallationandConnections”onpage77.
Connectthecomputercable(VGA)betweentheprojector’sCOMPUTERINterminalandthecomputer’sport(mini
D-Sub 15 Pin). Turn two thumb screws of both terminals to fix the computer cable (VGA).
2. Connectthesuppliedpowercordtotheprojector.
Firstconnectthesuppliedpowercord’sthree-pinplugtotheACINoftheprojector,andthenconnecttheother
plug of the supplied power cord in the wall outlet.
The projector’s power indicator will flash for a few seconds and then will light red* (standby mode).
* Thiswillapplyforbothindicatorswhen[NORMAL]isselectedfor[STANDBYMODE].SeethePowerIndicator
section.(→ page 122)
Makesurethattheprongsarefullyinsertedinto
boththeACINandthewalloutlet.
To wall outlet ←
CAUTION:
PartsoftheprojectormaybecometemporarilyheatediftheprojectoristurnedoffwiththePOWERbuttonorifthe
ACpowersupplyisdisconnectedduringnormalprojectoroperation.
Becarefultohandletheprojector.
14
2. Projecting an Image (Basic Operation)
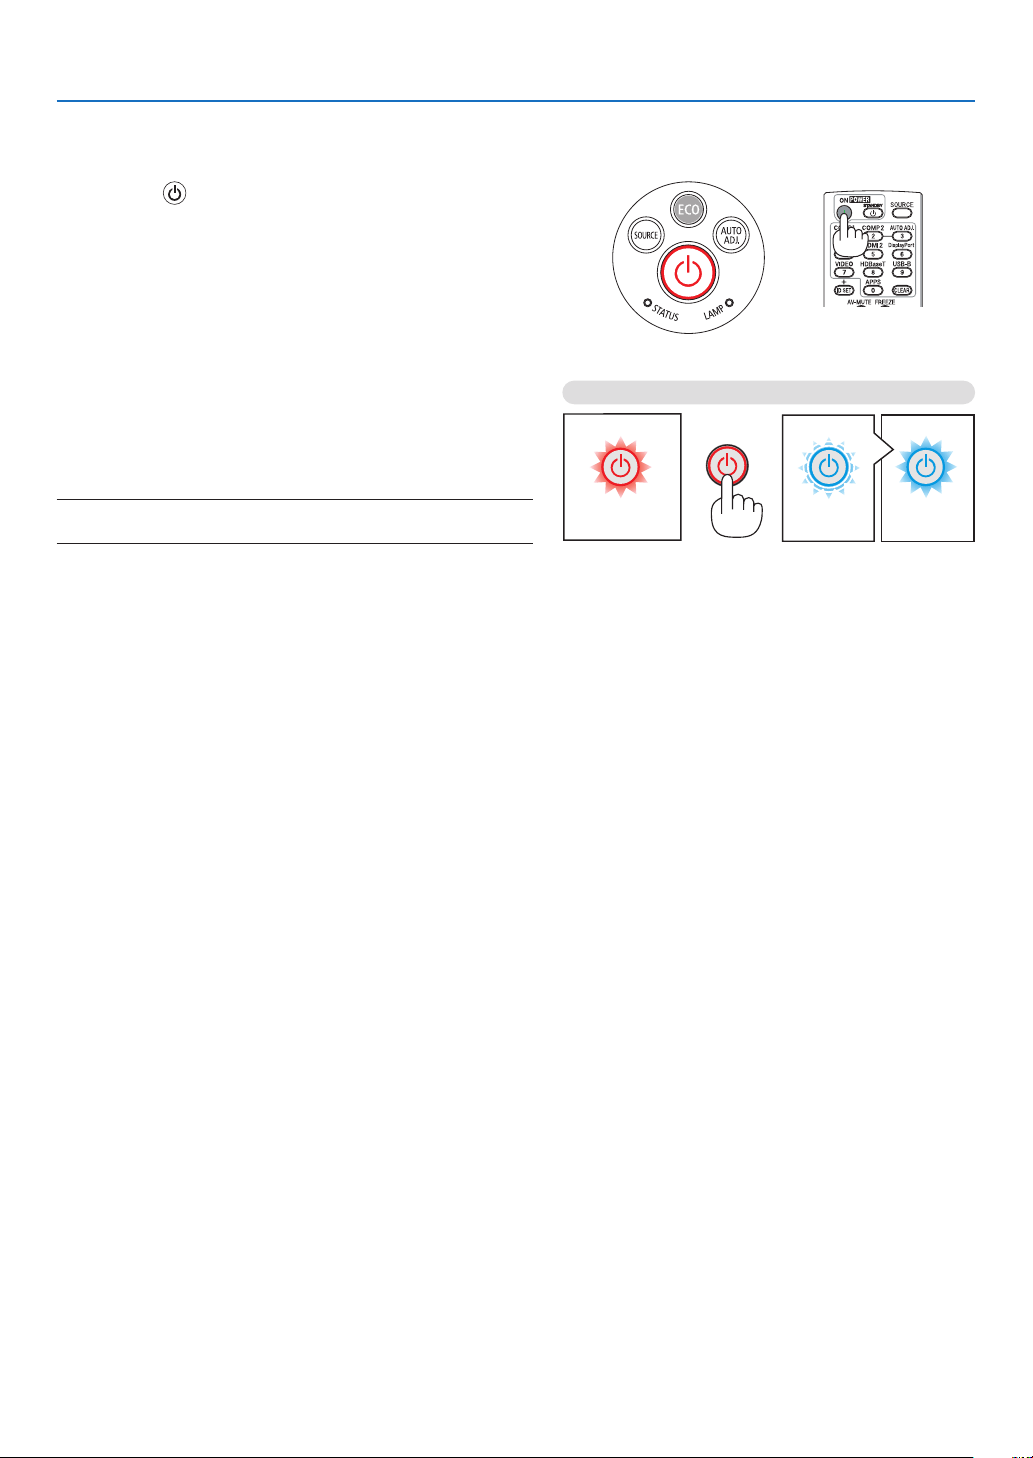
❸ Turning on the Projector
• Pressthe (POWER) button on the projector cabinet
or the POWER ON button on the remote control.
ThePOWERindicatorwillblinkandtheprojectorwillbe-
come ready to use.
TIP:
• Whenthemessage“Projectorislocked!Enteryourpassword.”
isdisplayed,itmeansthatthe[SECURITY]featureisturnedon.
(→page35)
After you turn on your projector, ensure that the computer
or video source is turned on.
NOTE:Whennoinputsignalispresent,theno-signalguidanceis
displayed(factorymenusetting).
(→page122)
Standby Blinking PowerOn
Steady red light Blinking blue light Steady blue light
15
2. Projecting an Image (Basic Operation)
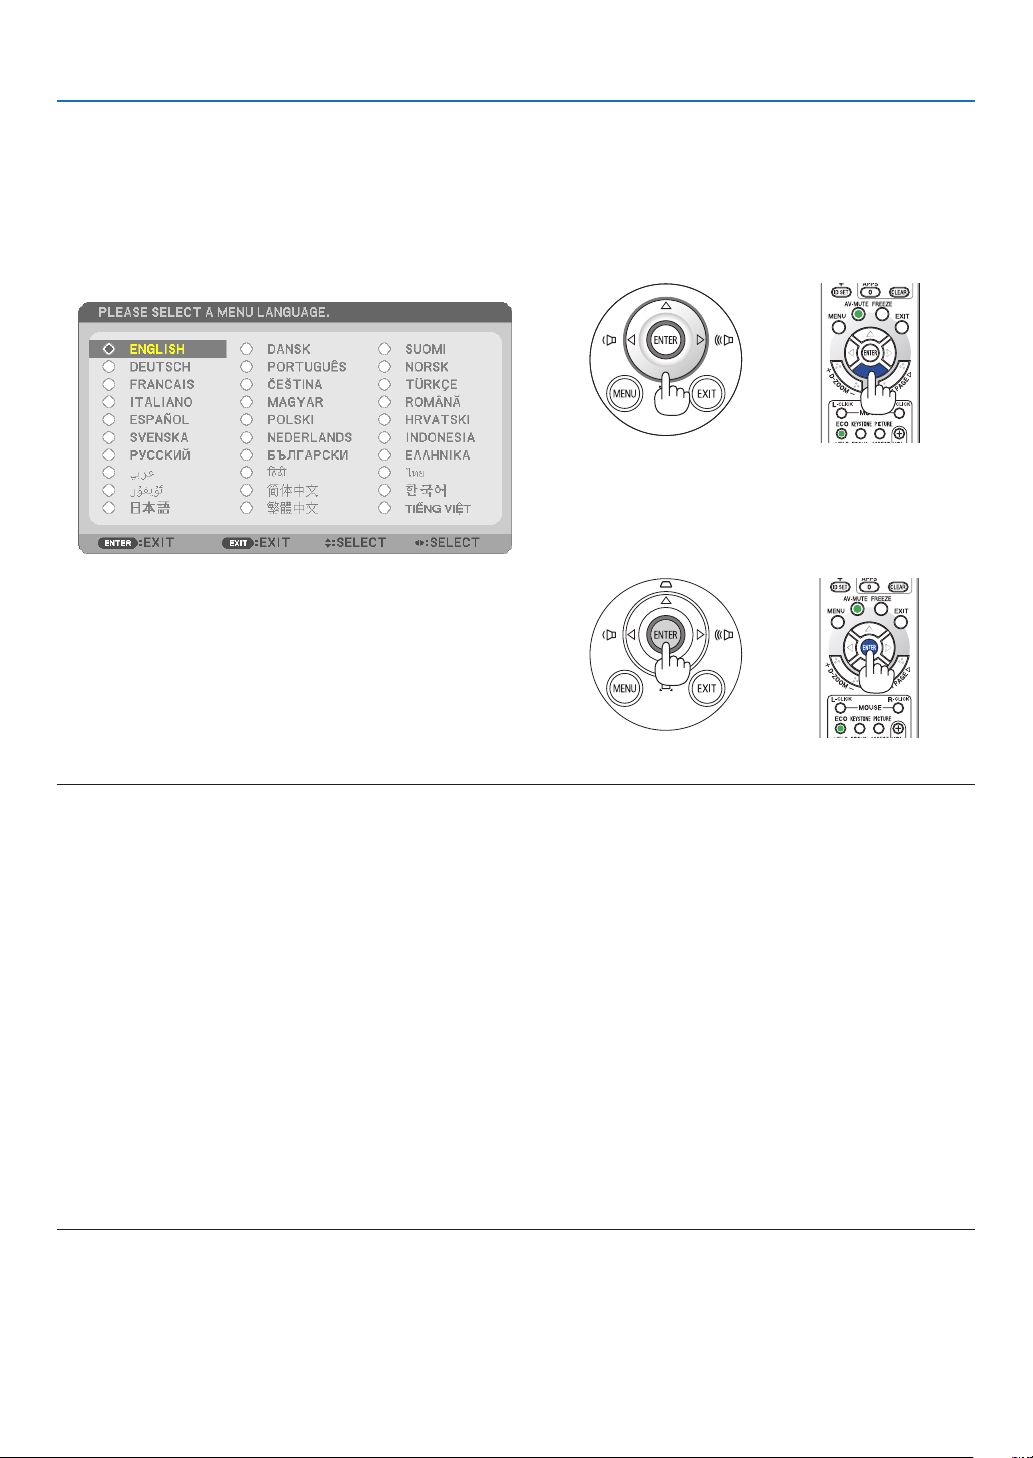
Note on Startup screen (Menu Language Select screen)
Whenyourstturnontheprojector,youwillgettheStartupmenu.Thismenugivesyoutheopportunitytoselectone
ofthe30menulanguages.
Toselectamenulanguage,followthesesteps:
1. Use the ▲, ▼, ◀ or ▶ button to select one of the 30
languages from the menu.
2. Press the ENTER button to execute the selection.
Afterthis has been done,youcan proceedto the menu
operation.
Ifyouwant,youcanselectthemenulanguagelater.
(→[LANGUAGE]onpage46and59)
NOTE:
• IftheprojectorisshutoffbyDIRECTPOWEROFF(pullingoutthepowercord)duringprojection,waitfor1secondatleastfor
reconnectthepowercordforturningontheprojector.
Failingtodosocouldresultinnopowertotheprojector.(Therewillbenostand-byLED)
Shouldthishappen,unplugthepowercordandplugitinagain.Turnonthemainpower.
• Ifoneofthefollowingthingshappens,theprojectorwillnotturnon.
- Iftheinternaltemperatureoftheprojectoristoohigh,theprojectordetectsabnormalhightemperature.Inthisconditionthe
projectorwillnotturnontoprotecttheinternalsystem.Ifthishappens,waitfortheprojector’sinternalcomponentstocool
down.
- Whenthelampreachesitsendofusablelife,theprojectorwillnotturnon.Ifthishappens,replacethelamp.
- IftheSTATUSindicatorlightsorangewiththepowerbuttonpressed,itmeansthatthe[CONTROLPANELLOCK]isturnedon.
Cancelthelockbyturningitoff.(→page62)
- Ifthelampfailstolight,andiftheSTATUSindicatorashesonandoffinacycleofsixtimes,waitafullminuteandthenturn
onthepower.
• WhilethePOWERindicatorisblinkingblueinshortcycles,thepowercannotbeturnedoffbyusingthepowerbutton.
• Immediatelyafterturningontheprojector,screenickermayoccur.Thisisnormal.Wait3to5minutesuntilthelamplightingis
stabilized.
• Whentheprojectoristurnedon,itmaytakesometimebeforethelamplightbecomesbright.
• Ifyouturnontheprojectorimmediatelyafterthelampisturnedofforwhenthelamptemperatureishigh,thefansrunwithout
displayinganimageforsometimeandthentheprojectorwilldisplaytheimage.
16
2. Projecting an Image (Basic Operation)
❹ Selecting a Source
Selecting the computer or video source
NOTE:Turnonthecomputerorvideosourceequipmentconnectedtotheprojector.
DetectingtheSignalAutomatically
PresstheSOURCEbuttononce.Theprojectorwillsearchfortheavail-
ableinputsourceanddisplayit.Theinputsourcewillchangeasfollows:
COMPUTER→HDMI1/MHL→HDMI2→VIDEO→USB-B→APPS
• WiththeSOURCEscreendisplayed,youcanpresstheSOURCE
buttonafewtimestoselecttheinputsource.
TIP:Ifnoinputsignalispresent,theinputwillbeskipped.
UsingtheRemoteControl
PressanyoneoftheCOMPUTER1,HDMI1/MHL,HDMI2,VIDEO,USB-
B,orAPPSbuttons.
SelectingDefaultSource
Youcansothatitwillbedisplayedeachtimetheprojectoristurnedon.
1. Press the MENU button.
The menu will be displayed.
2. Press the ▶buttontwicetoselect[SETUP]andthe▼ button or
theENTERbuttontoselect[GENERAL].
3.
Press the
▶
buttonfourtimestoselect[OPTIONS(2)].
4. Press the ▼buttonvetimestoselect[DEFAULTSOURCESE-
LECT]andpresstheENTERbutton.
The [DEFAULT SOURCE SELECT] screen will be displayed.
(→ page 69)
5.
Select a source as the default source, and press the ENTER button.
6. Press the EXIT button a few times to close the menu.
7. Restart the projector.
The source you selected in step 5 will be projected.
TIP:
• WhentheprojectorisinStandbymode,applyingacomputersignalfroma
computerconnectedtotheCOMPUTERINinputwillpowerontheprojector
andsimultaneouslyprojectthecomputer’simage.
([AUTOPOWERON]→page68)
• OnWindows7,acombinationoftheWindowsandPkeysallowsyoutosetup
externaldisplayeasilyandquickly.
17
2. Projecting an Image (Basic Operation)
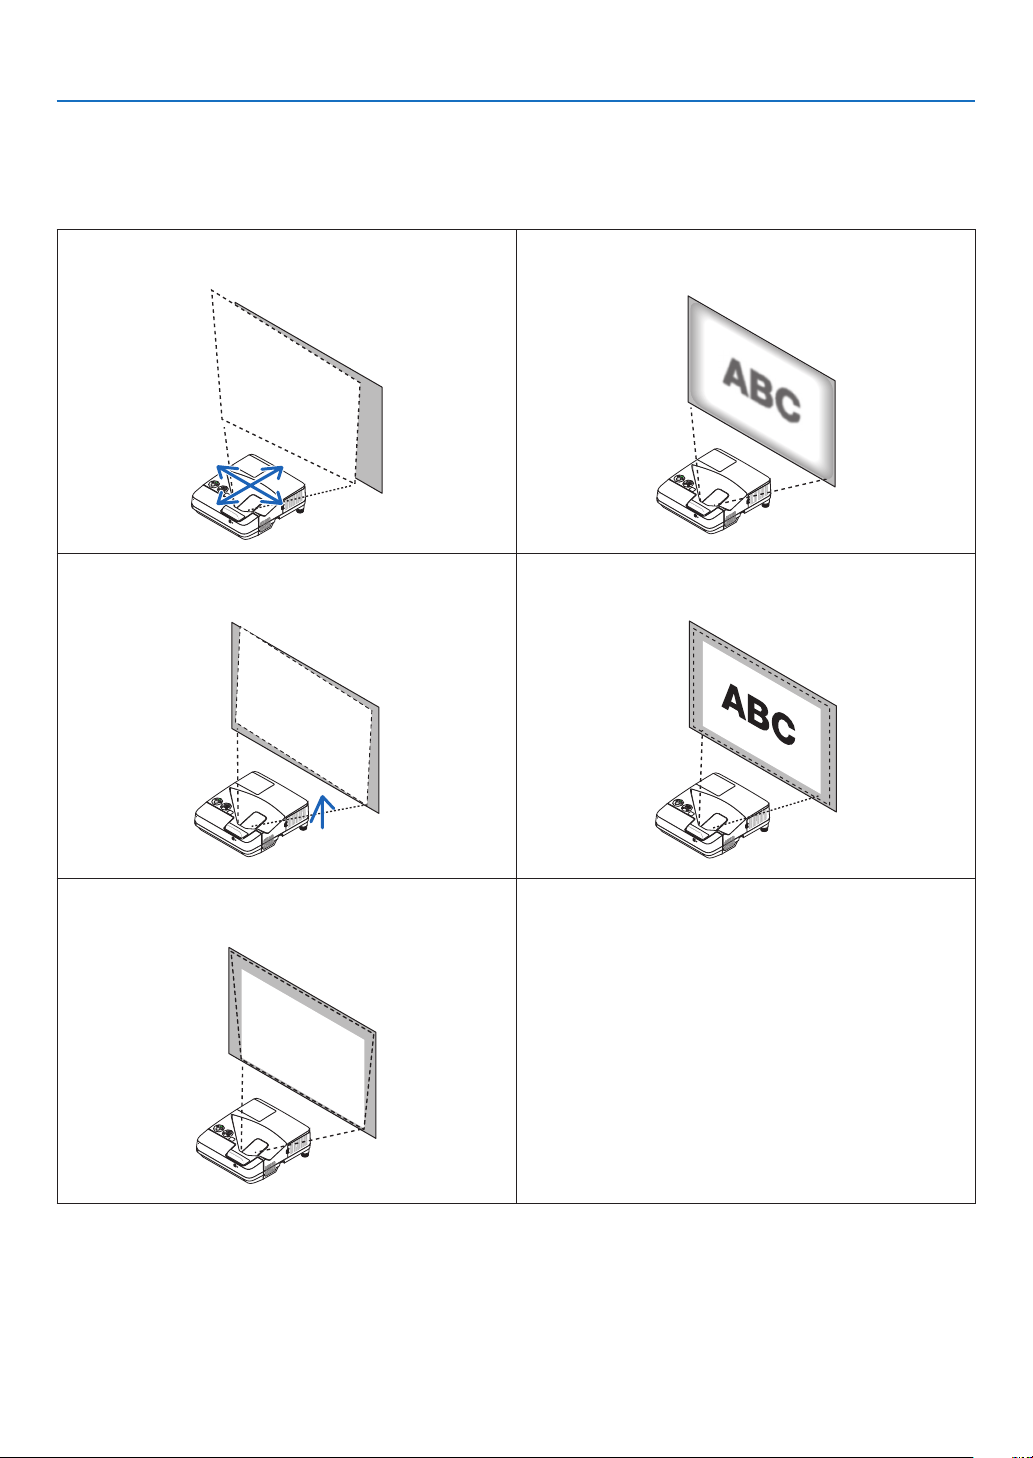
❺ Adjusting the Picture Size and Position
Usetheadjustabletiltfoot,thezoomfunctionorthefocusringtoadjustthepicturesizeandposition.
Inthischapterdrawingsandcablesareomittedforclarity.
Adjustinghorizontal/verticalposition
(→page18)
Adjustingthefocus[Focusring]
(→page18)
Finelyadjustingtheleftandrighttilt[TiltFoot]
(→page19)
Adjustingthesize[DigitalZoom]
(→page20)
Correctingthekeystonedistortion[Keystone]*
(→page21)
* Toperformkeystonecorrectionmanually,see“6.CorrectingKeystoneDistortion[KEYSTONE]”onpage21.

18
2. Projecting an Image (Basic Operation)
Adjusting horizontal/vertical position
Thethrowdistancecanaffectthesizeandtheheightoftheprojectedimage.Beforeinstallingtheprojector,decide
thethrowdistanceaccordingto“SettingUptheScreenandtheProjector”(→page75)
Itisrecommendedtodisplaythetestpatternwhileadjustingtheimage.(→page64)
1. Move the projector back and forth and left and right so that
the image fits the screen width.
Youcanreducetheimagesizeto70%byusing[DIGITALZOOM]
from the menu.
2. Place the projector so that it is parallel with the screen.
Ifthetopsideoftheimageisnotparallelwithitsbottomside,rotate
theprojectorslightlytoadjustit. If the side of theimageshows
outside the screen, move it to the center line of the screen.
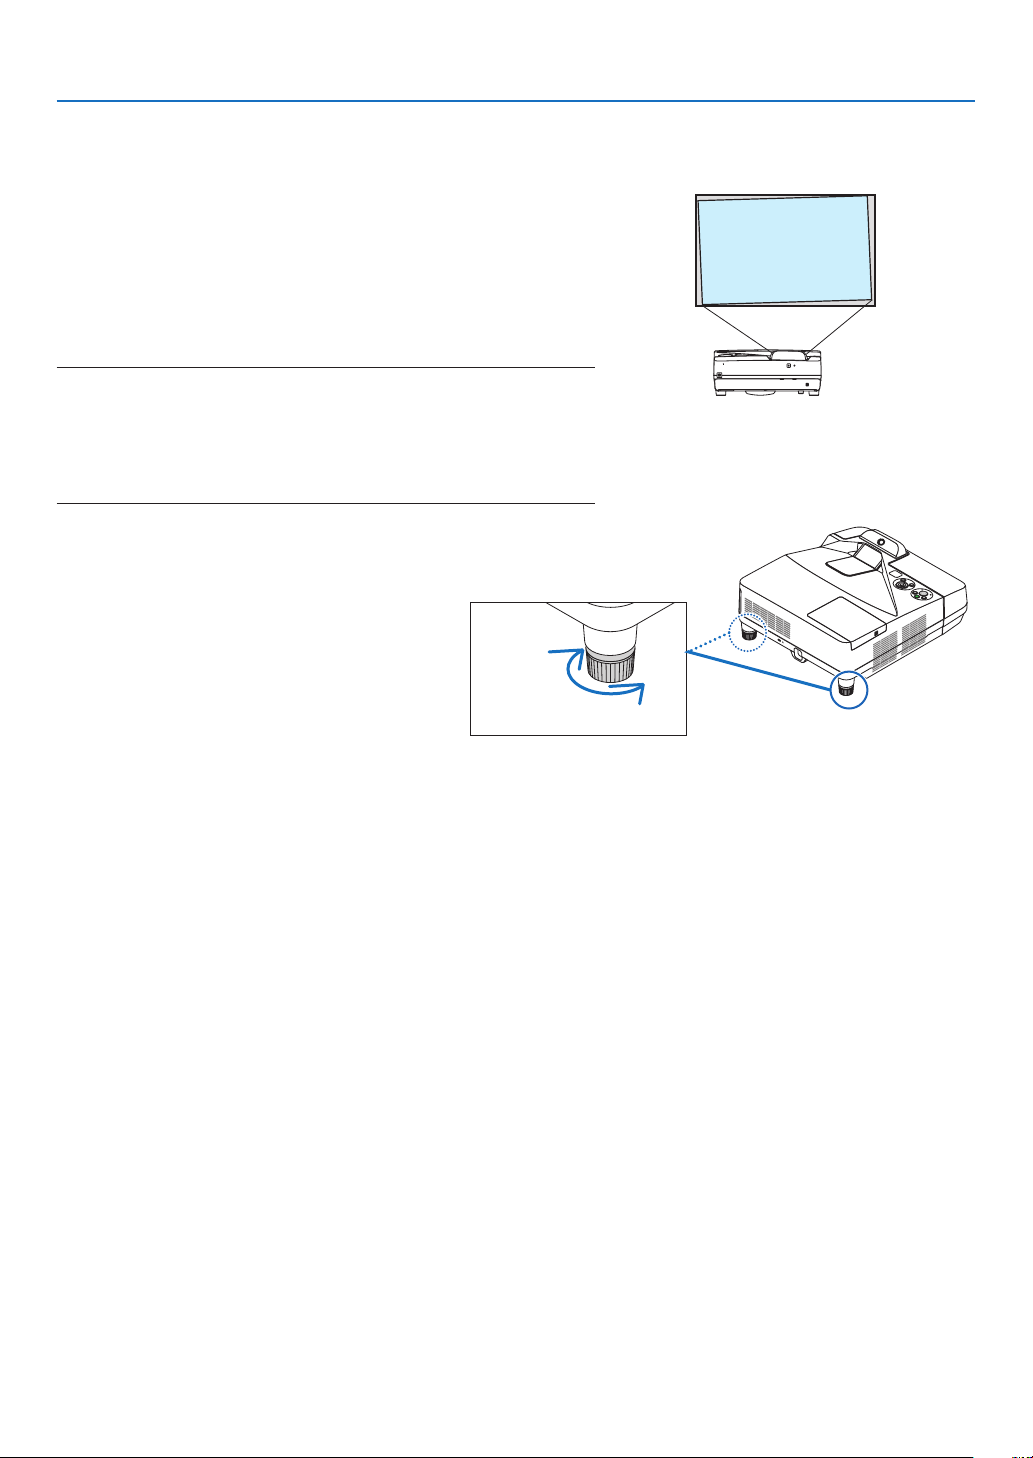
Adjusting the focus (Focus ring)
• Rotatethefocusringuntilyouobtainthebestfocus.
Focus ring
(view from the bottom)
19
2. Projecting an Image (Basic Operation)
Adjusting the tilt (Tilt foot)
Adjustingtheleftandrighttilt.
1. Rotate the tilt foot to adjust the left and right tilt.
The tilt foot is equipped at the left and the right front bottom of the
projector.
Iftheprojectedimageistilted,rotateoneofthetiltfoottoadjust
the angle to project.
Ifkeystonedistortionisappeared,adjustiteitherbythe▼ button
onthecabinetorkeystonebuttonontheremotecontrol
NOTE:
• Donotextendthetiltfootbeyonditsheightlimit(18mm/0.7inches).Doing
somaycausethetiltfoottocomeoutoftheprojector.
• Donotusethetilt-footforpurposesotherthanoriginallyintended.
Misusessuchasusingthetiltfoottocarryorhang(fromthewallorceiling)
theprojectorcancausedamagetotheprojector.
Up
Down
20
2. Projecting an Image (Basic Operation)
Adjusting the size [Digital Zoom]
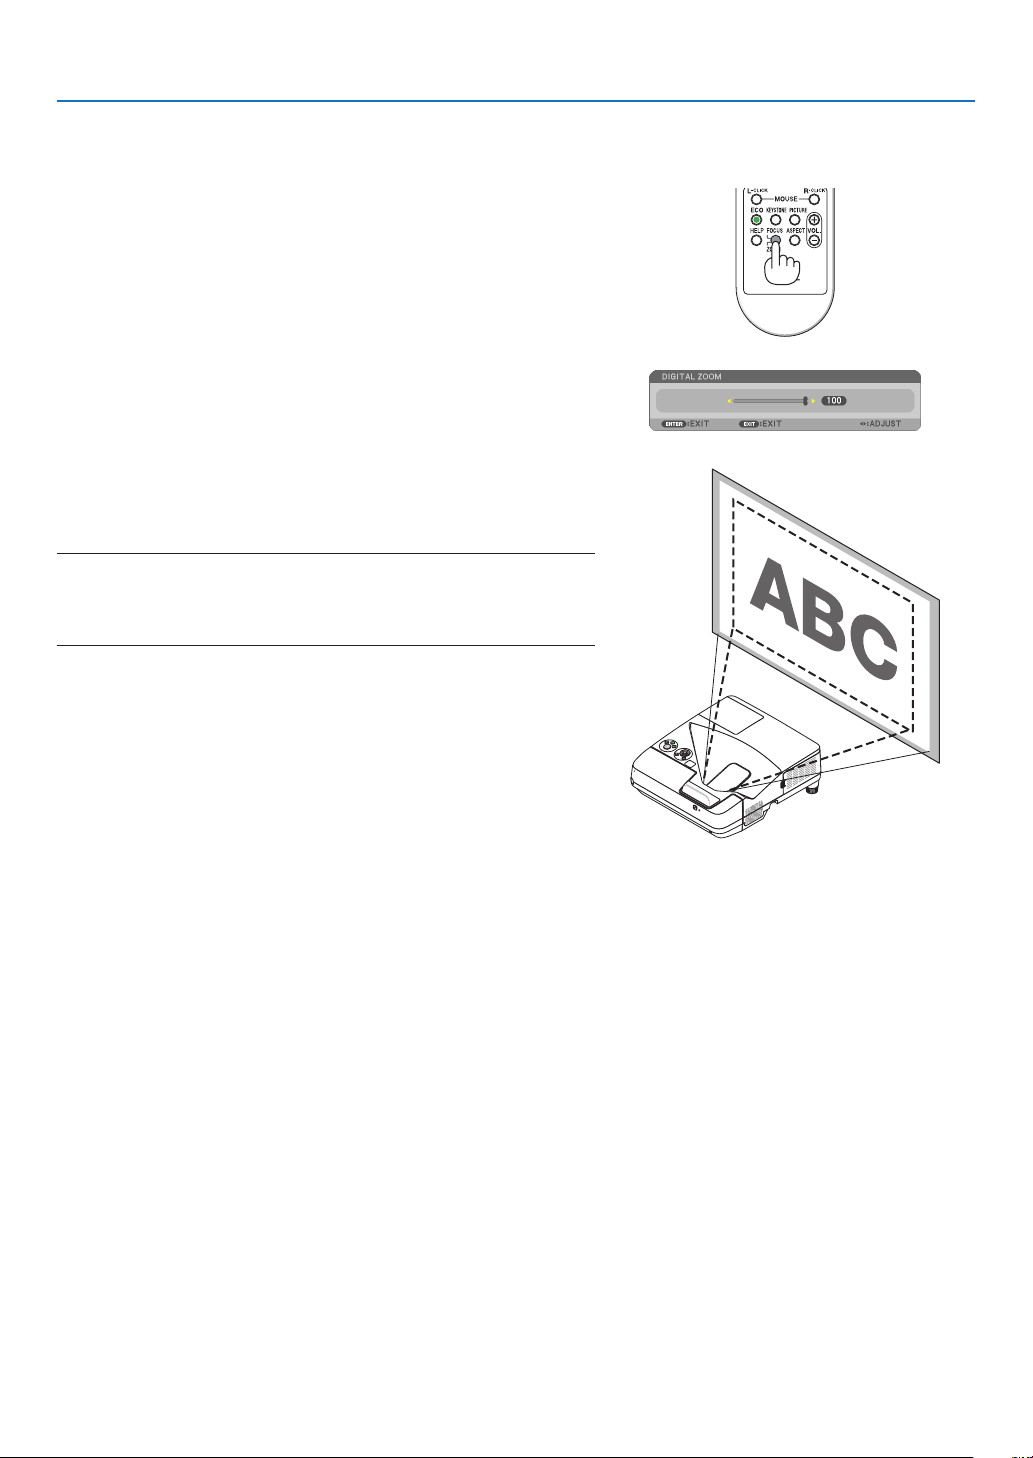
Usetheremotecontroltonelyadjustthesizeoftheimage.
1. PresstheFOCUS/ZOOMbuttonontheremotecontrol.
TheDIGITALZOOMbarwillbedisplayed.
2. Press the ◀ or ▶buttontonelyzoominorout.
3. After completing the adjustment, press the ENTER button.
TheDIGITALZOOMbarwillbeclosed.
NOTE:
• Thisfeatureallowsyoutoelectronicallyneadjusttheimagesizeonthe
screen
• Thisfeaturecannotbeusedwhen[USB-B]isselectedasainputterminal.
21
2. Projecting an Image (Basic Operation)
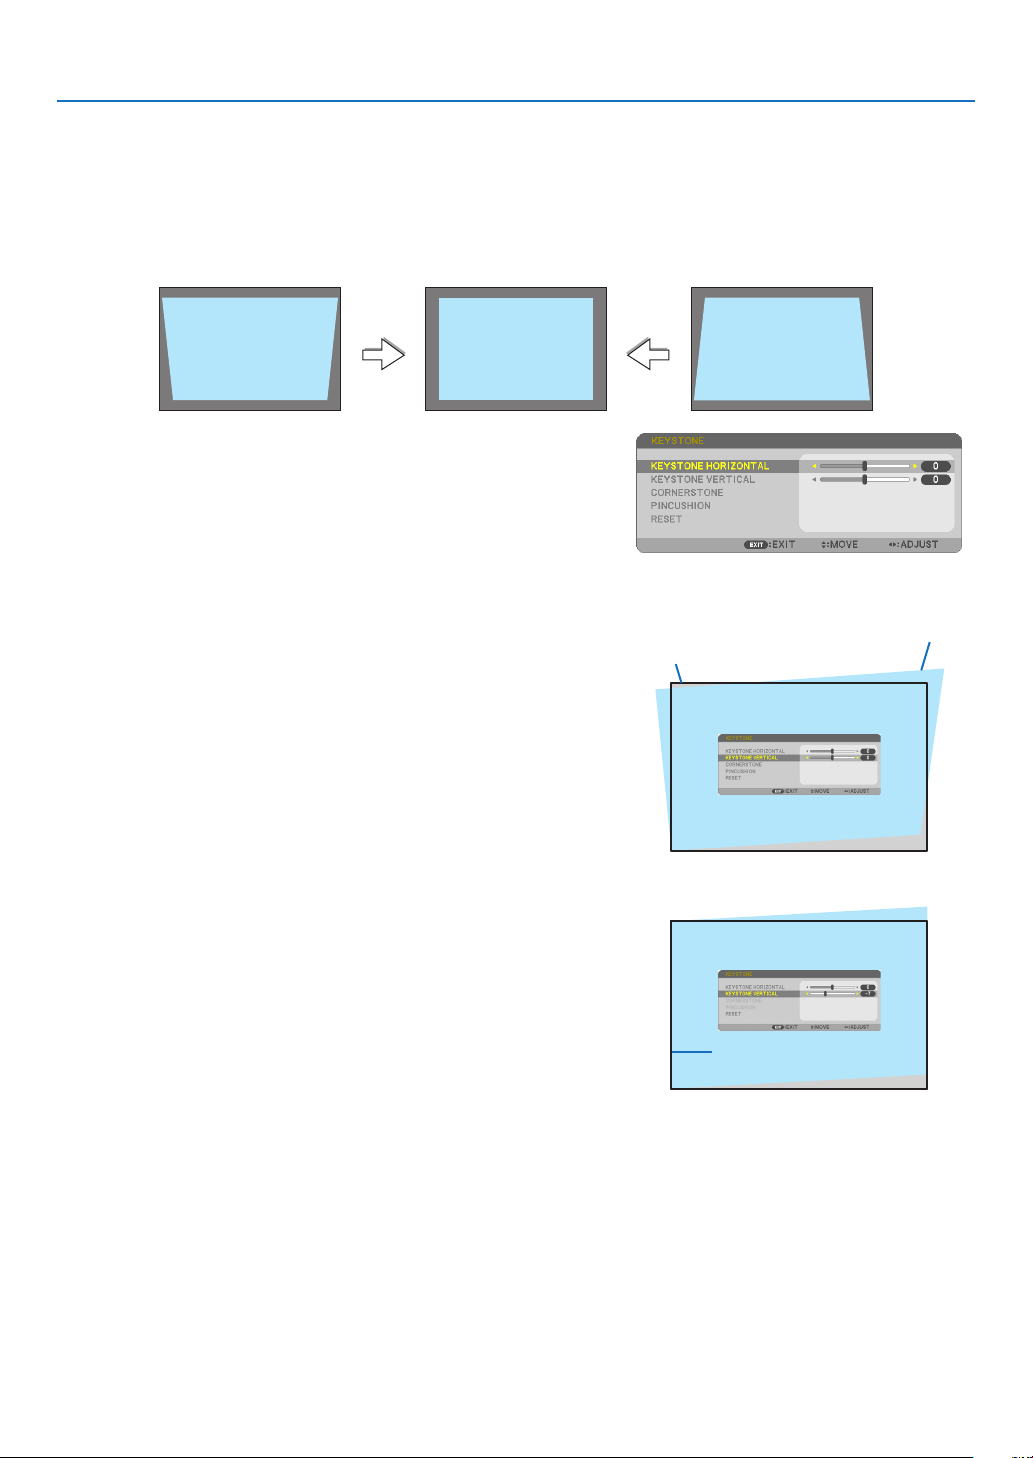
❻ Correcting Keystone Distortion [KEYSTONE]
Whentheprojectorisnotexactlyperpendiculartothescreen,keystonedistortionoccurs.Toovercomeit,youcanusethe
“Keystone”function,adigitaltechnologythatcanadjustforkeystone-typedistortion,resultinginacrisp,squareimage.
Thefollowingprocedureexplainshowtousethe[KEYSTONE]screenfromthemenutocorrecttrapezoidaldistortions.
Whentheprojectorisplaceddiagonallytothescreen,
Whentheprojectorissetupatanangleinrelationtothescreen,adjusttheHorizontaloptionoftheKeystonemenu
sothatthetopandbottomofsidesoftheprojectedimageareparallel.
1. When APPS is not selected as source and the menu is not dis-
played on, press the ▼ button on the projector cabinet.
The Keystone screen will be displayed on the screen.
• PresstheKEYSTONEbuttonwhenusingtheremotecontrol.
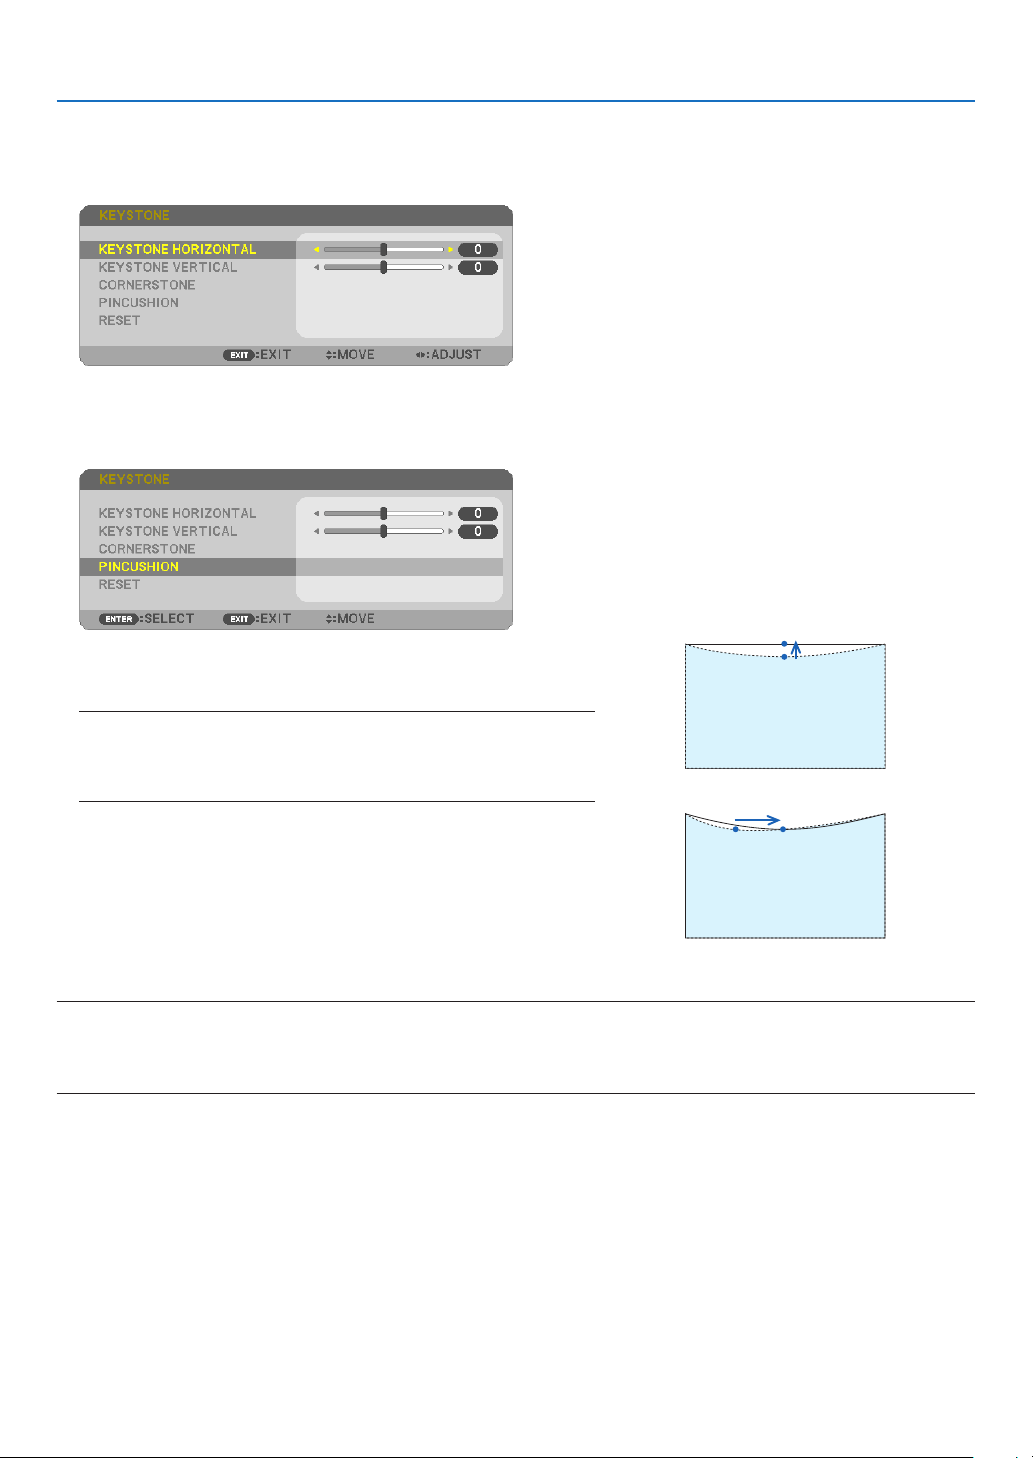
• SeepageforPINCUSHION.
• SeepageforCORNERSTONE.
• SeepageforRESET.
2. Press the ▼buttontoselect[KEYSTONEVERTICAL]andthenuse
the ◀ or ▶ so that the left and right sides of the projected image
are parallel.
* Adjusttheverticalkeystonedistortion.
Projected area
Screen frame
3. Align the left (or right) side of the screen with the left (or right)
side of the projected image.
• Usetheshortersideoftheprojectedimageasthebase.
• Intherightexample,usetheleftsideasthebase.
Align left side
22
2. Projecting an Image (Basic Operation)
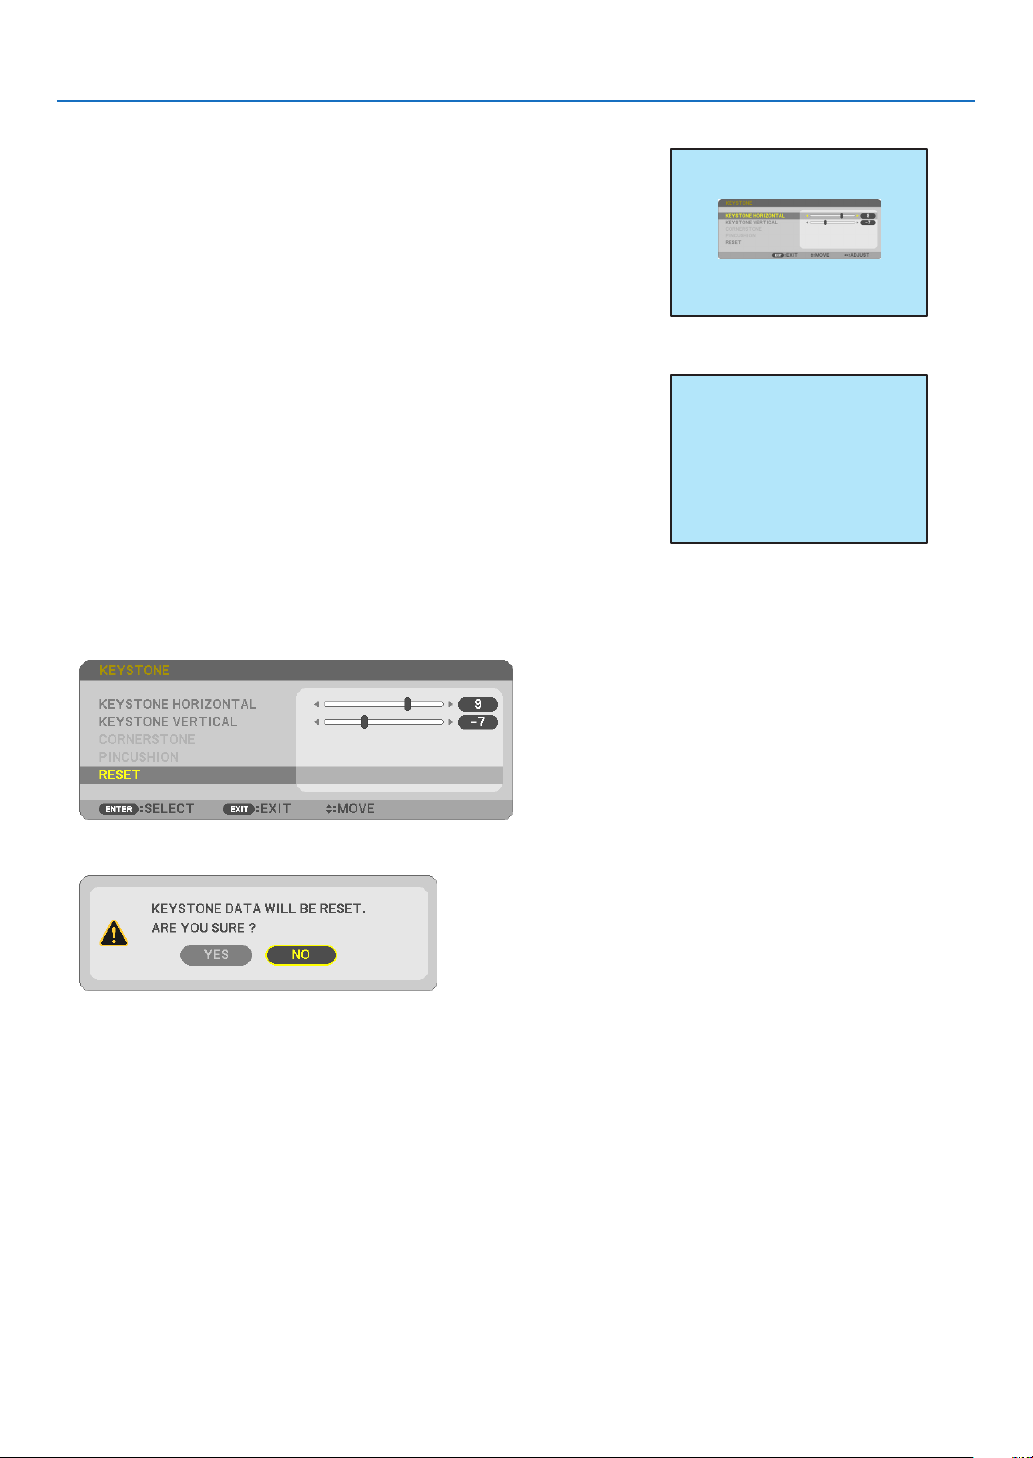
4. Press the ▲buttontoselect[KEYSTONEHORIZONTAL]andthen
use the ◀ or ▶ so that the top and bottom sides of the projected
image are parallel.
• Adjustthehorizontalkeystonedistortion.
5. Repeat steps 2 and 4 to correct keystone distortion.
6. AftercompletingKeystonecorrection,presstheEXITbutton.
The Keystone screen will disappear.
• ToperformKeystonecorrectionagain,pressthe▼ button to display
the Keystone screen and repeat above steps 1 to 6.
Toreturnthekeystoneadjustmentstodefault:
1. Press the ▼buttontoselect[RESET]andpresstheENTERbutton.
2. Press the ◀ or ▶buttontoselect[YES]andpresstheENTERbutton.
The adjustments will be reset.
All the adjustments for all the five items will be reset at the same time.
• TheKEYSTONEfeaturecancauseanimagetobeslightlyblurredbecausethecorrectionismadeelectronically.
23
2. Projecting an Image (Basic Operation)
❼ Optimizing Computer Signal Automatically
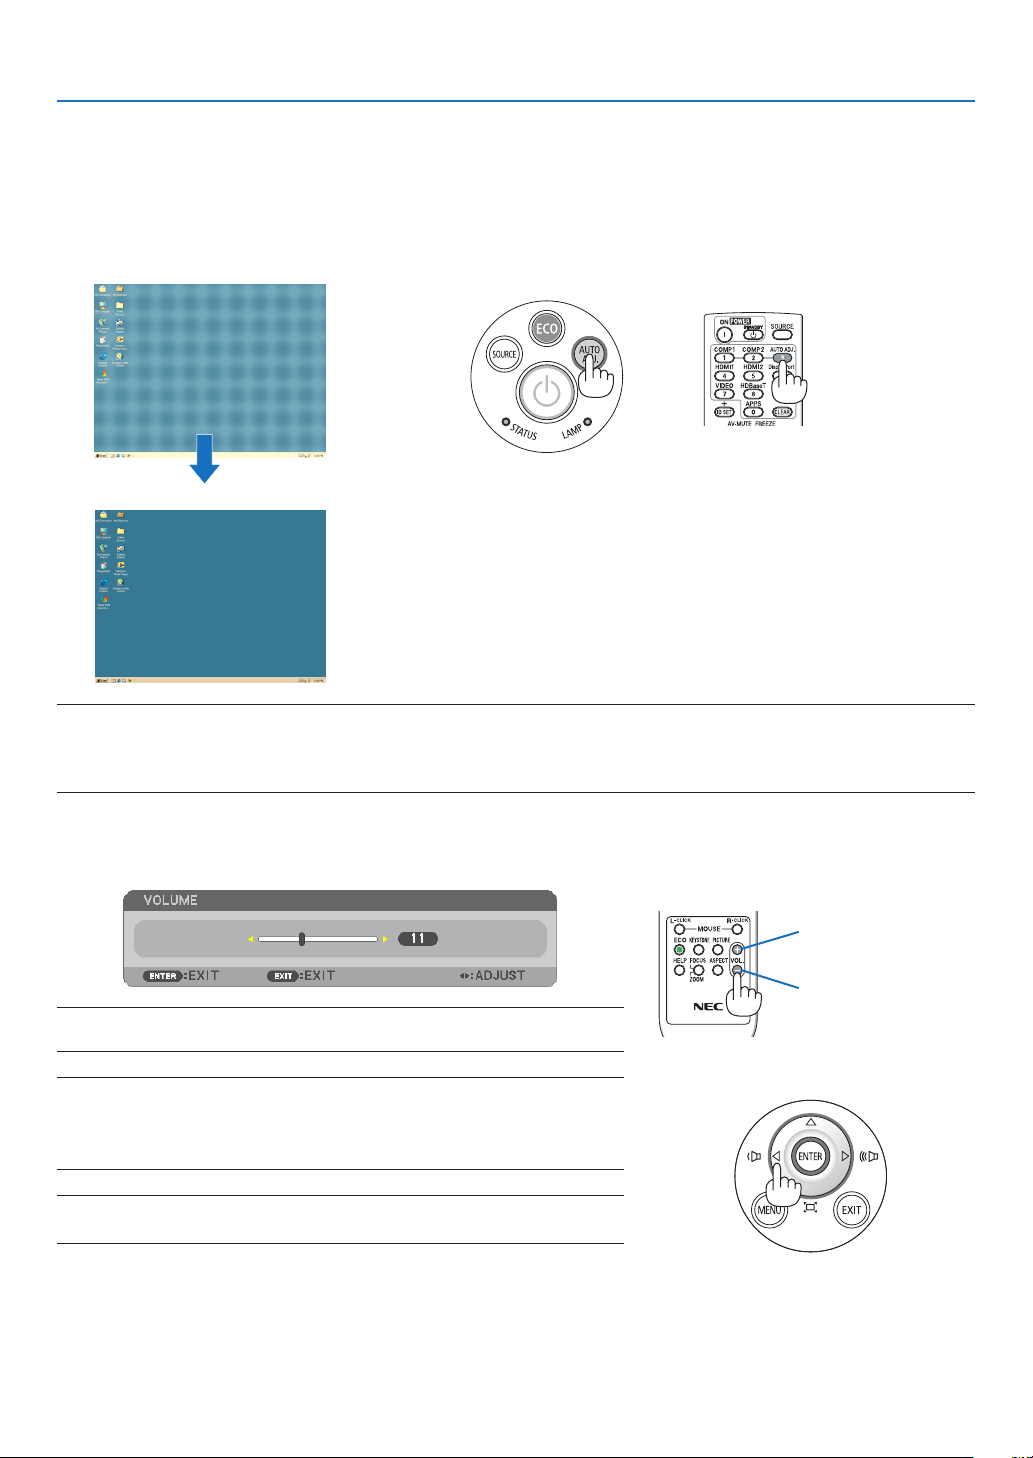
Adjusting the Image Using Auto Adjust
Optimizingacomputerimageautomatically.(COMPUTER)
PresstheAUTOADJ.buttontooptimizeacomputerimageautomatically.
Thisadjustmentmaybenecessarywhenyouconnectyourcomputerforthersttime.
[Poor picture]
[Normal picture]
NOTE:
Somesignalsmaytaketimetodisplayormaynotbedisplayedcorrectly.
• IftheAutoAdjustoperationcannotoptimizethecomputersignal,trytoadjust[HORIZONTAL],[VERTICAL],[CLOCK],and[PHASE]
manually.(→page53,54)
❽ Turning Up or Down Volume
Soundlevelfromthespeakeroraudiooutputcanbeadjusted.
TIP:Whennomenusappear,the◀and▶buttonsontheprojectorcabinetwork
asavolumecontrol.
NOTE:
• Volumecontrolisnotavailablewiththe◀or▶buttonwhenanimageismagni-
edbyusingtheD-ZOOM(+)button,whenthemenuisdisplayed,orwhenthe
APPSisdisplayed.
TIP:The[BEEP]soundvolumecannotbeadjusted.Toturnoffthe[BEEP]sound,
fromthemenu,select[SETUP]→[OPTIONS(1)]→[BEEP]→[OFF].
Increasevolume
Decrease volume
24
2. Projecting an Image (Basic Operation)
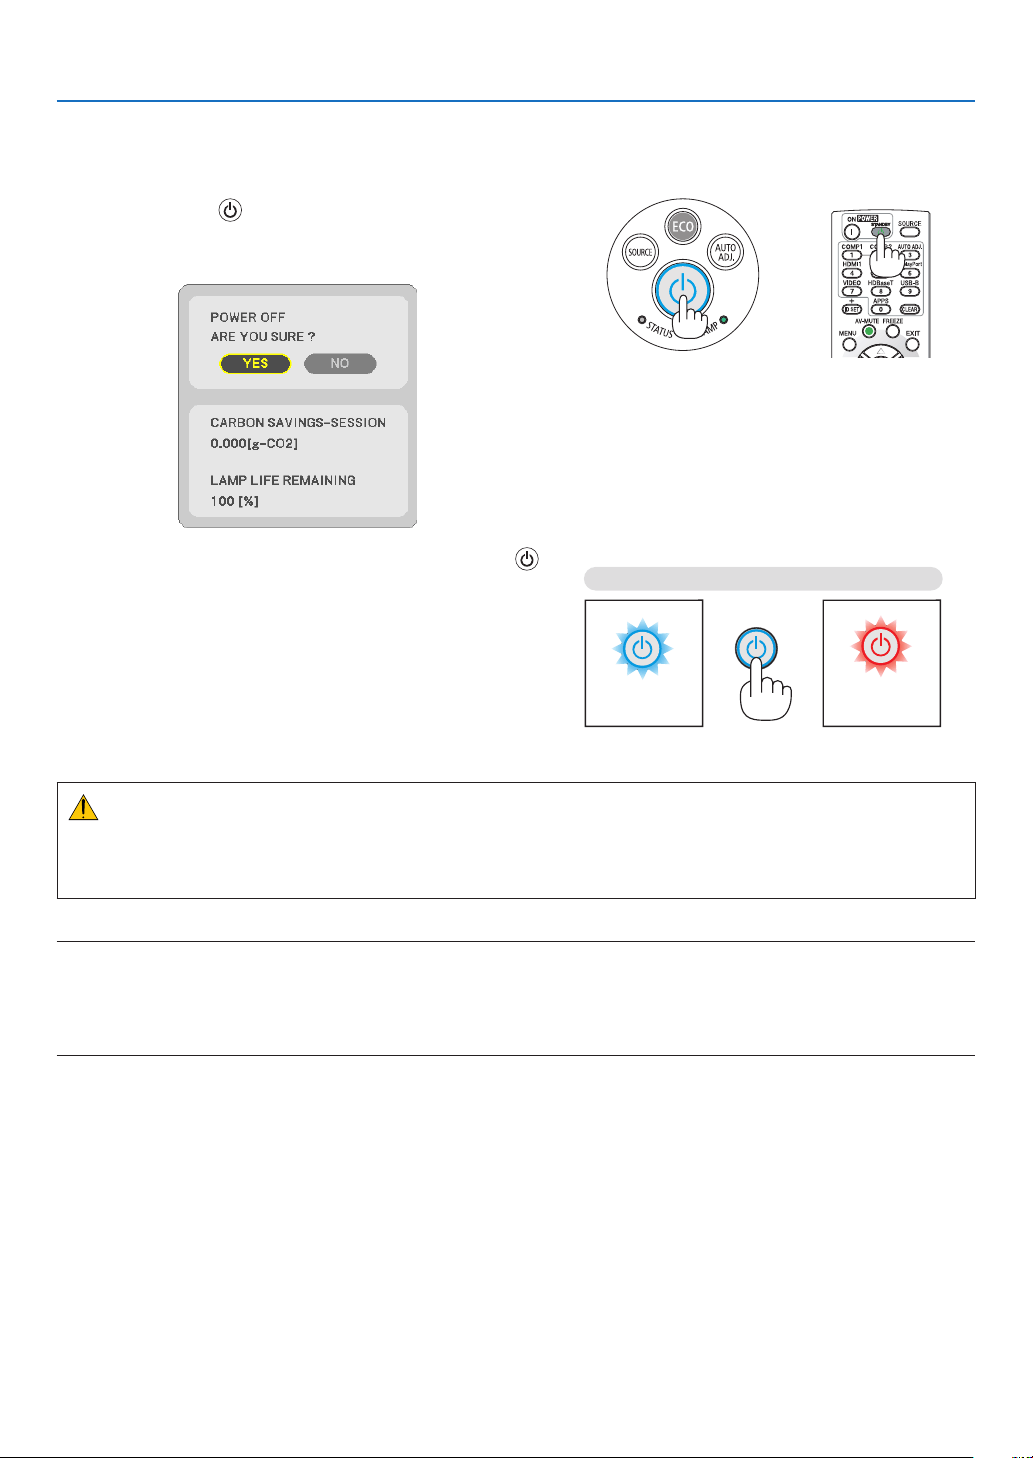
❾ Turning off the Projector
Toturnofftheprojector:
1. First, press the (POWER) button on the projector
cabinet or the STANDBY button on the remote control.
The confirmation message will be displayed.
2. Secondly, press the ENTER button or press the
(POWER) or the STANDBY button again.
The lamp will turn off and the projector will go into standby
mode. When in standby mode, the POWER indicator will
light red and the STATUS indicator will turn off when [NOR-
MAL] is selected for [STANDBY MODE].
CAUTION:
PartsoftheprojectormaybecometemporarilyheatediftheprojectoristurnedoffwiththePOWERbuttonorifthe
ACpowersupplyisdisconnectedduringnormalprojectoroperation.
Usecautionwhenpickinguptheprojector.
NOTE:
• Whilethepowerindicatorisblinkingblueinshortcycles,thepowercannotbeturnedoff.
• Youcannotturnoffthepowerfor60secondsimmediatelyafterturningitonanddisplayinganimage.
• DonotdisconnecttheACpowersupplytotheprojectorwithin10secondsofmakingadjustmentorsettingchangesandclosing
themenu.Doingsocancauselossofadjustmentsandsettings.
PowerOn
Steady blue light
Standby
Steady red light

25
2. Projecting an Image (Basic Operation)
❿ When Moving the Projector
Preparation:Makesurethattheprojectoristurnedoff.
1. Remove the cable cover.
(→ page 5)
2. Unplug the power cord.
3. Disconnect any other cables.
• RemovetheUSBmemoryorthewirelessLANUnitifitisinsertedintotheprojector.
(→ page 86)
26
❶ Turning off the Image and Sound
PresstheAV-MUTEbuttontoturnofftheimageandsoundforashort
periodoftime.Pressagaintorestoretheimageandsound.
Theprojector’spower-savingfunctionwillwork10secondsafterthe
imageisturnedoff.
Asaresult,thelamppowerwillbereduced.
NOTE:
• Eventhoughtheimageisturnedoff,themenustillremainsonthescreen.
• SoundfromtheAUDIOOUTjack(Stereomini)canbeturnedoff.
• Evenwhenthepower-savingfunctionworks,thelamppowermayberestoredtoitsoriginalleveltemporarily.
• Torestoretheimage,evenifyoupresstheAV-MUTEbuttonimmediatelyafterthestartofthepower-savingfunction,thelamp
brightnessmaynotberestoredtoitsoriginallevel.
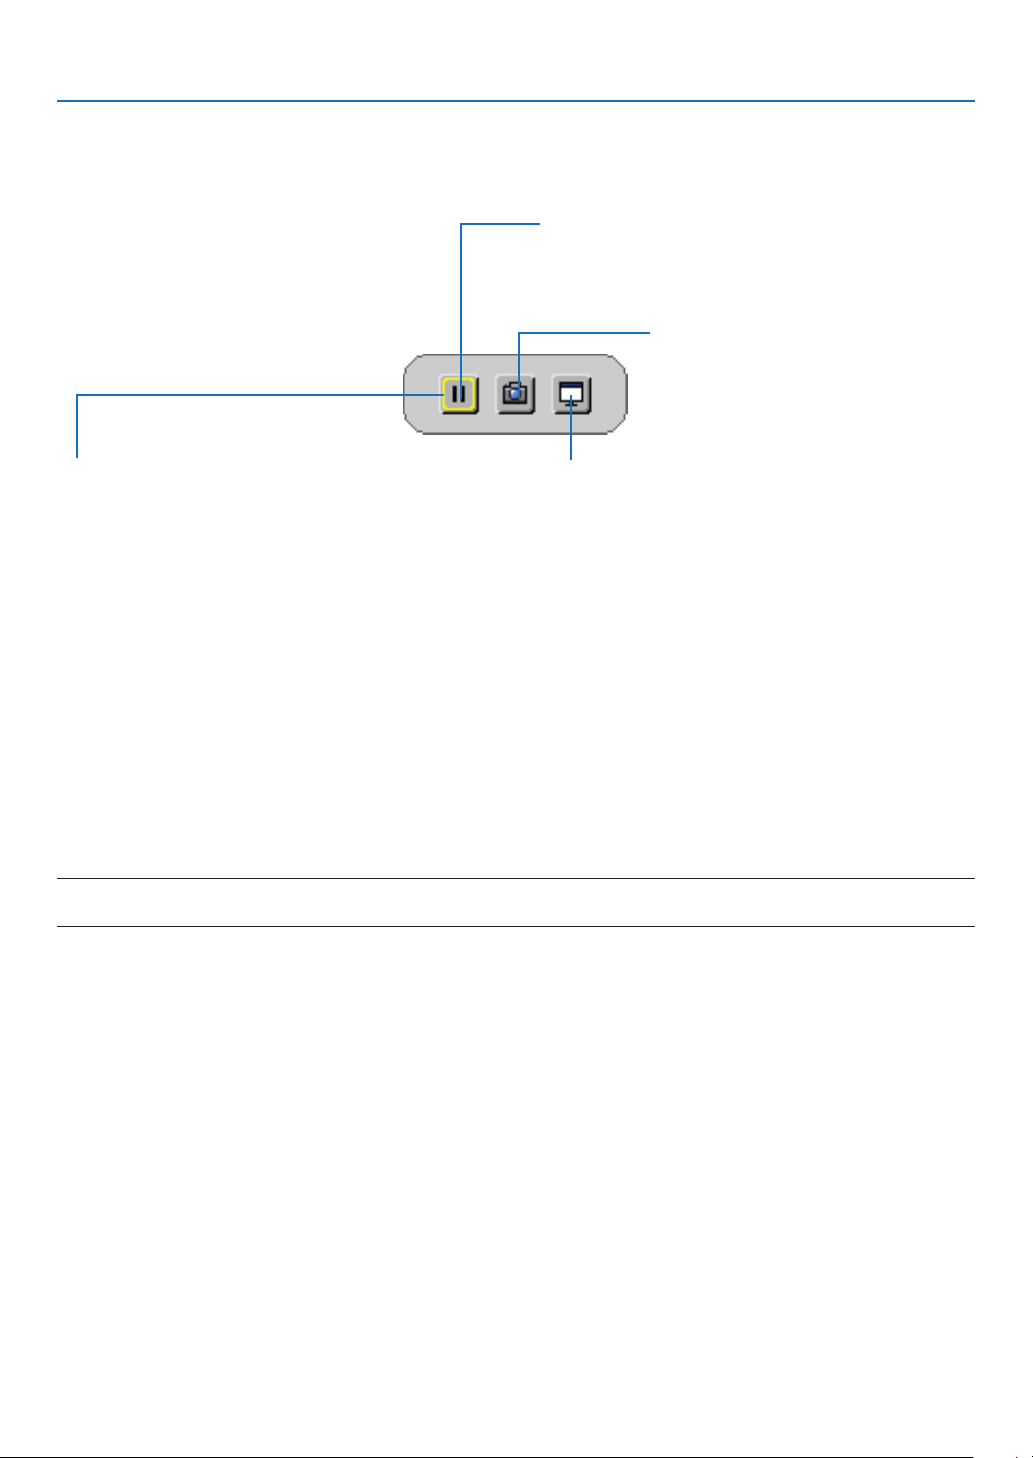
❷ Freezing a Picture/Screen Capture
OncetheFREEZEbuttonispressed,theScreenCapturemenuis
indicatedattheleftbottomofthescreen.(→ nextpage)
NOTE:Theimageisfrozenbuttheoriginalvideoisstillplayingback.
3. Convenient Features
27
3. Convenient Features
Saving the projected screen images temporarily on the build-in memory/Screen Capture
OncetheFREEZEbuttonispressed,theScreenCapturemenuisindicatedattheleftbottomofthescreen.Ifno
operationisperformedfor3seconds,themenuwilldisappearandapicturewillfreeze.
CAPTURE&INTERACTIVEWHITEBOARD
Capture the projected screen image and boot up the inter-
active whiteboard.
FREEZE
A picture will freeze by press. Press again to resume mo-
tion.
CAPTURE
Temporarily save the projected screen image
on the projector’s built-in memory. The built-
inmemoryiscalled“theProjectorMemory”.
FOCUS
Shows the current selection that is surrounded by yellow
lines. Use ◀ or ▶ button for moving to other options.
• ItispossibletocalloutthecaptureddisplayscreenutilizingtheVIEWERintheAPPSMENUortheweb-sharing
function.Moreover,theweb-sharingfunctionenablestosavethecapturedscreenimageontoterminalsasacom-
puterandasmartphonethatareconnectedbythenetwork.
• YoumaynotselecttheCAPTUREicondependingontheinputterminalsorsignals.Inthebelowconditions,you
cannotselecttheCAPTUREicon.
• WhentheVIDEO-INisselectedastheinputterminalandtheinputsignalhascontentsprotection.
• WhentheHDMI/MHLisselectedastheinputterminalandtheinputsignalhascontentsprotection(HDCP).
• DuringplayingthemotionpicturethrutheVIEWER.
• WhentheMiracastisselectedfromtheAPPSMENU.
• Theformatofthecapturedscreenimageisasfollows:
• Format:JPEG
• Resolution:1280×800dots(Panelresolutionoftheprojector)
• Fileprepareddateandtime:Dateandtimesetontheprojector
NOTE:
• Thecapturedpictureswillbedeletedfromtheprojectormemorywhentheprojectoristurnedoff.
28
3. Convenient Features
❸ Magnifying a Picture
Youcanenlargethepictureuptofourtimes.
NOTE:
• Themaximummagnicationmaybelessthanfourtimesdependingonthesignal.
• Thisfeaturecannotbeusedwhen[USB-B]isselectedastheinputterminal.
Todoso:
1. PresstheD-ZOOM(+)buttontomagnifythepicture.
To move the magnified image, use the ▲,▼,◀ or ▶ button.
2. Press the ▲▼◀▶ button.
The area of the magnified image will be moved
3. PresstheD-ZOOM(−)button.
EachtimetheD-ZOOM(−)buttonispressed,theimageisreduced.
NOTE:
• Theimagewillbemagniedordemagniedatthecenterofthescreen.
• Displayingthemenuwillcancelthecurrentmagnication.
29
3. Convenient Features
❹ Changing Eco Mode/Checking Energy-Saving Effect
Using Eco Mode [ECO MODE]
TheECOMODE(NORMALandECO)increaseslamplife,whileloweringpowerconsumptionandcuttingdownon
CO
2
emissions.
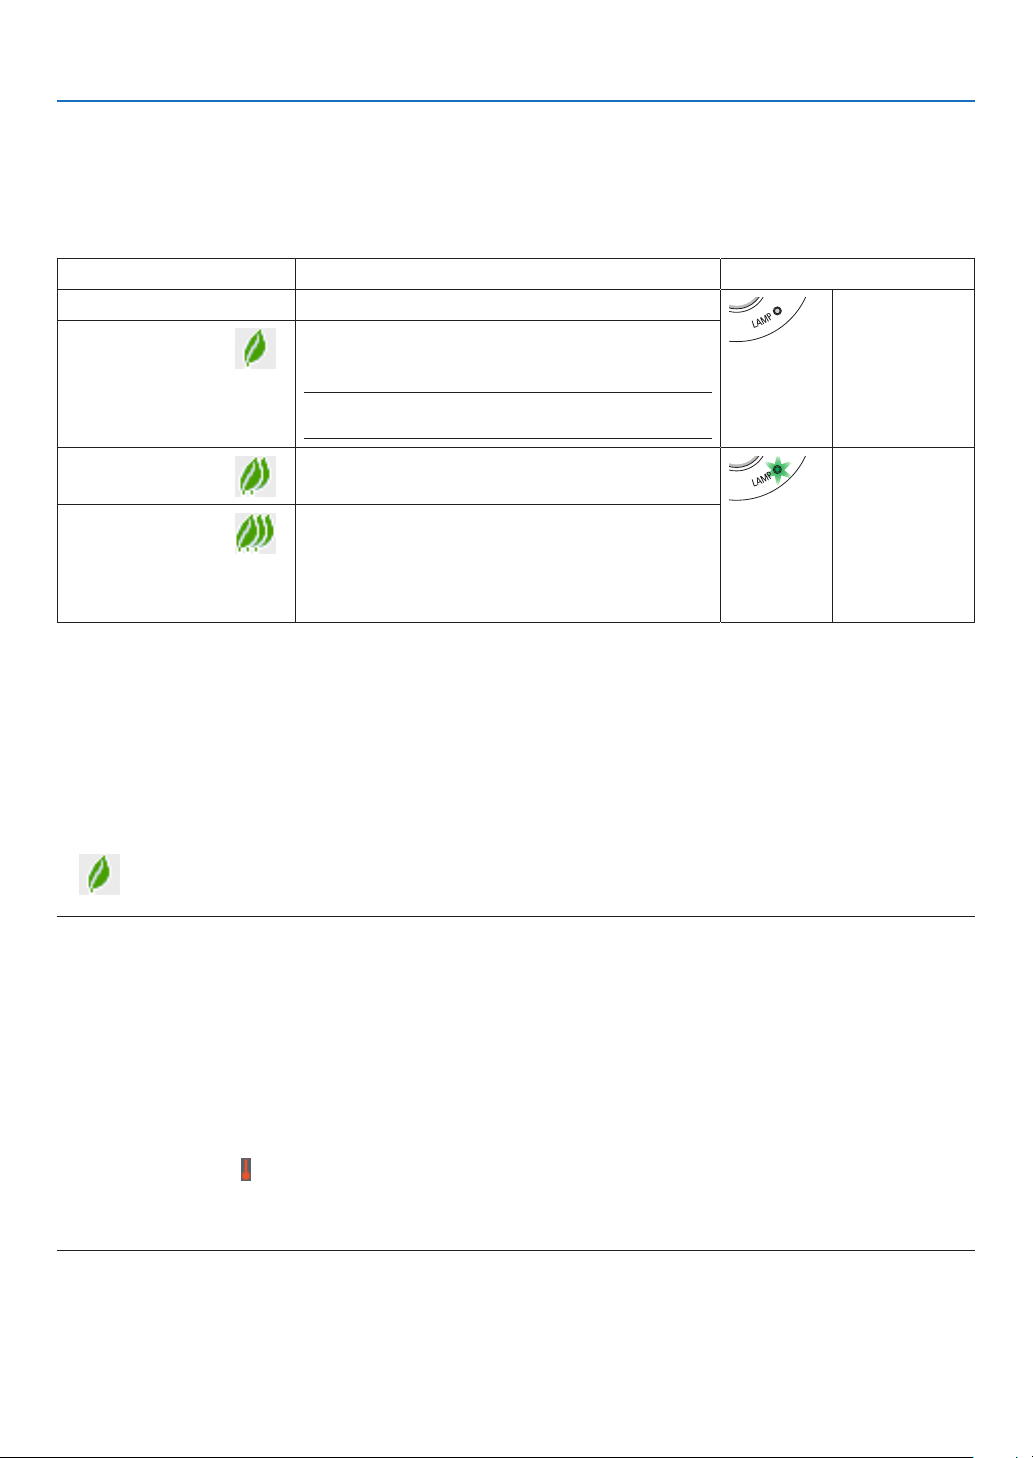
Fourbrightnessmodesofthelampcanbeselected:[OFF],[AUTOECO],[NORMAL]and[ECO]modes.
[ECOMODE] Description StatusofLAMPindicator
[OFF] Thelampbrightnessis100%. Off
[AUTOECO] Lamppowerconsumptionwillbechangedbetween
[OFF]and [NORMAL] automaticallyaccording to
picturelevel
NOTE:Abrightgradationmaybelessvisible depending
ontheimage.
[NORMAL] Lamppowerconsumption:approx.80%brightness.
Thelamplifewillextendbyloweringthelamppower.
SteadyGreen
light
[ECO]
Lamppowerconsumption(approx.60%brightness).
Thelamp lifewill extendlonger thanthe oneon
NORMALmodebycontrollingpowerappropriatefor
thelamp.Themaximumpowerbecomesequivalent
tothepowerinNORMAL.
Toturnonthe[ECOMODE],dothefollowing:
1. PresstheECOButtonontheremotecontroltodisplay[ECOMODE]screen.
2. PresstheECObuttonagaintoselectamodeyouwish.
• EachtimetheECObuttonispressed,thechoiceswillbechanged:
OFF → AUTO ECO → NORMAL → ECO → OFF
TIP:
• TheleafsymbolatthebottomofthemenushowsthecurrentselectionofECOmode.
NOTE:
• The[ECOMODE]canbechangedbyusingthemenu.
Select[SETUP]→[GENERAL]→[ECOMODE].
• Thelampliferemainingandlamphoursusedcanbecheckedin[USAGETIME].Select[INFO.]→[USAGETIME].
• Theprojectorisalwaysin[NORMAL]for90secondsafterthelampisturnedonandwhilethePOWERindicatorisblinkinggreen.
Thelampconditionwillnotbeaffectedevenwhen[ECOMODE]ischanged.
• Afteralapseof1minutefromwhentheprojectordisplaysno-signalguidance,ablue,blackorlogoscreen,[ECOMODE]will
automaticallyswitchto[ECO].Theprojectorwillreturntoitsoriginalsettingonceasignalisaccepted.
• Iftheprojectorisoverheatedin[OFF]mode,theremaybeacasewherethe[ECOMODE]automaticallychangesto[NORMAL]
modetoprotecttheprojector.Whentheprojectorisin[NORMAL]mode,thepicturebrightnessdecreases.Whentheprojector
comesbacktonormaltemperature,the[ECOMODE]returnstoitsoriginalsetting.
Thermometersymbol[ ]indicatesthe[ECOMODE]isautomaticallysetto[NORMAL]modebecausetheinternaltemperature
istoohigh.
• Immediatelyafter[ECOMODE]ischangedfrom[ECO]tooneof[OFF],[AUTOECO],or[NORMAL],thelampbrightnessmay
decreasetemporarily.Thisisnotamalfunction.
30
3. Convenient Features
Checking Energy-Saving Effect [CARBON METER]
Thisfeaturewillshowenergy-savingeffectintermsofCO
2
emissionreduction(kg)whentheprojector’s[ECOMODE]
issetto[AUTOECO],[NORMAL],or[ECO].Thisfeatureiscalledas[CARBONMETER].
Therearetwomessages:[TOTALCARBONSAVINGS]and[CARBONSAVINGS-SESSION].The[TOTALCARBON
SAVINGS]messageshowsthetotalamountofCO
2
emissionreductionfromthetimeofshipmentuptonow.Youcan
checktheinformationon[USAGETIME]from[INFO.]ofthemenu.(→page70)
The[CARBONSAVINGS-SESSION]messageshowstheamountofCO
2
emissionreductionbetweenthetimeof
changingtoECOMODEimmediatelyafterthetimeofpower-onandthetimeofpower-off.The[CARBONSAVINGS-
SESSION]messagewillbedisplayedinthe[POWEROFF/AREYOUSURE?]messageatthetimeofpower-off.
TIP:
• TheformulaasshownbelowisusedtocalculatetheamountofCO
2
emissionreduction.
AmountofCO
2
emissionreduction=(PowerconsumptioninOFFforECOMODE−PowerconsumptioninAUTOECO/NORMAL/
ECOforECOMODE)×CO
2
conversionfactor.*WhentheimageisturnedoffwiththeAV-MUTEbutton,theamountofCO
2
em-
missionreductionwillalsoincrease.
*CalculationforamountofCO
2
emissionreductionisbasedonanOECDpublication“CO
2
EmissionsfromFuelCombustion,2008
Edition”.
• The[TOTALCARBONSAVINGS]iscalculatedbasedonsavingsrecordedin15minutesintervals.
• Thisformulawillnotapplytothepowerconsumptionwhichisnotaffectedbywhether[ECOMODE]isturnedonoroff.
31
3. Convenient Features
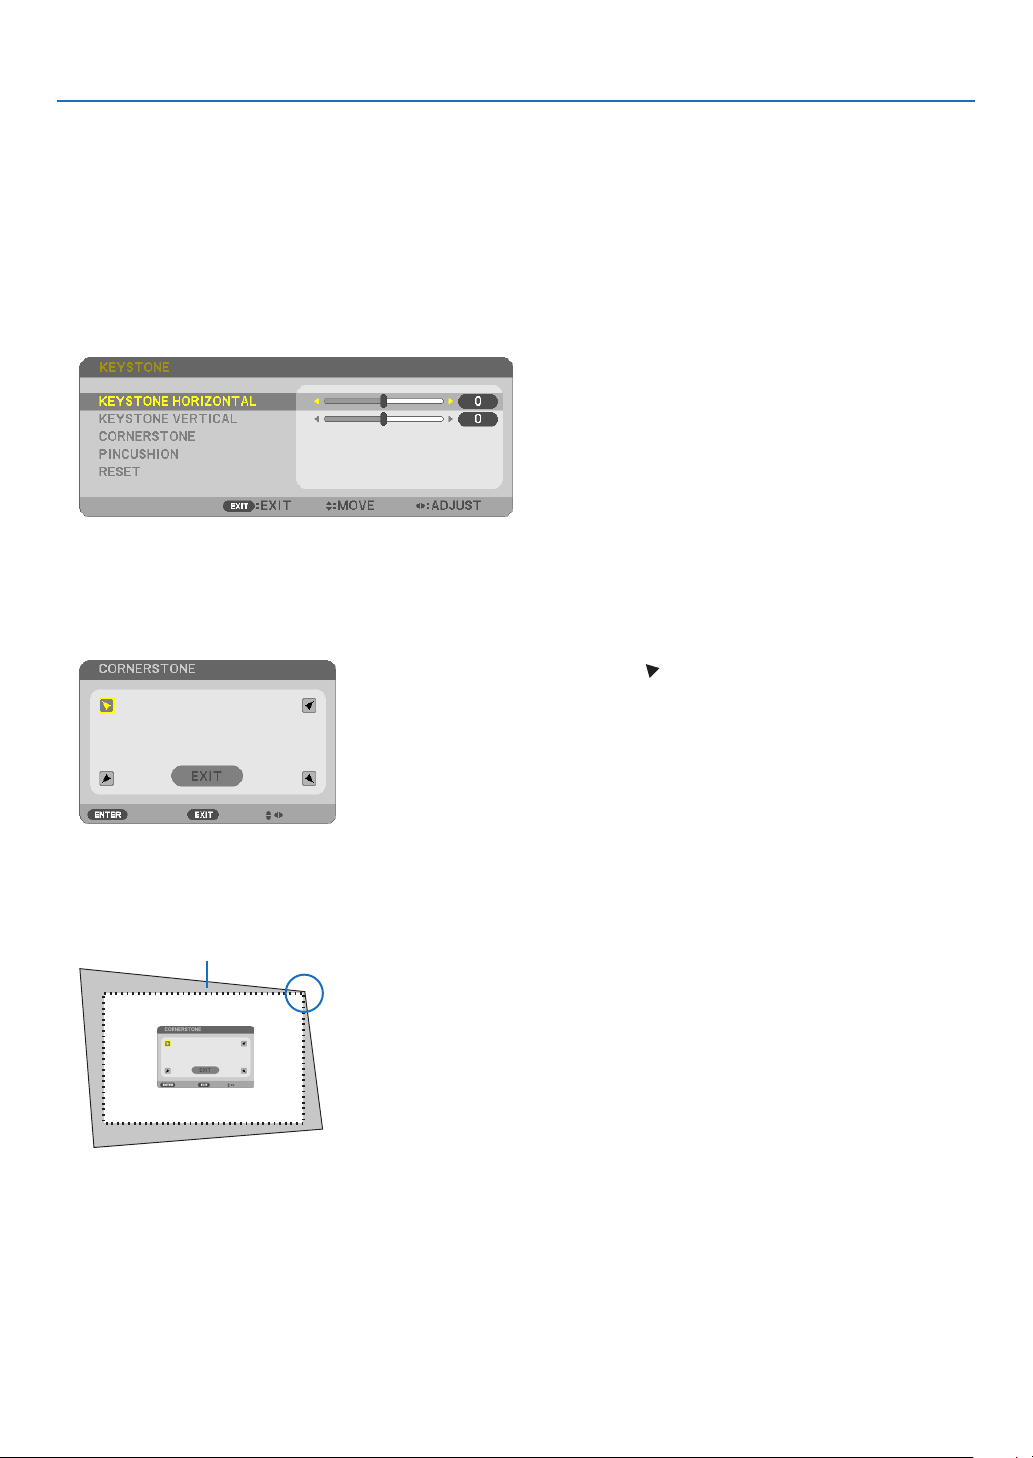
❺ Using 4-Point Corner to Correct Keystone Distortion
[CORNERSTONE]
Usethe[KEYSTONEHORIZONTAL],[KEYSTONEVERTICAL](abletocorrectsimultaneously),[CORNERSTONE]
and[PINCUSHION]tocorrectkeystonedistortion.
Cornerstone
1. WhenAPPSisnotselectedassourceandthemenuisnotdisplayedon,presstheKEYSTONEbuttonon
the remote.
The KEYSTONE screen will be displayed.
• PresstheKEYSTONEbuttonwhenusingtheremotecontrol.
• SeepageforPINCUSHION.
2. Press the ▼buttontoselect[CORNERSTONE]andpresstheENTERbutton.
The drawing shows the upper left icon ( ) is selected.
The CORNERSTONE screen will be displayed.
3. Project an image so that the screen is smaller than the area of the raster.
4. Pick up any one of the corners and align the corner of the image with a corner of the screen.
Projected image
The drawing shows the upper right corner.
TIP:Ifyouareadjusting[KEYSTONEHORIZONTAL],[KEYSTONEVERTICAL],or[PINCUSHION],the[CORNERSTONE]itemwill
notbeavailable.Ifthishappens,resetthe[KEYSTONE]adjustments.
5. Use the ▲▼◀▶ button to select one icon (▲) which points in the direction you wish to move the projected
image frame.
6. Press the ENTER button.
32
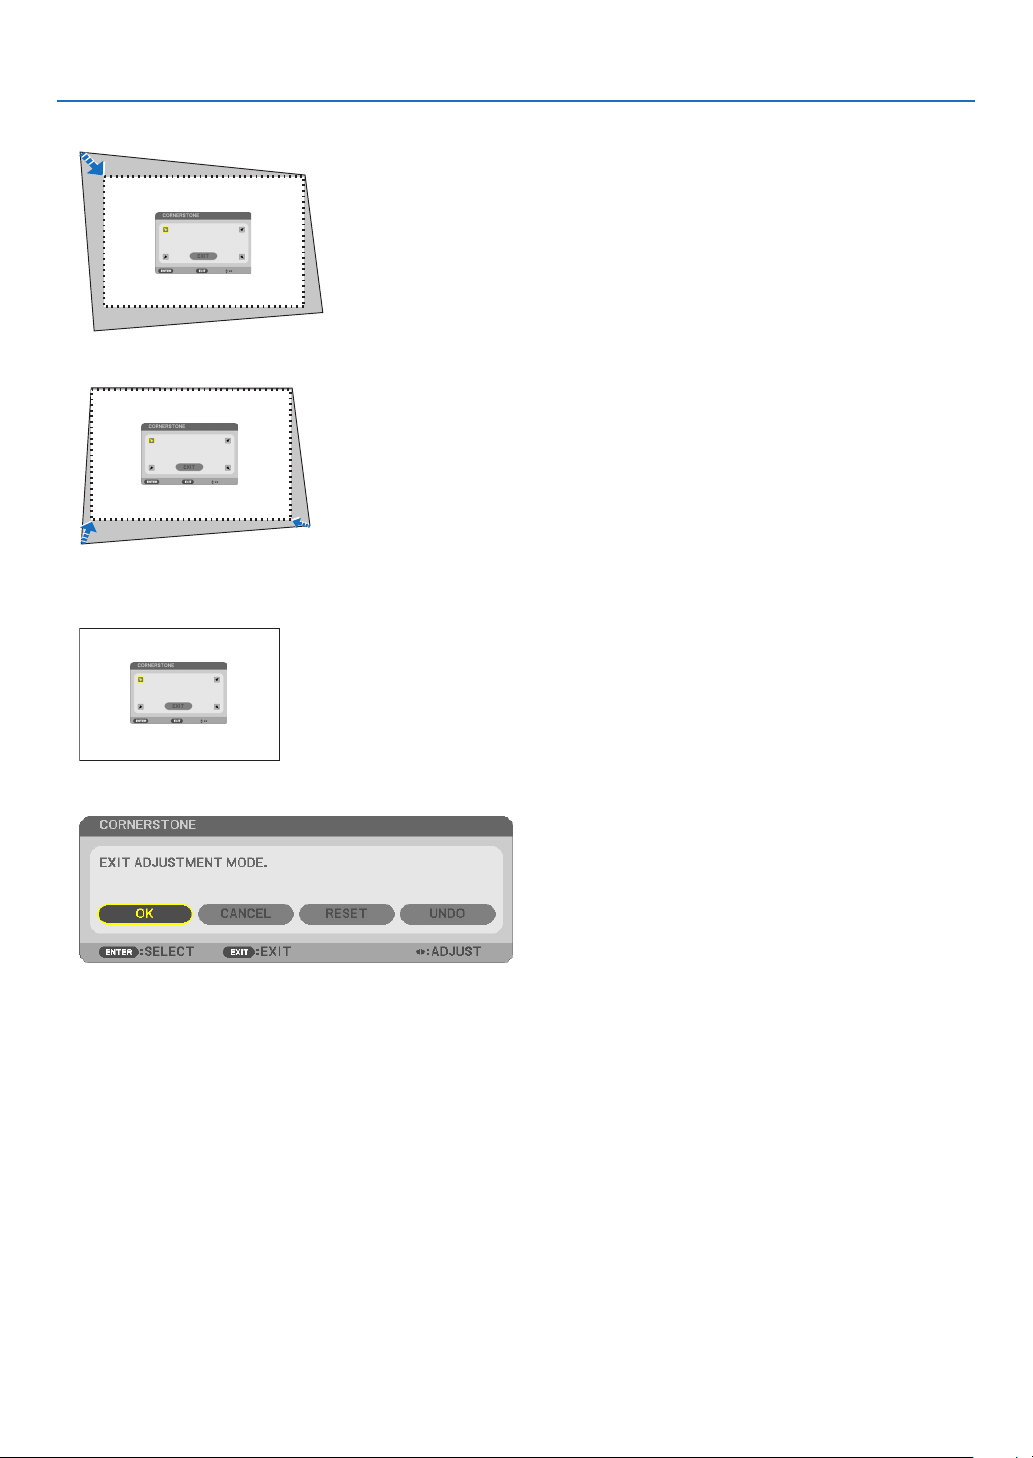
3. Convenient Features
7. Use the ▲▼◀▶ button to move the projected image frame as shown on the example.
8. Press the ENTER button.
9. Use the ▲▼◀▶ button to select another icon which points in the direction.
OntheCornerstoneadjustmentscreen,select[EXIT]orpresstheEXITbuttonontheremotecontrol.
The confirmation screen is displayed.
10
. Press the ◀ or ▶buttontohighlightthe[OK]andpresstheENTERbutton.
ThiscompletestheCornerstonecorrection.
Selecting[CANCEL]willreturntotheadjustmentscreenwithoutsavingchanges(Step3).
Selecting[RESET]willreturntothefactorydefault.
Selecting[UNDO]willexitwithoutsavingchanges.
33
3. Convenient Features
Pincushion
1. PresstheKEYSTONEbuttonwithnomenudisplayed.
The KEYSTONE screen will be displayed.
• PresstheKEYSTONEbuttonwhenusingtheremotecontrol.
2. Press the ▼buttontoselect[PINCUSHION]andthenpress
the ENTER.
3. Press either ▲ or ▼ button to select one from top, bottom, left,
right, and then press either ◀ or ▶ button to reform pincushion
distortion.
NOTE:
• Onceasideisreformed,itdisablesreformingremainingthreesides.
• Forchangingthesidetobereformed,setbackthereformvalueofthe
sideunderreformingto“0”.
4. Using ▲ or ▼ buttons and select the reference point, and then
move the peak point of curved side for reforming using the ◀
or ▶ buttons.
5. PresstheEXITwhenPINCUSHIONadjustmentiscompleted.
NOTE:
• Evenwhentheprojectoristurnedon,thelastusedcorrectionvaluesareapplied.
• [PINCUSHION]and[CORNERSTONE]correctionscancausetheimagetobeslightlyblurredbecausethecorrectionismade
electronically.
34
3. Convenient Features
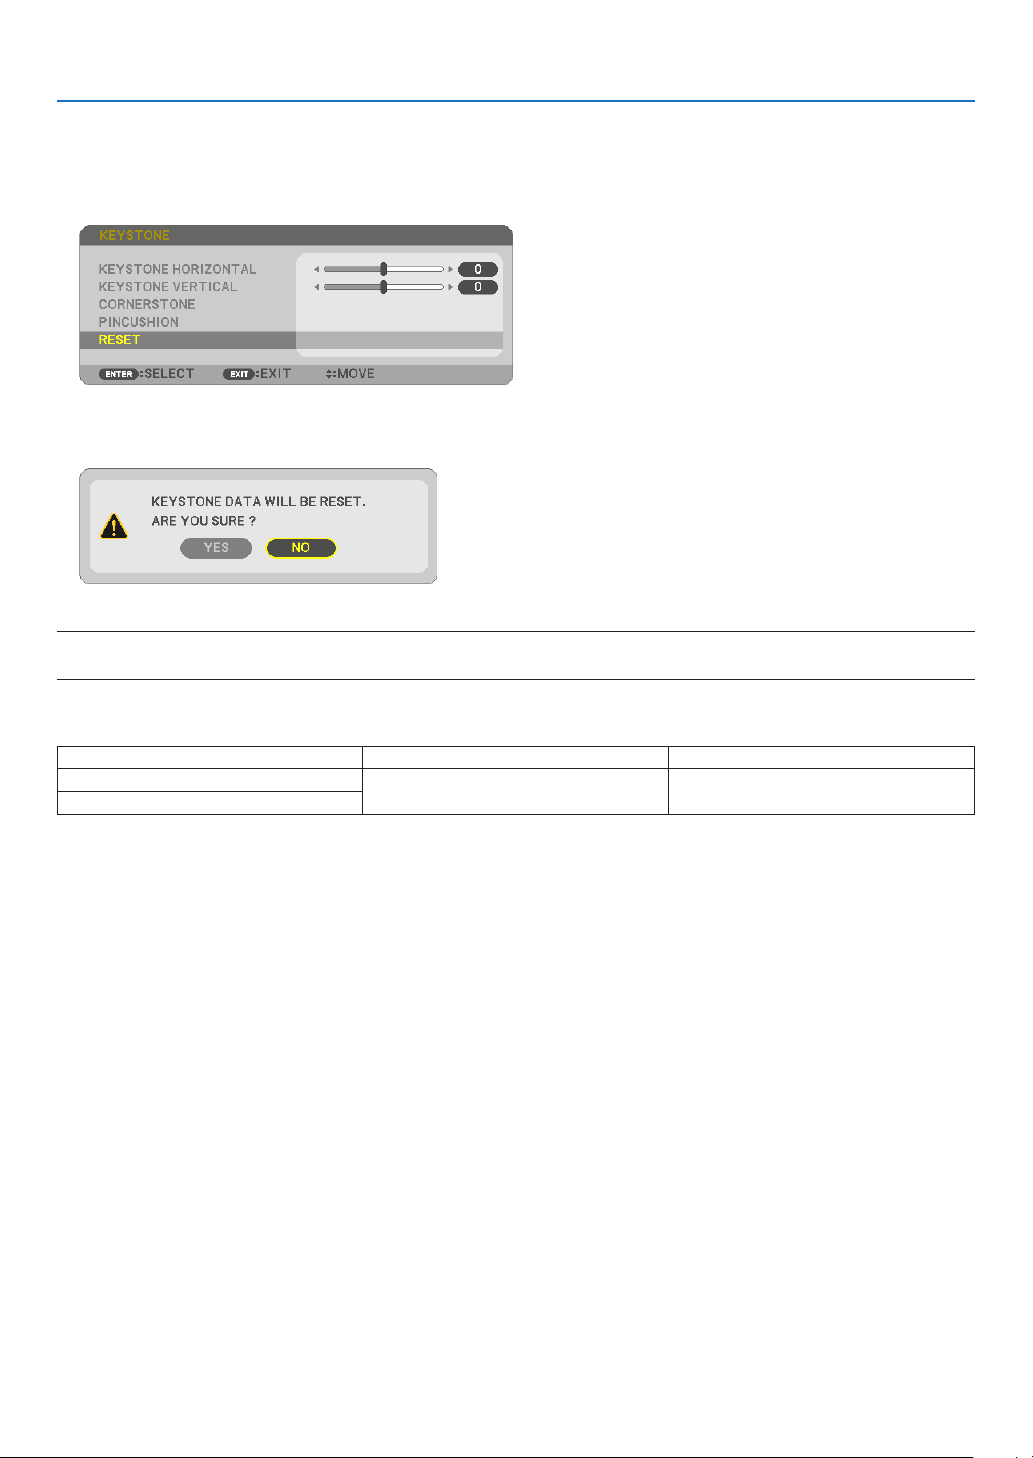
Resetthekeystoneandpincushionadjustmenttotheinitialvalue
1. PresstheKEYSTONEbuttonwithnomenudisplayed.
ON the displayed KEYSTONE menu, set the cursor at RESET using the ▼ button and press ENTER button.
• Conrmationmessageisdisplayedon.
2. Move the cursor onto YES using either ◀ or ▶ button and then press the ENTER.
NOTE:
• AlladjustedvaluessetintheKEYSTONEadjustmentareresettoinitialvalues
TIP:
AdjustablerangeoftheKEYSTONEandtheCORNERSTONE:
HorizontalDirection VerticalDirection
CORNERSTONE
Approx.±10°(Max) Approx.±10°(Max)
KEYSTONE
Adjustablerangemaybenarrowerdependingoninputsignal.
35
3. Convenient Features
❻
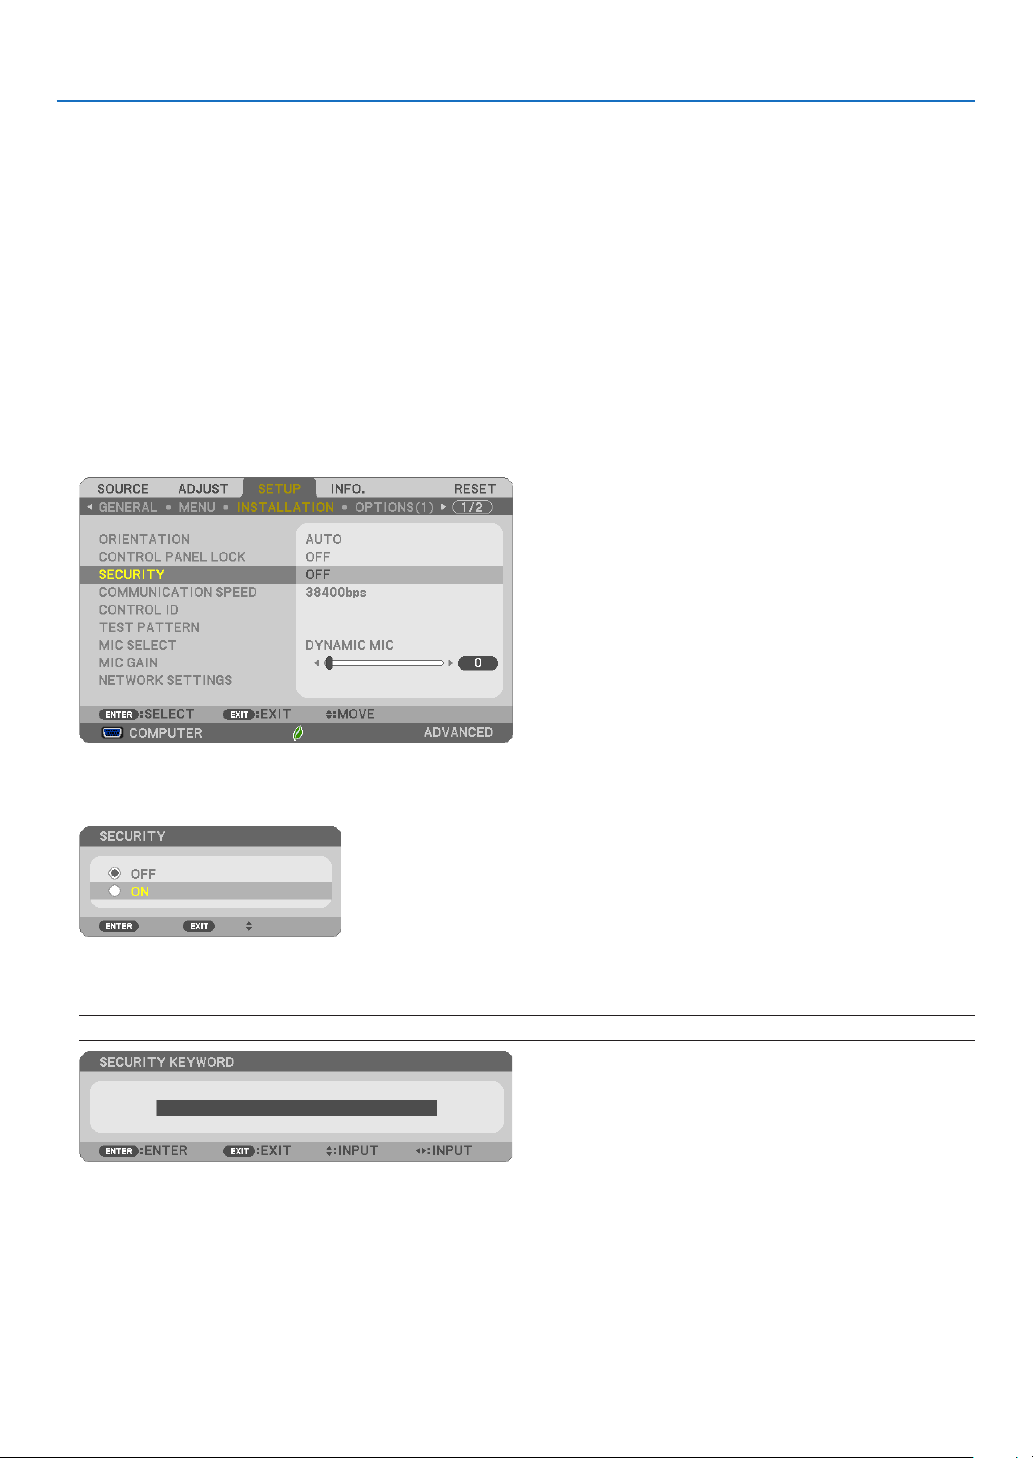
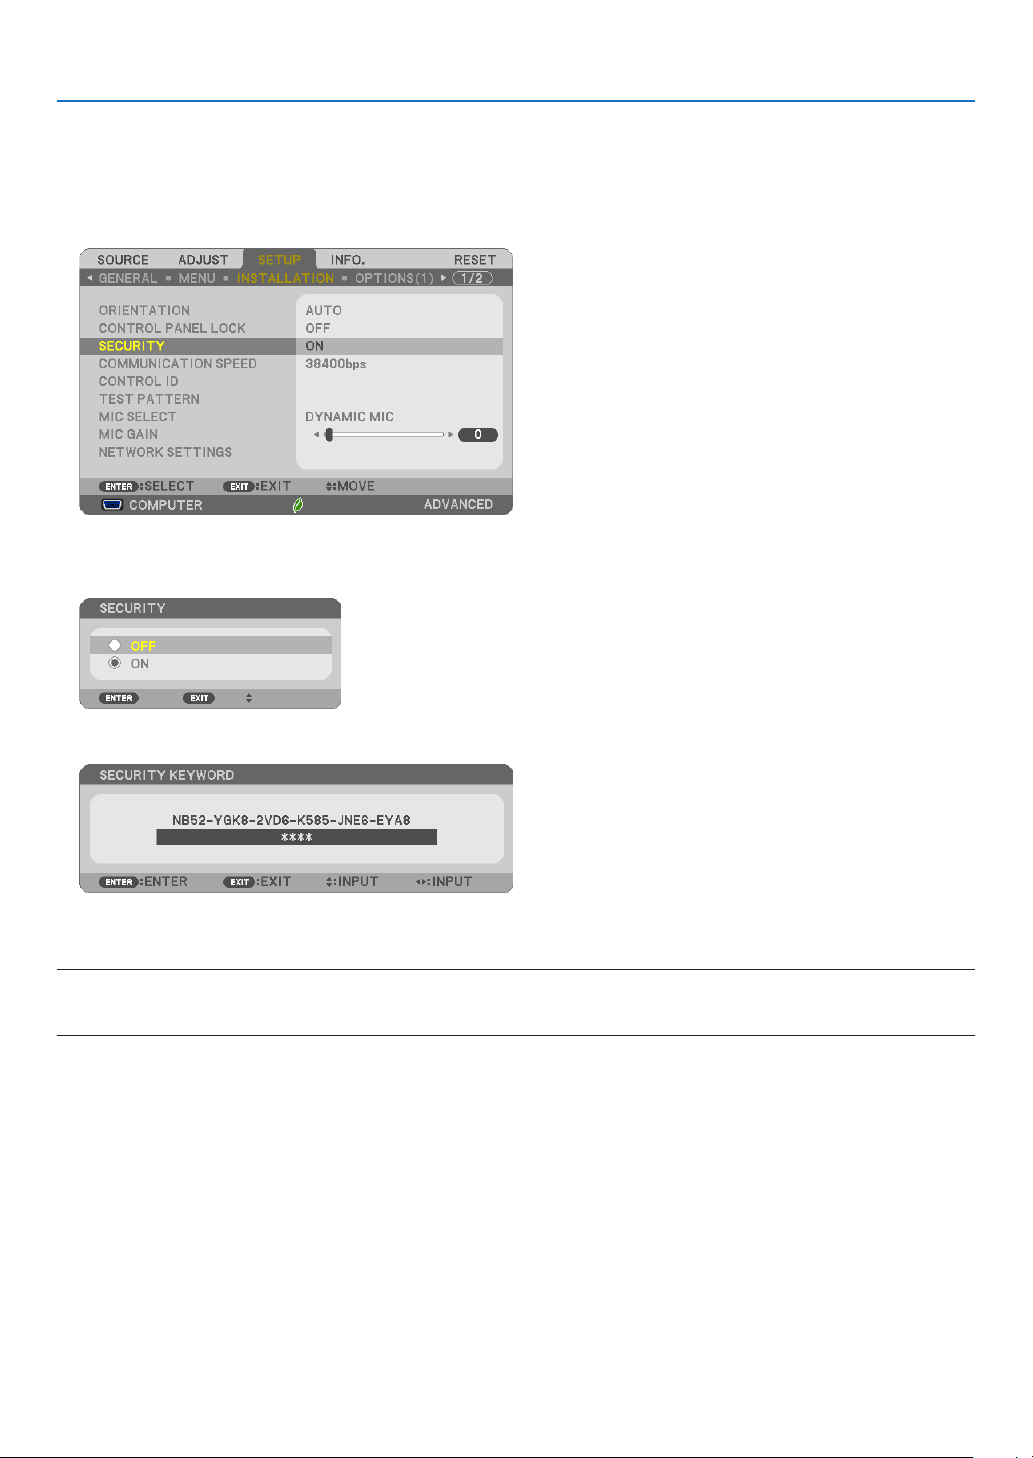
Preventing the Unauthorized Use of the Projector [SECURITY]
AkeywordcanbesetforyourprojectorusingtheMenutoavoidoperationbyanunauthorizeduser.Whenakeyword
isset,turningontheprojectorwilldisplaytheKeywordinputscreen.Unlessthecorrectkeywordisentered,thepro-
jectorcannotprojectanimage.
• The[SECURITY]settingcannotbecancelledbyusingthe[RESET]ofthemenu.
ToenabletheSecurityfunction:
1. Press the MENU button.
The menu will be displayed.
2. Press the ▶buttontwicetoselect[SETUP]andpressthe▼buttonortheENTERbuttontoselect[GEN-
ERAL].
3. Press the ▶buttontoselect[INSTALLATION].
4. Press the ▼buttonthreetimestoselect[SECURITY]andpresstheENTERbutton.
The OFF/ON menu will be displayed.
5. Press the ▼buttontoselect[ON]andpresstheENTERbutton.
The[SECURITYKEYWORD]screenwillbedisplayed.
6. Type in a combination of the four ▲▼◀▶ buttons and press the ENTER button.
NOTE:Akeywordmustbe4to10digitsinlength.
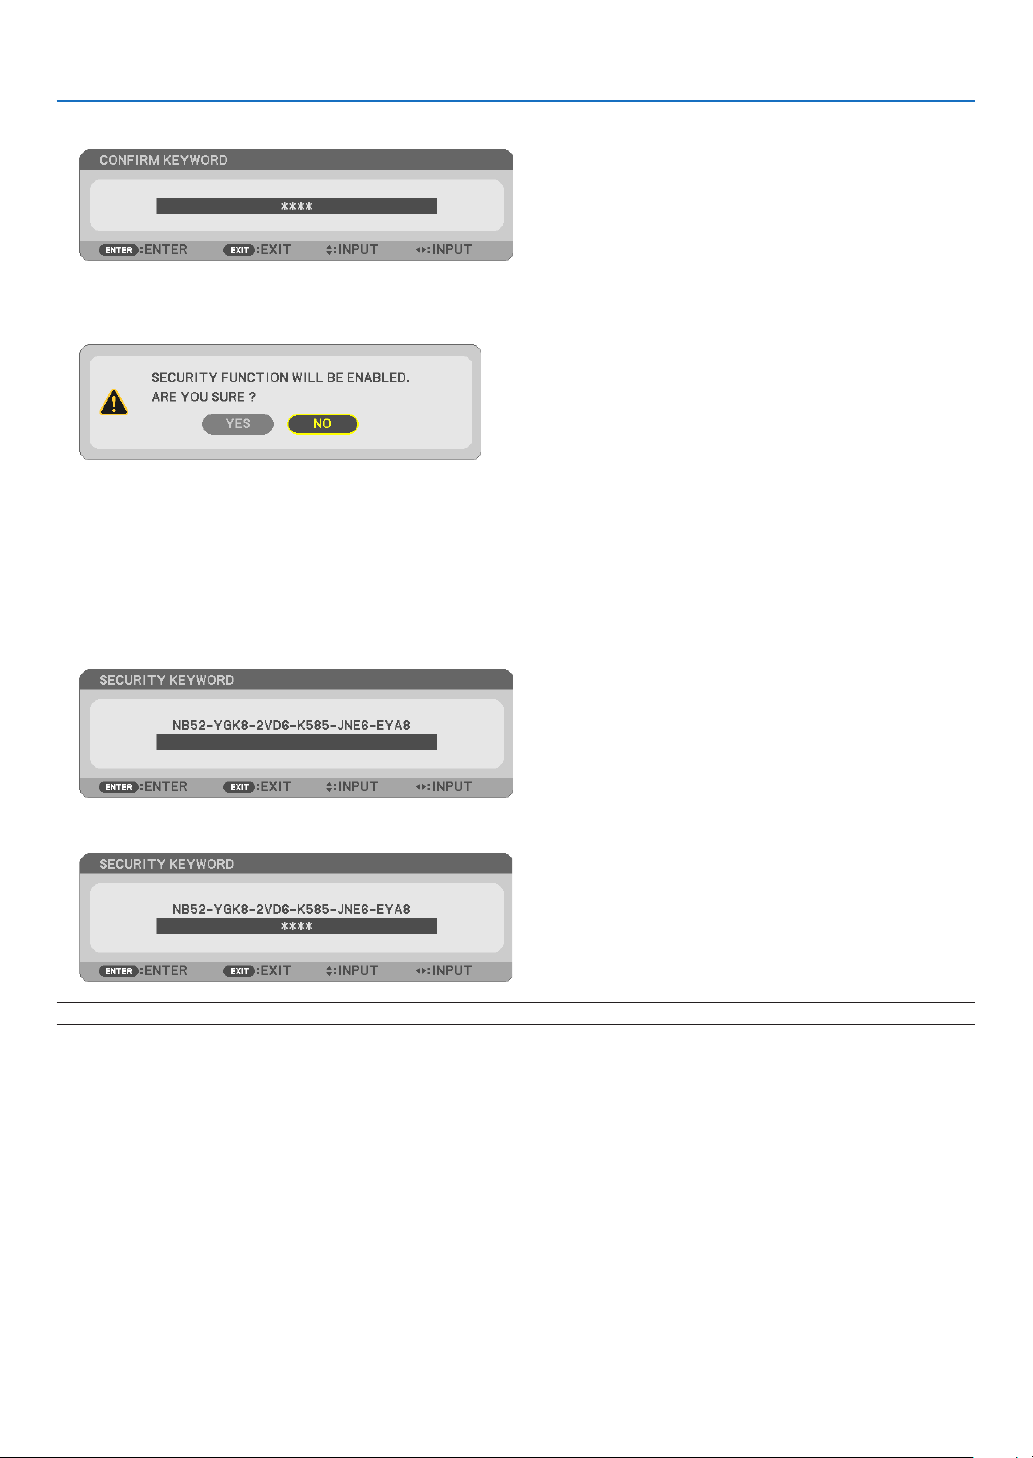
The[CONFIRMKEYWORD]screenwillbedisplayed.
36
3. Convenient Features
7. Type in the same combination of ▲▼◀▶ buttons and press the ENTER button.
The confirmation screen will be displayed.
8. Select[YES]andpresstheENTERbutton.
TheSECURITYfunctionhasbeenenabled.
Toturnontheprojectorwhen[SECURITY]isenabled:
1. Press the POWER button.
Theprojectorwillbeturnedonanddisplayamessagetotheeffectthattheprojectorislocked.
2. Press the MENU button.
3. Type in the correct keyword and press the ENTER button. The projector will display an image.
NOTE:Thesecuritydisablemodeismaintaineduntilthemainpoweristurnedofforunpluggingthepowercord.
37
3. Convenient Features
TodisabletheSECURITYfunction:
1. Press the MENU button.
The menu will be displayed.
2.Select[SETUP]→[INSTALLATION]→[SECURITY]andpresstheENTERbutton.
The OFF/ON menu will be displayed.
3. Select[OFF]andpresstheENTERbutton.
TheSECURITYKEYWORDscreenwillbedisplayed.
4. Type in your keyword and press the ENTER button.
Whenthecorrectkeywordisentered,theSECURITYfunctionwillbedisabled.
NOTE:Ifyouforgetyourkeyword,contactyourdealer.Yourdealerwillprovideyouwithyourkeywordinexchangeforyourrequest
code.YourrequestcodeisdisplayedintheKeywordConrmationscreen.Inthisexample[NB52-YGK8-2VD6-K585-JNE6-EYA8]
isarequestcode.
38
3. Convenient Features
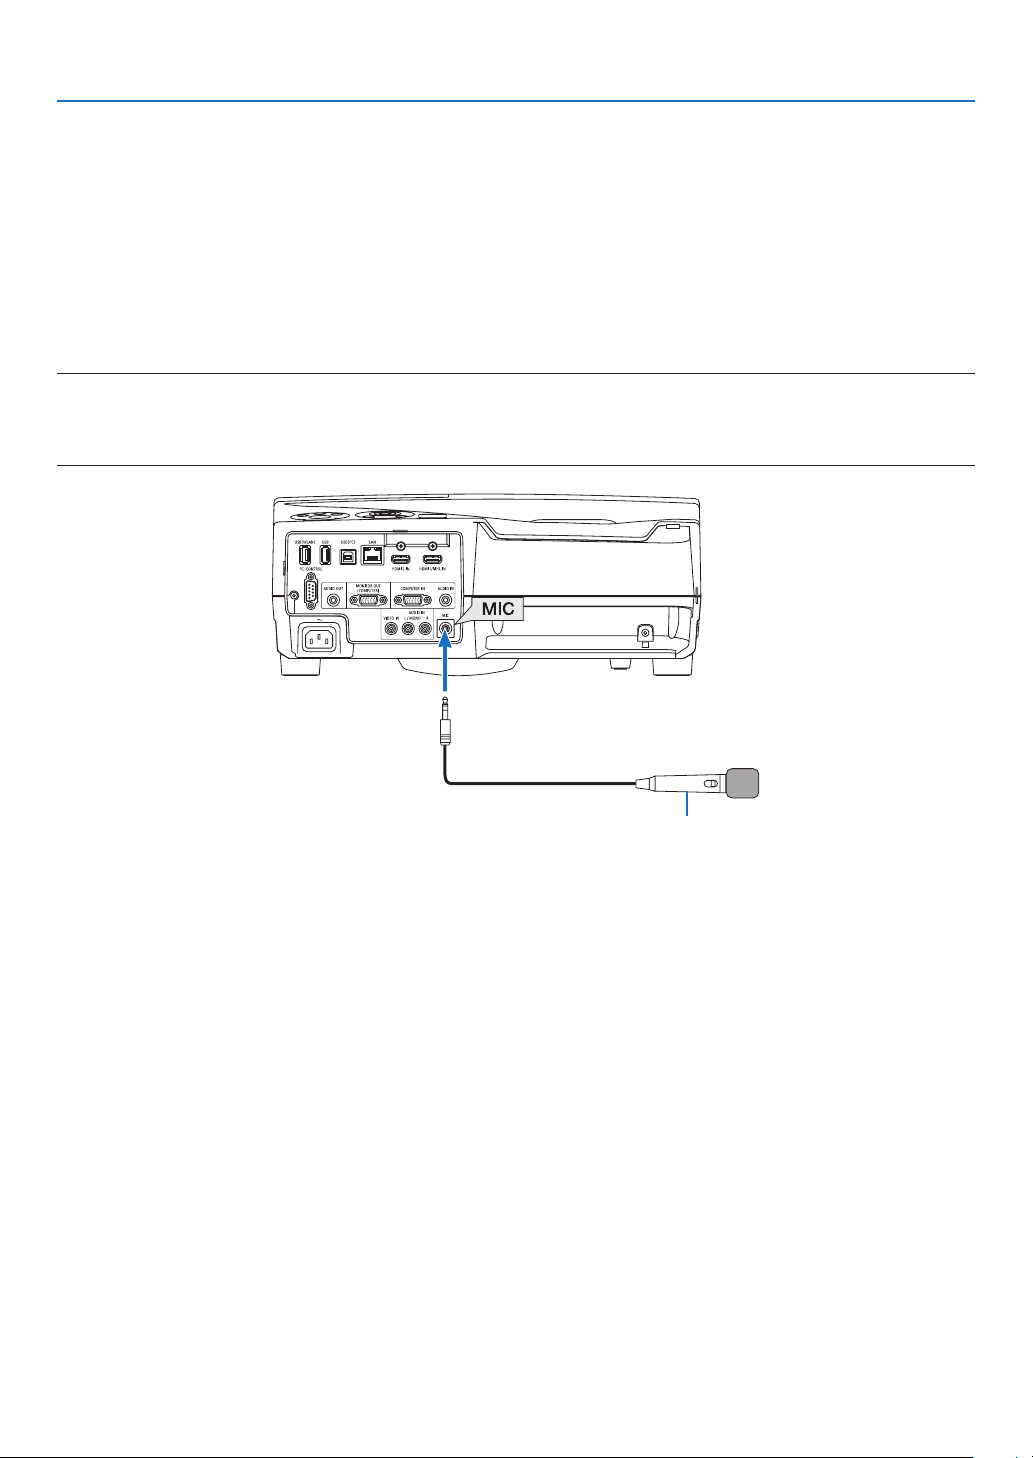
❼ Connecting Your Microphone
ConnectingacommerciallyavailabledynamicmicrophoneorcondensermictotheMICinputjackallowsyoutooutput
yourmicsoundfromthebuilt-inspeaker.
SoundinputfromallinputterminalsincludingAPPSandUSB-Bwillbeheardfromthespeakerwithyourmicrophone
voice.
Selectthemicrophonetype(dynamicmicrophoneorcondensermicrophone)fromthemenu[SETUP]→[INSTAL-
LATION]→[MICSELECT].
Microphonesensitivitycanbeadjusted.Fromthemenu,select[SETUP]→[INSTALLATION]→[MICGAIN].(→page64)
NOTE:
• DependingoninputconditionofHDMI1/MHLorHDMI2signal,theseisacasesoundmaynotoutput.
• DonotconnectanaudiosignaltotheMICinputjack.Doingsomaycauseexcessivelyloudsound,resultinginadamagetothe
speaker.
Dynamic microphone or condenser microphone
39
3. Convenient Features
❽
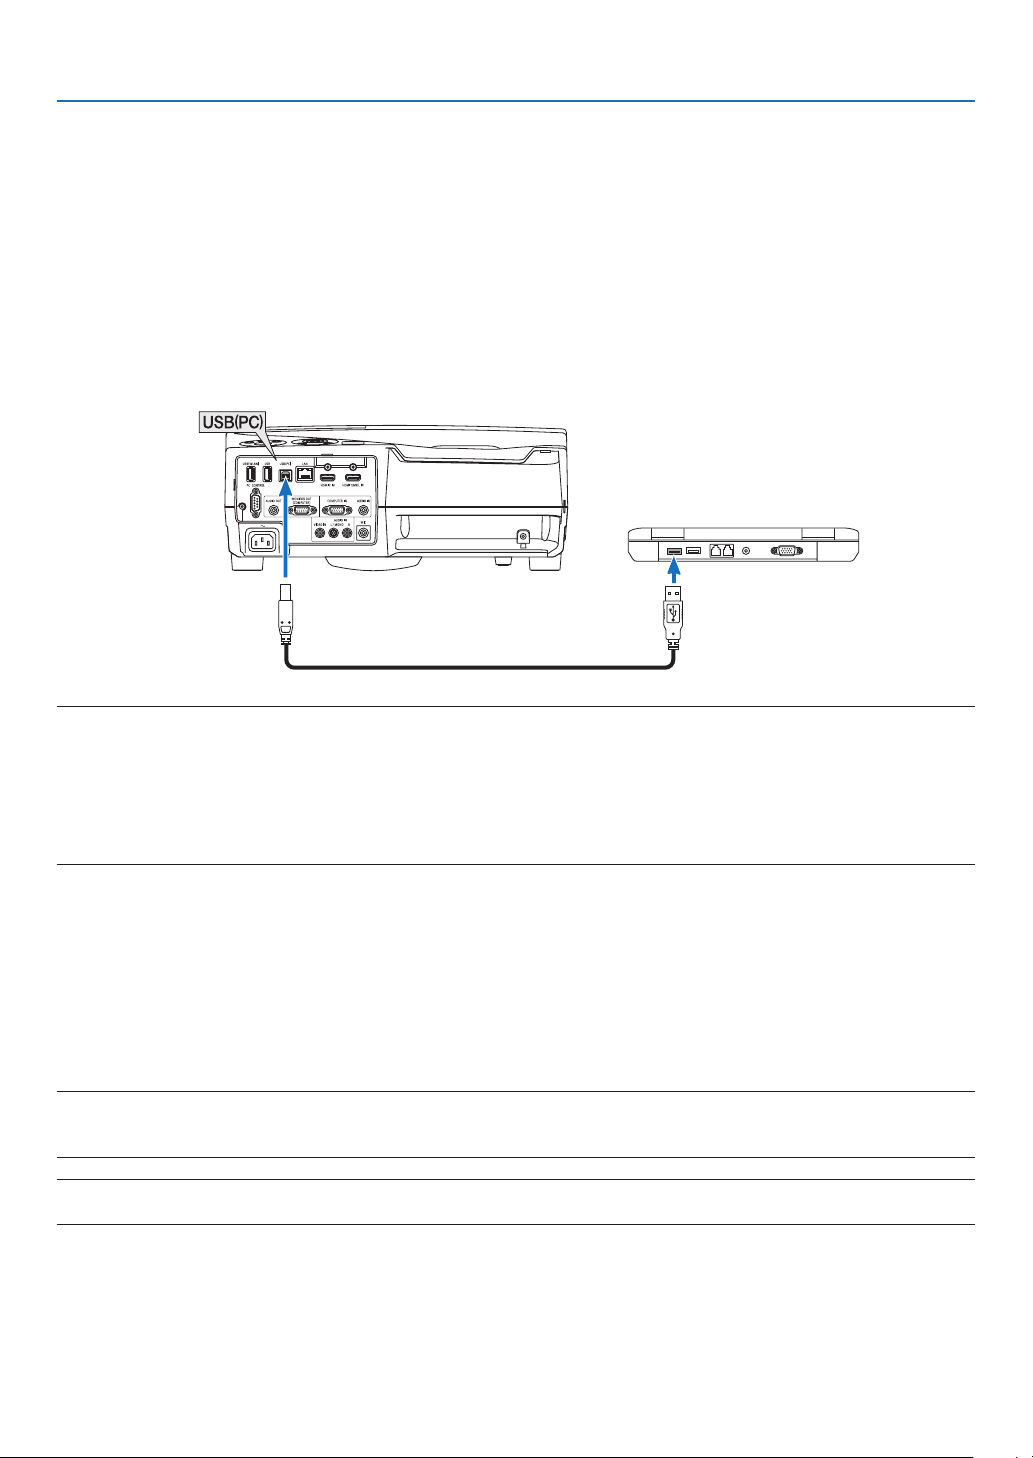
Operating Your Computer’s Mouse Functions from the
Projector’s Remote Control via the USB Cable (Remote Mouse
Function)
Thebuilt-inremotemousefunctionenablesyoutooperateyourcomputer’smousefunctionsfromthesuppliedremote
controlwhentheprojectorisconnectedtoacomputerviatheUSBcablesuppliedwiththeprojector(compatiblewith
USB2.0specications).
PresstheUSB-Bbuttonontheremotecontrol,orselect[USB-B]forthesourceontheOn-screenmenu.
• UsingtheUSBcabletoconnecttheprojectorandthecomputerwillalsostartUSBDisplayfunction.
• WhenyouconnectyourcomputerandtheprojectorbyaUSBcableforthersttime,yourcomputerwillreadin
thesoftware.ItwilltakefewminutesforstartinguptheUSBdisplay.
USB cable (supplied)
NOTE:
• AUSBcablemustsupporttheUSB2.0Specications.
• Themousefunctioncanbeusedwiththefollowingoperatingsystems:
Windows8,Windows7,orWindowsVista
• Waitatleast5secondsafterdisconnectingtheUSBcablebeforereconnectingitandviceversa.Thecomputermaynotidentify
theUSBcableifitisrepeatedlyconnectedanddisconnectedinrapidintervals.
• ConnecttheprojectortothecomputerwithaUSBcableafterstartingthecomputer.Failuretodosomayfailtostartthecomputer.
Operatingyourcomputer’smousefromtheremotecontrol
Youcanoperateyourcomputer’smousefromtheremotecontrol.
PAGE ▽/△ Button ���������������������������scrolls the viewing area of the window or to move to the previous or next slide in PowerPoint
on your computer�
▲▼◀▶ Buttons ������������������������������moves the mouse cursor on your computer�
MOUSE L-CLICK/ENTER Button ������works as the mouse left button�
MOUSE R-CLICK Button ������������������works as the mouse right button�
NOTE:
• Whenyouoperatethecomputerusingthe▲▼◀or▶buttonwiththemenudisplayed,boththemenuandthemousepointer
willbeaffected.Closethemenuandperformthemouseoperation.
TIP:YoucanchangethePointerspeedontheMousePropertiesdialogboxontheWindows.Formoreinformation,seetheuser
documentationoronlinehelpsuppliedwithyourcomputer.
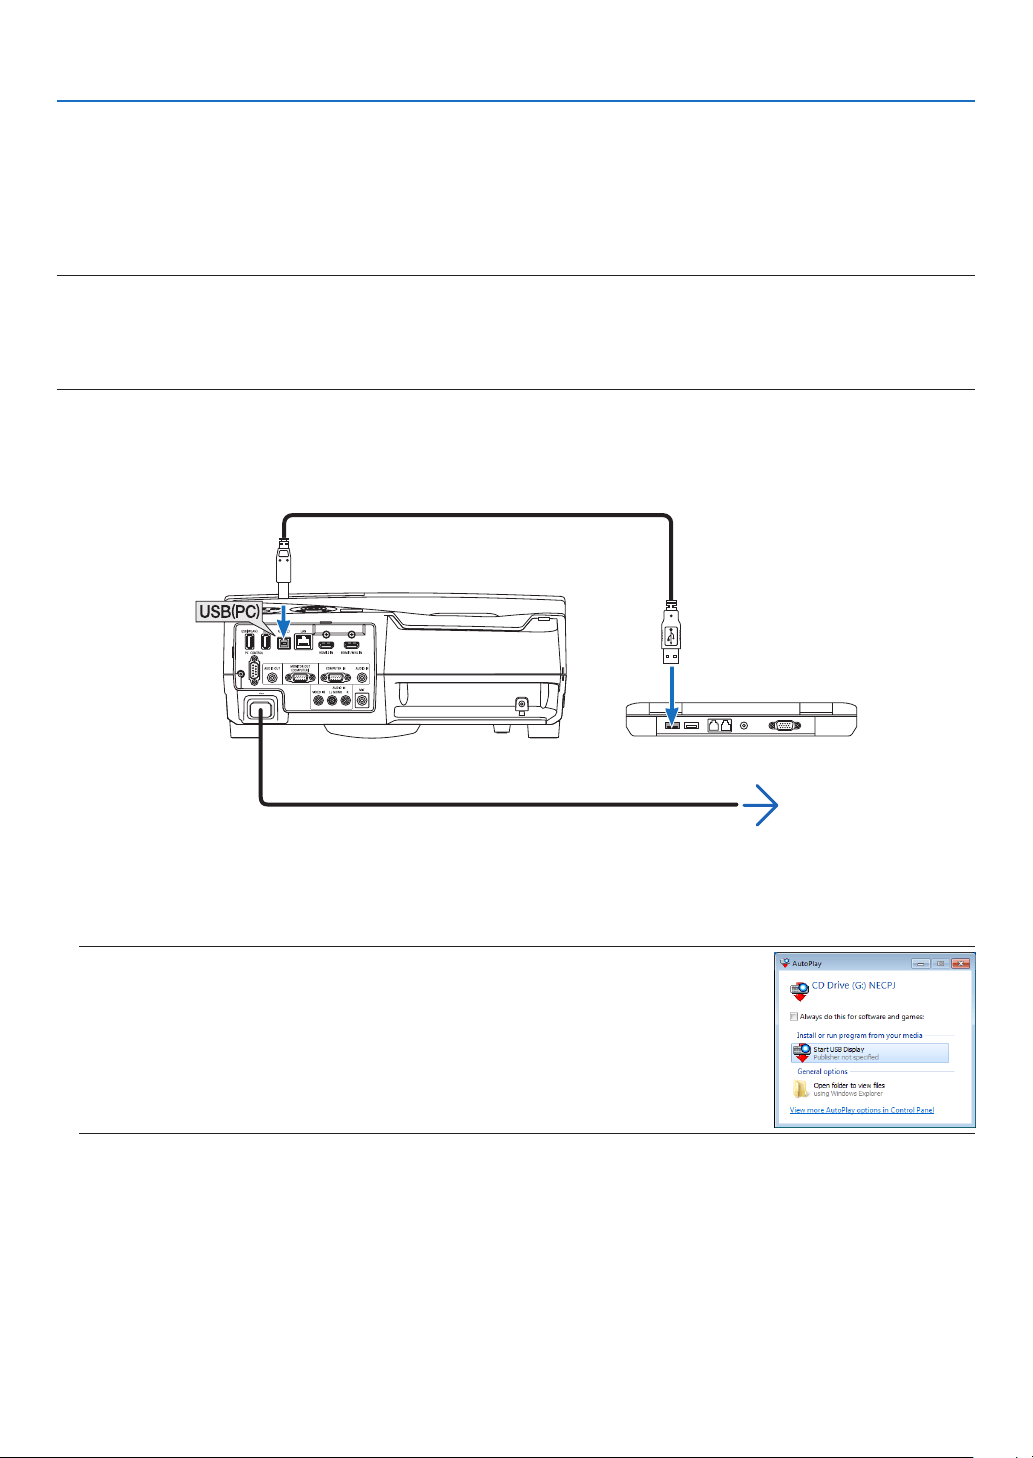
40
3. Convenient Features
❾ Projecting Your Computer’s Screen Image from the
Projector via the USB Cable (USB Display)
UsingtheUSBcablesuppliedwiththeprojector(compatiblewithUSB2.0specications)toconnectthecomputerwith
theprojectorallowsyoutosendyourcomputerscreenimagetotheprojectorfordisplaying.PowerOn/Offandsource
selectionoftheprojectorcanbedonefromyourcomputerwithoutconnectingacomputercable(VGA).
NOTE:
• USBDisplayusesfunctionsofImageExpressUtilityLitecontainedonNECProjectorCD-ROM(→page93).
StartingUSBDisplay,however,willnotinstallImageExpressUtilityLiteonyourcomputer.ThisisbecauseUSBDisplayexecutes
theprojector’sprogramonly.
• USBDisplaywillnotworkin[NORMAL]of[STANDBYMODE].(→page67)
1. Start the computer.
2. Turnontheprojectorandchangetheinputsourceto[USB-B].
3. Use the USB cable to connect the computer with the projector.
USB cable (supplied)
→ To wall outlet
Power cord (supplied)
Themessage“Theprojectorisinstandbymode.Connectit?”willbedisplayedonthecomputerscreen.
• ThecontrolwindowofImageExpressUtilityLitewillbedisplayedonthetopofthescreen.
NOTE:Dependingonthecomputersetting,the“AutoPlay”windowmaybedisplayedwhenthe
computerdetectstheconnectiontotheprojector.Ifthishappens,clickthe“StartUSBDisplay”
window.
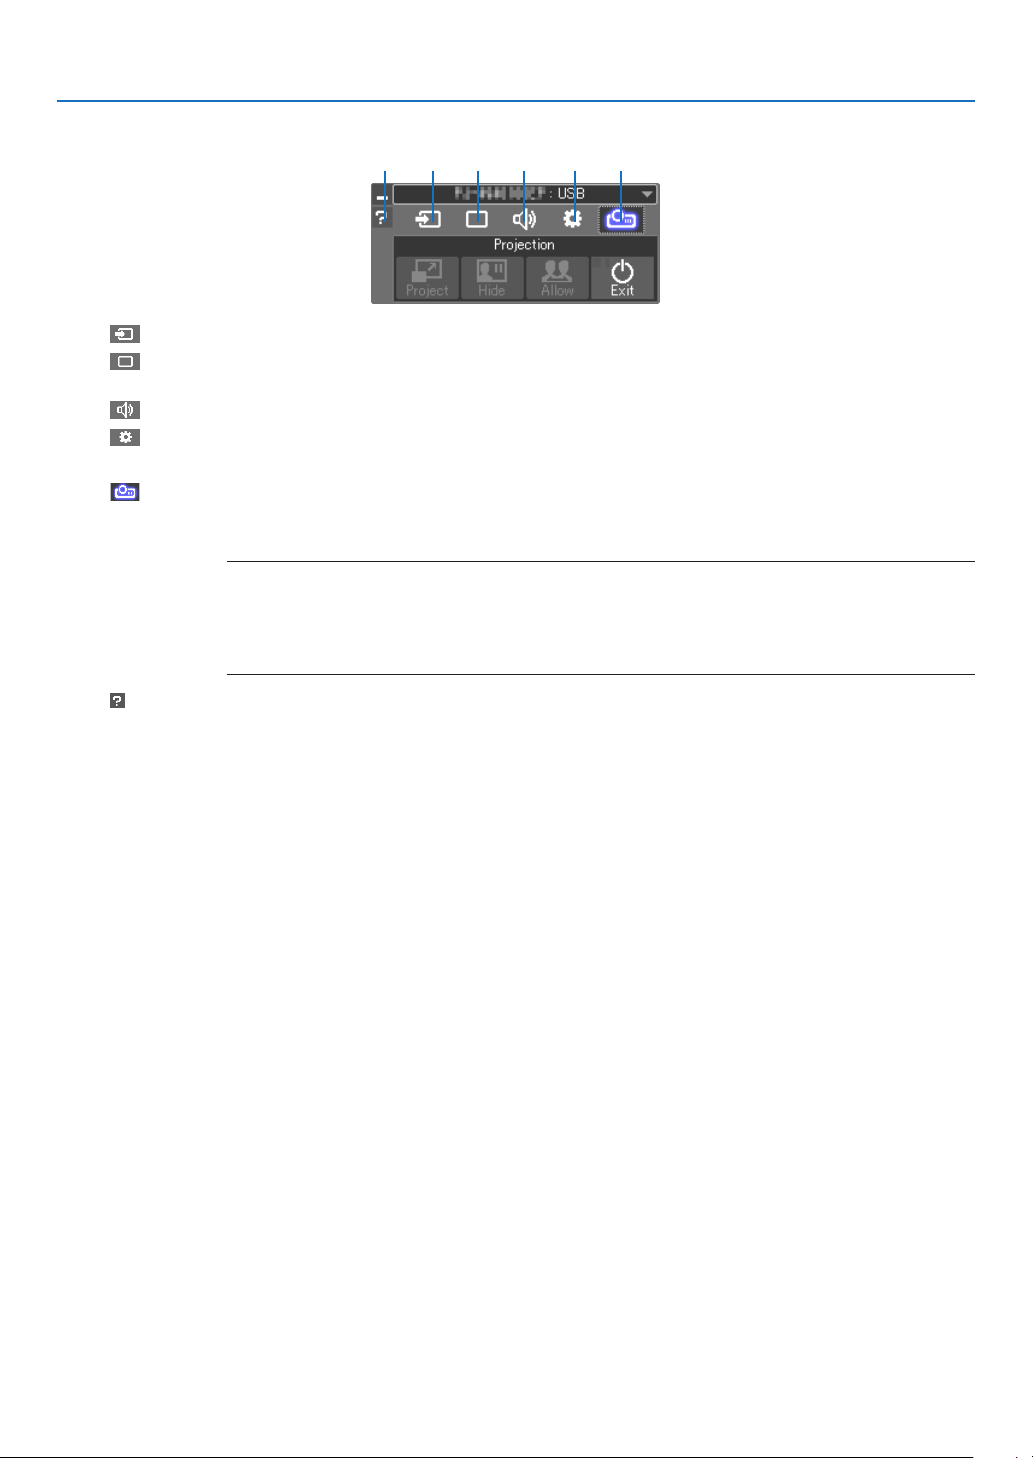
41
3. Convenient Features
4. Operate the control window.
(1) (2) (3) (4) (5)(6)
(1) (Source) ��� Selects an input source of the projector�
(2) (Picture) ��� Turns on or off AV-MUTE (Picture mute), FREEZE (Freeze a picture), display, and GCT (geometric correction
tool)� Refer to page 98 about GCT�
(3) (Sound) ���� Turns on or off AV-MUTE (Sound mute), play the sound and control the volume�
(4) (Others) ���� Uses for “Update”, “HTTP Server”*, “Settings” and “Information”�
* The HTTP Server cannot be selected when a USB cable is connected�
(5) (Project) ��� Enables to change screen size for presentation, menu indication (hide/indicate), interruption prohibition/
accept interruption and finishing the USB Display�
It also enables to power off the projector at the same time with finishing the USB Display�
NOTE:
• WhentheUSBcableisconnected,youcannotselecttochangebelow:
- Screensizeforpresentation
- menuindication(hide/indicate)
- Interruptionprohibition/acceptinterruption
(6) (Help) ����������� Displays the help of Image Express Utility Lite�

42
3. Convenient Features
❿ Using the stylus pen (Calibration)
Eitherwhenusingthestyluspenforthersttimeorchangingtheinstallationplaceoftheprojector,makesureto
performcalibrationforlettingtheprojectortorecognizethestyluspenpositionproperly.
Therearethreeoptionsforthepensetup.
AUTOCALIBRATION Adjustthestyluspenpositionautomatically.Selectthisforeasyadjustment.
MANUALCALIBRATION Adjustthestyluspenpositionmanually.Selectthisforprecisepositionadjustment
asforpermanentprojectorinstallation.
REMOTEPEN Operationbyacomputermousecanbeperformedbythestyluspentouch.
Forutilizingtheremotepen,connecttheUSB-BportontheprojectorandtheUSB-A
portonthecomputerbythesuppliedUSBcable.
NOTE:
• Beforestartingtousetheremotepen,installthelatestIWBSetupSoftwareforthewhite
boardkitontothecomputerandperformcalibration.ThelatestIWBSetupSoftwarefor
thewhiteboardkitisavailabletodownloadfromourwebsite:
http://www.nec-display.com/dl/en/pj_soft/lineup.html
Afterperformingcalibrationofthestyluspen,youcanusethestyluspenontheWHITEBOARD,etc.intheAPPSMENU.
TIP:
• Onthe[PENSETTINGS],youcanalsoperformtheadjustmentoftheseparatelysoldTouchModulealso.Abouttheinformation
foradjustment,referthemanualuploadedonourwebsite.
Automatic Calibration
1. Press APPS button on the remote.
The APPS MENU is displayed on.
2. Select[TOOL]→[PENSETTINGS]
The[PENSETTINGS]screenisdisplayedon.
3. Setthefocusonthe[AUTOCALIBRATION]andthenpressENTERbutton.
Start calibration.
Position adjustment will be completed within 5 to 8 seconds and the message of the calibration completion will be
displayed on.
Manual Calibration
1. Setthefocusonthe[MANUALCALIBRATION]inthe[PENSETTINGS]andpressENTER.
The projection screen will switch to the manual calibration screen and a red dot will be indicated at the left top of
the screen.
2. Touch the center of dot by the stylus pen.
• Aftertouchingthereddot,itmovesto25positionsinorder.
3. Touch all 25 positions.
Complete the position adjustment and the message of calibration completion will be displayed on.
NOTE:
• Youmaynotabletoperformmanualcalibrationbytheaffectionofthelightfromoutside.

43
3. Convenient Features
Remote Pen
1. Same as the “❽OperatingYourComputer’sMouseFunctionsfromtheProjector’sRemoteControlviathe
USBCable(RemoteMouseFunction)”,connecttheprojectorandthecomputerbythesuppliedUSBcable.
(→ page 39)
2. Setthefocusonthe[REMOTEPEN]inthe[PENSETTINGS]andpressENTER.
Thecheckedmarkisadded.
3. Press the USB-B button on the remote.
• Orselect[USB-B]asthe[SOURCE]ontheonscreenmenu.
The computer screen will be displayed on.
4. Start the latest IWB Setup Software for the white board kit onto the computer and perform calibration.
The stylus pen becomes available for operations as a computer mouse.
NOTE:
• Whiletheremotepenisavailable,theoperationsbyacomputermousecanbeperformedbythestyluspenbuttheoperations
ontheprojector[APPSMENU]andthe[WHITEBOARD]cannotbeperformedbythestyluspen.
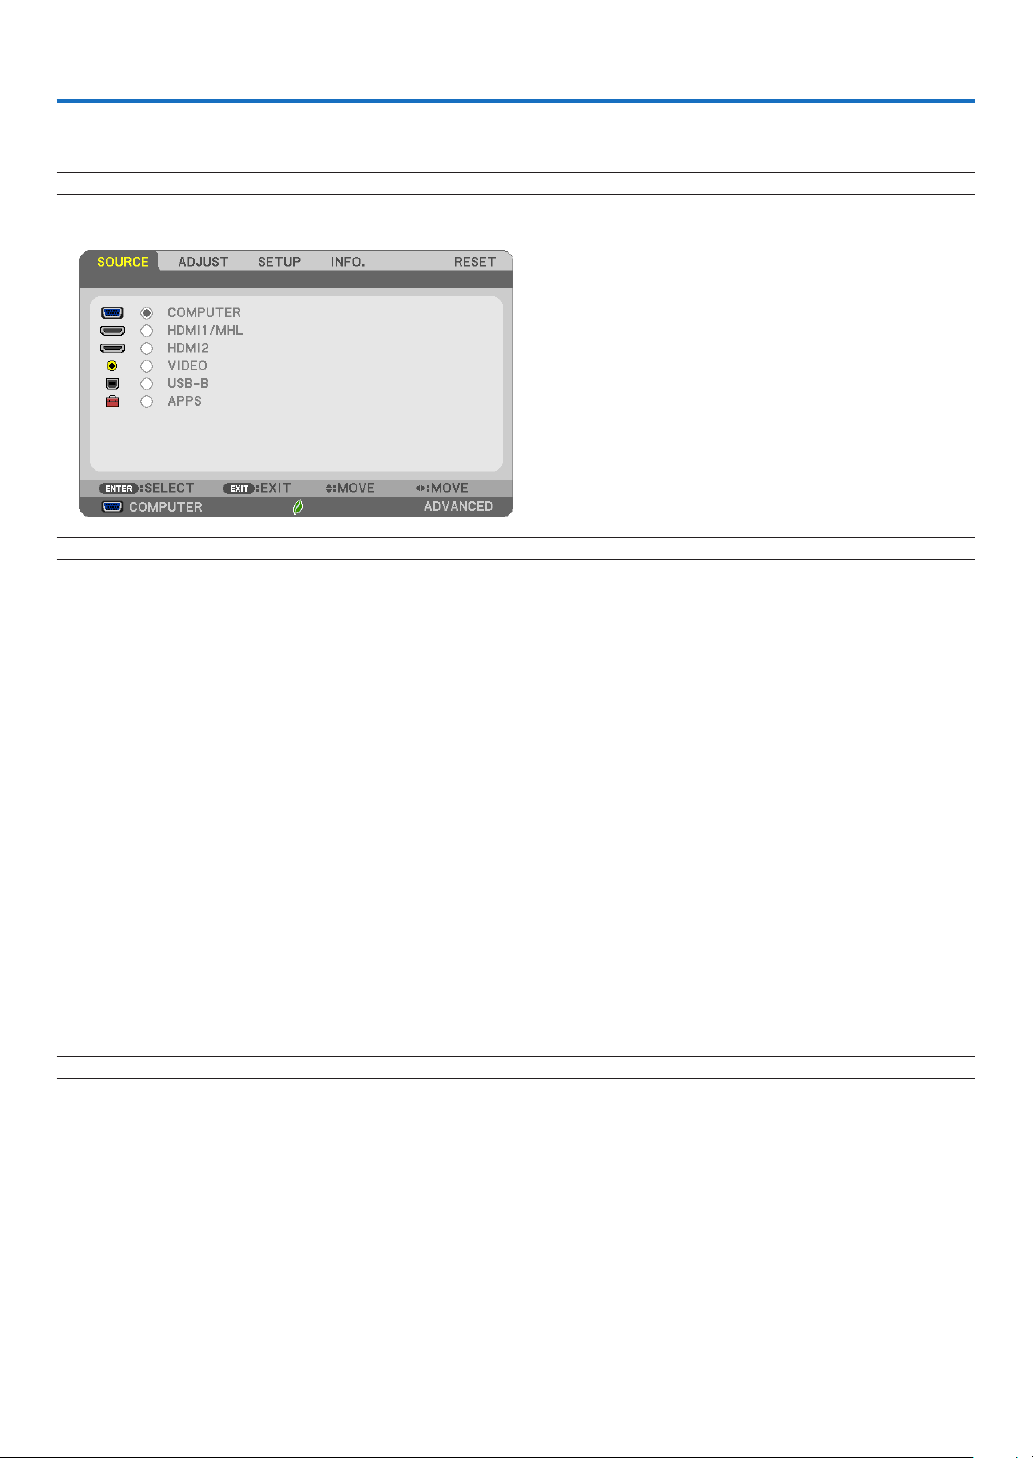
44
4. Using On-Screen Menu
❶ Using the Menus
NOTE:Theon-screenmenumaynotbedisplayedcorrectlywhileinterlacedmotionvideoimageisprojected.
1. Press the MENU button on the remote control or the projector cabinet to display the menu.
NOTE:ThecommandssuchasENTER,EXIT,▲▼,◀▶inthebottomshowavailablebuttonsforyouroperation.
2. Press the ◀▶ buttons on the remote control or the projector cabinet to display the submenu.
3. Press the ENTER button on the remote control or the projector cabinet to highlight the top item or the first
tab.
4. Use the ▲▼ buttons on the remote control or the projector cabinet to select the item you want to adjust or
set.
You can use the ◀▶ buttons on the remote control or the projector cabinet to select the tab you want.
5. Press the ENTER button on the remote control or the projector cabinet to display the submenu window.
6. Adjust the level or turn the selected item on or off by using the ▲▼◀▶ buttons on the remote control or
the projector cabinet.
Changesarestoreduntiladjustedagain.
7. Repeat steps 2 -6 to adjust an additional item, or press the EXIT button on the remote control or the projec-
tor cabinet to quit the menu display.
NOTE:Whenamenuormessageisdisplayed,severallinesofinformationmaybelost,dependingonthesignalorsettings.
8. Press the MENU button to close the menu.
To return to the previous menu, press the EXIT button.
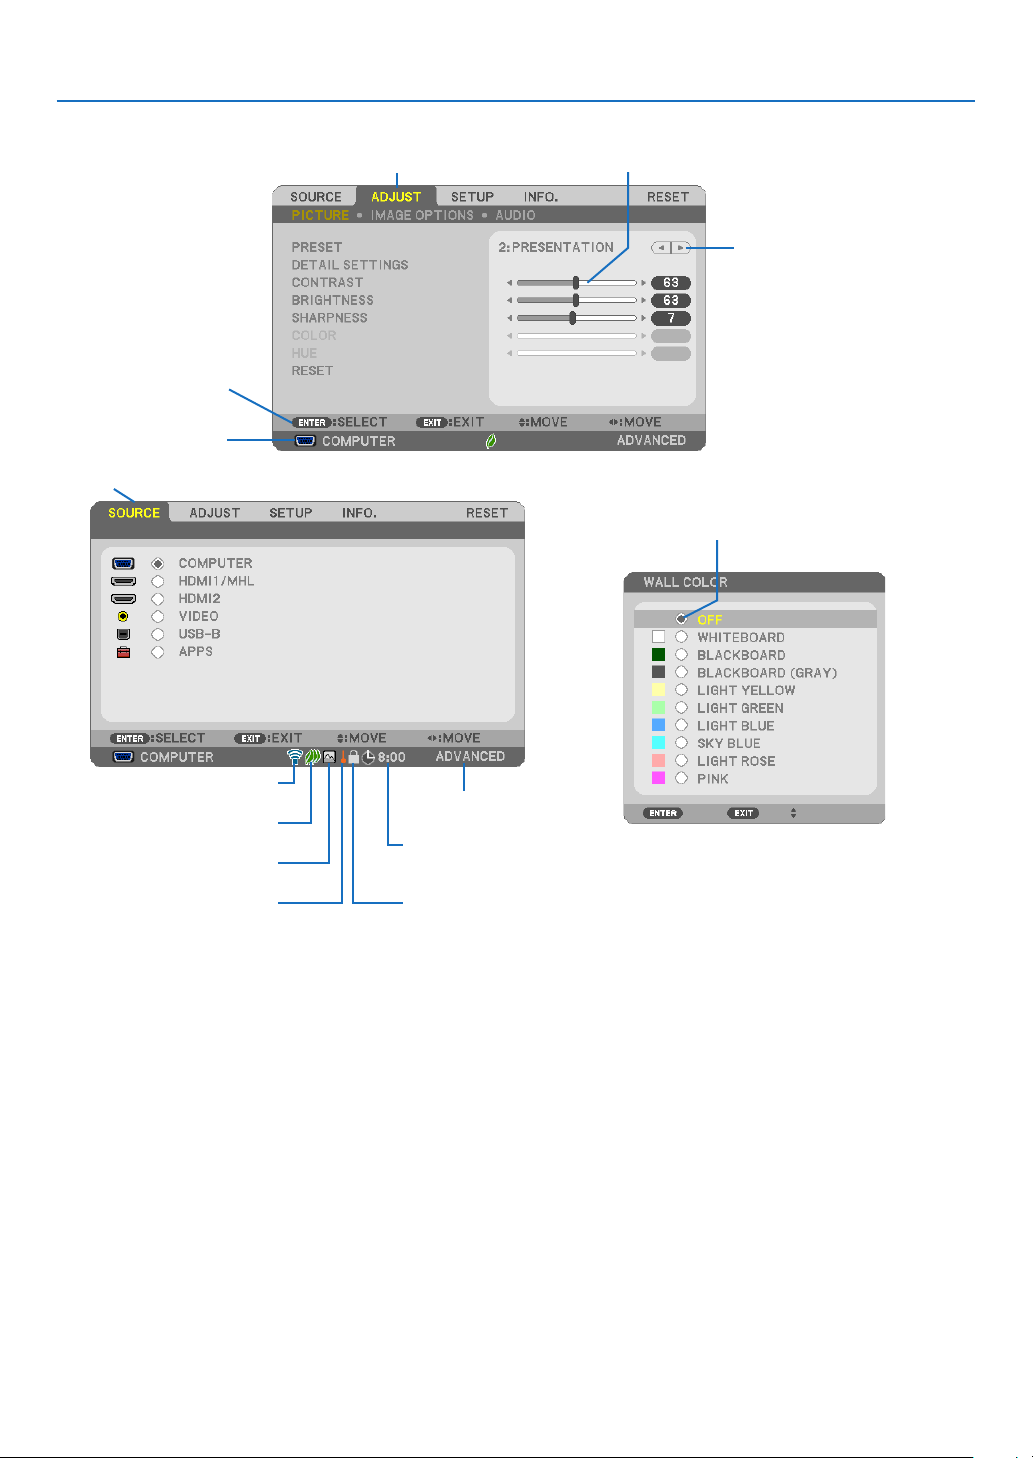
45
4. Using On-Screen Menu
Menu Elements
Slide bar
Solid triangle
Ta b
Radio button
High Altitude symbol
ECO mode symbol
Wireless symbol
Menuwindowsordialogboxestypicallyhavethefollowingelements:
Highlight ����������������������������� Indicates the selected menu or item�
Solid triangle ����������������������Indicates further choices are available� A highlighted triangle indicates the item is active�
Tab ��������������������������������������Indicates a group of features in a dialog box� Selecting on any tab brings its page to the front�
Radio button ����������������������� Use this round button to select an option in a dialog box�
Source ��������������������������������Indicates the currently selected source�
Off Timer remaining time ���� Indicates the remaining countdown time when the [OFF TIMER] is preset�
Slide bar �����������������������������Indicates settings or the direction of adjustment�
ECO mode symbol ��������������Indicates ECO MODE is set�
Key Lock symbol ����������������Indicates the [CONTROL PANEL LOCK] is enabled�
Thermometer symbol ���������Indicates the [ECO MODE] is forcibly set to [NORMAL] mode because the internal temperature is
too high�
High Altitude symbol ����������Indicates the [FAN MODE] is set to [HIGH ALTITUDE] mode�
Wireless symbol �����������������Indicate the wireless LAN connection is enabled�
Menu mode ������������������������Indicate the [ADVANCED] menu or [BASIC] menu�
Source
Available buttons
Thermometer symbol KeyLocksymbol
Off Timer remaining time
Menu mode
Highlight
46
4. Using On-Screen Menu
❷ List of Menu Items
Somemenuitemsarenotavailabledependingontheinputsource.Thebelowlistedmenuitemsareontheadvanced
menu.Themark(B)isaddedtotheitemsonthebasicmenu.
Referto88pagesabouttheAPPSMENU.
Menu Item Default Options
SOURCE COMPUTER (B) *
HDMI1/MHL (B) *
HDMI2 (B) *
VIDEO (B) *
USB-B (B) *
APPS (B) *
ADJUST PICTURE PRESET * 1–7
DETAIL SETTINGS GENERAL
REFERENCE * HIGH-BRIGHT, PRESENTATION, VIDEO, MOVIE, GRAPHIC, sRGB,
DICOM SIM�
GAMMA
CORRECTION*
1
DYNAMIC, NATURAL, BLACK DETAIL
SCREEN SIZE*
2
* LARGE, MEDIUM, SMALL
COLOR TEMPERATURE * 5000, 6500, 7800, 8500, 9300, 10500
DYNAMIC CONTRAST * OFF, ON
IMAGE MODE * STILL, MOVIE
COLOR ENHANCEMENT * OFF, LOW, MIDDLE, HIGH
WHITE BALANCE
CONTRAST R 0
CONTRAST G 0
CONTRAST B 0
BRIGHTNESS R 0
BRIGHTNESS G 0
BRIGHTNESS B 0
CONTRAST (B) 63
BRIGHTNESS (B) 63
SHARPNESS (B) 7
COLOR (B) 31
HUE (B) 31
RESET (B)
IMAGE OPTIONS CLOCK *
PHASE *
HORIZONTAL *
VERTICAL *
OVERSCAN * AUTO, 0[%], 5[%], 10[%]
ASPECT RATIO * AUTO, 4:3, 16:9, 15:9, 16:10, LETTERBOX, NATIVE
AUDIO VOLUME (B)
SETUP GENERAL DIGITAL ZOOM (B) 100 70 to 100
KEYSTONE (B) KEYSTONE HORIZONTAL 0
KEYSTONE VERTICAL 0
CORNERSTONE 0
PINCUSHION 0 TOP, BOTTOM, LEFT, RIGHT, REFERENCE POSITION
RESET
WALL COLOR (B) OFF OFF, WHITEBOARD, BLACKBOARD, BLACKBOARD (GRAY), LIGHT
YELLOW, LIGHT GREEN, LIGHT BLUE, SKY BLUE, LIGHT ROSE, PINK
ECO MODE (B) AUTO ECO OFF, AUTO ECO, NORMAL, ECO
CLOSED CAPTION OFF OFF, CAPTION1, CAPTION2, CAPTION3, CAPTION4, TEXT1, TEXT2,
TEXT3, TEXT4
OFF TIMER (B) OFF OFF, 0:30, 1:00, 2:00, 4:00, 8:00, 12:00, 16:00
TOOLS (B)
LANGUAGE (B) ENGLISH ENGLISH, DEUTSCH, FRANÇAIS, ITALIANO, ESPAÑOL, SVENSKA, 日
本語
DANSK, PORTUGUÊS, EŠTINA, MAGYAR, POLSKI, NEDERLANDS,
SUOMI
NORSK, TÜRKÇE, РУССКИЙ,
, Ελληνικά, 中文, 한국어,
TIẾNG ViỆT
ROMÂNĂ, HRVATSKI, БЪЛГАРСКИ, INDONESIA, ,
ไทย,
, 繁體中文
* Theasterisk(*)indicatesthatthedefaultsettingvariesdependingonthesignal.
*1 The[GAMMACORRECTION]itemisavailablewhenanitemotherthan[DICOMSIM.]isselectedfor[REFERENCE].
*2 The[SCREENSIZE]itemisavailablewhen[DICOMSIM.]isselectedfor[REFERENCE].
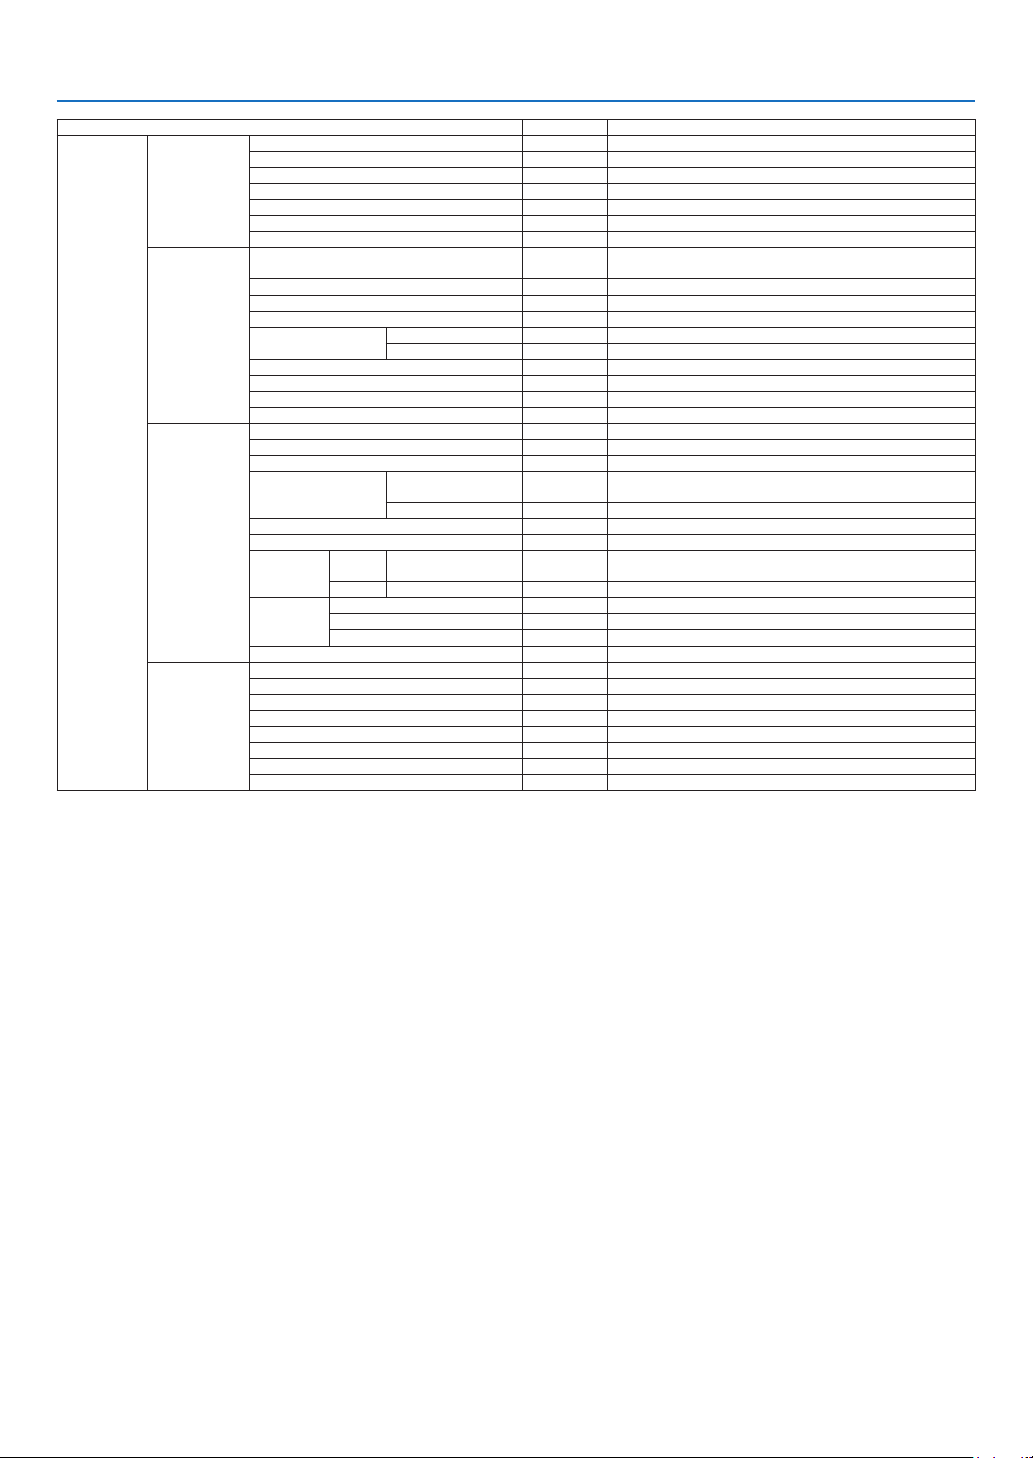
47
4. Using On-Screen Menu
Menu Item Default Options
SETUP MENU COLOR SELECT COLOR COLOR, MONOCHROME
SOURCE DISPLAY ON OFF, ON
ID DISPLAY ON OFF, ON
ECO MESSAGE OFF OFF, ON
DISPLAY TIME AUTO 45 SEC MANUAL, AUTO 5 SEC, AUTO 15 SEC, AUTO 45 SEC
BACKGROUND BLUE BLUE, BLACK, LOGO
FILTER MESSAGE 5000(H) OFF, 100[H], 500[H], 1000[H], 2000[H], 5000[H]
INSTALLATION ORIENTATION DESKTOP
FRONT
AUTO, DESKTOP FRONT, CEILING REAR, DESKTOP REAR, CEILING
FRONT
CONTROL PANEL LOCK OFF OFF, ON
SECURITY OFF OFF, ON
COMMUNICATION SPEED 38400bps 4800bps, 9600bps, 19200bps, 38400bps
CONTROL ID CONTROL ID NUMBER 1 1–254
CONTROL ID OFF OFF, ON
TEST PATTERN
MIC SELECT DYNAMIC DYNAMIC, CONDENSOR
MIC GAIN
NETWORK SETTINGS
OPTIONS(1) AUTO ADJUST NORMAL OFF, NORMAL, FINE
SEAMLESS SWITCHING OFF, ON
FAN MODE AUTO AUTO, HIGH, HIGH ALTITUDE
SIGNAL SELECT COMPUTER RGB/
COMPONENT
RGB/COMPONENT, RGB, COMPONENT
VIDEO AUTO
AUTO, NTSC3�58, NTSC4�43, PAL, PAL-M, PAL-N, PAL60, SECAM
WXGA MODE ON OFF, ON
DEINTERLACE ON OFF, ON
HDMI
SETTINGS
HDMI1/
MHL
VIDEO LEVEL AUTO AUTO, NORMAL, ENHANCED
HDMI2 VIDEO LEVEL AUTO AUTO, NORMAL, ENHANCED
AUDIO
SELECT
HDMI1/MHL HDMI1/MHL HDMI1/MHL, COMPUTER
HDMI2 HDMI2 HDMI2, COMPUTER
USB-B USB-B USB-B, COMPUTER
BEEP ON OFF, ON
OPTIONS(2) STANDBY MODE NORMAL NORMAL, NETWORK STANDBY
DIRECT POWER ON OFF OFF, ON
AUTO POWER ON OFF OFF, ON
AUTO POWER OFF 1:00 OFF, 0:05, 0:10, 0:20, 0:30, 1:00
DEFAULT SOURCE SELECT LAST LAST, AUTO, COMPUTER, HDMI1/MHL, HDMI2, VIDEO, USB-B, APPS
CARBON CONVERT
CURRENCY $, €, JP¥, RMB¥
CURRENCY CONVERT
* Theasterisk(*)indicatesthatthedefaultsettingvariesdependingonthesignal.
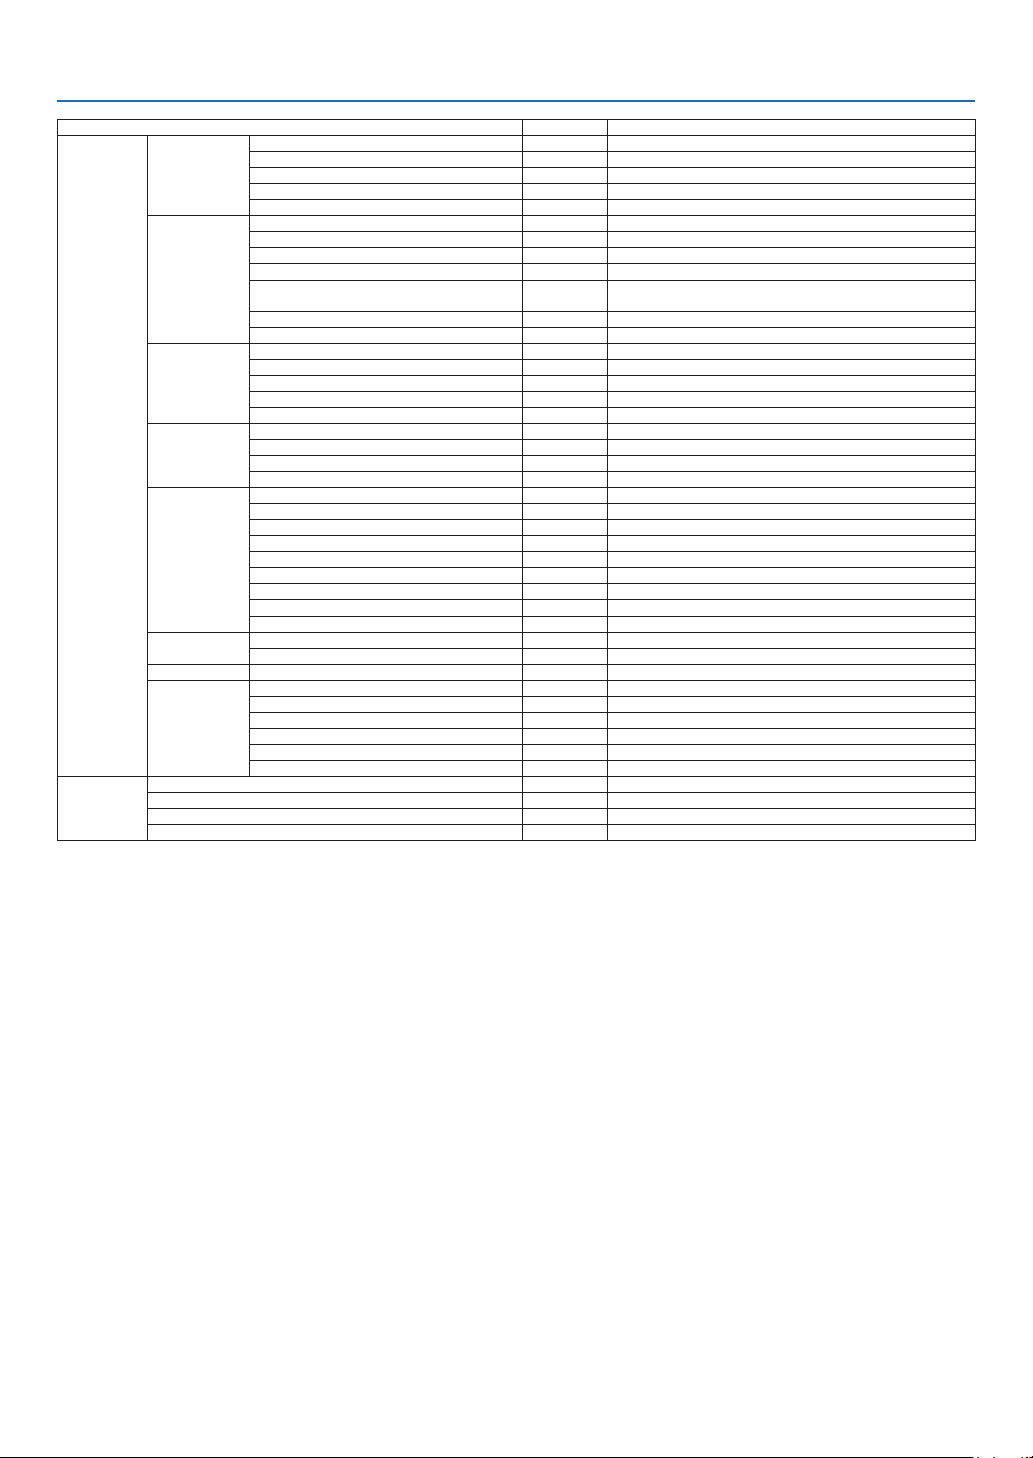
48
4. Using On-Screen Menu
Menu Item Default Options
INFO� USAGE TIME (B) LAMP LIFE REMAINING
LAMP HOURS USED
FILTER HOURS USED
TOTAL CARBON SAVINGS
TOTAL COST SAVINGS
SOURCE(1) (B) SOURCE NAME
SOURCE INDEX
HORIZONTAL FREQUENCY
VERTICAL FREQUENCY
SYNC TYPE SEPARATE SYNC, COMPOSITE SYNC, SYNC ON GREEN, SYNC ON
VIDEO
SYNC POLARITY
SCAN TYPE INTERLACE, NON-INTERLACE
SOURCE(2) (B) SIGNAL TYPE RGB, COMPONENT, VIDEO, HDTV
VIDEO TYPE
NTSC, NTSC3�58, NTSC4�43, PAL, PAL-M, PAL-N, PAL60, SECAM
BIT DEPTH 8[bits], 10[bits], 12[bits]
VIDEO LEVEL ENHANCED, FULL
MHL SIGNAL SUPPORTED, NOT SUPPORTED
WIRED LAN IP ADDRESS
SUBNET MASK
GATEWAY
MAC ADDRESS
WIRELESS LAN IP ADDRESS
SUBNET MASK
GATEWAY
MAC ADDRESS
SSID
NETWORK TYPE
SECURITY
CHANNEL
SIGNAL LEVEL
VERSION(1) (B) FIRMWARE
DATA
VERSION(2) (B) FIRMWARE2
OTHERS (B) PROJECTOR NAME (B)
HOST NAME (B)
MODEL NO� (B)
SERIAL NUMBER (B)
LAN UNIT TYPE
CONTROL ID (when [CONTROL ID] is set) (B)
RESET CURRENT SIGNAL
ALL DATA
CLEAR LAMP HOURS
CLEAR FILTER HOURS
* Theasterisk(*)indicatesthatthedefaultsettingvariesdependingonthesignal.

49
4. Using On-Screen Menu
❸ Menu Descriptions & Functions [SOURCE]
COMPUTER
SelectsthecomputerconnectedtoyourCOMPUTERinputterminalsignal.
NOTE:WhenthecomponentinputsignalisconnectedtotheCOMPUTERINterminal,select[COMPUTER].
HDMI1/MHL and HDMI2
SelectstheHDMIcompatibleequipmentconnectedtoyourHDMI1/MHLor2INterminal.
VIDEO
SelectswhatisconnectedtoyourVIDEOinput-VCR,DVDplayerordocumentcamera.
USB-B
SelectsthecomputerconnectedtotheUSB(PC)port(typeB)byusingtheUSBcablesuppliedwiththeprojector.
(→page39)
APPS
DisplaytheAPPSMENUorthefunctionintheAPPSMENUthatwasusedlasttime.
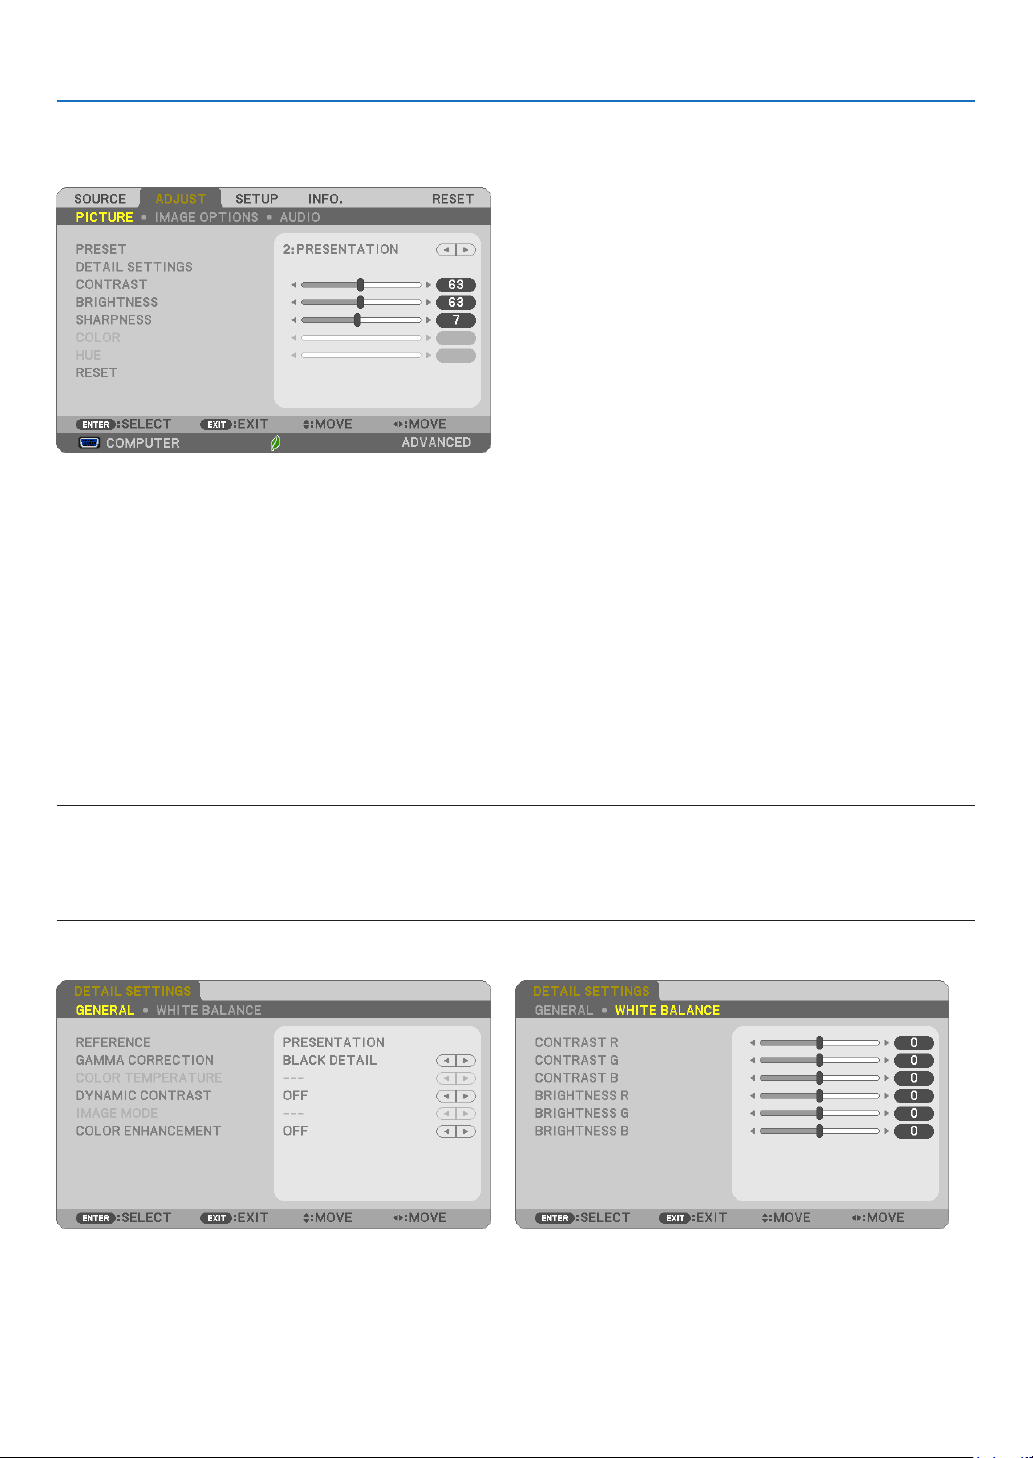
50
4. Using On-Screen Menu
❹ Menu Descriptions & Functions [ADJUST]
[PICTURE]
[PRESET]
Thisfunctionallowsyoutoselectoptimizedsettingsforyourprojectedimage.
Youcanadjustneutraltintforyellow,cyanormagenta.
Therearesevenfactorypresetsoptimizedforvarioustypesofimages.Youcanalsouse[DETAILSETTINGS]toset
useradjustablesettingstocustomizeeachgammaorcolor.
Yoursettingscanbestoredin[PRESET1]to[PRESET7].
HIGH-BRIGHT �������� Recommended for use in a brightly lit room�
PRESENTATION ����� Recommended for making a presentation using a PowerPoint file�
VIDEO �������������������� Recommended for typical TV program viewing�
MOVIE ������������������� Recommended for movies�
GRAPHIC ��������������� Recommended for graphics�
sRGB ��������������������� Standard color values
DICOM SIM� ���������� Recommended for DICOM simulation format�
NOTE:
• The[DICOMSIM.]optionisfortraining/referenceonlyandshouldnotbeusedforactualdiagnosis.
• DICOMstandsforDigitalImagingandCommunicationsinMedicine.ItisastandarddevelopedbytheAmericanCollegeofRadiol-
ogy(ACR)andtheNationalElectricalManufacturersAssociation(NEMA).
Thestandardspecieshowdigitalimagedatacanbemovedfromsystemtosystem.
[DETAIL SETTINGS]

51
4. Using On-Screen Menu
[GENERAL]
StoringYourCustomizedSettings[REFERENCE]
Thisfunctionallowsyoutostoreyourcustomizedsettingsin[PRESET1]to[PRESET7].
First,selectabasepresetmodefrom[REFERENCE],thenset[GAMMACORRECTION]and[COLORTEMPERATURE].
HIGH-BRIGHT �������� Recommended for use in a brightly lit room�
PRESENTATION ����� Recommended for making a presentation using a PowerPoint file�
VIDEO �������������������� Recommended for typical TV program viewing�
MOVIE ������������������� Recommended for movies�
GRAPHIC ��������������� Recommended for graphics�
sRGB ��������������������� Standard color values�
DICOM SIM� ���������� Recommended for DICOM simulation format�
SelectingGammaCorrectionMode[GAMMACORRECTION]
Eachmodeisrecommendedfor:
DYNAMIC �������������� Creates a high-contrast picture�
NATURAL ��������������� Natural reproduction of the picture�
BLACK DETAIL ������� Emphasizes detail in dark areas of the picture�
NOTE:Thisfunctionisnotavailablewhen[DICOMSIM.]isselectedfor[DETAILSETTINGS].
SelectingScreenSizeforDICOMSIM[SCREENSIZE]
Thisfunctionwillperformgammacorrectionappropriateforthescreensize.
LARGE ������������������� For screen size of 110"
MEDIUM
���������������� For screen size of 90"
SMALL
������������������� For screen size of 70"
NOTE:Thisfunctionisavailableonlywhen[DICOMSIM.]isselectedfor[DETAILSETTINGS].
AdjustingColorTemperature[COLORTEMPERATURE]
Thisoptionallowsyoutoselectthecolortemperatureofyourchoice.
NOTE:When[PRESENTATION]or[HIGH-BRIGHT]isselectedin[REFERENCE],thisfunctionisnotavailable.
AdjustingBrightnessandContrast[DYNAMICCONTRAST]
Thisfunctionallowsyoutoadjustthecontrastratioopticallyusingthebuilt-iniris.
Toincreasethecontrastratio,select[ON].
SelectingStillImageModeorMovieMode[IMAGEMODE]
Thisfunctionallowsyoutoselectthestillimagemodeorthemoviemode.
STILL ��������������������� This mode is for a still image�
MOVIE ������������������� This mode is for a movie�
NOTE:Thisfunctionisavailableonlywhen[HIGH-BRIGHT]isselectedfor[REFERENCE].

52
4. Using On-Screen Menu
EnhancingtheColor[COLORENHANCEMENT]
Thisallowsyoutoadjustthecolordensityoftheimage.
Thecoloroftheimagewillbecomedeeperintheorderof"LOW","MEDIUM",AND"HIGH"asthedisplayedimage
willbecomedarker.
With"OFF"selected,theCOLORENHANCEMENTfunctionwillnotwork.
NOTE:Thisfunctionisavailableonlywhen[PRESENTATION]isselected[REFERENCE].
AdjustingWhiteBalance[WHITEBALANCE]
Thisallowsyoutoadjustthewhitebalance.Contrastforeachcolor(RGB)toadjustthewhitelevelofthescreen;
Brightnessforeachcolor(RGB)isusedtoadjusttheblacklevelofthescreen.
[CONTRAST]
Adjuststheintensityoftheimageaccordingtotheincomingsignal.
[BRIGHTNESS]
Adjuststhebrightnesslevelorthebackrasterintensity.
[SHARPNESS]
Controlsthedetailoftheimage.
[COLOR]
Increasesordecreasesthecolorsaturationlevel.
[HUE]
Variesthecolorlevelfrom+/−greento+/−blue.Theredlevelisusedasreference.
Inputsignal CONTRAST BRIGHTNESS SHARPNESS COLOR HUE
COMPUTER/HDMI(RGB) Yes Ye s Ye s No No
COMPUTER/HDMI(COMPONENT) Yes Ye s Ye s Ye s Ye s
USB-B Yes Ye s Ye s No No
VIDEO Ye s Ye s Ye s Ye s Ye s
APPS Yes Ye s Ye s No No
Yes=Adjustable,No=Notadjustable
[RESET]
Thesettingsandadjustmentsfor[PICTURE]willbereturnedtothefactorysettingswiththeexceptionofthefollowing;
Presetnumbersand[REFERENCE]withinthe[PRESET]screen.
Thesettingsandadjustmentsunder[DETAILSETTINGS]withinthe[PRESET]screenthatarenotcurrentlyselected
willnotbereset.
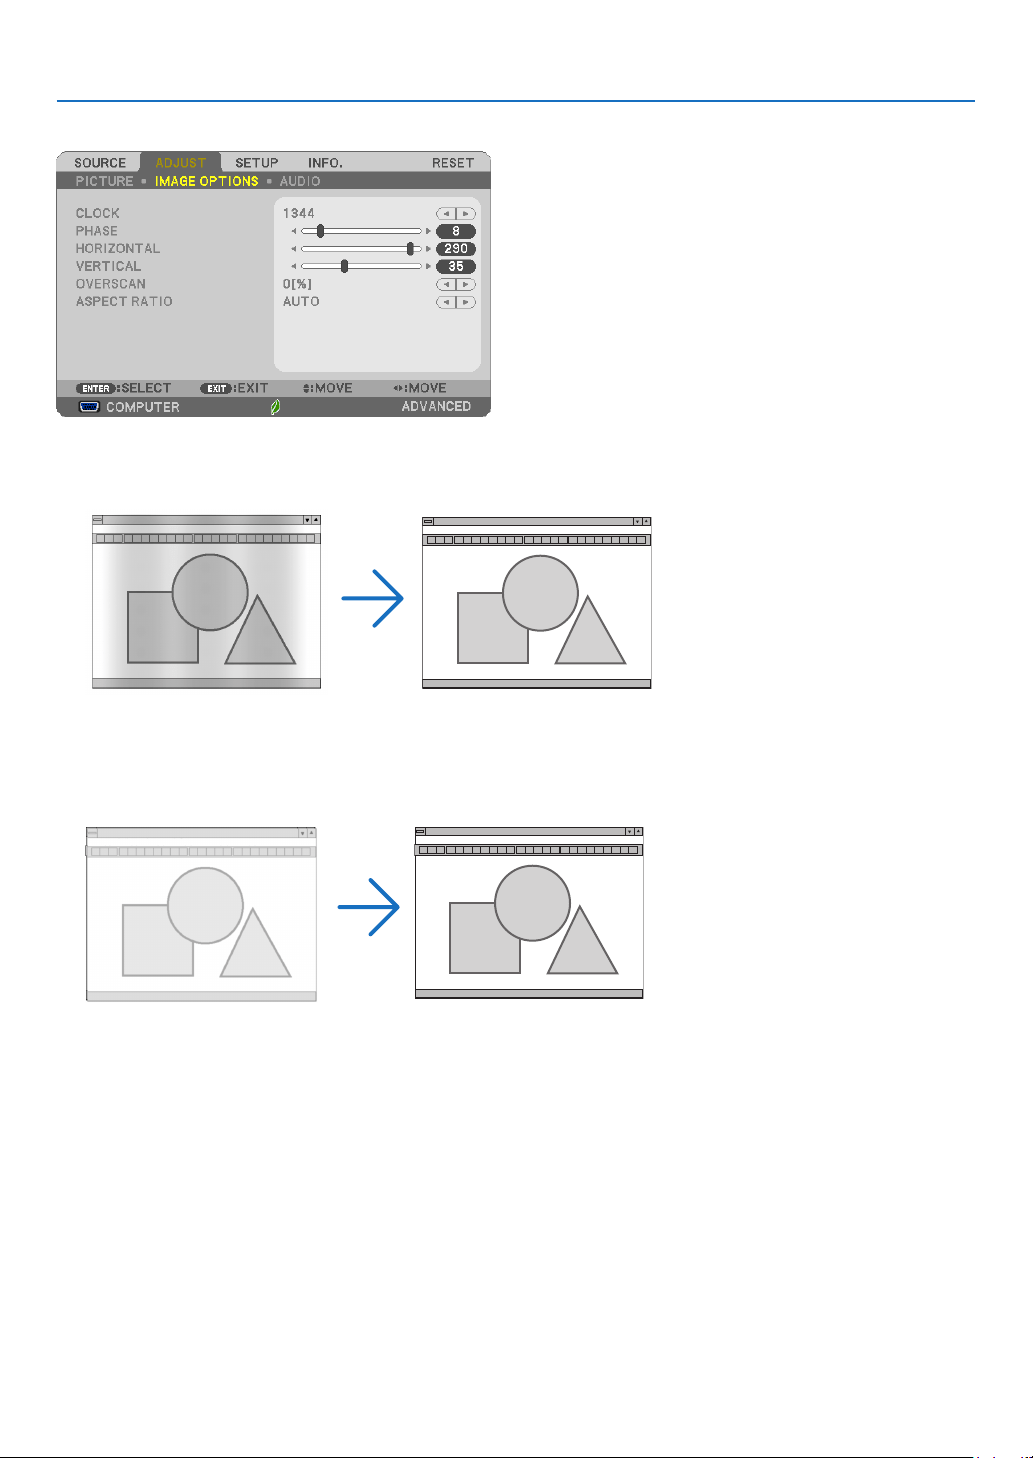
53
4. Using On-Screen Menu
[IMAGE OPTIONS]
AdjustingClockandPhase[CLOCK/PHASE]
ThisallowsyoutomanuallyadjustCLOCKandPHASE.
CLOCK ������������������� Use this item to fine tune the computer image or to remove any vertical banding that might appear� This
function adjusts the clock frequencies that eliminate the horizontal banding in the image�
This adjustment may be necessary when you connect your computer for the first time�
PHASE ������������������� Use this item to adjust the clock phase or to reduce video noise, dot interference or cross talk� (This is
evident when part of your image appears to be shimmering�)
Use [PHASE] only after the [CLOCK] is complete�
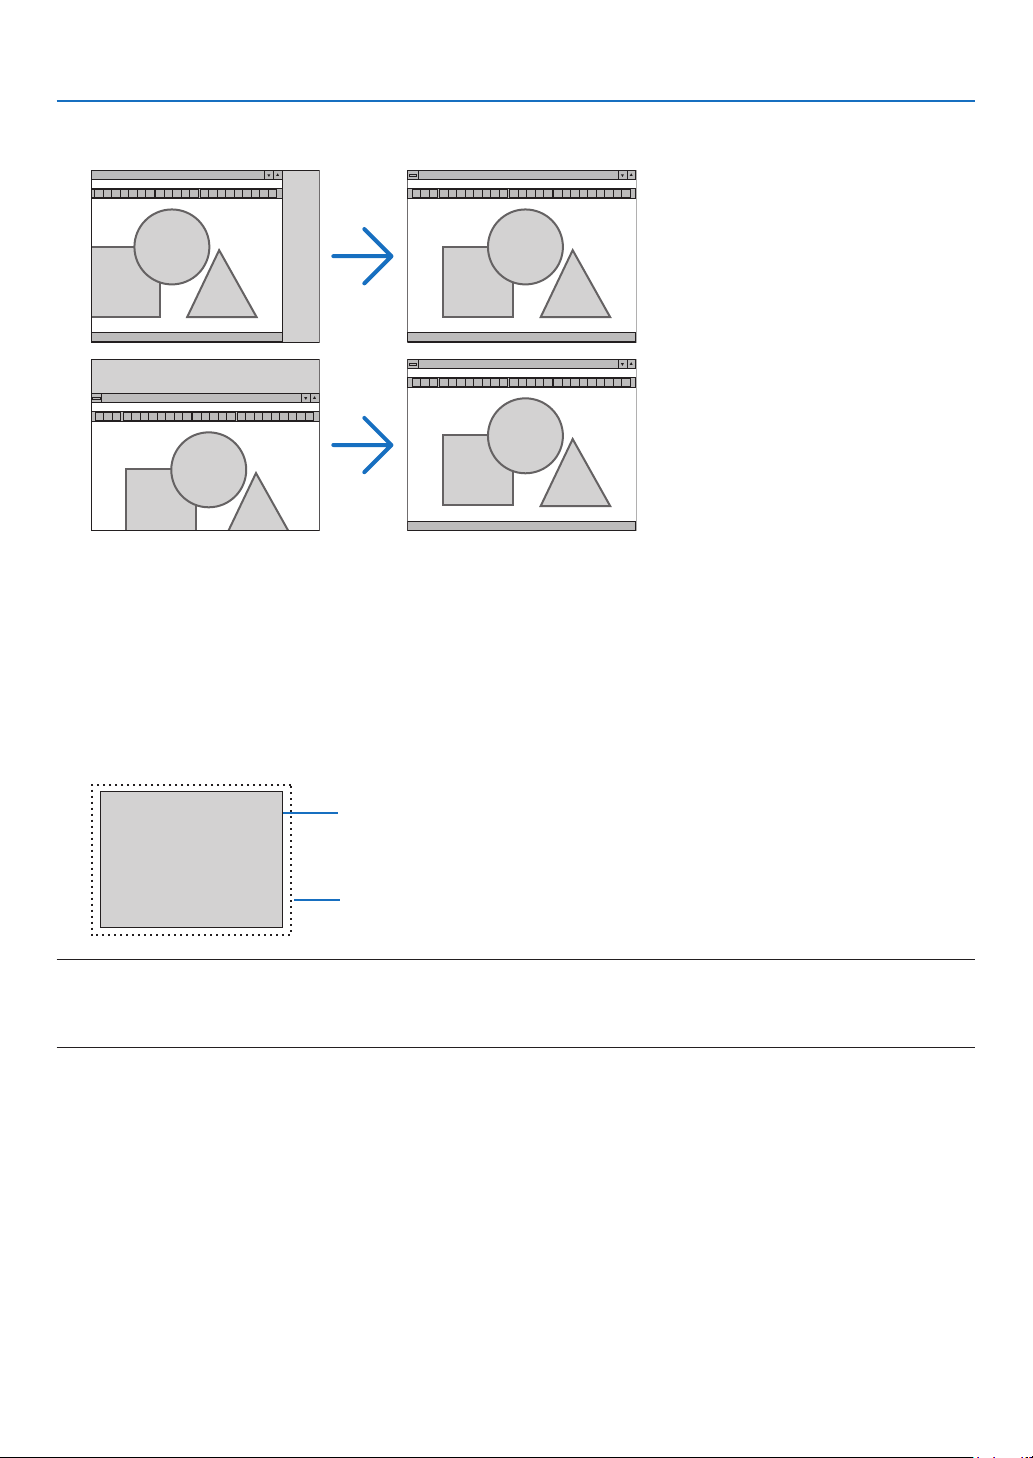
54
4. Using On-Screen Menu
AdjustingHorizontal/VerticalPosition[HORIZONTAL/VERTICAL]
Adjuststheimagelocationhorizontallyandvertically.
- Animagecanbedistortedduringtheadjustmentof[CLOCK]and[PHASE].Thisisnotmalfunction.
- Theadjustmentsfor[CLOCK],[PHASE],[HORIZONTAL],and[VERTICAL]willbestoredinmemoryforthe
currentsignal.Thenexttimeyouprojectthesignalwiththesameresolution,horizontalandverticalfrequency,
itsadjustmentswillbecalledupandapplied.
Todeleteadjustmentsstoredinmemory,fromthemenu,youselect[RESET]→[CURRENTSIGNAL]or[ALL
DATA]andresettheadjustments.
SelectingOverscanPercentage[OVERSCAN]
Selectoverscanpercentage(AUTO,0%,5%and10%)forsignal.
Projected image
Overscaned by 10%
NOTE:
• The[0[%]]cannotbeselectedwhenVIDEOsignalisused.
• The[OVERSCAN]itemisnotavailable:
- when[NATIVE]isselectedfor[ASPECTRATIO].
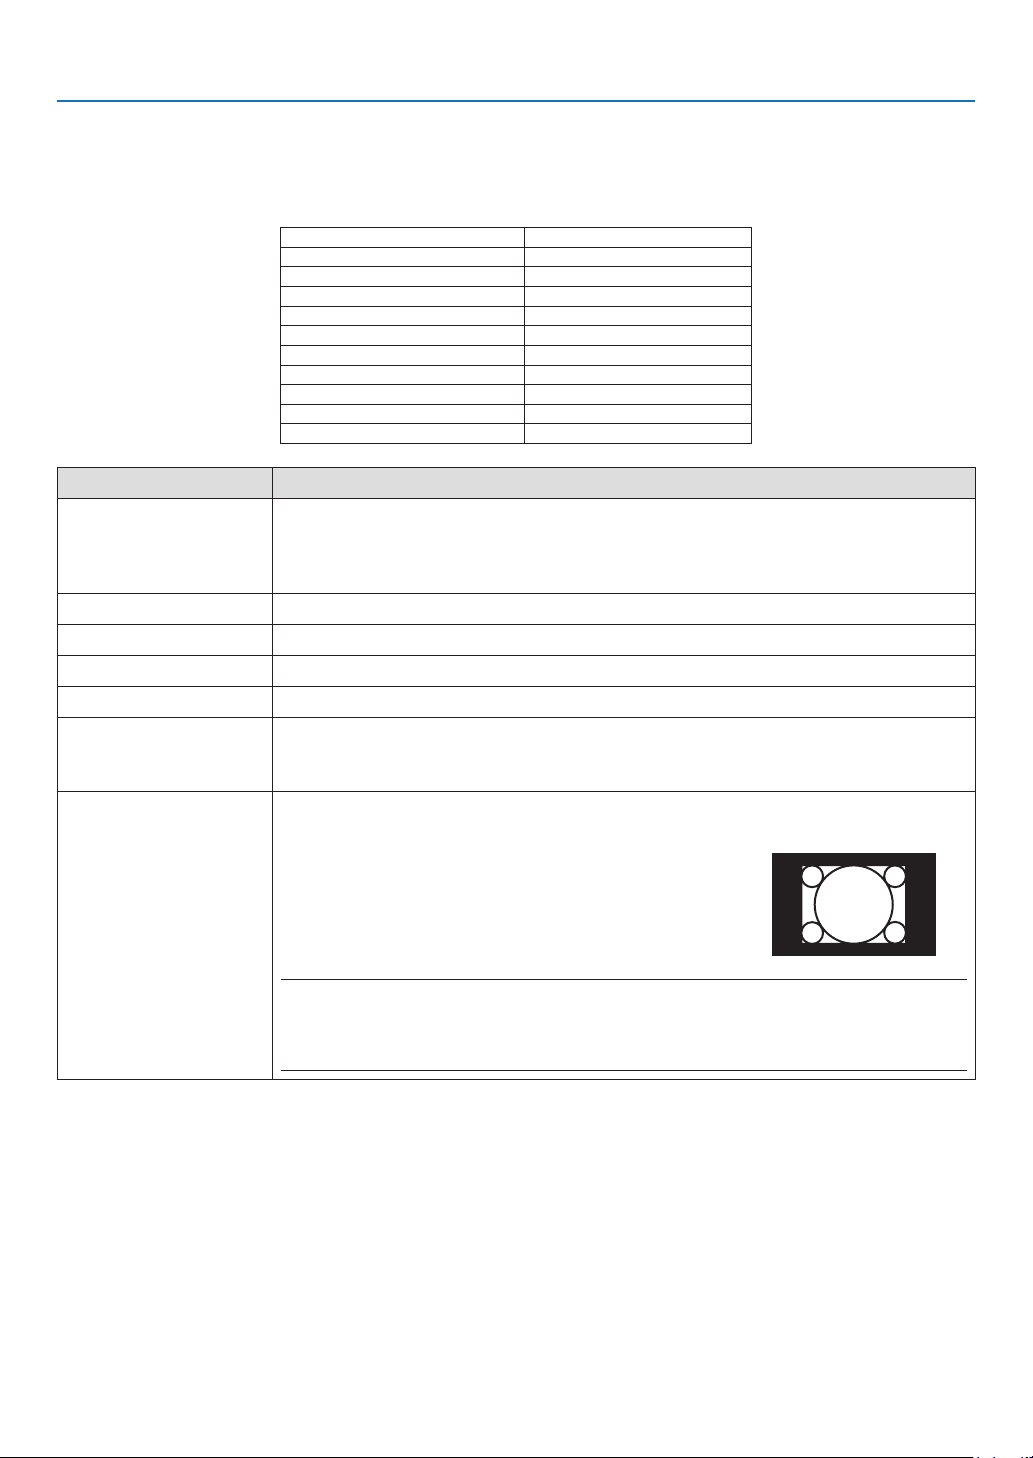
55
4. Using On-Screen Menu
SelectingAspectRatio[ASPECTRATIO]
Theterm“aspectratio”referstotheratioofwidthtoheightofaprojectedimage.
Theprojectorautomaticallydeterminestheincomingsignalanddisplaysitinitsappropriateaspectratio.
• Thistableshowstypicalresolutionsandaspectratiosthatmostcomputerssupport.
Resolution AspectRatio
VGA 640×480 4:3
SVGA
800×600 4:3
XGA
1024×768 4:3
WXGA
1280×768 15:9
WXGA
1280×800 16:10
WXGA+
1440×900 16:10
SXGA
1280×1024 5:4
SXGA+
1400×1050 4:3
UXGA
1600×1200 4:3
WUXGA
1920×1200 16:10
Options Function
AUTO
Theprojectorwillautomaticallydeterminetheincomingsignalanddisplayitinitsaspect
ratio.(→ nextpage)
Theprojectormayerroneouslydeterminetheaspectratiodependingonitssignal.Ifthis
occurs,selecttheappropriateaspectratiofromthefollowing.
4:3 Theimageisdisplayedin4:3aspectratio.
16:9 Theimageisdisplayedin16:9aspectratio.
15:9 Theimageisdisplayedin15:9aspectratio.
16:10 Theimageisdisplayedin16:10aspectratio.
LETTERBOX Theimageofaletterboxsignalisstretchedequallyinthehorizontalandverticaldirec-
tionstotthescreen.Partsofthedisplayedimagearecroppedatthetopandbottom
edgesandthereforenotvisible.
NATIVE Theprojectordisplaysthecurrentimageinitstrueresolutionwhentheincomingcomputer
signalhasalowerresolutionthantheprojector’snativeresolution.
[Example]Whentheincomingsignalwiththeresolutionof
800×600isdisplayed:
NOTE:
• Whenanon-computersignalisdisplayed,the[NATIVE]isnotavailable.
• Whenasignalwithahigherresolutionthantheprojector’snativeresolutionisdisplayed,[NA-
TIVE]isnotavailable.
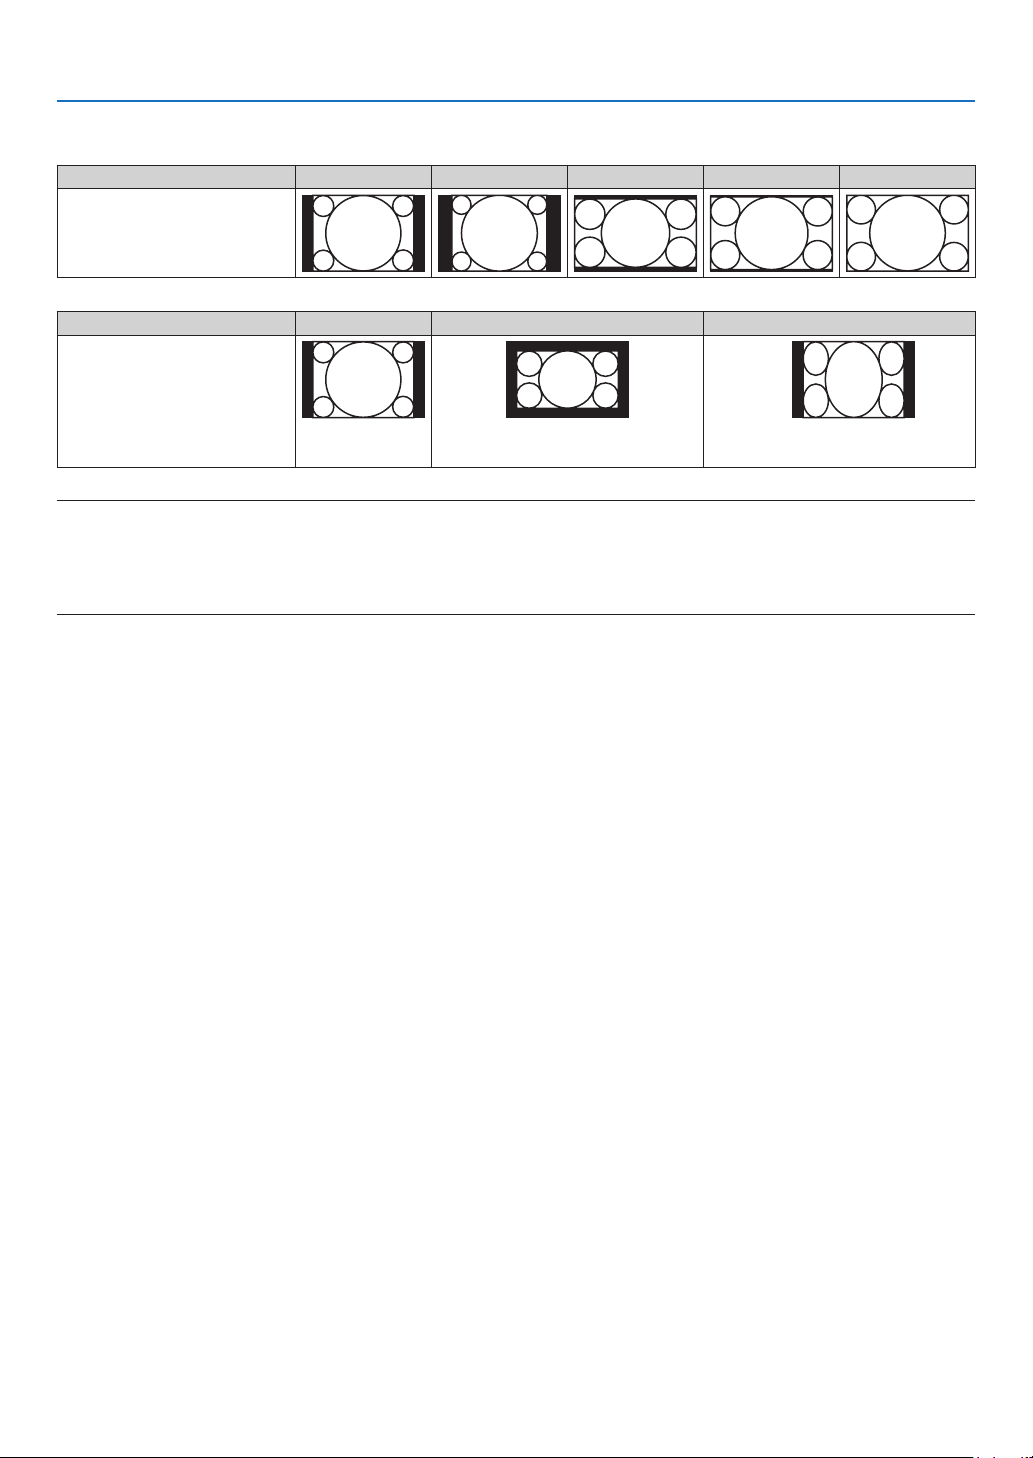
56
4. Using On-Screen Menu
Sampleimagewhentheappropriateaspectratioisautomaticallydetermined
[Computersignal]
Aspectratioofincomingsignal 4:3 5:4 16:9 15:9 16:10
Sampleimagewhentheappro-
priate aspect ratiois automati-
callydetermined
[Videosignal]
Aspectratioofincomingsignal 4:3 Letterbox Squeeze
Sampleimagewhentheaspect
ratioisautomaticallydetermined
NOTE:Todisplayaletterboxsignalprop-
erly,select[LETTERBOX].
NOTE:Todisplayasqueezedsignalprop-
erly,select[16:9].
TIP:
• Theterm“letterbox”referstoamorelandscape-orientedimagewhencomparedtoa4:3image,whichisthestandardaspect
ratioforavideosource.
Theletterboxsignalhasaspectratioswiththevistasize“1.85:1”orcinemascopesize“2.35:1”formovielm.
• Theterm“squeeze”referstothecompressedimageofwhichaspectratioisconvertedfrom16:9to4:3.

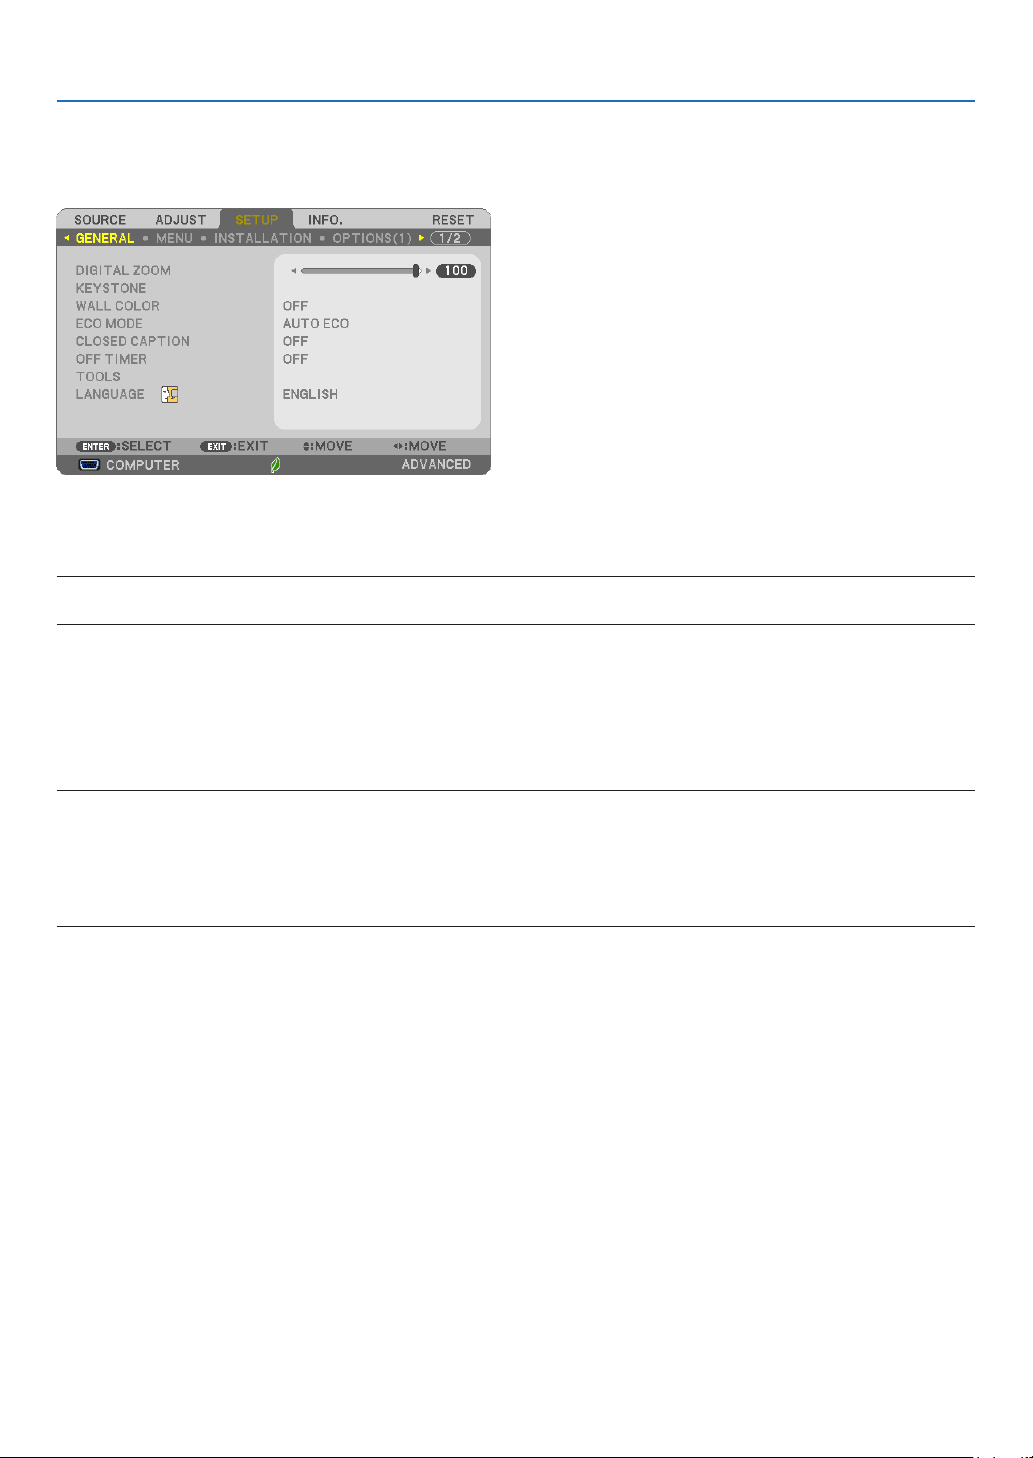
58
4. Using On-Screen Menu
❺ Menu Descriptions & Functions [SETUP]
[GENERAL]
UsingDigitalZoom[DIGITALZOOM]
Thisfeatureallowsyoutoelectronicallyneadjusttheimagesizeonthescreen.
NOTE:
• Thisfeaturecannotbeusedwhen[USB-B]isselectedasainputterminal.
TIP:Toadjusttheprojectedimagesizeroughly,movetheprojectorawayorclosertothescreen.Toneadjustthezoom,usethe
[DIGITALZOOM]function.(
→
page20)
CorrectingKeystoneDistortionManually[KEYSTONE]
Youcancorrecthorizontalorverticalkeystone,pincushion,orcornerstonedistortionmanually.
NOTE:
• Someitemsarenotavailablewhenoneitemisactivated.Unavailableitemsareshowningrey.
• Tochangefromoneitemtoanotheritem,resettherstitem.
• Adjustmentvalueswillbeoverwritten.Theywillnotbedeletedevenwhentheprojectoristurnedoff.
• Using[KEYSTONE],[PINCUSHION]and[CORNERSTONE]correctioncancausetheimagetobeslightlyblurredbecausethe
correctionismadeelectronically.
KEYSTONE HORIZONTAL ���Corrects horizontal keystone distortion� (→ page 21)
KEYSTONE VERTICAL
���������Corrects vertical keystone distortion� (→ page 21)
CORNERSTONE
������������������Fits a projected image within the border of the screen easily by align the four corner of an image to
the ones of the screen� (→ page 31)
PINCUSHION
����������������������Corrects pincushion distortion at the top, bottom, left, or right side� By moving the reference point,
enable to move the top position of the correction curve�
RESET ���������������������������������Returns all the above items to the factory preset values�
TIP:
• Adjustableanglerangeinhorizontalandverticaldirectioninthecornerstoneandthekeystonecorrections:Approx.10degrees
(Max)
- Dependingoninputsignal,theadjustablerangemaybenarrower.

59
4. Using On-Screen Menu
UsingtheWallColorCorrection[WALLCOLOR]
Thisfunctionallowsforquickadaptivecolorcorrectioninapplicationswherethescreenmaterialisnotwhite.
NOTE:Selecting[WHITEBOARD]reduceslampbrightness.
SettingEcoMode[ECOMODE]
TheECOMODEincreaseslamplife,whileloweringpowerconsumptionandcuttingdownonCO
2
emissions.
Fourbrightnessmodesofthelampcanbeselected:[OFF],[AUTOECO],[NORMAL]and[ECO]modes.
(→page29)
SettingClosedCaption[CLOSEDCAPTION]
ThisoptionsetsseveralclosedcaptionmodesthatallowtexttobesuperimposedontheprojectedimageofVideo
orS-Video.
OFF ������������������������ This exits the closed caption mode�
CAPTION 1-4 ��������� Text is superimposed�
TEXT 1-4 ���������������� Text is displayed�
NOTE:
• Theclosedcaptionisnotavailableunderthefollowingconditions:
- whenmessagesormenusaredisplayed.
- whenanimageismagnied,frozen,ormuted.
• Portionsofsuperimposedtextorclosedcaptionmaybetruncated.Ifthathappens,trytoplacethesuperimposedtextorclosed
captionwithinthescreen.
UsingOffTimer[OFFTIMER]
1. Select your desired time between 30 minutes and 16 hours: OFF, 0:30, 1:00, 2:00, 4:00, 8:00, 12:00, 16:00.
2. Press the ENTER button on the remote control.
3. The remaining time starts counting down.
4. The projector will turn off after the countdown is complete.
NOTE:
• Tocancelthepresettime,set[OFF]forthepresettimeorturnoffthepower.
• Whentheremainingtimereaches3minutesbeforetheprojectoristurnedoff,the[THEPROJECTORWILLTURNOFFWITHIN3
MINUTES]messagewillbedisplayedonthebottomofthescreen.
Displaythetoolsmenu[TOOLS]
Thisfunctiondisplaythetoolsmenu.(→page90)
SelectingMenuLanguage[LANGUAGE]
Youcanchooseoneof30languagesforon-screeninstructions.
NOTE:Yoursettingwillnotbeaffectedevenwhen[RESET]isdonefromthemenu.
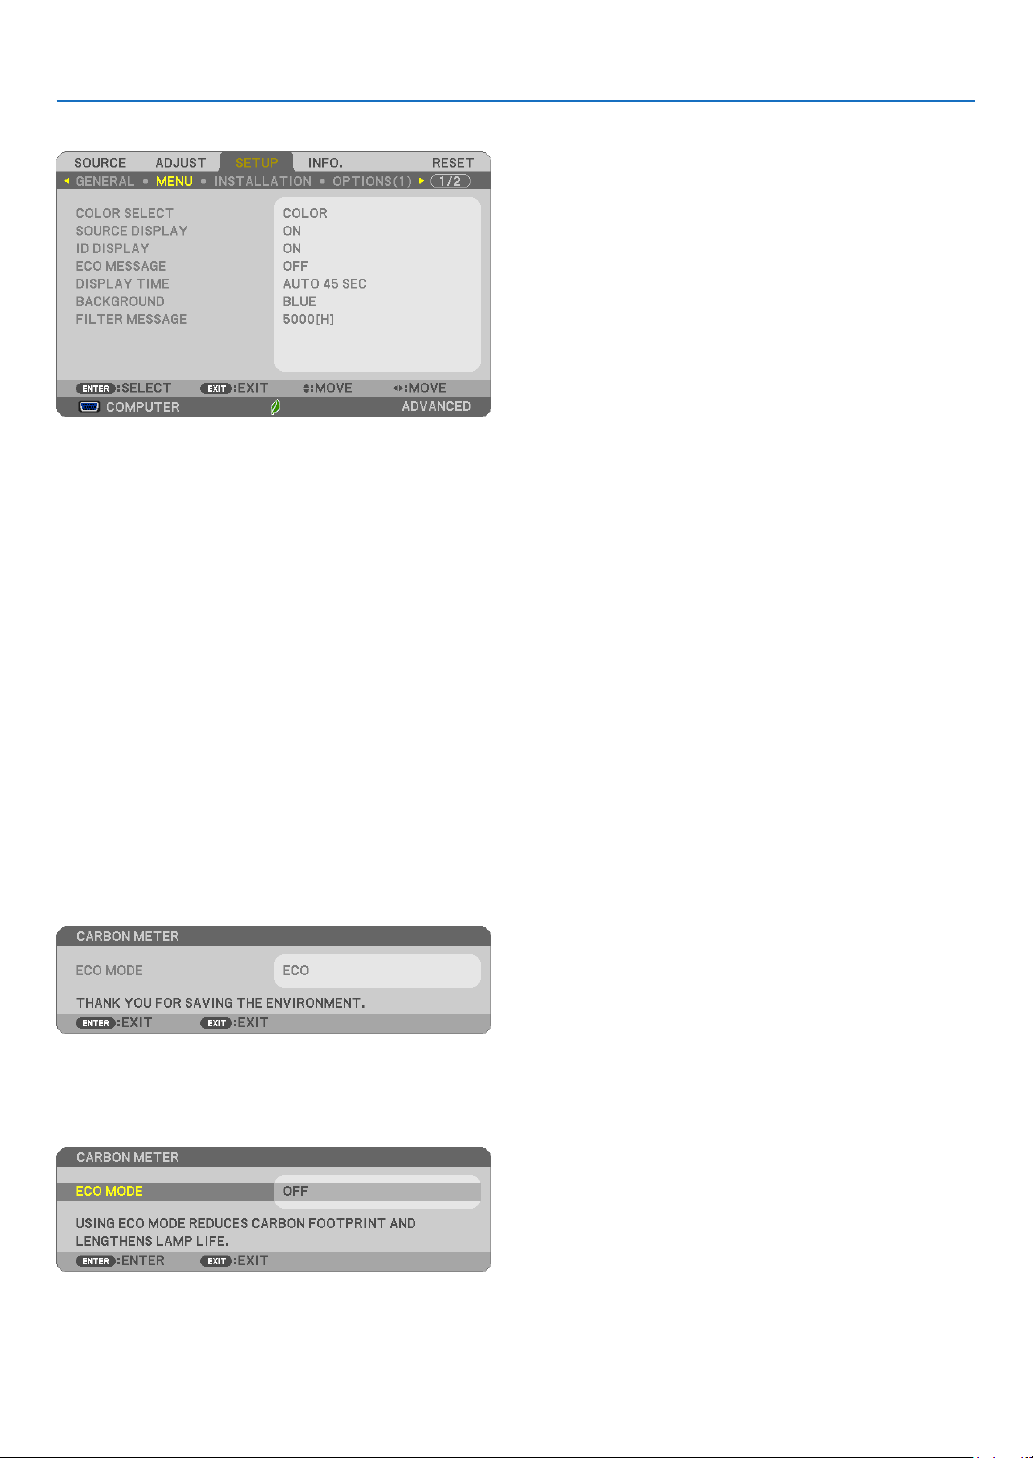
60
4. Using On-Screen Menu
[MENU]
SelectingMenuColor[COLORSELECT]
Youcanchoosebetweentwooptionsformenucolor:COLORandMONOCHROME.
TurningOn/OffSourceDisplay[SOURCEDISPLAY]
ThisoptionturnsonoroffinputnamedisplaysuchasCOMPUTER,HDMI1/MHL,HDMI2,VIDEO,USB-B,APPS,to
bedisplayedonthetoprightofthescreen.
Whennoinputsignalispresent,theno-signalguidancepromptingyoutocheckforanavailableinputwillbedisplayedat
thecenterofthescreen.Whenthe[APPS]itemisselectedfor[SOURCE],theno-signalguidancewillnotbedisplayed.
TurningON/OFFControlID[IDDISPLAY]
ID DISPLAY ����������� This option turns on or off the ID number which is displayed when the ID SET button on the remote control
is pressed�
TurningOn/OffEcoMessage[ECOMESSAGE]
Thisoptionturnsonoroffthefollowingmessageswhentheprojectoristurnedon.
TheEcoMessagepromptstheusertosaveenergy.When[OFF]isselectedfor[ECOMODE],youwillgetamessage
topromptyoutoselect[AUTOECO],[NORMAL],or[ECO]for[ECOMODE].
When[AUTOECO],[NORMAL],or[ECO]isselectedfor[ECOMODE]
Toclosethemessage,pressanyoneofthebuttons.Themessagewilldisappearifnobuttonoperationisdonefor
30seconds.
When[OFF]isselectedfor[ECOMODE]
PressingtheENTERbuttonwilldisplaythe[ECOMODE]screen.(→page29)
Toclosethemessage,presstheEXITbutton.

61
4. Using On-Screen Menu
SelectingMenuDisplayTime[DISPLAYTIME]
Thisoptionallowsyoutoselecthowlongtheprojectorwaitsafterthelasttouchofabuttontoturnoffthemenu.The
presetchoicesare[MANUAL],[AUTO5SEC],[AUTO15SEC],and[AUTO45SEC].The[AUTO45SEC]isthefac-
torypreset.
SelectingaColororLogoforBackground[BACKGROUND]
Usethisfeaturetodisplayablue/blackscreenorlogowhennosignalisavailable.Thedefaultbackgroundis[BLUE].
NOTE:
• Ifthe[LOGO]itemisselectedfor[BACKGROUND]withthe[USB-B]sourceselected,the[BLUE]itemwillbeselectedregardless
ofitsselection.
• When[SOURCEDISPLAY]isturnedon,theno-signalguidancepromptingyoutocheckforanavailableinputwillbedisplayed
atthecenterofthescreenregardlessofitsselection.
• Yoursettingwillnotbeaffectedevenwhen[RESET]isdonefromthemenu.
SelectingIntervalTimeforFilterMessage[FILTERMESSAGE]
Thisoptionallowsyoutoselectthetimepreferencebetweendisplayingthemessageforcleaningthelters.Clean
thelterwhenyougetthemessage“PLEASECLEANTHEFILTER.”(→page112)
Sixoptionsareavailable:
OFF,100[H],500[H],1000[H],2000[H],5000[H]
NOTE:Yoursettingwillnotbeaffectedevenwhen[RESET]isdonefromthemenu.
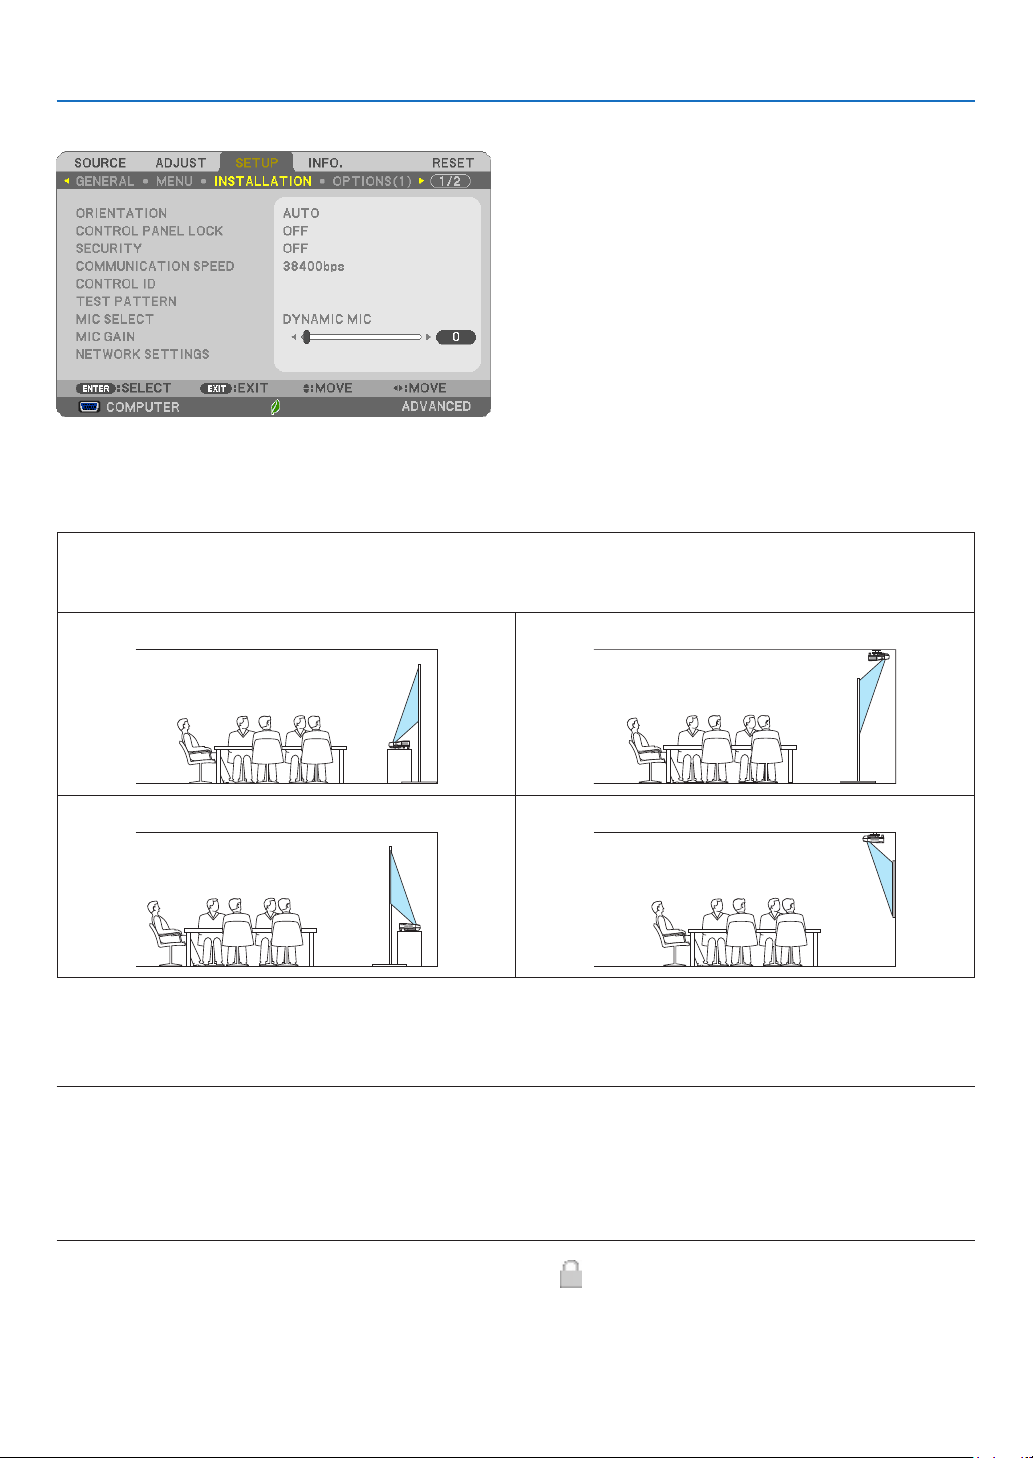
62
4. Using On-Screen Menu
[INSTALLATION]
SelectingProjectorOrientation[ORIENTATION]
Thisreorientsyourimageforyourtypeofprojection.Theoptionsare:desktopfrontprojection,ceilingrearprojection,
desktoprearprojection,andceilingfrontprojection.
AUTO
WhenthelampisturnedON,theinnersensoroftheprojectordetectsitsinstallationstateeitherDESKFRONTor
CEILINGFRONTandthenswitchitsprojectionmethod
DESKTOPFRONT CEILINGREAR
DESKTOPREAR CEILINGFRONT
DisablingtheCabinetButtons[CONTROLPANELLOCK]
ThisoptionturnsonorofftheCONTROLPANELLOCKfunction.
NOTE:
• ThisCONTROLPANELLOCKdoesnotaffecttheremotecontrolfunctions.
• HowtoreleasetheCONTROLPANELLOCK
1.Whentheprojectorisprojectingimageorinthesleepmode,pressandholdtheSOURCEbuttonontheprojectorcabinetfor
about10seconds.TheCONTROLPANELLOCKwillbereleased.
2.Whentheprojectorisinthestandbymode,pressandholdthePOWERbuttonontheprojectorcabinet.Itenablestopoweron
theprojector.Aftercheckingtheprojectorisprojectingimage,performthepreviousstep1.
TIP:Whenthe[CONTROLPANELLOCK]isturnedon,akeylockicon[ ]willbedisplayedatthebottomrightofthemenu.

63
4. Using On-Screen Menu
EnablingSecurity[SECURITY]
ThisfeatureturnsonorofftheSECURITYfunction.
Unlessthecorrectkeywordisentered,theprojectorcannotprojectanimage.(→page35)
NOTE:Yoursettingwillnotbeaffectedevenwhen[RESET]isdonefromthemenu.
SelectingCommunicationSpeed[COMMUNICATIONSPEED]
ThisfeaturesetsthebaudrateofthePCControlport(D-Sub9P).Itsupportsdataratesfrom4800to38400bps.The
defaultis38400bps.Selecttheappropriatebaudrateforyourequipmenttobeconnected(dependingontheequip-
ment,alowerbaudratemayberecommendedforlongcableruns).
NOTE:Yourselectedcommunicationspeedwillnotbeaffectedevenwhen[RESET]isdonefromthemenu.
SettingIDtotheProjector[CONTROLID]
YoucanoperatemultipleprojectorsseparatelyandindependentlywiththesingleremotecontrolthathastheCONTROL
IDfunction.IfyouassignthesameIDtoalltheprojectors,youcanconvenientlyoperatealltheprojectorstogether
usingthesingleremotecontrol.Todoso,youhavetoassignanIDnumbertoeachprojector.
CONTROL ID NUMBER ������� Select a number from 1 to 254 you wish to assign to your projector�
CONTROL ID �����������������������Select [OFF] to turn off the CONTROL ID setting and select [ON] to turn on the CONTROL ID setting�
NOTE:
• When[ON]isselectedfor[CONTROLID],theprojectorcannotbeoperatedbyusingtheremotecontrolthatdoesnotsupport
theCONTROLIDfunction.(Inthiscasethebuttonsontheprojectorcabinetcanbeused.)
• Yoursettingwillnotbeaffectedevenwhen[RESET]isdonefromthemenu.
• PressingandholdingtheENTERbuttonontheprojectorcabinetfor10secondswilldisplaythemenuforcancelingtheControl
ID.
AssigningorChangingtheControlID
1. Turn on the projector.
2. Press the ID SET button on the remote control.
TheCONTROLIDscreenwillbedisplayed.
IftheprojectorcanbeoperatedwiththecurrentremotecontrolID,the[ACTIVE]will
bedisplayed.IftheprojectorcannotbeoperatedwiththecurrentremotecontrolID,
the[INACTIVE]willbedisplayed.Tooperatetheinactiveprojector,assignthecontrol
IDusedfortheprojectorbyusingthefollowingprocedure(Step3).
+

64
4. Using On-Screen Menu
3. Press one of numeric keypad buttons while pressing and holding the ID SET
button on the remote control.
Example:
Toassign“3”,pressthe“3”buttonontheremotecontrol.
NoIDmeansthatalltheprojectorscanbeoperatedtogetherwithasingleremote
control.Toset“NoID”,enter“000”orpresstheCLEARbutton.
TIP:TherangeofIDsisfrom1to254.
4. Release the ID SET button.
TheupdatedCONTROLIDscreenwillbedisplayed.
NOTE:
• TheIDscanbeclearedinafewdaysafterthebatteriesarerundownorremoved.
• Accidentallypressinganyoneofthebuttonsoftheremotecontrolwillclearcurrentlyspecied
IDwithbatteriesremoved.
UsingTestPattern[TESTPATTERN]
Displaysthetestpatterntocheckforimagedistortionatthetimeoftheprojectorsetup.PresstheENTERbuttonto
displaythetestpattern;presstheEXITbuttontoclosethetestpatternandreturntothemenu.Menuoperationand
correctionsforkeystone,cornerstoneandpincushionarenotavailablewhenthetestpatternisdisplayed.
SelectingMicrophoneType[MICSELECT]
Thisfeatureallowsyoutoselectdynamicorcondensertypeforyourmicrophone.
SettingMICGain[MICGAIN]
ThisfeatureallowsyoutoadjustyourmicrophonesensitivitywhenitisconnectedtotheMICinputjackoftheprojec-
tor.MicrophonevolumecanbeadjustedwiththeVOL.(+)or(−)buttonontheremotecontrolorthe◀ or ▶onthe
projectorcabinet.
Settingthenetwork[NETWORKSETTINGS]
Thisfunctiondisplaythenetworksettingsmenu.(→page90)
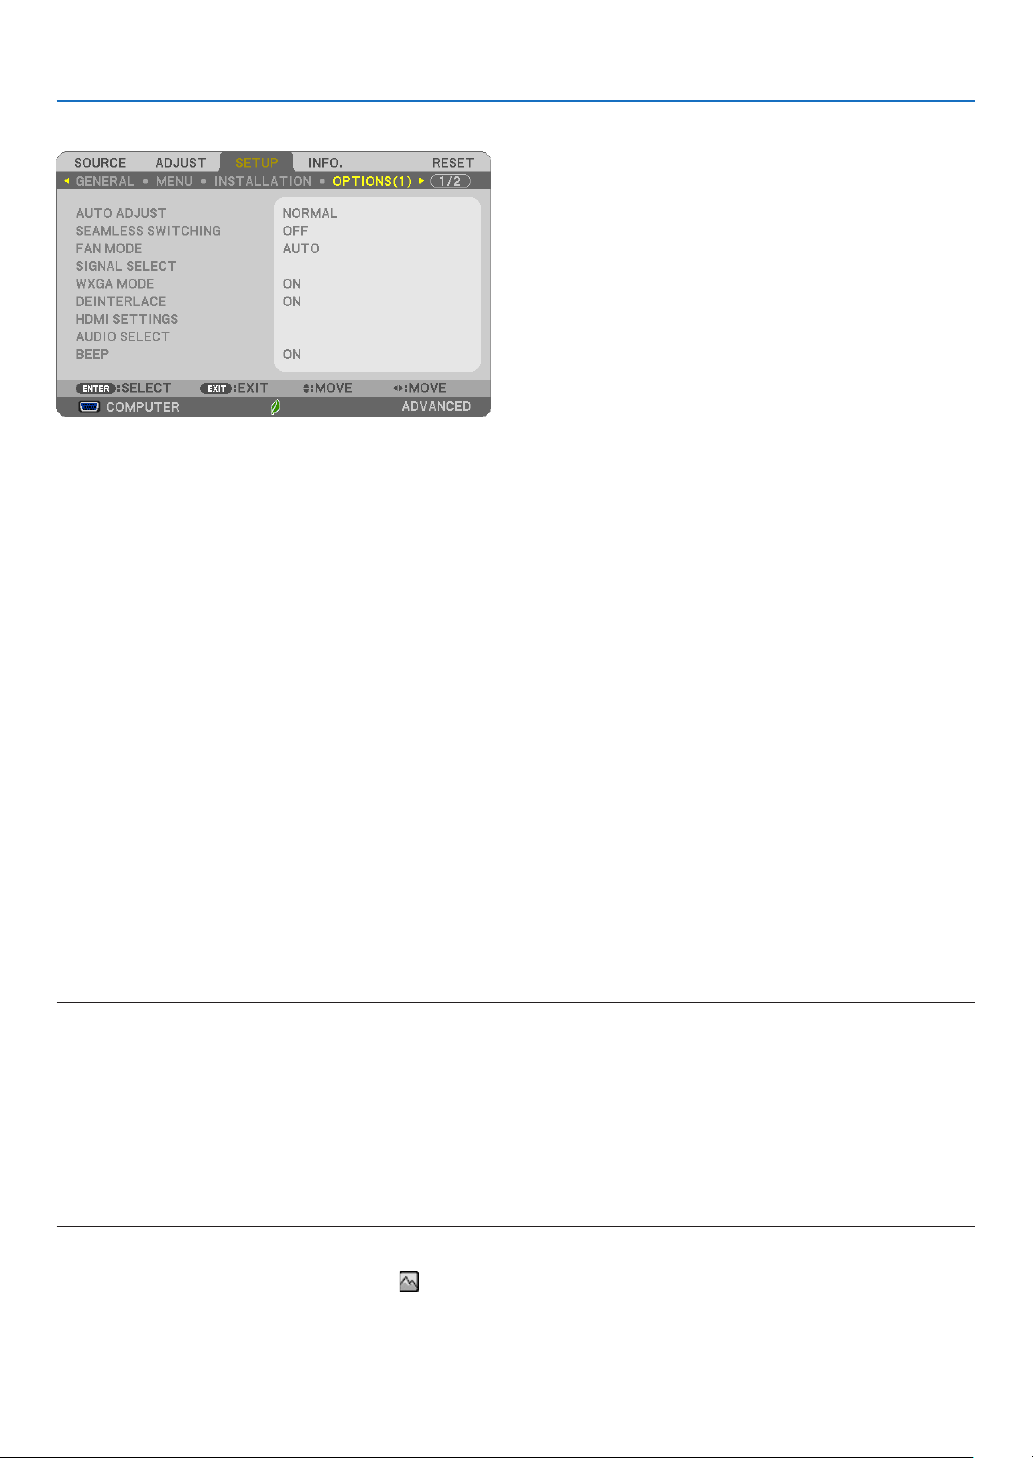
65
4. Using On-Screen Menu
[OPTIONS(1)]
SettingAutoAdjust[AUTOADJUST]
ThisfeaturesetstheAutoAdjustmodesothatthecomputersignalcanbeautomaticallyormanuallyadjustedfor
noiseandstability.Youcanautomaticallymakeadjustmentintwoways:[NORMAL]and[FINE].
OFF ������������������������ The computer signal will not be automatically adjusted� You can manually optimize the computer signal�
NORMAL ���������������� Default setting� The computer signal will be automatically adjusted� Normally select this option�
FINE ����������������������� Select this option if fine adjustment is needed� It takes more time to switch to the source than when [NOR-
MAL]is selected�
[SEAMLESS SWITCHING]
Whentheinputterminalisswitched,theimagedisplayedbeforeswitchingisheldtoswitchtothenewimagewithout
abreakduetoabsenceofasignal.
SelectingFanMode[FANMODE]
Thisoptionallowsyoutoselectthreemodesforfanspeed:Automode,Highspeedmode,andHighAltitudemode.
AUTO ��������������������� The built-in fans automatically run at a variable speed according to the internal temperature�
HIGH ���������������������� The built-in fans run at high speed�
HIGH ALTITUDE ����� The built-in fans run at a high speed� Select this option when using the projector at altitudes approximately
5500 feet/1700 meters or higher�
Whenyouwishtocooldownthetemperatureinsidetheprojectorquickly,select[HIGH].
NOTE:
• ItisrecommendedthatyouselectHighspeedmodeifyouusetheprojectornon-stopforconsecutivedays.
• Set[FANMODE]to[HIGHALTITUDE]whenusingtheprojectorataltitudesapproximately5500feet/1700metersorhigher.
• Usingtheprojectorataltitudesapproximately5500feet/1700metersorhigherwithoutsettingto[HIGHALTITUDE]cancause
theprojectortooverheatandtheprotectorcouldshutdown.Ifthishappens,waitacoupleminutesandturnontheprojector.
• Usingtheprojectorataltitudeslessthanapproximately5500feet/1700metersandsettingto[HIGHALTITUDE]cancausethe
lamptoovercool,causingtheimagetoicker.Switch[FANMODE]to[AUTO].
• Usingtheprojectorataltitudesapproximately5500feet/1700metersorhighercanshortenthelifeofopticalcomponentssuch
asthelamp.
• Yoursettingwillnotbeaffectedevenwhen[RESET]isdonefromthemenu.
TIP:
• When[HIGHALTITUDE]isselected,anicon[ ]isdisplayedatthebottomoftheon-screenmenu.

66
4. Using On-Screen Menu
SelectingSignalFormat[SIGNALSELECT]
[COMPUTER]
Allowsyoutochoose[COMPUTER]foranRGBsourcesuchasacomputer,or[COMPONENT]foracomponent
videosourcesuchasaDVDplayer.Normallyselect[RGB/COMPONENT]andtheprojectorautomaticallydetectsa
componentsignal.Howevertheremaybesomecomponentsignalsthattheprojectorisunabletodetect.Ifthisisthe
case,select[COMPONENT].
[VIDEO&S-VIDEOSystemSelect]
Thisfeatureenablesyoutoselectcompositevideostandardsautomaticallyormanually.
Normallyselect[AUTO]andtheprojectorwillautomaticallydetectthevideostandard.
Inthecasewheretheprojectorhasdifcultydetectingthevideostandard,selecttheappropriatevideostandardfrom
themenu.
ThismustbedoneforVIDEOandS-VIDEOrespectively.
EnablingorDisablingWXGAMode[WXGAMODE]
Selecting[ON]willgiveprioritytoWXGA(1280×768)/WUXGA(1920×1200)signalsinrecognizinganinputsignal.
When[WXGAMODE]issetto[ON],XGA(1024×768)/UXGA(1600×1200)signalsmaynotberecognized.Inthis
case,select[OFF].
NOTE:
• The[ON]isselectedatthetimeofshipment.
Enablingthedeinterlace[DEINTERLACE]
Turnsonoroffthedeinterlacefunctionforatelecinesignal.
OFF ������������������������ Select this option if there is any jitter or artifacts in video�
ON ������������������������� Default standard setting�
NOTE:ThisfeatureisnotavailableforHDTV(progressive)andcomputersignals.
SettingHDMI1/MHL&HDMI2[HDMISETTINGS]
MakethesettingsforeachvideolevelwhenconnectingHDMI1/MHLequipmentsuchasaDVDplayer.
VIDEO LEVEL ��������� Select [AUTO] to automatically detect video level� If automatic detection may not work well, select [NOR-
MAL] to disable the [ENHANCED] feature of your HDMI equipment or select [ENHANCED] to improve image
contrast and increase detail in the dark areas�
SettingAudio[AUDIOSELECT]
MakethesettingsforeachaudiolevelwhenconnectingHDMIequipmentandUSB(PC)terminal.Selectbetween
eachequipmentandcomputer.
HDMI1/MHL, HDMI2
���� Select [HDMI1/MHL] or [HDMI2] to switch the HDMI1/MHL IN or HDMI 2 IN digital audio signal or select
[COMPUTER] to switch the COMPUTER input audio signal�
USB-B �������������������� Select [USB-B] or [COMPUTER] to switch the source connected over the USB cable (USB-B)�
EnablingKeySoundandErrorSound[BEEP]
Thisfeatureturnsonoroffthebuttonsoundoralarmwhenanerroroccursorthefollowingoperationsareperformed.
-Displayingthemainmenu
-Switchingsources
-Resettingdatabyusing[RESET]
-PressingPOWERONorSTANDBYbutton

67
4. Using On-Screen Menu
[OPTIONS(2)]
SelectingPower-savingin[STANDBYMODE]
Theprojectorhastwostandbymodes:[NORMAL]and[NETWORKSTANDBY].
TheNORMALmodeisthemodethatallowsyoutoputtheprojectorinthepower-savingconditionwhichconsumes
lesspowerthantheNETWORKSTANDBYmode.
NORMAL �����������������������������POWER indicator: Red light/STATUS indicator: Off
When [NORMAL] is selected, only the following buttons and feature will work:
POWER button on the projector cabinet and the remote control, powering on from PC Control
command, and AUTO POWER ON�
NETWORK STANDBY ����������POWER indicator: Orange light/STATUS indicator: Off
When [NETWORK STANDBY] is selected, the projector can be turned on over a wired LAN connec-
tion and only the following buttons, port, and features will work:
POWER button on the projector cabinet and the remote control, powering on from PC Control
command, AUTO POWER ON, Operation by User Supportware, Network service, Program Timer�
Important:
• Inthebelowconditions,settingofthe[STANDBYMODE]isdisabledandtheprojectorwillgointotheSLEEPmode*.
* Sleepmoderefersthemodewithoutfunctionalrestrictionsbythe[STANDBYMODE].PowerconsumptionintheSLEEPmode
isrelativelyhigherthanthe[NETWORKSTANDBY]mode.TheStatusindicatorturnsoninGreen.
When[STANDBYMODE]→[NETWORKSTANDBY]isselected
- When[NETWORKSERVICE]→[AMXSETTINGS]→[ENABLE]isselected
- When[NETWORKSERVICE]→[CRESTRONSETTINGS]→[CRESTRONCONTROL]→[ENABLE]isselected
- When[NETWORKSETTINGS]→[WIRELESSLAN]→Exceptfor[DISABLE]andmountingthewirelessLANunittotheprojector
- Whenthesignalisinputtothecomputer,HDMI1/MHLorHDMI2terminals
Regardlessofthe[STANDBYMODE]
- WhentheUSBcableisconnectedtotheprojectorandthecomputer
NOTE:
• Evenwhen[NORMAL]isselectedfor[STANDBYMODE],poweronoroffcanbedonebyusingthePCCONTROLport.
• ThepowerconsumptioninthestandbymodewillnotbeincludedincalculatingCO
2
emissionreduction.
• Yoursettingwillnotbeaffectedevenwhen[RESET]isdonefromthemenu.
EnablingDirectPowerOn[DIRECTPOWERON]
Turnstheprojectoronautomaticallywhenthepowercordisinsertedintoanactivepoweroutlet.Thiseliminatesthe
needtoalwaysusethePOWERbuttonontheremotecontrolorprojectorcabinet.

68
4. Using On-Screen Menu
TurningOntheProjectorByApplyingComputerSignal[AUTOPOWERON]
WhentheprojectorisinStandbymode,applyingacomputerorHDMIsignalfromacomputerconnectedtothe
COMPUTERINinput,HDMI1/MHL,orHDMI2inputwillpowerontheprojectorandsimultaneouslyprojecttheimage.
ThisfunctionalityeliminatestheneedtoalwaysusethePOWERbuttonontheremotecontrolortheprojectorcabinet
topowerontheprojector.
Tousethisfunction,rstconnectacomputertotheprojectorandtheprojectortoanactiveACinput.
NOTE:
• Disconnectingacomputersignalfromthecomputerwillnotpowerofftheprojector.Werecommendusingthisfunctionincom-
binationoftheAUTOPOWEROFFfunction.
• Thisfunctionwillnotbeavailableunderthefollowingconditions:
- whenacomponentsignalisappliedtotheCOMPUTERINterminal
- whenaSynconGreenRGBsignalorcompositesyncsignalisapplied
- whenMHLsignalissppliedtoHDMI1/MHLINterminal
• ToenabletheAUTOPOWERONafterchangingtothesleepmodeturningofftheprojector,wait5secondsandinputacomputer
orHDMIsignal.
IfacomputerorHDMIsignalisstillpresentwhentheprojectoristurnedoff,theAUTOPOWERONwillnotworkandtheprojector
remainsinstandbymode.
EnablingPowerManagement[AUTOPOWEROFF]
Theprojectorhaspowermanagementfunctions.Toreducepowerconsumption,thepowermanagementfunctions(1
and2)arefactorypresetasshownbelow.TocontroltheprojectorfromanexternaldeviceviaaLANorserialcable
connection,usetheon-screenmenutochangethesettingsfor1and2.
1. STANDBY MODE (Factory preset: NORMAL)
To control the projector from an external device, select [NETWORK STANDBY] for [STANDBY MODE].
NOTE:
• When[NORMAL]isselectedfor[STANDBYMODE],thefollowingterminalsandfunctionswillnotwork:
MONITOROUTterminal,AUDIOOUTterminal,LANfunctions,MailAlertfunction,DDC/CI(VirtualRemoteTool)
2. AUTO POWER OFF (Factory preset: 1 hour)
To control the projector from an external device, select [OFF] for [AUTO POWER OFF].
NOTE:
• When[1:00]isselectedfor[AUTOPOWEROFF],youcanenabletheprojectortoautomaticallyturnoffin60minutesifthereis
nosignalreceivedbyanyinputorifnooperationisperformed.

69
4. Using On-Screen Menu
SelectingDefaultSource[DEFAULTSOURCESELECT]
Youcansettheprojectortodefaulttoanyoneofitsinputseachtimetheprojectoristurnedon.
LAST ���������������������� Sets the projector to default to the previous or last active input each time the projector is turned on�
AUTO ��������������������� Searches for an active source in order of COMPUTER → HDMI1/MHL → HDMI2 → VIDEO → COMPUTER
and displays the first found source�
COMPUTER ����������� Displays the computer signal from the COMPUTER IN terminal every time the projector is turned on�
HDMI1/MHL ���������� Displays the digital source from the HDMI 1/MHL IN terminal every time the projector is turned on�
HDMI2 ������������������� Displays the digital source from the HDMI 2 IN terminal every time the projector is turned on�
VIDEO �������������������� Displays the Video source from the VIDEO IN terminal every time the projector is turned on�
USB-B �������������������� Displays the computer signal from the USB (PC) terminal every time the projector is turned on�
APPS ��������������������� Display the APPS MENU�
NOTE:
• [USB-B]and[APPS]cannotbedetectedwhen[AUTO]isselected.ForprojectingimagefromUSB-BorAPPS,select[USB-B],
[APPS]or[LAST].
Settingcarbonfootprintfactor[CARBONCONVERT]
Adjuststhecarbonfootprintfactorinthecarbonsavingcalculation.Theinitialsettingis0.505[kg-CO
2
/kWh]basedon
theCO
2
EmissionsfromFuelCombustion(2008Edition)publishedbyOECD.
Selectingyourcurrency[CURRENCY]
Displayselectricitypricing(availablein4currencyunits).
$ ���������������������������� US Dollar
€
��������������������������� EU Euro
JP¥
������������������������ Japanese Yen
RMB¥
�������������������� Chinese Yuan
Changingcurrencysettingandcurrencyconvertsetting[CURRENCYCONVERT]
ChangescurrencysettingandcurrencyconvertsettingforCARBONMETER.
Theinitialsettingareasfollows:
US Dollar ��������������� 0�11 [$/kWh]
EU Euro ����������������� 0�19 [€/kWh]
Japanese Yen
��������� 20 [¥/kWh]
Chinese Yuan
��������� 0�48 [¥/kWh]
TheinitialsettingsforUSdollar,EUEuro,andJapaneseYenarebasedon“EnergyPricesandTaxes(secondquarter
2010”publishedbyOECD.
TheinitialsettingforChineseYuanisbasedon“ChineseDataFile(2010)”publishedbyJETRO.
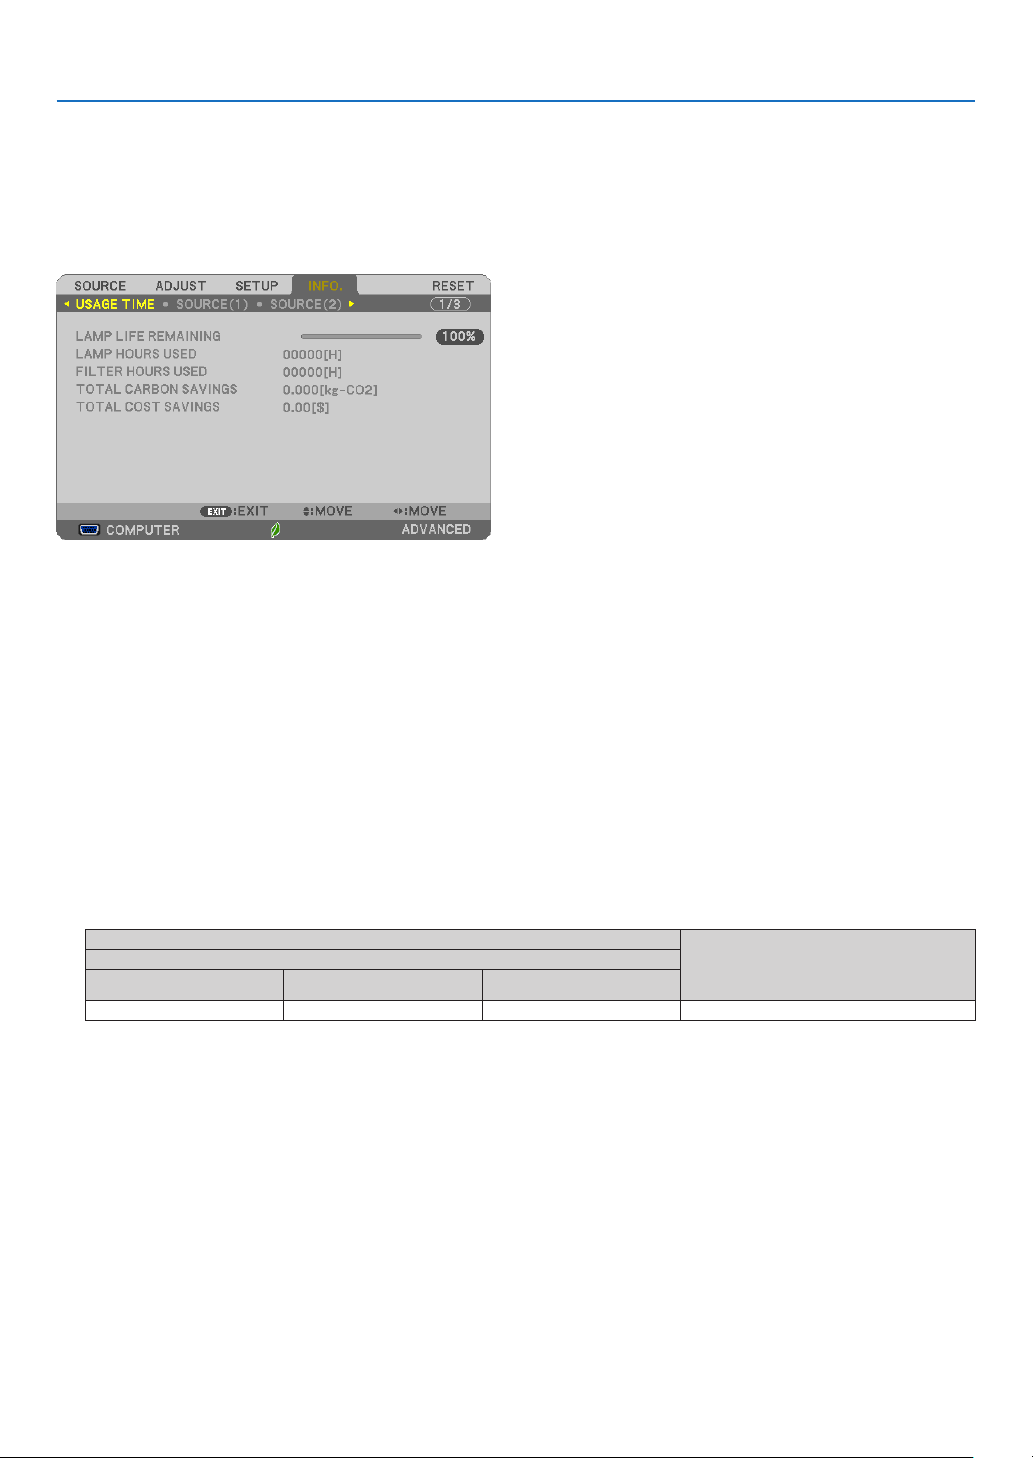
70
4. Using On-Screen Menu
❻ Menu Descriptions & Functions [INFO.]
Displaysthestatusofthecurrentsignalandlampusage.Thisitemhassixpages.Theinformationincludedisasfollows:
TIP:PressingtheHELPbuttonontheremotecontrolwillshowthe[INFO.]menuitems.
[USAGE TIME]
[LAMPLIFEREMAINING](%)*
[LAMPHOURSUSED](H)
[FILTERHOURSUSED](H)
[TOTALCARBONSAVINGS](kg-CO2)
[TOTALCOSTSAVINGS]
* Theprogressindicatorshowsthepercentageofremainingbulblife.
Thevalueinformsyouoftheamountoflampusage.Whentheremaininglamptimereaches0,theLAMPLIFE
REMAININGbarindicatorchangesfrom0%to100Hoursandstartscountingdown.
Iftheremaininglamptimereaches0hours,theprojectorwillnotturnon.
• Themessagetotheeffectthatthelamportheltersshouldbereplacedwillbedisplayedforoneminutewhen
theprojectoristurnedonandwhenthePOWERbuttonontheprojectorortheremotecontrolispressed.
Todismissthismessage,pressanybuttonontheprojectorortheremotecontrol.
Lamplife(H)
Replacementlamp
ECO MODE
OFF/AUTOECO NORMAL ECO
3800 5000 6000 NP33LP
• [TOTALCARBONSAVINGS]
Thisdisplaystheestimatedcarbonsavinginformationinkg.Thecarbonfootprintfactorinthecarbonsavingcal-
culationisbasedontheOECD(2008Edition).(→page30)
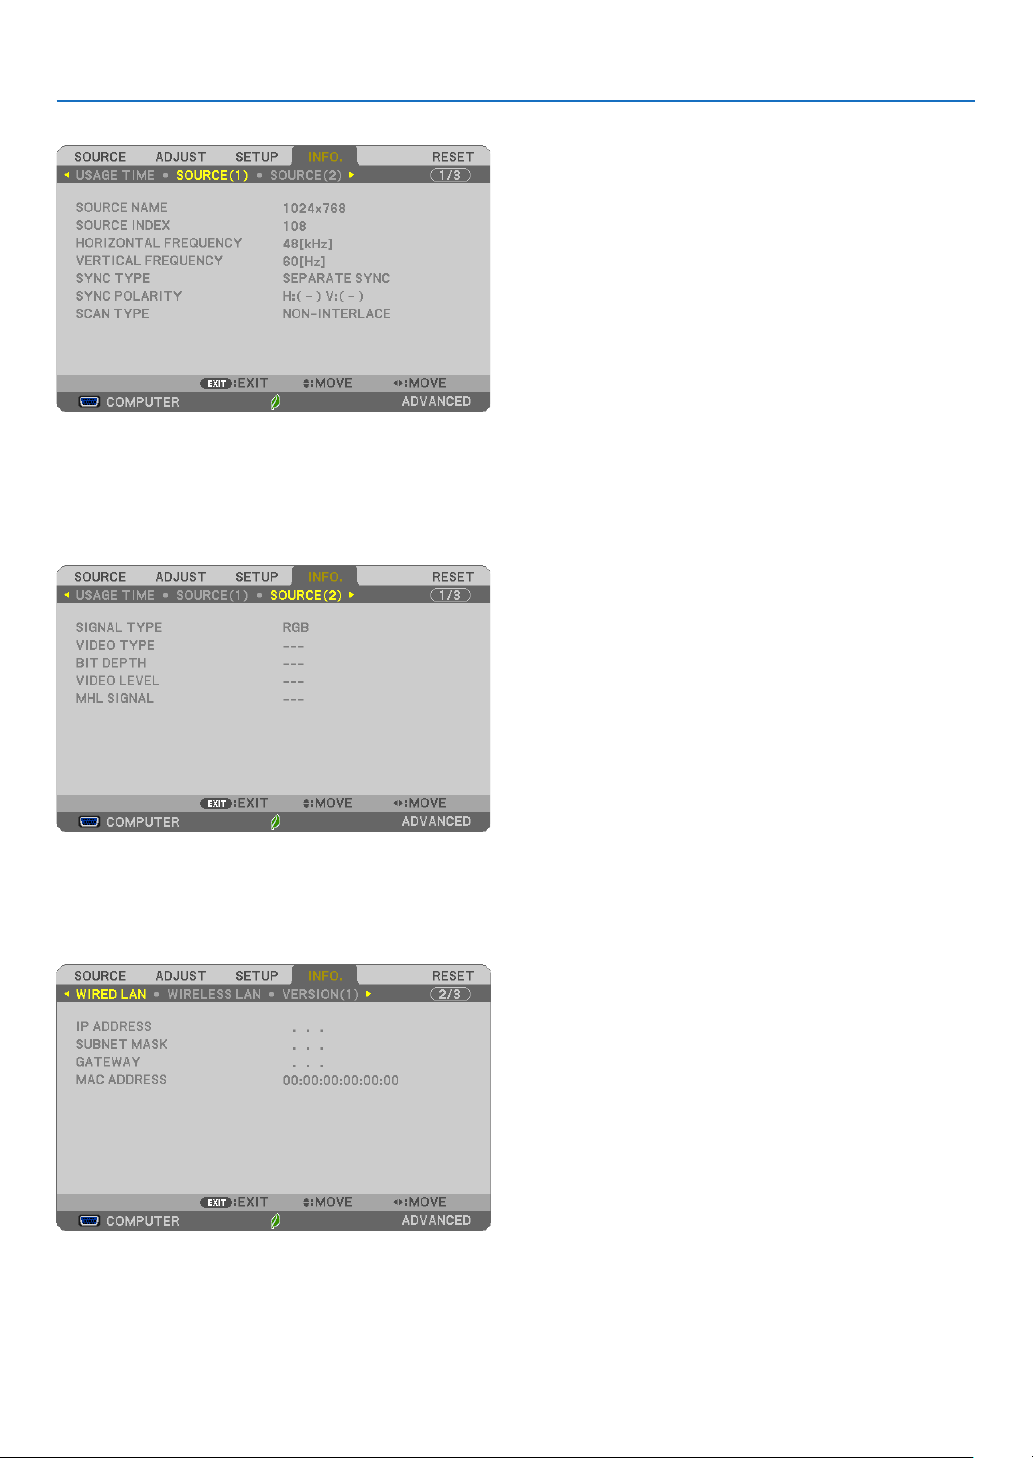
71
4. Using On-Screen Menu
[SOURCE(1)]
[SOURCENAME] [SOURCEINDEX]
[HORIZONTALFREQUENCY] [VERTICALFREQUENCY]
[SYNCTYPE] [SYNCPOLARITY]
[SCANTYPE]
[SOURCE(2)]
[SIGNALTYPE] [VIDEOTYPE]
[BITDEPTH] [VIDEOLEVEL]
[MHLSIGNAL]
[WIRED LAN]
[IPADDRESS] [SUBNETMASK]
[GATEWAY] [MACADDRESS]
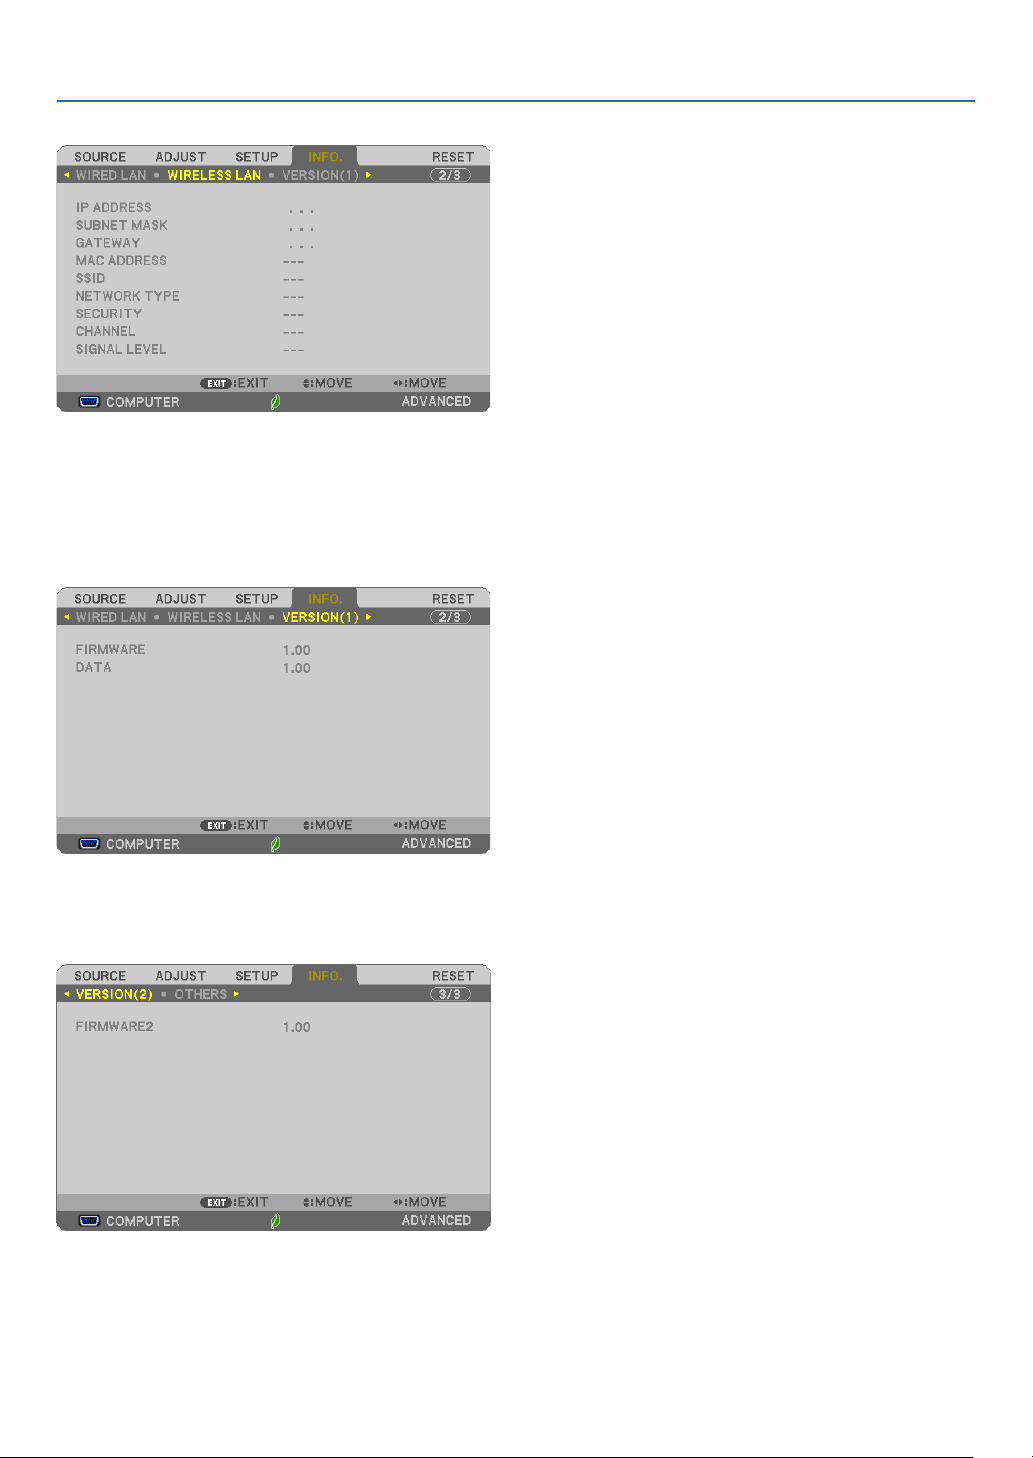
72
4. Using On-Screen Menu
[WIRELESS LAN]
[IPADDRESS] [SUBNETMASK]
[GATEWAY] [MACADDRESS]
[SSID] [NETWORKTYPE]
[SECURITY] [CHANNEL]
[SIGNALLEVEL]
[VERSION(1)]
[FIRMWARE]Version
[DATA]Version
[VERSION(2)]
[FIRMWARE2]Version

73
4. Using On-Screen Menu
[OTHERS]
[PROJECTORNAME]
[HOSTNAME]
[MODELNO.]
[SERIALNUMBER]
[LANUNITTYPE]
[CONTROLID](when[CONTROLID]isset)

74
4. Using On-Screen Menu
❼ Menu Descriptions & Functions [RESET]
Returning to Factory Default [RESET]
TheRESETfeatureallowsyoutochangeadjustmentsandsettingstothefactorypresetfora(all)source(s)except
thefollowing:
[CURRENTSIGNAL]
Resetstheadjustmentsforthecurrentsignaltothefactorypresetlevels.
Theitemsthatcanberesetare:[PRESET],[CONTRAST],[BRIGHTNESS],[COLOR],[HUE],[SHARPNESS],
[ASPECTRATIO],[HORIZONTAL],[VERTICAL],[CLOCK],[PHASE],and[OVERSCAN].
[ALLDATA]
Resetalltheadjustmentsandsettingsforallthesignalstothefactorypreset.
AllitemscanberesetEXCEPT[LANGUAGE],[BACKGROUND],[FILTERMESSAGE],[SECURITY],[COMMUNI-
CATIONSPEED],[CONTROLID],[STANDBYMODE],[FANMODE],[LAMPLIFEREMAINING],[LAMPHOURS
USED],[FILTERHOURSUSED],[TOTALCARBONSAVINGS],[PROJECTORNAME],[WIREDLAN],[WIRELESS
LAN],[IMAGEEXPRESSUTILITYLITE],[NETWORKSERVICE],[DATE&TIME],[ADMINISTRATORMODE],
and[REMOTEDESKTOPCONNECTION].
Toresetthelampusagetime,see“ClearingLampHourMeter[CLEARLAMPHOURS]”below.
ClearingLampHourMeter[CLEARLAMPHOURS]
Resetsthelampclockbacktozero.Selectingthisoptiondisplayssubmenuforaconrmation.Select[YES]andpress
theENTERbutton.
NOTE:Elapsedtimeofthelampusewillnotbeaffectedevenwhen[RESET]isdonefromthemenu.
NOTE:Theprojectorwillturnoffandgointostandbymodewhenyoucontinuetousetheprojectorforanother100hoursafterthe
lamphasreachedtheendofitslife.Inthisconditionyoucannotclearthelamphourmeteronthemenu.Ifthishappens,press
theHELPbuttonontheremotecontrolfor10secondstoresetthelampclockbacktozero.Dothisonlyafterreplacingthelamp.
ClearingtheFilterUsageHours[CLEARFILTERHOURS]
Resetsthelterusagebacktozero.Selectingthisoptiondisplayssubmenuforaconrmation.Select[YES]andpress
theENTERbutton.
NOTE:Elapsedtimeofthelterusewillnotbeaffectedevenwhen[RESET]isdonefromthemenu.

75
❶ Setting Up the Screen and the Projector
Thefurtheryourprojectorisfromthescreenorwall,thelargertheimage.Theminimumsizetheimagecanbeis58"
(1473mm)measureddiagonallywhentheprojectoris4inches(105mm)betweenthescreensideoftheprojector
andthewallorscreen.Thelargesttheimagecanbeis110"(2794mm)whentheprojectoris20inches(510mm)
betweenthescreensideoftheprojectorandthewallorscreen.
ScreenSize
H1 H2
L1 L2
Diagonal Width Height wide
inch mm inch mm inch mm inch mm inch mm inch mm inch mm
58 1473 49 1249 31 781 9 239 40 1020 4 105 18 448
60 1524 51 1292 32 808 10 244 41 1051 5 120 18 464
70 1778 59 1508 37 942 11 267 48 1210 8 198 21 542
80 2032 68 1723 42 1077 11 291 54 1368 11 276 24 620
90 2286 76 1939 48 1212 12 315 60 1527 14 354 27 698
100 2540 85 2154 53 1346 13 339 66 1685 17 432 31 776
110 2794 93 2369 58 1481 14 363 73 1843 20 510 34
854
L2
L1
H1
H2
0102030405060708090
58
60
70
80
90
100
110
L2
L1
Screen height
Screen size (inch)
Screen size (diagonal)
Screen width
Center of screen
Projector bottom
Throw distance L1/L2 (cm)
Screen side of projector
Center of projection window
5. Installation and Connections

76
5. Installation and Connections
WARNING
* Installingyourprojectorontheceilingmustbedonebyaqualiedtechnician.ContactyourNECdealerformore
information.
* Donotattempttoinstalltheprojectoryourself.
• Onlyuseyourprojectoronasolid,levelsurface.Iftheprojectorfallstotheground,youcanbeinjuredandthe
projectorseverelydamaged.
• Donotusetheprojectorwheretemperaturesvarygreatly.Theprojectormustbeusedattemperaturesbetween
41°F(5°C)and104°F(40°C)(Ecomodeselectedautomaticallyat95°Fto104°F/35°Cto40°C).
• Donotexposetheprojectortomoisture,dust,orsmoke.Thiswillharmthescreenimage.
• Ensurethatyouhaveadequateventilationaroundyourprojectorsoheatcandissipate.Donotcovertheventson
thesideorthefrontoftheprojector.
ReectingtheImage
Usingamirrortoreectyourprojector’simageenablesyoutoenjoyamuchlargerimagewhenasmallerspaceis
required.ContactyourNECdealerifyouneedamirrorsystem.Ifyou’reusingamirrorsystemandyourimageis
inverted,usetheMENUand▲▼◀▶buttonsonyourprojectorcabinetoryourremotecontroltocorrecttheorienta-
tion.(→page62)
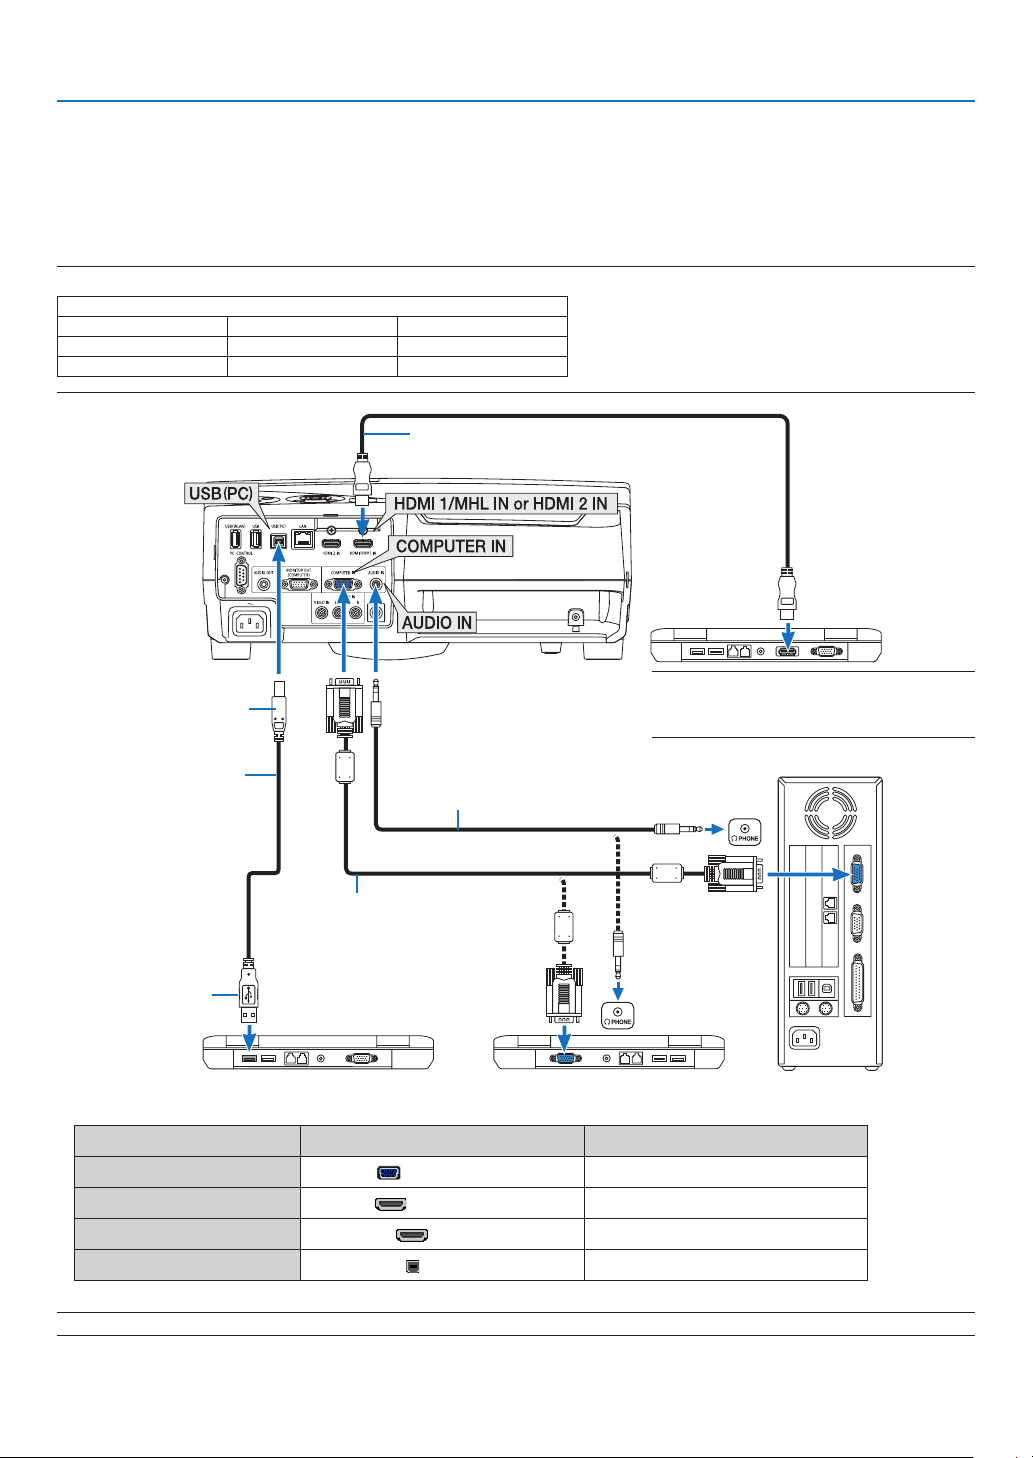
77
5. Installation and Connections
❷ Making Connections
Connecting Your Computer
Computercables,HDMIandUSBcanbeusedtoconnecttoacomputer.TheHDMIcableisnotenclosedwiththe
projector.Pleasegetreadyasuitablecablefortheconnection.
NOTE:SignalssupportedbyPlug&Play(DDC2)
INPUT
COMPUTER IN HDMI 1/MHL IN HDMI 2 IN
analog digital digital
Yes Yes Yes
USB cable (supplied)
(compatible with USB 2.0
specifications)
Computer cable (VGA) (supplied)
To mini D-Sub 15-pin terminal on the
projector.Itisrecommendedthatyou
use a commercially available distribu-
tion amplifier if connecting a signal
cable longer than the cable supplied.
Type B
Type A
Stereo mini-plug audio cable (not supplied)
HDMIcable(notsupplied)
UseHighSpeedHDMI
®
Cable.
NOTE:ForMac,useacommerciallyavailable
pinadapter(notsupplied)toconnecttoyour
Mac’svideoport.
• Selectthesourcenameforitsappropriateinputterminalafterturningontheprojector.
Inputterminal
SOURCEbuttonontheprojectorcabinet
Buttonontheremotecontrol
COMPUTERIN COMPUTER (COMPUTER1)
HDMI1/MHLIN HDMI1/MHL (HDMI1/MHL*)
HDMI2IN HDMI2 (HDMI2*)
USB(PC) USB-B (USB-B)
NOTE:TheprojectorisnotcompatiblewithvideodecodedoutputsoftheNECISS-6020switcher.
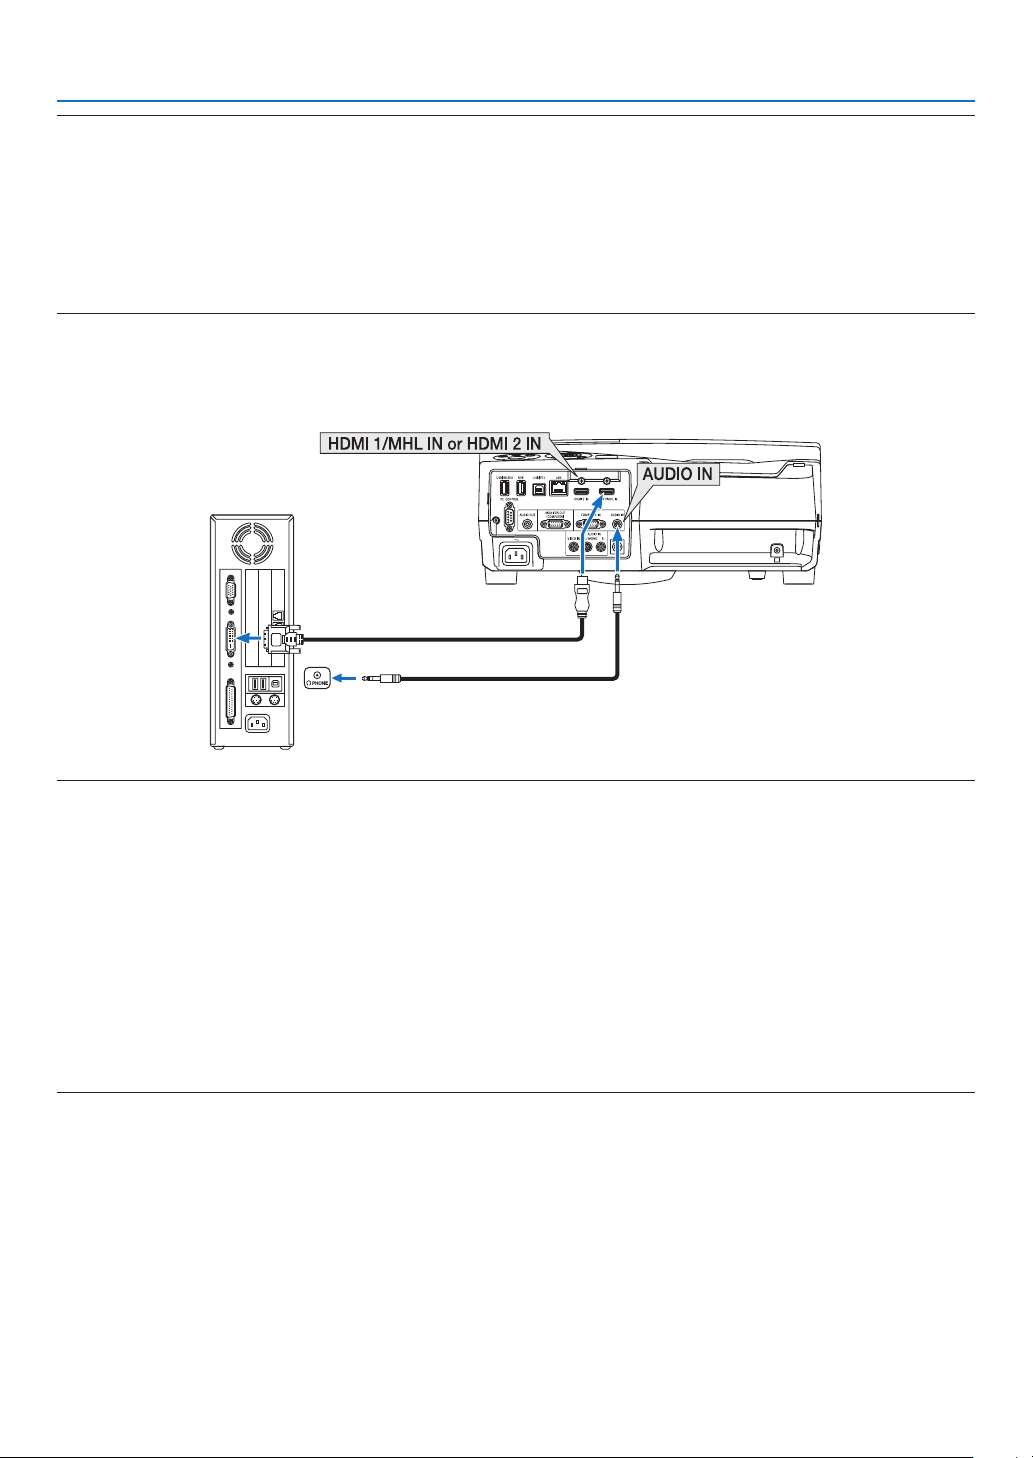
78
5. Installation and Connections
NOTE:AnimagemaynotbedisplayedcorrectlywhenaVideosourceisplayedbackviaacommerciallyavailablescanconverter.
Thisisbecausetheprojectorwillprocessavideosignalasacomputersignalatthedefaultsetting.Inthatcase,dothefollowing.
* Whenanimageisdisplayedwiththelowerandupperblackportionofthescreenoradarkimageisnotdisplayedcorrectly:
ProjectanimagetollthescreenandthenpresstheAUTOADJ.buttonontheremotecontrolortheprojectorcabinet.
Enabling the computer’s external display
DisplayinganimageonthenotebookPC’sscreendoesnotnecessarilymeanitoutputsasignaltotheprojector.
WhenusingaPCcompatiblelaptop,acombinationoffunctionkeyswillenable/disabletheexternaldisplay.
Usually,thecombinationofthe“Fn”keyalongwithoneofthe12functionkeysgetstheexternaldisplaytocomeonoroff.For
example,NEClaptopsuseFn+F3,whileDelllaptopsuseFn+F8keycombinationstotogglethroughexternaldisplayselections.
CautionswhenusingaDVIsignal
• WhenthecomputerhasaDVIoutputconnector,useacommerciallyavailableconvertercabletoconnectthecom-
putertotheprojector’sHDMI1/MHLorHDMI2inputconnector(onlydigitalvideosignalscanbeinput).
NOTE:WhenViewingaDVIDigitalSignal
• Turnoffthepowerofthecomputerandprojectorbeforeconnecting.
• Whenavideodeckisconnectedviaascanconverter,etc.,thedisplaymaynotbecorrectduringfast-forwardingandrewinding.
• UseaDVI-to-HDMIcablecompliantwithDDWG(DigitalDisplayWorkingGroup)DVI(DigitalVisualInterface)revision1.0stan-
dard.
Thecableshouldbewithin197"/5mlong.
• TurnofftheprojectorandthePCbeforeconnectingtheDVI-to-HDMIcable.
• ToprojectaDVIdigitalsignal:Connectthecables,turntheprojectoron,thenselecttheHDMIinput.Finally,turnonyourPC.
Failuretodosomaynotactivatethedigitaloutputofthegraphicscardresultinginnopicturebeingdisplayed.Shouldthishappen,
restartyourPC.
• DonotdisconnecttheDVI-to-HDMIcablewhiletheprojectorisrunning.Ifthesignalcablehasbeendisconnectedandthen
reconnected,animagemaynotbecorrectlydisplayed.Shouldthishappen,restartyourPC.
• TheCOMPUTERvideoinputconnectorssupportWindowsPlugandPlay.
• AMacsignaladapter(commerciallyavailable)mayberequiredtoconnectaMaccomputer.
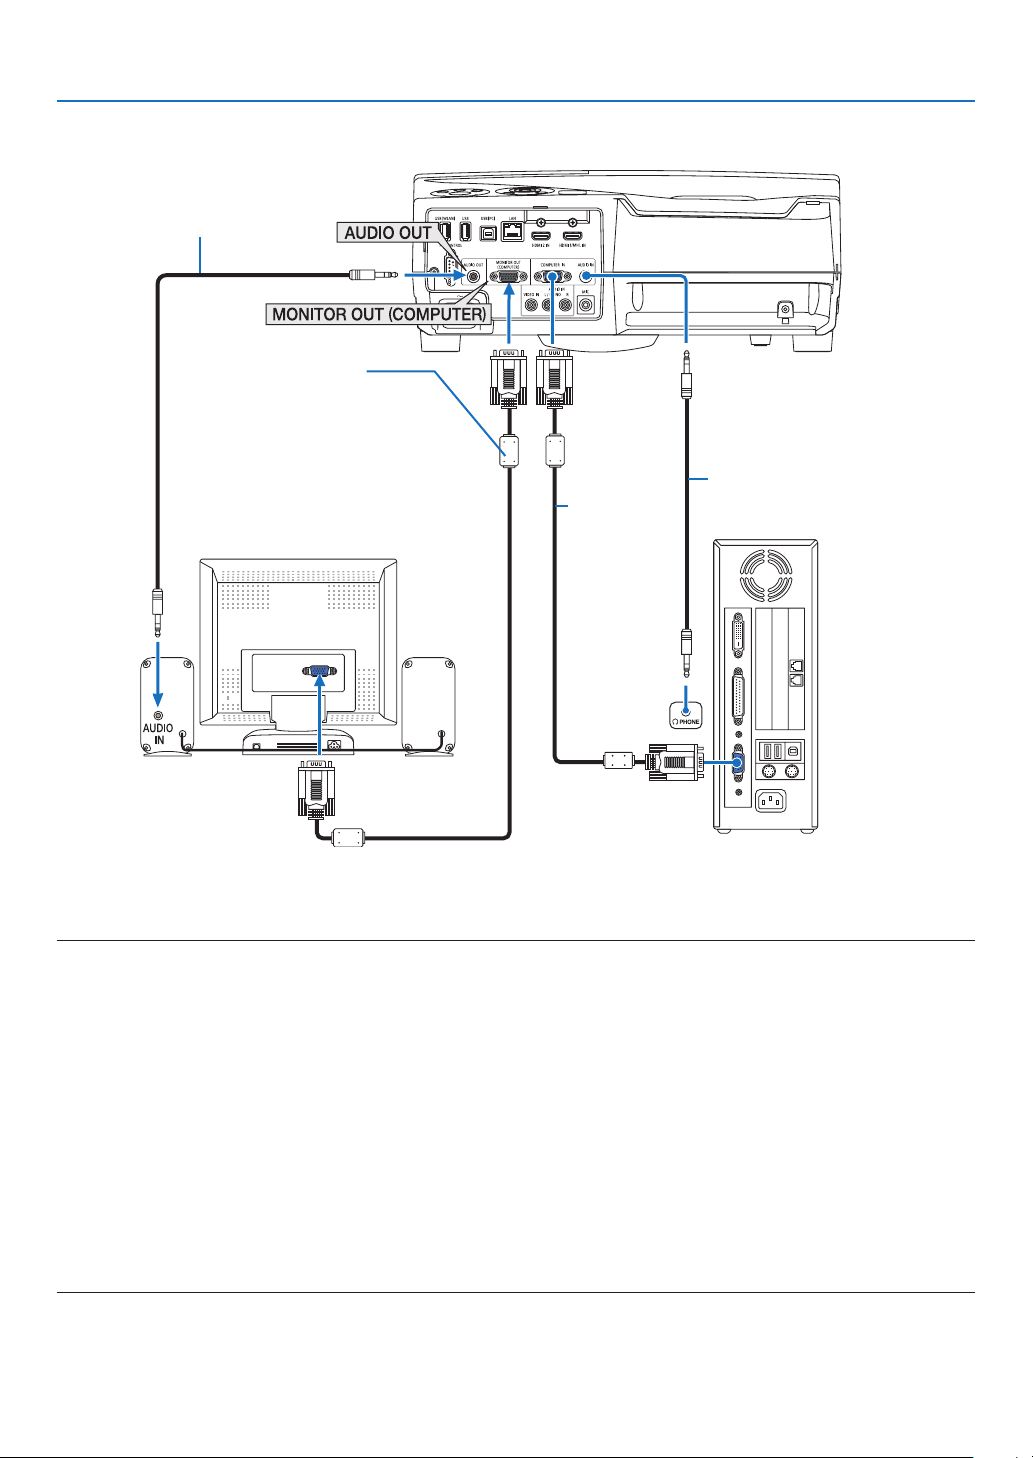
79
5. Installation and Connections
Connecting an External Monitor
Youcanconnectaseparate,externalmonitortoyourprojectortosimultaneouslyviewonamonitorthecomputer
analogimageyou’reprojecting.
NOTE:
• TheAUDIOOUTminijackdoesnotsupportHeadphoneterminal.
• Whenaudioequipmentisconnected,theprojectorspeakerisdisabled.
• ThesignaloutputfromtheMONITOROUT(COMPUTER)ofthisprojectorisforprojectingimageonexclusiveonedisplay.
• Whennosignalisappliedover3minutesintheconditionofprojectorstandbywhenNETWORKSTANDBYissetintheStandby
mode,outputfromtheMONITOROUTorAUDIOOUTterminalwillbestopped.Inthiscasepulloutthecomputercableandset
itbackafterinputtingvideosignal
Monitoroutandsleepmode:
• TheMONITOROUT(COMP.)connectorwillnotworkwhen[NORMAL]isselectedfor[STANDBYMODE].
TheMONITOROUT(COMP.)connectorwillworkonlyinthesleepmode.
ApplyingasignalfromtheCOMPUTERINconnectorwillputtheprojectorinthesleepmode,whichallowsyoutousetheMONI-
TOROUT(COMP.)connectorandtheAUDIOOUTminijack.SoundfromtheMICinputjackwillbeoutputtotheAUDIOOUTmini
jack.
Thesleepmodeisoneofthestandbymodes.Thesleepmodecannotbeselectedfromthemenu.
• Inthenetworkstandbymode,soundforthelastviewedcomputerorvideosourcewillbeheard.
BNC-to-COMPUTERINterminalconvertedsignalwillnotbeoutputinthestandbymodeandsleepmode.
Computer
cable (VGA)
(supplied)
Stereo mini-plug audio cable (not
supplied)
Computer cable (VGA)
(not supplied)
Stereo mini-plug audio
cable (not supplied)
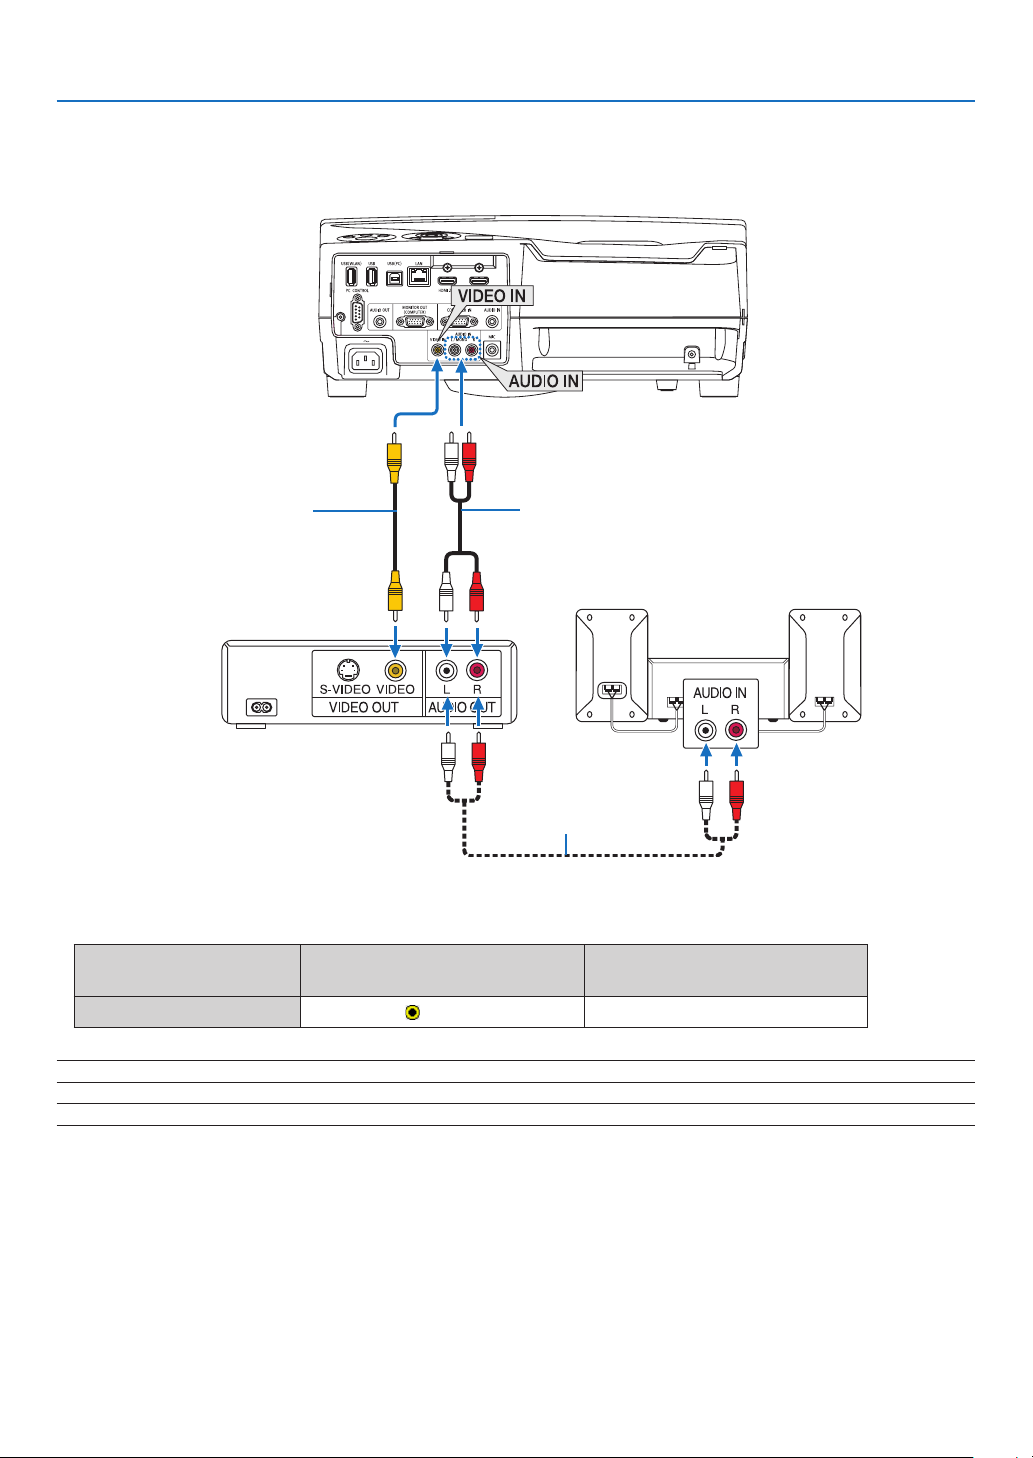
80
5. Installation and Connections
Connecting Your DVD Player or Other AV Equipment
ConnectingVideoInput
• Selectthesourcenameforitsappropriateinputterminalafterturningontheprojector.
Inputterminal
SOURCEbuttonontheprojector
cabinet
Buttonontheremotecontrol
VIDEOIN
VIDEO
(VIDEO)
NOTE:RefertoyourVCRowner’smanualformoreinformationaboutyourequipment’svideooutputrequirements.
NOTE:AnimagemaynotbedisplayedcorrectlywhenaVideosourceisplayedbackinfast-forwardorfast-rewindviaascanconverter.
Audio cable (not supplied)
Video cable (not supplied)
Audio cable (not supplied)
Audio equipment
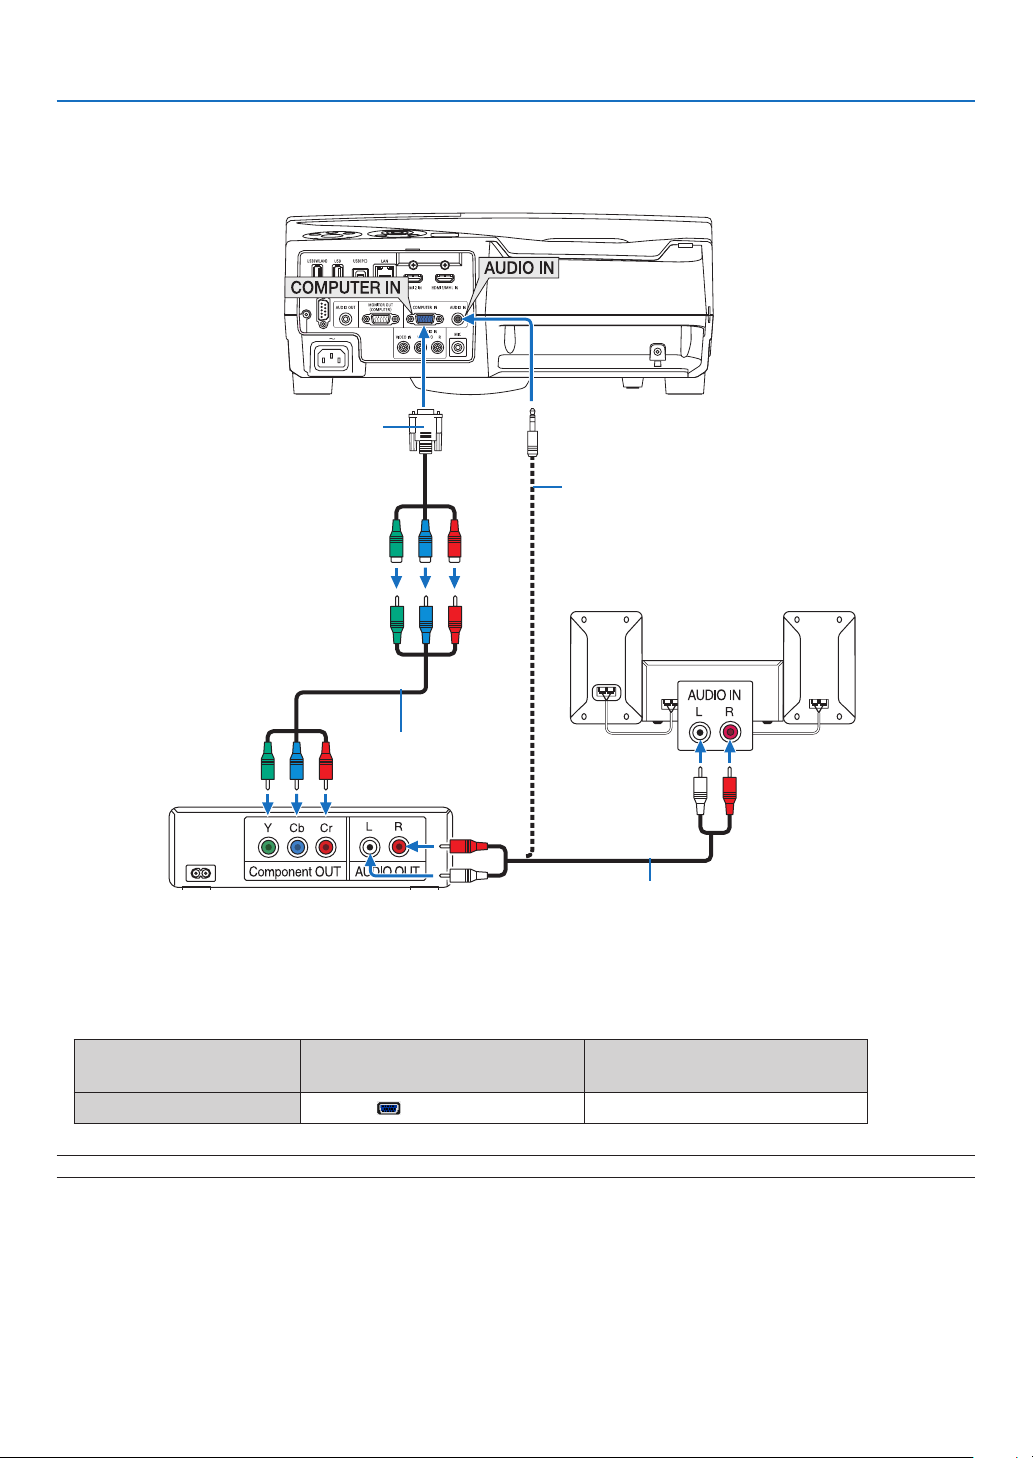
81
5. Installation and Connections
Connecting Component Input
Acomponentsignalwillbeautomaticallydisplayed.Ifnot,fromthemenu,select[SETUP]→[OPTIONS(1)]→
[SIGNALSELECT]→[COMPUTER],andthenplaceacheckmarkintheComponentradiobutton.
• Selectthesourcenameforitsappropriateinputterminalafterturningontheprojector.
Inputterminal
SOURCEbuttonontheprojector
cabinet
Buttonontheremotecontrol
COMPUTERIN COMPUTER (COMPUTER1)
NOTE:RefertoyourDVDplayer’sowner’smanualformoreinformationaboutyourDVDplayer’svideooutputrequirements.
15-pin - to - RCA (female) × 3
cable adapter (ADP-CV1E)
Stereo mini plug - to - RCA audio
cable (not supplied)
Component video RCA ×
3 cable (not supplied)
Audio cable (not supplied)
DVD player
Audio Equipment
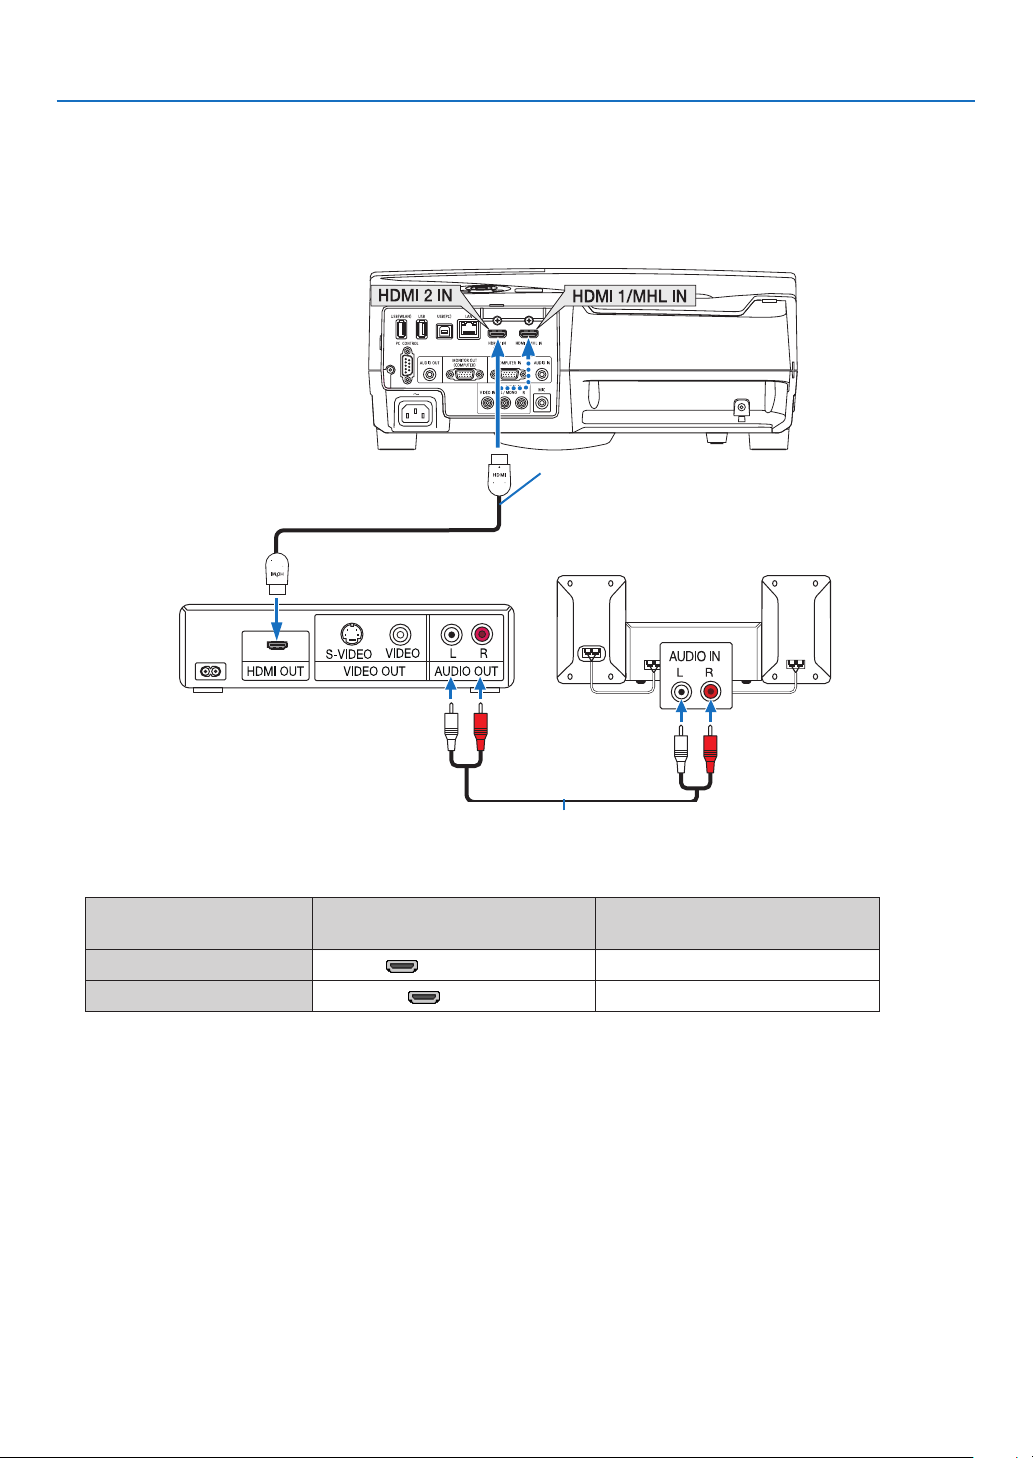
82
5. Installation and Connections
Connecting HDMI Input
YoucanconnecttheHDMIoutputofyourDVDplayer,harddiskplayer,Blu-rayplayer,ornotebooktypePCtothe
HDMIINterminalofyourprojector.
• Selectthesourcenameforitsappropriateinputterminalafterturningontheprojector.
Inputterminal
SOURCEbuttonontheprojector
cabinet
Buttonontheremotecontrol
HDMI1/MHLIN HDMI1/MHL (HDMI1/MHL*)
HDMI2IN HDMI2 (HDMI2*)
• WhenconnectingtheHDMI1/MHLINterminal(orHDMI2terminal)oftheprojectortotheDVDplayer,theprojec-
tor’svideolevelcanbemadesettingsinaccordancewiththeDVDplayer’svideolevel.Inthemenuselect[HDMI
SETTINGS]→[VIDEOLEVEL]andmakenecessarysettings.
• IftheHDMIinputsoundcannotbeheard,inthemenuselect[AUDIOSELECT]→[HDMI1/MHL]or[HDMI2].(→
page66)
HDMIcable(notsupplied)
UseHighSpeedHDMI
®
Cable.
Audio cable (not supplied)
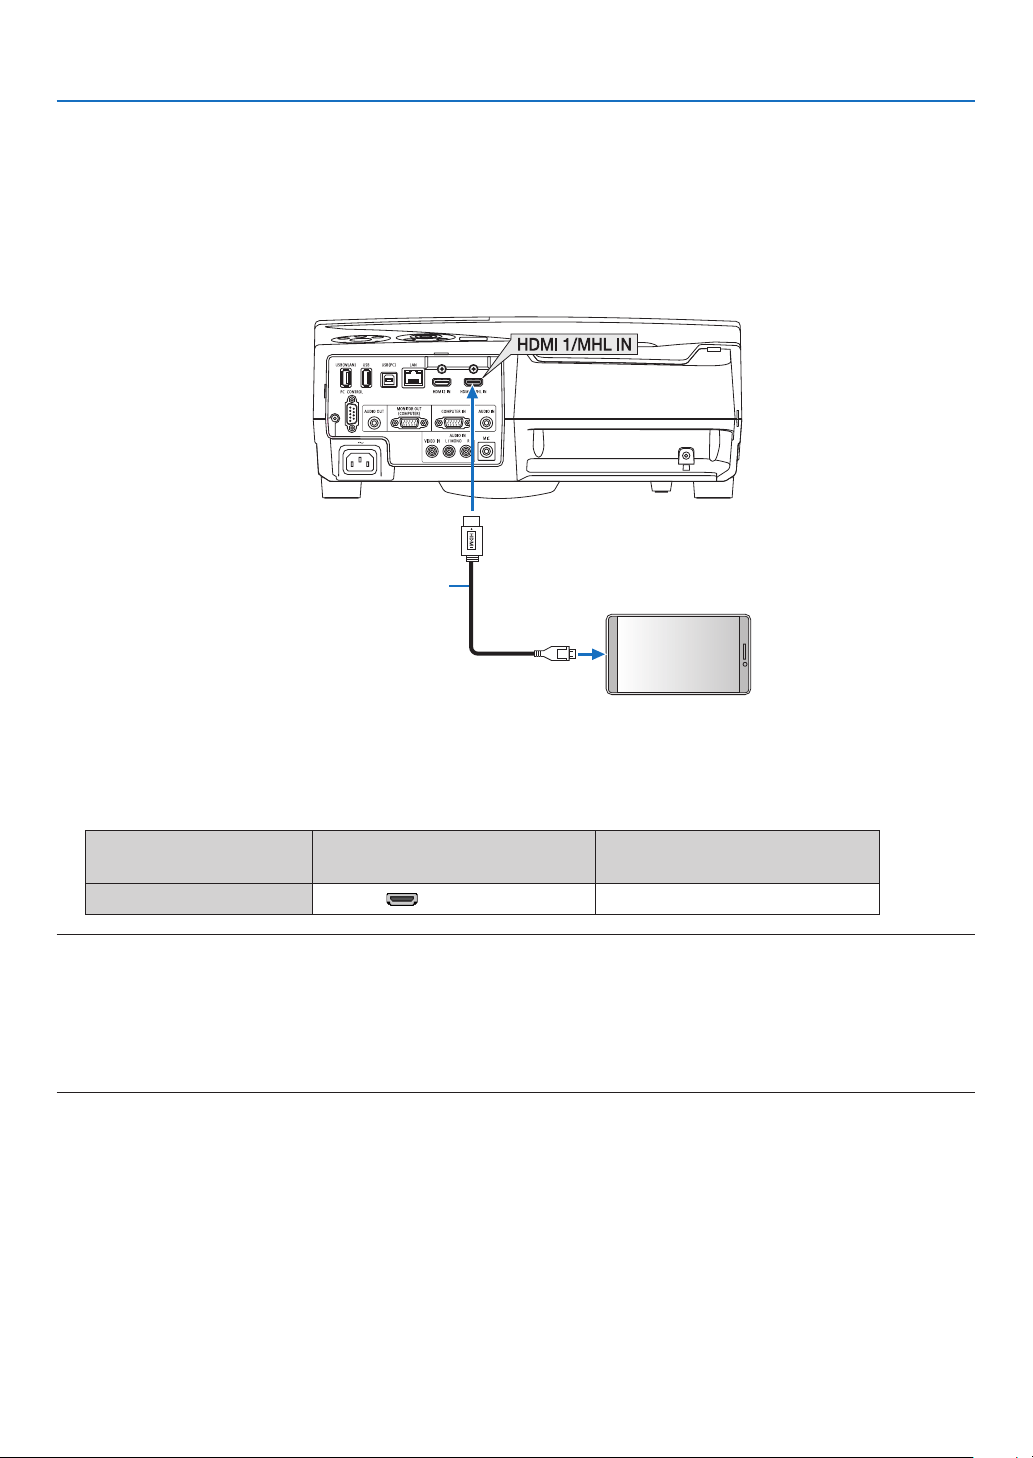
83
5. Installation and Connections
Connecting a smart phone and a tablet terminal
ThebelowmentionedfeatureisavailablewhentheprojectorisconnectedwithMHLsupporteddevicessuchasa
smartphoneandatabletterminalbyaMHLcable(notsupplied)
• ProjectingaimageandaleontheMHLsupporteddevices.
• OutputsoundontheMHLsupporteddevicesfromthebuild-inspeaker.
• ChargetheMHLsupporteddevices.
• OperatetheMHLsupporteddevicesbytheremotecontrolfortheprojector.
• OperatetheprojectorbytheMHLsupporteddevices
MHL cable (not supplied)
MHL supported devices
Micro USB cable / to the double use terminal as
power source
• Selectthesourcenameforitsappropriateinputterminalafterturningontheprojector.
Inputterminal
SOURCEbuttonontheprojector
cabinet
Buttonontheremotecontrol
HDMI1/MHLIN HDMI1/MHL (HDMI1/MHL*)
NOTE:
• PleaseusetheMHLcable(notsupplied)thatmeetsthestandard.
Ifthecablethatdoesnotmeetthestandardisused,itmaybecauseofre,injuryordamageofpropertyaroundduringcharging
theMHLsupporteddevices.
• IfMHL-HDMIadaptorisused,itmaydisabletocharge/operatetheMHLsupporteddevicesbytheremotecontroloftheprojector.
• Ifimagecannotbeprojectedcorrectly,pullouttheMHLcableonceandputitbackagain.
• Dependingontypesandsettingofsmartphonesandtablets,imagemaynotbeprojectedcorrectly.
Information
• Inthebelowmentionedconditions,theMHLsupporteddevicesarenotcharged
- WhentheprojectorisinSTANDBYmode
- WhentheMHLsupporteddevicesaredischargedcompletely.
- Whensupplycurrentisoverconsumptioncurrent.
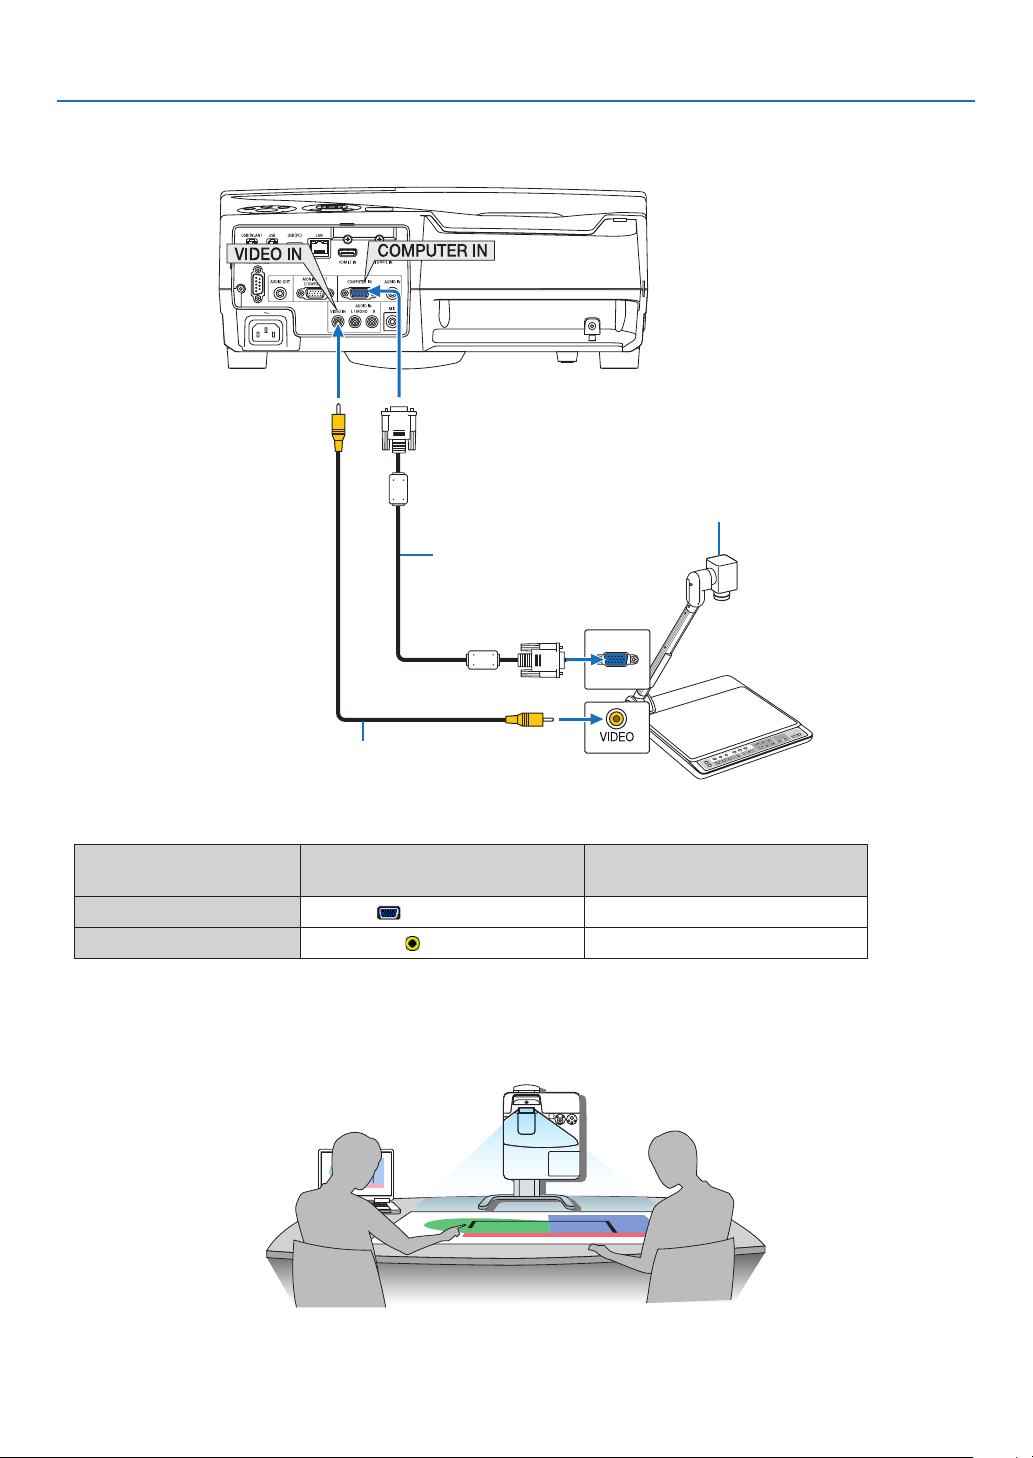
84
5. Installation and Connections
Connecting your document camera
Youcanconnectyourdocumentcameraandprojectprinteddocuments,etc.
Name, position, and direction of terminals are
varydependingoncameramodel.Pleasecheck
user's manual of your camera for details.
Computer cable (VGA)
(supplied)
Video cable (not supplied)
• Selectthesourcenameforitsappropriateinputterminalafterturningontheprojector.
Inputterminal
SOURCEbuttonontheprojector
cabinet
Buttonontheremotecontrol
COMPUTERIN COMPUTER (COMPUTER1)
VIDEOIN
VIDEO
(VIDEO)
Table projection
Installingtheprojectorinverticalposition,itabletoprojectimagesontotheceiling,thetableandtheoor.
Makesuretoinstalltheprojectorwiththetableprojectionmount(NP01TKsoldseparately).
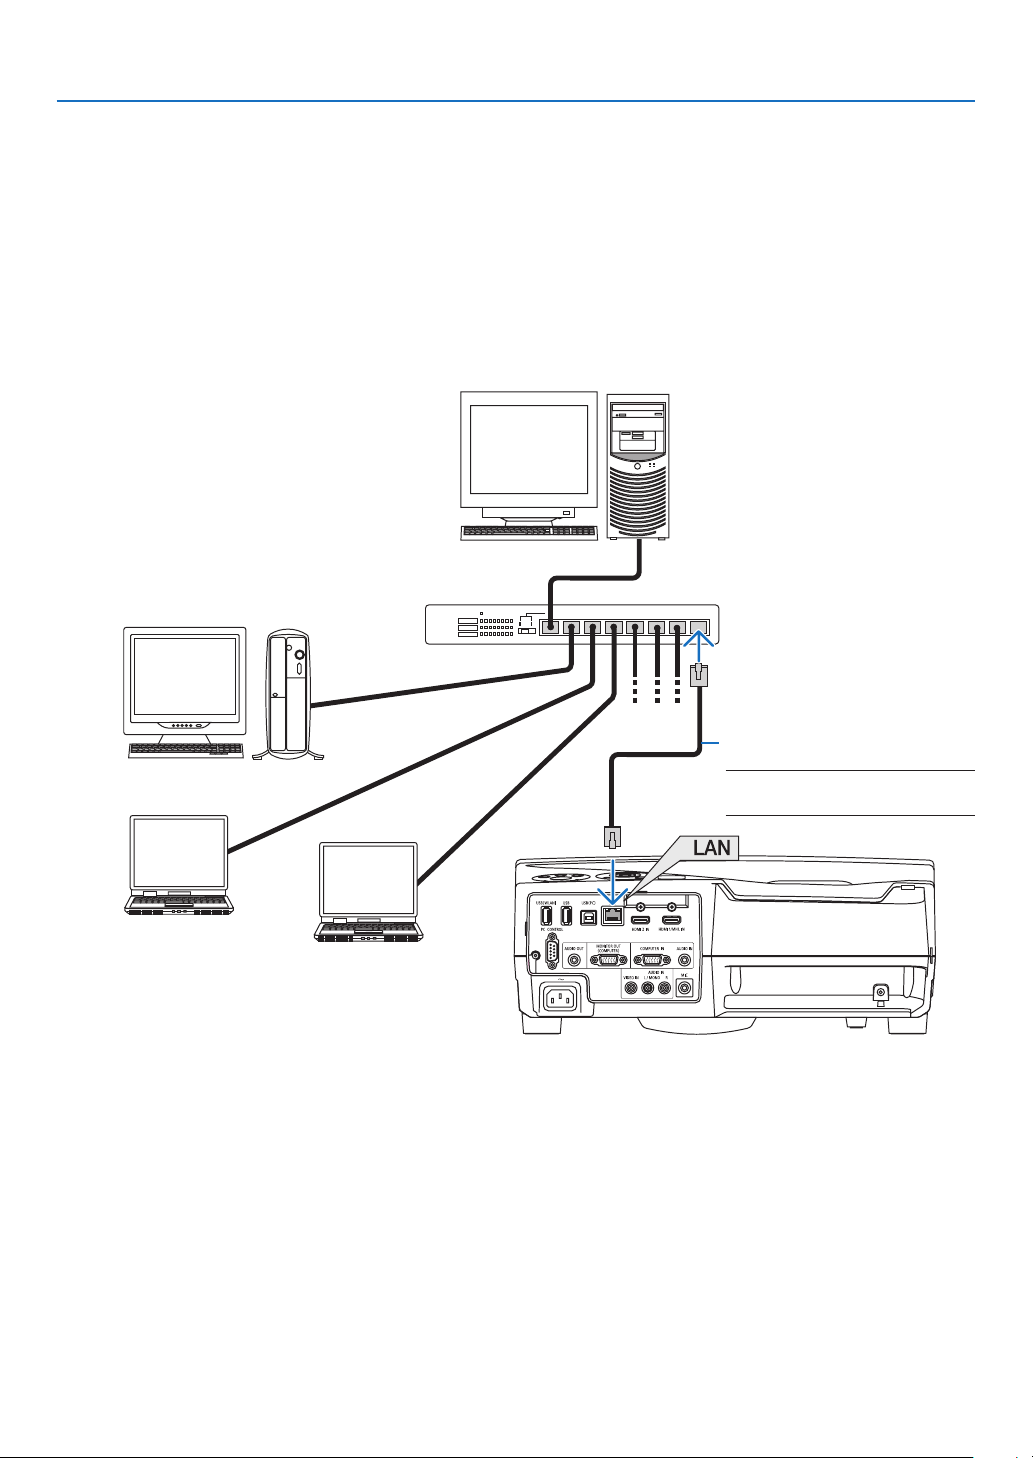
85
5. Installation and Connections
Connecting to a Wired LAN
TheprojectorcomesstandardwithaLANport(RJ-45)whichprovidesaLANconnectionusingaLANcable.
TouseaLANconnection,youarerequiredtosetthewiredLANsettingsontheprojectormenu.Select[SETUP]→
[INSTALLATION]→[NETWORKSETTINGS].(→page64).
ExampleofLANconnection
ExampleofwiredLANconnection
Server
Hub
LAN cable (not supplied)
NOTE:UseaCategory5orhigher
LANcable.
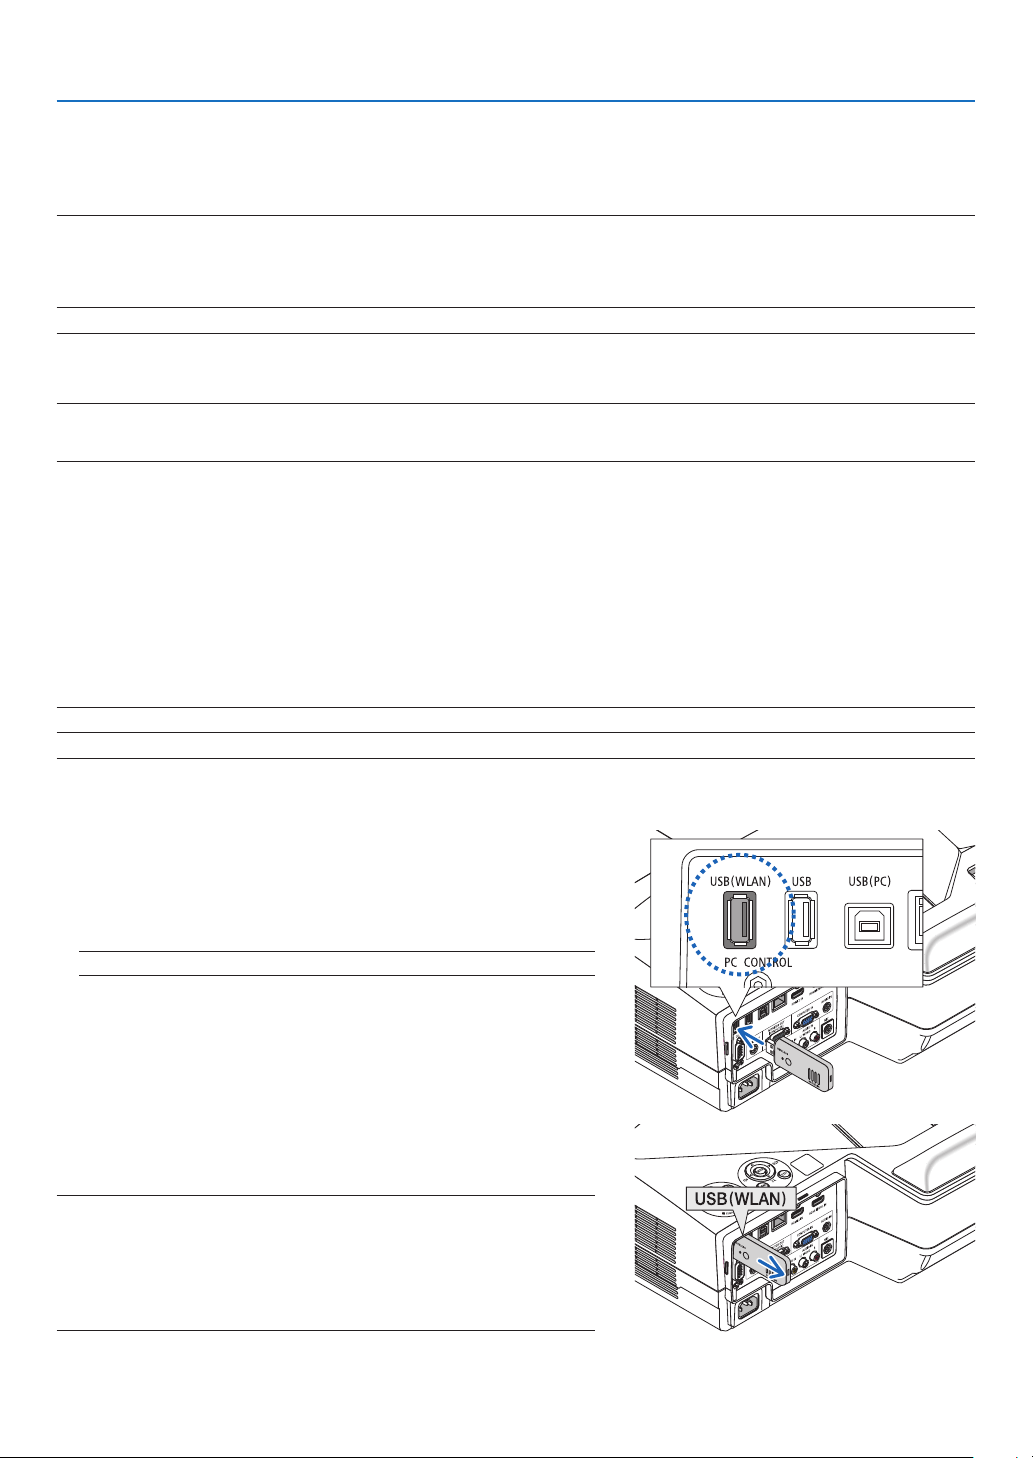
86
5. Installation and Connections
Connecting to a Wireless LAN (Optional: NP05LM series)
TheUSBWirelessLANUnitalsoprovidesawirelessLANconnection.TouseawirelessLANconnection,youare
requiredtoassignanIPaddresstotheprojector.
Important:
• IfyouusetheprojectorwiththeUSBWirelessLANUnitintheareawheretheuseofwirelessLANequipmentisprohibited,remove
theUSBWirelessLANUnitfromtheprojector.
• BuytheappropriateUSBWirelessLANUnitforyourcountryorarea.
NOTE:
• ThegreenLEDontheUSBWirelessLANUnitashestoshowthattheUSBWirelessLANUnitisworking.
• Yourcomputer’swirelessLANadapter(orunit)mustbecompliedwithWi-Fi(IEEE802.11b/g/n)standard.
AttachingtheUSBWirelessLANUnit
NOTE:
• TheUSBWirelessLANUnitmustbeinsertedintotheUSBWirelessLANUnitportinthecorrectdirection.Itcannotbeinserted
inthereversedirection.IftheUSBWirelessLANUnitisinsertedinthereversedirectionwithexcessiveforceapplied,theUSB
portmaybreak.
• BeforetouchingtheUSBWirelessLANUnit,touchametallicobject(suchasadoorknoboraluminumwindowframe)todischarge
thestaticelectricityfromyourbody.
• AlwaysinsertorremovetheUSBWirelessLANunitwhenthemainpoweristurnedoff.Failuretodosomaycauseprojector
malfunctionordamagetotheUSBwirelessLANunit.Iftheprojectorwillnotworkcorrectly,turnofftheprojector,disconnect
thepowercord,andthenconnectitagain.
• DonotinsertotherUSBdevicesintotheUSBWirelessLANunitport.DonotinserttheUSBWirelessLANunitintotheUSB(PC)
port(TypeB).
NOTE:Whenthecablecoverisattached,removeitbeforeinsertingtheUSBWirelessLANUnit.
1. Press the POWER button to turn off the projector and set it
into standby condition, and disconnect the power cord.
2. Slowly insert the USB Wireless LAN Unit into the USB (WLAN)
port.
Remove the cap from the USB Wireless LAN Unit, and then insert
it with the surface (side of indicator) facing outward. Keep the cap
for later use.
NOTE:DonotforcetoinserttheUSBWirelessLANUnit.
* To remove the USB Wireless LAN Unit, disconnect the power
cord and use the above procedure.
NOTE:
• ThegreenLEDontheUSBWirelessLANUnitashestoshowthatWireless
LANUnitisworking.IftheUSBWirelessLANUnitisincorrectlyattached,
theblueLEDwillnotash.
• DonotpressthebuttonontheUSBWirelessLANUnit.Thebuttonwillnot
workwiththismodel.
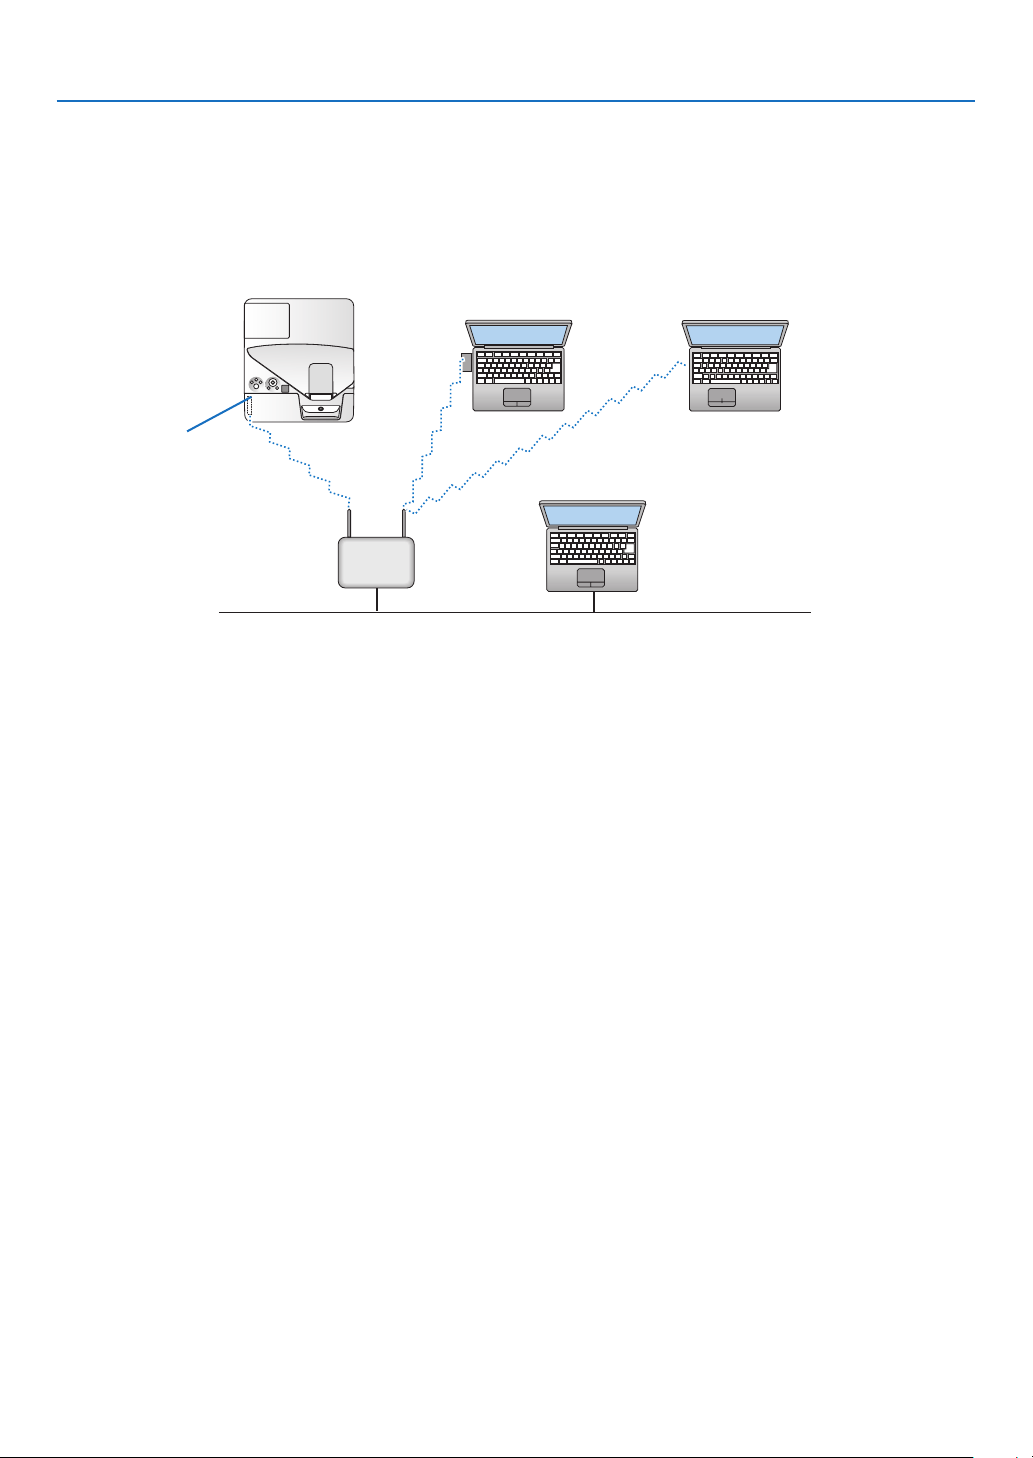
87
5. Installation and Connections
ExampleofwirelessLANconnection
TouseaLANconnection,youarerequiredtosettheWirelessLANsettingsontheprojectormenu.Select[SETUP]
→[INSTALLATION]→[NETWORKSETTINGS].(→page64).
PC with wireless LAN
card inserted
PC with built-in wireless
LAN function
Wired LAN
Wireless access point
USB Wireless LAN Unit
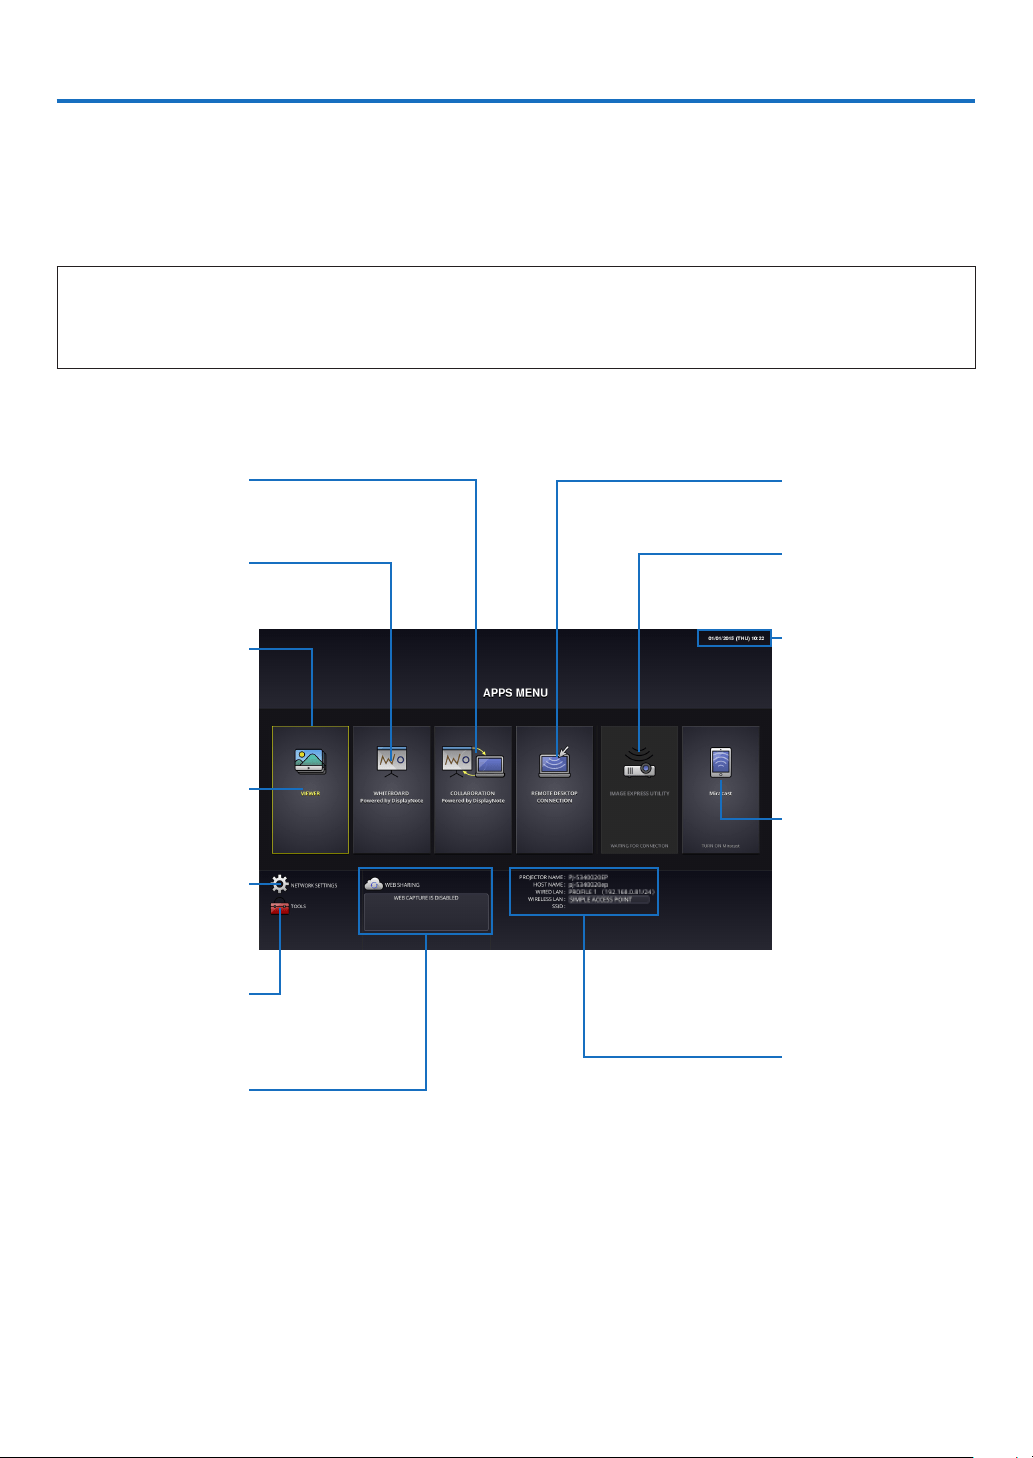
88
6. APPS MENU
❶ What can you do with the APPS MENU?
ItbecomesavailabletoselecttheexpansionfunctionsindicatedinbelowandvarioussettingwiththeAPPSMENU.
FordisplayingtheAPPSMENU,presstheAPPSbuttonontheremoteorselect[APPS]asthe[SOURCE]onthe
onscreenmenu.
Oncecalibrationforthestyluspenisperformed,thestyluspenbecomesavailableforselectingandsettingupvarious
functionsontheAPPSMENU.
INFORMATION
DetailedinformationabouteachfunctionontheAPPSMENUisexplainedonourwebsite.Pleasesearchitbythe
modelnameofyourprojector.
http://www.nec-display.com/dl/en/pj_manual/lineup.html
APPSMENUscreendisplay
Current date and time
Important:
Before utilizing the func-
tion of APPS MENU, set
day and time.
REMOTE DESKTOP
CONNECTION
Miracast
IMAGEEXPRESSUTIL-
ITYLITE
NETWORKINFORMA-
TION
COLLABORATION
WHITEBOARD
FOCUS
Indicatingtheselected
item.
Surrounded in a yellow
square.
VIEWER
NETWORKSETTINGS
TOOLS
WEBSHARING
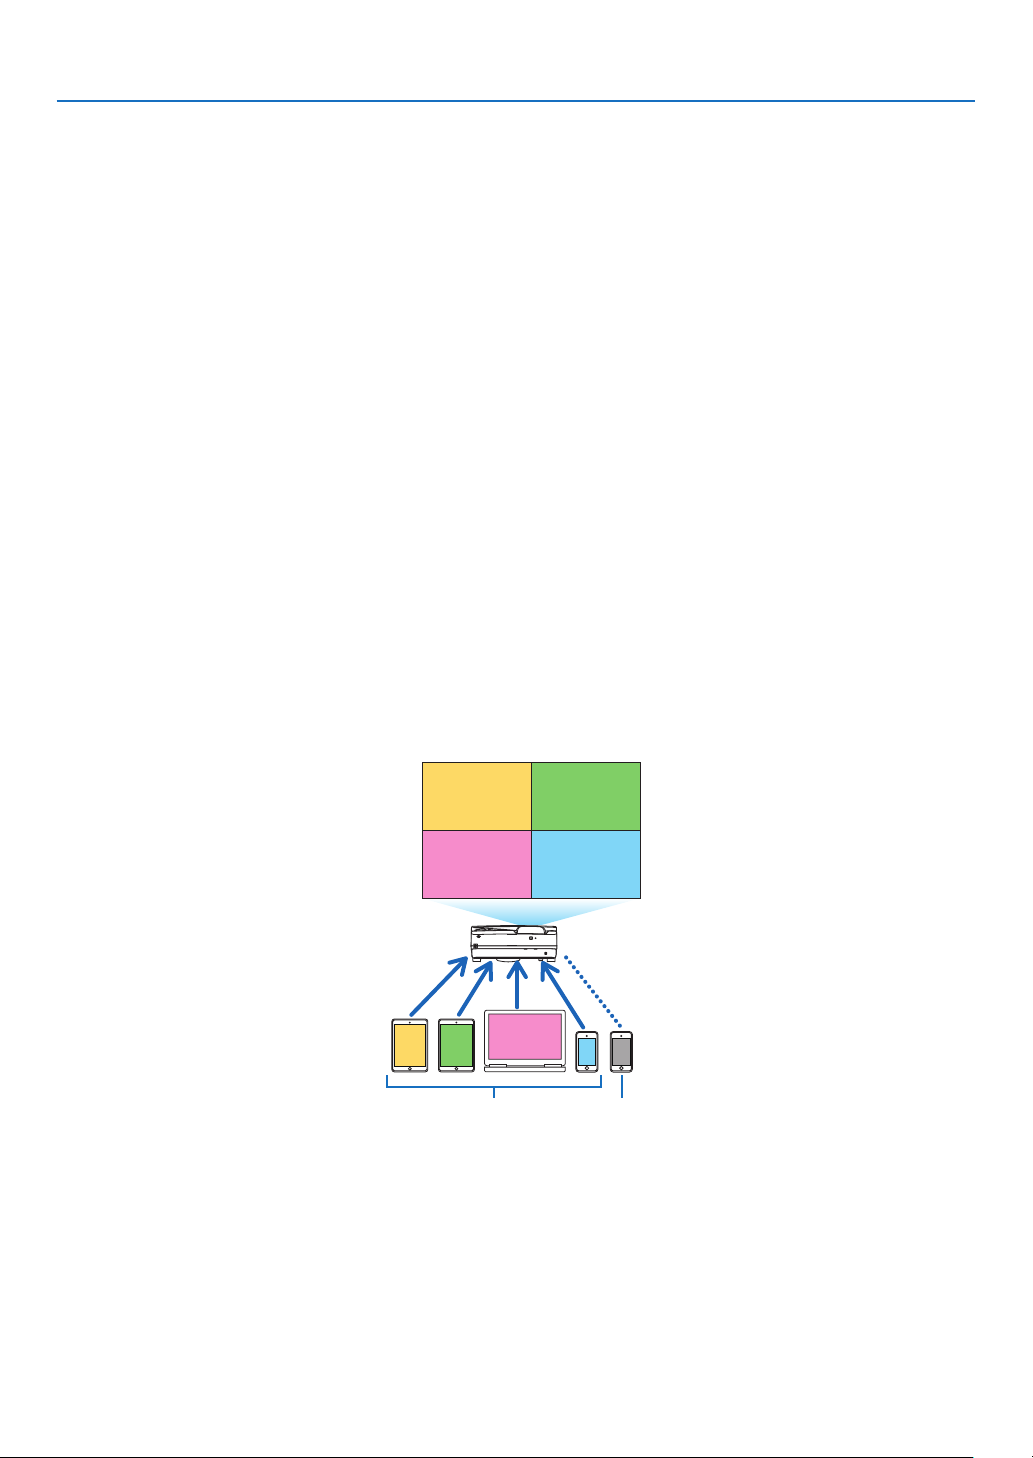
89
6. APPS MENU
VIEWER
Selectthesavedimages/videosandprojectthembytheprojector.Thisfunctionisavailablesaveddatainthreestor-
agesexplainedbelow:
(1)ProjectorMemory:Imagestemporarilysavedintheprojectorbuilt-inmemory.(Call“Capturedimage”inthismanual)
(2)USBMemory:ImagesandvideossavedintheUSBmemoryconnectedwiththeprojector.
(3)CommonFolder:Imagesandvideossavedinthecommonfolderinanetworkconnectedwiththeprojector.
WHITEBOARD
Enablestoperformdrawingbythestyluspensuppliedwiththeprojector.Beforestartingthe[WHITEBOARD],perform
thecalibrationinthe[TOOLS]→[PENSETTINGS].
COLLABORATION
Enablestosharethedrawingdrawnbythestyluspenwiththecomputerconnectedinanetwork.
REMOTE DESKTOP CONNECTION
• Selectthecomputerconnectedinthesamenetworkwiththeprojector,andtheprojectorprojectstheimageson
thecomputeroverthenetwork.
AcommerciallyavailableUSBkeyboardcanbeusedforcontrollingWindows8andWindows7computersconnected
inthenetworkwiththeprojector.
IMAGE EXPRESS UTILITY LITE
• Ifvariousterminalunitssuchasacomputer,asmartphone,andatabletareconnectedwiththeprojectorinthe
network,itenablestotransferimagessavedoneachterminaltotheprojectorandtoprojectthem.
• YoucanconnectterminalunitsinmultipleOS(Windows,MacOS,Android,andiOS)withtheprojectorsimultane-
ously.
• Theprojectorreceivesimagestransferredfrommultipleterminalunits(Max.50units)andprojectsthemonthe
screendividingit(Max.4×4)atthesametime.
BA
C
D
E
AB
CD
Transmit Stop
Simultaneous connection
Simultaneous display
• Installtheapplicationsoftware“ImageExpressUtilityLite”,includedintheCD-ROMsuppliedwiththeprojectoron
computers.(→page94,97)
• Forasmartphoneandatablet,downloadtheapplication“WirelessImageUtility”fromourwebsiteandinstalliton
these.(→page111)
Miracast
BywirelesslyconnectingtheterminalunitssupportingtheMiracastsuchastheAndroidwiththeprojector,itenables
theprojectortoprojectimagestransferredfromtheseterminals.
Beforeconnectingtheseterminalunits,set[Miracast]inthe[NETWORKSETTINGS]ontheprojector.
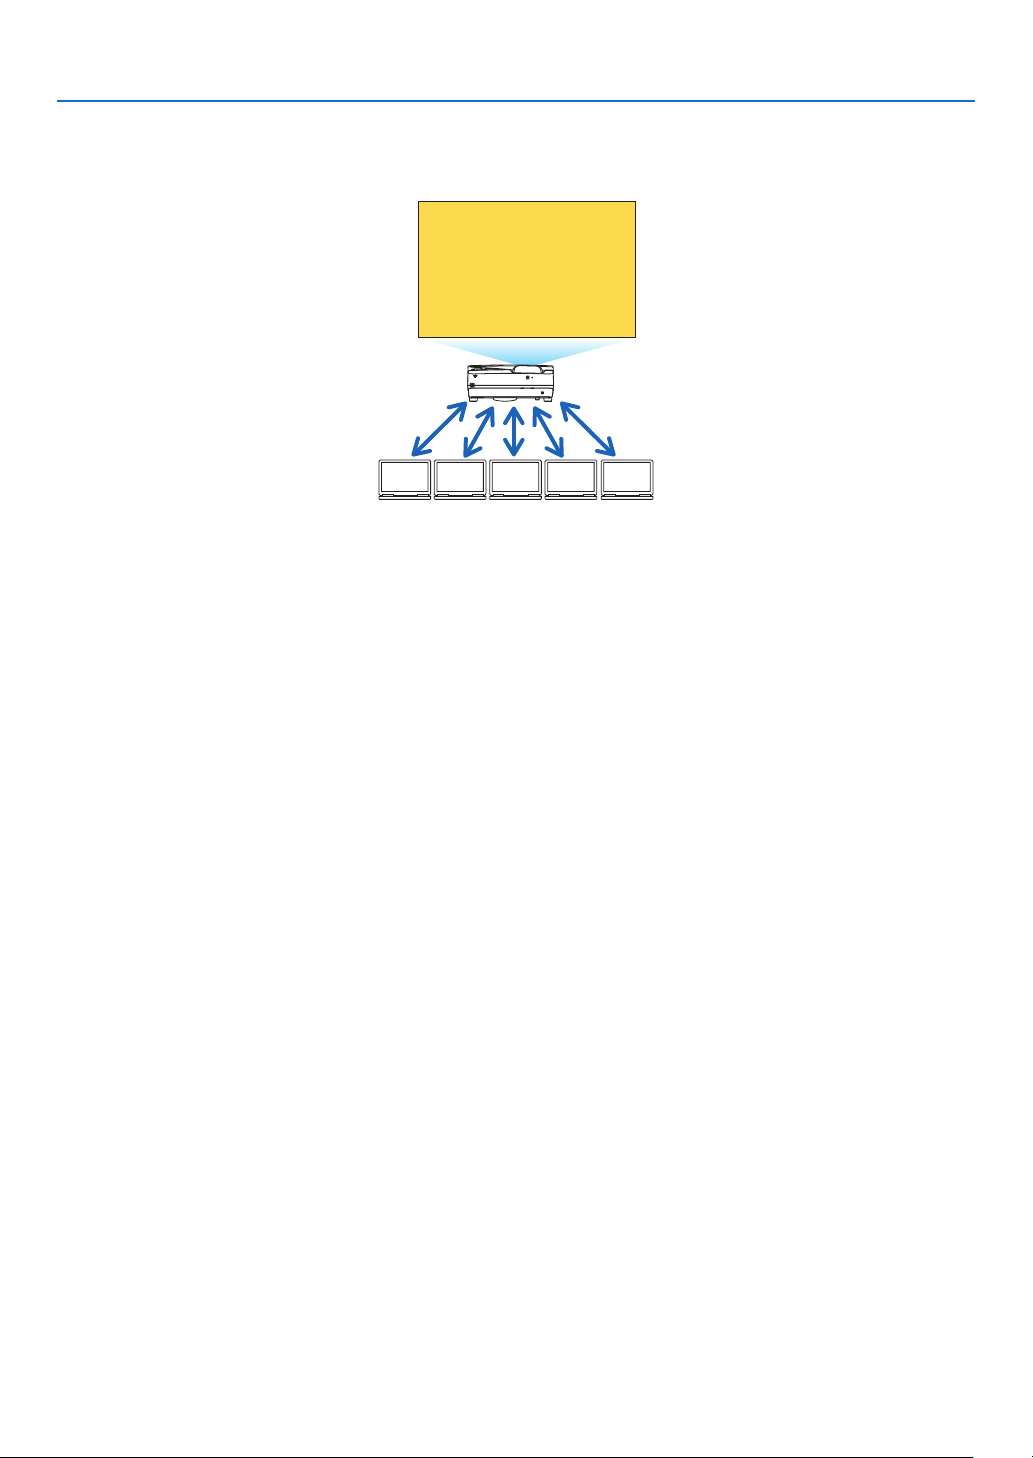
90
6. APPS MENU
WEB SHARING
• Withoutusingtheexclusivesoftware,itenablestoshareimagesandlesamongtheprojectorandcomputersin
thesamenetworkbyaccessingtheHTTPserveroftheprojectorutilizingthewebbrowser.(WEBSHARING)
BACDE
Sharing files
• Itenablestocontroltheprojectoronthewebbrowserscreensonthecomputers.
• ConnecttheprojectorandcomputersinanetworkandaccesstheURLinbelowbythewebbrowserofthecomput-
ers.
URL:http://<IPaddressoftheprojector>
NETWORK SETTINGS
Setupbelowforconnectingtheprojectorwithawired/wirelessLAN.
PROJECTORNAME
Setupthehostnameanddomainnameoftheprojector.Serialnumberoftheprojectorissetasfactorydefault.
NETWORKINFORMATION
Indicateinformationwhentheprojectorhasconnectedinanetwork(byawired/wirelessLAN)
WIRED LAN
SetupforconnectingtheprojectorbyawiredLAN.
WIRELESS LAN
SetupforconnectingtheprojectorbyawirelessLAN.Atthesametime,setupfortheSIMPLEACCESSPOINT,
Wi-FiDirect,andMiracast.
IMAGEEXPRESSUTILITYLITE
SetuptheMODE(FREE,MANAGED)fortheIMAGEEXPRESSUTILITYLITE.
NETWORKSERVICE
SetupvarioussettingfortheAMX,HTTPserver,PJLink,AlertmailandCRESTRON.
TOOLS
Setupforvariousfeaturesasthestyluspen,mouse,programtimer,dayandtime,administratormodeanddefaultAPP.
PEN SETTINGS
Forusingthestyluspenatthersttimeorwhentheprojectorinstallationplaceischanged,makesuretoperform
calibrationofthestyluspenforlettingtheprojectortorecognizethestyluspenpositionproperly.(→page42)
MOUSE
AcommerciallyavailableUSBmousecanbeusedforoperatingtheAPPSMENU.Performthesetupforusingit.
PROGRAM TIMER
Oncedayandtimeissetup,changingtheprojector’sconditioninpoweringON/standby,switchinginputsignals,and
switchingECOmodecanbeautomaticallyperformed.
DATE AND TIME
Determinetimezoneandsummertimeofyourareaandsetupcurrentdateandtime.

91
6. APPS MENU
ADMINISTRATOR MODE
Selectingthemenumodeoftheprojector,enable/disabletosaveallsetupvaluesoftheprojector,andsetupa
passwordfortheadministratormode.
DEFAULT APP
Selectanapplication(internalapplication)performingasdefaultwithoutdisplayingtheAPPSMENUeitherwhenthe
APPSbuttonontheremoteorAPPSisselectedastheSOURCEontheonscreenmenu.
Whentheprojectoristurnedonintheconditionofbeingselectedthe“APPS”terminal,theapplicationselectedinthe
[DEFAULTAPP]willbestartedautomatically.

92
7. User Supportware
❶ Software Included on CD-ROM
NamesandFeaturesofBundledSoftwarePrograms
Nameofsoftwareprogram Features
ImageExpressUtilityLite
ImageExpressUtilityLitefor
MacOS
• Thisisasoftwareprogramusedtoprojectyourcomputer’sscreenoverthe
USBcableorthewired/wirelessnetwork.Thecomputercable(VGA)isnot
required.(→page40,93)
• ThissoftwareprogramcanbeusedtocontrolthepowerON/OFFandsource
selectionoftheprojectorfromyourcomputer.
• TheGeometricCorrectionTool(GCT)functionallowsyoutocorrectdistortion
ofimagesprojectedonacurvedwall.(→page98)
* “USBDisplay”and“GCT”functionsarenotsupportedbyMac.
Nameofsoftwareprogram Features
PCControlUtilityPro4
PCControlUtilityPro5(forMac
OS)
Thisisasoftwareprogramusedtooperatetheprojectorfromthecomputerwhen
thecomputerandtheprojectorareconnectedwithLAN(wiredorwireless)or
aserialcable.(→page101)
Nameofsoftwareprogram Features
VirtualRemoteTool
(Windowsonly)
ThisisasoftwareprogramusedtocontrolthepowerON/OFFandsourceselec-
tionoftheprojectorfromyourcomputerbyusingthesuppliedcomputercable
(VGA)andothers.(→page105)
NOTE:
• ImageExpressUtilityLitedoesnotsupport“MeetingMode”inImageExpressUtility2.0suppliedwithourothermodels.
DownloadServiceandOperatingEnvironment
Pleasevisitourwebsiteaboutoperatingenvironmentanddownloadserviceforeachsoftware:
VisitURL:http://www.nec-display.com/dl/en/index.html
Download-Projector→Software&Driver
NameandFeaturesofanapplicationforAndroid/iOS.
Nameofapplication:
WirelessImageUtility(Android/iOS)
Features:
Byconnectingtheprojectorwithasmartphone,itenablestotransferphotosanddocumentssavedonthesmartphone
andprojecttheseontheprojector.(→page111)
* WirelessImageUtilityisnotcontainedinthesuppliedCD-ROM.

93
7. User Supportware
❷ Projecting Your Computer’s Screen Image from the
Projector over a LAN (Image Express Utility Lite)
UsingImageExpressUtilityLitecontainedonthesuppliedNECProjectorCD-ROMallowsyoutosendthecomputer’s
screenimagetotheprojectoroveraUSBcableorawiredorwirelessLAN.
ImageExpressUtilityLiteisaprogramcompatiblewithWindows.
ImageExpressUtilityLiteforMacOSisaprogramcompatiblewithMacOS.(→page97)
ThissectionwillshowyouanoutlineabouthowtoconnecttheprojectortoaLANandtouseImageExpressUtility
Lite.FortheoperationofImageExpressUtilityLite,seethehelpofImageExpressUtilityLite.
Step1:installImageExpressUtilityLiteonthecomputer.
Step2:ConnecttheprojectortoaLAN.
Step3:StartImageExpressUtilityLite.
TIP:
• ImageExpressUtilityLite(forWindows)canbestartedfrommostcommerciallyavailableremovablemediasuchasUSBmemory
devicesorSDcardswithouttheneedtoinstallonyourcomputer.(→page96)
What You can Do with Image Express Utility Lite
Imagetransmission(forWindowsandMacOS)
• Thescreenofyourcomputercanbesenttotheprojectorviaawiredorwirelessnetworkwithoutacomputercable
(VGA).
Audiotransfercapability(forWindowsonly)
• ImageExpressUtilityLiteallowsyoutosendthecomputer'sscreenimageandaudiototheprojectoroverwired/
wirelessLANorUSBconnection.
• Audiotransfercapabilityisavailableonlywhenthecomputerconnectswiththeprojectorinpeer-to-peernetwork.
USBDisplay(forWindowsonly)
• Computer’sscreenimagecanbeprojectedviaaUSBcable,withoutconnectingacomputercable(VGA).
• JustconnectingthecomputerandtheprojectoroveraUSBcablewillmaketheUSBDisplayfunctionavailable
(Plug&Play)evenwithoutinstallingImageExpressUtilityLiteonthecomputer.(→page40)
GeometricCorrectionTool[GCT](forWindowsonly)
See“❸ProjectinganImagefromanAngle(GeometricCorrectionToolinImageExpressUtilityLite)”.(→page98)
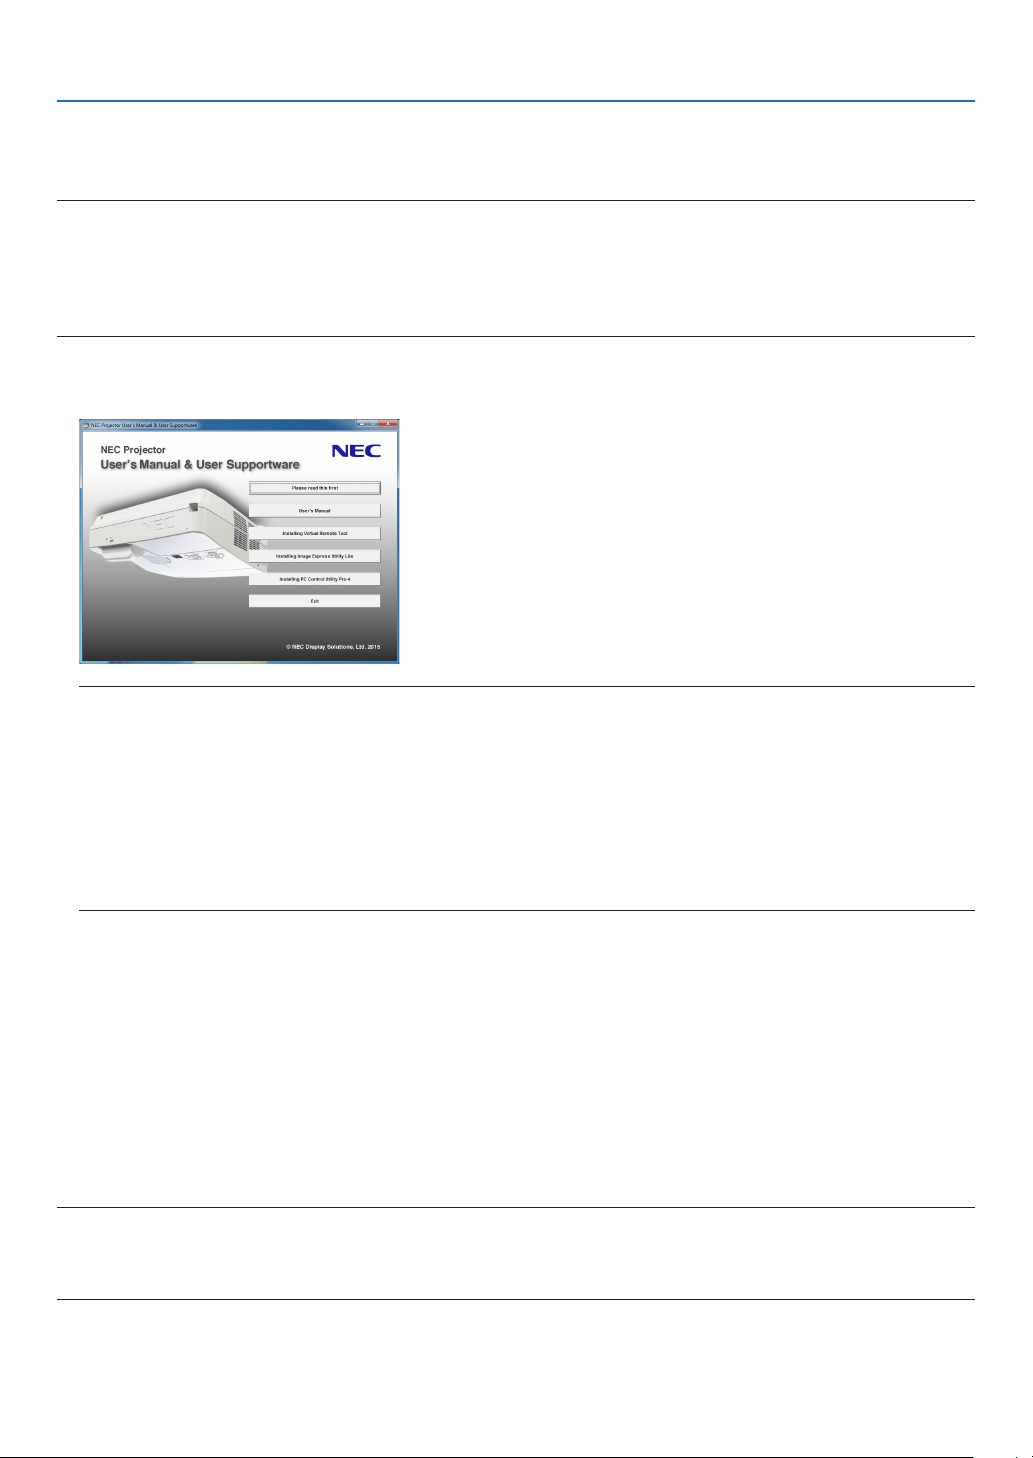
94
7. User Supportware
Using on Windows
Step 1: install Image Express Utility Lite on the computer.
NOTE:
• Toinstalloruninstalltheprogram,theWindowsuseraccountmusthave“Administrator”privilege.
• Exitallrunningprogramsbeforeinstallation.Ifanotherprogramisrunning,theinstallationmaynotbecompleted.
• ImageExpressUtilityLitewillbeinstalledtothesystemdriveofyourcomputer.
Ifthemessage“Thereisnotenoughfreespaceondestination”isdisplayed,freeupenoughspace(about100MB)toinstallthe
program.
1. InserttheaccompanyingNECProjectorCD-ROMintoyourCD-ROMdrive.
The menu window will be displayed.
TIP:
Ifthemenuwindowwillnotbedisplayed,trythefollowingprocedure.
ForWindows7:
1.Click“start”onWindows.
2.Click“AllPrograms”→“Accessories”→“Run”.
3. TypeyourCD-ROMdrivename(example:“Q:\”)and“LAUNCHER.EXE”in“Name”.(example:Q:\LAUNCH-
ER.EXE)
4. Click“OK”.
The menu window will be displayed.
2. Click“InstallingImageExpressUtilityLite”onthemenuwindow.
The installation will start.
“ENDUSERLICENSEAGREEMENT”screenwillbedisplayed.
Read“ENDUSERLICENSEAGREEMENT”carefully
3. Ifyouagree,click“Iagree.”andthenclick“Next”.
• Followtheinstructionsontheinstallerscreenstocompletetheinstallation.
• Whentheinstallationiscomplete,youwillreturntothemenuwindow.
When the installation is complete, a completion message will be displayed.
4. Click“OK”.
This completes the installation.
TIP:
•UninstallingImageExpressUtilityLite
TouninstallImageExpressUtilityLite,dothesameproceduresstatedasin“UninstallingVirtualRemoteTool”.Read“VirtualRemote
Tool”as“ImageExpressUtilityLite”(→page108)

95
7. User Supportware
Step 2: Connect the projector to a LAN.
ConnecttheprojectortotheLANbyfollowingtheinstructionsin“ConnectingtoaWiredLAN”(→page85)and“Con-
nectingtoaWirelessLAN(Optional:NP05LMseries)”(→page86).
Step 3: Start Image Express Utility Lite.
1. OnWindows,click“Start”→“Allprograms”→“NECProjectorUserSupportware”→ “Image Express Utility
Lite”→“ImageExpressUtilityLite”.
ImageExpressUtilityLitewillstart.
Theselectwindowfornetworkconnectionwillbedisplayed
2. SelectNetworkandclick“OK”.
The select window for destination will show a list of connectable projectors.
• Whenconnectingthecomputerdirectlytotheprojectorbyone-to-one,“SimpleAccessPoint”isrecommended.
• Tocheckforthenetworkavailableforconnectedprojectors,fromthemenu,select[INFO.]→[WIRELESSLAN]
→[SSID].
3. Placeacheckmarkforprojectorstobeconnected,andthenclick“Connect”.
• Whenoneormoreprojectorsaredisplayed,fromthemenuontheprojector,select[INFO.]→[WIRELESSLAN]
→[IPADDRESS].
When connecting with the projector is established, you can operate the control window to control the projector. (→
page 41)
NOTE:
• When[NORMAL]isselectedfor[STANDBYMODE]fromthemenu,theprojectorthatisturnedoffwillnotbedisplayedinthe
selectwindowfordestination

96
7. User Supportware
TIP:
Viewingthe“Help”leofImageExpressUtilityLite
• DisplayingtheHelpleofImageExpressUtilityLitewhileitisrunning.
Clickthe[?](help)icononthecontrolwindow.
The Help screen will be displayed.
• DisplayingtheHelpleofGCTwhileitisrunning.
Click“Help”→“Help”ontheeditwindow.
The Help screen will be displayed.
• DisplayingthehelpleusingtheStartMenu.
Click“Start”→“Allprograms”or“Programs”→“NECProjectorUserSupportware”→“ImageExpressUtilityLite”
→“ImageExpressUtilityLiteHelp”.
The Help screen will be displayed.
Starting Image Express Utility Lite from a USB Memory or SD Card
ImageExpressUtilityLitecanbestartedfromcommerciallyavailableremovablemediasuchUSBmemoryorSD
cardsifitiscopiedbeforehand.ThiswilleliminatethetroubleofinstallingImageExpressUtilityLitetoyourcomputer.
1. CopyImageExpressUtilityLitetoremovablemedia.
Copyallthefoldersandles(totalsizeapprox.7MB)fromthe“IEU_Lite(removable-media)”folderinthesupplied
NEC Projector CD-ROM to the root directory of your removable media.
2. Insert your removable media into your computer.
The“AutoPlay”screenwillbedisplayedonyourcomputer.
TIP:
• Ifthe“AutoPlay”screenisnotdisplayed,openthefolderfrom“Computer”(“MyComputer”forWindowsXP).
3. Click“Openfoldertoviewles”
TheIEU_Lite.exe,otherfolder,andleswillbedisplayed.
4. Double-clickthe“IEU_Lite.exe”( ) icon.
ImageExpressUtilityLitewillstart.

97
7. User Supportware
Using on Mac OS
Step 1: Install Image Express Utility Lite for Mac OS on the computer
1. InserttheaccompanyingNECProjectorCD-ROMinyourMacCD-ROMdrive.
TheCD-ROMiconwillbedisplayedonthedesktop.
2. Double-clicktheCD-ROMicon.
The CD-ROM window will be displayed.
3. Double-clickthe“MacOSX”folder.
4. Double-click“ImageExpressUtilityLite.dmg”.
The“ImageExpressUtilityLite”windowwillbedisplayed.
5. Draganddropthe“ImageExpressUtilityLite”foldertoyourApplicationsfolderinMacOS.
Step 2: Connect the projector to a LAN
ConnecttheprojectortotheLANbyfollowingtheinstructionsin“ConnectingtoaWiredLAN”(→page85)and“Con-
nectingtoaWirelessLAN(Optional:NP05LMseries)”(→page86).
Step 3: Start Image Express Utility Lite for Mac OS
1. Open your Applications folder in Mac OS.
2. Double-clickthe“ImageExpressUtilityLite”folder.
3. Double-clickthe“ImageExpressUtilityLite”icon.
WhenImageExpressUtilityLiteforMacOSstarts,theselectwindowfordestinationwillbedisplayed.
• Atthersttimeofstartup,“ENDUSERLICENSEAGREEMENT” screenwillbedisplayedbeforetheselect
window for destination is displayed.
Read“ENDUSERLICENSEAGREEMENT”andselect“Iacceptthetermsinthelicenseagreement”,andclick
“OK”.
4. Selectaprojectortobeconnected,andthenclick“Connect”.
Yourdesktopscreenwillbedisplayedontheprojector.
TIP:
ViewingtheHelpofImageExpressUtilityLiteforMacOS
• Fromthemenubar,click“Help”→“ImageExpressUtilityLiteHelp”whileImageExpressUtilityisrunning.
The Help screen will be displayed
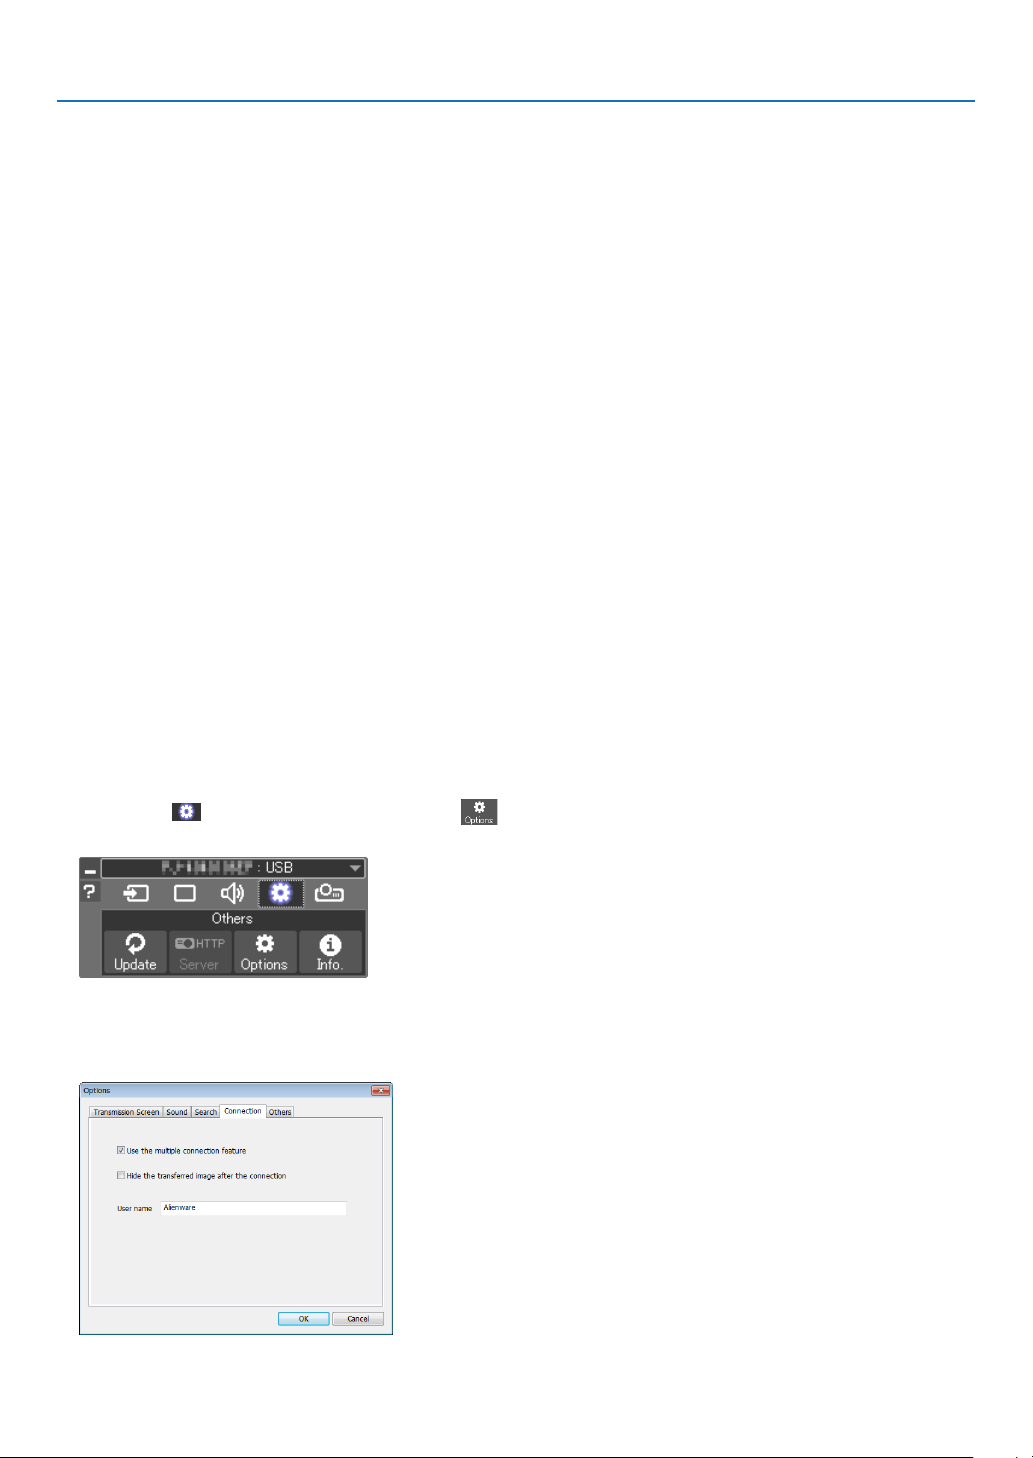
98
7. User Supportware
❸ Projecting an Image from an Angle (Geometric Correction
Tool in Image Express Utility Lite)
TheGeometricCorrectionTool(GCT)functionallowsyoutocorrectdistortionofimagesprojectedevenfromanangle.
What you can do with GCT
• TheGCTfeatureincludesthefollowingthreefunctions
• 4-pointCorrection:Youcantaprojectedimagewithintheborderofthescreeneasilybyalignthefourcorners
ofanimagetotheonesofthescreen.
• Multi-pointCorrection:Youcancorrectadistortedimageonthecornerofawallorirregularshapedscreen
byusingmanyseparatedscreenstocorrecttheimageaswellas4-pointCorrection.
• Parameters Correction:Youcancorrectadistortedimagebyusingacombinationoftransformationalrules
preparedinadvance.
Thissectionwillshowanexampleforusewith4-pointCorrection.
Forinformationabout“Multi-pointCorrection”and“ParametersCorrection”,seethehelpleofImageExpress
UtilityLite.(→page96,97)
• Yourcorrectiondatacanbestoredintheprojectororyourcomputerwhichcanberestoredwhennecessary.
• TheGCTfunctionisavailablewithaUSBcable,wiredorwirelessLANconnection,andvideocable.
Projecting an Image from an Angle (GCT)
ThissectionwillshowanexampleforusewithUSBDisplay(usingaUSBcabletoconnectacomputerandtheprojector).
• TheUSBDisplayfunctionwillautomaticallydisplaythecontrolwindow
• ForavideocableorLANconnection,installandstartImageExpressUtilityLiteinyourcomputerbeforehand.(→
page93)
Preparation:Adjusttheprojectorpositionorthezoomsothattheprojectedimagecancoverthewholescreenarea.
1. Clickthe“ ”(Others)iconandthenthe“ ”(Options)
button.
Options window will be displayed.
2. Clickthecheckbox“Usethemultipleconnectionfeature”and
then clear the check mark.
3. Clickthe“OK”button.
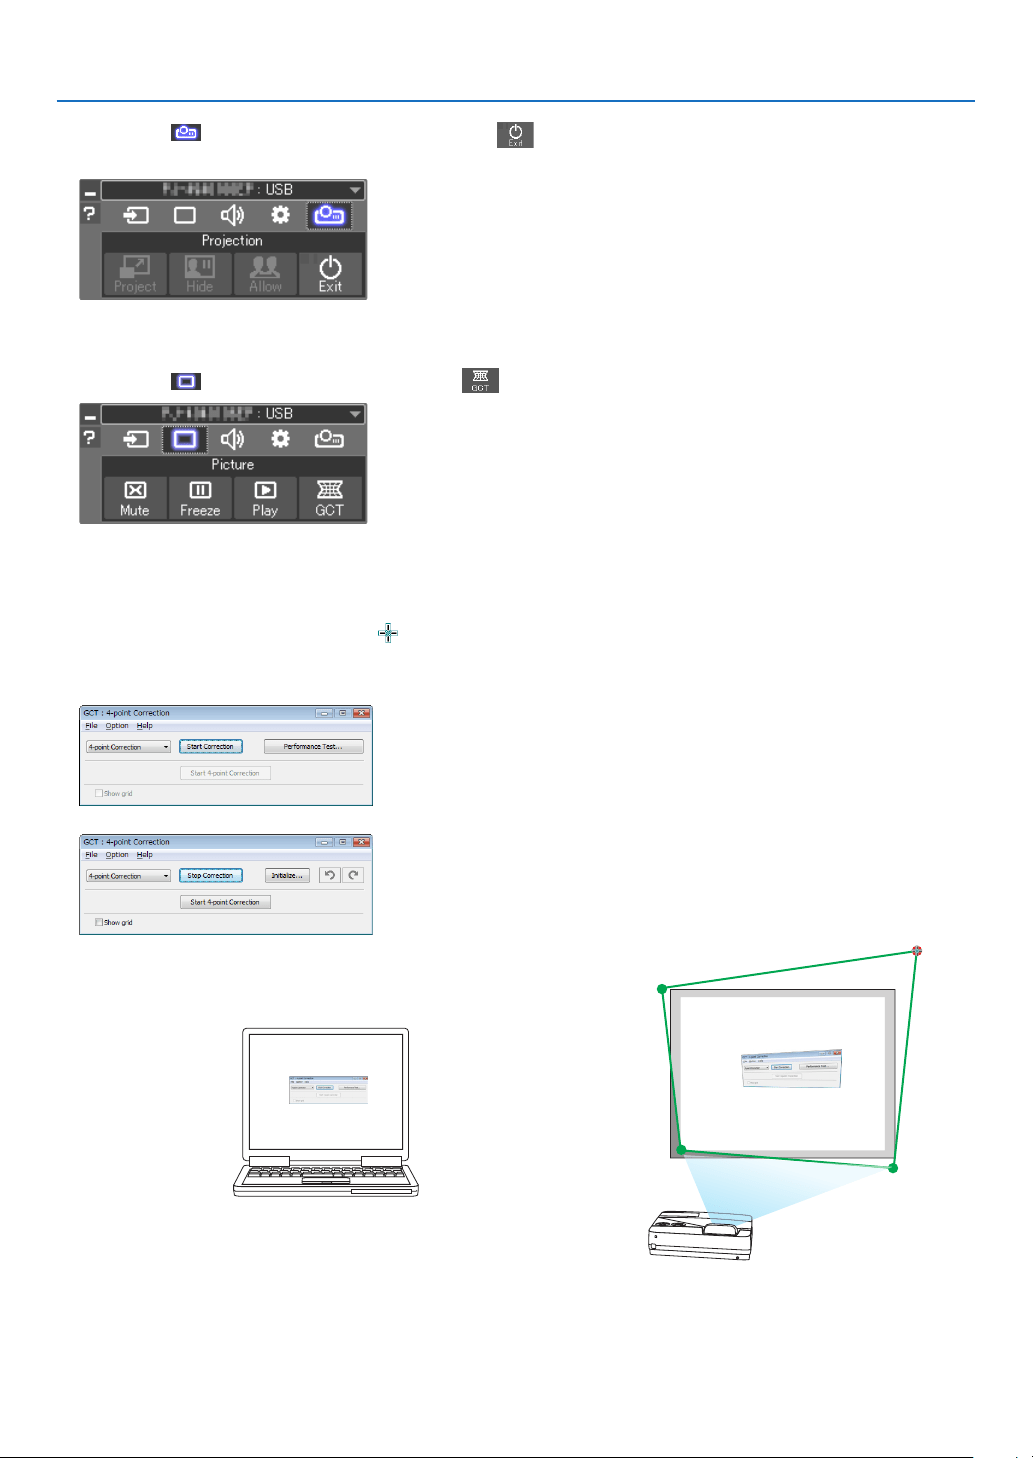
99
7. User Supportware
4. Clickthe“ ”(Projection) icon and then the“ ”(Exit)
button.
5. Click“Yes”.
6. Start the Image Express Utility Lite again.
7. Clickthe“ ”(Picture)iconandthenthe“ ”button.
The“4-pointCorrection”windowwillbedisplayed.
8. Click the“Start Correction” button and then“Start 4-point
Correction”button.
A green frame and a mouse pointer ( ) will be displayed.
• Four[•]markswillbeappearedatfourcornersofthegreen
frame
9. Usethemousetoclickthe[•]markofwhichcorneryouwish
to move.
The currently selected [ •]markwillturnred.
(Intheaboveexample,Windowsscreensareomittedforclarication.)
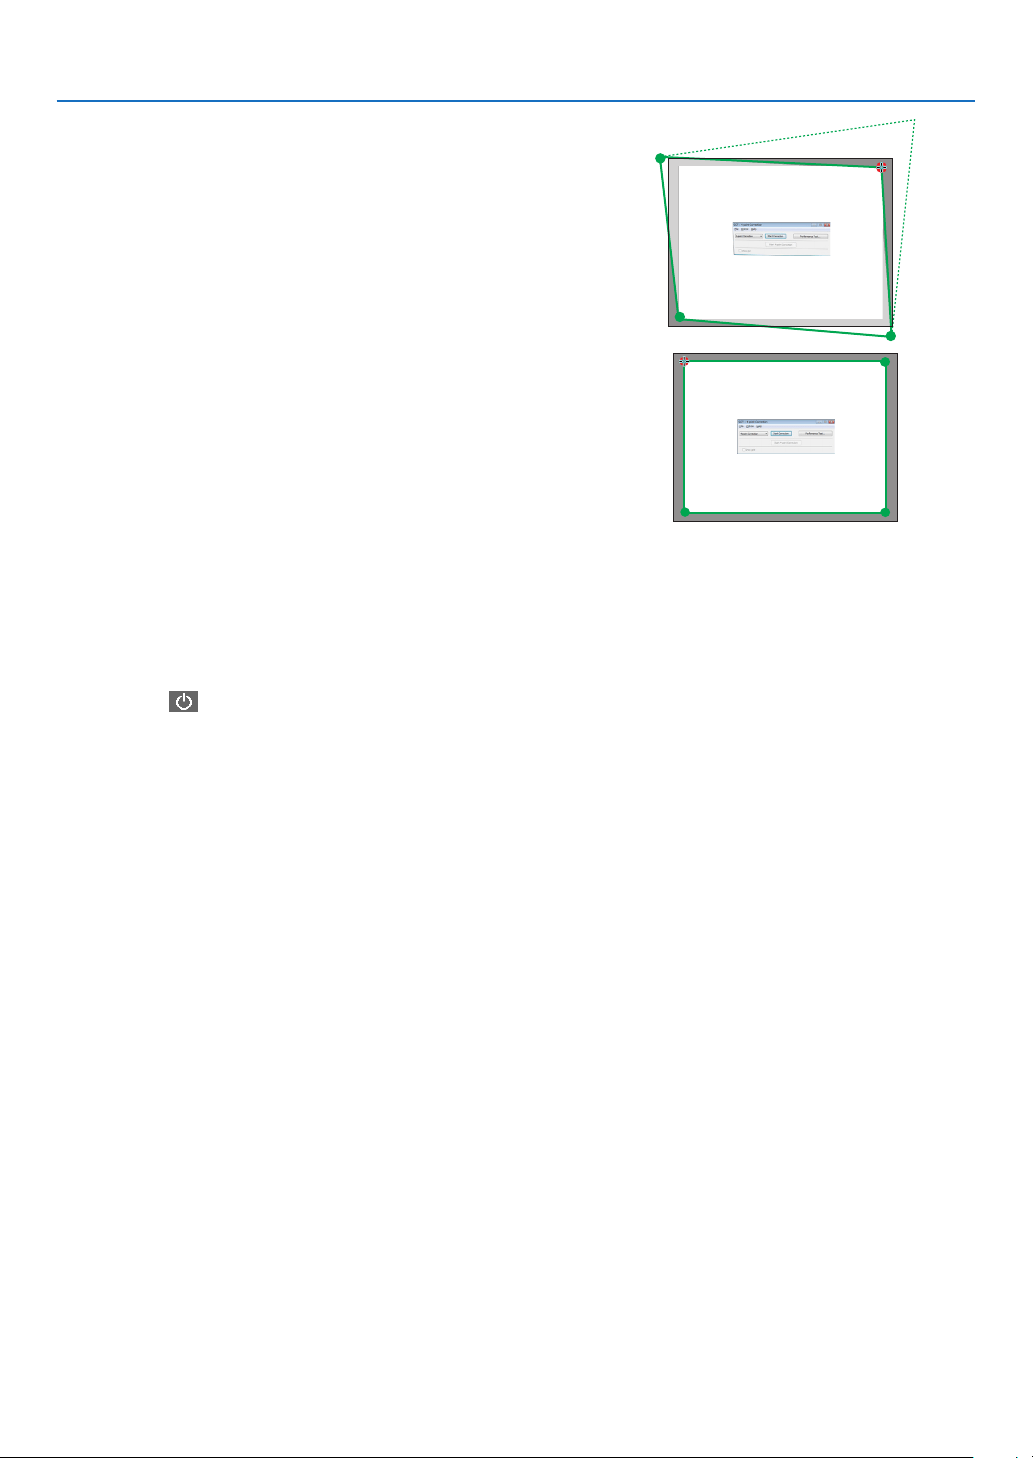
100
7. User Supportware
10
.Dragtheselected[•]marktothepointyouwishtocorrect
and drop it.
• Whenyouclicksomewherewithintheprojectimagearea,the
nearest [ •]markwillgotothepositionwherethemousecur-
sor is.
11
. Repeat Step 9 and 10 to correct the distortion of the projected
image.
12
. After completing, right-click the mouse.
The green frame and the mouse pointer will disappear from the
projected image area. This will complete the correction.
13
.Clickthe“X”(close)buttononthe“4-pointCorrection”window.
The“4-point Correction” window will disappear and the4-point
correctionwilltakeeffect.
14
.Clickthe“ ”buttononthecontrolwindowtoexittheGCT.
TIP:
• Afterperformingthe4-pointcorrection,youcansavethe4-pointcorrectiondatatotheprojectorbyclicking“File”→“Exportto
theprojector…”onthe“4-pointCorrection”window.
• SeetheHelpofImageExpressUtilityLiteforoperating“4-pointCorrection”windowandotherfunctionsthanGCT.(→page96,
97)
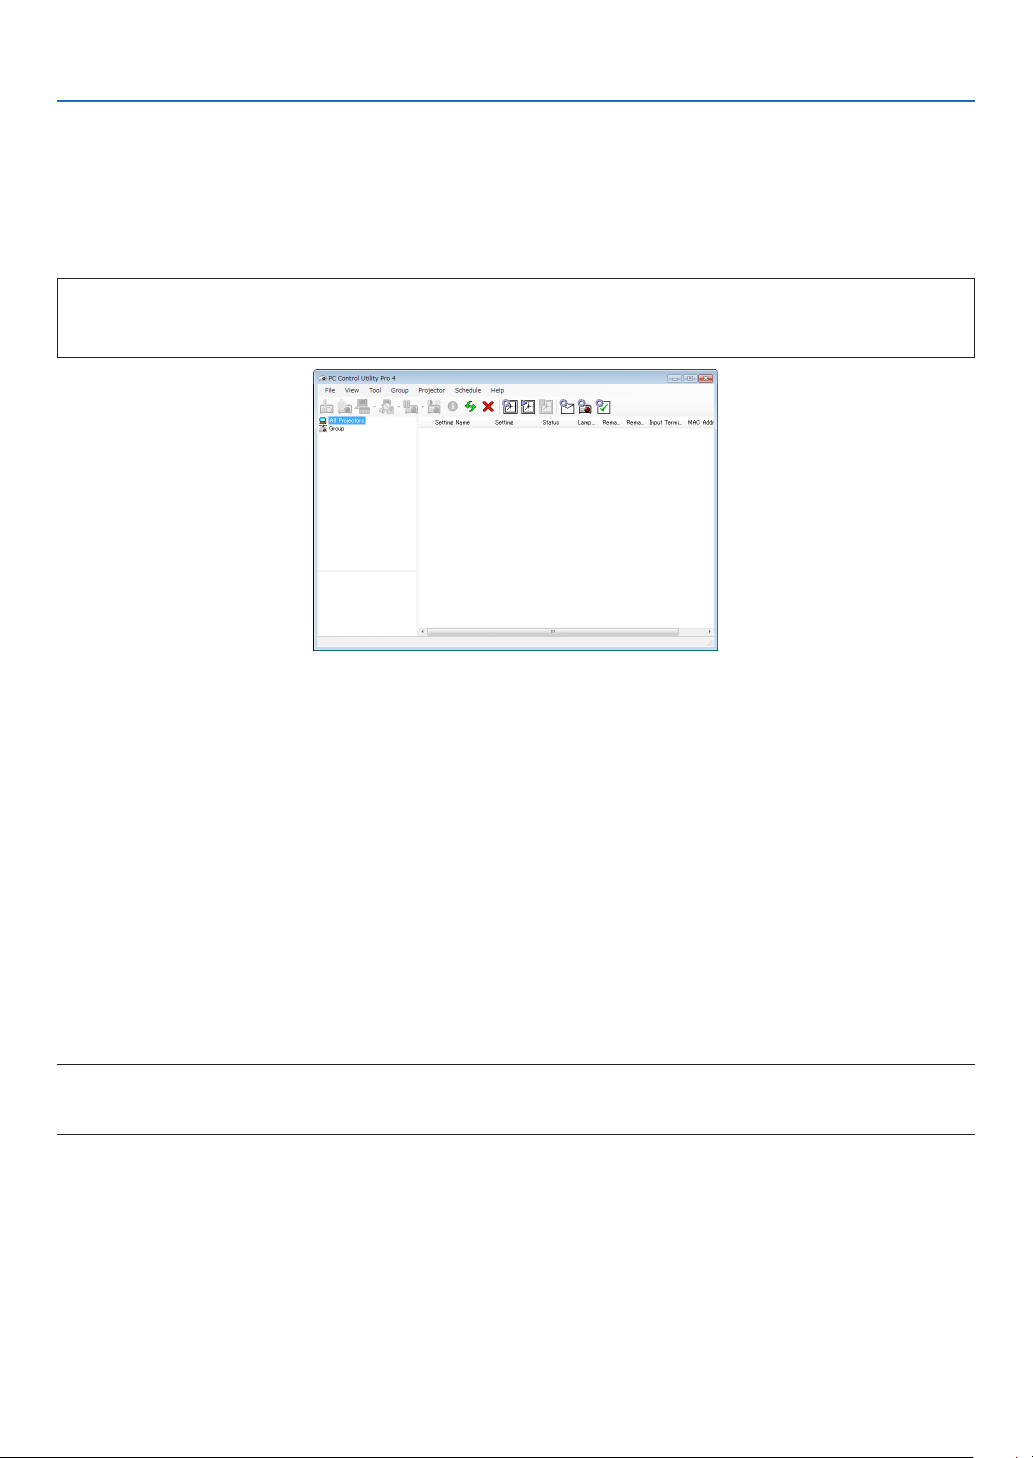
101
7. User Supportware
❹
Controlling the Projector over a LAN (PC Control Utility Pro 4/
Pro 5)
Usingtheutilitysoftware“PCControlUtilityPro4”and“PCControlUtilityPro5”includedonthecompanionNEC
ProjectorCD-ROM,theprojectorcanbecontrolledfromacomputeroveraLAN.
PCControlUtilityPro4isaprogramcompatiblewithWindows.(→thispage)
PCControlUtilityPro5isaprogramcompatiblewithMacOS.(→page104)
ControlFunctions
PowerOn/Off,signalselection,picturefreeze,picturemute,audiomute,adjusting,errormessagenotication,
eventschedule.
ScreenofPCControlUtilityPro4
ThissectionprovidesanoutlineofpreparationforuseofPCControlUtilityPro4/Pro5.Forinformationonhowtouse
PCControlUtilityPro4/Pro5,seeHelpofPCControlUtilityPro4/Pro5.(→page103,104)
Step1:InstallPCControlUtilityPro4/Pro5onthecomputer.
Step2:ConnecttheprojectortoaLAN.
Step3:StartPCControlUtilityPro4/Pro5.
• TorunPCControlUtilityPro4onWindows8.1,Windows8andWindowsXP,“Microsoft.NETFrameworkVersion
2.0”isrequired.TheMicrosoft.NETFrameworkVersion2.0,3.0or3.5isavailable fromMicrosoft’swebpage.
Downloadandinstallitonyourcomputer.
TIP:
• PCControlUtilityPro4canbeusedwithaserialconnection.
Using on Windows
Step 1: Install PC Control Utility Pro 4 on the computer
NOTE:
• Toinstalloruninstalltheprogram,theWindowsuseraccountmusthave[Administrator]privilege.
• Exitallrunningprogramsbeforeinstallation.Ifanotherprogramisrunning,theinstallationmaynotbecompleted.
1 InserttheaccompanyingNECProjectorCD-ROMintoyourCD-ROMdrive.
The menu window will be displayed.
102
7. User Supportware
TIP:
Ifthemenuwindowwillnotbedisplayed,trythefollowingprocedure.
ForWindows7:
1. Click“start”onWindows.
2. Click“AllPrograms”→“Accessories”→“Run”.
3. Type your CD-ROM drive name (example:“Q:\”) and“LAUNCHER.EXE” in“Name”.(example: Q:\
LAUNCHER.EXE)
4. Click“OK”.
The menu window will be displayed.
2 Click“PCControlUtilityPro4”onthemenuwindow.
The installation will start.
When the installation is complete, the Welcome window will be displayed.
3 Click“Next”.
“ENDUSERLICENSEAGREEMENT”screenwillbedisplayed.
Read“ENDUSERLICENSEAGREEMENT”carefully.
4 Ifyouagree,click“Iacceptthetermsinthelicenseagreement”andthenclick“Next”.
• Followtheinstructionsontheinstallerscreenstocompletetheinstallation.
• Whentheinstallationiscomplete,youwillreturntothemenuwindow.
TIP:
•UninstallingPCControlUtilityPro4
TouninstallPCControlUtilityPro4,dothesameproceduresstatedasin“UninstallingVirtualRemoteTool”.Read“VirtualRemote
Tool”as“PCControlUtilityPro4”(→page108)

103
7. User Supportware
Step 2: Connect the projector to a LAN.
ConnecttheprojectortotheLANbyfollowingtheinstructionsin“ConnectingtoaWiredLAN”(→page85)and“Con-
nectingtoaWirelessLAN(Optional:NP05LMseries)”(→page86).
Step 3: Start PC Control Utility Pro 4
Click“Start”→“Allprograms”or“Programs”→“NECProjectorUserSupportware”→“PCControlUtilityPro4”→
“PCControlUtilityPro4”.
NOTE:
• FortheSchedulefunctionofthePCControlutilityPro4towork,youmusthaveyourcomputerrunningandnotinstandby/
sleepmode.Select“PowerOptions”fromthe“ControlPanel”inWindowsanddisableitsstandby/sleepmodebeforerunningthe
scheduler.
[Example]ForWindows7:
Select“ControlPanel”→“SystemandSecurity”→“PowerOptions”→“Changewhenthecomputersleeps”→“Putthecomputer
tosleep”→“Never”.
NOTE:
• When[NORMAL]isselectedfor[STANDBYMODE]fromthemenu,theprojectorcannotbeturnedonviathenetwork(wiredLAN/
wirelessLAN)connection.
TIP:
ViewingtheHelpofPCControlUtilityPro4
• DisplayingtheHelpleofPCControlUtilityPro4whileitisrunning.
Click“Help(H)”→“Help(H)…”ofwindowofPCControlUtilityPro4inthisorder.
The pop-up menu will be displayed.
• DisplayingthehelpleusingtheStartMenu.
Click“Start”→“Allprograms”or“Programs”→“NECProjectorUserSupportware”→“PCControlUtilityPro4”→
“PCControlUtilityPro4Help”.
The Help screen will be displayed.

104
7. User Supportware
Using on Mac OS
Step 1: Install PC Control Utility Pro 5 on the computer
1. InserttheaccompanyingNECProjectorCD-ROMinyourMacCD-ROMdrive.
TheCD-ROMiconwillbedisplayedonthedesktop.
2. Double-clicktheCD-ROMicon.
The CD-ROM window will be displayed.
3. Double-clickthe“MacOSX”folder.
4. Double-click“PCControlUtilityPro5.pkg”.
The installer will start.
5. Click“Next”.
“ENDUSERLICENSEAGREEMENT”screenwillbedisplayed.
6. Read“ENDUSERLICENSEAGREEMENT”andclick“Next”.
The confirmation window will be displayed
7. Click“Iacceptthetermsinthelicenseagreement”.
Follow the instructions on the installer screens to complete the installation.
Step 2: Connect the projector to a LAN
ConnecttheprojectortotheLANbyfollowingtheinstructionsin“ConnectingtoaWiredLAN”(→page85)and“Con-
nectingtoaWirelessLAN(Optional:NP05LMseries)”(→page86).
Step 3: Start PC Control Utility Pro 5
1. Open your Applications folder in Mac OS.
2. Clickthe“PCControlUtilityPro5”folder.
3. Clickthe“PCControlUtilityPro5”icon.
PC Control Utility Pro 5 will start.
NOTE:
• FortheSchedulefunctionofthePCControlutilityPro5towork,youmusthaveyourcomputerrunningandnotinsleepmode.
Select“EnergySaver”fromthe“SystemPreferences”inMacanddisableitssleepmodebeforerunningthescheduler.
• When[NORMAL]isselectedfor[STANDBYMODE]fromthemenu,theprojectorcannotbeturnedonviathenetwork(wiredLAN/
wirelessLAN)connection.
TIP:
ViewingtheHelpofPCControlUtilityPro5
•DisplayingtheHelpleofPCControlUtilityPro5whileitisrunning.
• Fromthemenubar,click“Help”→“Help”inthisorder.
The Help screen will be displayed.
•DisplayingtheHelpusingtheDock
1. Open“ApplicationFolder”inMacOS.
2. Clickthe“PCControlUtilityPro5”folder.
3. Clickthe“PCControlUtilityPro5Help”icon.
The Help screen will be displayed.
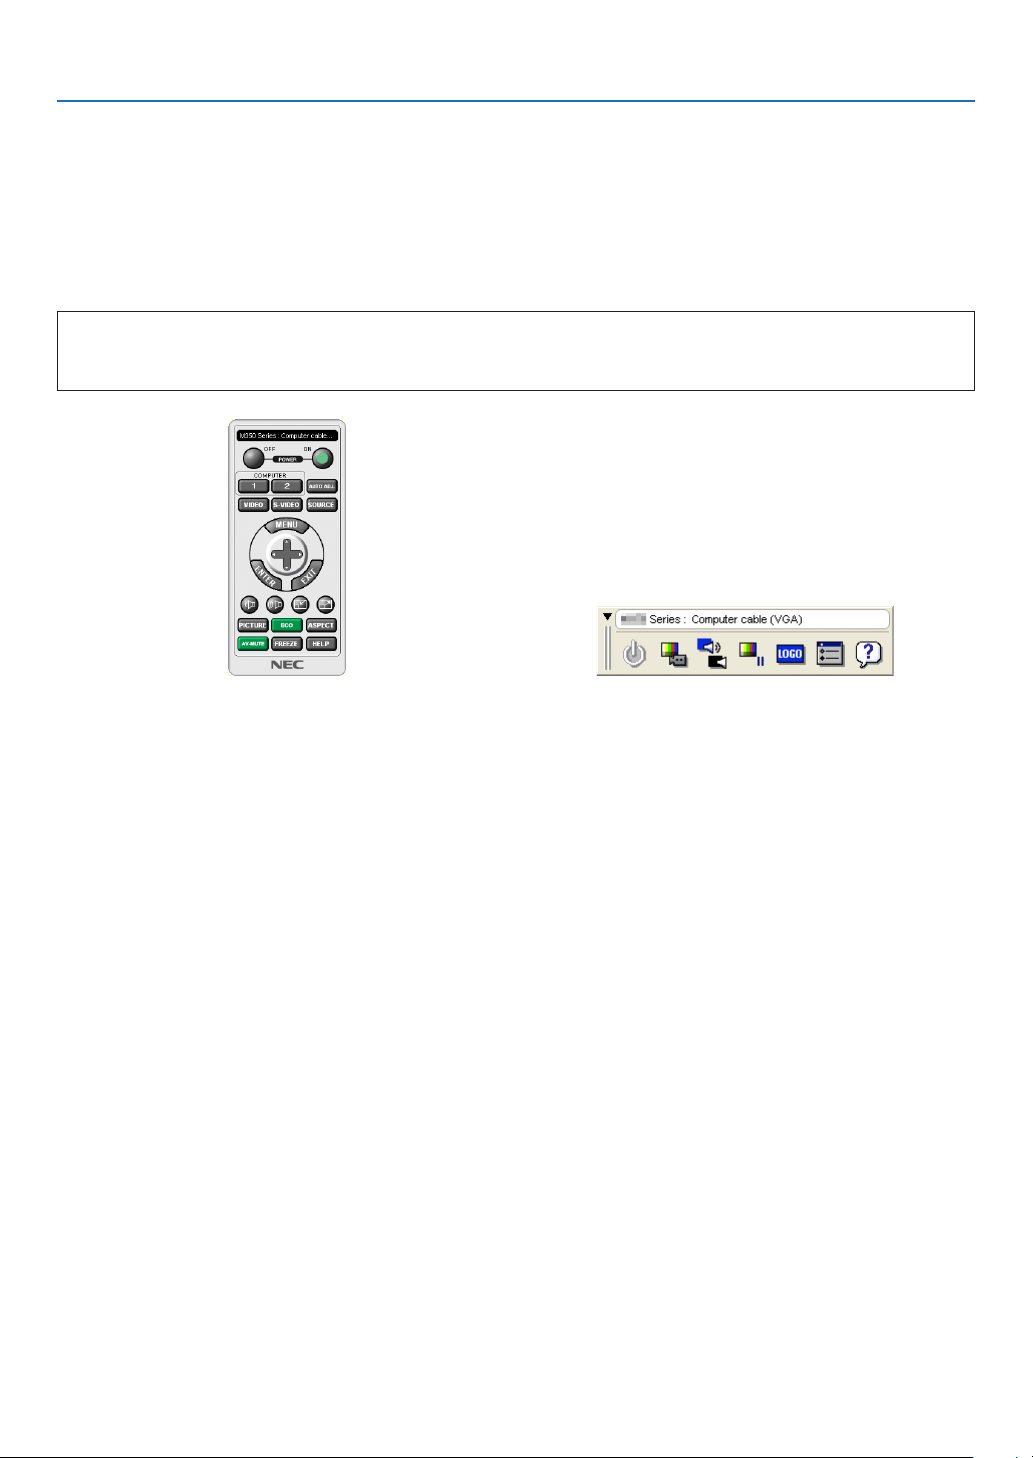
105
7. User Supportware
❺ Using the Computer Cable (VGA) to Operate the
Projector (Virtual Remote Tool)
Usingtheutilitysoftware“VirtualRemoteTool”includedonthecompanionNECProjectorCD-ROM,VirtualRemote
screen(ortoolbar)canbedisplayedonyourcomputerscreen.
Thiswillhelpyouperformoperationssuchasprojector’spoweronoroffandsignalselectionviathecomputercable
(VGA),serialcable,orLANconnection.OnlyviaserialorLANconnectionitisalsousedtosendanimagetotheprojec-
torandregisteritasthelogodataoftheprojector.Afterregisteringit,youcanlockthelogotopreventitfromchanging.
ControlFunctions
PowerOn/Off,signalselection,picturefreeze,picturemute,audiomute,Logotransfertotheprojector,andremote
controloperationonyourPC.
VirtualRemotescreen Toolbar
ThissectionprovidesanoutlineofpreparationforuseofVirtualRemoteTool.
ForinformationonhowtouseVirtualRemoteTool,seeHelpofVirtualRemoteTool.(→page110)
Step1:InstallVirtualRemoteToolonthecomputer.(→page106)
Step2:Connecttheprojectortothecomputer.(→page108)
Step3:StartVirtualRemoteTool.(→page109)
TIP:
• VirtualRemoteToolcanbeusedwithaLANandaserialconnection.USBconnectionisnotsupportedbyVirtualRemoteTool.
• ForupdateinformationonVirtualRemoteTool,visitourwebsite:
http://www.nec-display.com/dl/en/index.html

106
7. User Supportware
NOTE:
• When[COMPUTER]isselectedfromyoursourceselection,theVirtualRemotescreenorthetoolbarwillbedisplayedaswellas
yourcomputerscreen.
• Usethesuppliedcomputercable(VGA)toconnecttheCOMPUTERINterminaldirectlywiththemonitoroutputterminalofthe
computertouseVirtualRemoteTool.
Usingaswitcherorothercablesthanthesuppliedcomputercable(VGA)maycausefailureinsignalcommunication.
VGAcableterminal:
PinNos.12and15arerequiredforDDC/CI.
• VirtualRemoteToolmaynotworkdependingonyourcomputer’sspecicationsandversionofgraphicadaptersordrivers.
• TorunVirtualRemoteToolonWindows8.1andWindows8,“Microsoft.NETFrameworkVersion2.0”isrequired.TheMicrosoft
.NETFrameworkVersion2.0,3.0or3.5isavailablefromMicrosoft’swebpage.Downloadandinstallitonyourcomputer.
• Logodata(graphics)thatcanbesenttotheprojectorwithVirtualRemoteToolhasthefollowingrestrictions:
(OnlyviaserialorLANconnection)
- Filesize:Lessthan1MB
- Imagesize(resolution):
Horizontal1280×vertical800dotsorless
- Numberofcolors:256colorsorless
• Toputthedefault"NEClogo"backinthebackgroundlogo,youneedtoregisteritasthebackgroundlogobyusingtheimagele
(/Logo/necpj_bbwx.bmp)incluldedonthesuppliedNECProjectorCD-ROM.
TIP:
• Theprojector’sCOMPUTER IN terminal supports DDC/CI (Display Data Channel Command Interface).DDC/CIis a standard
interfaceforbidirectionalcommunicationbetweendisplay/projectorandcomputer.
Step 1: Install Virtual Remote Tool on the computer
NOTE:
• ToinstallVirtualRemoteTool,theWindowsuseraccountmusthave“Administrator”privilege.
• ExitallrunningprogramsbeforeinstallingVirtualRemoteTool.Ifanotherprogramisrunning,theinstallationmaynotbecom-
pleted.
1 InserttheaccompanyingNECProjectorCD-ROMintoyourCD-ROMdrive.
The menu window will be displayed.
TIP:
Ifthemenuwindowwillnotbedisplayed,trythefollowingprocedure.
ForWindows7
1. Click“start”onWindows.
2. Click“AllPrograms”→“Accessories”→“Run”.
3. Type your CD-ROM drive name (example:“Q:\”) and“LAUNCHER.EXE” in“Name”.(example: Q:\
LAUNCHER.EXE)
4. Click“OK”.
The menu window will be displayed.
107
7. User Supportware
2 Click“InstallVirtualRemoteTool”onthemenuwindow.
The installation will start.
When the installation is complete, the Welcome window will be displayed.
3 Click“Next”.
“ENDUSERLICENSEAGREEMENT”screenwillbedisplayed.
Read“ENDUSERLICENSEAGREEMENT”carefully.
4 Ifyouagree,click“Iacceptthetermsinthelicenseagreement”andthenclick“Next”.
• Followtheinstructionsontheinstallerscreenstocompletetheinstallation.
• Whentheinstallationiscomplete,youwillreturntothemenuwindow.
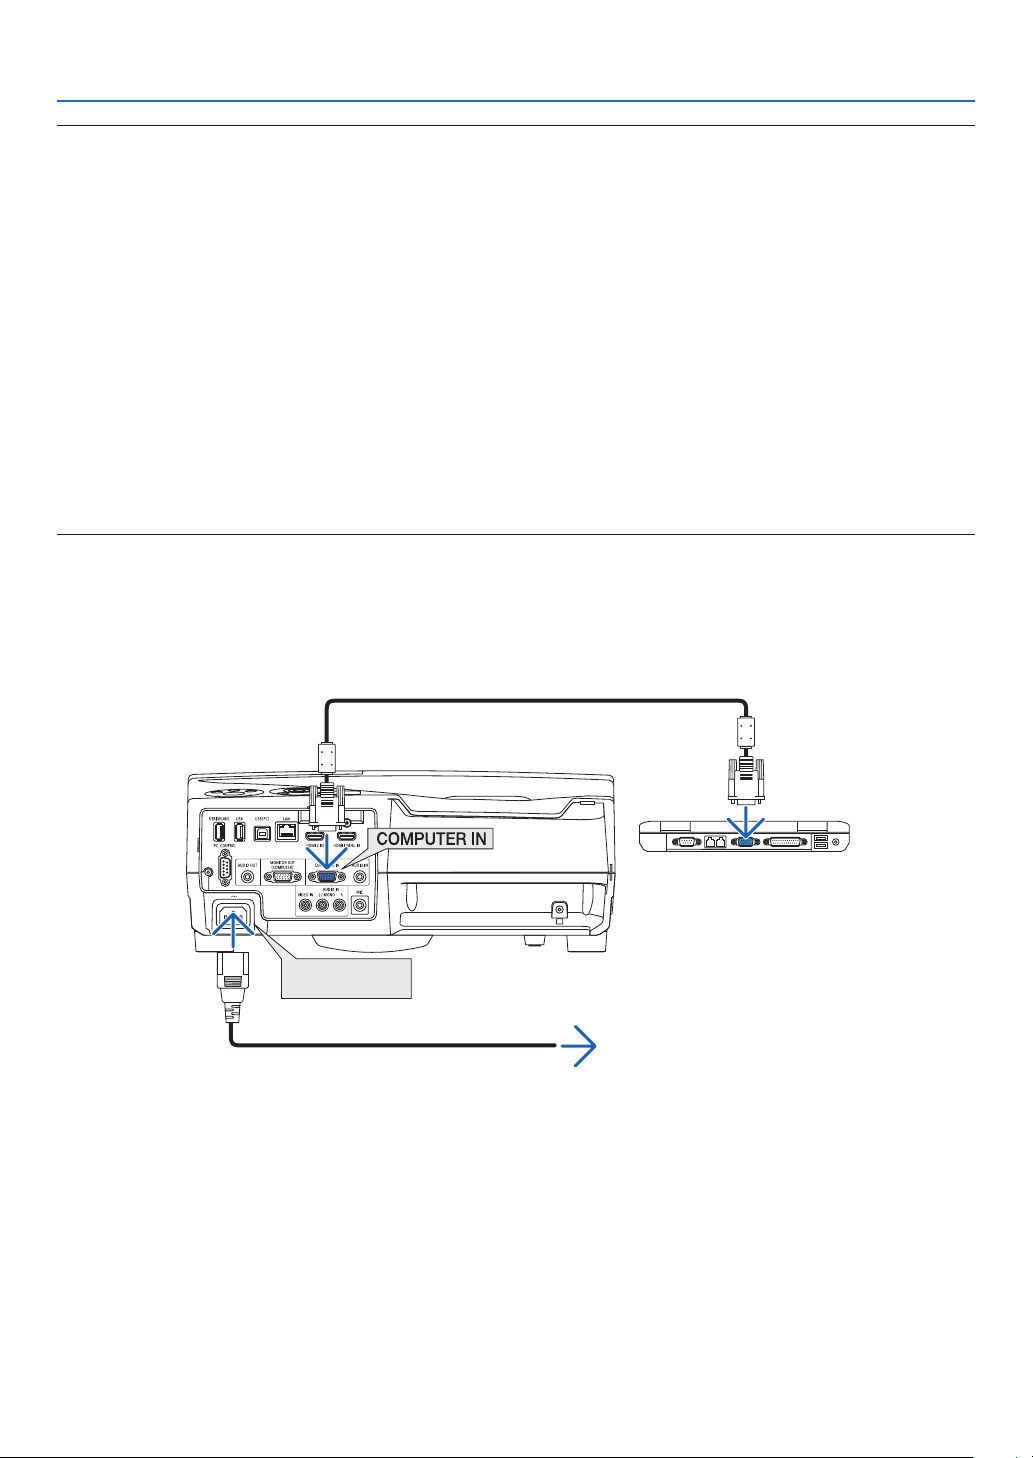
108
7. User Supportware
TIP:
UninstallingVirtualRemoteTool
Preparation:
ExitVirtualRemoteToolbeforeuninstalling.TouninstallVirtualRemoteTool,theWindowsuseraccountmusthave
“Administrator” privilege(Windows 8.1,Windows 8,Windows7 andWindowsVista)or“Computer Administrator”
privilege(WindowsXP).
•ForWindows8.1,Windows8,Windows7andWindowsVista
1 Click“Start”andthen“ControlPanel”.
The Control Panel window will be displayed.
2 Click“Uninstallaprogram”under“Programs”
The“ProgramsandFeatures”windowwillbedisplayed.
3 SelectVirtualRemoteToolandclickit.
4 Click“Uninstall/Change”or“Uninstall”.
•Whenthe“UserAccountControl”windowsisdisplayed,click“Continue”.
Follow the instructions on the screens to complete the uninstallation.
Step 2: Connect the projector to the computer
1 Usethesuppliedcomputercable(VGA)toconnecttheCOMPUTERINterminaloftheprojectordirectly
with the monitor output terminal of the computer.
2 ConnectthesuppliedpowercordtotheACINoftheprojectorandthewalloutlet.
The projector is in the standby condition.
ACInput
Supplied computer cable (VGA)
→ To wall outlet
Power cord (supplied)
TIP:
• WhenVirtualRemoteToolstartsforthersttime,“EasySetup”windowwillbedisplayedtonavigateyourconnections.
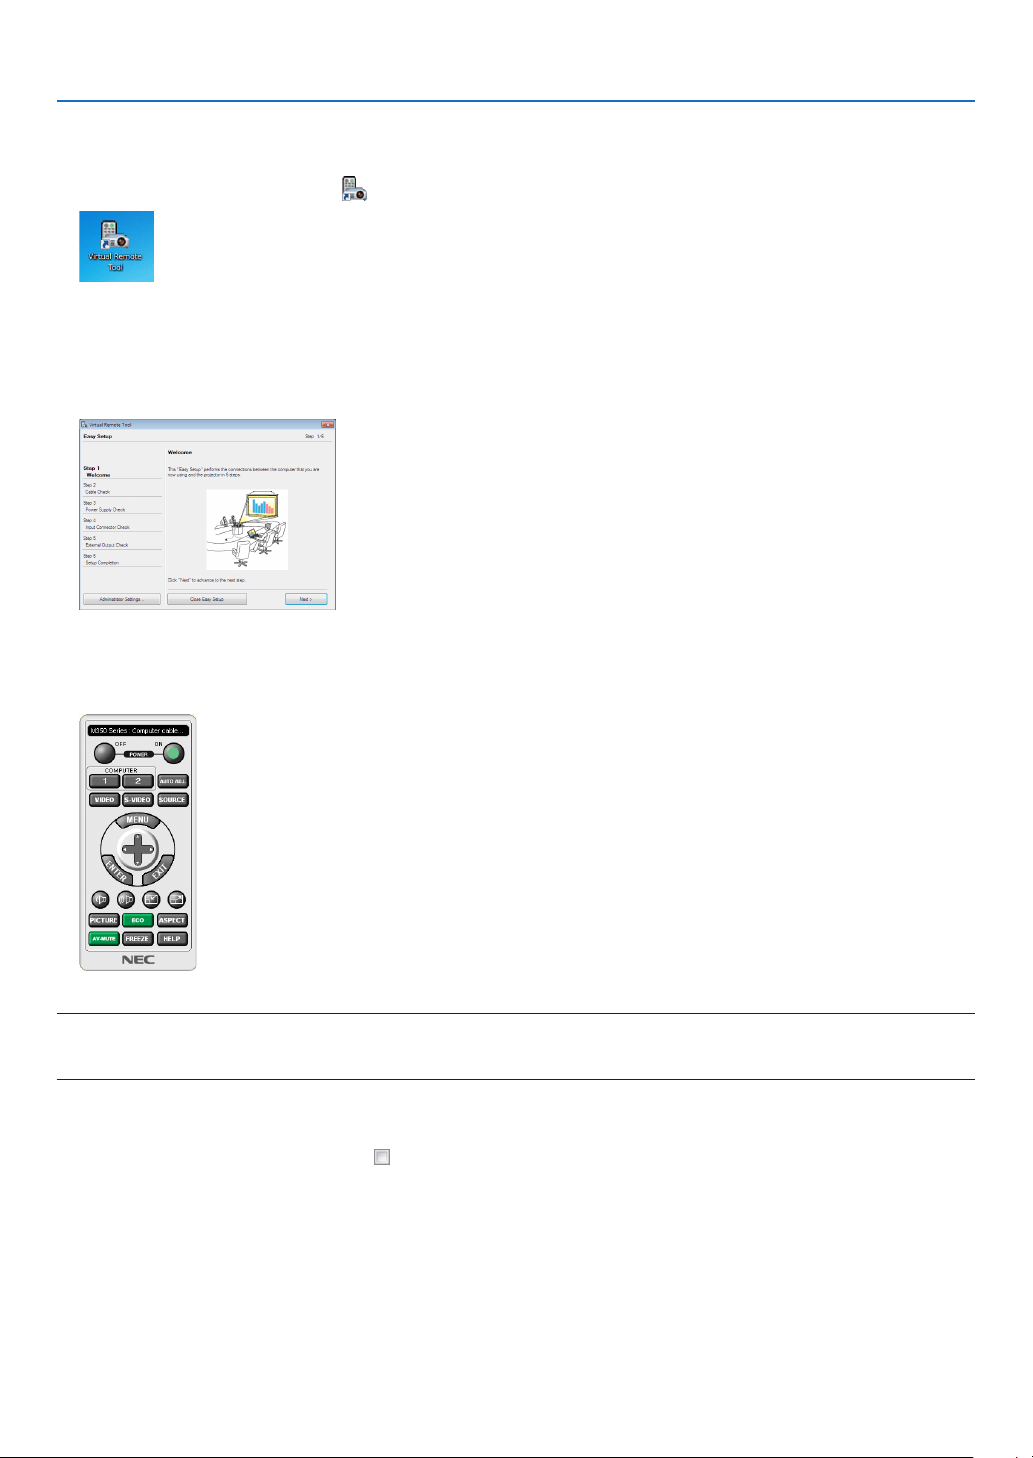
109
7. User Supportware
Step 3: Start Virtual Remote Tool
Startusingtheshortcuticon
• Double-clicktheshortcuticon on the Windows Desktop.
StartfromtheStartmenu
• Click[Start]→[AllPrograms]or[Programs]→[NECProjectorUserSupportware]→[VirtualRemoteTool]
→[VirtualRemoteTool].
WhenVirtualRemoteToolstartsforthersttime,“EasySetup”windowwillbedisplayed.
Follow the instructions on the screens
When“EasySetup”iscompleted,theVirtualRemoteToolscreenwillbedisplayed.
NOTE:
• When[NORMAL]isselectedfor[STANDBYMODE]fromthemenu,theprojectorcannotbeturnedonviathecomputercable
(VGA)ornetwork(wiredLAN/wirelessLAN)connection.
TIP:
• TheVirtualRemoteToolscreen(orToolbar)canbedisplayedwithoutdisplaying“EasySetup”window.
Todoso,clicktoplaceacheckmarkfor“ DonotuseEasySetupnexttime”onthescreenatStep6in“EasySetup”.
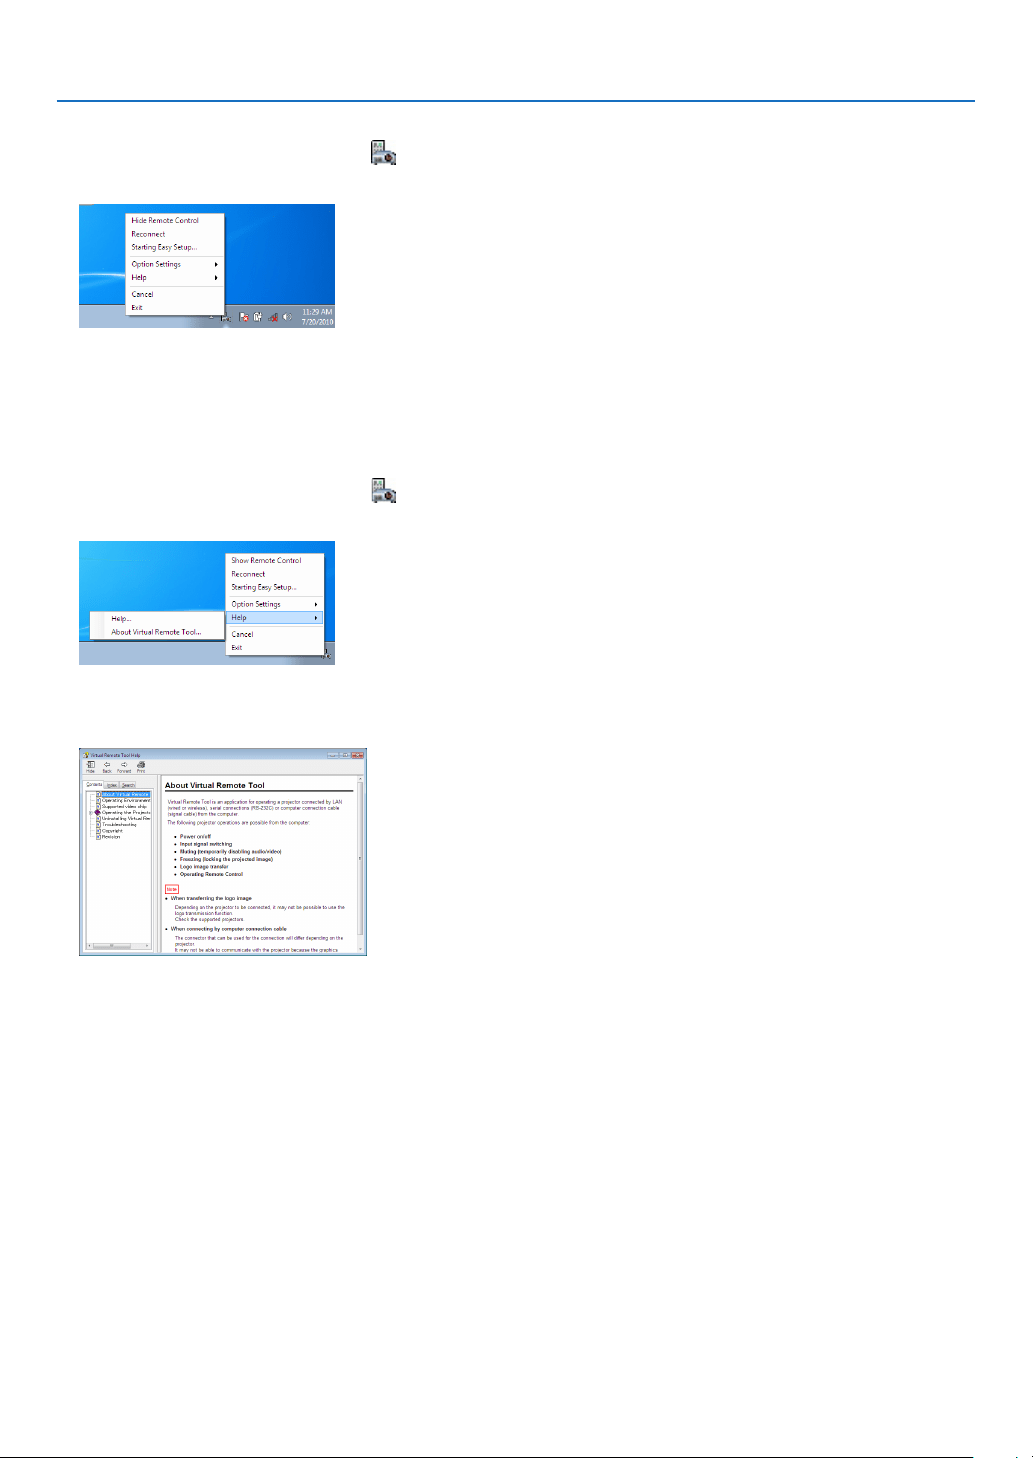
110
7. User Supportware
ExitingVirtualRemoteTool
1 ClicktheVirtualRemoteToolicon on the Taskbar.
The pop-up menu will be displayed.
2 Click“Exit”.
The Virtual Remote Tool will be closed.
ViewingthehelpleofVirtualRemoteTool
•Displayingthehelpleusingthetaskbar
1 ClicktheVirtualRemoteToolicon onthetaskbarwhenVirtualRemoteToolisrunning.
The pop-up menu will be displayed.
2. Click“Help”.
The Help screen will be displayed.
•DisplayingthehelpleusingtheStartMenu.
1. Click“Start”→“Allprograms”or“Programs”→“NECProjectorUserSupportware”→“VirtualRemote
Tool”→andthen“VirtualRemoteToolHelp”inthisorder.
The Help screen will be displayed.

111
7. User Supportware
❻ Projecting photos or documents saved on the smartphone
over a wireless LAN (Wireless Image Utility)
UtilizingtheWirelessImageUtility,itenablestotransferphotosanddocumentssavedonterminalsasasmartphone
oratablettotheprojectorviathewirelessLANandprojectthem.
TherearetwokindsofWirelessImageUtilitysoftwareoneforAndroidandanotherforiOSthatcanbedownloaded
fromGooglePlayorAppStore.
For Android
http://www.nec-display.com/dl/en/pj_android/wiu_for-android.html
For iOS
http://www.nec-display.com/dl/en/pj_ios/wiu_for-ios.html
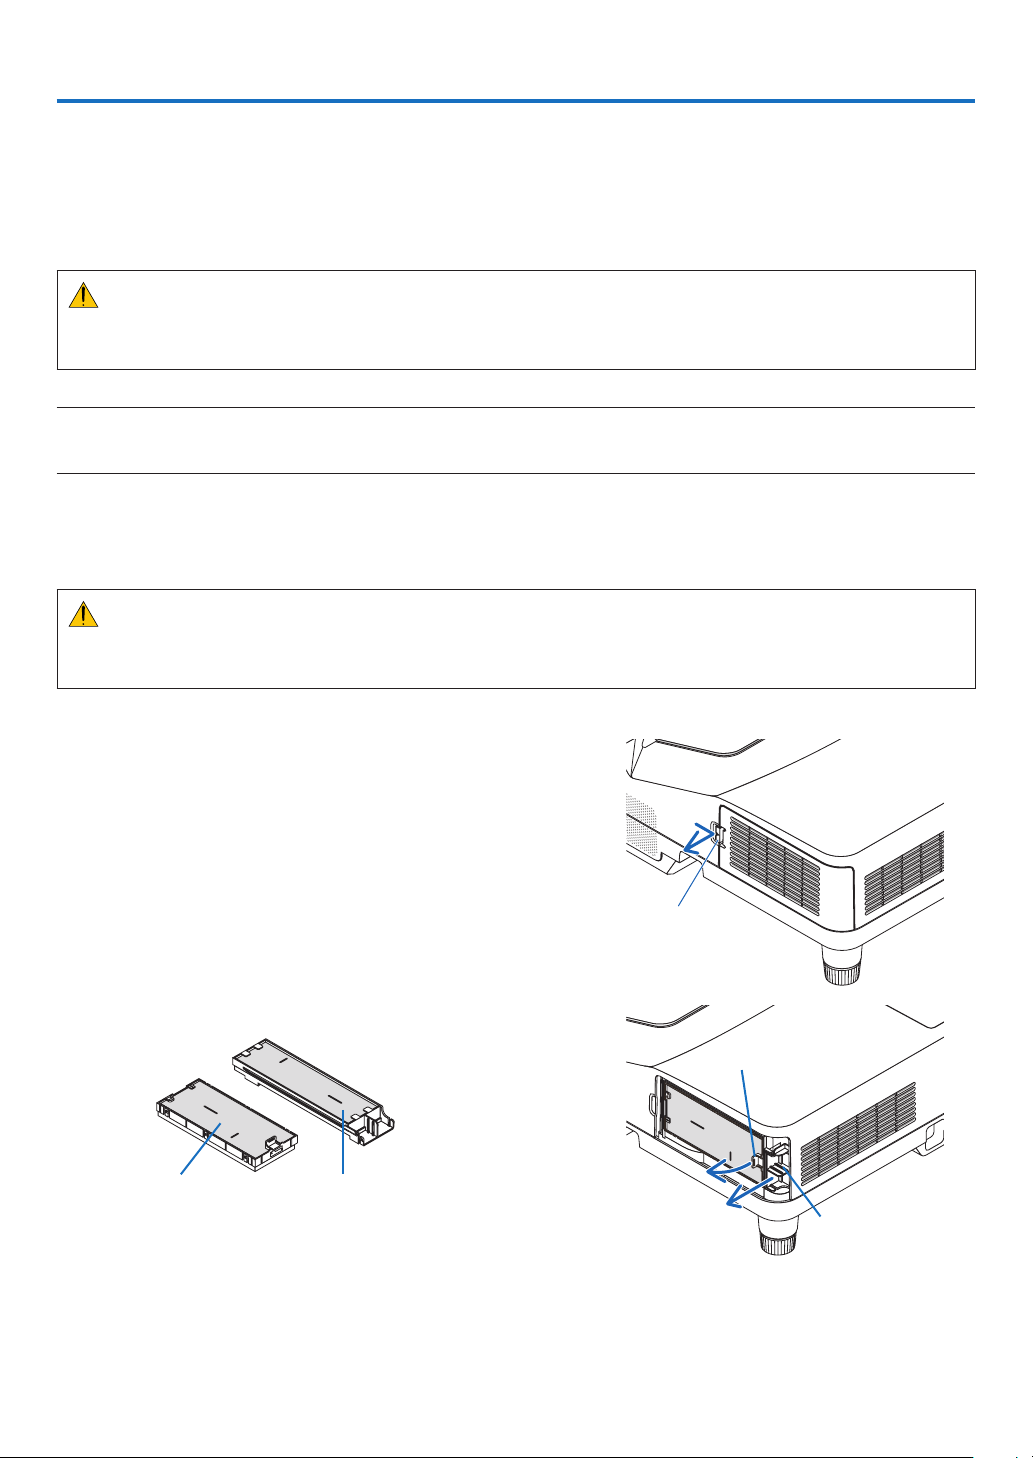
112
Thissectiondescribesthesimplemaintenanceproceduresyoushouldfollowtocleanthelters,theprojectionwindow,
thecabinet,andtoreplacethelampandthelters.
❶ Cleaning the Filters
Theair-lterspongekeepsdustanddirtfromgettinginsidetheprojectorandshouldbefrequentlycleaned.Ifthelter
isdirtyorclogged,yourprojectormayoverheat.
WARNING
• Donotuseaspraycontainingammablegastogetridofaccumulateddustanddirtonthelters.Itmaycause
ofre.
NOTE:Themessageforltercleaningwillbedisplayedforoneminuteaftertheprojectoristurnedonoroff.Whenthemessageis
displayed,cleanthelters.Thetimetocleantheltersissetto[5000H]attimeofshipment.
Tocancelthemessage,pressanybuttonontheprojectorcabinetortheremotecontrol.
Thetwo-layerlterontheprojectorimprovescoolinganddust-proofcapabilities.
Theoutsides(intakeside)oftherstandsecondlayerltersremovedust.
Tocleanthelter,detachthelterunitandtheltercover.
CAUTION
• Beforecleaningthelters,turnofftheprojector,disconnectthepowercordandthenallowthecabinettocool.
Failuretodosocanresultinelectricshockorburninjuries.
1. Push the button rightward to release the filter cover and pull
it out.
Button
2. Remove the two filter cases.
Small filter case Large filter case
Ta b
Ta b
8. Maintenance

113
8. Maintenance
3. Remove the four filters and use a vacuum cleaner to vacuum
all the dust inside and outside.
Get rid of dust in the sponge filter
NOTE:
• Whenever you vacuum the lter, use the soft brush attachment to
vacuum.Thisistoavoiddamagetothelter.
• Donotwashthelterwithwater.Doingsocanresultinlterclogging.
4. Remove dust from the filter cover and the two filter cases
(large and small).
Clean both outside and inside.
5. Attach the four filters to two filter cases (large and small).
• Attachthe coarse-texturespongelterto the outsideoflter
case.
The coarse-texture sponge filter has slits on it. Align these slits
with the protrusions of the filter case.
• Attachthene-texturespongeltertotheinsideoftheltercase.
Slit
Slit
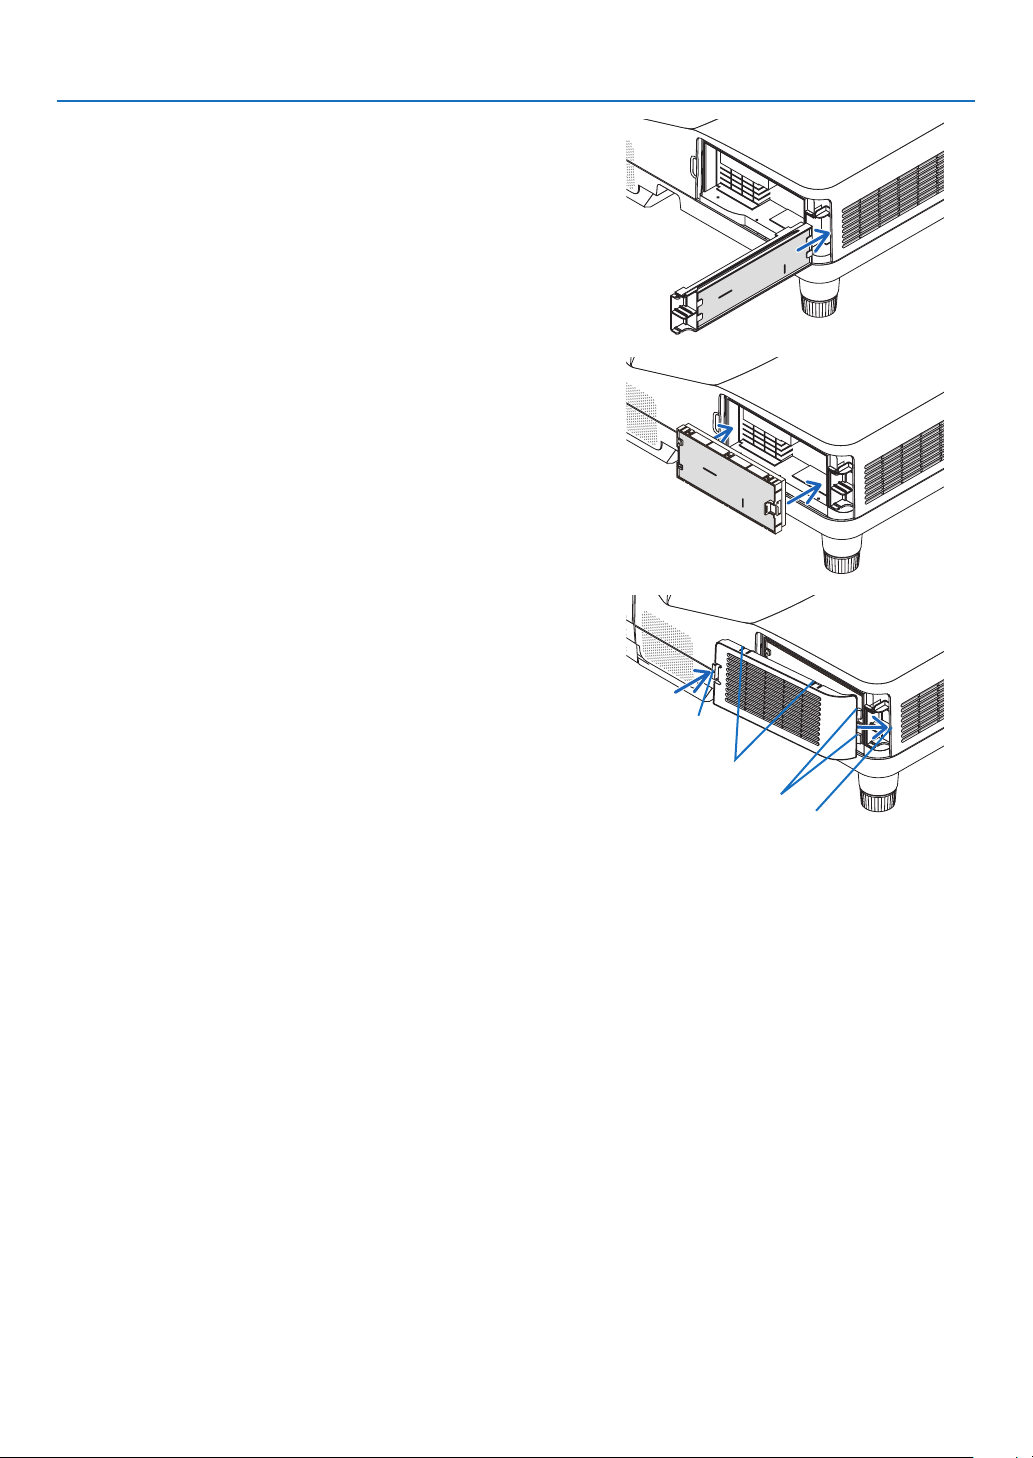
114
8. Maintenance
6. Insert the large filter case into the projector cabinet.
Makesurethattheltercaseisinsertedinthecorrectorientation.
7. Put the small filter case to the projector cabinet.
Makesurethattheltercaseisinsertedinthecorrectorientation.
8. Put the filter cover back to the projector cabinet.
Inserttwocatchesofthetipoftheltercoverintothegrooveofthe
cabinet, and push the button to close the filter cover.
• Ifyoundittohardtoclosetheltercover,trypushingthehook.
Button
Hook
Catch
Insiderib
(protrusion)
9. Clearthelterusagehours.
Plug the power cord into the wall outlet, and then turn on the pro-
jector.
From the menu, select [RESET] →[CLEARFILTERHOURS].(→
page 74)
The interval time to clean the filters is set to [OFF] at time of ship-
ment. When using the projector as it is, you do not clear the filter
usage
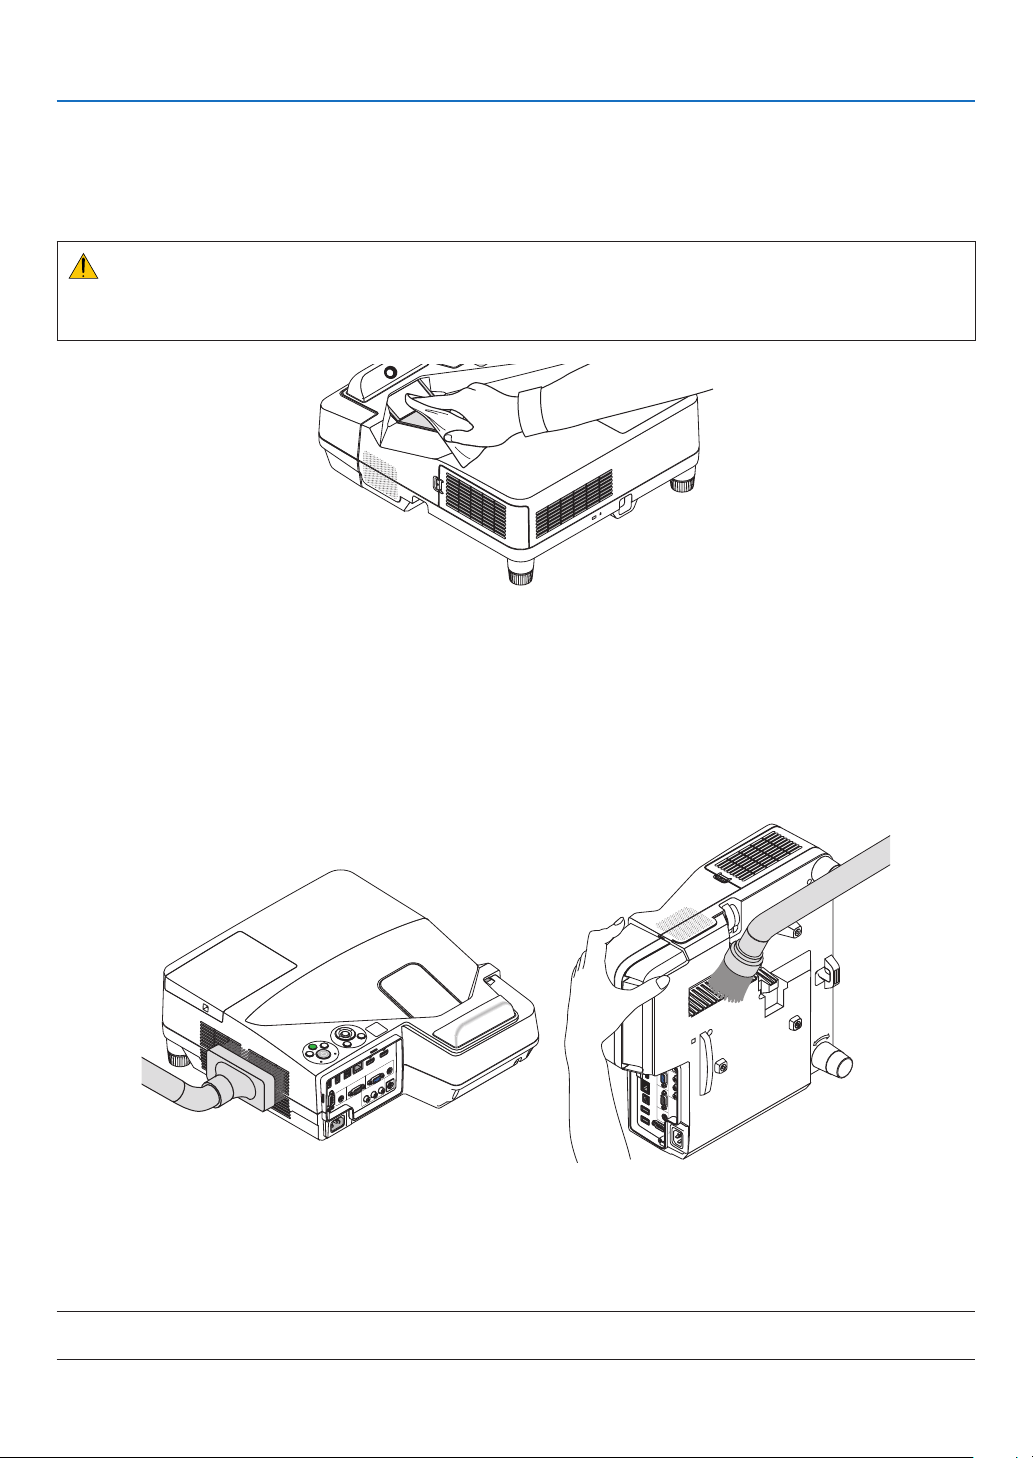
115
8. Maintenance
❷ Cleaning the Projection Window
• Turnofftheprojectorbeforecleaning.
• Donotscratchormartheprojectionwindowasitismadeofglass.
• Useablowerorlenspapertocleantheprojectionwindow,andbecarefulnottoscratchormartheglasssurface.
WARNING
• Donotuseaspraycontainingammablegastogetridofaccumulateddustanddirtontheprojectionwindow.
Itmaycauseofre.
❸ Cleaning the Cabinet
Turnofftheprojector,andunplugtheprojectorbeforecleaning.
• Useadrysoftclothtowipedustoffthecabinet.
Ifheavilysoiled,useamilddetergent.
• Neverusestrongdetergentsorsolventssuchasalcoholorthinner.
• Whencleaningtheventsorthespeakerusingavacuumcleaner,donotforcethebrushofthevacuumcleaner
intotheslitsofthecabinet.
Vacuum the dust off the vents.
• Cloggedventsmaycauseariseintheinternaltemperatureoftheprojector,resultinginmalfunction.
• Donotscratchorhitthecabinetwithyourngersoranyhardobjects
• Contactyourdealerforcleaningtheinsideoftheprojector.
NOTE:Donotapplyvolatileagentsuchasinsecticideonthecabinet,theprojectionwindow,orthescreen.Donotleavearubber
orvinylproductinprolongedcontactwithit.Otherwisethesurfacenishwillbedeterioratedorthecoatingmaybestrippedoff.

116
8. Maintenance
❹ Replacing the Lamp and the Filters
Whenthelampreachestheendofitslife,theLAMPindicatorinthecabinetwillblinkredandthemessage“THE
LAMPHASREACHEDTHEENDOFITSUSABLELIFE.PLEASEREPLACETHELAMPANDFILTER.”willappear
(*).Eventhoughthelampmaystillbeworking,replacethelamptomaintaintheoptimalprojectorperformance.After
replacingthelamp,besuretoclearthelamphourmeter.(→page74)
CAUTION
• DONOTTOUCHTHELAMPimmediatelyafterithasbeenused.Itwillbeextremelyhot.Turntheprojectoroff
andthendisconnectthepowercord.Allowatleastonehourforthelamptocoolbeforehandling.
• Usethespeciedlampforsafetyandperformance.
Toorderthereplacementlamp,specifyyourlamptype.
Replacementlamp:
NP33LP
Thereplacementlampcomeswithlters.Whiletheltersattachedtotheprojectoratthetimeofpurchaseare
madeofdarkspongematerial,theltersincludedwiththeoptionallamparemadeofnon-wovenwhitematerial.
Thereisnodifferenceinperformancebetweenthesetwotypes.
• DONOTREMOVEANYSCREWSexceptonelampcoverscrewandtwolamphousingscrews.Youcouldreceive
anelectricshock.
• Donotbreaktheglassonthelamphousing.
Keepngerprintsofftheglasssurfaceonthelamphousing.Leavingngerprintsontheglasssurfacemightcause
anunwantedshadowandpoorpicturequality.
• Theprojectorwillturnoffandgointostandbymodewhenyoucontinuetousetheprojectorforanother100hours
afterthelamphasreachedtheendofitslife.Ifthishappens,besuretoreplacethelamp.Ifyoucontinuetouse
thelampafterthelampreachestheendofitslife,thelampbulbmayshatter,andpiecesofglassmaybescattered
inthelampcase.Donottouchthemasthepiecesofglassmaycauseinjury.Ifthishappens,contactyourNEC
dealerforlampreplacement.
*NOTE:Thismessagewillbedisplayedunderthefollowingconditions:
• foroneminuteaftertheprojectorhasbeenpoweredon
• whenthe (POWER)buttonontheprojectorcabinetortheSTANDBYbuttonontheremotecontrolispressed
Toturnoffthemessage,pressanybuttonontheprojectorcabinetortheremotecontrol.
Optionallampandtoolsneededforreplacement:
• Phillipsscrewdriver(plus-head)
• Replacementlamp
Flow of Replacing the Lamp and the Filters
Step 1. Replace the lamp
Step 2. Replace the filters (→ page 119)
Step 3. Clearthelampusagehoursandthelterusagehours(→ page 74)
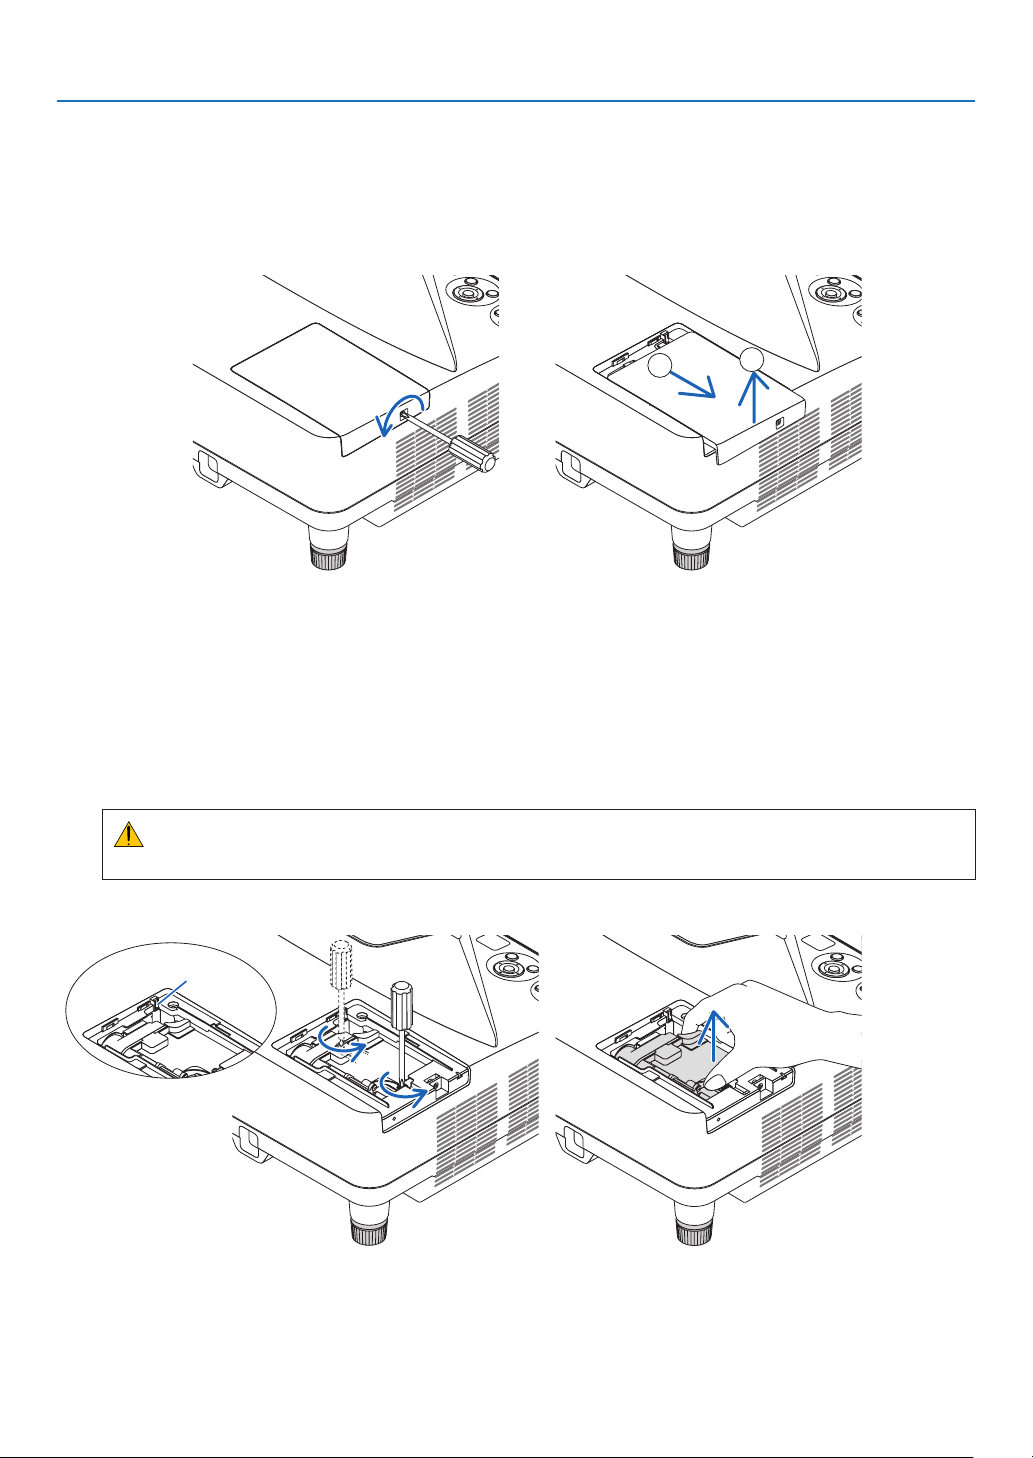
117
8. Maintenance
2. Remove the lamp housing.
(1) Loosen the two screws securing the lamp housing until the phillips screwdriver goes into a freewheeling condi-
tion.
• Thetwoscrewsarenotremovable.
• Thereisaninterlockonthiscasetopreventtheriskofelectricalshock.Donotattempttocircumventthis
interlock.
(2) Remove the lamp housing by holding it.
CAUTION:
Makesurethatthelamphousingiscoolenoughtobeforeremovingit.
Toreplacethelamp:
1. Remove the lamp cover.
(1) Loosen the lamp cover screw
• Thelampcoverscrewisnotremovable.
(2) Push and slide the lamp cover off.
a
b
Interlock
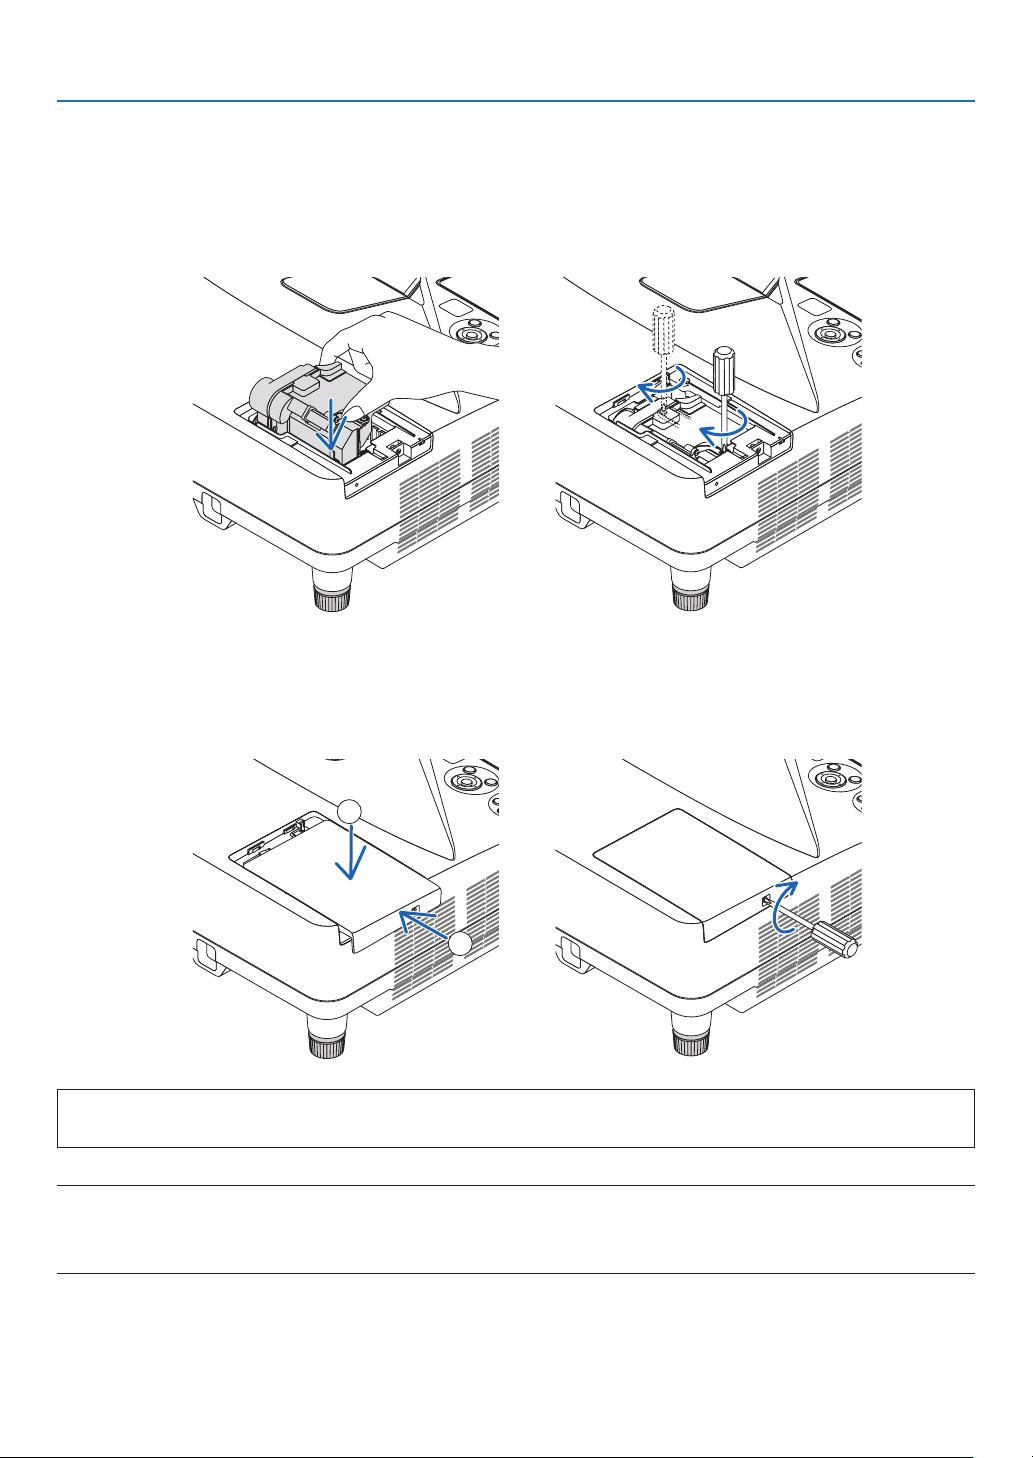
118
8. Maintenance
Thiscompletesthelampreplacement.
Goontothelterreplacement.
NOTE:Whenyoucontinuetousetheprojectorforanother100hoursafterthelamphasreachedtheendofitslife,theprojector
cannotturnonandthemenuisnotdisplayed.
Ifthishappens,presstheHELPbuttonontheremotecontrolfor10secondstoresetthelampclockbacktozero.
Whenthelamptimeclockisresettozero,theLAMPindicatorgoesout.
4. Reattach the lamp cover.
(1)Slidethelampcoverbackuntilitsnapsintoplace.
(2) Tighten the screw to secure the lamp cover.
• Besuretotightenthescrew.
3. Install a new lamp housing.
(1)Insertanewlamphousinguntilthelamphousingispluggedintothesocket.
(2) Push the top center of the lamp housing to secure it.
(3) Secure it in place with the two screws.
• Besuretotightenthescrews.
a
b
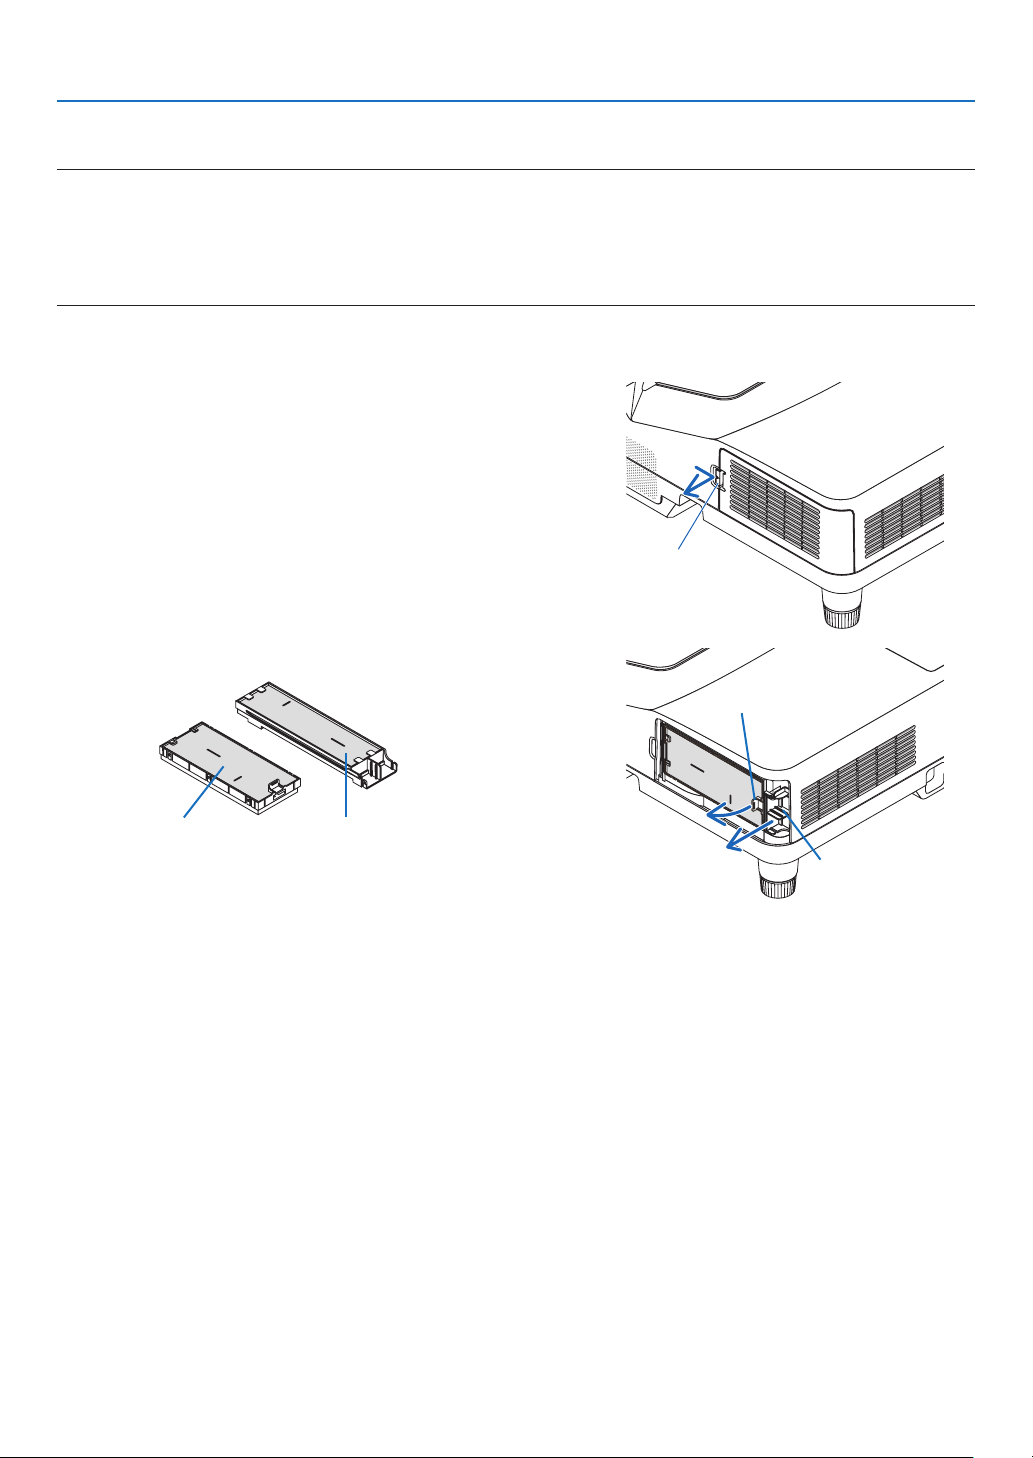
119
8. Maintenance
Toreplacethelters:
NOTE:
• Replaceallfourltersatthesametime.
• Beforereplacingthelters,wipeoffdustanddirtfromtheprojectorcabinet.
• Theprojectorisprecisionequipment.Keepoutdustanddirtduringlterreplacement.
• Donotwashthelterswithsoapandwater.Soapandwaterwilldamagetheltermembrane.
• Putltersintoplace.Incorrectattachmentofaltermaycausedustanddirttogetintotheinsideoftheprojector.
Beforereplacingthelters,replacethelamp.(→page116)
1. Push the button rightward to release the filter cover and pull
it out.
Button
2. Remove the two filter cases.
Small filter case Large filter case
Ta b
Ta b

120
8. Maintenance
3. Remove the four filters and use a vacuum cleaner to vacuum
all the dust inside and outside.
Get rid of dust in the sponge filter
NOTE:
• Whenever you vacuum the lter, use the soft brush attachment to
vacuum.Thisistoavoiddamagetothelter.
• Donotwashthelterwithwater.Doingsocanresultinlterclogging.
4. Remove dust from the filter cover and the two filter cases
(large and small).
Clean both outside and inside.
5. Attach the four filters to two filter cases (large and small).
• Attachthe coarse-texturespongelterto the outsideoflter
case.
The coarse-texture sponge filter has slits on it. Align these slits
with the protrusions of the filter case.
• Attachthene-texturespongeltertotheinsideoftheltercase.
Slit
Slit
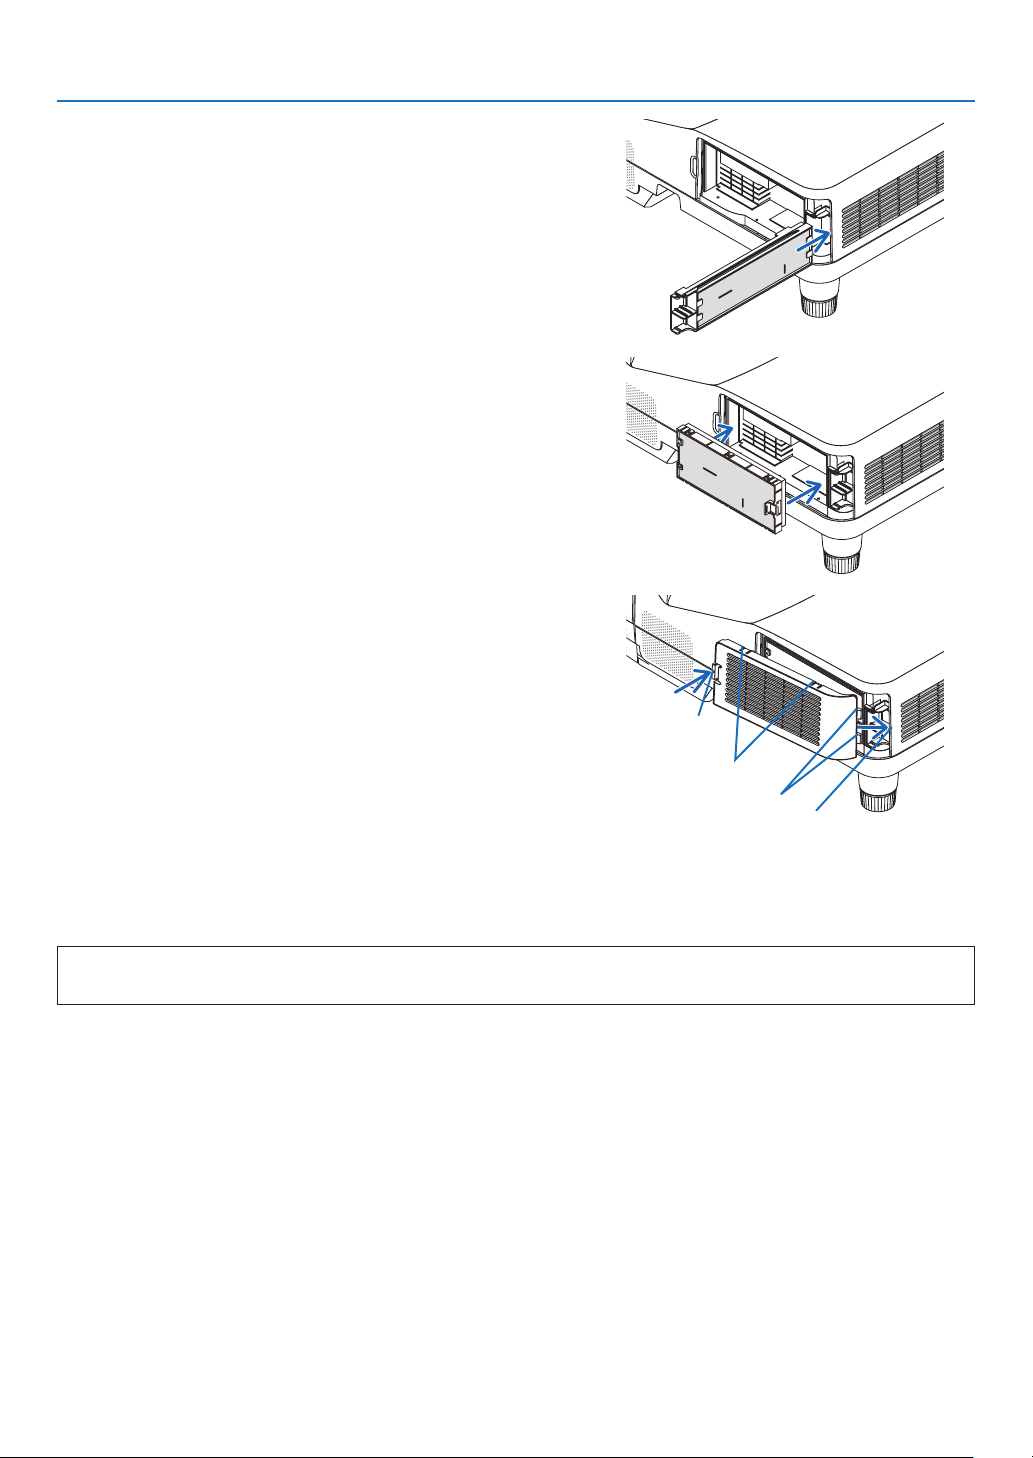
121
8. Maintenance
6. Insert the large filter case into the projector cabinet.
Makesurethattheltercaseisinsertedinthecorrectorientation.
7. Put the small filter case to the projector cabinet.
Makesurethattheltercaseisinsertedinthecorrectorientation.
8. Put the filter cover back to the projector cabinet.
Inserttwocatchesofthetipoftheltercoverintothegrooveofthe
cabinet, and push the button to close the filter cover.
• Ifyoundittohardtoclosetheltercover,trypushingthehook.
Button
Hook
Catch
Insiderib
(protrusion)
Thiscompletesthelterreplacement.
Goontotheclearinglampandlterhourmeters.
Toclearthelampusagehoursandthelterusagehours:
1. Place the projector where you use it.
2. Plug the power cord into the wall outlet, and then turn on the projector.
3. Clearthelampusagehoursandthelterusagehours.
1. From the menu, select [RESET] → [CLEAR LAMP HOURS] and reset the lamp usage hours.
2. Select[CLEARFILTERHOURS]andresetthelterusagehours.(→ page 74)

122
9. Appendix
❶ Troubleshooting
Thissectionhelpsyouresolveproblemsyoumayencounterwhilesettinguporusingtheprojector.
Indicator Messages
PowerIndicator
Indicator Condition ProjectorCondition Note
Off The main power is off –
Blinking
light
Blue
0�5 sec On,
0�5 sec Off
The projector is getting ready to turn on� Wait for a moment�
2�5 sec On,
0�5 sec Off
Off Timer is enabled�
Program timer (off time enabled)
–
Orange (short flashes) Cooling Wait for a moment
Orange (long flashes) Program timer (on time enabled)
Steady
light
Blue
The projector is turned on� –
Orange In Standby condition [NETWORK STAND-
BY] is selected for [STANDBY MODE]
–
Red In Standby condition [NORMAL] is
selected for [STANDBY MODE]
–
StatusIndicator
Indicator Condition ProjectorCondition Note
Off Normal or Standby –
Blinking
light
Red
1 cycle (0�5 sec
On, 2�5 sec Off)
Lamp cover error or lamp housing error Mount the lamp cover or lamp housing correctly�
2 cycle (0�5 sec
On, 0�5 sec Off)
Temperature error The projector is overheated� Move the projector to a
cooler location�
3 cycle (0�5 sec
On, 0�5 sec Off)
Power error Power unit is not working properly� Contact your dealer�
4 cycle (0�5 sec
On, 0�5 sec Off)
Fan error Fans will not work correctly�
6 cycle (0�5 sec
On, 0�5 sec Off)
Lamp error Lamp fails to light� Wait a full minute and then turn on
again�
Orange 1 cycle (0�5 sec
On, 2�5 sec Off)
Network conflict Both the built-in wired LAN and the wireless LAN cannot
be connected to the same network at the same time�
To use both built-in wired LAN and wireless LAN at the
same time, connect them to different networks�
NOTE:IntheStandbycondition,thestatusindicator
on the cabinet does not blink in orange even if the
networkconicts
Green Re-firing the lamp (The projector is cool-
ing down�)
The projector is re-firing�
Wait for a moment�
Steady
light
Green Sleep mode –
Orange
CONTROL PANEL LOCK is on� You have pressed cabinet button when Control Panel
Lock is on�
CONTROL ID error Remote control ID and projector ID are not matched�
Lamp Indicator
Indicator Condition ProjectorCondition Note
Off Normal –
Blinking
light
Red
Lamp has reached its end of life� Lamp
replacement message will be displayed�
Replace the lamp�
Steady
light
Red Lamp has been used beyond its limit� The
projector will not turn on until the lamp is
replaced�
Replace the lamp�
Green [ECO MODE] is set to [NORMAL] or [ECO] –

123
9. Appendix
Over-TemperatureProtection
Ifthetemperatureinsidetheprojectorrisestoohigh,theover-temperatureprotectorwillautomaticallyturnoffthelamp
withtheSTATUSindicatorblinking(2-cycleOnandOff.)
Shouldthishappen,dothefollowing:
• Unplugthepowercordafterthecoolingfansstop.
• Movetheprojectortoacoolerlocationiftheroomwhereyouarepresentingisparticularlytoowarm.
• Cleantheventsiftheyarecloggedwithdust.
• Waitabout60minutesuntiltheinsideoftheprojectorbecomescoolenough.

124
9. Appendix
Common Problems & Solutions
(→“Power/Status/LampIndicator”onpage122.)
Problem CheckTheseItems
Does not turn on
or shut down
• Checkthatthepowercordispluggedinandthatthepowerbuttonontheprojectorcabinetortheremote
control is on� (→ pages 13, 14)
• Ensurethatthelampcoverisinstalledcorrectly.(→ page 118)
• Checktoseeiftheprojectorhasoverheated.Ifthereisinsufcientventilationaroundtheprojectororifthe
room where you are presenting is particularly warm, move the projector to a cooler location�
• Checktoseeifyoucontinuetousetheprojectorforanother100hoursafterthelamphasreachedtheend
of its life� If so, replace the lamp� After replacing the lamp, reset the lamp hours used� (→ page 116)
• Thelampmayfailtolight.Waitafullminuteandthenturnonthepoweragain.
• Set[FANMODE]to[HIGHALTITUDE]whenusingtheprojectorataltitudesapproximately5500feet/1700
meters or higher� Using the projector at altitudes approximately 5500 feet/1700 meters or higher without
setting to [HIGH ALTITUDE] can cause the projector to overheat and the projector could shut down� If this
happens, wait a couple minutes and turn on the projector� (→ page 65)
If you turn on the projector immediately after the lamp is turned off, the fans run without displaying an
image for some time and then the projector will display the image� Wait for a moment�
Will turn off • Ensurethatthe[OFFTIMER]or[AUTOPOWEROFF]isoff.(→ page 59, 68)
No picture
• UsetheCOMPUTER1,HDMI1/MHL, HDMI2, VIDEO, USB-B, or APPS button on the remote control to select
your source (COMPUTER, HDMI1/MHL, HDMI2, VIDEO, USB-B, or APPS)� (→ page 16) If there is still no
picture, press the button again�
• Ensureyourcablesareconnectedproperly.
• Usemenustoadjustthebrightnessandcontrast.(→ page 52)
• Resetthesettingsoradjustmentstofactorypresetlevelsusingthe[RESET]intheMenu.(→ page 74)
• EnteryourregisteredkeywordiftheSecurityfunctionisenabled.(→ page 35)
• BesuretoconnecttheprojectorandnotebookPCwhiletheprojectorisinstandbymodeandbeforeturning
on the power to the notebook PC�
In most cases the output signal from the notebook PC is not turned on unless connected to the projector
before being powered up�
* If the screen goes blank while using your remote control, it may be the result of the computer’s screen-
saver or power management software�
• Seealsothenext page�
Picture suddenly
becomes dark
• CheckiftheprojectorisintheForcedECOmodebecauseoftoohighambienttemperature.Ifthisisthe
case, lower the internal temperature of the projector by selecting [HIGH] for [FAN MODE]� (→ page 65)
Color tone or hue is
unusual
• Checkifanappropriatecolorisselectedin[WALLCOLOR].Ifso,selectanappropriateoption.(→ page
59)
• Adjust[HUE]in[PICTURE].(→ page 52)
Image isn’t square to
the screen
• Repositiontheprojectortoimproveitsangletothescreen.(→ page 17, 18)
• UsetheKeystonecorrectionfunctiontocorrectthetrapezoiddistortion.(→ page 21)
Picture is blurred
• Adjustthefocus.(→ page 18)
• Repositiontheprojectortoimproveitsangletothescreen.(→ page 17, 18)
• Ensurethatthedistancebetweentheprojectorandscreeniswithintheadjustmentrangeoftheprojection
window� (→ page 75)
• Condensationmayformonthelensiftheprojectoriscold,broughtintoawarmplaceandisthenturned
on� Should this happen, let the projector stand until there is no condensation on the lens�
Flicker appears on
screen
•
Set [FAN MODE] to other than [HIGH ALTITUDE] mode when using the projector at altitudes approximately 5500
feet/1700 meters or lower� Using the projector at altitudes less than approximately 5500 feet/1700 meters and setting
to [HIGH ALTITUDE] can cause the lamp to overcool, causing the image to flicker� Switch [FAN MODE] to [AUTO]�
(→ page 65)
Image is scrolling
vertically, horizontally
or both
• Checkthecomputer’sresolutionandfrequency.Makesurethattheresolutionyouaretryingtodisplayis
supported by the projector� (→ page 131)
• AdjustthecomputerimagemanuallywiththeHorizontal/Verticalinthe[IMAGEOPTIONS].(→ page 54)
Remote control does
not work
• Installnewbatteries.(→ page 10)
• Makesuretherearenoobstaclesbetweenyouandtheprojector.
• Standwithin22feet(7m)oftheprojector.(→ page 10)
Indicator is lit or
blinking
• SeethePOWER/STATUS/LAMPIndicator.(→ page 122)

125
9. Appendix
Problem CheckTheseItems
Cross color in RGB
mode
• PresstheAUTOADJ.buttonontheprojectorcabinetortheremotecontrol.(→ page 23)
• Adjustthecomputerimagemanuallywith[CLOCK]/[PHASE]in[IMAGEOPTIONS]inthemenu.(→ page
53)
Mic sound is not
heard
• CheckifyourmicrophonecableisconnectedtotheMICinputjackcorrectly.
• Checkifselectionofmicrophonetypeintheinstallationmenuiscorrect.
Mic sound is too loud
or quiet
• Adjust[MICGAIN]fromthemenu.(→ page 64)
The stylus pen does
not work�
• Hascalibrationperformedproperly?
• Doesthestyluspenhavepropercharge?
If red LED is not turned on by pressing the pen tip, charge the stylus pen�
Lines traced with the
stylus pen do not
match lines indicated
on the screen�
• Hascalibrationperformedproperly?
If it does not solve the problem by performing automatic calibration, try to perform manual calibration�
• Changetheplacetoinstallthemavoidingtoreceivedirectsunshineorstronglight.
When the projector is mounted beside a window, avoid receiving influence of light from outside by ap-
propriate measures as closing a curtain and keeping a certain distance from the window, etc�
Formoreinformationcontactyourdealer.
If there is no picture, or the picture is not displayed correctly.
• PoweronprocessfortheprojectorandthePC.
BesuretoconnecttheprojectorandnotebookPCwhiletheprojectorisinstandbymodeandbeforeturningonthe
powertothenotebookPC.
InmostcasestheoutputsignalfromthenotebookPCisnotturnedonunlessconnectedtotheprojectorbefore
beingpoweredup.
NOTE:Youcancheckthehorizontalfrequencyofthecurrentsignalintheprojector’smenuunderInformation.Ifitreads“0kHz”,
thismeansthereisnosignalbeingoutputfromthecomputer.(→page71orgotonextstep)
• Enablingthecomputer’sexternaldisplay.
DisplayinganimageonthenotebookPC’sscreendoesnotnecessarilymeanitoutputsasignaltotheprojector.
WhenusingaPCcompatiblelaptop,acombinationoffunctionkeyswillenable/disabletheexternaldisplay.Usually,
thecombinationofthe“Fn”keyalongwithoneofthe12functionkeysgetstheexternaldisplaytocomeonoroff.
Forexample,NEClaptopsuseFn+F3,whileDelllaptopsuseFn+F8keycombinationstotogglethroughexternal
displayselections.
• Non-standardsignaloutputfromthecomputer
IftheoutputsignalfromanotebookPCisnotanindustrystandard,theprojectedimagemaynotbedisplayed
correctly.Shouldthishappen,deactivatethenotebookPC’sLCDscreenwhentheprojectordisplayisinuse.Each
notebookPChasadifferentwayofdeactivate/reactivatethelocalLCDscreensasdescribedinthepreviousstep.
Refertoyourcomputer’sdocumentationfordetailedinformation.
• ImagedisplayedisincorrectwhenusingaMac
WhenusingaMacwiththeprojector,settheDIPswitchoftheMacadapter(notsuppliedwiththeprojector)accord-
ingtoyourresolution.Aftersetting,restartyourMacforthechangestotakeaffect.
ForsettingdisplaymodesotherthanthosesupportedbyyourMacandtheprojector,changingtheDIPswitchon
aMacadaptermaybounceanimageslightlyormaydisplaynothing.Shouldthishappen,settheDIPswitchto
the13"xedmodeandthenrestartyourMac.Afterthat,restoretheDIPswitchestoadisplayablemodeandthen
restarttheMacagain.
NOTE:AVideoAdaptercablemanufacturedbyAppleInc.isneededforaMacBookwhichdoesnothaveaminiD-Sub15-pinterminal.
• MirroringonaMacBook
* WhenusingtheprojectorwithaMacBook,outputmaynotbesetto1024×768unless“mirroring”isoffonyour
MacBook.Refertoowner’smanualsuppliedwithyourMaccomputerformirroring.
• FoldersoriconsarehiddenontheMacscreen
Foldersoriconsmaynotbeseenonthescreen.Shouldthishappen,select[View]→[Arrange]fromtheApple
menuandarrangeicons.
126
9. Appendix
❷ Specifications
Thissectionprovidestechnicalinformationaboutprojector’sperformance.
Optical
ModelNumber NP-UM352W
LCDPanel 0.59inchLCDwithMicroLensArray(AspectRatio16:10)
Resolution*
1
1280×800pixels(WXGA)
Lens Digitalzoomandmanualfocus
DigitalZoomRatio=1.4
F=1.8 f=4.78mm
Lamp 255WAC
(200WinNORMAL)
(160WinECO)
LightOutput*
2
*
3
3500lumens
NORMAL:80%
ECO:60%*
4
ContrastRatio*
3
(fullwhite:fullblack)
4000:1
ImageSize(Diagonal) 58-110inches/1473-2794mm
ProjectionDistance
(Min.–Max.)
18-34inches/448-854mm
ProjectionAngle 49°
*1 Effectivepixelsaremorethan99.99%.
*2 Thisisthelightoutputvalue(lumens)whenthe[PRESET]modeissetto[HIGH-BRIGHT].Ifanyothermodeisselectedasthe
[PRESET]mode,thelightoutputvaluemaydropslightly.
*3 CompliancewithISO21118-2005
*4 ThemaximumpowerbecomesequivalenttopowerinNORMAL(ECOMODE).
Electrical
ModelNumber NP-UM352W
Inputs
1×RGB/Component(D-Sub15P),2×HDMITypeA(19P,HDMI
®
Terminal)HDCPsupported*
5
,Ex-
clusivelyHDMI1supportsMHLsignals,1×Video(RCA),1×(L/R)RCAAudio,1×StereoMiniAudio
Outputs 1×RGB(D-Sub15P),1×StereoMiniAudio
PCControl 1×PCControlPort(D-Sub9P)
WiredLANPort 1×RJ-45(10BASE-T/100BASE-TX)
WirelessLANPort
(Optional)
IEE802.11b/g/n(optionalUSBWirelessLANUnitrequired)
USBPort 1×TypeA,1×TypeB
MICInput 1×MonauralMiniAudio(DynamicmichrophoneandCondensermicrophone)
ColorReproduction 10-bitsignalprocessing(1.07billioncolors)(USB-B,APPS:Colors,16.7millioncolors)
CompatibleSignals*
6
Analog:VGA/SVGA/XGA/WXGA/Quad-VGA/SXGA/SXGA+/WXGA+/WXGA++/UXGA/WSXGA+/HD/
FullHD/WUXGA/Mac13",16",21",23"
Component:480i/480p/576i/576p/720p/1080i/1080p
HDMI:VGA/SVGA/XGA/WXGA/Quad-VGA/SXGA/SXGA+/WXGA+/WXGA++/WSXGA+/480p/576p/7
20p/1080i/1080p
HorizontalResolution 540TVlines:NTSC/NTSC4.43/PAL/PAL-M/PAL-N/PAL60
300TVlines:SECAM
ScanRate Horizontal:15kHzto100kHz(RGB:24kHzorover)
Vertical:50Hzto120Hz(HDMI:50Hzto85Hz)
SyncCompatibility SeparateSync
Built-inSpeaker 20W(monaural)
*5 HDMI
®
(DeepColor,LipSync)withHDCP
WhatisHDCP/HDCPtechnology?
HDCPisanacronymforHigh-bandwidthDigitalContentProtection.HighbandwidthDigitalContentProtection(HDCP)isasystem
forpreventingillegalcopyingofvideodatasentoveraHigh-DenitionMultimediaInterface(HDMI).
IfyouareunabletoviewmaterialviatheHDMIinput,thisdoesnotnecessarilymeantheprojectorisnotfunctioningproperly.With
theimplementationofHDCP,theremaybecasesinwhichcertaincontentisprotectedwithHDCPandmightnotbedisplayed
duetothedecision/intentionoftheHDCPcommunity(DigitalContentProtection,LLC).
Video:DeepColor;8/10/12-bit,LipSync
Audio:LPCM;upto2ch,samplerate32/44.1/48KHz,samplebit;16/20/24-bit
*6 Animagewithhigherorlowerresolutionthantheprojector’snativeresolution(1280×800)willbedisplayedwithAdvancedAc-
cuBlend.(→page131)
127
9. Appendix
ModelNumber NP-UM352W
PowerRequirement 100–240VAC,50/60Hz
InputCurrent 3.9A/1.7A
PowerCon-
sumption
ECOMODE
OFF
339W(100-130V)/326W(200-240V)
NORMAL 269W(100-130V)/261W(200-240V)
ECO 222W(100-130V)/216W(200-240V)
STANDBY
(NETWORK
STANDBY)
2.3W(100-130V)/2.6W(200-240V)
STANDBY
(NORMAL)
0.22W(100-130V)/0.39W(200-240V)
Mechanical
ModelNumber NP-UM352W
Installation
Orientation
Desktop/Front,Desktop/Rear,Ceiling/Front,Ceiling/Rear
Dimensions 14.9"(W)×4.4"(H)×16.9"(D)/378mm(W)×112mm(H)×428mm(D)
(notincludingprotrusions)
Weight 5.8kg/12.8lbs
Environmental
Considerations
OperationalTemperatures:41°to104°F(5°to40°C),
(ECOmodeselectedautomaticallyat95°Fto104°F/35°Cto40°C)
20%to80%humidity(non-condensing)
StorageTemperatures:14°to122°F(-10°to50°C),
20%to80%humidity(non-condensing)
Operatingaltitude:0to2600m/8500feet(Set[FANMODE]to[HIGHALUTITUDE]whenusingthe
projectorataltitudesapproximately1700m/5500feet)
Regulations UL/C-ULApproved(UL60950-1,CSA60950-1)
MeetsDOCCanadaClassBrequirements
MeetsFCCClassBrequirements
MeetsAS/NZSCISPR.22ClassB
MeetsEMCDirective(EN55022,EN55024,EN61000-3-2,EN61000-3-3)
MeetsLowVoltageDirective(EN60950-1,TÜVGSApproved)
Foradditionalinformationvisit:
US:http://www.necdisplay.com/
Europe:http://www.nec-display-solutions.com/
Global:http://www.nec-display.com/global/index.html
Forinformationonouroptionalaccessories,visitourwebsiteorseeourbrochure.
Thespecicationsaresubjecttochangewithoutnotice.
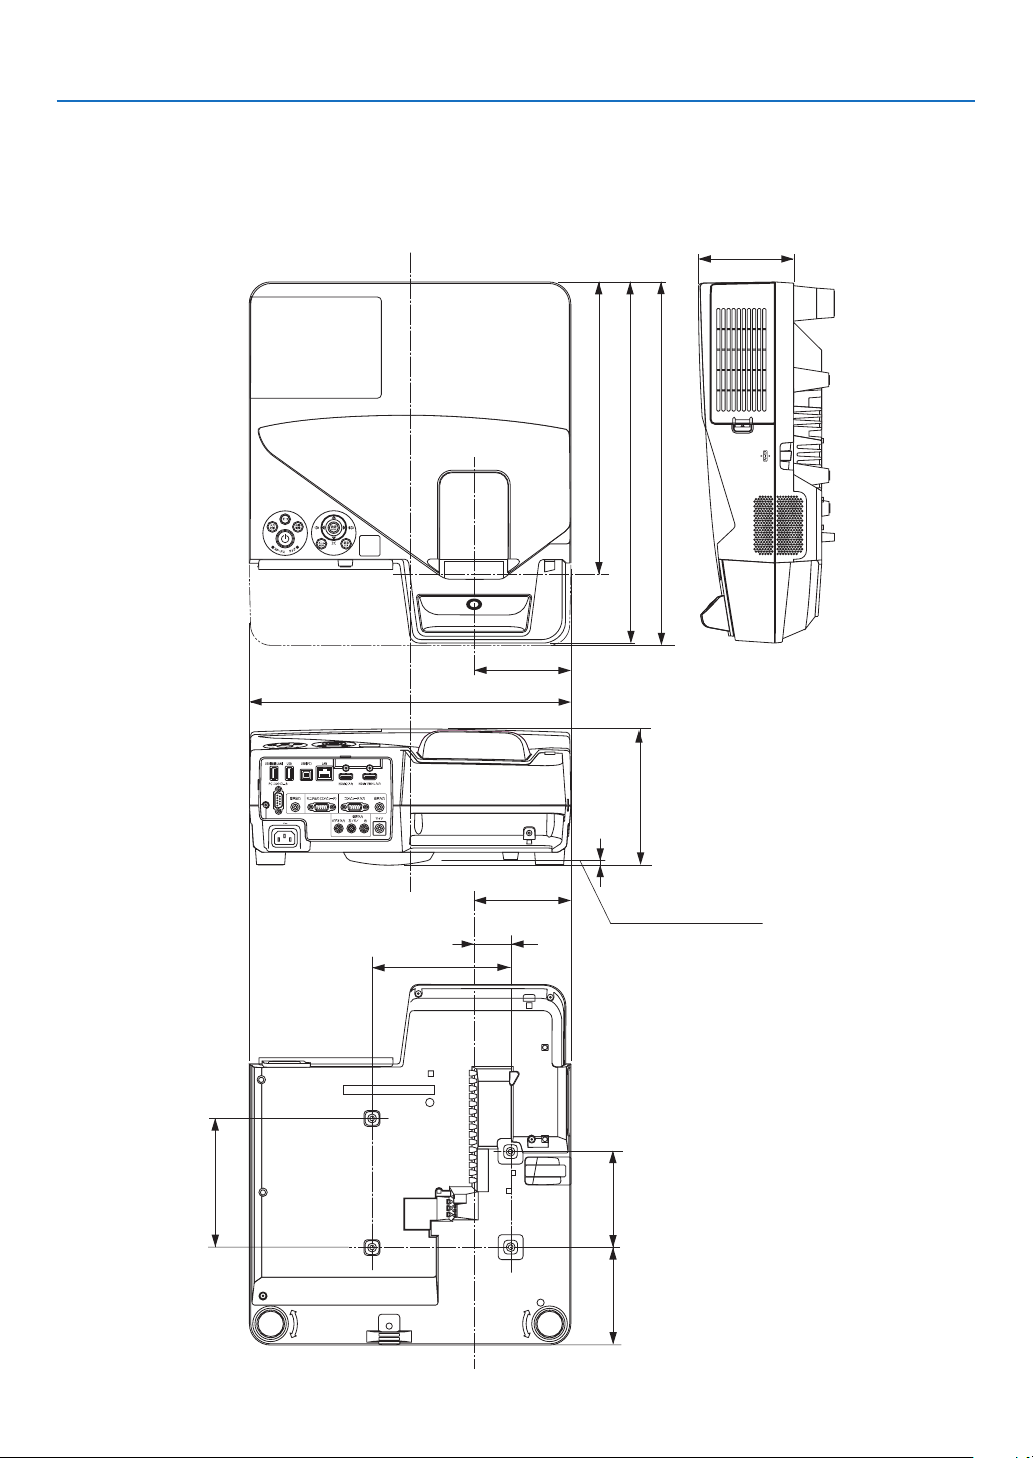
128
9. Appendix
378 (14.9)
114 (4.5)
43 (1.7)
163 (6.4)
114 (4.5)
112 (4.4)
424.5 (16.7)
344 (13.5)
160 (6.3)
115 (4.5)
112.5 (4.4)
151.25 (6)
428 (16.9)
5.5 (0.2)
❸ Cabinet Dimensions
Unit:mm(inch)
Attachment surface of ceiling mount
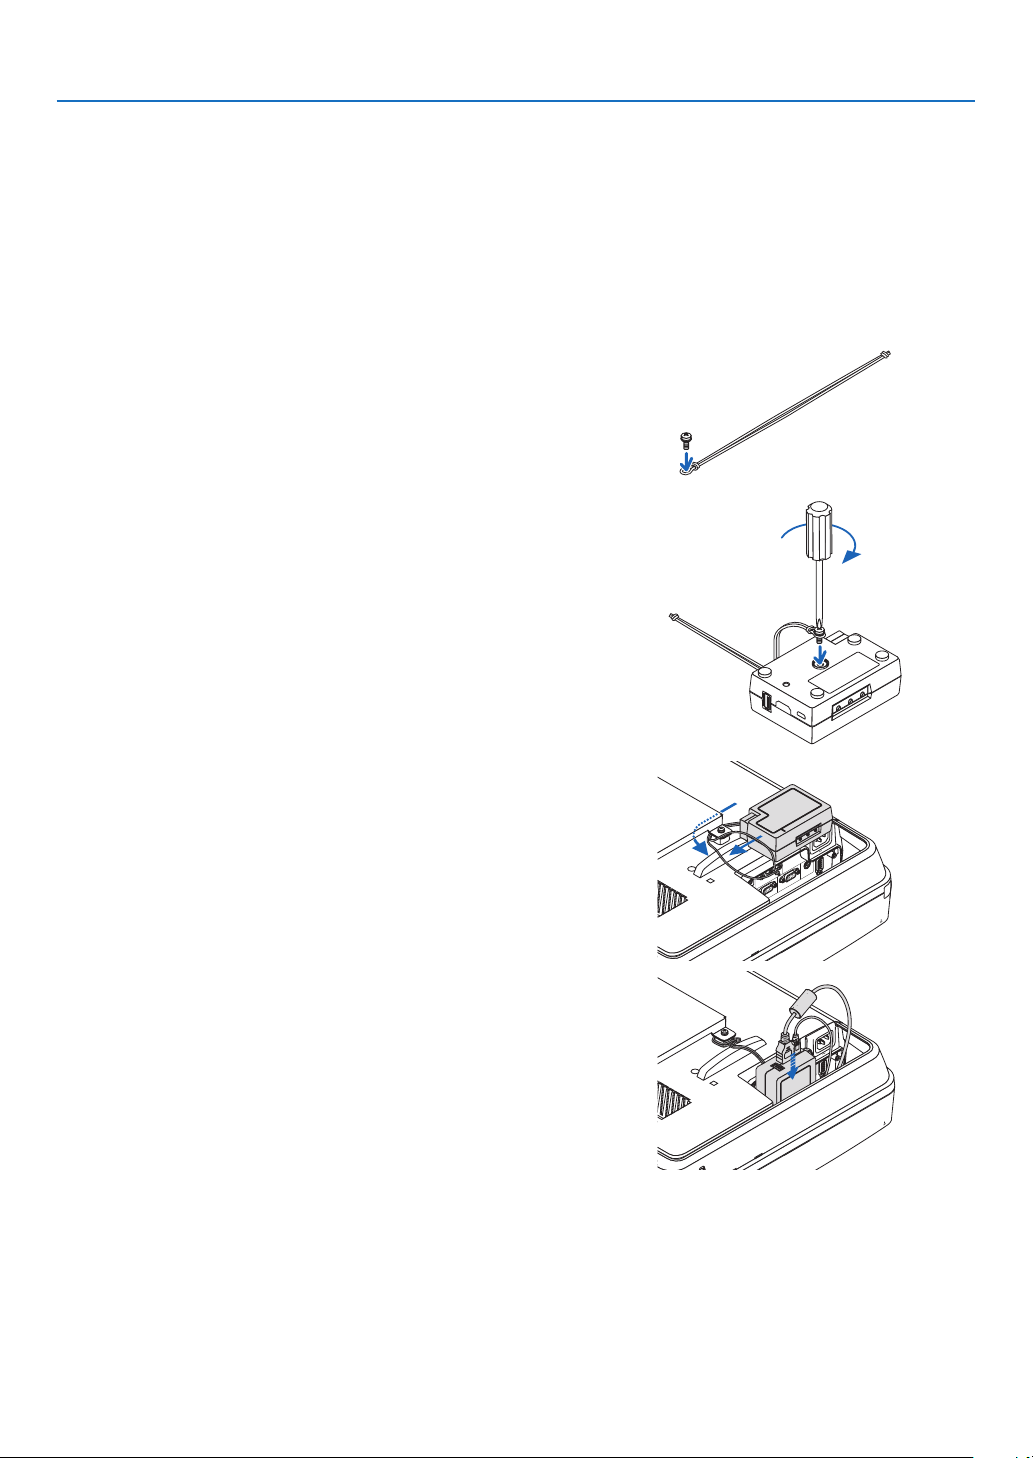
129
9. Appendix
❹ Mounting the wireless receiver (sold separately)
Forusingtheseparatelysoldwirelessreceiverontotheprojectormountedbytheceilingmountunitorthewallmount
unit,tiethewirelessreceiverwiththeprojectorbythesuppliedstrapforthepreventionmeasurefromdroppingdown.
1. ConnecttheHDMIcablesuppliedthewirelessreceivertothe
projector.
• Pleaserefertothewirelessreceiveruser'smanualaboutthe
cable connection.
2. Attaching the cable cover to the projector. (→ page 5)
3. Prepare the screw enclosed with the wireless receiver and the
strap enclosed with the projector.
Put the screw thread into the circle at the strap end.
4. Fasten the screw attached at the strap end to the screw setting
hole at the rear face of the wireless receiver.
5. Take the another end of strap around the projector fixing
screw on the ceiling mount or wall mount unit and then pass
the wireless receiver through the strap circle for hanging it
from the projector.
6. Store the wireless receiver connected with the projector by
the strap at the cable cover inside.
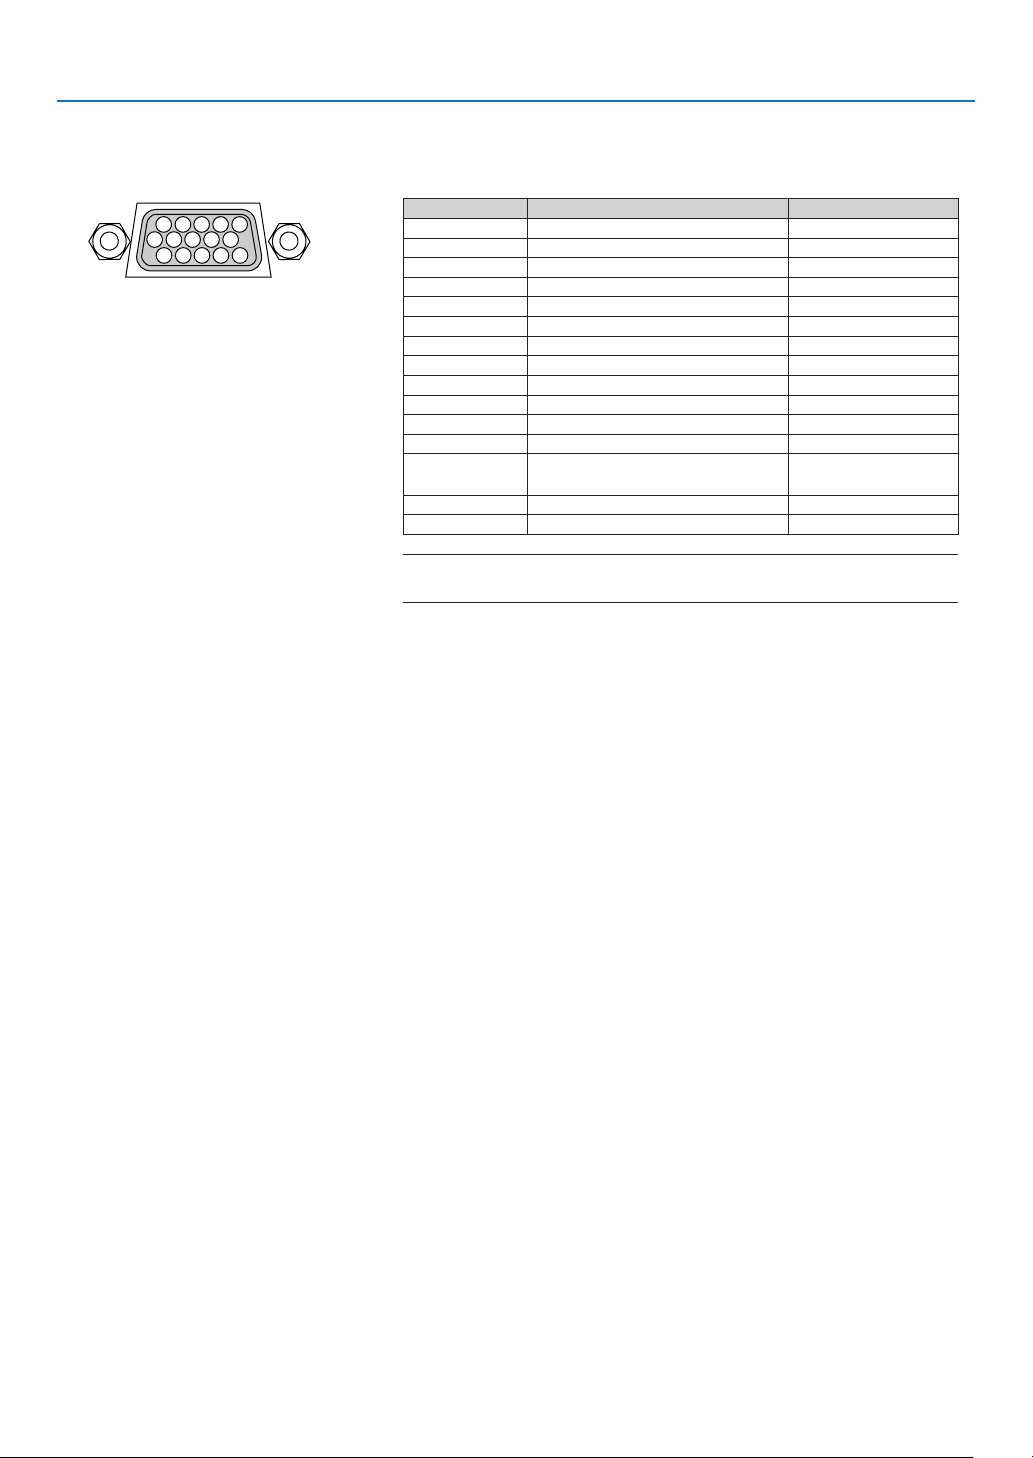
130
9. Appendix
❺ Pin Assignments of D-Sub COMPUTER Input Terminal
Mini D-Sub 15 Pin Terminal
SignalLevel
Videosignal:0.7Vp-p(Analog)
Syncsignal:TTLlevel
51423
10
11 12 13 14 15
6978
Pin No. RGBSignal(Analog) YCbCrSignal
1 Red Cr
2
GreenorSynconGreen Y
3 Blue Cb
4 Ground
5 Ground
6
RedGround CrGround
7 GreenGround YGround
8 BlueGround CbGround
9 Hotplug
10
SyncSignalGround
11 NoConnection
12 Bi-directionalDATA(SDA)
13 HorizontalSyncorComposite
Sync
14
VerticalSync
15 DataClock
COMPUTER IN
NOTE:PinNos.12and15arerequiredforDDC/CI.
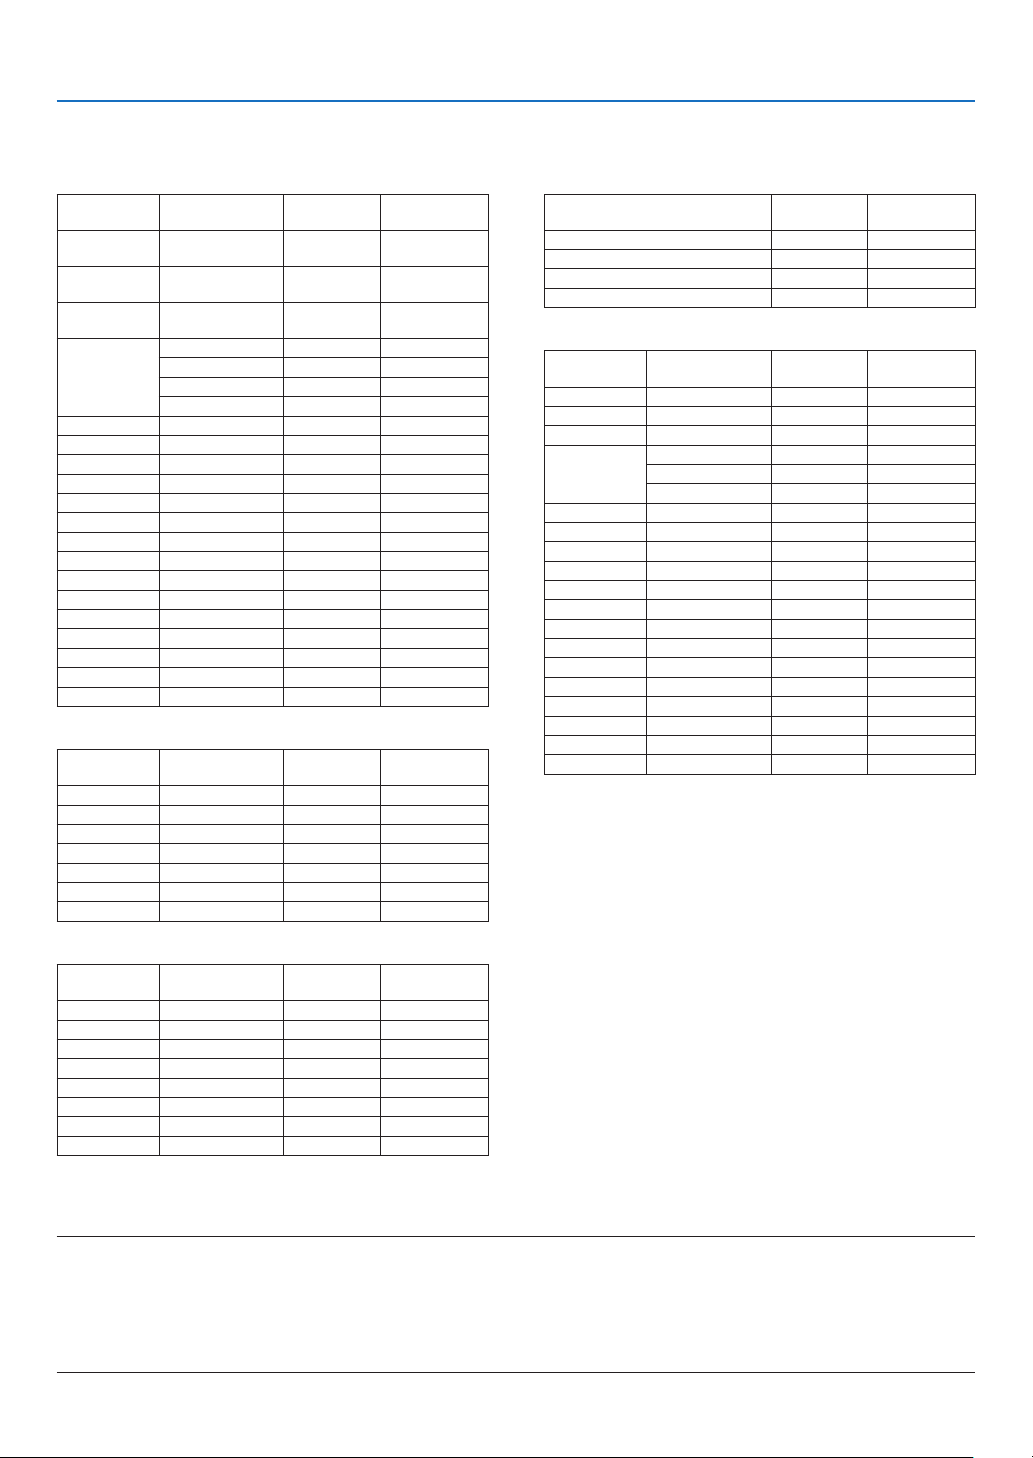
131
9. Appendix
❻ Compatible Input Signal List
AnalogRGB
Signal
Resolution
(dots)
AspectRatio
RefreshRate
(Hz)
VGA 640 × 480 4:3 60/72/75/85/
iMac
SVGA 800 × 600 4:3 56/60/72/75/85/
iMac
XGA 1024 × 768 4:3 60/70/75/85/
iMac
WXGA 1280 × 768 *
1
15:9 60
1280 × 800 *
1
16:10 60
1360 × 768 *
2
16:9 60
1366 × 768 *
2
16:9 60
Quad-VGA 1280 × 960 4:3 60/75
SXGA 1280 × 1024 5:4 60/75
SXGA+ 1400 × 1050 4:3 60
WXGA+ 1440 × 900 16:10 60
WXGA++ 1600 × 900 *
2
16:9 60
UXGA 1600 × 1200 *
3
4:3 60
WSXGA+ 1680 × 1050 16:10 60
HD 1280 × 720 16:9 60
FullHD 1920 × 1080 16:9 60
WUXGA 1920 × 1200 *
4
16:10 60
MAC13" 640 × 480 4:3 67
MAC16" 832 × 624 4:3 75
MAC19" 1024 × 768 4:3 75
MAC21" 1152 × 870 4:3 75
MAC23" 1280 × 1024 5:4 65
Component
Signal Format AspectRatio
RefreshRate
(Hz)
HDTV(1080p) 1920 × 1080 16:9 50/60
HDTV(1080i) 1920 × 1080 16:9 50/60
HDTV(720p) 1280 × 720 16:9 50/60
SDTV(480p) 720 × 480 4:3/16:9 60
SDTV(576p) 720 × 576 4:3/16:9 50
SDTV(480i) 720 × 480 4:3/16:9 60
SDTV(576i) 720 × 576 4:3/16:9 50
MHL
Signal Format AspectRatio
RefreshRate
(Hz)
VGA 640 × 480 4:3 60
HDTV(1080p) 1920 × 1080 16:9 50/60
HDTV(1080i) 1920 × 1080 16:9 50/60
HDTV(720p) 1280 × 720 16:9 50/60
SDTV(480p) 720 × 480 4:3/16:9 60
SDTV(576p) 720 × 576 4:3/16:9 50
SDTV(480i) 720 × 480 4:3/16:9 60
SDTV(576i) 720 × 576 4:3/16:9 50
*1Nativeresolution
*2Theprojectormayfailtodisplaythesesignalscorrectlywhen[AUTO]
isselectedfor[ASPECTRATIO]intheon-screenmenu.
Thefactorydefaultis[AUTO]for[ASPECTRATIO].Todisplaythese
signals,select[16:9]for[ASPECTRATIO].
*3WXGAMODE:OFF
*4WXGAMODE:ON
*5RB(Reducedblankingsignal)iseffectiveupto154MHz.
NOTE:
• Animagewithhigherorlowerresolutionthantheprojector’snativeresolution(1280×800)willbedisplayedwithAdvanced
AccuBlend.
• SynconGreenandCompositesyncsignalsarenotsupported.
• Signalsotherthanthosespeciedinthetableabovemaynotbedisplayedcorrectly.Ifthisshouldhappen,changetherefresh
rateorresolutiononyourPC.RefertoDisplayPropertieshelpsectionofyourPCforprocedures.
CompositeVideo/S-Video
Signal AspectRatio
RefreshRate
(Hz)
NTSC 4:3 60
PAL 4:3 50
PAL60 4:3 60
SECAM 4:3 50
HDMI
Signal
Resolution
(dots)
AspectRatio
RefreshRate
(Hz)
VGA 640 × 480 4:3 60
SVGA 800 × 600 4:3 60
XGA 1024 × 768 4:3 60
WXGA 1280 × 768 *
1
15:9 60
1280 × 800 *
1
16:10 60
1366 × 768 16:9 60
Quad-VGA 1280 × 960 4:3 60
SXGA 1280 × 1024 5:4 60
SXGA+ 1400 × 1050 4:3 60
WXGA+ 1440 × 900 16:10 60
WXGA++ 1600 × 900 16:9 60
WSXGA+ 1680 × 1050 16:10 60
WUXGA 1920 × 1200 16:10 60*
5
HDTV(1080p) 1920 × 1080 16:9 50/60
HDTV(1080i) 1920 × 1080 16:9 50/60
HDTV(720p) 1280 × 720 16:9 50/60
SDTV(480p) 720 × 480 4:3/16:9 60
SDTV(576p) 720 × 576 4:3/16:9 50
SDTV(480i) 720 × 480 4:3/16:9 60
SDTV(576i) 720 × 576 4:3/16:9 50
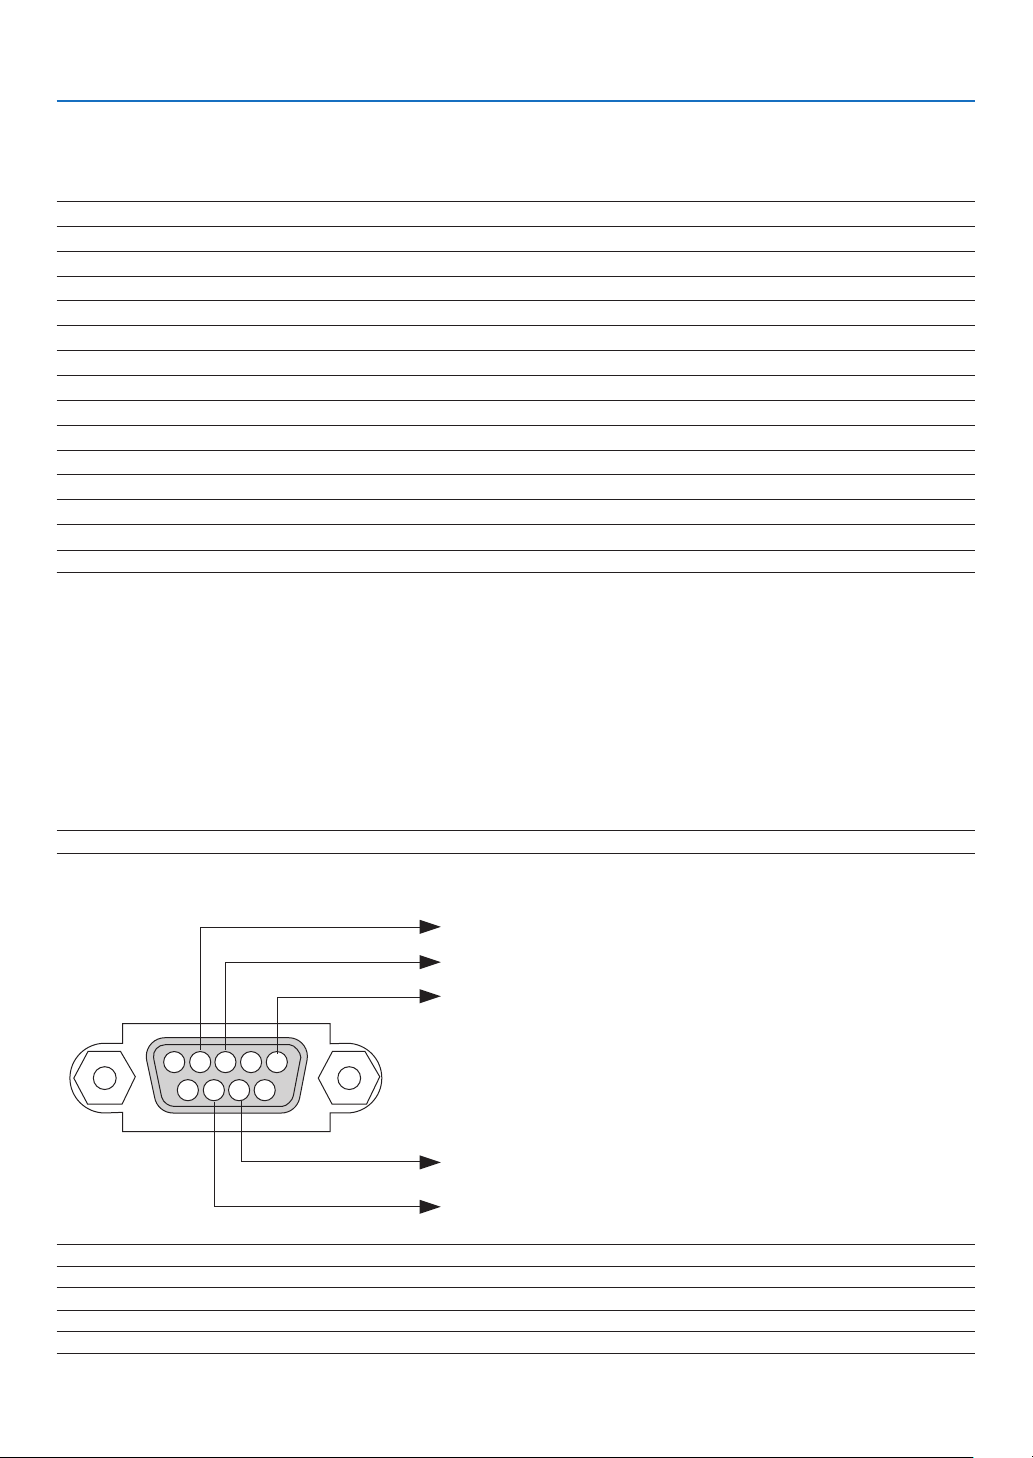
132
9. Appendix
❼ PC Control Codes and Cable Connection
PC Control Codes
Function Code Data
POWER ON 02H 00H 00H 00H 00H 02H
POWER OFF 02H 01H 00H 00H 00H 03H
INPUT SELECT COMPUTER 02H 03H 00H 00H 02H 01H 01H 09H
INPUT SELECT HDMI1/MHL 02H 03H 00H 00H 02H 01H 1AH 22H
INPUT SELECT HDMI2 02H 03H 00H 00H 02H 01H 1BH 23H
INPUT SELECT VIDEO 02H 03H 00H 00H 02H 01H 06H 0EH
INPUT SELECT APPS 02H 03H 00H 00H 02H 01H 20H 28H
INPUT SELECT USB-B 02H 03H 00H 00H 02H 01H 22H 2AH
PICTURE MUTE ON 02H 10H 00H 00H 00H 12H
PICTURE MUTE OFF 02H 11H 00H 00H 00H 13H
SOUND MUTE ON 02H 12H 00H 00H 00H 14H
SOUND MUTE OFF 02H 13H 00H 00H 00H 15H
NOTE:ContactyourlocaldealerforafulllistofthePCControlCodesifneeded.
Cable Connection
CommunicationProtocol
Baud rate �����������������������������������������38400 bps
Data length
��������������������������������������8 bits
Parity
�����������������������������������������������No parity
Stop bit
��������������������������������������������One bit
X on/off
��������������������������������������������None
Communications procedure
�������������Full duplex
NOTE:Dependingontheequipment,alowerbaudratemayberecommendedforlongcableruns.
PC Control Terminal (D-SUB 9P)
15243
67 98
To GND of PC
To RxD of PC
To TxD of PC
To RTS of PC
To CTS of PC
NOTE1:Pins1,4,6and9arenoused.
NOTE2:Jumper“RequesttoSend”and“CleartoSend”togetheronbothendsofthecabletosimplifycableconnection.
NOTE3:Forlongcablerunsitisrecommendedtosetcommunicationspeedwithinprojectormenusto9600bps.
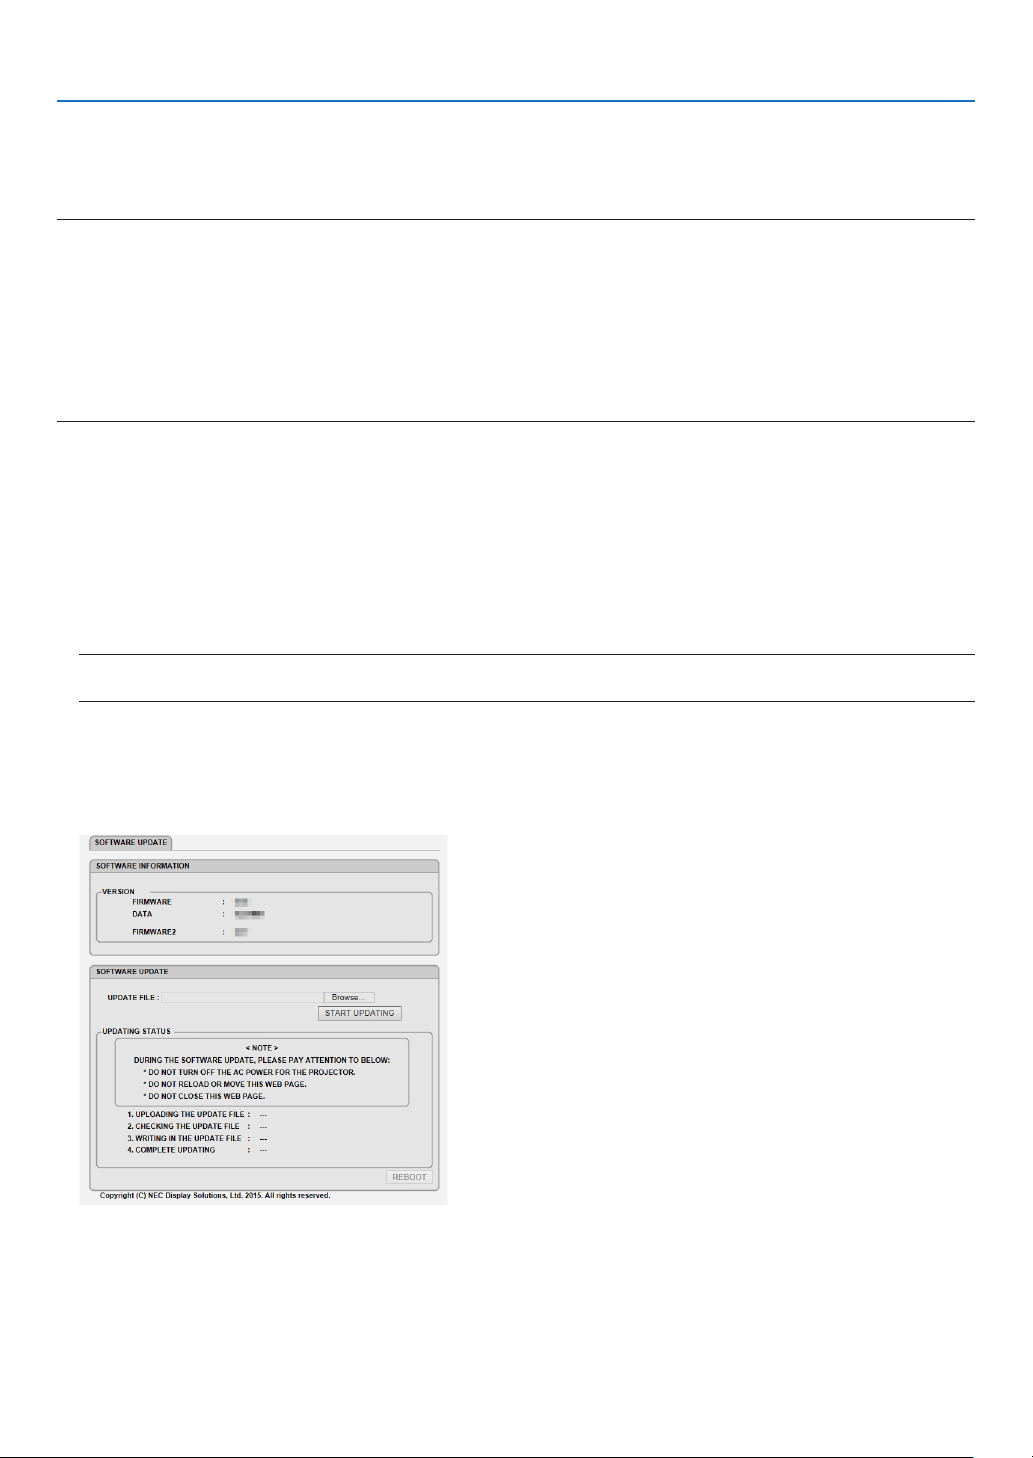
133
9. Appendix
❽ Update the Software
Usingthewebbrowseronacomputer,downloadtheupdatedsoftwarefortheprojectorfromourwebsiteandinstall
itontheprojectorbythewiredLANconnection.
NOTE:
• TheexclusivewebbrowserenablestoupdatethesoftwareisInternetExplorer11.
• Beforeperformingthesoftwareupdate,makesuretoconnectyourcomputerwiththeprojectorbytheLANcable.Itdoesnot
supportthewirelessLANconnection.
• Makesuretoset[NETWORKSTANDBY]asthestandbymodeoftheprojector.Factorydefaultsettingforthestandbymodeis
[NORMAL](→page67)
• Thesoftwareupdateisenabledonlywhentheprojectorisinstandbycondition.Whileperformingthesoftwareupdate,donot
powerontheprojector.Atthesametime,donotshutdowntheACpower.
• Neverupdatethebrowserpageduringthesoftwareupdate.Itdisablesthecomputerfordisplayingthewebpagecorrectly.
1. Access to the software download support page in our web site.
URL: http://www.nec-display.com/dl/en/pj_soft/lineup.html
2. Checkifthesoftwareinstalledontheprojectorinuseisupdated.
• Youcancheckthesoftwareversionfromeither[VERSION(1)]or[VERSION(2)]intheonscreenmenu[INFOR-
MATION].
3. If newer software version than one on the projector in use is uploaded on our website, download and save
it in an appropriate folder on your computer.
4. Turn off the power of the projector and set it in the standby condition.
Important:
• SoftwareupdatecannotbeperformedwhenthestandbymodeissetatNORMAL.
5. ConnecttheprojectorwithyourcomputerbytheLANcable.
6. Start up the web browser on your computer and then input the following web address:
URL(forthesoftwareupdate):http://<ProjectorIPaddress>/update.html
The software update screen will be displayed on.
7. Click[Browse….]atthecenterofthescreenandselectthesoftwareyousavedintheprocedure3.
• CheckthelenameindicatedontheUPDATEFILElist.
8. Click[STARTUPDATING]atthecenterofthescreen.
The screen display will change and your computer starts to update the software.

134
9. Appendix
NOTE:
• Duringthesoftwareupdate,payattentiontothefollows:
- DonotturnofftheACPowerfortheprojector.
- Donotreloadormovethewebpage.
- Donotclosethewebpage.
• Whensoftwareupdateiscompletedproperly,thebelowwillbedisplayedon:
1. UPLOADINGTHEUPDATEFILE:COMPLETED
2. CHECKINGTHEUPDATEFILE:COMPLETED
3. WRITINGINTHEUPDATEFILE:COMPLETED
4. COMPLETEUPDATING:PLEASEREBOOT.
9. Click[REBOOT]attherightbottomofthescreen.
The software update is completed and the projector will go into the standby mode.
NOTE:
• Ifanerroroccursduringthesoftwareupdate,anerrorcodeinbelowwillbedisplayedinthe“UPDATINGSTATUS”column.
2001:Failedtouploadthele.
2007:Theuploadedleistoolarge.
2011:Theuploadedleisbroken.
2012:Theuploadedleisbroken.
Theerrorcodesotherthanabovemaybedisplayed.
Ifanerrorisfoundduringthesoftwareupdate,turnontheprojectorandupdatetheleagain.
Whenthesoftwareupdateisnotcompletedproperlyevenifyoutriedtoupdateseveraltimes,pleaseconsultyourdealer.

135
9. Appendix
❾ Troubleshooting Check List
Beforecontactingyourdealerorservicepersonnel,checkthefollowinglisttobesurerepairsareneededalsoby
referringtothe“Troubleshooting”sectioninyouruser’smanual.Thischecklistbelowwillhelpussolveyourproblem
moreefciently.
* Printthispageandthenextpageforyourcheck.
Frequency of occurrence □ always □sometimes(Howoften?_____________________) □other(__________________)
Power
□
No power (POWER indicator does not light blue)� See also “Status
Indicator (STATUS)”�
□
Power cord’s plug is fully inserted into the wall outlet�
□
Main power switch is pressed to the ON position�
□
Lamp cover is installed correctly �
□
Lamp Hours Used (lamp operation hours) was cleared after
lamp replacement�
□
No power even though you press and hold the POWER button�
□
Shut down during operation�
□
Power cord’s plug is fully inserted into the wall outlet�
□
Lamp cover is installed correctly �
□
[AUTO POWER OFF] is turned off (only models with the [AUTO
POWER OFF] function)�
□
[OFF TIMER] is turned off (only models with the [OFF TIMER]
function)�
Video and Audio
□
No image is displayed from your PC or video equipment to the
projector�
□
Still no image even though you connect the projector to the PC
first, then start the PC�
□
Enabling your notebook PC’s signal output to the projector�
• Acombinationoffunctionkeyswillenable/disabletheexter-
naldisplay.Usually,thecombinationofthe“Fn”keyalong
withoneofthe12functionkeysturnstheexternaldisplay
onoroff.
□
No image (blue or black background, no display)�
□
Still no image even though you press the AUTO ADJUST button�
□
Still no image even though you carry out [RESET] in the
projector’s menu�
□
Signal cable’s plug is fully inserted into the input terminal
□
A message appears on the screen�
(_____________________________________________)
□
The source connected to the projector is active and available�
□
Still no image even though you adjust the brightness and/or
the contrast�
□
Input source’s resolution and frequency are supported by the
projector�
□
Image is too dark�
□
Remains unchanged even though you adjust the brightness
and/or the contrast�
□
Image is distorted�
□
Image appears to be trapezoidal (unchanged even though you
carry out the [KEYSTONE] adjustment)�
□
Parts of the image are lost�
□
Still unchanged even though you press the AUTO ADJUST
button�
□
Still unchanged even though you carry out [RESET] in the
projector’s menu�
□
Image is shifted in the vertical or horizontal direction�
□
Horizontal and vertical positions are correctly adjusted on a
computer signal�
□
Input source’s resolution and frequency are supported by the
projector�
□
Some pixels are lost�
□
Image is flickering�
□
Still unchanged even though you press the AUTO ADJUST
button�
□
Still unchanged even though you carry out [RESET] in the
projector’s menu�
□
Image shows flickering or color drift on a computer signal�
□
Still unchanged even though you change [FAN MODE] from
[HIGH ALTITUDE] to [AUTO]�
□
Image appears blurry or out of focus�
□
Still unchanged even though you checked the signal’s resolution
on PC and changed it to projector’s native resolution�
□
Still unchanged even though you adjusted the focus�
□
No sound�
□
Audio cable is correctly connected to the audio input of the
projector�
□
Still unchanged even though you adjusted the volume level�
□
AUDIO OUT is connected to your audio equipment (only models
with the AUDIO OUT terminal)�
Other
□
Remote control does not work�
□
No obstacles between the sensor of the projector and the
remote control�
□
Projector is placed near a fluorescent light that can disturb the
infrared remote controls�
□
Batteries are new and are not reversed in installation�
□
Buttons on the projector cabinet do not work (only models with the
[CONTROL PANEL LOCK] function)
□
[CONTROL PANEL LOCK] is not turned on or is disabled in
the menu�
□
Still unchanged even though you press and hold the EXIT button
for a minimum of 10 seconds�
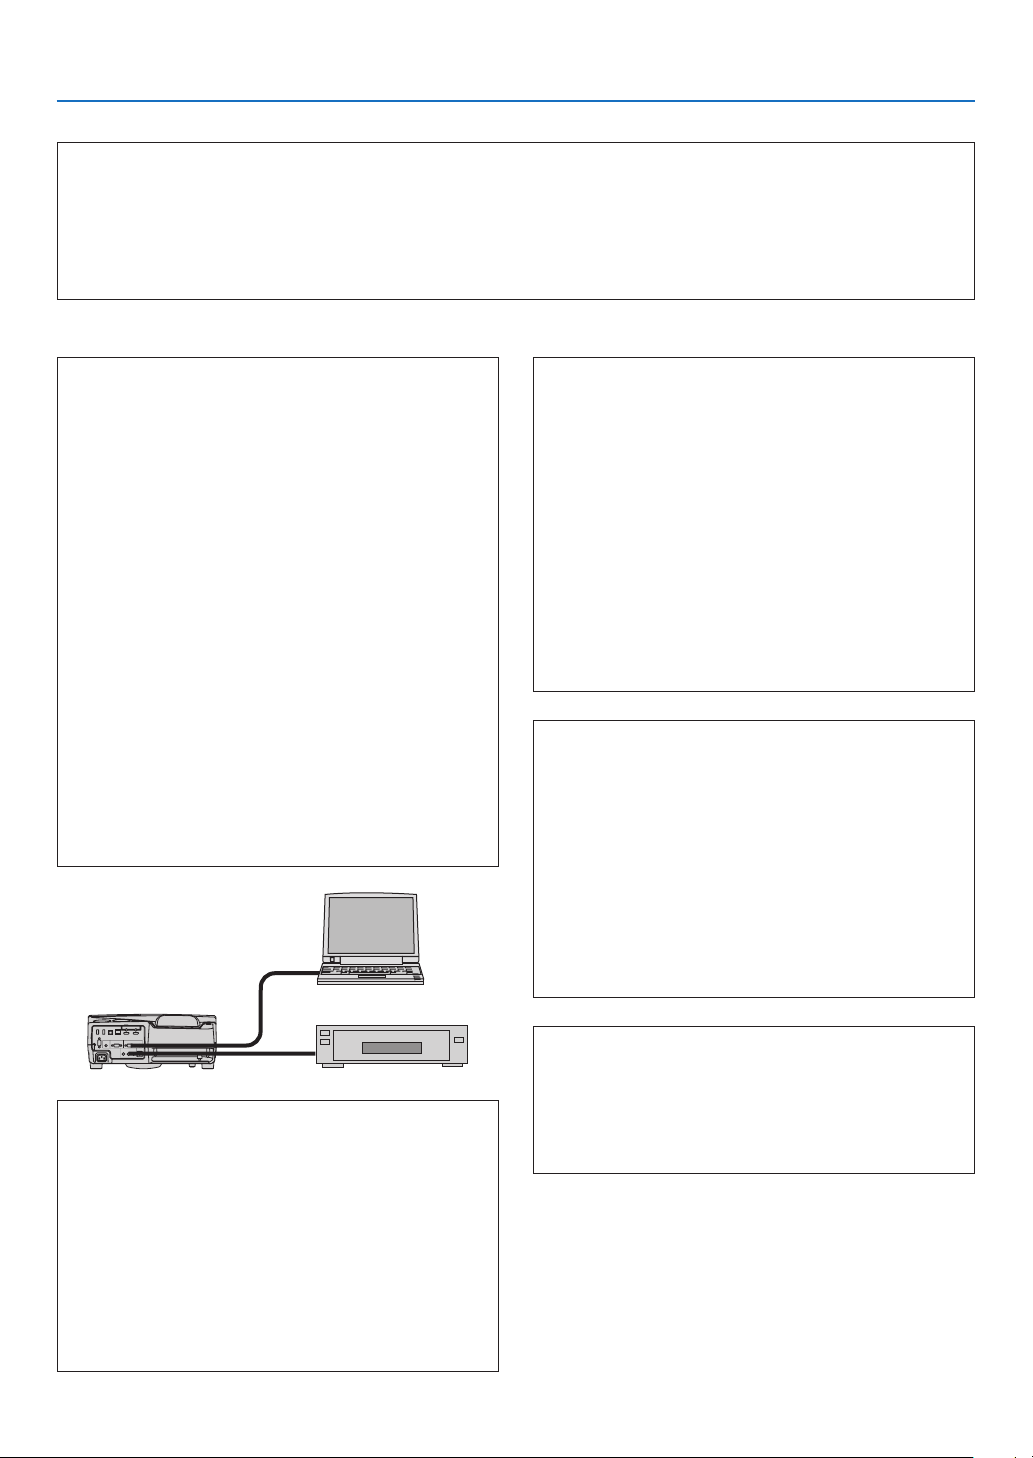
136
9. Appendix
In the space below please describe your problem in detail.
Information on application and environment where your projector is used
Installationenvironment
Screen size: inch
Screen type: □ White matte □ Beads □ Polarization
□
Wide angle □ High contrast
Throw distance: feet/inch/m
Orientation: □ Ceiling mount □ Desktop
Power outlet connection:
□
Connected directly to wall outlet
□ Connected to power cord extender or other (the
numberofconnectedequipment______________)
□ Connected to a power cord reel or other (the number
ofconnectedequipment______________)
Computer
Manufacturer:
Model number:
Notebook PC □ / Desktop □
Native resolution:
Refresh rate:
Video adapter:
Other:
Videoequipment
VCR, DVD player, Video camera, Video game or other
Manufacturer:
Model number:
Signalcable
NECstandardorothermanufacturer’scable?
Model number: Length: inch/m
Distribution amplifier
Model number:
Switcher
Model number:
Adapter
Model number:
Projector
PC
DVD player
Projector
Model number:
Serial No�:
Date of purchase:
Lamp operating time (hours):
Eco Mode: □ OFF □ AUTO ECO
□ NORMAL □ ECO
Information on input signal:
Horizontal synch frequency [ ] kHz
Vertical synch frequency [ ] Hz
Synch polarity H □ (+) □ (−)
V □ (+) □ (−)
Synch type □ Separate □ Composite
□ Sync on Green
STATUS Indicator:
Steady light □ Orange □ Green
Flashing light [ ] cycles
Remote control model number:

137
9. Appendix
❿ TCO Certification
SomemodelsinthisproductfamilyareTCOcertied.AllTCOcertiedmodelshavetheTCOmarkonthemarking
plate(onthebottomoftheproduct).ToseealistofourTCOcertiedprojectorsandtheirTCOCertication(inEnglish
only),visitourwebsiteathttp://www.nec-display.com/ap/en_projector/tco/index.html
TheTCOcertication,designedbyTCODevelopment,isaninternationalenvironmentalandergonomicsstandard
forITequipment.
InsomecaseswemaypostalistofTCOcertiedmodelsonourwebsitebeforetheTCOmarkisplacedontheproduct.
Thisdifferenceintimingisrelatedtothedatecerticationisreceivedcomparedwiththeprojectorsmanufacturingdate.

138
9. Appendix
⓫ REGISTER YOUR PROJECTOR! (for residents in the United
States, Canada, and Mexico)
Pleasetaketimetoregisteryournewprojector.ThiswillactivateyourlimitedpartsandlaborwarrantyandInstaCare
serviceprogram.
Visitourwebsiteatwww.necdisplay.com,clickonsupportcenter/registerproductandsubmityourcompletedformonline.
Uponreceipt,wewillsendaconrmationletterwithallthedetailsyouwillneedtotakeadvantageoffast,reliable
warrantyandserviceprogramsfromtheindustryleader,NECDisplaySolutionsofAmerica,Inc.

©NECDisplaySolutions,Ltd.2015 7N952151