Use & Care Guide
Manual de Uso y Cuidado
Kenmore
116o1@7@1
Vacuum Cleaner Help Line:
1-877-531-7321
8:00am-5:00pm EST, M-F
Sears Brands Management Corporation
Hoffman Estates, JL60179 USA
www.kenmore.com
www.sears.com
www.kmart.com
Before Using Your New Vacuum Cleaner ........................................ 2
Vacuum Cleaner Help Line ................................................. 3
Kenmore Vacuum Cleaner Warranty ........................................... 3
Important Safety Instructions.................................................. 4
Parts and Features .......................................................... 5
Assembly Instructions...................................................... 6-7
Operating Instructions ....................................................... 8
Canister Care ............................................................. 12
Troubleshooting ........................................................... 17
RequestingAssistanceor Service ...................................... Back Cover
Please read this guide. It will help you assemble and operate your new I<enmore vacuum
cleaner in the safest and most effective way.
For more information about vacuum cleaner care and operation, call your nearest Sears
store. You will need the complete model and serial numberswhen requesting information.
Yourvacuum cleaner's model and serial numbersare located on the Model and Serial
Number Plate.
Use the space below to record the model number and serial number of your new I<enmore
vacuum cleaner.
Model No.
Serial No.
Date of Purchase
Keep this book and your sales check (receipt) in a safe place for future reference.
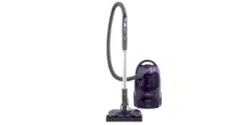
PACKING LIST
Your I<ENMORE VACUUM CLEANER is packaged with the following parts and
components assembled separately in the carton:
1 Canister Vacuum Cleaner 1 Floor Brush
1 Hose & Handle Assembly 1 Combination Tool
1 Telescoping Wand 1 Use & Care Guide
1 Turbine Unit 1 Repair Parts List
Each of the above assemblies are shown in detail inside the Repair Parts List.
-2-
KENMORE LIMITED WARRANTY
FOR ONE YEAR from the date of sale this appliance iswarranted against defects in
material or workmanship when it iscorrectly installed, operated and maintained
according to all supplied instructions.
WITH PROOF OF SALE, a defective appliance will be replaced free of charge.
For warranty coverage details to obtain free repair or replacement, visit the web page:
www.kenmore.com/warranty.
This warranty does not cover filters, belts, bags, or bulbs, which are expendable parts
that can wear out from normal use within the warranty period.
This warranty isvoid if this product isever used for other than private household
purposes.
This warranty gives you specific legal rights, and you may also have other rights which
vary from state to state.
Sears Brands Management Corporation, Hoffman Estates, IL 60179
-3-
Read all instructionsin thisguide before assembling or usingyour vacuum cleaner.
,WARNING:
Your safety is important to us. To reduce the risk of fire, electrical shock, injury to
persons or damage when using your vacuum cleaner, follow basic safety
precautions including the following:
Use your vacuum cleaner only as described
in this guide. Use only with Sears
recommended attachments.
Do not leave vacuum cleaner when plugged
in. Unplug from outlet when not in useand
before performing servicing.
Toreduce the risk of electrical shock - Do
not useoutdoors or on wet surfaces.
Do not allow to be usedas a toy. Close
attention is necessary when used by or near
children.
Do not usewith a damaged cord or plug.
If vacuum cleaner isnot working as it
should, has been dropped, damaged, left
outdoors, or dropped in water, return it to a
Sears Service Center.
Do not pull or carry by cord, usecord as a
handle, close a door on cord, or pull cord
around sharp edges or corners. Do not run
vacuum cleaner over cord. Keep cord
away from heated surfaces.
Do not unplug by pulling on cord. To
unplug, grasp the plug, not the cord.
Do not handle plug or vacuum cleaner with
wet hands.
Do not put any objects into openings.
Do not use with any opening blocked; keep
free of dust, lint, hair, and anything that
may reduce air flow.
Keep hair, loose clothing, fingers, and all
parts of body away from openings and
moving parts.
Turn off all controls before unplugging.
Use extra care when cleaning on stairs.
Do not put on chairs, tables, etc. Keep on
floor.
Do not use vacuum cleaner to pick up
flammable or combustible liquids (gasoline,
cleaning fluid, perfumes, etc.), or use in
areas where they may be present. The
fumes from these substances can create a
fire hazard or explosion.
Do not pick up anything that is burning or
smoking, such as cigarettes, matches, or hot
ashes.
Do not usevacuum cleaner without dust bin
and/or filters in place.
Always empty the dust bin after vacuuming
carpet cleaners or freshener,powders, and
fine dust. Theseproducts clog the filters,
reduce airflow and can cause damage to
the vacuumcleaner. Failure to do so could
cause permanent damage to the vacuum
cleaner.
Do not usethe vacuum cleaner to pick up
sharp hard objects, small toys, pins, paper
clips, etc. They may damage the vacuum
cleaner.
Do not operature the vacuum cleaner
without the exhaust filter and filter door in
place.
Hold plugwhen rewinding onto cord reel.
Do not allow plug to whip when rewinding.
You are responsible for making sure that
your vacuum cleaner is not usedby anyone
unable to operate it properly.
SAVE THESEINSTRUCTIONS
Properassembly and safe useofyour vacuumcleaner are your responsibilities.Yourvacuum
cleaner is intended for Householduse. Read this Use& Care Guide carefully for important
use and safety intormation. This guide contains satety statements under warning and
caution symbols.
-4-
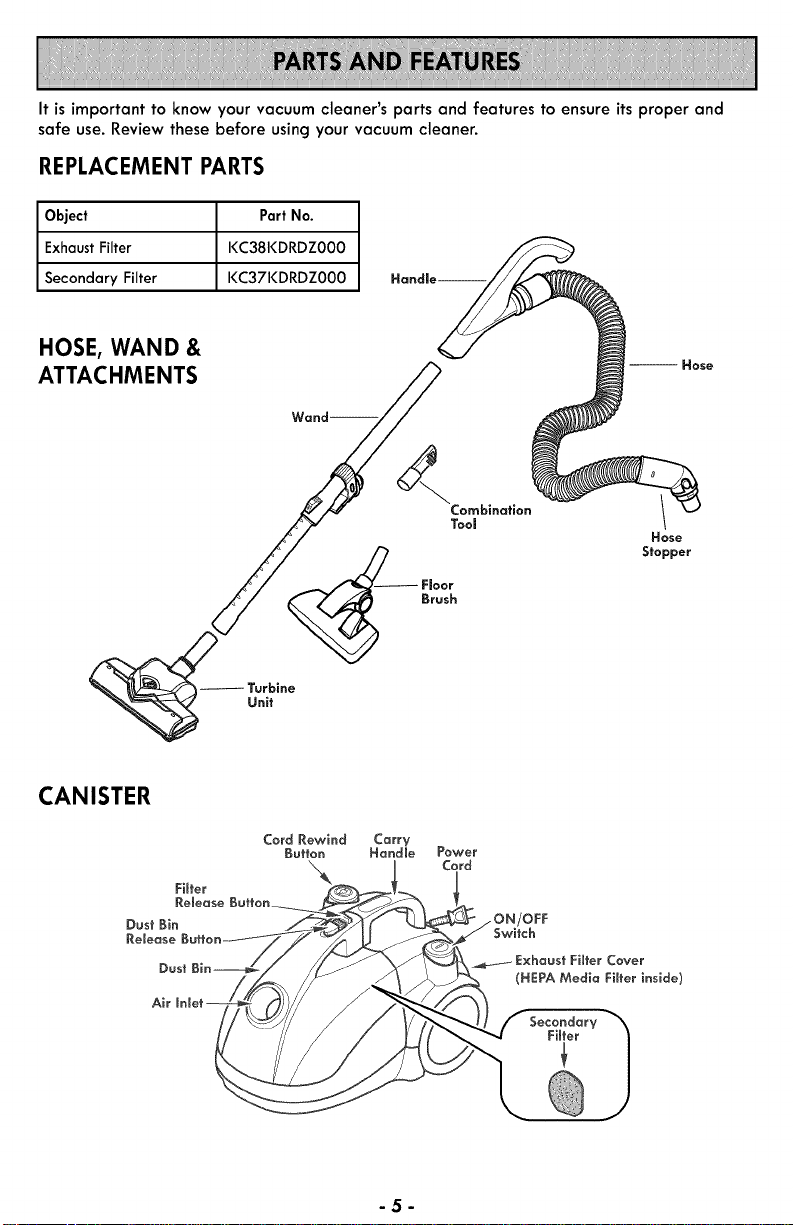
It is important to know your vacuum cleaneds parts and features to ensure its proper and
safe use. Review these before using your vacuum cleaner.
REPLACEMENT PARTS
Object Part No.
Exhaust Filter I<C381<DRDZ000
Secondary Filter I<C371<DRDZ000
HOSE, WAND &
ATTACHMENTS
-- Hose
Combination
Tool
_ Floor
Brush
CANISTER
Cord Rewind
Button
Carry
Handle
Power
Cord
-5-
Please pay special attention to these hazard alert boxes, and follow any instruc-
,_ tions given. WARNING statements alert you to such dangers as fire, electric
shock, burns and personal injury. CAUTION statements alert you to such dan-
gers as personal injury and/or property damage.
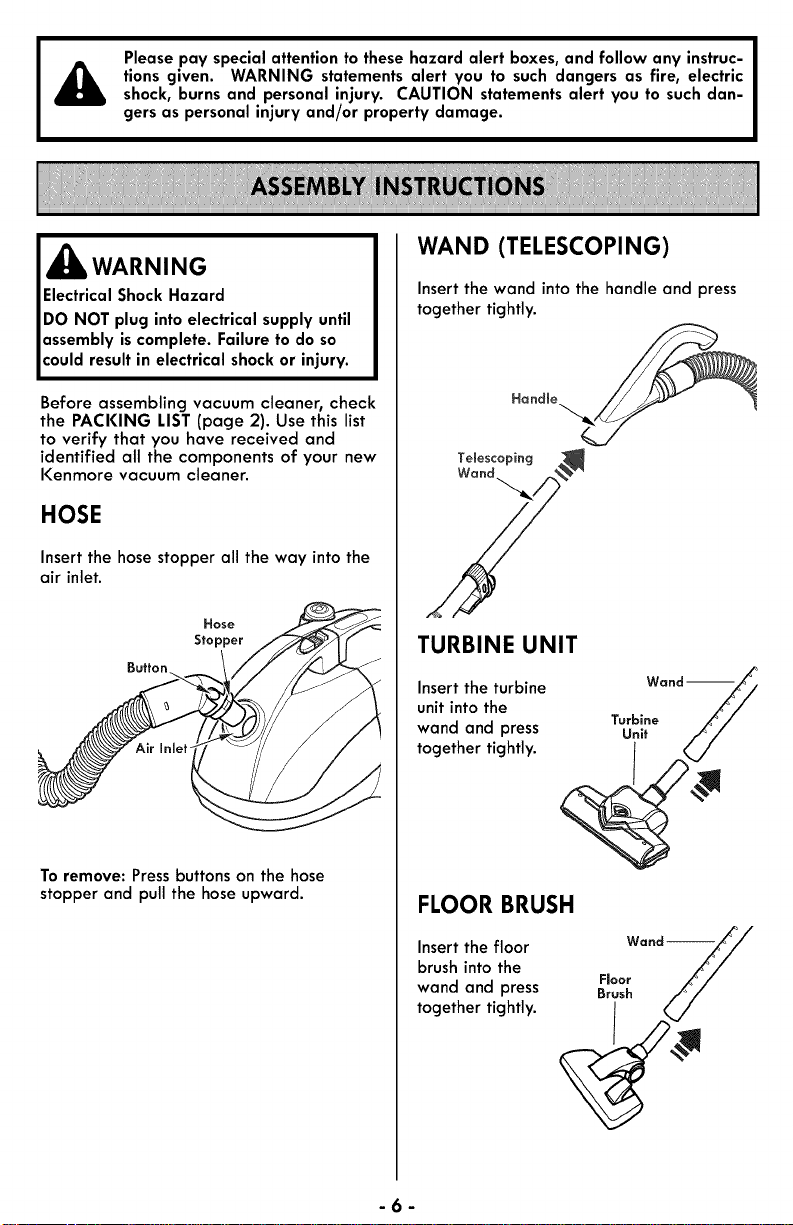
J,_ WARNING
ElectricalShock Hazard
DO NOT plug intoelectrical supply until
assembly iscomplete. Failure to do so
could result in electrical shockor injury.
Before assembling vacuum cleaner, check
the PACKING LIST (page 2). Use this list
to verify that you have received and
identified all the components of your new
I<enmore vacuum cleaner.
HOSE
Insert the hose stopper all the way into the
air inlet.
Hose
Stopper
To remove: Press buttons on the hose
stopper and pull the hose upward.
WAND (TELESCOPING)
Insertthe wand into the handle and press
together tightly.
Hond_e _
Telescoping
TURBINE UNIT
Insert the turbine
unit into the
wand and press
together tightly.
Wond --
Turbine
Unit
FLOOR BRUSH
Insertthe floor
brush into the
wand and press
together tightly.
-6-
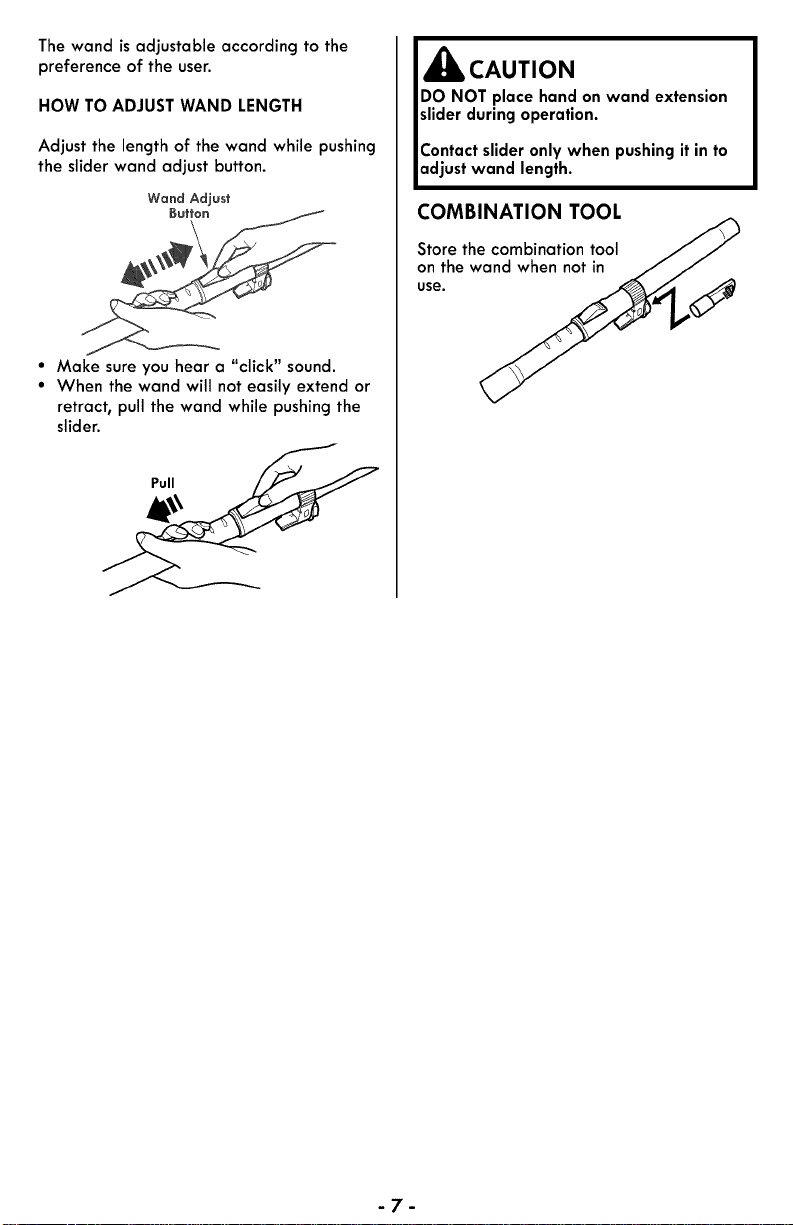
The wand is adjustable according to the
preference of the user.
HOW TO ADJUST WAND LENGTH
Adjust the length of the wand while pushing
the slider wand adjust button.
Wand Adjust
Button
• Make sure you hear a "click" sound.
• When the wand will not easily extend or
retract, pull the wand while pushing the
slider.
Pull
_, CAUTION
DO NOT place hand on wand extension
slider during operation.
Contactslider only when pushingit in to
adjust wand length.
COMBINATION TOOL
Store the combination tool
on the wand when not in
use.
-7-

HOW TO START
J_IWARNING
Personal Injury and Product Damage
Hazard
DO NOT plug in if switch is in ON
position. Personalinjury or property
damage could result.
The cord moves rapidly when
rewinding. Keep children away
and provide a clear path when
rewinding the cord to prevent
personal injury.
DO NOT useoutlets above counters.
Damage from cord to itemsin
surroundingarea could occur.
When any abnormality/failure occurs,
stop usingthe product immediately and
disconnectthe power plug.
1. Pullcord out of canister to desired
length.
Cord
Rewind
Button
NOTE: To reduce the risk of electric shock,
this vacuum cleaner has a polarized plug;
one blade is wider than the other. This plug
will fit in a polarized outlet only one way. If
the plug does not fit fully in the outlet,
reverse the plug. If it still does not fit,
contact a qualified electrician to install the
proper outlet. Do not change the plug in
any way.
2. Plugthe polarized power cord intoa 120
Volt outlet located near the floor.
3. Start or stop
vacuum cleaner by
pushing on the
switch.
Torewind: Turn off and unplugthe vacuum
cleaner. Hold the plug while rewinding to
prevent damage or injury from the moving
cord. Pushcord rewind button.
-8-
VACUUMING TIPS
J_IWARNING
Personal Injury and Product Damage
Hazard
• DO NOT pull plug from wall by
the power cord. If there isdamage to
the cordor plug, personal injury or
property damage could result.
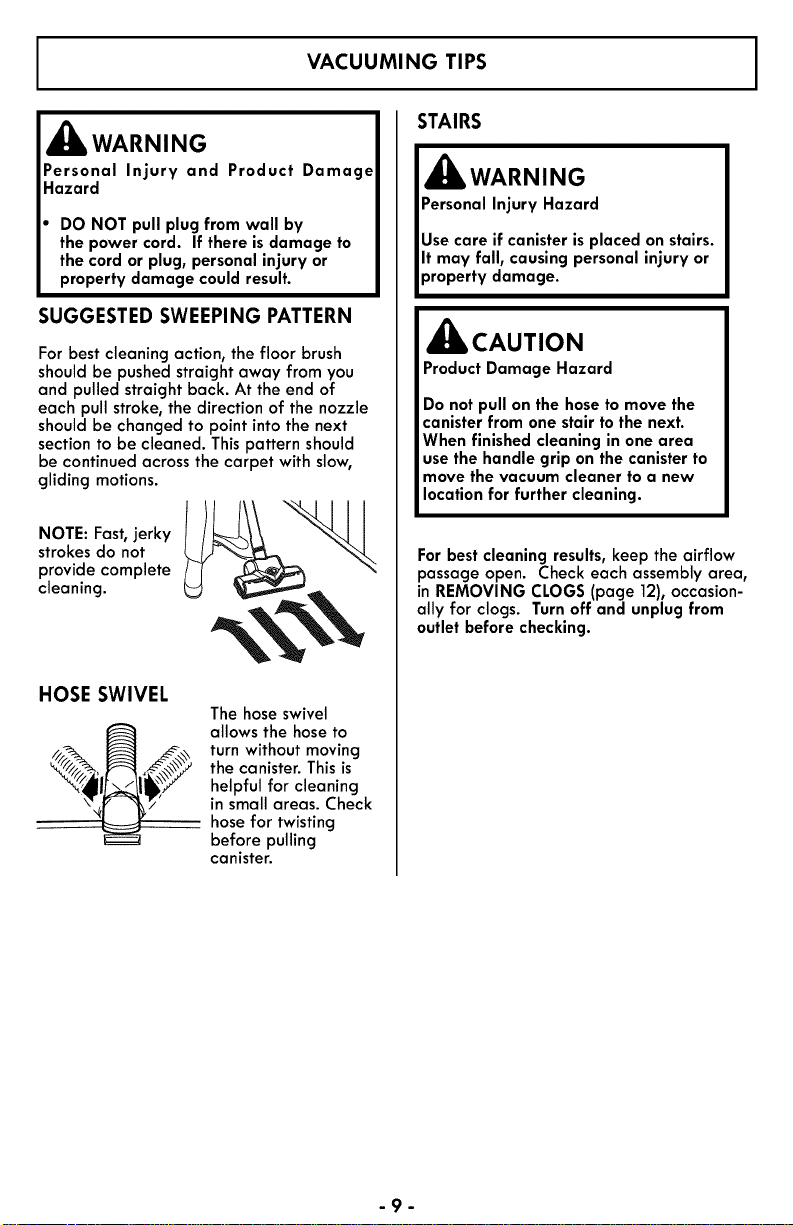
SUGGESTED SWEEPING PATTERN
For best cleaning action, the floor brush
shouldbe pushed straight away from you
and pulled straight back. At the end of
each pull stroke, the direction of the nozzle
should be changed to point into the next
section to be cleaned. This pattern should
be continued across the carpet with slow,
gliding motions.
NOTE: Fast,jerky
strokesdo not
provide complete
cleaning.
HOSE SWIVEL
The hoseswivel
_ _ _\_ allows the hoseto
turn without moving
the canister. Thisis
_<,//,/_I_115/;,/ helpful for cleaning
in small areas. Check
hose for twisting
before pulling
canister.
STAIRS
,_WARNING
Personal Injury Hazard
Usecare if canister isplaced on stairs.
It may fall, causing personal injury or
property damage.
_ICAUTION
Product Damage Hazard
Do not pull on the hose to move the
canister from one stair to the next.
When finished cleaning in one area
usethe handle grip on the canister to
move the vacuum cleaner to a new
locationfor further cleaning.
For bestcleaning results, keep the airflow
passage open. Checkeach assembly area,
in REMOVING CLOGS (page 12), occasion-
ally for clogs. Turn off and unplug from
outlet before checking.
-9-
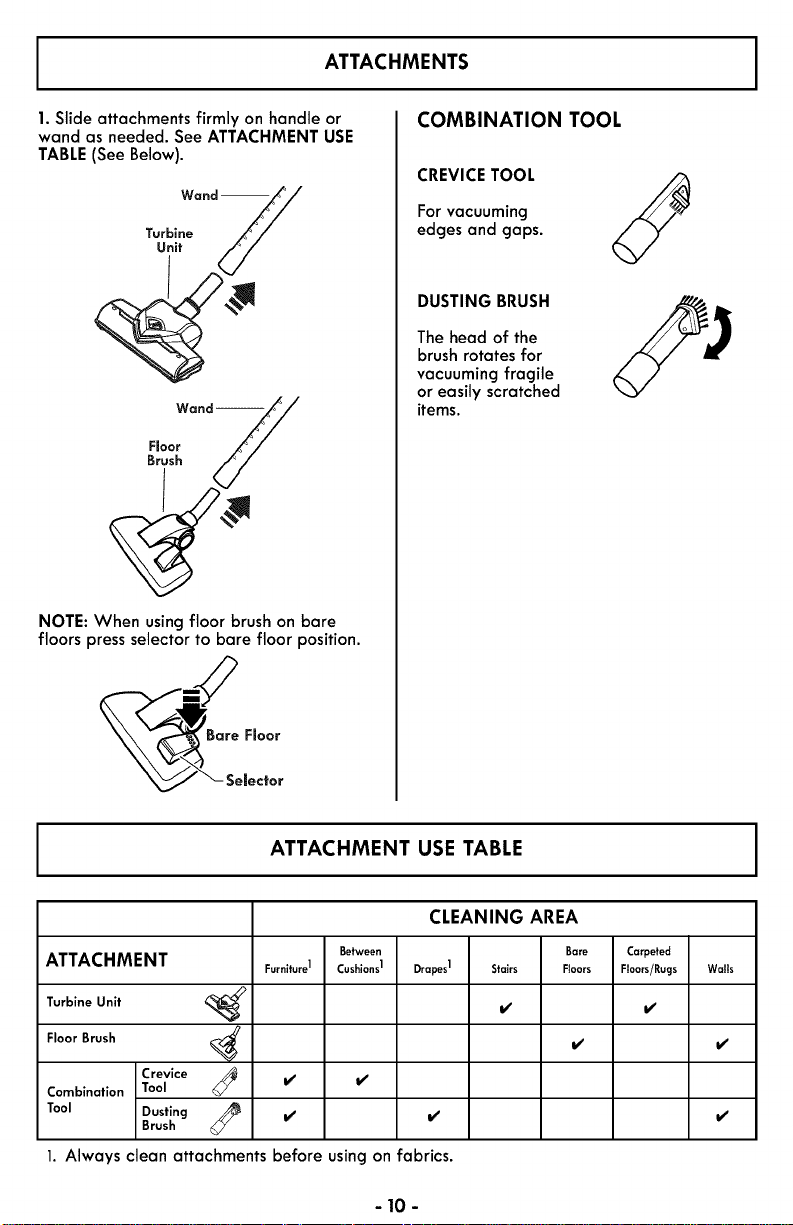
ATTACHMENTS
1.Slide attachments firmly on handle or
wand as needed. See ATTACHMENT USE
TABLE(See Below).
Turbine
Unit
oo OOd/7
Brush
NOTE: When using floor brush on bare
floors press selector to bare floor position.
COMBINATION TOOL
CREVICETOOL
For vacuuming
edges and gaps.
DUSTING BRUSH
The head of the
brush rotates for
vacuuming fragile
or easily scratched
items.
ATTACHMENT USE TABLE
CLEANING AREA
Between Bare Carpeted
ATTACHMENT Furniture1 Cushions1 Drapes1 Stairs FI.... Floors/Rugs Walls
TurbineUnit
FloorBrush _ I/ I/
Crevice _ I/ I/
Combination Tool
Tool Dusting _ I/ I/ I/
Brush
1. Always clean attachments before using on fabrics.
- 10 -
PERFORMANCE FEATURES
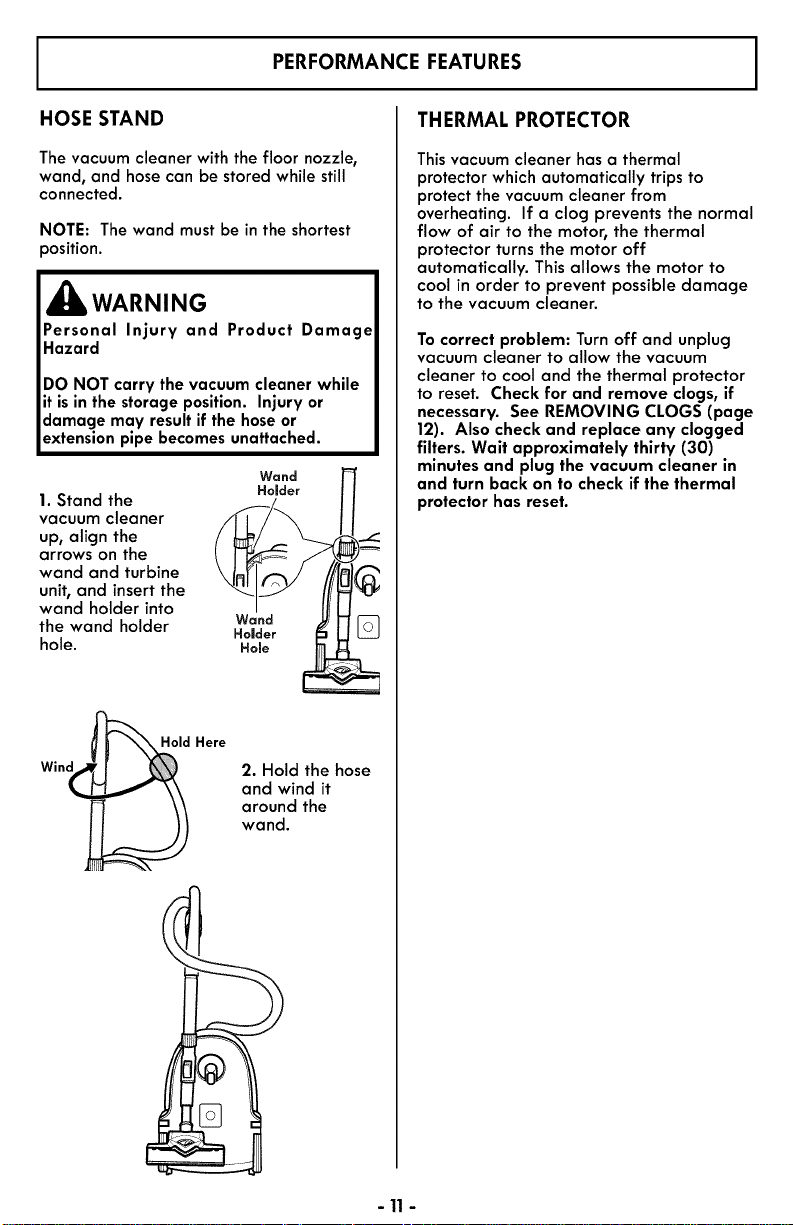
HOSE STAND
The vacuum cleaner with the floor nozzle,
wand, and hose can be stored while still
connected.
NOTE: The wand must be in the shortest
oosition.
_hb WARNING
Personal Injury and Product Damage
Hazard
DO NOT carry the vacuum cleaner while
it isin the storage position. Injury or
damage may resultif the hoseor
extension pipe becomesunattached.
Wand
Holder
1. Stand the _/
vacuum cleaner
up, align the
arrows on the
wand and turbine
unit, and insert the
wand holder into
the wand holder Wand
Holder
hole. HoJe
E
2. Hold the hose
and wind it
around the
wand.
THERMAL PROTECTOR
This vacuum cleaner has a thermal
protector which automatically trips to
protect the vacuum cleaner from
overheating. If a clog prevents the normal
flow of air to the motor, the thermal
protector turns the motor off
automatically. This allows the motor to
cool in order to prevent possible damage
to the vacuum cleaner.
Tocorrect problem: Turn off and unplug
vacuum cleaner to allow the vacuum
cleaner to cool and the thermal protector
to reset. Check for and remove clogs, if
necessary. See REMOVING CLOGS (page
12). Also check and replace any clogged
filters. Wait approximately thirty (30)
minutes and plug the vacuum cleaner in
and turn back on to check if the thermal
protector has reset.
- 11-
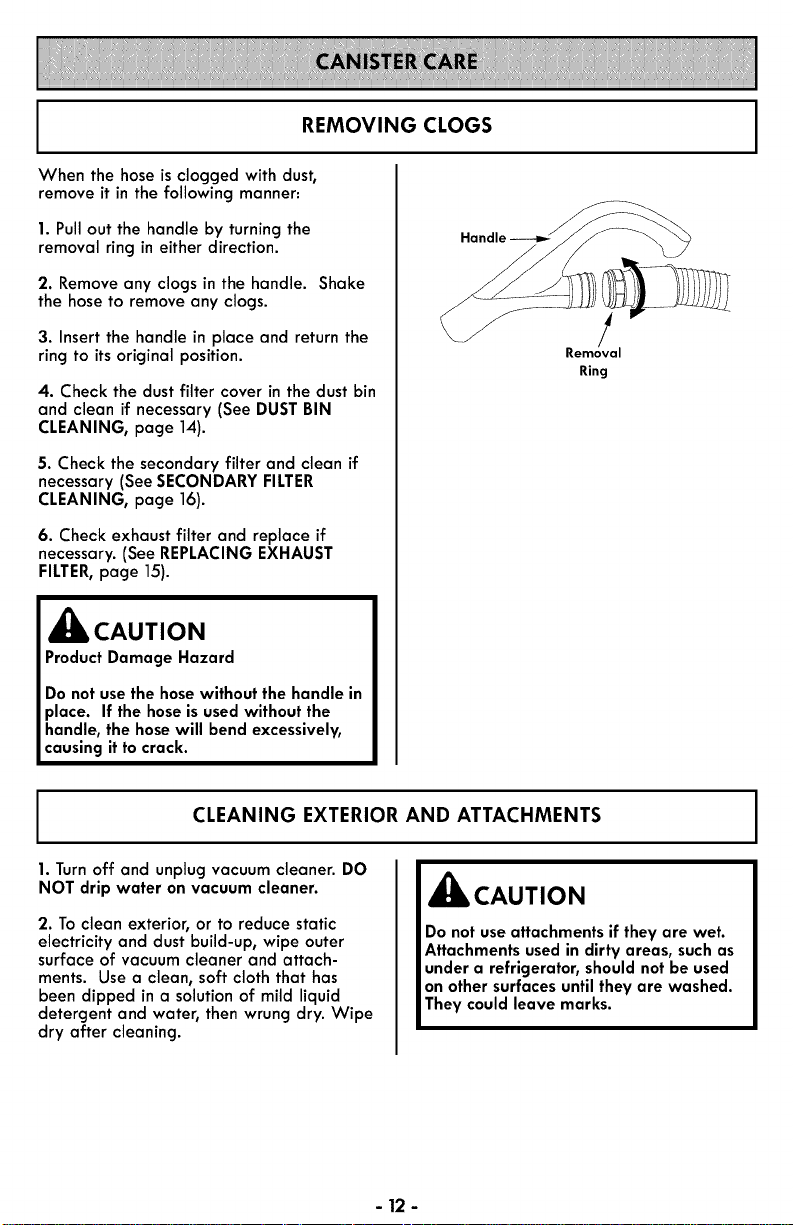
REMOVING CLOGS
When the hose is clogged with dust,
remove it in the following manner:
1. Pullout the handle by turning the
removal ring in either direction.
2. Remove any clogs in the handle. Shake
the hose to remove any clogs.
3. Insert the handle in place and return the
ring to its original position.
4. Check the dust filter cover in the dust bin
and clean if necessary (See DUSTBIN
CLEANING, page 14).
5. Check the secondary filter and clean if
necessary (SeeSECONDARY FILTER
CLEANING, page 16).
6. Check exhaust filter and replace if
necessary. (See REPLACING EXHAUST
FILTER,page 15).
CAUTION
Product Damage Hazard
Do not usethe hose without the handle in
place. If the hose isusedwithout the
handle, the hosewill bend excessively,
causing it tocrack.
Remo/val
Ring
CLEANING EXTERIOR AND ATTACHMENTS
1.Turn off and unplug vacuum cleaner. DO
NOT drip water on vacuum cleaner.
2. Toclean exterior, or to reduce static
electricity and dust build-up, wipe outer
surface of vacuum cleaner and attach-
ments. Use a clean, soft cloth that has
been dipped in a solution of mild liquid
detergent and water, then wrung dry. Wipe
dry after cleaning.
,_ CAUTION
Do not useattachments if they are wet.
Attachmentsusedin dirty areas, such as
under a refrigerator, should not be used
onother surfacesuntil they are washed.
They could leave marks.
- 12 -
EMPTYING DUST BIN
I
Turn off and unplug vacuum cleaner I
before performing maintenance to the I
vacuum cleaner. I
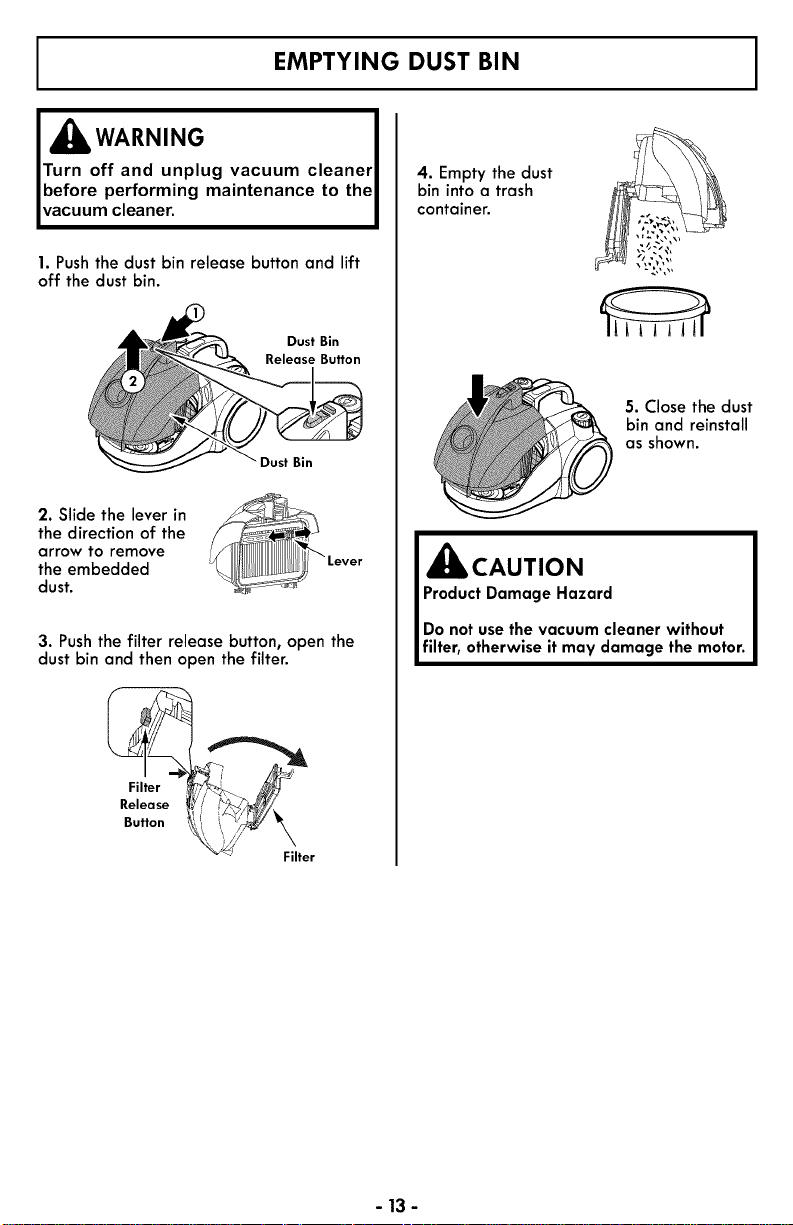
1. Push the dust bin release button and lift
off the dust bin.
Dust Bin
Release Button
Dust Bin
2. Slide the lever in
the direction of the
arrow to remove
the embedded
dust.
3. Push the filter release button, open the
dust bin and then open the filter.
Filter
Release
Button
Filter
4. Empty the dust
bin into a trash
container.
5. Close the dust
bin and reinstall
as shown.
_k CAUTION
Product Damage Hazard
Do not usethe vacuum cleaner without
filter, otherwise it may damage the motor.
- 13-

CLEANING DUST BIN
A "N'N I
Turn off and unplug vacuum cleanerJ
before performing maintenance to theJ
vacuum cleaner. J
1. Remove the dust
bin.
2. Slide the lever in
the direction of the
arrow to remove
the embedded dust.
3. Push the filter release button, open the
dust bin.
Filter
Release
Button
Filter
4. Take out the cleaning brush (included) to
clean the dust filter.
5. Pushthe dust filter cover release latch to
pull out dust filter cover.
Dust Filter
Cover Release
Latch
6. Wash all _x_
parts of the
dust bin.
7. Allow filter to dry 24 hours before
putting back into vacuum cleaner.
NOTE: When the cleaning of the filter no
longer restores vacuum cleaner suction to
full power, replace the filter.
DO NOT operate without filter installed.
DO NOT wash in the dishwasher.
DO NOT install damp.
_lb CAUTION
° Do not attempt to dry with a hair
dryer or by placing in clothes dryer.
Hot air may cause the filters to warp.
° It is not necessary to wash after each
use.
Dust Filter
Cover
8. Installthe dust
filter cover along
the inside of
locating strip, and
make sure you
hear a "click."
9. Close the dust
bin and reattach
it as shown.
- 14 -
REPLACING EXHAUST FILTER
,_WARNING
Always unplug power cord from
electrical outlet before performing any
service on vacuum cleaner.
Under normal usage, the HEPAmedia filter
will require replacement once every year.
However, vacuuming large amounts of
extremely fine dust or similar material over
a long period of time may decrease airflow
performance through the filter. If this
occurs, it may become necessary to
replace the HEPAmedia filter more often.
Toassure the best results,it is
recommended to change the filter at least
once a year.
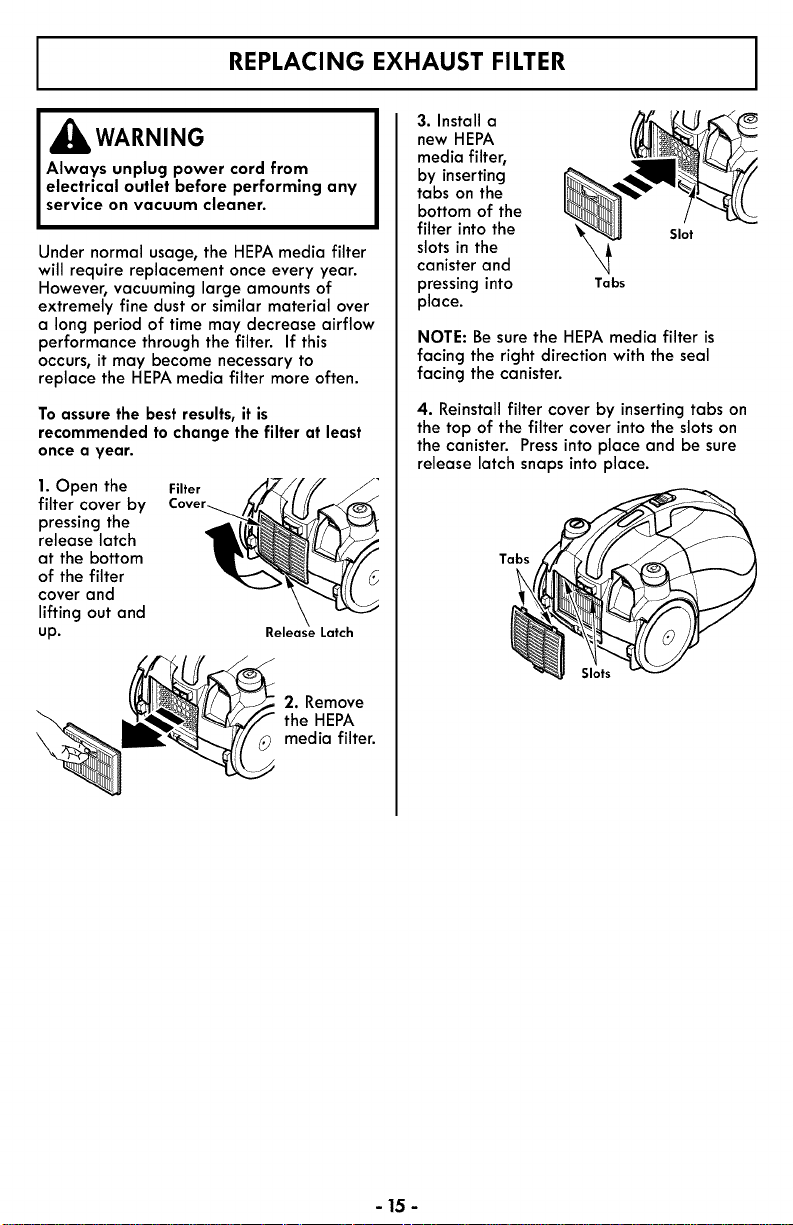
1. Open the
filter cover by
pressing the
release latch
at the bottom
of the filter
cover and
lifting out and
up.
Filter
Relea Latch
2. Remove
the HEPA
0 media filter.
3. Install a
new HEPA
media filter,
by inserting
tabs on the
bottom of the
filter into the
slots in the
canister and
pressing into
place.
Tabs
Slot
NOTE: Be surethe HEPAmedia filter is
facing the right direction with the seal
facing the canister.
4. Reinstall filter cover by inserting tabs on
the top of the filter cover intothe slotson
the canister. Pressinto place and be sure
release latch snaps into place.
Tabs
- 15 -

CLEANING SECONDARY FILTER
,_WARNING
Always unplug power cord from
electrical outlet before performing any
service on vacuum cleaner.
1. Remove the
dust bin.
Secondary
Filter___
2. Remove the
secondary
filter and rinse
with water.
3. Once the filter iswashed clean,
squeeze by hand and allow to air dry.
4. Allow filter to dry 24 hours before
putting back into vacuum cleaner.
NOTE: When the cleaning of the filter no
longer restores vacuum cleaner suction to
full power, replace the filter.
DO NOT operate without filter installed.
DO NOT wash in the dishwasher.
DO NOT install damp.
5. Reinstall secondary filter.
6. Reinstall dust bin.
- 16 -
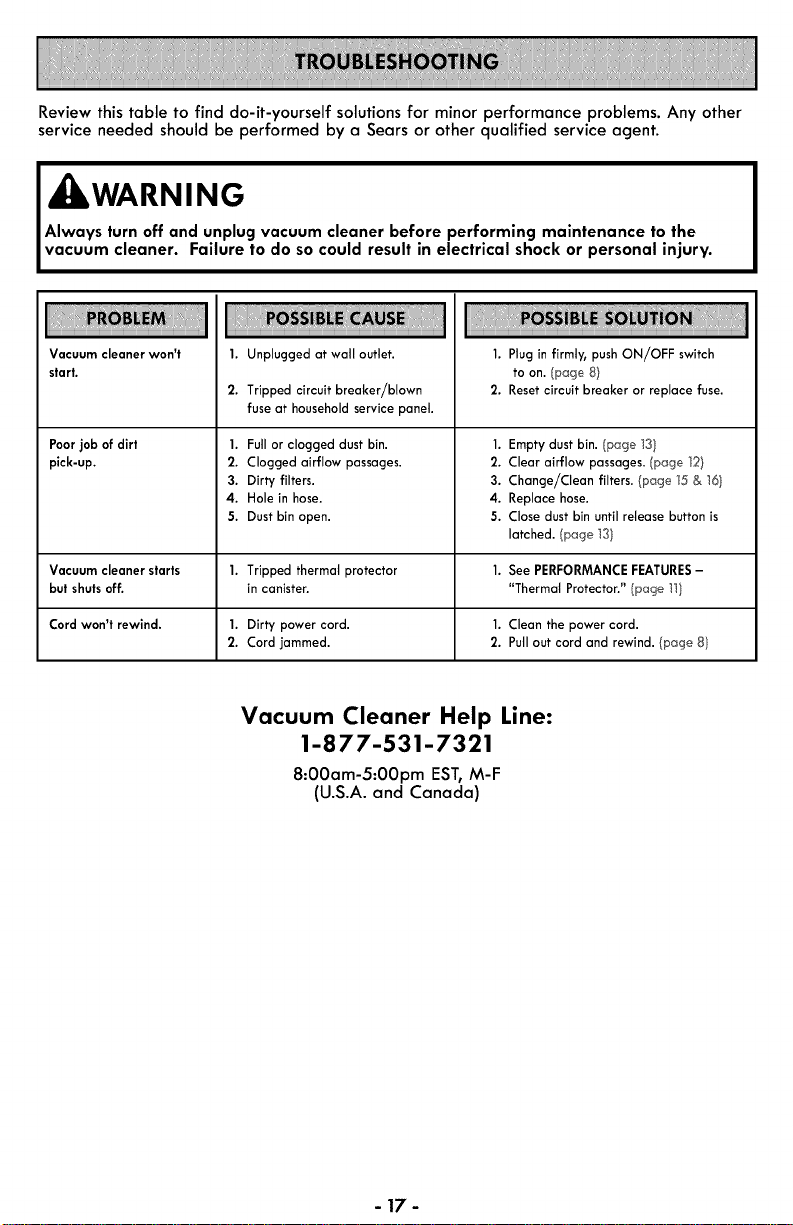
Review this table to find do-it-yourself solutions for minor performance problems. Any other
service needed should be performed by a Sears or other qualified service agent.
bWARNING
Always turn off and unplug vacuum cleaner before performing maintenance to the
vacuum cleaner. Failure to do so could result in electrical shock or personal injury.
Vacuum cleaner won't
start.
Poor job of dirt
pick-up.
1. Unplugged at wall outlet.
2. Tripped circuit breaker/blown
fuse at household service panel.
1. Fullor clogged dust bin.
2. Clogged airflow passages.
3. Dirty filters.
4. Hole in hose.
5. Dust bin open.
1. Plug in firmly, push ON/OFF switch
to on. (page 8}
2. Reset circuit breaker or replace fuse.
1. Empty dust bin. (page 13}
2. Clear airflow passages. (page 12}
3. Change/Clean filters. (page 15 & 16]
4. Replace hose.
5. Close dust bin until release button is
latched. (page 13}
Vacuum cleaner starts 1. Tripped thermal protector 1. See PERFORMANCE FEATURES-
but shutsoff. in canister. '_Thermal Protector."/page 11]
Cord won't rewind. 1. Dirty power cord. 1. Clean the power cord.
2. Cord jammed. 2. Pull out cord and rewind./page 8]
Vacuum Cleaner Help Line:
1-877-531-7321
8:00am-5:OOpm EST,M-F
(U.S.A. and Canada)
- 17-

- 18 -
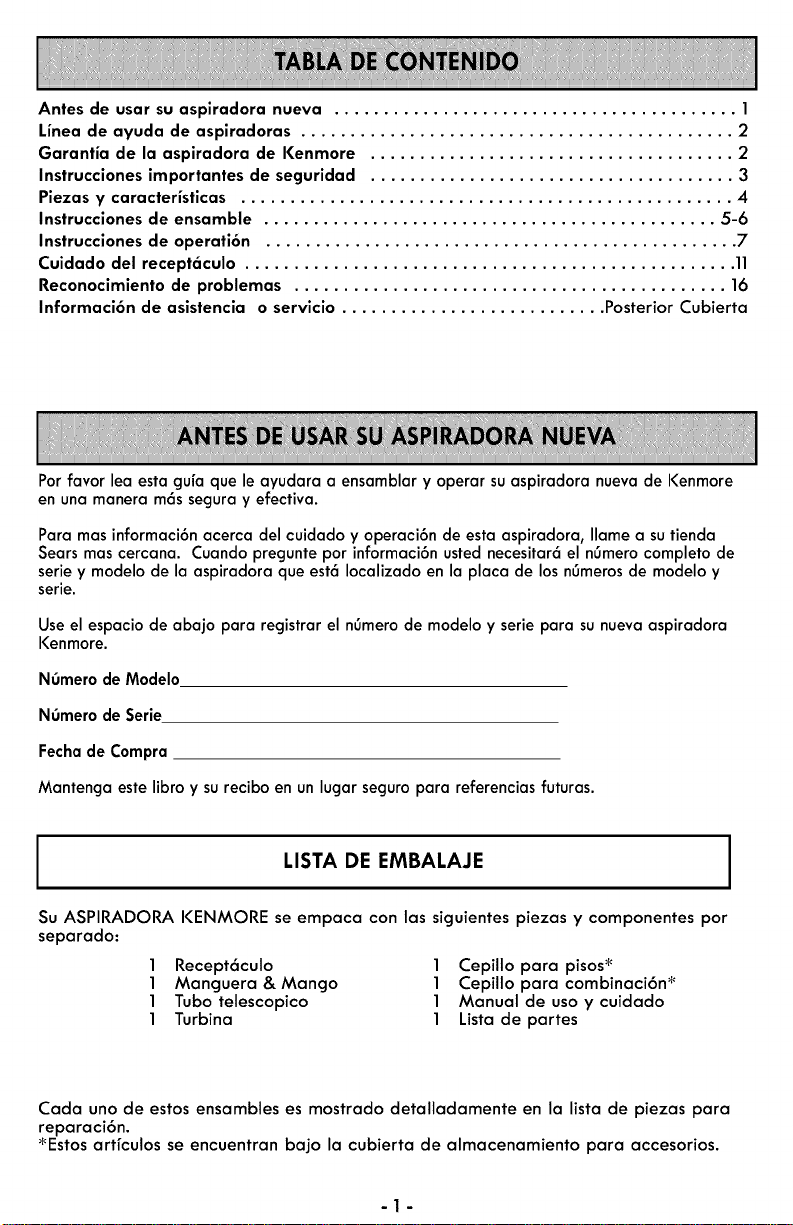
Antesdeusarsuaspiradoranueva......................................... 1
Linea de ayuda de aspiradoras ............................................ 2
Garantia de la aspiradora de Kenmore ..................................... 2
lnstrucciones importantes de seguridad ..................................... 3
Piezas y caracteristicas .................................................. 4
lnstrucciones de ensamble .............................................. 5-6
lnstrucciones de operati6n ................................................ 7
Cuidado del recept6culo .................................................. 11
Reconocimiento de problemas ............................................ 16
lnformaci6n de asistencia o servicio ........................... Posterior Cubierta
Porfavor lea esta gufa que le ayudara a ensamblar y operar suaspiradora nueva de Kenmore
en una manera m6s seguray efectiva.
Para mas informaci6nacerca del cuidado y operaci6n de esta aspiradora, Ilame a sutienda
Sears mas cercana. Cuando pregunte por informaci6n usted necesitar6 el n6mero completo de
seriey modelo de la aspiradora que est6 Iocalizado en la placa de losn6merosde modelo y
serie.
Use el espacio de abajo para registrar el n6mero de modelo y serie para su nuevaaspiradora
I<enmore.
N0mero de Modelo
N0mero de Serie
Fecha de Compra
Mantenga este libro y su recibo en un lugar seguro para referencias futuras.
LISTA DE EMBALAJE
Su ASPIRADORA KENMORE se empaca con las sicjuientespiezas y componentes pot
separado:
1 Recept6culo 1 Cepillo para pisos_
1 Manguera & Mango 1 Cepillo para combinaci6n _
1 Tubo telescopico 1 Manual de uso y cuidado
1 Turbina 1 Lista de partes
Carla uno de estos ensambles es mostrado detalladamente en la lista de piezas para
reparaci6n.
_Estos artfculos se encuentran bajo la cubierta de almacenamiento para accesorios.
-1-
Garantia limitada de Kenmore
DURANTE un afio a partir de la fecha de compra este aparato est6 garantizado contra
defectos de materiales o mano de obra cuando sees instalado correctamente, operado
y mantenido segOn las instrucciones suministradas.
CON LA PRUEBADE COMPRA, el aparato defectuoso ser6 remplazado sin costo.
Para los detalles de la cobertura de garant[a, para obtener la reparaci6n o reemplazo
gratuito, visite la p6gina web: www.kenmore.com/warranty.
Esta garant[a no cubre filtros, correas, bolsas, o focos, los cuales son partes gastables
las cuales se deterioran con el uso normal en el periodo de garant[a.
Esta garant[a queda anulada si este producto se utiliza para otros prop6sitos que no
sean de uso dom_sticos.
Esta garant[a le otorga derechos legales espec[ficos, y usted podr[a tenet otros
derechos que var[an en funci6n de cada estado.
Sears Brands Management Corporation, Hoffman Estates,IL 60179
-2-
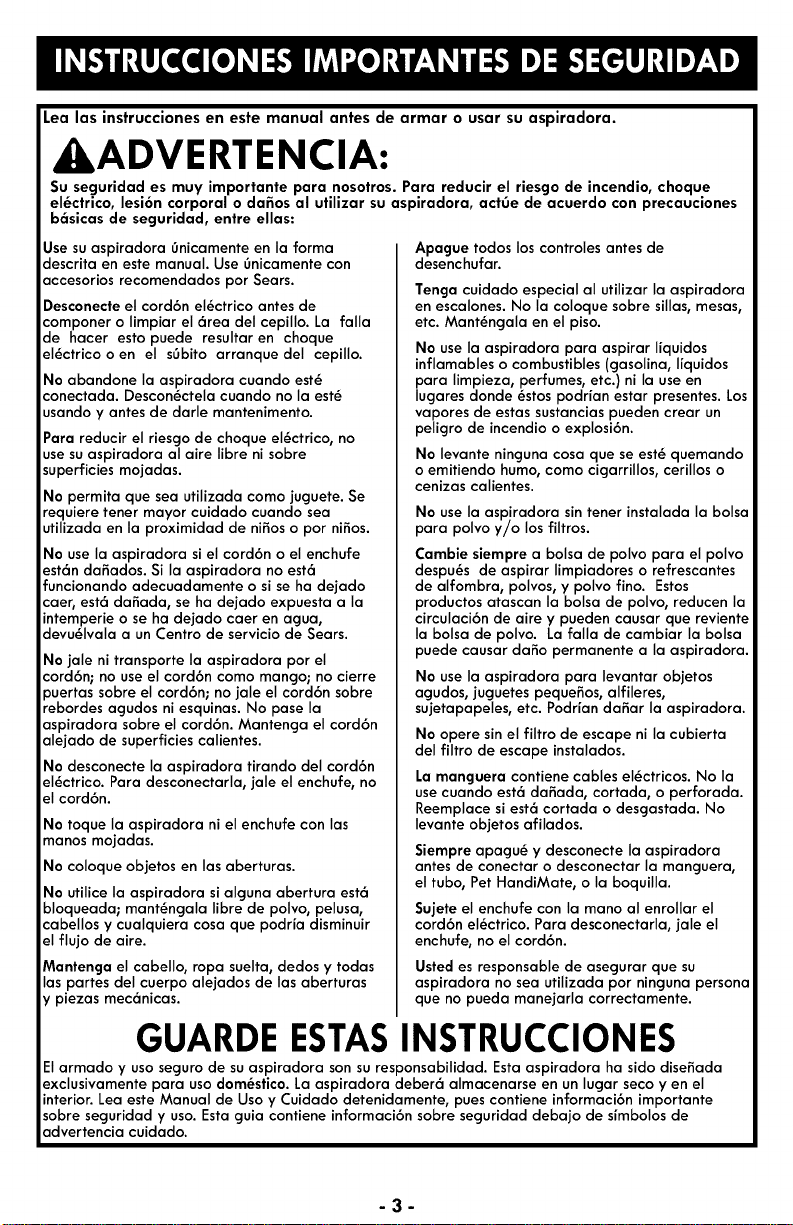
Lea las instrucciones en este manual antes de armar o usar su aspiradora.
AADVERTENCIA:
Su seguridad es muy importante para nosotros. Para reducir el riesgo de incendio, choque
el_ctrico, lesi6n corporal o dafios al utilizar su aspiradora, actOe de acuerdo con precauciones
b_sicas de seguridad, entre elias:
Use suaspiradora Onicamente en Ia forma
descrita en este manual Use Onicamente con
accesorios recomendados por Sears.
Desconecte el cord6n eI_ctrico antes de
componer o Simpiar el 6rea deI cepiHo. La faHa
de hacer esto puede resuffar en choque
eI_ctrico o en el sObito arranque deI cepiHo.
No abandone Ia aspiradora cuando est_
conectada. Descon_cteSacuando no Ia est_
usando y antes de darle mantenimento.
Para reducir eSriesgo de choque eS_ctrico, no
use suaspiradora aI aire Iibre ni sobre
superficies mojadas.
No permita que sea utiSizada como juguete. Se
requiere tener mayor cuidado cuando sea
utiSizada en Ia proximidad de nifios o por nifios.
No use Saaspiradora si el cord6n o eSenchufe
est6n dafiados. Si Saaspiradora no est6
funcionando adecuadamente o si se ha dejado
caer, est6 dafiada, se ha dejado expuesta a Ia
intemperie o se ha dejado caer en agua,
devu_Svalaa un Centro de servicio de Sears.
No jale ni transporte Ia aspiradora por el
cord6n; no use eScord6n como mango; no cierre
puertas sobre el cord6n; no jale el cord6n sobre
rebordes agudos ni esquinas. No pase Ia
aspiradora sobre el cord6n. Mantenga el cord6n
alejado de superficies calientes.
No desconecte la aspiradora tirando descord6n
el_ctrico. Para desconectarla, jale el enchufe, no
el cord6n.
No toque Ia aspiradora ni el enchufe con Ias
manos mojadas.
No coloque objetos en Ias aberturas.
No utilice Ia aspiradora si aSguna abertura est6
bSoqueada; mant_ngala fibre de polvo, peSusa,
cabelIos y cuaSquiera cosa que podria disminuir
el flujo de aire.
Mantenga el cabello, ropa sueffa, dedos y todas
Ias partes del cuerpo alejados de Ias aberturas
y piezas mec6nicas.
GUARDEESTAS
El armado y uso segurode su aspiradora sonsure.,
Apague todos los controles antes de
desenchufar.
Tenga cuidado especial aI utiSizar Saaspiradora
en escaSones. No Ia coloque sobre siHas,mesas,
etc. Mant_ngaSa en el piso.
No use Ia aspiradora para aspirar ffquidos
inflamabSes o combustibles (gasolina, ffquidos
para Simpieza, perfumes, etc.) ni Sause en
Iugares donde _stos podrian estar presentes. Los
vapores de estas sustancias pueden crear un
peligro de incendio o explosi6n.
No levante ninguna cosa que se est_ quemando
o emitiendo humo, como cigarriHos, cerillos o
cenizas calientes.
No use la aspiradora sintener instalada Ia bolsa
para poSvoy/o los fiffros.
Cambie siempre a boSsade poSvopara el polvo
despu_s de aspirar Simpiadores o refrescantes
de alfombra, poSvos,y poSvofino. Estos
productos atascan Ia bolsa de polvo, reducen Ia
circulaci6n de aire y pueden causar que reviente
Ia boSsade poSvo. La faHa de cambiar Ia boSsa
puede causar dafio permanente a Saaspiradora.
No use la aspiradora para levantar objetos
agudos, juguetes pequefios, alfileres,
suietapapeles, etc. Podrian dafiar Saaspiradora.
No opere sin el fiffro de escape ni Sacubierta
desfiffro de escape instalados.
La manguera contiene cables eI_ctricos. No Ia
use cuando est6 dafiada, cortada, o perforada.
Reemplace si est6 cortada o desgastada. No
Ievante obietos afHados.
Siempre apagu_ y desconecte Ia aspiradora
antes de conectar o desconectar la manguera,
el tubo, Pet HandiMate, o Ia boquiHa.
Sujete el enchufe con Ia mano al enrolIar el
cord6n el_ctrico. Para desconectarla, jale el
enchufe, no el cord6n.
Usted es responsable de asegurar que su
aspiradora no sea utilizada por ninguna persona
que no pueda manejarla correctamente.
NSTRUCCIONES
_onsabilidad. Esta aspiradora ha sido disefiada
exdusivamente para uso dom_stico. La aspiradora deber6 almacenarse en un lugar seco y en el
interior. Lea este Manual de Uso y Cuidado detenidamente, pues contiene informaci6n importante
sobre seguridad y uso. Esta guia contiene informaci6n sobre seguridad debajo de s_mbolos de
advertencia cuidado.
-3-
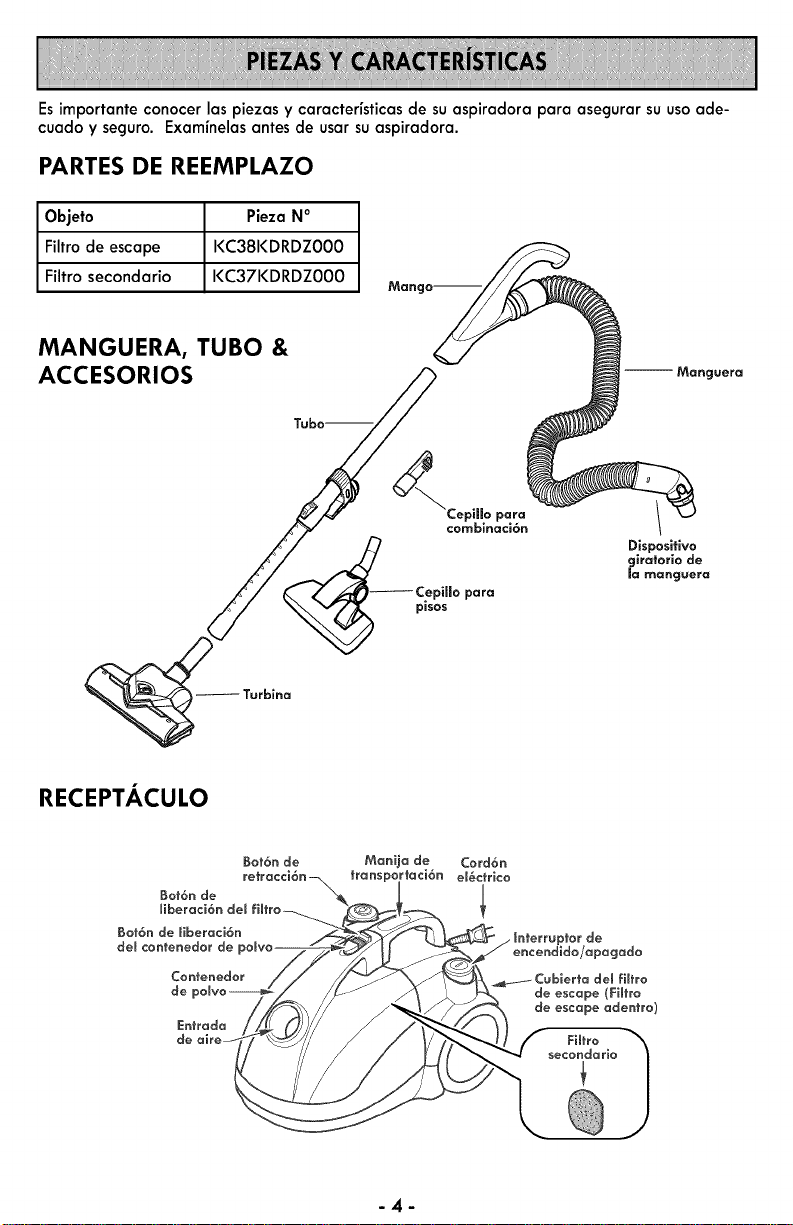
Esimportante conocer las piezas y caracteristicasde suaspiradora para asegurar su useade-
cuado y seguro. Examlnelas antes de usar suaspiradora.
PARTES DE REEMPLAZO
Objeto PiezaN°
Filtro de escape I<C381<DRDZ000
Filtrosecondario I<C371<DRDZ000
Man
MANGUERA, TUBe &
ACCESORIOS
_Cepille para
cembinaci6n
para
pisos
Turblna
RECEPTACULO
-4-
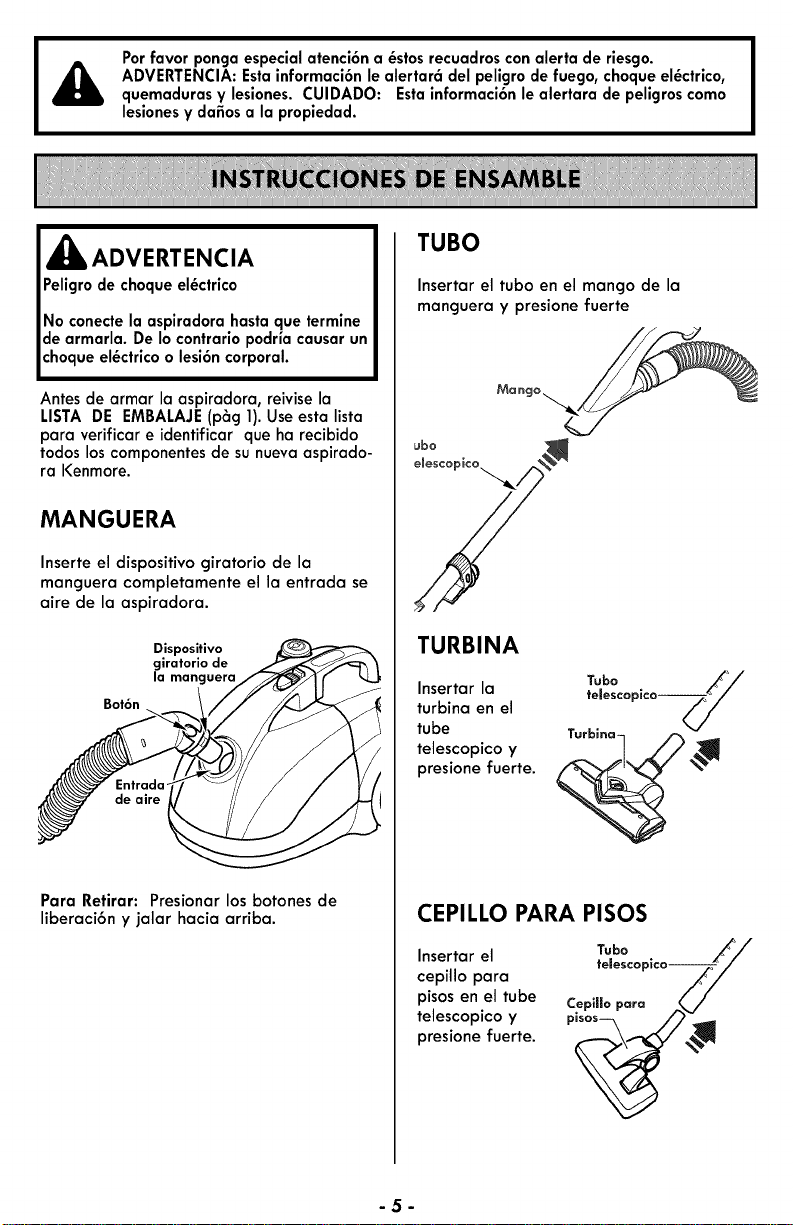
Porfavor pongaespecialatenci6na _stos recuadros conalerta de riesgo.
ADVERTENCIA:Estainformaci6nle alertar6 del peligrode fuego,choqueel_ctrico,
quemadurasy lesiones. CUIDADO: Estainformaci6nle alertara de peligroscomo
lesionesy da_osa la propiedad.
,_k ADVERTENCIA
Peligrode choque el_ctrico
No conecte la aspiradorahastaque termine
de armarla. De lo contrario podria causar un
choque el_ctricoo lesi6ncorporal.
Antes de armar la aspiradora, reivise la
LISTA DE EMBALAJE (p_g 1). Use esta lista
para verificar e identificar que ha recibido
todos los componentes de su nueva aspirado-
ra Kenmore.
MANGUERA
Inserte el dispositivo giratorio de la
manguera completamente el la entrada se
aire de la aspiradora.
Dispositivo
giratorio de
la Jguera
Bot6n
Para Retirar: Presionarlos botones de
liberaci6n y jalar hacia arriba.
TUBO
Insertar el tubo en el mango de la
manguera y presionefuerte
TURBINA
Insertar la
turbina en el
tube
telescopico y
presione fuerte.
Tubo /7
_elescopico--ii_/
Turbina_ /O
CEPILLO PARA PISOS
Insertar el
cepillo para
pisos en el tube
telescopico y
presione fuerte.
Tubo
Cepillo para
-,5-

El tubo telescopico se ajusta de acuerdo a
las preferencias del usuario.
COMO EXPANDER/ CONTRAER ELTUBO
Ajuste la Iongitud del tubo deseada
presionando el bot6n.
del fubo
• Aseg6rese de ofr un "click".
• Cuando el tubo no expanda 6 contraiga
con facilidad jale uno de los tubos
mientras presiona el bot6n.
Jale
_ll CUIDADO
NO ponga las manos en el tubo de
expansi6n mientras esta en uso.
Presioneel bot6ncuando ajuste la Iongitud
deseada.
CEPILLO DE COMBINACION
Guarde el cepillo para
conbinaci6n en el tubo cuando
no esta usado.
-6-
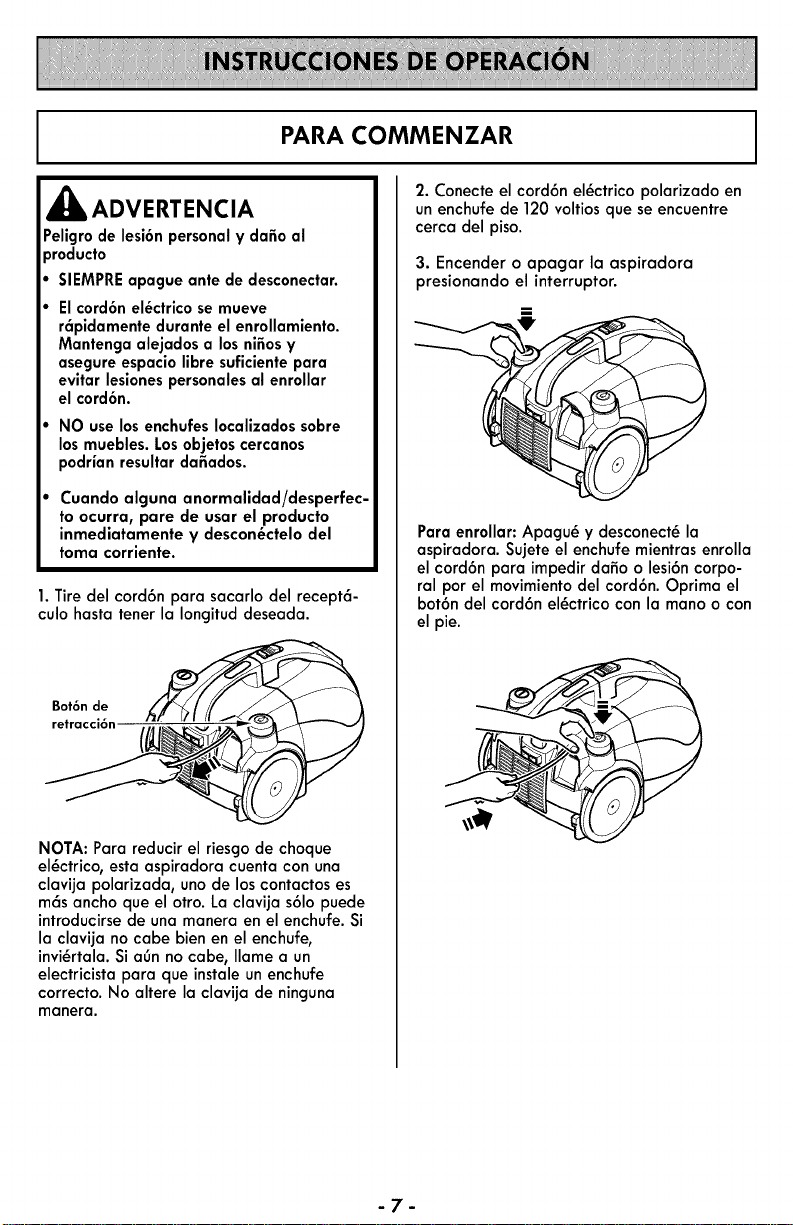
PARA COMMENZAR
l_k ADVERTENCIA
Peligrode lesi6npersonalV dafio al
_roducto
SIEMPRE apague ante de desconectar.
El cord6n el_ctrico se mueve
r6pidamente durante el enrollamiento.
Mantenga alejados a los ni_os V
asegure espacio libre suficiente para
evitar lesiones personales al enrollar
el cord6n.
NO use los enchufes localizados sobre
los muebles. Los objetos cercanos
podrian resultar da_ados.
Cuando alguna anormalidad/desperfec-
to ocurra, pare de usar el producto
inmediatamente V descon_ctelodel
toma corriente.
1.Tire del cord6n para sacarlo del recept6-
culo hasta tener la Iongitud deseada.
Bot6n de
retracci6n II/II_'-r'_
NOTA: Para reducir el riesgo de choque
el_ctrico, esta aspiradora cuenta con una
clavija polarizada, uno de los contactos es
m6s ancho que el otro. La clavija s61opuede
introducirse de una manera en el enchufe. Si
la clavija no cabe bien en el enchufe,
invi_rtala. Si a6n no cabe, Ilame a un
electricista para que instale un enchufe
correcto. No altere la clavija de ninguna
manera.
2. Conecte el cord6n el_ctrico polarizado en
un enchufe de 120voltios que se encuentre
cerca del piso.
3. Encender o apagar la aspiradora
presionando el interruptor.
Para enrollar: Apagu_ y desconect_la
aspiradora. Sujete el enchufe mientras enrolla
el cord6n para impedir dafio o lesi6ncorpo-
ral por el movimiento del cord6n. Oprima el
bot6n del cord6n el_ctrico con la mano o con
el pie.
-7-
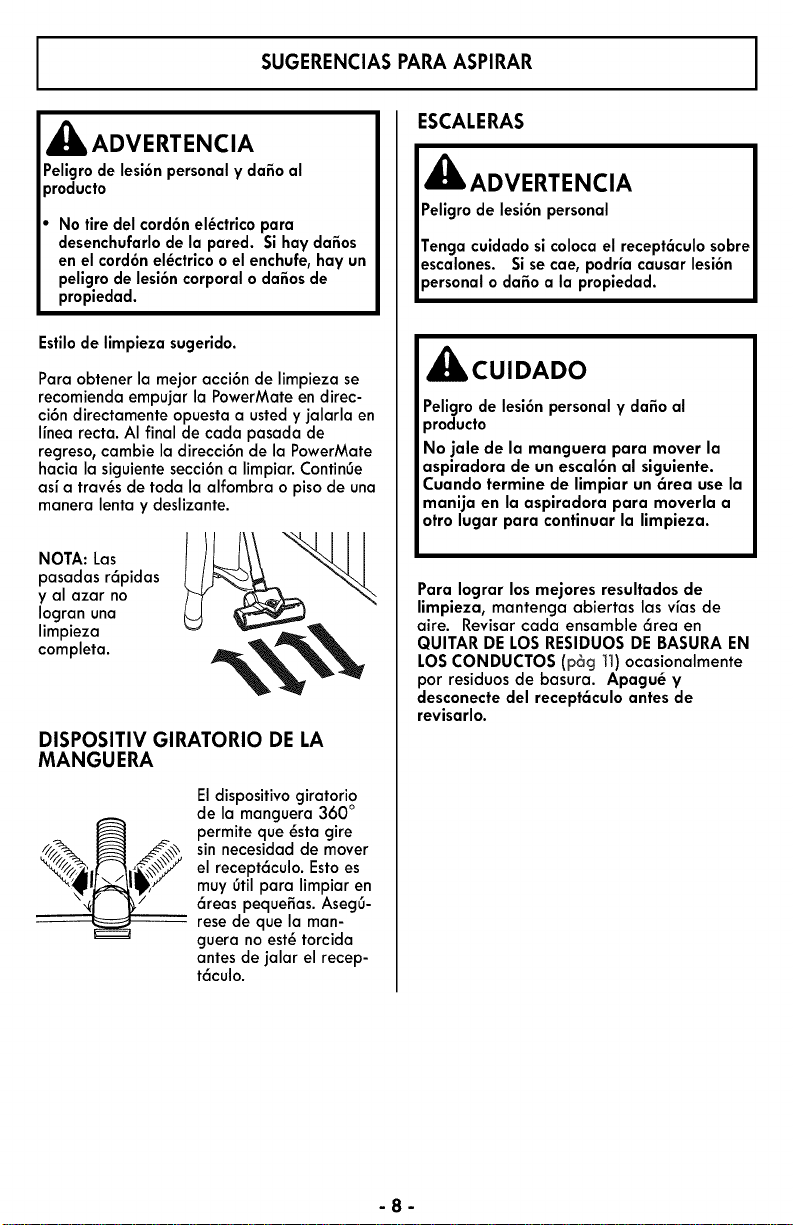
SUGERENCIAS PARA ASPIRAR
J_k ADVERTENCIA
Peligrode lesi6npersonalV dafio al
_roducto
No tire del cord6nel_ctricopara
desenchufarlode la pared. Sihay dafios
en el cord6nel_ctricooel enchufe,hay un
peligrode lesi6ncorporalo dafiosde
propiedad.
Estilode limpiezasugerido.
Para obtener la mejor acci6n de limpieza se
recomienda empujar la PowerMate endirec-
ci6n directamente opuesta a ustedy jalarla en
Ifnea recta. AI final de cada pasada de
regreso,cambie la direcci6n de la PowerMate
hacia la siguiente secci6n a limpiar. Contin6e
asfa trav_s de toda la alfombra o piso de una
manera lenta y deslizante.
NOTA: Las
pasadas r6pidas
y al azar no
Iogran una
limpieza
completa.
DISPOSITIV GIRATORIO DE LA
MANGUERA
El dispositivo giratorio
de la manguera 360°
permite que _sta gire
sin necesidad de mover
el recept6culo. Estoes
muy 6til para limpiar en
6reas pequefias. Aseg6-
-- resede que la man-
guera no est_ torcida
antes de jalar el recep-
t6culo.
ESCALERAS
'_ ADVERTENCIA
Peligrode lesi6n personal
Tengacuidado sl coloca el recept6culosobre
escalones. Si se cae, podria causarlesi6n
personalo dafioa la propiedad.
,_CUIDADO
Peligrode lesi6n personal¥ dafio al
producto
No jale de la manguera para mover la
aspiradora de un escal6n al siguiente.
Cuando termine de limpiar un 6rea use la
manija en la aspiradora para moverla a
otrolugar para continuar la limpieza.
Para Iograr los mejores resultadosde
Iimpieza, mantenga abiertas las vfas de
aire. Revisarcada ensamble 6rea en
QUITAR DE LOSRESIDUOSDE BASURAEN
LOSCONDUCTOS (pbg 11)ocasionalmente
por residuosde basura. Apagu_ y
desconectedel recept6culoantes de
revisarlo.
-8-
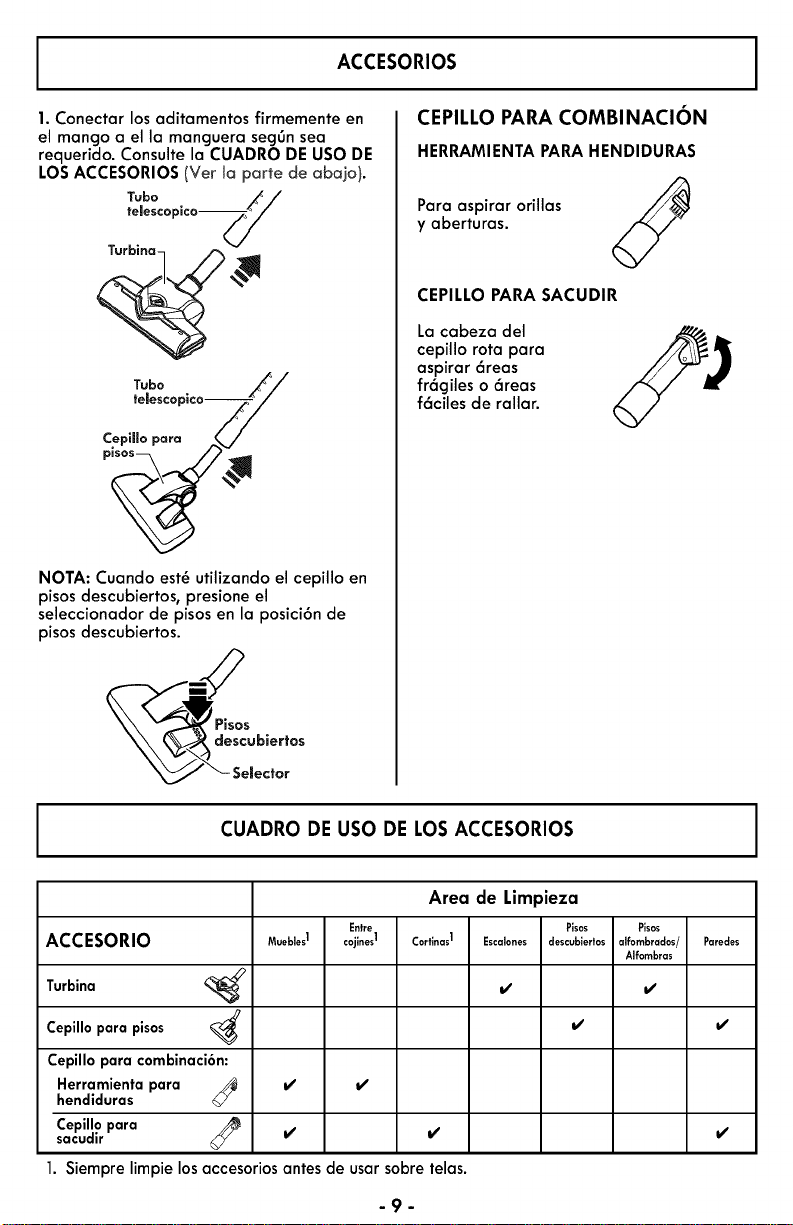
ACCESORIOS
CEPILLO PARA COMBINACION
1.Conectar los aditamentos firmemente en
el mango a el la manguera seg6nsea
requerido. Consulte la CUADRO DE USO DE
LOSACCESORIOS (Ver la parte de abajo).
Tubo / /
telescoplcom__i_
Tobo //
C.epillo par°
plsos_ j/_
NOTA: Cuando est6 utilizando el cepillo en
pisos descubiertos, presione el
seleccionador de pisos en la posici6n de
pisos descubiertos.
descubierlos
HERRAMIENTA PARAHENDIDURAS
Para aspirar orillas /J'b_
y aberturas.
CEPILLO PARA SACUDIR
La cabeza del
cepillo rota para
aspirar 6reas
fr6giles o 6teas
f6ciles de rallar.
CUADRO DE USO DE LOS ACCESORIOS
Area de Limpieza
Entre Pisos Pisos
ACCESORIO Muebles1 cojlnes1 Cortlnas1 Escal.... descublertos alfombrados/ Paredes
Alfombras
Turbina
Cepilloparapisos
ii ii
Cepilloparacombinaci6n:
Herramientapara _'_ _ is
hendiduras
Cepillopara
sacudir _ _
1. Siemprelimpie los accesoriosantesde usarsobretelas.
-9-
CARACTERJSTICASDE RENDIMIENTO
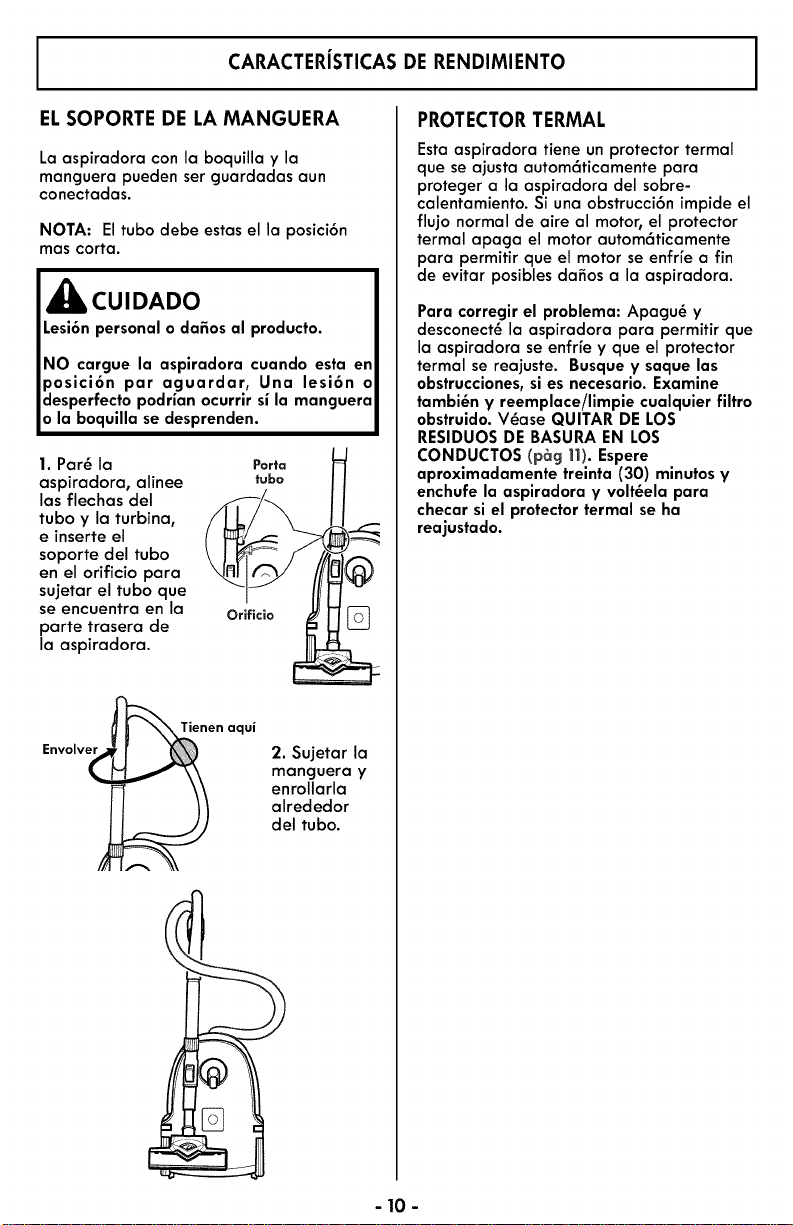
ELSOPORTE DE LA MANGUERA
La aspiradora con la boquilla y la
manguera pueden set guardadas aun
conectadas.
NOTA: El tubo debe estas el la posici6n
mas corta.
l cu,o oo
Lesi6npersonal o dafios al producto.
NO cargue la aspiradora cuando esta en
posici6n par aguardar, Una lesi6n o
desperfecto podrian ocurrir sl la manguera
o la boquilla se desprenden.
1. Par_ la
aspiradora, alinee
las flechas del
tubo y la turbina,
e inserte el
soporte del tubo
en el orificio para
sujetar el tubo que
se encuentra en la
parte trasera de
la aspiradora.
Por_a
tubo
Orificio
EnvoJver
Tienen aqul
2. Sujetar la
manguera y
enrollarla
alrededor
del tubo.
PROTECTORTERMAL
Esta aspiradora tiene unprotector termal
que seajusta autom6ticamente para
proteger a la aspiradora del sobre-
calentamiento. Si una obstrucci6n impide el
flujo normal de aire al motor, el protector
termal apaga el motor autom6ticamente
para permitir que el motor se enfHe a fin
de evitar posibles dafios a la aspiradora.
Para corregir el problema: Apagu_ y
desconect_ la aspiradora para permitir que
la aspiradora se enfHe y que el protector
termal se reajuste. Busque y saque las
obstrucclones, sl es necesarlo. Examine
tambi_n y reemplace/limpie cualquier filtro
obstruido. V_ase QUITAR DE LOS
RESIDUOSDE BASURA EN LOS
CONDUCTOS CP6g11).Espere
aproximadamente treinta (30) minutos V
enchufe la aspiradora y volt_ela para
checar sl el protector termal se ha
reajustado.
- 10 -
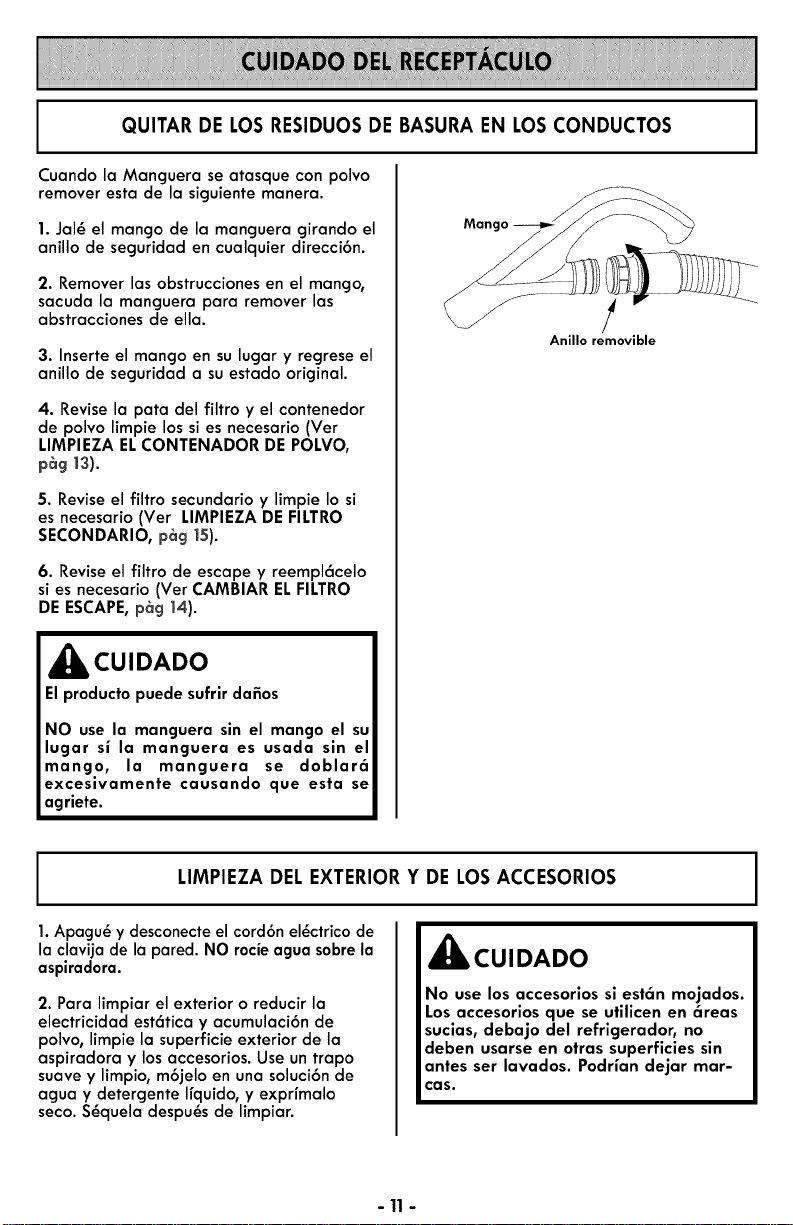
QUITAR DE LOS RESIDUOS DE BASURA EN LOSCONDUCTOS
Cuando la Manguera se atasque con polvo
remover esta de la siguientemanera.
1.Jal_ el mango de la manguera girando el
anillo de seguridad en cualquier direcci6n.
2. Remover las obstrucciones en el mango,
sacuda la manguera para remover las
abstracciones de ella.
3. Inserte el mango en su lugar y regrese el
anillo de seguridad a su estado original.
4. Revise la pata del filtro y el contenedor
de polvo limpie los sies necesario (Vet
LIMPIEZA ELCONTENADOR DE POLVO,
p_g 13).
5. Reviseel filtro secundarioy limpie Io si
es necesario (Ver LIMPIEZA DE FILTRO
SECONDARIO, p_g 15).
6. Reviseel filtro de escape y reempl6celo
si es necesario (Ver CAMBIAR ELFILTRO
DE ESCAPE,p6g 14).
_CUIDADO
Elproductopuede sufrir dafios
NO use la manguera sin el mango el su
lugar sl la manguera es usada sin el
mango, la manguera se doblar6
excesivamente causando que esta se
agriete.
Mango
Anillo removible
LIMPIEZA DEL EXTERIOR Y DE LOSACCESORIOS
1.Apagu_ y desconecte el cord6n el_ctrico de
la clavija de la pared. NO rocieagua sobre la
aspiradora.
2. Para limpiar el exterior o reducir la
electricidad est6tica y acumulaci6n de
polvo, limpie la superficie exterior de la
aspiradora y los accesorios. Use un trapo
suave y limpio, m6jelo en una soluci6n de
agua y detergente Ifquido, y expHmalo
seco. S_quela despu_s de limpiar.
_Jl. CUIDADO
No use los accesorios si est6n mojados.
Los accesorios que se utilicen en 6reas
sucias, debajo del refrigerador, no
deben usarse en otras superficies sin
antes ser lavados. Podrian dejar mar-
cas.
- 11-
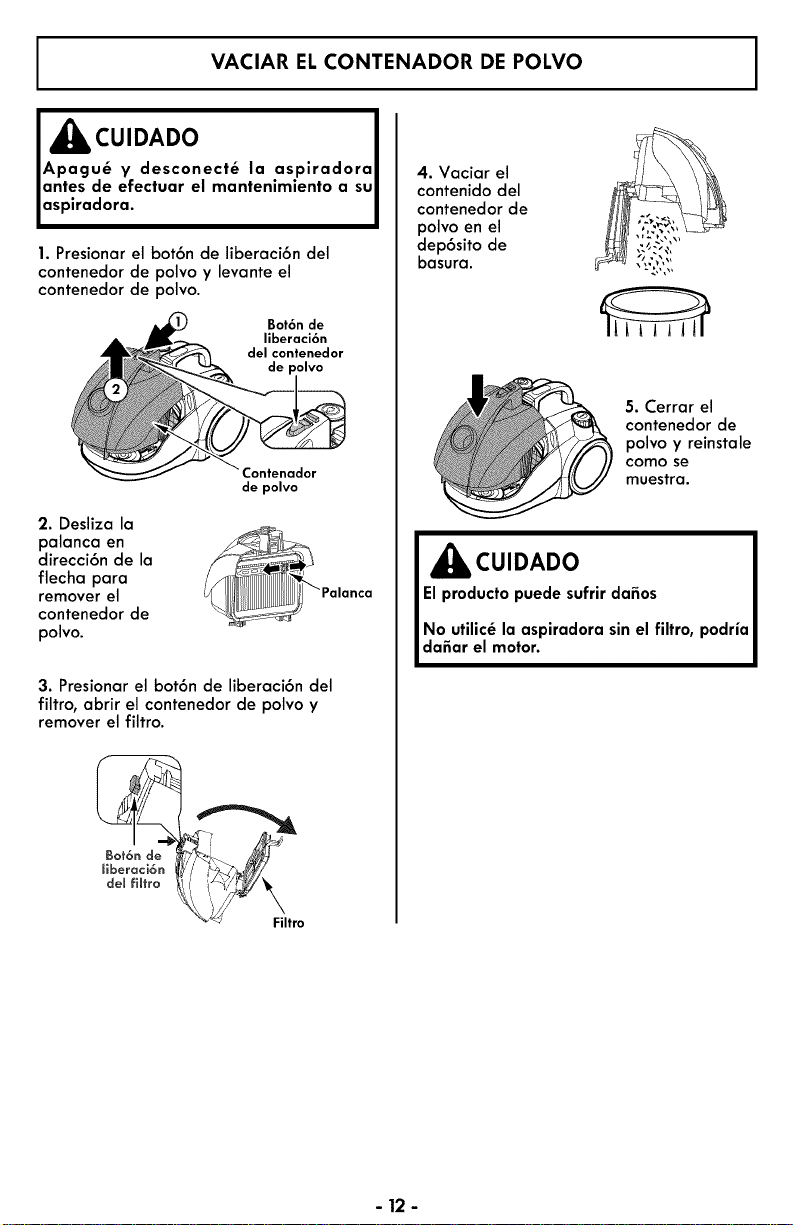
VACIAR EL CONTENADOR DE POLVO
A u,0 0o I
Apagu_ y desconect_ la aspiradora I
antes de efectuar el mantenimiento a suI
aspiradora. I
1. Presionarel bot6n de liberaci6n del
contenedor de polvo y levante el
contenedor de polvo.
Bot6n de
liberaci6n
del contenedor
de polvo
2. Desliza la
palanca en
direcci6n de la
flecha para
remover el
contenedor de
polvo.
Contenador
de polvo
3. Presionarel bot6n de liberaci6n del
filtro, abrir el contenedor de polvo y
remover el filtro.
Bot6n de
liberaci6n
del filtro
4. Vaciar el
contenido del
contenedor de
polvo en el
dep6sito de
basura.
5. Cerrar el
contenedor de
polvo y reinstale
como se
muestro.
_lb CUIDADO
Elproducto puedesufrir dafios
No utilic_ la aspiradora sin el filtro, podria
dafiar el motor.
- 12 -
LIMPIEZA EL CONTENADOR DE POLVO
A u,0 0o I
Apagu_ y desconect_ la aspiradora I
antes de efectuar el mantenimiento a suI
aspiradora. I
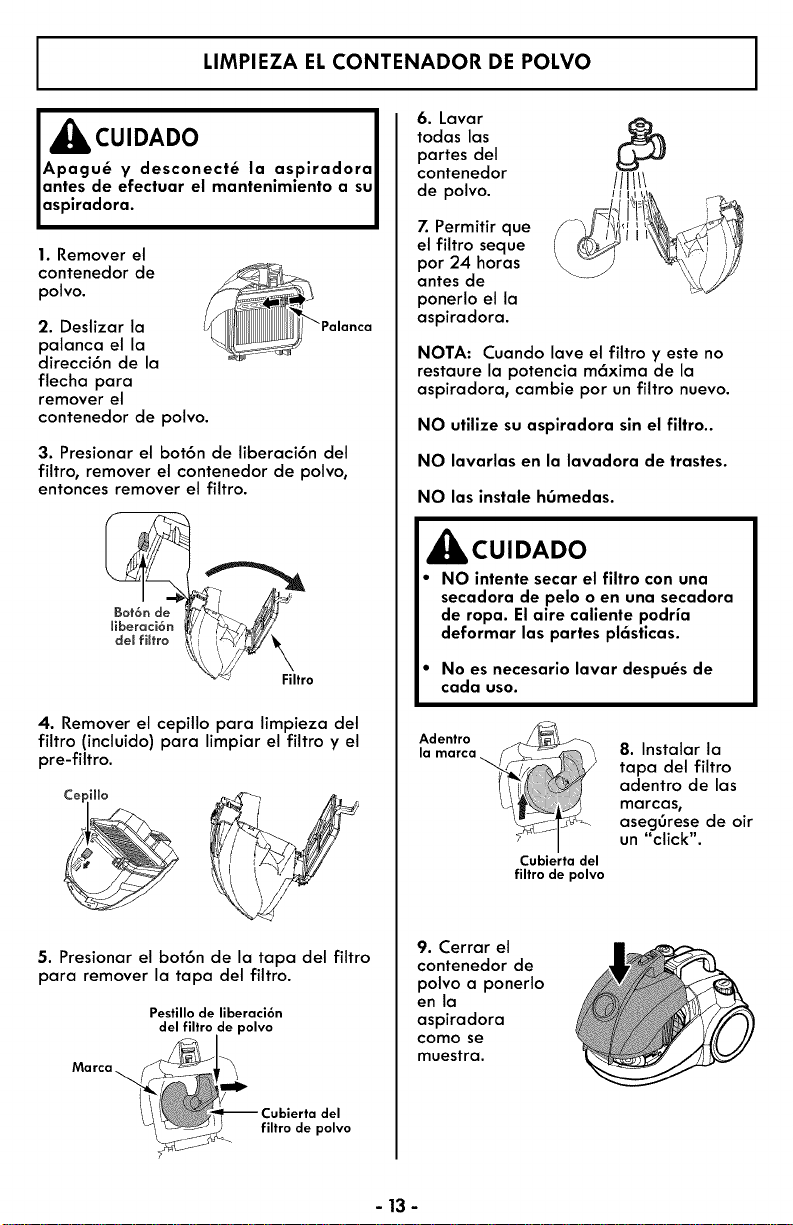
1. Remover el
contenedor de
polvo.
2. Deslizar la
palanca el la
direcci6n de la
flecha para
remover el
contenedor de polvo.
3. Presionar el bot6n de liberaci6n del
filtro, remover el contenedor de polvo,
entonces remover el filtro.
Bot6n de
liberaci6n
demfiltro
4. Remover el cepillo para limpieza del
filtro (incluido) para limpiar el filtro y el
pre-filtro.
5. Presionar el bot6n de la tapa del filtro
para remover la tapa del filtro.
Marca
Pestillo de liberaci6n
del filtro de polvo
Cubierta del
filtro de polvo
6. Lavar
todas las
partes del
contenedor
de polvo.
Z Permitir que
el filtro seque
por 24 horas
antes de
ponerlo el la
aspiradora.
NOTA: Cuando lave el filtro y este no
restaure la potencia m6xima de la
aspiradora, cambie por un filtro nuevo.
NO utilize su aspiradora sin el filtro..
NO lavarlas en la lavadora de trastes.
NO las instale h0medas.
,_k CUIDADO
* NO intente secar el filtro con una
secadora de pelo o en una secadora
de ropa. Elaire caliente podria
deformar las partes pl6sticas.
* No es necesario lavar despu_s de
cada uso.
Adentro
la marca
Cubierta del
filtro de polvo
8. Instalar la
tapa del filtro
adentro de las
marcas,
asegOrese de oir
un "click".
9. Cerrar el
contenedor de
polvo a ponerlo
en la
aspiradora
como se
muestra.
- 13-
CAMBIO DEL FILTRODE ESCAPE
A u,o,0o I
Apagu_ y desconect_ la aspiradora I
antes de efectuar el mantenimiento a suI
aspiradora. I
Dentro del usonormal, el filtro HEPA
requerir6 que se remplace una vez al a_o.
Pero, se aspiran largas cantidades fe polvo
fino pot un largo periodo de tiempo esto
podHa afectar el fluido de aire en el filtro,
si esto ocurre, entonces ser6 necesario
remplazar el filtro HEPAmas seguido.
Para asegurar un mejor resultado, es
recomendable cambiar el filtro por Io
menos una vez al afio.
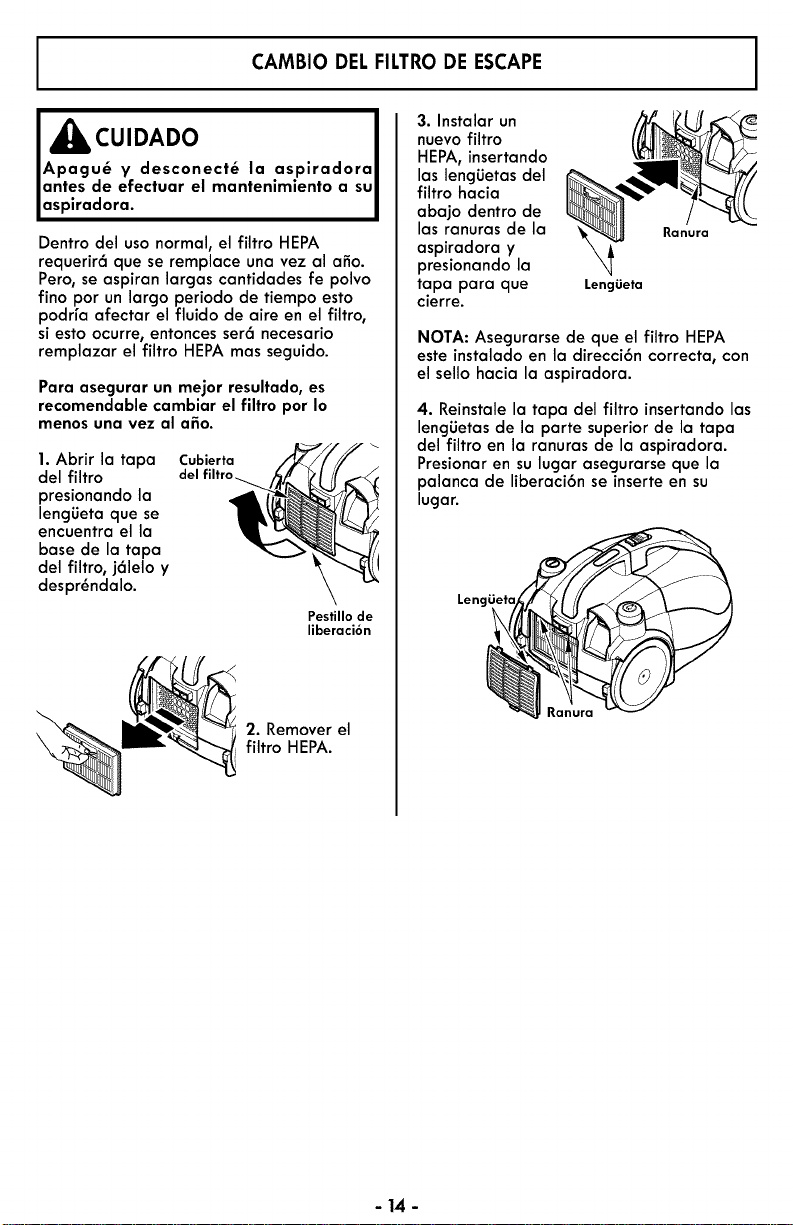
1.Abrir la tapa
del filtro
presionando la
lengiJeta que se
encuentra el la
base de la tapa
del filtro, j61elo y
despr_ndalo.
Cubierta
del filtro
Pestillo de
liberaci6n
2. Remover el
filtro HEPA.
3. Instalar un
nuevo filtro
HEPA, insertando
las leng_Jetasdel
filtro hacia
abajo dentro de
las ranuras de la
aspiradora y
presionando la
tapa para que
cierre.
LengLieta
Ranura
NOTA: Asegurarse de que el filtro HEPA
este instalado en la direcci6n correcta, con
el sello hacia la aspiradora.
4. Reinstale la tapa del filtro insertando las
lengiJetas de la parte superiorde la tapa
del filtro en la ranuras de la aspiradora.
Presionar en sulugar asegurarse que la
palanca de liberaci6n se inserte en su
lugar.
Lenc
- 14 -
LIMPIEZA DEL FILTRO SECONDARIO
CU,DA00 I
Apagu_ y desconect_ la aspiradoraJ
antes de efectuar el mantenimiento a suJ
aspiradora. I
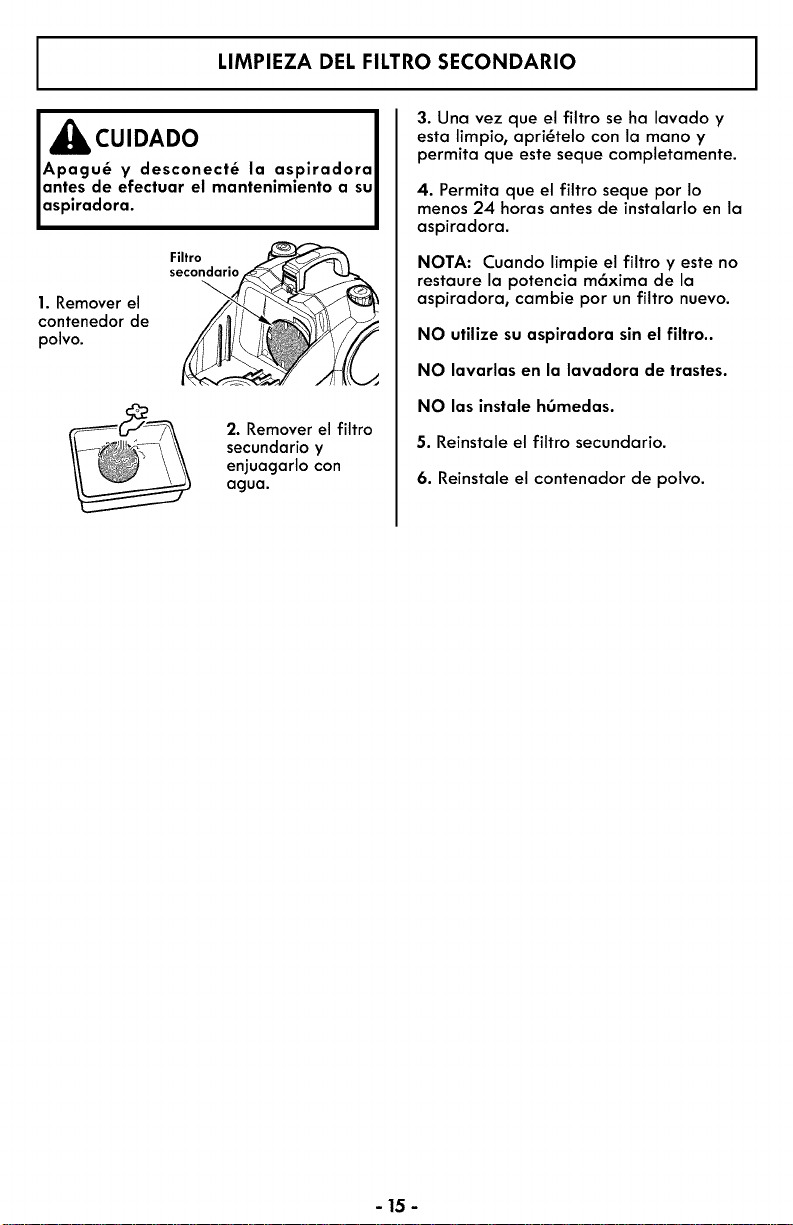
1. Remover el
contenedor de
polvo.
Filtro
secon___
2. Remover el filtro
secundarioy
enjuagarlo con
agua.
3. Una vez que el filtro se ha lavado y
esta limpio, apri_telo con la mano y
permita que este seque completamente.
4. Permita que el filtro seque pot Io
menos 24 horas antes de instalarlo en la
aspiradora.
NOTA: Cuando limpie el filtro y este no
restaure la potencia m6xima de la
aspiradora, cambie pot un filtro nuevo.
NO utilize su aspiradora sin el filtro..
NO lavarlas en la lavadora de trastes.
NO las instale h0medas.
5. Reinstale el filtro secundario.
6. Reinstale el contenador de polvo.
- 15 -
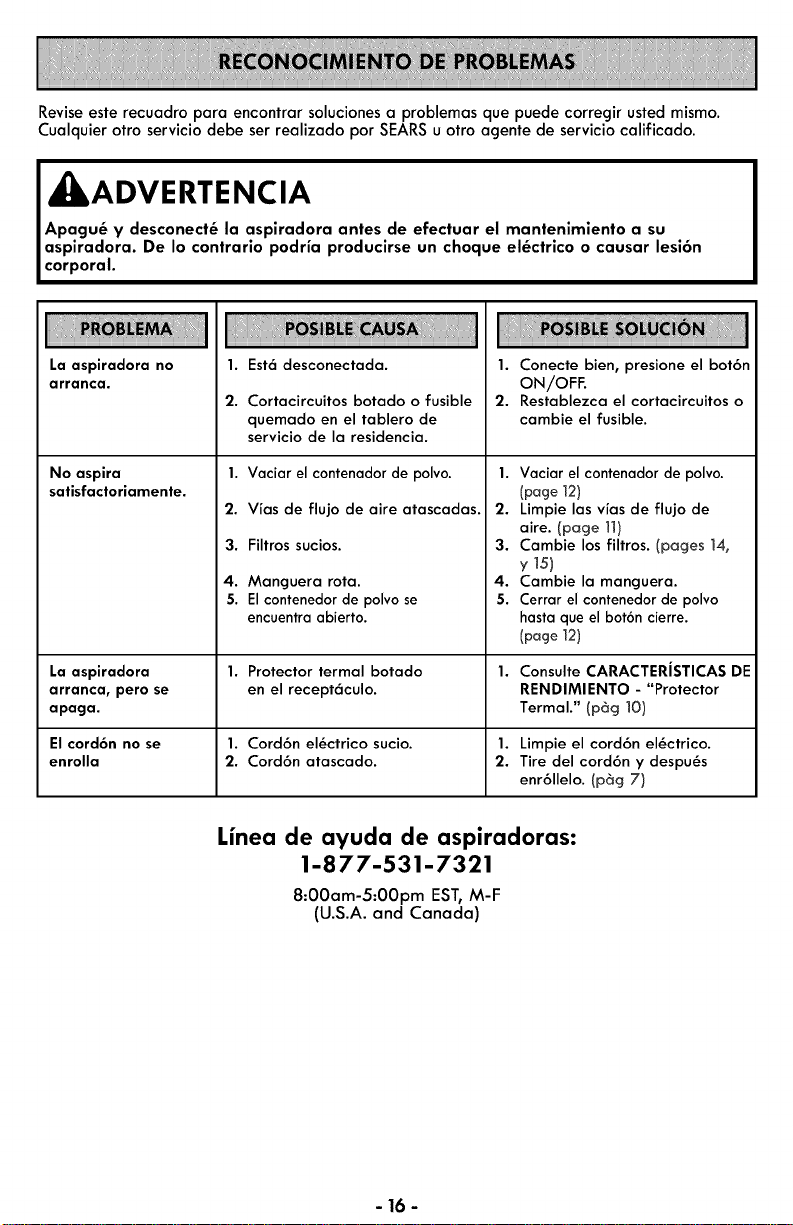
Reviseesterecuadroparaencontrarsolucionesaproblemasquepuedecorregirustedmismo.
CualquierotroserviciodebeserrealizadoporSEARSuotroagentedeserviciocalificado.
J ,ADVERTENCIA
Apagu_ y desconect_ la asplradora antes de efectuar el mantenlmlento a su
asplradora. De Io contrarlo podria produclrse un choque el_ctrlco o causar lesi6n
corporal.
La aspiradora no
arranca.
No aspira
satisfactoriamente.
1. Est6 desconectada.
2. Cortacircuitos botado o fusible
quemado en el tablero de
servicio de la residencia.
1. Vaciar el contenador de polvo.
2. Vias de flujo de aire atascadas.
3. Filtros sucios.
4. Manguera rota.
5. El contenedor de polvo se
encuentra abierto.
1. Conecte bien, presione el bot6n
ON/OFF.
2. Restablezca el cortacircuitos o
cambie el fusible.
1. Vaciar el contenador de polvo.
(page 12)
2. Limpie las vias de flujo de
aire. (page ]])
3. Cambie los filtros. (pages ]4o
y 15)
4. Cambie la manguera.
5. Cerrar el contenedor de polvo
hasta que el bot6n cierre.
(page ]2)
La aspiradora 1. Protector termal botado 1. Consulte CARACTERISTICAS DE
arranca, pero se en el recept6culo. RENDIMIENTO - "Protector
apaga. Termal." (p_g ]0)
Elcord6n no se 1. Cord6n el6ctrico sucio. 1. Limpie el cord6n el6ctrico.
enrolla 2. Cord6n atascado. 2. Tire del cord6n y despu_s
enr611elo. (p6g 7)
Linea de ayuda de aspiradoras:
1-877-531-7321
8:00am-5:OOpm EST,M-F
(U.S.A. and Canada)
- 16 -

- 17-

Your Home
For troubleshooting, product manuals and expert advice:
www.managemylife,com
For repair - in your home - of all major brand appliances,
lawn and garden equipment, or heating and cooling systems,
no matter who made it, no matter who sold it !
For the replacement parts, accessories and
owner's manuals that you need to do-it-yourself.
For Sears professional installation of home appliances
and items like garage door openers and water heaters.
1-800-4-MY-HOME ® Ca, anytime, day or night
(I-800-469-4663) (U.S.A. and Canada)
www,sears,com www,sears,ca
® Registered Trademark / TrvlTrademark of KCD IP, LLC in the United States, or Sears Brands, LLC in other countries
® Marca Registrada / TMMarca de Fabrica de KCD IP, LLC en Estados Unidos, o Sears Brands, LLC in otros paises
lqc
Marque de commerce / Marque depos6e de Sears Brands, LLC
P/N C01ZEDN00U00 - I<C01ZEDNZOU0