OWNER'S MANUAL
ROBOT CLEANER
Before beginning installation, read these instructions
carefully. This will simplify installation and ensure that the
product is installed correctly and safely. Leave these
instructions near the product after installation for future
reference.
ENGLISH
R5T-AUTO
MFL71751924
Rev.00_070323
www.lg.com
Copyright © 2023 LG Electronics Inc. All Rights Reserved.
global_main.book.book Page 1 Monday, July 3, 2023 4:15 PM
TABLE OF CONTENTS
This manual may contain images or
content that may be different from the
model you purchased.
This manual is subject to revision by the
manufacturer.
SAFETY INSTRUCTIONS
READ ALL INSTRUCTIONS BEFORE USE...........................................................3
WARNING............................................................................................................3
CAUTION .............................................................................................................8
BEFORE USING
Parts and Specifications ..................................................................................10
Charging............................................................................................................12
OPERATION
Control Panel ....................................................................................................15
Cleaning ............................................................................................................15
SMART FUNCTIONS
Using LG ThinQ Application............................................................................18
MAINTENANCE
Regular Cleaning..............................................................................................21
TROUBLESHOOTING
Before Calling for Service................................................................................25
global_main.book.book Page 2 Monday, July 3, 2023 4:15 PM
3
SAFETY INSTRUCTIONS
ENGLISH
SAFETY INSTRUCTIONS
READ ALL INSTRUCTIONS BEFORE USE
The following safety guidelines are intended to prevent unforeseen
risks or damage from unsafe or incorrect operation of the appliance.
The guidelines are separated into ‘WARNING’ and ‘CAUTION’ as
described below.
Safety Messages
WARNING
WARNING
• To reduce the risk of explosion, fire, death, electric shock, injury or
scalding to persons when using this product, follow basic
precautions, including the following:
Technical Safety
• Read all safety warnings and instructions. Use only manufacturer’s
recommended attachments.
• If the power supply cord is damaged, it must be replaced by an LG
Electronics service center or dealer in order to avoid a potential
hazard.
This symbol is displayed to indicate matters and operations
that can cause risk.
Read the part with this symbol carefully and follow the
instructions in order to avoid risk.
WARNING
This indicates that the failure to follow the instructions can
cause serious injury or death.
CAUTION
This indicates that the failure to follow the instructions can
cause the minor injury or damage to the appliance.
global_main.book.book Page 3 Monday, July 3, 2023 4:15 PM

4
SAFETY INSTRUCTIONS
• This appliance is not intended for use by persons (including children)
with reduced physical, sensory or mental capabilities, or lack of
experience and knowledge, unless they have been given supervision
or instruction concerning use of the appliance by a person
responsible for their safety. Children should be supervised to ensure
that they do not play with the appliance.
• Do not allow children or pets to to play with or hang on the appliance.
• Do not allow children or pets to to sit on the appliance.
• Do not use the appliance on a wet surface.
• Place the cords from other appliances out of the area to be cleaned.
• Do not operate the appliance in a room where an infant or child is
sleeping.
• The appliance only is intended for domestic use such as household
cleaning. Do not use it for commercial, experimental or industrial
purposes.
• Do not use in commercial applications such as workshops or garages
or around indoor swimming pools, or wet areas, etc.
• Before using this appliance, clear the floor of objects such as candles,
power cords, fragile objects, clothing, loose papers, and pull cords for
blinds or curtains.
• For your safety, do not remove the battery from the appliance. If you
need to replace the battery of the appliance, take it to an authorized
LG Electronics service centre or dealer for assistance.
• Do not stare into the laser beam.
• Potential dazzling visual effects may be caused by exposure to the
direct laser beam particularly in low ambient light.
Battery
• Never use the battery, adapter, and the home station from other
appliances with this appliance. Use only the battery and the home
station provided by LG Electronics.
• Never use the battery, adapter, and the home station from this
appliance with other appliances.
global_main.book.book Page 4 Monday, July 3, 2023 4:15 PM
5
SAFETY INSTRUCTIONS
ENGLISH
• Keep the batteries out of the reach of children. Swallowing the
batteries can lead to chemical burns, perforation of soft tissue, and
death. Seek medical attention immediately. Severe burns can occur
within 2 hours of swallowing.
• Unplug the power cord if the appliance will not be used for an
extended period of time and store it in a safe place away from heat
and children.
• Do not use modified or damaged batteries.
• When disposing of the battery or the appliance, remove the battery
from the appliance and safely dispose of it.
• Do not use the battery if it is leaking or has changed shape. If battery
fluid comes into contact with skin or eyes, thoroughly wash the
affected area immediately with clean water and seek medical
attention.
• Do not disassemble or short-circuit the battery. Do not crush or
dismantle the battery.
• Do not heat or place the battery near any heat source or direct
sunlight. Do not subject the battery to mechanical shock.
• Have the battery replaced when it is no longer able to hold a charge.
For replacement, contact an authorized LG Electronics service centre
for alternative battery options.
• When disposing of this appliance, follow regulations for disposal of
rechargeable lithium-ion batteries.
• Follow all local ordinances and regulations when handling or
disposing of the battery.
Battery Specifications
Model Name
INR18650F9M-4S1P
Type
Rechargeable Lithium-ion Battery
Rated Capacity
DC 14.4 V, 3200 mAh
global_main.book.book Page 5 Monday, July 3, 2023 4:15 PM

6
SAFETY INSTRUCTIONS
Installation
• Charge, store and operate this appliance in room temperature
environments only.
• Do not use a multiple socket outlet such as a power board, an
extension power cable or adapter with this appliance.
• Place the home station on a firm, level surface.
• Charge and store the appliance in a well-ventilated place.
• Do not store the product body, power cord or home station near
heating devices or open flames.
• Do not operate or store the appliance at temperatures below 5 °C or
above 38 °C.
• This appliance is designed to be plugged into a standard outlet only.
The appliance may not be used with any type of power converter.
• Do not plug the appliance into a damaged or loose outlet.
• Dispose of all packaging materials (such as plastic bags and
styrofoam) away from children. The packaging materials can cause
suffocation.
Operation
• Read all instructions before using the appliance, and save these
instructions.
• Do not handle the power cord, plug, home station or product body
with wet hands.
• Wipe any moisture or dirt off the cord or plug with a dry cloth.
• Never unplug the appliance by pulling on the power cord. Always grip
the plug firmly and pull straight out from the outlet.
• Never attempt to operate this appliance if it is damaged,
malfunctioning, partially disassembled, or has missing or broken
parts, including a damaged cord or plug. Take it to an authorized LG
Electronics service centre or dealer for assistance.
• Do not apply excessive force to the power cord to bend it, or place it
under a heavy object as this will damage it.
• Do not plug the appliance into a damaged or loose outlet.
global_main.book.book Page 6 Monday, July 3, 2023 4:15 PM

7
SAFETY INSTRUCTIONS
ENGLISH
• Push the power plug firmly into the wall outlet so that it is not loose.
• Before using the appliance, remove any wire or string on the floor.
• Do not cover the power cord with a rug or carpeting.
• If the product makes a strange noise or emits an odour or smoke,
discontinue use and contact an LG Electronics customer information
centre.
• Only qualified technicians or service personnel from LG Electronics
may disassemble, repair or modify the appliance.
• Never insert a sharp metal object such as a pin, nail or knife in a hole
or gap in the product body or the home station.
• Do not clean up liquids with this appliance. Make sure that no water,
beverage or detergent gets inside the product body or the home
station.
• Do not use the appliance to clean up blades, thumb tacks, sawdust,
sharp objects, or hot or cold ashes.
• Keep clothing and hair, fingers, or other parts of the body away from
openings and moving parts.
• Do not use in an enclosed space where vapors are present from paint
thinner, mothproofing substances, flammable dust or other
explosive or toxic materials.
• Do not touch the charging terminals on the appliance or the home
station, or insert an electrified object inside the appliance or the
station.
• If the earth leakage breaker is tripped when the product is put on the
home station, immediately remove the appliance from the home
station. Contact an LG Electronics customer service centre.
• Do not use or store a heating device or flammable substance (ether,
benzene, alcohol, chemicals, combustible sprays, insecticide, air
freshener or cosmetics) in close proximity to the appliance.
• Do not attempt to clean up liquids (water, beverages), smelly
substances (candy, chocolate, pet excrement), metal objects (blades,
pins), flammable substances, surfactants, or glass shards with this
appliance.
global_main.book.book Page 7 Monday, July 3, 2023 4:15 PM
8
SAFETY INSTRUCTIONS
• In the event of a gas leak (natural gas, propane gas, etc.), do not
operate this or any other appliance. Open a window or door to
ventilate the area immediately.
• Never allow any water, beverage or detergent to get inside the
battery.
• Make sure to unplug the power cord when cleaning or maintaining
the home station.
Maintenance
• Turn the power supply off immediately if any abnormal sound, odor,
or smoke is generated from the appliance by removing it from the
Home Station and turning off the main switch on the rear side of the
appliance.
• Do not spray or use inflammable materials, surfactants, or drinking
water in the vicinity of the appliance.
- Inflammable materials: gasoline, thinner, etc.
- Surfactant: detergent, articles for bath, etc.
CAUTION
CAUTION
• To reduce the risk of explosion, fire, death, electric shock, injury or
scalding to persons when using this product, follow basic
precautions, including the following:
Installation
• Remove any cables or string from the floor before starting.
• Make sure the appliance is not put on a table or desk, with the power
ON.
Operation
• Do not use the appliance around a banister, staircase or any other
dangerous place.
global_main.book.book Page 8 Monday, July 3, 2023 4:15 PM

9
SAFETY INSTRUCTIONS
ENGLISH
• Do not use the appliance when the dust bin is completely full.
• Use a protective cover on the chair leg, table leg or other narrow
pieces of furniture to reduce the possibility of collision or scratch.
• Do not put water, detergent, etc. into or onto the appliance.
• Ensure that liquids do not seep into the appliance. If liquid gets inside
of the appliance, turn off the power supply and take it to the
authorized LG Electronics service center or dealer for assistance.
• Remove thin mats or carpets that may be damaged.
• Do not turn over the robot mop and wet the mop pad with water
while the mop pad is attached to the robot mop.
• Wet floors can pose a slip hazard. Allow floors to dry completely
before allowing anyone to walk on them.
• Do not clean carpets with the robot mop. The carpet may get wet or
stick to the velcro, causing damage to the carpet.
• Do not clean a coated floor with the robot mop. Cleaning a coated
floor repeatedly could cause the coating to peel off.
• Do not use on PVC and PU mats for infants and children as friction
may cause the motor to overheat.
• Do not fill the water tank with liquid other than room temperature
water. Liquids such as hot water, detergent, fabric softener or aroma
oil must not be used.
• Close the door to prevent the robot vacuum cleaner from entering
the bathroom before using it.
global_main.book.book Page 9 Monday, July 3, 2023 4:15 PM
10
BEFORE USING
BEFORE USING
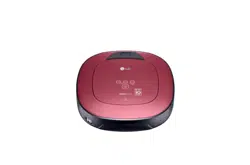
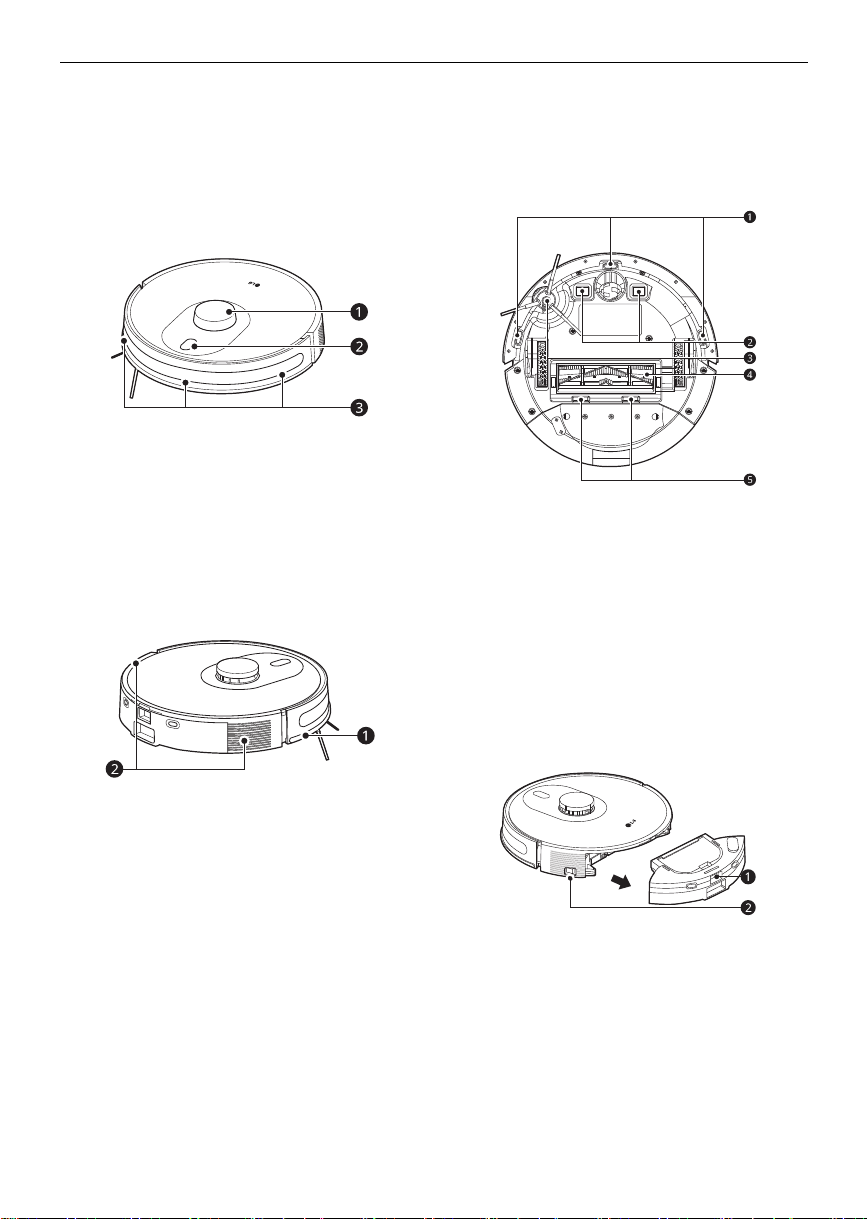
Parts and Specifications
Front View
a
LIDAR Sensor
b
Control Panel
c
Infrared sensor for charging
Side View
a
Bumper
b
Ventilation Port
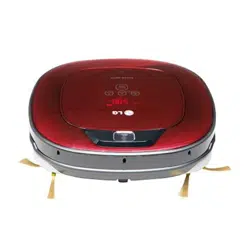
Bottom View
a
Cliff Detection Sensors
b
Charging Terminals
c
Side Brush
d
Brush
e
Brush Cover Release Buttons
Rear View
a
Dust Bin and Water Tank Release Button
b
Main Power Switch
global_main.book.book Page 10 Monday, July 3, 2023 4:15 PM
11
BEFORE USING
ENGLISH
Dust Bin and Water Tank
a
Dust Bin
b
Water Tank
c
Filter
d
Suction Inlet
e
Water Inlet
f
Rear Charging Terminal
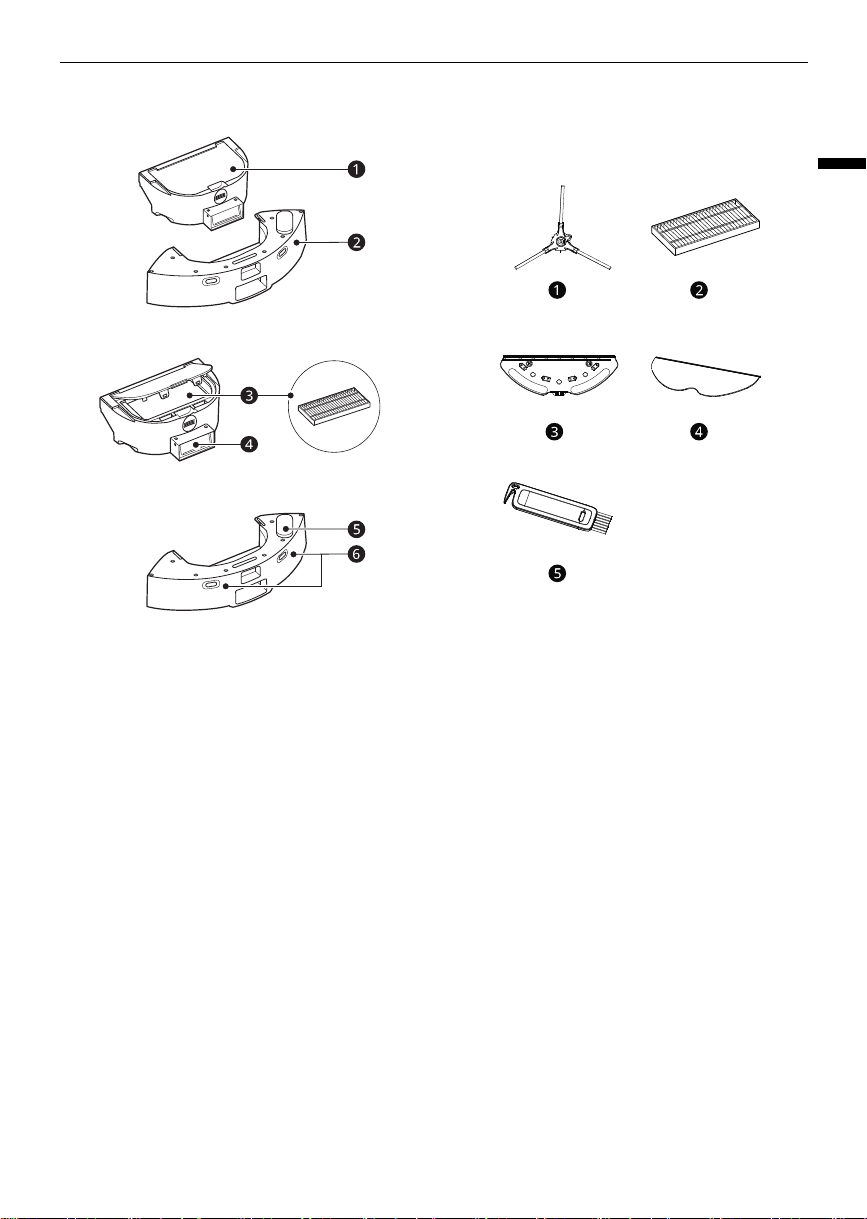
Accessories
Included Accessories
a
Side Brush
b
Filter
c
Mop Holder
d
Mop
e
Cleaning Brush
Specifications
This product is a Class I laser device of which
conformity assessment is conducted in accordance
with the IEC 60825-1.
Robot Cleaner
•
Model
: R5T-AUTO
•
Maximum Physical Dimensions
: 342 mm
(Width) × 342 mm (Depth) × 94.5 mm (Height)
•
Power Consumption
- 30 W (
Mid
level)
•
Charging Time
: Approximately 5 hours
•
Cleaning Time (Based on general wooden
floor)
global_main.book.book Page 11 Monday, July 3, 2023 4:15 PM
12
BEFORE USING
- Up to 140 minutes (
Low
level)
- Up to 110 minutes (
Mid
level)
- Up to 80 minutes (
High
level)
- Up to 60 minutes (General mode with Turbo
function)
Charging Station
Charging
Installing the Home Station
Always keep the home station plugged in when in
use. If the home station is not plugged in, the robot
cleaner will not return to the home station to
charge automatically when the battery is low or
when the cleaning is completed.
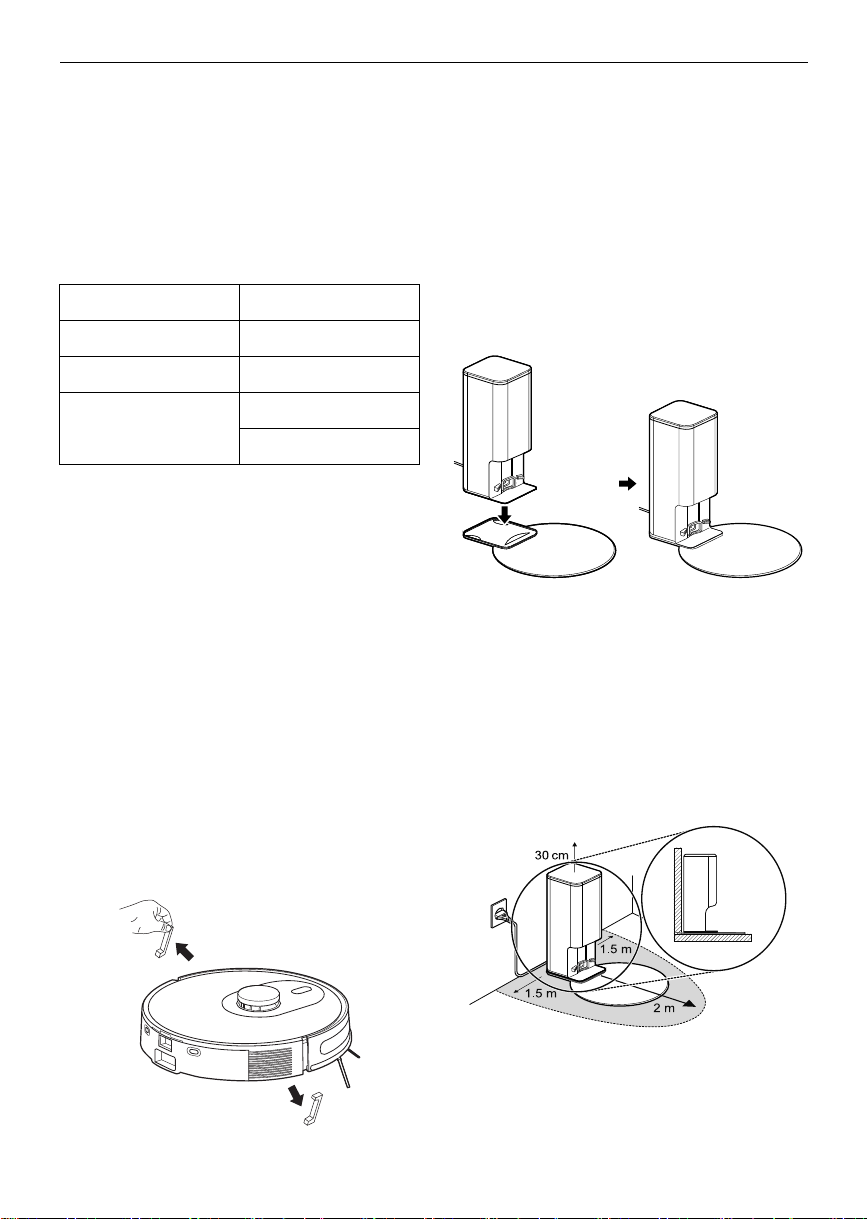
1
Before use, remove both the foam strips from
behind the collision bumper.
• If the foam strip are not removed, it may be
difficult for the Robot Cleaner to find the
charging station or product performance
may be adversely effected, and may cause
damage to furniture and skirtings.
2
Remove the protective film attached to the
charging station and the Robot Cleaner.
• If the protective film is not removed, it may
be difficult for the Robot Cleaner to find the
charging station or product performance
may be adversely effected.
3
Install the charging station on top of the Floor
Damage Prevention Plate. Install the charging
station by lowering it into position.
4
Place the home station on a flat and firm
indoor floor and place it hard against a suitable
wall in your selected location. Do not install,
store or place the home station charging dock
or the robot cleaner in any outdoor or
sheltered outdoor location.
• Remove all obstacles from around the home
station.
5
Connect the power adapter to a wall outlet.
Model T-RB4**
Input 220 - 240 V~ 50 Hz
Output DC 24.5 V / 1.45 A
Power Consumption 1450 W (Cleaning)
0.4 A (Charging)
global_main.book.book Page 12 Monday, July 3, 2023 4:15 PM
13
BEFORE USING
ENGLISH
NOTE
• If two robot cleaners are used together, there
should be at least 1.5 m distance between home
stations.
- If the home stations are too close together,
the robot cleaner may not be able to return to
its home station.
• Do not install the home station on a carpet.
• If the charging station is not plugged into a
power outlet, the Robot Cleaner battery will not
charge.
• Do not install the charging station in a narrow
space. Doing so will make it difficult for the
Robot Cleaner to find the charging station.
• Make sure that the charging station is plugged
into a power outlet during use. If the power
supply is not connected to the charging station,
the Robot Cleaner cannot automatically returns
to the charging station to charge the battery
when it is low or when the cleaning is completed.
Charging the Robot Cleaner
Always keep the power plug of the home station
connected to an electrical outlet. The robot cleaner
can only find the home station for it to recharge
when power is supplied to the home station. If the
home docking station is moved while the robot
cleaner is cleaning, then it willnot be found by the
robot cleaner when it needs to return for re
charging or when cleaning is completed.
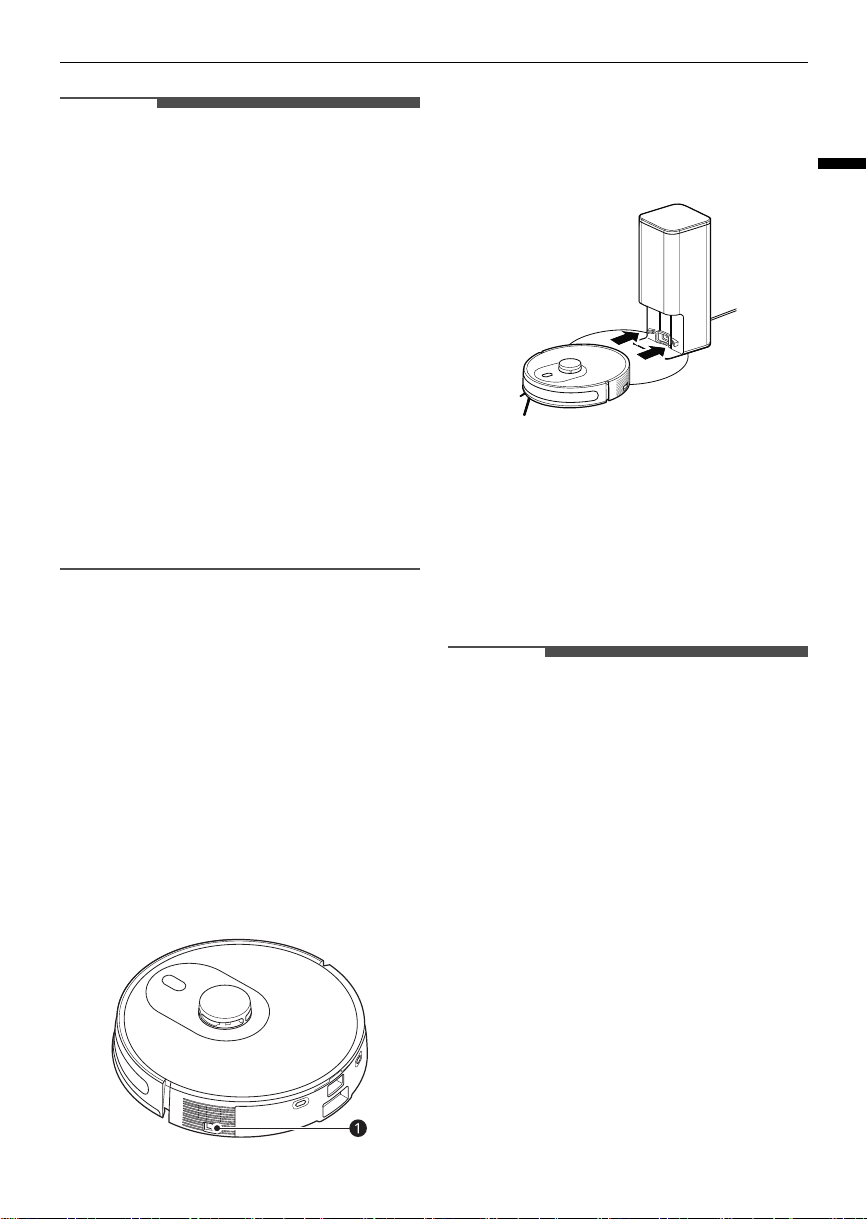
1
Turning on the Power Supply. Turn the main
power switch ON
a
at the back of the robot
cleaner to turn on the power supply.
2
Place the robot cleaner on the home station,
align the centre of the robot cleaner with the
centre of the home station and push the robot
cleaner from behind.
• When charging begins, the status indicator
on the Robot Cleaner will blink pink.
• The robot cleaner returns to the home
station on its own to charge the battery
when cleaning is finished or battery
becomes low. If the robot cleaner returns to
the home station due to low battery, it will
resume cleaning after the battery is fully
charged.
NOTE
• The battery is a consumable. The battery life and
service life will decrease based on the years of
usage and hours of use.
• If the robot cleaner cannot be charged without
presenting with a problem or malfunction, check
if the charging terminals are contaminated by a
foreign substance, and clean the home station
with a dry towel.
• If charging is still not available after cleaning,
check if the home station and the adapter are
connected properly.
• Fully charge the battery every 6 months when
not using the robot cleaner or if keeping in
storage for a long time.
- Storing the battery for a long period of time
without charging may cause battery failure.
global_main.book.book Page 13 Monday, July 3, 2023 4:15 PM

14
BEFORE USING
NOTE
• When the main power switch is turned off, the
battery % display in the ThinQ app does not
change when charging. Turn on the main power
switch on the back of the robot vacuum cleaner.
Charging is possible even when the main power
switch is turned off.
global_main.book.book Page 14 Monday, July 3, 2023 4:15 PM
15
OPERATION
ENGLISH
OPERATION
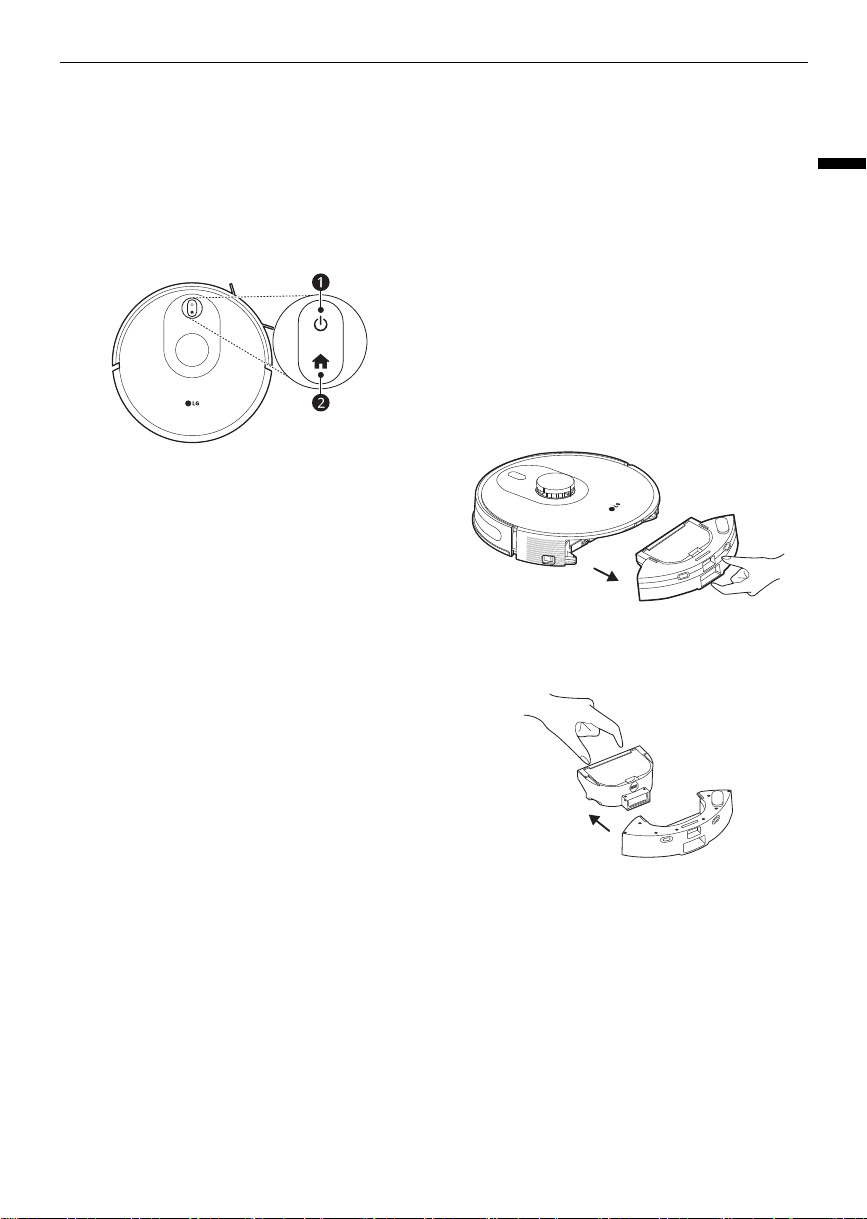
Control Panel
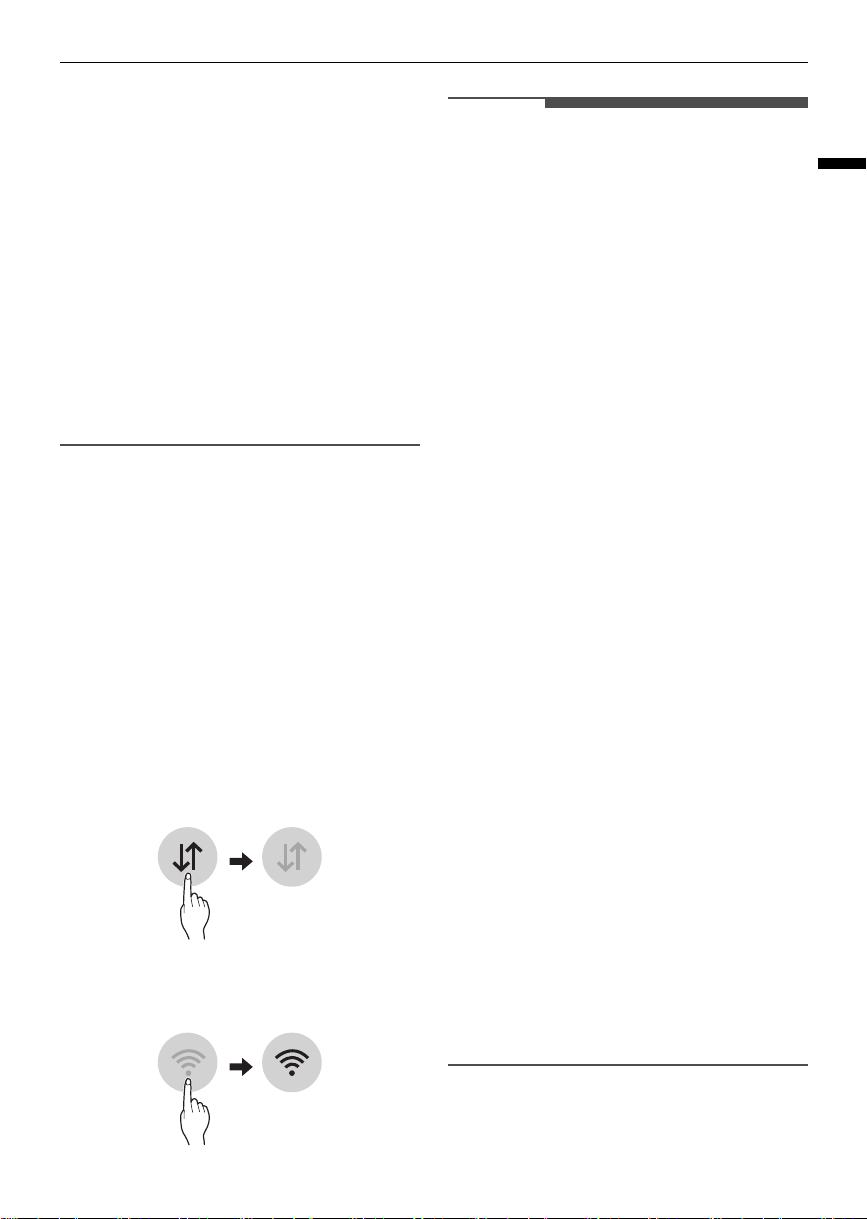
Press Buttons
Press the button icons to start the robot cleaner.
a
t
Button
• Press and hold
t
button for 3 seconds to turn
the robot cleaner on or off.
- The button can't be pressed when in charge.
• Press the button to start or pause cleaning when
the robot cleaner is on.
- For the first use, please turn the main power
switch ON.
b
h
Button
• Press
h
button once to send the robot cleaner
to its home station and charge.
• Press
h
button again to cancel.
c
t
+
h
Button
• Press and hold
t
+
h
button for 3 seconds to
connect the robot cleaner to the
LG ThinQ
application.
Status Display
a
Robot Status Display
• Battery level
2
20% : White
• Battery level
3
20% : Pink
• Charging : Breathing blinking in pink
• Fault status : Red
b
Robot Wi- Fi Indicator
• Wait for connection : Blinking fast in white
• Being connected to Wi-Fi : Blinking fast in white
• Wi-Fi connected : White
Cleaning
Using the Mop
1
Take out the dustbin and water tank.
2
Take out the dustbin.
3
Remove the Water Inlet cap and fill the water
tank from a filtered or potable water source.
Do not use other liquids or chemicals as they
global_main.book.book Page 15 Monday, July 3, 2023 4:15 PM
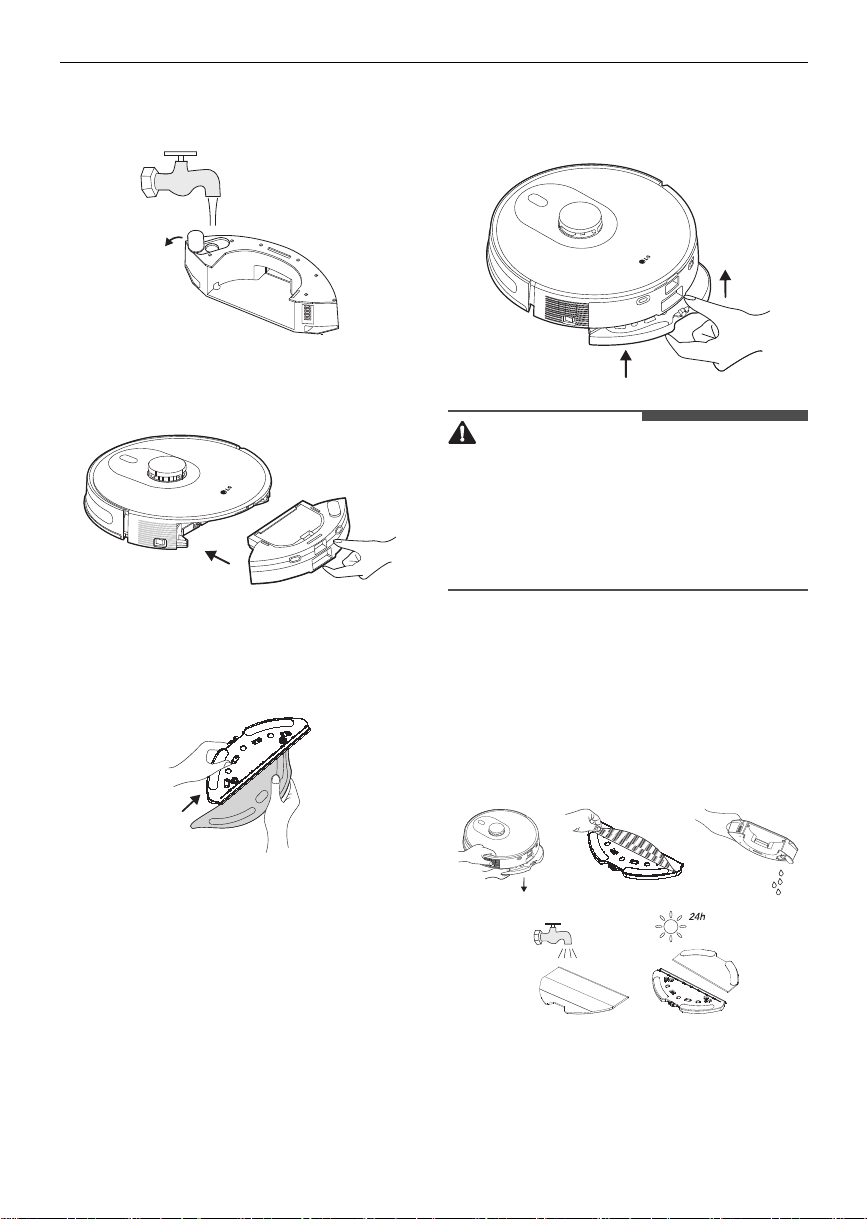
16
OPERATION
can cause property damage and product
malfunction.
4
Re-install the dustbin and water tank in place.
5
Install the mop on the mop holder.
• Before attaching the mop, wet the mop with
enough water and wring the mop.
6
Insert the mop holder into the bottom of the
robot cleaner until you hear a click.
CAUTION
• If the mop is excessively wet, the floor may
become slippery and cause people to slip.
• Do not leave the robot cleaner in the home
station or on the floor for a long time with wet
mop attached. Doing so may cause floor damage
or odours.
Drying the Water Tank and
Washing the Mop
It is recommended that after each use of the mop
holder, take out the mop holder from one side,
empty the water tank, rinse the mop with water,
and air dry it.
If you wish to completely remove remaining water
from the water tank, use the following additional
guidelines. This is recommended if the mopping
function is not used daily.
global_main.book.book Page 16 Monday, July 3, 2023 4:15 PM
17
OPERATION
ENGLISH
1) With the water tank in an upright position,
attach a paper towel or a cloth to the outlet
and remove remaining water.
2) Remove as much water from the water tank as
possible, tilt the water tank towards the water
tank stopper so as to collect the water, and
then dry it by laying it upside down on a paper
towel or a cloth.
CAUTION
• Do not use the mopping mode on any carpet.
• When the robot cleaner is being charged or idle,
please remove the mop holder.
• In order to achieve better mopping results, it is
recommended to sweep your floor three times
with the robot cleaner before installing the mop
holder.
• To avoid damaging your wood floor, please
make sure to take out the mop holder
immediately after floor mopping is complete. Or
install the home station onto the Floor Protector
Plate (optional).
• When mopping is paused or finished, the robot
cleaner will automatically cut off the water to the
mop pad. However, the mop remains wet and
should not be left attached as it can case odors.
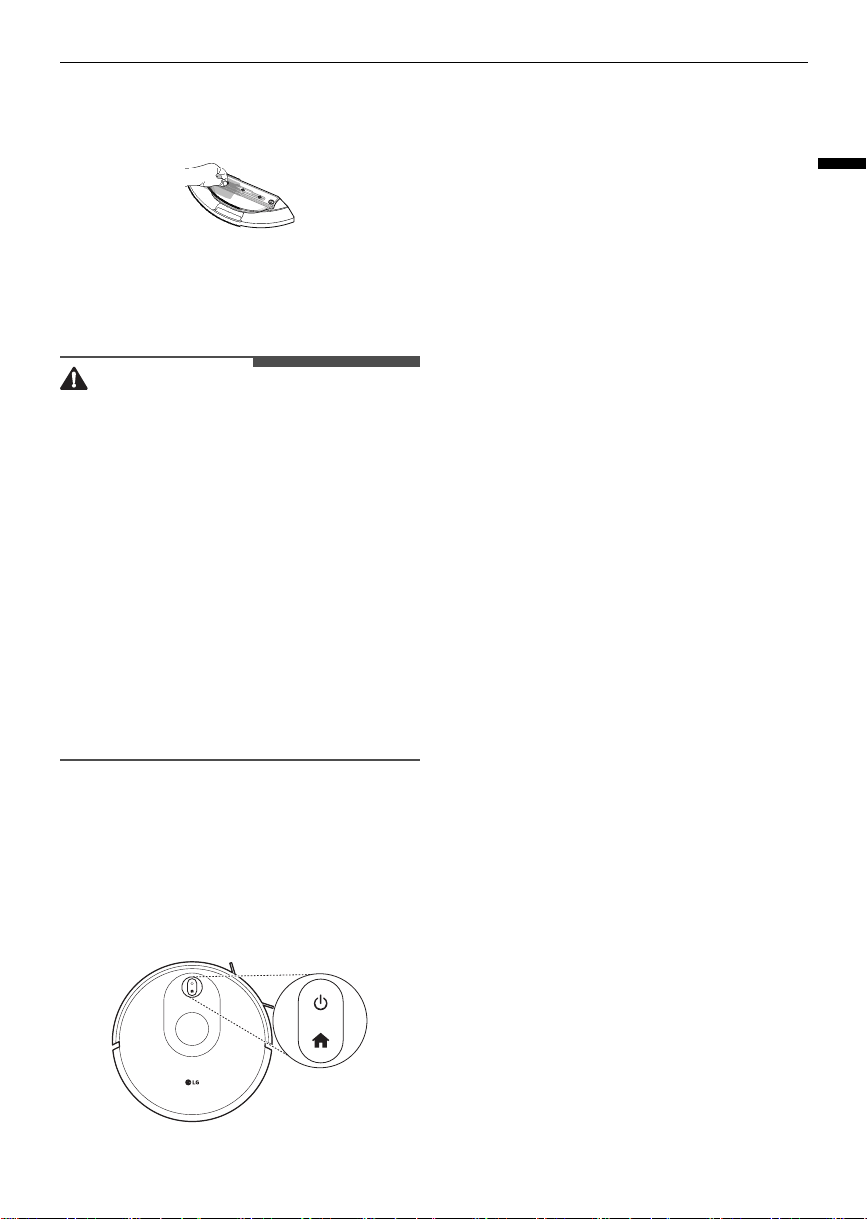
Restarting the System
In standby mode, press and hold the home button
for 15 seconds to reset the system. After resetting
the system, the robot cleaner will lose the original
settings including the map and do not clean areas.
global_main.book.book Page 17 Monday, July 3, 2023 4:15 PM
18
SMART FUNCTIONS
SMART FUNCTIONS
Using LG ThinQ Application
LG ThinQ Application Features
•
Suction Level Adjustment
The user can use the mobile APP to switch
between four suction modes:
Low
,
Mid
,
High
and
Turbo
. The default is the
Mid
mode.
•
Smart Turbo
Automatically detects and cleans carpets using
powerful suction.
Smart Turbo settings can be turned on and off in
the
LG ThinQ
app. If the suction level is
Turbo
,
detecting the carpet does not increase the
suction power.
•
Water Level Adjustment
The user can switch between
Dry
,
Low
,
Medium
and
High
water level settings using the mobile
APP, and the default is
Low
water level.
•
Simple Control
- Operate the robot cleaner manually from the
Simple Control
screen.
•
Volume Setting
- The volume of the product's voice guidance
can be adjusted with the
LG ThinQ
app.
•
Language Setting
- The user can switch the languages.
•
Locate
- When the robot cleaner is powered on and
you press the Locate button, the robot cleaner
will make a sound to inform you of its current
location.
•
Schedule Cleaning
- Use Schedule Cleaning to set a regular
cleaning time for the robot cleaner to begin
cleaning.
•
Cleaning Diary
- The Cleaning Diary records the date, cleaning
mode, and start and completion times of each
cleaning and shows the cleaning history.
•
My Zone
With the
My Zone
feature and the
LG ThinQ
application, a designated area of the mapped
home can be selected for specific cleaning
attention.
-
Specified Area Cleaning
: Allows you to select
part of the mapped area to clean or to clean
selected areas in a certain order.
-
Do Not Clean Area
: Exclude certain areas
from cleaning, such as bathrooms or pet
zones, if desired. If
Do Not Clean Areas
are
set too close together, the robot cleaner may
be unable to clean between them.
NOTE
• If you change your wireless router, Internet
service provider, or password, delete the
connected appliance from the
LG ThinQ
application and connect it again.
• This information is current at the time of
publication. The application is subject to change
for product improvement purposes without
notice to users.
• If you press the setting button at the top right of
the screen to clean the selected area, you can
edit the area and set the area to be cleaned.
• Set the cleaning prohibited area to prevent the
robot vacuum from falling or being constrained
to clean.
- If it falls on the toilet or hallway
- If you are constrained by a threshold or under
a sofa
• When setting the cleaning prohibited area,
consider the movement error and set the
prohibited area large.
• If you set the no-clean area while the product is
running, it stops cleaning and sets the
prohibited area. At this time, you can continue
cleaning after setting the prohibited area in a
paused state during cleaning.
• If you want to save the drawing and prohibited
area settings, press the power button of the
robot vacuum cleaner outside the charging
station for 3 seconds.
• Drawings may be deleted if the robot vacuum
cleaner's main power switch is turned off.
global_main.book.book Page 18 Monday, July 3, 2023 4:15 PM
19
SMART FUNCTIONS
ENGLISH
However, if the drawing is saved by pressing the
power button for 3 seconds, it will not be
deleted.
• If the drawing is distorted or there are missing
spaces, initialize the drawing by turning the
main power switch of the robot vacuum cleaner
off and on before saving the drawing.
• The robot vacuum cleaner updates the drawing
every time it cleans. If the robot vacuum cleaner
is turned off while cleaning, the drawings up to
that point are saved in the
LG ThinQ
app.
• After the drawing is completely saved, you can
delete the drawing by pressing the charging
button on the robot vacuum cleaner for more
than 15 seconds. At this time, the product is
initialized and reconnect to the
LG ThinQ
app.
Before Using LG ThinQ
Application
1
Use a smartphone to check the strength of the
wireless router (Wi-Fi network) near the
appliance.
• If the distance between the appliance and
the wireless router is too far, the signal
becomes weak. It may take a long time to
register or fail to install the application.
2
Turn off the
Mobile Data
or
Cellular Data
on
your smartphone.
3
Connect your smartphone to the wireless
router.
NOTE
• To verify the Wi-Fi connection, check that Wi-Fi
Indicator on the control panel is lit.
• The appliance supports 2.4 GHz Wi-Fi networks
only. To check your network frequency, contact
your Internet service provider or refer to your
wireless router manual.
•
LG ThinQ
is not responsible for any network
connection problems or any faults,
malfunctions, or errors caused by network
connection.
• The surrounding wireless environment can
make the wireless network service run slowly.
• If the appliance is having trouble connecting to
the Wi-Fi network, it may be too far from the
router. Purchase a Wi-Fi repeater (range
extender) to improve the Wi-Fi signal strength.
• The network connection may not work properly
depending on the Internet service provider.
• The Wi-Fi may not connect or the connection
may be interrupted because of the home
network environment.
• If the appliance cannot be registered due to
problems with the wireless signal transmission,
unplug the appliance and wait about a minute
before trying again.
• If the firewall on your wireless router is enabled,
disable the firewall or add an exception to it.
• The wireless network name (SSID) should be a
combination of English letters and numbers. (Do
not use special characters.)
• Smartphone user interface (UI) may vary
depending on the mobile operating system (OS)
and the manufacturer.
• If the security protocol of the router is set to
WEP
, network setup may fail. Change the
security protocol (
WPA2
is recommended), and
register the product again.
• If the connection with the
LG ThinQ
is lost while
using the product, press and hold the power
button for 3 seconds to turn the product off and
then on again.
global_main.book.book Page 19 Monday, July 3, 2023 4:15 PM

20
SMART FUNCTIONS
Installing the LG ThinQ
Application
Search for the
LG ThinQ
application from the
Google Play Store or Apple App Store on a
smartphone. Follow instructions to download and
install the application.
RF Radiation Exposure
Statement
This equipment shall be installed and used at a
minimum distance of 20 cm from the human body.
Open Source Software Notice
Information
To obtain the source code that is contained in this
product, under GPL, LGPL, MPL, and other open
source licenses that have the obligation to disclose
source code, and to access all referred license
terms, copyright notices and other relevant
documents, please visit https://
opensource.lge.com.
LG Electronics will also provide open source code to
you on CD-ROM for a charge covering the cost of
performing such distribution (such as the cost of
media, shipping, and handling) upon email request
to opensour[email protected]m.
This offer is valid to anyone in receipt of this
information for a period of three years after our
last shipment of this product.
global_main.book.book Page 20 Monday, July 3, 2023 4:15 PM
21
MAINTENANCE
ENGLISH
MAINTENANCE
Regular Cleaning
WARNING
• Unplug the appliance before cleaning to avoid
the risk of electric shock. Failure to follow this
warning can cause serious injury, fire, electric
shock, or death.
CAUTION
• Do not wipe the robot cleaner with a volatile
solvent or an organic solvent (thinner, solvent,
acetone, etc.) Doing so will cause product
damage.
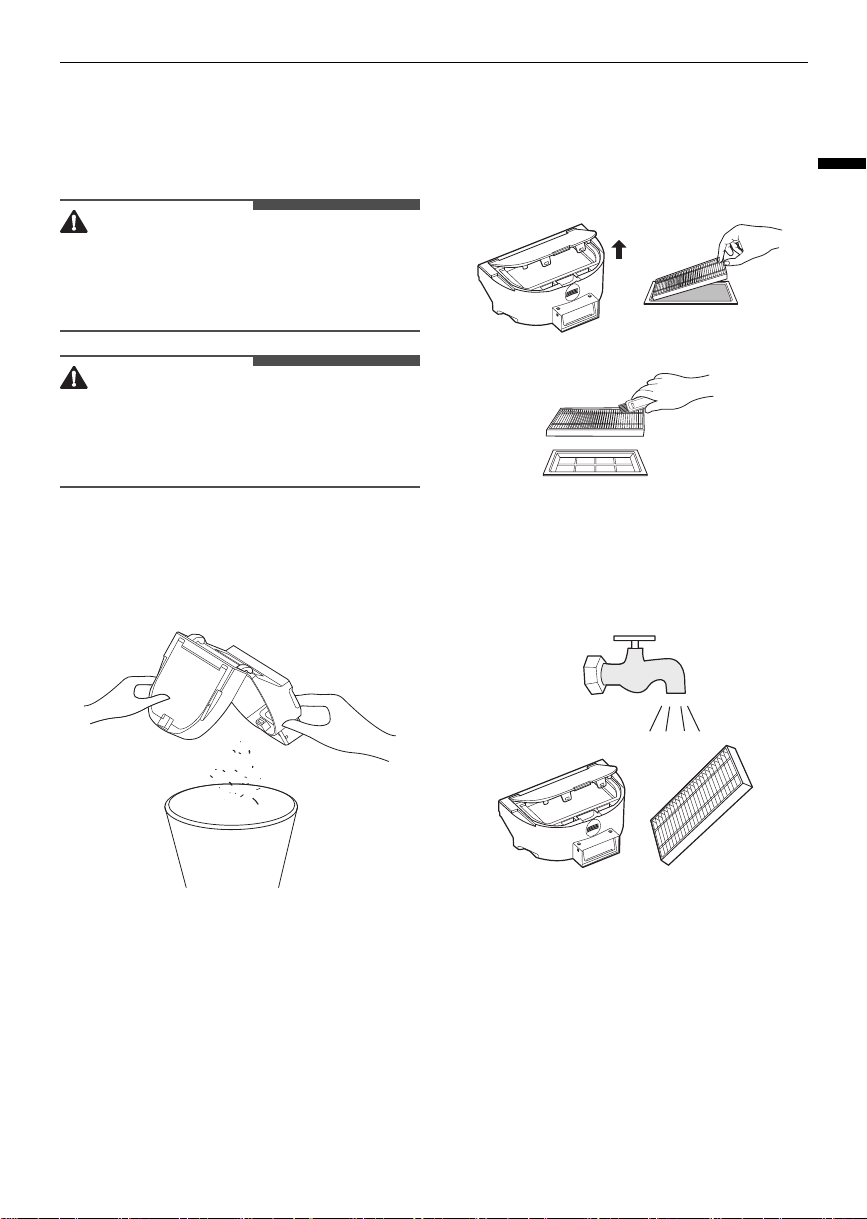
Cleaning the Dust Bin
1
Open the dustbin, tap it to knock off excess
dirt.
2
Remove the filter, and clean filters with a
cleaning brush.
3
Flush the water tank, dustbin and filter
thoroughly with water as necessary (Note:
Filters shall not be cleaned with hot water or
detergent).
4
After cleaning, the water tank, the dustbin and
the filter must be thoroughly air-dried. (Note:
Repeated rinsing will destroy the high-
global_main.book.book Page 21 Monday, July 3, 2023 4:15 PM
22
MAINTENANCE
performance filter material and make it
ineffective.)
5
Reassemble the air-dried water tank, dustbin
and filter, and install them back into the robot.
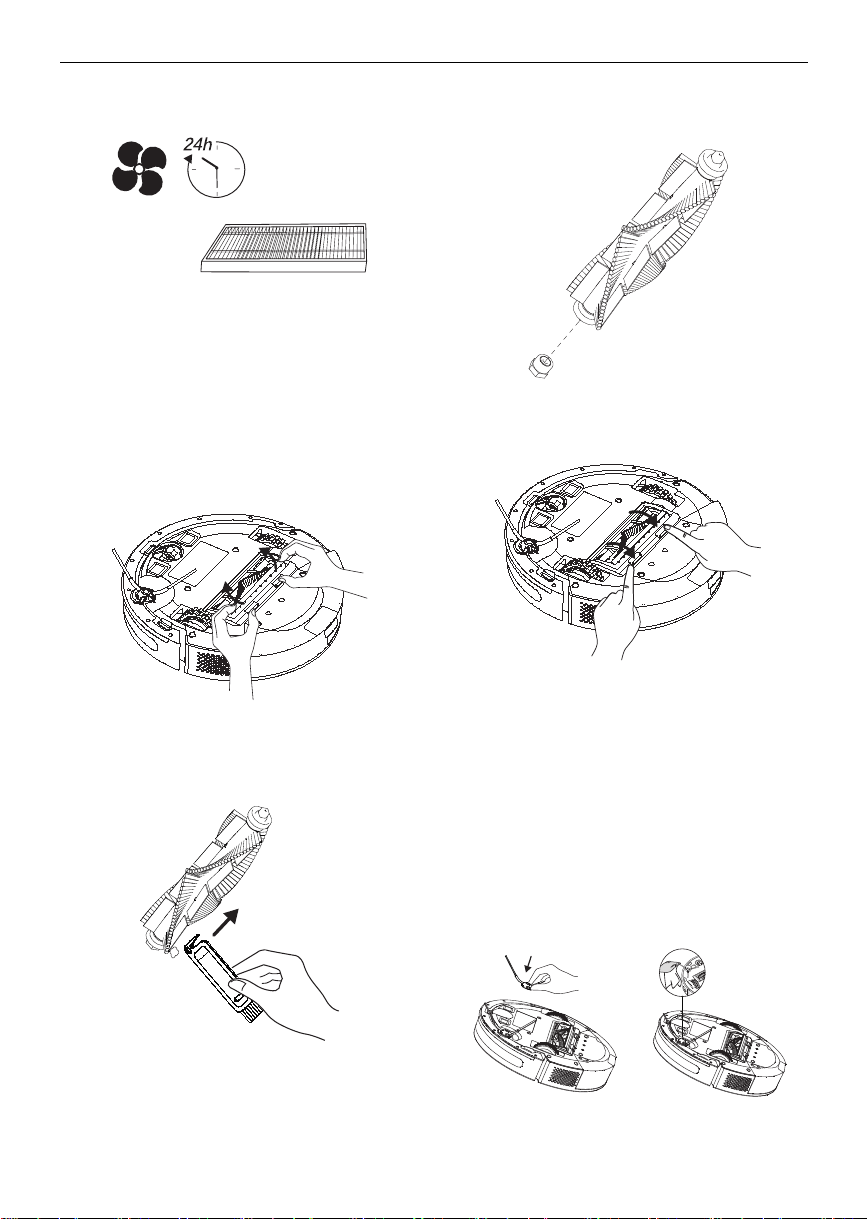
Cleaning the Brush
1
Take out the brush cover and brush.
2
Clean the brush with a cleaning tool. The blade
can cut off the hair entangled on the brush.
3
Remove the roller at one end of the brush and
clean the hair entangled on the roller.
4
After cleaning, re-install the brush in place.
Cleaning the Side Brush
1
Remove side brush, clear it of hair or foreign
matters, and decide whether to use a wet cloth
based on your personal needs.
2
Re-install the side brush and press it tightly to
ensure it is installed in place.
global_main.book.book Page 22 Monday, July 3, 2023 4:15 PM
23
MAINTENANCE
ENGLISH
NOTE
• It is recommended to replace side brush every 3-
6 months to ensure cleaning results.
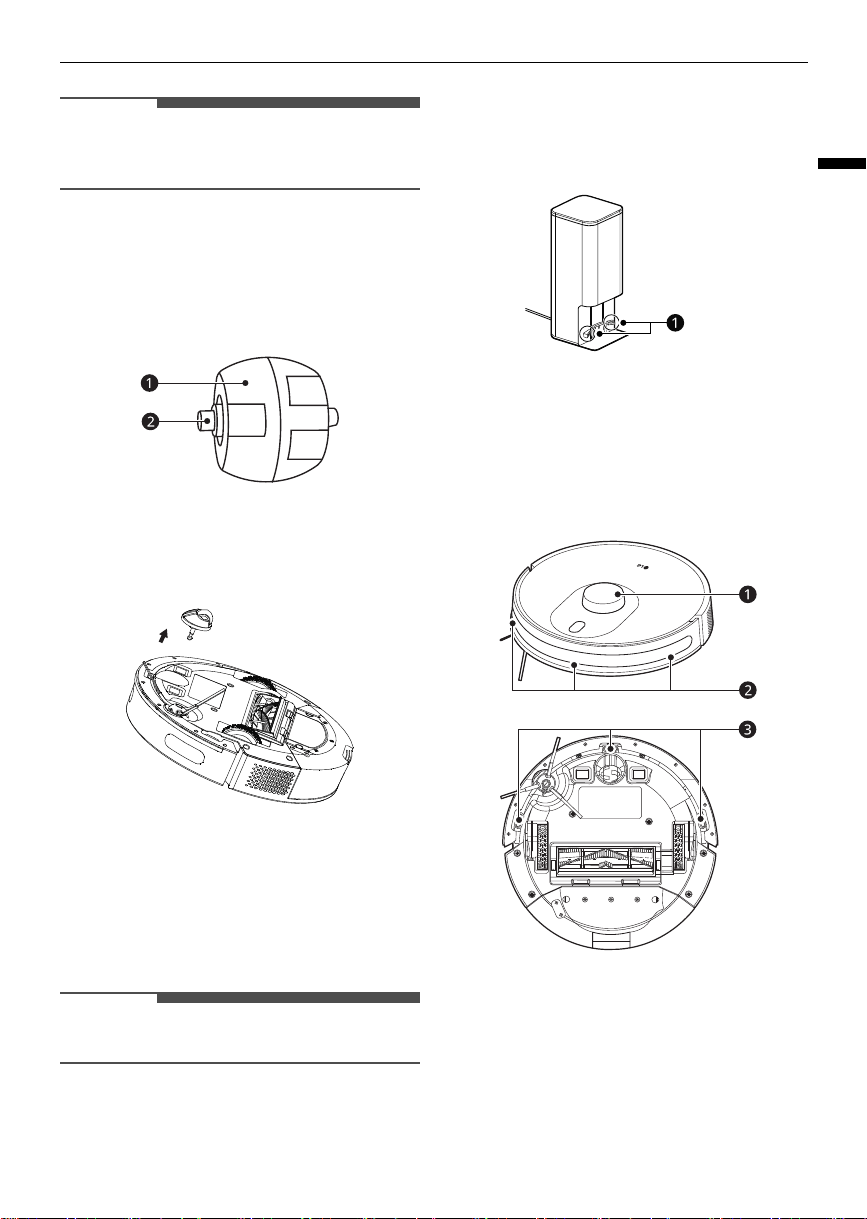
Cleaning the Front Wheel
Hair or dust particles tend to affix to the universal
wheel. The front wheel must be cleaned regularly
or as needed.
a
Wheel
b
Shaft
1
Pull up front wheels to take them out.
2
Clean any hair or sundries entangled around
front wheels or in any front wheel chamber.
3
Reinstall front wheels and push them in till they
click into place.
NOTE
• Please do not rinse the front wheel with water.
Cleaning the Charging Dock
Please clean regularly, and wipe dust off them with
a soft dry cloth or sweep brush.
a
Charging Terminals
Cleaning the Sensors
Please clean sensors regularly, and wipe dust off
them with a soft dry cloth or sweep brush.
a
LIDAR Sensor
b
Infrared Sensor for Charging
c
Cliff Detection Sensors
global_main.book.book Page 23 Monday, July 3, 2023 4:15 PM

24
MAINTENANCE
NOTE
• Clean the cliff detection sensors regularly with a
soft brush. Failing to clean the sensors can cause
the cleaner to fall froma ledge due to a dusty or
contaminated sensor not being able to detect
the drop.
global_main.book.book Page 24 Monday, July 3, 2023 4:15 PM
25
TROUBLESHOOTING
ENGLISH
TROUBLESHOOTING
Before Calling for Service
Operation
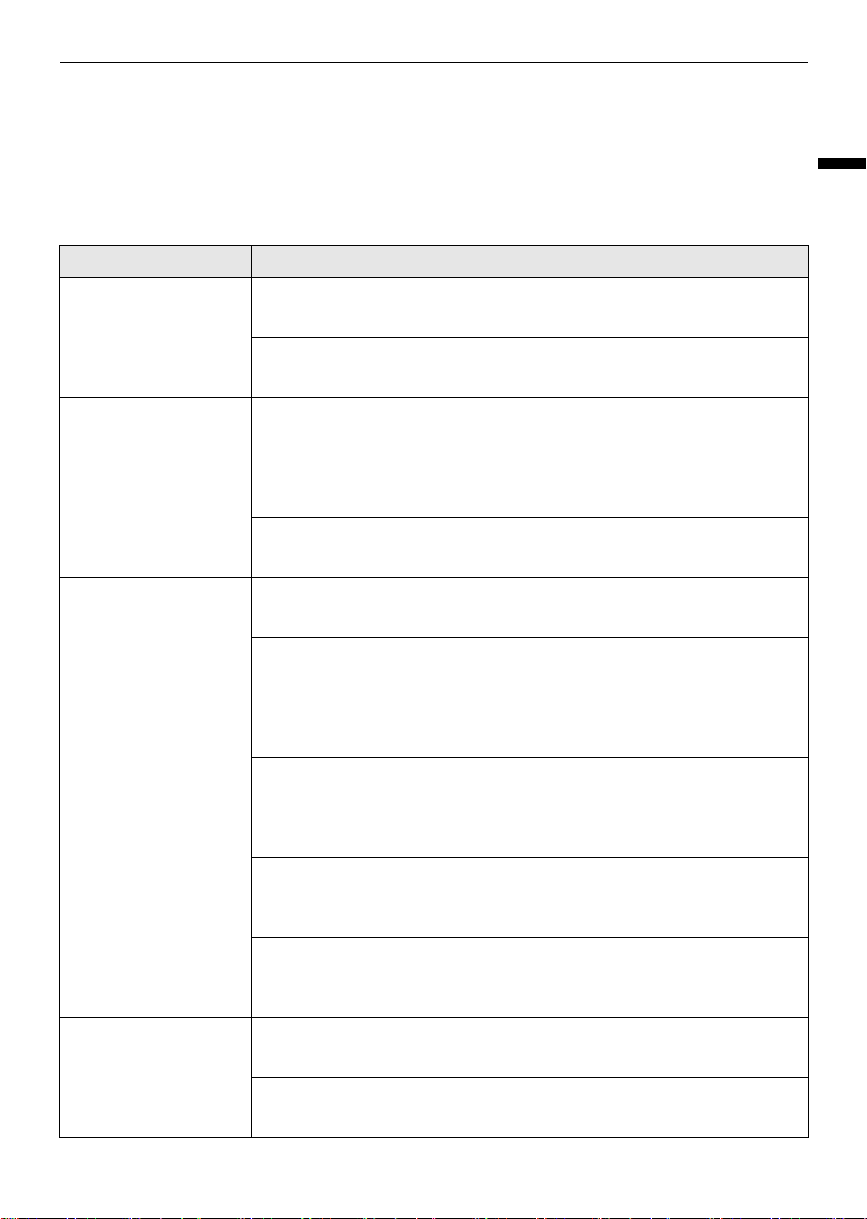
Symptoms Possible Cause & Solution
Power cannot be
turned on.
Main power switch of the robot cleaner is turned off.
• Turn on the main power switch at the back of the robot cleaner.
Battery is discharged completely.
• If needed, manually move the robot cleaner to the home station to charge.
Power is turned off
automatically.
Robot cleaner was stopped for more than 10 minutes without being
charged.
• If the robot cleaner has been on standby for more than 10 minutes without
being charged, the power will be turned off automatically. Place the robot
cleaner in the home station.
Robot cleaner was trapped by an obstacle for more than 10 minutes.
• Remove obstacles from the area to be cleaned before starting cleaning.
Charging cannot be
carried out.
There is an obstacle near the home station.
• Remove the obstacle near the home station.
Main power switch of the robot cleaner is turned off.
• When the robot vacuum main power switch is turned off, the battery %
display in the
LG ThinQ
app does not change when charging. Turn on the
main power switch on the back of the robot vacuum cleaner. Charging is
possible even when the main power switch is turned off.
Battery charging indicator on the home station is turned off.
• Make sure the home station is plugged into an outlet. When the robot
cleaner is normally connected to the home station, the indicator light turns
off.
Charging terminals are stained with foreign substances.
• Wipe the robot cleaner and the charging terminals of the home station
with a soft cloth.
Robot cleaner was charged in a cool place.
• The battery may not charge properly at temperatures below 41°F (5°C).
Use the robot cleaner after charging the battery at proper temperatures.
Suction power
becomes weak.
There is foreign material blocking the suction port.
• Remove any foreign material in the suction port.
Dust bin is completely filled.
• Empty the dust bin.
global_main.book.book Page 25 Monday, July 3, 2023 4:15 PM
26
TROUBLESHOOTING
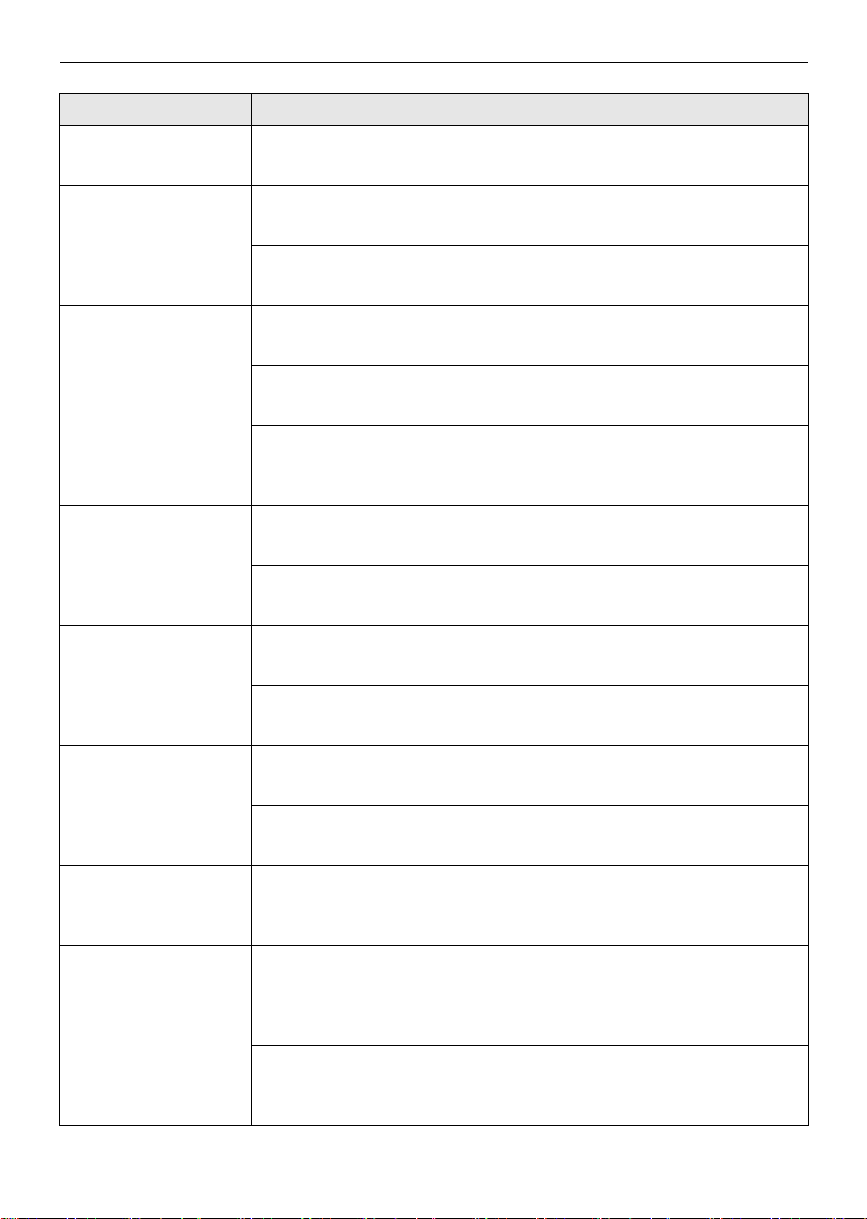
Suction power
becomes weak.
Filter is blocked.
• Clean the filter.
The product is noisy
when it’s running.
Dust bin is not attached to the robot cleaner correctly.
• Attach the dust bin correctly.
Filter is not attached to the dust bin correctly.
• Attach the filter correctly.
The product is noisier
than usual.
Brush is clogged with foreign substances.
• Remove foreign substances from the brush.
Brush cover is not installed properly.
• Install the brush cover properly.
The robot cleaner is cleaning against the grain of the flooring.
• The robot cleaner may be noisier than usual if it is cleaning against the
grain of the floor.
The robot cleaner will
not run.
Main power switch of the robot cleaner is turned off.
• Turn on the main power switch at the back of the robot cleaner.
Battery is discharged completely.
• If needed, manually move the robot cleaner to the home station to charge.
The brush will not spin. Brush is not installed correctly.
• Separate and install the brush again.
Brush is clogged with foreign substances.
• Remove foreign substances from the brush.
The robot cleaner runs
abnormally.
Sensor is blocked with foreign substances.
• Wipe the sensor with a soft cloth.
Wheel is blocked with foreign substances.
• Remove foreign substances from the wheels.
The robot cleaner gives
off an odour.
There are foreign objects on the bottom of the robot cleaner.
• Wet dust on the mop holder may give off an odour. After cleaning with
water, wipe the dust off of the mop holder before storage.
The mop gives off an
odour.
The mop was not washed after cleaning.
• After cleaning, wash the mop and store it after drying it completely. If the
mop gives off a strong odour, wash them using a neutral detergent and
rinse them thoroughly using clean water.
The mop was not completely dried after it was washed.
• The mop may gives off an odour if it is not dried completely. Be sure to use
them only after drying it completely in a well-ventilated place.
Symptoms Possible Cause & Solution
global_main.book.book Page 26 Monday, July 3, 2023 4:15 PM
27
TROUBLESHOOTING
ENGLISH
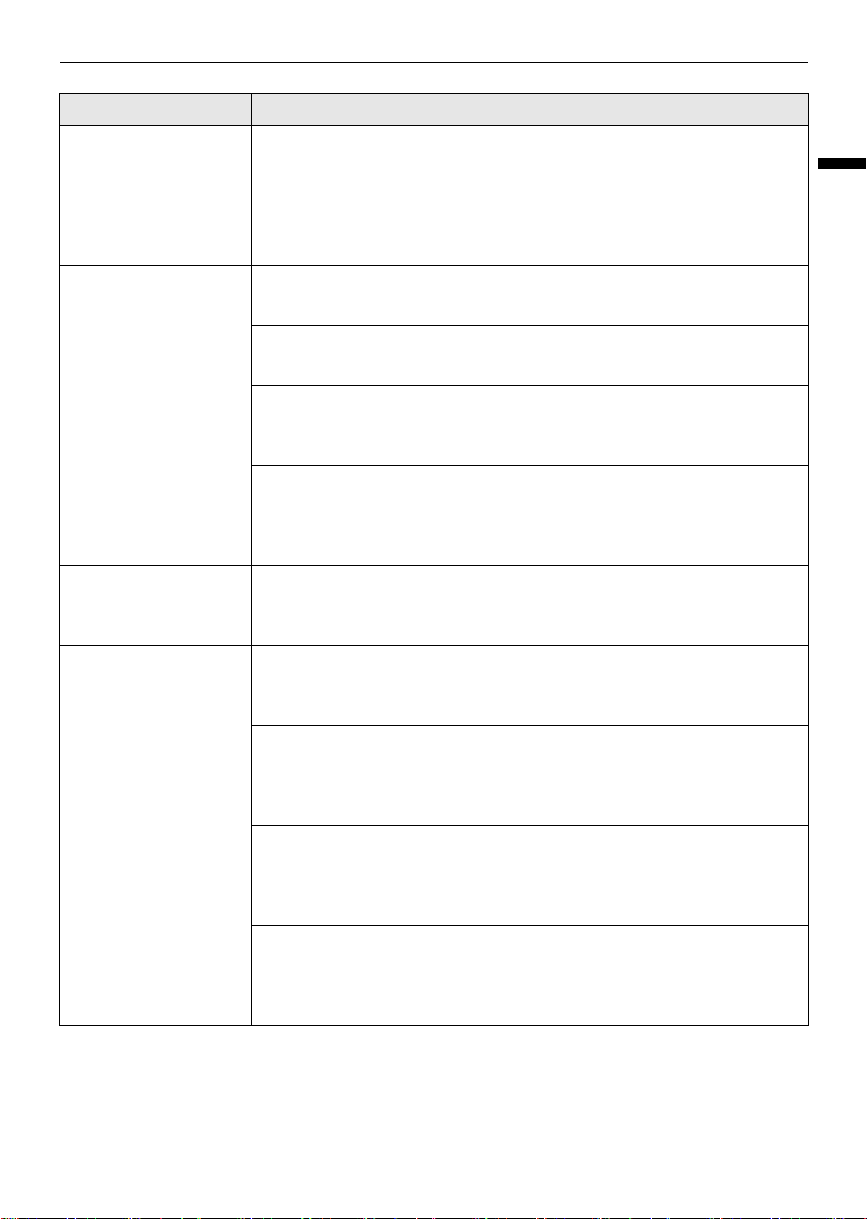
The water tank gives
off an odour.
The water tank was not emptied after cleaning.
• After cleaning, be sure to empty the water tank and store it after drying it
completely. If the water tank gives off a strong odour, wash it using a
neutral detergent diluted with water, pouring diluted neutral detergent
into the water tank and shaking the tank. After washing, rinse the tank
thoroughly using clean water.
No water is sprayed. There is no water in the water tank.
• Fill the water tank with water.
The water tank has not been inserted correctly into the robot cleaner.
• Reinsert the water tank into the robot cleaner.
The water control was set to the Dry.
• Change the water supply mode in APP. The water supply is cut off in the
Dry.
The water supply outlet is clogged with a foreign substance, such as
calcium deposits left by water, etc.
• Punch a hole through the clogged water supply outlet using a needle or a
toothpick.
There is moisture in
the water tank.
The water tank has not been emptied after use.
• Empty out the water tank and let it thoroughly dry out of direct sunlight
before storing.
The floor becomes
dirty after cleaning.
The mop has not been washed after use.
• Wash the mop after every use. Cleaning with dirty mop may makes the
floor dirty.
There is liquid, coffee, animal waste or grease on the floor.
• If there is liquid, coffee, animal waste or grease on the floor, wipe it up with
another mop first before using the robot cleaner. Stains can be picked up
by the mop and carried to other parts of the floor.
An excessively wide area was cleaned in one operation.
• The mop may gets dirty fast according to the size of the area cleaned or
the environment in which it is used. Clean the remaining area after
washing the mop or replacing the dirty mop with a clean mop.
The room temperature is high.
• Depending on the condition of the indoor floor, water will evaporate and
odors may occur due to humidity. Ventilate when cleaning when the room
temperature is high.
Symptoms Possible Cause & Solution
global_main.book.book Page 27 Monday, July 3, 2023 4:15 PM
28
TROUBLESHOOTING
Wi-Fi
Symptoms Possible Cause & Solution
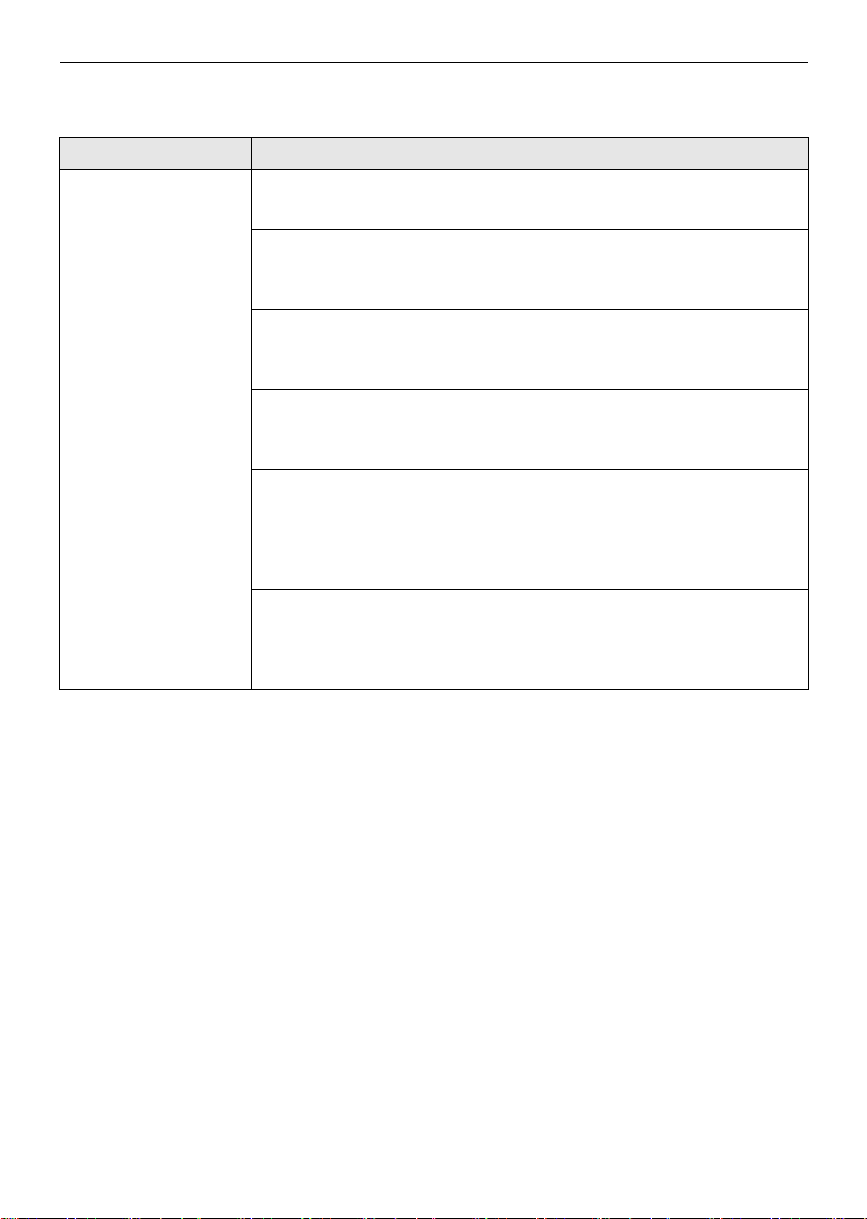
Your home appliance
and smartphone are
not connected to the
Wi-Fi network.
Battery is fully discharged.
• Charge the battery, then register your appliance on
LG ThinQ
.
The password for the Wi-Fi that you are trying to connect to is incorrect.
• Find the Wi-Fi network connected to your smartphone and remove it, then
register your appliance on
LG ThinQ
.
Mobile data for your smartphone is turned on.
• Turn off the
Mobile data
of your smartphone and register the appliance
using the Wi-Fi network.
The wireless network name (SSID) is set incorrectly.
• The wireless network name (SSID) should be a combination of English
letters and numbers. (Do not use special characters.)
The router frequency is not 2.4 GHz.
• Only a 2.4 GHz router frequency is supported. Set the wireless router to 2.4
GHz and connect the appliance to the wireless router. To check the router
frequency, check with your Internet service provider or the router
manufacturer.
The distance between the appliance and the router is too far.
• If the distance between the appliance and the router is too far, the signal
may be weak and the connection may not be configured correctly. Move
the location of the router so that it is closer to the appliance.
global_main.book.book Page 28 Monday, July 3, 2023 4:15 PM

Memo
global_main.book.book Page 29 Monday, July 3, 2023 4:15 PM

Memo
global_main.book.book Page 30 Monday, July 3, 2023 4:15 PM
Memo
global_main.book.book Page 31 Monday, July 3, 2023 4:15 PM
global_main.book.book Page 32 Monday, July 3, 2023 4:15 PM